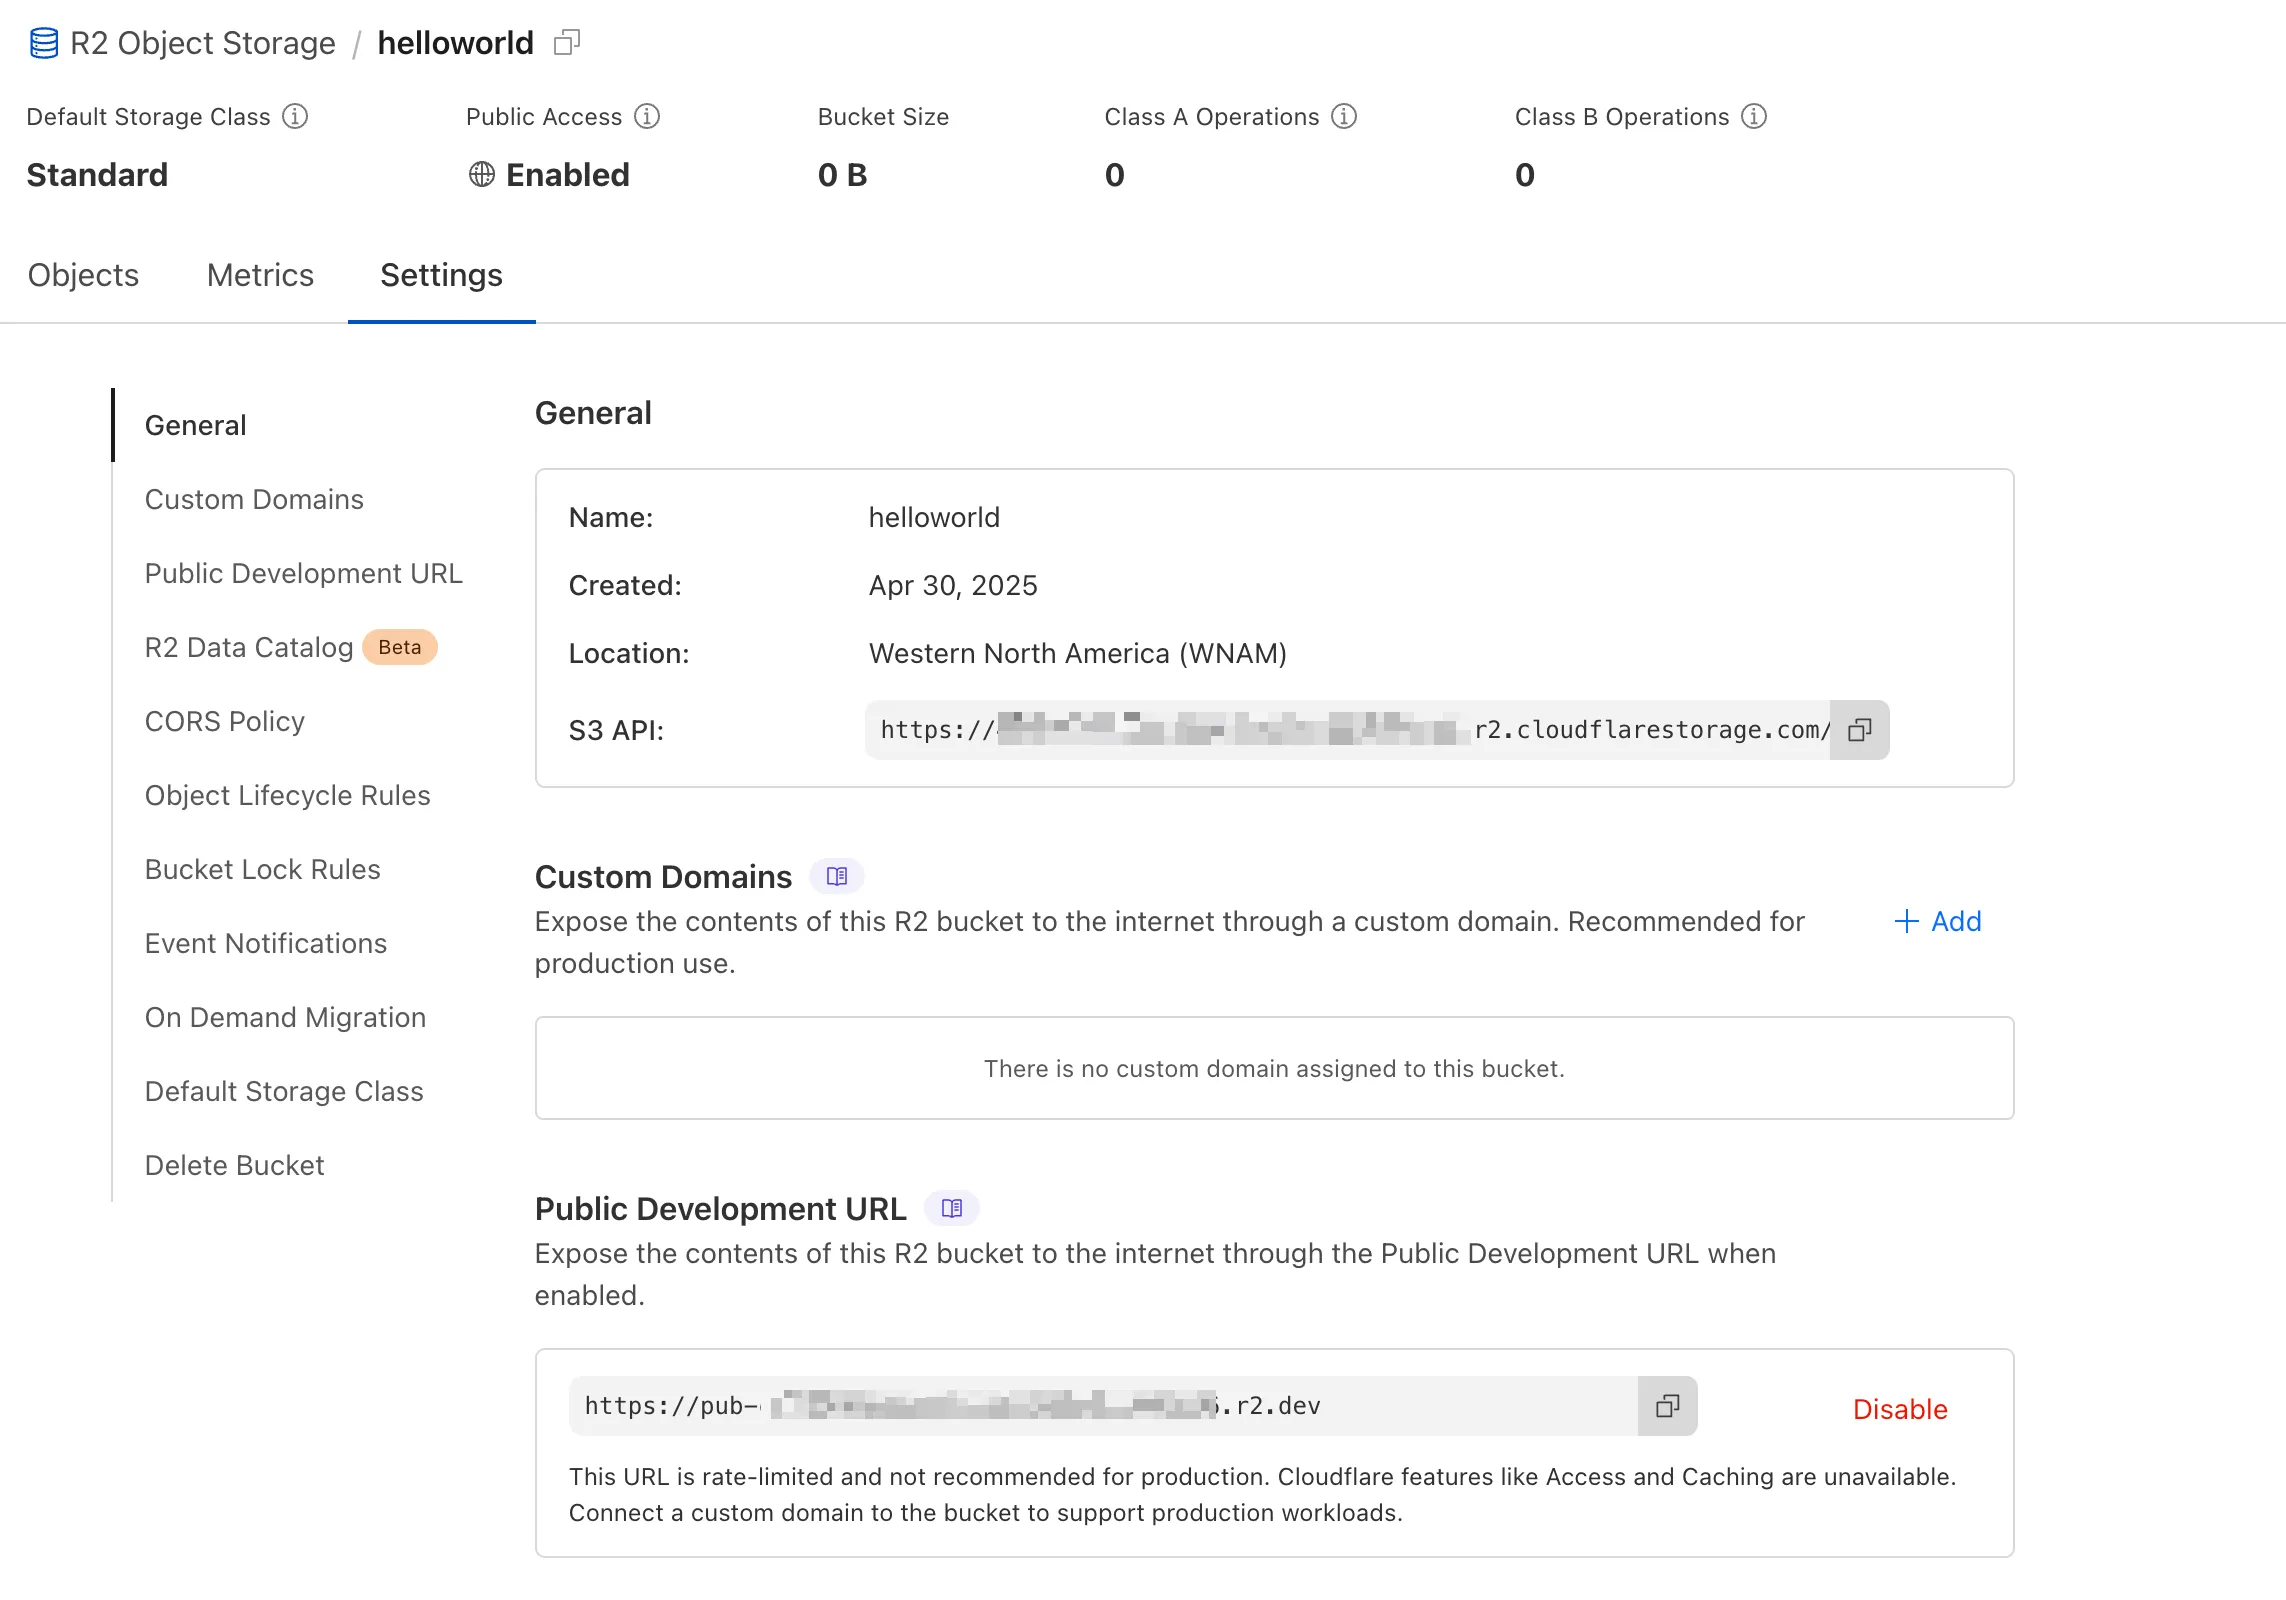
TanStack Start ↗ apps can now prerender routes to static HTML at build time with access to build time environment variables
and bindings, and serve them as static assets. To enable prerendering, configure the prerender option of the TanStack Start plugin in your Vite config:
vite.config.ts
import {defineConfig} from "vite";
import {cloudflare} from "@cloudflare/vite-plugin";
import {tanstackStart} from "@tanstack/react-start/plugin/vite";
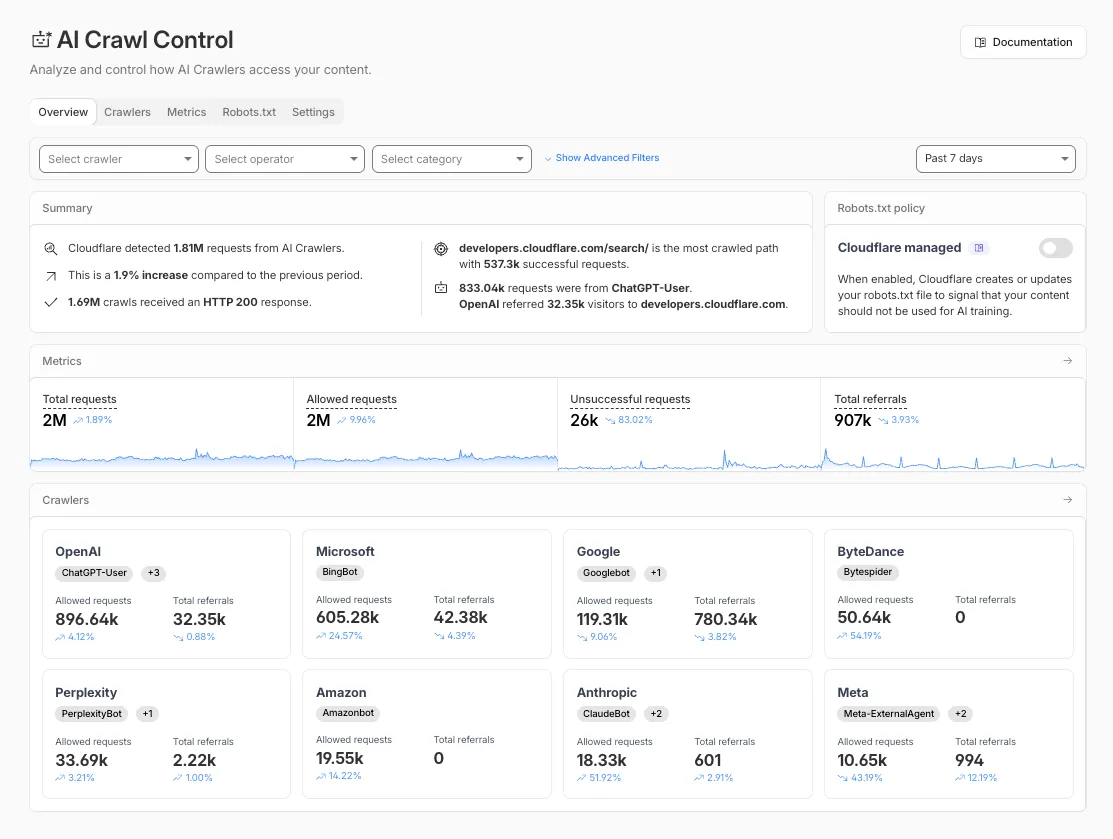
The Overview tab is now the default view in AI Crawl Control. The previous default view with controls for individual AI crawlers is available in the Crawlers tab.
What's new
Executive summary — Monitor total requests, volume change, most common status code, most popular path, and high-volume activity
Operator grouping — Track crawlers by their operating companies (OpenAI, Microsoft, Google, ByteDance, Anthropic, Meta)
Customizable filters — Filter your snapshot by date range, crawler, operator, hostname, or path
Get started
Log in to the Cloudflare dashboard and select your account and domain.
Go to AI Crawl Control, where the Overview tab opens by default with your activity snapshot.
Use filters to customize your view by date range, crawler, operator, hostname, or path.
Navigate to the Crawlers tab to manage controls for individual crawlers.
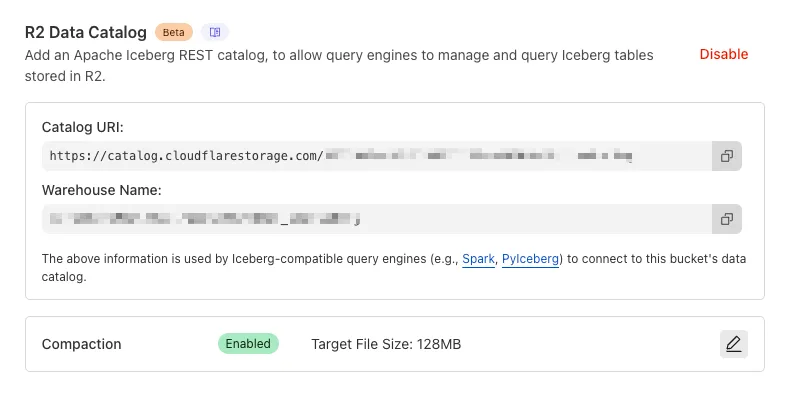
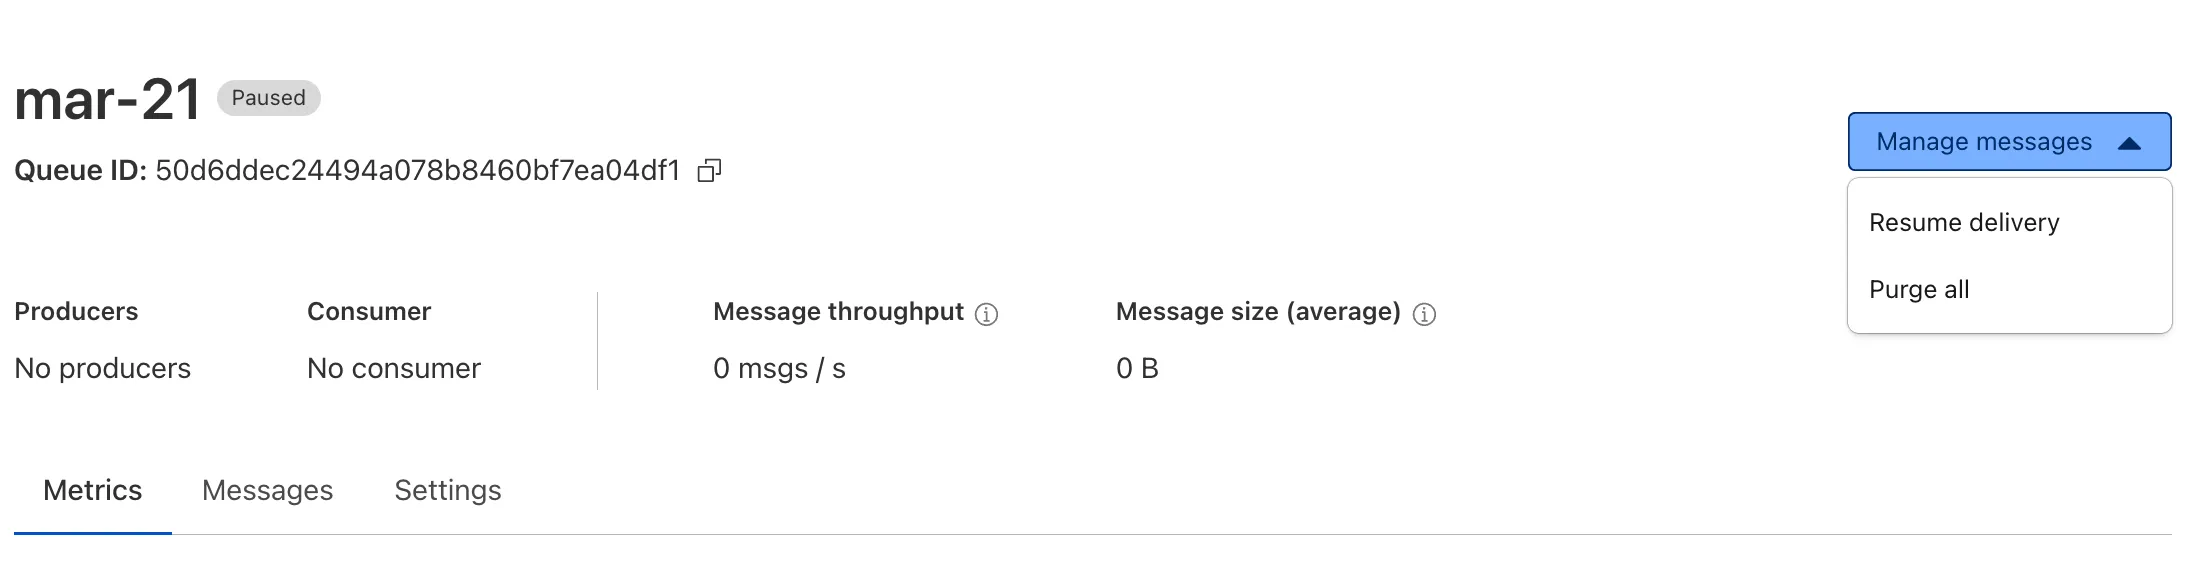
R2 Data Catalog now supports automatic snapshot expiration for Apache Iceberg tables.
In Apache Iceberg, a snapshot is metadata that represents the state of a table at a given point in time. Every mutation creates a new snapshot which enable powerful features like time travel queries and rollback capabilities but will accumulate over time.
Without regular cleanup, these accumulated snapshots can lead to:
Metadata overhead
Slower table operations
Increased storage costs.
Snapshot expiration in R2 Data Catalog automatically removes old table snapshots based on your configured retention policy, improving performance and storage costs.
Terminal window
# Enable catalog-level snapshot expiration
# Expire snapshots older than 7 days, always retain at least 10 recent snapshots
Snapshot expiration uses two parameters to determine which snapshots to remove:
--older-than-days: age threshold in days
--retain-last: minimum snapshot count to retain
Both conditions must be met before a snapshot is expired, ensuring you always retain recent snapshots even if they exceed the age threshold.
This feature complements automatic compaction, which optimizes query performance by combining small data files into larger ones. Together, these automatic maintenance operations keep your Iceberg tables performant and cost-efficient without manual intervention.
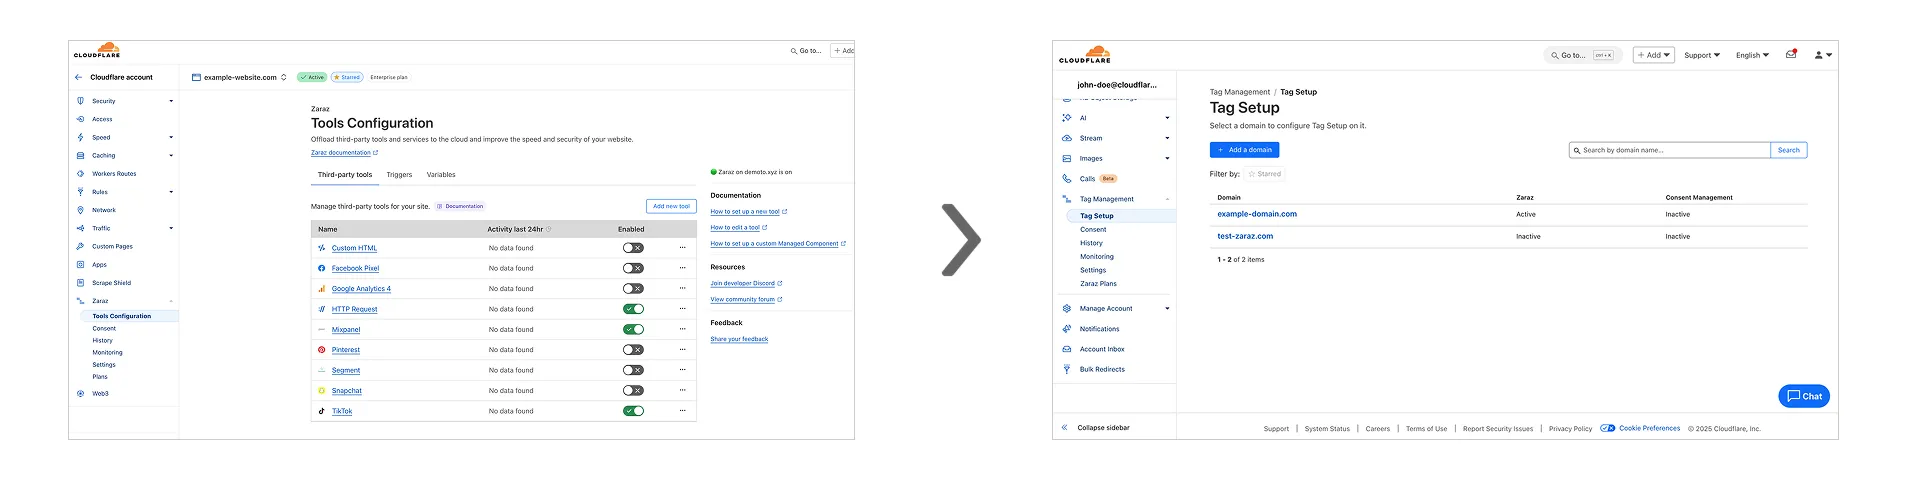
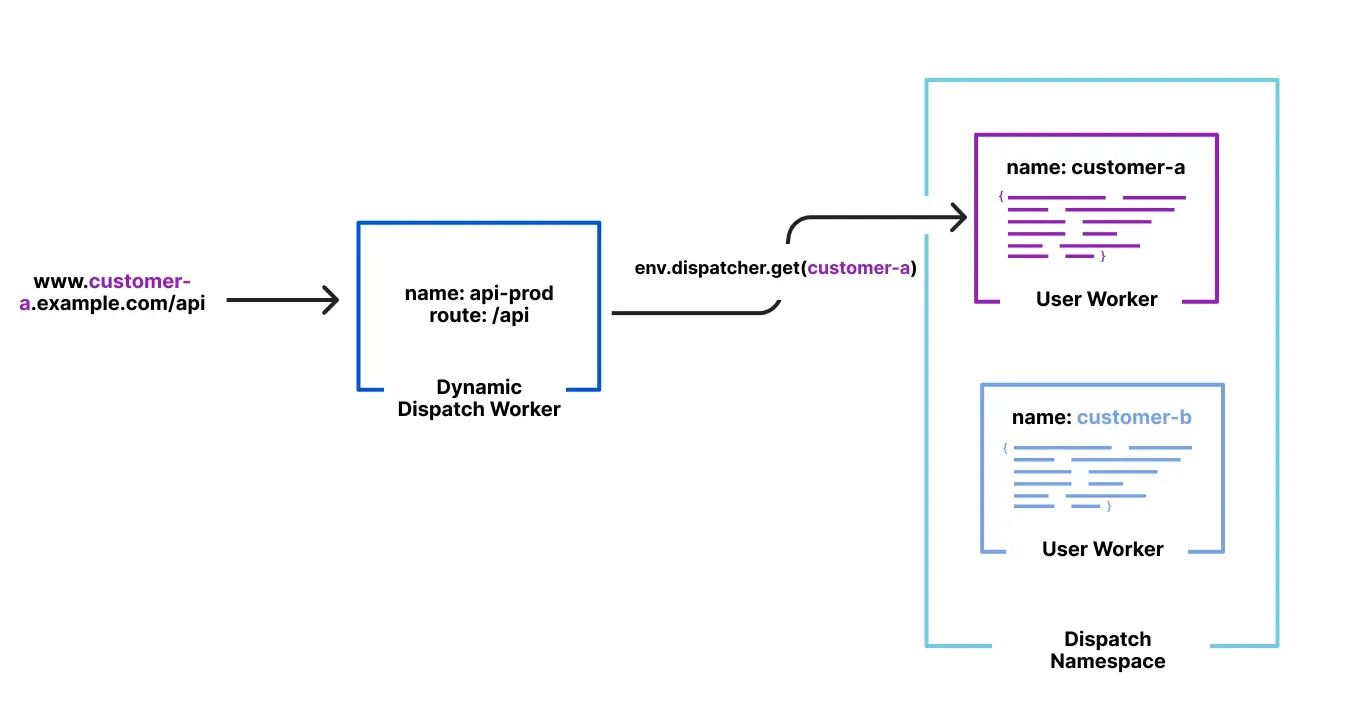
Workers for Platforms lets you build multi-tenant platforms on Cloudflare Workers, allowing your end users to deploy and run their own code on your platform. It's designed for anyone building an AI vibe coding platform, e-commerce platform, website builder, or any product that needs to securely execute user-generated code at scale.
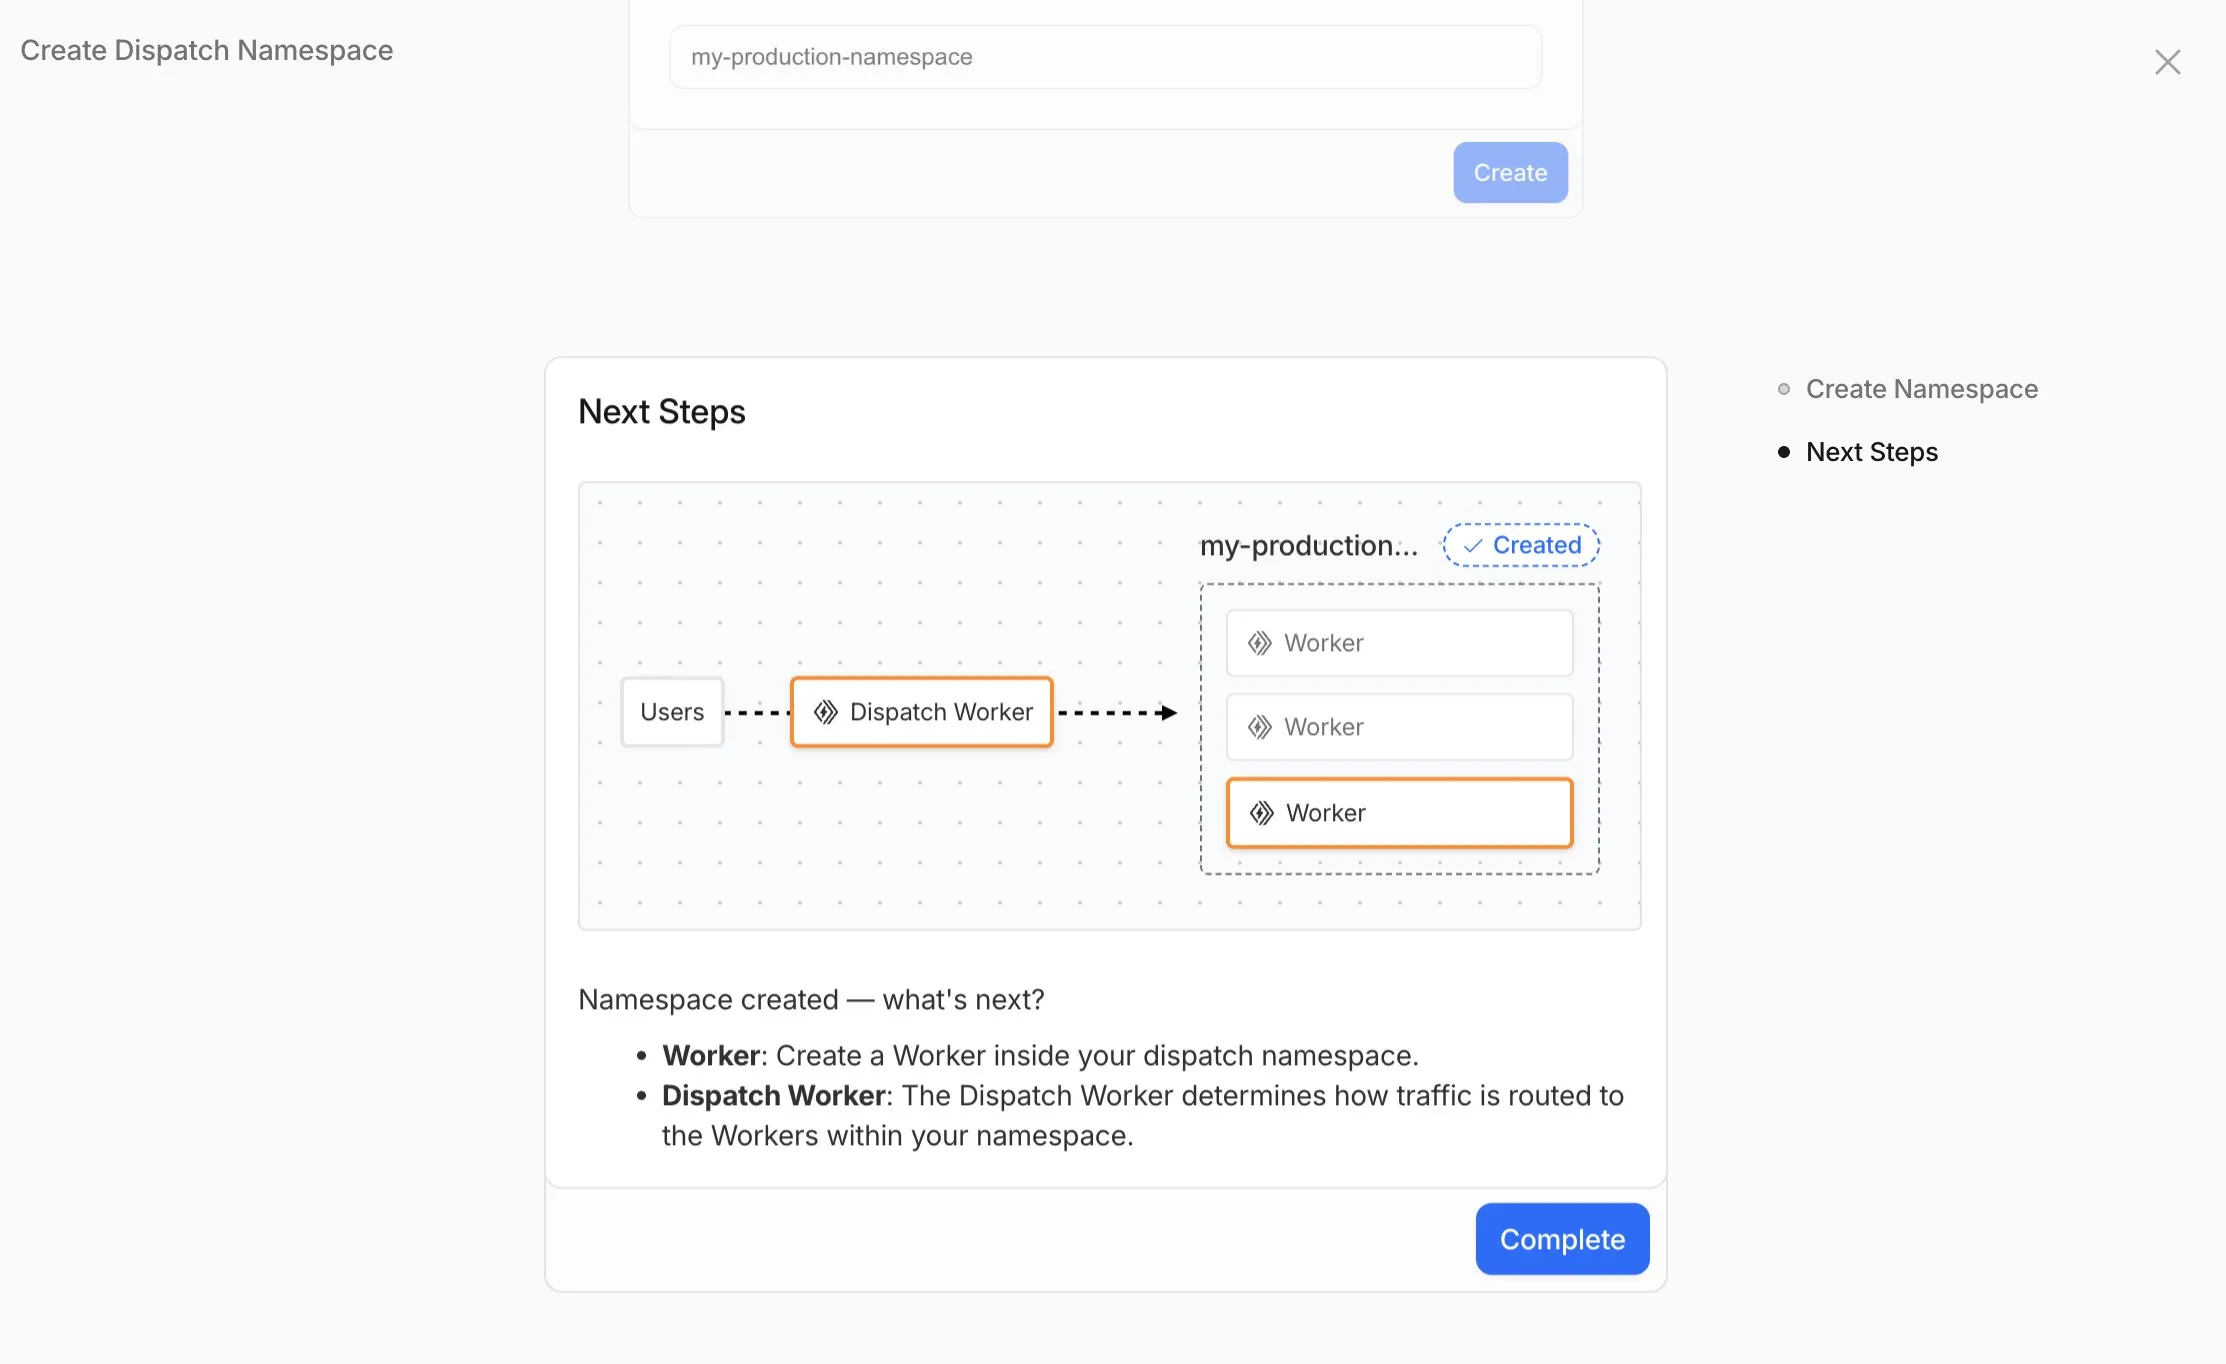
Previously, setting up Workers for Platforms required using the API. Now, the Workers for Platforms UI supports namespace creation, dispatch worker templates, and tag management, making it easier for Workers for Platforms customers to build and manage multi-tenant platforms directly from the Cloudflare dashboard.
Key improvements
Namespace Management: You can now create and configure dispatch namespaces directly within the dashboard to start a new platform setup.
Dispatch Worker Templates: New Dispatch Worker templates allow you to quickly define how traffic is routed to individual Workers within your namespace. Refer to the Dynamic Dispatch documentation for more examples.
Tag Management: You can now set and update tags on User Workers, making it easier to group and manage your Workers.
Binding Visibility:Bindings attached to User Workers are now visible directly within the User Worker view.
Deploy Vibe Coding Platform in one-click: Deploy a reference implementation of an AI vibe coding platform directly from the dashboard. Powered by the Cloudflare's VibeSDK ↗, this starter kit integrates with Workers for Platforms to handle the deployment of AI-generated projects at scale.
To get started, go to Workers for Platforms under Compute & AI in the Cloudflare dashboard ↗.
Minor version updates: We typically update preinstalled software to the latest available minor version without notice. For tools that don't follow semantic versioning (e.g., Bun or Hugo), we provide 3 months’ notice.
Major version updates: Before preinstalled software reaches end-of-life, we update to the next stable LTS version with 3 months’ notice.
Build image version deprecation (Pages only): We provide 6 months’ notice before deprecation. Projects on v1 or v2 will be automatically moved to v3 on their specified deprecation dates.
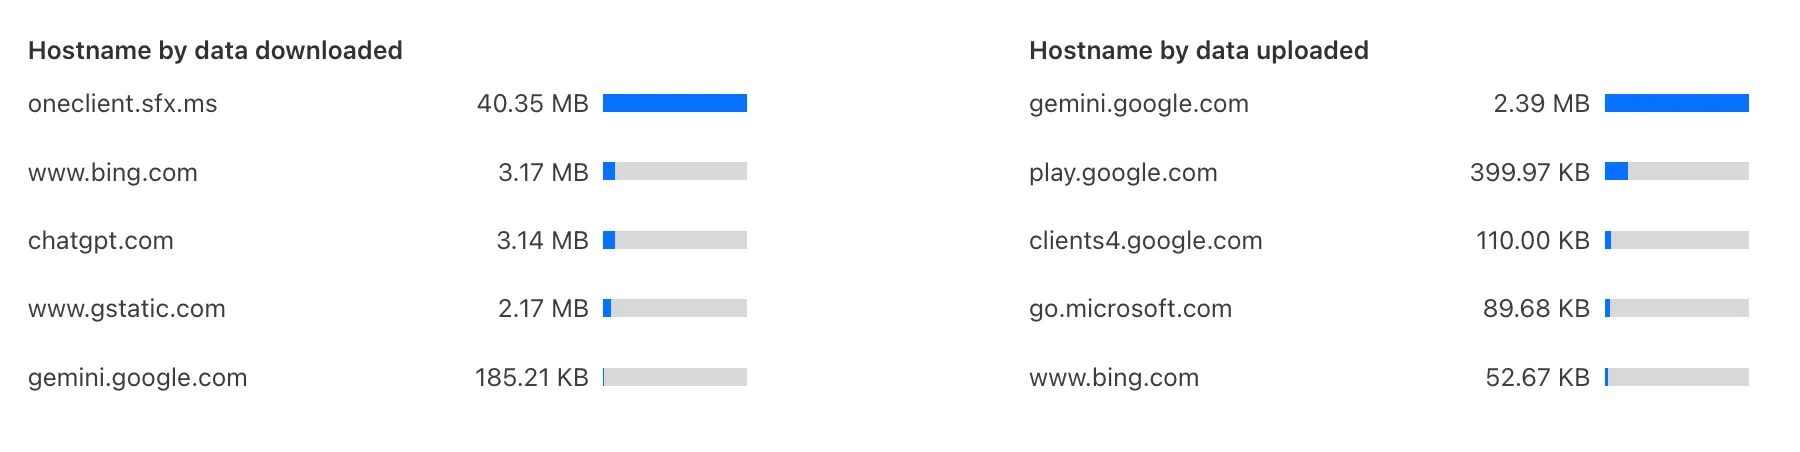
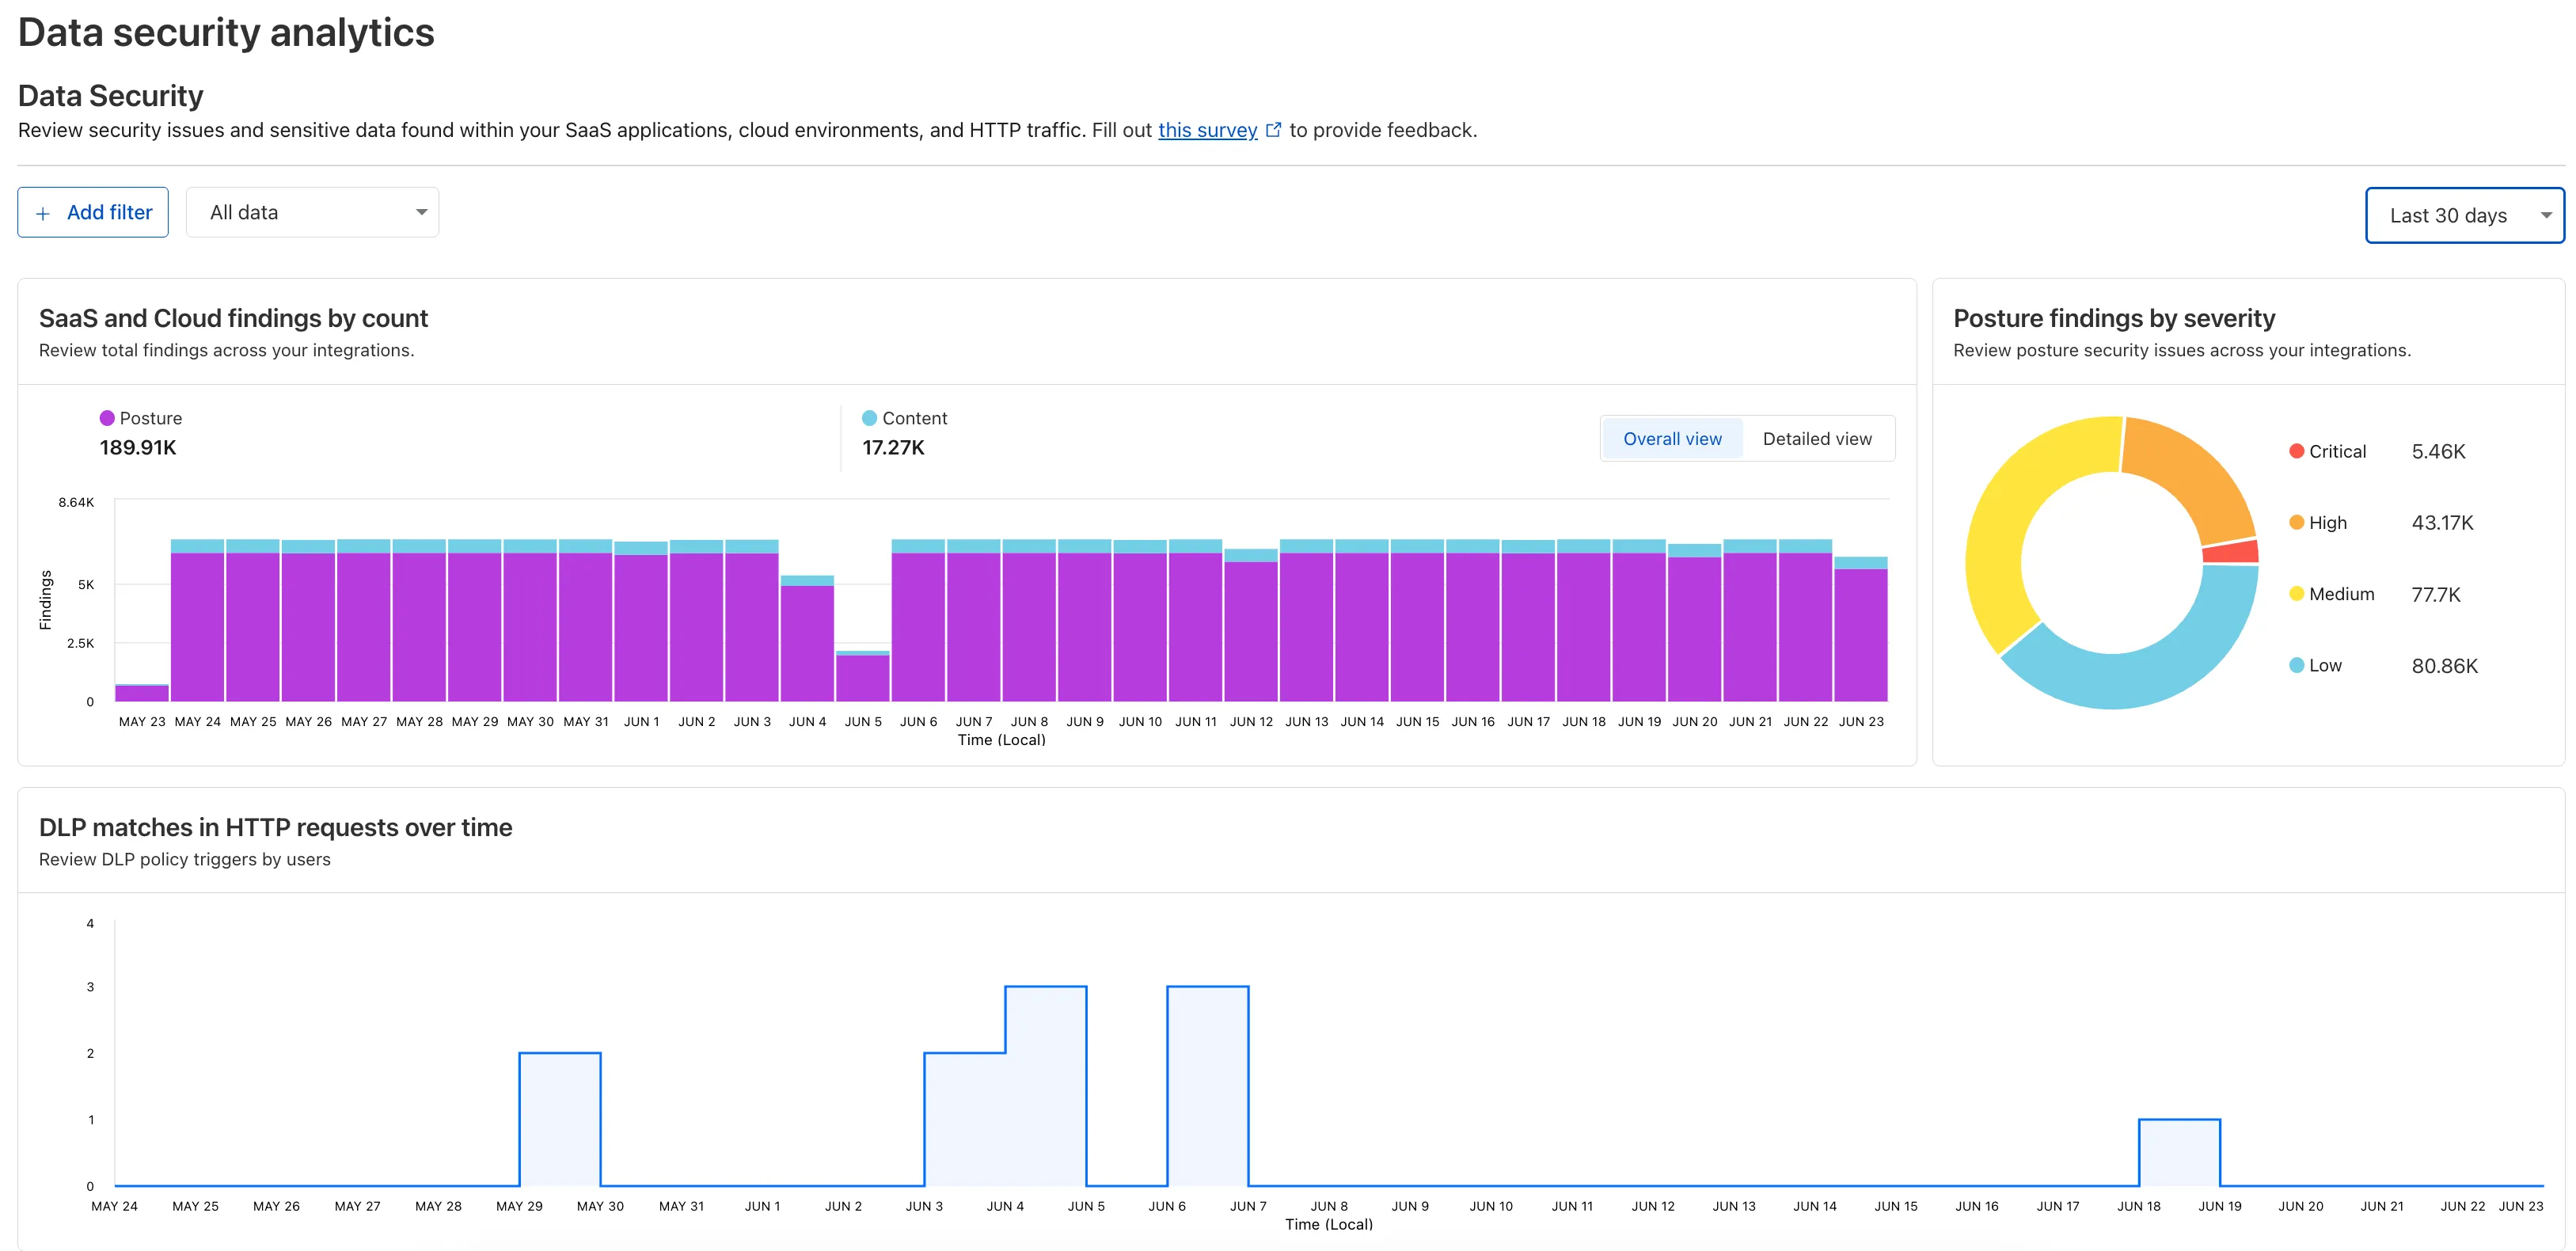
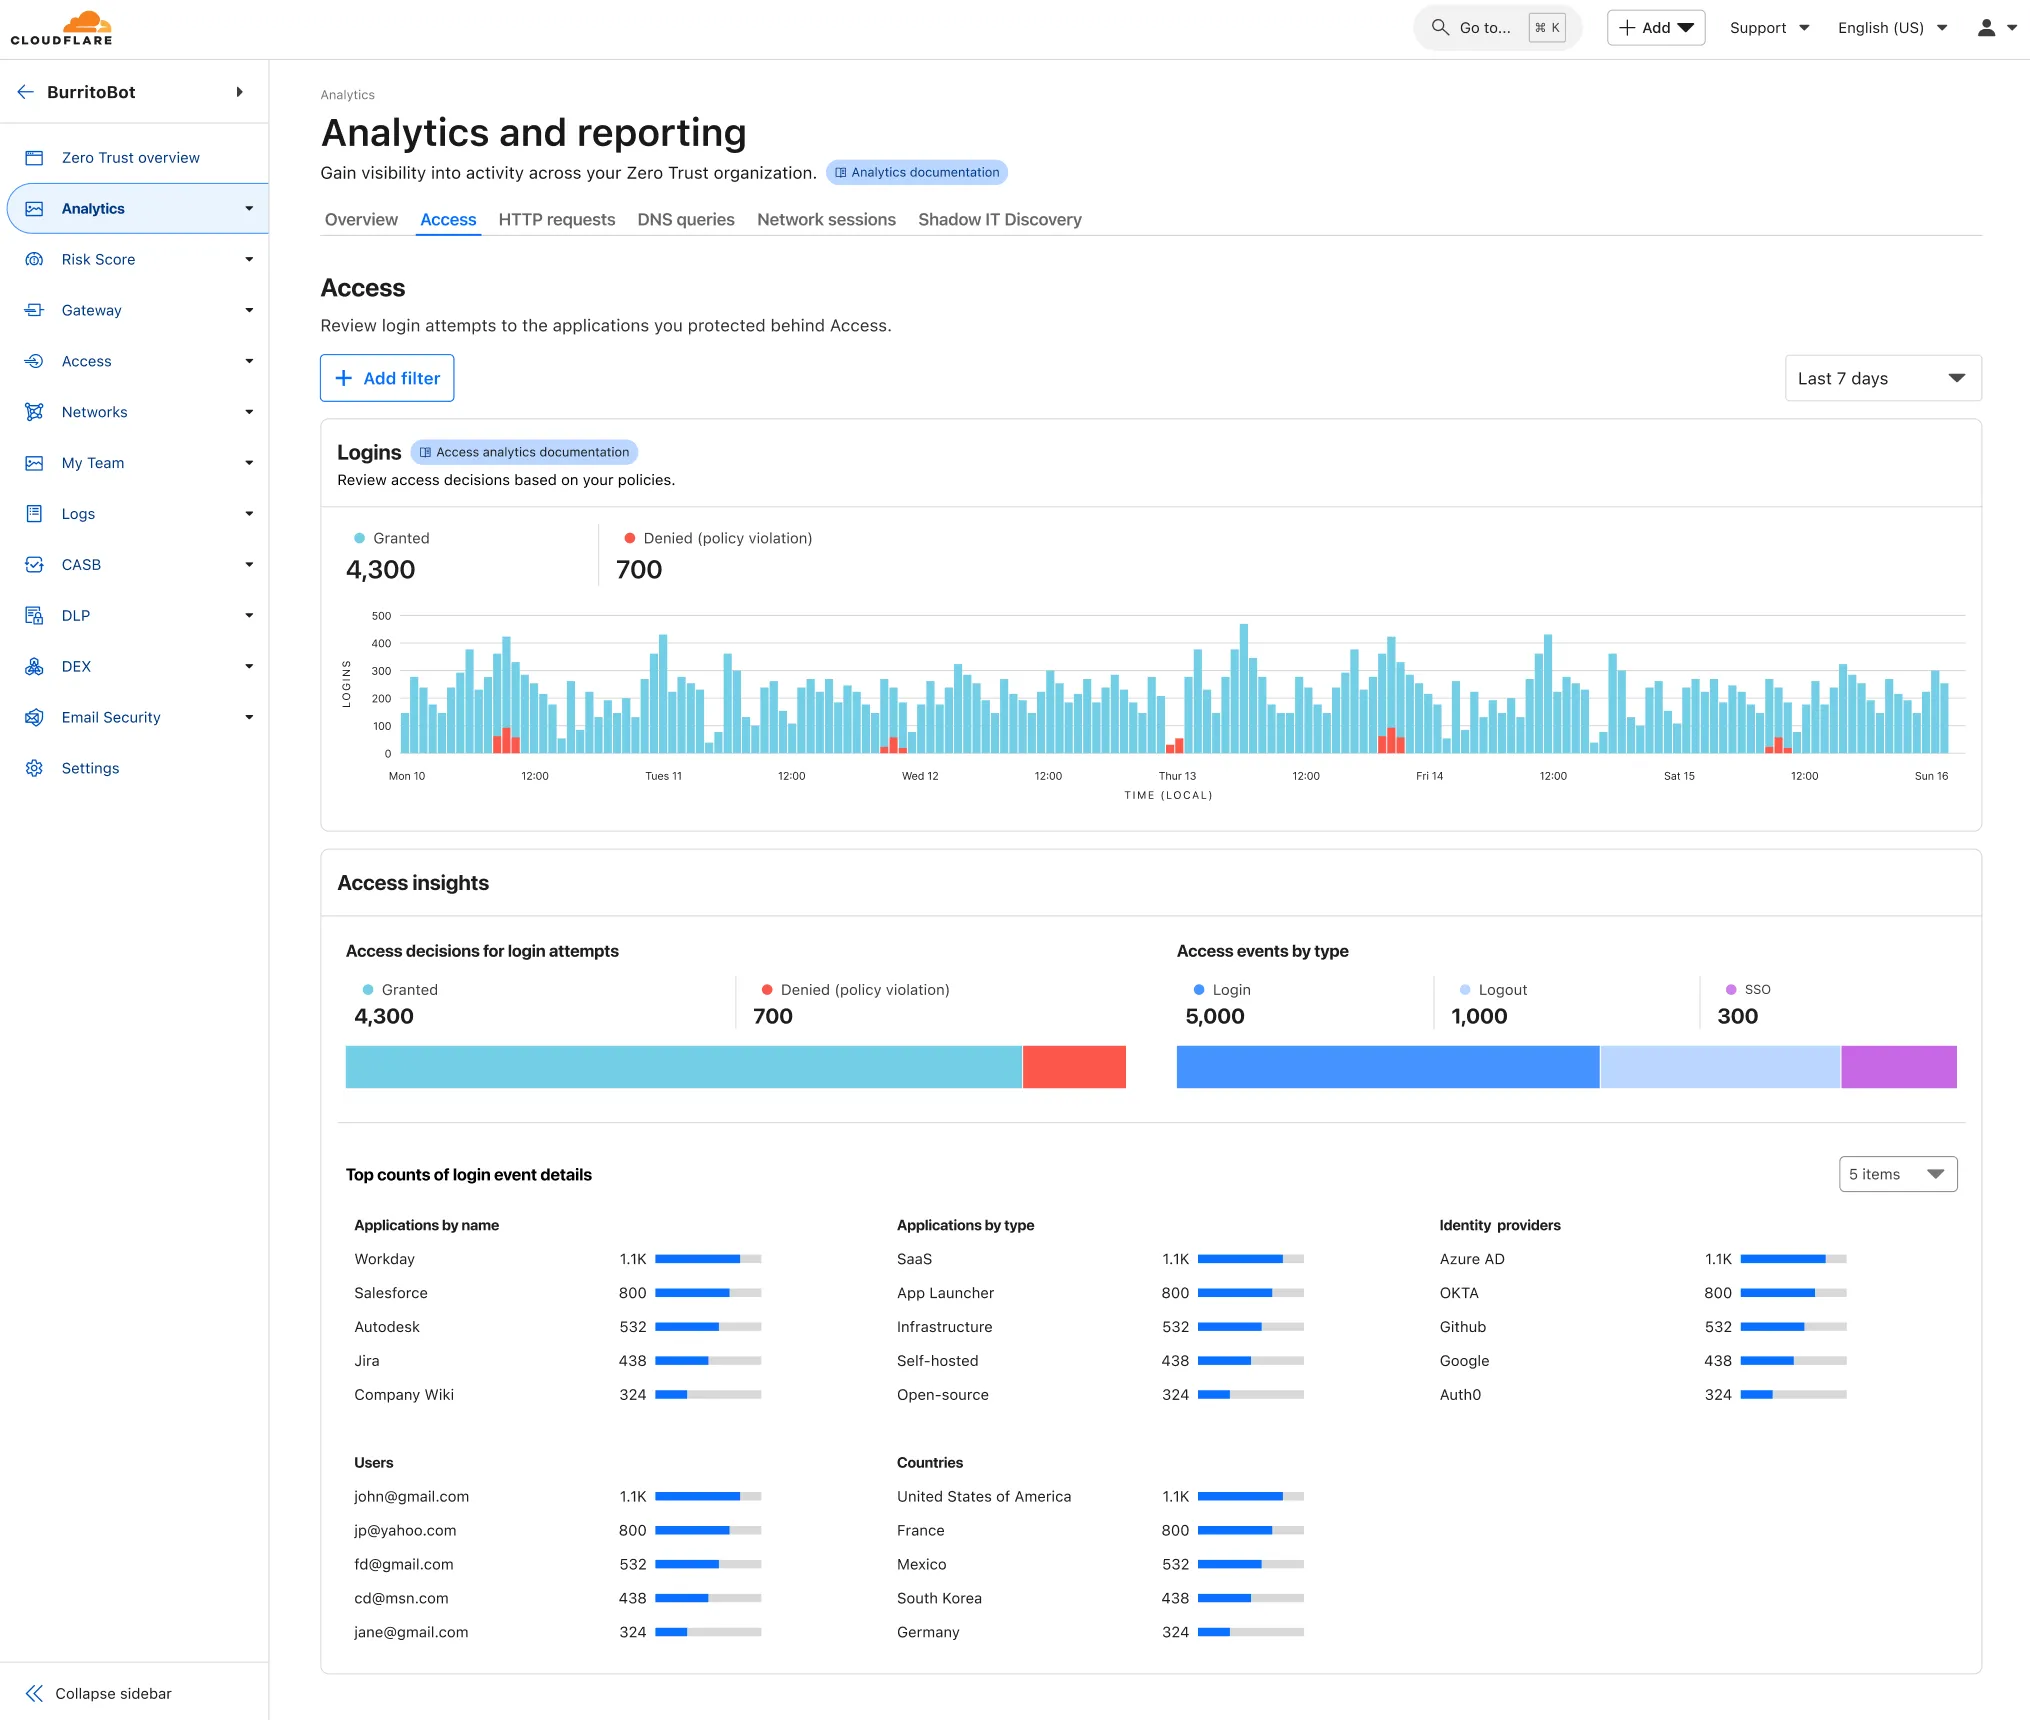
Zero Trust has again upgraded its Shadow IT analytics, providing you with unprecedented visibility into your organizations use of SaaS tools. With this dashboard, you can review who is using an application and volumes of data transfer to the application.
With this update, you can review data transfer metrics at the domain level, rather than just the application level, providing more granular insight into your data transfer patterns.
These metrics can be filtered by all available filters on the dashboard, including user, application, or content category.
Both the analytics and policies are accessible in the Cloudflare Zero Trust dashboard ↗, empowering organizations with better visibility and control.
You can now duplicate specific Cloudflare One resources with a single click from the dashboard.
Initially supported resources:
Access Applications
Access Policies
Gateway Policies
To try this out, simply click on the overflow menu (⋮) from the resource table and click Duplicate. We will continue to add the Duplicate action for resources throughout 2026.
This is a beta detection and will replace the action on original detection "Wordpress, Drupal - Code Injection, Deserialization - Stream Wrapper - CVE:CVE-2019-11831, CVE:CVE-2019-6339, CVE:CVE-2018-1000773" (ID: )
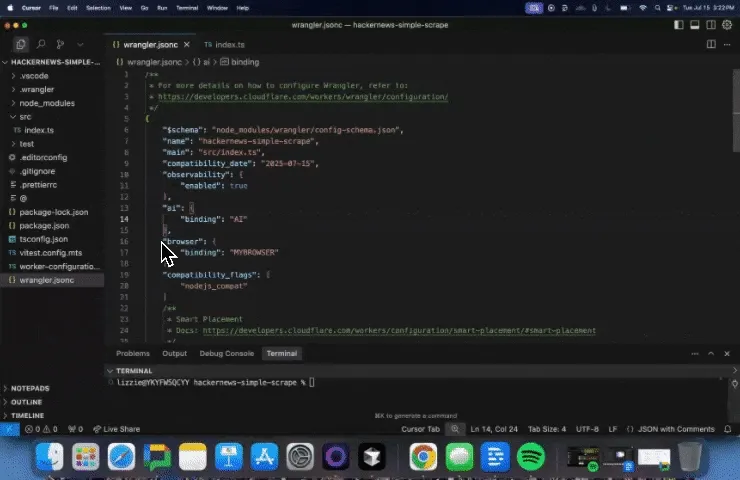
Wrangler now supports automatic configuration for popular web frameworks in experimental mode, making it even easier to deploy to Cloudflare Workers.
Previously, if you wanted to deploy an application using a popular web framework like Next.js or Astro, you had to follow tutorials to set up your application for deployment to Cloudflare Workers. This usually involved creating a Wrangler file, installing adapters, or changing configuration options.
Now wrangler deploy does this for you. Starting with Wrangler 4.55, you can use npx wrangler deploy --x-autoconfig in the directory of any web application using one of the supported frameworks. Wrangler will then proceed to configure and deploy it to your Cloudflare account.
You can also configure your application without deploying it by using the new npx wrangler setup command. This enables you to easily review what changes we are making so your application is ready for Cloudflare Workers.
The following application frameworks are supported starting today:
Next.js
Astro
Nuxt
TanStack Start
SolidStart
React Router
SvelteKit
Docusaurus
Qwik
Analog
Automatic configuration also supports static sites by detecting the assets directory and build command. From a single index.html file to the output of a generator like Jekyll or Hugo, you can just run npx wrangler deploy --x-autoconfig to upload to Cloudflare.
We're really excited to bring you automatic configuration so you can do more with Workers. Please let us know if you run into challenges using this experimentally. We’ve opened a GitHub discussion ↗ and would love to hear your feedback.
A new Rules of Durable Objects guide is now available, providing opinionated best practices for building effective Durable Objects applications. This guide covers design patterns, storage strategies, concurrency, and common anti-patterns to avoid.
Key guidance includes:
Design around your "atom" of coordination — Create one Durable Object per logical unit (chat room, game session, user) instead of a global singleton that becomes a bottleneck.
Use SQLite storage with RPC methods — SQLite-backed Durable Objects with typed RPC methods provide the best developer experience and performance.
Understand input and output gates — Learn how Cloudflare's runtime prevents data races by default, how write coalescing works, and when to use blockConcurrencyWhile().
Leverage Hibernatable WebSockets — Reduce costs for real-time applications by allowing Durable Objects to sleep while maintaining WebSocket connections.
The testing documentation has also been updated with modern patterns using @cloudflare/vitest-pool-workers, including examples for testing SQLite storage, alarms, and direct instance access:
If you do not want to incur costs, please take action such as optimizing queries or deleting unnecessary stored data in order to reduce your SQLite storage usage ahead of the January 7th target. Only usage on and after the billing target date will incur charges.
Developers on the Workers Paid plan with Durable Object's SQLite storage usage beyond included limits will incur charges according to SQLite storage pricing announced in September 2024 with the public beta ↗. Developers on the Workers Free plan will not be charged.
Compute billing for SQLite-backed Durable Objects has been enabled since the initial public beta. SQLite-backed Durable Objects currently incur charges for requests and duration, and no changes are being made to compute billing.
R2 SQL now supports aggregation functions, GROUP BY, HAVING, along with schema discovery commands to make it easy to explore your data catalog.
Aggregation Functions
You can now perform aggregations on Apache Iceberg tables in R2 Data Catalog using standard SQL functions including COUNT(*), SUM(), AVG(), MIN(), and MAX(). Combine these with GROUP BY to analyze data across dimensions, and use HAVING to filter aggregated results.
-- Calculate average transaction amounts by department
SELECT department, COUNT(*), AVG(total_amount)
FROM my_namespace.sales_data
WHERE region ='North'
GROUP BY department
HAVINGCOUNT(*) >50
ORDER BYAVG(total_amount) DESC
-- Find high-value departments
SELECT department, SUM(total_amount)
FROM my_namespace.sales_data
GROUP BY department
HAVINGSUM(total_amount) >50000
Schema Discovery
New metadata commands make it easy to explore your data catalog and understand table structures:
SHOW DATABASES or SHOW NAMESPACES - List all available namespaces
SHOW TABLES IN namespace_name - List tables within a namespace
DESCRIBE namespace_name.table_name - View table schema and column types
To learn more about the new aggregation capabilities and schema discovery commands, check out the SQL reference. If you're new to R2 SQL, visit our getting started guide to begin querying your data.
Cloudflare Logpush now supports SentinelOne as a native destination.
Logs from Cloudflare can be sent to SentinelOne AI SIEM ↗ via Logpush. The destination can be configured through the Logpush UI in the Cloudflare dashboard or by using the Logpush API.
This emergency release introduces rules for CVE-2025-55183 and CVE-2025-55184, targeting server-side function exposure and resource-exhaustion patterns, respectively.
Key Findings
Added coverage for Leaking Server Functions (CVE-2025-55183) and React Function DoS detection (CVE-2025-55184).
Impact
These updates strengthen protection for server-function abuse techniques (CVE-2025-55183, CVE-2025-55184) that may expose internal logic or disrupt application availability.
Ruleset
Rule ID
Legacy Rule ID
Description
Previous Action
New Action
Comments
Cloudflare Managed Ruleset
N/A
React - Leaking Server Functions - CVE:CVE-2025-55183
N/A
Block
This was labeled as Generic - Server Function Source Code Exposure.
Cloudflare Free Ruleset
N/A
React - Leaking Server Functions - CVE:CVE-2025-55183
N/A
Block
This was labeled as Generic - Server Function Source Code Exposure.
Cloudflare Managed Ruleset
N/A
React - DoS - CVE:CVE-2025-55184
N/A
Disabled
This was labeled as Generic – Server Function Resource Exhaustion.
Pay Per Crawl is introducing enhancements for both AI crawler operators and site owners, focusing on programmatic discovery, flexible pricing models, and granular configuration control.
For AI crawler operators
Discovery API
A new authenticated API endpoint allows verified crawlers to programmatically discover domains participating in Pay Per Crawl. Crawlers can use this to build optimized crawl queues, cache domain lists, and identify new participating sites. This eliminates the need to discover payable content through trial requests.
The API endpoint is GET https://crawlers-api.ai-audit.cfdata.org/charged_zones and requires Web Bot Auth authentication. Refer to Discover payable content for authentication steps, request parameters, and response schema.
Payment header signature requirement
Payment headers (crawler-exact-price or crawler-max-price) must now be included in the Web Bot Auth signature-input header components. This security enhancement prevents payment header tampering, ensures authenticated payment intent, validates crawler identity with payment commitment, and protects against replay attacks with modified pricing. Crawlers must add their payment header to the list of signed components when constructing the signature-input header.
New crawler-error header
Pay Per Crawl error responses now include a new crawler-error header with 11 specific error codes for programmatic handling. Error response bodies remain unchanged for compatibility. These codes enable robust error handling, automated retry logic, and accurate spending tracking.
For site owners
Configure free pages
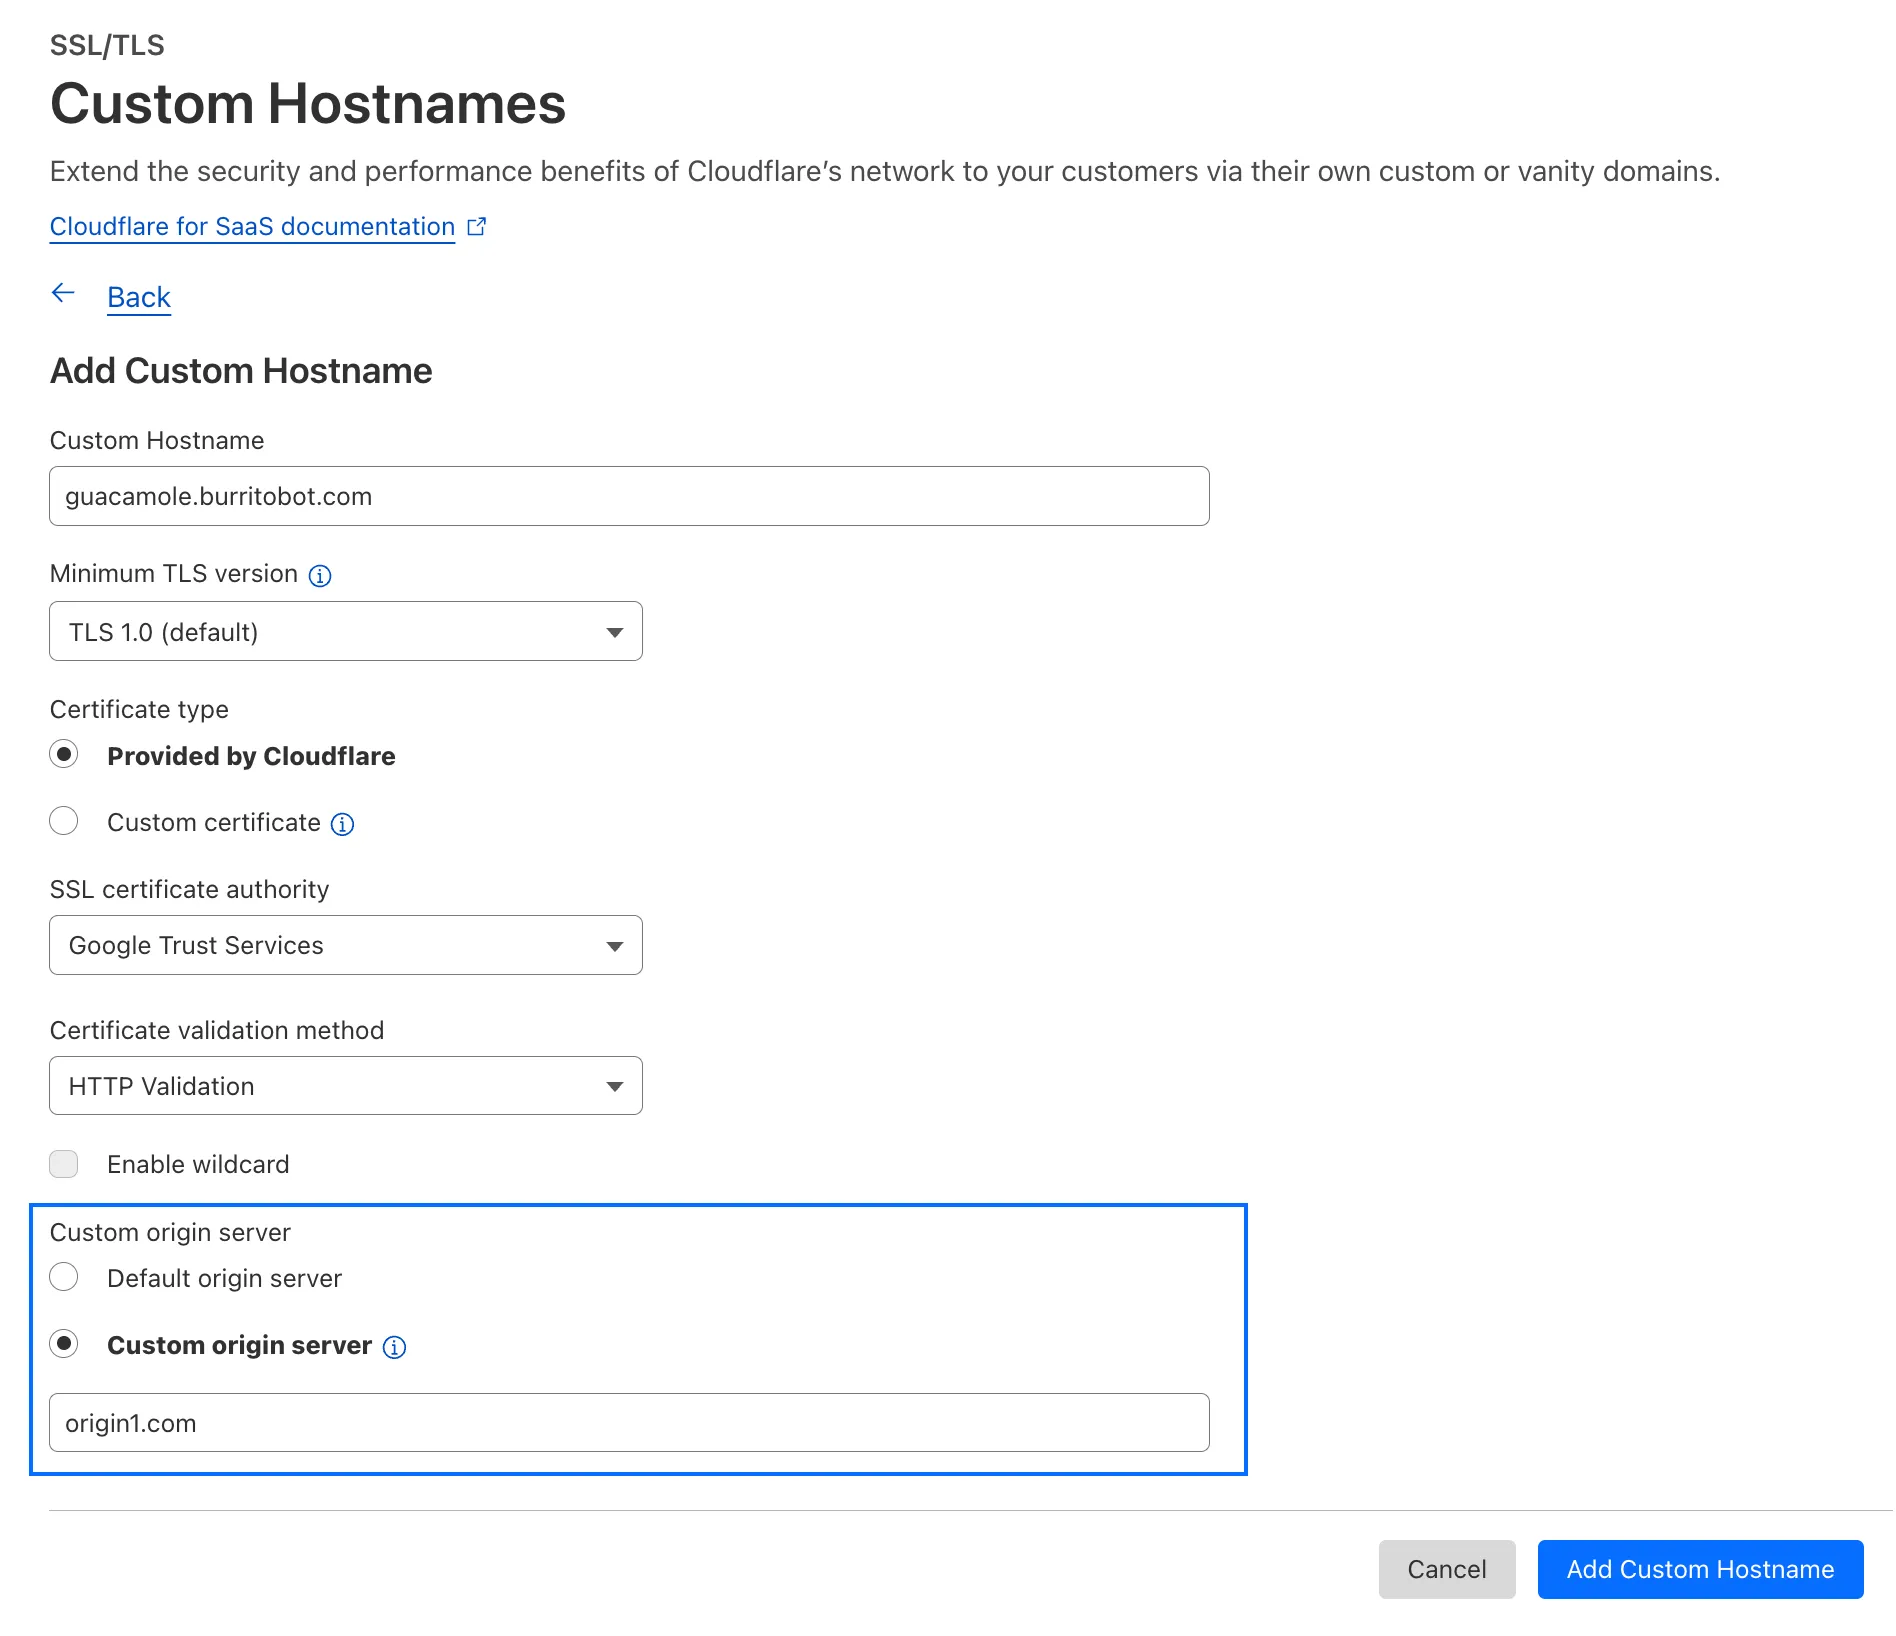
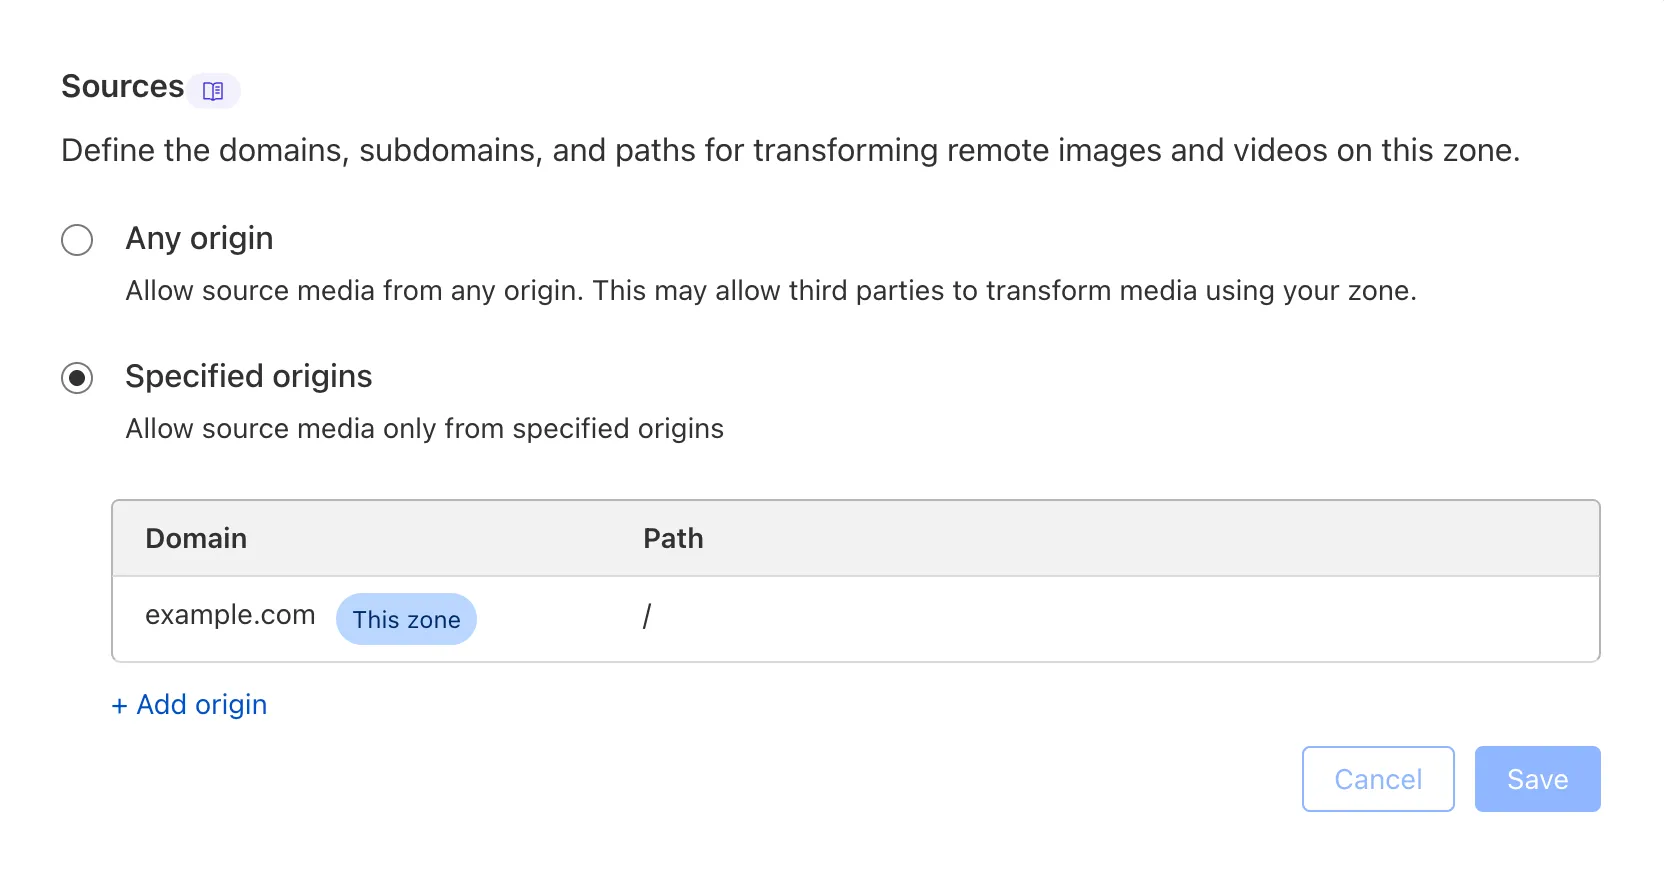
Site owners can now offer free access to specific pages like homepages, navigation, or discovery pages while charging for other content. Create a Configuration Rule in Rules > Configuration Rules, set your URI pattern using wildcard, exact, or prefix matching on the URI Full field, and enable the Disable Pay Per Crawl setting. When disabled for a URI pattern, crawler requests pass through without blocking or charging.
Some paths are always free to crawl. These paths are: /robots.txt, /sitemap.xml, /security.txt, /.well-known/security.txt, /crawlers.json.
This additional week's emergency release introduces improvements to our existing rule for React – Remote Code Execution – CVE-2025-55182 - 2, along with two new generic detections covering server-side function exposure and resource-exhaustion patterns.
Key Findings
Enhanced detection logic for React – RCE – CVE-2025-55182, added Generic – Server Function Source Code Exposure, and added Generic – Server Function Resource Exhaustion.
Impact
These updates strengthen protection against React RCE exploitation attempts and broaden coverage for common server-function abuse techniques that may expose internal logic or disrupt application availability.
This release contains minor fixes and improvements.
Changes and improvements
The Local Domain Fallback feature has been fixed for devices running WARP client version 2025.4.929.0 and newer. Previously, these devices could experience failures with Local Domain Fallback unless a fallback server was explicitly configured. This configuration is no longer a requirement for the feature to function correctly.
Proxy mode now supports transparent HTTP proxying in addition to CONNECT-based proxying.
Fixed an issue where sending large messages to the WARP daemon by Inter-Process Communication (IPC) could cause WARP to crash and result in service interruptions.
Known issues
For Windows 11 24H2 users, Microsoft has confirmed a regression that may lead to performance issues like mouse lag, audio cracking, or other slowdowns. Cloudflare recommends users experiencing these issues upgrade to a minimum Windows 11 24H2 KB5062553 or higher for resolution.
Devices with KB5055523 installed may receive a warning about Win32/ClickFix.ABA being present in the installer. To resolve this false positive, update Microsoft Security Intelligence to version 1.429.19.0 or later.
DNS resolution may be broken when the following conditions are all true:
WARP is in Secure Web Gateway without DNS filtering (tunnel-only) mode.
A custom DNS server address is configured on the primary network adapter.
The custom DNS server address on the primary network adapter is changed while WARP is connected.
To work around this issue, reconnect the WARP client by toggling off and back on.
This release contains minor fixes and improvements.
Changes and improvements
The Local Domain Fallback feature has been fixed for devices running WARP client version 2025.4.929.0 and newer. Previously, these devices could experience failures with Local Domain Fallback unless a fallback server was explicitly configured. This configuration is no longer a requirement for the feature to function correctly.
Proxy mode now supports transparent HTTP proxying in addition to CONNECT-based proxying.
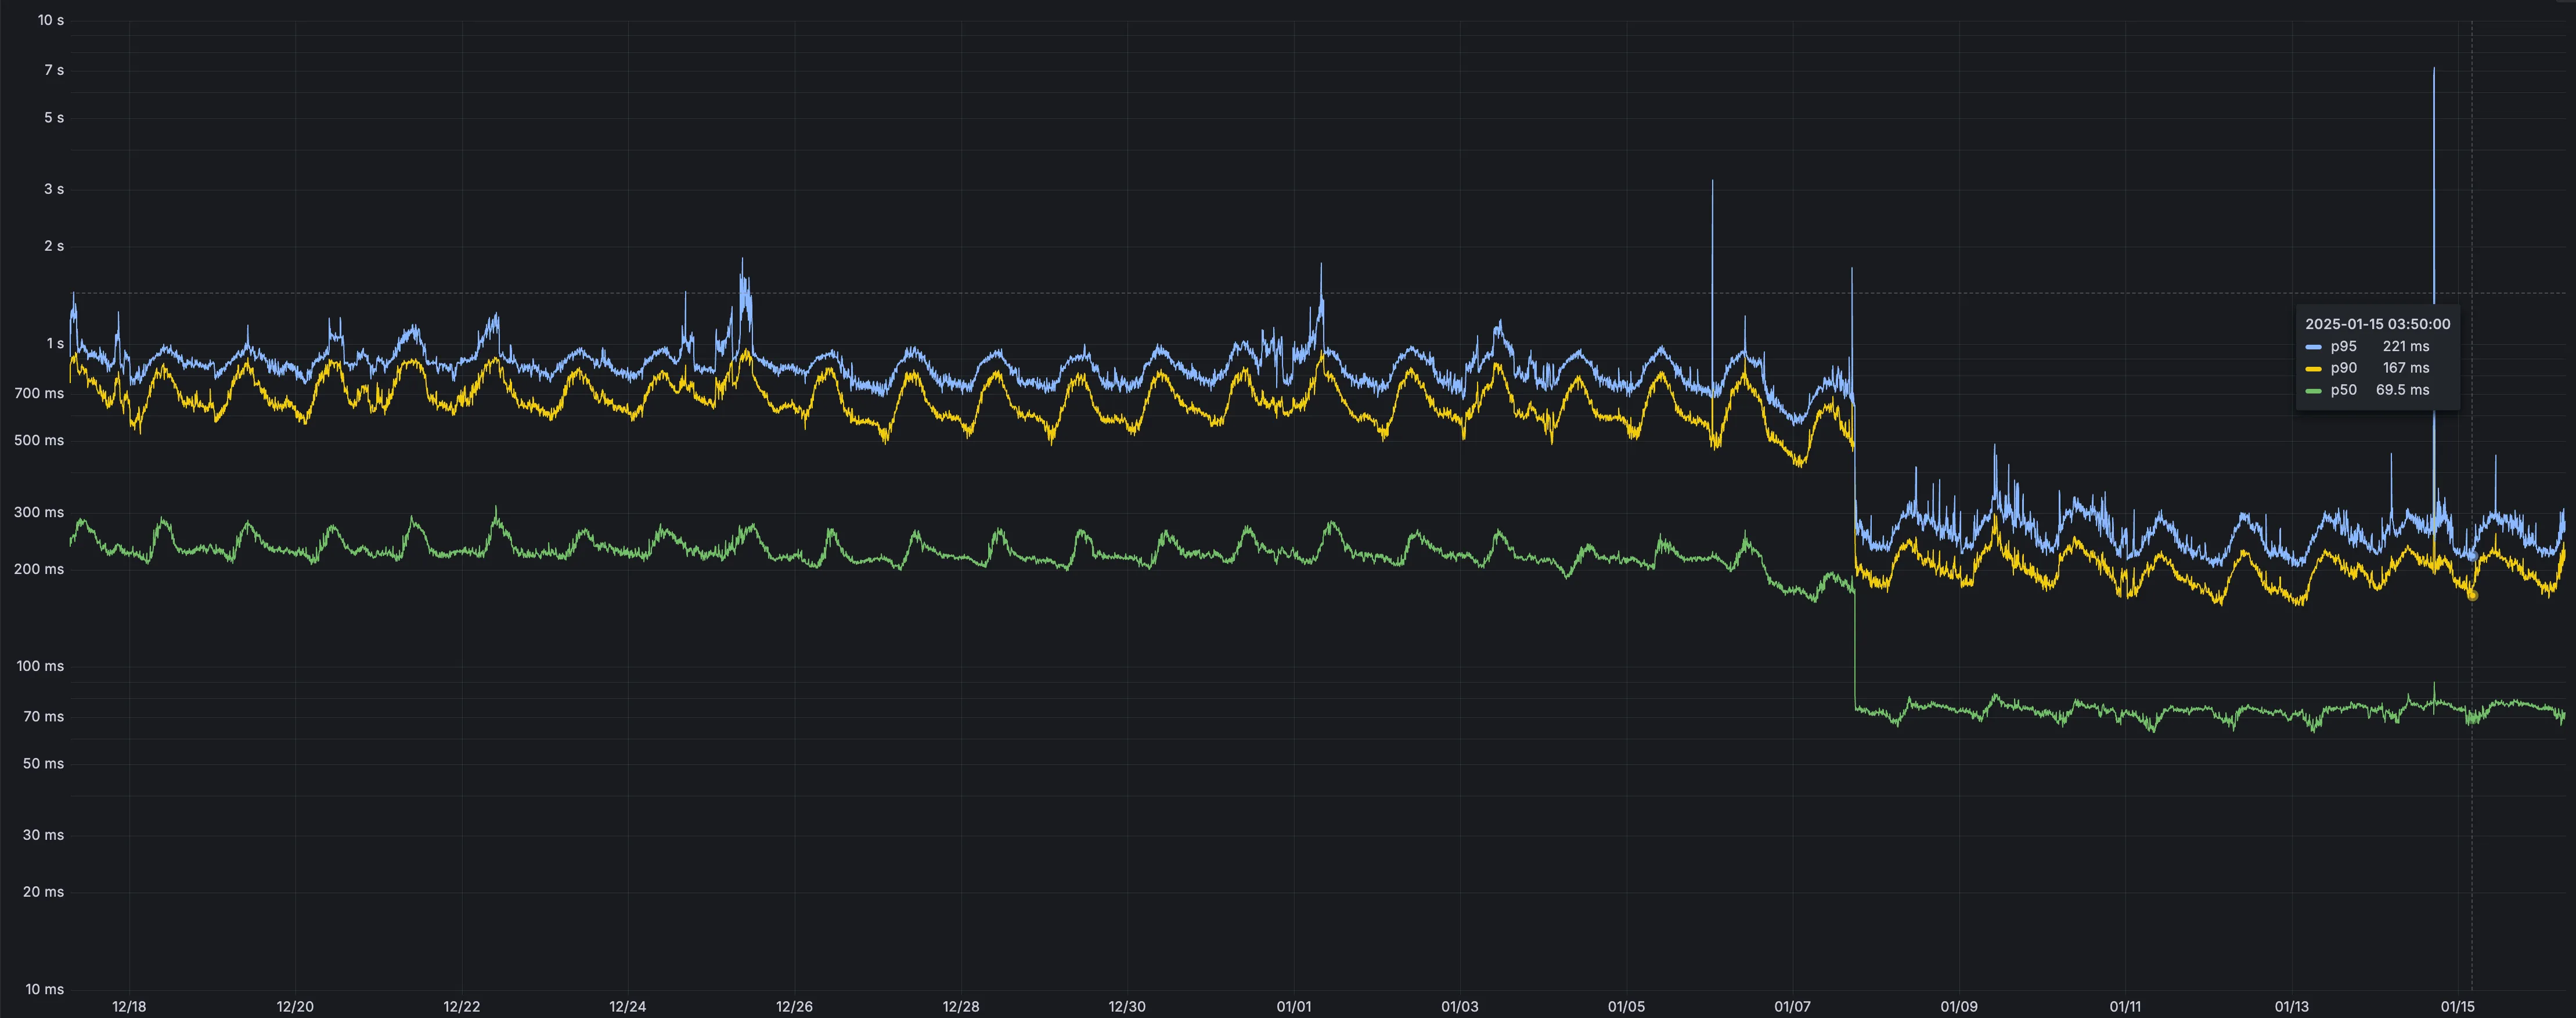
Python Workers now feature improved cold start performance, reducing initialization time for new Worker instances.
This improvement is particularly noticeable for Workers with larger dependency sets or complex initialization logic.
Every time you deploy a Python Worker, a memory snapshot is captured after the top level of the Worker is executed.
This snapshot captures all imports, including package imports that are often costly to load. The memory snapshot is loaded
when the Worker is first started, avoiding the need to reload the Python runtime and all dependencies on each cold start.
We set up a benchmark that imports common packages (httpx ↗,
fastapi ↗ and pydantic ↗)
to see how Python Workers stack up against other platforms:
Platform
Mean Cold Start (ms)
Cloudflare Python Workers
1027
AWS Lambda
2502
Google Cloud Run
3069
These benchmarks run continuously. You can view the results and the methodology on our benchmark page ↗.
In additional testing, we have found that without any memory snapshot, the cold start for this benchmark takes around 10 seconds, so this change improves cold start performance by roughly a factor of 10.
We are introducing a brand new tool called Pywrangler, which simplifies package management in Python Workers by
automatically installing Workers-compatible Python packages into your project.
With Pywrangler, you specify your Worker's Python dependencies in your pyproject.toml file:
[project]
name="python-beautifulsoup-worker"
version="0.1.0"
description="A simple Worker using beautifulsoup4"
requires-python=">=3.12"
dependencies=[
"beautifulsoup4"
]
[dependency-groups]
dev=[
"workers-py",
"workers-runtime-sdk"
]
You can then develop and deploy your Worker using the following commands:
Terminal window
uvrunpywranglerdev
uvrunpywranglerdeploy
Pywrangler automatically downloads and vendors the necessary packages for your Worker, and these packages are bundled with the Worker when you deploy.
Earlier this year, we announced the launch of the new Terraform v5 Provider. We are aware of the high number of issues reported by the Cloudflare community related to the v5 release. We have committed to releasing improvements on a 2-3 week cadence ↗ to ensure its stability and reliability, including the v5.14 release. We have also pivoted from an issue-to-issue approach to a resource-per-resource approach ↗ - we will be focusing on specific resources to not only stabilize the resource but also ensure it is migration-friendly for those migrating from v4 to v5.
Thank you for continuing to raise issues. They make our provider stronger and help us build products that reflect your needs.
This release includes bug fixes, the stabilization of even more popular resources, and more.
Deprecation notice
Resource affected: api_shield_discovery_operation
Cloudflare continuously discovers and updates API endpoints and web assets of your web applications. To improve the maintainability of these dynamic resources, we are working on reducing the need to actively engage with discovered operations.
The corresponding public API endpoint of discovered operations ↗ is not affected and will continue to be supported.
workers_kv: Ignores value import state for verify (#6521 ↗)
workers_script: No longer treats the migrations attribute as WriteOnly (#6489 ↗)
workers_script: Resolves resource drift when worker has unmanaged secret (#6504 ↗)
zero_trust_device_posture_rule: Preserves input.version and other fields (#6500 ↗) and (#6503 ↗)
zero_trust_dlp_custom_profile: Adds sweepers for dlp_custom_profile
zone_subscription|account_subscription: Adds partners_ent as valid enum for rate_plan.id (#6505 ↗)
zone: Ensures datasource model schema parity (#6487 ↗)
subscription: Updates import signature to accept account_id/subscription_id to import account subscription (#6510 ↗)
Upgrade to newer version
We suggest waiting to migrate to v5 while we work on stabilization. This helps with avoiding any blocking issues while the Terraform resources are actively being stabilized ↗. We will be releasing a new migration tool in March 2026 to help support v4 to v5 transitions for our most popular resources.
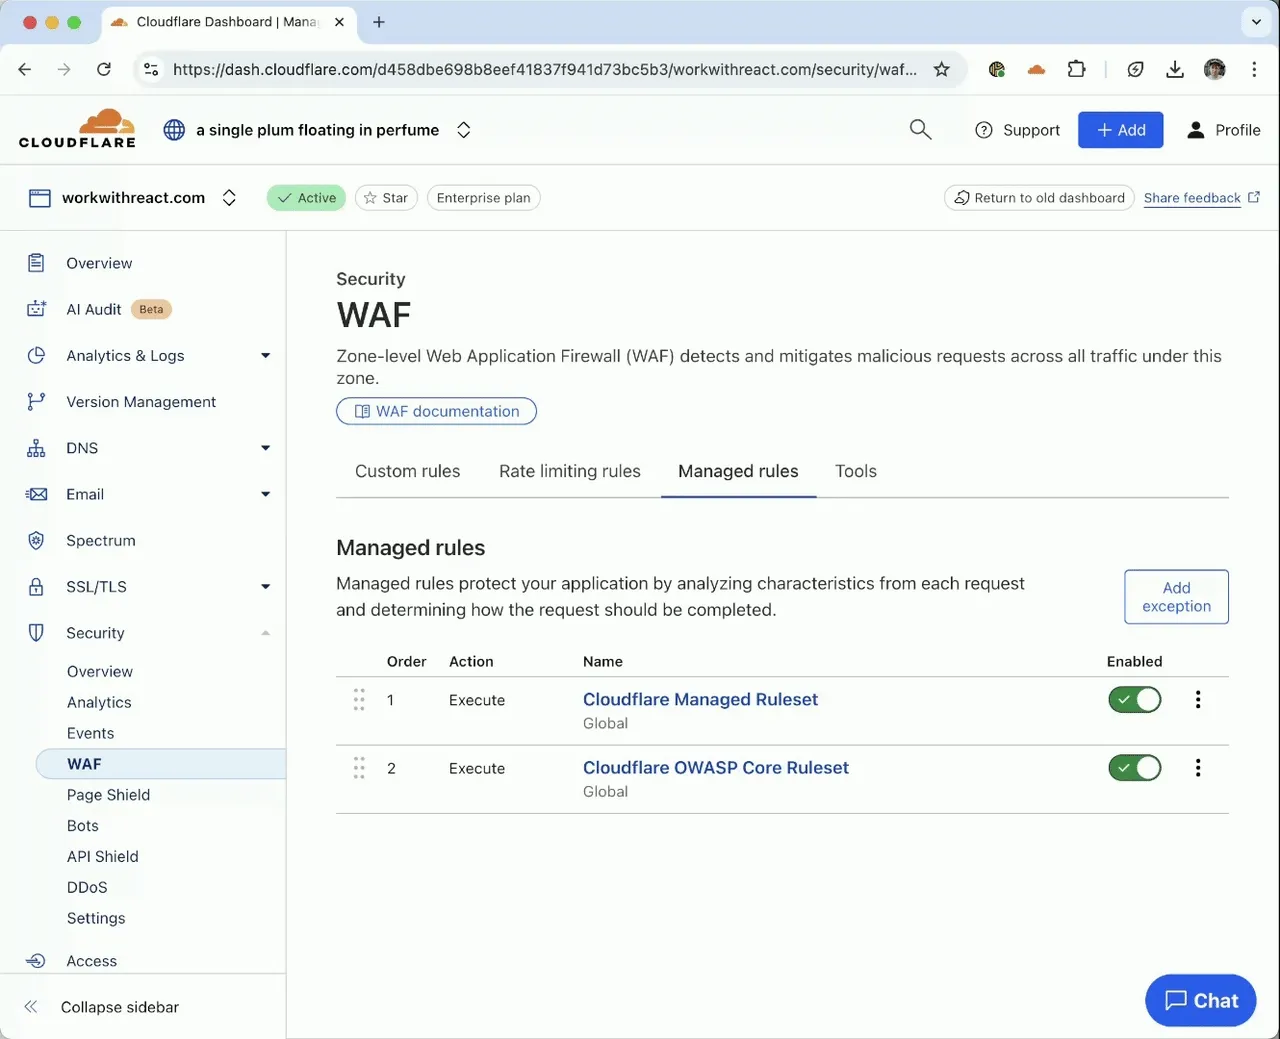
Cloudflare WAF now inspects request-payload size of up to 1 MB across all plans to enhance our detection capabilities for React RCE (CVE-2025-55182).
Key Findings
React payloads commonly have a default maximum size of 1 MB. Cloudflare WAF previously inspected up to 128 KB on Enterprise plans, with even lower limits on other plans.
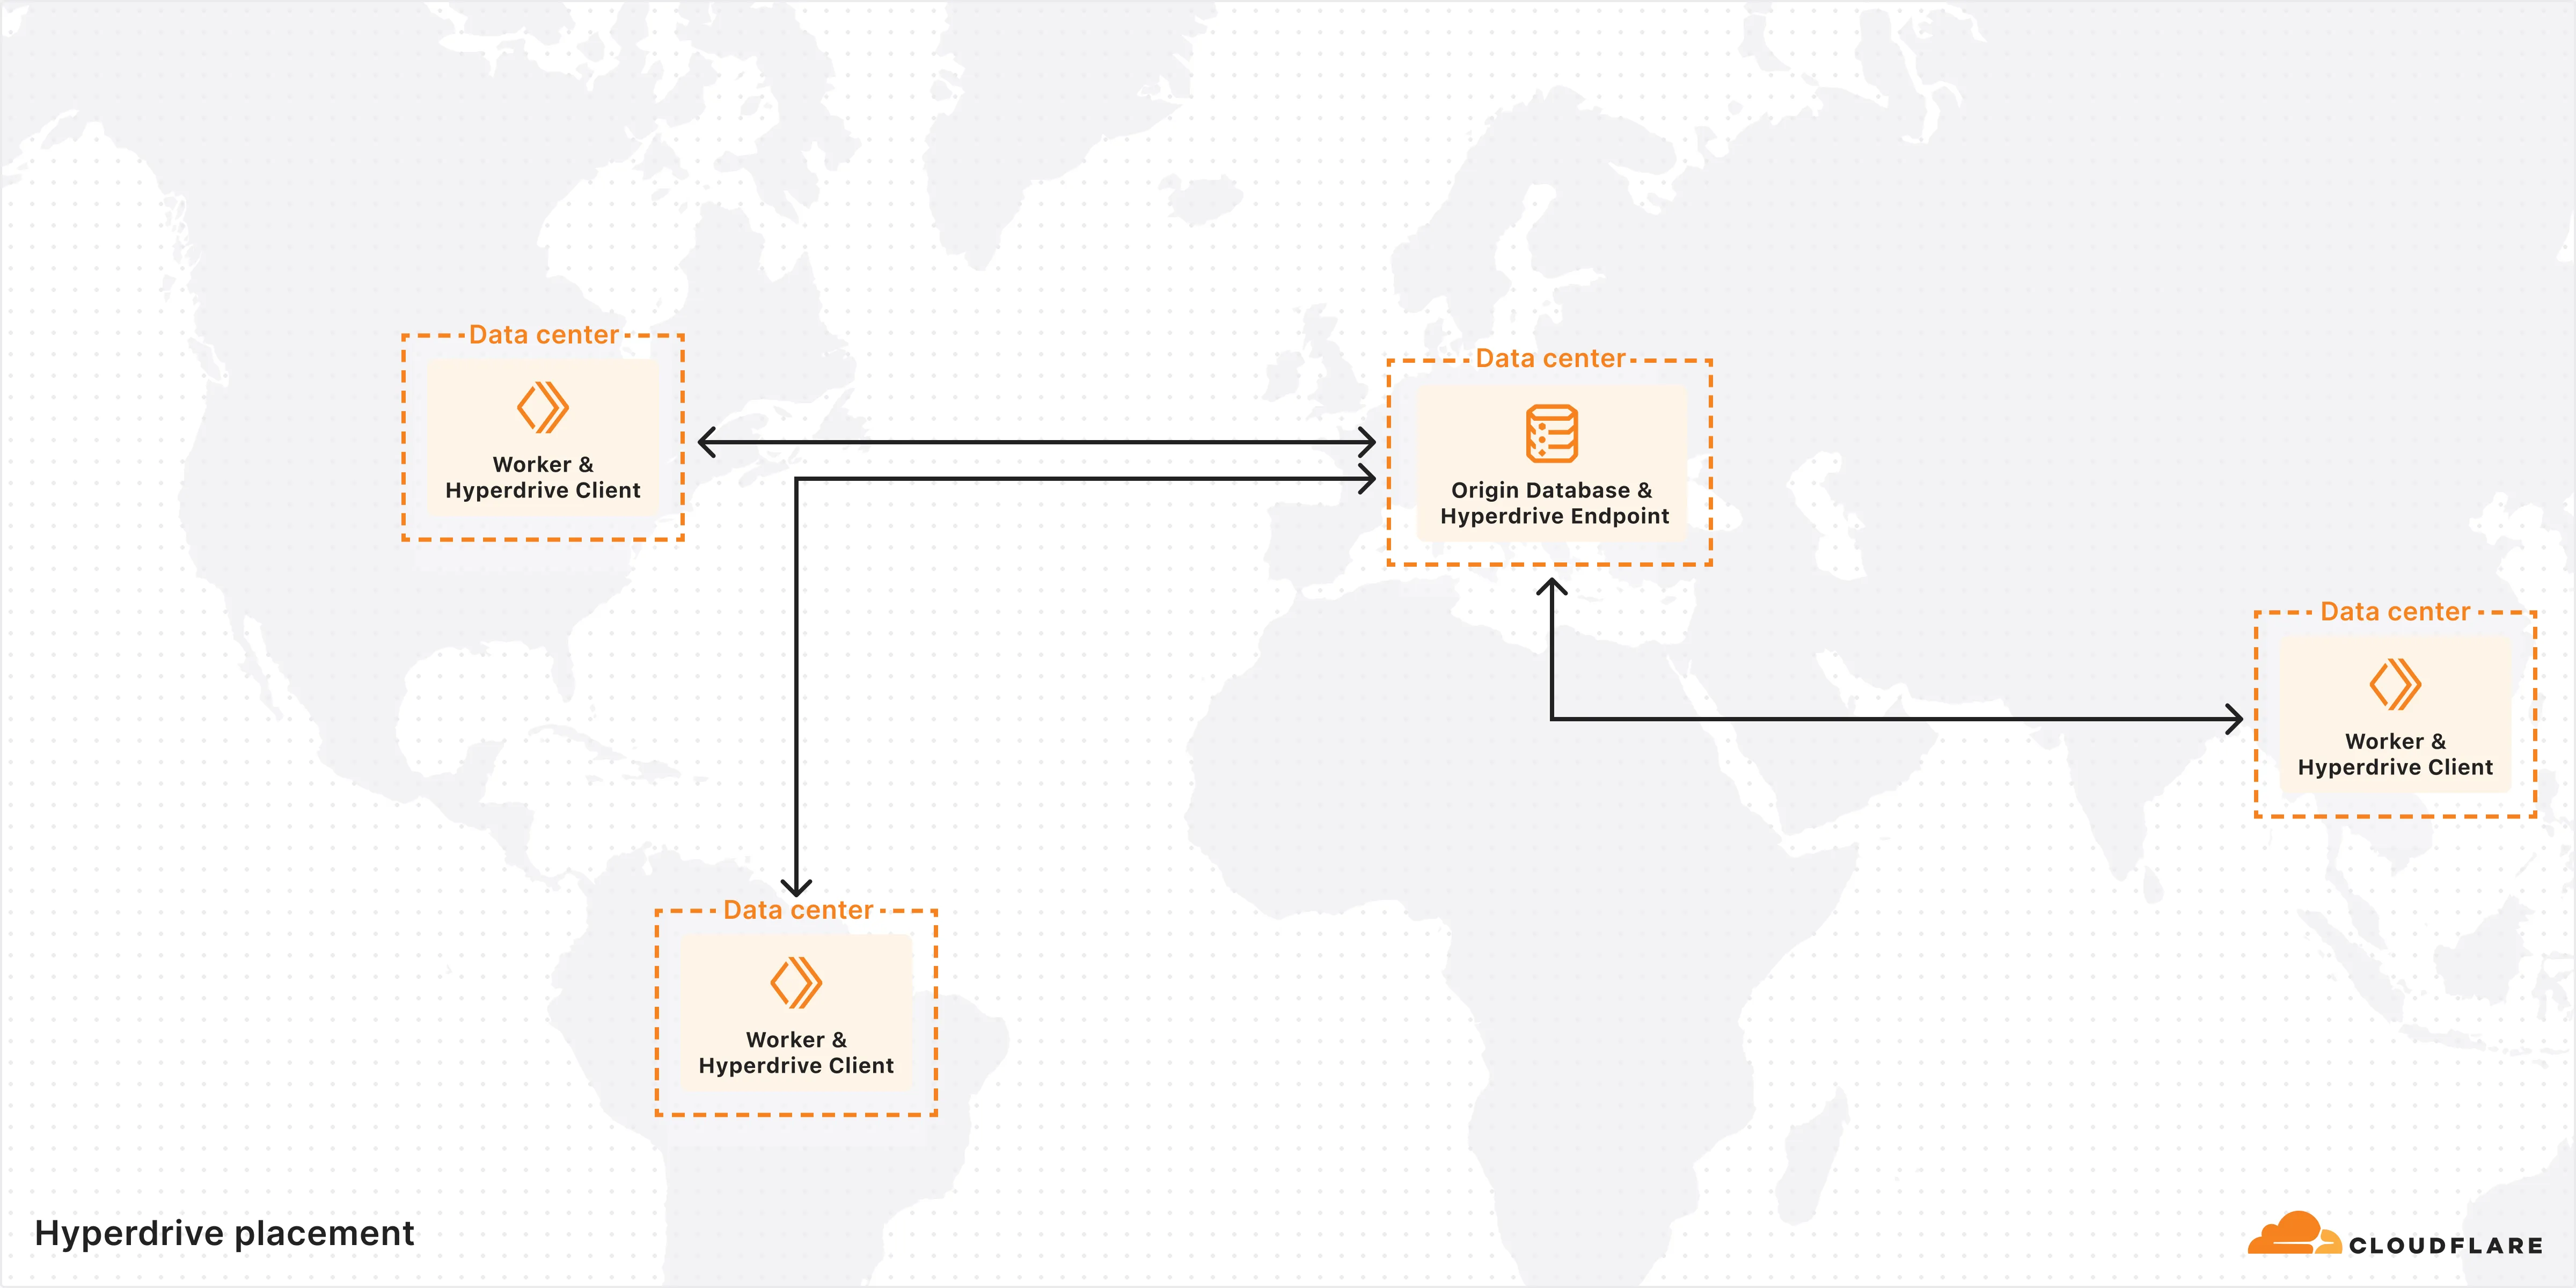
You can now connect directly to remote databases and databases requiring TLS with wrangler dev.
This lets you run your Worker code locally while connecting to remote databases, without needing to use wrangler dev --remote.
The localConnectionString field and CLOUDFLARE_HYPERDRIVE_LOCAL_CONNECTION_STRING_<BINDING_NAME> environment variable can be used to configure the connection string used by wrangler dev.
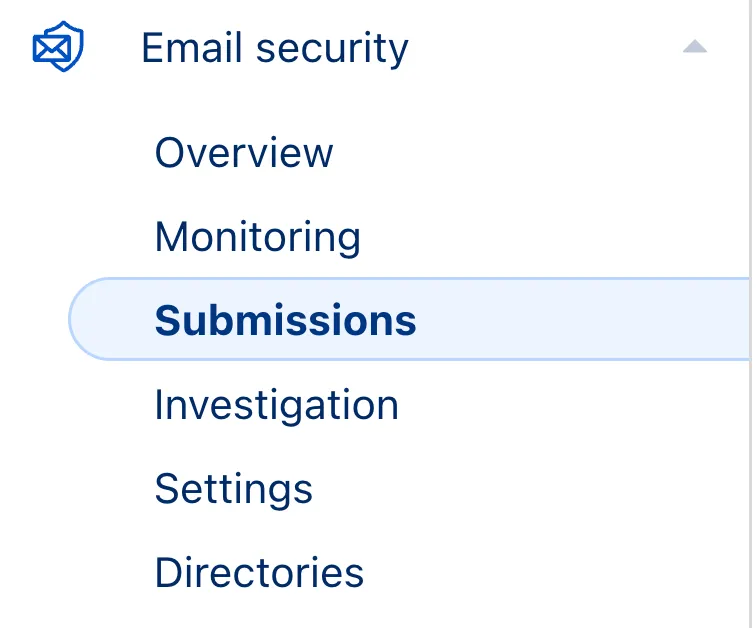
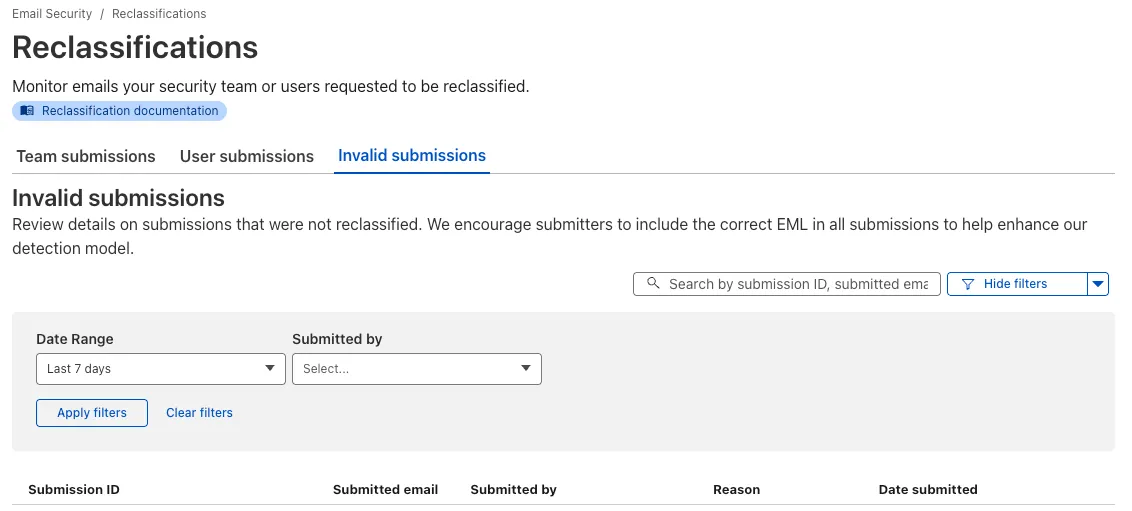
We have updated the terminology “Reclassify” and “Reclassifications” to “Submit” and “Submissions” respectively. This update more accurately reflects the outcome of providing these items to Cloudflare.
Submissions are leveraged to tune future variants of campaigns. To respect data sanctity, providing a submission does not change the original disposition of the emails submitted.
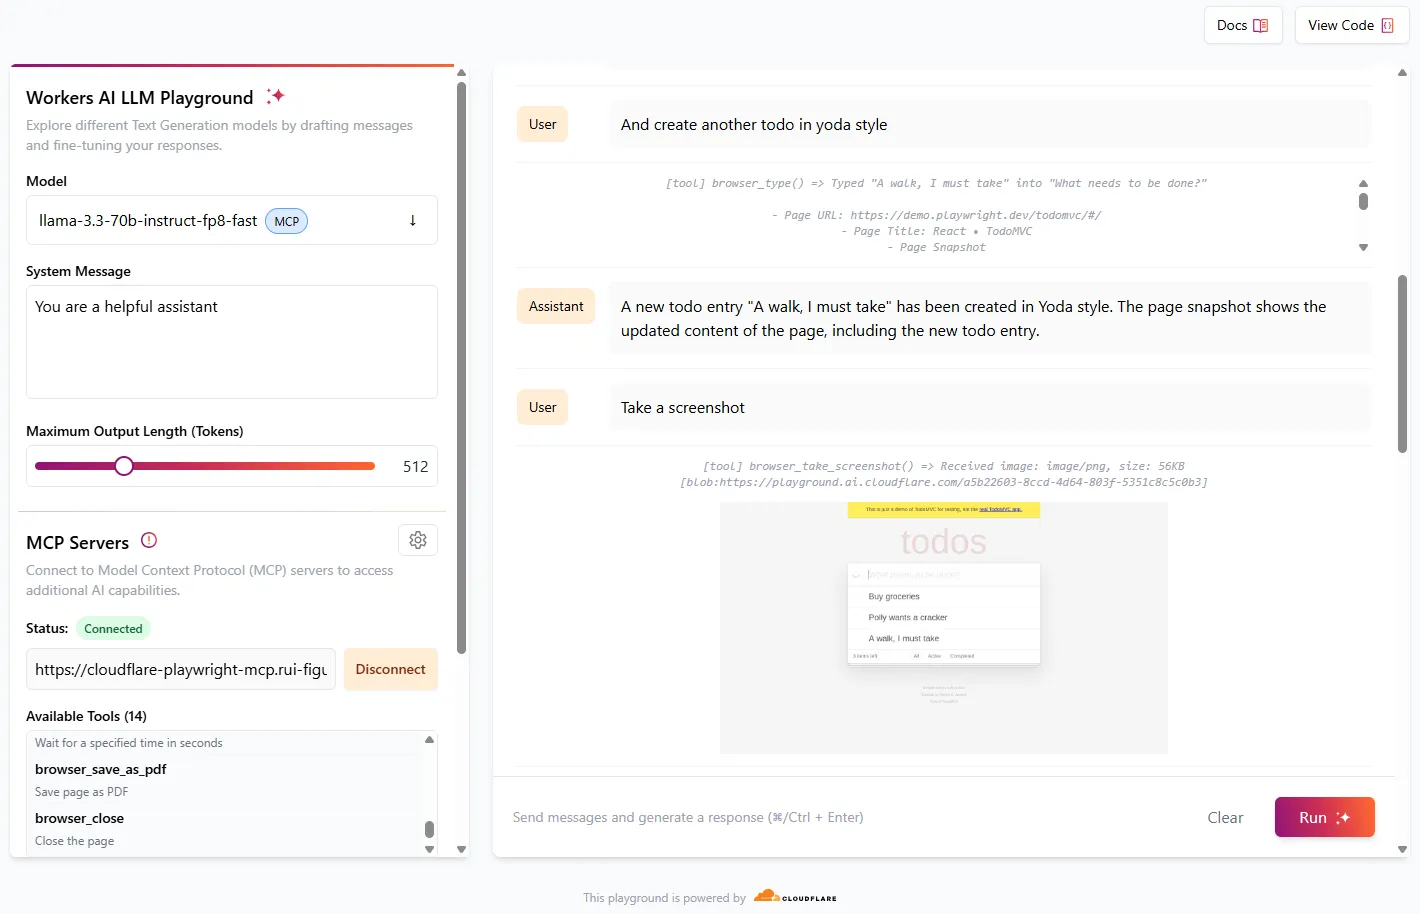
The latest release of @cloudflare/agents ↗ brings resumable streaming, significant MCP client improvements, and critical fixes for schedules and Durable Object lifecycle management.
Resumable streaming
AIChatAgent now supports resumable streaming, allowing clients to reconnect and continue receiving streamed responses without losing data. This is useful for:
Long-running AI responses
Users on unreliable networks
Users switching between devices mid-conversation
Background tasks where users navigate away and return
Real-time collaboration where multiple clients need to stay in sync
Streams are maintained across page refreshes, broken connections, and syncing across open tabs and devices.
The MCPClientManager API has been redesigned for better clarity and control:
New registerServer() method: Register MCP servers without immediately connecting
New connectToServer() method: Establish connections to registered servers
Improved reconnect logic: restoreConnectionsFromStorage() now properly handles failed connections
TypeScript
// Register a server to Agent
const{id}=awaitthis.mcp.registerServer({
name:"my-server",
url:"https://my-mcp-server.example.com",
});
// Connect when ready
awaitthis.mcp.connectToServer(id);
// Discover tools, prompts and resources
awaitthis.mcp.discoverIfConnected(id);
The SDK now includes a formalized MCPConnectionState enum with states: idle, connecting, authenticating, connected, discovering, and ready.
Enhanced MCP discovery
MCP discovery fetches the available tools, prompts, and resources from an MCP server so your agent knows what capabilities are available. The MCPClientConnection class now includes a dedicated discover() method with improved reliability:
Supports cancellation via AbortController
Configurable timeout (default 15s)
Discovery failures now throw errors immediately instead of silently continuing
Bug fixes
Fixed a bug where schedules ↗ meant to fire immediately with this.schedule(0, ...) or this.schedule(new Date(), ...) would not fire
Fixed an issue where schedules that took longer than 30 seconds would occasionally time out
Fixed SSE transport now properly forwards session IDs and request headers
Fixed AI SDK stream events convertion to UIMessageStreamPart
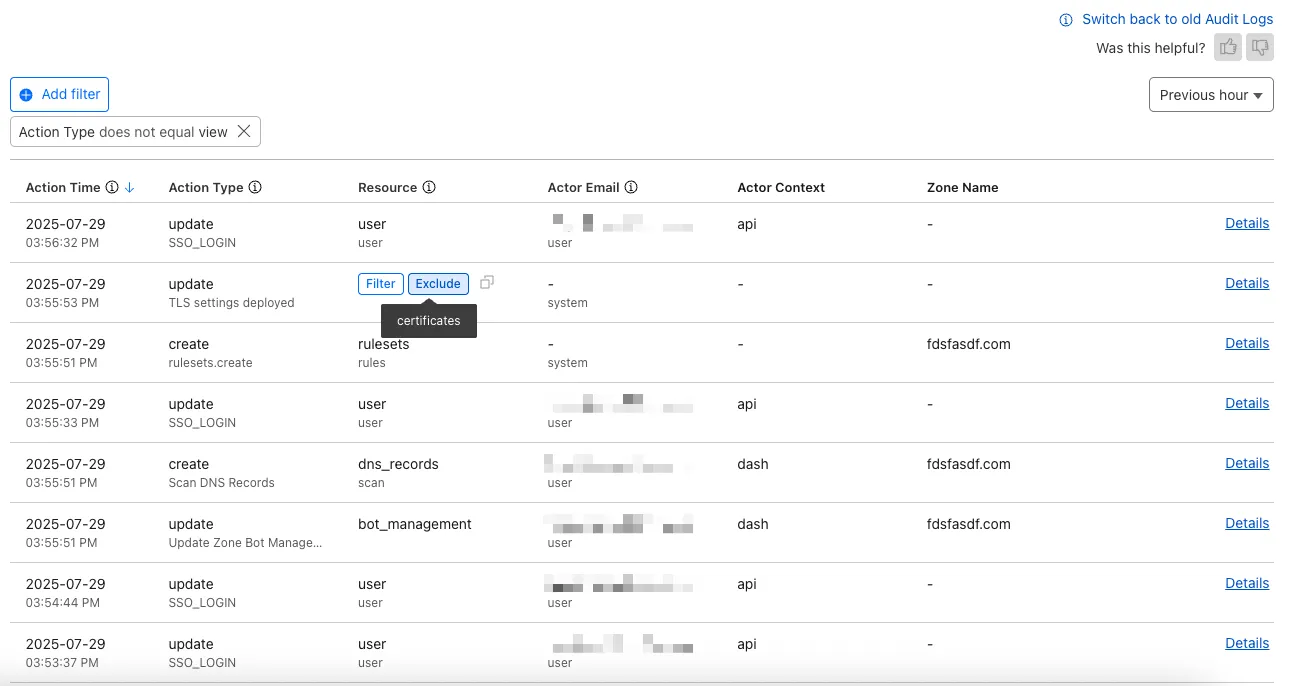
You can now review detailed audit logs for cache purge events, giving you visibility into what purge requests were sent, what they contained, and by whom. Audit your purge requests via the Dashboard or API for all purge methods:
Purge everything
List of prefixes
List of tags
List of hosts
List of files
Example
The detailed audit payload is visible within the Cloudflare Dashboard (under Manage Account > Audit Logs) and via the API. Below is an example of the Audit Logs v2 payload structure:
We've partnered with Black Forest Labs (BFL) to bring their latest FLUX.2 [dev] model to Workers AI! This model excels in generating high-fidelity images with physical world grounding, multi-language support, and digital asset creation. You can also create specific super images with granular controls like JSON prompting.
Pricing documentation is available on the model page or pricing page. Note, we expect to drop pricing in the next few days after iterating on the model performance.
Workers AI Platform specifics
The model hosted on Workers AI is able to support up to 4 image inputs (512x512 per input image). Note, this image model is one of the most powerful in the catalog and is expected to be slower than the other image models we currently support. One catch to look out for is that this model takes multipart form data inputs, even if you just have a prompt.
With the REST API, the multipart form data input looks like this:
The parameters you can send to the model are detailed here:
JSON Schema for ModelRequired Parameters
prompt (string) - Text description of the image to generate
Optional Parameters
input_image_0 (string) - Binary image
input_image_1 (string) - Binary image
input_image_2 (string) - Binary image
input_image_3 (string) - Binary image
steps (integer) - Number of inference steps. Higher values may improve quality but increase generation time
guidance (float) - Guidance scale for generation. Higher values follow the prompt more closely
width (integer) - Width of the image, default 1024 Range: 256-1920
height (integer) - Height of the image, default 768 Range: 256-1920
seed (integer) - Seed for reproducibility
## Multi-Reference Images
The FLUX.2 model is great at generating images based on reference images. You can use this feature to apply the style of one image to another, add a new character to an image, or iterate on past generate images. You would use it with the same multipart form data structure, with the input images in binary.
For the prompt, you can reference the images based on the index, like `take the subject of image 1 and style it like image 0` or even use natural language like `place the dog beside the woman`.
Note: you have to name the input parameter as `input_image_0`, `input_image_1`, `input_image_2` for it to work correctly. All input images must be smaller than 512x512.
The model supports prompting in JSON to get more granular control over images. You would pass the JSON as the value of the 'prompt' field in the multipart form data. See the JSON schema below on the base parameters you can pass to the model.
JSON Prompting Schema
{
"type":"object",
"properties":{
"scene":{
"type":"string",
"description":"Overall scene setting or location"
},
"subjects":{
"type":"array",
"items":{
"type":"object",
"properties":{
"type":{
"type":"string",
"description":"Type of subject (e.g., desert nomad, blacksmith, DJ, falcon)"
Radar introduces HTTP Origins insights, providing visibility into the status of traffic between Cloudflare's global network and cloud-based origin infrastructure.
The new Origins API provides provides the following endpoints:
/origins - Lists all origins (cloud providers and associated regions).
/origins/{origin} - Retrieves information about a specific origin (cloud provider).
/origins/timeseries - Retrieves normalized time series data for a specific origin, including the following metrics:
REQUESTS: Number of requests
CONNECTION_FAILURES: Number of connection failures
RESPONSE_HEADER_RECEIVE_DURATION: Duration of the response header receive
TCP_HANDSHAKE_DURATION: Duration of the TCP handshake
TCP_RTT: TCP round trip time
TLS_HANDSHAKE_DURATION: Duration of the TLS handshake
/origins/summary - Retrieves HTTP requests to origins summarized by a dimension.
/origins/timeseries_groups - Retrieves timeseries data for HTTP requests to origins grouped by a dimension.
The following dimensions are available for the summary and timeseries_groups endpoints:
region: Origin region
success_rate: Success rate of requests (2XX versus 5XX response codes)
percentile: Percentiles of metrics listed above
Additionally, the Annotations and Traffic Anomalies APIs have been extended to support origin outages and anomalies, enabling automated detection and alerting for origin infrastructure issues.
Containers now support mounting R2 buckets as FUSE (Filesystem in Userspace) volumes, allowing applications to interact with R2 using standard filesystem operations.
Common use cases include:
Bootstrapping containers with datasets, models, or dependencies for sandboxes and agent environments
Persisting user configuration or application state without managing downloads
Accessing large static files without bloating container images or downloading at startup
FUSE adapters like tigrisfs ↗, s3fs ↗, and gcsfuse ↗ can be installed in your container image and configured to mount buckets at startup.
FROM alpine:3.20
# Install FUSE and dependencies
RUN apk update && \
apk add --no-cache ca-certificates fuse curl bash
# Install tigrisfs
RUN ARCH=$(uname -m) && \
if [ "$ARCH" = "x86_64" ]; then ARCH="amd64"; fi && \
if [ "$ARCH" = "aarch64" ]; then ARCH="arm64"; fi && \
See the Mount R2 buckets with FUSE example for a complete guide on mounting R2 buckets and/or other S3-compatible storage buckets within your containers.
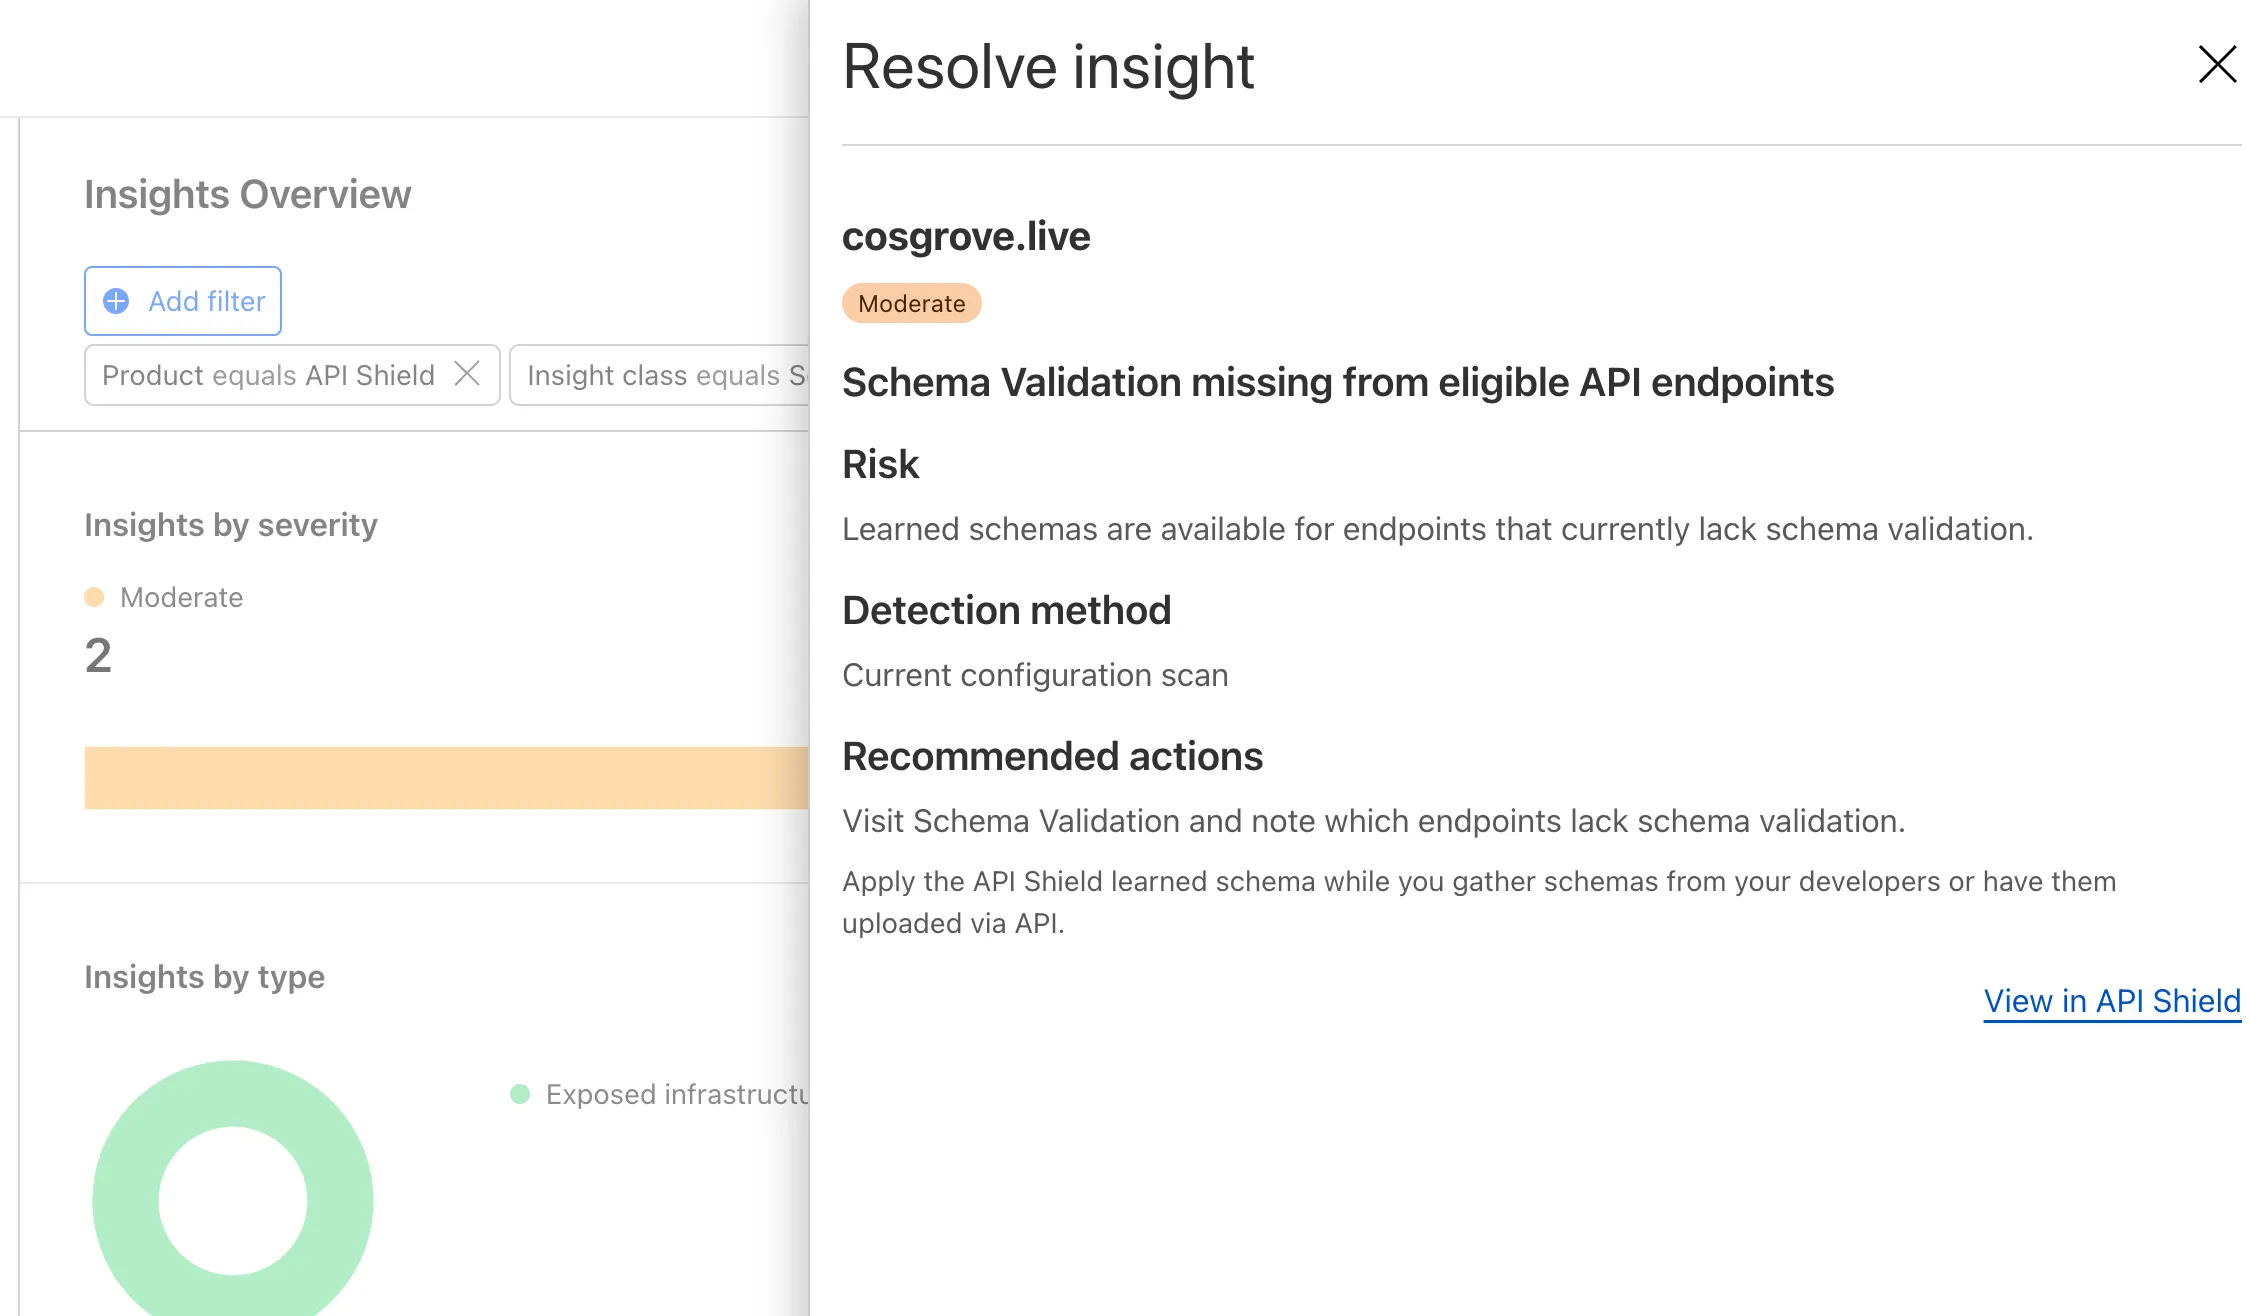
The threat events platform now has threat insights available for some relevant parent events. Threat intelligence analyst users can access these insights for their threat hunting activity.
Insights are also highlighted in the Cloudflare dashboard by a small lightning icon and the insights can refer to multiple, connected events, potentially part of the same attack or campaign and associated with the same threat actor.
Earlier this year, we announced the launch of the new Terraform v5 Provider. We are aware of the high number of issues reported by the Cloudflare community related to the v5 release. We have committed to releasing improvements on a 2-3 week cadence ↗ to ensure its stability and reliability, including the v5.13 release. We have also pivoted from an issue-to-issue approach to a resource-per-resource approach ↗ - we will be focusing on specific resources to not only stabilize the resource but also ensure it is migration-friendly for those migrating from v4 to v5.
Thank you for continuing to raise issues. They make our provider stronger and help us build products that reflect your needs.
This release includes new features, new resources and data sources, bug fixes, updates to our Developer Documentation, and more.
Breaking Change
Please be aware that there are breaking changes for the cloudflare_api_token and cloudflare_account_token resources. These changes eliminate configuration drift caused by policy ordering differences in the Cloudflare API.
zero_trust_dex_test: correct configurability for 'targeted' attribute to fix drift
zero_trust_tunnel_cloudflared_config: remove warp_routing from cloudflared_config (#6471 ↗)
Upgrading
We suggest holding off on migration to v5 while we work on stabilization. This help will you avoid any blocking issues while the Terraform resources are actively being stabilized. We will be releasing a new migration tool in March 2026 to help support v4 to v5 transitions for our most popular resources.
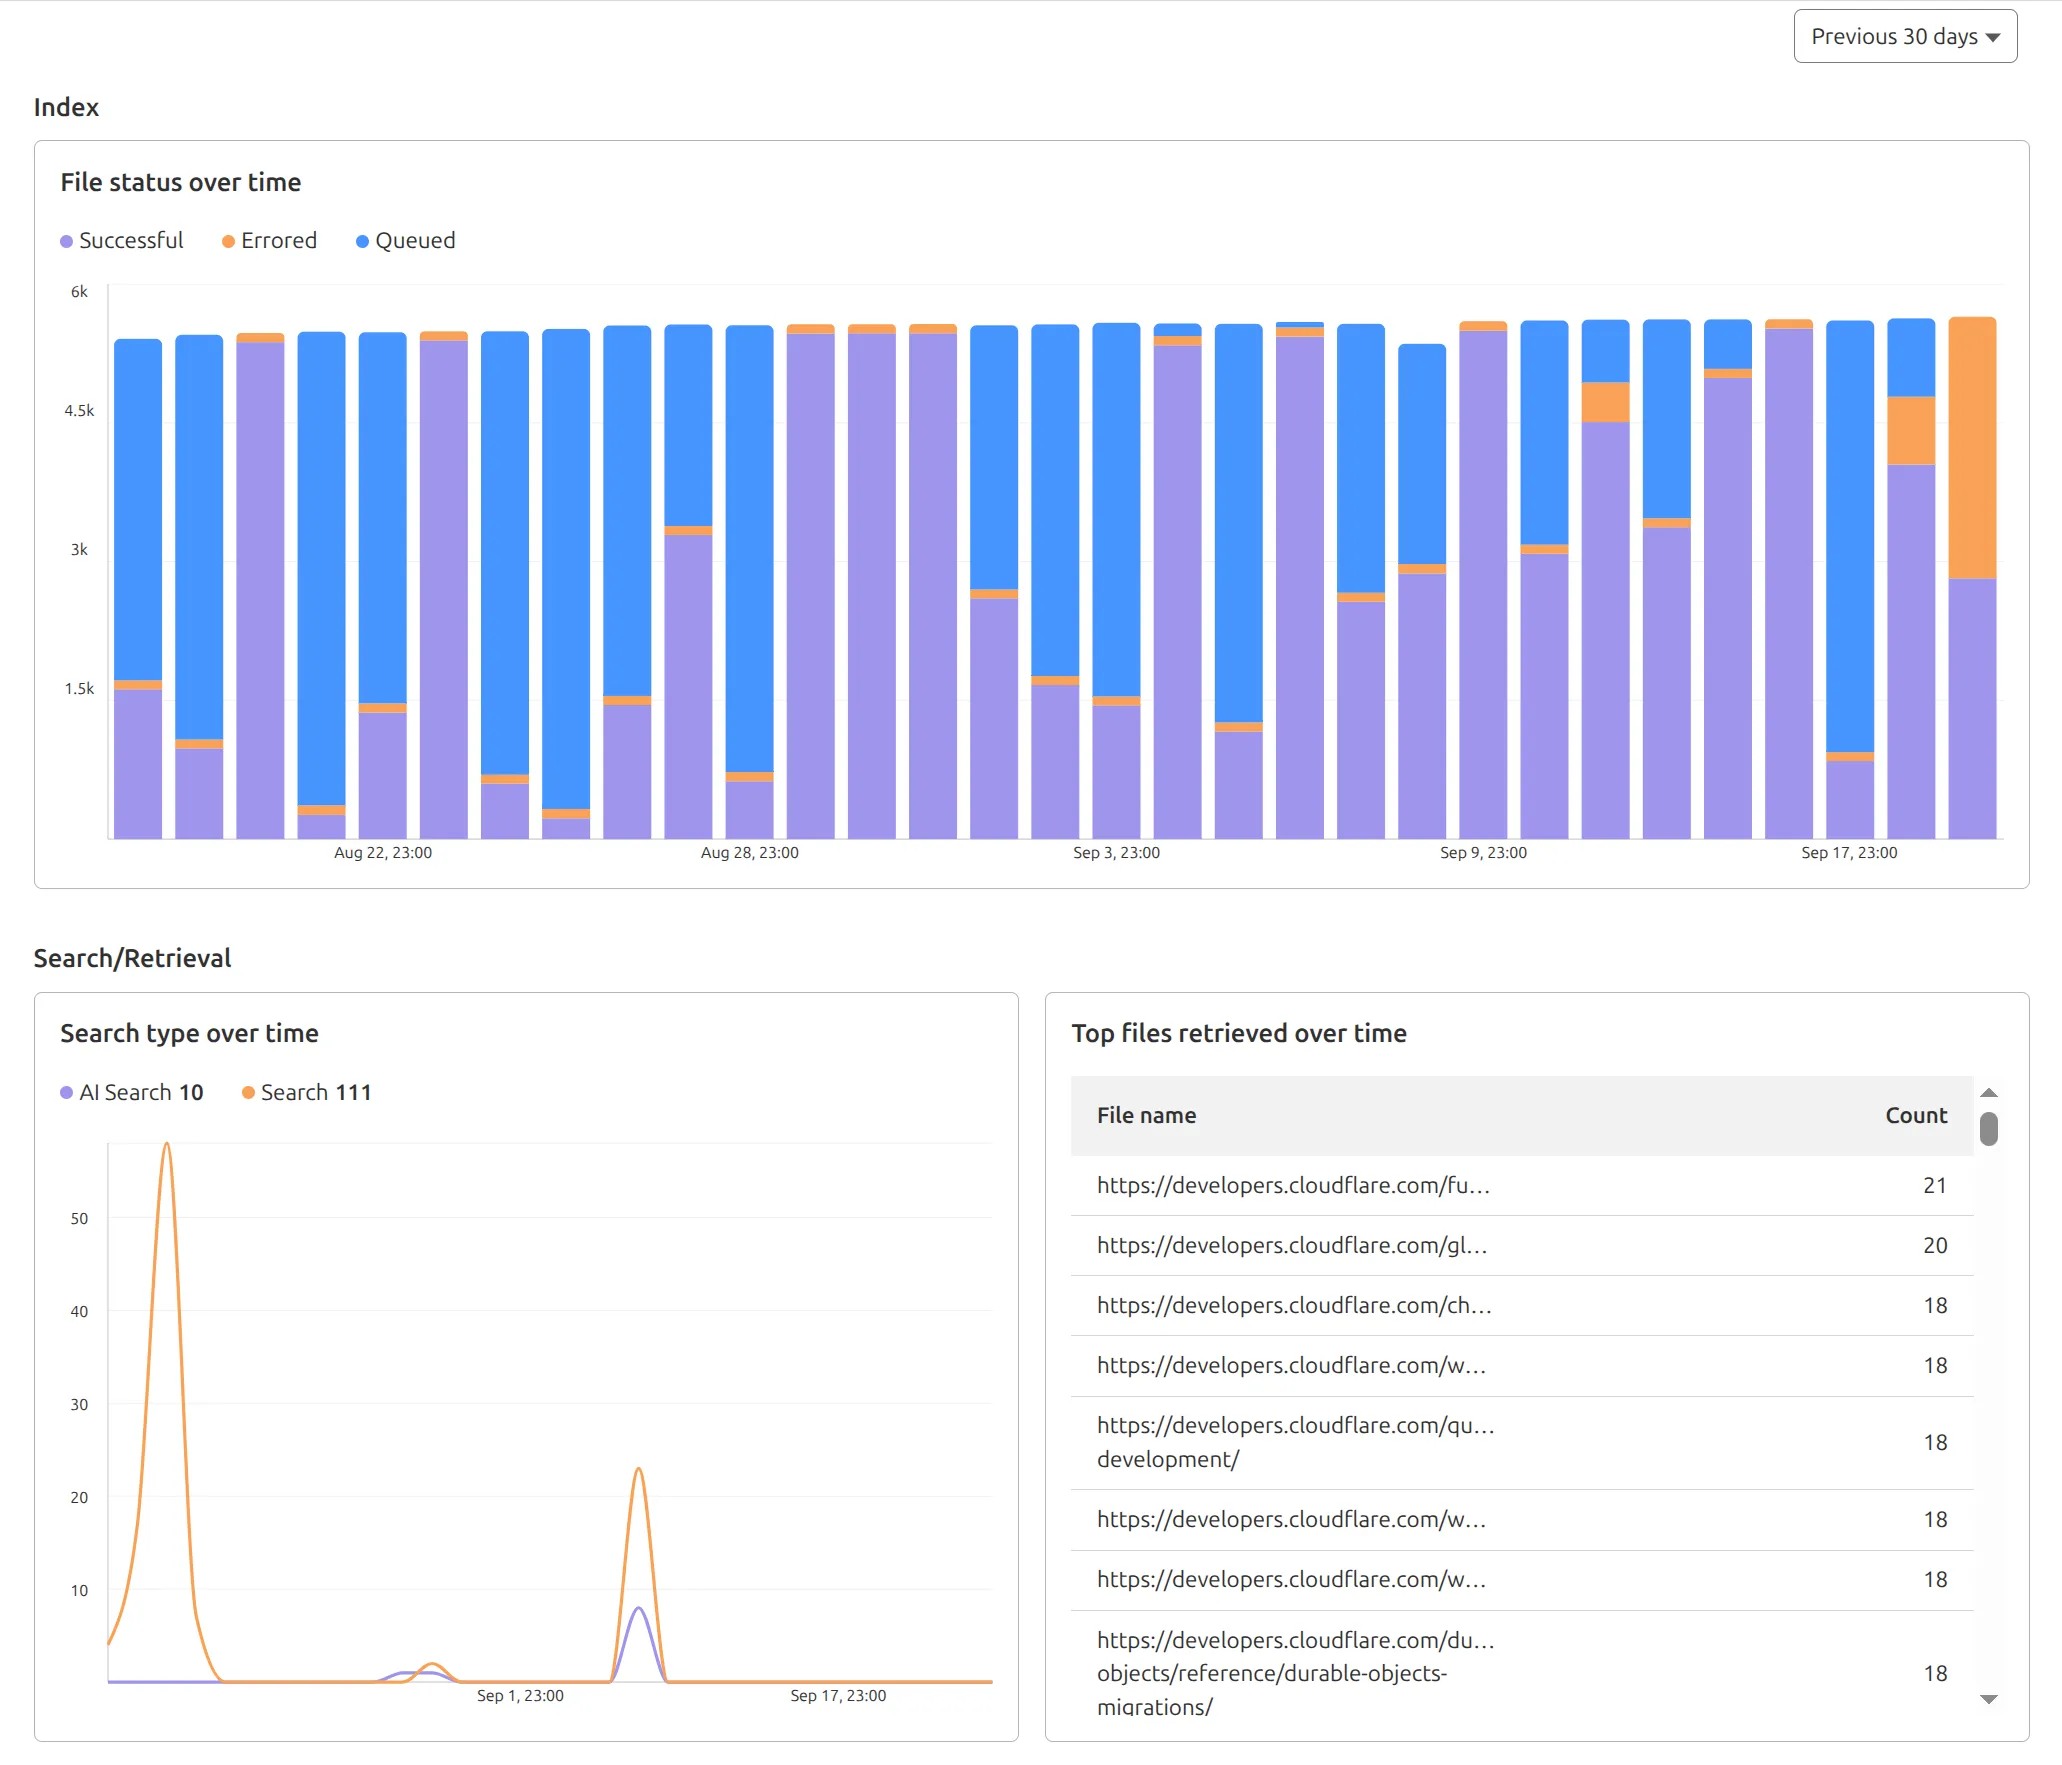
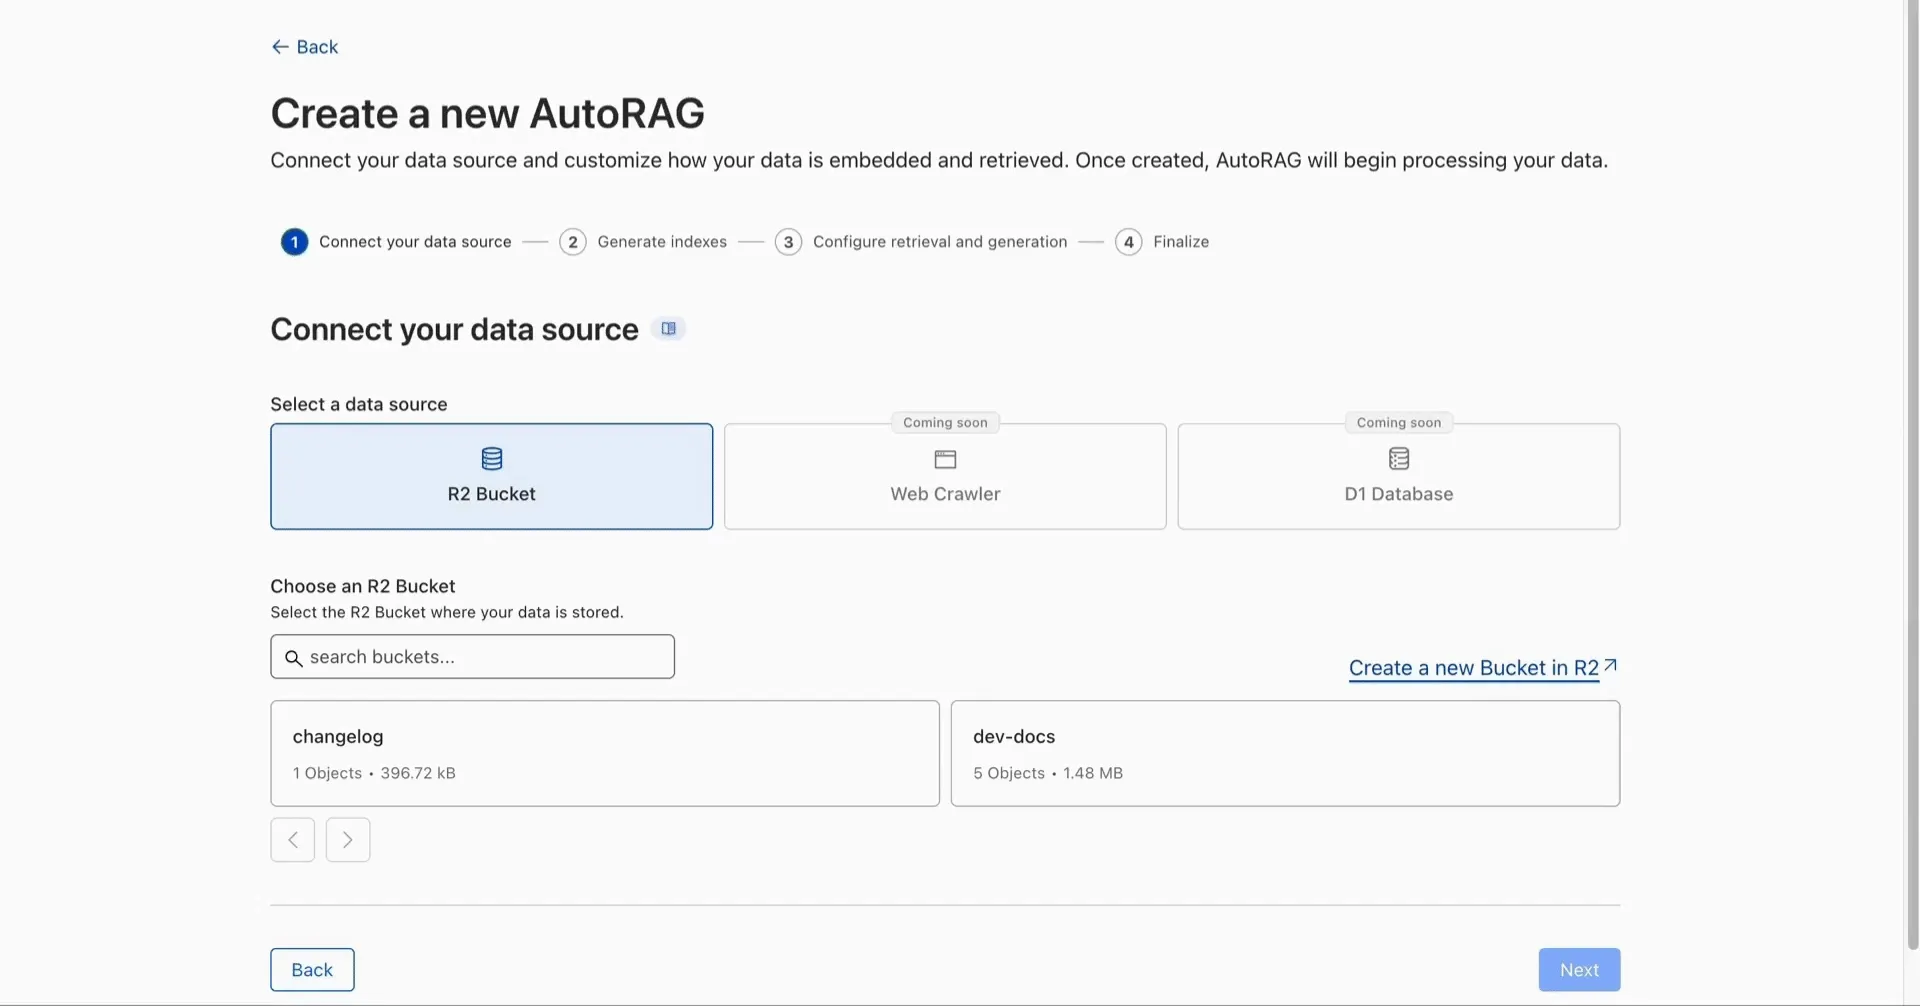
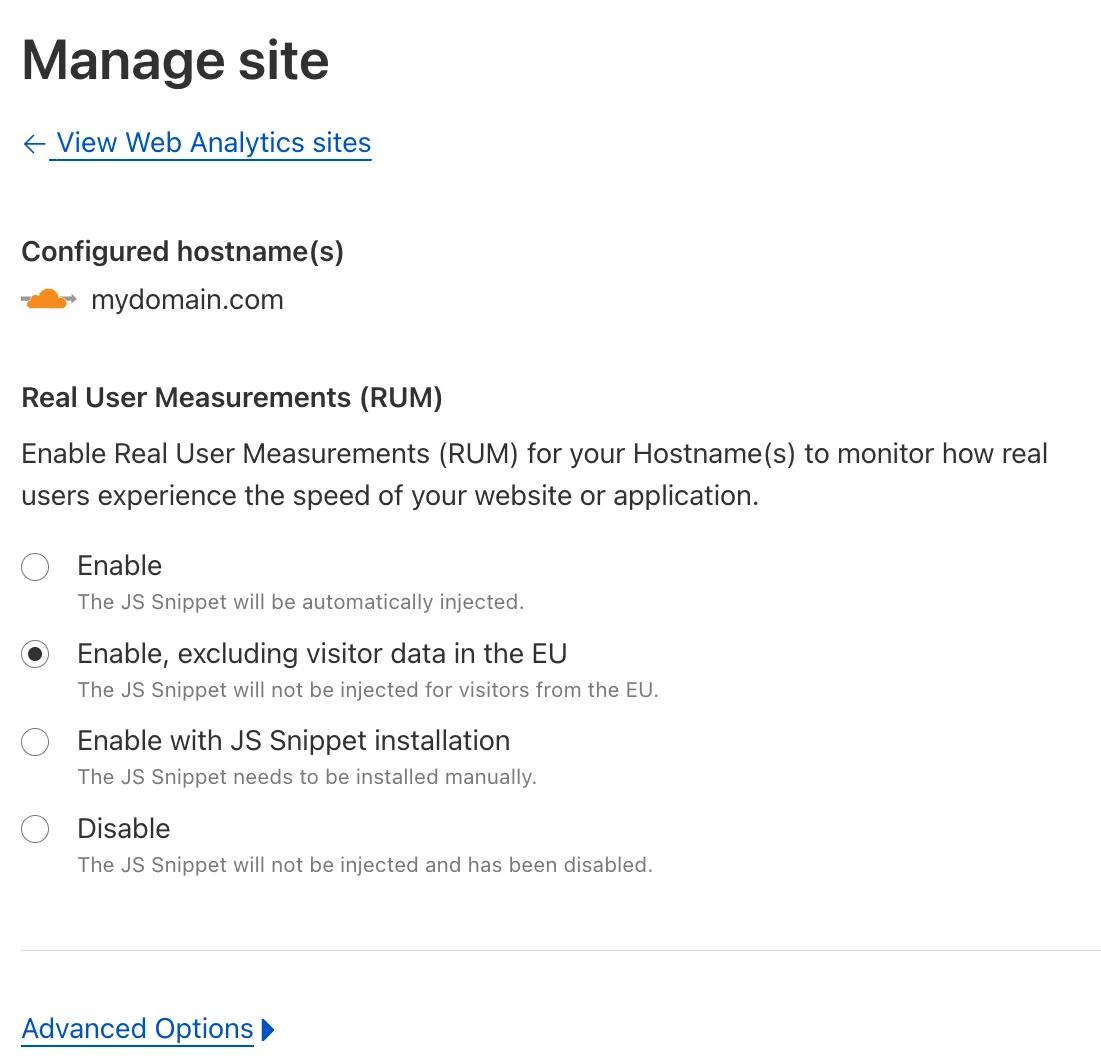
AI Search now supports custom HTTP headers for website crawling, solving a common problem where valuable content behind authentication or access controls could not be indexed.
Previously, AI Search could only crawl publicly accessible pages, leaving knowledge bases, documentation, and other protected content out of your search results. With custom headers support, you can now include authentication credentials that allow the crawler to access this protected content.
This is particularly useful for indexing content like:
Internal documentation behind corporate login systems
Premium content that requires users to provide access to unlock
Sites protected by Cloudflare Access using service tokens
To add custom headers when creating an AI Search instance, select Parse options. In the Extra headers section, you can add up to five custom headers per Website data source.
For example, to crawl a site protected by Cloudflare Access, you can add service token credentials as custom headers:
CF-Access-Client-Id: your-token-id.access
CF-Access-Client-Secret: your-token-secret
The crawler will automatically include these headers in all requests, allowing it to access protected pages that would otherwise be blocked.
To facilitate significant enhancements to our submission processes, the Final Disposition column of the Team Submissions > Reclassifications page inside the Email Security Zero Trust application will be temporarily removed.
What's Changing
The column displaying the final disposition status for submitted email misses will no longer be visible on the specified page.
Why We're Doing This
This temporary change is required as we revamp and integrate a more powerful backend infrastructure for processing these security-critical submissions. This update is designed to make even more effective use of the data you provide to improve our detection capabilities. We assure you that your submissions are continuing to be addressed at an even greater rate than before, fueling faster and more accurate security improvements.
Next Steps
Rest assured, the ability to submit email misses and the underlying analysis work remain fully operational. We are committed to reintroducing a refined, more valuable status update feature once the new infrastructure is completed.
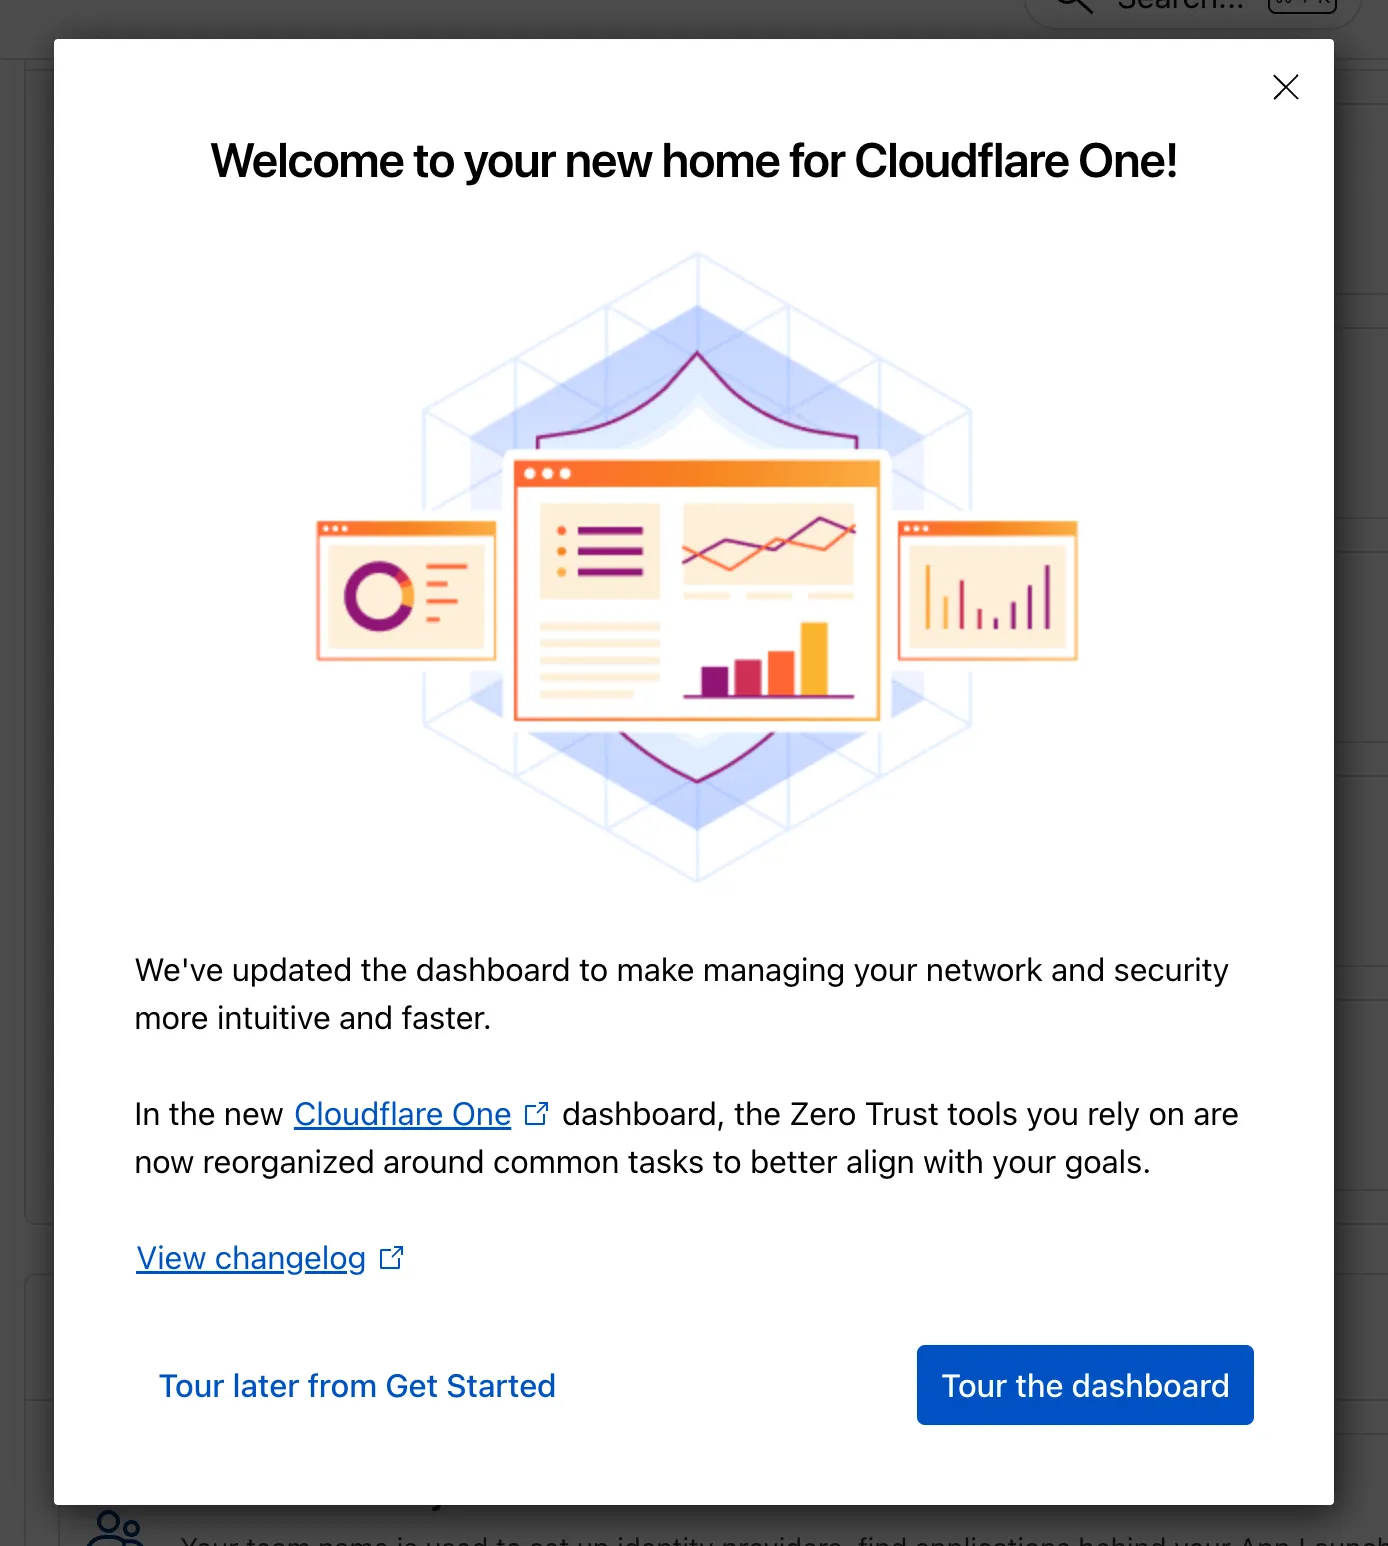
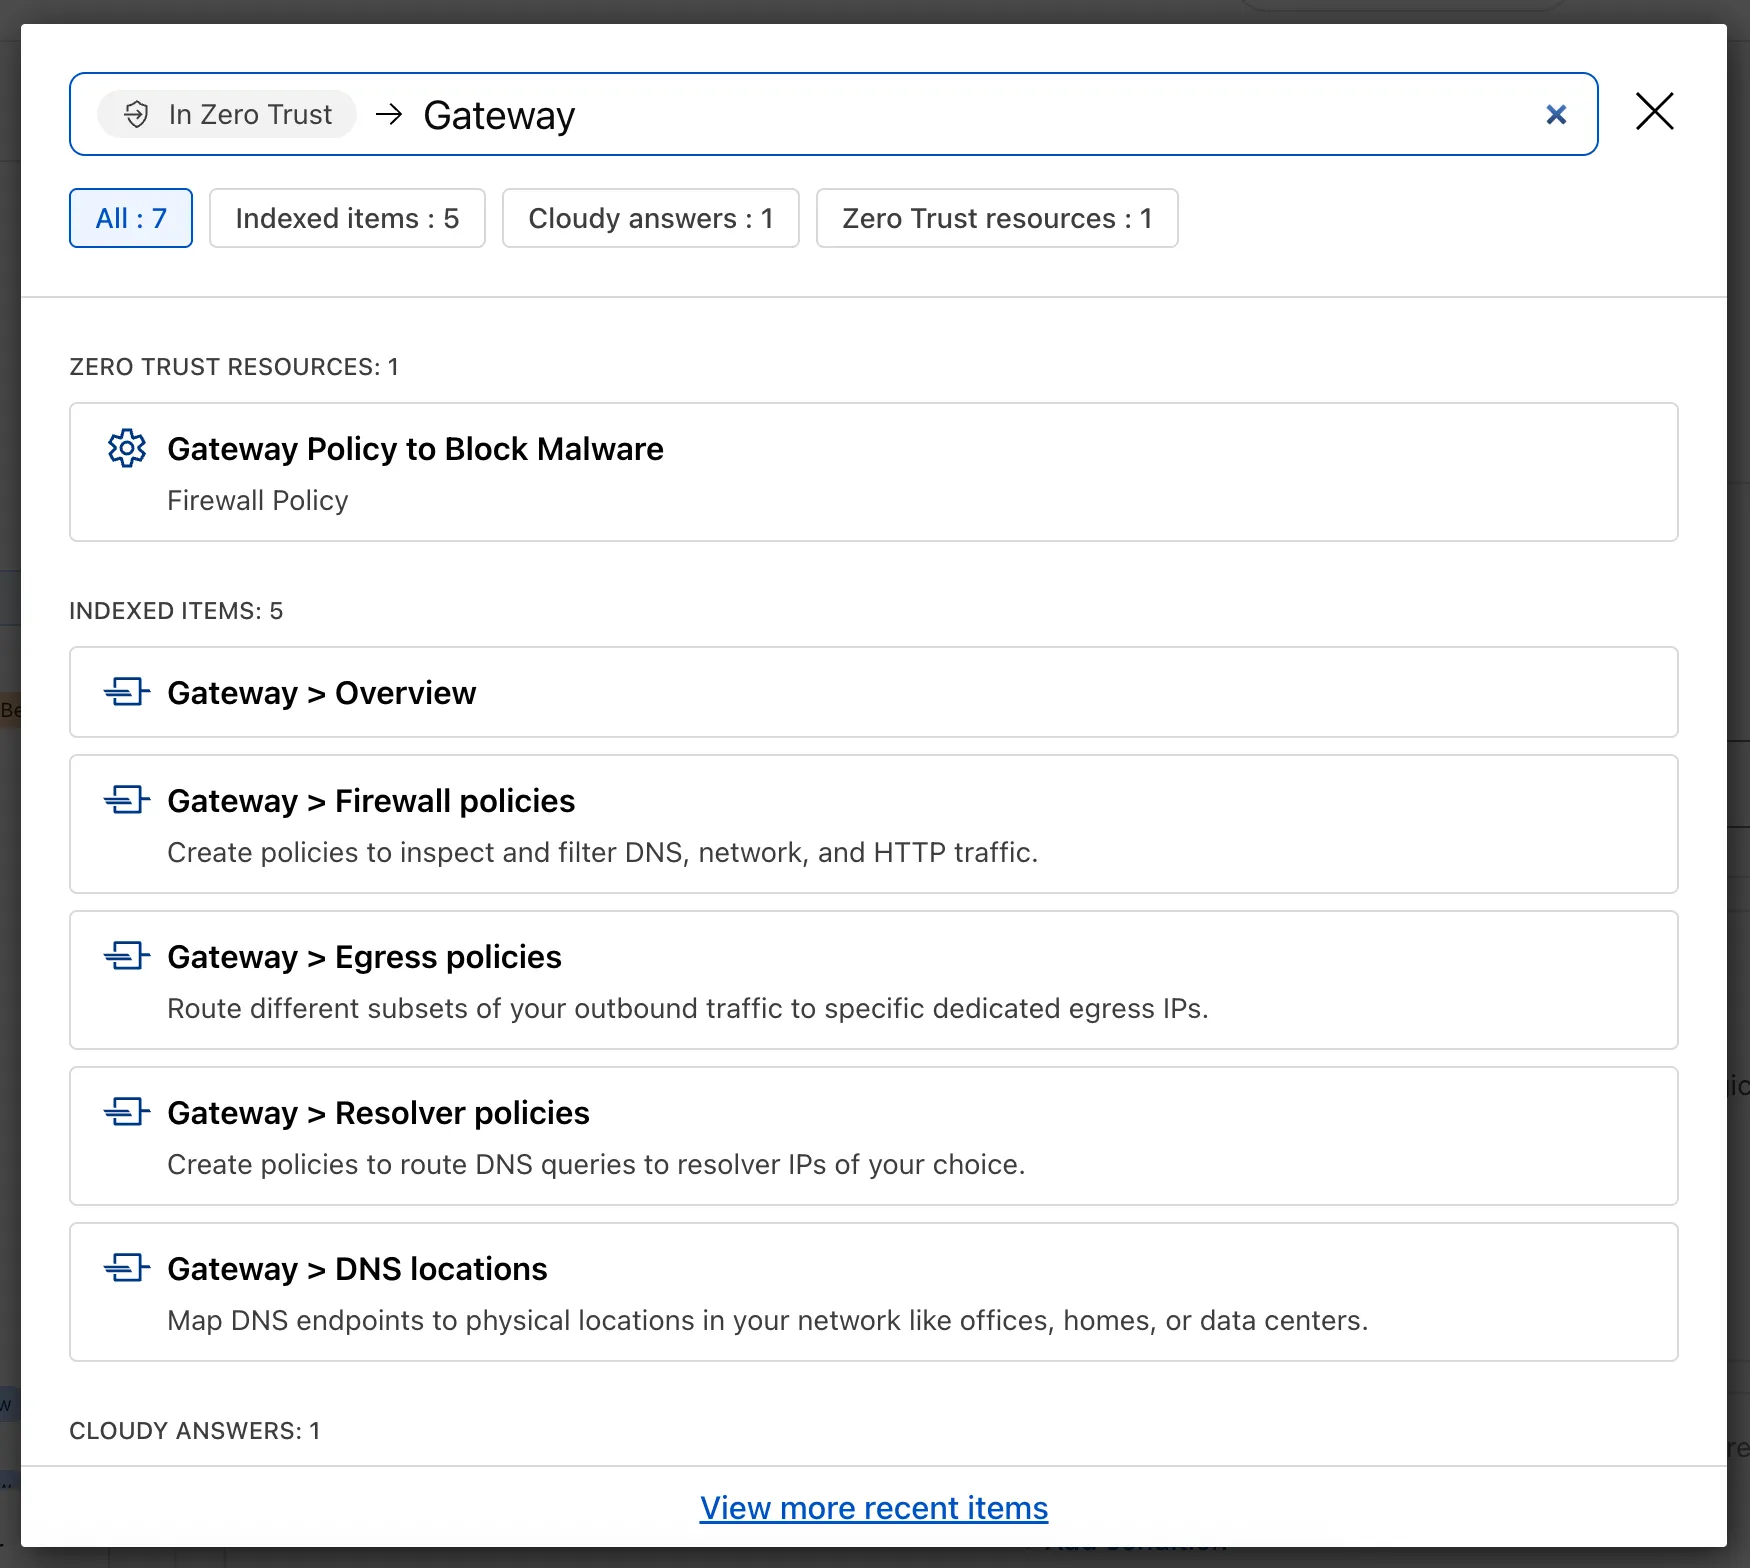
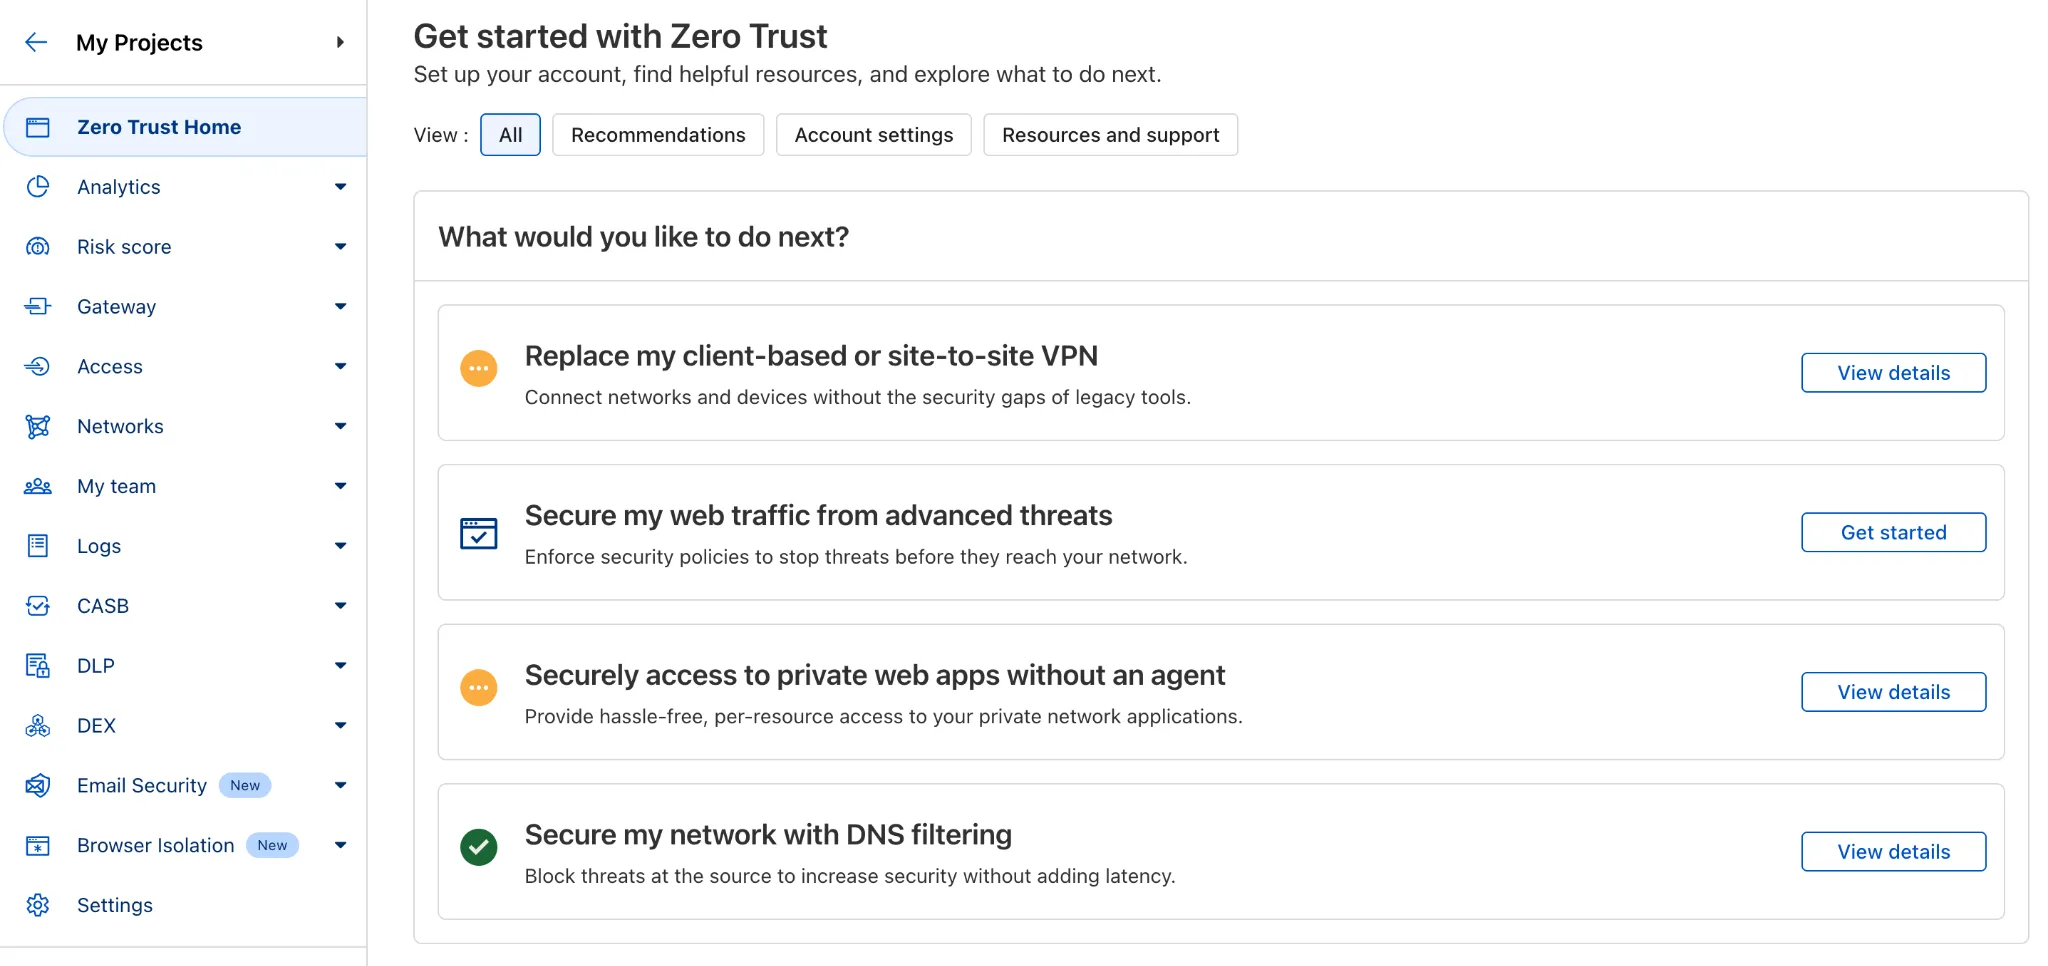
The Zero Trust dashboard and navigation is receiving significant and exciting updates. The dashboard is being restructured to better support common tasks and workflows, and various pages have been moved and consolidated.
There is a new guided experience on login detailing the changes, and you can use the Zero Trust dashboard search to find product pages by both their new and old names, as well as your created resources. To replay the guided experience, you can find it in Overview > Get Started.
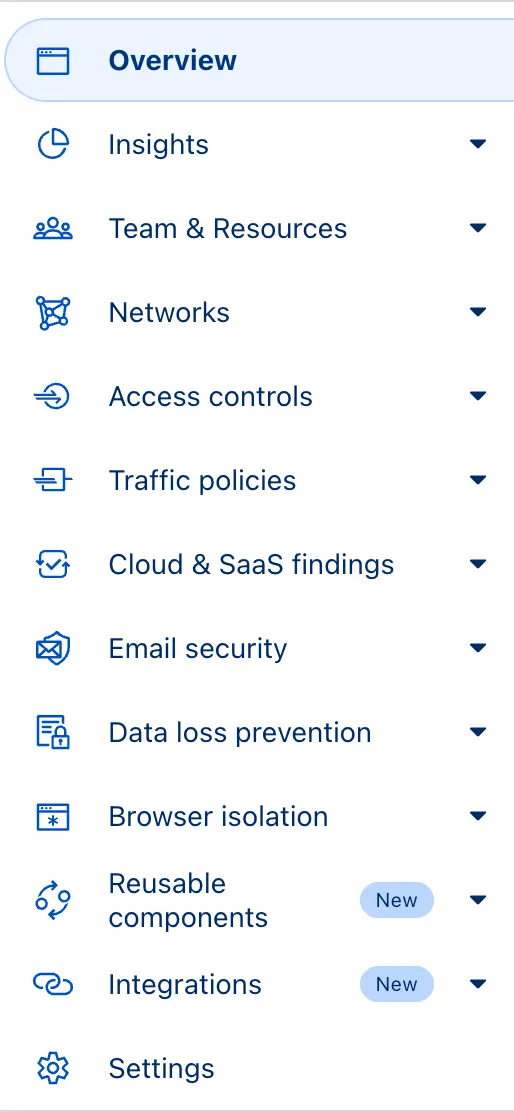
Notable changes
Product names have been removed from many top-level navigation items to help bring clarity to what they help you accomplish. For example, you can find Gateway policies under ‘Traffic policies' and CASB findings under ‘Cloud & SaaS findings.'
You can view all analytics, logs, and real-time monitoring tools from ‘Insights.'
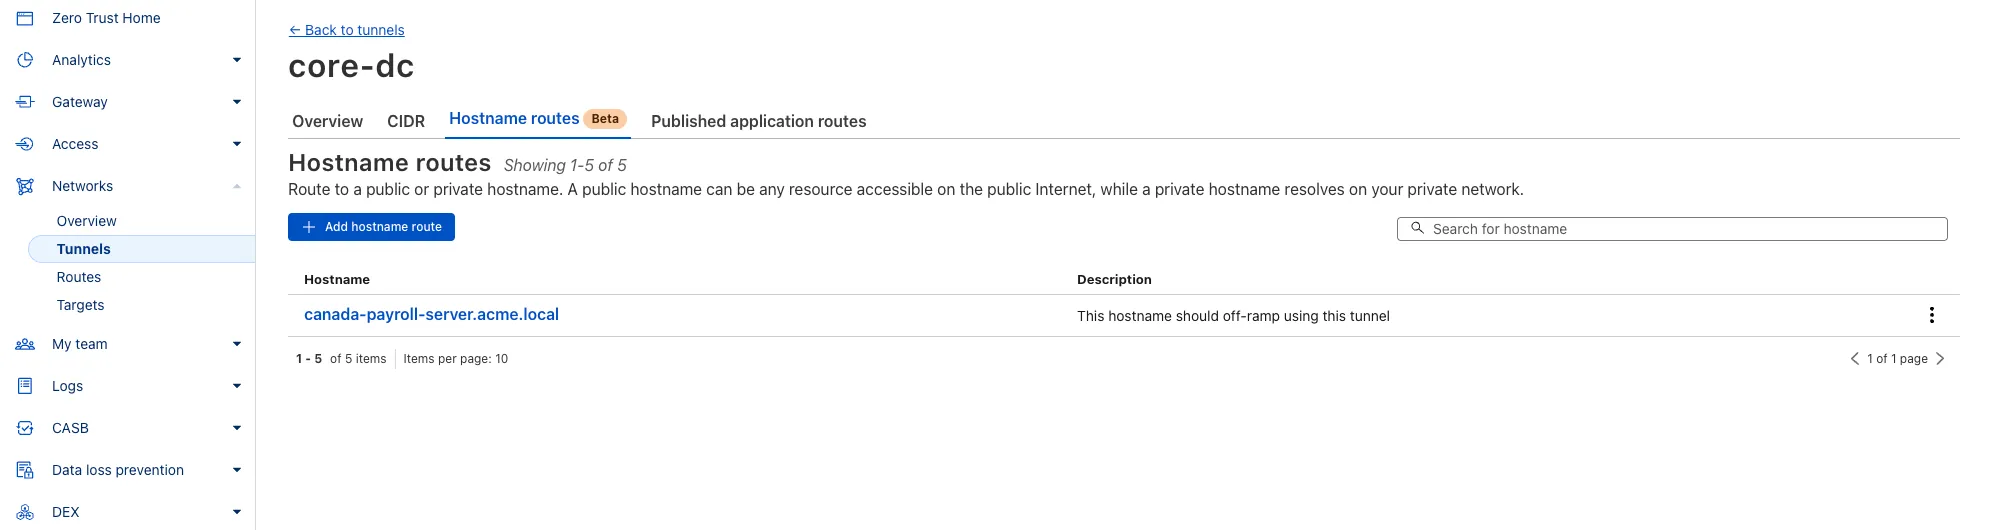
‘Networks' better maps the ways that your corporate network interacts with Cloudflare. Some pages like Tunnels, are now a tab rather than a full page as part of these changes. You can find them at Networks > Connectors.
Settings are now located closer to the tools and resources they impact. For example, this means you'll find your WARP configurations at Team & Resources > Devices.
No changes to our API endpoint structure or to any backend services have been made as part of this effort.
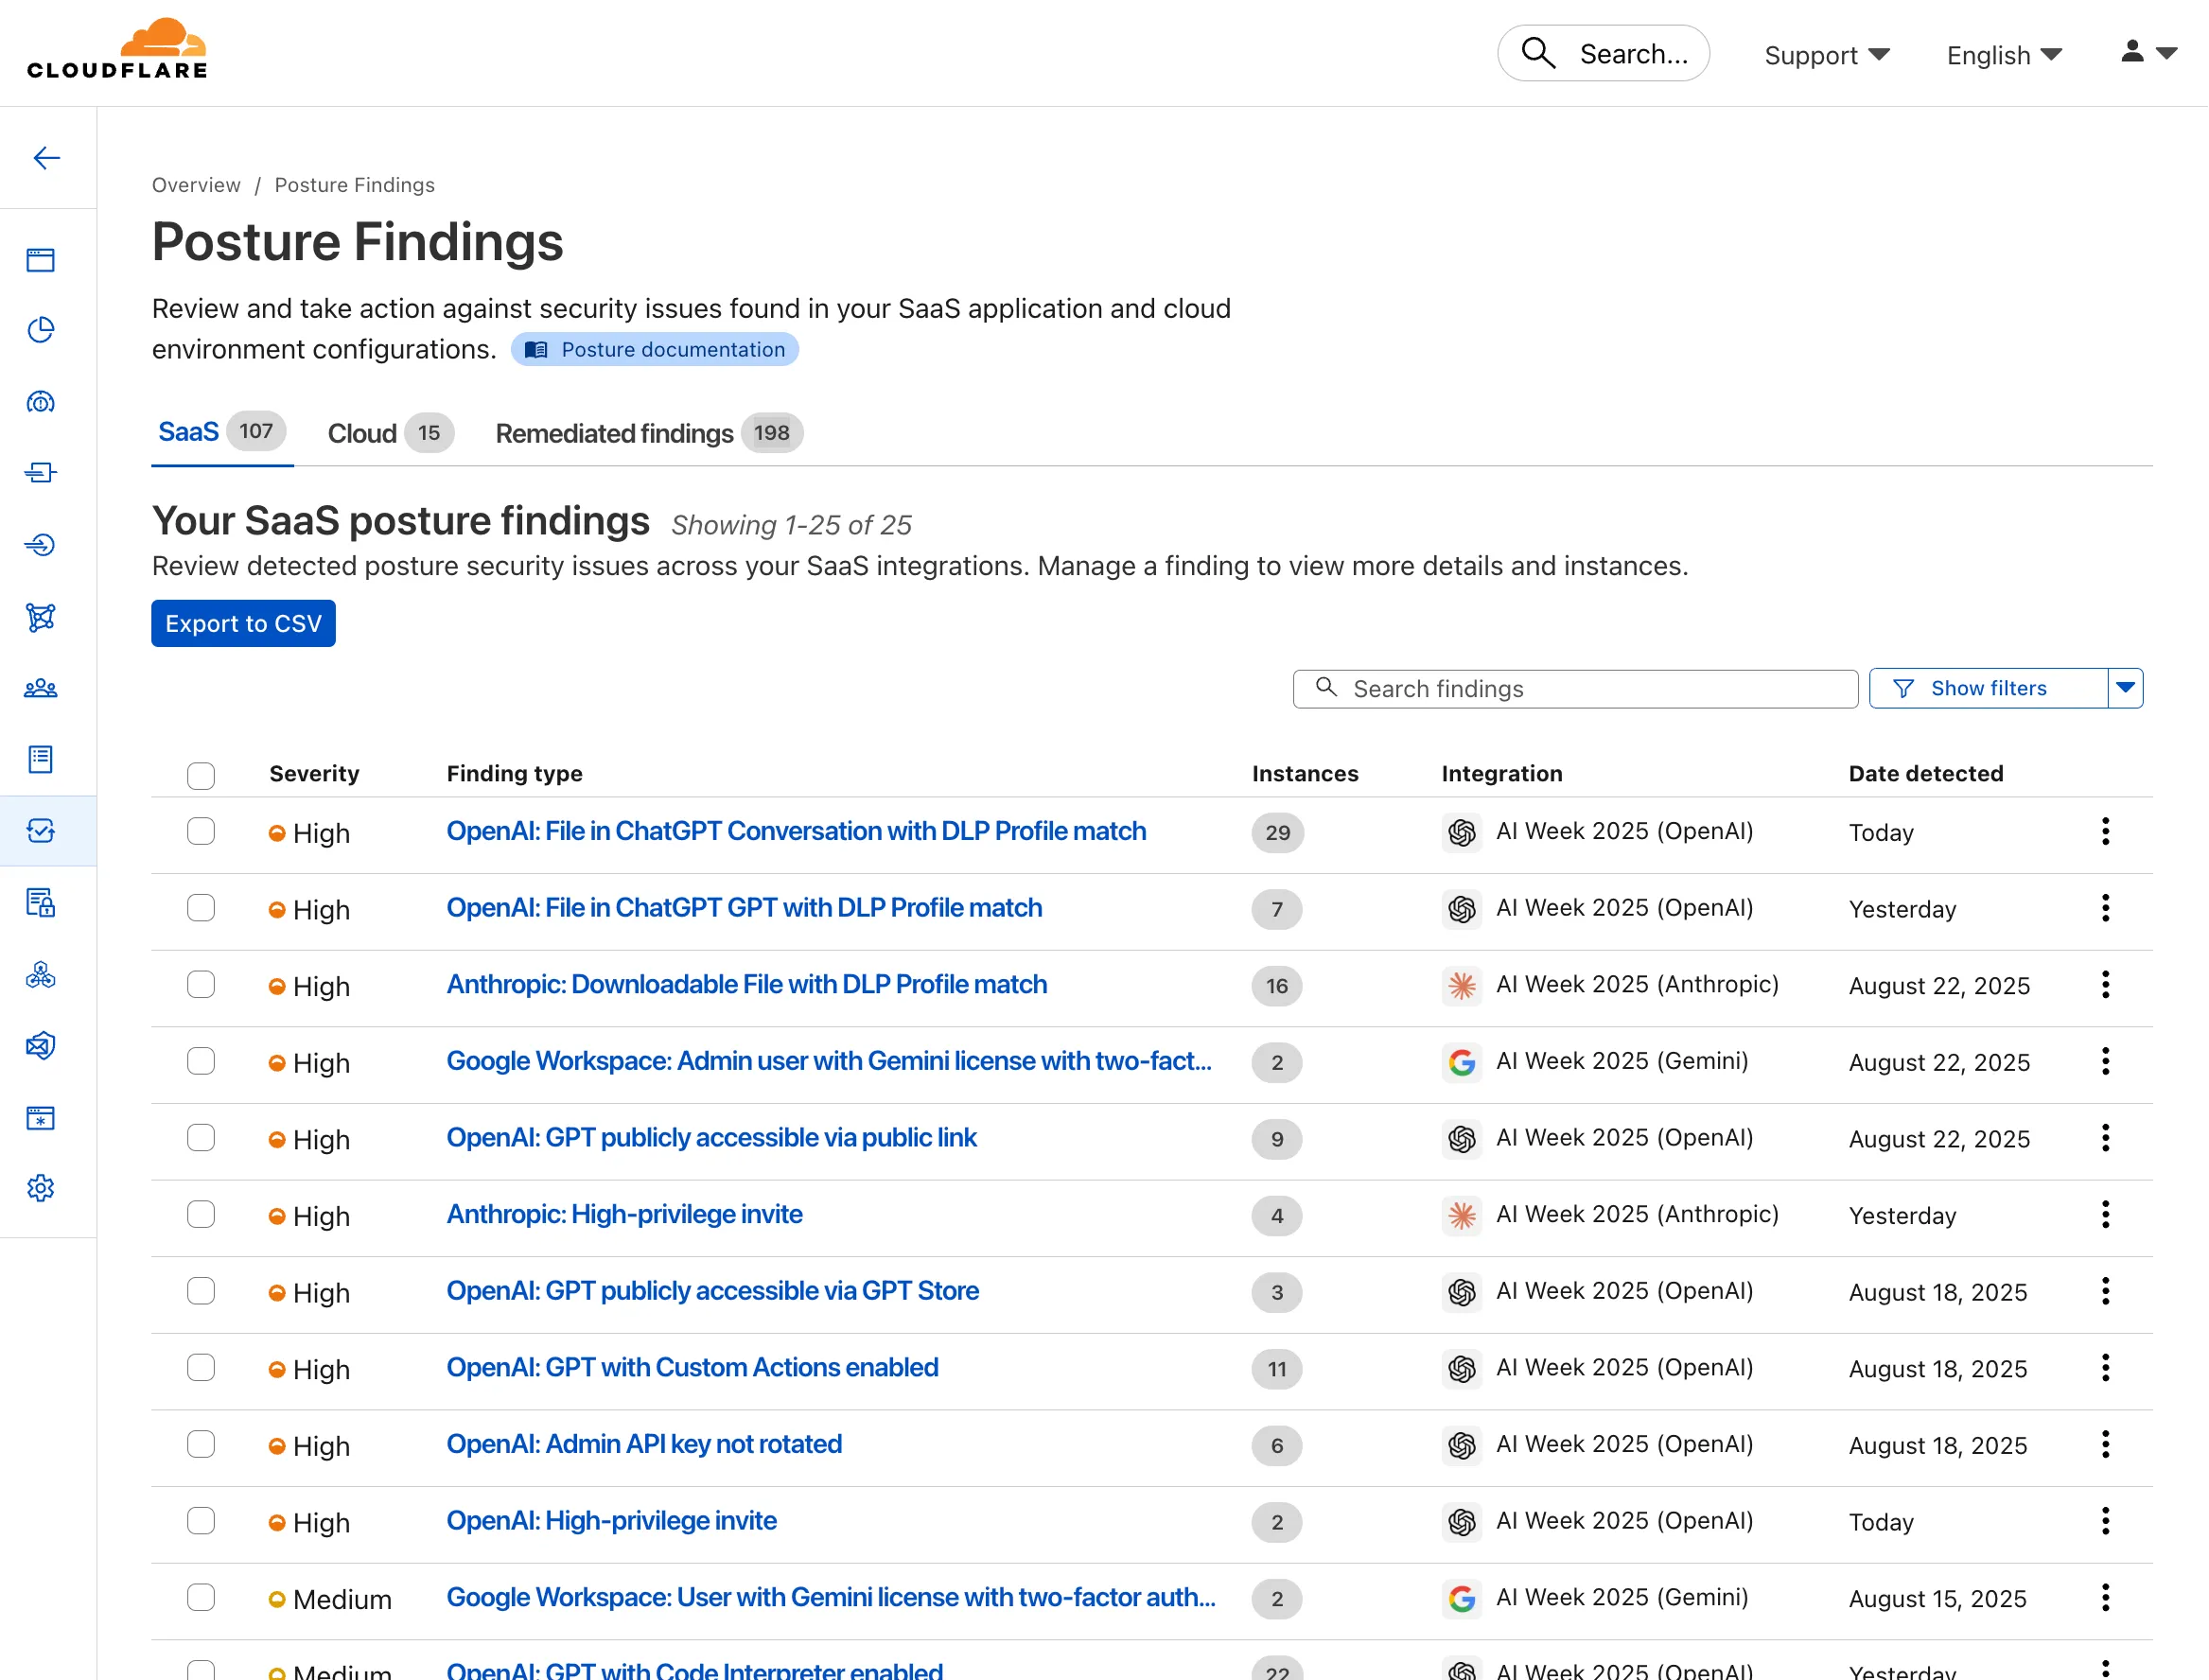
You can now stay on top of your SaaS security posture with the new CASB Weekly Digest notification. This opt-in email digest is delivered to your inbox every Monday morning and provides a high-level summary of your organization's Cloudflare API CASB findings from the previous week.
This allows security teams and IT administrators to get proactive, at-a-glance visibility into new risks and integration health without having to log in to the dashboard.
To opt in, navigate to Manage Account > Notifications in the Cloudflare dashboard to configure the CASB Weekly Digest alert type.
Key capabilities
At-a-glance summary — Review new high/critical findings, most frequent finding types, and new content exposures from the past 7 days.
Integration health — Instantly see the status of all your connected SaaS integrations (Healthy, Unhealthy, or Paused) to spot API connection issues.
Proactive alerting — The digest is sent automatically to all subscribed users every Monday morning.
Easy to configure — Users can opt in by enabling the notification in the Cloudflare dashboard under Manage Account > Notifications.
We've resolved a bug in Log Explorer that caused inconsistencies between the custom SQL date field filters and the date picker dropdown. Previously, users attempting to filter logs based on a custom date field via a SQL query sometimes encountered unexpected results or mismatching dates when using the interactive date picker.
This fix ensures that the custom SQL date field filters now align correctly with the selection made in the date picker dropdown, providing a reliable and predictable filtering experience for your log data. This is particularly important for users creating custom log views based on time-sensitive fields.
We've significantly enhanced Log Explorer by adding support for 14 additional Cloudflare product datasets.
This expansion enables Operations and Security Engineers to gain deeper visibility and telemetry across a wider range of Cloudflare services. By integrating these new datasets, users can now access full context to efficiently investigate security incidents, troubleshoot application performance issues, and correlate logged events across different layers (like application and network) within a single interface. This capability is crucial for a complete and cohesive understanding of event flows across your Cloudflare environment.
The newly supported datasets include:
Zone Level
Dns_logs
Nel_reports
Page_shield_events
Spectrum_events
Zaraz_events
Account Level
Audit Logs
Audit_logs_v2
Biso_user_actions
DNS firewall logs
Email_security_alerts
Magic Firewall IDS
Network Analytics
Sinkhole HTTP
ipsec_logs
Example: Correlating logs
You can now use Log Explorer to query and filter with each of these datasets. For example, you can identify an IP address exhibiting suspicious behavior in the FW_event logs, and then instantly pivot to the Network Analytics logs or Access logs to see its network-level traffic profile or if it bypassed a corporate policy.
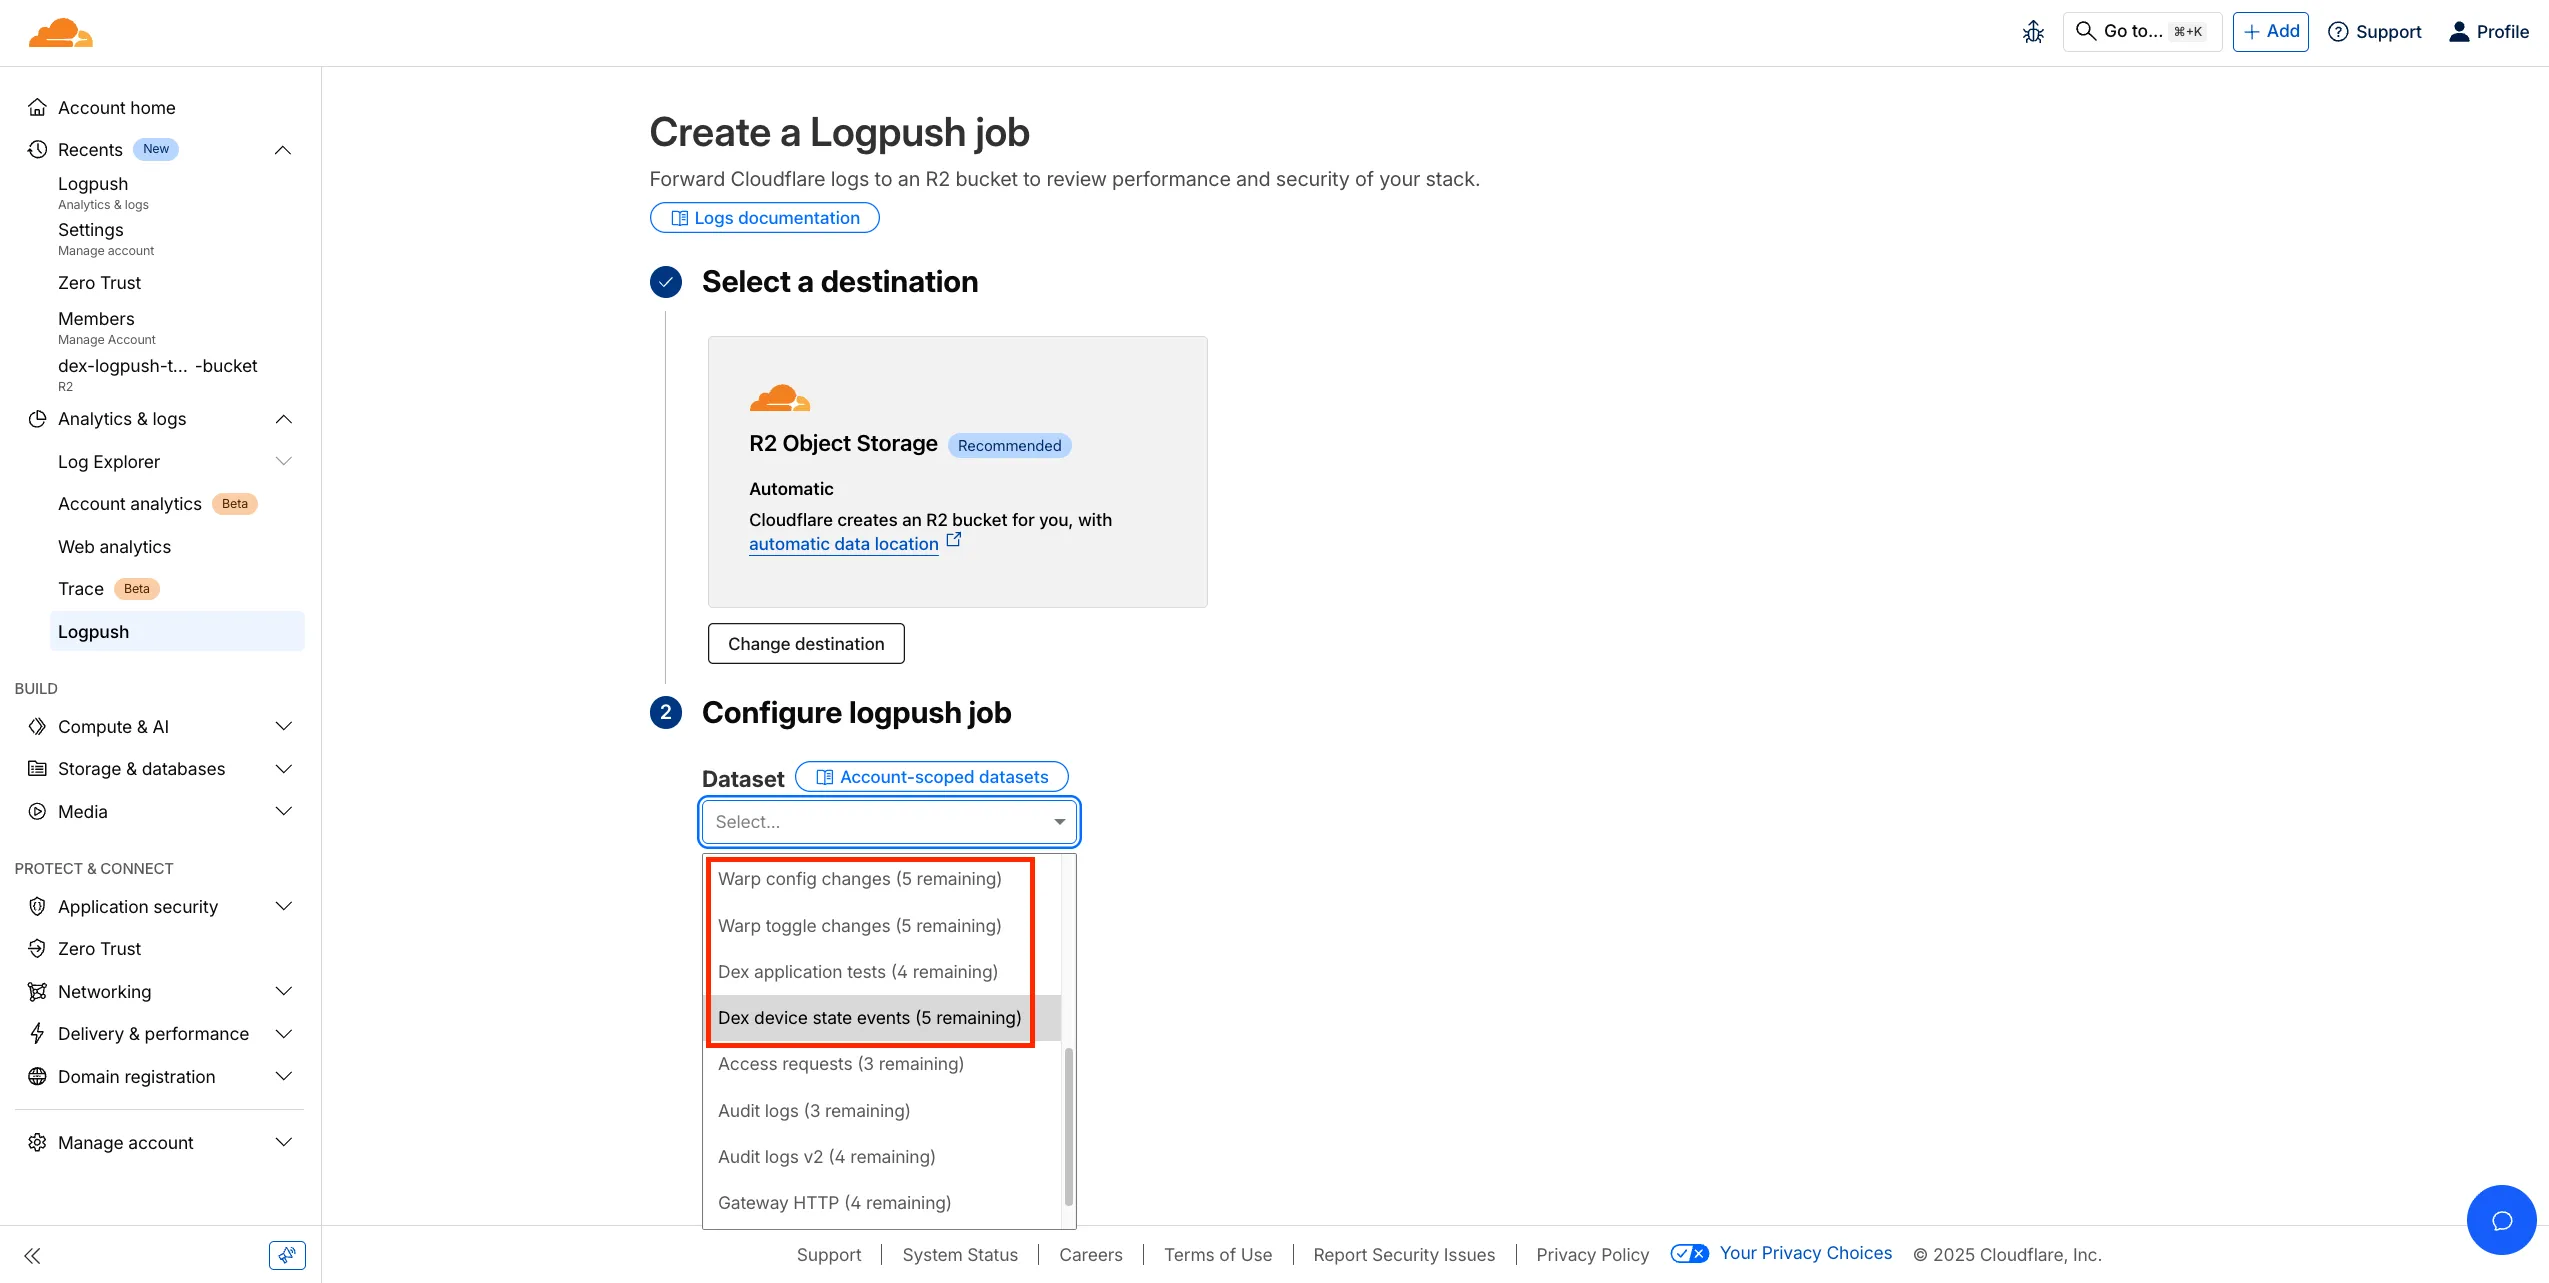
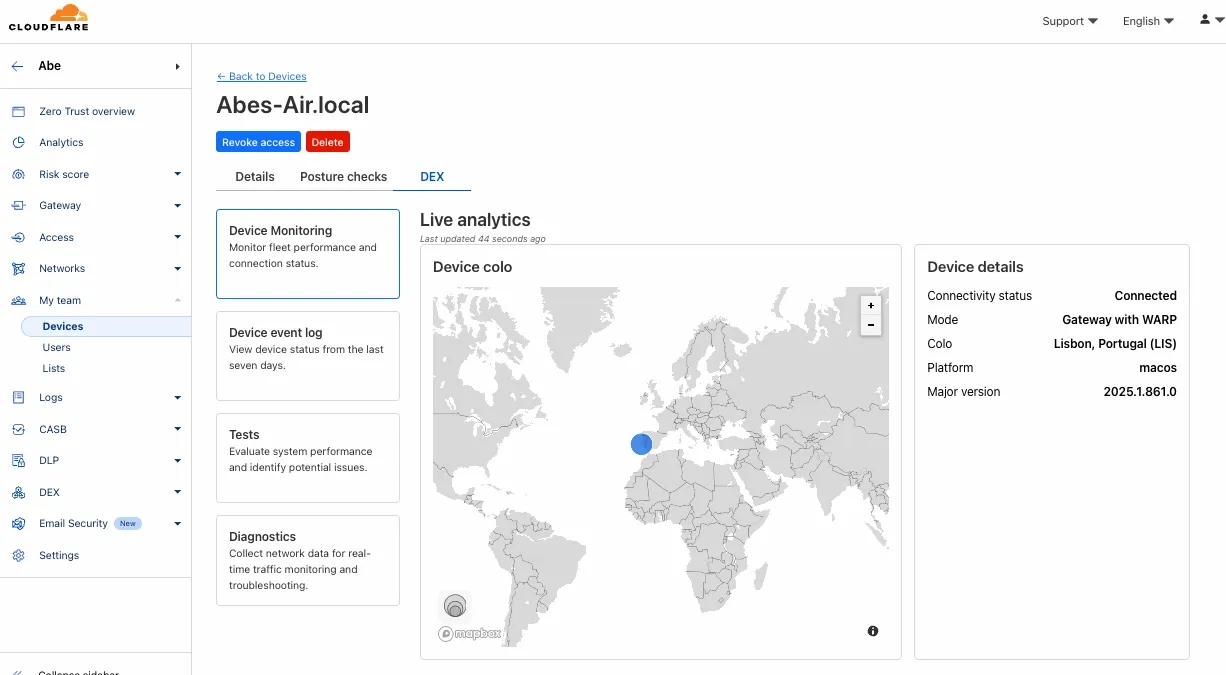
Digital Experience Monitoring (DEX) provides visibility into WARP device metrics, connectivity, and network performance across your Cloudflare SASE deployment.
We've released four new WARP and DEX device data sets that can be exported via Cloudflare Logpush. These Logpush data sets can be exported to R2, a cloud bucket, or a SIEM to build a customized logging and analytics experience.
To create a new DEX or WARP Logpush job, customers can go to the account level of the Cloudflare dashboard > Analytics & Logs > Logpush to get started.
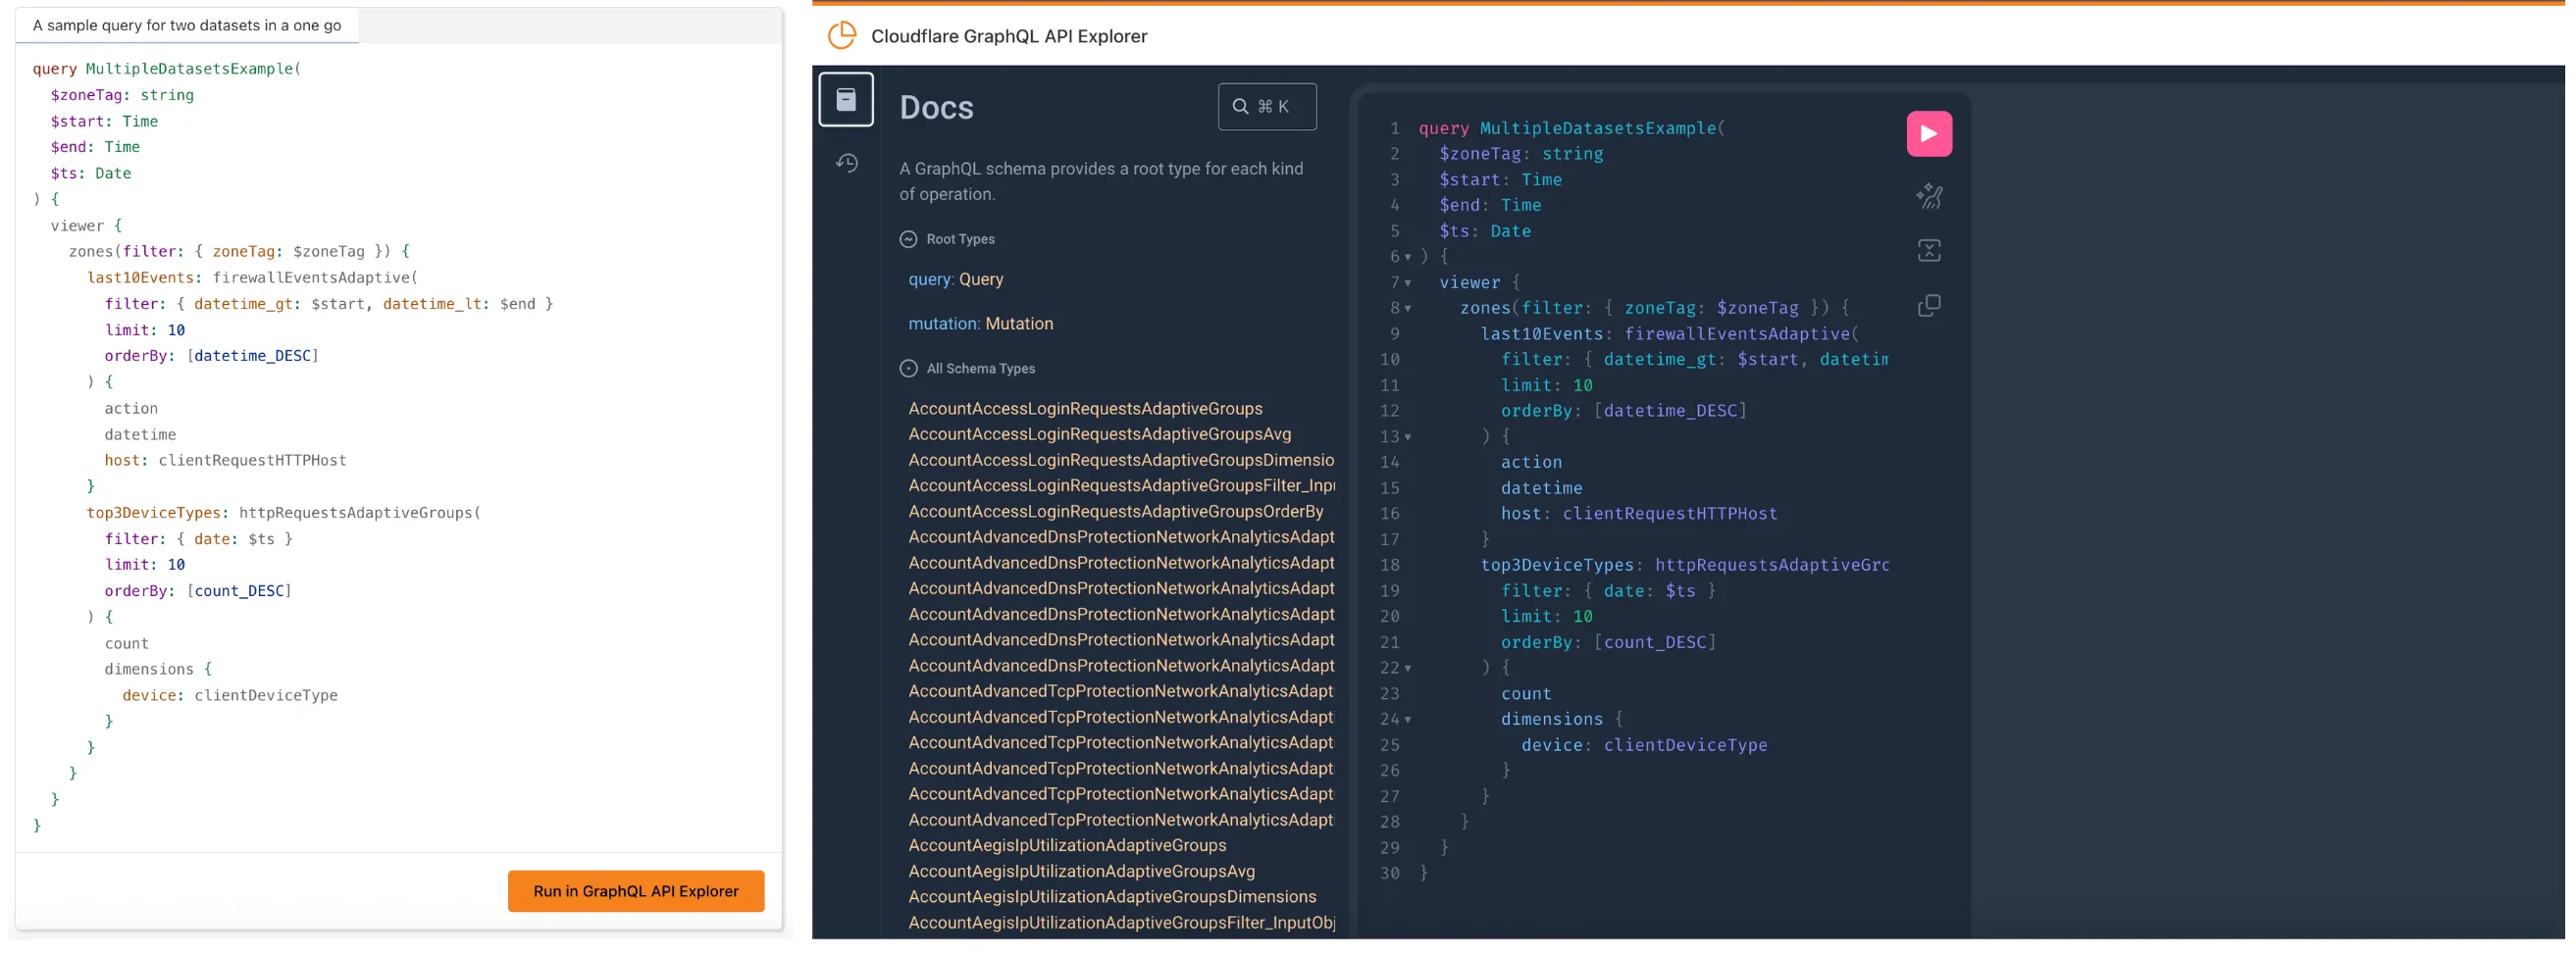
You can now perform more powerful queries directly in Workers Analytics Engine ↗ with a major expansion of our SQL function library.
Workers Analytics Engine allows you to ingest and store high-cardinality data at scale (such as custom analytics) and query your data through a simple SQL API.
Today, we've expanded Workers Analytics Engine's SQL capabilities with several new functions:
Whether you're building usage-based billing systems, customer analytics dashboards, or other custom analytics, these functions let you get the most out of your data. Get started with Workers Analytics Engine and explore all available functions in our SQL reference documentation.
This release contains minor fixes, improvements, and new features including Path Maximum Transmission Unit Discovery (PMTUD). When PMTUD is enabled, the client will dynamically adjust packet sizing to optimize connection performance. There is also a new connection status message in the GUI to inform users that the local network connection may be unstable. This will make it easier to diagnose connectivity issues.
Changes and improvements
Fixed an inconsistency with Global WARP override settings in multi-user environments when switching between users.
The GUI now displays the health of the tunnel and DNS connections by showing a connection status message when the network may be unstable. This will make it easier to diagnose connectivity issues.
Fixed an issue where deleting a registration was erroneously reported as having failed.
Path Maximum Transmission Unit Discovery (PMTUD) may now be used to discover the effective MTU of the connection. This allows the WARP client to improve connectivity optimized for each network. PMTUD is disabled by default. To enable it, refer to the PMTUD documentation.
Improvements for the OS version WARP client check. Windows Updated Build Revision (UBR) numbers can now be checked by the client to ensure devices have required security patches and features installed.
The WARP client now supports Windows 11 ARM-based machines. For information on known limitations, refer to the Known limitations page.
Known issues
For Windows 11 24H2 users, Microsoft has confirmed a regression that may lead to performance issues like mouse lag, audio cracking, or other slowdowns. Cloudflare recommends users experiencing these issues upgrade to a minimum Windows 11 24H2 KB5062553 or higher for resolution.
Devices using WARP client 2025.4.929.0 and up may experience Local Domain Fallback failures if a fallback server has not been configured. To configure a fallback server, refer to Route traffic to fallback server.
Devices with KB5055523 installed may receive a warning about Win32/ClickFix.ABA being present in the installer. To resolve this false positive, update Microsoft Security Intelligence to version 1.429.19.0 or later.
DNS resolution may be broken when the following conditions are all true:
WARP is in Secure Web Gateway without DNS filtering (tunnel-only) mode.
A custom DNS server address is configured on the primary network adapter.
The custom DNS server address on the primary network adapter is changed while WARP is connected.
To work around this issue, reconnect the WARP client by toggling off and back on.
This release contains minor fixes, improvements, and new features including Path Maximum Transmission Unit Discovery (PMTUD). When PMTUD is enabled, the client will dynamically adjust packet sizing to optimize connection performance. There is also a new connection status message in the GUI to inform users that the local network connection may be unstable. This will make it easier to diagnose connectivity issues.
Changes and improvements
The GUI now displays the health of the tunnel and DNS connections by showing a connection status message when the network may be unstable. This will make it easier to diagnose connectivity issues.
Fixed an issue where deleting a registration was erroneously reported as having failed.
Path Maximum Transmission Unit Discovery (PMTUD) may now be used to discover the effective MTU of the connection. This allows the WARP client to improve connectivity optimized for each network. PMTUD is disabled by default. To enable it, refer to the PMTUD documentation.
Known issues
Devices using WARP client 2025.4.929.0 and up may experience Local Domain Fallback failures if a fallback server has not been configured. To configure a fallback server, refer to Route traffic to fallback server.
This release contains minor fixes, improvements, and new features including Path Maximum Transmission Unit Discovery (PMTUD). When PMTUD is enabled, the client will dynamically adjust packet sizing to optimize connection performance. There is also a new connection status message in the GUI to inform users that the local network connection may be unstable. This will make it easier to diagnose connectivity issues.
WARP client version 2025.8.779.0 introduced an updated public key for Linux packages. The public key must be updated if it was installed before September 12, 2025 to ensure the repository remains functional after December 4, 2025. Instructions to make this update are available at pkg.cloudflareclient.com.
Changes and improvements
The GUI now displays the health of the tunnel and DNS connections by showing a connection status message when the network may be unstable. This will make it easier to diagnose connectivity issues.
Fixed an issue where deleting a registration was erroneously reported as having failed.
Path Maximum Transmission Unit Discovery (PMTUD) may now be used to discover the effective MTU of the connection. This allows the WARP client to improve connectivity optimized for each network. PMTUD is disabled by default. To enable it, refer to the PMTUD documentation.
Starting February 2, 2026, the cloudflared proxy-dns command will be removed from all new cloudflaredreleases.
This change is being made to enhance security and address a potential vulnerability in an underlying DNS library. This vulnerability is specific to the proxy-dns command and does not affect any other cloudflared features, such as the core Cloudflare Tunnel service.
The proxy-dns command, which runs a client-side DNS-over-HTTPS (DoH) proxy, has been an officially undocumented feature for several years. This functionality is fully and securely supported by our actively developed products.
Versions of cloudflared released before this date will not be affected and will continue to operate. However, note that our official support policy for any cloudflared release is one year from its release date.
Migration paths
We strongly advise users of this undocumented feature to migrate to one of the following officially supported solutions before February 2, 2026, to continue benefiting from secure DNS-over-HTTPS.
End-user devices
The preferred method for enabling DNS-over-HTTPS on user devices is the Cloudflare WARP client. The WARP client automatically secures and proxies all DNS traffic from your device, integrating it with your organization's Zero Trust policies and posture checks.
Servers, routers, and IoT devices
For scenarios where installing a client on every device is not possible (such as servers, routers, or IoT devices), we recommend using the WARP Connector.
Instead of running cloudflared proxy-dns on a machine, you can install the WARP Connector on a single Linux host within your private network. This connector will act as a gateway, securely routing all DNS and network traffic from your entire subnet to Cloudflare for filtering and logging.
We're excited to announce a quality-of-life improvement for Log Explorer users. You can now resize the custom SQL query window to accommodate longer and more complex queries.
Previously, if you were writing a long custom SQL query, the fixed-size window required excessive scrolling to view the full query. This update allows you to easily drag the bottom edge of the query window to make it taller. This means you can view your entire custom query at once, improving the efficiency and experience of writing and debugging complex queries.
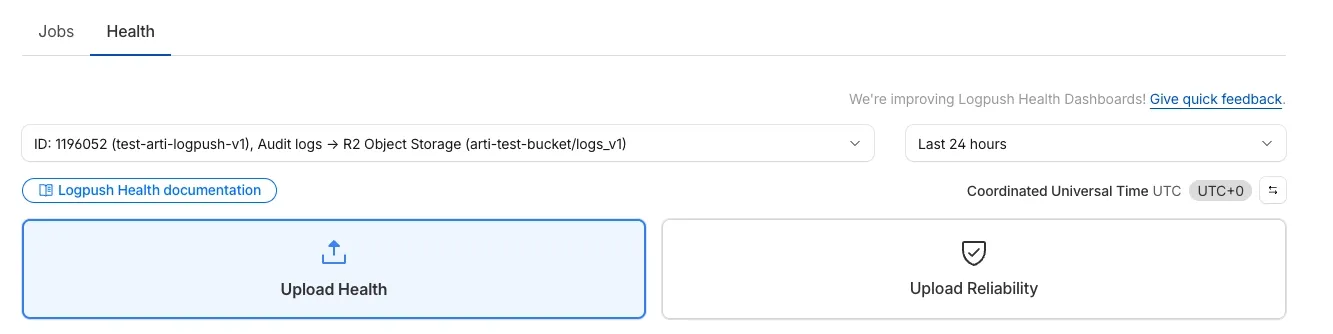
We’re excited to introduce Logpush Health Dashboards, giving customers real-time visibility into the status, reliability, and performance of their Logpush jobs. Health dashboards make it easier to detect delivery issues, monitor job stability, and track performance across destinations. The dashboards are divided into two sections:
Upload Health: See how much data was successfully uploaded, where drops occurred, and how your jobs are performing overall. This includes data completeness, success rate, and upload volume.
Upload Reliability – Diagnose issues impacting stability, retries, or latency, and monitor key metrics such as retry counts, upload duration, and destination availability.
Health Dashboards can be accessed from the Logpush page in the Cloudflare dashboard at the account or zone level, under the Health tab. For more details, refer to our Logpush Health Dashboards documentation, which includes a comprehensive troubleshooting guide to help interpret and resolve common issues.
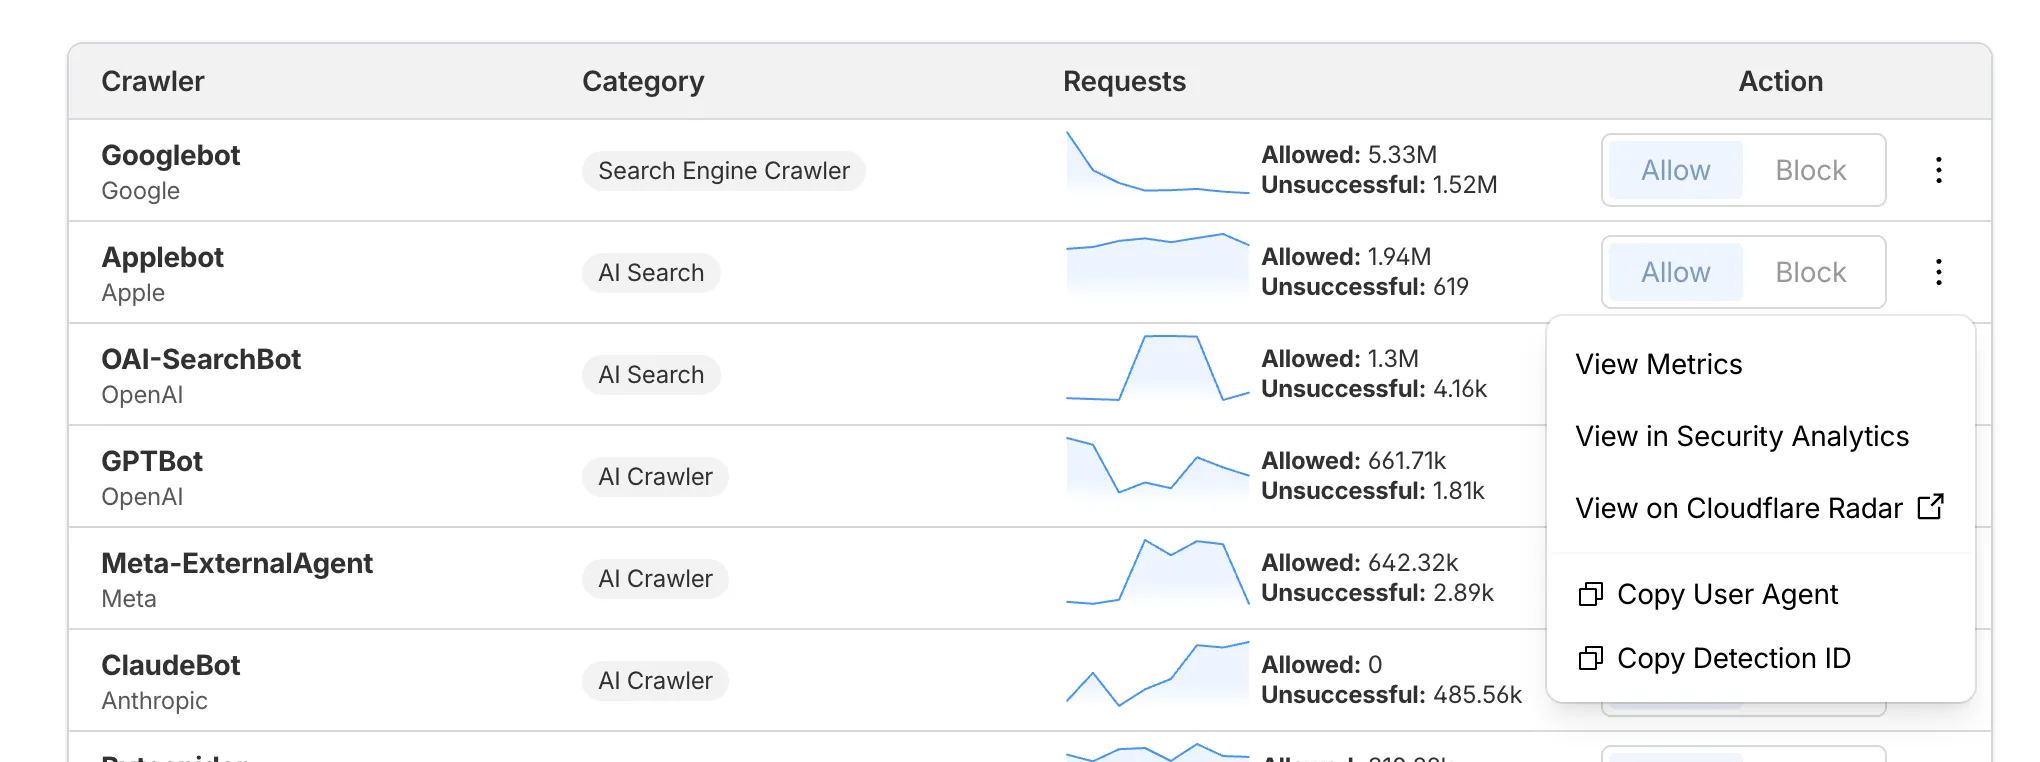
AI Crawl Control now supports per-crawler drilldowns with an extended actions menu and status code analytics. Drill down into Metrics, Cloudflare Radar, and Security Analytics, or export crawler data for use in WAF custom rules, Redirect Rules, and robots.txt files.
What's new
Status code distribution chart
The Metrics tab includes a status code distribution chart showing HTTP response codes (2xx, 3xx, 4xx, 5xx) over time. Filter by individual crawler, category, operator, or time range to analyze how specific crawlers interact with your site.
Extended actions menu
Each crawler row includes a three-dot menu with per-crawler actions:
View Metrics — Filter the AI Crawl Control Metrics page to the selected crawler.
View on Cloudflare Radar — Access verified crawler details on Cloudflare Radar.
Copy User Agent — Copy user agent strings for use in WAF custom rules, Redirect Rules, or robots.txt files.
View in Security Analytics — Filter Security Analytics by detection IDs (Bot Management customers).
Copy Detection ID — Copy detection IDs for use in WAF custom rules (Bot Management customers).
Get started
Log in to the Cloudflare dashboard, and select your account and domain.
Go to AI Crawl Control > Metrics to access the status code distribution chart.
Go to AI Crawl Control > Crawlers and select the three-dot menu for any crawler to access per-crawler actions.
Select multiple crawlers to use bulk copy buttons for user agents or detection IDs.
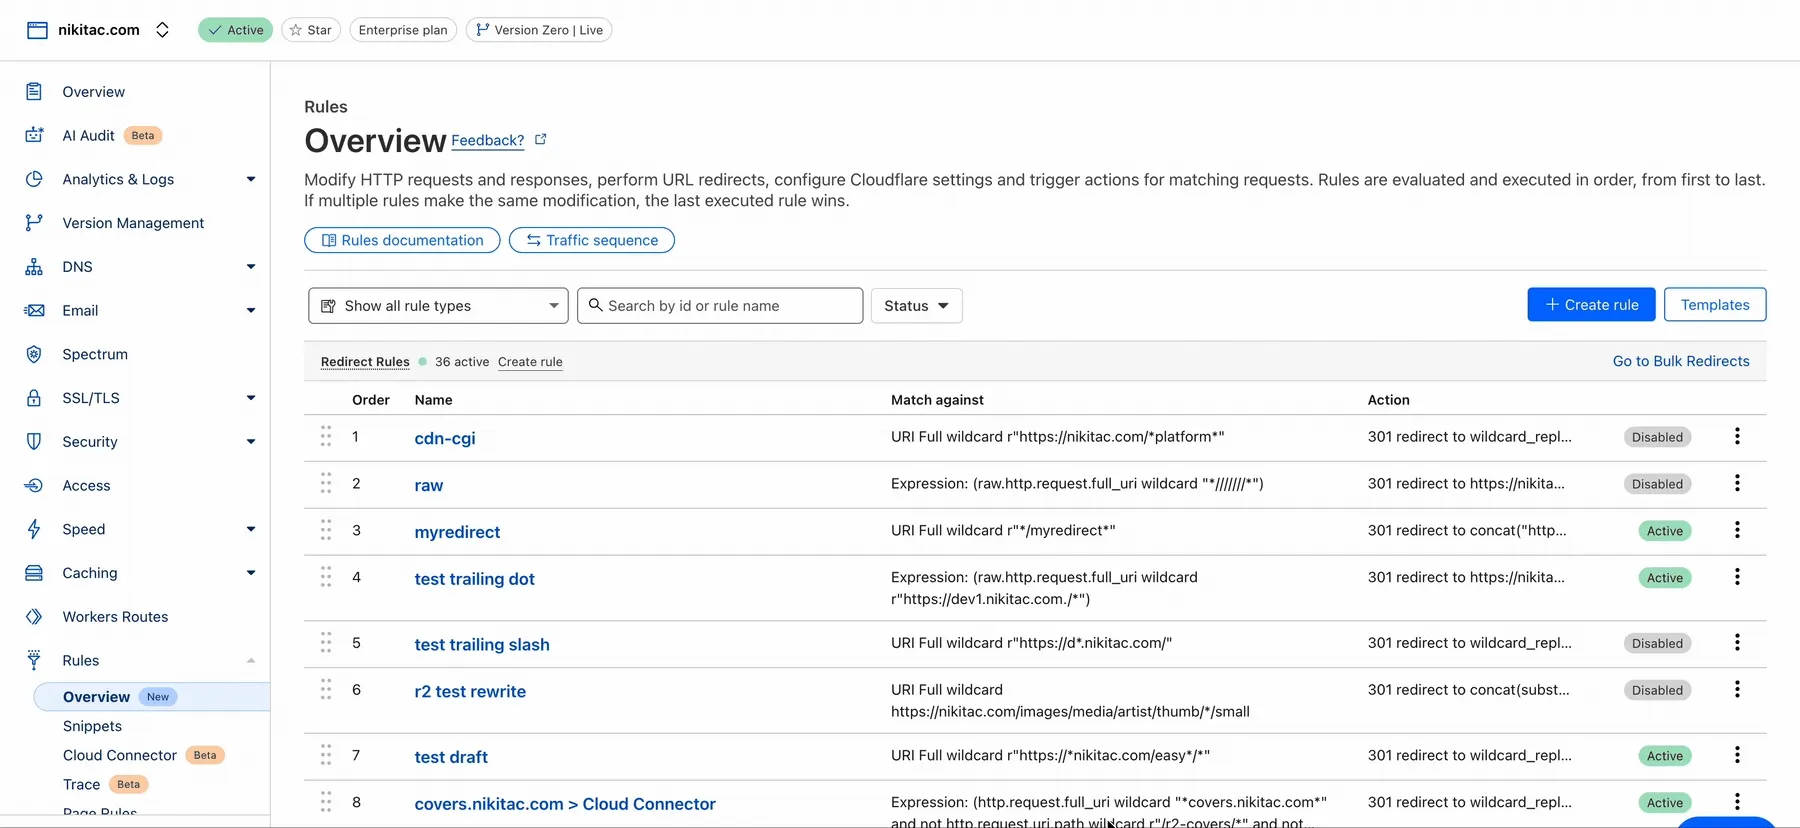
You can now see the exact cache key generated for any request directly in Cloudflare Trace. This visibility helps you troubleshoot cache hits and misses, and verify that your Custom Cache Keys — configured via Cache Rules or Page Rules — are working as intended.
Previously, diagnosing caching behavior required inferring the key from configuration settings. Now, you can confirm that your custom logic for headers, query strings, and device types is correctly applied.
Access Trace via the dashboard or API, either manually for ad-hoc debugging or automated as part of your quality-of-service monitoring.
Example scenario
If you have a Cache Rule that segments content based on a specific cookie (for example, user_region), run a Trace with that cookie present to confirm the user_region value appears in the resulting cache key.
The Trace response includes the cache key in the cache object:
We have previously added new application categories to better reflect their content and improve HTTP traffic management: refer to Changelog.
While the new categories are live now, we want to ensure you have ample time to review and adjust any existing rules you have configured against old categories.
The remapping of existing applications into these new categories will be completed by January 30, 2026.
This timeline allows you a dedicated period to:
Review the new category structure.
Identify any policies you have that target the older categories.
Adjust your rules to reference the new, more precise categories before the old mappings change.
Once the applications have been fully remapped by January 30, 2026, you might observe some changes in the traffic being mitigated or allowed by your existing policies. We encourage you to use the intervening time to prepare for a smooth transition.
You can now set a jurisdiction when creating a D1 database to guarantee where your database runs and stores data. Jurisdictions can help you comply with data localization regulations such as GDPR. Supported jurisdictions include eu and fedramp.
A jurisdiction can only be set at database creation time via wrangler, REST API or the UI and cannot be added/updated after the database already exists.
Permissions for managing Logpush jobs related to Zero Trust datasets (Access, Gateway, and DEX) have been updated to improve data security and enforce appropriate access controls.
To view, create, update, or delete Logpush jobs for Zero Trust datasets, users must now have both of the following permissions:
Workers VPC Services is now available, enabling your Workers to securely access resources in your private networks, without having to expose them on the public Internet.
What's new
VPC Services: Create secure connections to internal APIs, databases, and services using familiar Worker binding syntax
Multi-cloud Support: Connect to resources in private networks in any external cloud (AWS, Azure, GCP, etc.) or on-premise using Cloudflare Tunnels
JavaScript
exportdefault{
asyncfetch(request,env,ctx){
// Perform application logic in Workers here
// Sample call to an internal API running on ECS in AWS using the binding
Set up a Cloudflare Tunnel, create a VPC Service, add service bindings to your Worker, and access private resources securely. Refer to the documentation to get started.
We're excited to announce that Log Explorer users can now cancel queries that are currently running.
This new feature addresses a common pain point: waiting for a long, unintended, or misconfigured query to complete before you can submit a new, correct one. With query cancellation, you can immediately stop the execution of any undesirable query, allowing you to quickly craft and submit a new query, significantly improving your investigative workflow and productivity within Log Explorer.
We're excited to announce a new feature in Log Explorer that significantly enhances how you analyze query results: the Query results distribution chart.
This new chart provides a graphical distribution of your results over the time window of the query. Immediately after running a query, you will see the distribution chart above your result table. This visualization allows Log Explorer users to quickly spot trends, identify anomalies, and understand the temporal concentration of log events that match their criteria. For example, you can visually confirm if a spike in traffic or errors occurred at a specific time, allowing you to focus your investigation efforts more effectively. This feature makes it faster and easier to extract meaningful insights from your vast log data.
The chart will dynamically update to reflect the logs matching your current query.
The Brand Protection logo query dashboard now allows you to use the Report to Cloudflare button to submit an Abuse report directly from the Brand Protection logo queries dashboard. While you could previously report new domains that were impersonating your brand before, now you can do the same for websites found to be using your logo wihtout your permission. The abuse reports wiull be prefilled and you will only need to validate a few fields before you can click the submit button, after which our team process your request.
Workers, including those using Durable Objects and Browser Rendering, may now process WebSocket messages up to 32 MiB in size. Previously, this limit was 1 MiB.
This change allows Workers to handle use cases requiring large message sizes, such as processing Chrome Devtools Protocol messages.
Instance creation rate increased from 100 workflow instances per 10 seconds to 100 instances per second
Concurrency limit increased from 4,500 to 10,000 workflow instances per account
These increases mean you can create new instances up to 10x faster, and have more workflow instances concurrently executing. To learn more and get started with Workflows, refer to the getting started guide.
Two-factor authentication (2FA) is one of the best ways to protect your account from the risk of account takeover. Cloudflare has offered phishing resistant 2FA options including hardware based keys (for example, a Yubikey) and app based TOTP (time-based one-time password) options which use apps like Google or Microsoft's Authenticator app. Unfortunately, while these solutions are very secure, they can be lost if you misplace the hardware based key, or lose the phone which includes that app. The result is that users sometimes get locked out of their accounts and need to contact support.
Today, we are announcing the addition of email as a 2FA factor for all Cloudflare accounts. Email 2FA is in wide use across the industry as a least common denominator for 2FA because it is low friction, loss resistant, and still improves security over username/password login only. We also know that most commercial email providers already require 2FA, so your email address is usually well protected already.
You can now enable email 2FA on the Cloudflare dashboard:
Go to Profile at the top right corner.
Select Authentication.
Under Two-Factor Authentication, select Set up.
Sign-in security best practices
Cloudflare is critical infrastructure, and you should protect it as such. Review the following best practices and make sure you are doing your part to secure your account:
Use a unique password for every website, including Cloudflare, and store it in a password manager like 1Password or Keeper. These services are cross-platform and simplify the process of managing secure passwords.
Use 2FA to make it harder for an attacker to get into your account in the event your password is leaked.
Store your backup codes securely. A password manager is the best place since it keeps the backup codes encrypted, but you can also print them and put them somewhere safe in your home.
If you use an app to manage your 2FA keys, enable cloud backup, so that you don't lose your keys in the event you lose your phone.
If you use a custom email domain to sign in, configure SSO.
If you use a public email domain like Gmail or Hotmail, you can also use social login with Apple, GitHub, or Google to sign in.
If you manage a Cloudflare account for work:
Have at least two administrators in case one of them unexpectedly leaves your company.
Use SCIM to automate permissions management for members in your Cloudflare account.
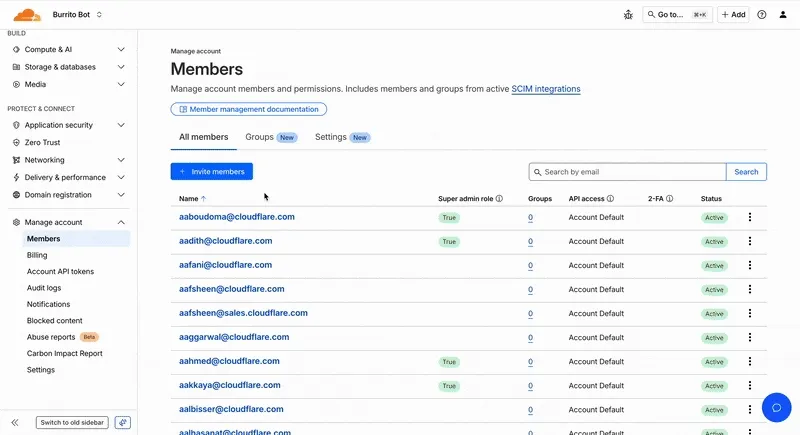
As Cloudflare's platform has grown, so has the need for precise, role-based access control. We’ve redesigned the Member Management experience in the Dashboard to help administrators more easily discover, assign, and refine permissions for specific principals.
What's New
Refreshed member invite flow
We overhauled the Invite Members UI to simplify inviting users and assigning permissions.
Refreshed Members Overview Page
We've updated the Members Overview Page to clearly display:
Member 2FA status
Which members hold Super Admin privileges
API access settings per member
Member onboarding state (accepted vs pending invite)
New Member Permission Policies Details View
We've created a new member details screen that shows all permission policies associated with a member; including policies inherited from group associations to make it easier for members to understand the effective permissions they have.
Improved Member Permission Workflow
We redesigned the permission management experience to make it faster and easier for administrators to review roles and grant access.
Account-scoped Policies Restrictions Relaxed
Previously, customers could only associate a single account-scoped policy with a member. We've relaxed this restriction, and now Administrators can now assign multiple account-scoped policies to the same member; bringing policy assignment behavior in-line with user-groups and providing greater flexibility in managing member permissions.
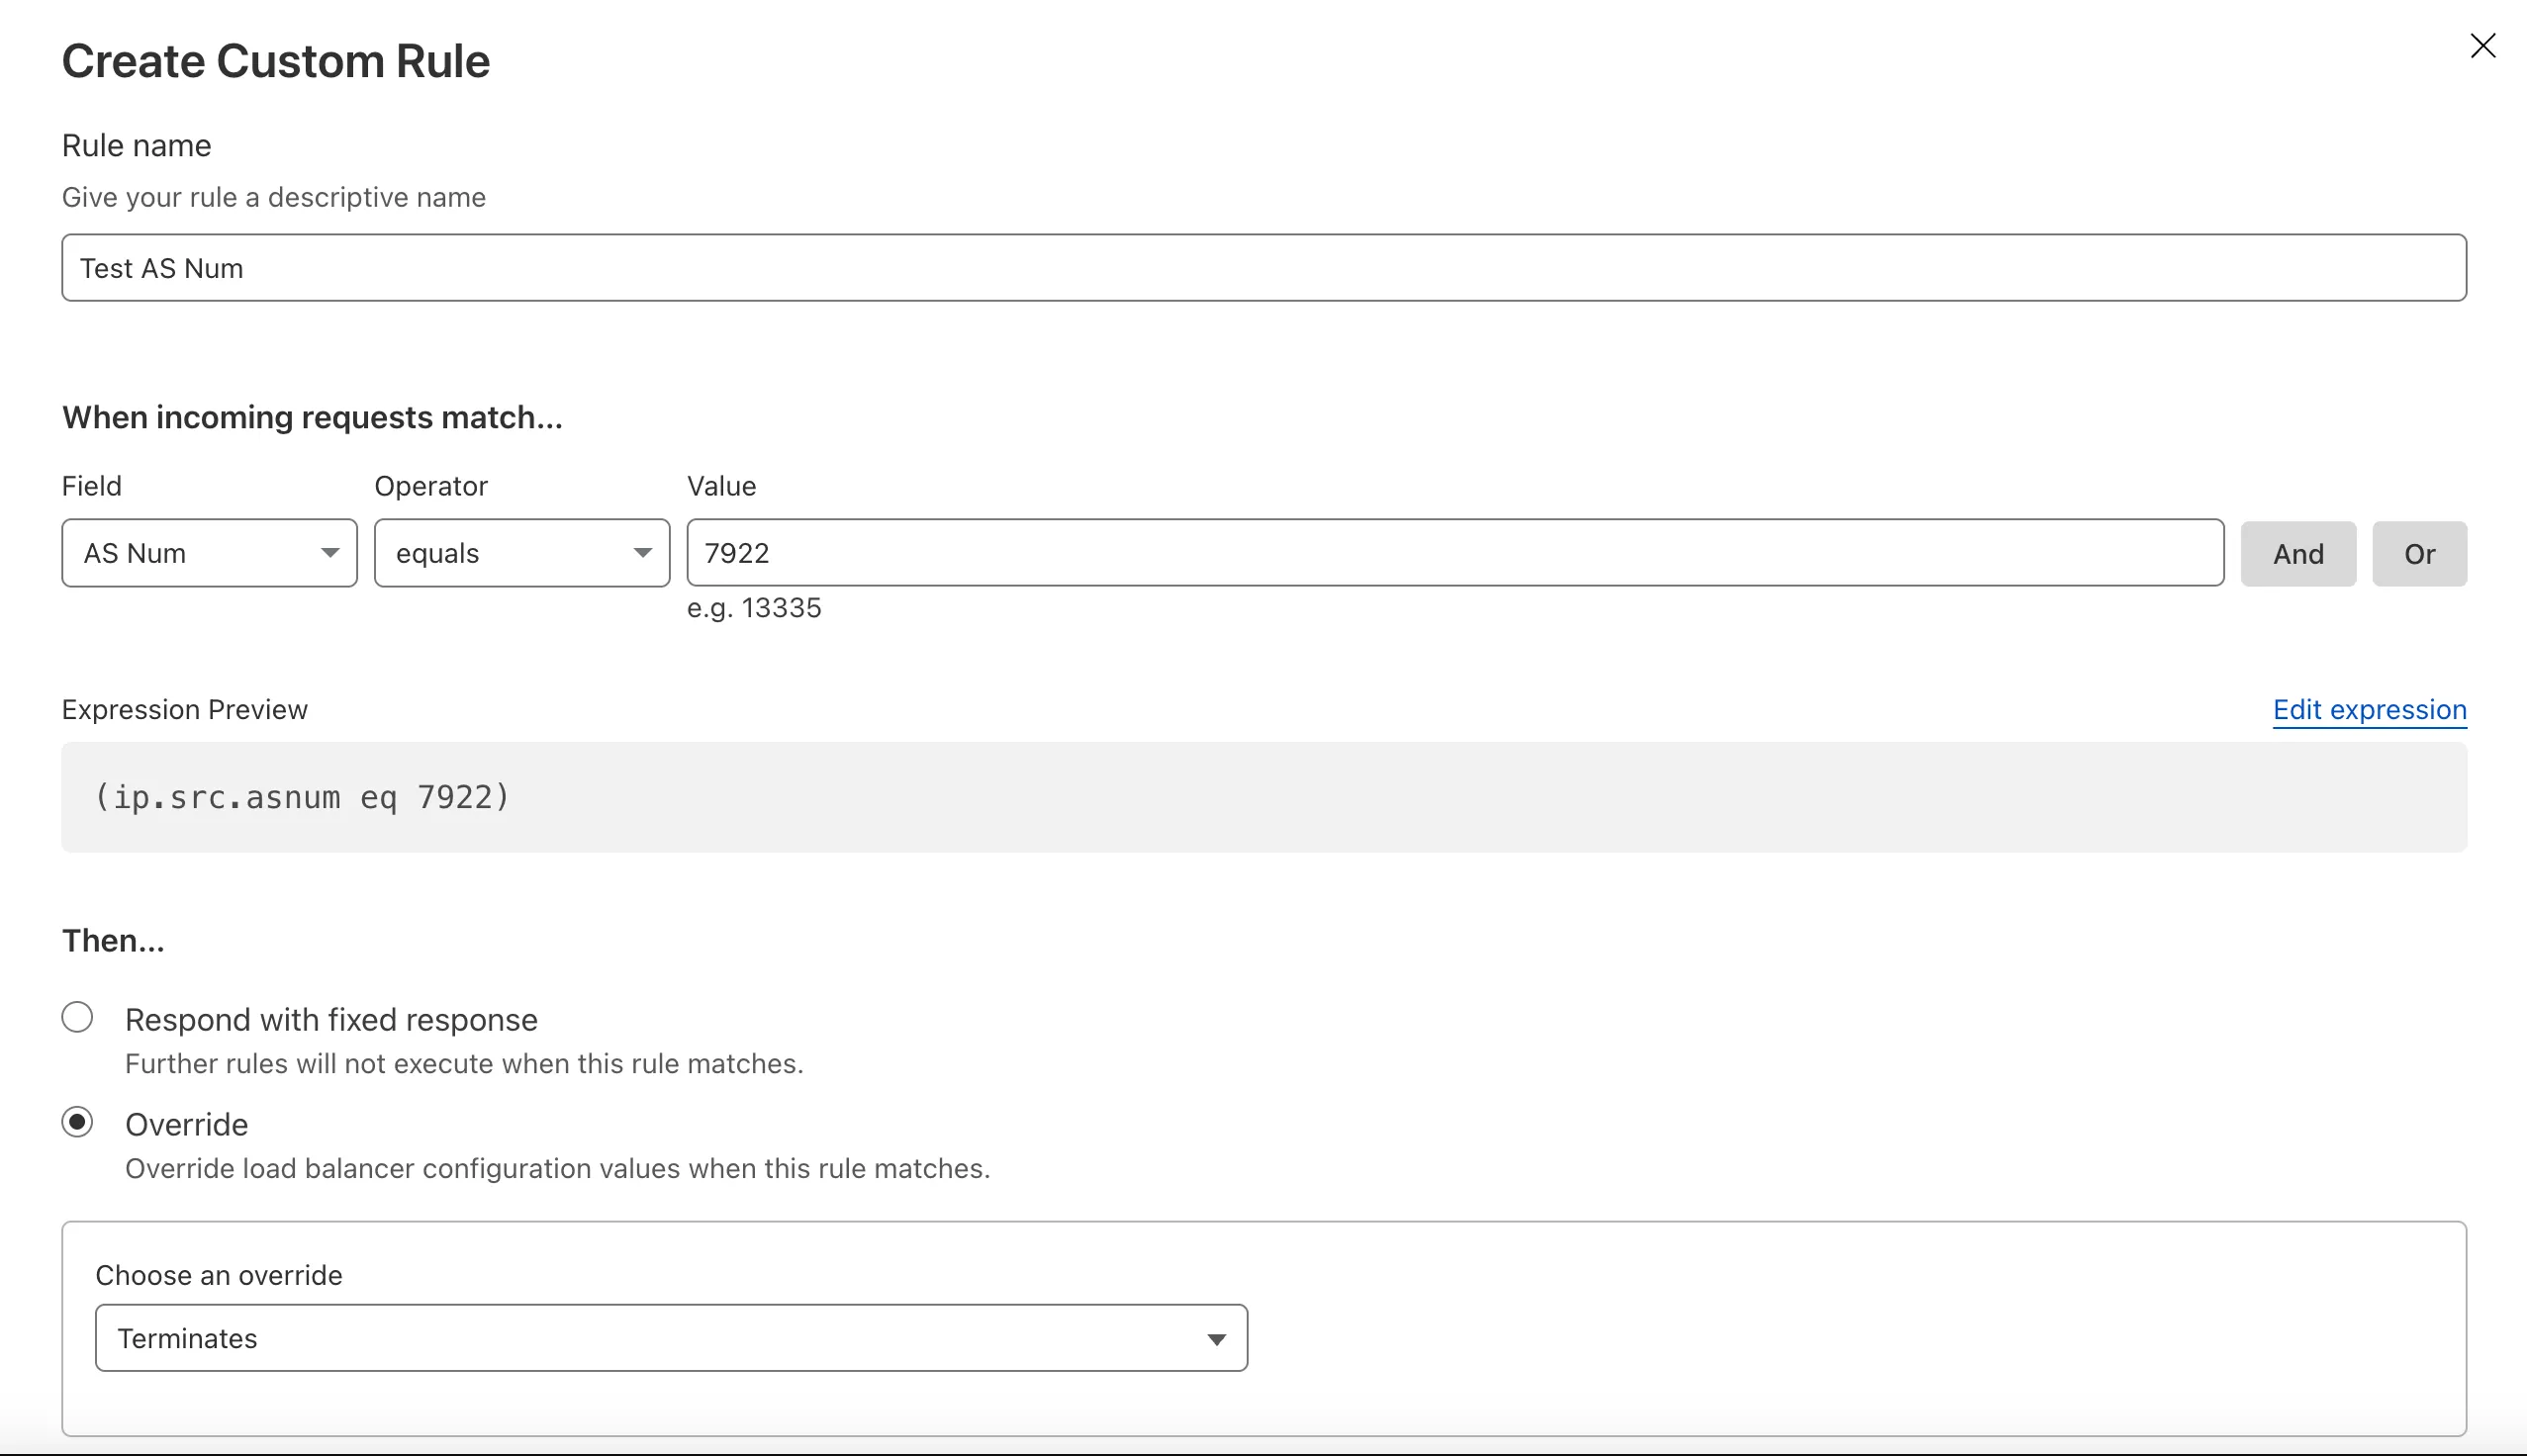
Cloudflare now provides two new request fields in the Ruleset engine that let you make decisions based on whether a request used TCP and the measured TCP round-trip time between the client and Cloudflare. These fields help you understand protocol usage across your traffic and build policies that respond to network performance. For example, you can distinguish TCP from QUIC traffic or route high latency requests to alternative origins when needed.
New fields
Field
Type
Description
cf.edge.client_tcp
Boolean
Indicates whether the request used TCP. A value of true means the client connected using TCP instead of QUIC.
cf.timings.client_tcp_rtt_msec
Number
Reports the smoothed TCP round-trip time between the client and Cloudflare in milliseconds. For example, a value of 20 indicates roughly twenty milliseconds of RTT.
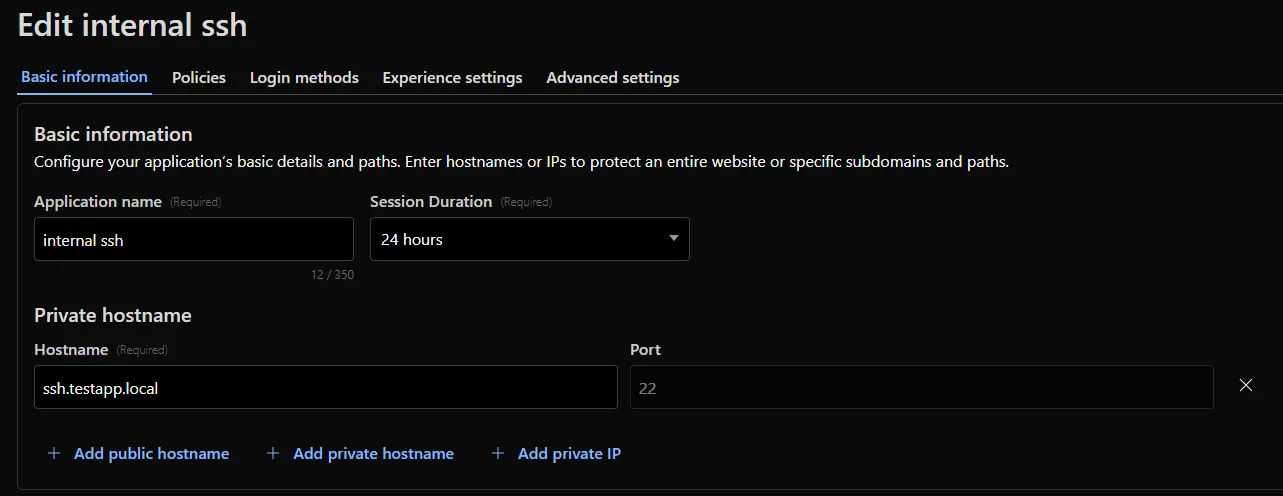
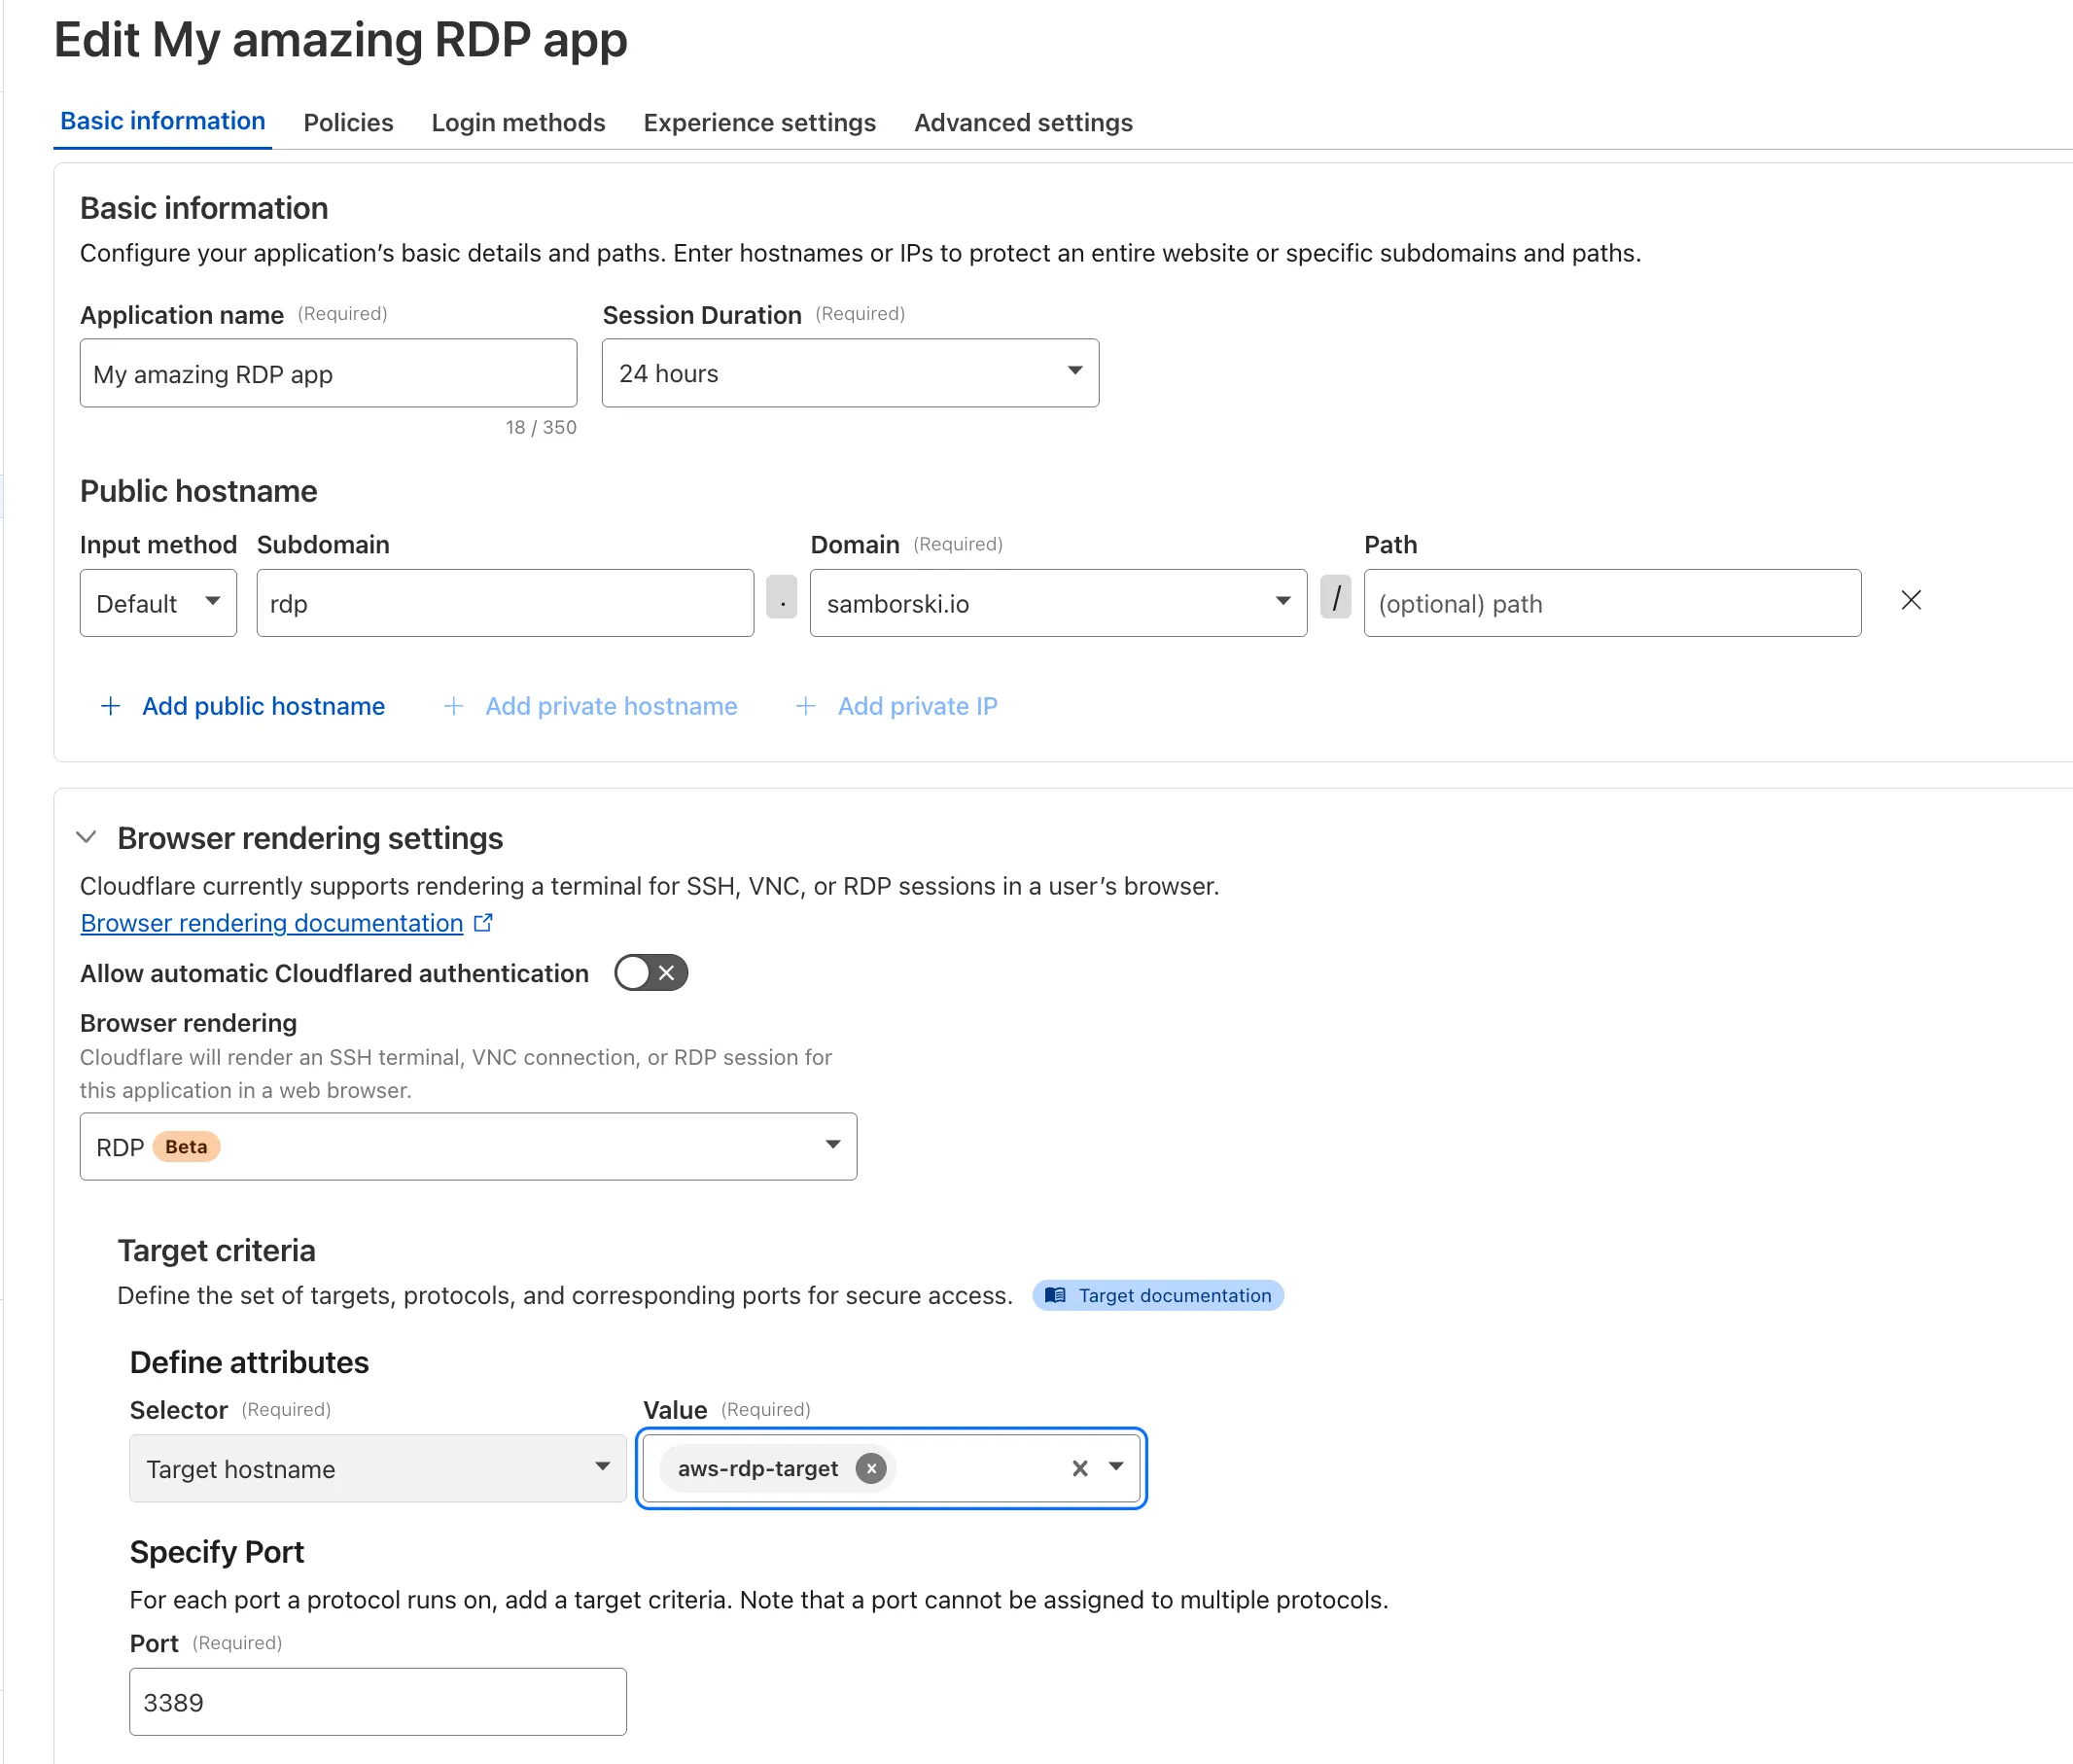
Previously, applying Zero Trust policies to private applications required the application to use HTTPS on port 443 and support Server Name Indicator (SNI).
This update removes that limitation. As long as the application is reachable via a Cloudflare off-ramp, you can now enforce your critical security controls — like single sign-on (SSO), MFA, device posture, and variable session lengths — to any private application. This allows you to extend Zero Trust security to services like SSH, RDP, internal databases, and other non-HTTPS applications.
For example, you can now create a self-hosted application in Access for ssh.testapp.local running on port 22. You can then build a policy that only allows engineers in your organization to connect after they pass an SSO/MFA check and are using a corporate device.
This feature is generally available across all plans.
AI Search now supports reranking for improved retrieval quality and allows you to set the system prompt directly in your API requests.
Rerank for more relevant results
You can now enable reranking to reorder retrieved documents based on their semantic relevance to the user’s query. Reranking helps improve accuracy, especially for large or noisy datasets where vector similarity alone may not produce the optimal ordering.
You can enable and configure reranking in the dashboard or directly in your API requests:
query:"How do I train a llama to deliver coffee?",
model:"@cf/meta/llama-3.3-70b-instruct-fp8-fast",
reranking:{
enabled: true,
model:"@cf/baai/bge-reranker-base"
}
});
Set system prompts in API
Previously, system prompts could only be configured in the dashboard. You can now define them directly in your API requests, giving you per-query control over behavior. For example:
JavaScript
// Dynamically set query and system prompt in AI Search
Cloudflare CASB (Cloud Access Security Broker) now supports two new granular roles to provide more precise access control for your security teams:
Cloudflare CASB Read: Provides read-only access to view CASB findings and dashboards. This role is ideal for security analysts, compliance auditors, or team members who need visibility without modification rights.
Cloudflare CASB: Provides full administrative access to configure and manage all aspects of the CASB product.
These new roles help you better enforce the principle of least privilege. You can now grant specific members access to CASB security findings without assigning them broader permissions, such as the Super Administrator or Administrator roles.
To enable Data Loss Prevention (DLP), scans in CASB, account members will need the Cloudflare Zero Trust role.
You can find these new roles when inviting members or creating API tokens in the Cloudflare dashboard under Manage Account > Members.
To give you precision and flexibility while creating policies to block unwanted traffic, we are introducing new, more granular application categories in the Gateway product.
We have added the following categories to provide more precise organization and allow for finer-grained policy creation, designed around how users interact with different types of applications:
Business
Education
Entertainment & Events
Food & Drink
Health & Fitness
Lifestyle
Navigation
Photography & Graphic Design
Travel
The new categories are live now, but we are providing a transition period for existing applications to be fully remapped to these new categories.
The full remapping will be completed by January 30, 2026.
We encourage you to use this time to:
Review the new category structure.
Identify and adjust any existing HTTP policies that reference older categories to ensure a smooth transition.
Logpush now supports integration with Microsoft Sentinel ↗.The new Azure Sentinel Connector built on Microsoft’s Codeless Connector Framework (CCF), is now avaialble. This solution replaces the previous Azure Functions-based connector, offering significant improvements in security, data control, and ease of use for customers. Logpush customers can send logs to Azure Blob Storage and configure this new Sentinel Connector to ingest those logs directly into Microsoft Sentinel.
This upgrade significantly streamlines log ingestion, improves security, and provides greater control:
Simplified Implementation: Easier for engineering teams to set up and maintain.
Cost Control: New support for Data Collection Rules (DCRs) allows you to filter and transform logs at ingestion time, offering potential cost savings.
Enhanced Security: CCF provides a higher level of security compared to the older Azure Functions connector.
ata Lake Integration: Includes native integration with Data Lake.
Find the new solution here ↗ and refer to the Cloudflare's developer documention ↗for more information on the connector, including setup steps, supported logs and Microsfot's resources.
Radar now introduces Top-Level Domain (TLD) insights, providing visibility into popularity based on the DNS magnitude metric, detailed TLD information including its type, manager, DNSSEC support, RDAP support, and WHOIS data, and trends such as DNS query volume and geographic distribution observed by the 1.1.1.1 DNS resolver.
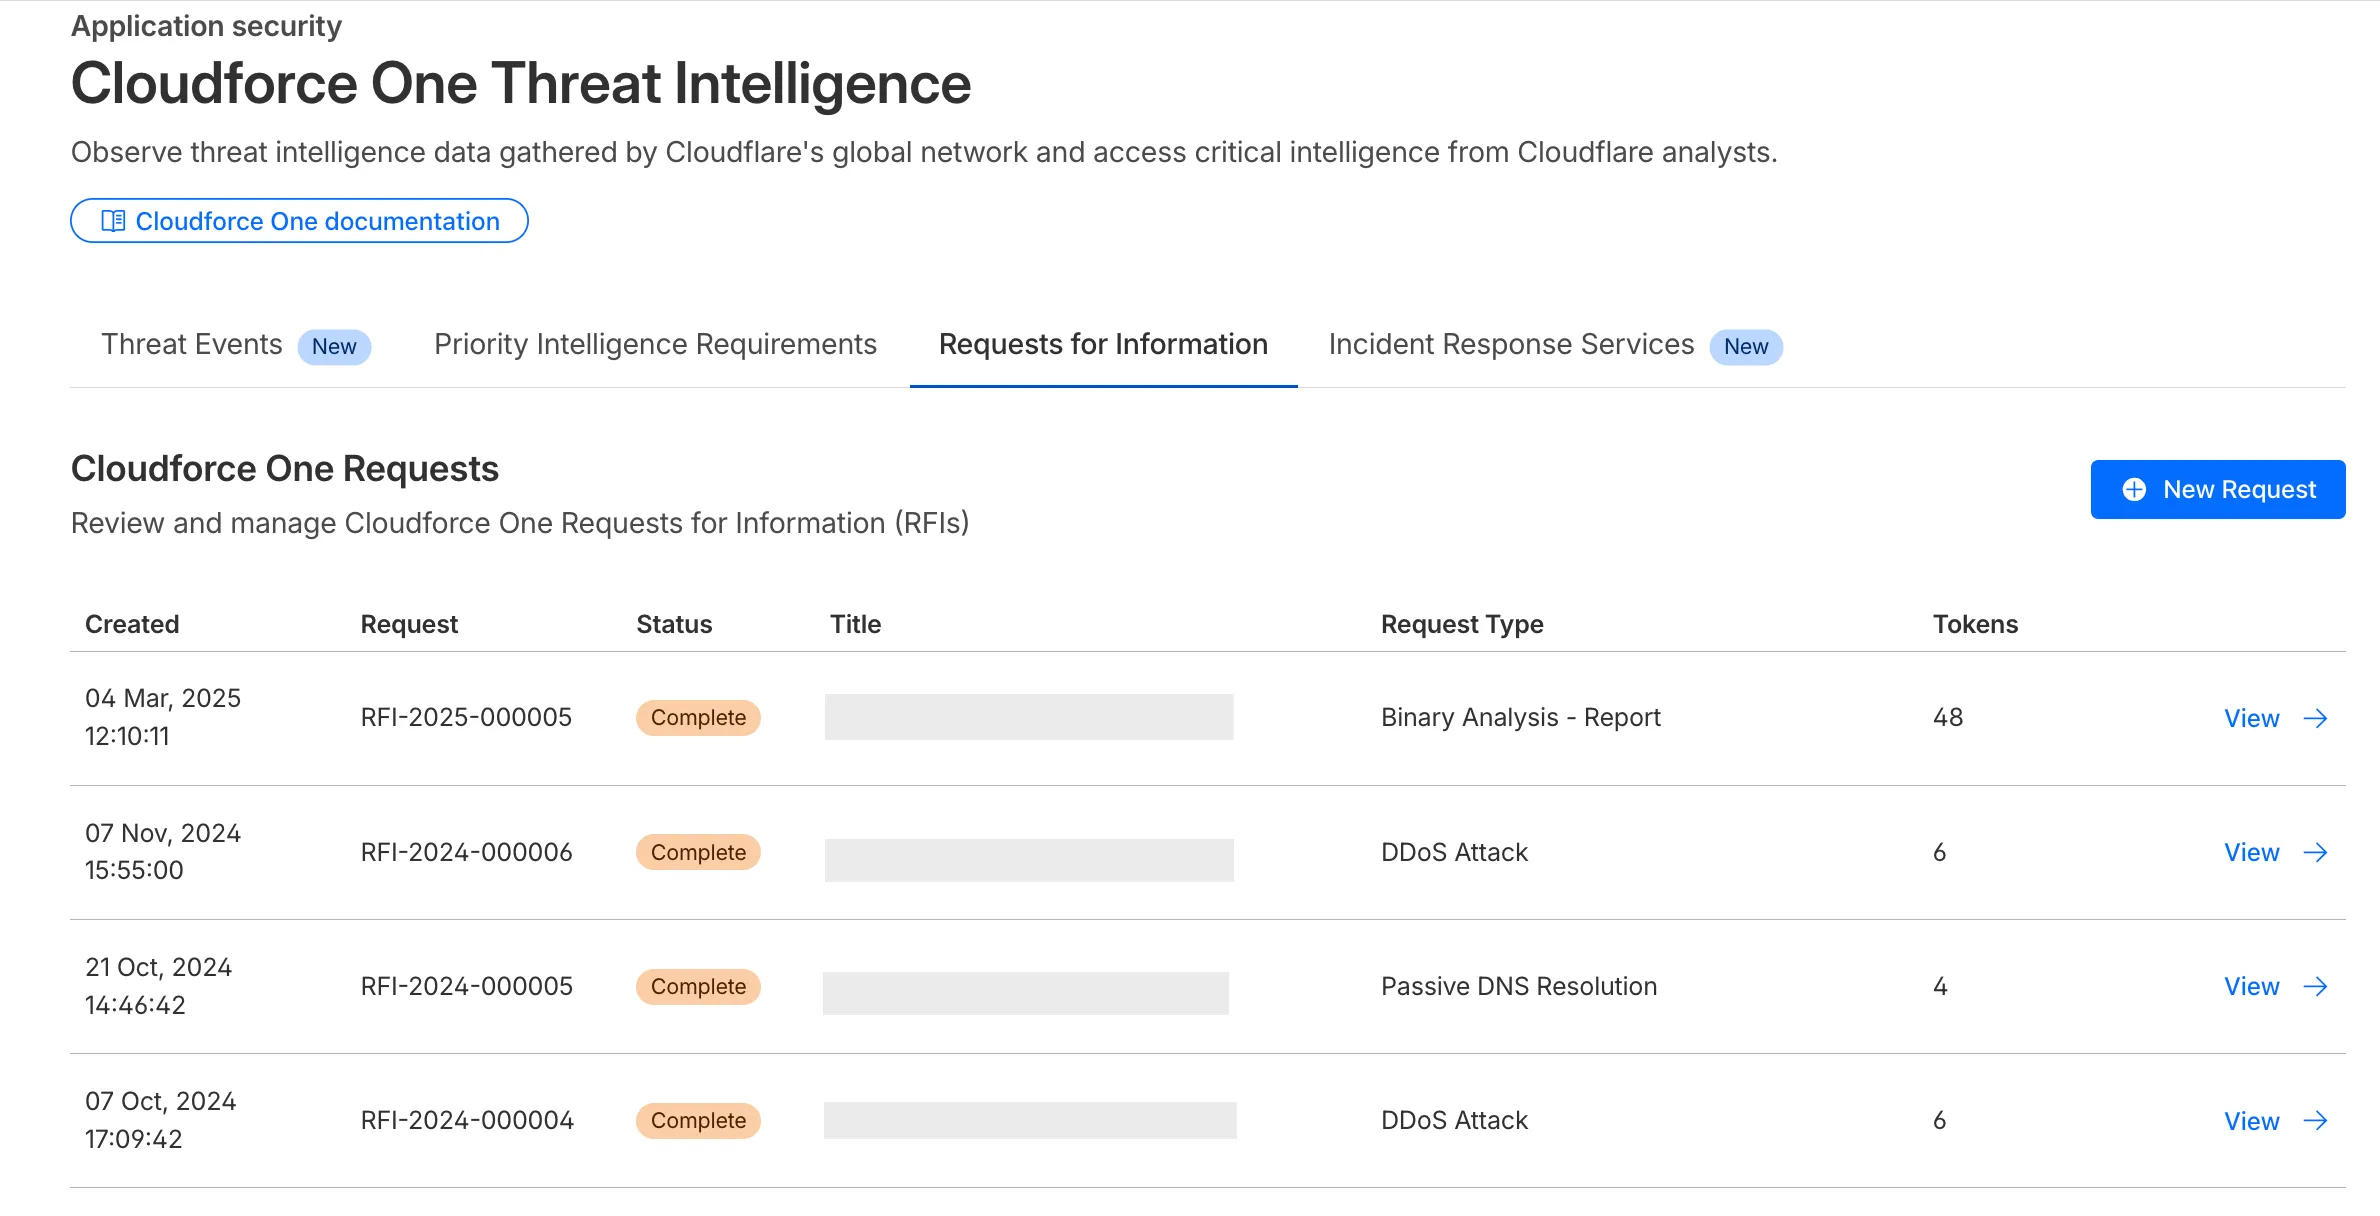
The Requests for Information (RFI) dashboard now shows users the number of tokens used by each submitted RFI to better understand usage of tokens and how they relate to each request submitted.
What’s new:
Users can now see the number of tokens used for a submitted request for information.
Users can see the remaining tokens allocated to their account for the quarter.
Users can only select the Routine priority for the Strategic Threat Research request type.
AI Crawl Control now includes a Robots.txt tab that provides insights into how AI crawlers interact with your robots.txt files.
What's new
The Robots.txt tab allows you to:
Monitor the health status of robots.txt files across all your hostnames, including HTTP status codes, and identify hostnames that need a robots.txt file.
Track the total number of requests to each robots.txt file, with breakdowns of successful versus unsuccessful requests.
Check whether your robots.txt files contain Content Signals ↗ directives for AI training, search, and AI input.
Identify crawlers that request paths explicitly disallowed by your robots.txt directives, including the crawler name, operator, violated path, specific directive, and violation count.
Filter robots.txt request data by crawler, operator, category, and custom time ranges.
Take action
When you identify non-compliant crawlers, you can:
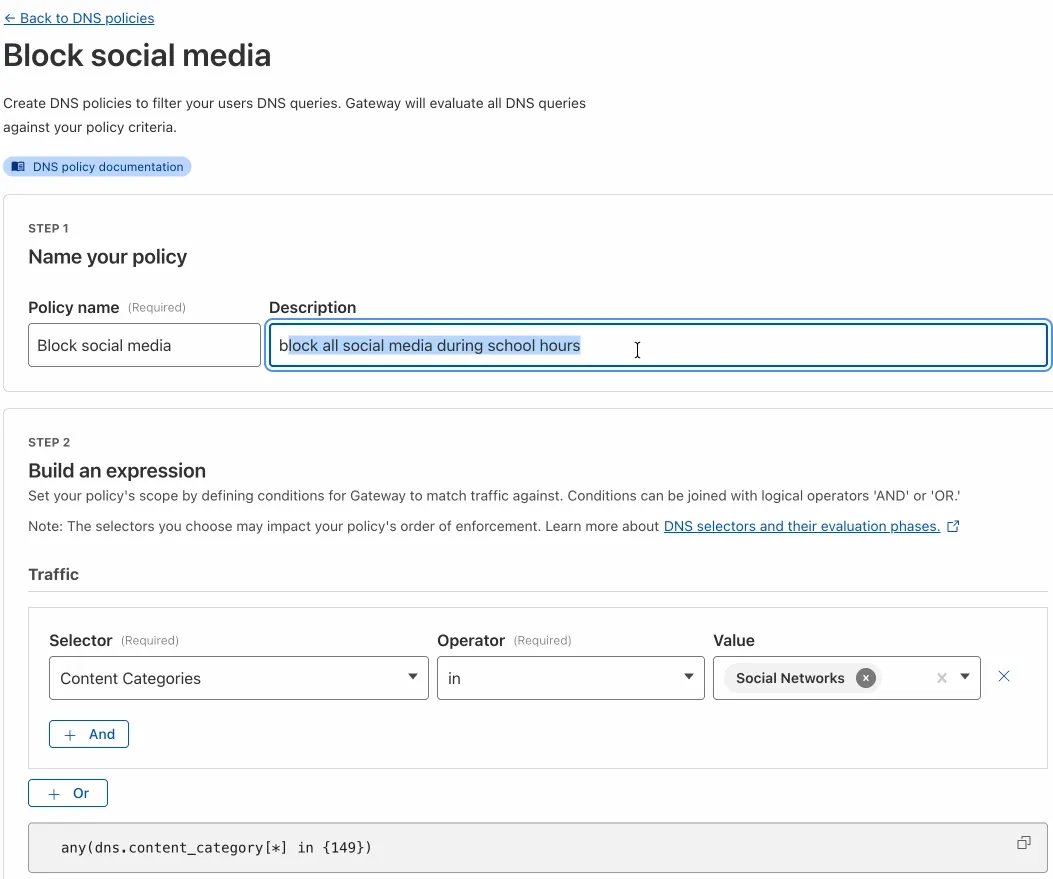
Admins can now create scheduled DNS policies directly from the Zero Trust dashboard, without using the API. You can configure policies to be active during specific, recurring times, such as blocking social media during business hours or gaming sites on school nights.
Preset Schedules: Use built-in templates for common scenarios like Business Hours, School Days, Weekends, and more.
Custom Schedules: Define your own schedule with specific days and up to three non-overlapping time ranges per day.
Timezone Control: Choose to enforce a schedule in a specific timezone (for example, US Eastern) or based on the local time of each user.
Combined with Duration: Policies can have both a schedule and a duration. If both are set, the duration's expiration takes precedence.
You can see the flow in the demo GIF:
This update makes time-based DNS policies accessible to all Gateway customers, removing the technical barrier of the API.
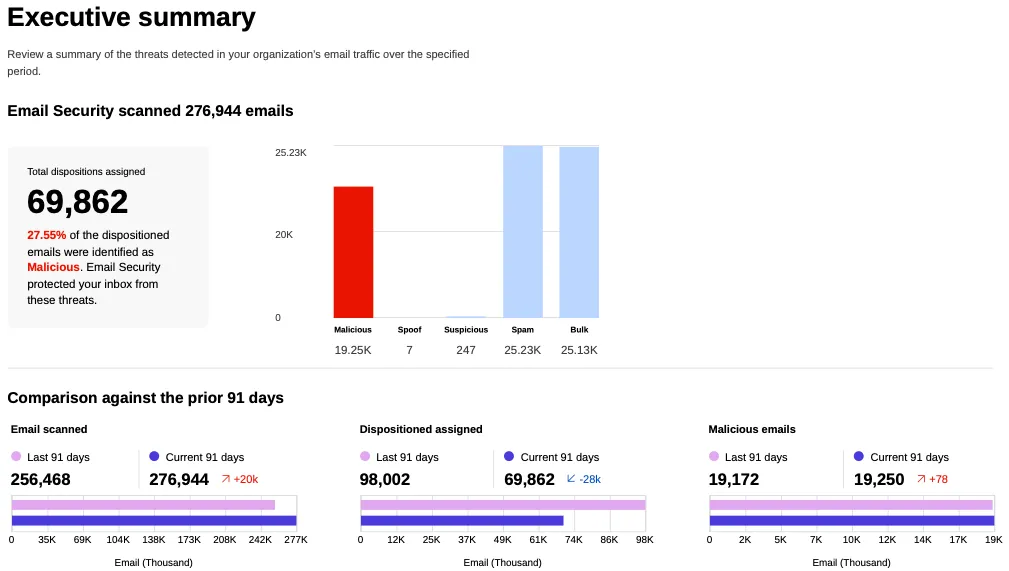
You can now generate on-demand security reports directly from the Cloudflare dashboard. This new feature provides a comprehensive overview of your email security posture, making it easier than ever to demonstrate the value of Cloudflare’s Email security to executives and other decision makers.
These reports offer several key benefits:
Executive Summary: Quickly view the performance of Email security with a high-level executive summary.
Actionable Insights: Dive deep into trend data, breakdowns of threat types, and analysis of top targets to identify and address vulnerabilities.
Configuration Transparency: Gain a clear view of your policy, submission, and domain configurations to ensure optimal setup.
Account Takeover Risks: Get a snapshot of your M365 risky users (requires a Microsoft Entra ID P2 license and M365 SaaS integration ↗).
This feature is available across the following Email security packages:
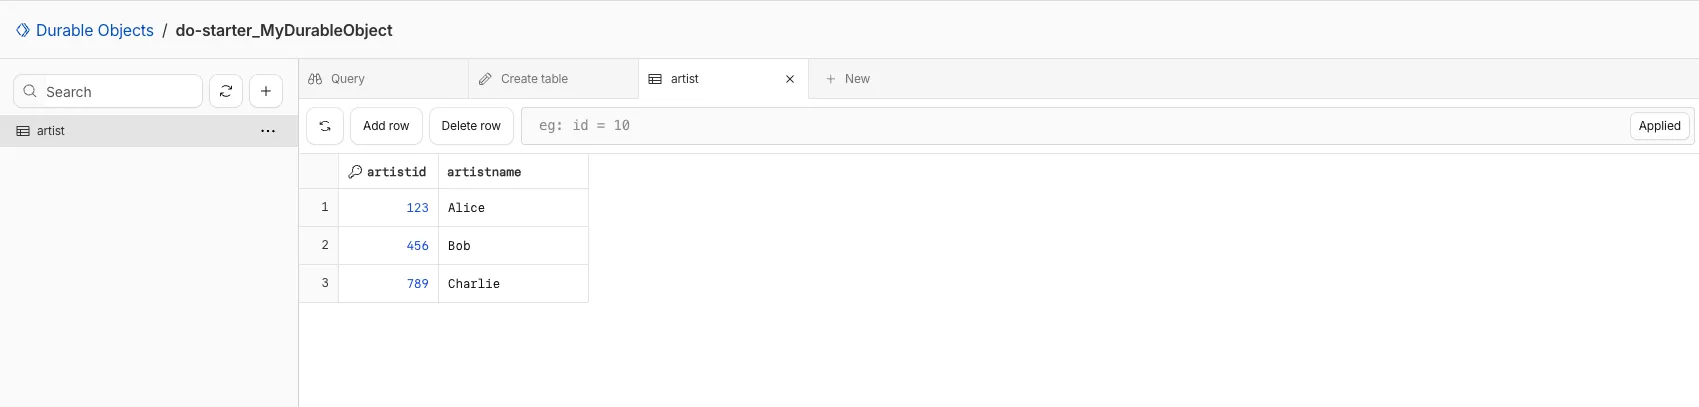
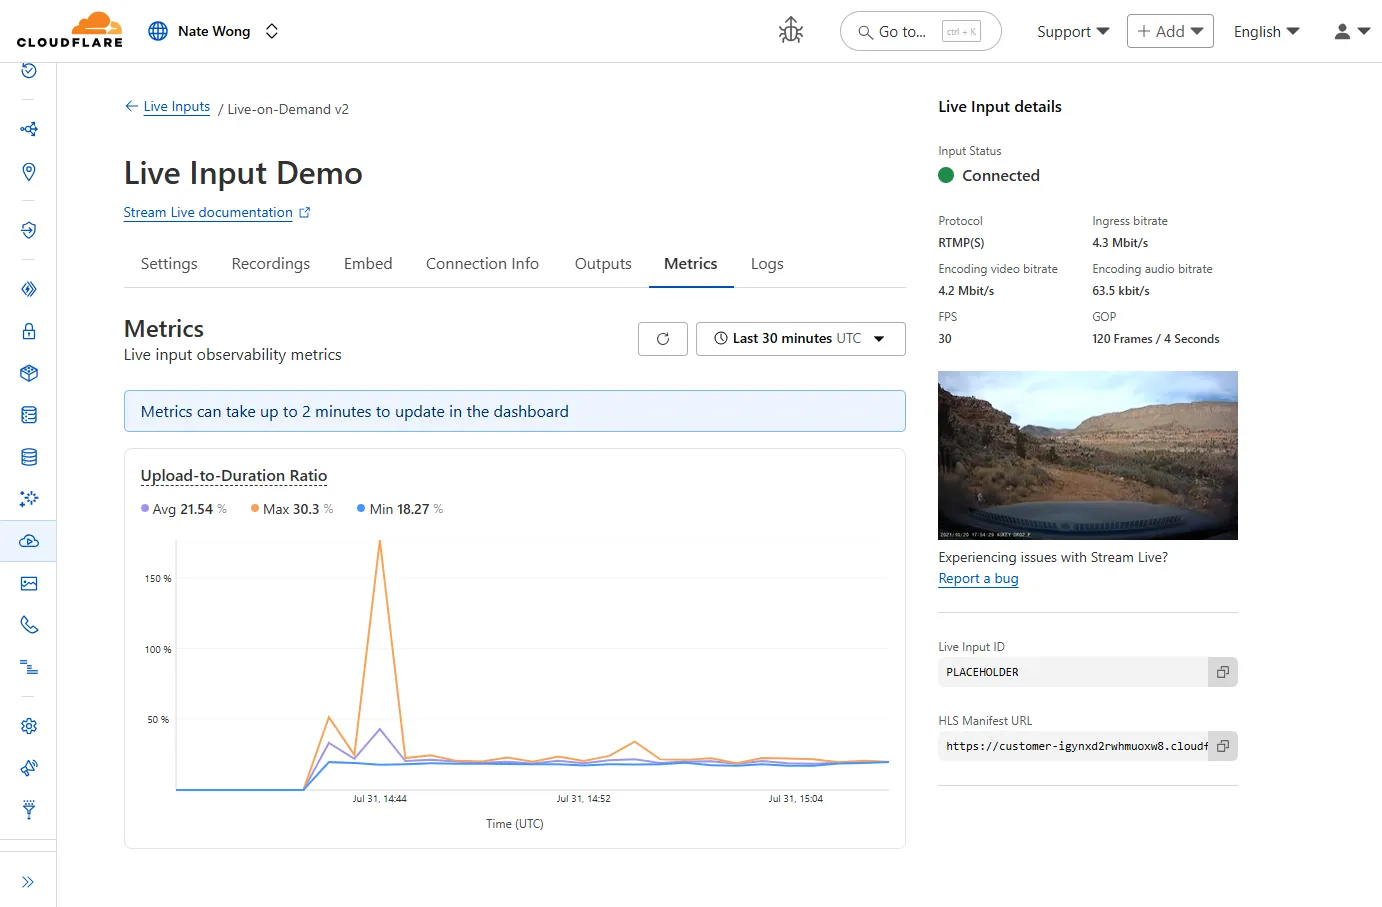
You can now view and write to each Durable Object's storage using a UI editor on the Cloudflare dashboard. Only Durable Objects using SQLite storage can use Data Studio.
Data Studio unlocks easier data access with Durable Objects for prototyping application data models to debugging production storage usage. Before, querying your Durable Objects data required deploying a Worker.
To access a Durable Object, you can provide an object's unique name or ID generated by Cloudflare. Data Studio requires you to have at least the Workers Platform Admin role, and all queries are captured with audit logging for your security and compliance needs. Queries executed by Data Studio send requests to your remote, deployed objects and incur normal usage billing.
To learn more, visit the Data Studio documentation. If you have feedback or suggestions for the new Data Studio, please share your experience on Discord ↗
CDN now supports 128 KB request and response headers 🚀
We're excited to announce a significant increase in the maximum header size supported by Cloudflare's Content Delivery Network (CDN). Cloudflare now supports up to 128 KB for both request and response headers.
Previously, customers were limited to a total of 32 KB for request or response headers, with a maximum of 16 KB per individual header. Larger headers could cause requests to fail with HTTP 413 (Request Header Fields Too Large) errors.
What's new?
Support for large headers: You can now utilize much larger headers, whether as a single large header up to 128 KB or split over multiple headers.
Reduces 413 and 520 HTTP errors: This change drastically reduces the likelihood of customers encountering HTTP 413 errors from large request headers or HTTP 520 errors caused by oversized response headers, improving the overall reliability of your web applications.
Enhanced functionality: This is especially beneficial for applications that rely on:
A large number of cookies.
Large Content-Security-Policy (CSP) response headers.
Advanced use cases with Cloudflare Workers that generate large response headers.
This enhancement improves compatibility with Cloudflare's CDN, enabling more use cases that previously failed due to header size limits.
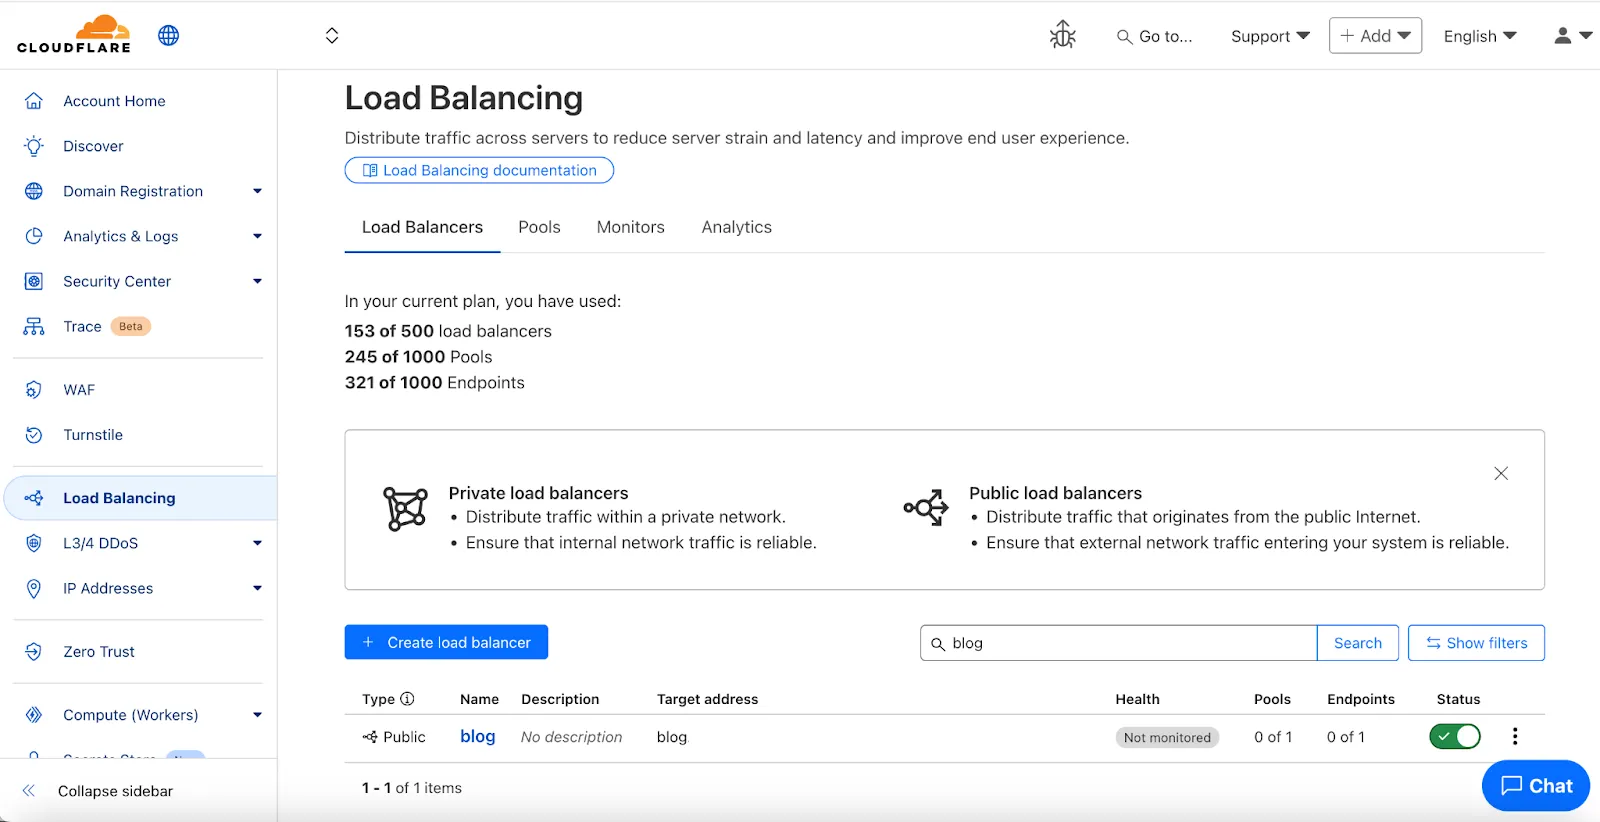
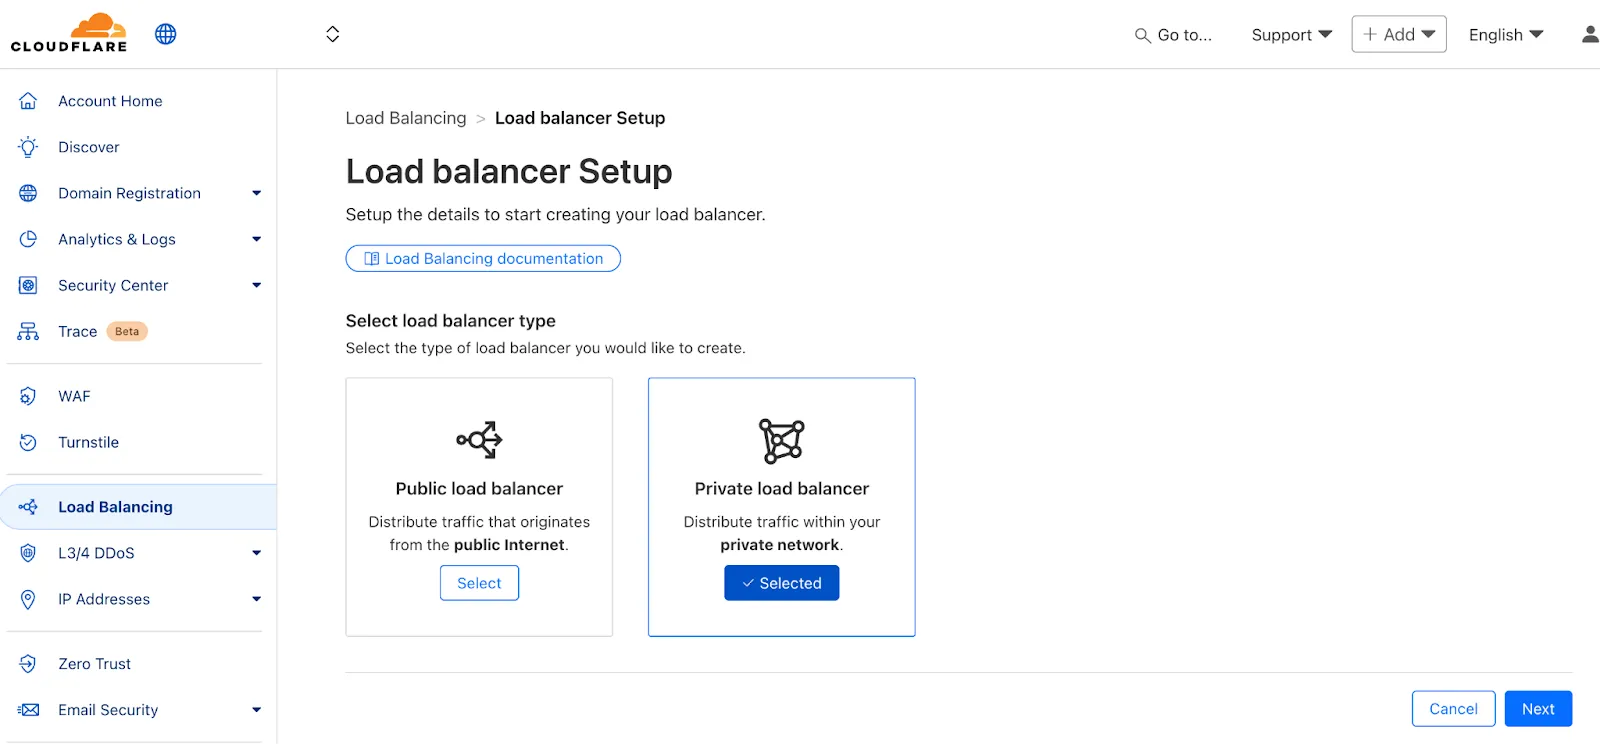
Cloudflare Load Balancing now supports Monitor Groups, a powerful new way to combine multiple health monitors into a single, logical group. This allows you to create sophisticated health checks that more accurately reflect the true availability of your applications by assessing multiple services at once.
With Monitor Groups, you can ensure that all critical components of an application are healthy before sending traffic to an origin pool, enabling smarter failover decisions and greater resilience. This feature is now available via the API for customers with an Enterprise Load Balancing subscription.
What you can do:
Combine Multiple Monitors: Group different health monitors (for example, HTTP, TCP) that check various application components, like a primary API gateway and a specific /login service.
Isolate Monitors for Observation: Mark a monitor as "monitoring only" to receive alerts and data without it affecting a pool's health status or traffic steering. This is perfect for testing new checks or observing non-critical dependencies.
Improve Steering Intelligence: Latency for Dynamic Steering is automatically averaged across all active monitors in a group, providing a more holistic view of an origin's performance.
This enhancement is ideal for complex, multi-service applications where the health of one component depends on another. By aggregating health signals, Monitor Groups provide a more accurate and comprehensive assessment of your application's true status.
For detailed information and API configuration guides, please visit our developer documentation for Monitor Groups.
During Birthday Week, we announced that single sign-on (SSO) is available for free ↗ to everyone who signs in with a custom email domain and maintains a compatible identity provider ↗. SSO minimizes user friction around login and provides the strongest security posture available. At the time, this could only be configured using the API.
Today, we are launching a new user experience which allows users to manage their SSO configuration from within the Cloudflare dashboard. You can access this by going to Manage account > Members > Settings.
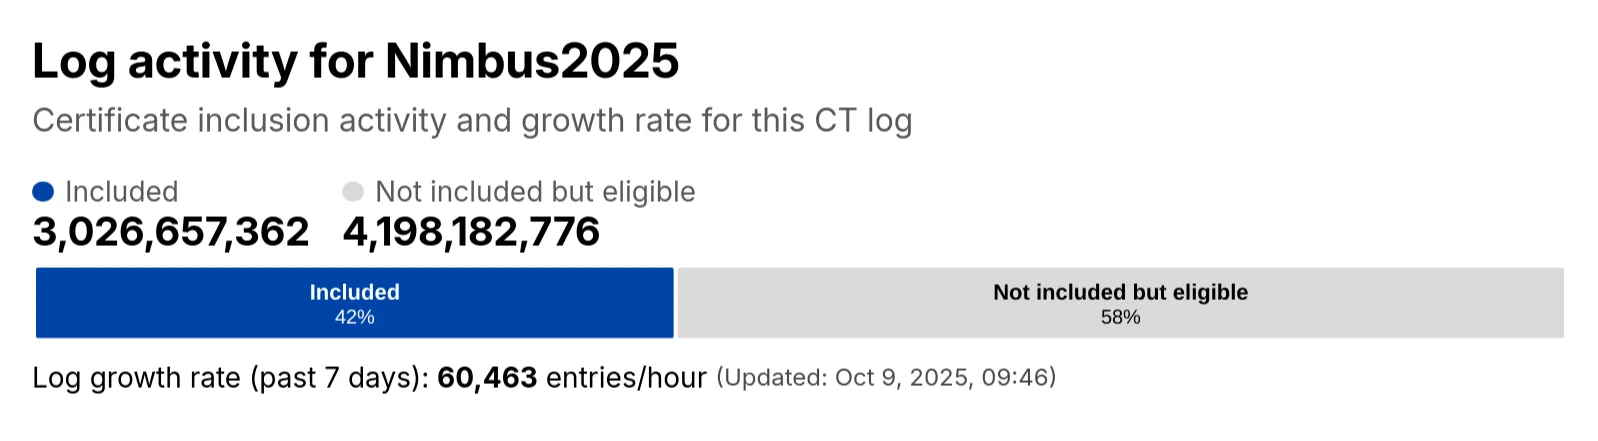
Radar has expanded its Certificate Transparency (CT) log insights with new stats that provide greater visibility into log activity:
Log growth rate: The average throughput of the CT log over the past 7 days, measured in certificates per hour.
Included certificate count: The total number of certificates already included in this CT log.
Eligible-for-inclusion certificate count: The number of certificates eligible for inclusion in this log but not yet included. This metric is based on certificates signed by trusted root CAs within the log’s accepted date range.
Last update: The timestamp of the most recent update to the CT log.
The most common reason users contact Cloudflare support is lost two-factor authentication (2FA) credentials. Cloudflare supports both app-based and hardware keys for 2FA, but you could lose access to your account if you lose these. Over the past few weeks, we have been rolling out email and in-product reminders that remind you to also download backup codes (sometimes called recovery keys) that can get you back into your account in the event you lose your 2FA credentials. Download your backup codes now by logging into Cloudflare, then navigating to Profile > Security & Authentication > Backup codes.
Sign-in security best practices
Cloudflare is critical infrastructure, and you should protect it as such. Please review the following best practices and make sure you are doing your part to secure your account.
Use a unique password for every website, including Cloudflare, and store it in a password manager like 1Password or Keeper. These services are cross-platform and simplify the process of managing secure passwords.
Use 2FA to make it harder for an attacker to get into your account in the event your password is leaked
Store your backup codes securely. A password manager is the best place since it keeps the backup codes encrypted, but you can also print them and put them somewhere safe in your home.
If you use an app to manage your 2FA keys, enable cloud backup, so that you don't lose your keys in the event you lose your phone.
If you use a custom email domain to sign in, configure SSO ↗.
If you use a public email domain like Gmail or Hotmail, you can also use social login with Apple, GitHub, or Google to sign in.
If you manage a Cloudflare account for work:
Have at least two administrators in case one of them unexpectedly leaves your company
Use SCIM to automate permissions management for members in your Cloudflare account
Radar now includes browser detection for Post-quantum (PQ) encryption.
The Post-quantum encryption card ↗ now checks whether a user’s browser supports post-quantum encryption.
If support is detected, information about the key agreement in use is displayed.
Deepgram's newest Flux model @cf/deepgram/flux is now available on Workers AI, hosted directly on Cloudflare's infrastructure. We're excited to be a launch partner with Deepgram and offer their new Speech Recognition model built specifically for enabling voice agents. Check out Deepgram's blog ↗ for more details on the release.
The Flux model can be used in conjunction with Deepgram's speech-to-text model @cf/deepgram/nova-3 and text-to-speech model @cf/deepgram/aura-1 to build end-to-end voice agents. Having Deepgram on Workers AI takes advantage of our edge GPU infrastructure, for ultra low latency voice AI applications.
Promotional Pricing
For the month of October 2025, Deepgram's Flux model will be free to use on Workers AI. Official pricing will be announced soon and charged after the promotional pricing period ends on October 31, 2025. Check out the model page for pricing details in the future.
Example Usage
The new Flux model is WebSocket only as it requires live bi-directional streaming in order to recognize speech activity.
Create a worker that establishes a websocket connection with @cf/deepgram/flux
JavaScript
exportdefault{
asyncfetch(request,env,ctx):Promise<Response>{
constresp=awaitenv.AI.run("@cf/deepgram/flux",{
encoding:"linear16",
sample_rate:"16000"
},{
websocket: true
});
returnresp;
},
}satisfiesExportedHandler<Env>;
Deploy your worker
Terminal window
npxwranglerdeploy
Write a client script to connect to your worker and start sending random audio bytes to it
You can now perform more powerful queries directly in Workers Analytics Engine ↗ with a major expansion of our SQL function library.
Workers Analytics Engine allows you to ingest and store high-cardinality data at scale (such as custom analytics) and query your data through a simple SQL API.
Today, we've expanded Workers Analytics Engine's SQL capabilities with several new functions:
toUInt8() - Converts any numeric expression, or expression resulting in a string representation of a decimal, into an unsigned 8 bit integer
Ready to get started?
Whether you're building usage-based billing systems, customer analytics dashboards, or other custom analytics, these functions let you get the most out of your data. Get started with Workers Analytics Engine and explore all available functions in our SQL reference documentation.
The GraphQL Analytics API now supports confidence intervals for sum and count fields on adaptive (sampled) datasets. Confidence intervals provide a statistical range around sampled results, helping verify accuracy and quantify uncertainty.
New instance types provide up to 4 vCPU, 12 GiB of memory, and 20 GB of disk per container instance.
Instance Type
vCPU
Memory
Disk
lite
1/16
256 MiB
2 GB
basic
1/4
1 GiB
4 GB
standard-1
1/2
4 GiB
8 GB
standard-2
1
6 GiB
12 GB
standard-3
2
8 GiB
16 GB
standard-4
4
12 GiB
20 GB
The dev and standard instance types are preserved for backward compatibility and are aliases for lite and standard-1, respectively. The standard-1 instance type now provides up to 8 GB of disk instead of only 4 GB.
You can now enhance your security posture by blocking additional application installer and disk image file types with Cloudflare Gateway. Preventing the download of unauthorized software packages is a critical step in securing endpoints from malware and unwanted applications.
We have expanded Gateway's file type controls to include:
Executable: Microsoft Software Installer (msix), Microsoft Software Installer (appx), Apple Software Package (pkg)
To ensure these file types are blocked effectively, please note the following behaviors:
DMG: Due to their file structure, DMG files are blocked at the very end of the transfer. A user's download may appear to progress but will fail at the last moment, preventing the browser from saving the file.
MSIX: To comprehensively block Microsoft Software Installers, you should also include the file type Unscannable. MSIX files larger than 100 MB are identified as Unscannable ZIP files during inspection.
To get started, go to your HTTP policies in Zero Trust. For a full list of file types, refer to supported file types.
Gateway users can now apply granular controls to their file sharing and AI chat applications through HTTP policies.
The new feature offers two methods of controlling SaaS applications:
Application Controls are curated groupings of Operations which provide an easy way for users to achieve a specific outcome. Application Controls may include Upload, Download, Prompt, Voice, and Share depending on the application.
Operations are controls aligned to the most granular action a user can take. This provides a fine-grained approach to enforcing policy and generally aligns to the SaaS providers API specifications in naming and function.
All summary and timeseries_groups endpoints in HTTP and NetFlows now include an adm1 dimension for grouping data by first level administrative division (for example, state, province, etc.)
A new filter geoId was also added to all endpoints in HTTP and NetFlows, allowing filtering by a specific administrative division.
Check out the new Regional traffic insights on a country specific traffic page new Radar page ↗.
Today, we're launching the new Cloudflare Pipelines: a streaming data platform that ingests events, transforms them with SQL, and writes to R2 as Apache Iceberg ↗ tables or Parquet files.
Pipelines can receive events via HTTP endpoints or Worker bindings, transform them with SQL, and deliver to R2 with exactly-once guarantees. This makes it easy to build analytics-ready warehouses for server logs, mobile application events, IoT telemetry, or clickstream data without managing streaming infrastructure.
For example, here's a pipeline that ingests clickstream events and filters out bot traffic while extracting domain information:
INSERT into events_table
SELECT
user_id,
lower(event) AS event_type,
to_timestamp_micros(ts_us) AS event_time,
regexp_match(url, '^https?://([^/]+)')[1] AS domain,
url,
referrer,
user_agent
FROM events_json
WHEREevent='page_view'
ANDNOT regexp_like(user_agent, '(?i)bot|spider');
Get started by creating a pipeline in the dashboard or running a single command in Wrangler:
Terminal window
npxwranglerpipelinessetup
Check out our getting started guide to learn how to create a pipeline that delivers events to an Iceberg table you can query with R2 SQL. Read more about today's announcement in our blog post ↗.
Today, we're launching the open beta for R2 SQL: A serverless, distributed query engine that can efficiently analyze petabytes of data in Apache Iceberg ↗ tables managed by R2 Data Catalog.
R2 SQL is ideal for exploring analytical and time-series data stored in R2, such as logs, events from Pipelines, or clickstream and user behavior data.
If you already have a table in R2 Data Catalog, running queries is as simple as:
Terminal window
npxwranglerr2sqlqueryYOUR_WAREHOUSE"
SELECT
user_id,
event_type,
value
FROM events.user_events
WHERE event_type = 'CHANGELOG' or event_type = 'BLOG'
AND __ingest_ts > '2025-09-24T00:00:00Z'
ORDER BY __ingest_ts DESC
LIMIT 100"
To get started with R2 SQL, check out our getting started guide or learn more about supported features in the SQL reference. For a technical deep dive into how we built R2 SQL, read our blog post ↗.
We’re shipping three updates to Browser Rendering:
Playwright support is now Generally Available and synced with Playwright v1.55 ↗, giving you a stable foundation for critical automation and AI-agent workflows.
We’re also adding Stagehand support (Beta) so you can combine code with natural language instructions to build more resilient automations.
To get started with Stagehand, refer to the Stagehand example that uses Stagehand and Workers AI to search for a movie on this example movie directory ↗, extract its details using natural language (title, year, rating, duration, and genre), and return the information along with a screenshot of the webpage.
AutoRAG is now AI Search! The new name marks a new and bigger mission: to make world-class search infrastructure available to every developer and business.
With AI Search you can now use models from different providers like OpenAI and Anthropic. By attaching your provider keys to the AI Gateway linked to your AI Search instance, you can use many more models for both embedding and inference.
In Provider Keys, choose your provider, click Add, and enter the key.
Connect a gateway to AI Search: When creating a new AI Search, select the AI Gateway with your provider keys. For an existing AI Search, go to Settings and switch to a gateway that has your keys under Resources.
Select models: Embedding models are only available to be changed when creating a new AI Search. Generation model can be selected when creating a new AI Search and can be changed at any time in Settings.
Once configured, your AI Search instance will be able to reference models available through your AI Gateway when making a /ai-search request:
JavaScript
exportdefault{
asyncfetch(request,env){
// Query your AI Search instance with a natural language question to an OpenAI model
In the coming weeks we will also roll out updates to align the APIs with the new name. The existing APIs will continue to be supported for the time being. Stay tuned to the AI Search Changelog and Discord ↗ for more updates!
You can now more precisely control your HTTP DLP policies by specifying whether to scan the request or response body, helping to reduce false positives and target specific data flows.
In the Gateway HTTP policy builder, you will find a new selector called Body Phase. This allows you to define the direction of traffic the DLP engine will inspect:
Request Body: Scans data sent from a user's machine to an upstream service. This is ideal for monitoring data uploads, form submissions, or other user-initiated data exfiltration attempts.
Response Body: Scans data sent to a user's machine from an upstream service. Use this to inspect file downloads and website content for sensitive data.
For example, consider a policy that blocks Social Security Numbers (SSNs). Previously, this policy might trigger when a user visits a website that contains example SSNs in its content (the response body). Now, by setting the Body Phase to Request Body, the policy will only trigger if the user attempts to upload or submit an SSN, ignoring the content of the web page itself.
All policies without this selector will continue to scan both request and response bodies to ensure continued protection.
Compaction is the process of taking a group of small files and combining them into fewer larger files. This is an important maintenance operation as it helps ensure that query performance remains consistent by reducing the number of files that needs to be scanned.
To enable automatic compaction in R2 Data Catalog, find it under R2 Data Catalog in your R2 bucket settings in the dashboard.
Email security relies on your submissions to continuously improve our detection models. However, we often receive submissions in formats that cannot be ingested, such as incomplete EMLs, screenshots, or text files.
To ensure all customer feedback is actionable, we have launched two new features to manage invalid submissions sent to our team and user submission aliases:
Email Notifications: We now automatically notify users by email when they provide an invalid submission, educating them on the correct format. To disable notifications, go to Settings ↗ > Invalid submission emails and turn the feature off.
Invalid Submission dashboard: You can quickly identify which users need education to provide valid submissions so Cloudflare can provide continuous protection.
Browser-based RDP with Cloudflare Access is now generally available for all Cloudflare customers. It enables secure, remote Windows server access without VPNs or RDP clients.
Since we announced our open beta, we've made a few improvements:
More robust error messaging on the login page to help you if you encounter an issue.
Worldwide keyboard support. Whether your day-to-day is in Portuguese, Chinese, or something in between, your browser-based RDP experience will look and feel exactly like you are using a desktop RDP client.
Cleaned up some other miscellaneous issues, including but not limited to enhanced support for Entra ID accounts and support for usernames with spaces, quotes, and special characters.
As a refresher, here are some benefits browser-based RDP provides:
Control how users authenticate to internal RDP resources with single sign-on (SSO), multi-factor authentication (MFA), and granular access policies.
Record who is accessing which servers and when to support regulatory compliance requirements and to gain greater visibility in the event of a security event.
Eliminate the need to install and manage software on user devices. You will only need a web browser.
Reduce your attack surface by keeping your RDP servers off the public Internet and protecting them from common threats like credential stuffing or brute-force attacks.
AutoRAG now includes a Metrics tab that shows how your data is indexed and searched. Get a clear view of the health of your indexing pipeline, compare usage between ai-search and search, and see which files are retrieved most often.
You can find these metrics within each AutoRAG instance:
Indexing: Track how files are ingested and see status changes over time.
Search breakdown: Compare usage between ai-search and search endpoints.
Top file retrievals: Identify which files are most frequently retrieved in a given period.
You can now route private traffic to Cloudflare Tunnel based on a hostname or domain, moving beyond the limitations of IP-based routing. This new capability is free for all Cloudflare One customers.
Previously, Tunnel routes could only be defined by IP address or CIDR range. This created a challenge for modern applications with dynamic or ephemeral IP addresses, often forcing administrators to maintain complex and brittle IP lists.
What’s new:
Hostname & Domain Routing: Create routes for individual hostnames (e.g., payroll.acme.local) or entire domains (e.g., *.acme.local) and direct their traffic to a specific Tunnel.
Simplified Zero Trust Policies: Build resilient policies in Cloudflare Access and Gateway using stable hostnames, making it dramatically easier to apply per-resource authorization for your private applications.
Precise Egress Control: Route traffic for public hostnames (e.g., bank.example.com) through a specific Tunnel to enforce a dedicated source IP, solving the IP allowlist problem for third-party services.
No More IP Lists: This feature makes the workaround of maintaining dynamic IP Lists for Tunnel connections obsolete.
Zero Trust Dashboard has a brand new, AI-powered search functionality. You can search your account by resources (applications, policies, device profiles, settings, etc.), pages, products, and more.
Ask Cloudy — You can also ask Cloudy, our AI agent, questions about Cloudflare Zero Trust. Cloudy is trained on our developer documentation and implementation guides, so it can tell you how to configure functionality, best practices, and can make recommendations.
Cloudy can then stay open with you as you move between pages to build configuration or answer more questions.
Find Recents — Recent searches and Cloudy questions also have a new tab under Zero Trust Overview.
We’re excited to announce that Email security customers can now choose their preferred mail processing location directly from the UI when onboarding a domain. This feature is available for the following onboarding methods: MX, BCC, and Journaling.
What’s new
Customers can now select where their email is processed. The following regions are supported:
Germany
India
Australia
Global processing remains the default option, providing flexibility to meet both compliance requirements or operational preferences.
How to use it
When onboarding a domain with MX, BCC, or Journaling:
Select the desired processing location (Germany, India, or Australia).
The UI will display updated processing addresses specific to that region.
For MX onboarding, if your domain is managed by Cloudflare, you can automatically update MX records directly from the UI.
Availability
This feature is available across these Email security packages:
Advantage
Enterprise
Enterprise + PhishGuard
What’s next
We’re expanding the list of processing locations to match our Data Localization Suite (DLS) footprint, giving customers the broadest set of regional options in the market without the complexity of self-hosting.
D1 now detects read-only queries and automatically attempts up to two retries to execute those queries in the event of failures with retryable errors. You can access the number of execution attempts in the returned response metadata property total_attempts.
At the moment, only read-only queries are retried, that is, queries containing only the following SQLite keywords: SELECT, EXPLAIN, WITH. Queries containing any SQLite keyword ↗ that leads to database writes are not retried.
The retry success ratio among read-only retryable errors varies from 5% all the way up to 95%, depending on the underlying error and its duration (like network errors or other internal errors).
The retry success ratio among all retryable errors is lower, indicating that there are write-queries that could be retried. Therefore, we recommend D1 users to continue applying retries in their own code for queries that are not read-only but are idempotent according to the business logic of the application.
D1 ensures that any retry attempt does not cause database writes, making the automatic retries safe from side-effects, even if a query causing changes slips through the read-only detection. D1 achieves this by checking for modifications after every query execution, and if any write occurred due to a retry attempt, the query is rolled back.
The read-only query detection heuristics are simple for now, and there is room for improvement to capture more cases of queries that can be retried, so this is just the beginning.
Magic WAN and WARP Connector users can now securely route their DNS traffic to the Gateway resolver without exposing traffic to the public Internet.
Routing DNS traffic to the Gateway resolver allows DNS resolution and filtering for traffic coming from private networks while preserving source internal IP visibility. This ensures Magic WAN users have full integration with our Cloudflare One features, including Internal DNS and hostname-based policies.
To configure DNS filtering, change your Magic WAN or WARP Connector DNS settings to use Cloudflare's shared resolver IPs, 172.64.36.1 and 172.64.36.2. Once you configure DNS resolution and filtering, you can use Source Internal IP as a traffic selector in your resolver policies for routing private DNS traffic to your Internal DNS.
We've shipped a new release for the Agents SDK ↗ bringing full compatibility with AI SDK v5 ↗ and introducing automatic message migration that handles all legacy formats transparently.
This release includes improved streaming and tool support, tool confirmation detection (for "human in the loop" systems), enhanced React hooks with automatic tool resolution, improved error handling for streaming responses, and seamless migration utilities that work behind the scenes.
This makes it ideal for building production AI chat interfaces with Cloudflare Workers AI models, agent workflows, human-in-the-loop systems, or any application requiring reliable message handling across SDK versions — all while maintaining backward compatibility.
Additionally, we've updated workers-ai-provider v2.0.0, the official provider for Cloudflare Workers AI models, to be compatible with AI SDK v5.
useAgentChat(options)
Creates a new chat interface with enhanced v5 capabilities.
Now, Magic WAN customers can configure a custom IKE ID for their IPsec tunnels. Customers that are using Magic WAN and a VeloCloud SD-WAN device together can utilize this new feature to create a high availability configuration.
All bidirectional tunnel health check return packets are accepted by any Magic on-ramp.
Previously, when a Magic tunnel had a bidirectional health check configured, the bidirectional health check would pass when the return packets came back to Cloudflare over the same tunnel that was traversed by the forward packets.
There are SD-WAN devices, like VeloCloud, that do not offer controls to steer traffic over one tunnel versus another in a high availability tunnel configuration.
Now, when a Magic tunnel has a bidirectional health check configured, the bidirectional health check will pass when the return packet traverses over any tunnel in a high availability configuration.
We're excited to be a launch partner alongside Google ↗ to bring their newest embedding model, EmbeddingGemma, to Workers AI that delivers best-in-class performance for its size, enabling RAG and semantic search use cases.
@cf/google/embeddinggemma-300m is a 300M parameter embedding model from Google, built from Gemma 3 and the same research used to create Gemini models. This multilingual model supports 100+ languages, making it ideal for RAG systems, semantic search, content classification, and clustering tasks.
Using EmbeddingGemma in AI Search:
Now you can leverage EmbeddingGemma directly through AI Search for your RAG pipelines. EmbeddingGemma's multilingual capabilities make it perfect for global applications that need to understand and retrieve content across different languages with exceptional accuracy.
To use EmbeddingGemma for your AI Search projects:
You can now upload up to 100,000 static assets per Worker version
Paid and Workers for Platforms users can now upload up to 100,000 static assets per Worker version, a 5x increase from the previous limit of 20,000.
Customers on the free plan still have the same limit as before — 20,000 static assets per version of your Worker
The individual file size limit of 25 MiB remains unchanged for all customers.
This increase allows you to build larger applications with more static assets without hitting limits.
Wrangler
To take advantage of the increased limits, you must use Wrangler version 4.34.0 or higher.
Earlier versions of Wrangler will continue to enforce the previous 20,000 file limit.
Starting December 1, 2025, list endpoints for the Cloudflare Tunnel API and Zero Trust Networks API will no longer return deleted tunnels, routes, subnets and virtual networks by default. This change makes the API behavior more intuitive by only returning active resources unless otherwise specified.
No action is required if you already explicitly set is_deleted=false or if you only need to list active resources.
The default behavior of the is_deleted query parameter will be updated.
Scenario
Previous behavior (before December 1, 2025)
New behavior (from December 1, 2025)
is_deleted parameter is omitted
Returns active & deleted tunnels, routes, subnets and virtual networks
Returns only active tunnels, routes, subnets and virtual networks
Action required
If you need to retrieve deleted (or all) resources, please update your API calls to explicitly include the is_deleted parameter before December 1, 2025.
To get a list of only deleted resources, you must now explicitly add the is_deleted=true query parameter to your request:
Following this change, retrieving a complete list of both active and deleted resources will require two separate API calls: one to get active items (by omitting the parameter or using is_deleted=false) and one to get deleted items (is_deleted=true).
Why we’re making this change
This update is based on user feedback and aims to:
Create a more intuitive default: Aligning with common API design principles where list operations return only active resources by default.
Reduce unexpected results: Prevents users from accidentally operating on deleted resources that were returned unexpectedly.
Improve performance: For most users, the default query result will now be smaller and more relevant.
The DEX MCP server is an AI tool that allows customers to ask a question like, "Show me the connectivity and performance metrics for the device used by carly@acme.com", and receive an answer that contains data from the DEX API.
Any Cloudflare One customer using a Free, PayGo, or Enterprise account can access the DEX MCP Server. This feature is available to everyone.
Customers can test the new DEX MCP server in less than one minute. To learn more, read the DEX MCP server documentation.
Earlier this year, we announced the launch of the new Terraform v5 Provider. We are aware of the high number of issues ↗ reported by the Cloudflare community related to the v5 release. We have committed to releasing improvements on a 2 week cadence to ensure its stability and reliability, including the v5.9 release. We have also pivoted from an issue-to-issue approach to a resource-per-resource approach - we will be focusing on specific resources for every release, stabilizing the release, and closing all associated bugs with that resource before moving onto resolving migration issues.
Thank you for continuing to raise issues. We triage them weekly and they help make our products stronger.
This release includes a new resource, cloudflare_snippet, which replaces cloudflare_snippets. cloudflare_snippet is now considered deprecated but can still be used. Please utilize cloudflare_snippet as soon as possible.
Changes
Resources stabilized:
cloudfare_zone_setting
cloudflare_worker_script
cloudflare_worker_route
tiered_cache
NEW resource cloudflare_snippet which should be used in place of cloudflare_snippets. cloudflare_snippets is now deprecated. This enables the management of Cloudflare's snippet functionality through Terraform.
DNS Record Improvements: Enhanced handling of DNS record drift detection
Load Balancer Fixes: Resolved created_on field inconsistencies and improved pool configuration handling
Bot Management: Enhanced auto-update model state consistency and fight mode configurations
Other bug fixes
For a more detailed look at all of the changes, refer to the
changelog ↗ in GitHub.
If you have an unaddressed issue with the provider, we encourage you to check the open issues ↗ and open a new issue if one does not already exist for what you are experiencing.
Upgrading
We suggest holding off on migration to v5 while we work on stabilization. This help will you avoid any blocking issues while the Terraform resources are actively being stabilized.
If you'd like more information on migrating from v4 to v5, please make use of the migration guide ↗. We have provided automated migration scripts using Grit which simplify the transition. These do not support implementations which use Terraform modules, so customers making use of modules need to migrate manually. Please make use of terraform plan to test
your changes before applying, and let us know if you encounter any additional issues by reporting to our GitHub repository ↗.
Zero Trust has significantly upgraded its Shadow IT analytics, providing you with unprecedented visibility into your organizations use of SaaS tools. With this dashboard, you can review who is using an application and volumes of data transfer to the application.
You can review these metrics against application type, such as Artificial Intelligence or Social Media. You can also mark applications with an approval status, including Unreviewed, In Review, Approved, and Unapproved designating how they can be used in your organization.
These application statuses can also be used in Gateway HTTP policies, so you can block, isolate, limit uploads and downloads, and more based on the application status.
Both the analytics and policies are accessible in the Cloudflare Zero Trust dashboard ↗, empowering organizations with better visibility and control.
New state-of-the-art models have landed on Workers AI! This time, we're introducing new partner models trained by our friends at Deepgram ↗ and Leonardo ↗, hosted on Workers AI infrastructure.
As well, we're introuding a new turn detection model that enables you to detect when someone is done speaking — useful for building voice agents!
Read the blog ↗ for more details and check out some of the new models on our platform:
@cf/deepgram/aura-1 is a text-to-speech model that allows you to input text and have it come to life in a customizable voice
@cf/deepgram/nova-3 is speech-to-text model that transcribes multilingual audio at a blazingly fast speed
@cf/leonardo/lucid-origin is a text-to-image model that generates images with sharp graphic design, stunning full-HD renders, or highly specific creative direction
@cf/leonardo/phoenix-1.0 is a text-to-image model with exceptional prompt adherence and coherent text
You can filter out new partner models with the Partner capability on our Models page.
As well, we're introducing WebSocket support for some of our audio models, which you can filter though the Realtime capability on our Models page. WebSockets allows you to create a bi-directional connection to our inference server with low latency — perfect for those that are building voice agents.
An example python snippet on how to use WebSockets with our new Aura model:
import json
import os
import asyncio
import websockets
uri = f"wss://api.cloudflare.com/client/v4/accounts/{ACCOUNT_ID}/ai/run/@cf/deepgram/aura-1"
input = [
"Line one, out of three lines that will be provided to the aura model.",
"Line two, out of three lines that will be provided to the aura model.",
"Line three, out of three lines that will be provided to the aura model. This is a last line.",
]
async def text_to_speech():
async with websockets.connect(uri, additional_headers={"Authorization": os.getenv("CF_TOKEN")}) as websocket:
Cloudflare CASB ↗ now supports three of the most widely used GenAI platforms — OpenAI ChatGPT, Anthropic Claude, and Google Gemini. These API-based integrations give security teams agentless visibility into posture, data, and compliance risks across their organization’s use of generative AI.
Key capabilities
Agentless connections — connect ChatGPT, Claude, and Gemini tenants via API; no endpoint software required
Posture management — detect insecure settings and misconfigurations that could lead to data exposure
DLP detection — identify sensitive data in uploaded chat attachments or files
GenAI-specific insights — surface risks unique to each provider’s capabilities
An MCP server portal centralizes multiple Model Context Protocol (MCP) servers onto a single HTTP endpoint. Key benefits include:
Streamlined access to multiple MCP servers: MCP server portals support both unauthenticated MCP servers as well as MCP servers secured using any third-party or custom OAuth provider. Users log in to the portal URL through Cloudflare Access and are prompted to authenticate separately to each server that requires OAuth.
Customized tools per portal: Admins can tailor an MCP portal to a particular use case by choosing the specific tools and prompt templates that they want to make available to users through the portal. This allows users to access a curated set of tools and prompts — the less external context exposed to the AI model, the better the AI responses tend to be.
Observability: Once the user's AI agent is connected to the portal, Cloudflare Access logs the indiviudal requests made using the tools in the portal.
This is available in an open beta for all customers across all plans! For more information check out our blog ↗ for this release.
You can now control who within your organization has access to internal MCP servers, by putting internal MCP servers behind Cloudflare Access.
Self-hosted applications in Cloudflare Access now support OAuth for MCP server authentication. This allows Cloudflare to delegate access from any self-hosted application to an MCP server via OAuth. The OAuth access token authorizes the MCP server to make requests to your self-hosted applications on behalf of the authorized user, using that user's specific permissions and scopes.
For example, if you have an MCP server designed for internal use within your organization, you can configure Access policies to ensure that only authorized users can access it, regardless of which MCP client they use. Support for internal, self-hosted MCP servers also works with MCP server portals, allowing you to provide a single MCP endpoint for multiple MCP servers. For more on MCP server portals, read the blog post ↗ on the Cloudflare Blog.
You can now list all vector identifiers in a Vectorize index using the new list-vectors operation. This enables bulk operations, auditing, and data migration workflows through paginated requests that maintain snapshot consistency.
The operation is available via Wrangler CLI and REST API. Refer to the list-vectors best practices guide for detailed usage guidance.
Cloudflare Secrets Store is now integrated with AI Gateway, allowing you to store, manage, and deploy your AI provider keys in a secure and seamless configuration through Bring Your Own Key ↗. Instead of passing your AI provider keys directly in every request header, you can centrally manage each key with Secrets Store and deploy in your gateway configuration using only a reference, rather than passing the value in plain text.
You can now create a secret directly from your AI Gateway in the dashboard ↗ by navigating into your gateway -> Provider Keys -> Add.
You now have access to a comprehensive suite of capabilities to secure your organization's use of generative AI. AI prompt protection introduces four key features that work together to provide deep visibility and granular control.
Prompt Detection for AI Applications
DLP can now natively detect and inspect user prompts submitted to popular AI applications, including Google Gemini, ChatGPT, Claude, and Perplexity.
Prompt Analysis and Topic Classification
Our DLP engine performs deep analysis on each prompt, applying topic classification. These topics are grouped into two evaluation categories:
Content: PII, Source Code, Credentials and Secrets, Financial Information, and Customer Data.
Intent: Jailbreak attempts, requests for malicious code, or attempts to extract PII.
To help you apply these topics quickly, we have also released five new predefined profiles (for example, AI Prompt: AI Security, AI Prompt: PII) that bundle these new topics.
Granular Guardrails
You can now build guardrails using Gateway HTTP policies with application granular controls. Apply a DLP profile containing an AI prompt topic detection to individual AI applications (for example, ChatGPT) and specific user actions (for example, SendPrompt) to block sensitive prompts.
Full Prompt Logging
To aid in incident investigation, an optional setting in your Gateway policy allows you to capture prompt logs to store the full interaction of prompts that trigger a policy match. To make investigations easier, logs can be filtered by conversation_id, allowing you to reconstruct the full context of an interaction that led to a policy violation.
AI prompt protection is now available in open beta. To learn more about it, read the blog ↗ or refer to AI prompt topics.
Workers KV has completed rolling out performance improvements across all KV namespaces, providing a significant latency reduction on read operations for all KV users. This is due to architectural changes to KV's underlying storage infrastructure, which introduces a new metadata later and substantially improves redundancy.
Performance improvements
The new hybrid architecture delivers substantial latency reductions throughout Europe, Asia, Middle East, Africa regions. Over the past 2 weeks, we have observed the following:
p95 latency: Reduced from ~150ms to ~50ms (67% decrease)
p99 latency: Reduced from ~350ms to ~250ms (29% decrease)
Cloudflare Logpush can now deliver logs from using fixed, dedicated egress IPs. By routing Logpush traffic through a Cloudflare zone enabled with Aegis IP, your log destination only needs to allow Aegis IPs making setup more secure.
Highlights:
Fixed egress IPs ensure your destination only accepts traffic from known addresses.
Works with any supported Logpush destination.
Recommended to use a dedicated zone as a proxy for easier management.
To get started, work with your Cloudflare account team to provision Aegis IPs, then configure your Logpush job to deliver logs through the proxy zone. For full setup instructions, refer to the Logpush documentation.
You can now build Workflows using Python. With Python Workflows, you get automatic retries, state persistence, and the ability to run multi-step operations that can span minutes, hours, or weeks using Python’s familiar syntax and the Python Workers runtime.
Python Workflows use the same step-based execution model as JavaScript Workflows, but with Python syntax and access to Python’s ecosystem. Python Workflows also enable DAG (Directed Acyclic Graph) workflows, where you can define complex dependencies between steps using the depends parameter.
Here’s a simple example:
Python
from workers import Response, WorkflowEntrypoint
classPythonWorkflowStarter(WorkflowEntrypoint):
asyncdefrun(self,event,step):
@step.do("my first step")
asyncdefmy_first_step():
# do some work
return"Hello Python!"
awaitmy_first_step()
await step.sleep("my-sleep-step","10 seconds")
@step.do("my second step")
asyncdefmy_second_step():
# do some more work
return"Hello again!"
awaitmy_second_step()
classDefault(WorkerEntrypoint):
asyncdeffetch(self,request):
awaitself.env.MY_WORKFLOW.create()
returnResponse("Hello Workflow creation!")
Python Workflows support the same core capabilities as JavaScript Workflows, including sleep scheduling, event-driven workflows, and built-in error handling with configurable retry policies.
You can now create a client (a Durable Object stub) to a Durable Object with the new getByName method, removing the need to convert Durable Object names to IDs and then create a stub.
JavaScript
// Before: (1) translate name to ID then (2) get a client
constobjectId=env.MY_DURABLE_OBJECT.idFromName("foo");// or .newUniqueId()
conststub=env.MY_DURABLE_OBJECT.get(objectId);
// Now: retrieve client to Durable Object directly via its name
conststub=env.MY_DURABLE_OBJECT.getByName("foo");
// Use client to send request to the remote Durable Object
constrpcResponse=awaitstub.sayHello();
Each Durable Object has a globally-unique name, which allows you to send requests to a specific object from anywhere in the world. Thus, a Durable Object can be used to coordinate between multiple clients who need to work together. You can have billions of Durable Objects, providing isolation between application tenants.
You can now subscribe to events from other Cloudflare services (for example, Workers KV, Workers AI, Workers) and consume those events via Queues, allowing you to build custom workflows, integrations, and logic in response to account activity.
Event subscriptions allow you to receive messages when events occur across your Cloudflare account. Cloudflare products can publish structured events to a queue, which you can then consume with Workers or pull via HTTP from anywhere.
To create a subscription, use the dashboard or Wrangler:
An event is a structured record of something happening in your Cloudflare account – like a Workers AI batch request being queued, a Worker build completing, or an R2 bucket being created. Events follow a consistent structure:
You can now create more granular, network-aware Custom Rules in Cloudflare Load Balancing using the Autonomous System Number (ASN) of an incoming request.
This allows you to steer traffic with greater precision based on the network source of a request. For example, you can route traffic from specific Internet Service Providers (ISPs) or enterprise customers to dedicated infrastructure, optimize performance, or enforce compliance by directing certain networks to preferred data centers.
To get started, create a Custom Rule ↗ in your Load Balancer and select AS Num from the Field dropdown.
Brand Protection detects domains that may be impersonating your brand — from common misspellings (cloudfalre.com) to malicious concatenations (cloudflare-okta.com). Saved search queries run continuously and alert you when suspicious domains appear.
You can now create and save multiple queries in a single step, streamlining setup and management. Available now via the Brand Protection bulk query creation API.
Earlier this year, we announced the launch of the new Terraform v5 Provider. We are aware of the high number of issues ↗ reported by the Cloudflare Community related to the v5 release. We have committed to releasing improvements on a two week cadence to ensure stability and reliability.
One key change we adopted in recent weeks is a pivot to more comprehensive, test-driven development. We are still evaluating individual issues, but are also investing in much deeper testing to drive our stabilization efforts. We will subsequently be investing in comprehensive migration scripts. As a result, you will see several of the highest traffic APIs have been stabilized in the most recent release, and are supported by comprehensive acceptance tests.
Thank you for continuing to raise issues. We triage them weekly and they help make our products stronger.
If you have an unaddressed issue with the provider, we encourage you to check the open issues ↗ and open a new one if one does not already exist for what you are experiencing.
Upgrading
We suggest holding off on migration to v5 while we work on stablization. This help will you avoid any blocking issues while the Terraform resources are actively being stablized.
If you'd like more information on migrating to v5, please make use of the migration guide ↗. We have provided automated migration scripts using Grit which simplify the transition. These migration scripts do not support implementations which use Terraform modules, so customers making use of modules need to migrate manually. Please make use of terraform plan to test your changes before applying, and let us know if you encounter any additional issues by reporting to our GitHub repository ↗.
New information about broadcast metrics and events is now available in
Cloudflare Stream in the Live Input details of the Dashboard.
You can now easily understand broadcast-side health and performance with new
observability, which can help when troubleshooting common issues, particularly
for new customers who are just getting started, and platform customers who may
have limited visibility into how their end-users configure their encoders.
To get started, start a live stream (just getting started?), then visit the Live Input details page in Dash.
See our new live Troubleshooting guide
to learn what these metrics mean and how to use them to address common broadcast
issues.
Cloudflare Load Balancing Monitors support loading and applying settings for a specific zone to monitoring requests to origin endpoints. This feature has been migrated to new infrastructure to improve reliability, performance, and accuracy.
All zone monitors have been tested against the new infrastructure. There should be no change to health monitoring results of currently healthy and active pools. Newly created or re-enabled pools may need validation of their monitor zone settings before being introduced to service, especially regarding correct application of mTLS.
What you can expect:
More reliable application of zone settings to monitoring requests, including
Authenticated Origin Pulls
Aegis Egress IP Pools
Argo Smart Routing
HTTP/2 to Origin
Improved support and bug fixes for retries, redirects, and proxied origin resolution
Improved performance and reliability of monitoring requests withing the Cloudflare network
Unrelated CDN or WAF configuration changes should have no risk of impact to pool health
The latest releases of @cloudflare/agents ↗ brings major improvements to MCP transport protocols support and agents connectivity. Key updates include:
MCP elicitation support
MCP servers can now request user input during tool execution, enabling interactive workflows like confirmations, forms, and multi-step processes. This feature uses durable storage to preserve elicitation state even during agent hibernation, ensuring seamless user interactions across agent lifecycle events.
TypeScript
// Request user confirmation via elicitation
constconfirmation=awaitthis.elicitInput({
message:`Are you sure you want to increment the counter by ${amount}?`,
requestedSchema:{
type:"object",
properties:{
confirmed:{
type:"boolean",
title:"Confirm increment",
description:"Check to confirm the increment",
},
},
required: ["confirmed"],
},
});
Check out our demo ↗ to see elicitation in action.
HTTP streamable transport for MCP
MCP now supports HTTP streamable transport which is recommended over SSE. This transport type offers:
Better performance: More efficient data streaming and reduced overhead
Improved reliability: Enhanced connection stability and error recover- Automatic fallback: If streamable transport is not available, it gracefully falls back to SSE
TypeScript
exportdefaultMyMCP.serve("/mcp",{
binding:"MyMCP",
});
The SDK automatically selects the best available transport method, gracefully falling back from streamable-http to SSE when needed.
Enhanced MCP connectivity
Significant improvements to MCP server connections and transport reliability:
Auto transport selection: Automatically determines the best transport method, falling back from streamable-http to SSE as needed
Improved error handling: Better connection state management and error reporting for MCP servers
Reliable prop updates: Centralized agent property updates ensure consistency across different contexts
Lightweight .queue for fast task deferral
You can use .queue() to enqueue background work — ideal for tasks like processing user messages, sending notifications etc.
TypeScript
classMyAgentextendsAgent{
doSomethingExpensive(payload){
// a long running process that you want to run in the background
}
queueSomething(){
awaitthis.queue("doSomethingExpensive",somePayload);// this will NOT block further execution, and runs in the background
awaitthis.queue("doSomethingExpensive",someOtherPayload);// the callback will NOT run until the previous callback is complete
// ... call as many times as you want
}
}
Want to try it yourself? Just define a method like processMessage in your agent, and you’re ready to scale.
New email adapter
Want to build an AI agent that can receive and respond to emails automatically? With the new email adapter and onEmail lifecycle method, now you can.
TypeScript
exportclassEmailAgentextendsAgent{
asynconEmail(email:AgentEmail){
constraw=awaitemail.getRaw();
constparsed=awaitPostalMime.parse(raw);
// create a response based on the email contents
// and then send a reply
awaitthis.replyToEmail(email,{
fromName:"Email Agent",
body:`Thanks for your email! You've sent us "${parsed.subject}". We'll process it shortly.`,
Custom methods are now automatically wrapped with the agent's context, so calling getCurrentAgent() should work regardless of where in an agent's lifecycle it's called. Previously this would not work on RPC calls, but now just works out of the box.
TypeScript
exportclassMyAgentextendsAgent{
asyncsuggestReply(message){
// getCurrentAgent() now correctly works, even when called inside an RPC method
const{agent}=getCurrentAgent()!;
returngenerateText({
prompt:`Suggest a reply to: "${message}" from "${agent.name}"`,
We’ve shipped a major release for the @cloudflare/sandbox ↗ SDK, turning it into a full-featured, container-based execution platform that runs securely on Cloudflare Workers.
This update adds live streaming of output, persistent Python and JavaScript code interpreters with rich output support (charts, tables, HTML, JSON), file system access, Git operations, full background process control, and the ability to expose running services via public URLs.
This makes it ideal for building AI agents, CI runners, cloud REPLs, data analysis pipelines, or full developer tools — all without managing infrastructure.
Code interpreter (Python, JS, TS)
Create persistent code contexts with support for rich visual + structured outputs.
createCodeContext(options)
Creates a new code execution context with persistent state.
Sandboxes are still experimental. We're using them to explore how isolated, container-like workloads might scale on Cloudflare — and to help define the developer experience around them.
We're thrilled to be a Day 0 partner with OpenAI ↗ to bring their latest open models ↗ to Workers AI, including support for Responses API, Code Interpreter, and Web Search (coming soon).
Get started with the new models at @cf/openai/gpt-oss-120b and @cf/openai/gpt-oss-20b.
Check out the blog ↗ for more details about the new models, and the gpt-oss-120b and gpt-oss-20b model pages for more information about pricing and context windows.
Responses API
If you call the model through:
Workers Binding, it will accept/return Responses API – env.AI.run(“@cf/openai/gpt-oss-120b”)
REST API on /run endpoint, it will accept/return Responses API – https://api.cloudflare.com/client/v4/accounts/<account_id>/ai/run/@cf/openai/gpt-oss-120b
REST API on new /responses endpoint, it will accept/return Responses API – https://api.cloudflare.com/client/v4/accounts/<account_id>/ai/v1/responses
REST API for OpenAI Compatible endpoint, it will return Chat Completions (coming soon) – https://api.cloudflare.com/client/v4/accounts/<account_id>/ai/v1/chat/completions
"content": "What are the benefits of open-source models?"
}
]
}'
Code Interpreter
The model is natively trained to support stateful code execution, and we've implemented support for this feature using our Sandbox SDK ↗ and Containers ↗. Cloudflare's Developer Platform is uniquely positioned to support this feature, so we're very excited to bring our products together to support this new use case.
Web Search (coming soon)
We are working to implement Web Search for the model, where users can bring their own Exa API Key so the model can browse the Internet.
Earlier this year, we announced the launch of the new Terraform v5 Provider. We are aware of the high mumber of issues ↗ reported by the Cloudflare community related to the v5 release. We have committed to releasing improvements on a 2 week cadeance to ensure it's stability and reliability. We have also pivoted from an issue-to-issue approach to a resource-per-resource approach - we will be focusing on specific resources for every release, stablizing the release and closing all associated bugs with that resource before moving onto resolving migration issues.
Thank you for continuing to raise issues. We triage them weekly and they help make our products stronger.
Changes
Resources stablized:
cloudflare_custom_pages
cloudflare_page_rule
cloudflare_dns_record
cloudflare_argo_tiered_caching
Addressed chronic drift issues in cloudflare_logpush_job, cloudflare_zero_trust_dns_location, cloudflare_ruleset & cloudflare_api_token
cloudflare_zone_subscripton returns expected values rate_plan.id from former versions
cloudflare_workers_script can now successfully be destroyed with bindings & migration for Durable Objects now recorded in tfstate
Ability to configure add_headers under cloudflare_zero_trust_gateway_policy
Other bug fixes
For a more detailed look at all of the changes, see the changelog ↗ in GitHub.
If you have an unaddressed issue with the provider, we encourage you to check the open issues ↗ and open a new one if one does not already exist for what you are experiencing.
Upgrading
We suggest holding off on migration to v5 while we work on stablization. This help will you avoid any blocking issues while the Terraform resources are actively being stablized.
If you'd like more information on migrating from v4 to v5, please make use of the migration guide ↗. We have provided automated migration scripts using Grit which simplify the transition, although these do not support implementations which use Terraform modules, so customers making use of modules need to migrate manually. Please make use of terraform plan to test your changes before applying, and let us know if you encounter any additional issues by reporting to our GitHub repository ↗.
Today, we are excited to announce that all Magic Transit and Magic WAN customers with CMB EU (Customer Metadata Boundary - Europe) enabled in their account will be able to access GRE, IPsec, and CNI health check and traffic volume data in the Cloudflare dashboard and via API.
This ensures that all Magic Transit and Magic WAN customers with CMB EU enabled will be able to access all Magic Transit and Magic WAN features.
Specifically, these two GraphQL endpoints are now compatible with CMB EU:
Add secrets to a .dev.vars.example or .env.example file:
.dev.vars.example
COOKIE_SIGNING_KEY=my-secret # comment
And optionally, you can add a description for these bindings in your template's package.json to help users understand how to configure each value:
package.json
{
"name":"my-worker",
"private":true,
"cloudflare":{
"bindings":{
"API_KEY":{
"description":"Select your company's API key for connecting to the example service."
},
"COOKIE_SIGNING_KEY":{
"description":"Generate a random string using `openssl rand -hex 32`."
}
}
}
}
These secrets and environment variables will be presented to users in the dashboard as they deploy this template, allowing them to configure each value. Additional information about creating templates and Deploy to Cloudflare buttons can be found in our documentation.
The Audit Logs v2 UI is now available to all Cloudflare customers in Beta. This release builds on the public Beta of the Audit Logs v2 API ↗ and introduces a redesigned user interface with powerful new capabilities to make it easier to investigate account activity.
Enabling the new UI
To try the new user interface, go to Manage Account > Audit Logs. The previous version of Audit Logs remains available and can be re-enabled at any time using the Switch back to old Audit Logs link in the banner at the top of the page.
New Features:
Advanced Filtering: Filter logs by actor, resource, method, and more for faster insights.
On-hover filter controls: Easily include or exclude values in queries by hovering over fields within a log entry.
Detailed Log Sidebar: View rich context for each log entry without leaving the main view.
JSON Log View: Inspect the raw log data in a structured JSON format.
Custom Time Ranges: Define your own time windows to view historical activity.
Infinite Scroll: Seamlessly browse logs without clicking through pages.
A small number of audit logs may currently be unavailable in Audit Logs v2. In some cases, certain fields such as actor information may be missing in certain audit logs. We are actively working to improve coverage and completeness for General Availability.
Export to CSV is not supported in the new UI.
We are actively refining the Audit Logs v2 experience and welcome your feedback. You can share overall feedback by clicking the thumbs up or thumbs down icons at the top of the page, or provide feedback on specific audit log entries using the thumbs icons next to each audit log line or by filling out our feedback form ↗.
We’ve launched pricing for Browser Rendering, including a free tier and a pay-as-you-go model that scales with your needs. Starting August 20, 2025, Cloudflare will begin billing for Browser Rendering.
There are two ways to use Browser Rendering. Depending on the method you use, here’s how billing will work:
REST API: Charged for Duration only ($/browser hour)
Workers Bindings: Charged for both Duration and Concurrency ($/browser hour and # of concurrent browsers)
Included usage and pricing by plan
Plan
Included duration
Included concurrency
Price (beyond included)
Workers Free
10 minutes per day
3 concurrent browsers
N/A
Workers Paid
10 hours per month
10 concurrent browsers (averaged monthly)
1. REST API: $0.09 per additional browser hour 2. Workers Bindings: $0.09 per additional browser hour $2.00 per additional concurrent browser
What you need to know:
Workers Free Plan: 10 minutes of browser usage per day with 3 concurrent browsers at no charge.
Workers Paid Plan: 10 hours of browser usage per month with 10 concurrent browsers (averaged monthly) at no charge. Additional usage is charged as shown above.
You can monitor usage via the Cloudflare dashboard ↗. Go to Compute (Workers) > Browser Rendering.
If you've been using Browser Rendering and do not wish to incur charges, ensure your usage stays within your plan's included usage. To estimate costs, take a look at these example pricing scenarios.
You can now run your Browser Rendering locally using npx wrangler dev, which spins up a browser directly on your machine before deploying to Cloudflare's global network. By running tests locally, you can quickly develop, debug, and test changes without needing to deploy or worry about usage costs.
We now support audio mode! Use this feature to extract audio from a source video, outputting
an M4A file to use in downstream workflows like AI inference, content moderation, or transcription.
Subaddressing, as defined in RFC 5233 ↗, also known as plus addressing, is now supported in Email Routing. This enables using the "+" separator to augment your custom addresses with arbitrary detail information.
Now you can send an email to user+detail@example.com and it will be captured by the user@example.com custom address. The +detail part is ignored by Email Routing, but it can be captured next in the processing chain in the logs, an Email Worker or an Agent application ↗.
Customers can use this feature to dynamically add context to their emails, such as tracking the source of an email or categorizing emails without needing to create multiple custom addresses.
Check our Developer Docs to learn on to enable subaddressing in Email Routing.
You can now create document-based detection entries in DLP by uploading example documents. Cloudflare will encrypt your documents and create a unique fingerprint of the file. This fingerprint is then used to identify similar documents or snippets within your organization's traffic and stored files.
Key features and benefits:
Upload documents, forms, or templates: Easily upload .docx and .txt files (up to 10 MB) that contain sensitive information you want to protect.
Granular control with similarity percentage: Define a minimum similarity percentage (0-100%) that a document must meet to trigger a detection, reducing false positives.
Comprehensive coverage: Apply these document-based detection entries in:
Gateway policies: To inspect network traffic for sensitive documents as they are uploaded or shared.
CASB (Cloud Access Security Broker): To scan files stored in cloud applications for sensitive documents at rest.
Identify sensitive data: This new detection entry type is ideal for identifying sensitive data within completed forms, templates, or even small snippets of a larger document, helping you prevent data exfiltration and ensure compliance.
Once uploaded and processed, you can add this new document entry into a DLP profile and policies to enhance your data protection strategy.
Your real-time applications running over Cloudflare Tunnel are now faster and more reliable. We've completely re-architected the way cloudflared proxies UDP traffic in order to isolate it from other traffic, ensuring latency-sensitive applications like private DNS are no longer slowed down by heavy TCP traffic (like file transfers) on the same Tunnel.
This is a foundational improvement to Cloudflare Tunnel, delivered automatically to all customers. There are no settings to configure — your UDP traffic is already flowing faster and more reliably.
What’s new:
Faster UDP performance: We've significantly reduced the latency for establishing new UDP sessions, making applications like private DNS much more responsive.
Greater reliability for mixed traffic: UDP packets are no longer affected by heavy TCP traffic, preventing timeouts and connection drops for your real-time services.
Earlier this year, we announced the launch of the new Terraform v5 Provider. We are aware of the high mumber of issues ↗ reported by the Cloudflare community related to the v5 release, with 13.5% of resources impacted. We have committed to releasing improvements on a 2 week cadeance to ensure it's stability and relability, including the v5.7 release.
Thank you for continuing to raise issues and please keep an eye on this changelog for more information about upcoming releases.
Changes
Addressed permanent diff bug on Cloudflare Tunnel config
State is now saved correctly for Zero Trust Access applications
Exact match is now working as expected within data.cloudflare_zero_trust_access_applications
cloudflare_zero_trust_access_policy now supports OIDC claims & diff issues resolved
Self hosted applications with private IPs no longer require a public domain for cloudflare_zero_trust_access_application.
New resource:
cloudflare_zero_trust_tunnel_warp_connector
Other bug fixes
For a more detailed look at all of the changes, see the
changelog ↗ in GitHub.
If you have an unaddressed issue with the provider, we encourage you to check the open issues ↗ and open a new one if one does not already exist for what you are experiencing.
Upgrading
We suggest holding on migration to v5 while we work on stablization of the v5 provider. This will ensure Cloudflare can work ahead and avoid any blocking issues.
If you'd like more information on migrating from v4 to v5, please make use of the
migration guide ↗. We have
provided automated migration scripts using Grit which simplify the transition, although these do not support implementations which
use Terraform modules, so customers making use of modules need to migrate manually. Please make use of terraform plan to test
your changes before applying, and let us know if you encounter any additional issues by reporting to our
GitHub repository ↗.
Use our brand new onboarding experience for Cloudflare Zero Trust. New and returning users can now engage with a Get Started tab with walkthroughs for setting up common use cases end-to-end.
There are eight brand new onboarding guides in total:
Securely access a private network (sets up device client and Tunnel)
Device-to-device / mesh networking (sets up and connects multiple device clients)
Network to network connectivity (sets up and connects multiple WARP Connectors, makes reference to Magic WAN availability for Enterprise)
Secure web traffic (sets up device client, Gateway, pre-reqs, and initial policies)
Secure DNS for networks (sets up a new DNS location and Gateway policies)
Clientless web access (sets up Access to a web app, Tunnel, and public hostname)
Clientless SSH access (all the same + the web SSH experience)
Clientless RDP access (all the same + RDP-in-browser)
Each flow walks the user through the steps to configure the essential elements, and provides a “more details” panel with additional contextual information about what the user will accomplish at the end, along with why the steps they take are important.
You can now expect 3-5× faster indexing in AutoRAG, and with it, a brand new Jobs view to help you monitor indexing progress.
With each AutoRAG, indexing jobs are automatically triggered to sync your data source (i.e. R2 bucket) with your Vectorize index, ensuring new or updated files are reflected in your query results. You can also trigger jobs manually via the Sync API or by clicking “Sync index” in the dashboard.
With the new jobs observability, you can now:
View the status, job ID, source, start time, duration and last sync time for each indexing job
Inspect real-time logs of job events (e.g. Starting indexing data source...)
See a history of past indexing jobs under the Jobs tab of your AutoRAG
This makes it easier to understand what’s happening behind the scenes.
Coming soon: We’re adding APIs to programmatically check indexing status, making it even easier to integrate AutoRAG into your workflows.
You can now specify the number of connections your Hyperdrive configuration uses to connect to your origin database.
All configurations have a minimum of 5 connections. The maximum connection count for a Hyperdrive configuration depends on the Hyperdrive limits of your Workers plan.
This feature allows you to right-size your connection pool based on your database capacity and application requirements. You can configure connection counts through the Cloudflare dashboard or API.
The Email Routing platform supports SPF ↗ records and DKIM (DomainKeys Identified Mail) ↗ signatures and
honors these protocols when the sending domain has them configured. However, if the sending domain doesn't implement them,
we still forward the emails to upstream mailbox providers.
Starting on July 3, 2025, we will require all emails to be authenticated using at least one of the protocols, SPF or DKIM, to
forward them. We also strongly recommend that all senders implement the DMARC protocol.
If you are using a Worker with an Email trigger to receive email messages and forward them upstream, you will need to handle the case where
the forward action may fail due to missing authentication on the incoming email.
SPAM has been a long-standing issue with email. By enforcing mail authentication, we will increase the efficiency of identifying abusive senders and blocking
bad emails.
If you're an email server delivering emails to large mailbox providers, it's likely you already use these protocols; otherwise, please ensure
you have them properly configured.
AI is supercharging app development for everyone, but we need a safe way to run untrusted, LLM-written code. We’re introducing Sandboxes ↗, which let your Worker run actual processes in a secure, container-based environment.
exec(command: string, args: string[], options?: { stream?: boolean }):Execute a command in the sandbox.
gitCheckout(repoUrl: string, options: { branch?: string; targetDir?: string; stream?: boolean }): Checkout a git repository in the sandbox.
mkdir(path: string, options: { recursive?: boolean; stream?: boolean }): Create a directory in the sandbox.
writeFile(path: string, content: string, options: { encoding?: string; stream?: boolean }): Write content to a file in the sandbox.
readFile(path: string, options: { encoding?: string; stream?: boolean }): Read content from a file in the sandbox.
deleteFile(path: string, options?: { stream?: boolean }): Delete a file from the sandbox.
renameFile(oldPath: string, newPath: string, options?: { stream?: boolean }): Rename a file in the sandbox.
moveFile(sourcePath: string, destinationPath: string, options?: { stream?: boolean }): Move a file from one location to another in the sandbox.
ping(): Ping the sandbox.
Sandboxes are still experimental. We're using them to explore how isolated, container-like workloads might scale on Cloudflare — and to help define the developer experience around them.
You can try it today from your Worker, with just a few lines of code. Let us know what you build.
The @cloudflare/actors library is a new SDK for Durable Objects and provides a powerful set of abstractions for building real-time, interactive, and multiplayer applications on top of Durable Objects. With beta usage and feedback, @cloudflare/actors will become the recommended way to build on Durable Objects and draws upon Cloudflare's experience building products/features on Durable Objects.
The name "actors" originates from the actor programming model, which closely ties to how Durable Objects are modelled.
The @cloudflare/actors library includes:
Storage helpers for querying embeddeded, per-object SQLite storage
Storage helpers for managing SQL schema migrations
Alarm helpers for scheduling multiple alarms provided a date, delay in seconds, or cron expression
Actor class for using Durable Objects with a defined pattern
Durable Objects Workers API ↗ is always available for your application as needed
Storage and alarm helper methods can be combined with any Javascript class ↗ that defines your Durable Object, i.e, ones that extend DurableObject including the Actor class.
JavaScript
import {Storage} from "@cloudflare/actors/storage";
exportclassChatRoomextendsDurableObject<Env>{
storage:Storage;
constructor(ctx:DurableObjectState,env:Env){
super(ctx,env)
this.storage=newStorage(ctx.storage);
this.storage.migrations= [{
idMonotonicInc:1,
description:"Create users table",
sql:"CREATE TABLE IF NOT EXISTS users (id INTEGER PRIMARY KEY)"
constquery=this.storage.sql`SELECT * FROM users WHERE id = ${userId};`
returnnewResponse(`${JSON.stringify(query)}`);
}
}
@cloudflare/actors library introduces the Actor class pattern. Actor lets you access Durable Objects without writing the Worker that communicates with your Durable Object (the Worker is created for you). By default, requests are routed to a Durable Object named "default".
JavaScript
exportclassMyActorextendsActor<Env>{
asyncfetch(request:Request):Promise<Response>{
returnnewResponse('Hello, World!')
}
}
exportdefaulthandler(MyActor);
You can route to different Durable Objects by name within your Actor class using nameFromRequest ↗.
For more examples, check out the library README ↗. @cloudflare/actors library is a place for more helpers and built-in patterns, like retry handling and Websocket-based applications, to reduce development overhead for common Durable Objects functionality. Please share feedback and what more you would like to see on our Discord channel ↗.
Zero Trust now includes Data security analytics, providing you with unprecedented visibility into your organization sensitive data.
The new dashboard includes:
Sensitive Data Movement Over Time:
See patterns and trends in how sensitive data moves across your environment. This helps understand where data is flowing and identify common paths.
Sensitive Data at Rest in SaaS & Cloud:
View an inventory of sensitive data stored within your corporate SaaS applications (for example, Google Drive, Microsoft 365) and cloud accounts (such as AWS S3).
DLP Policy Activity:
Identify which of your Data Loss Prevention (DLP) policies are being triggered most often.
See which specific users are responsible for triggering DLP policies.
To access the new dashboard, log in to Cloudflare One ↗ and go to Insights on the sidebar.
This allows users to query DNS analytics across multiple zones in their account, by using the accounts filter.
Here is an example to retrieve the most recent DNS queries across all zones in your account that resulted in an NXDOMAIN response over a given time frame. Please replace a30f822fcd7c401984bf85d8f2a5111c with your actual account ID.
We've simplified the programmatic deployment of Workers via our Cloudflare SDKs. This update abstracts away the low-level complexities of the multipart/form-data upload process, allowing you to focus on your code while we handle the deployment mechanics.
Previously, deploying a Worker programmatically required manually constructing a multipart/form-data HTTP request, packaging your code and a separate metadata.json file. This was more complicated and verbose, and prone to formatting errors.
For example, here's how you would upload a Worker script previously with cURL:
return new Response(env.MESSAGE, { status: 200 });
}
};
EOF
After: SDK interface
With the new SDK interface, you can now define your entire Worker configuration using a single, structured object.
This approach allows you to specify metadata like main_module, bindings, and compatibility_date as clearer properties directly alongside your script content. Our SDK takes this logical object and automatically constructs the complex multipart/form-data API request behind the scenes.
Fixed the cloudflare_workers_script ↗ resource in Terraform, which previously was producing a diff even when there were no changes. Now, your terraform plan outputs will be cleaner and more reliable.
Fixed the cloudflare_workers_for_platforms_dispatch_namespace ↗, where the provider would attempt to recreate the namespace on a terraform apply. The resource now correctly reads its remote state, ensuring stability for production environments and CI/CD workflows.
The cloudflare_workers_route ↗ resource now allows for the script property to be empty, null, or omitted to indicate that pattern should be negated for all scripts (see routes docs). You can now reserve a pattern or temporarily disable a Worker on a route without deleting the route definition itself.
Using primary_location_hint in the cloudflare_d1_database ↗ resource will no longer always try to recreate. You can now safely change the location hint for a D1 database without causing a destructive operation.
Earlier this year, we announced the launch of the new Terraform v5 Provider.
Unlike the earlier Terraform providers, v5 is automatically generated based on the OpenAPI Schemas for our REST APIs. Since
launch, we have seen an unexpectedly high number of issues ↗
reported by customers. These issues currently impact about 15% of resources. We have been working diligently to address
these issues across the company, and have released the v5.6.0 release which includes a number of bug fixes. Please keep an
eye on this changelog for more information about upcoming releases.
Changes
Broad fixes across resources with recurring diffs, including, but not limited to:
cloudflare_zero_trust_access_identity_provider
cloudflare_zone
cloudflare_page_rules runtime panic when setting cache_level to cache_ttl_by_status
Failure to serialize requests in cloudflare_zero_trust_tunnel_cloudflared_config
Undocumented field 'priority' on zone_lockdown resource
Missing importability for cloudflare_zero_trust_device_default_profile_local_domain_fallback and cloudflare_account_subscription
New resources:
cloudflare_schema_validation_operation_settings
cloudflare_schema_validation_schemas
cloudflare_schema_validation_settings
cloudflare_zero_trust_device_settings
Other bug fixes
For a more detailed look at all of the changes, see the
changelog ↗ in GitHub.
If you have an unaddressed issue with the provider, we encourage you to check the
open issues ↗ and open a new one if one does not already
exist for what you are experiencing.
Upgrading
If you are evaluating a move from v4 to v5, please make use of the
migration guide ↗. We have
provided automated migration scripts using Grit which simplify the transition, although these do not support implementations which
use Terraform modules, so customers making use of modules need to migrate manually. Please make use of terraform plan to test
your changes before applying, and let us know if you encounter any additional issues by reporting to our
GitHub repository ↗.
Enterprise customers can now select NSEC3 as method for proof of non-existence on their zones.
What's new:
NSEC3 support for live-signed zones – For both primary and secondary zones that are configured to be live-signed (also known as "on-the-fly signing"), NSEC3 can now be selected as proof of non-existence.
NSEC3 support for pre-signed zones – Secondary zones that are transferred to Cloudflare in a pre-signed setup now also support NSEC3 as proof of non-existence.
For more information and how to enable NSEC3, refer to the NSEC3 documentation.
Custom Errors can now fetch and store assets and error pages from your origin even if they are served with a 4xx or 5xx HTTP status code — previously, only 200 OK responses were allowed.
What’s new:
You can now upload error pages and error assets that return error status codes (for example, 403, 500, 502, 503, 504) when fetched.
These assets are stored and minified at the edge, so they can be reused across multiple Custom Error rules without triggering requests to the origin.
This is especially useful for retrieving error content or downtime banners from your backend when you can’t override the origin status code.
You can now use the cf.worker.upstream_zone field in Transform Rules to control rule execution based on whether a request originates from Workers, including subrequests issued by Workers in other zones.
What's new:
cf.worker.upstream_zone is now supported in Transform Rules expressions.
Cloudflare One now offers powerful new analytics dashboards to help customers easily discover available insights into their application access and network activity. These dashboards provide a centralized, intuitive view for understanding user behavior, application usage, and security posture.

Additionally, a new exportable access report is available, allowing customers to quickly view high-level metrics and trends in their application access. A preview of the report is shown below, with more to be found in the report:
Both features are accessible in the Cloudflare Zero Trust dashboard ↗, empowering organizations with better visibility and control.
Redesigned the user interface, now centralized at the account level.
Introduced Private Load Balancers to the UI, enabling you to manage traffic for all of your external and internal applications in a single spot.
This update streamlines how you manage load balancers across multiple zones and extends robust traffic management to your private network infrastructure.
Key Enhancements:
Account-Level UI Consolidation:
Unified Management: Say goodbye to navigating individual zones for load balancing tasks. You can now view, configure, and monitor all your load balancers across every zone in your account from a single, intuitive interface at the account level.
Improved Efficiency: This centralized approach provides a more streamlined workflow, making it faster and easier to manage both your public-facing and internal traffic distribution.
Private Network Load Balancing:
Secure Internal Application Access: Create Private Load Balancers to distribute traffic to applications hosted within your private network, ensuring they are not exposed to the public Internet.
WARP & Magic WAN Integration: Effortlessly direct internal traffic from users connected via Cloudflare WARP or through your Magic WAN infrastructure to the appropriate internal endpoint pools.
Enhanced Security for Internal Resources: Combine reliable Load Balancing with Zero Trust access controls to ensure your internal services are both performant and only accessible by verified users.
Users can now use an OpenAI Compatible endpoint in AI Gateway to easily switch between providers, while keeping the exact same request and response formats. We're launching now with the chat completions endpoint, with the embeddings endpoint coming up next.
To get started, use the OpenAI compatible chat completions endpoint URL with your own account id and gateway id and switch between providers by changing the model and apiKey parameters.
OpenAI SDK Example
import OpenAI from "openai";
constclient=newOpenAI({
apiKey:"YOUR_PROVIDER_API_KEY",// Provider API key
messages: [{ role:"user", content:"What is Cloudflare?"}],
});
console.log(response.choices[0].message.content);
Additionally, the OpenAI Compatible endpoint can be combined with our Universal Endpoint to add fallbacks across multiple providers. That means AI Gateway will return every response in the same standardized format, no extra parsing logic required!
When you use the built-in build system that is part of Cloudflare Pages, the Build Image now includes Node.js v22. Previously, Node.js v18 was provided by default, and Node.js v18 is now end-of-life (EOL).
If you are creating a new Pages project, the new V3 build image that includes Node.js v22 will be used by default. If you have an existing Pages project, you can update to the latest build image by navigating to Settings > Build & deployments > Build system version in the Cloudflare dashboard for a specific Pages project.
Note that you can always specify a particular version of Node.js or other built-in dependencies by setting an environment variable.
You can now enable Polish with the webp format directly in Configuration Rules, allowing you to optimize image delivery for specific routes, user agents, or A/B tests — without applying changes zone-wide.
What’s new:
WebP is now a supported value in the Polish setting for Configuration Rules.
This gives you more precise control over how images are compressed and delivered, whether you're targeting modern browsers, running experiments, or tailoring performance by geography or device type.
Users can now access significant enhancements to Cloudflare Gateway analytics, providing you with unprecedented visibility into your organization's DNS queries, HTTP requests, and Network sessions. These powerful new dashboards enable you to go beyond raw logs and gain actionable insights into how your users are interacting with the Internet and your protected resources.
You can now visualize and explore:
Patterns Over Time: Understand trends in traffic volume and blocked requests, helping you identify anomalies and plan for future capacity.
Top Users & Destinations: Quickly pinpoint the most active users, enabling better policy enforcement and resource allocation.
Actions Taken: See a clear breakdown of security actions applied by Gateway policies, such as blocks and allows, offering a comprehensive view of your security posture.
Geographic Regions: Gain insight into the global distribution of your traffic.
To access the new overview, log in to your Cloudflare Zero Trust dashboard ↗ and go to Analytics in the side navigation bar.
Users using Cloudflare's REST API to query their D1 database can see lower end-to-end request latency now that D1 authentication is performed at the closest Cloudflare network data center that received the request. Previously, authentication required D1 REST API requests to proxy to Cloudflare's core, centralized data centers, which added network round trips and latency.
Latency improvements range from 50-500 ms depending on request location and database location and only apply to the REST API. REST API requests and databases outside the United States see a bigger benefit since Cloudflare's primary core data centers reside in the United States.
D1 query endpoints like /query and /raw have the most noticeable improvements since they no longer access Cloudflare's core data centers. D1 control plane endpoints such as those to create and delete databases see smaller improvements, since they still require access to Cloudflare's core data centers for other control plane metadata.
We're excited to share that you can now use the Playwright MCP ↗ server with Browser Rendering.
Once you deploy the server, you can use any MCP client with it to interact with Browser Rendering. This allows you to run AI models that can automate browser tasks, such as taking screenshots, filling out forms, or scraping data.
Cloudflare for SaaS ↗ allows you to extend the benefits of Cloudflare to your customers via their own custom or vanity domains. Now, the limit for custom hostnames ↗ on a Cloudflare for SaaS pay-as-you-go plan has been raised from 5,000 custom hostnames to 50,000 custom hostnames.
With custom origin server -- previously an enterprise-only feature -- you can route traffic from one or more custom hostnames somewhere other than your default proxy fallback. Custom origin server ↗ is now available to Cloudflare for SaaS customers on Free, Pro, and Business plans.
You can enable custom origin server on a per-custom hostname basis via the API ↗ or the UI:
We’ve launched two powerful new tools to make the GraphQL Analytics API more accessible:
GraphQL API Explorer
The new GraphQL API Explorer ↗ helps you build, test, and run queries directly in your browser. Features include:
In-browser schema documentation to browse available datasets and fields
Interactive query editor with autocomplete and inline documentation
A "Run in GraphQL API Explorer" button to execute example queries from our docs
Seamless OAuth authentication — no manual setup required
GraphQL Model Context Protocol (MCP) Server
MCP Servers let you use natural language tools like Claude to generate structured queries against your data. See our blog post ↗ for details on how they work and which servers are available. The new GraphQL MCP server ↗ helps you discover and generate useful queries for the GraphQL Analytics API. With this server, you can:
Explore what data is available to query
Generate and refine queries using natural language, with one-click links to run them in the API Explorer
Build dashboards and visualizations from structured query outputs
Example prompts include:
“Show me HTTP traffic for the last 7 days for example.com”
“What GraphQL node returns firewall events?”
“Can you generate a link to the Cloudflare GraphQL API Explorer with a pre-populated query and variables?”
We’re continuing to expand these tools, and your feedback helps shape what’s next. Explore the documentation to learn more and get started.
Earlier this year, we announced the launch of the new Terraform v5 Provider. Unlike the earlier Terraform providers, v5 is automatically generated based on the OpenAPI Schemas for our REST APIs. Since launch, we have seen an unexpectedly high number of issues ↗ reported by customers. These issues currently impact about 15% of resources. We have been working diligently to address these issues across the company, and have released the v5.5.0 release which includes a number of bug fixes. Please keep an eye on this changelog for more information about upcoming releases.
Changes
Broad fixes across resources with recurring diffs, including, but not limited to:
cloudflare_zero_trust_gateway_policy
cloudflare_zero_trust_access_application
cloudflare_zero_trust_tunnel_cloudflared_route
cloudflare_zone_setting
cloudflare_ruleset
cloudflare_page_rule
Zone settings can be re-applied without client errors
Page rules conversion errors are fixed
Failure to apply changes to cloudflare_zero_trust_tunnel_cloudflared_route
Other bug fixes
For a more detailed look at all of the changes, see the changelog ↗ in GitHub.
If you have an unaddressed issue with the provider, we encourage you to check the open issues ↗ and open a new one if one does not already exist for what you are experiencing.
Upgrading
If you are evaluating a move from v4 to v5, please make use of the migration guide ↗. We have provided automated migration scripts using Grit which simplify the transition, although these do not support implementations which use Terraform modules, so customers making use of modules need to migrate manually. Please make use of terraform plan to test your changes before applying, and let us know if you encounter any additional issues by reporting to our GitHub repository ↗.
A new Access Analytics dashboard is now available to all Cloudflare One customers. Customers can apply and combine multiple filters to dive into specific slices of their Access metrics. These filters include:
You can now create Durable Objects using
Python Workers. A Durable Object is a special kind of
Cloudflare Worker which uniquely combines compute with storage, enabling stateful
long-running applications which run close to your users. For more info see
here.
You can define a Durable Object in Python in a similar way to JavaScript:
Python
from workers import DurableObject, Response, WorkerEntrypoint
from urllib.parse import urlparse
classMyDurableObject(DurableObject):
def__init__(self,ctx,env):
self.ctx = ctx
self.env = env
deffetch(self,request):
result =self.ctx.storage.sql.exec("SELECT 'Hello, World!' as greeting").one()
returnResponse(result.greeting)
classDefault(WorkerEntrypoint):
asyncdeffetch(self,request):
url =urlparse(request.url)
id= env.MY_DURABLE_OBJECT.idFromName(url.path)
stub = env.MY_DURABLE_OBJECT.get(id)
greeting =await stub.fetch(request.url)
return greeting
Define the Durable Object in your Wrangler configuration file:
Hyperdrive has been approved for FedRAMP Authorization and is now available in the FedRAMP Marketplace ↗.
FedRAMP is a U.S. government program that provides standardized assessment and authorization for cloud products and services. As a result of this product update,
Hyperdrive has been approved as an authorized service to be used by U.S. federal agencies at the Moderate Impact level.
We are adding source origin restrictions to
the Media Transformations beta. This allows customers to restrict what sources
can be used to fetch images and video for transformations. This feature is the
same as --- and uses the same settings as ---
Image Transformations sources.
When transformations is first enabled, the default setting only allows
transformations on images and media from the same website or domain being used to make
the transformation request. In other words, by default, requests to
example.com/cdn-cgi/media can only reference originals on example.com.
Adding access to other sources, or allowing any source,
is easy to do
in the Transformations tab under Stream. Click each domain enabled for
Transformations and set its sources list to match the needs of your content. The
user making this change will need permission to edit zone settings.
Remote Browser Isolation (RBI) now supports SAML HTTP-POST bindings, enabling seamless authentication for SSO-enabled applications that rely on POST-based SAML responses from Identity Providers (IdPs) within a Remote Browser Isolation session. This update resolves a previous limitation that caused 405 errors during login and improves compatibility with multi-factor authentication (MFA) flows.
With expanded support for major IdPs like Okta and Azure AD, this enhancement delivers a more consistent and user-friendly experience across authentication workflows. Learn how to set up Remote Browser Isolation.
You can now configure custom word lists to enforce case sensitivity. This setting supports flexibility where needed and aims to reduce false positives where letter casing is critical.
You can now publish messages to Cloudflare Queues directly via HTTP from any service or programming language that supports sending HTTP requests. Previously, publishing to queues was only possible from within Cloudflare Workers. You can already consume from queues via Workers or HTTP pull consumers, and now publishing is just as flexible.
Publishing via HTTP requires a Cloudflare API token with Queues Edit permissions for authentication. Here's a simple example:
You can now use IP, Autonomous System (AS), and Hostname custom lists to route traffic to Snippets and Cloud Connector, giving you greater precision and control over how you match and process requests at the edge.
In Snippets, you can now also match on Bot Score and WAF Attack Score, unlocking smarter edge logic for everything from request filtering and mitigation to tarpitting and logging.
What’s new:
Custom lists matching – Snippets and Cloud Connector now support user-created IP, AS, and Hostname lists via dashboard or Lists API. Great for shared logic across zones.
Bot Score and WAF Attack Score – Use Cloudflare’s intelligent traffic signals to detect bots or attacks and take advanced, tailored actions with just a few lines of code.
These enhancements unlock new possibilities for building smarter traffic workflows with minimal code and maximum efficiency.
You can now send DLP forensic copies to third-party storage for any HTTP policy with an Allow or Block action, without needing to include a DLP profile. This change increases flexibility for data handling and forensic investigation use cases.
By default, Gateway will send all matched HTTP requests to your configured DLP Forensic Copy jobs.
Cloudflare Load Balancing now supports UDP (Layer 4) and ICMP (Layer 3) health monitors for private endpoints. This makes it simple to track the health and availability of internal services that don’t respond to HTTP, TCP, or other protocol probes.
What you can do:
Set up ICMP ping monitors to check if your private endpoints are reachable.
Use UDP monitors for lightweight health checks on non-TCP workloads, such as DNS, VoIP, or custom UDP-based services.
Gain better visibility and uptime guarantees for services running behind Private Network Load Balancing, without requiring public IP addresses.
This enhancement is ideal for internal applications that rely on low-level protocols, especially when used in conjunction with Cloudflare Tunnel, WARP, and Magic WAN to create a secure and observable private network.
Earlier this year, we announced the launch of the new Terraform v5 Provider. Unlike the earlier Terraform providers, v5 is automatically generated based on the OpenAPI Schemas for our REST APIs. Since launch, we have seen an unexpectedly high number of issues ↗ reported by customers. These issues currently impact about 15% of resources. We have been working diligently to address these issues across the company, and have released the v5.4.0 release which includes a number of bug fixes. Please keep an eye on this changelog for more information about upcoming releases.
Changes
Removes the worker_platforms_script_secret resource from the provider (see migration guide ↗ for alternatives—applicable to both Workers and Workers for Platforms)
Removes duplicated fields in cloudflare_cloud_connector_rules resource
If you are evaluating a move from v4 to v5, please make use of the migration guide ↗. We have provided automated migration scripts using Grit which simplify the transition, although these do not support implementations which use Terraform modules, so customers making use of modules need to migrate manually. Please make use of terraform plan to test your changes before applying, and let us know if you encounter any additional issues either by reporting to our GitHub repository ↗, or by opening a support ticket ↗.
A new Browser Isolation Overview page is now available in the Cloudflare Zero Trust dashboard. This centralized view simplifies the management of Remote Browser Isolation (RBI) deployments, providing:
Streamlined Onboarding: Easily set up and manage isolation policies from one location.
Centralized Monitoring: Track aggregate usage and blocked actions.
This update consolidates previously disparate settings, accelerating deployment, improving visibility into isolation activity, and making it easier to ensure your protections are working effectively.
To access the new overview, log in to your Cloudflare Zero Trust dashboard ↗ and find Browser Isolation in the side navigation bar.
We're excited to announce several improvements to the Cloudflare R2 dashboard experience that make managing your object storage easier and more intuitive:
All-new settings page
We've redesigned the bucket settings page, giving you a centralized location to manage all your bucket configurations in one place.
Improved navigation and sharing
Deeplink support for prefix directories: Navigate through your bucket hierarchy without losing your state. Your browser's back button now works as expected, and you can share direct links to specific prefix directories with teammates.
Objects as clickable links: Objects are now proper links that you can copy or CMD + Click to open in a new tab.
Clearer public access controls
Renamed "r2.dev domain" to "Public Development URL" for better clarity when exposing bucket contents for non-production workloads.
Public Access status now clearly displays "Enabled" when your bucket is exposed to the internet (via Public Development URL or Custom Domains).
We've also made numerous other usability improvements across the board to make your R2 experience smoother and more productive.
Queues pull consumers can now pull and acknowledge up to 5,000 messages / second per queue. Previously, pull consumers were rate limited to 1,200 requests / 5 minutes, aggregated across all queues.
Pull consumers allow you to consume messages over HTTP from any environment—including outside of Cloudflare Workers. They’re also useful when you need fine-grained control over how quickly messages are consumed.
To setup a new queue with a pull based consumer using Wrangler, run:
Create a queue with a pull based consumer
npxwranglerqueuescreatemy-queue
npxwranglerqueuesconsumerhttpaddmy-queue
You can also configure a pull consumer using the REST API or the Queues dashboard.
Once configured, you can pull messages from the queue using any HTTP client. You'll need a Cloudflare API Token with queues_read and queues_write permissions. For example:
To learn more about how to acknowledge messages, pull batches at once, and setup multiple consumers, refer to the pull consumer documentation.
As always, Queues doesn't charge for data egress. Pull operations continue to be billed at the existing rate, of $0.40 / million operations. The increased limits are available now, on all new and existing queues. If you're new to Queues, get started with the Cloudflare Queues guide.
You can now retrieve up to 100 keys in a single bulk read request made to Workers KV using the binding.
This makes it easier to request multiple KV pairs within a single Worker invocation. Retrieving many key-value pairs using the bulk read operation is more performant than making individual requests since bulk read operations are not affected by Workers simultaneous connection limits.
JavaScript
// Read single key
constkey="key-a";
constvalue=awaitenv.NAMESPACE.get(key);
// Read multiple keys
constkeys= ["key-a","key-b","key-c",...] // up to 100 keys
Previously, a request to the Workers Create Route API always returned null for "script" and an empty string for "pattern" even if the request was successful.
The Workers and Workers for Platforms secrets APIs are now properly documented in the Cloudflare OpenAPI docs. Previously, these endpoints were not publicly documented, leaving users confused on how to directly manage their secrets via the API. Now, you can find the proper endpoints in our public documentation, as well as in our API Library SDKs such as cloudflare-typescript ↗ (>4.2.0) and cloudflare-python ↗ (>4.1.0).
Note the cloudflare_workers_secret and cloudflare_workers_for_platforms_script_secretTerraform resources ↗ are being removed in a future release. This resource is not recommended for managing secrets. Users should instead use the:
Secrets Store with the "Secrets Store Secret" binding on Workers and Workers for Platforms Script Upload
Cloudflare Stream has completed an infrastructure upgrade for our Live WebRTC beta support which brings increased scalability and improved playback performance to all customers. WebRTC allows broadcasting directly from a browser (or supported WHIP client) with ultra-low latency to tens of thousands of concurrent viewers across the globe.
Additionally, as part of this upgrade, the WebRTC beta now supports Signed URLs to protect playback, just like our standard live stream options (HLS/DASH).
D1 read replication is available in public beta to help lower average latency and increase overall throughput for read-heavy applications like e-commerce websites or content management tools.
Workers can leverage read-only database copies, called read replicas, by using D1 Sessions API. A session encapsulates all the queries from one logical session for your application. For example, a session may correspond to all queries coming from a particular web browser session. With Sessions API, D1 queries in a session are guaranteed to be sequentially consistent to avoid data consistency pitfalls. D1 bookmarks can be used from a previous session to ensure logical consistency between sessions.
TypeScript
// retrieve bookmark from previous session stored in HTTP header
Read replicas are automatically created by Cloudflare (currently one in each supported D1 region), are active/inactive based on query traffic, and are transparently routed to by Cloudflare at no additional cost.
To checkout D1 read replication, deploy the following Worker code using Sessions API, which will prompt you to create a D1 database and enable read replication on said database.
To learn more about how read replication was implemented, go to our blog post ↗.
Pipelines let you ingest high volumes of real time data, without managing the underlying infrastructure. A single pipeline can ingest up to 100 MB of data per second, via HTTP or from a Worker. Ingested data is automatically batched, written to output files, and delivered to an R2 bucket in your account. You can use Pipelines to build a data lake of clickstream data, or to store events from a Worker.
Today, we're launching R2 Data Catalog in open beta, a managed Apache Iceberg catalog built directly into your Cloudflare R2 bucket.
If you're not already familiar with it, Apache Iceberg ↗ is an open table format designed to handle large-scale analytics datasets stored in object storage, offering ACID transactions and schema evolution. R2 Data Catalog exposes a standard Iceberg REST catalog interface, so you can connect engines like Spark, Snowflake, and PyIceberg to start querying your tables using the tools you already know.
To enable a data catalog on your R2 bucket, find R2 Data Catalog in your buckets settings in the dashboard, or run:
Terminal window
npxwranglerr2bucketcatalogenablemy-bucket
And that's it. You'll get a catalog URI and warehouse you can plug into your favorite Iceberg engines.
Visit our getting started guide for step-by-step instructions on enabling R2 Data Catalog, creating tables, and running your first queries.
Hyperdrive now supports more SSL/TLS security options for your database connections:
Configure Hyperdrive to verify server certificates with verify-ca or verify-full SSL modes and protect against man-in-the-middle attacks
Configure Hyperdrive to provide client certificates to the database server to authenticate itself (mTLS) for stronger security beyond username and password
Use the new wrangler cert commands to create certificate authority (CA) certificate bundles or client certificate pairs:
Cloudflare Secrets Store is available today in Beta. You can now store, manage, and deploy account level secrets from a secure, centralized platform to your Workers.
To spin up your Cloudflare Secrets Store, simply click the new Secrets Store tab in the dashboard ↗ or use this Wrangler command:
Terminal window
wranglersecrets-storestorecreate<name>--remote
The following are supported in the Secrets Store beta:
Secrets Store UI & API: create your store & create, duplicate, update, scope, and delete a secret
Workers UI: bind a new or existing account level secret to a Worker and deploy in code
Wrangler: create your store & create, duplicate, update, scope, and delete a secret
Account Management UI & API: assign Secrets Store permissions roles & view audit logs for actions taken in Secrets Store core platform
Email Workers enables developers to programmatically take action on anything that hits their email inbox. If you're building with Email Workers, you can now test the behavior of an Email Worker script, receiving, replying and sending emails in your local environment using wrangler dev.
Below is an example that shows you how you can receive messages using the email() handler and parse them using postal-mime ↗:
Now when you run npx wrangler dev, wrangler will expose a local /cdn-cgi/handler/email endpoint that you can POST email messages to and trigger your Worker's email() handler:
--data-raw'Received: from smtp.example.com (127.0.0.1)
by cloudflare-email.com (unknown) id 4fwwffRXOpyR
for <recipient@example.com>; Tue, 27 Aug 2024 15:50:20 +0000
From: "John" <sender@example.com>
Reply-To: sender@example.com
To: recipient@example.com
Subject: Testing Email Workers Local Dev
Content-Type: text/html; charset="windows-1252"
X-Mailer: Curl
Date: Tue, 27 Aug 2024 08:49:44 -0700
Message-ID: <6114391943504294873000@ZSH-GHOSTTY>
Hi there'
This is what you get in the console:
{
"headers":[
{
"key":"received",
"value":"from smtp.example.com (127.0.0.1) by cloudflare-email.com (unknown) id 4fwwffRXOpyR for <recipient@example.com>; Tue, 27 Aug 2024 15:50:20 +0000"
Local development is a critical part of the development flow, and also works for sending, replying and forwarding emails. See our documentation for more information.
Hyperdrive is now available on the Free plan of Cloudflare Workers, enabling you to build Workers that connect to PostgreSQL or MySQL databases without compromise.
Low-latency access to SQL databases is critical to building full-stack Workers applications. We want you to be able to build on fast, global apps on Workers,
regardless of the tools you use. So we made Hyperdrive available for all, to make it easier to build Workers that connect to PostgreSQL and MySQL.
If you want to learn more about how Hyperdrive works, read the deep dive ↗ on how Hyperdrive can make your database queries up to 4x faster.
Visit the docs to get started with Hyperdrive for PostgreSQL or MySQL.
The Agents SDK now includes built-in support for building remote MCP (Model Context Protocol) servers directly as part of your Agent. This allows you to easily create and manage MCP servers, without the need for additional infrastructure or configuration.
The SDK includes a new MCPAgent class that extends the Agent class and allows you to expose resources and tools over the MCP protocol, as well as authorization and authentication to enable remote MCP servers.
See the example ↗ for the full code and as the basis for building your own MCP servers, and the client example ↗ for how to build an Agent that acts as an MCP client.
To learn more, review the announcement blog ↗ as part of Developer Week 2025.
Agents SDK updates
We've made a number of improvements to the Agents SDK, including:
Support for building MCP servers with the new MCPAgent class.
The ability to export the current agent, request and WebSocket connection context using import { context } from "agents", allowing you to minimize or avoid direct dependency injection when calling tools.
Fixed a bug that prevented query parameters from being sent to the Agent server from the useAgent React hook.
Automatically converting the agent name in useAgent or useAgentChat to kebab-case to ensure it matches the naming convention expected by routeAgentRequest.
To install or update the Agents SDK, run npm i agents@latest in an existing project, or explore the agents-starter project:
AutoRAG is now in open beta, making it easy for you to build fully-managed retrieval-augmented generation (RAG) pipelines without managing infrastructure. Just upload your docs to R2, and AutoRAG handles the rest: embeddings, indexing, retrieval, and response generation via API.
With AutoRAG, you can:
Customize your pipeline: Choose from Workers AI models, configure chunking strategies, edit system prompts, and more.
Instant setup: AutoRAG provisions everything you need from Vectorize, AI gateway, to pipeline logic for you, so you can go from zero to a working RAG pipeline in seconds.
Keep your index fresh: AutoRAG continuously syncs your index with your data source to ensure responses stay accurate and up to date.
Ask questions: Query your data and receive grounded responses via a Workers binding or API.
Whether you're building internal tools, AI-powered search, or a support assistant, AutoRAG gets you from idea to deployment in minutes.
Get started in the Cloudflare dashboard ↗ or check out the guide for instructions on how to build your RAG pipeline today.
We’re excited to announce Browser Rendering is now available on the Workers Free plan ↗, making it even easier to prototype and experiment with web search and headless browser use-cases when building applications on Workers.
The Browser Rendering REST API is now Generally Available, allowing you to control browser instances from outside of Workers applications. We've added three new endpoints to help automate more browser tasks:
Extract structured data – Use /json to retrieve structured data from a webpage.
Retrieve links – Use /links to pull all links from a webpage.
Convert to Markdown – Use /markdown to convert webpage content into Markdown format.
For example, to fetch the Markdown representation of a webpage:
We also recently landed support for Playwright in Browser Rendering for browser automation from Cloudflare Workers, in addition to Puppeteer, giving you more flexibility to test across different browser environments.
Visit the Browser Rendering docs to learn more about how to use headless browsers in your applications.
Durable Objects can now be used with zero commitment on the Workers Free plan allowing you to build AI agents with Agents SDK, collaboration tools, and real-time applications like chat or multiplayer games.
Durable Objects let you build stateful, serverless applications with millions of tiny coordination instances that run your application code alongside (in the same thread!) your durable storage. Each Durable Object can access its own SQLite database through a Storage API. A Durable Object class is defined in a Worker script encapsulating the Durable Object's behavior when accessed from a Worker. To try the code below, click the button:
JavaScript
import {DurableObject} from "cloudflare:workers";
// Durable Object
exportclassMyDurableObjectextendsDurableObject{
...
asyncsayHello(name){
return`Hello, ${name}!`;
}
}
// Worker
exportdefault{
asyncfetch(request,env){
// Every unique ID refers to an individual instance of the Durable Object class
constid=env.MY_DURABLE_OBJECT.idFromName("foo");
// A stub is a client used to invoke methods on the Durable Object
conststub=env.MY_DURABLE_OBJECT.get(id);
// Methods on the Durable Object are invoked via the stub
constresponse=awaitstub.sayHello("world");
returnresponse;
},
};
Free plan limits apply to Durable Objects compute and storage usage. Limits allow developers to build real-world applications, with every Worker request able to call a Durable Object on the free plan.
SQLite in Durable Objects is now generally available (GA) with 10GB SQLite database per Durable Object. Since the public beta ↗ in September 2024, we've added feature parity and robustness for the SQLite storage backend compared to the preexisting key-value (KV) storage backend for Durable Objects.
SQLite-backed Durable Objects are recommended for all new Durable Object classes, using new_sqlite_classesWrangler configuration. Only SQLite-backed Durable Objects have access to Storage API's SQL and point-in-time recovery methods, which provide relational data modeling, SQL querying, and better data management.
JavaScript
exportclassMyDurableObjectextendsDurableObject{
sql:SqlStorage
constructor(ctx:DurableObjectState,env:Env){
super(ctx,env);
this.sql=ctx.storage.sql;
}
asyncsayHello(){
letresult=this.sql
.exec("SELECT 'Hello, World!' AS greeting")
.one();
returnresult.greeting;
}
}
KV-backed Durable Objects remain for backwards compatibility, and a migration path from key-value storage to SQL storage for existing Durable Object classes will be offered in the future.
Workflows is now Generally Available (or "GA"): in short, it's ready for production workloads. Alongside marking Workflows as GA, we've introduced a number of changes during the beta period, including:
A new waitForEvent API that allows a Workflow to wait for an event to occur before continuing execution.
Improved observability, including new CPU time metrics that allow you to better understand which Workflow instances are consuming the most resources and/or contributing to your bill.
Support for vitest for testing Workflows locally and in CI/CD pipelines.
Workflows also supports the new increased CPU limits that apply to Workers, allowing you to run more CPU-intensive tasks (up to 5 minutes of CPU time per instance), not including the time spent waiting on network calls, AI models, or other I/O bound tasks.
Human-in-the-loop
The new step.waitForEvent API allows a Workflow instance to wait on events and data, enabling human-in-the-the-loop interactions, such as approving or rejecting a request, directly handling webhooks from other systems, or pushing event data to a Workflow while it's running.
Because Workflows are just code, you can conditionally execute code based on the result of a waitForEvent call, and/or call waitForEvent multiple times in a single Workflow based on what the Workflow needs.
For example, if you wanted to implement a human-in-the-loop approval process, you could use waitForEvent to wait for a user to approve or reject a request, and then conditionally execute code based on the result.
You can now access all Cloudflare cache purge methods — no matter which plan you’re on. Whether you need to update a single asset or instantly invalidate large portions of your site’s content, you now have the same powerful tools previously reserved for Enterprise customers.
Anyone on Cloudflare can now:
Purge Everything: Clears all cached content associated with a website.
Purge by Tag: Uses Cache-Tag response headers to invalidate grouped assets, offering flexibility for complex cache management scenarios.
Want to learn how each purge method works, when to use them, or what limits apply to your plan? Dive into our purge cache documentation and API reference ↗ for all the details.
Queues now supports the ability to pause message delivery and/or purge (delete) messages on a queue. These operations can be useful when:
Your consumer has a bug or downtime, and you want to temporarily stop messages from being processed while you fix the bug
You have pushed invalid messages to a queue due to a code change during development, and you want to clean up the backlog
Your queue has a backlog that is stale and you want to clean it up to allow new messages to be consumed
To pause a queue using Wrangler, run the pause-delivery command. Paused queues continue to receive messages. And you can easily unpause a queue using the resume-delivery command.
Pause and resume a queue
$wranglerqueuespause-deliverymy-queue
Pausingmessagedeliveryforqueuemy-queue.
Pausedmessagedeliveryforqueuemy-queue.
$wranglerqueuesresume-deliverymy-queue
Resumingmessagedeliveryforqueuemy-queue.
Resumedmessagedeliveryforqueuemy-queue.
Purging a queue permanently deletes all messages in the queue. Unlike pausing, purging is an irreversible operation:
Cloudflare Registrar now supports .ai and .shop domains. These are two of our most highly-requested top-level domains (TLDs) and are great additions to the 300+ other TLDs we support ↗.
Starting today, customers can:
Register and renew these domains at cost without any markups or add-on fees
Enjoy best-in-class security and performance with native integrations with Cloudflare DNS, CDN, and SSL services like one-click DNSSEC
We can't wait to see what AI and e-commerce projects you deploy on Cloudflare. To get started, transfer your domains to Cloudflare or search for new ones to register ↗.
The latest version of audit logs streamlines audit logging by automatically capturing all user and system actions performed through the Cloudflare Dashboard or public APIs. This update leverages Cloudflare’s existing API Shield to generate audit logs based on OpenAPI schemas, ensuring a more consistent and automated logging process.
Availability: Audit logs (version 2) is now in Beta, with support limited to API access.
Use the following API endpoint to retrieve audit logs:
You can access detailed documentation for audit logs (version 2) Beta API release here ↗.
Key Improvements in the Beta Release:
Automated & standardized logging: Logs are now generated automatically using a standardized system, replacing manual, team-dependent logging. This ensures consistency across all Cloudflare services.
Expanded product coverage: Increased audit log coverage from 75% to 95%. Key API endpoints such as /accounts, /zones, and /organizations are now included.
Granular filtering: Logs now follow a uniform format, enabling precise filtering by actions, users, methods, and resources—allowing for faster and more efficient investigations.
Enhanced context and traceability: Each log entry now includes detailed context, such as the authentication method used, the interface (API or Dashboard) through which the action was performed, and mappings to Cloudflare Ray IDs for better traceability.
Comprehensive activity capture: Expanded logging to include GET requests and failed attempts, ensuring that all critical activities are recorded.
Known Limitations in Beta
Error handling for the API is not implemented.
There may be gaps or missing entries in the available audit logs.
UI is unavailable in this Beta release.
System-level logs and User-Activity logs are not included.
Support for these features is coming as part of the GA release later this year. For more details, including a sample audit log, check out our blog post: Introducing Automatic Audit Logs ↗
Update: Mon Mar 24th, 11PM UTC: Next.js has made further changes to address a smaller vulnerability introduced in the patches made to its middleware handling. Users should upgrade to Next.js versions 15.2.4, 14.2.26, 13.5.10 or 12.3.6. If you are unable to immediately upgrade or are running an older version of Next.js, you can enable the WAF rule described in this changelog as a mitigation.
Update: Mon Mar 24th, 8PM UTC: Next.js has now backported the patch for this vulnerability ↗ to cover Next.js v12 and v13. Users on those versions will need to patch to 13.5.9 and 12.3.5 (respectively) to mitigate the vulnerability.
Update: Sat Mar 22nd, 4PM UTC: We have changed this WAF rule to opt-in only, as sites that use auth middleware with third-party auth vendors were observing failing requests.
We strongly recommend updating your version of Next.js (if eligible) to the patched versions, as your app will otherwise be vulnerable to an authentication bypass attack regardless of auth provider.
Enable the Managed Rule (strongly recommended)
This rule is opt-in only for sites on the Pro plan or above in the WAF managed ruleset.
To enable the rule:
Head to Security > WAF > Managed rules in the Cloudflare dashboard for the zone (website) you want to protect.
Click the three dots next to Cloudflare Managed Ruleset and choose Edit
Scroll down and choose Browse Rules
Search for CVE-2025-29927 (ruleId: 34583778093748cc83ff7b38f472013e)
Change the Status to Enabled and the Action to Block. You can optionally set the rule to Log, to validate potential impact before enabling it. Log will not block requests.
Click Next
Scroll down and choose Save
This will enable the WAF rule and block requests with the x-middleware-subrequest header regardless of Next.js version.
Create a WAF rule (manual)
For users on the Free plan, or who want to define a more specific rule, you can create a Custom WAF rule to block requests with the x-middleware-subrequest header regardless of Next.js version.
To create a custom rule:
Head to Security > WAF > Custom rules in the Cloudflare dashboard for the zone (website) you want to protect.
Give the rule a name - e.g. next-js-CVE-2025-29927
Set the matching parameters for the rule match any request where the x-middleware-subrequest header exists per the rule expression below.
Set the action to 'block'. If you want to observe the impact before blocking requests, set the action to 'log' (and edit the rule later).
Deploy the rule.
Next.js CVE-2025-29927
We've made a WAF (Web Application Firewall) rule available to all sites on Cloudflare to protect against the Next.js authentication bypass vulnerability ↗ (CVE-2025-29927) published on March 21st, 2025.
Note: This rule is not enabled by default as it blocked requests across sites for specific authentication middleware.
This managed rule protects sites using Next.js on Workers and Pages, as well as sites using Cloudflare to protect Next.js applications hosted elsewhere.
This rule has been made available (but not enabled by default) to all sites as part of our WAF Managed Ruleset and blocks requests that attempt to bypass authentication in Next.js applications.
The vulnerability affects almost all Next.js versions, and has been fully patched in Next.js 14.2.26 and 15.2.4. Earlier, interim releases did not fully patch this vulnerability.
Users on older versions of Next.js (11.1.4 to 13.5.6) did not originally have a patch available, but this the patch for this vulnerability and a subsequent additional patch have been backported to Next.js versions 12.3.6 and 13.5.10 as of Monday, March 24th. Users on Next.js v11 will need to deploy the stated workaround or enable the WAF rule.
The managed WAF rule mitigates this by blocking external user requests with the x-middleware-subrequest header regardless of Next.js version, but we recommend users using Next.js 14 and 15 upgrade to the patched versions of Next.js as an additional mitigation.
Smart Placement is a unique Cloudflare feature that can make decisions to move your Worker to run in a more optimal location (such as closer to a database). Instead of always running in the default location (the one closest to where the request is received), Smart Placement uses certain “heuristics” (rules and thresholds) to decide if a different location might be faster or more efficient.
Previously, if these heuristics weren't consistently met, your Worker would revert to running in the default location—even after it had been optimally placed. This meant that if your Worker received minimal traffic for a period of time, the system would reset to the default location, rather than remaining in the optimal one.
Now, once Smart Placement has identified and assigned an optimal location, temporarily dropping below the heuristic thresholds will not force a return to default locations. For example in the previous algorithm, a drop in requests for a few days might return to default locations and heuristics would have to be met again. This was problematic for workloads that made requests to a geographically located resource every few days or longer. In this scenario, your Worker would never get placed optimally. This is no longer the case.
This new capability allows developers to establish persistent, low-latency connections between their applications and AI models, enabling natural, real-time conversational AI experiences, including speech-to-speech interactions.
In Cloudflare Terraform Provider ↗ versions 5.2.0 and above, dozens of resources now have proper drift detection. Before this fix, these resources would indicate they needed to be updated or replaced — even if there was no real change. Now, you can rely on your terraform plan to only show what resources are expected to change.
This issue affected resources ↗ related to these products and features:
In the Cloudflare Terraform Provider ↗ versions 5.2.0 and above, sensitive properties of resources are redacted in logs. Sensitive properties in Cloudflare's OpenAPI Schema ↗ are now annotated with x-sensitive: true. This results in proper auto-generation of the corresponding Terraform resources, and prevents sensitive values from being shown when you run Terraform commands.
This issue affected resources ↗ related to these products and features:
If you've already been building with the Agents SDK, you can update your dependencies to use the new package name, and replace references to agents-sdk with agents:
Terminal window
# Install the new package
npmiagents
Terminal window
# Remove the old (deprecated) package
npmuninstallagents-sdk
# Find instances of the old package name in your codebase
grep-r'agents-sdk'.
# Replace instances of the old package name with the new one
All future updates will be pushed to the new agents package, and the older package has been marked as deprecated.
Agents SDK updates New
We've added a number of big new features to the Agents SDK over the past few weeks, including:
You can now set cors: true when using routeAgentRequest to return permissive default CORS headers to Agent responses.
The regular client now syncs state on the agent (just like the React version).
useAgentChat bug fixes for passing headers/credentials, including properly clearing cache on unmount.
Experimental /schedule module with a prompt/schema for adding scheduling to your app (with evals!).
Changed the internal zod schema to be compatible with the limitations of Google's Gemini models by removing the discriminated union, allowing you to use Gemini models with the scheduling API.
We've also fixed a number of bugs with state synchronization and the React hooks.
We've added a new @unstable_callable() decorator for defining methods that can be called directly from clients. This allows you call methods from within your client code: you can call methods (with arguments) and get native JavaScript objects back.
returnthis.sql`SELECT * FROM history ORDER BY created_at DESC LIMIT 10`;
}
}
TypeScript
// server.ts
import {unstable_callable,Agent, type StreamingResponse} from "agents";
import type {Env} from "../server";
exportclassRpcextendsAgent<Env>{
// Use the decorator to define a callable method
@unstable_callable({
description:"rpc test",
})
asyncgetHistory(){
returnthis.sql`SELECT * FROM history ORDER BY created_at DESC LIMIT 10`;
}
}
agents-starter Updated
We've fixed a number of small bugs in the agents-starter ↗ project — a real-time, chat-based example application with tool-calling & human-in-the-loop built using the Agents SDK. The starter has also been upgraded to use the latest wrangler v4 release.
If you're new to Agents, you can install and run the agents-starter project in two commands:
You can use the starter as a template for your own Agents projects: open up src/server.ts and src/client.tsx to see how the Agents SDK is used.
More documentation Updated
We've heard your feedback on the Agents SDK documentation, and we're shipping more API reference material and usage examples, including:
Expanded API reference documentation, covering the methods and properties exposed by the Agents SDK, as well as more usage examples.
More Client API documentation that documents useAgent, useAgentChat and the new @unstable_callable RPC decorator exposed by the SDK.
New documentation on how to call agents and (optionally) authenticate clients before they connect to your Agents.
Note that the Agents SDK is continually growing: the type definitions included in the SDK will always include the latest APIs exposed by the agents package.
API Shield will scan for risks on your API inventory daily. Here are the new risks we're scanning for and automatically labelling:
cf-risk-sensitive: applied if the customer is subscribed to the sensitive data detection ruleset and the WAF detects sensitive data returned on an endpoint in the last seven days.
cf-risk-missing-auth: applied if the customer has configured a session ID and no successful requests to the endpoint contain the session ID.
cf-risk-mixed-auth: applied if the customer has configured a session ID and some successful requests to the endpoint contain the session ID while some lack the session ID.
cf-risk-missing-schema: added when a learned schema is available for an endpoint that has no active schema.
cf-risk-error-anomaly: added when an endpoint experiences a recent increase in response errors over the last 24 hours.
cf-risk-latency-anomaly: added when an endpoint experiences a recent increase in response latency over the last 24 hours.
cf-risk-size-anomaly: added when an endpoint experiences a spike in response body size over the last 24 hours.
In addition, API Shield has two new 'beta' scans for Broken Object Level Authorization (BOLA) attacks. If you're in the beta, you will see the following two labels when API Shield suspects an endpoint is suffering from a BOLA vulnerability:
cf-risk-bola-enumeration: added when an endpoint experiences successful responses with drastic differences in the number of unique elements requested by different user sessions.
cf-risk-bola-pollution: added when an endpoint experiences successful responses where parameters are found in multiple places in the request.
We are currently accepting more customers into our beta. Contact your account team if you are interested in BOLA attack detection for your API.
Refer to the blog post ↗ for more information about Cloudflare's expanded posture management capabilities.
You can now retry your Cloudflare Pages and Workers builds directly from GitHub. No need to switch to the Cloudflare Dashboard for a simple retry!
Let’s say you push a commit, but your build fails due to a spurious error like a network timeout. Instead of going to the Cloudflare Dashboard to manually retry, you can now rerun the build with just a few clicks inside GitHub, keeping you inside your workflow.
For Pages and Workers projects connected to a GitHub repository:
When a build fails, go to your GitHub repository or pull request
Select the failed Check Run for the build
Select "Details" on the Check Run
Select "Rerun" to trigger a retry build for that commit
We’re removing some of the restrictions in Email Routing so that AI Agents and task automation can better handle email workflows, including how Workers can reply to incoming emails.
It's now possible to keep a threaded email conversation with an Email Worker script as long as:
The email can only be replied to once in the same EmailMessage event.
The recipient in the reply must match the incoming sender.
The outgoing sender domain must match the same domain that received the email.
Every time an email passes through Email Routing or another MTA, an entry is added to the References list. We stop accepting replies to emails with more than 100 References entries to prevent abuse or accidental loops.
Here's an example of a Worker responding to Emails using a Workers AI model:
Digital Experience Monitoring (DEX) provides visibility into device, network, and application performance across your Cloudflare SASE deployment. The latest release of the Cloudflare One agent (v2025.1.861) now includes device endpoint monitoring capabilities
to provide deeper visibility into end-user device performance which can be analyzed directly from the dashboard.
Device health metrics are now automatically collected, allowing administrators to:
View the last network a user was connected to
Monitor CPU and RAM utilization on devices
Identify resource-intensive processes running on endpoints
With these enhanced logs, administrators can gain visibility into end user behavior in the remote browser and track blocked data extraction attempts, along with the websites that triggered them, in an isolated session.
{
"AccountID":"$ACCOUNT_ID",
"Decision":"block",
"DomainName":"www.example.com",
"Timestamp":"2025-02-27T23:15:06Z",
"Type":"copy",
"UserID":"$USER_ID"
}
User Actions available:
Copy & Paste
Downloads & Uploads
Printing
Learn more about how to get started with Logpush in our documentation.
We've released the Agents SDK ↗, a package and set of tools that help you build and ship AI Agents.
You can get up and running with a chat-based AI Agent ↗ (and deploy it to Workers) that uses the Agents SDK, tool calling, and state syncing with a React-based front-end by running the following command:
Workflows now supports up to 4,500 concurrent (running) instances, up from the previous limit of 100. This limit will continue to increase during the Workflows open beta. This increase applies to all users on the Workers Paid plan, and takes effect immediately.
This allows more fine-grained control over transformation request flows and cache behavior. For example, you can resize, manipulate, and overlay images without requiring them to be accessible through a URL.
The Images binding can be configured in the Cloudflare dashboard for your Worker or in the wrangler.toml file in your project's directory:
Previously, you could only configure Zaraz by going to each individual zone under your Cloudflare account. Now, if you’d like to get started with Zaraz or manage your existing configuration, you can navigate to the Tag Management ↗ section on the Cloudflare dashboard – this will make it easier to compare and configure the same settings across multiple zones.
These changes will not alter any existing configuration or entitlements for zones you already have Zaraz enabled on. If you’d like to edit existing configurations, you can go to the Tag Setup ↗ section of the dashboard, and select the zone you'd like to edit.
Previously, when a new User Worker was uploaded, there was a short delay before it became available for dispatch. This meant that even though an API request could return a 200 OK response, the script might not yet be ready to handle requests, causing unexpected failures for platforms that immediately dispatch to new Workers.
With this update, first-time uploads of User Workers are now deployed synchronously. A 200 OK response guarantees the script is fully provisioned and ready to handle traffic immediately, ensuring more predictable deployments and reducing errors.
You can now customize a queue's message retention period, from a minimum of 60 seconds to a maximum of 14 days. Previously, it was fixed to the default of 4 days.
You can customize the retention period on the settings page for your queue, or using Wrangler:
You can use this prompt with your favorite AI model, including Claude 3.5 Sonnet, OpenAI's o3-mini, Gemini 2.0 Flash, or Llama 3.3 on Workers AI. Models with large context windows will allow you to paste the prompt directly: provide your own prompt within the <user_prompt></user_prompt> tags.
You can now locally configure your Magic WAN Connector to work in a static IP configuration.
This local method does not require having access to a DHCP Internet connection. However, it does require being comfortable with using tools to access the serial port on Magic WAN Connector as well as using a serial terminal client to access the Connector's environment.
Cloudflare has supported both RSA and ECDSA certificates across our platform for a number of years. Both certificates offer the same security, but ECDSA is more performant due to a smaller key size. However, RSA is more widely adopted and ensures compatibility with legacy clients. Instead of choosing between them, you may want both – that way, ECDSA is used when clients support it, but RSA is available if not.
Now, you can upload both an RSA and ECDSA certificate on a custom hostname via the API.
curl -X POST https://api.cloudflare.com/client/v4/zones/$ZONE_ID/custom_hostnames \
-H 'Content-Type: application/json' \
-H "X-Auth-Email: $CLOUDFLARE_EMAIL" \
-H "X-Auth-Key: $CLOUDFLARE_API_KEY" \
-d '{
"hostname": "hostname",
"ssl": {
"custom_cert_bundle": [
{
"custom_certificate": "RSA Cert",
"custom_key": "RSA Key"
},
{
"custom_certificate": "ECDSA Cert",
"custom_key": "ECDSA Key"
}
],
"bundle_method": "force",
"wildcard": false,
"settings": {
"min_tls_version": "1.0"
}
}
}’
You can also:
Upload an RSA or ECDSA certificate to a custom hostname with an existing ECDSA or RSA certificate, respectively.
Replace the RSA or ECDSA certificate with a certificate of its same type.
Delete the RSA or ECDSA certificate (if the custom hostname has both an RSA and ECDSA uploaded).
This feature is available for Business and Enterprise customers who have purchased custom certificates.
AI Gateway adds additional ways to handle requests - Request Timeouts and Request Retries, making it easier to keep your applications responsive and reliable.
AI Gateway has added three new providers: Cartesia, Cerebras, and ElevenLabs, giving you more even more options for providers you can use through AI Gateway. Here's a brief overview of each:
Cartesia provides text-to-speech models that produce natural-sounding speech with low latency.
Cerebras delivers low-latency AI inference to Meta's Llama 3.1 8B and Llama 3.3 70B models.
ElevenLabs offers text-to-speech models with human-like voices in 32 languages.
To get started with AI Gateway, just update the base URL. Here's how you can send a request to Cerebras using cURL:
You can now implement our child safety tooling, the CSAM Scanning Tool, more easily. Instead of requiring external reporting credentials, you only need a verified email address for notifications to onboard. This change makes the tool more accessible to a wider range of customers.
Cloudflare's v5 Terraform Provider is now generally available. With this release, Terraform resources are now automatically generated based on OpenAPI Schemas. This change brings alignment across our SDKs, API documentation, and now Terraform Provider. The new provider boosts coverage by increasing support for API properties to 100%, adding 25% more resources, and more than 200 additional data sources. Going forward, this will also reduce the barriers to bringing more resources into Terraform across the broader Cloudflare API. This is a small, but important step to making more of our platform manageable through GitOps, making it easier for you to manage Cloudflare just like you do your other infrastructure.
Workers for Platforms customers can now attach static assets (HTML, CSS, JavaScript, images) directly to User Workers, removing the need to host separate infrastructure to serve the assets.
This allows your platform to serve entire front-end applications from Cloudflare's global edge, utilizing caching for fast load times, while supporting dynamic logic within the same Worker. Cloudflare automatically scales its infrastructure to handle high traffic volumes, enabling you to focus on building features without managing servers.
What you can build
Static Sites: Host and serve HTML, CSS, JavaScript, and media files directly from Cloudflare's network, ensuring fast loading times worldwide. This is ideal for blogs, landing pages, and documentation sites because static assets can be efficiently cached and delivered closer to the user, reducing latency and enhancing the overall user experience.
Full-Stack Applications: Combine asset hosting with Cloudflare Workers to power dynamic, interactive applications. If you're an e-commerce platform, you can serve your customers' product pages and run inventory checks from within the same Worker.
Get Started:
Upload static assets using the Workers for Platforms API or Wrangler. For more information, visit our Workers for Platforms documentation. ↗
You can now have up to 1000 Workers KV namespaces per account.
Workers KV namespace limits were increased from 200 to 1000 for all accounts. Higher limits for Workers KV namespaces enable better organization of key-value data, such as by category, tenant, or environment.
Workflows (beta) now allows you to define up to 1024 steps. sleep steps do not count against this limit.
We've also added:
instanceId as property to the WorkflowEvent type, allowing you to retrieve the current instance ID from within a running Workflow instance
Improved queueing logic for Workflow instances beyond the current maximum concurrent instances, reducing the cases where instances are stuck in the queued state.
Support for pause and resume for Workflow instances in a queued state.
We're continuing to work on increases to the number of concurrent Workflow instances, steps, and support for a new waitForEvent API over the coming weeks.
Users making D1 requests via the Workers API can see up to a 60% end-to-end latency improvement due to the removal of redundant network round trips needed for each request to a D1 database.
p50, p90, and p95 request latency aggregated across entire D1 service. These latencies are a reference point and should not be viewed as your exact workload improvement.
This performance improvement benefits all D1 Worker API traffic, especially cross-region requests where network latency is an outsized latency factor. For example, a user in Europe talking to a database in North America. D1 location hints can be used to influence the geographic location of a database.
For more details on how D1 removed redundant round trips, see the D1 specific release note entry.
The latest cloudflared build 2024.12.2 ↗ introduces the ability to collect all the diagnostic logs needed to troubleshoot a cloudflared instance.
A diagnostic report collects data from a single instance of cloudflared running on the local machine and outputs it to a cloudflared-diag file.
The cloudflared-diag-YYYY-MM-DDThh-mm-ss.zip archive contains the files listed below. The data in a file either applies to the cloudflared instance being diagnosed (diagnosee) or the instance that triggered the diagnosis (diagnoser). For example, if your tunnel is running in a Docker container, the diagnosee is the Docker instance and the diagnoser is the host instance.
JSON traceroutes to Cloudflare's global network using IPv4 and IPv6
diagnoser
raw-network.txt
Raw traceroutes to Cloudflare's global network using IPv4 and IPv6
diagnoser
systeminformation.json
Operating system information and resource usage
diagnosee
task-result.json
Result of each diagnostic task
diagnoser
tunnelstate.json
Tunnel connections at the time of diagnosis
diagnosee
Footnotes
If the log file is blank, you may need to set --loglevel to debug when you start the tunnel. The --loglevel parameter is only required if you ran the tunnel from the CLI using a cloudflared tunnel run command. It is not necessary if the tunnel runs as a Linux/macOS service or runs in Docker/Kubernetes. ↩
Magic WAN and Magic Transit customers can use the Cloudflare dashboard to configure and manage BGP peering between their networks and their Magic routing table when using a Direct CNI on-ramp.
Using BGP peering with a CNI allows customers to:
Automate the process of adding or removing networks and subnets.
Take advantage of failure detection and session recovery features.
With this functionality, customers can:
Establish an eBGP session between their devices and the Magic WAN / Magic Transit service when connected via CNI.
Secure the session by MD5 authentication to prevent misconfigurations.
Exchange routes dynamically between their devices and their Magic routing table.
You can now generate customized terraform files for building cloud network on-ramps to Magic WAN.
Magic Cloud can scan and discover existing network resources and generate the required terraform files to automate cloud resource deployment using their existing infrastructure-as-code workflows for cloud automation.
You might want to do this to:
Review the proposed configuration for an on-ramp before deploying it with Cloudflare.
Deploy the on-ramp using your own infrastructure-as-code pipeline instead of deploying it with Cloudflare.
You can now use CASB to find security misconfigurations in your AWS cloud environment using Data Loss Prevention.
You can also connect your AWS compute account to extract and scan your S3 buckets for sensitive data while avoiding egress fees. CASB will scan any objects that exist in the bucket at the time of configuration.
To connect a compute account to your AWS integration:
In Cloudflare One ↗, go to Cloud & SaaS findings > Integrations.
Find and select your AWS integration.
Select Open connection instructions.
Follow the instructions provided to connect a new compute account.
You can now type in languages that use diacritics (like á or ç) and character-based scripts (such as Chinese, Japanese, and Korean) directly within the remote browser. The isolated browser now properly recognizes non-English keyboard input, eliminating the need to copy and paste content from a local browser or device.
Workflows is now in open beta, and available to any developer a free or paid Workers plan.
Workflows allow you to build multi-step applications that can automatically retry, persist state and run for minutes, hours, days, or weeks. Workflows introduces a programming model that makes it easier to build reliable, long-running tasks, observe as they progress, and programmatically trigger instances based on events across your services.
Get started
You can get started with Workflows by following our get started guide and/or using npm create cloudflare to pull down the starter project:
You can now easily enable Real User Monitoring (RUM) monitoring for your hostnames, while safely dropping requests from visitors in the European Union to comply with GDPR and CCPA.
Our Web Analytics product has always been centered on giving you insights into your users' experience that you need to provide the best quality experience, without sacrificing user privacy in the process.
To help with that aim, you can now selectively enable RUM monitoring for your hostname and exclude EU visitor data in a single click. If you opt for this option, we will drop all metrics collected by our EU data centeres automatically.
You can learn more about what metrics are reported by Web Analytics and how it is collected in the Web Analytics documentation. You can enable Web Analytics on any hostname by going to the Web Analytics ↗ section of the dashboard, selecting "Manage Site" for the hostname you want to monitor, and choosing the appropriate enablement option.