Okta
Okta provides cloud software that helps companies manage and secure user authentication to modern applications, and helps developers build identity controls into applications, website web services, and devices. You can integrate Okta with Cloudflare One and build rules based on user identity and group membership. Cloudflare One supports Okta integrations using either the OIDC (default) or SAML protocol.
Additionally, you can configure Okta to use risk information from Cloudflare One user risk scores to create SSO-level policies. For more information, refer to Send risk score to Okta.
- A Zero Trust Organization with any subscription tier (including Free)
- A Cloudflare One administrator role with
Access Editpermissions
- SP-initiated SSO: When a user goes to an Access application, Access redirects them to sign in with Okta.
- SCIM provisioning: Synchronize Okta groups and automatically deprovision users. SCIM currently requires a separate custom OIDC application.
To set up the Okta integration using the Okta Integration Network (OIN) App Catalog:
-
Log in to your Okta admin dashboard.
-
Go to Applications > Applications.
-
Select Browse App Catalog.
-
Search for
Cloudflareand select the Cloudflare One app. -
Select Add integration.
-
In Application label, enter a name for the application (for example,
Cloudflare Access). -
In Team domain, enter your Cloudflare Zero Trust team name (only the subdomain prefix, do not include
.cloudflareaccess.com):<your-team-name>You can find your team name in the Cloudflare dashboard ↗ under Settings > Team name and domain > Team name.
-
In the Sign On tab, copy the Client ID and Client secret and paste these into
App IDandClient secret. -
Copy your Okta Account URL (without the
-adminvalue) and copy it into the Cloudflare Okta setup field.
-
Log in to your Okta admin dashboard and go to Applications > Applications.
-
Select Create App Integration.
-
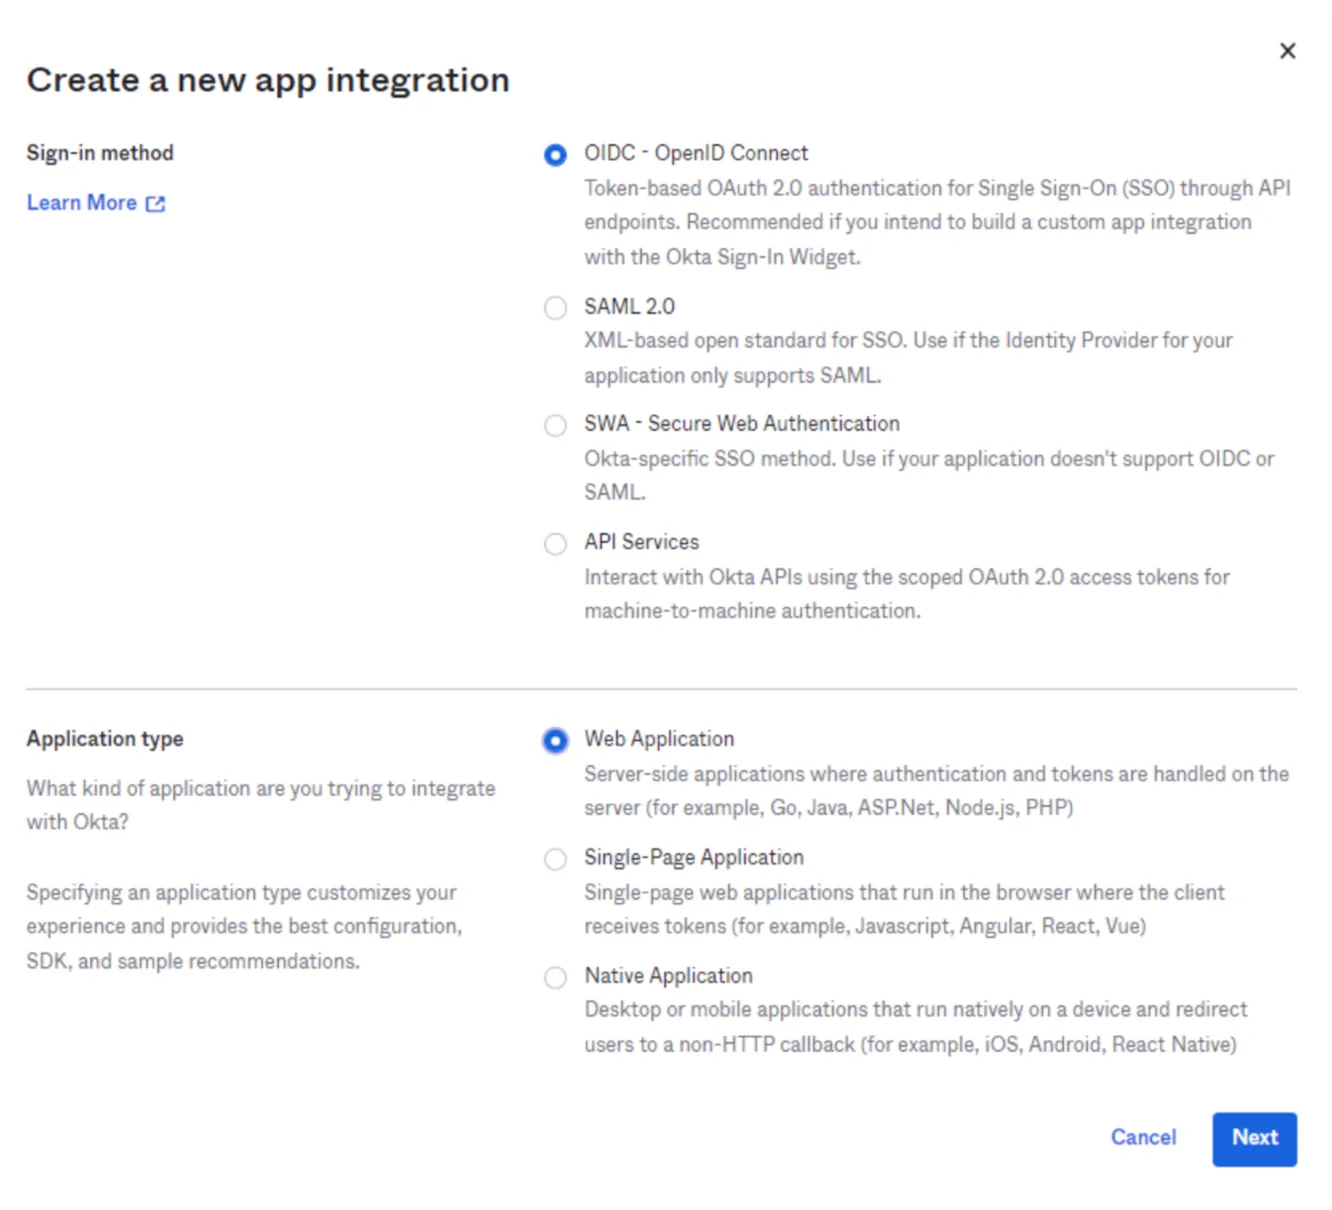
For the Sign-in method, select OIDC - OpenID Connect.
-
For the Application type, select Web Application. Select Next.
-
Enter any name for the application. In the Sign-in redirect URIs field, enter the following URL:
https://<your-team-name>.cloudflareaccess.com/cdn-cgi/access/callbackYou can find your team name in the Cloudflare dashboard ↗ under Settings > Team name and domain > Team name.
-
Choose the desired Assignment option and select Save.
-
From the application view, go to the Sign On tab.
-
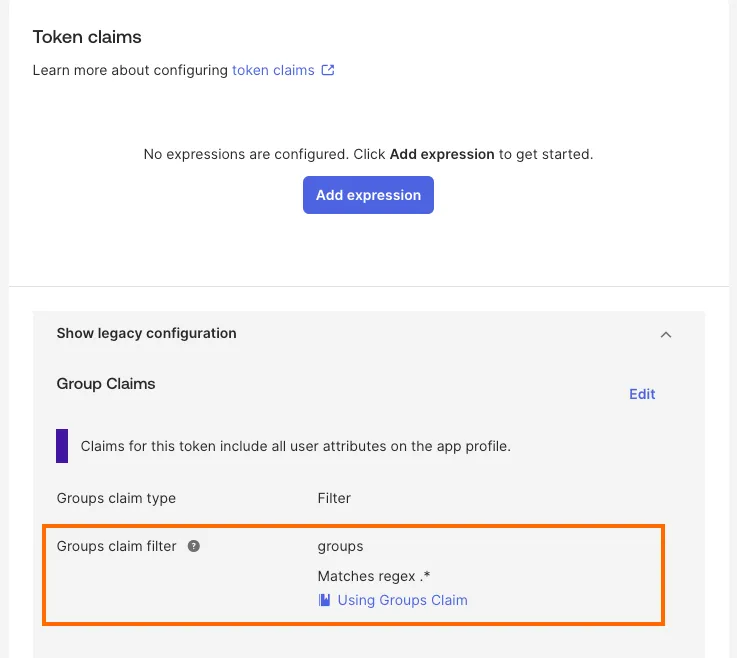
Scroll down to Token claims and select Show legacy configuration > Edit.
-
Set Groups claim filter to Matches regex and its value to
.*.
-
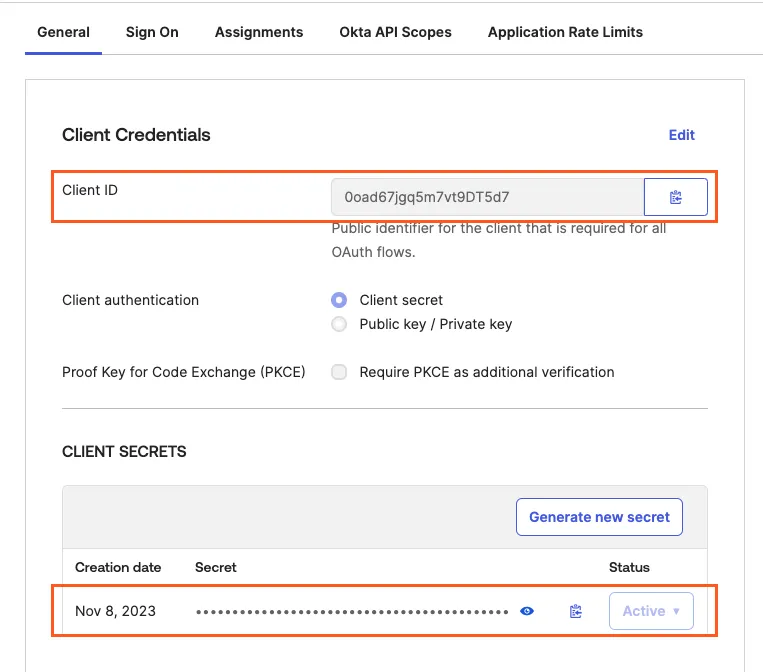
In the General tab, copy the Client ID and Client secret.
-
In the Cloudflare dashboard ↗, go to Zero Trust > Integrations > Identity providers.
-
Under Your identity providers, select Add new identity provider. Select Okta as your identity provider.
-
Fill in the following information:
- Name: Name your identity provider.
- App ID: Enter your Okta client ID.
- Client secret: Enter your Okta client secret.
- Okta account URL: Enter your Okta domain ↗, for example
https://my-company.okta.com.
-
(Optional) Create an Okta API token and enter it in the Cloudflare dashboard ↗ under Zero Trust > Integrations > Identity providers (the token can be read-only). Use an API token if your Okta tenant has more than 100 groups. Without this token, Cloudflare may not be able to retrieve all Okta groups for policy evaluation.
-
(Optional) To configure custom OIDC claims:
- In Okta, create a custom authorization server ↗ and ensure that the
groupsscope is enabled. - In the Cloudflare dashboard ↗, enter the Authorization Server ID obtained from Okta.
- Under Optional configurations, enter the claims that you wish to add to your users' identity.
- In Okta, create a custom authorization server ↗ and ensure that the
-
(Optional) Enable Proof of Key Exchange (PKCE) ↗. PKCE will be performed on all login attempts.
-
Select Save.
To test that your connection is working, select Test.
The Okta integration allows you to synchronize IdP groups and automatically deprovision users using SCIM. To enable SCIM provisioning between Access and Okta, you need two separate app integrations in Okta:
- The OIDC application you created when adding Okta as an identity provider. You can create this application via the Okta App Catalog or via a Custom App Integration.
- A second Okta application of type SCIM 2.0 Test App (Header Auth). This is technically a SAML app but is responsible for sending user and group info via SCIM.
-
In the Cloudflare dashboard ↗, go to Zero Trust > Integrations > Identity providers.
-
Find the Okta integration and select Edit.
-
Turn on Enable SCIM
-
(Optional) Configure the following settings:
- Enable user deprovisioning: Revoke a user's active session when they are removed from the SCIM application in Okta. This will invalidate all active Access sessions and prompt for reauthentication for any Cloudflare One Client session policies.
- Remove user seat on deprovision: Remove a user's seat from your Cloudflare One account when they are removed from the SCIM application in Okta.
- SCIM identity update behavior: Choose what happens in Cloudflare One when the user's identity updates in Okta.
- Automatic identity updates: Automatically update the User Registry identity when Okta sends an updated identity or group membership through SCIM. This identity is used for Gateway policies and Cloudflare One Client device profiles; Access will read the user's updated identity when they reauthenticate.
- Group membership change reauthentication: Revoke a user's active session when their group membership changes in Okta. This will invalidate all active Access sessions and prompt for reauthentication for any Cloudflare One Client session policies. Access will read the user's updated group membership when they reauthenticate.
- No action: Update the user's identity the next time they reauthenticate to Access or the Cloudflare One Client.
-
Select Regenerate Secret. Copy the SCIM Endpoint and SCIM Secret. You will need to enter these values into Okta.
-
Select Save.
The SCIM secret never expires, but you can manually regenerate the secret at any time.
-
On your Okta admin dashboard, go to Applications > Applications.
-
Select Browse App Catalog.
-
Search for
SCIM Header Authand select SCIM 2.0 Test App (Header Auth). -
Select Add Integration.
-
On the General Settings tab, name your application and select Next.
-
On the Sign-on Options tab, ensure that SAML 2.0 is selected.
-
Under Credential Details, set Application username format to either Okta Username or Email. This value will be used for the SCIM
userNameattribute. -
Select Done to create the integration.
-
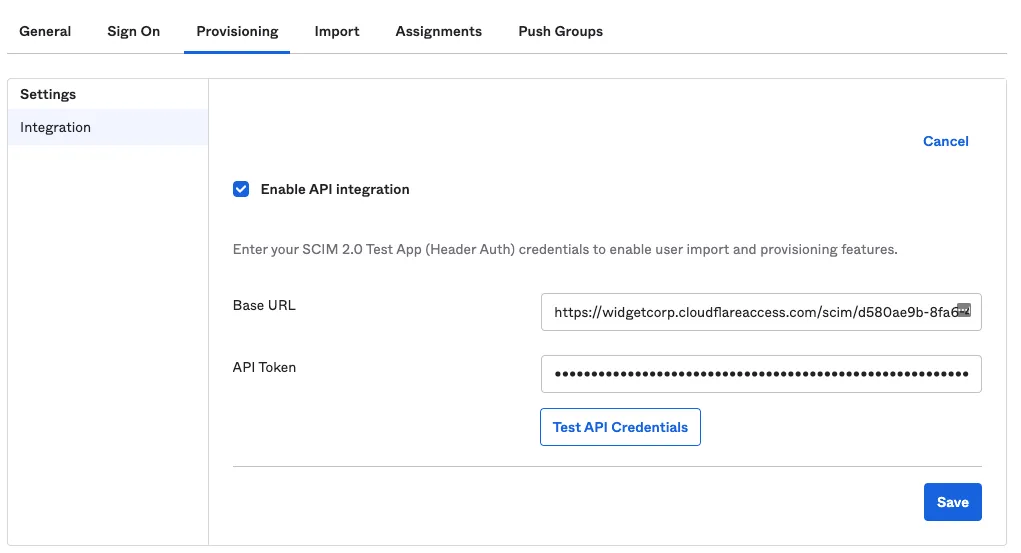
On the Provisioning tab, select Configure API Integration.
-
Select Enable API integration.
-
In the Base URL field, enter the SCIM Endpoint obtained from Cloudflare One.
-
In the API Token field, enter the SCIM Secret obtained from Cloudflare One.
-
Select Test API Credentials to ensure that the credentials were entered correctly. Select Save.
-
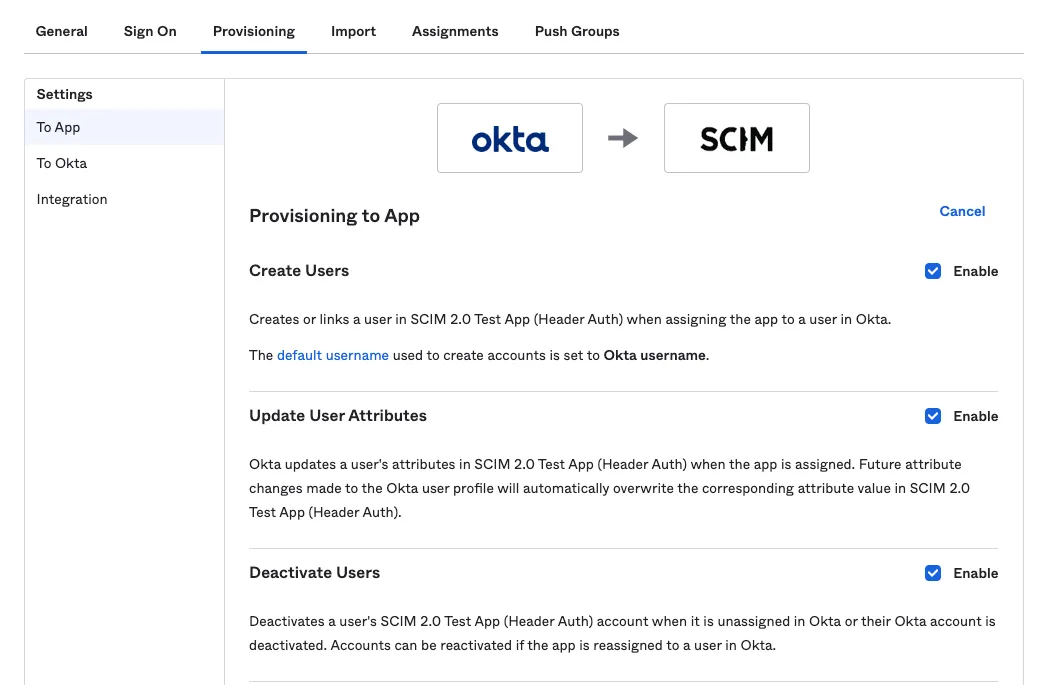
On the Provisioning tab, select Edit and enable:
- Create Users
- Update User Attributes
- Deactivate Users
-
In the Assignments tab, add the users you want to synchronize with Cloudflare Access. You can add users in batches by assigning a group. If a user is removed from the application assignment via a either direct user assignment or removed from the group that was assigned to the app, this will trigger a deprovisioning event from Okta to Cloudflare.
-
In the Push Groups tab, add the Okta groups you want to synchronize with Cloudflare Access. These groups will display in the Access policy builder and are the group memberships that will be added and removed upon membership change in Okta.
To verify the integration, select View Logs in the Okta SCIM application.
To check if user identities were updated in Cloudflare One, view your SCIM provisioning logs.
{ "config": { "client_id": "<your client id>", "client_secret": "<your client secret>", "okta_account": "https://dev-abc123.oktapreview.com" }, "type": "okta", "name": "my example idp"}If you see the error Failed to fetch user/group information from the identity, double-check your Okta configuration:
- If your Okta tenant has more than 100 groups, ensure you include an Okta API token in the identity provider configuration. Cloudflare uses the token to retrieve groups from Okta for policy evaluation.
- If Okta returns more than 100 groups in a user's OIDC token, Okta may omit some group memberships from the token. This is an Okta token claim limitation, not a Cloudflare limit. If a required group is omitted, Cloudflare cannot evaluate policies that depend on that group. To avoid this, narrow the Okta groups claim filter so that only groups used in Cloudflare policies are included. For more information, refer to Okta's group functions and dynamic allowlists documentation ↗.
- The request may be blocked by the ThreatInsights feature ↗ within Okta.