MCP server portals
An MCP server portal centralizes multiple Model Context Protocol (MCP) servers ↗ onto a single HTTP endpoint.
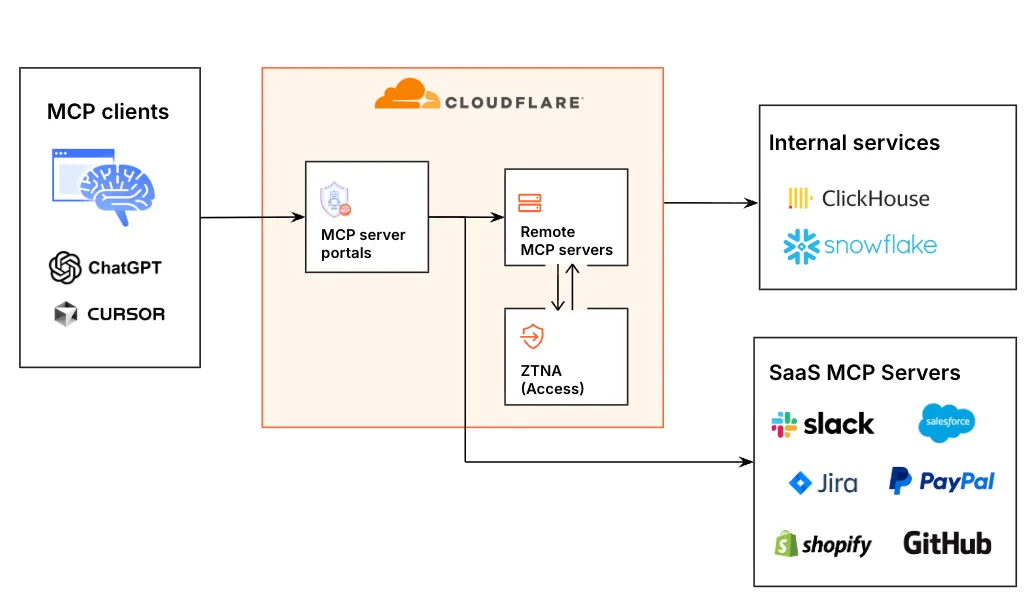
This guide explains how to add MCP servers to Cloudflare Access, create an MCP portal with customized tools and policies, and connect users to the portal using an MCP client.
MCP server portals provide the following capabilities:
-
Streamlined access to multiple MCP servers: MCP server portals support both unauthenticated MCP servers and MCP servers secured using OAuth (for example, via Access for SaaS or a third-party OAuth provider). Users log in to the portal URL through Cloudflare Access and are prompted to authenticate separately to each server that requires OAuth.
-
Customized tools per portal: Admins can tailor an MCP portal to a particular use case by choosing the specific tools and prompt templates that they want to make available to users through the portal. This allows users to access a curated set of tools and prompts — the less external context exposed to the AI model, the better the AI responses tend to be.
-
Context optimization: Portals support query parameter options that reduce context window usage by minimizing or hiding tool definitions. Refer to Optimize context for details.
-
Non-browser client support: MCP clients authenticate to the portal using a standard OAuth 2.0 authorization code flow via managed OAuth. Non-browser clients receive a
401response with aWWW-Authenticateheader pointing to Access's OAuth discovery endpoints, rather than a browser redirect. -
Code mode: Code mode is available by default on all portals. It collapses all upstream tools into a single
codetool. The AI agent writes JavaScript that calls typed methods for each tool, and the code runs in an isolated Dynamic Worker environment. This keeps context window usage fixed regardless of how many tools are available. Refer to code mode for connection instructions. -
Observability: Once the user's AI agent is connected to the portal, Cloudflare Access logs the individual requests made using the tools in the portal. You can optionally route portal traffic through Cloudflare Gateway for richer HTTP logging and data loss prevention (DLP) scanning.
- An active domain on Cloudflare
- Domain uses either a full setup or a partial (
CNAME) setup - An identity provider configured on Cloudflare Zero Trust
Add individual MCP servers to Cloudflare Access to bring them under centralized management.
To add an MCP server:
-
In the Cloudflare dashboard ↗, go to Zero Trust > Access controls > AI controls.
-
Go to the MCP servers tab.
-
Select Add an MCP server.
-
Enter any name for the server.
-
(Optional) Enter a custom string for the Server ID.
-
In HTTP URL, enter the full URL of your MCP server. For example, if you want to add the Cloudflare Documentation MCP server ↗, enter
https://docs.mcp.cloudflare.com/mcp. -
Add Access policies to show or hide the server in an MCP server portal. The MCP server link will only appear in the portal for users who match an Allow policy. Users who do not pass an Allow policy will not see this server through any portals.
-
Select Save and connect server.
-
If the MCP server supports OAuth, you will be redirected to log in to your OAuth provider. You can log in to any account on the MCP server. The account used to authenticate will serve as the admin credential for that MCP server. You can configure an MCP portal to use this admin credential to make requests.
Cloudflare Access will validate the server connection and fetch a list of tools and prompts. Once the server is successfully connected, the server status will change to Ready. You can now add the MCP server to an MCP server portal.
The MCP server status indicates the synchronization status of the MCP server to Cloudflare Access.
| Status | Description |
|---|---|
| Error | The server's authentication failed due to expired or incorrect credentials. To fix the issue, reauthenticate the server. |
| Waiting | The server's tools, prompts, and resources are being synchronized. |
| Ready | The server was successfully synchronized and all tools, prompts, and resources are available. |
To reauthenticate an MCP server in Cloudflare Access:
- In the Cloudflare dashboard ↗, go to Zero Trust > Access controls > AI controls.
- Go to the MCP servers tab.
- Select the server that you want to reauthenticate, then select Edit.
- Select Authenticate server.
You will be redirected to log in to your OAuth provider. The account used to authenticate will serve as the new admin credential for this MCP server.
Cloudflare Access automatically synchronizes with your MCP server every 24 hours. To manually refresh the MCP server in Zero Trust:
- In the Cloudflare dashboard ↗, go to Zero Trust > Access controls > AI controls.
- Go to the MCP servers tab and find the server that you want to refresh.
- Select the three dots > Sync capabilities.
The MCP server page will show the updated list of tools and prompts. New tools and prompts are automatically enabled in the MCP server portal.
To create an MCP server portal:
-
In the Cloudflare dashboard ↗, go to Zero Trust > Access controls > AI controls.
-
Select Add MCP server portal.
-
Enter any name for the portal.
-
Under Custom domain, select a domain for the portal URL. Domains must belong to an active zone in your Cloudflare account. You can optionally specify a subdomain.
-
Add MCP servers to the portal.
-
(Optional) Under MCP servers, configure the tools and prompts available through the portal.
-
(Optional) Configure Require user auth for servers that support OAuth: -
Enabled: (default) User will be prompted to utilize their own login credentials to establish a connection with the MCP server. -Disabled: Users who are connected to the portal will automatically have access to the MCP server via its admin credential. -
Add Access policies to define the users who can connect to the portal URL.
-
Select Add an MCP server portal.
-
(Optional) Customize the login experience for the portal.
Users can now connect to the portal at https://<subdomain>.<domain>/mcp using an MCP client.
Cloudflare Access automatically creates an Access application for each MCP server portal. You can customize the portal login experience by updating Access application settings:
- In the Cloudflare dashboard ↗, go to Zero Trust > Access controls > Applications.
- Find the portal that you want to configure, then select the three dots > Edit.
- To configure identity providers for the portal:
- Go to the Login methods tab.
- Select the identity providers that you want to enable for your application.
- (Recommended) If you plan to only allow access via a single identity provider, turn on Instant Auth. End users will not be shown the Cloudflare Access login page. Instead, Cloudflare will redirect users directly to your SSO login event.
- To customize the block page:
- Go to the Experience settings tab.
-
Under Block page, choose what end users will see when they are denied access to the application:
- Cloudflare default: Reload the login page and display a block message below the Cloudflare Access logo. The default message is
That account does not have access, or you can enter a custom message. - Redirect URL: Redirect to the specified website.
- Custom page template: Display a custom block page hosted in Cloudflare One.
- Cloudflare default: Reload the login page and display a block message below the Cloudflare Access logo. The default message is
- Select Save application.
Code mode is turned on by default on all MCP server portals. It reduces context window usage by collapsing all tools in the portal into a single code tool. Instead of loading a separate tool definition for each upstream MCP server tool, the connected AI agent writes JavaScript that calls typed codemode.* methods. The generated code runs in an isolated Dynamic Worker environment, which keeps authentication credentials and environment variables out of the model context.
To use code mode, the MCP client must request it when connecting to the portal URL. Refer to Connect with code mode for the required query parameter.
Code mode is useful for portals that aggregate many MCP servers or servers that expose a large number of tools. Context window usage stays fixed regardless of how many tools are available through the portal.
To use code mode, append the ?codemode=search_and_execute query string parameter to your portal URL when connecting from an MCP client.
For example, if your portal URL is https://<subdomain>.<domain>/mcp, connect to:
https://<subdomain>.<domain>/mcp?codemode=search_and_executeFor MCP clients with server configuration files, use the portal URL with the query string parameter:
{ "mcpServers": { "example-portal": { "command": "npx", "args": [ "-y", "mcp-remote@latest", "https://<subdomain>.<domain>/mcp?codemode=search_and_execute" ] } }}When code mode is active, the portal advertises a single code tool to connected MCP clients. The AI agent discovers available tools by inspecting the typed method signatures in the Dynamic Worker environment and composes multiple tool calls into a single code execution.
For more information on building with code mode, refer to the code mode SDK reference.
To turn off code mode for a portal:
- In the Cloudflare dashboard ↗, go to Zero Trust > Access controls > AI controls.
- Find the portal you want to configure, then select the three dots > Edit.
- Under Basic information, turn off Code mode.
-
Get your existing MCP portal configuration:
Read details of an MCP Portal curl "https://api.cloudflare.com/client/v4/accounts/$ACCOUNT_ID/access/ai-controls/mcp/portals/$ID" \--request GET \--header "Authorization: Bearer $CLOUDFLARE_API_TOKEN" -
Send a
PUTrequest to the Update a MCP Portal endpoint withallow_code_modeset tofalse. To avoid overwriting your existing configuration, thePUTrequest body should contain all fields returned by the previousGETrequest.Update a MCP Portal curl "https://api.cloudflare.com/client/v4/accounts/$ACCOUNT_ID/access/ai-controls/mcp/portals/$ID" \--request PUT \--header "Authorization: Bearer $CLOUDFLARE_API_TOKEN" \--json '{"allow_code_mode": false}'
When Gateway routing is turned on, calls to MCP servers protected by your MCP server portal appear in your Gateway HTTP logs alongside the rest of your organization's HTTP traffic. You can then create Data Loss prevention (DLP) policies to detect and block sensitive data from leaving your users' devices and being sent to your upstream MCP servers.
To route MCP server portal traffic through Gateway:
- In the Cloudflare dashboard ↗, go to Zero Trust > Access controls > AI controls.
- Find the portal you want to configure, then select the three dots > Edit.
- Under Basic information, turn on Route traffic through Cloudflare Gateway.
- Select Save.
Portal traffic will now appear in your Gateway HTTP logs. To apply DLP scanning, create a Gateway HTTP policy.
To scan traffic for sensitive data, create a Gateway HTTP policy that matches both the MCP server and a predefined or custom DLP profile.
Gateway HTTP policies for MCP portal traffic must explicitly target the MCP server — this differs from typical Gateway HTTP policies which apply to all inspected traffic. Ensure that your policy matches the upstream MCP server (for example, https://example-mcp-server.example.workers.dev/mcp) rather than the portal URL (https://<subdomain>.<domain>/mcp).
For example, the following policy blocks traffic that contains credentials and secrets or financial information:
| Selector | Operator | Value | Logic | Action |
|---|---|---|---|---|
| Host | in | example-mcp-server.example.workers.dev | And | Block |
| DLP Profile | in | Credentials and Secrets, Financial Information |
Users can connect to your MCP server running at https://<subdomain>.<domain>/mcp using Workers AI Playground ↗, MCP inspector ↗, or other MCP clients that support remote MCP servers.
To test in Workers AI Playground:
- Go to Workers AI Playground ↗.
- Under MCP Servers, enter
https://<subdomain>.<domain>/mcpfor the portal URL. - Select Connect.
- In the popup window, log in to your Cloudflare Access identity provider.
- The popup window will list the MCP servers in the portal that require authentication. For each of these MCP servers, select Connect and follow the login prompts.
- Select Done to complete the portal authentication process.
Workers AI Playground will show a Connected status and list the available tools. You can now ask the AI model to complete a task using an available tool. Requests made to an MCP server will appear in your portal logs.
For MCP clients with server configuration files, we recommend using the npx command with the mcp-remote@latest argument:
{ "mcpServers": { "example-mcp-server": { "command": "npx", "args": [ "-y", "mcp-remote@latest", "https://<subdomain>.<domain>.com/mcp" ] } }}We do not recommend using the serverURL parameter since it may cause issues with portal session creation and management.
MCP server portals support context optimization options that reduce how many tokens tool definitions consume in the model's context window. These options are useful when a portal aggregates many MCP servers or servers that expose a large number of tools.
To use context optimization, append the optimize_context query parameter to your portal URL when connecting from an MCP client.
The minimize_tools option strips tool descriptions and input schemas from all upstream tools, leaving only their names. The portal exposes a special query tool that agents use to search and retrieve full tool definitions on demand. Agents can discover tools without loading all definitions upfront.
This option provides up to 5x savings in token usage, though querying tool definitions before use adds a small amount of overhead.
To connect with minimize_tools, use the following portal URL:
https://<subdomain>.<domain>/mcp?optimize_context=minimize_toolsFor MCP clients with server configuration files:
{ "mcpServers": { "example-portal": { "command": "npx", "args": [ "-y", "mcp-remote@latest", "https://<subdomain>.<domain>/mcp?optimize_context=minimize_tools" ] } }}The search_and_execute option hides all upstream tools and exposes only two tools to the agent: query and execute. The query tool searches and retrieves tool definitions. The execute tool runs the upstream tools. The generated code runs in an isolated Dynamic Worker environment, which keeps authentication credentials and environment variables out of the model context.
This option reduces the initial token cost of portal tools to a small constant, regardless of how many tools are available. However, the agent becomes fully reliant on query to discover tools before it can call them.
To connect with search_and_execute, use the following portal URL:
https://<subdomain>.<domain>/mcp?optimize_context=search_and_executeFor MCP clients with server configuration files:
{ "mcpServers": { "example-portal": { "command": "npx", "args": [ "-y", "mcp-remote@latest", "https://<subdomain>.<domain>/mcp?optimize_context=search_and_execute" ] } }}For more information on the code mode pattern behind search_and_execute, refer to the Code mode SDK reference.
Once connected to a portal, users can manage their upstream MCP server sessions without leaving their MCP client. The portal uses MCP elicitations ↗ to provide a server selection page where you can enable or disable servers, log out of individual servers, and reauthenticate.
To manage your server connections during an active session, ask your AI agent to take you back to the server selection page. For example, prompt your agent with:
Take me back to the server selection page.
The portal returns an authorization URL. Open this URL in your web browser to access the server selection page:
https://<subdomain>.<domain>/authorize?elicitationId=<ELICITATION_ID>From this page you can:
- Enable or disable servers — Toggle individual upstream MCP servers on or off. Disabling a server removes its tools from the active session, which reduces context window usage.
- Log out and reauthenticate — Log out of a server and log back in if you need to change which data the server has access to. For example, you may need to reauthenticate with different permissions.
You can also enable or disable a specific server directly from your MCP client without visiting the server selection page. For example:
Enable the wiki server.
Disable my Jira server.
The portal toggles the server and updates the active tool list immediately. Disabling a server removes its tools from the session, which reduces context window usage.
When an upstream MCP server token expires, the portal prompts you to reauthenticate from within your MCP client. Open the provided URL in your browser and complete the login to restore the session.
If your MCP client does not display the reauthentication prompt, you can manually clear cached credentials:
rm -rf ~/.mcp-authAfter clearing credentials, reconnect to the portal from your MCP client.
When an admin adds a new upstream MCP server to a portal, the portal automatically prompts connected users to authorize the new server. The portal batches admin changes and redirects you to the authorization flow once, rather than interrupting for each individual server update.
Portal logs allow you to monitor user activity through an MCP server portal. You can view logs on a per-portal or per-server basis.
- In Cloudflare One ↗, go to Access controls > AI controls.
- Find the portal or server that you want to view logs for, then select the three dots > Edit.
- Select Logs.
| Field | Description |
|---|---|
| Time | Date and time of the request |
| Status | Whether the server successfully returned a response |
| Server | Name of the MCP server that handled the request |
| Capability | The tool used to process the request |
| Duration | Processing time for the request in milliseconds |
You can automatically export MCP portal logs to third-party storage destinations or security information and event management (SIEM) tools using Logpush. This allows you to integrate with your existing security workflows and retain logs for as long as your business requires.
To set up a Logpush job for MCP portal logs, refer to Logpush integration. For a list of available log fields, refer to MCP portal logs.
After authenticating to the portal, my user receives the error No allowed servers available, check your Zero Trust Policies.
- An MCP portal and server must both have an attached Access policy. Ensure that all MCP servers assigned to the portal have their own associated policy.
- The server's admin authentication may be expired. Check that the server's status is Ready. If the status shows an error, reauthenticate the server.
- Verify that the portal has an assigned Access policy.
- Verify that the portal URL does not have any applied Workers, Page Rules, custom hostname definitions, or any other configuration that may interfere with its ability to connect to the MCP client.