---
description: Route traffic across the fastest network paths to reduce latency and packet loss.
title: Argo Smart Routing
image: https://developers.cloudflare.com/og-docs.png
---
[Skip to content](#main-content)
> Documentation Index
> Fetch the complete documentation index at: https://developers.cloudflare.com/argo-smart-routing/llms.txt
> Use this file to discover all available pages before exploring further.
# Argo Smart Routing
Last updated Apr 16, 2026|Copy as Markdown|[View as Markdown](https://developers.cloudflare.com/argo-smart-routing/index.md)|[Agent setup](https://developers.cloudflare.com/agent-setup/)
Speed up your global traffic with a single click
Paid add-on
Smart Shield
This functionality is now offered as part of Cloudflare's origin server safeguard, Smart Shield. [Learn more](https://developers.cloudflare.com/smart-shield/).
Argo Smart Routing detects real-time network issues and routes your web traffic across the most efficient network path, avoiding congestion.
This results in faster loading times, increased reliability, and reduced costs. These benefits are most apparent for users farthest from your origin server.
Learn more about the [benefits of Argo Smart Routing ↗](https://www.cloudflare.com/application-services/products/argo-smart-routing/).
Note
Enterprise customers can preview this product as a [non-contract service](https://developers.cloudflare.com/billing/understand/preview-services/), which provides full access, free of metered usage fees, limits, and certain other restrictions.
---
## Features
[Analytics](https://developers.cloudflare.com/argo-smart-routing/analytics/)
Argo Smart Routing includes comprehensive analytics to compare performance improvements with and without Argo enabled.
Use Analytics
---
## Related products
[Tiered Cache](https://developers.cloudflare.com/cache/how-to/tiered-cache/)
Increase cache hit ratios to reduce requests to your origin server.
[China Network](https://developers.cloudflare.com/china-network/)
Improve security and performance within mainland China.
[Magic Transit](https://developers.cloudflare.com/magic-transit/)
Reduce latency and protect from DDoS attacks using the Cloudflare network.
---
## More resources
### [Plans](https://www.cloudflare.com/plans/#overview)
Compare available Cloudflare plans
### [Pricing](https://dash.cloudflare.com/?to=/:account/:zone/traffic/)
Explore pricing options for Argo in the dashboard
Was this helpful?
YesNo
## On this page
[Docs](https://developers.cloudflare.com/)
```json
{"@context":"https://schema.org","@type":"WebPage","@id":"https://developers.cloudflare.com/argo-smart-routing/#page","headline":"Overview · Cloudflare Argo Smart Routing docs","description":"Route traffic across the fastest network paths to reduce latency and packet loss.","url":"https://developers.cloudflare.com/argo-smart-routing/","inLanguage":"en","image":"https://developers.cloudflare.com/og-docs.png","dateModified":"2026-04-16","publisher":{"@type":"Organization","name":"Cloudflare","url":"https://www.cloudflare.com/"},"isPartOf":{"@type":"WebSite","@id":"https://developers.cloudflare.com/#website","name":"Cloudflare Docs","url":"https://developers.cloudflare.com/"}}
```
---
---
description: Learn how to enable Argo Smart Routing in the Cloudflare dashboard.
title: Get started
image: https://developers.cloudflare.com/og-docs.png
---
[Skip to content](#main-content)
> Documentation Index
> Fetch the complete documentation index at: https://developers.cloudflare.com/argo-smart-routing/llms.txt
> Use this file to discover all available pages before exploring further.
# Get started
Last updated May 5, 2026|Copy as Markdown|[View as Markdown](https://developers.cloudflare.com/argo-smart-routing/get-started/index.md)|[Agent setup](https://developers.cloudflare.com/agent-setup/)
Smart Shield
This functionality is now offered as part of Cloudflare's origin server safeguard, Smart Shield. [Learn more](https://developers.cloudflare.com/smart-shield/).
Argo Smart Routing speeds up your global traffic by routing requests across the fastest network paths available.
To enable [Argo Smart Routing ↗](https://dash.cloudflare.com/?to=/:account/:zone/traffic) in the dashboard:
1. In the Cloudflare dashboard, go to the **Argo Smart Routing** page.
[Go to **Argo Smart Routing** ↗](https://dash.cloudflare.com/?to=/:account/:zone/traffic)
2. For **Argo Smart Routing**, switch the toggle to **On**.
3. Provide your billing information.
* If you do not have a [billing profile](https://developers.cloudflare.com/billing/get-started/create-billing-profile/), enter your billing information.
* If you have a billing profile, confirm your billing information.
To enable or disable Argo Smart Routing with the API, send a [PATCH](https://developers.cloudflare.com/api/resources/argo/subresources/smart%5Frouting/methods/edit/) request with the `value` parameter set to your desired setting (`"on"` or `"off"`).
You will need to already have a [billing profile](https://developers.cloudflare.com/billing/get-started/create-billing-profile/) on your account to enable Argo Smart Routing.
Note
Enterprise customers can preview this product as a [non-contract service](https://developers.cloudflare.com/billing/understand/preview-services/), which provides full access, free of metered usage fees, limits, and certain other restrictions.
## Billing
If Cloudflare mitigates attacks on your site - whether through DDoS protection, the WAF, or other mechanisms - that traffic will not be included in any charges for Argo Smart Routing.
Since this is a service with [usage-based billing](https://developers.cloudflare.com/billing/understand/usage-based-billing/), Cloudflare recommends that you set up usage-based billing notifications to avoid unexpected bills.
To set up those notifications:
1. In the Cloudflare dashboard, go to the **Notifications** page.
[Go to **Notifications** ↗](https://dash.cloudflare.com/?to=/:account/notifications)
2. On **Alert Type** of **Usage Based Billing**, click **Select**.
3. Fill out the following information:
* **Name**
* **Product**
* **Notification limit** (exact metric will vary based on product)
* **Notification email**
Note
Some plans also have access to alerts through [PagerDuty](https://developers.cloudflare.com/notifications/get-started/configure-pagerduty/) and [Webhooks](https://developers.cloudflare.com/notifications/get-started/configure-webhooks/).
4. Select **Save**.
## Enable Tiered Cache
[Cache](https://developers.cloudflare.com/cache/) works by storing a copy of website content at Cloudflare's data centers. [Tiered Cache](https://developers.cloudflare.com/cache/how-to/tiered-cache/) organizes these data centers into a hierarchy based on location. This behavior allows Cloudflare to deliver content from data centers closest to your visitor.
When used together, Argo Smart Routing optimizes the network path between Cloudflare data centers and your origin, while Tiered Cache reduces the number of requests that reach your origin. For more information, refer to [Tiered Cache](https://developers.cloudflare.com/cache/how-to/tiered-cache/).
Was this helpful?
YesNo
## On this page
[Docs](https://developers.cloudflare.com/)
```json
{"@context":"https://schema.org","@type":"TechArticle","@id":"https://developers.cloudflare.com/argo-smart-routing/get-started/#page","headline":"Get started · Cloudflare Argo Smart Routing docs","description":"Learn how to enable Argo Smart Routing in the Cloudflare dashboard.","url":"https://developers.cloudflare.com/argo-smart-routing/get-started/","inLanguage":"en","image":"https://developers.cloudflare.com/og-docs.png","dateModified":"2026-05-05","publisher":{"@type":"Organization","name":"Cloudflare","url":"https://www.cloudflare.com/"},"isPartOf":{"@type":"WebSite","@id":"https://developers.cloudflare.com/#website","name":"Cloudflare Docs","url":"https://developers.cloudflare.com/"}}
```
---
---
description: View latency improvements and response time data for Argo Smart Routing.
title: Analytics
image: https://developers.cloudflare.com/og-docs.png
---
[Skip to content](#main-content)
> Documentation Index
> Fetch the complete documentation index at: https://developers.cloudflare.com/argo-smart-routing/llms.txt
> Use this file to discover all available pages before exploring further.
# Analytics
Last updated May 5, 2026|Copy as Markdown|[View as Markdown](https://developers.cloudflare.com/argo-smart-routing/analytics/index.md)|[Agent setup](https://developers.cloudflare.com/agent-setup/)
Cloudflare provides analytics to show the performance benefits of Argo Smart Routing.
You can access Argo analytics for your domain in the [Cloudflare dashboard ↗](https://dash.cloudflare.com/) at **Analytics** \> **Performance**. For information on all analytics in the dashboard, refer to [Analytics](https://developers.cloudflare.com/analytics/).
## How it works
Analytics collects data based on the time-to-first-byte (TTFB) from your origin to the Cloudflare network. TTFB is the delay between when Cloudflare sends a request to your server and when it receives the first byte in response. Argo Smart Routing optimizes your server's network transit time to minimize this delay.
Note
Detailed performance data within **Origin Performance (Argo)** will only display if Argo has routed at least 500 origin requests within the last 48 hours.
## Types of analytics
The dashboard displays two different views for performance data:
* **Origin Response Time**: A histogram shows response time from your origin to the Cloudflare network. The blue bars show time-to-first-byte (TTFB) without Argo, while the orange bars show TTFB where Argo found a Smart Route.
* **Geography**: A map shows the improvement in response time at each Cloudflare data center.
* A negative value indicates that requests from that location would not have benefited from Argo Smart Routing, so instead would have been routed directly.
Was this helpful?
YesNo
## On this page
[Docs](https://developers.cloudflare.com/)
```json
{"@context":"https://schema.org","@type":"TechArticle","@id":"https://developers.cloudflare.com/argo-smart-routing/analytics/#page","headline":"Analytics · Cloudflare Argo Smart Routing docs","description":"View latency improvements and response time data for Argo Smart Routing.","url":"https://developers.cloudflare.com/argo-smart-routing/analytics/","inLanguage":"en","image":"https://developers.cloudflare.com/og-docs.png","dateModified":"2026-05-05","publisher":{"@type":"Organization","name":"Cloudflare","url":"https://www.cloudflare.com/"},"isPartOf":{"@type":"WebSite","@id":"https://developers.cloudflare.com/#website","name":"Cloudflare Docs","url":"https://developers.cloudflare.com/"},"keywords":["Analytics"]}
```
---
---
description: Optimize IP layer routing for Magic Transit, Cloudflare WAN, and Cloudflare for Offices.
title: Argo for Packets
image: https://developers.cloudflare.com/og-docs.png
---
[Skip to content](#main-content)
> Documentation Index
> Fetch the complete documentation index at: https://developers.cloudflare.com/argo-smart-routing/llms.txt
> Use this file to discover all available pages before exploring further.
# Argo for Packets
Last updated May 5, 2026|Copy as Markdown|[View as Markdown](https://developers.cloudflare.com/argo-smart-routing/argo-for-packets/index.md)|[Agent setup](https://developers.cloudflare.com/agent-setup/)
Argo for Packets optimizes IP layer network routing for Cloudflare network services products, including [Magic Transit](https://developers.cloudflare.com/magic-transit/), [Cloudflare WAN](https://developers.cloudflare.com/cloudflare-wan/) (formerly Magic WAN), and [Cloudflare for Offices ↗](https://blog.cloudflare.com/cloudflare-for-offices/).
Argo for Packets monitors the performance of network paths between every Cloudflare data center and your origin. It uses existing Layer 4 traffic data and network analytics to select the fastest, most available path.
Organizations with multiple origin locations benefit most from Argo for Packets, because it optimizes complex Internet paths that would otherwise route suboptimally.
To begin using Argo for Packets, contact your account manager.
Was this helpful?
YesNo
## On this page
[Docs](https://developers.cloudflare.com/)
```json
{"@context":"https://schema.org","@type":"TechArticle","@id":"https://developers.cloudflare.com/argo-smart-routing/argo-for-packets/#page","headline":"Argo for Packets · Cloudflare Argo Smart Routing docs","description":"Optimize IP layer routing for Magic Transit, Cloudflare WAN, and Cloudflare for Offices.","url":"https://developers.cloudflare.com/argo-smart-routing/argo-for-packets/","inLanguage":"en","image":"https://developers.cloudflare.com/og-docs.png","dateModified":"2026-05-05","publisher":{"@type":"Organization","name":"Cloudflare","url":"https://www.cloudflare.com/"},"isPartOf":{"@type":"WebSite","@id":"https://developers.cloudflare.com/#website","name":"Cloudflare Docs","url":"https://developers.cloudflare.com/"}}
```
---
---
description: Cache and serve your entire WordPress site from the Cloudflare edge network.
title: Automatic Platform Optimization
image: https://developers.cloudflare.com/og-docs.png
---
[Skip to content](#main-content)
> Documentation Index
> Fetch the complete documentation index at: https://developers.cloudflare.com/automatic-platform-optimization/llms.txt
> Use this file to discover all available pages before exploring further.
# Automatic Platform Optimization
Last updated Apr 16, 2026|Copy as Markdown|[View as Markdown](https://developers.cloudflare.com/automatic-platform-optimization/index.md)|[Agent setup](https://developers.cloudflare.com/agent-setup/)
Take your WordPress site’s performance to the next level with Automatic Platform Optimizations (APO). APO allows Cloudflare to serve your entire WordPress site from its edge network ensuring consistent, fast performance for visitors no matter where they are.
Automatic Platform Optimization is the result of using the power of [Cloudflare Workers](https://developers.cloudflare.com/workers/) to intelligently cache dynamic content. By caching dynamic content, Cloudflare can serve the entire website from our edge network to make a site's time to first byte (TTFB) both fast and consistent.
To read more about the benefits of using APO with your site, see [The Benefits of Automatic Platform Optimization blog ↗](https://blog.cloudflare.com/automatic-platform-optimizations-starting-with-wordpress/#the-benefits-of-automatic-platform-optimization). You must use the Cloudflare for WordPress plugin to begin using APO.
Was this helpful?
YesNo
## On this page
[Docs](https://developers.cloudflare.com/)
```json
{"@context":"https://schema.org","@type":"WebPage","@id":"https://developers.cloudflare.com/automatic-platform-optimization/#page","headline":"Overview · Cloudflare Automatic Platform Optimization docs","description":"Cache and serve your entire WordPress site from the Cloudflare edge network.","url":"https://developers.cloudflare.com/automatic-platform-optimization/","inLanguage":"en","image":"https://developers.cloudflare.com/og-docs.png","dateModified":"2026-04-16","publisher":{"@type":"Organization","name":"Cloudflare","url":"https://www.cloudflare.com/"},"isPartOf":{"@type":"WebSite","@id":"https://developers.cloudflare.com/#website","name":"Cloudflare Docs","url":"https://developers.cloudflare.com/"}}
```
---
---
description: How APO caches dynamic WordPress content at the Cloudflare edge.
title: About
image: https://developers.cloudflare.com/og-docs.png
---
[Skip to content](#main-content)
> Documentation Index
> Fetch the complete documentation index at: https://developers.cloudflare.com/automatic-platform-optimization/llms.txt
> Use this file to discover all available pages before exploring further.
# About
Last updated Apr 16, 2026|Copy as Markdown|[View as Markdown](https://developers.cloudflare.com/automatic-platform-optimization/about/index.md)|[Agent setup](https://developers.cloudflare.com/agent-setup/)
With Automatic Platform Optimization (APO), Cloudflare serves your entire site from our edge network, ensuring customers see improved performance when visiting your site. Cloudflare typically only caches static content, but with APO, we can also cache dynamic content — like HTML — to serve the entire site from the cache. This process removes round trips from the origin to drastically improve time to first byte (TTFB) along with other site performance metrics. In addition to caching dynamic content, APO caches third-party scripts to further reduce the number of requests that leave Cloudflare's edge network.
With APO, you can manage your WordPress site as normal. Whenever you update content in WordPress, Cloudflare updates content on our edge to prevent serving stale content when you use Cloudflare's WordPress plugin. Additionally, for logged-in or administrator users, we bypass the cache to ensure that private content is not cached and served to other visitors. Find more about [what APO can do for you. ↗](https://www.youtube.com/watch?v=DWANhxoDxFI?feature=youtu.be)
## Limitations
Automatic Platform Optimization is not compatible with Enterprise [subdomain setup](https://developers.cloudflare.com/dns/zone-setups/subdomain-setup/) when a subdomain, for example, `www` is in a different zone to the apex domain.
Was this helpful?
YesNo
## On this page
[Docs](https://developers.cloudflare.com/)
```json
{"@context":"https://schema.org","@type":"TechArticle","@id":"https://developers.cloudflare.com/automatic-platform-optimization/about/#page","headline":"About · Cloudflare Automatic Platform Optimization docs","description":"How APO caches dynamic WordPress content at the Cloudflare edge.","url":"https://developers.cloudflare.com/automatic-platform-optimization/about/","inLanguage":"en","image":"https://developers.cloudflare.com/og-docs.png","dateModified":"2026-04-16","publisher":{"@type":"Organization","name":"Cloudflare","url":"https://www.cloudflare.com/"},"isPartOf":{"@type":"WebSite","@id":"https://developers.cloudflare.com/#website","name":"Cloudflare Docs","url":"https://developers.cloudflare.com/"}}
```
---
---
description: WordPress plugins supported and known to conflict with APO.
title: Plugin compatibility
image: https://developers.cloudflare.com/og-docs.png
---
[Skip to content](#main-content)
> Documentation Index
> Fetch the complete documentation index at: https://developers.cloudflare.com/automatic-platform-optimization/llms.txt
> Use this file to discover all available pages before exploring further.
# Plugin compatibility
Last updated Apr 16, 2026|Copy as Markdown|[View as Markdown](https://developers.cloudflare.com/automatic-platform-optimization/about/plugin-compatibility/index.md)|[Agent setup](https://developers.cloudflare.com/agent-setup/)
Currently, WordPress offers over 50,000 plugins for download. As a result, testing the compatibility between APO and every available plugin is impossible. However, Cloudflare has a list of officially supported plugins and a list of plugins known to cause issues when APO is enabled.
For questions about a specific plugin not shown in the list, create a thread in the [Cloudflare Community ↗](https://community.cloudflare.com/) to begin the conversation.
Note
The Cloudflare APO WordPress plugin does not support multisite WordPress installation.
## Compatible plugins
* [NitroPack ↗](https://nitropack.io/)
* [FlyingPress ↗](https://flyingpress.com/)
* [WP Rocket ↗](https://community.cloudflare.com/t/cloudflares-apo-with-wp-rockets-minified-css/225906/3?u=yevgen) **version 3.8.6 or later**
* [BigCommerce ↗](https://wordpress.org/plugins/bigcommerce/)
* [Easy Digital Downloads ↗](https://wordpress.org/plugins/easy-digital-downloads/)
* [WooCommerce ↗](https://wordpress.org/plugins/woocommerce/)
* [Redis Object Cache ↗](https://wordpress.org/plugins/redis-cache/)
* [Object Cache Pro ↗](https://objectcache.pro)
* [YITH WooCommerce Wishlist ↗](https://wordpress.org/plugins/yith-woocommerce-wishlist/)
* [WP EasyCart ↗](https://wordpress.org/plugins/wp-easycart/)
* [Ecwid Ecommerce Shopping Cart ↗](https://wordpress.org/plugins/ecwid-shopping-cart/)
* [WP ECommerce ↗](https://wordpress.org/plugins/wp-e-commerce/)
* [Bookly ↗](https://wordpress.org/plugins/bookly-responsive-appointment-booking-tool/)
* [WPTouch ↗](https://wordpress.org/plugins/wptouch/)
* [Mobile Detect ↗](https://wordpress.org/plugins/tinywp-mobile-detect/)
* [WordPress Mobile Pack ↗](https://wordpress.org/plugins/wordpress-mobile-pack/)
* [WP-Mobilizer ↗](https://wordpress.org/plugins/wp-mobilizer/)
* [Any Mobile Theme Switcher ↗](https://wordpress.org/plugins/any-mobile-theme-switcher/)
* [Easy Social Share Buttons ↗](https://codecanyon.net/item/easy-social-share-buttons-for-wordpress/6394476)
* [Jetpack (Mobile Theme) ↗](https://wordpress.org/plugins/jetpack/)
* [WPML ↗](https://wpml.org/)
* [Hummingbird ↗](https://wordpress.org/plugins/hummingbird-performance/)
* [Imunify360 ↗](https://docs.imunify360.com/features/#webshield)
* [Perfmatters ↗](https://perfmatters.io/docs/cloudflare-wordpress-settings/)
Was this helpful?
YesNo
## On this page
[Docs](https://developers.cloudflare.com/)
```json
{"@context":"https://schema.org","@type":"TechArticle","@id":"https://developers.cloudflare.com/automatic-platform-optimization/about/plugin-compatibility/#page","headline":"Plugin compatibility · Cloudflare Automatic Platform Optimization docs","description":"WordPress plugins supported and known to conflict with APO.","url":"https://developers.cloudflare.com/automatic-platform-optimization/about/plugin-compatibility/","inLanguage":"en","image":"https://developers.cloudflare.com/og-docs.png","dateModified":"2026-04-16","publisher":{"@type":"Organization","name":"Cloudflare","url":"https://www.cloudflare.com/"},"isPartOf":{"@type":"WebSite","@id":"https://developers.cloudflare.com/#website","name":"Cloudflare Docs","url":"https://developers.cloudflare.com/"},"keywords":["WordPress"]}
```
---
---
description: Benchmark your site speed before enabling APO with GTmetrix.
title: Test current speed
image: https://developers.cloudflare.com/og-docs.png
---
[Skip to content](#main-content)
> Documentation Index
> Fetch the complete documentation index at: https://developers.cloudflare.com/automatic-platform-optimization/llms.txt
> Use this file to discover all available pages before exploring further.
# Test current speed
Last updated Apr 16, 2026|Copy as Markdown|[View as Markdown](https://developers.cloudflare.com/automatic-platform-optimization/about/test-current-speed/index.md)|[Agent setup](https://developers.cloudflare.com/agent-setup/)
Before you begin using APO, we recommend testing your current site speed. Your site speed results give your website a letter grade and performance rating.
1. Visit [GTmetrix ↗](https://gtmetrix.com/).
2. In the text field, enter your website's URL.
3. Click **Test your site**.
After the test runs, you can view your site's grade, performance rating, and other performance metrics.
Was this helpful?
YesNo
## On this page
[Docs](https://developers.cloudflare.com/)
```json
{"@context":"https://schema.org","@type":"TechArticle","@id":"https://developers.cloudflare.com/automatic-platform-optimization/about/test-current-speed/#page","headline":"Test current speed · Cloudflare Automatic Platform Optimization docs","description":"Benchmark your site speed before enabling APO with GTmetrix.","url":"https://developers.cloudflare.com/automatic-platform-optimization/about/test-current-speed/","inLanguage":"en","image":"https://developers.cloudflare.com/og-docs.png","dateModified":"2026-04-16","publisher":{"@type":"Organization","name":"Cloudflare","url":"https://www.cloudflare.com/"},"isPartOf":{"@type":"WebSite","@id":"https://developers.cloudflare.com/#website","name":"Cloudflare Docs","url":"https://developers.cloudflare.com/"}}
```
---
---
description: Resolve common APO issues including plugin detection and stale content.
title: Troubleshooting
image: https://developers.cloudflare.com/og-docs.png
---
[Skip to content](#main-content)
> Documentation Index
> Fetch the complete documentation index at: https://developers.cloudflare.com/automatic-platform-optimization/llms.txt
> Use this file to discover all available pages before exploring further.
# Troubleshooting
Last updated Apr 16, 2026|Copy as Markdown|[View as Markdown](https://developers.cloudflare.com/automatic-platform-optimization/troubleshooting/index.md)|[Agent setup](https://developers.cloudflare.com/agent-setup/)
## WordPress plugin is undetected on Cloudflare dashboard
The WordPress plugin may go undetected on your Cloudflare dashboard for a few reasons.
* Versions older than 3.8.2 of the WordPress plugin are installed.
* **Solution:** Install version 4.4.0 of the WordPress plugin.
* Version 3.8.2 of the plugin is installed but existing cache plugins return stale responses, for example, without `cf-edge-cache` header.
* **Solution:** Enable APO from the WordPress plugin and purge the cache in the existing cache plugins.
* WordPress only runs on a subdomain, but WordPress and the WordPress plugin check against the apex domain.
* **Solution:** For additional information, see [Subdomains and subdirectories](https://developers.cloudflare.com/automatic-platform-optimization/reference/subdomain-subdirectories/)
If your Cloudflare dashboard cannot detect the WordPress plugin after trying the solutions above, ensure you completed all of the steps listed in [Activate the Cloudflare WordPress plugin](https://developers.cloudflare.com/automatic-platform-optimization/get-started/activate-cf-wp-plugin/).
Note
The Cloudflare APO WordPress plugin does not support multisite WordPress installation.
## WordPress returns stale content
If WordPress is returning stale content, [purge the cache](https://developers.cloudflare.com/cache/how-to/purge-cache/) when APO is enabled.
Was this helpful?
YesNo
## On this page
[Docs](https://developers.cloudflare.com/)
```json
{"@context":"https://schema.org","@type":"TechArticle","@id":"https://developers.cloudflare.com/automatic-platform-optimization/troubleshooting/#page","headline":"Troubleshooting · Cloudflare Automatic Platform Optimization docs","description":"Resolve common APO issues including plugin detection and stale content.","url":"https://developers.cloudflare.com/automatic-platform-optimization/troubleshooting/","inLanguage":"en","image":"https://developers.cloudflare.com/og-docs.png","dateModified":"2026-04-16","publisher":{"@type":"Organization","name":"Cloudflare","url":"https://www.cloudflare.com/"},"isPartOf":{"@type":"WebSite","@id":"https://developers.cloudflare.com/#website","name":"Cloudflare Docs","url":"https://developers.cloudflare.com/"}}
```
---
---
description: Answers to common questions about APO caching, Page Rules, and WordPress integration.
title: FAQs
image: https://developers.cloudflare.com/og-docs.png
---
[Skip to content](#main-content)
> Documentation Index
> Fetch the complete documentation index at: https://developers.cloudflare.com/automatic-platform-optimization/llms.txt
> Use this file to discover all available pages before exploring further.
# FAQs
Last updated Apr 16, 2026|Copy as Markdown|[View as Markdown](https://developers.cloudflare.com/automatic-platform-optimization/troubleshooting/faq/index.md)|[Agent setup](https://developers.cloudflare.com/agent-setup/)
## Do I still need to create "Edge Cache TTL" page rules with "Cache Level: Cache Everything"?
No, you do not need create Edge Cache TTL page rules. When the WordPress plugin is installed, APO automatically caches content for 30 days and invalidates on change within 30 seconds. However, because APO now supports cache-related page rules, make sure existing page rules do not affect the resources served by APO.
## Does Origin Cache Control override APO?
No. APO ignores Origin Cache Control for caching on the Edge, but APO serves original Origin Cache Control to the client.
## Why are my browser cache control headers missing with APO?
The browser cache control headers may be missing with APO if you set your **Browser Cache TTL** to **Respect Existing Headers**. For example:
```sh
curl --silent --verbose --output /dev/null https://example.com/ --header 'Accept: text/html' 2>&1 | grep cache-control
```
```sh
< cache-control: max-age=86400, stale-while-revalidate=86400, stale-if-error=86400
```
## Is the stale-if-error directive still needed with APO?
No, the `stale-if-error` directive is not needed because the feature is built into APO.
## When I check the posts and homepage cache status, the response header shows `cf-cache-status: BYPASS`. Is APO working?
When Chrome DevTools is open, Chrome sends `Cache-Control: no-cache` by default. You can uncheck the **Disable cache (while DevTools is open)** setting and see that `cf-cache-status: HIT` and `cf-apo-via: cache` headers will be returned.
## When I check `cf-cache-status` via cURL, `MISS` and `DYNAMIC` are always returned. In my browser, I see `HIT` but other tools return `DYNAMIC`. Is this expected behavior?
Yes, this is expected behavior because the requests must contain `accept: "text/html"`.
## Are Google Fonts optimized when APO is activated?
Yes, Google Fonts are also optimized when APO is activated. You can confirm the optimization by checking the font URLs. For example, the URL will change from `https://fonts.gstatic.com/s/...` to `https://example.com/fonts.gstatic.com/s/...` when the site loads. For proxied fonts, the `cf-apo-via:proxy` header is returned.
## Can I customize query string caching with APO?
For more information on query parameters, see [Query parameters and cached responses](https://developers.cloudflare.com/automatic-platform-optimization/reference/query-parameters/).
## Why are my font URLs not being transformed?
APO will skip URL font transformation when the `content-security-policy` response header is present but missing the values described below.
To fix the problem, the `content-security-policy` header value must allow for `unsafe-inline` on either the `style-src` or `default-src` directive. For example, `Content-Security-Policy: style-src unsafe-inline;`.
The header must allow for `self` on either the `font-src` or `default-src` directive. For example, `Content-Security-Policy: font-src self;`.
## Why do I see Worker subrequests in my zone logs when using APO?
APO uses Cloudflare Workers internally to optimize content delivery, which results in Worker subrequests. These subrequests may appear in your zone logs (for example, via Logpush).
## For the APO plugin why do I see: This plugin hasn’t been tested with the latest 3 major releases of WordPress. It may no longer be maintained or supported and may have compatibility issues when used with more recent versions of WordPress.
It is not uncommon for mature plugins to see no updates for longer periods than it takes to trigger the WordPress not tested warning. The warning is for notification purposes and is not an indication that a plugin no longer works. It is still maintained.
Was this helpful?
YesNo
## On this page
[Docs](https://developers.cloudflare.com/)
```json
{"@context":"https://schema.org","@type":"TechArticle","@id":"https://developers.cloudflare.com/automatic-platform-optimization/troubleshooting/faq/#page","headline":"FAQs · Cloudflare Automatic Platform Optimization docs","description":"Answers to common questions about APO caching, Page Rules, and WordPress integration.","url":"https://developers.cloudflare.com/automatic-platform-optimization/troubleshooting/faq/","inLanguage":"en","image":"https://developers.cloudflare.com/og-docs.png","dateModified":"2026-04-16","publisher":{"@type":"Organization","name":"Cloudflare","url":"https://www.cloudflare.com/"},"isPartOf":{"@type":"WebSite","@id":"https://developers.cloudflare.com/#website","name":"Cloudflare Docs","url":"https://developers.cloudflare.com/"},"keywords":["WordPress","Headers","Security"]}
```
---
---
description: The easiest way to begin using APO is directly from Cloudflare's WordPress plugin. Before you can use APO, you must first install and activate the plugin and then activate APO.
title: Activate the Cloudflare WordPress plugin
image: https://developers.cloudflare.com/og-docs.png
---
[Skip to content](#main-content)
> Documentation Index
> Fetch the complete documentation index at: https://developers.cloudflare.com/automatic-platform-optimization/llms.txt
> Use this file to discover all available pages before exploring further.
# Activate the Cloudflare WordPress plugin
Last updated May 5, 2026|Copy as Markdown|[View as Markdown](https://developers.cloudflare.com/automatic-platform-optimization/get-started/activate-cf-wp-plugin/index.md)|[Agent setup](https://developers.cloudflare.com/agent-setup/)
After you [change your nameservers](https://developers.cloudflare.com/automatic-platform-optimization/get-started/change-nameservers/), activate the Cloudflare WordPress plugin.
## Prerequisites
Before activating the Cloudflare WordPress plugin, review the following prerequisites.
### Plan type
For users on the free plan, [purchase APO](#purchase-apo) before installing the WordPress plugin.
For users on a Pro plan or higher, continue to [Install and activate](#install-and-activate-the-cloudflare-wordpress-plugin) the Cloudflare WordPress plugin.
### Plugin compatibility
Cloudflare recommends turning off plugins such as WP Rocket Cache Plugin, W3 Total Cache, or similar plugins when first setting up APO. After confirming APO is working, we recommend testing whether turning on the plugins listed above improves results or causes unexpected behavior. In many cases, using APO along with other caching plugins can cause unexpected results.
We also recommend clearing the server cache for the WP Rocket Cache plugin, W3 Total Cache, or similar plugins after APO activation.
For more details, refer to [Plugin compatibility](https://developers.cloudflare.com/automatic-platform-optimization/about/plugin-compatibility/).
### Limitations
The Cloudflare APO WordPress plugin does not support multisite WordPress installation.
## Purchase APO
1. In the Cloudflare dashboard, go to the **Speed** \> **Settings** page.
[Go to **Settings** ↗](https://dash.cloudflare.com/?to=/:account/:zone/speed/optimization)
2. Go to **Content Optimization**.
3. For **Automatic Platform Optimization for WordPress**, select **Purchase**.
4. Enter your payment information and select **Confirm payment**.
## Install and activate the Cloudflare WordPress plugin
The easiest way to begin using APO is directly from Cloudflare’s WordPress plugin. Before you can use APO, you must first install and activate the plugin and then activate APO.
1. Navigate and log in to your WordPress account.
2. Select **Plugins** \> **Add new**.
3. In the search field, enter `Cloudflare`.
4. Locate the Cloudflare plugin and select **Install now**.
5. After the plugin finishes installing, select **Activate**. The Cloudflare plugin now displays in your Plugins list.
## Activate APO
To create the connection between WordPress and Cloudflare, you will create an API token from your Cloudflare dashboard and add it to WordPress. To set up APO on a subdomain, refer to [Subdomains and subdirectories](https://developers.cloudflare.com/automatic-platform-optimization/reference/subdomain-subdirectories/).
## Create the API token from Cloudflare
1. In the Cloudflare dashboard, go to the **Account API tokens** page.
[Go to **Account API tokens** ↗](https://dash.cloudflare.com/?to=/:account/api-tokens)
2. Select **Create Token**.
3. Locate **WordPress** from the list and select **Use template**.
4. Select **Continue to summary** at the bottom of the page.
5. On the **WordPress API token summary** page, select **Create Token**. Your API token displays.
6. Select the **Copy** button to copy your token. You will need to paste the token in the next section.
Note
Copy and paste your API token into a document saved on your computer to easily reference it again.
## Add your API token to WordPress
1. Open your WordPress account and navigate to Plugins.
2. Locate the Cloudflare plugin and select **Settings**.
3. Select the option to sign in with an existing account.
4. Enter your email address and paste the token you copied in Step 7 of Create the API token from Cloudflare.
5. Select **Save API Credentials**.
6. For **Apply Recommended Cloudflare Settings for WordPress**, select **Apply**.
7. For **Automatic Platform Optimization**, switch the toggle to **On** to enable APO.
To verify APO is working, see [Verify APO works](https://developers.cloudflare.com/automatic-platform-optimization/get-started/verify-apo-works/).
Was this helpful?
YesNo
## On this page
[Docs](https://developers.cloudflare.com/)
```json
{"@context":"https://schema.org","@type":"TechArticle","@id":"https://developers.cloudflare.com/automatic-platform-optimization/get-started/activate-cf-wp-plugin/#page","headline":"Activate the Cloudflare WordPress plugin · Cloudflare Automatic Platform Optimization docs","description":"The easiest way to begin using APO is directly from Cloudflare's WordPress plugin. Before you can use APO, you must first install and activate the plugin and then activate APO.","url":"https://developers.cloudflare.com/automatic-platform-optimization/get-started/activate-cf-wp-plugin/","inLanguage":"en","image":"https://developers.cloudflare.com/og-docs.png","dateModified":"2026-05-05","publisher":{"@type":"Organization","name":"Cloudflare","url":"https://www.cloudflare.com/"},"isPartOf":{"@type":"WebSite","@id":"https://developers.cloudflare.com/#website","name":"Cloudflare Docs","url":"https://developers.cloudflare.com/"},"keywords":["WordPress"]}
```
---
---
description: Update your domain nameservers to Cloudflare for APO to work.
title: Change nameservers
image: https://developers.cloudflare.com/og-docs.png
---
[Skip to content](#main-content)
> Documentation Index
> Fetch the complete documentation index at: https://developers.cloudflare.com/automatic-platform-optimization/llms.txt
> Use this file to discover all available pages before exploring further.
# Change nameservers
Last updated Apr 16, 2026|Copy as Markdown|[View as Markdown](https://developers.cloudflare.com/automatic-platform-optimization/get-started/change-nameservers/index.md)|[Agent setup](https://developers.cloudflare.com/agent-setup/)
After you [confirm your DNS records](https://developers.cloudflare.com/automatic-platform-optimization/get-started/confirm-dns-records/), change your nameservers.
Updating your domain to use Cloudflare's nameservers is a critical step to ensure Cloudflare can optimize and protect your site. Nameservers are your primary DNS controller and identify the location of your domain on the Internet.
Domain registrars can take up to 24 hours to process the nameserver updates. You will receive an email from Cloudflare once your site is activated.
## Lookup domain name registration
1. Visit [WHOIS ↗](https://lookup.icann.org/) to look up your domain name registration.
2. In the text field, enter your domain name without `https://www.` and select **Lookup**.
3. From **Domain Information**, make note of the nameserver information that displays. You will update those nameservers to point to Cloudflare.
We recommend keeping this browser tab or window open and opening a new tab or window for the next section.
## Update your nameserver with your domain registrar
1. Log in to the administrator account for your domain registrar.
2. Navigate to DNS Management.
3. Locate your nameserver information. Your nameservers should match the information from Step 3 of Lookup domain name registration.
4. Replace the existing nameserver information with the Cloudflare nameservers from Step 4 of Create the custom nameserver with Cloudflare.
Note
You may be prompted to confirm the nameserver change with your domain registrar. Confirm or continue after making the update.
Was this helpful?
YesNo
## On this page
[Docs](https://developers.cloudflare.com/)
```json
{"@context":"https://schema.org","@type":"TechArticle","@id":"https://developers.cloudflare.com/automatic-platform-optimization/get-started/change-nameservers/#page","headline":"Change nameservers · Cloudflare Automatic Platform Optimization docs","description":"Update your domain nameservers to Cloudflare for APO to work.","url":"https://developers.cloudflare.com/automatic-platform-optimization/get-started/change-nameservers/","inLanguage":"en","image":"https://developers.cloudflare.com/og-docs.png","dateModified":"2026-04-16","publisher":{"@type":"Organization","name":"Cloudflare","url":"https://www.cloudflare.com/"},"isPartOf":{"@type":"WebSite","@id":"https://developers.cloudflare.com/#website","name":"Cloudflare Docs","url":"https://developers.cloudflare.com/"},"keywords":["DNS"]}
```
---
---
description: Verify your DNS records are correct before enabling APO.
title: Confirm DNS records
image: https://developers.cloudflare.com/og-docs.png
---
[Skip to content](#main-content)
> Documentation Index
> Fetch the complete documentation index at: https://developers.cloudflare.com/automatic-platform-optimization/llms.txt
> Use this file to discover all available pages before exploring further.
# Confirm DNS records
Last updated Apr 16, 2026|Copy as Markdown|[View as Markdown](https://developers.cloudflare.com/automatic-platform-optimization/get-started/confirm-dns-records/index.md)|[Agent setup](https://developers.cloudflare.com/agent-setup/)
Before you change your nameservers, confirm your DNS records are displaying correctly.
1. In the Cloudflare dashboard, go to the DNS **Records** page.
[Go to **Records** ↗](https://dash.cloudflare.com/?to=/:account/:zone/dns/records)
2. To add a record, select **Add record**.
3. To edit an existing record, select **Edit** for the appropriate record.
4. After making your changes, select **Save**.
After you confirm your DNS records, [change your nameservers](https://developers.cloudflare.com/automatic-platform-optimization/get-started/change-nameservers/).
Was this helpful?
YesNo
## On this page
[Docs](https://developers.cloudflare.com/)
```json
{"@context":"https://schema.org","@type":"TechArticle","@id":"https://developers.cloudflare.com/automatic-platform-optimization/get-started/confirm-dns-records/#page","headline":"Confirm DNS records · Cloudflare Automatic Platform Optimization docs","description":"Verify your DNS records are correct before enabling APO.","url":"https://developers.cloudflare.com/automatic-platform-optimization/get-started/confirm-dns-records/","inLanguage":"en","image":"https://developers.cloudflare.com/og-docs.png","dateModified":"2026-04-16","publisher":{"@type":"Organization","name":"Cloudflare","url":"https://www.cloudflare.com/"},"isPartOf":{"@type":"WebSite","@id":"https://developers.cloudflare.com/#website","name":"Cloudflare Docs","url":"https://developers.cloudflare.com/"},"keywords":["DNS"]}
```
---
---
description: When APO is working, three headers are present: CF-Cache-Status, cf-apo-via,cf-edge-cache. APO works correctly when the headers exactly match the headers below.
title: Verify APO works
image: https://developers.cloudflare.com/og-docs.png
---
[Skip to content](#main-content)
> Documentation Index
> Fetch the complete documentation index at: https://developers.cloudflare.com/automatic-platform-optimization/llms.txt
> Use this file to discover all available pages before exploring further.
# Verify APO works
Last updated Apr 16, 2026|Copy as Markdown|[View as Markdown](https://developers.cloudflare.com/automatic-platform-optimization/get-started/verify-apo-works/index.md)|[Agent setup](https://developers.cloudflare.com/agent-setup/)
You can check whether or not APO is working by verifying APO headers are present. When APO is working, three headers are present: `CF-Cache-Status`, `cf-apo-via`, `cf-edge-cache`.
1. Visit [Uptrends.com ↗](https://www.uptrends.com/tools/http-response-header-check).
2. In the text field, enter the URL for your WordPress homepage including the `https://www.`.
3. Select **Start test**. The **Response Headers** table displays.
4. Locate the three header responses and their description. APO is working correctly when the headers exactly match the headers below.
* `CF-Cache-Status` | `HIT`
* The `cf-cache-status` header displays if the asset is served from the cache or was considered dynamic and served from the origin.
* `cf-apo-via` | `tcache`
* The `cf-apo-via` header returns the APO status for the given request.
* `cf-edge-cache` | `cache, platform=wordpress`
* The `cf-edge-cache` headers confirms the WordPress plugin is installed and enabled.
In a terminal, use the following cURL. The header `'accept: text/html'` is important.
```sh
curl -svo /dev/null -A "CF" 'https://example.com/' -H 'accept: text/html' 2>&1 | grep 'cf-cache-status\|cf-edge\|cf-apo-via'
```
```sh
< cf-cache-status: HIT
< cf-apo-via: cache
< cf-edge-cache: cache,platform=wordpress
```
As always, `cf-cache-status` displays if the asset hit the cache or was considered dynamic and served from the origin.
* `cf-apo-via` | `tcache`
* The `cf-apo-via` header returns the APO status for the given request.
* `cf-edge-cache` | `cache, platform=wordpress`
* The `cf-edge-cache` headers confirms the WordPress plugin is installed and enabled.
## Verify the APO integration and WordPress integration work
Open your WordPress site and publish a change. When the integration is working, the page is cached with `cf-cache-status: HIT` and `cf-apo-via: tcache`.
Was this helpful?
YesNo
## On this page
[Docs](https://developers.cloudflare.com/)
```json
{"@context":"https://schema.org","@type":"TechArticle","@id":"https://developers.cloudflare.com/automatic-platform-optimization/get-started/verify-apo-works/#page","headline":"Verify APO works · Cloudflare Automatic Platform Optimization docs","description":"When APO is working, three headers are present: CF-Cache-Status, cf-apo-via,cf-edge-cache. APO works correctly when the headers exactly match the headers below.","url":"https://developers.cloudflare.com/automatic-platform-optimization/get-started/verify-apo-works/","inLanguage":"en","image":"https://developers.cloudflare.com/og-docs.png","dateModified":"2026-04-16","publisher":{"@type":"Organization","name":"Cloudflare","url":"https://www.cloudflare.com/"},"isPartOf":{"@type":"WebSite","@id":"https://developers.cloudflare.com/#website","name":"Cloudflare Docs","url":"https://developers.cloudflare.com/"},"keywords":["WordPress","Headers"]}
```
---
---
description: Serve different cached content to mobile, tablet, and desktop visitors.
title: Cache by device type
image: https://developers.cloudflare.com/og-docs.png
---
[Skip to content](#main-content)
> Documentation Index
> Fetch the complete documentation index at: https://developers.cloudflare.com/automatic-platform-optimization/llms.txt
> Use this file to discover all available pages before exploring further.
# Cache by device type
Last updated Apr 16, 2026|Copy as Markdown|[View as Markdown](https://developers.cloudflare.com/automatic-platform-optimization/reference/cache-device-type/index.md)|[Agent setup](https://developers.cloudflare.com/agent-setup/)
APO cache by device type provides all of the same benefits of Cloudflare's cache while targeting visitors with content appropriate to their device. Cloudflare evaluates the `User-Agent` header in the HTTP request to identify the device type. Cloudflare then identifies each device type with a case insensitive match to the regex below:
* **Mobile**: `(?:phone|windows\s+phone|ipod|blackberry|(?:android|bb\d+|meego|silk|googlebot) .+? mobile|palm|windows\s+ce|opera mini|avantgo|mobilesafari|docomo|kaios)`
* **Tablet**: `(?:ipad|playbook|(?:android|bb\d+|meego|silk)(?! .+? mobile))`
* **Desktop**: Everything else not matched above.
To enable caching by device type, enable the setting from the Cloudflare dashboard's APO card or from the WordPress plugin version 4.4.0 or later.
Once enabled, Cloudflare sends a `CF-Device-Type` HTTP header to your origin with a value of either `mobile`, `tablet`, `desktop` for every request to specify the visitor’s device type. If your origin responds with the appropriate content for that device type, Cloudflare only caches the resource for that specific device type.
Note
Changing Cache By Device Type setting will invalidate Cache.
The Cloudflare for WordPress plugin automatically purges all cache variations for updated pages.
Cloudflare recommends that you use plugins that support cache by device type, which you may have to enable on the plugin. You will still need to test your plugins to make sure they behave as expected.
Was this helpful?
YesNo
## On this page
[Docs](https://developers.cloudflare.com/)
```json
{"@context":"https://schema.org","@type":"TechArticle","@id":"https://developers.cloudflare.com/automatic-platform-optimization/reference/cache-device-type/#page","headline":"Cache by device type · Cloudflare Automatic Platform Optimization docs","description":"Serve different cached content to mobile, tablet, and desktop visitors.","url":"https://developers.cloudflare.com/automatic-platform-optimization/reference/cache-device-type/","inLanguage":"en","image":"https://developers.cloudflare.com/og-docs.png","dateModified":"2026-04-16","publisher":{"@type":"Organization","name":"Cloudflare","url":"https://www.cloudflare.com/"},"isPartOf":{"@type":"WebSite","@id":"https://developers.cloudflare.com/#website","name":"Cloudflare Docs","url":"https://developers.cloudflare.com/"},"keywords":["Headers"]}
```
---
---
description: Page Rules that control APO caching behavior for specific URL patterns.
title: Page Rule integration with APO
image: https://developers.cloudflare.com/og-docs.png
---
[Skip to content](#main-content)
> Documentation Index
> Fetch the complete documentation index at: https://developers.cloudflare.com/automatic-platform-optimization/llms.txt
> Use this file to discover all available pages before exploring further.
# Page Rule integration with APO
Last updated Apr 16, 2026|Copy as Markdown|[View as Markdown](https://developers.cloudflare.com/automatic-platform-optimization/reference/page-rule-integration/index.md)|[Agent setup](https://developers.cloudflare.com/agent-setup/)
The following Page Rules can control APO. Any changes to caching via Page Rules require purging the cache for the changes to take effect.
Caution
Consider using [Cache Rules](https://developers.cloudflare.com/cache/how-to/cache-rules/) instead to control APO due to their enhanced configurability.
* **Cache Level: Bypass** — APO bypasses pages with response header `cf-apo-via: origin,page-rules`
* **Cache Level: Ignore Query String** — APO ignores all query strings when serving from Cache.
* **Cache Level: Cache Everything** — APO caches pages with all query strings.
Caution
Automatic page purge via the WordPress plugin won’t clean all cached pages, only pages without query strings. Cached responses will be returned even with request header `cache-control: no-cache`.
* **Bypass Cache on Cookie (Business and Enterprise plans only)** — APO applies custom bypass cookies in addition to the default list.
* **Edge Cache TTL** — APO applies custom Edge TTL instead of 30 days. This page rule is helpful for pages that can generate CAPTCHAs or nonces.
* **Browser Cache TTL** — APO applies custom Browser TTL.
* `CDN-Cache-Control` and `Cloudflare-CDN-Cache-Control` – Enables users to have detailed control over cache TTLs without using a page rule. For more information on the `CDN-Cache-Control` and `Cloudflare-CDN-Cache-Control` headers, refer to [CDN-Cache-Control](https://developers.cloudflare.com/cache/concepts/cache-control/).
Was this helpful?
YesNo
## On this page
[Docs](https://developers.cloudflare.com/)
```json
{"@context":"https://schema.org","@type":"TechArticle","@id":"https://developers.cloudflare.com/automatic-platform-optimization/reference/page-rule-integration/#page","headline":"Page Rule integration with APO · Cloudflare Automatic Platform Optimization docs","description":"Page Rules that control APO caching behavior for specific URL patterns.","url":"https://developers.cloudflare.com/automatic-platform-optimization/reference/page-rule-integration/","inLanguage":"en","image":"https://developers.cloudflare.com/og-docs.png","dateModified":"2026-04-16","publisher":{"@type":"Organization","name":"Cloudflare","url":"https://www.cloudflare.com/"},"isPartOf":{"@type":"WebSite","@id":"https://developers.cloudflare.com/#website","name":"Cloudflare Docs","url":"https://developers.cloudflare.com/"}}
```
---
---
description: How APO handles query parameters, UTMs, and cookies in cached responses.
title: Query parameters and cached responses
image: https://developers.cloudflare.com/og-docs.png
---
[Skip to content](#main-content)
> Documentation Index
> Fetch the complete documentation index at: https://developers.cloudflare.com/automatic-platform-optimization/llms.txt
> Use this file to discover all available pages before exploring further.
# Query parameters and cached responses
Last updated Apr 16, 2026|Copy as Markdown|[View as Markdown](https://developers.cloudflare.com/automatic-platform-optimization/reference/query-parameters/index.md)|[Agent setup](https://developers.cloudflare.com/agent-setup/)
Query parameters often signal the presence of dynamic content. As a result, if there are query parameters in the URL, APO bypasses the cache and attempts to get a new version of the page from the origin by default. Because query parameters are also often used for marketing attribution, like UTMs, quick loading times are especially important for users.
To add a query parameter to our allowlist, [create a post in the community ↗](https://community.cloudflare.com/) for consideration.
APO serves cached content as long as the query parameters in the URL are one of the following:
* `ref`
* `utm_source`
* `utm_medium`
* `utm_campaign`
* `utm_term`
* `utm_content`
* `utm_expid`
* `fbclid`
* `fb_action_ids`
* `fb_action_types`
* `fb_source`
* `mc_cid`
* `mc_eid`
* `gclid`
* `dclid`
* `_ga`
* `campaignid`
* `adgroupid`
* `_ke`
* `cn-reloaded`
* `age-verified`
* `ao_noptimize`
* `usqp`
* `mkt_tok`
* `epik`
* `ck_subscriber_id`
## Cookies prefixes that always bypass cache
* `wp-`
* `wordpress`
* `comment_`
* `woocommerce_`
* `xf_`
* `edd_`
* `jetpack`
* `yith_wcwl_session_`
* `yith_wrvp_`
* `wpsc_`
* `ecwid`
* `ec_`
* `bookly_`
* `bookly`
Was this helpful?
YesNo
## On this page
[Docs](https://developers.cloudflare.com/)
```json
{"@context":"https://schema.org","@type":"TechArticle","@id":"https://developers.cloudflare.com/automatic-platform-optimization/reference/query-parameters/#page","headline":"Query parameters and cached responses · Cloudflare Automatic Platform Optimization docs","description":"How APO handles query parameters, UTMs, and cookies in cached responses.","url":"https://developers.cloudflare.com/automatic-platform-optimization/reference/query-parameters/","inLanguage":"en","image":"https://developers.cloudflare.com/og-docs.png","dateModified":"2026-04-16","publisher":{"@type":"Organization","name":"Cloudflare","url":"https://www.cloudflare.com/"},"isPartOf":{"@type":"WebSite","@id":"https://developers.cloudflare.com/#website","name":"Cloudflare Docs","url":"https://developers.cloudflare.com/"},"keywords":["Cookies"]}
```
---
---
description: Run APO on WordPress subdomains and subdirectory installations.
title: Subdomains and subdirectories
image: https://developers.cloudflare.com/og-docs.png
---
[Skip to content](#main-content)
> Documentation Index
> Fetch the complete documentation index at: https://developers.cloudflare.com/automatic-platform-optimization/llms.txt
> Use this file to discover all available pages before exploring further.
# Subdomains and subdirectories
Last updated Apr 16, 2026|Copy as Markdown|[View as Markdown](https://developers.cloudflare.com/automatic-platform-optimization/reference/subdomain-subdirectories/index.md)|[Agent setup](https://developers.cloudflare.com/agent-setup/)
## Run APO on a subdomain
After you enable APO, you configure it to run on the subdomain that uses WordPress. For example, if you have a website called `www.mysite.com` which includes a subdomain running WordPress called `shop.mysite.com`, you would configure APO to run on the `shop.mysite.com` subdomain.
1. Install version 4.4.0 or later of the Cloudflare WordPress plugin.
2. Log in using Cloudflare **API token** or **Global key**.
3. Enable APO. The subdomain displays in the list of hostnames in the card.
4. Repeat the process for each subdomain to enable APO.
By default, APO runs on the apex domain (also known as "root domain" or "naked domain"). If you choose to run APO on a subdomain, the apex domain is automatically disabled. To run APO on a subdomain and the apex domain, upgrade the WordPress plugin to version 4.4.0 or later on the apex domain and re-enable APO.
## Run APO on a subdirectory
After you enable APO, you configure it to run on the subdirectory that uses WordPress. For example, if you have a website called `www.mysite.com` which includes a subdirectory running WordPress called `mysite.com/shop`, you would configure APO to run on the `mysite.com` domain.
1. Install the Cloudflare WordPress plugin.
2. Add your Cloudflare API Token.
3. Activate APO.
Repeat steps 1 and 2 for each subdirectory to activate the WordPress plugin for automatic cache purging.
## Run APO only on a subdirectory
If you choose to run APO only on a subdirectory, the rest of the domain should be configured to bypass APO. You can bypass APO in one of two ways.
### Use the `cf-edge-cache` response header
The `cf-edge-cache: no-cache` instructs the APO service to bypass caching for non-WordPress parts of the site. You can implement this option with Cloudflare Workers using the example below.
```js
export default {
async fetch(request, env, ctx) {
const originalResponse = await fetch(request);
// Response properties are immutable. To change them, construct a new Response object.
const response = new Response(originalResponse.body, originalResponse);
// Response headers can be modified through the headers `set` method.
response.headers.set("cf-edge-cache", "no-cache");
return response;
},
};
```
### Use Cache Rules
Create a [cache rule](https://developers.cloudflare.com/cache/how-to/cache-rules/) to exclude non-WordPress portions of the site from caching using **Cache eligibility: Bypass cache**. This option disables all caching, including static assets for those paths. As a result, we recommend disabling APO via the response header.
Was this helpful?
YesNo
## On this page
[Docs](https://developers.cloudflare.com/)
```json
{"@context":"https://schema.org","@type":"TechArticle","@id":"https://developers.cloudflare.com/automatic-platform-optimization/reference/subdomain-subdirectories/#page","headline":"Subdomains and subdirectories · Cloudflare Automatic Platform Optimization docs","description":"Run APO on WordPress subdomains and subdirectory installations.","url":"https://developers.cloudflare.com/automatic-platform-optimization/reference/subdomain-subdirectories/","inLanguage":"en","image":"https://developers.cloudflare.com/og-docs.png","dateModified":"2026-04-16","publisher":{"@type":"Organization","name":"Cloudflare","url":"https://www.cloudflare.com/"},"isPartOf":{"@type":"WebSite","@id":"https://developers.cloudflare.com/#website","name":"Cloudflare Docs","url":"https://developers.cloudflare.com/"},"keywords":["WordPress","JavaScript"]}
```
---
---
description: Cache and serve static and dynamic content from Cloudflare edge servers.
title: Cloudflare Cache
image: https://developers.cloudflare.com/og-docs.png
---
[Skip to content](#main-content)
> Documentation Index
> Fetch the complete documentation index at: https://developers.cloudflare.com/cache/llms.txt
> Use this file to discover all available pages before exploring further.
# Cloudflare Cache
Last updated Apr 16, 2026|Copy as Markdown|[View as Markdown](https://developers.cloudflare.com/cache/index.md)|[Agent setup](https://developers.cloudflare.com/agent-setup/)
Cache content across Cloudflare's global server network.
Available on all plans
Cache stores copies of frequently accessed content (such as images, videos, or webpages) in geographically distributed data centers that are located closer to end users than origin servers, reducing server load and improving website performance.
## Features
[Default cache behavior](https://developers.cloudflare.com/cache/concepts/default-cache-behavior/)
Learn about default cache behavior, default cached file extensions and cache responses.
Use Default cache behavior
[Cache Rules](https://developers.cloudflare.com/cache/how-to/cache-rules/)
Configure Cache Rules to optimize your website by specifying which resources should be cached and for how long.
Use Cache Rules
[Tiered Cache](https://developers.cloudflare.com/cache/how-to/tiered-cache/)
Enable Tiered Cache to optimize content delivery by caching frequently accessed content in multiple locations for faster delivery and reduced origin traffic.
Use Tiered Cache
[Cache Reserve](https://developers.cloudflare.com/cache/advanced-configuration/cache-reserve/)
Use Cloudflare's persistent storage to increase cache times.
Use Cache Reserve
[Purge](https://developers.cloudflare.com/cache/how-to/purge-cache/)
Instantly purge cached files to force Cloudflare to fetch fresh versions from your web server files. You can purge specific files or all at once.
Use Purge
---
## Related products
[Load Balancing](https://developers.cloudflare.com/load-balancing/)
Cloudflare Load Balancing distributes traffic across your endpoints, reducing endpoint strain and latency and improving the end users experience.
[Images](https://developers.cloudflare.com/images/)
A suite of products tailored to your image-processing needs.
[Workers](https://developers.cloudflare.com/workers/)
Cloudflare Workers allows developers to build serverless applications and deploy instantly across the globe for exceptional performance, reliability, and scale.
[Rules](https://developers.cloudflare.com/rules/)
Cloudflare Rules allows you to make adjustments to requests and responses, configure Cloudflare settings, and trigger specific actions for matching requests.
[Cloudflare Network Interconnect](https://developers.cloudflare.com/network-interconnect/)
Cloudflare Network Interconnect (CNI) allows you to connect your network infrastructure directly with Cloudflare – rather than using the public Internet – for a more reliable and secure experience.
[R2](https://developers.cloudflare.com/r2/)
Cloudflare R2 Storage allows developers to store large amounts of unstructured data without the costly egress bandwidth fees associated with typical cloud storage services.
[Dedicated CDN Egress IPs](https://developers.cloudflare.com/smart-shield/configuration/dedicated-egress-ips/)
Smart Shield Advanced provides dedicated egress IPs (from Cloudflare to your origin) for your layer 7 WAF and CDN services, as well as Spectrum.
---
## More resources
### [Plans](https://www.cloudflare.com/cdn/)
Compare available Cloudflare plans
### [Pricing](https://www.cloudflare.com/plans/#overview)
Explore pricing options for Cache
Was this helpful?
YesNo
## On this page
[Docs](https://developers.cloudflare.com/)
```json
{"@context":"https://schema.org","@type":"WebPage","@id":"https://developers.cloudflare.com/cache/#page","headline":"Cloudflare Cache · Cloudflare Cache (CDN) docs","description":"Cache and serve static and dynamic content from Cloudflare edge servers.","url":"https://developers.cloudflare.com/cache/","inLanguage":"en","image":"https://developers.cloudflare.com/og-docs.png","dateModified":"2026-04-16","publisher":{"@type":"Organization","name":"Cloudflare","url":"https://www.cloudflare.com/"},"isPartOf":{"@type":"WebSite","@id":"https://developers.cloudflare.com/#website","name":"Cloudflare Docs","url":"https://developers.cloudflare.com/"}}
```
---
---
description: Compare cache features available on each Cloudflare plan.
title: Plans
image: https://developers.cloudflare.com/og-docs.png
---
[Skip to content](#main-content)
> Documentation Index
> Fetch the complete documentation index at: https://developers.cloudflare.com/cache/llms.txt
> Use this file to discover all available pages before exploring further.
# Plans
Last updated Apr 16, 2026|Copy as Markdown|[View as Markdown](https://developers.cloudflare.com/cache/plans/index.md)|[Agent setup](https://developers.cloudflare.com/agent-setup/)
Cloudflare provides the following features for different [plans ↗](https://www.cloudflare.com/plans/).
## Features
### Always Online
**Link:** [Always Online](https://developers.cloudflare.com/cache/how-to/always-online/)
**Feature availability**
* **Free:** Yes
* **Pro:** Yes
* **Business:** Yes
* **Enterprise:** Yes
**Crawl interval**
Available on all plans
* **Free:** Every 30 days
* **Pro:** Every 15 days
* **Business:** Every 5 days
* **Enterprise:** Every 5 days
### Browser Cache TTL
**Link:** [Browser Cache TTL](https://developers.cloudflare.com/cache/how-to/edge-browser-cache-ttl/)
**Feature availability**
* **Free:** Yes
* **Pro:** Yes
* **Business:** Yes
* **Enterprise:** Yes
**Minimum Browser Cache TTL (Page Rules)**
* **Free:** 2 minutes
* **Pro:** 2 minutes
* **Business:** 2 minutes
* **Enterprise:** 30 seconds
**Minimum Browser Cache TTL**
* **Free:** 1 second
* **Pro:** 1 second
* **Business:** 1 second
* **Enterprise:** 1 second
**Default Browser Cache TTL**
* **Free:** 4 hours
* **Pro:** 4 hours
* **Business:** 4 hours
* **Enterprise:** 4 hours
### Cache analytics
**Link:** [Cache analytics](https://developers.cloudflare.com/cache/performance-review/cache-analytics/)
**Feature availability**
* **Free:** No
* **Pro:** Yes
* **Business:** Yes
* **Enterprise:** Yes
**Retention period**
* **Free:** N/A
* **Pro:** 7 days
* **Business:** 30 days
* **Enterprise:** 30 days
### Cache keys
**Link:** [Cache keys](https://developers.cloudflare.com/cache/how-to/cache-keys/)
**Cache deception armor**
* **Free:** Yes
* **Pro:** Yes
* **Business:** Yes
* **Enterprise:** Yes
**Cache by device type**
* **Free:** Yes
* **Pro:** Yes
* **Business:** Yes
* **Enterprise:** Yes
**Ignore query string**
* **Free:** Yes
* **Pro:** Yes
* **Business:** Yes
* **Enterprise:** Yes
**Sort query string**
* **Free:** Yes
* **Pro:** Yes
* **Business:** Yes
* **Enterprise:** Yes
**Query string**
* **Free:** No
* **Pro:** No
* **Business:** No
* **Enterprise:** Yes
**Headers**
* **Free:** No
* **Pro:** No
* **Business:** No
* **Enterprise:** Yes
**Cookie**
* **Free:** No
* **Pro:** No
* **Business:** No
* **Enterprise:** Yes
**Host**
* **Free:** No
* **Pro:** No
* **Business:** No
* **Enterprise:** Yes
**User features**
* **Free:** No
* **Pro:** No
* **Business:** No
* **Enterprise:** Yes
### Set caching level
**Link:** [Set caching level](https://developers.cloudflare.com/cache/how-to/set-caching-levels/)
**Feature availability**
* **Free:** Yes
* **Pro:** Yes
* **Business:** Yes
* **Enterprise:** Yes
### Cache reserve
**Link:** [Cache reserve](https://developers.cloudflare.com/cache/advanced-configuration/cache-reserve/)
**Feature availability**
* **Free:** Paid add-on
* **Pro:** Paid add-on
* **Business:** Paid add-on
* **Enterprise:** Paid add-on
### Cache Rules
**Link:** [Cache Rules](https://developers.cloudflare.com/cache/how-to/cache-rules/)
**Feature availability**
* **Free:** Yes
* **Pro:** Yes
* **Business:** Yes
* **Enterprise:** Yes
**Number of rules**
* **Free:** 10
* **Pro:** 25
* **Business:** 50
* **Enterprise:** 300
### Cache by status code
**Link:** [Cache by status code](https://developers.cloudflare.com/cache/how-to/configure-cache-status-code/)
**Feature availability**
* **Free:** No
* **Pro:** No
* **Business:** No
* **Enterprise:** Yes
### Crawler Hints
**Link:** [Crawler Hints](https://developers.cloudflare.com/cache/advanced-configuration/crawler-hints/)
**Feature availability**
* **Free:** Yes
* **Pro:** Yes
* **Business:** Yes
* **Enterprise:** Yes
### CSAM Scanning Tool
**Link:** [CSAM Scanning Tool](https://developers.cloudflare.com/cache/reference/csam-scanning/)
**Feature availability**
* **Free:** Yes
* **Pro:** Yes
* **Business:** Yes
* **Enterprise:** Yes
### Development mode
**Link:** [Development mode](https://developers.cloudflare.com/cache/reference/development-mode/)
**Feature availability**
* **Free:** Yes
* **Pro:** Yes
* **Business:** Yes
* **Enterprise:** Yes
### Edge Cache TTL
**Link:** [Edge Cache TTL](https://developers.cloudflare.com/cache/how-to/edge-browser-cache-ttl/)
**Feature availability**
* **Free:** Yes
* **Pro:** Yes
* **Business:** Yes
* **Enterprise:** Yes
**Minimum Edge Cache TTL**
* **Free:** 2 hours
* **Pro:** 1 hour
* **Business:** 1 second
* **Enterprise:** 1 second
### ETag Headers
**Link:** [ETag Headers](https://developers.cloudflare.com/cache/reference/etag-headers/)
**Feature availability**
* **Free:** Yes
* **Pro:** Yes
* **Business:** Yes
* **Enterprise:** Yes
### Purge cache
**Link:** [Purge cache](https://developers.cloudflare.com/cache/how-to/purge-cache/)
**Feature availability**
* **Free:** Yes
* **Pro:** Yes
* **Business:** Yes
* **Enterprise:** Yes
**Purge options**
* **Free:** URL, Hostname, Tag, Prefix, and Purge Everything
* **Pro:** URL, Hostname, Tag, Prefix, and Purge Everything
* **Business:** URL, Hostname, Tag, Prefix, and Purge Everything
* **Enterprise:** URL, Hostname, Tag, Prefix, and Purge Everything
### Purge limits for hostname, tag, prefix URL, and purge everything.
**Link:** [Purge limits for hostname, tag, prefix URL, and purge everything.](https://developers.cloudflare.com/cache/how-to/purge-cache/)
**Requests**
Available on all plans
* **Free:** 5 requests per minute
* **Pro:** 5 requests per second
* **Business:** 10 requests per second
* **Enterprise:** 50 requests per second
**Bucket size**
* **Free:** 25
* **Pro:** 25
* **Business:** 50
* **Enterprise:** 500
**Max operations per request**
* **Free:** 100
* **Pro:** 100
* **Business:** 100
* **Enterprise:** 100
### Single file purge
**Link:** [Single file purge](https://developers.cloudflare.com/cache/how-to/purge-cache/purge-by-single-file/)
**URLs**
Available on all plans
* **Free:** 800 URLs per second
* **Pro:** 1500 URLs per second
* **Business:** 1500 URLs per second
* **Enterprise:** 3000 URLs per second
**Max operations per request**
* **Free:** 100
* **Pro:** 100
* **Business:** 100
* **Enterprise:** 500
### Query string sort
**Link:** [Query string sort](https://developers.cloudflare.com/cache/advanced-configuration/query-string-sort/)
**Feature availability**
* **Free:** No
* **Pro:** No
* **Business:** No
* **Enterprise:** Yes
### Tiered cache
**Link:** [Tiered cache](https://developers.cloudflare.com/cache/how-to/tiered-cache/)
**Tiered Cache**
Available on all plans
* **Free:** Yes
* **Pro:** Yes
* **Business:** Yes
* **Enterprise:** Yes
**Smart Topology**
* **Free:** Yes
* **Pro:** Yes
* **Business:** Yes
* **Enterprise:** Yes
**Generic Global Topology**
* **Free:** No
* **Pro:** No
* **Business:** No
* **Enterprise:** Yes
**Regional Tiered Cache**
* **Free:** No
* **Pro:** No
* **Business:** No
* **Enterprise:** Yes
**Custom Topology**
* **Free:** No
* **Pro:** No
* **Business:** No
* **Enterprise:** Yes
### Vary
**Link:** [Vary](https://developers.cloudflare.com/cache/concepts/vary/)
**Feature availability**
* **Free:** Yes
* **Pro:** Yes
* **Business:** Yes
* **Enterprise:** Yes
### Vary for images
**Link:** [Vary for images](https://developers.cloudflare.com/cache/advanced-configuration/vary-for-images/)
**Feature availability**
* **Free:** No
* **Pro:** Yes
* **Business:** Yes
* **Enterprise:** Yes
Was this helpful?
YesNo
## On this page
[Docs](https://developers.cloudflare.com/)
```json
{"@context":"https://schema.org","@type":"TechArticle","@id":"https://developers.cloudflare.com/cache/plans/#page","headline":"Features by plan type · Cloudflare Cache (CDN) docs","description":"Compare cache features available on each Cloudflare plan.","url":"https://developers.cloudflare.com/cache/plans/","inLanguage":"en","image":"https://developers.cloudflare.com/og-docs.png","dateModified":"2026-04-16","publisher":{"@type":"Organization","name":"Cloudflare","url":"https://www.cloudflare.com/"},"isPartOf":{"@type":"WebSite","@id":"https://developers.cloudflare.com/#website","name":"Cloudflare Docs","url":"https://developers.cloudflare.com/"}}
```
---
---
description: Set up and configure Cloudflare caching for your website.
title: Get started
image: https://developers.cloudflare.com/og-docs.png
---
[Skip to content](#main-content)
> Documentation Index
> Fetch the complete documentation index at: https://developers.cloudflare.com/cache/llms.txt
> Use this file to discover all available pages before exploring further.
# Get started
Last updated May 6, 2026|Copy as Markdown|[View as Markdown](https://developers.cloudflare.com/cache/get-started/index.md)|[Agent setup](https://developers.cloudflare.com/agent-setup/)
Cloudflare speeds up your website by caching content across globally distributed data centers.
Content can be static or dynamic. Static content — such as images, CSS, and JavaScript files — is [cacheable](https://developers.cloudflare.com/cache/concepts/default-cache-behavior/#default-cached-file-extensions) by default. Dynamic content, such as HTML pages, is not cached by default, but you can use [Cache Rules](https://developers.cloudflare.com/cache/how-to/cache-rules/) to cache it.
Cloudflare caches static content based on the following factors:
* [Caching levels](https://developers.cloudflare.com/cache/how-to/set-caching-levels/)
* [File extension](https://developers.cloudflare.com/cache/concepts/default-cache-behavior/#default-cached-file-extensions)
* Presence of [query strings](https://developers.cloudflare.com/cache/advanced-configuration/query-string-sort/)
* [Origin cache-control headers](https://developers.cloudflare.com/cache/concepts/cache-control/)
* Origin headers that indicate dynamic content
* Cache rules that bypass cache on cookie
Cloudflare only caches resources within the Cloudflare data center that serve the request. Cloudflare does not cache off-site or third-party resources, or content hosted on [DNS-only (unproxied)](https://developers.cloudflare.com/dns/proxy-status/) DNS records.
## Learn the basics
Discover the benefits of caching with Cloudflare's CDN and understand the default cache behavior.
* [Understand what is a CDN ↗](https://www.cloudflare.com/learning/cdn/what-is-a-cdn/)
* [Understand default cache behavior](https://developers.cloudflare.com/cache/concepts/default-cache-behavior/)
* [Understand the default file types Cloudflare caches](https://developers.cloudflare.com/cache/concepts/default-cache-behavior/#default-cached-file-extensions)
## Make more resources cacheable
Configure your settings to cache static HTML or cache anonymous page views of dynamic content.
* [Customize Caching with Cache Rules](https://developers.cloudflare.com/cache/how-to/cache-rules/)
* [Specify which resources to cache](https://developers.cloudflare.com/cache/concepts/customize-cache/)
* [Understand Origin Cache Control](https://developers.cloudflare.com/cache/concepts/cache-control/)
* [Cache by device type (Enterprise only)](https://developers.cloudflare.com/cache/how-to/cache-rules/examples/cache-device-type/)
## Improve cache HIT rates
Include or exclude query strings, optimize cache keys, or enable [Tiered Cache](https://developers.cloudflare.com/cache/how-to/tiered-cache/) to improve HIT rates and reduce traffic to your origin.
* [Choose a cache level](https://developers.cloudflare.com/cache/how-to/set-caching-levels/)
* [Enable Tiered Cache with Argo](https://developers.cloudflare.com/cache/how-to/tiered-cache/#enable-tiered-cache)
* [Configure custom cache keys (Enterprise only)](https://developers.cloudflare.com/cache/how-to/cache-keys/)
* [Enable Prefetch URLs (Enterprise only)](https://developers.cloudflare.com/speed/optimization/content/prefetch-urls/)
## Secure your cache configuration
Control resources a client is allowed to load and set access permissions to allow different origins to access your origin's resources. Protect your site from web cache deception attacks while still caching static assets.
* [Avoid web cache poisoning attacks](https://developers.cloudflare.com/cache/cache-security/avoid-web-poisoning/)
* [Configure Cross-Origin Resource Sharing (CORS)](https://developers.cloudflare.com/cache/cache-security/cors/)
* [Enable Cache Deception Armor](https://developers.cloudflare.com/cache/cache-security/cache-deception-armor/#enable-cache-deception-armor)
## Features that alter cached content
Some Cloudflare features modify your HTML or cached objects at the edge to enable optimizations or security protections. These alterations only affect cached copies at Cloudflare's edge and do not change your original source files. Cloudflare removes the changes when you disable the feature and purge the cache. These alterations only affect cached copies at Cloudflare's edge and do not change your original source files. The changes are removed if the feature is disabled and the cache is purged.
* [Rocket Loader](https://developers.cloudflare.com/speed/optimization/content/rocket-loader/)
* [Polish](https://developers.cloudflare.com/images/polish/)
* [Hotlink Protection](https://developers.cloudflare.com/waf/tools/scrape-shield/hotlink-protection/)
* [Email address obfuscation](https://developers.cloudflare.com/waf/tools/scrape-shield/email-address-obfuscation/)
* [Bot Management JavaScript Detections](https://developers.cloudflare.com/bots/additional-configurations/javascript-detections/)
## Troubleshoot
Resolve common caching concerns.
* [Learn about Cloudflare's cache response statuses](https://developers.cloudflare.com/cache/concepts/cache-responses/)
* [Investigate Cloudflare's cache response with cURL](https://developers.cloudflare.com/support/troubleshooting/general-troubleshooting/gathering-information-for-troubleshooting-sites/#troubleshoot-requests-with-curl)
* [Diagnose Always Online issues](https://developers.cloudflare.com/cache/troubleshooting/always-online/)
Was this helpful?
YesNo
## On this page
[Docs](https://developers.cloudflare.com/)
```json
{"@context":"https://schema.org","@type":"TechArticle","@id":"https://developers.cloudflare.com/cache/get-started/#page","headline":"Get started with Cache · Cloudflare Cache (CDN) docs","description":"Set up and configure Cloudflare caching for your website.","url":"https://developers.cloudflare.com/cache/get-started/","inLanguage":"en","image":"https://developers.cloudflare.com/og-docs.png","dateModified":"2026-05-06","publisher":{"@type":"Organization","name":"Cloudflare","url":"https://www.cloudflare.com/"},"isPartOf":{"@type":"WebSite","@id":"https://developers.cloudflare.com/#website","name":"Cloudflare Docs","url":"https://developers.cloudflare.com/"},"keywords":["CORS"]}
```
---
---
description: How caching interacts with Workers, R2, WAF, and other products.
title: Interaction with Cloudflare products
image: https://developers.cloudflare.com/og-docs.png
---
[Skip to content](#main-content)
> Documentation Index
> Fetch the complete documentation index at: https://developers.cloudflare.com/cache/llms.txt
> Use this file to discover all available pages before exploring further.
# Interaction with Cloudflare products
Last updated May 7, 2026|Copy as Markdown|[View as Markdown](https://developers.cloudflare.com/cache/interaction-cloudflare-products/index.md)|[Agent setup](https://developers.cloudflare.com/agent-setup/)
Cloudflare caches content at data centers close to your visitors so your origin server handles fewer requests. The pages below explain how caching works when you also use Workers, R2 storage, or WAF security rules, and what to watch out for when combining them.
* [Customize cache behavior with Workers](https://developers.cloudflare.com/cache/interaction-cloudflare-products/workers/)
* [How Workers interact with Cache Rules](https://developers.cloudflare.com/cache/interaction-cloudflare-products/workers-cache-rules/)
* [Enable cache in an R2 bucket](https://developers.cloudflare.com/cache/interaction-cloudflare-products/r2/)
* [Control cache access with WAF and Snippets](https://developers.cloudflare.com/cache/interaction-cloudflare-products/waf-snippets/)
Was this helpful?
YesNo
## On this page
[Docs](https://developers.cloudflare.com/)
```json
{"@context":"https://schema.org","@type":"WebPage","@id":"https://developers.cloudflare.com/cache/interaction-cloudflare-products/#page","headline":"Interaction with Cloudflare products · Cloudflare Cache (CDN) docs","description":"How caching interacts with Workers, R2, WAF, and other products.","url":"https://developers.cloudflare.com/cache/interaction-cloudflare-products/","inLanguage":"en","image":"https://developers.cloudflare.com/og-docs.png","dateModified":"2026-05-07","publisher":{"@type":"Organization","name":"Cloudflare","url":"https://www.cloudflare.com/"},"isPartOf":{"@type":"WebSite","@id":"https://developers.cloudflare.com/#website","name":"Cloudflare Docs","url":"https://developers.cloudflare.com/"}}
```
---
---
description: Serve cached content from R2 buckets through Cloudflare.
title: Enable cache in an R2 bucket
image: https://developers.cloudflare.com/og-docs.png
---
[Skip to content](#main-content)
> Documentation Index
> Fetch the complete documentation index at: https://developers.cloudflare.com/cache/llms.txt
> Use this file to discover all available pages before exploring further.
# Enable cache in an R2 bucket
Last updated May 7, 2026|Copy as Markdown|[View as Markdown](https://developers.cloudflare.com/cache/interaction-cloudflare-products/r2/index.md)|[Agent setup](https://developers.cloudflare.com/agent-setup/)
By default, R2 buckets are private. To serve R2 objects through Cloudflare's cache, you need to attach a domain name you control — called a [Custom Domain](https://developers.cloudflare.com/r2/buckets/public-buckets/#custom-domains) — to the bucket. This creates a public URL backed by Cloudflare's network, so requests for your stored files go through Cloudflare's cache instead of hitting R2 directly every time.
Follow these steps to set up a Custom Domain for your bucket:
1. Go to **R2** and select your bucket.
2. On the bucket page, select **Settings**.
3. Under **Public access** \> **Custom Domains**, select **Connect Domain**.
4. Enter the domain name you want to connect to and select **Continue**.
5. Review the new DNS record that will be added and select **Connect Domain**.
Cloudflare automatically adds a CNAME record that maps your domain to the bucket, generating a publicly available URL in the format `[name].domain.com`.
Note
The development URL (`r2.dev`) does not support caching, WAF, or bot management. You must use a Custom Domain for these features.
## Tiered Cache
By default, Cloudflare caches R2 content at edge data centers (the data centers closest to visitors) based on [cache rules](https://developers.cloudflare.com/cache/how-to/cache-rules/). Each edge data center that gets a cache miss fetches content directly from R2.
[Tiered Cache](https://developers.cloudflare.com/cache/how-to/tiered-cache/) changes this by organizing data centers into a hierarchy. When a nearby data center has a cache miss, it first checks a designated upper-tier data center before going to R2\. This reduces the number of requests that reach R2.
To enable Tiered Cache for R2, configure [Smart Tiered Cache](https://developers.cloudflare.com/cache/how-to/tiered-cache/#smart-tiered-cache), which automatically selects the upper-tier data center with the lowest latency to your R2 bucket.
## Additional considerations
* **Access controls**: When you connect a Custom Domain, your R2 bucket becomes publicly accessible. Apply access controls to restrict who can request your files. Refer to [Control cache access with WAF and Snippets](https://developers.cloudflare.com/cache/interaction-cloudflare-products/waf-snippets/) for more information.
* **Cacheable size limits**: Files that exceed the [cacheable size limits](https://developers.cloudflare.com/cache/concepts/default-cache-behavior/#cacheable-size-limits) are not cached. Free, Pro, and Business plans have a limit of 512 MB per file. Enterprise plans default to 5 GB per file.
* **Default cached file types**: Cloudflare does not cache all file types by default. For example, HTML and JSON are not cached unless you create a [Cache Rule](https://developers.cloudflare.com/cache/how-to/cache-rules/) with the appropriate settings.
Was this helpful?
YesNo
## On this page
[Docs](https://developers.cloudflare.com/)
```json
{"@context":"https://schema.org","@type":"TechArticle","@id":"https://developers.cloudflare.com/cache/interaction-cloudflare-products/r2/#page","headline":"Enable cache in an R2 bucket · Cloudflare Cache (CDN) docs","description":"Serve cached content from R2 buckets through Cloudflare.","url":"https://developers.cloudflare.com/cache/interaction-cloudflare-products/r2/","inLanguage":"en","image":"https://developers.cloudflare.com/og-docs.png","dateModified":"2026-05-07","publisher":{"@type":"Organization","name":"Cloudflare","url":"https://www.cloudflare.com/"},"isPartOf":{"@type":"WebSite","@id":"https://developers.cloudflare.com/#website","name":"Cloudflare Docs","url":"https://developers.cloudflare.com/"}}
```
---
---
description: Control cache access using WAF custom rules and Snippets.
title: Control cache access with WAF and Snippets
image: https://developers.cloudflare.com/og-docs.png
---
[Skip to content](#main-content)
> Documentation Index
> Fetch the complete documentation index at: https://developers.cloudflare.com/cache/llms.txt
> Use this file to discover all available pages before exploring further.
# Control cache access with WAF and Snippets
Last updated May 7, 2026|Copy as Markdown|[View as Markdown](https://developers.cloudflare.com/cache/interaction-cloudflare-products/waf-snippets/index.md)|[Agent setup](https://developers.cloudflare.com/agent-setup/)
When you make an R2 bucket publicly accessible for caching (via a [Custom Domain](https://developers.cloudflare.com/r2/buckets/public-buckets/#custom-domains)), anyone who knows the URL can access the content. To restrict access, you can use Cloudflare's [WAF](https://developers.cloudflare.com/waf/custom-rules/use-cases/configure-token-authentication/) to validate requests before they reach the cache or your bucket.
The following diagram illustrates the flow of a request through WAF, Cache, and R2\. WAF custom rules run before cache rules in the [request pipeline](https://developers.cloudflare.com/ruleset-engine/reference/phases-list/), so invalid requests are blocked before consuming cache resources.
flowchart LR
accTitle: Connections with Cloudflare
A[User's request] --> B[WAF] --> C[Cache] --> D[R2]
## Presigned URLs
A presigned URL is a regular URL with a cryptographic token appended to it. The token contains a hash-based message authentication code (HMAC) computed from the URL path, a timestamp, and a secret key shared between the signing service and the validator. Anyone with the URL can access the content until the token expires, but the token cannot be reused for a different URL path.
You can presign URLs similar to [S3 ↗](https://docs.aws.amazon.com/AmazonS3/latest/userguide/using-presigned-url.html), enabling you to share direct access to your content with an associated timeout. This approach can be implemented using a combination of Snippets, Rules, or Cloudflare Workers.
For optimal performance, we recommend separating the creation and validation processes:
* [Snippets](https://developers.cloudflare.com/rules/snippets/examples/signing-requests/) for HMAC creation (signing the URL)
* [WAF custom rules](https://developers.cloudflare.com/ruleset-engine/rules-language/functions/#hmac-validation) for HMAC validation (verifying the token on each request)
In the Workers documentation, the [Signing requests](https://developers.cloudflare.com/workers/examples/signing-requests/) example shows how to both generate and verify signed requests using HMAC. The Workers implementation is compatible with the WAF's [is\_timed\_hmac\_valid\_v0() validation function](https://developers.cloudflare.com/waf/custom-rules/use-cases/configure-token-authentication/), so you can sign with Workers and validate with WAF custom rules, or handle both in Workers.
Was this helpful?
YesNo
## On this page
[Docs](https://developers.cloudflare.com/)
```json
{"@context":"https://schema.org","@type":"TechArticle","@id":"https://developers.cloudflare.com/cache/interaction-cloudflare-products/waf-snippets/#page","headline":"Control cache access with WAF and Snippets · Cloudflare Cache (CDN) docs","description":"Control cache access using WAF custom rules and Snippets.","url":"https://developers.cloudflare.com/cache/interaction-cloudflare-products/waf-snippets/","inLanguage":"en","image":"https://developers.cloudflare.com/og-docs.png","dateModified":"2026-05-07","publisher":{"@type":"Organization","name":"Cloudflare","url":"https://www.cloudflare.com/"},"isPartOf":{"@type":"WebSite","@id":"https://developers.cloudflare.com/#website","name":"Cloudflare Docs","url":"https://developers.cloudflare.com/"},"keywords":["S3"]}
```
---
---
description: Customize cache behavior with the Workers Cache API.
title: Customize cache behavior with Workers
image: https://developers.cloudflare.com/og-docs.png
---
[Skip to content](#main-content)
> Documentation Index
> Fetch the complete documentation index at: https://developers.cloudflare.com/cache/llms.txt
> Use this file to discover all available pages before exploring further.
# Customize cache behavior with Workers
Last updated Jul 6, 2026|Copy as Markdown|[View as Markdown](https://developers.cloudflare.com/cache/interaction-cloudflare-products/workers/index.md)|[Agent setup](https://developers.cloudflare.com/agent-setup/)
You can use [Workers](https://developers.cloudflare.com/workers/) to customize cache behavior on Cloudflare's network. Workers run as middleware in the request lifecycle — a single Worker handles both the request and response phases. When a request arrives, it hits the Worker before the cache is checked. The Worker can modify the incoming request (for example, rewrite the URL or add headers), then call `fetch()` to continue the request through the cache. When the response comes back — whether from cache or from the origin server — the Worker can also modify the response before it is sent to the visitor.
Note
This page describes how Workers interact with a zone's Cloudflare Cache. You can can also enable **[Workers Cache](https://developers.cloudflare.com/workers/cache/)** for your Worker — a cache that sits in front of the Worker itself, so that Cloudflare returns a cached response without running the Worker. Use Workers Caching to cache the output of a Worker's logic directly, independent of any zone configuration.
The diagram below illustrates a common interaction flow between Workers and Cache.
1. A visitor (a) requests a URL, and this request is directed to a Worker. The Worker can then interact with the request, either requesting the content from the origin server using (b) `fetch()` or sending a (f) response back to the visitor.
2. If the content is cached, the cache sends a (e) response back to the Worker, which can modify the response before sending a (f) response back to the visitor.
3. When using [cache rules](https://developers.cloudflare.com/cache/how-to/cache-rules/) with Workers, the cache rule must match the properties of the URL in the `fetch()` (b) request — such as headers, hostname, or URL path — not the original visitor URL/host (a). Otherwise, the rule will not be applied.
Here are a few examples of how Workers can be used to customize cache behavior:
* **Modify Response**: Adjust or enhance content after it is retrieved from the cache, ensuring that responses are up-to-date or tailored to specific needs.
* **Signed URLs**: Generate time-limited signed URLs to control access and enhance security.
* **Personalized Response**: Deliver personalized content based on user data while using cached resources to reduce the load on the origin server.
* **Reduce Latency**: Serve content from a data center close to the visitor, decreasing load times and improving the user experience.
You can also use [Snippets](https://developers.cloudflare.com/rules/snippets/) for lightweight modifications like header changes, redirects, and JWT validation without deploying a full Worker script. Snippets are included at no additional cost on all paid plans but have stricter resource limits (5 ms execution time, 32 KB package size).
Note
When using Workers and [O2O](https://developers.cloudflare.com/cloudflare-for-platforms/cloudflare-for-saas/saas-customers/how-it-works/) (a traffic routing configuration where requests pass through two Cloudflare zones), some caveats and limitations may apply.
## Cache features in Workers
Workers offer two ways to interact with the cache. Use `fetch()` when your Worker makes subrequests to an origin. Use the Cache API when your Worker generates responses without a backend origin.
* **fetch()**: When a Worker calls `fetch()`, the request passes through Cloudflare's cache and [Tiered Cache](https://developers.cloudflare.com/cache/how-to/tiered-cache/) (if enabled). You can control caching behavior by setting properties on the request's [cf object](https://developers.cloudflare.com/workers/runtime-apis/request/#the-cf-property-requestinitcfproperties) — including time-to-live (TTL) values, custom cache keys, and cache headers. For more details, refer to [Cache using fetch](https://developers.cloudflare.com/workers/examples/cache-using-fetch/).
* **Cache API**: Allows you to programmatically store, retrieve, and delete responses in Cloudflare's cache using `caches.default` or `caches.open()`. Unlike `fetch()`, the Cache API only operates on the cache in the data center handling the current request — it does not interact with Tiered Cache. Use the Cache API when you need to cache responses that did not come from an origin. For more details, refer to [Using the Cache API](https://developers.cloudflare.com/workers/examples/cache-api/).
To understand more about how Cache and Workers interact, refer to [Cache in Workers](https://developers.cloudflare.com/workers/reference/how-the-cache-works/).
Was this helpful?
YesNo
## On this page
[Docs](https://developers.cloudflare.com/)
```json
{"@context":"https://schema.org","@type":"TechArticle","@id":"https://developers.cloudflare.com/cache/interaction-cloudflare-products/workers/#page","headline":"Customize cache behavior with Workers · Cloudflare Cache (CDN) docs","description":"Customize cache behavior with the Workers Cache API.","url":"https://developers.cloudflare.com/cache/interaction-cloudflare-products/workers/","inLanguage":"en","image":"https://developers.cloudflare.com/og-docs.png","dateModified":"2026-07-06","publisher":{"@type":"Organization","name":"Cloudflare","url":"https://www.cloudflare.com/"},"isPartOf":{"@type":"WebSite","@id":"https://developers.cloudflare.com/#website","name":"Cloudflare Docs","url":"https://developers.cloudflare.com/"}}
```
---
---
description: How Workers interact with Cache Rules execution.
title: How Workers interact with Cache Rules
image: https://developers.cloudflare.com/og-docs.png
---
[Skip to content](#main-content)
> Documentation Index
> Fetch the complete documentation index at: https://developers.cloudflare.com/cache/llms.txt
> Use this file to discover all available pages before exploring further.
# How Workers interact with Cache Rules
Last updated May 7, 2026|Copy as Markdown|[View as Markdown](https://developers.cloudflare.com/cache/interaction-cloudflare-products/workers-cache-rules/index.md)|[Agent setup](https://developers.cloudflare.com/agent-setup/)
When you use both [Cache Rules](https://developers.cloudflare.com/cache/how-to/cache-rules/) and [Workers](https://developers.cloudflare.com/workers/) on the same request, the Worker's cache settings take priority — but only when the required [compatibility flags](#compatibility-flags) are enabled.
Your Workers script can override Cache Rules behavior, whether the request is for a domain proxied through Cloudflare or a domain that is not. For example, if a Cache Rule is configured to bypass cache for `example.com/foo`, but your Workers script sets `cacheEverything: true` in the [cf object](https://developers.cloudflare.com/workers/runtime-apis/request/#the-cf-property-requestinitcfproperties) of a `fetch()` request, the Worker's setting takes precedence and the response is cached.
## Precedence order
Cache behavior is determined by the following order of precedence:
1. [Workers](https://developers.cloudflare.com/workers/) script settings
2. [Cache rules](https://developers.cloudflare.com/cache/how-to/cache-rules/)
3. [Page rules](https://developers.cloudflare.com/rules/page-rules/)
Workers override Cache Rules, and Cache Rules override Page Rules. When multiple rules at the same level match the same request, the [last matching rule wins](https://developers.cloudflare.com/cache/how-to/cache-rules/order/) for any conflicting settings.
## Compatibility flags
The override behavior is controlled by [compatibility flags](https://developers.cloudflare.com/workers/configuration/compatibility-flags/) — configuration settings that opt your Worker into specific runtime behaviors. There are two flags because Workers have two ways to interact with the cache:
* For the [Fetch API](https://developers.cloudflare.com/workers/runtime-apis/fetch/) (`fetch()` with `cf` properties): `request_cf_overrides_cache_rules`
* For the [Cache API](https://developers.cloudflare.com/workers/runtime-apis/cache/) (`caches.default.put()` / `caches.default.match()`): `cache_api_request_cf_overrides_cache_rules`
These flags must be enabled to allow Workers scripts to override Cache Rules. If the correct flag is not enabled for the API you are using, your Worker's cache settings are silently ignored and Cache Rules apply instead.
### Compatibility date behavior
A Worker's [compatibility date](https://developers.cloudflare.com/workers/configuration/compatibility-dates/) determines which flags are active by default. When you set a compatibility date, all flags with an enable date on or before that date are automatically turned on.
| Flag | Enabled by default | Prerequisite |
| ------------------------------------------------------------ | ------------------------------------------ | ---------------------------------- |
| request\_cf\_overrides\_cache\_rules (Fetch API) | Compatibility dates on or after 2025-04-02 | None |
| cache\_api\_compat\_flags | Compatibility dates on or after 2025-04-19 | None |
| cache\_api\_request\_cf\_overrides\_cache\_rules (Cache API) | Compatibility dates on or after 2025-05-19 | Requires cache\_api\_compat\_flags |
The Cache API has an extra requirement: `cache_api_compat_flags` must be enabled for any compatibility flags to take effect on the Cache API. Without it, the Cache API ignores all compatibility flags, even ones you explicitly list in your configuration.
If your Worker uses a compatibility date before the dates listed above, you must manually add the flags to your configuration. Otherwise, cache behavior follows Cache Rules instead of the Worker's settings.
### Example (Older compatibility date)
A Cache Rule bypasses cache for `example.com/foo`. A Worker with a compatibility date before `2025-04-02` sets `cacheEverything: true` via `fetch()`. Because the compatibility date is too old for `request_cf_overrides_cache_rules` to be active by default, the Cache Rule wins and the response is not cached.
Similarly, if you use the Cache API and your compatibility date is before `2025-04-19`, `cache_api_compat_flags` is not active. Even if you manually add `cache_api_request_cf_overrides_cache_rules` to your configuration, it has no effect because the Cache API does not recognize compatibility flags without `cache_api_compat_flags`.
Was this helpful?
YesNo
## On this page
[Docs](https://developers.cloudflare.com/)
```json
{"@context":"https://schema.org","@type":"TechArticle","@id":"https://developers.cloudflare.com/cache/interaction-cloudflare-products/workers-cache-rules/#page","headline":"How Workers interact with Cache Rules · Cloudflare Cache (CDN) docs","description":"How Workers interact with Cache Rules execution.","url":"https://developers.cloudflare.com/cache/interaction-cloudflare-products/workers-cache-rules/","inLanguage":"en","image":"https://developers.cloudflare.com/og-docs.png","dateModified":"2026-05-07","publisher":{"@type":"Organization","name":"Cloudflare","url":"https://www.cloudflare.com/"},"isPartOf":{"@type":"WebSite","@id":"https://developers.cloudflare.com/#website","name":"Cloudflare Docs","url":"https://developers.cloudflare.com/"}}
```
---
---
description: Track the latest updates and changes to Cloudflare Cache features.
title: Changelog
image: https://developers.cloudflare.com/og-docs.png
---
[Skip to content](#main-content)
> Documentation Index
> Fetch the complete documentation index at: https://developers.cloudflare.com/cache/llms.txt
> Use this file to discover all available pages before exploring further.
# Changelog
Last updated Apr 16, 2026|Copy as Markdown|[View as Markdown](https://developers.cloudflare.com/cache/changelog/index.md)|[Agent setup](https://developers.cloudflare.com/agent-setup/)
[Subscribe to RSS](https://developers.cloudflare.com/changelog/rss/cache.xml)
## 2026-07-02
**Cache multiple versions of a URL with Vary**
Your origin can serve different responses for the same URL — different languages based on `Accept-Language`, or different formats based on `Accept` — by returning a [Vary ↗](https://www.rfc-editor.org/rfc/rfc9110.html#name-vary) response header. Cloudflare's cache now honors that header directly in [Cache Rules](https://developers.cloudflare.com/cache/how-to/cache-rules/), so the same URL can hold multiple cached versions and each request is matched to the right one. Content that previously had to bypass cache to stay correct can now be cached, following standard [HTTP caching behavior ↗](https://www.rfc-editor.org/rfc/rfc9111.html#name-calculating-cache-keys-with).
#### What changed
Your origin now decides which request headers matter by listing them in its `Vary` response, and you control how Cloudflare treats each one. When you have enabled Vary using a cache rule and a response includes a `Vary` header, the request headers listed become part of the cache key.
For each header your origin varies on, choose one of three actions:
| Action | Behavior | Best for |
| ----------- | ------------------------------------------------------------------------------------------------------------- | -------------------------------------------------------------------------- |
| normalize | Converts equivalent header values to the same cache key value before matching, collapsing redundant versions. | Most Accept, Accept-Language, and Accept-Encoding use cases. |
| passthrough | Uses the raw header value to select the cached version and forwards it to the origin unchanged. | When byte-for-byte differences in the header value should create versions. |
| bypass | Bypasses cache whenever this header name appears in the origin's Vary response. | Per-user values, or headers with too many possible values to cache safely. |
#### Benefits
* **Higher cache hit ratios**: `normalize` treats semantically equivalent headers as one version. For example, `Accept-Language: en-US, fr;q=0.8` and `Accept-Language: fr;q=0.8, en-GB` both resolve to the same cache key, so you serve more requests from cache instead of the origin.
* **Correct content negotiation**: Requests always receive the cached version that matches their headers, so language and format variants stay accurate.
* **No origin or Worker changes required**: If your origin already sends `Vary`, you configure the behavior entirely in Cache Rules.
* **Standards-aligned**: Cache key calculation follows RFC 9111, and `Vary: *` continues to bypass cache as required by RFC 9110.
#### Availability
Vary in Cache Rules is available on all plans (Free, Pro, Business, and Enterprise). For per-request control in Workers subrequests, use the [cf.vary](https://developers.cloudflare.com/workers/runtime-apis/request/#the-cfvary-property) property.
#### Get started
Configure Vary in the [Cloudflare dashboard ↗](https://dash.cloudflare.com/?to=/:account/:zone/caching/cache-rules) under **Caching** \> **Cache Rules**, or through the [Rulesets API](https://developers.cloudflare.com/ruleset-engine/rulesets-api/). To learn how Vary affects cache keys and how each action works, refer to [Vary](https://developers.cloudflare.com/cache/concepts/vary/) and the [Cache Rules Vary setting](https://developers.cloudflare.com/cache/how-to/cache-rules/settings/#vary).
## 2026-05-26
**BYPASS status now returned for uncacheable responses**
Cloudflare now returns a `BYPASS` [cache status](https://developers.cloudflare.com/cache/concepts/cache-responses/) whenever a response is not cacheable, instead of the previous mix of `BYPASS` and `MISS` that depended on why Cloudflare chose not to cache the response.
There are multiple reasons Cloudflare may refuse to cache a response — for example, the response exceeds the [maximum cacheable file size](https://developers.cloudflare.com/cache/concepts/default-cache-behavior/#cacheable-size-limits) for your plan, the origin sends `Cache-Control: no-cache`, `private`, or `max-age=0`, the response includes a `Set-Cookie` header, or the request includes an `Authorization` header.
Previously, only some of these conditions returned `BYPASS`. Others — such as responses exceeding the maximum cacheable file size — returned `MISS` on every request, regardless of whether [Origin Cache Control](https://developers.cloudflare.com/cache/concepts/cache-control/#origin-cache-control-behavior) was on or off. Because the response could never be cached, every subsequent request also returned `MISS`, which looked indistinguishable from a broken cache and made it hard to tell whether Cloudflare was trying and failing to cache the asset or had deliberately chosen not to cache it.
`BYPASS` now consistently signals that Cloudflare refused to cache the response, regardless of the reason. `MISS` is reserved for cacheable responses that simply were not in the local cache at request time.
#### What to expect in your analytics
After this change rolls out, you should see:
* **MISS rate decreases**: Uncacheable responses no longer count as cache misses.
* **BYPASS rate increases**: These same responses are now reported as bypasses.
* **Cache hit ratio increases**: Hit ratio calculations no longer include uncacheable traffic that could never have been cached, giving you a more accurate view of cache effectiveness.
Your total request volume and origin traffic are unchanged — only the cache status label is different.
#### Browser cache TTL behavior is preserved
The cache status label is the only thing changing — browser cache TTL handling for any given response is identical to what it was before:
* Responses that historically returned `MISS` because Cloudflare refused to cache them (for example, responses over the maximum cacheable file size) now return `BYPASS`, but continue to have browser cache TTL applied — exactly as they did when they were labeled `MISS`.
* Responses that historically returned `BYPASS` and skipped browser cache TTL continue to skip browser cache TTL.
In both cases, the decision to apply browser cache TTL depends on the underlying reason Cloudflare did not cache the response, not on the new `BYPASS` label.
## 2026-05-04
**Pingora now powers Cloudflare's cache**
Cloudflare's cache now runs on a new proxy built on [Pingora ↗](https://github.com/cloudflare/pingora), the Rust-based framework that already serves a significant portion of Cloudflare's network traffic. The new proxy is faster, more memory-safe, and designed to evolve our cache architecture. It delivers immediate performance improvements and enables new caching capabilities.
#### What this brings
* **Lower latency**: The new proxy reduces per-request overhead through improved connection reuse.
* **Reduced cache MISSes**: Enhanced cache retention improves origin offload.
* **Better RFC compliance**: Caching behavior more closely follows HTTP caching standards.
* **Foundation for future features**: The new architecture enables upcoming improvements to cache functionality and efficiency.
#### New features
* **Asynchronous `stale-while-revalidate`**: Every request returns stale content immediately while revalidation happens in the background, instead of the first request after expiry blocking on the origin. Refer to the [asynchronous stale-while-revalidate changelog](https://developers.cloudflare.com/changelog/post/2026-02-26-async-stale-while-revalidate/) for details.
* **Unbuffered bypass by default**: Responses that bypass cache are streamed directly to the client without buffering, reducing time-to-first-byte for uncacheable content.
#### Behavioral changes
The new architecture introduces the following behavioral changes to improve RFC compliance and correctness:
* **`Vary: *` results in cache bypass**: According to [RFC 9110 Section 12.5.5 ↗](https://httpwg.org/specs/rfc9110.html#field.vary), a `Vary` header value of `*` indicates the response varies on factors beyond request headers and must not be served from cache. Cloudflare now bypasses cache for these responses instead of storing them.
* **`Set-Cookie` stripped on MISS and EXPIRED**: For cacheable assets, `Set-Cookie` is now stripped on MISS and EXPIRED responses, not only on HITs.
* **Floating-point TTL values**: Floating-point time-to-live values (for example, `max-age=1.5`) are rounded down to the nearest integer instead of being rejected as invalid.
#### What's next
A deeper look at the new cache proxy is coming soon to the [Cloudflare blog ↗](https://blog.cloudflare.com/). For background on the underlying framework, read:
* [Open sourcing Pingora: our Rust framework for building programmable network services ↗](https://blog.cloudflare.com/pingora-open-source/)
* [How we built Pingora, the proxy that connects Cloudflare to the Internet ↗](https://blog.cloudflare.com/how-we-built-pingora-the-proxy-that-connects-cloudflare-to-the-internet/)
## 2026-04-27
**Cache Response Rules now support zone versioning**
Cache Response Rules now work with [Version Management](https://developers.cloudflare.com/version-management/). You can version response-phase cache settings and promote them through environments, just like Cache Rules and other supported configurations.
#### What changed
Previously, Cache Response Rules were excluded from zone versioning. Any response-phase rule you created applied globally across all environments with no way to test changes in staging first. Cache Rules already supported versioning, but the response phase, where you modify `Cache-Control` directives, manage cache tags, and strip headers, did not.
Cache Response Rules are now fully integrated with Version Management. You can create or modify response-phase rules within a version, and those changes stay scoped to that version until promoted.
#### Benefits
* **Safe rollout of cache behavior changes**: Test response-phase rules in a staging environment before promoting to production. Catch unintended caching side effects early.
* **Parity with Cache Rules**: Cache Response Rules now follow the same versioning workflow as Cache Rules, so you can manage all cache configuration through a single promotion pipeline.
* **Independent environment control**: Run different response-phase cache settings per environment. For example, strip `Set-Cookie` headers in staging to validate cacheability without affecting production traffic.
#### Get started
Configure Cache Response Rules in the [Cloudflare dashboard ↗](https://dash.cloudflare.com/?to=/:account/:zone/caching/cache-rules) under **Caching** \> **Cache Rules**, or via the [Rulesets API](https://developers.cloudflare.com/ruleset-engine/rulesets-api/). For more details, refer to the [Cache Response Rules documentation](https://developers.cloudflare.com/cache/how-to/cache-response-rules/) and the [Version Management documentation](https://developers.cloudflare.com/version-management/).
## 2026-04-17
**Smart Tiered Cache optimizes public cloud origins**
You can now achieve higher cache HIT rates and reduce origin load for origins hosted on public cloud providers with [Smart Tiered Cache](https://developers.cloudflare.com/cache/how-to/tiered-cache/#smart-tiered-cache). By setting a cloud region hint for your origin, Cloudflare selects the optimal upper-tier data center for that cloud region, funneling all cache MISSes through a single location close to your origin.
Previously, Smart Tiered Cache could not reliably select an optimal upper tier for origins behind anycast or regional unicast networks commonly used by cloud providers. Origins on AWS, GCP, Azure, and Oracle Cloud would fall back to a multi-upper-tier topology, resulting in lower cache HIT rates and more requests reaching your origin.
#### How it works
Set a cloud region hint (for example, `aws/us-east-1` or `gcp/europe-west1`) for your origin IP or hostname. Smart Tiered Cache uses this hint along with real-time latency data to select a primary upper tier close to your cloud region, plus a fallback in a different location for resilience.
* **Supported providers**: AWS, GCP, Azure, and Oracle Cloud.
* **All plans**: Available on Free, Pro, Business, and Enterprise plans at no additional cost.
* **Dashboard and API**: Configure from **Caching** \> **Tiered Cache** \> **Origin Configuration**, or use the API and Terraform.
#### Get started
To get started, enable [Smart Tiered Cache](https://developers.cloudflare.com/cache/how-to/tiered-cache/) and set a cloud region hint for your origin in the [Tiered Cache settings](https://developers.cloudflare.com/cache/how-to/tiered-cache/#public-cloud-origins).
## 2026-03-24
**Cache Response Rules**
You can now control how Cloudflare handles origin responses without changing your origin. Cache Response Rules let you modify `Cache-Control` directives, manage cache tags, and strip headers like `Set-Cookie` from origin responses _before_ they reach Cloudflare's cache. Whether traffic is cached or passed through dynamically, these rules give you control over origin response behavior that was previously out of reach.
#### What changed
Cache Rules previously only operated on request attributes. Cache Response Rules introduce a new response phase that evaluates origin responses and lets you act on them before caching. You can now:
* **Modify `Cache-Control` directives**: Set or remove individual directives like `no-store`, `no-cache`, `max-age`, `s-maxage`, `stale-while-revalidate`, `immutable`, and more. For example, remove a `no-cache` directive your origin sends so Cloudflare can cache the asset, or set an `s-maxage` to control how long Cloudflare stores it.
* **Set a different browser `Cache-Control`**: Send a different `Cache-Control` header downstream to browsers and other clients than what Cloudflare uses internally, giving you independent control over edge and browser caching strategies.
* **Manage cache tags**: Add, set, or remove cache tags on responses, including converting tags from another CDN's header format into Cloudflare's `Cache-Tag` header. This is especially useful if you are migrating from a CDN that uses a different tag header or delimiter.
* **Strip headers that block caching**: Remove `Set-Cookie`, `ETag`, or `Last-Modified` headers from origin responses before caching, so responses that would otherwise be treated as uncacheable can be stored and served from cache.
#### Benefits
* **No origin changes required**: Fix caching behavior entirely from Cloudflare, even when your origin configuration is locked down or managed by a different team.
* **Simpler CDN migration**: Match caching behavior from other CDN providers without rewriting your origin. Translate cache tag formats and override directives that do not align with Cloudflare's defaults.
* **Native support, fewer workarounds**: Functionality that previously required workarounds is now built into Cache Rules with full Tiered Cache compatibility.
* **Fine-grained control**: Use expressions to match on request and response attributes, then apply precise cache settings per rule. Rules are stackable and composable with existing Cache Rules.
#### Get started
Configure Cache Response Rules in the [Cloudflare dashboard ↗](https://dash.cloudflare.com/?to=/:account/:zone/caching/cache-rules) under **Caching** \> **Cache Rules**, or via the [Rulesets API ↗](https://developers.cloudflare.com/ruleset-engine/rulesets-api/). For more details, refer to the [Cache Rules documentation ↗](https://developers.cloudflare.com/cache/how-to/cache-response-rules/).
## 2026-02-26
**Asynchronous stale-while-revalidate**
Cloudflare's [stale-while-revalidate](https://developers.cloudflare.com/cache/concepts/cache-control/#revalidation) support is now fully asynchronous. Previously, the first request for a stale (expired) asset in cache had to wait for an origin response, after which that visitor received a REVALIDATED or EXPIRED status. Now, the first request after the asset expires triggers revalidation in the background and immediately receives stale content with an UPDATING status. All following requests also receive stale content with an `UPDATING` status until the origin responds, after which subsequent requests receive fresh content with a `HIT` status.
`stale-while-revalidate` is a `Cache-Control` directive set by your origin server that allows Cloudflare to serve an expired cached asset while a fresh copy is fetched from the origin.
Asynchronous revalidation brings:
* **Lower latency**: No visitor is waiting for the origin when the asset is already in cache. Every request is served from cache during revalidation.
* **Consistent experience**: All visitors receive the same cached response during revalidation.
* **Reduced error exposure**: The first request is no longer vulnerable to origin timeouts or errors. All visitors receive a cached response while revalidation happens in the background.
#### Availability
This change is live for all Free, Pro, and Business zones. Approximately 75% of Enterprise zones have been migrated, with the remaining zones rolling out throughout the quarter.
#### Get started
To use this feature, make sure your origin includes the `stale-while-revalidate` directive in the `Cache-Control` header. Refer to the [Cache-Control documentation](https://developers.cloudflare.com/cache/concepts/cache-control/#revalidation) for details.
## 2025-11-25
**Audit Logs for Cache Purge Events**
You can now review detailed audit logs for cache purge events, giving you visibility into what purge requests were sent, what they contained, and by whom. Audit your purge requests via the Dashboard or API for all purge methods:
* Purge everything
* List of prefixes
* List of tags
* List of hosts
* List of files
#### Example
The detailed audit payload is visible within the Cloudflare Dashboard (under **Manage Account** \> **Audit Logs**) and via the API. Below is an example of the Audit Logs v2 payload structure:
```json
{
"action": {
"result": "success",
"type": "create"
},
"actor": {
"id": "1234567890abcdef",
"email": "user@example.com",
"type": "user"
},
"resource": {
"product": "purge_cache",
"request": {
"files": [
"https://example.com/images/logo.png",
"https://example.com/css/styles.css"
]
}
},
"zone": {
"id": "023e105f4ecef8ad9ca31a8372d0c353",
"name": "example.com"
}
}
```
#### Get started
To get started, refer to the [Audit Logs documentation](https://developers.cloudflare.com/fundamentals/account/account-security/audit-logs/).
## 2025-11-07
**Inspect Cache Keys with Cloudflare Trace**
You can now see the exact cache key generated for any request directly in Cloudflare Trace. This visibility helps you troubleshoot cache hits and misses, and verify that your Custom Cache Keys — configured via Cache Rules or Page Rules — are working as intended.
Previously, diagnosing caching behavior required inferring the key from configuration settings. Now, you can confirm that your custom logic for headers, query strings, and device types is correctly applied.
Access Trace via the [dashboard](https://developers.cloudflare.com/rules/trace-request/how-to/#use-trace-in-the-dashboard) or [API](https://developers.cloudflare.com/api/resources/request%5Ftracer/methods/trace/), either manually for ad-hoc debugging or automated as part of your quality-of-service monitoring.
#### Example scenario
If you have a Cache Rule that segments content based on a specific cookie (for example, `user_region`), run a Trace with that cookie present to confirm the `user_region` value appears in the resulting cache key.
The Trace response includes the cache key in the `cache` object:
```json
{
"step_name": "request",
"type": "cache",
"matched": true,
"public_name": "Cache Parameters",
"cache": {
"key": {
"zone_id": "023e105f4ecef8ad9ca31a8372d0c353",
"scheme": "https",
"host": "example.com",
"uri": "/images/hero.jpg"
},
"key_string": "023e105f4ecef8ad9ca31a8372d0c353::::https://example.com/images/hero.jpg:::::"
}
}
```
#### Get started
To learn more, refer to the [Trace documentation](https://developers.cloudflare.com/rules/trace-request/) and our guide on [Custom Cache Keys](https://developers.cloudflare.com/cache/how-to/cache-keys/).
## 2025-08-29
**Smart Tiered Cache Fallback to Generic**
[Smart Tiered Cache](https://developers.cloudflare.com/cache/how-to/tiered-cache/#smart-tiered-cache) now falls back to [Generic Tiered Cache](https://developers.cloudflare.com/cache/how-to/tiered-cache/#generic-global-tiered-cache) when the origin location cannot be determined, improving cache precision for your content.
Previously, when Smart Tiered Cache was unable to select the optimal upper tier (such as when origins are masked by Anycast IPs), latency could be negatively impacted. This fallback now uses Generic Tiered Cache instead, providing better performance and cache efficiency.
#### How it works
When Smart Tiered Cache falls back to Generic Tiered Cache:
1. **Multiple upper-tiers**: Uses all of Cloudflare's global data centers as a network of upper-tiers instead of a single optimal location.
2. **Distributed cache requests**: Lower-tier data centers can query any available upper-tier for cached content.
3. **Improved global coverage**: Provides better cache hit ratios across geographically distributed visitors.
4. **Automatic fallback**: Seamlessly transitions when origin location cannot be determined, such as with Anycast-masked origins.
#### Benefits
* **Preserves high performance during fallback**: Smart Tiered Cache now maintains strong cache efficiency even when optimal upper tier selection is not possible.
* **Minimizes latency impact**: Automatically uses Generic Tiered Cache topology to keep performance high when origin location cannot be determined.
* **Seamless experience**: No configuration changes or intervention required when fallback occurs.
* **Improved resilience**: Smart Tiered Cache remains effective across diverse origin infrastructure, including Anycast-masked origins.
#### Get started
This improvement is automatically applied to all zones using [Smart Tiered Cache](https://developers.cloudflare.com/cache/how-to/tiered-cache/). No action is required on your part.
## 2025-04-04
**Workers Fetch API can override Cache Rules**
You can now programmatically override Cache Rules using the `cf` object in the `fetch()` command. This feature gives you fine-grained control over caching behavior on a per-request basis, allowing Workers to customize cache settings dynamically based on request properties, user context, or business logic.
#### How it works
Using the `cf` object in `fetch()`, you can override specific Cache Rules settings by:
1. **Setting custom cache options**: Pass cache properties in the `cf` object as the second argument to `fetch()` to override default Cache Rules.
2. **Dynamic cache control**: Apply different caching strategies based on request headers, cookies, or other runtime conditions.
3. **Per-request customization**: Bypass or modify Cache Rules for individual requests while maintaining default behavior for others.
4. **Programmatic cache management**: Implement complex caching logic that adapts to your application's needs.
#### What can be configured
Workers can override the following Cache Rules settings through the `cf` object:
* **`cacheEverything`**: Treat all content as static and cache all file types beyond the default cached content.
* **`cacheTtl`**: Set custom time-to-live values in seconds for cached content at the edge, regardless of origin headers.
* **`cacheTtlByStatus`**: Set different TTLs based on the response status code (for example, `{ "200-299": 86400, 404: 1, "500-599": 0 }`).
* **`cacheKey`**: Customize cache keys to control which requests are treated as the same for caching purposes (Enterprise only).
* **`cacheTags`**: Append additional cache tags for targeted cache purging operations.
#### Benefits
* **Enhanced flexibility**: Customize cache behavior without modifying zone-level Cache Rules.
* **Dynamic optimization**: Adjust caching strategies in real-time based on request context.
* **Simplified configuration**: Reduce the number of Cache Rules needed by handling edge cases programmatically.
* **Improved performance**: Fine-tune cache behavior for specific use cases to maximize hit rates.
#### Get started
To get started, refer to the [Workers Fetch API documentation](https://developers.cloudflare.com/workers/runtime-apis/fetch/) and the [cf object properties documentation](https://developers.cloudflare.com/workers/runtime-apis/request/#the-cf-property-requestinitcfproperties).
## 2025-04-03
**All cache purge methods now available for all plans**
You can now access all Cloudflare cache purge methods — no matter which plan you’re on. Whether you need to update a single asset or instantly invalidate large portions of your site’s content, you now have the same powerful tools previously reserved for Enterprise customers.
**Anyone on Cloudflare can now:**
1. [Purge Everything](https://developers.cloudflare.com/cache/how-to/purge-cache/purge-everything/): Clears all cached content associated with a website.
2. [Purge by Prefix](https://developers.cloudflare.com/cache/how-to/purge-cache/purge%5Fby%5Fprefix/): Targets URLs sharing a common prefix.
3. [Purge by Hostname](https://developers.cloudflare.com/cache/how-to/purge-cache/purge-by-hostname/): Invalidates content by specific hostnames.
4. [Purge by URL (single-file purge)](https://developers.cloudflare.com/cache/how-to/purge-cache/purge-by-single-file/): Precisely targets individual URLs.
5. [Purge by Tag](https://developers.cloudflare.com/cache/how-to/purge-cache/purge-by-tags/): Uses Cache-Tag response headers to invalidate grouped assets, offering flexibility for complex cache management scenarios.
Want to learn how each purge method works, when to use them, or what limits apply to your plan? Dive into our [purge cache documentation](https://developers.cloudflare.com/cache/how-to/purge-cache/) and [API reference ↗](https://developers.cloudflare.com/api/resources/cache/methods/purge/) for all the details.
## 2025-02-12
**Configurable multiplexing HTTP/2 to Origin**
You can now configure HTTP/2 multiplexing settings for origin connections on Enterprise plans. This feature allows you to optimize how Cloudflare manages concurrent requests over HTTP/2 connections to your origin servers, improving cache efficiency and reducing connection overhead.
#### How it works
HTTP/2 multiplexing allows multiple requests to be sent over a single TCP connection. With this configuration option, you can:
1. **Control concurrent streams**: Adjust the maximum number of concurrent streams per connection.
2. **Optimize connection reuse**: Fine-tune connection pooling behavior for your origin infrastructure.
3. **Reduce connection overhead**: Minimize the number of TCP connections required between Cloudflare and your origin.
4. **Improve cache performance**: Better connection management can enhance cache fetch efficiency.
#### Benefits
* **Customizable performance**: Tailor multiplexing settings to your origin's capabilities.
* **Reduced latency**: Fewer connection handshakes improve response times.
* **Lower origin load**: More efficient connection usage reduces server resource consumption.
* **Enhanced scalability**: Better connection management supports higher traffic volumes.
#### Get started
Enterprise customers can configure HTTP/2 multiplexing settings in the [Cloudflare Dashboard ↗](https://dash.cloudflare.com/) or through our [API](https://developers.cloudflare.com/api/).
Important consideration
This setting needs to be tuned carefully for your origin infrastructure. Setting the concurrent stream limit too high can negatively impact performance by saturating the shared TCP connection and overwhelming server processing capacity, leading to increased latency for individual requests.
## 2025-02-04
**Fight CSAM More Easily Than Ever**
You can now implement our **child safety tooling**, the **[CSAM Scanning Tool](https://developers.cloudflare.com/cache/reference/csam-scanning/)**, more easily. Instead of requiring external reporting credentials, you only need a verified email address for notifications to onboard. This change makes the tool more accessible to a wider range of customers.
**How It Works**
When enabled, the tool automatically [hashes images for enabled websites as they enter the Cloudflare cache ↗](https://blog.cloudflare.com/the-csam-scanning-tool/). These hashes are then checked against a database of **known abusive images**.
* **Potential match detected?**
* The **content URL is blocked**, and
* **Cloudflare will notify you** about the found matches via the provided email address.
**Updated Service-Specific Terms**
We have also made updates to our **[Service-Specific Terms ↗](https://www.cloudflare.com/service-specific-terms-application-services/#csam-scanning-tool-terms)** to reflect these changes.
## 2025-01-08
**Smart Tiered Cache optimizes Load Balancing Pools**
You can now achieve higher cache hit rates and reduce origin load when using [Load Balancing](https://developers.cloudflare.com/load-balancing/) with [Smart Tiered Cache](https://developers.cloudflare.com/cache/how-to/tiered-cache/). Cloudflare automatically selects a single, optimal tiered data center for all origins in your Load Balancing Pool.
#### How it works
When you use [Load Balancing](https://developers.cloudflare.com/load-balancing/) with [Smart Tiered Cache](https://developers.cloudflare.com/cache/how-to/tiered-cache/), Cloudflare analyzes performance metrics across your pool's origins and automatically selects the optimal Upper Tier data center for the entire pool. This means:
* **Consistent cache location**: All origins in the pool share the same Upper Tier cache.
* **Higher HIT rates**: Requests for the same content hit the cache more frequently.
* **Reduced origin requests**: Fewer requests reach your origin servers.
* **Improved performance**: Faster response times for cache HITs.
#### Example workflow
```txt
Load Balancing Pool: api-pool
├── Origin 1: api-1.example.com
├── Origin 2: api-2.example.com
└── Origin 3: api-3.example.com
↓
Selected Upper Tier: [Optimal data center based on pool performance]
```
#### Get started
To get started, enable [Smart Tiered Cache](https://developers.cloudflare.com/cache/how-to/tiered-cache/) on your zone and configure your [Load Balancing Pool](https://developers.cloudflare.com/load-balancing/).
## 2024-11-20
**Smart Tiered Cache automatically optimizes R2 caching**
You can now reduce latency and lower R2 egress costs automatically when using [Smart Tiered Cache](https://developers.cloudflare.com/cache/how-to/tiered-cache/) with [R2](https://developers.cloudflare.com/r2/). Cloudflare intelligently selects a tiered data center close to your R2 bucket location, creating an efficient caching topology without additional configuration.
#### How it works
When you enable [Smart Tiered Cache](https://developers.cloudflare.com/cache/how-to/tiered-cache/) for zones using [R2](https://developers.cloudflare.com/r2/) as an origin, Cloudflare automatically:
1. **Identifies your R2 bucket location**: Determines the geographical region where your R2 bucket is stored.
2. **Selects an optimal Upper Tier**: Chooses a data center close to your bucket as the common Upper Tier cache.
3. **Routes requests efficiently**: All cache misses in edge locations route through this Upper Tier before reaching R2.
#### Benefits
* **Automatic optimization**: No manual configuration required.
* **Lower egress costs**: Fewer requests to R2 reduce egress charges.
* **Improved hit ratio**: Common Upper Tier increases cache efficiency.
* **Reduced latency**: Upper Tier proximity to R2 minimizes fetch times.
#### Get started
To get started, enable [Smart Tiered Cache](https://developers.cloudflare.com/cache/how-to/tiered-cache/) on your zone using R2 as an origin.
## 2024-11-07
**Stage and test cache configurations safely**
You can now stage and test cache configurations before deploying them to production. Versioned environments let you safely validate cache rules, purge operations, and configuration changes without affecting live traffic.
#### How it works
With versioned environments, you can:
1. **Create staging versions** of your cache configuration.
2. **Test cache rules** in a non-production environment.
3. **Purge staged content** independently from production.
4. **Validate changes** before promoting to production.
This capability integrates with Cloudflare's broader [versioning system](https://developers.cloudflare.com/version-management/), allowing you to manage cache configurations alongside other zone settings.
#### Benefits
* **Risk-free testing**: Validate configuration changes without impacting production.
* **Independent purging**: Clear staging cache without affecting live content.
* **Deployment confidence**: Catch issues before they reach end users.
* **Team collaboration**: Multiple team members can work on different versions.
#### Get started
To get started, refer to the [version management documentation](https://developers.cloudflare.com/version-management/).
Important limitation
Cache Reserve is only supported for your production environment. Staged environments can use standard cache functionality, but Cache Reserve persistence is limited to production deployments.
## 2024-11-07
**Shard cache using custom cache key values**
Enterprise customers can now optimize cache hit ratios for content that varies by device, language, or referrer by **sharding cache** using up to ten values from previously restricted headers with [custom cache keys](https://developers.cloudflare.com/cache/how-to/cache-keys/).
#### How it works
When configuring [custom cache keys](https://developers.cloudflare.com/cache/how-to/cache-keys/), you can now include values from these headers to create distinct cache entries:
* **`accept*` headers** (for example, `accept`, `accept-encoding`, `accept-language`): Serve different cached versions based on content negotiation.
* **`referer` header**: Cache content differently based on the referring page or site.
* **`user-agent` header**: Maintain separate caches for different browsers, devices, or bots.
#### When to use cache sharding
* Content varies significantly by device type (mobile vs desktop).
* Different language or encoding preferences require distinct responses.
* Referrer-specific content optimization is needed.
#### Example configuration
```json
{
"cache_key": {
"custom_key": {
"header": {
"include": ["accept-language", "user-agent"],
"check_presence": ["referer"]
}
}
}
}
```
This configuration creates separate cache entries based on the `accept-language` and `user-agent` headers, while also considering whether the `referer` header is present.
#### Get started
To get started, refer to the [custom cache keys documentation](https://developers.cloudflare.com/cache/how-to/cache-keys/).
Note
While cache sharding can improve hit ratios for specific use cases, overly sharding your cache can reduce overall cache efficiency and negatively impact performance. Carefully evaluate whether sharding benefits your specific traffic patterns.
## 2024-09-05
**One-click Cache Rules templates now available**
You can now create optimized cache rules instantly with **one-click templates**, eliminating the complexity of manual rule configuration.
#### How it works
1. Navigate to **Rules** \> **Templates** in your Cloudflare dashboard.
2. Select a template for your use case.
3. Click to apply the template with sensible defaults.
4. Customize as needed for your specific requirements.
#### Available cache templates
* **Cache everything**: Adjust the cache level for all requests.
* **Bypass cache for everything**: Bypass cache for all requests.
* **Cache default file extensions**: Replicate Page Rules caching behavior by making only default extensions eligible for cache.
* **Bypass cache on cookie**: Bypass cache for requests containing specific cookies.
* **Set edge cache time**: Cache responses with status code between 200 and 599 on the Cloudflare edge.
* **Set browser cache time**: Adjust how long a browser should cache a resource.
#### Get started
To get started, go to [**Rules > Templates** ↗](https://dash.cloudflare.com/?to=/:account/:zone/caching/cache-rules) in the dashboard. For more information, refer to the [Cache Rules documentation](https://developers.cloudflare.com/cache/how-to/cache-rules/).
## 2024-07-19
**Regionalized Generic Tiered Cache for higher hit ratios**
You can now achieve higher cache hit ratios with [Generic Global Tiered Cache](https://developers.cloudflare.com/cache/how-to/tiered-cache/#generic-global-tiered-cache). Regional content hashing routes content consistently to the same upper-tier data centers, eliminating redundant caching and reducing origin load.
#### How it works
Regional content hashing groups data centers by region and uses consistent hashing to route content to designated upper-tier caches:
* Same content always routes to the same upper-tier data center within a region.
* Eliminates redundant copies across multiple upper-tier caches.
* Increases the likelihood of cache HITs for the same content.
#### Example
A popular image requested from multiple edge locations in a region:
* **Before**: Cached at 3-4 different upper-tier data centers
* **After**: Cached at 1 designated upper-tier data center
* **Result**: 3-4x fewer cache MISSes, reducing origin load and improving performance
#### Get started
To get started, enable [Generic Global Tiered Cache](https://developers.cloudflare.com/cache/how-to/tiered-cache/#generic-global-tiered-cache) on your zone.
Was this helpful?
YesNo
## On this page
[Docs](https://developers.cloudflare.com/)
```json
{"@context":"https://schema.org","@type":"BlogPosting","@id":"https://developers.cloudflare.com/cache/changelog/#page","headline":"Changelog · Cloudflare Cache (CDN) docs","description":"Track the latest updates and changes to Cloudflare Cache features.","url":"https://developers.cloudflare.com/cache/changelog/","inLanguage":"en","image":"https://developers.cloudflare.com/og-docs.png","dateModified":"2026-04-16","publisher":{"@type":"Organization","name":"Cloudflare","url":"https://www.cloudflare.com/"},"isPartOf":{"@type":"WebSite","@id":"https://developers.cloudflare.com/#website","name":"Cloudflare Docs","url":"https://developers.cloudflare.com/"}}
```
---
---
description: Persist cached content in R2 storage to eliminate cache evictions.
title: Cache Reserve
image: https://developers.cloudflare.com/og-docs.png
---
[Skip to content](#main-content)
> Documentation Index
> Fetch the complete documentation index at: https://developers.cloudflare.com/cache/llms.txt
> Use this file to discover all available pages before exploring further.
# Cache Reserve
Last updated Jun 30, 2026|Copy as Markdown|[View as Markdown](https://developers.cloudflare.com/cache/advanced-configuration/cache-reserve/index.md)|[Agent setup](https://developers.cloudflare.com/agent-setup/)
Smart Shield
This functionality is now offered as part of Cloudflare's origin server safeguard, Smart Shield. [Learn more](https://developers.cloudflare.com/smart-shield/).
Cache Reserve is a large, persistent data store [implemented on top of R2](https://developers.cloudflare.com/r2/). By pushing a single button in the dashboard, your website's cacheable content will be written to Cache Reserve.
In the same way that Tiered Cache builds a hierarchy of caches between your visitors and your origin, Cache Reserve serves as the ultimate upper-tier cache, that will reserve storage space for your assets for as long as you want. This ensures that your content is served from cache longer, shielding your origin from unneeded egress fees.
Content in Cache Reserve is considered fresh based on the [Edge Cache TTL](https://developers.cloudflare.com/cache/how-to/edge-browser-cache-ttl/#edge-cache-ttl) setting, or your origin's `Cache-Control` headers if Edge Cache TTL is not set. After the freshness period expires, Cloudflare revalidates the asset with your origin the next time it is requested. This is the same behavior as in Cloudflare's regular CDN.
The retention period controls how long an asset stays in Cache Reserve before it is removed. Cache Reserve starts with a retention period of 30 days. If an asset is not requested within the retention period, it is removed from Cache Reserve. Requesting the asset resets the retention period.
Assets must [meet certain criteria](#cache-reserve-asset-eligibility) to use Cache Reserve.
Cache Reserve is a usage-based product and [pricing](#pricing) is detailed below. While Cache Reserve does require a paid plan, users can continue to use Cloudflare’s CDN (without Cache Reserve) for free.
## Enable Cache Reserve
A paid Cache Reserve plan is required.
1. In the Cloudflare dashboard, go to the **Cache Reserve** page.
[Go to **Cache Reserve** ↗](https://dash.cloudflare.com/?to=/:account/:zone/caching/cache-reserve)
2. Select **Enable storage sync**.
Refer to the [Change Cache Reserve setting API](https://developers.cloudflare.com/api/resources/cache/subresources/cache%5Freserve/methods/edit/) for more information.
Note
You can pause Cache Reserve at any time. Pausing Cache Reserve means that Cloudflare’s network will no longer use Cache Reserve to serve data, but resources will remain in storage until they are purged or expired.
If you are an Enterprise customer and are interested in Cache Reserve, contact your account team to get help with your configuration.
## Cache Reserve asset eligibility
Not all assets are eligible for Cache Reserve. To be admitted into Cache Reserve, assets must:
* Be cacheable, according to Cloudflare's standard [cacheability factors](https://developers.cloudflare.com/cache/).
* Have a freshness time-to-live (TTL) of at least 10 hours (set by any means such as Cache-Control / [CDN-Cache-Control](https://developers.cloudflare.com/cache/concepts/cache-control/) origin response headers, [Edge Cache TTL](https://developers.cloudflare.com/cache/how-to/edge-browser-cache-ttl/#edge-cache-ttl), [Cache TTL By Status](https://developers.cloudflare.com/cache/how-to/configure-cache-status-code/), or [Cache Rules](https://developers.cloudflare.com/cache/how-to/cache-rules/)),
* Have a Content-Length response header.
* When using [Image transformations](https://developers.cloudflare.com/images/optimization/hosted-images/create-variants/), original files are eligible for Cache Reserve, but resized file variants are not eligible because transformations happen after Cache Reserve in the response flow.
## Purge behavior
To remove all data from Cache Reserve, refer to [Cache Reserve clear button](#cache-reserve-clear-button).
Note that [Purge Everything](https://developers.cloudflare.com/cache/how-to/purge-cache/) performs a soft purge on Cache Reserve and does not update metadata set by [Cache Response Rules](https://developers.cloudflare.com/cache/how-to/cache-response-rules/) (such as cache tags). To refresh that metadata, purge the individual asset or wait for it to fully expire.
## Limits
* Cache Reserve file limits are the same as [R2 limits](https://developers.cloudflare.com/r2/platform/limits/). Note that [CDN cache limits](https://developers.cloudflare.com/cache/concepts/default-cache-behavior/#customization-options-and-limits) still apply. Assets larger than standard limits will not be stored in the standard CDN cache, so these assets will incur Cache Reserve operations costs far more frequently.
* Origin Range requests are not supported at this time from Cache Reserve.
* [Vary for images](https://developers.cloudflare.com/cache/advanced-configuration/vary-for-images/) is currently not compatible with Cache Reserve.
* Requests to [R2 public buckets linked to a zone's domain](https://developers.cloudflare.com/r2/buckets/public-buckets/) will not use Cache Reserve. Enabling Cache Reserve for the connected zone will use Cache Reserve only for requests not destined for the R2 bucket.
* Cache Reserve makes requests for uncompressed content directly from the origin. Unlike the standard Cloudflare CDN, Cache Reserve does not include the `Accept-Encoding: gzip` header when sending requests to the origin.
* Cache Reserve is bypassed when using the Cloudflare [O2O](https://developers.cloudflare.com/cloudflare-for-platforms/cloudflare-for-saas/saas-customers/how-it-works/) setup.
## Usage
Like the standard CDN, Cache Reserve also uses the `cf-cache-status` header to indicate [cache response statuses](https://developers.cloudflare.com/cache/concepts/cache-responses/) like `MISS`, `HIT`, and `REVALIDATED`. Cache Reserve cache misses and hits are factored into the dashboard's cache hit ratio.
Individual sampled requests that filled or were served by Cache Reserve are viewable via the [CacheReserveUsed](https://developers.cloudflare.com/logs/logpush/logpush-job/datasets/zone/http%5Frequests/) Logpush field.
Cache Reserve monthly operations and storage usage are viewable in the dashboard.
## Pricing
Cache Reserve charges based on the total volume of data stored, along with two classes of operations on that data:
* [Class A operations](https://developers.cloudflare.com/r2/pricing/#class-a-operations) which are more expensive and tend to mutate state.
* [Class B operations](https://developers.cloudflare.com/r2/pricing/#class-b-operations) which tend to read existing state.
In most cases, a Cache Reserve miss will result in both one class A and one class B operation, and a Cache Reserve hit will result in one class B operation. Assets larger than 1 GB will incur more operations proportional to their size.
### Cache Reserve pricing
| | Rates | | Storage | $0.015 / GB-month |
| --------------------------- | ------------------------ | ---------- | ----------------- |
| Class A Operations (writes) | $4.50 / million requests | | |
| Class B Operations (reads) | $0.36 / million requests | | |
Note
The billable quantity is rounded up to the nearest million.
### Storage usage
Storage is billed using gigabyte-month (GB-month) as the billing metric. A GB-month is calculated by recording total bytes stored for the duration of the month.
For example:
* Storing 1 GB for 30 days will be charged as 1 GB-month.
* Storing 2 GB for 15 days will be charged as 1 GB-month.
### Operations
Operations are performed by Cache Reserve on behalf of the user to write data from the origin to Cache Reserve and to pass that data downstream to other parts of Cloudflare’s network. These operations are managed internally by Cloudflare.
#### Class A operations (writes)
Class A operations are performed based on cache misses from Cloudflare’s CDN. When a request cannot be served from cache, it will be fetched from the origin and written to cache reserve as well as our edge caches on the way back to the visitor.
#### Class B operations (reads)
Class B operations are performed when data needs to be fetched from Cache Reserve to respond to a miss in the edge cache.
#### Purge
Asset purges are free operations.
Cache Reserve will be instantly purged along with edge cache when you send a purge by URL request. Refer to [cache configurations](https://developers.cloudflare.com/cache/how-to/purge-cache/) for details.
Other purge methods, such as purge by tag, host, prefix, or purge everything will force an attempt to [revalidate](https://developers.cloudflare.com/cache/concepts/cache-responses/#revalidated) on the subsequent request for the Cache Reserve asset. Note that assets purged this way will still incur storage costs until their retention TTL expires.
Note
Note this differs from the standard CDN's purge by tag, host, or prefix features which force a cache miss, requiring the origin to deliver the asset in full.
## Cache Reserve billing examples
#### Example 1
Assuming 1,000 assets (each 1 GB) are written to Cache Reserve at the start of the month and each asset is read 1,000 times, the estimated cost for the month would be:
| | Usage | Billable Quantity | Price |
| ------------------ | ----------------------------------------- | ----------------- | ---------- |
| Class B Operations | (1,000 assets) \* (1,000 reads per asset) | 1,000,000 | $0.36 |
| Class A Operations | (1,000 assets) \* (1 write per asset) | 1,000 | $4.50 |
| Storage | (1,000 assets) \* (1GB per asset) | 1,000 GB-months | $15.00 |
| **TOTAL** | | | **$19.86** |
| | | | |
Note
The billable quantity is rounded up to the nearest million.
#### Example 2
Assuming 1,000,000 assets (each 1 MB) are in Cache Reserve, and:
* each asset expires and is rewritten into Cache Reserve 1 time per day
* each asset is read 2 times per day
the estimated cost for the month would be:
| | Usage | Billable Quantity | Price |
| ------------------ | ---------------------------------------------------- | ----------------- | ----------- |
| Class B Operations | (1,000,000 assets) \* (2 reads per day) \* (30 days) | 60,000,000 | $21.60 |
| Class A Operations | (1,000,000 assets) \* (1 write per day) \* (30 days) | 30,000,000 | $135.00 |
| Storage | (1,000,000 assets) \* (1MB per asset) | 1,000 GB-months | $15.00 |
| **TOTAL** | | | **$171.60** |
| | | | |
Note
The billable quantity is rounded up to the nearest million.
## Tips and best practices
Cache Reserve is designed for use with [Tiered Cache](https://developers.cloudflare.com/cache/how-to/tiered-cache/) enabled for maximum origin shielding. Using Cache Reserve without Tiered Cache may result in higher storage operation costs. The Cloudflare dashboard will warn you if you try to enable Cache Reserve without Tiered Cache.
## Cache Reserve Analytics
Cache Reserve Analytics provides insights regarding your Cache Reserve usage. It allows you to check what content is stored in Cache Reserve, how often it is being accessed, how long it has been there and how much egress from your origin it is saving you.
In the **Overview** section, under **Cache Reserve**, you have access to the following metrics:
* **Egress savings (bandwidth)** \- is an estimation based on response bytes served from Cache Reserve that did not need to be served from your origin server. These are represented as cache hits.
* **Requests served by Cache Reserve** \- is the number of requests served by Cache Reserve (total).
* **Data storage summary** \- is based on a representative sample of requests. Refer to [Sampling](https://developers.cloudflare.com/analytics/graphql-api/sampling/) for more details about how Cloudflare samples data.
* **Current data stored** \- is the data stored (currently) over time.
* **Aggregate storage usage** \- is the total of storage used for the selected timestamp.
* **Operations** \- Class A (writes) and Class B (reads) operations over time.
## Cache Reserve clear button
You can remove all data stored in Cache Reserve through the dashboard or via API. To clear your cache reserve:
* Cache Reserve must have already been enabled for the zone.
* Cache Reserve needs to be off.
Be aware that the deletion may take up to 24 hours to complete.
1. In the Cloudflare dashboard, go to the **Cache Reserve** page.
[Go to **Cache Reserve** ↗](https://dash.cloudflare.com/?to=/:account/:zone/caching/cache-reserve)
2. In **Delete Cache Reserve Data**, select **Delete Storage**.
To delete Cache Reserve data via API use the following example requests. For more information, refer to the [API documentation](https://developers.cloudflare.com/api/resources/cache/subresources/cache%5Freserve/methods/clear/).
**Request 1: Get Cache Reserve status**
Required API token permissions
At least one of the following [token permissions](https://developers.cloudflare.com/fundamentals/api/reference/permissions/) is required:
* `Zone Settings Write`
* `Zone Settings Read`
* `Zone Read`
* `Zone Write`
```bash
curl "https://api.cloudflare.com/client/v4/zones/$ZONE_ID/cache/cache_reserve" \
--request GET \
--header "Authorization: Bearer $CLOUDFLARE_API_TOKEN"
```
```json
{
"result": {
"editable": true,
"id": "cache_reserve",
"value": "off"
},
"success": true,
"errors": [],
"messages": []
}
```
If Cache Reserve is turned off, you can proceed to the Cache Reserve Clear operation.
**Request 2: Start Cache Reserve Clear**
Required API token permissions
At least one of the following [token permissions](https://developers.cloudflare.com/fundamentals/api/reference/permissions/) is required:
* `Zone Settings Write`
* `Zone Write`
```bash
curl "https://api.cloudflare.com/client/v4/zones/$ZONE_ID/cache/cache_reserve_clear" \
--request POST \
--header "Authorization: Bearer $CLOUDFLARE_API_TOKEN"
```
```json
{
"result": {
"id": "cache_reserve_clear",
"start_ts": "2024-06-02T10:00:00.12345Z",
"state": "In-progress"
},
"success": true,
"errors": [],
"messages": []
}
```
Was this helpful?
YesNo
## On this page
[Docs](https://developers.cloudflare.com/)
```json
{"@context":"https://schema.org","@type":"TechArticle","@id":"https://developers.cloudflare.com/cache/advanced-configuration/cache-reserve/#page","headline":"Cache Reserve · Cloudflare Cache (CDN) docs","description":"Persist cached content in R2 storage to eliminate cache evictions.","url":"https://developers.cloudflare.com/cache/advanced-configuration/cache-reserve/","inLanguage":"en","image":"https://developers.cloudflare.com/og-docs.png","dateModified":"2026-06-30","publisher":{"@type":"Organization","name":"Cloudflare","url":"https://www.cloudflare.com/"},"isPartOf":{"@type":"WebSite","@id":"https://developers.cloudflare.com/#website","name":"Cloudflare Docs","url":"https://developers.cloudflare.com/"}}
```
---
---
description: Signal search engine crawlers when content changes with IndexNow.
title: Crawler Hints
image: https://developers.cloudflare.com/og-docs.png
---
[Skip to content](#main-content)
> Documentation Index
> Fetch the complete documentation index at: https://developers.cloudflare.com/cache/llms.txt
> Use this file to discover all available pages before exploring further.
# Crawler Hints
Last updated May 5, 2026|Copy as Markdown|[View as Markdown](https://developers.cloudflare.com/cache/advanced-configuration/crawler-hints/index.md)|[Agent setup](https://developers.cloudflare.com/agent-setup/)
Crawler Hints uses Cloudflare cache signals to tell search engines when your content has likely changed, so they crawl your site at the right time instead of guessing.
## Background
Search engines and similar services operate massive networks of bots that crawl the Internet to identify the content most relevant to a user query. Content on the web is always changing though, and search engine crawlers must continually wander the Internet and guess how frequently they should check a site for content updates.
With Crawler Hints, Cloudflare can proactively tell a crawler about the best time to index or when content changes. Additionally, Crawler Hints supports [IndexNow ↗](https://www.indexnow.org/), which allows websites to notify search engines whenever content on their website content is created, updated, or deleted. Crawler Hints uses cache-status [MISS](https://developers.cloudflare.com/cache/concepts/cache-responses/#miss) to determine when content has likely been updated and sends it to IndexNow's crawler. If an asset's response has an HTTP status code greater than 4xx, the Crawler hints will not report that to [IndexNow ↗](https://www.indexnow.org/).
## Benefits
Crawler Hints help search engines and other bot-powered services serve the freshest version of your content, which can improve search rankings.
Crawler Hints also reduces unnecessary crawl traffic to your origin, lowering resource consumption and improving site performance.
## Availability
| | Free | Pro | Business | Enterprise |
| ------------ | ---- | --- | -------- | ---------- |
| Availability | Yes | Yes | Yes | Yes |
## Enable Crawler Hints
1. In the Cloudflare dashboard, go to the **Configuration** page.
[Go to **Configuration** ↗](https://dash.cloudflare.com/?to=/:account/:zone/caching/configuration)
2. Enable **Crawler Hints**.
After enabling Crawler Hints, Cloudflare will begin sending hints to search engines about when they should crawl particular parts of your website.
## Prevent indexing for a specific page
When enabled, Crawler Hints is a global setting for your entire website. You can stop a specific page from being indexed by either:
* Having the origin server send through the header `X-Robots-Tag: noindex` on any pages that should not be indexed.
* Including `` in the HTML of any pages that should not be indexed.
* Creating a [Response header Transform Rule](https://developers.cloudflare.com/rules/transform/response-header-modification/) in Cloudflare to add the `X-Robots-Tag: noindex` header instead of doing it from the origin server.
Was this helpful?
YesNo
## On this page
[Docs](https://developers.cloudflare.com/)
```json
{"@context":"https://schema.org","@type":"TechArticle","@id":"https://developers.cloudflare.com/cache/advanced-configuration/crawler-hints/#page","headline":"Crawler Hints · Cloudflare Cache (CDN) docs","description":"Signal search engine crawlers when content changes with IndexNow.","url":"https://developers.cloudflare.com/cache/advanced-configuration/crawler-hints/","inLanguage":"en","image":"https://developers.cloudflare.com/og-docs.png","dateModified":"2026-05-05","publisher":{"@type":"Organization","name":"Cloudflare","url":"https://www.cloudflare.com/"},"isPartOf":{"@type":"WebSite","@id":"https://developers.cloudflare.com/#website","name":"Cloudflare Docs","url":"https://developers.cloudflare.com/"}}
```
---
---
description: Preload assets with 103 Early Hints to speed up page loads.
title: Early Hints
image: https://developers.cloudflare.com/og-docs.png
---
[Skip to content](#main-content)
> Documentation Index
> Fetch the complete documentation index at: https://developers.cloudflare.com/cache/llms.txt
> Use this file to discover all available pages before exploring further.
# Early Hints
Last updated May 5, 2026|Copy as Markdown|[View as Markdown](https://developers.cloudflare.com/cache/advanced-configuration/early-hints/index.md)|[Agent setup](https://developers.cloudflare.com/agent-setup/)
When a browser requests a page, the origin server takes time to prepare the full response. Early Hints uses this wait time to send the browser a preliminary `103` response containing `Link` headers that tell the browser which assets it will need. The browser can start loading those assets before the full response arrives, which speeds up page loads.
Early Hints is defined in [RFC 8297 ↗](https://httpwg.org/specs/rfc8297.html) as a new HTTP status code (`103 Early Hints`). Cloudflare caches and serves these `103` responses with `Link` headers from your HTML pages, reducing user-perceived latency.
Note
Early Hints is currently only supported over HTTP/2 and HTTP/3.
For more information about Early Hints, refer to the [Cloudflare ↗](https://blog.cloudflare.com/early-hints) and [Google Chrome ↗](https://developer.chrome.com/en/blog/early-hints/) blogs.
## Availability
| | Free | Pro | Business | Enterprise |
| ------------ | ---- | --- | -------- | ---------- |
| Availability | Yes | Yes | Yes | Yes |
## Enable Early Hints
1. In the Cloudflare dashboard, go to the **Speed** \> **Settings** page.
[Go to **Settings** ↗](https://dash.cloudflare.com/?to=/:account/:zone/speed/optimization)
2. Go to the **Content Optimization** tab.
3. For **Early Hints**, toggle the switch to **On**.
## Generate Early Hints
Early Hints are only generated and cached:
* For URIs with `.html`, `.htm`, or `.php` file extensions, or no file extension
* On 200, 301, or 302 response return codes
* When the response contains [link headers ↗](https://developer.mozilla.org/en-US/docs/Web/HTTP/Reference/Headers/Link) with preconnect or preload rel types, such as `Link: ; rel=preload`
Note
Early Hints cache entries are keyed by request URI and ignore query strings.
## Emit Early Hints
Cloudflare will asynchronously look up and emit a cached 103 Early Hints response ahead of a main response.
Currently, only certain browser versions will take action to preload or preconnect on receiving Early Hints, such as Google Chrome M94 and higher. Instructions for running WebPageTest to experiment with compatible client browsers can be found in the [blog post ↗](https://blog.cloudflare.com/early-hints/#testing-early-hints-with-web-page-test).
Additionally, keep the following in mind:
* Early Hints responses may be emitted before reaching the origin server or Worker. When Early Hints is enabled and pages on your site require authentication, unauthenticated visitors may receive a 103 response. The 103 response would contain cached Link headers and be sent before a 403 Forbidden response from your origin.
* Early Hints may be emitted less frequently on requests where the content is cacheable. Cloudflare CDN is more likely to retrieve a response header before the asynchronous Early Hints lookup finishes if the response has been cached. Cloudflare will not send a 103 response if the main response header is already available.
* Cloudflare currently disables Early Hints on some User-Agents, for example, select search crawler bots that show incompatibility with 1xx responses.
* You may see an influx of `504` responses with the `RequestSource` of `earlyHintsCache` in Cloudflare Logs when Early Hints is enabled, which is expected and benign. Requests from `earlyHintsCache` are internal subrequests for cached Early Hints, and they are neither end user requests, nor do they go to your origin. Their response status only indicates whether there are cached Early Hints for the request URI (`200` on cache HIT, `504` on cache MISS). These requests are already filtered out in other views, such as Cache Analytics. To filter out these requests or to filter requests by end users of your website only, please refer to [Filter end users](https://developers.cloudflare.com/analytics/graphql-api/features/filtering/#filter-end-users).
Was this helpful?
YesNo
## On this page
[Docs](https://developers.cloudflare.com/)
```json
{"@context":"https://schema.org","@type":"TechArticle","@id":"https://developers.cloudflare.com/cache/advanced-configuration/early-hints/#page","headline":"Early Hints · Cloudflare Cache (CDN) docs","description":"Preload assets with 103 Early Hints to speed up page loads.","url":"https://developers.cloudflare.com/cache/advanced-configuration/early-hints/","inLanguage":"en","image":"https://developers.cloudflare.com/og-docs.png","dateModified":"2026-05-05","publisher":{"@type":"Organization","name":"Cloudflare","url":"https://www.cloudflare.com/"},"isPartOf":{"@type":"WebSite","@id":"https://developers.cloudflare.com/#website","name":"Cloudflare Docs","url":"https://developers.cloudflare.com/"}}
```
---
---
description: Improve cache hit rates by sorting query string parameters.
title: Query String Sort
image: https://developers.cloudflare.com/og-docs.png
---
[Skip to content](#main-content)
> Documentation Index
> Fetch the complete documentation index at: https://developers.cloudflare.com/cache/llms.txt
> Use this file to discover all available pages before exploring further.
# Query String Sort
Last updated Apr 16, 2026|Copy as Markdown|[View as Markdown](https://developers.cloudflare.com/cache/advanced-configuration/query-string-sort/index.md)|[Agent setup](https://developers.cloudflare.com/agent-setup/)
**Query String Sort** increases cache-hit rates by first sorting query strings into a consistent order before checking the Cloudflare cache.
By default, Cloudflare’s cache treats resources as distinct if their URL query strings are in a different order. For instance, these resources are cached separately:
* `/video/48088296?title=0&byline=0&portrait=0&color=51a516`
* `/video/48088296?byline=0&color=51a516&portrait=0&title=0`
Query String Sort changes this behavior. If two query strings exist with the same name, the URL is sorted by the parameter value. For example:
`/example/file?word=alpha&word=beta` and `/example/file?word=beta&word=alpha`
would be sorted to:
`/example/file?word=alpha&word=beta`
## Availability
| | Free | Pro | Business | Enterprise |
| ------------ | ---- | --- | -------- | ---------- |
| Availability | No | No | No | Yes |
---
## Enable Query String Sort
To enable Query String Sort:
1. Log into the [Cloudflare dashboard ↗](https://dash.cloudflare.com).
2. Select your account and zone.
3. Go to **Caching** \> **Configuration**.
4. For **Enable Query String Sort**, switch the toggle to **On**.
---
## Unexpected behavior with WordPress admin pages
When a site or an application requires exact query string ordering, enabling Query String Sort might cause unexpected behavior.
For example in the WordPress admin UI, you might notice any of the following behaviors:
* No media appear in the Media Library
* Inability to customize the site via **Appearance** \> **Customize**
* Inability to drag any widget to a sidebar in **Appearance** \> **Widgets**
* Inability to edit menus in **Appearance** \> **Menus**
To understand why this happens, note that WordPress [concatenates JavaScript files ↗](https://developer.wordpress.org/advanced-administration/wordpress/wp-config/#disable-javascript-concatenation) to speed up the administration interface. The way WordPress implements this involves multiple occurrences of `load[]` parameters in the query string, where the order of those parameters is crucial.
Note
Note that more recent versions of WordPress may not experience this issue, as a patch has been implemented in WordPress since 2019\. The patch can be found at [WordPress Core Trac Changeset 45456 ↗](https://core.trac.wordpress.org/changeset/45456).
### Identify the problem
The screenshot below shows an example where resources in the Media Library are not rendered correctly and the browser debugging console reveals that the page is throwing an error:
When the page `load-scripts.php` loads, the browser sends a request to Cloudflare for:
```txt
/wp-admin/load-scripts.php?c=0&load%5B%5D=hoverIntent,common,admin-bar,underscore,shortcode,backbone,wp-util,wp-backbone,media-models,wp-plupload,wp-mediaelement,wp-api-r&load%5B%5D=equest,media-views,media-editor,media-audiovideo,mce-view,imgareaselect,image-edit,media-grid,media,svg-painter&ver=5.0.3
```
With Query String Sort enabled, Cloudflare will then sort the parameters and values in the request query string, resulting in the following:
```txt
/wp-admin/load-scripts.php?c=0&load%5B%5D=equest,media-views,media-editor,media-audiovideo,mce-view,imgareaselect,image-edit,media-grid,media,svg-painter&load%5B%5D=hoverIntent,common,admin-bar,underscore,shortcode,backbone,wp-util,wp-backbone,media-models,wp-plupload,wp-mediaelement,wp-api-r&ver=5.0.3
```
Note that the `load[]` parameters were swapped, as `equest` should come before `hoverIntent` when alphabetically ordered.
When this happens, you will most likely find errors in the browser console, such as:
`_____ is not defined at load-scripts.php?c=0&load[]=...`
This type of error indicates that Query String Sort is inadvertently breaking some WordPress admin page functionality.
After sorting, the query then goes to Cloudflare's cache infrastructure (and to the origin server, if the resource is not in the Cloudflare cache or is not cacheable). The origin server then serves the concatenated scripts, which are ordered differently. Because scripts might depend on other scripts, this process might break dependencies.
### Respond to the issue
Start by analyzing your site or application behavior around the use of query strings. Do you have assets served with multiple possible arrangements of query strings?
For example, you might have an image resizing endpoint or a search form, where the order of query parameters might vary - such as width, height, and version - yet a unique parameter combination points to a single relevant asset.
To minimize problems, consider:
* Disabling **Query String Sort** for the site if you’re sure that this feature does not add value to any part of your site. Cloudflare disables this option by default in the **Caching** app.
* Use Cache Rules to enable **Query String Sort** (set **Cache key** \> **Sort query string**: `On`) for URLs where preserving the query string parameter order is not important.
* Alternatively, use Cache Rules to disable **Query String Sort** for URLs where a specific parameter order is required. For example, set **Cache key** \> **Sort query string**: `Off` for URI paths starting with `/wp-admin/load-scripts.php`, or for any URLs with similar requirements.
To learn more about Cache Rules, visit [Cache Rules](https://developers.cloudflare.com/cache/how-to/cache-rules/).
---
## Related resources
* [Increasing Cache Hit Rates with Query String Sort ↗](https://blog.cloudflare.com/increasing-cache-hit-rates-with-query-string-sort/)
* [Best Practice: Caching Everything While Ignoring Query Strings](https://developers.cloudflare.com/cache/how-to/cache-rules/examples/cache-everything-ignore-query-strings/)
Was this helpful?
YesNo
## On this page
[Docs](https://developers.cloudflare.com/)
```json
{"@context":"https://schema.org","@type":"TechArticle","@id":"https://developers.cloudflare.com/cache/advanced-configuration/query-string-sort/#page","headline":"Query String Sort · Cloudflare Cache (CDN) docs","description":"Improve cache hit rates by sorting query string parameters.","url":"https://developers.cloudflare.com/cache/advanced-configuration/query-string-sort/","inLanguage":"en","image":"https://developers.cloudflare.com/og-docs.png","dateModified":"2026-04-16","publisher":{"@type":"Organization","name":"Cloudflare","url":"https://www.cloudflare.com/"},"isPartOf":{"@type":"WebSite","@id":"https://developers.cloudflare.com/#website","name":"Cloudflare Docs","url":"https://developers.cloudflare.com/"},"keywords":["WordPress"]}
```
---
---
description: Serve different cached content based on device type, location, or language.
title: Serving tailored content with Cloudflare
image: https://developers.cloudflare.com/og-docs.png
---
[Skip to content](#main-content)
> Documentation Index
> Fetch the complete documentation index at: https://developers.cloudflare.com/cache/llms.txt
> Use this file to discover all available pages before exploring further.
# Serving tailored content with Cloudflare
Last updated Apr 16, 2026|Copy as Markdown|[View as Markdown](https://developers.cloudflare.com/cache/advanced-configuration/serve-tailored-content/index.md)|[Agent setup](https://developers.cloudflare.com/agent-setup/)
Content negotiation is the practice of serving different versions of a resource from a single URL, tailoring the experience to the end user. Common examples include delivering content in a specific language (`Accept-Language`), optimizing for a device (`User-Agent`), or serving modern image formats (`Accept`).
Cloudflare's global network is designed to handle this at scale. For common scenarios such as serving next-generation images, this negotiation is streamlined with a dedicated feature. For more customized logic, Cloudflare provides a toolkit including Transform Rules, Snippets, Custom Cache Keys, and Workers, giving you granular control to ensure the right content is served to every user, every time.
---
## Use query strings
The [Transform Rule](https://developers.cloudflare.com/rules/transform/) method is ideal when you can create a distinct URL, such as serving content based on a visitor's location.
### Geolocation example
In this example, you run an e-commerce site and want to display prices in the local currency based on the visitor's country.
1. In the Cloudflare dashboard, go to the Rules **Overview** page.
[Go to **Overview** ↗](https://dash.cloudflare.com/?to=/:account/:zone/rules/overview)
2. Select **Create rule** and select the option **URL Rewrite Rule**.
3. Enter a descriptive name, such as `Vary by Country - Canada`.
4. In **If incoming requests match...**, select **Custom filter expression**.
5. Under **When incoming requests match...**, create the following expression:
* **Field:** `Country`
* **Operator:** `equals`
* **Value:** `Canada`
6. Under **Then...**
* for **Path**, select **Preserve**.
* for **Query**, select **Rewrite to**: **Dynamic** `loc=ca`
7. Select **Save**.
Now, requests from Canada to `/products/item` will be transformed to `/products/item?loc=ca` before reaching your origin or the cache, creating a distinct cache entry.
Availability
Free, Pro, Business, and Enterprise plans
---
## Vary for Images
[Vary for Images](https://developers.cloudflare.com/cache/advanced-configuration/vary-for-images/) tells Cloudflare which variants your origin supports. Cloudflare then caches each version separately and serves the correct one to browsers without contacting your origin each time. This feature is managed via the Cloudflare API.
### Enable Vary for Images
To enable this feature, create a _variants rule_ using the API. This rule maps file extensions to the image formats your origin can serve.
For example, the following API call tells Cloudflare that for `.jpeg` and `.jpg` files, your origin can serve `image/webp` and `image/avif` variants:
Required API token permissions
At least one of the following [token permissions](https://developers.cloudflare.com/fundamentals/api/reference/permissions/) is required:
* `Zone Settings Write`
* `Zone Write`
```bash
curl "https://api.cloudflare.com/client/v4/zones/$ZONE_ID/cache/variants" \
--request PATCH \
--header "Authorization: Bearer $CLOUDFLARE_API_TOKEN" \
--json '{
"value": {
"jpeg": [
"image/webp",
"image/avif"
],
"jpg": [
"image/webp",
"image/avif"
]
}
}'
```
After creating the rule, Cloudflare will create distinct cache entries for each image variant, improving performance for users with modern browsers.
Availability
Pro, Business, and Enterprise plans
## Use Snippets for programmatic caching
[Snippets](https://developers.cloudflare.com/rules/snippets/) are self-contained JavaScript fetch handlers that run at the edge on your requests through Cloudflare. They allow you to programmatically interact with the cache, providing full control over the cache key and response behavior without changing the user-facing URL.
### Example: A/B testing
In this example, you run an A/B test controlled by a cookie named `ab-test` (with values `group-a` or `group-b`). You want to cache a different version of the page for each group.
1. In the Cloudflare dashboard, go to the **Snippets** page.
[Go to **Snippets** ↗](https://dash.cloudflare.com/?to=/:account/:zone/rules/snippets)
2. Select **Create new Snippet** and name it `ab-test-caching`.
3. Paste the following code. It modifies the cache key based on the `ab-test` cookie and caches the response for 30 days.
```js
const CACHE_DURATION = 30 * 24 * 60 * 60; // 30 days
export default {
async fetch(request) {
// Construct a new URL for the cache key based on the A/B cookie
const abCookie = request.headers.get('Cookie')?.match(/ab-test=([^;]+)/)?.[1] || 'control';
const url = new URL(request.url);
url.pathname = `/ab-test/${abCookie}${url.pathname}`;
const cacheKey = new Request(url, request);
const cache = caches.default;
let response = await cache.match(cacheKey);
if (!response) {
// If not in cache, fetch from origin
response = await fetch(request);
response = new Response(response.body, response);
response.headers.set("Cache-Control", `s-maxage=${CACHE_DURATION}`);
// Put the response into cache with the custom key
await cache.put(cacheKey, response.clone());
}
return response;
},
};
```
1. Save and deploy the Snippet.
2. From the Snippets dashboard, select **Attach to routes** to assign the Snippet.
Availability
Pro, Business, and Enterprise plans
## Custom Cache Keys (Enterprise)
If your account is on an Enterprise plan, the [Custom Cache Keys](https://developers.cloudflare.com/cache/how-to/cache-keys) feature provides a no-code interface to define which request properties are included in the cache key.
Custom Cache Key options:
* Cache by device type
* Query string option `No query string parameters except`
* Include headers and values
* Include cookie names and values
* User: Device type, Country, Language
### Example: Same URL, different content
If your origin serves different content types (for example, `application/json` vs. `text/html`) at the same URL based on the `Accept` header, use a custom cache key to cache them separately.
1. In the Cloudflare dashboard, go to the **Cache Rules** page.
[Go to **Cache Rules** ↗](https://dash.cloudflare.com/?to=/:account/:zone/caching/cache-rules)
2. Select **Create rule**.
3. Enter rule name, such as `Vary by Accept Header`.
4. Set the condition for the rule to apply (for example, a specific hostname or path).
5. Under **Cache key**, select **Use custom key**.
6. Select **Add new**.
* **Type**: `Header`
* **Name**: `Accept`
* **Value**: Add each `value`, or leave empty for all.
7. Select **Deploy**.
This configuration creates separate cache entries based on the `Accept` header value, respecting your API's content negotiation.
Availability
Enterprise plans only
## Use Cloudflare Workers for advanced logic
For complex caching scenarios, [Cloudflare Workers](https://developers.cloudflare.com/cache/interaction-cloudflare-products/workers/) provide a full serverless environment ideal for custom logic at scale.
### Example: Device type – Free/Pro/Biz (without Tiered Cache)
This Worker detects whether a visitor is on a mobile or desktop device and creates separate cache entries for each, ensuring the correct version of the site is served and cached.
```js
export default {
async fetch(request, env, ctx) {
const userAgent = request.headers.get('User-Agent') || '';
const deviceType = userAgent.includes('Mobile') ? 'mobile' : 'desktop';
// Create a new URL for the cache key that includes the device type
const url = new URL(request.url);
url.pathname = `/${deviceType}${url.pathname}`;
const cacheKey = new Request(url, request);
const cache = caches.default;
let response = await cache.match(cacheKey);
if (!response) {
console.log(`Cache miss for ${deviceType} device. Fetching from origin.`);
response = await fetch(request);
let responseToCache = response.clone();
ctx.waitUntil(cache.put(cacheKey, responseToCache));
}
return response;
},
};
```
Availability
Free and Paid plans
### Example: Device type – Enterprise (with Tiered Cache)
This Worker detects if a visitor is on a mobile device or a desktop and creates a separate cache entry for each, ensuring the correct version of the site is served and cached. Uses the Enterprise `cf.customCacheKey` feature.
```js
export default {
async fetch(request) {
// 1. Determine the device type from the User-Agent header
const userAgent = request.headers.get('User-Agent') || '';
const deviceType = userAgent.includes('Mobile') ? 'mobile' : 'desktop';
// 2. Create a custom cache key by appending the device type to the URL
const customCacheKey = `${request.url}-${deviceType}`;
// 3. Fetch the response. Cloudflare's cache automatically uses the
// customCacheKey for cache operations (match, put).
const response = await fetch(request, {
cf: {
cacheKey: customCacheKey,
},
});
// Optionally, you can modify the response before returning it
// For example, add a header to indicate which cache key was used
const newResponse = new Response(response.body, response);
newResponse.headers.set("X-Cache-Key", customCacheKey);
return newResponse;
},
};
```
Availability
Enterprise only
## Example: Caching Next.js RSC payloads
A common challenge is caching content from frameworks like Next.js, which uses an `RSC` (React Server Components) request header to differentiate between HTML page loads and RSC data payloads for the same URL. Here are the best ways to handle this.
### Method 1: Transform Rules
The simplest solution is to create a [Transform Rule](https://developers.cloudflare.com/rules/transform/) that checks for the `RSC` header and adds a unique query parameter on the request, creating two distinct cacheable URLs: `/page` (for HTML) and `/page?_rsc=1` (for the RSC payload).
1. In the Cloudflare dashboard, go to the Rules **Overview** page.
[Go to **Overview** ↗](https://dash.cloudflare.com/?to=/:account/:zone/rules/overview)
2. Select **Create rule** and select the option **URL Rewrite Rule**.
3. Enter a name, such as `Vary by RSC Header`.
4. In **If incoming requests match**, select **Custom filter expression**.
5. Under **When incoming requests match**, manually edit the expression so that it checks for the presence of the `RSC` header:
* `has_key(http.request.headers, "rsc")`
6. Under **Then**:
* For **Path**, select **Preserve**.
* For **Query**, select **Rewrite to**, select **Static**: `_rsc=1`.
7. Select **Save**.
### Method 2: Snippets or Custom Cache Keys
Alternatively, use [Snippets](https://developers.cloudflare.com/rules/snippets/) or [Custom Cache Keys](https://developers.cloudflare.com/cache/how-to/cache-keys) to add the `RSC` header directly to the cache key without modifying the visible URL. This provides a cleaner URL but requires more advanced configuration.
Availability
* Snippets: Pro, Business, Enterprise
* Custom Cache Keys: Enterprise only
Was this helpful?
YesNo
## On this page
[Docs](https://developers.cloudflare.com/)
```json
{"@context":"https://schema.org","@type":"TechArticle","@id":"https://developers.cloudflare.com/cache/advanced-configuration/serve-tailored-content/#page","headline":"Serving tailored content with Cloudflare · Cloudflare Cache (CDN) docs","description":"Serve different cached content based on device type, location, or language.","url":"https://developers.cloudflare.com/cache/advanced-configuration/serve-tailored-content/","inLanguage":"en","image":"https://developers.cloudflare.com/og-docs.png","dateModified":"2026-04-16","publisher":{"@type":"Organization","name":"Cloudflare","url":"https://www.cloudflare.com/"},"isPartOf":{"@type":"WebSite","@id":"https://developers.cloudflare.com/#website","name":"Cloudflare Docs","url":"https://developers.cloudflare.com/"},"keywords":["JavaScript","A/B testing","Geolocation","Next.js"]}
```
---
---
description: Serve images in the best format for each visitor browser.
title: Vary for images
image: https://developers.cloudflare.com/og-docs.png
---
[Skip to content](#main-content)
> Documentation Index
> Fetch the complete documentation index at: https://developers.cloudflare.com/cache/llms.txt
> Use this file to discover all available pages before exploring further.
# Vary for images
Last updated May 5, 2026|Copy as Markdown|[View as Markdown](https://developers.cloudflare.com/cache/advanced-configuration/vary-for-images/index.md)|[Agent setup](https://developers.cloudflare.com/agent-setup/)
The `Vary` HTTP response header tells Cloudflare that an origin can serve different versions of the same resource depending on the request headers. For images, this allows your origin to serve modern formats like WebP or AVIF to browsers that support them, while continuing to serve JPEG or PNG to others.
When Cloudflare receives a response with image variants, it caches each variant separately. Subsequent requests from browsers with the same image format preferences are served directly from cache without contacting your origin.
Vary for Images works by parsing the `Accept` header in each request to determine which image format the browser supports, then serving the matching cached variant.
Vary for images is available for Pro, Business, and Enterprise customers.
## Availability
| | Free | Pro | Business | Enterprise |
| ------------ | ---- | --- | -------- | ---------- |
| Availability | No | Yes | Yes | Yes |
## File extensions
You can use vary for images on the file extensions below if the origin server sends the `Vary: Accept` response header. If the origin server sends `Vary: Accept` but does not serve the set variant, the response is not cached and displays `BYPASS` in the cache status in the response header. Additionally, the list of variant types the origin serves for each extension must be configured so that Cloudflare decides which variant to serve without contacting the origin server.
File extensions enabled for varying
* .avif
* .bmp
* .gif
* .jpg
* .jpeg
* .jp2
* .png
* .tif
* .tiff
* .webp
## Enable vary for images
Vary for Images is enabled through Cloudflare's API by creating a variants rule. In the examples below, learn how to serve JPEG, WebP, and AVIF variants for `.jpeg` and `.jpg` extensions.
### Create a variants rule
Required API token permissions
At least one of the following [token permissions](https://developers.cloudflare.com/fundamentals/api/reference/permissions/) is required:
* `Zone Settings Write`
* `Zone Write`
```bash
curl "https://api.cloudflare.com/client/v4/zones/$ZONE_ID/cache/variants" \
--request PATCH \
--header "Authorization: Bearer $CLOUDFLARE_API_TOKEN" \
--json '{
"value": {
"jpeg": [
"image/webp",
"image/avif"
],
"jpg": [
"image/webp",
"image/avif"
]
}
}'
```
### Modify to only allow WebP variants
Required API token permissions
At least one of the following [token permissions](https://developers.cloudflare.com/fundamentals/api/reference/permissions/) is required:
* `Zone Settings Write`
* `Zone Write`
```bash
curl "https://api.cloudflare.com/client/v4/zones/$ZONE_ID/cache/variants" \
--request PATCH \
--header "Authorization: Bearer $CLOUDFLARE_API_TOKEN" \
--json '{
"value": {
"jpeg": [
"image/webp"
],
"jpg": [
"image/webp"
]
}
}'
```
### Delete the rule
Required API token permissions
At least one of the following [token permissions](https://developers.cloudflare.com/fundamentals/api/reference/permissions/) is required:
* `Zone Settings Write`
* `Zone Write`
```bash
curl "https://api.cloudflare.com/client/v4/zones/$ZONE_ID/cache/variants" \
--request DELETE \
--header "Authorization: Bearer $CLOUDFLARE_API_TOKEN"
```
### Get the rule
Required API token permissions
At least one of the following [token permissions](https://developers.cloudflare.com/fundamentals/api/reference/permissions/) is required:
* `Zone Settings Write`
* `Zone Settings Read`
* `Zone Read`
* `Zone Write`
```bash
curl "https://api.cloudflare.com/client/v4/zones/$ZONE_ID/cache/variants" \
--request GET \
--header "Authorization: Bearer $CLOUDFLARE_API_TOKEN"
```
To learn more about purging varied images, refer to [Purge varied images](https://developers.cloudflare.com/cache/how-to/purge-cache/purge-varied-images/).
## Limitations
* For Vary for images to work, your image URLs must include the file extension in the path and not the query string. For example the URL `https://example.com/image.jpg` is compatible but `https://example.com/index.php?file=image.jpg` is not compatible.
* Your origin must return an image type matching the file extension in the URL when a HTTP client sends no `Accept` header, or an `Accept: */*` header. Otherwise, you will see `CF-Cache-Status: BYPASS` in the HTTP response headers.
Was this helpful?
YesNo
## On this page
[Docs](https://developers.cloudflare.com/)
```json
{"@context":"https://schema.org","@type":"TechArticle","@id":"https://developers.cloudflare.com/cache/advanced-configuration/vary-for-images/#page","headline":"Vary for images · Cloudflare Cache (CDN) docs","description":"Serve images in the best format for each visitor browser.","url":"https://developers.cloudflare.com/cache/advanced-configuration/vary-for-images/","inLanguage":"en","image":"https://developers.cloudflare.com/og-docs.png","dateModified":"2026-05-05","publisher":{"@type":"Organization","name":"Cloudflare","url":"https://www.cloudflare.com/"},"isPartOf":{"@type":"WebSite","@id":"https://developers.cloudflare.com/#website","name":"Cloudflare Docs","url":"https://developers.cloudflare.com/"}}
```
---
---
description: Protect your site from web cache poisoning attacks.
title: Avoid web cache poisoning
image: https://developers.cloudflare.com/og-docs.png
---
[Skip to content](#main-content)
> Documentation Index
> Fetch the complete documentation index at: https://developers.cloudflare.com/cache/llms.txt
> Use this file to discover all available pages before exploring further.
# Avoid web cache poisoning
Last updated May 6, 2026|Copy as Markdown|[View as Markdown](https://developers.cloudflare.com/cache/cache-security/avoid-web-poisoning/index.md)|[Agent setup](https://developers.cloudflare.com/agent-setup/)
A cache poisoning attack uses an HTTP request to trick an origin web server into responding with a harmful resource that has the same cache key as a clean request. As a result, the poisoned resource gets cached and served to other users.
A Content Delivery Network (CDN) like Cloudflare relies on cache keys to compare new requests against cached resources. The CDN then determines whether the resource should be served from the cache or requested directly from the origin web server.
## Learn about Cache Poisoning
To deepen your understanding of the risks and vulnerabilities associated with cache poisoning, consult the following resources:
* [Practical Web Cache Poisoning ↗](https://portswigger.net/blog/practical-web-cache-poisoning)
* [How Cloudflare protects customers from cache poisoning ↗](https://blog.cloudflare.com/cache-poisoning-protection/)
## Only cache files that are truly static
Review the caching configuration for your origin web server and ensure you are caching files that are static and do not depend on user input in any way. To learn more about Cloudflare caching, review:
* [Which file extensions does Cloudflare cache for static content?](https://developers.cloudflare.com/cache/concepts/default-cache-behavior/)
* [How Do I Tell Cloudflare What to Cache?](https://developers.cloudflare.com/cache/how-to/cache-rules/)
## Do not trust data in HTTP headers
Attackers can exploit HTTP headers to inject malicious content into cached responses. For example, if your application reflects an untrusted header value in the response body, an attacker could use this to perform cross-site scripting (XSS) through the cache. To reduce this risk:
* Do not rely on values in HTTP headers if they are not part of your [cache key](https://developers.cloudflare.com/cache/how-to/cache-keys/).
* Do not include untrusted header values in your response body.
## Do not trust GET request bodies
Cloudflare caches contents of GET request bodies, but they are not included in the cache key. GET request bodies should be considered untrusted and should not modify the contents of a response. If a GET body can change the contents of a response, consider bypassing cache or using a POST request.
## Monitor web security advisories
To keep informed about Internet security threats, Cloudflare recommends that you monitor web security advisories on a regular basis. Some of the more popular advisories include:
* [Drupal Security Advisories ↗](https://www.drupal.org/security)
* [Symfony Security Advisories ↗](https://symfony.com/blog/category/security-advisories)
* [Laminas Security Advisories ↗](https://getlaminas.org/security/advisories)
Was this helpful?
YesNo
## On this page
[Docs](https://developers.cloudflare.com/)
```json
{"@context":"https://schema.org","@type":"TechArticle","@id":"https://developers.cloudflare.com/cache/cache-security/avoid-web-poisoning/#page","headline":"Avoid Web Cache Poisoning · Cloudflare Cache (CDN) docs","description":"Protect your site from web cache poisoning attacks.","url":"https://developers.cloudflare.com/cache/cache-security/avoid-web-poisoning/","inLanguage":"en","image":"https://developers.cloudflare.com/og-docs.png","dateModified":"2026-05-06","publisher":{"@type":"Organization","name":"Cloudflare","url":"https://www.cloudflare.com/"},"isPartOf":{"@type":"WebSite","@id":"https://developers.cloudflare.com/#website","name":"Cloudflare Docs","url":"https://developers.cloudflare.com/"},"keywords":["Security"]}
```
---
---
description: Prevent cache deception attacks that expose private content.
title: Cache Deception Armor
image: https://developers.cloudflare.com/og-docs.png
---
[Skip to content](#main-content)
> Documentation Index
> Fetch the complete documentation index at: https://developers.cloudflare.com/cache/llms.txt
> Use this file to discover all available pages before exploring further.
# Cache Deception Armor
Last updated May 6, 2026|Copy as Markdown|[View as Markdown](https://developers.cloudflare.com/cache/cache-security/cache-deception-armor/index.md)|[Agent setup](https://developers.cloudflare.com/agent-setup/)
## Web Cache Deception attacks
A Web Cache Deception attack tricks a user into visiting a URL that appears to point to a static asset but actually returns dynamic, personalized content from the origin.
This attack works when an origin treats requests to non-existent paths as equivalent to a parent path — for example, when `http://www.example.com/newsfeed` is a dynamic page that returns different content for each authenticated user, and the origin also serves that same response for `/newsfeed/foo.jpg`. Because the path ends in `.jpg`, Cloudflare caches the response by default. The attacker then visits the same URL and receives the cached copy of the user's personalized content.
## Cache Deception Armor protects against attacks
You can protect users from Web Cache Deception attacks by [creating a cache rule](https://developers.cloudflare.com/cache/cache-security/cache-deception-armor/#enable-cache-deception-armor). With this rule, you can continue to cache static assets, but the rule will verify a URL's extension matches the returned `Content-Type`.
In the newsfeed example above, if `http://www.example.com/newsfeed` is a script that outputs a webpage, the `Content-Type` is `text/html`. On the other hand, `http://www.example.com/newsfeed/foo.jpg` is expected to have `image/jpeg` as `Content-Type`. When a mismatch that could result in a Web Cache Deception attack is found, Cloudflare does not cache the response.
### Exceptions
* If the returned `Content-Type` is `application/octet-stream`, the extension does not matter because that is typically a signal to instruct the browser to save the asset instead of to display it.
* Cloudflare allows `.jpg` to be served as `image/webp` or `.gif` as `video/webm` and other cases that are unlikely to be attacks.
* Keep in mind that Cache Deception Armor depends upon [Origin Cache Control](https://developers.cloudflare.com/cache/concepts/cache-control/). A `Cache-Control` header from the origin, or an [Edge Cache TTL Cache Rule](https://developers.cloudflare.com/cache/how-to/cache-rules/settings/#edge-ttl) may override the protection.
## Enable Cache Deception Armor
To enable Cache Deception Armor, you need to start by creating a [cache rule](https://developers.cloudflare.com/cache/how-to/cache-rules/). Follow the steps below for guidance:
1. In the Cloudflare dashboard, go to the **Cache Rules** page.
[Go to **Cache Rules** ↗](https://dash.cloudflare.com/?to=/:account/:zone/caching/cache-rules)
2. Select **Create rule**.
3. Under **When incoming requests match**, define the [rule expression](https://developers.cloudflare.com/ruleset-engine/rules-language/expressions/edit-expressions/#expression-builder).
4. Under **Then**, in the **Cache eligibility** section, select **Eligible for cache**.
5. Add the **Cache Key** setting to the rule and turn on **Cache deception armor**.
6. To save and deploy your rule, select **Deploy**. If you are not ready to deploy your rule, select **Save as Draft**.
Was this helpful?
YesNo
## On this page
[Docs](https://developers.cloudflare.com/)
```json
{"@context":"https://schema.org","@type":"TechArticle","@id":"https://developers.cloudflare.com/cache/cache-security/cache-deception-armor/#page","headline":"Cache Deception Armor · Cloudflare Cache (CDN) docs","description":"Prevent cache deception attacks that expose private content.","url":"https://developers.cloudflare.com/cache/cache-security/cache-deception-armor/","inLanguage":"en","image":"https://developers.cloudflare.com/og-docs.png","dateModified":"2026-05-06","publisher":{"@type":"Organization","name":"Cloudflare","url":"https://www.cloudflare.com/"},"isPartOf":{"@type":"WebSite","@id":"https://developers.cloudflare.com/#website","name":"Cloudflare Docs","url":"https://developers.cloudflare.com/"},"keywords":["Security"]}
```
---
---
description: How Cloudflare handles CORS headers and cross-origin resource caching.
title: Cross-Origin Resource Sharing (CORS)
image: https://developers.cloudflare.com/og-docs.png
---
[Skip to content](#main-content)
> Documentation Index
> Fetch the complete documentation index at: https://developers.cloudflare.com/cache/llms.txt
> Use this file to discover all available pages before exploring further.
# Cross-Origin Resource Sharing (CORS)
Last updated May 6, 2026|Copy as Markdown|[View as Markdown](https://developers.cloudflare.com/cache/cache-security/cors/index.md)|[Agent setup](https://developers.cloudflare.com/agent-setup/)
A cross-origin request occurs when a webpage on one origin (for example, `a.example.com`) requests a resource from a different origin (for example, `b.secondexample.com`). Cross-Origin Resource Sharing (CORS) is a mechanism that uses HTTP headers to let the server at `b.secondexample.com` indicate whether `a.example.com` is allowed to access its resources. Browsers enforce these headers and block access to responses that are not permitted.
Cloudflare supports CORS by:
* Identifying cached assets based on the `Host` Header, `Origin` Header, URL path, and query. This allows different resources to use the same `Host` header but different `Origin` headers.
* Passing `Access-Control-Allow-Origin` headers from the origin server to the browser.
The `Access-Control-Allow-Origin` header lets a server specify rules for sharing its resources with external origins. A server may respond with different `Access-Control-Allow-Origin` values depending on the `Origin` header in the request. These headers are often present on [cacheable content](https://developers.cloudflare.com/cache/concepts/default-cache-behavior/).
## Add or change CORS headers at the origin server
If you add or change CORS configuration at your origin web server, purging the Cloudflare cache by URL does not update the CORS headers. Force Cloudflare to retrieve the new CORS headers via one of the following options:
* Change the filename or URL to bypass cache to instruct Cloudflare to retrieve the latest CORS headers.
* Use the [single-file purge API](https://developers.cloudflare.com/api/resources/cache/methods/purge/#purge-cached-content-by-url) to specify the appropriate CORS headers along with the purge request.
* Update the resource’s last-modified time at your origin web server. Then, complete a [full purge](https://developers.cloudflare.com/cache/how-to/purge-cache/purge-everything/) to retrieve the latest version of your assets including updated CORS headers.
## Add or change CORS headers on Cloudflare
You can use one of following methods to set CORS headers using Cloudflare products:
* Use a [Worker](https://developers.cloudflare.com/workers/): Refer to [CORS header proxy](https://developers.cloudflare.com/workers/examples/cors-header-proxy/) for an example.
* Configure a [Snippet](https://developers.cloudflare.com/rules/snippets/): Refer to [Define CORS headers](https://developers.cloudflare.com/rules/snippets/examples/define-cors-headers/) for an example.
* Use [Transform Rules](https://developers.cloudflare.com/rules/transform/): Refer to [Add a wildcard CORS response header](https://developers.cloudflare.com/rules/transform/examples/add-cors-header/) for an example.
Was this helpful?
YesNo
## On this page
[Docs](https://developers.cloudflare.com/)
```json
{"@context":"https://schema.org","@type":"TechArticle","@id":"https://developers.cloudflare.com/cache/cache-security/cors/#page","headline":"Cross-Origin Resource Sharing (CORS) · Cloudflare Cache (CDN) docs","description":"How Cloudflare handles CORS headers and cross-origin resource caching.","url":"https://developers.cloudflare.com/cache/cache-security/cors/","inLanguage":"en","image":"https://developers.cloudflare.com/og-docs.png","dateModified":"2026-05-06","publisher":{"@type":"Organization","name":"Cloudflare","url":"https://www.cloudflare.com/"},"isPartOf":{"@type":"WebSite","@id":"https://developers.cloudflare.com/#website","name":"Cloudflare Docs","url":"https://developers.cloudflare.com/"},"keywords":["CORS"]}
```
---
---
description: How Cloudflare handles HEAD requests and Set-Cookie headers.
title: Head Requests and Set-Cookie Headers
image: https://developers.cloudflare.com/og-docs.png
---
[Skip to content](#main-content)
> Documentation Index
> Fetch the complete documentation index at: https://developers.cloudflare.com/cache/llms.txt
> Use this file to discover all available pages before exploring further.
# Head Requests and Set-Cookie Headers
Last updated May 6, 2026|Copy as Markdown|[View as Markdown](https://developers.cloudflare.com/cache/concepts/cache-behavior/index.md)|[Agent setup](https://developers.cloudflare.com/agent-setup/)
This page describes how Cloudflare's cache system behaves in interaction with:
* `HEAD` requests
* `Set-Cookie` response headers
## Interaction of `HEAD` requests with Cache
Cloudflare converts `HEAD` requests to `GET` requests for [cacheable requests](https://developers.cloudflare.com/cache/concepts/default-cache-behavior/#default-cached-file-extensions).
When you make a `HEAD` request for a cacheable resource and Cloudflare does not have that resource in the edge cache, a cache miss happens. Cloudflare will send a `GET` request to your origin, cache the full response and return the response headers only. Make sure the origin server is set up to handle `GET` requests, even if only `HEAD` requests are expected, so that compatibility with this behavior is ensured.
## Interaction of `Set-Cookie` response header with Cache
For non-cacheable requests, `Set-Cookie` is always preserved. For cacheable requests, there are three possible behaviors:
* `Set-Cookie` is returned from origin and the default cache level is used. If [origin cache control](https://developers.cloudflare.com/cache/concepts/cache-control/) is not enabled, Cloudflare removes the `Set-Cookie` and caches the asset. If origin cache control is enabled, Cloudflare does not cache the asset and preserves the `Set-Cookie`. A cache status of `BYPASS` is returned.
* `Set-Cookie` is returned from origin and the cache level is set to `Cache Everything` in Page Rules, or `Eligible for cache` in Cache Rules. In this case, Cloudflare preserves the `Set-Cookie` but does not cache the asset. A cache `MISS` will be returned every time.
* `Set-Cookie` is returned from origin, the cache level is set to `Cache Everything` in Page Rules, or `Eligible for cache` in Cache Rules, and edge cache TTL is explicitly set using either the "Ignore cache-control header and use this TTL" or "Status code TTL" setting. In this case, Cloudflare removes the `Set-Cookie` and the asset is cached.
Was this helpful?
YesNo
## On this page
[Docs](https://developers.cloudflare.com/)
```json
{"@context":"https://schema.org","@type":"TechArticle","@id":"https://developers.cloudflare.com/cache/concepts/cache-behavior/#page","headline":"Head Requests and Set-Cookie Headers · Cloudflare Cache (CDN) docs","description":"How Cloudflare handles HEAD requests and Set-Cookie headers.","url":"https://developers.cloudflare.com/cache/concepts/cache-behavior/","inLanguage":"en","image":"https://developers.cloudflare.com/og-docs.png","dateModified":"2026-05-06","publisher":{"@type":"Organization","name":"Cloudflare","url":"https://www.cloudflare.com/"},"isPartOf":{"@type":"WebSite","@id":"https://developers.cloudflare.com/#website","name":"Cloudflare Docs","url":"https://developers.cloudflare.com/"},"keywords":["Headers","Cookies"]}
```
---
---
description: How origin Cache-Control headers affect Cloudflare caching behavior.
title: Origin Cache Control
image: https://developers.cloudflare.com/og-docs.png
---
[Skip to content](#main-content)
> Documentation Index
> Fetch the complete documentation index at: https://developers.cloudflare.com/cache/llms.txt
> Use this file to discover all available pages before exploring further.
# Origin Cache Control
Last updated Jun 30, 2026|Copy as Markdown|[View as Markdown](https://developers.cloudflare.com/cache/concepts/cache-control/index.md)|[Agent setup](https://developers.cloudflare.com/agent-setup/)
Origin Cache Control is a Cloudflare feature. When enabled on an Enterprise customer's website, it indicates that Cloudflare should strictly respect `Cache-Control` directives received from the origin server. Free, Pro and Business customers have this feature enabled by default.
`Cache-Control` directives in the HTTP response from your origin server provide specific [caching instructions ↗](https://datatracker.ietf.org/doc/html/rfc7234) to intermediary services like Cloudflare.
With the Origin Cache Control feature enabled, `Cache-Control` directives present in the origin server's response will be followed as specified. For example, if the response includes a `max-age` directive of 3,600 seconds, Cloudflare will cache the resource for that duration before checking the origin server again for updates.
Cloudflare's [Cache Rules](https://developers.cloudflare.com/cache/how-to/cache-rules/) allows users to either augment or override an origin server's `Cache-Control` headers or [default policies](https://developers.cloudflare.com/cache/concepts/default-cache-behavior/) set by Cloudflare.
The following sections cover:
* The most common `Cache-Control` directives.
* How to enable Origin Cache Control.
* How Origin Cache Control behaves with `Cache-Control` directives.
* How other Cloudflare products interact with `Cache-Control` directives.
## `Cache-control` directives
A `Cache-Control` header can include a number of directives, and the directive dictates who can cache a resource along with how long those resources can be cached before they must be updated.
Note
For more information about `Cache-Control` directives at origin servers, refer to the [Mozilla Cache-Control documentation ↗](https://developer.mozilla.org/en-US/docs/Web/HTTP/Reference/Headers/Cache-Control).
If multiple directives are passed together, each directive is separated by a comma. If the directive takes an argument, it follows the directive separated by an equal sign. For example: `max-age=86400`.
Directives can be broken down into four groups: [cacheability](https://developers.cloudflare.com/cache/concepts/cache-control/#cacheability), [expiration](https://developers.cloudflare.com/cache/concepts/cache-control/#expiration), [revalidation](https://developers.cloudflare.com/cache/concepts/cache-control/#revalidation), and [other](https://developers.cloudflare.com/cache/concepts/cache-control/#other).
### Cacheability
Cacheability refers to whether or not a resource should enter a cache, and the directives below indicate a resource's cacheability.
* `public` — Indicates any cache may store the response, even if the response is normally non-cacheable or cacheable only within a private cache.
* `private` — Indicates the response message is intended for a single user, such as a browser cache, and must not be stored by a shared cache like Cloudflare or a corporate proxy.
* `no-store` — Indicates any cache, such as a client or proxy cache, must not store any part of either the immediate request or response.
### Expiration
Expiration refers to how long a resource should remain in the cache, and the directives below affect how long a resource stays in the cache.
Note
Cloudflare respects whichever value is higher: the [Browser Cache TTL](https://developers.cloudflare.com/cache/how-to/edge-browser-cache-ttl/) in Cloudflare or the `max-age` header. You can also simultaneously specify a Cloudflare Edge Cache TTL different than a Browser's Cache TTL respectively via the `s-maxage` and `max-age` `Cache-Control` headers.
When using Origin Cache Control and setting `max-age=0`, Cloudflare prefers to cache and revalidate. With Origin Cache Control off and `max-age=0`, Cloudflare will bypass cache.
When setting `no-cache` with Origin Cache Control off, Cloudflare does not cache. When setting `no-cache` with Origin Cache Control on, Cloudflare caches and always revalidates.
* `max-age=seconds` — Indicates the response is stale after its age is greater than the specified number of seconds. Age is defined as the time in seconds since the asset was served from the origin server. The `seconds` argument is an unquoted integer.
* `s-maxage=seconds` — Indicates that in shared caches, the maximum age specified by this directive overrides the maximum age specified by either the `max-age` directive or the `Expires` header field. The `s-maxage` directive also implies the semantics of the `proxy-revalidate` response directive. Browsers ignore `s-maxage`.
\`s-maxage\` disables \`stale-while-revalidate\`
Per [RFC 9111 ↗](https://www.rfc-editor.org/rfc/rfc9111.html#section-5.2.2.10-4), `s-maxage` incorporates the semantics of `proxy-revalidate`, which means a shared cache must not serve stale content without first revalidating with the origin. For a complete list of directives that disable `stale-while-revalidate` and workarounds, refer to [Controlling stale behavior](https://developers.cloudflare.com/cache/concepts/revalidation/#controlling-stale-behavior).
* `no-cache` — Indicates the response cannot be used to satisfy a subsequent request without successful validation on the origin server. This allows an origin server to prevent a cache from using the origin to satisfy a request without contacting it, even by caches that have been configured to send stale responses.
Ensure the HTTP `Expires` header is set in your origin server to use Greenwich Mean Time (GMT) as stipulated in [RFC 2616 ↗](https://www.w3.org/Protocols/rfc2616/rfc2616-sec3.html#sec3.3 "3.3.1 Full Date").
### Revalidation
Revalidation determines how the cache should behave when a resource expires, and the directives below affect the revalidation behavior.
* `must-revalidate` — Indicates that once the resource is stale, a cache (client or proxy) must not use the response to satisfy subsequent requests without successful validation on the origin server.
* `proxy-revalidate` — Has the same meaning as the `must-revalidate` response directive except that it does not apply to private client caches.
* `stale-while-revalidate=` — When present in an HTTP response, indicates caches may serve the response in which it appears after it becomes stale, up to the indicated number of seconds since the resource expired. If [Always Online](https://developers.cloudflare.com/cache/how-to/always-online/) is enabled, then the `stale-while-revalidate` and `stale-if-error` directives are ignored. This directive is not supported when using the Cache API methods `cache.match` or `cache.put`. For more information, refer to the [Workers documentation for Cache API](https://developers.cloudflare.com/workers/runtime-apis/cache/#methods).
Note
`stale-while-revalidate` is now fully asynchronous. The first request after expiry triggers revalidation in the background and immediately receives stale content with an UPDATING status instead of blocking. All requests during revalidation are served stale with an UPDATING status until the origin responds, after which they receive a HIT.
For more details, refer to [Revalidation](https://developers.cloudflare.com/cache/concepts/revalidation/#asynchronous-revalidation).
* `stale-if-error=` — Indicates that when an error is encountered, a cached stale response may be used to satisfy the request, regardless of other freshness information. To avoid this behavior, include `stale-if-error=0` directive with the object returned from the origin. This directive is not supported when using the Cache API methods `cache.match` or `cache.put`. For more information, refer to the [Workers documentation for Cache API](https://developers.cloudflare.com/workers/runtime-apis/cache/#methods).
Error status codes
The `stale-if-error` directive triggers when your origin returns a `5xx` status code (`500`, `502`, `503`, `504`). Other responses such as `404` are not considered errors for this purpose — the origin response replaces the stale cached content. There is currently no way to customize which status codes trigger `stale-if-error`.
The `stale-if-error` directive is ignored if [Always Online](https://developers.cloudflare.com/cache/how-to/always-online/) is enabled or if an explicit in-protocol directive is passed. Examples of explicit in-protocol directives include a `no-store` or `no-cache cache` directive, a `must-revalidate` cache-response-directive, or an applicable `s-maxage` or `proxy-revalidate` cache-response-directive.
### Other
Additional directives that influence cache behavior are listed below.
* `no-transform` — Indicates that an intermediary — regardless of whether it implements a cache — must not transform the payload.
* `vary` — By default, Cloudflare does not consider vary values in caching decisions. Vary values are respected when you configure the [Cache Rules Vary setting](https://developers.cloudflare.com/cache/concepts/vary/), when [Vary for images](https://developers.cloudflare.com/cache/advanced-configuration/vary-for-images/) is configured, and when the vary header is [vary: accept-encoding](https://developers.cloudflare.com/speed/optimization/content/compression/).
* `immutable` — Indicates to clients the response body does not change over time. The resource, if unexpired, is unchanged on the server. The user should not send a conditional revalidation request, such as `If-None-Match` or `If-Modified-Since`, to check for updates, even when the user explicitly refreshes the page. This directive has no effect on public caches like Cloudflare, but does change browser behavior.
### Understand `no-store` and `no-cache` directives
There is often confusion between the directives `Cache-Control: no-store` and `Cache-Control: no-cache`, particularly regarding how they impact browser caching and features like the [Back-Forward Cache ↗](https://developer.mozilla.org/en-US/docs/Glossary/bfcache) (BFCache).
#### `no-store`
* Tells both browsers and intermediaries (like CDNs) not to store a copy of the response under any circumstance.
* The response is never written to disk or memory, which means the browser must fetch it again every time.
* In many browsers, `no-store` disables BFCache, because restoring a page from BFCache requires the browser to keep a copy of the page's memory state, which contradicts the “do not store” directive.
* This directive is used for highly sensitive or dynamic data (for example, banking apps, personal information, secure dashboards).
#### `no-cache`
* Allows storing of the response (in both browser and intermediate caches), but requires revalidation with the origin server before using it.
* This ensures the content is always up-to-date, while still potentially allowing BFCache or other forms of performance optimization.
* This directive is used for data that changes frequently but is not sensitive, and can be served faster if validated rather than re-downloaded.
For more information about how these directives behave when Origin Cache Control is enabled or disabled refer to the [Directives](https://developers.cloudflare.com/cache/concepts/cache-control/#directives) section.
## Enable Origin Cache Control
If you enable Origin Cache Control, Cloudflare will aim to strictly adhere to [RFC 7234 ↗](https://datatracker.ietf.org/doc/html/rfc7234). Enterprise customers have the ability to select if Cloudflare will adhere to this behavior, enabling or disabling Origin Cache Control for their websites through cache rules in the [dashboard](https://developers.cloudflare.com/cache/how-to/cache-rules/settings/#origin-cache-control-enterprise-only) or via [API](https://developers.cloudflare.com/cache/how-to/cache-rules/settings/#origin-cache-control-enterprise-only). Free, Pro, and Business customers have this option enabled by default and cannot disable it.
## Origin Cache Control behavior
The following section covers the directives and behavioral conditions associated with enabling or disabling Origin Cache Control.
Integer values required
The `max-age`, `s-maxage`, and `stale-while-revalidate` directives require integer values per RFC 9111\. Floating-point values (for example, `max-age=2.5`) are not valid and will be ignored, potentially causing cache bypass. Ensure your origin returns integer TTL values.
### Directives
The table below lists directives and their behaviors when Origin Cache Control is disabled and when it is enabled.
| Directive | Origin Cache Control Disabled Behavior | Origin Cache Control Enabled Behavior |
| ----------------------- | ----------------------------------------------- | -------------------------------------------------------------------------------------------------------------------------------------------- |
| s-maxage=0 | Will not cache. | Caches and always revalidates |
| max-age=0 | Will not cache. | Caches and always revalidates. |
| no-cache | Will not cache. | Caches and always revalidates. Does not serve stale. |
| no-cache= | Will not cache. | Caches if headers mentioned in no-cache= do not exist. Always revalidates if any header mentioned in no-cache= is present. |
| Private= | Will not cache. | Does not cache values mentioned in Private= directive. |
| must-revalidate | Cache directive is ignored and stale is served. | Does not serve stale. Must revalidate for CDN and for browser. |
| proxy-revalidate | Cache directive is ignored and stale is served. | Does not serve stale. Must revalidate for CDN but not for browser. |
| no-transform | May (un)Gzip, Polish, email filter, etc. | Does not transform body. |
| s-maxage=delta, delta>1 | Same as max-age. | Max-age and proxy-revalidate. |
| immutable | Not proxied downstream. | Proxied downstream. Browser facing, does not impact caching proxies. |
| no-store | Will not cache. | Will not cache. |
### Conditions
Certain scenarios also affect Origin Cache Control behavior when it is enabled or disabled.
| Condition | Origin Cache Control disabled behavior | Origin Cache Control enabled behavior | | Presence of Authorization header. | Content may be cached. | Content is cached only if must-revalidate, public, or s-maxage is also present. |
| ---------------------------------------------------------------------- | ----------------------------------------------------------- | ------------------------------------------------------------ | ------------------------------------ | ---------------------- | ------------------------------------------------------------------------------- |
| Use of no-cache header. | In logs, cacheStatus=miss. | In logs, cacheStatus=bypass. | | | |
| Origin response has Set-Cookie header and default cache level is used. | Content may be cached with stripped set-cookie header. | Content is not cached. | | | |
| Browser Cache TTL is set. | Cache-Control returned to eyeball does not include private. | If origin returns private in Cache-Control then preserve it. | | | |
Note
When the `Cloudflare-Cdn-Cache-Control` header is set, OCC is turned **on** (regardless of whether OCC is enabled or disabled). As a result, we apply our Authorization header logic (per [RFC 7234, Section 3.2 ↗](https://tools.ietf.org/html/rfc7234#section-3.2)) to allow only the `s-maxage`, `must-revalidate`, or `public` directives. If any other directive is present, we do not cache the asset and instead return `BYPASS`.
## Examples
Review the examples below to learn which directives to use with the `Cache-Control` header to control specific caching behavior.
Cache a static asset.
`Cache-Control: public, max-age=86400`
Ensure a secret asset is never cached.
`Cache-Control: no-store`
Cache assets on browsers but not on proxy cache.
`Cache-Control: private, max-age=3600`
Cache assets in client and proxy caches, but prefer revalidation when serve.
`Cache-Control: public, no-cache`
Cache assets in proxy caches but REQUIRE revalidation by the proxy when serve.
`Cache-Control: public, no-cache, proxy-revalidate` or `Cache-Control: public, s-maxage=0`
Cache assets in proxy caches, but REQUIRE revalidation by any cache when serve.
`Cache-Control: public, no-cache, must-revalidate`
Cache assets, but ensure the proxy does not modify it.
`Cache-Control: public, no-transform`
This configuration also disables transformation like gzip or brotli compression from our edge to your visitors if the original payload was served uncompressed.
Cache assets with revalidation, but allow stale responses if origin server is unreachable.
`Cache-Control: public, max-age=3600, stale-if-error=60`
With this configuration, Cloudflare attempts to revalidate the content with the origin server after it has been in cache for 3600 seconds (one hour). If the server returns an error instead of proper revalidation responses, Cloudflare continues serving the stale resource for a total of one minute beyond the expiration of the resource.
Cache assets for different amounts of time on Cloudflare and in visitor browsers.
`Cache-Control: public, max-age=7200, s-maxage=3600`
Cache an asset and serve while asset is being revalidated.
`Cache-Control: max-age=600, stale-while-revalidate=30`
This configuration indicates the asset is fresh for 600 seconds. The asset can be served stale for up to an additional 30 seconds while Cloudflare revalidates the asset with the origin in the background. For more information, refer to [Revalidation](https://developers.cloudflare.com/cache/concepts/revalidation/).
Note
Do not use `s-maxage` with `stale-while-revalidate`. The `s-maxage` directive implies `proxy-revalidate`, which prevents shared caches from serving stale content. For workarounds, refer to [Controlling stale behavior](https://developers.cloudflare.com/cache/concepts/revalidation/#controlling-stale-behavior).
## Interaction with other Cloudflare features
This section covers how other Cloudflare features interact with `Cache-Control` directives.
### Edge Cache TTL
[Edge Cache TTL](https://developers.cloudflare.com/cache/how-to/edge-browser-cache-ttl/#edge-cache-ttl) Cache Rules override `s-maxage` and disable revalidation directives if present. When Origin Cache Control is enabled at Cloudflare, the original `Cache-Control` header passes downstream from our edge even if Edge Cache TTL overrides are present. Otherwise, when Origin Cache Control is disabled at Cloudflare, Cloudflare overrides the Origin Cache Control.
### Browser Cache TTL
[Browser Cache TTL](https://developers.cloudflare.com/cache/how-to/edge-browser-cache-ttl/#browser-cache-ttl) Cache Rules override `max-age` settings passed downstream from our edge, typically to your visitor's browsers.
### Polish
[Polish](https://developers.cloudflare.com/images/polish/) is disabled when the `no-transform` directive is present.
### Gzip and Other Compression
Compression is disabled when the `no-transform` directive is present. If the original asset fetched from the origin is compressed, it is served compressed to the visitor. If the original asset is uncompressed, compression is not applied.
### JavaScript Detections
[JavaScript Detections](https://developers.cloudflare.com/cloudflare-challenges/challenge-types/javascript-detections/) injection is disabled when the `no-transform` directive is present. The `cf.bot_management.js_detection.passed` field will show as `missing` for affected requests.
Was this helpful?
YesNo
## On this page
[Docs](https://developers.cloudflare.com/)
```json
{"@context":"https://schema.org","@type":"TechArticle","@id":"https://developers.cloudflare.com/cache/concepts/cache-control/#page","headline":"Origin Cache Control · Cloudflare Cache (CDN) docs","description":"How origin Cache-Control headers affect Cloudflare caching behavior.","url":"https://developers.cloudflare.com/cache/concepts/cache-control/","inLanguage":"en","image":"https://developers.cloudflare.com/og-docs.png","dateModified":"2026-06-30","publisher":{"@type":"Organization","name":"Cloudflare","url":"https://www.cloudflare.com/"},"isPartOf":{"@type":"WebSite","@id":"https://developers.cloudflare.com/#website","name":"Cloudflare Docs","url":"https://developers.cloudflare.com/"},"keywords":["Headers"]}
```
---
---
description: Cache status headers returned by Cloudflare in HTTP responses.
title: Cloudflare cache responses
image: https://developers.cloudflare.com/og-docs.png
---
[Skip to content](#main-content)
> Documentation Index
> Fetch the complete documentation index at: https://developers.cloudflare.com/cache/llms.txt
> Use this file to discover all available pages before exploring further.
# Cloudflare cache responses
Last updated Jul 23, 2026|Copy as Markdown|[View as Markdown](https://developers.cloudflare.com/cache/concepts/cache-responses/index.md)|[Agent setup](https://developers.cloudflare.com/agent-setup/)
The `CF-Cache-Status` header output indicates whether a resource is cached or not. To investigate cache responses returned by this header, use services like [Redbot ↗](https://redbot.org/), [webpagetest.org ↗](http://www.webpagetest.org/), or a visual tool like [Cloudflare Optics plugin ↗](https://chromewebstore.google.com/detail/cloudflare-optics/mdjgbjnbdnhneejmmaabmccfehigbjbe).
\`Age\` response header
The `Age` response header is a header returned from cache that specifies the time in seconds that an asset has been in Cloudflare's cache. This value resets if the asset is revalidated, purged, or evicted and then re-cached.
The `Age` header is only present for responses served from the cache. It will not appear on a cache MISS, dynamic traffic, the first request that populates the lower tier HIT from tiered cache `CacheTieredFill=true` or any responses that did not originate from the cache (for example, responses generated by a Worker that bypassed the cache).
Below you can find a comprehensive breakdown of Cloudflare's cache response statuses.
## HIT
The resource was found in Cloudflare's cache.
## MISS
The resource was not found in Cloudflare's cache and was served from the origin web server.
## NONE/UNKNOWN
Cloudflare generated a response that denotes the asset is not eligible for caching. This may have happened because:
* A Worker generated a response without sending any subrequests. In this case, the response did not come from cache, so the cache status will be `none/unknown`.
* A Worker request made a subrequest (`fetch`). In this case, the subrequest will be logged with a cache status, while the main request will be logged with `none/unknown` status (the main request did not hit cache, since Workers sits in front of cache).
* A WAF custom rule was triggered to block a request. The response will come from the Cloudflare global network before it hits cache. Since there is no cache status, Cloudflare will log as `none/unknown`.
* A [redirect rule](https://developers.cloudflare.com/rules/url-forwarding/) or [Always Use HTTPS](https://developers.cloudflare.com/ssl/edge-certificates/additional-options/always-use-https/) caused the global network to respond with a redirect to another asset/URL. This redirect response happens before the request reaches cache, so the cache status is `none/unknown`.
## EXPIRED
The resource was found in Cloudflare's cache but was expired and served from the origin web server.
## STALE
The resource was served from Cloudflare's cache but was expired. Cloudflare could not contact the origin web server to retrieve an updated resource.
## BYPASS
Cloudflare considered the asset eligible for cache at request time — either because it matches the [default cached file extensions](https://developers.cloudflare.com/cache/concepts/default-cache-behavior/#default-cached-file-extensions), or because a [Cache Rule](https://developers.cloudflare.com/cache/how-to/cache-rules/) enabled caching for it — but the origin response was ultimately not cacheable.
Common reasons the origin response is treated as not cacheable include:
* The origin web server returned a `Cache-Control` header set to `no-cache`, `no-store`, or `private`. Origin `Cache-Control` directives are only honored when [Origin Cache-Control](https://developers.cloudflare.com/cache/concepts/cache-control/) is enabled, and specific directives may result in a different cache status (for example, `max-age=0` with Origin Cache Control enabled caches and revalidates). Refer to [Conditions](https://developers.cloudflare.com/cache/concepts/cache-control/#conditions) for the full behavior.
* The origin web server returned a `Set-Cookie` header.
* The request to the origin web server included an `Authorization` header (in some cases).
Note
If you configured a [Cache Rule](https://developers.cloudflare.com/cache/how-to/cache-rules/) with **Eligible for cache** set to _Yes_ (for example, on HTML content) and the origin returns a non-cacheable `Cache-Control` directive, the response is returned with `CF-Cache-Status: BYPASS` — not `DYNAMIC`. `DYNAMIC` is only returned when Cloudflare determines the asset is not eligible for cache at request time.
BYPASS means the decision not to cache was made at **response time** — the request was initially eligible for caching, but the origin response or response headers instructed Cloudflare not to cache. For example, a Cache Rule that sets `"cache": true` enables caching at request time, but if the origin returns `Cache-Control: no-store`, the response will be BYPASS.
## REVALIDATED
The origin confirmed the cached resource was unchanged via a conditional request (`If-Modified-Since` or `If-None-Match`), and the response is served from Cloudflare's cache. This status reflects the synchronous validation path — the request waits for the origin to respond before being served.
With [asynchronous stale-while-revalidate](https://developers.cloudflare.com/cache/concepts/revalidation/#asynchronous-revalidation), most revalidations now return `UPDATING` or `HIT` instead. `REVALIDATED` is seen in the following situations: `stale-while-revalidate` is not set; or directives like `must-revalidate` or `no-cache` (with [Origin Cache Control](https://developers.cloudflare.com/cache/concepts/cache-control/) enabled) prevent stale content from being served.
## UPDATING
The resource was expired but served from Cloudflare's cache while the origin updates it in the background. `UPDATING` is the expected status during [asynchronous stale-while-revalidate](https://developers.cloudflare.com/cache/concepts/revalidation/#asynchronous-revalidation) revalidation — all requests during the revalidation window receive `UPDATING` or `HIT` rather than waiting for the origin.
## DYNAMIC
Cloudflare determined at request time that the asset is not eligible for cache, so the request went to the origin web server without a cache lookup.
This typically happens when:
* The requested asset is not one of the [default cached file extensions](https://developers.cloudflare.com/cache/concepts/default-cache-behavior/#default-cached-file-extensions) (for example, HTML or JSON) and no rule instructs Cloudflare to cache it.
* A [Cache Rule](https://developers.cloudflare.com/cache/how-to/cache-rules/) with the **Bypass cache** setting matches the request. The legacy `Cache Level: Bypass` option in [Configuration Rules](https://developers.cloudflare.com/rules/configuration-rules/) or [Page Rules](https://developers.cloudflare.com/rules/page-rules/) behaves the same way.
Use [Cache Rules](https://developers.cloudflare.com/cache/how-to/cache-rules/) to change what content Cloudflare caches. Once the request is treated as eligible for cache, the `CF-Cache-Status` header will reflect the response-time cache decision (`HIT`, `MISS`, `EXPIRED`, `REVALIDATED`, `BYPASS`, and so on) — refer to [BYPASS](#bypass) for the case where the origin response is ultimately not cacheable.
Was this helpful?
YesNo
## On this page
[Docs](https://developers.cloudflare.com/)
```json
{"@context":"https://schema.org","@type":"TechArticle","@id":"https://developers.cloudflare.com/cache/concepts/cache-responses/#page","headline":"Cloudflare cache responses · Cloudflare Cache (CDN) docs","description":"Cache status headers returned by Cloudflare in HTTP responses.","url":"https://developers.cloudflare.com/cache/concepts/cache-responses/","inLanguage":"en","image":"https://developers.cloudflare.com/og-docs.png","dateModified":"2026-07-23","publisher":{"@type":"Organization","name":"Cloudflare","url":"https://www.cloudflare.com/"},"isPartOf":{"@type":"WebSite","@id":"https://developers.cloudflare.com/#website","name":"Cloudflare Docs","url":"https://developers.cloudflare.com/"}}
```
---
---
description: Use CDN-Cache-Control headers to control Cloudflare cache independently.
title: CDN-Cache-Control
image: https://developers.cloudflare.com/og-docs.png
---
[Skip to content](#main-content)
> Documentation Index
> Fetch the complete documentation index at: https://developers.cloudflare.com/cache/llms.txt
> Use this file to discover all available pages before exploring further.
# CDN-Cache-Control
Last updated Apr 16, 2026|Copy as Markdown|[View as Markdown](https://developers.cloudflare.com/cache/concepts/cdn-cache-control/index.md)|[Agent setup](https://developers.cloudflare.com/agent-setup/)
`CDN-Cache-Control` is a response header field set on the origin to separately control the behavior of CDN caches from other intermediaries that might handle a response. You can set the `CDN-Cache-Control` or `Cloudflare-CDN-Cache-Control` response header using the same directives used with the [Cache-Control](https://developers.cloudflare.com/cache/concepts/cache-control/).
## Header precedence
You have several options available to determine how `CDN-Cache-Control` directives interact with `Cache-Control` directives.
If a [Cache Response Rule](https://developers.cloudflare.com/cache/how-to/cache-response-rules/) sets `Cache-Control` directives using the `set_cache_control` action, those directives take precedence over any origin-set `Cloudflare-CDN-Cache-Control` and `CDN-Cache-Control` headers.
When no Cache Response Rule applies, an origin can:
* Return the `CDN-Cache-Control` response header which Cloudflare evaluates to make caching decisions. `Cache-Control`, if also returned by the origin, is proxied as is and does not affect caching decisions made by Cloudflare. Additionally, `CDN-Cache-Control` is proxied downstream in case there are other CDNs between Cloudflare and the browser.
* Return the `Cloudflare-CDN-Cache-Control` response header. This results in the same behavior as the origin returning `CDN-Cache-Control` except Cloudflare does not proxy `Cloudflare-CDN-Cache-Control` downstream because it’s a header only used to control Cloudflare. This option is beneficial if you want only Cloudflare to have a different caching behavior while all other downstream servers rely on `Cache-Control` or if you do not want Cloudflare to proxy the `CDN-Cache-Control` header downstream.
* Return both `Cloudflare-CDN-Cache-Control` and `CDN-Cache-Control` response headers. In this case, Cloudflare only looks at `Cloudflare-CDN-Cache-Control` when making caching decisions because it is the most specific version of `CDN-Cache-Control` and proxies `CDN-Cache-Control` downstream. Only forwarding `CDN-Cache-Control` in this situation is beneficial if you want Cloudflare to have a different caching behavior than other CDNs downstream.
Additionally, surrogates will not honor `Cache-Control` headers in the response from an origin. For example, if the `Surrogate-Control` header is present within the response, Cloudflare ignores any `Cache-Control` directives, even if the `Surrogate-Control` header does not contain directives.
## Interaction with other Cloudflare features
### Edge Cache TTL cache rule
The [Edge Cache TTL cache rule](https://developers.cloudflare.com/cache/how-to/cache-rules/settings/#edge-ttl) overrides the amount of time an asset is cached on the edge (Cloudflare data centers). This cache rule overrides directives in `Cloudflare-CDN-Cache-Control/CDN-Cache-Control` which manage how long an asset is cached on the edge. You can create this rule in the dashboard in **Caching** \> **Cache Rules**.
### Browser Cache TTL cache rule
The [Browser Cache TTL cache rule](https://developers.cloudflare.com/cache/how-to/cache-rules/settings/#browser-ttl) overrides the amount of time an asset is cached by browsers/servers downstream of Cloudflare. Browser Cache TTL only modifies the `Cache-Control` response header. This cache rule does not modify `Cloudflare-CDN-Cache-Control/CDN-Cache-Control` response headers.
### Other Origin Response Headers
The origin returns the `Expires` response header which specifies the amount of time before an object is considered stale to the browser. This response header does not affect the caching decision at Cloudflare when `Cloudflare-CDN-Cache-Control/CDN-Cache-Control` is in use.
### Cloudflare Default cache values
In situations where Cloudflare does not receive `Cloudflare-CDN-Cache-Control`, `CDN-Cache-Control`, or `Cache-Control` values, cacheable assets use the general [default values](https://developers.cloudflare.com/cache/concepts/default-cache-behavior/).
## When to use CDN-Cache-Control
### Manage cached assets TTLs
Use `CDN-Cache-Control` when you want to manage cached asset’s TTLs separately for origin caches, CDN caches, and browser caches. The example below shows how you can manage your cached asset’s TTLs using origin-set response headers.
Headers:
* `Cache-Control: max-age=14400, s-maxage=84000`
* `Cloudflare-CDN-Cache-Control: max-age=24400`
* `CDN-Cache-Control: max-age=18000`
Cache behavior:
| Caches | Cache TTL (seconds) | | Origin Server Cache | 14400 |
| -------------------- | ------------------- | ---------------------- | ----- |
| Network Shared Cache | 84000 | | |
| Cloudflare Edge | 24400 | | |
| Other CDNs | 18000 | | |
| Browser Cache | 14400 | | |
### Specify when to serve stale content
Use `CDN-Cache-Control` headers in conjunction with `Cache-Control` headers to specify when to serve stale content in the case of error or during revalidation. The example below shows how you might set your headers and directives to apply to CDNs when handling errors.
Headers:
* `Cache-Control: stale-if-error=400`
* `Cloudflare-CDN-Cache-Control: stale-if-error=60`
* `CDN-Cache-Control: stale-if-error=200`
Behavior in response to [5XX error](https://developers.cloudflare.com/support/troubleshooting/http-status-codes/cloudflare-5xx-errors/):
| Caches | Stale served (seconds) in response to error | | Origin Cache Layer/Network Cache/Browser Cache | 400 (if it assumes the directive applies) |
| --------------- | ------------------------------------------- | ------------------------------------------------- | ----------------------------------------- |
| Cloudflare Edge | 60 | | |
| Other CDN | 200 | | |
Was this helpful?
YesNo
## On this page
[Docs](https://developers.cloudflare.com/)
```json
{"@context":"https://schema.org","@type":"TechArticle","@id":"https://developers.cloudflare.com/cache/concepts/cdn-cache-control/#page","headline":"CDN-Cache-Control · Cloudflare Cache (CDN) docs","description":"Use CDN-Cache-Control headers to control Cloudflare cache independently.","url":"https://developers.cloudflare.com/cache/concepts/cdn-cache-control/","inLanguage":"en","image":"https://developers.cloudflare.com/og-docs.png","dateModified":"2026-04-16","publisher":{"@type":"Organization","name":"Cloudflare","url":"https://www.cloudflare.com/"},"isPartOf":{"@type":"WebSite","@id":"https://developers.cloudflare.com/#website","name":"Cloudflare Docs","url":"https://developers.cloudflare.com/"},"keywords":["Headers"]}
```
---
---
description: Methods for customizing cache behavior with rules, Workers, and headers.
title: Customize cache
image: https://developers.cloudflare.com/og-docs.png
---
[Skip to content](#main-content)
> Documentation Index
> Fetch the complete documentation index at: https://developers.cloudflare.com/cache/llms.txt
> Use this file to discover all available pages before exploring further.
# Customize cache
Last updated Apr 16, 2026|Copy as Markdown|[View as Markdown](https://developers.cloudflare.com/cache/concepts/customize-cache/index.md)|[Agent setup](https://developers.cloudflare.com/agent-setup/)
Some possible combinations of origin web server settings and Cloudflare [Cache Rules](https://developers.cloudflare.com/cache/how-to/cache-rules/) include:
## Create a directory for static content at your origin web server
For example, create a `/static/` subdirectory at your origin web server and a Cache Everything Cache Rule matching the following expression:
* Using the Expression Builder: `Hostname contains "example.com" AND URI Path starts with "/static"`
* Using the Expression Editor: `(http.host contains "example.com" and starts_with(http.request.uri.path, "/static"))`
## Append a unique file extension to static pages
For example, create a `.shtml` file extension for resources at your origin web server and a Cache Everything Cache Rule matching the following expression:
* Using the Expression Builder: `Hostname contains "example.com" AND URI Path ends with ".shtml"`
* Using the Expression Editor: `(http.host contains "example.com" and ends_with(http.request.uri.path, ".shtml"))`
## Add a query string to a resource’s URL to mark the content as static
For example, add a `static=true` query string for resources at your origin web server and a Cache Everything Cache Rule matching the following expression:
* Using the Expression Builder: `Hostname contains "example.com" AND URI Query String contains "static=true"`
* Using the Expression Editor: `(http.host contains "example.com" and http.request.uri.query contains "static=true")`
Resources that match a Cache Everything Cache Rule are still not cached if the origin web server sends a Cache-Control header of `max-age=0`, `private`, `no-cache`, or an `Expires` header with an already expired date. Include the [Edge Cache TTL](https://developers.cloudflare.com/cache/how-to/cache-rules/settings/#edge-ttl) setting within the Cache Everything Cache Rule to additionally override the `Cache-Control` headers from the origin web server.
Was this helpful?
YesNo
## On this page
[Docs](https://developers.cloudflare.com/)
```json
{"@context":"https://schema.org","@type":"TechArticle","@id":"https://developers.cloudflare.com/cache/concepts/customize-cache/#page","headline":"Customize cache · Cloudflare Cache (CDN) docs","description":"Methods for customizing cache behavior with rules, Workers, and headers.","url":"https://developers.cloudflare.com/cache/concepts/customize-cache/","inLanguage":"en","image":"https://developers.cloudflare.com/og-docs.png","dateModified":"2026-04-16","publisher":{"@type":"Organization","name":"Cloudflare","url":"https://www.cloudflare.com/"},"isPartOf":{"@type":"WebSite","@id":"https://developers.cloudflare.com/#website","name":"Cloudflare Docs","url":"https://developers.cloudflare.com/"}}
```
---
---
description: Default file extensions and content types that Cloudflare caches.
title: Default cache behavior
image: https://developers.cloudflare.com/og-docs.png
---
[Skip to content](#main-content)
> Documentation Index
> Fetch the complete documentation index at: https://developers.cloudflare.com/cache/llms.txt
> Use this file to discover all available pages before exploring further.
# Default cache behavior
Last updated May 6, 2026|Copy as Markdown|[View as Markdown](https://developers.cloudflare.com/cache/concepts/default-cache-behavior/index.md)|[Agent setup](https://developers.cloudflare.com/agent-setup/)
Cloudflare respects the origin web server’s cache headers in the following order unless an [Edge Cache TTL cache rule](https://developers.cloudflare.com/cache/how-to/cache-rules/settings/#edge-ttl) overrides the headers. Refer to the [Edge TTL](https://developers.cloudflare.com/cache/how-to/configure-cache-status-code/#edge-ttl) section for details on default TTL behavior.
* Cloudflare **does not** cache the resource when:
* The `Cache-Control` header is set to `private`, `no-store`, `no-cache`, or `max-age=0`.
* The [Set-Cookie header](https://developers.cloudflare.com/cache/concepts/cache-behavior/#interaction-of-set-cookie-response-header-with-cache) exists.
* The HTTP request method is anything other than a `GET`.
* Cloudflare **does** cache the resource when:
* The `Cache-Control` header is set to `public` and `max-age` is greater than 0.
* The `Expires` header is set to a future date.
Note
Cloudflare does cache the resource even if there is no `Cache-Control` header based on [status codes](https://developers.cloudflare.com/cache/how-to/configure-cache-status-code/#edge-ttl).
Note
If both `max-age` and an `Expires` header are set, `max-age` will be used by Cloudflare.
When [Origin Cache Control](https://developers.cloudflare.com/cache/concepts/cache-control/) is enabled on an Enterprise customer’s website, it indicates that Cloudflare should strictly respect `Cache-Control` directives received from the origin server. Free, Pro and Business customers have this feature enabled by default. For a list of directives and behaviors when Origin Cache-Control is enabled or disabled, refer to [Cache-Control directives](https://developers.cloudflare.com/cache/concepts/cache-control/#cache-control-directives).
## Client side range requests
Clients can send range requests to be served from the cache using the `Range` header. Note that:
* If the origin response includes a `Content-Length` header, then the specified byte range will be returned with an [HTTP 206](https://developers.cloudflare.com/support/troubleshooting/http-status-codes/2xx-success/#206-partial-content) response.
* If the origin response does not include the `Content-Length` header, the cache will return the full content with an HTTP 200 response.
## Request collapsing
When multiple requests arrive simultaneously at a single Cloudflare data center for the same asset that is not in cache (a cache miss), Cloudflare uses a cache lock to avoid sending duplicate requests to your origin. Only the first request is forwarded to the origin to fetch the asset. The remaining requests wait for the first request to complete, after which the response is [streamed ↗](https://blog.cloudflare.com/introducing-concurrent-streaming-acceleration/) to all waiting requests.
The cache lock ensures that Cloudflare only sends one request at a time to the origin for a given asset from a single location in Cloudflare's network, preventing the origin from receiving excessive traffic.
## Default cached file extensions
Cloudflare only caches based on file extension and not by MIME type. The Cloudflare CDN does not cache HTML or JSON by default. Additionally, by default Cloudflare caches a website's robots.txt.
| 7Z | CSV | GIF | MIDI | PNG | TIF | ZIP |
| ----- | ---- | ---- | ---- | ---- | ----- | --- |
| AVI | DOC | GZ | MKV | PPT | TIFF | ZST |
| AVIF | DOCX | ICO | MP3 | PPTX | TTF | |
| APK | DMG | ISO | MP4 | PS | WEBM | |
| BIN | EJS | JAR | OGG | RAR | WEBP | |
| BMP | EOT | JPG | OTF | SVG | WOFF | |
| BZ2 | EPS | JPEG | PDF | SVGZ | WOFF2 | |
| CLASS | EXE | JS | PICT | SWF | XLS | |
| CSS | FLAC | MID | PLS | TAR | XLSX | |
To cache additional content, refer to [Cache Rules](https://developers.cloudflare.com/cache/how-to/cache-rules/) to create a rule to cache everything.
## Edge TTL
By default, Cloudflare caches certain HTTP response codes with the following Edge Cache TTL when a `cache-control` directive or `expires` response header are not present.
| HTTP status code | Default TTL |
| ---------------- | ----------- |
| 200, 206, 301 | 120m |
| 302, 303 | 20m |
| 404, 410 | 3m |
All other status codes are not cached by default.
## Customization options and limits
Cloudflare’s CDN provides several cache customization options:
* Caching behavior for individual URLs via [Cache Rules](https://developers.cloudflare.com/cache/how-to/cache-rules/)
[Go to **Cache Rules** ↗](https://dash.cloudflare.com/?to=/:account/:zone/caching/cache-rules)
* Customize caching with [Cloudflare Workers](https://developers.cloudflare.com/workers/reference/how-the-cache-works/)
* Adjust caching level, cache TTL, and more in the Caching page in the Cloudflare dashboard:
[Go to **Configuration** ↗](https://dash.cloudflare.com/?to=/:account/:zone/caching/configuration)
### Upload limits
| | Free | Pro | Business | Enterprise |
| --------------- | ------ | ------ | -------- | ---------- |
| Availability | Yes | Yes | Yes | Yes |
| Max upload size | 100 MB | 100 MB | 200 MB | 500+ MB |
Customers can reduce the **Maximum Upload Size** from the zone's **Network** page.
If you require a larger upload, you can group requests into smaller chunks, upload the full resource through a [DNS-only (unproxied) DNS record](https://developers.cloudflare.com/dns/proxy-status/) or [upgrade your plan](https://developers.cloudflare.com/billing/manage/change-plan/).
### Cacheable size limits
Cloudflare cacheable file limits:
* Free, Pro and Business customers have a limit of 512 MB.
* For Enterprise customers the default maximum cacheable file size is 5 GB. Contact your account team to request a limit increase.
## When does Cloudflare cache successfully?
The connection status between visitors and Cloudflare can vary, affecting whether Cloudflare caches the content or not. If Cloudflare has already established a connection to the origin and started fetching the content, it will continue to retrieve and cache the entire content, even if the visitor disconnects midway. However, if a visitor disconnects before the origin responds to Cloudflare's request, no content will have been fetched yet, so Cloudflare will not start caching the content.
Was this helpful?
YesNo
## On this page
[Docs](https://developers.cloudflare.com/)
```json
{"@context":"https://schema.org","@type":"TechArticle","@id":"https://developers.cloudflare.com/cache/concepts/default-cache-behavior/#page","headline":"Default Cache Behavior · Cloudflare Cache (CDN) docs","description":"Default file extensions and content types that Cloudflare caches.","url":"https://developers.cloudflare.com/cache/concepts/default-cache-behavior/","inLanguage":"en","image":"https://developers.cloudflare.com/og-docs.png","dateModified":"2026-05-06","publisher":{"@type":"Organization","name":"Cloudflare","url":"https://www.cloudflare.com/"},"isPartOf":{"@type":"WebSite","@id":"https://developers.cloudflare.com/#website","name":"Cloudflare Docs","url":"https://developers.cloudflare.com/"}}
```
---
---
description: How cache retention and TTL freshness differ in Cloudflare.
title: Retention vs Freshness (TTL)
image: https://developers.cloudflare.com/og-docs.png
---
[Skip to content](#main-content)
> Documentation Index
> Fetch the complete documentation index at: https://developers.cloudflare.com/cache/llms.txt
> Use this file to discover all available pages before exploring further.
# Retention vs Freshness (TTL)
Last updated May 6, 2026|Copy as Markdown|[View as Markdown](https://developers.cloudflare.com/cache/concepts/retention-vs-freshness/index.md)|[Agent setup](https://developers.cloudflare.com/agent-setup/)
In the context of Cloudflare CDN (Content Delivery Network), retention and freshness refer to two separate but related concepts. For an object in cache, freshness is how long it should be considered valid without consulting its source, while retention refers to how long it stays in cache before being removed.
## Retention
When a resource is requested, Cloudflare caches it so that subsequent requests can be served without contacting the origin server. If a cached object is not requested again, it is eventually removed to make room for newer, more popular content. This removal process is called eviction.
Cloudflare uses a Least Recently Used (LRU) algorithm to decide which objects to evict when the cache is full. An object's retention period is how long it stays in cache before being evicted. Retention is determined by the object's relative popularity and the size of the cache, and is not configurable.
## Freshness (TTL)
Freshness, also known as Time to Live (TTL), determines how long a cache can use an object without checking with the origin again. For example, if an object has a TTL of five minutes, the cache serves it directly for five minutes after first receiving it. After five minutes, Cloudflare must check with the origin to confirm the object is still valid before serving it again. There are a few ways to configure TTLs for resources served through Cloudflare's CDN:
* Include [Origin Cache Control](https://developers.cloudflare.com/cache/concepts/cache-control/) or [CDN Cache Control](https://developers.cloudflare.com/cache/concepts/cache-control/) directives, like `max-age` or `s-maxage`, in the origin cache-control response header.
* Use [Cache Rules](https://developers.cloudflare.com/cache/how-to/cache-rules/) or [Workers](https://developers.cloudflare.com/cache/interaction-cloudflare-products/workers/).
If an object in cache is no longer fresh, Cloudflare revalidates it with the origin. When [stale-while-revalidate](https://developers.cloudflare.com/cache/concepts/cache-control/#revalidation) is set, revalidation happens asynchronously at expiry — visitors continue to be served from cache while Cloudflare fetches a fresh copy in the background. Without this directive, incoming requests wait for the origin to respond before receiving content. The origin can either confirm the cached object is still valid (refreshing its TTL) or return a new version to replace it. Refer to [Revalidation](https://developers.cloudflare.com/cache/concepts/revalidation/) for details.
Was this helpful?
YesNo
## On this page
[Docs](https://developers.cloudflare.com/)
```json
{"@context":"https://schema.org","@type":"TechArticle","@id":"https://developers.cloudflare.com/cache/concepts/retention-vs-freshness/#page","headline":"Retention vs Freshness (TTL) · Cloudflare Cache (CDN) docs","description":"How cache retention and TTL freshness differ in Cloudflare.","url":"https://developers.cloudflare.com/cache/concepts/retention-vs-freshness/","inLanguage":"en","image":"https://developers.cloudflare.com/og-docs.png","dateModified":"2026-05-06","publisher":{"@type":"Organization","name":"Cloudflare","url":"https://www.cloudflare.com/"},"isPartOf":{"@type":"WebSite","@id":"https://developers.cloudflare.com/#website","name":"Cloudflare Docs","url":"https://developers.cloudflare.com/"}}
```
---
---
description: How Cloudflare revalidates stale cached content with your origin.
title: Revalidation
image: https://developers.cloudflare.com/og-docs.png
---
[Skip to content](#main-content)
> Documentation Index
> Fetch the complete documentation index at: https://developers.cloudflare.com/cache/llms.txt
> Use this file to discover all available pages before exploring further.
# Revalidation
Last updated Jun 26, 2026|Copy as Markdown|[View as Markdown](https://developers.cloudflare.com/cache/concepts/revalidation/index.md)|[Agent setup](https://developers.cloudflare.com/agent-setup/)
## Stale-while-revalidate
When a cached asset expires, Cloudflare uses the [stale-while-revalidate](https://developers.cloudflare.com/cache/concepts/cache-control/#revalidation) directive in `Cache-Control` to determine whether it can continue serving the stale asset while fetching a fresh copy from the origin. If the directive is present and the asset is within the allowed staleness window, Cloudflare serves the expired content to visitors and revalidates in the background. By using headers like `If-Modified-Since` and `ETag`, Cloudflare validates content without fully re-fetching it, reducing origin traffic.
## Asynchronous revalidation
Revalidation is fully asynchronous. When a cached asset expires and `stale-while-revalidate` is set, the first request that arrives after expiry triggers revalidation in the background. That request immediately receives stale content with an [UPDATING](https://developers.cloudflare.com/cache/concepts/cache-responses/#updating) status instead of blocking until the origin responds. All following requests also receive stale content with an `UPDATING` status until the origin responds. Once revalidation completes, subsequent requests receive fresh content with a [HIT](https://developers.cloudflare.com/cache/concepts/cache-responses/#hit) status.
If the stale content is still valid, Cloudflare sets a new TTL. If the content has changed, the origin provides fresh content to replace the old.
## Controlling stale behavior
Cloudflare only serves stale content during revalidation if your origin includes the `stale-while-revalidate` directive in its `Cache-Control` header. Without this directive, visitors wait for the origin to respond before receiving content.
If your origin sets `stale-while-revalidate` but you want to override it, you can disable stale serving through the [Serve stale content while revalidating](https://developers.cloudflare.com/cache/how-to/cache-rules/settings/#serve-stale-content-while-revalidating) setting in Cache Rules.
### Directives that disable stale-while-revalidate
When [Origin Cache Control](https://developers.cloudflare.com/cache/concepts/cache-control/#enable-origin-cache-control) is enabled, the following `Cache-Control` directives prevent Cloudflare from serving stale content, per [RFC 9111 §4.2.4 ↗](https://www.rfc-editor.org/rfc/rfc9111.html#section-4.2.4):
* **`must-revalidate`** — Prohibits serving stale content; the cache must revalidate with the origin first.
* **`proxy-revalidate`** — Same as `must-revalidate`, but only applies to shared caches (like Cloudflare).
* **`s-maxage`** — Implies `proxy-revalidate` semantics, so shared caches cannot serve stale content.
* **`no-cache`** — Requires revalidation before serving any cached response.
If any of these directives are present alongside `stale-while-revalidate`, Cloudflare will not serve stale content — requests will return `EXPIRED` instead of `UPDATING`.
Workaround for different edge and browser TTLs
If you need `stale-while-revalidate` behavior with a different TTL for Cloudflare than for browsers, do not use `s-maxage`. Instead, configure your origin to send `max-age` with `stale-while-revalidate`, then use [Edge Cache TTL](https://developers.cloudflare.com/cache/how-to/cache-rules/settings/#edge-ttl) in Cache Rules to set a separate TTL for Cloudflare.
For all available directives or behavior when Origin Cache Control is disabled, refer to [Cache-Control directives](https://developers.cloudflare.com/cache/concepts/cache-control/#cache-control-directives).
## Smart revalidation towards users
When both [Last-Modified ↗](https://datatracker.ietf.org/doc/html/rfc7232?cf%5Fhistory%5Fstate=%7B%22guid%22%3A%22C255D9FF78CD46CDA4F76812EA68C350%22%2C%22historyId%22%3A15%2C%22targetId%22%3A%226C8153BAEF7BC0C5A331E28F8BCF1ABA%22%7D#section-2.2) and [Etag ↗](https://datatracker.ietf.org/doc/html/rfc7232?cf%5Fhistory%5Fstate=%7B%22guid%22%3A%22C255D9FF78CD46CDA4F76812EA68C350%22%2C%22historyId%22%3A13%2C%22targetId%22%3A%226C8153BAEF7BC0C5A331E28F8BCF1ABA%22%7D#section-2.3) headers are absent from the origin server response, Smart Edge Revalidation will use the time the object was cached on Cloudflare's global network as the `Last-Modified` header value. When a browser sends a revalidation request to Cloudflare using `If-Modified-Since` or `If-None-Match`, our global network can answer those revalidation questions using the `Last-Modified` header generated from Smart Edge Revalidation. In this way, our global network can ensure efficient revalidation even if the headers are not sent from the origin.
Was this helpful?
YesNo
## On this page
[Docs](https://developers.cloudflare.com/)
```json
{"@context":"https://schema.org","@type":"TechArticle","@id":"https://developers.cloudflare.com/cache/concepts/revalidation/#page","headline":"Revalidation · Cloudflare Cache (CDN) docs","description":"How Cloudflare revalidates stale cached content with your origin.","url":"https://developers.cloudflare.com/cache/concepts/revalidation/","inLanguage":"en","image":"https://developers.cloudflare.com/og-docs.png","dateModified":"2026-06-26","publisher":{"@type":"Organization","name":"Cloudflare","url":"https://www.cloudflare.com/"},"isPartOf":{"@type":"WebSite","@id":"https://developers.cloudflare.com/#website","name":"Cloudflare Docs","url":"https://developers.cloudflare.com/"}}
```
---
---
description: Cache multiple versions of the same URL based on the request headers your origin varies on.
title: Vary
image: https://developers.cloudflare.com/og-docs.png
---
[Skip to content](#main-content)
> Documentation Index
> Fetch the complete documentation index at: https://developers.cloudflare.com/cache/llms.txt
> Use this file to discover all available pages before exploring further.
# Vary
Last updated Jul 2, 2026|Copy as Markdown|[View as Markdown](https://developers.cloudflare.com/cache/concepts/vary/index.md)|[Agent setup](https://developers.cloudflare.com/agent-setup/)
The [Vary ↗](https://www.rfc-editor.org/rfc/rfc9110.html#name-vary) HTTP response header tells Cloudflare that an origin can serve different responses for the same URL depending on request headers. For example, an origin might serve different languages based on `Accept-Language`, or different content formats based on `Accept`.
By default, Cloudflare's CDN constructs [cache keys](https://developers.cloudflare.com/cache/how-to/cache-keys/) from a request's URL and a handful of specific headers. [Cache Rules](https://developers.cloudflare.com/cache/how-to/cache-rules/) can add other request properties to the cache key ahead of time. The `Vary` response header lets the origin decide which request headers matter when Cloudflare receives the response.
Note
A response containing `Vary: *` always bypasses cache, regardless of your Vary configuration.
This page explains how Vary affects caching. To configure Vary, use [Vary](https://developers.cloudflare.com/cache/how-to/cache-rules/settings/#vary) in Cache Rules settings, or [cf.vary](https://developers.cloudflare.com/workers/runtime-apis/request/#the-cfvary-property) for Workers subrequests.
This feature is distinct from [Vary for images](https://developers.cloudflare.com/cache/advanced-configuration/vary-for-images/), which serves image format variants based on the `Accept` header through a separate cache variants rule.
## Availability
| | Free | Pro | Business | Enterprise |
| ------------ | ---- | --- | -------- | ---------- |
| Availability | Yes | Yes | Yes | Yes |
## How Vary affects cache keys
When Cloudflare caches a response with a `Vary` header, the listed request headers become part of the cache key for that response, following the HTTP caching behavior described in [RFC 9111 ↗](https://www.rfc-editor.org/rfc/rfc9111.html#name-calculating-cache-keys-with). The same URL can then have multiple cached versions, each selected by the request header values named in the origin's `Vary` response.
Cloudflare does not vary every cached response just because Vary is configured in a Cache Rule. The origin response must include a `Vary` header. Cloudflare then uses the configured action for each listed header to decide which request header value is added to the cache key.
For example, assume the origin returns this response:
```txt
Vary: Accept-Language
Cache-Control: public, max-age=3600
```
This tells Cloudflare that the value of the `Accept-Language` request header should be part of the cache key.
With `accept-language` configured to `normalize`, these two requests can use the same cached version:
```txt
Accept-Language: en-US, fr;q=0.8
Accept-Language: fr;q=0.8, en-GB
```
Both request headers normalize to the same language preference order, `en,fr`. A request with a different normalized value, such as `Accept-Language: fr, en;q=0.8`, creates or selects a different cached version of the same URL.
When a response varies on multiple headers, Cloudflare includes each listed header in the cache key. For example, a response with `Vary: Accept, Accept-Language` uses both the configured `accept` value and the configured `accept-language` value to select the cached response.
If the origin response does not include a `Vary` header, Cloudflare caches the response normally. If the origin response includes a `Vary` header name configured to `bypass` cache, Cloudflare does not store that response.
## Actions
Each configured header uses one of three actions:
| Action | Meaning | When to use |
| ----------- | ------------------------------------------------------------------------------------------------------------------------------------------------------------- | ----------------------------------------------------------------------------------------- |
| normalize | Normalize the request header value before selecting the cached version. For selected headers, Cloudflare may also forward the normalized value to the origin. | Most Accept, Accept-Language, and Accept-Encoding use cases. |
| passthrough | Use the raw request header value to select the cached version. The header is forwarded to the origin unchanged. | When byte-for-byte differences in the header value should create different versions. |
| bypass | Bypass cache when this header name appears in the origin's Vary response. | Headers with too many possible values, per-user values, or values you do not want cached. |
### Normalize
`normalize` reduces unnecessary cached versions by converting equivalent request header values into the same cache key value.
For example, these two `Accept` headers can normalize to the same value:
```txt
Accept: text/html, application/json;q=0.9
Accept: application/json;q=0.9, text/html
```
### Passthrough
`passthrough` uses the raw request header value when selecting a cached version. Semantically equivalent values can still create different cached versions if the bytes differ.
For example, under `passthrough`, these two requests select different cached versions:
```txt
Accept: text/html, application/json
Accept: application/json, text/html
```
Use `passthrough` only when the exact header value matters to your origin and should matter to the cache.
### Bypass
`bypass` tells Cloudflare not to cache a response when the origin's `Vary` response includes that header name.
For example, if your configuration sets `user-agent` to `bypass`, a response with this header is not cached:
```txt
Vary: User-Agent
```
## Normalization behavior
Vary normalization is the normalization performed when the configured action is `normalize`. It affects how Cloudflare selects a cached version and, for some headers, what Cloudflare forwards to the origin.
Normalization is optional but recommended for most deployments because it reduces the number of cached versions and improves cache hit ratio.
When a header's action is `normalize`, Cloudflare uses the normalized value to select the cached version. Normalization can be lossy: it may reorder values, drop quality values, lowercase values, or remove entries that are not in a configured allowlist.
### Origin request headers
For `Accept`, `Accept-Language`, and `Accept-Encoding` with [Respect Strong ETags](https://developers.cloudflare.com/cache/how-to/cache-rules/settings/#respect-strong-etags) enabled, Cloudflare may also forward the normalized header value to the origin. This keeps the response generated by the origin consistent with the cache key value Cloudflare uses for caching.
For example, if `accept-language` normalizes these two requests to `en,fr`, Cloudflare forwards `Accept-Language: en,fr` to the origin on a cache miss or revalidation:
```txt
Accept-Language: en-US, fr;q=0.8
Accept-Language: fr;q=0.8, en-GB
```
Forwarding the normalized value prevents Cloudflare from storing a response generated for one raw header value under a broader normalized value that another request could later reuse incorrectly.
This origin request rewrite applies to:
* `Accept`
* `Accept-Language`
* `Accept-Encoding`, only when Respect Strong ETags is enabled
This rewrite does not apply to:
* Headers configured as `passthrough`
* Headers configured as `bypass`
* Other generic headers
This rewrite happens before Cloudflare receives the origin response, so it is based on your Cache Rule configuration. If `Accept`, `Accept-Language`, or `Accept-Encoding` is configured with `normalize`, Cloudflare rewrites that request header when forwarding to the origin even if the origin's eventual response does not list that header in `Vary`. Cache selection and bypass still depend on the origin response's `Vary` header.
If normalization reduces a header to an empty value — for example, because none of the request's values match a configured `media_types` or `languages` list — Cloudflare removes that header from the origin request.
### Accept
Cloudflare normalizes the `Accept` request header in the following steps:
1. Convert MIME types to lowercase.
2. Strip optional whitespace.
3. Sort MIME types by quality value. Types with the same quality value are sorted alphabetically.
4. Strip parameters.
Quality values are used for sorting and then removed from the normalized value. `q=0` is preserved because it means "not acceptable" and should remain distinguishable from a low-priority value.
You can provide an optional `media_types` list. If provided, any MIME type not in the list is removed from the normalized value.
### Accept-Language
Cloudflare normalizes the `Accept-Language` request header in the following steps:
1. Convert languages to lowercase.
2. Strip optional whitespace.
3. Sort languages by quality value. Languages with the same quality value are sorted alphabetically.
4. Strip parameters.
5. Strip region variants. For example, `en-US` becomes `en`. If multiple region variants of the same language are present, they are combined into a single item.
Quality values are used for sorting and then removed from the normalized value. `q=0` is preserved because it means "not acceptable" and should remain distinguishable from a low-priority value.
You can provide an optional `languages` list. If provided, any language not in the list is removed from the normalized value. If an item in the list specifies a region variant, and there is a matching item in the request header, the region variant is retained in the normalized value.
### Accept-Encoding
By default, Cloudflare's CDN overrides the `Accept-Encoding` header based on the enabled compression encodings. If Brotli compression is enabled, the `Accept-Encoding` forwarded to the origin is `gzip, br`. If Brotli compression is not enabled, the `Accept-Encoding` forwarded to the origin is `gzip`. Cloudflare can then recompress cached assets based on the visitor's `Accept-Encoding`. For details, refer to [ETag headers](https://developers.cloudflare.com/cache/reference/etag-headers/).
This behavior can be turned off by enabling [Respect Strong ETags](https://developers.cloudflare.com/cache/how-to/cache-rules/settings/#respect-strong-etags). With Respect Strong ETags enabled, the visitor's `Accept-Encoding` is forwarded to the origin instead of Cloudflare's compression override. If Vary normalization is enabled for `Accept-Encoding`, the normalized value is used both to select the cached version and as the value forwarded to the origin.
Because Cloudflare controls `Accept-Encoding` when Respect Strong ETags is turned off, `Accept-Encoding` normalization only rewrites the origin request when Respect Strong ETags is turned on.
Cloudflare normalizes the `Accept-Encoding` request header in the following steps:
1. Convert encodings to lowercase.
2. Strip optional whitespace.
3. Sort encodings by quality value. Encodings with the same quality value are sorted alphabetically.
4. Strip parameters.
Quality values are used for sorting and then removed from the normalized value. `q=0` is preserved because it means "not acceptable" and should remain distinguishable from a low-priority value.
### Other headers
For any header other than `Accept`, `Accept-Language`, and `Accept-Encoding`, Cloudflare does not know the field's semantics. Normalization is restricted to transformations that are safe for any header:
* Multiple header field lines for the same header are combined into a single comma-separated value in the order received.
* Optional whitespace around each value is trimmed.
Values are not reordered, lowercased, deduplicated, or otherwise altered, because the order and contents of an arbitrary header may be significant.
For example, these two header field lines:
```txt
X-Custom-Header: Value2
X-Custom-Header: Value1
```
When selecting a cached version, Cloudflare combines these values as `Value2,Value1`. The header forwarded to the origin is not rewritten.
## Purge behavior
Purging a URL purges all cached versions for that URL. You do not need to send a separate [purge](https://developers.cloudflare.com/cache/how-to/purge-cache/) request for each `Vary` header value. This applies to purge methods that target the cached object, such as purge by URL, tag, hostname, prefix, or purge everything.
Changing Vary configuration does not itself purge cached content. Because a new Vary configuration can change how cached versions are selected, requests may miss and refill under the new cache keys until the old cached entries expire or are purged.
Was this helpful?
YesNo
## On this page
[Docs](https://developers.cloudflare.com/)
```json
{"@context":"https://schema.org","@type":"TechArticle","@id":"https://developers.cloudflare.com/cache/concepts/vary/#page","headline":"Vary · Cloudflare Cache (CDN) docs","description":"Cache multiple versions of the same URL based on the request headers your origin varies on.","url":"https://developers.cloudflare.com/cache/concepts/vary/","inLanguage":"en","image":"https://developers.cloudflare.com/og-docs.png","dateModified":"2026-07-02","publisher":{"@type":"Organization","name":"Cloudflare","url":"https://www.cloudflare.com/"},"isPartOf":{"@type":"WebSite","@id":"https://developers.cloudflare.com/#website","name":"Cloudflare Docs","url":"https://developers.cloudflare.com/"},"keywords":["Headers"]}
```
---
---
description: Definitions for terms used across Cloudflare Cache documentation.
title: Glossary
image: https://developers.cloudflare.com/og-docs.png
---
[Skip to content](#main-content)
> Documentation Index
> Fetch the complete documentation index at: https://developers.cloudflare.com/cache/llms.txt
> Use this file to discover all available pages before exploring further.
# Glossary
Last updated Apr 16, 2026|Copy as Markdown|[View as Markdown](https://developers.cloudflare.com/cache/glossary/index.md)|[Agent setup](https://developers.cloudflare.com/agent-setup/)
Review the definitions for terms used across Cloudflare's Cache documentation.
| Term | Definition |
| -------------------------------------------------------- | -------------------------------------------------------------------------------------------------------------------------------------------------------------------------------------------------------------------------------------------------------------------------------------------------------------------- |
| cache | A temporary storage area where frequently accessed data is stored for quick retrieval. |
| cache hit | When a requested piece of content is found in the cache, reducing the need to fetch it from the origin server. |
| cache lock | Cache lock (or mutex) is a mechanism employed by CDN data centers, comprising numerous servers, to prevent the overloading of origin servers. This mechanism ensures that only one server can request a specific file from the origin at any given time, facilitating efficient coordination among the servers. |
| cache miss | When a requested piece of content is not found in the cache, requiring the server to fetch it from the origin server. |
| cached bandwidth (cached egress bandwidth) | The amount of bandwidth served from Cloudflare without hitting the origin server. Cached bandwidth is the sum of all EdgeResponseBytes where CacheCacheStatus equals hit, stale, updating, ignored, or revalidated. |
| cached requests | The number of requests served from Cloudflare without having to hit the origin server. Cached requests are the sum of all requests where CacheCacheStatus equals hit, stale, updating, ignored. This does not include revalidated since the request had to be sent to the origin server. |
| caching | The process of storing copies of files or data in a cache to accelerate future requests. |
| dynamic content | Dynamic content refers to website content that changes based on factors specific to the user such as time of visit, location, and device. News websites or social media are examples of this type of content. For this type of website, content has to be fetched from the origin server every time it is requested. |
| edge server | A server located at the edge of a network, typically within a CDN, that serves content to end-users. |
| origin bandwidth (origin egress bandwidth) | The amount of data transferred from the origin server to Cloudflare within a certain period of time. Origin bandwidth is the sum of all EdgeResponseBytes where OriginResponseStatus does not equal 0. |
| origin server | The original server where the web content is hosted before it is distributed to edge servers in a CDN. |
| purge | The process of removing outdated content from the cache to make room for updated content and ensure the delivery of the latest content. |
| saved bandwidth (saved egress bandwidth) | The percentage of bandwidth saved by caching on the Cloudflare network. |
| static content | Static content, like images, stylesheets, and JavaScript, remains the same for all users. It can be directly served from the cache without fetching from the origin server because it does not change without manual intervention. |
| time-to-live (TTL) | The duration for which a cached copy of a resource is considered valid before it needs to be refreshed or revalidated. |
| total bandwidth (total egress bandwidth, edge bandwidth) | Total bandwidth is the amount of data transferred from Cloudflare to end users within a certain period of time. Total bandwidth equals the sum of all EdgeResponseBytes for a certain period of time. |
| uncached bandwidth (uncached egress bandwidth) | Uncached bandwidth is the amount of bandwidth that is not cached and therefore is served from the origin. Uncached bandwidth is the sum of all EdgeResponseBytes where CacheCacheStatus does not equal hit, stale, updating, ignored, or revalidated. |
| uncached requests | Uncached requests are requests that are not cached and therefore are served from the origin server. Uncached requests are the sum of all requests where CacheCacheStatus does not equal to hit, stale, updating, or ignored. |
Was this helpful?
YesNo
## On this page
[Docs](https://developers.cloudflare.com/)
```json
{"@context":"https://schema.org","@type":"TechArticle","@id":"https://developers.cloudflare.com/cache/glossary/#page","headline":"Glossary · Cloudflare Cache (CDN) docs","description":"Definitions for terms used across Cloudflare Cache documentation.","url":"https://developers.cloudflare.com/cache/glossary/","inLanguage":"en","image":"https://developers.cloudflare.com/og-docs.png","dateModified":"2026-04-16","publisher":{"@type":"Organization","name":"Cloudflare","url":"https://www.cloudflare.com/"},"isPartOf":{"@type":"WebSite","@id":"https://developers.cloudflare.com/#website","name":"Cloudflare Docs","url":"https://developers.cloudflare.com/"}}
```
---
---
description: Serve cached pages when your origin server is unavailable.
title: Always Online
image: https://developers.cloudflare.com/og-docs.png
---
[Skip to content](#main-content)
> Documentation Index
> Fetch the complete documentation index at: https://developers.cloudflare.com/cache/llms.txt
> Use this file to discover all available pages before exploring further.
# Always Online
Last updated May 22, 2026|Copy as Markdown|[View as Markdown](https://developers.cloudflare.com/cache/how-to/always-online/index.md)|[Agent setup](https://developers.cloudflare.com/agent-setup/)
Cloudflare’s Always Online feature is now integrated with the [Internet Archive ↗](https://archive.org/) so that visitors can access a portion of your website even when your origin server is unreachable and a Cloudflare-cached version is unavailable. When your origin is unreachable, Always Online checks Cloudflare’s cache for a stale or expired version of your website. If a version does not exist, Cloudflare goes to the Internet Archive to fetch and serve static portions of your website.
When you enable Always Online with Internet Archive integration, Cloudflare shares your hostname and popular URL paths with the archive so that the Internet Archive’s crawler stores the pages you want archived. When submitting targets to the crawler, Cloudflare identifies the most popular URLs found among GET requests that returned a 200 HTTP status code in the previous five hours.
Note that Cloudflare does not save a copy of every page of your website, and it cannot serve dynamic content while your origin is offline. If the requested page is not in the Internet Archive's Wayback Machine, the visitor sees the actual error page caused by the offline origin web server.
When the Internet Archive integration is enabled, Cloudflare tells the Internet Archive what pages to crawl and how often. The pages to crawl, as previously mentioned, are the most popular URLs that were successfully visited in the last five hours. The crawling intervals, to ensure stability of service, are limited by Cloudflare. Limits vary according to your Cloudflare plan.
## Availability
| | Free | Pro | Business | Enterprise |
| -------------- | ------------- | ------------- | ------------ | ------------ |
| Availability | Yes | Yes | Yes | Yes |
| Crawl interval | Every 30 days | Every 15 days | Every 5 days | Every 5 days |
## Visitor Experience
When Always Online with Internet Archive integration is enabled, visitors see a banner at the top of the webpage explaining they are visiting an archived version of the website. Visitors can select the Refresh button to check whether the origin has recovered and fresh content is available.
When a visitor requests content and Cloudflare is unable to reach your origin server, Cloudflare returns an HTTP response status code in the range [520–527](https://developers.cloudflare.com/support/troubleshooting/http-status-codes/cloudflare-5xx-errors/error-520/), depending on the issue. These status codes are generated by Cloudflare and indicate that the origin is unreachable. Always Online only activates when Cloudflare cannot connect to your origin — it does not activate when the origin is reachable but returning error responses.
If your origin is reachable and returns a 5xx status code (such as a 520), Always Online will not trigger because the origin is online. Always Online is designed to handle origin unreachability, not origin errors.
When the Internet Archive integration is enabled, Cloudflare checks the archive and serves the most recently archived version of the page.
Visitors who interact with dynamic parts of a website, such as a shopping cart or comment box, will see an error page caused by the offline origin web server.
## Enable Always Online
Here is how to enable Always Online in the dashboard:
1. In the Cloudflare dashboard, go to the **Configuration** page.
[Go to **Configuration** ↗](https://dash.cloudflare.com/?to=/:account/:zone/caching/configuration)
2. Choose the domain that will use Always Online with Internet Archive integration.
3. Under **Always Online**, set the toggle to **On**.
Note
When turning on Always Online, you are also enabling the Internet Archive integration.
Refer to [Always Online](https://developers.cloudflare.com/cache/troubleshooting/always-online/) for best practices, limitations, and FAQs.
Was this helpful?
YesNo
## On this page
[Docs](https://developers.cloudflare.com/)
```json
{"@context":"https://schema.org","@type":"TechArticle","@id":"https://developers.cloudflare.com/cache/how-to/always-online/#page","headline":"Always Online · Cloudflare Cache (CDN) docs","description":"Serve cached pages when your origin server is unavailable.","url":"https://developers.cloudflare.com/cache/how-to/always-online/","inLanguage":"en","image":"https://developers.cloudflare.com/og-docs.png","dateModified":"2026-05-22","publisher":{"@type":"Organization","name":"Cloudflare","url":"https://www.cloudflare.com/"},"isPartOf":{"@type":"WebSite","@id":"https://developers.cloudflare.com/#website","name":"Cloudflare Docs","url":"https://developers.cloudflare.com/"}}
```
---
---
description: Customize cache keys to control how Cloudflare stores cached resources.
title: Cache keys
image: https://developers.cloudflare.com/og-docs.png
---
[Skip to content](#main-content)
> Documentation Index
> Fetch the complete documentation index at: https://developers.cloudflare.com/cache/llms.txt
> Use this file to discover all available pages before exploring further.
# Cache keys
Last updated Apr 17, 2026|Copy as Markdown|[View as Markdown](https://developers.cloudflare.com/cache/how-to/cache-keys/index.md)|[Agent setup](https://developers.cloudflare.com/agent-setup/)
A Cache Key is an identifier that Cloudflare uses for a file in our cache, and the Cache Key Template defines the identifier for a given HTTP request.
A default cache key includes:
1. Full URL:
* scheme - could be HTTP or HTTPS.
* host - for example, `www.cloudflare.com`
* URI with query string - for example, `/logo.jpg?utm_source=newsletter`
2. Origin header sent by client (for CORS support).
3. `x-http-method-override`, `x-http-method`, and `x-method-override` headers.
4. `x-forwarded-host`, `x-host`, `x-forwarded-scheme` (unless http or https), `x-original-url`, `x-rewrite-url`, and `forwarded` headers.
## Create custom cache keys
Custom cache keys let you precisely set the cacheability setting for any resource. They provide the benefit of more control, though they may reduce your cache hit rate and result in cache sharding:
1. In the Cloudflare dashboard, go to the **Cache Rules** page.
[Go to **Cache Rules** ↗](https://dash.cloudflare.com/?to=/:account/:zone/caching/cache-rules)
2. Select **Create rule**.
3. Under **When incoming requests match**, define the [rule expression](https://developers.cloudflare.com/ruleset-engine/rules-language/expressions/edit-expressions/#expression-builder).
4. Under **Then**, in the **Cache eligibility** section, select **Eligible for cache**.
5. Add the **Cache Key** setting to the rule and select the appropriate **Query String** setting.
6. You can also select settings for **Headers**, **Cookie**, **Host**, and **User**.
7. To save and deploy your rule, select **Deploy**. If you are not ready to deploy your rule, select **Save as Draft**.
Note
When [URL normalization](https://developers.cloudflare.com/rules/normalization/) is enabled, we recommend also enabling [Normalize URLs to origin](https://developers.cloudflare.com/rules/normalization/manage/), especially if you are setting custom cache keys or using cache by device type, which also modifies the cache key. This helps ensure the URL in the cache key matches the URL sent to the origin, preventing cache poisoning and ensuring consistent behavior.
## Cache Key Template
There are a couple of common reasons to change the Cache Key Template. You might change the Cache Key Template to:
* Fragment the cache so one URL is stored in multiple files. For example, to store different files based on a specific query string in the URL.
* Consolidate the cache so different HTTP requests are stored in the same file. For example, to remove the Origin header added to Cloudflare Cache Keys by default.
### Impact of SSL settings on Cache behavior
Cloudflare's `$scheme` variable plays a key role in caching behavior, but its meaning varies depending on the cache key type:
* **Default Cache Key**: `$scheme` refers to the **origin scheme** — the protocol Cloudflare uses to connect to your origin server (HTTP or HTTPS). In this configuration, changes to your SSL settings (for example, switching from Flexible to Full) alter the origin scheme. Because the cache key includes the origin scheme, such changes trigger a cache bust, requiring Cloudflare to fetch content again from the origin.
* **Custom Cache Key**: `$scheme` refers to the **visitor's scheme** — the protocol used by the client making the request to Cloudflare. In this case, SSL setting changes do not impact the cache key unless the origin scheme is explicitly included in your custom configuration.
For example, with Flexible SSL, Cloudflare always connects to the origin over HTTP, regardless of whether the visitor uses HTTP or HTTPS. This results in the same cache key for both protocols under the default configuration.
Be aware that changes in the SSL setting can lead to cache invalidation when using the default cache key:
* Switching from **Off** to **Full**, **Full (strict)**, or **Strict** updates the origin scheme from HTTP to HTTPS, resulting in a cache bust.
* Moving from **Flexible** to **Full**, **Full (strict)**, or **Strict** similarly changes the origin scheme to HTTPS and causes a cache bust.
Understanding how `$scheme` interacts with your caching configuration is essential when modifying SSL modes to avoid unexpected cache behavior.
### Cache Level: Ignore Query String
A [Cache Level](https://developers.cloudflare.com/cache/how-to/set-caching-levels/) of Ignore Query String creates a Cache Key that includes all the elements in the default cache key, except for the query string in the URI that is no longer included. For instance, a request for `http://example.com/file.jpg?something=123` and a request for `http://example.com/file.jpg?something=789` will have the same cache key, in this case.
## Cache Key Settings
The following fields control the Cache Key Template.
### Query String
The query string controls which URL query string parameters go into the Cache Key. You can `include` specific query string parameters or `exclude` them using the respective fields. When you include a query string parameter, the `value` of the query string parameter is used in the Cache Key.
#### Example
If you include the query string foo in a URL like `https://www.example.com/?foo=bar`, then bar appears in the Cache Key. Exactly one of `include` or `exclude` is expected.
#### Usage notes
* To include all query string parameters (the default behavior), use include: `"\*"`
* To ignore query strings, use exclude: `"\*"`
* To include most query string parameters but exclude a few, use the exclude field which assumes the other query string parameters are included.
### Headers
Headers control which headers go into the Cache Key. Similar to Query String, you can include specific headers or exclude default headers.
When you include a header, the header value is included in the Cache Key. For example, if an HTTP request contains an HTTP header like `X-Auth-API-key: 12345`, and you include the `X-Auth-API-Key header` in your Cache Key Template, then `12345` appears in the Cache Key.
In the **Include headers and selected values** section, you can add header names and their values to the cache key. For custom headers, values are optional, but for the following restricted headers, you must include one to 10 specific values:
* `accept`
* `accept-charset`
* `accept-encoding`
* `accept-datetime`
* `accept-language`
* `referer`
* `user-agent`
To check for the presence of a header without including its actual value, use the **Check presence of** option.
Currently, you can only exclude the `Origin` header. The `Origin` header is always included unless explicitly excluded. Including the [Origin header ↗](https://developer.mozilla.org/en-US/docs/Web/HTTP/Reference/Headers/Origin) in the Cache Key is important to enforce [CORS ↗](https://developer.mozilla.org/en-US/docs/Glossary/CORS).
Additionally, you cannot include the following headers:
* Headers that re-implement cache or proxy features
* `connection`
* `content-length`
* `cache-control`
* `if-match`
* `if-modified-since`
* `if-none-match`
* `if-unmodified-since`
* `range`
* `upgrade`
* Headers that are covered by other Cache Key features
* `cookie`
* `host`
* Headers that are specific to Cloudflare and prefixed with `cf-`, for example, `cf-ray`
* Headers that are already included in the custom Cache Key template, for example, `origin`
### Host
Host determines which host header to include in the Cache Key.
* If `Use original host` (`resolved: false` in the API), Cloudflare includes the `Host` header in the HTTP request sent to the origin.
* If `Resolved host` (`resolved: true` in the API), Cloudflare includes the `Host` header that was resolved to get the `origin IP` for the request. The `Host` header may be different from the header actually sent if it has been changed with an [Origin Rule](https://developers.cloudflare.com/rules/origin-rules/features/#dns-record).
### Cookie
Like `query_string` or `header`, `cookie` controls which cookies appear in the Cache Key. You can either include the cookie value or check for the presence of a particular cookie.
#### Usage notes
You cannot include cookies specific to Cloudflare. Cloudflare cookies are prefixed with `__cf`, for example, `__cflb`
### User features
User feature fields add features about the end-user (client) into the Cache Key.
* `device_type` classifies a request as `mobile`, `desktop`, or `tablet` based on the User Agent
* `geo` includes the client’s country, derived from the IP address
* `lang` includes the first language code contained in the `Accept-Language` header sent by the client
## Availability
Cache keys options availability varies according to your plan.
| | Free | Pro | Business | Enterprise |
| --------------------- | ---- | --- | -------- | ---------- |
| Cache deception armor | Yes | Yes | Yes | Yes |
| Cache by device type | Yes | Yes | Yes | Yes |
| Ignore query string | Yes | Yes | Yes | Yes |
| Sort query string | Yes | Yes | Yes | Yes |
| Query string | No | No | No | Yes |
| Headers | No | No | No | Yes |
| Cookie | No | No | No | Yes |
| Host | No | No | No | Yes |
| User features | No | No | No | Yes |
## Troubleshooting
You can use [Cloudflare Trace](https://developers.cloudflare.com/rules/trace-request/) to find which Cache Key settings were applied to your request. When you send a request through the Trace tool, if the request was served from cache, it will show a cache hit in the **Cache Parameters** section. Then select **View parameter detail** to see exactly which Cache Key properties were used.
## Limitations
The [Prefetch](https://developers.cloudflare.com/speed/optimization/content/prefetch-urls/) feature is not compatible with the [Custom Cache Keys](https://developers.cloudflare.com/cache/how-to/cache-rules/examples/custom-cache-key/). With [Cache Rules](https://developers.cloudflare.com/cache/how-to/cache-rules/), the custom cache key is used to cache all assets. However, Prefetch always uses the default cache key. This results in a key mismatch.
Was this helpful?
YesNo
## On this page
[Docs](https://developers.cloudflare.com/)
```json
{"@context":"https://schema.org","@type":"TechArticle","@id":"https://developers.cloudflare.com/cache/how-to/cache-keys/#page","headline":"Cache Keys · Cloudflare Cache (CDN) docs","description":"Customize cache keys to control how Cloudflare stores cached resources.","url":"https://developers.cloudflare.com/cache/how-to/cache-keys/","inLanguage":"en","image":"https://developers.cloudflare.com/og-docs.png","dateModified":"2026-04-17","publisher":{"@type":"Organization","name":"Cloudflare","url":"https://www.cloudflare.com/"},"isPartOf":{"@type":"WebSite","@id":"https://developers.cloudflare.com/#website","name":"Cloudflare Docs","url":"https://developers.cloudflare.com/"},"keywords":["CORS","Geolocation","Headers","Cookies"]}
```
---
---
description: Control response headers and settings for cached content.
title: Cache Response Rules
image: https://developers.cloudflare.com/og-docs.png
---
[Skip to content](#main-content)
> Documentation Index
> Fetch the complete documentation index at: https://developers.cloudflare.com/cache/llms.txt
> Use this file to discover all available pages before exploring further.
# Cache Response Rules
Last updated Jun 30, 2026|Copy as Markdown|[View as Markdown](https://developers.cloudflare.com/cache/how-to/cache-response-rules/index.md)|[Agent setup](https://developers.cloudflare.com/agent-setup/)
Cache Response Rules allow you to configure cache settings based on request and response attributes. These rules execute prior to caching in the `http_response_cache_settings` phase, which runs after Cloudflare receives the origin response.
With Cache Response Rules you can:
* Modify `Cache-Control` directives sent by your origin.
* Modify cache tags on responses for targeted [cache purging](https://developers.cloudflare.com/cache/how-to/purge-cache/).
* Strip headers (`ETag`, `Set-Cookie`, `Last-Modified`) from origin responses before caching.
Cache Response Rules apply to both cached and non-cached (dynamic) responses from the origin. For example, you can strip Set-Cookie headers from responses that are not eligible for caching.
Cache Response Rules can be created in the [dashboard](https://developers.cloudflare.com/cache/how-to/cache-response-rules/create-dashboard/), via [API](https://developers.cloudflare.com/cache/how-to/cache-response-rules/create-api/), or [Terraform](https://developers.cloudflare.com/cache/how-to/cache-response-rules/terraform-example/).
Note
Cache Response Rules require that you [proxy the DNS records](https://developers.cloudflare.com/dns/proxy-status/) of your domain (or subdomain) through Cloudflare.
## Availability
The following table describes Cache Response Rules availability per plan.
| | Free | Pro | Business | Enterprise |
| --------------- | ---- | --- | -------- | ---------- |
| Availability | Yes | Yes | Yes | Yes |
| Number of rules | 10 | 25 | 50 | 300 |
## Troubleshooting
When troubleshooting Cache Response Rules, use [Cloudflare Trace](https://developers.cloudflare.com/rules/trace-request/) to determine if a rule is triggering for a specific URL.
## Relationship with Cache Rules
Cache Response Rules operate on the origin response, while [Cache Rules](https://developers.cloudflare.com/cache/how-to/cache-rules/) operate on the incoming request. When settings from both rule types conflict, Cache Response Rules take precedence.
Key differences:
* **Cache eligibility**: Cache Rules remain the only mechanism to decide whether content is eligible for caching. However, Cache Response Rules can make a cacheable asset non-cacheable by setting the `no-store` directive using the `set_cache_control` action.
* **Origin Cache Control (OCC)**: If any rule in the `http_response_cache_settings` phase matches, Cloudflare defaults to Origin Cache Control behavior (`origin_cache_control = true`).
* **CDN-Cache-Control precedence**: `Cache-Control` directives set by Cache Response Rules take precedence over origin-set `Cloudflare-CDN-Cache-Control` and `CDN-Cache-Control` headers. For more information, refer to [CDN-Cache-Control header precedence](https://developers.cloudflare.com/cache/concepts/cdn-cache-control/#header-precedence).
* **Stacking**: Cache Response Rules stack the same way as Cache Rules. When multiple rules specify the same setting, the last matching rule wins.
### Example: OCC precedence over Edge TTL
Consider the following scenario:
1. A Cache Rule sets **Edge TTL** to `override_origin` with a value of `7200` seconds (2 hours).
2. A Cache Response Rule uses `set_cache_control` to set `s-maxage` to `3600` seconds (1 hour) with `cloudflare_only` enabled.
3. The origin responds with `Cache-Control: s-maxage=600`.
In this case, the Cache Response Rule takes precedence. Cloudflare caches the asset for `3600` seconds (1 hour) based on the `s-maxage` directive set by the Cache Response Rule, while visitors still receive the original `s-maxage=600` from the origin because `cloudflare_only` is enabled.
## Difference from Workers and Transform Rules
Workers and [Response Header Transform Rules](https://developers.cloudflare.com/rules/transform/response-header-modification/) execute after the caching decision has been made and cannot influence whether or how a response is cached. Only [Cache Response Rules](https://developers.cloudflare.com/cache/how-to/cache-response-rules/) can modify caching behavior based on origin response headers.
If you need to override `Cache-Control` directives from the origin (for example, remove `private` or add `s-maxage`), use a [Cache Response Rule](https://developers.cloudflare.com/cache/how-to/cache-response-rules/) — not a Worker or Transform Rule.
## Notes
* If you strip last modified then Smart Edge Revalidation will be turned off.
* Cache Response Rules ignore [1xx HTTP response status codes](https://developers.cloudflare.com/support/troubleshooting/http-status-codes/1xx-informational/) as they are treated as informational responses.
* Cache Response Rules can be versioned. Refer to the [Version Management](https://developers.cloudflare.com/version-management/) documentation for more information.
Was this helpful?
YesNo
## On this page
[Docs](https://developers.cloudflare.com/)
```json
{"@context":"https://schema.org","@type":"TechArticle","@id":"https://developers.cloudflare.com/cache/how-to/cache-response-rules/#page","headline":"Cache Response Rules · Cloudflare Cache (CDN) docs","description":"Control response headers and settings for cached content.","url":"https://developers.cloudflare.com/cache/how-to/cache-response-rules/","inLanguage":"en","image":"https://developers.cloudflare.com/og-docs.png","dateModified":"2026-06-30","publisher":{"@type":"Organization","name":"Cloudflare","url":"https://www.cloudflare.com/"},"isPartOf":{"@type":"WebSite","@id":"https://developers.cloudflare.com/#website","name":"Cloudflare Docs","url":"https://developers.cloudflare.com/"}}
```
---
---
description: Create cache response rules using the Rulesets API.
title: Create a rule via API
image: https://developers.cloudflare.com/og-docs.png
---
[Skip to content](#main-content)
> Documentation Index
> Fetch the complete documentation index at: https://developers.cloudflare.com/cache/llms.txt
> Use this file to discover all available pages before exploring further.
# Create a rule via API
Last updated Apr 16, 2026|Copy as Markdown|[View as Markdown](https://developers.cloudflare.com/cache/how-to/cache-response-rules/create-api/index.md)|[Agent setup](https://developers.cloudflare.com/agent-setup/)
Use the [Rulesets API](https://developers.cloudflare.com/ruleset-engine/rulesets-api/) to create a Cache Response Rule via API. To configure the Cloudflare API, refer to the [API documentation](https://developers.cloudflare.com/fundamentals/api/get-started/).
## Basic rule settings
When creating a Cache Response Rule via API, make sure you:
* Set the rule action to one of the [available actions](https://developers.cloudflare.com/cache/how-to/cache-response-rules/settings/#available-actions).
* Define the parameters in the `action_parameters` field according to the [settings](https://developers.cloudflare.com/cache/how-to/cache-response-rules/settings/) you wish to configure for matching responses.
* Deploy the rule to the `http_response_cache_settings` phase entry point ruleset.
## Procedure
1. Use the [List zone rulesets](https://developers.cloudflare.com/api/resources/rulesets/methods/list/) method to check if a ruleset already exists for the `http_response_cache_settings` phase.
2. If the phase ruleset does not exist, create it using the [Create a zone ruleset](https://developers.cloudflare.com/api/resources/rulesets/methods/create/) operation. In the new ruleset properties, set the following values:
* kind: `zone`
* phase: `http_response_cache_settings`
3. Use the [Update a zone ruleset](https://developers.cloudflare.com/api/resources/rulesets/methods/update/) operation to add rules to the ruleset. Alternatively, include the rules in the [Create a zone ruleset](https://developers.cloudflare.com/api/resources/rulesets/methods/create/) request mentioned in the previous step.
## Example requests
These examples demonstrate all the available actions in Cache Response Rules using request and response matching criteria. Using these examples directly will cause any existing rules in the phase to be replaced.
Example: Strip response headers from JS files before caching
```bash
curl "https://api.cloudflare.com/client/v4/zones/$ZONE_ID/rulesets/phases/http_response_cache_settings/entrypoint" \
--request PUT \
--header "Authorization: Bearer $CLOUDFLARE_API_TOKEN" \
--json '{
"rules": [
{
"expression": "http.request.uri.path.extension eq \"js\"",
"description": "Strip caching headers from JS files",
"action": "set_cache_settings",
"action_parameters": {
"strip_etags": true,
"strip_set_cookie": true,
"strip_last_modified": true
}
}
]
}'
```
Example: Set static cache tags on API responses
```bash
curl "https://api.cloudflare.com/client/v4/zones/$ZONE_ID/rulesets/phases/http_response_cache_settings/entrypoint" \
--request PUT \
--header "Authorization: Bearer $CLOUDFLARE_API_TOKEN" \
--json '{
"rules": [
{
"expression": "http.request.uri.path starts_with \"/api/\"",
"description": "Tag API responses for targeted purging",
"action": "set_cache_tags",
"action_parameters": {
"operation": "set",
"values": [
"api-response",
"dynamic-content"
]
}
}
]
}'
```
Example: Add cache tags from a response header using an expression
```bash
curl "https://api.cloudflare.com/client/v4/zones/$ZONE_ID/rulesets/phases/http_response_cache_settings/entrypoint" \
--request PUT \
--header "Authorization: Bearer $CLOUDFLARE_API_TOKEN" \
--json '{
"rules": [
{
"expression": "any(http.response.headers.names[*] == \"Surrogate-Keys\")",
"description": "Extract cache tags from alternative CDN response header",
"action": "set_cache_tags",
"action_parameters": {
"operation": "add",
"expression": "split(http.response.headers[\"Surrogate-Keys\"][0], \",\", 1)"
}
}
]
}'
```
Example: Override cache-control with max-age
```bash
curl "https://api.cloudflare.com/client/v4/zones/$ZONE_ID/rulesets/phases/http_response_cache_settings/entrypoint" \
--request PUT \
--header "Authorization: Bearer $CLOUDFLARE_API_TOKEN" \
--json '{
"rules": [
{
"expression": "http.response.code eq 200",
"description": "Override cache-control for successful responses",
"action": "set_cache_control",
"action_parameters": {
"max-age": {
"operation": "set",
"value": 3600,
"cloudflare_only": true
}
}
}
]
}'
```
Example: Set private directive with qualifiers
```bash
curl "https://api.cloudflare.com/client/v4/zones/$ZONE_ID/rulesets/phases/http_response_cache_settings/entrypoint" \
--request PUT \
--header "Authorization: Bearer $CLOUDFLARE_API_TOKEN" \
--json '{
"rules": [
{
"expression": "http.request.uri.path starts_with \"/user/\"",
"description": "Mark user content as private",
"action": "set_cache_control",
"action_parameters": {
"private": {
"operation": "set",
"qualifiers": [
"X-User-Id",
"X-Session-Token"
]
},
"no-cache": {
"operation": "set"
}
}
}
]
}'
```
Example: Set immutable for static font assets
```bash
curl "https://api.cloudflare.com/client/v4/zones/$ZONE_ID/rulesets/phases/http_response_cache_settings/entrypoint" \
--request PUT \
--header "Authorization: Bearer $CLOUDFLARE_API_TOKEN" \
--json '{
"rules": [
{
"expression": "http.request.uri.path.extension in {\"woff2\" \"woff\" \"ttf\"}",
"description": "Mark fonts as immutable",
"action": "set_cache_control",
"action_parameters": {
"immutable": {
"operation": "set"
},
"max-age": {
"operation": "set",
"value": 31536000
}
}
}
]
}'
```
Example: Multiple rules with strip headers, tag responses, and set cache control
```bash
curl "https://api.cloudflare.com/client/v4/zones/$ZONE_ID/rulesets/phases/http_response_cache_settings/entrypoint" \
--request PUT \
--header "Authorization: Bearer $CLOUDFLARE_API_TOKEN" \
--json '{
"rules": [
{
"expression": "http.response.code eq 200 and http.request.uri.path.extension eq \"html\"",
"description": "Strip tracking headers from HTML responses",
"action": "set_cache_settings",
"action_parameters": {
"strip_etags": true,
"strip_set_cookie": true
}
},
{
"expression": "http.request.uri.path starts_with \"/products/\"",
"description": "Tag product pages for purging",
"action": "set_cache_tags",
"action_parameters": {
"operation": "add",
"values": [
"product-catalog",
"storefront"
]
}
},
{
"expression": "http.response.code eq 200",
"description": "Set cache control for all 200 responses",
"action": "set_cache_control",
"action_parameters": {
"s-maxage": {
"operation": "set",
"value": 86400,
"cloudflare_only": true
},
"must-revalidate": {
"operation": "set"
}
}
}
]
}'
```
## Required API token permissions
The API token used in API requests to manage Cache Response Rules must have the following permissions:
* _Zone_ \> _Cache Rules_ \> _Edit_
* _Account Rulesets_ \> _Edit_
* _Account Filter Lists_ \> _Edit_
Was this helpful?
YesNo
## On this page
[Docs](https://developers.cloudflare.com/)
```json
{"@context":"https://schema.org","@type":"TechArticle","@id":"https://developers.cloudflare.com/cache/how-to/cache-response-rules/create-api/#page","headline":"Create a Cache Response Rule via API · Cloudflare Cache (CDN) docs","description":"Create cache response rules using the Rulesets API.","url":"https://developers.cloudflare.com/cache/how-to/cache-response-rules/create-api/","inLanguage":"en","image":"https://developers.cloudflare.com/og-docs.png","dateModified":"2026-04-16","publisher":{"@type":"Organization","name":"Cloudflare","url":"https://www.cloudflare.com/"},"isPartOf":{"@type":"WebSite","@id":"https://developers.cloudflare.com/#website","name":"Cloudflare Docs","url":"https://developers.cloudflare.com/"}}
```
---
---
description: Create cache response rules in the Cloudflare dashboard.
title: Create a rule in the dashboard
image: https://developers.cloudflare.com/og-docs.png
---
[Skip to content](#main-content)
> Documentation Index
> Fetch the complete documentation index at: https://developers.cloudflare.com/cache/llms.txt
> Use this file to discover all available pages before exploring further.
# Create a rule in the dashboard
Last updated Apr 16, 2026|Copy as Markdown|[View as Markdown](https://developers.cloudflare.com/cache/how-to/cache-response-rules/create-dashboard/index.md)|[Agent setup](https://developers.cloudflare.com/agent-setup/)
1. In the Cloudflare dashboard, go to **Cache** \> **Cache Rules**.
[Go to **Cache Rules** ↗](https://dash.cloudflare.com/?to=/:account/:zone/caching/cache-rules)
2. Select the **Cache Response Rules** tab.
3. Select **Create rule**.
4. Enter a descriptive name for the rule in **Rule name**.
5. Under **When incoming requests match**, select **All incoming requests** if you want the rule to apply to all traffic or **Custom filter expression** if you want the rule to only apply to traffic matching the custom expression.
6. If you selected **Custom filter expression**, define the [rule expression](https://developers.cloudflare.com/ruleset-engine/rules-language/expressions/edit-expressions/#expression-builder). Use the **Field** drop-down list to choose an HTTP property and select an **Operator**. Both request fields (such as URI path or hostname) and response fields (such as response status code or response headers) are available for matching. Refer to [Available settings](https://developers.cloudflare.com/cache/how-to/cache-response-rules/settings/) for the full list of available fields and operators.
Note
Rules can be further customized by using the **Edit expression** option. You can find more information in [Edit expressions in the dashboard](https://developers.cloudflare.com/ruleset-engine/rules-language/expressions/edit-expressions/).
7. Following the selection of the field and operator, enter the corresponding value that will trigger the Cache Response Rule. For example, if the selected field is `Hostname` and the operator is `equals`, a value of `example.com` would mean the rule matches any request to that hostname.
8. Under **Then**, select one of the following actions:
* **Modify cache-control directives**: Set or remove `Cache-Control` directives sent by your origin. For each directive, choose **Set directive** or **Remove directive**. For duration-based directives like `max-age` or `s-maxage`, enter a value in seconds. Turn on **Cloudflare only** to apply the directive only within Cloudflare's cache without changing what visitors receive. Refer to [Supported directives](https://developers.cloudflare.com/cache/how-to/cache-response-rules/settings/#supported-directives) for the full list.
* **Modify cache tags**: Add, override, or remove cache tags on the response for targeted [purging](https://developers.cloudflare.com/cache/how-to/purge-cache/purge-by-tags/). Select one of the following operations:
* **Add to existing tags**: Append new tags to the current set.
* **Override existing tags**: Replace all current tags with the specified tags.
* **Remove from existing tags**: Remove specific tags from the current set.
For the tag source, you can either specify tags manually or select **Parse from response header** to extract tags from a response header value. When parsing from a header, you can split the header value using a custom separator (for example, commas instead of spaces).
* **Strip headers**: Remove `Set-Cookie`, `ETag`, or `Last-Modified` headers from the origin response before Cloudflare evaluates the response for caching. Select which headers to strip.
For more details on each action, refer to [Available settings](https://developers.cloudflare.com/cache/how-to/cache-response-rules/settings/#available-actions).
9. Under **Place at**, from the dropdown, you can select the order of your rule. From the main page, you can also change the order of the rules you have created.
10. To save and deploy your rule, select **Deploy**. If you are not ready to deploy your rule, select **Save as Draft**.
If you are matching a hostname in your rule expression, you may be prompted to create a proxied DNS record for that hostname. Refer to [Troubleshooting](https://developers.cloudflare.com/rules/reference/troubleshooting/#this-rule-may-not-apply-to-your-traffic) for more information.
Was this helpful?
YesNo
## On this page
[Docs](https://developers.cloudflare.com/)
```json
{"@context":"https://schema.org","@type":"TechArticle","@id":"https://developers.cloudflare.com/cache/how-to/cache-response-rules/create-dashboard/#page","headline":"Create a Cache Response Rule in the dashboard · Cloudflare Cache (CDN) docs","description":"Create cache response rules in the Cloudflare dashboard.","url":"https://developers.cloudflare.com/cache/how-to/cache-response-rules/create-dashboard/","inLanguage":"en","image":"https://developers.cloudflare.com/og-docs.png","dateModified":"2026-04-16","publisher":{"@type":"Organization","name":"Cloudflare","url":"https://www.cloudflare.com/"},"isPartOf":{"@type":"WebSite","@id":"https://developers.cloudflare.com/#website","name":"Cloudflare Docs","url":"https://developers.cloudflare.com/"}}
```
---
---
description: Available settings for cache response rules.
title: Available settings
image: https://developers.cloudflare.com/og-docs.png
---
[Skip to content](#main-content)
> Documentation Index
> Fetch the complete documentation index at: https://developers.cloudflare.com/cache/llms.txt
> Use this file to discover all available pages before exploring further.
# Available settings
Last updated Apr 16, 2026|Copy as Markdown|[View as Markdown](https://developers.cloudflare.com/cache/how-to/cache-response-rules/settings/index.md)|[Agent setup](https://developers.cloudflare.com/agent-setup/)
These are the settings that you can configure when creating a Cache Response Rule. Because Cache Response Rules execute after Cloudflare receives the origin response, both request and response fields are available for rule matching.
## Expression fields
### Request fields
| Field | Type | Description |
| -------------------------------- | ------ | ---------------------------------------------- |
| http.cookie | String | Full cookie header value |
| http.host | String | The HTTP Host header |
| http.referer | String | The HTTP Referer header |
| http.user\_agent | String | The HTTP User-Agent header |
| http.request.method | String | The HTTP request method |
| http.request.uri | String | The request URI |
| http.request.uri.path | String | The URI path |
| http.request.uri.path.basename | String | The basename of the URI path |
| http.request.uri.path.extension | String | The file extension from the URI path |
| http.request.uri.query | String | The query string |
| http.request.uri.args | Map | Query string arguments as key-value pairs |
| http.request.uri.args.names | Array | Query string argument names |
| http.request.uri.args.values | Array | Query string argument values |
| http.request.full\_uri | String | The full request URI including scheme and host |
| http.request.headers | Map | Request headers as key-value pairs |
| http.request.headers.names | Array | Request header names |
| http.request.headers.values | Array | Request header values |
| http.request.cookies | Map | Parsed cookies as key-value pairs |
| http.request.accepted\_languages | Array | Parsed Accept-Language header values |
### Response fields
| Field | Type | Description |
| ---------------------------- | ------- | --------------------------------------------- |
| http.response.code | Integer | The HTTP response status code from the origin |
| http.response.headers | Map | Response headers as key-value pairs |
| http.response.headers.names | Array | Response header names |
| http.response.headers.values | Array | Response header values |
If you select the [Edit expression](https://developers.cloudflare.com/ruleset-engine/rules-language/expressions/edit-expressions/#expression-editor) option, you can enter any of the above response fields.
## Functions
The following functions are available in this phase:
* all
* any
* concat
* decode\_base64
* ends\_with
* len
* lookup\_json\_integer
* lookup\_json\_string
* lower
* regex\_replace
* remove\_bytes
* remove\_query\_args
* split
* starts\_with
* substring
* to\_string
* upper
* url\_decode
* wildcard\_replace
For descriptions of each function, refer to [Functions](https://developers.cloudflare.com/ruleset-engine/rules-language/functions/).
## Operators
For the full list of operators, refer to [Operators](https://developers.cloudflare.com/ruleset-engine/rules-language/operators/).
## Available actions
Cache Response Rules support three actions:
| Action | Description |
| -------------------- | ----------------------------------------------------------------------------------------- |
| set\_cache\_settings | Strip headers (ETags, Set-Cookie, Last-Modified) from the origin response before caching. |
| set\_cache\_tags | Add, remove, or set cache tags on the response for targeted purging. |
| set\_cache\_control | Modify Cache-Control header directives in the origin response. |
---
### Action: set\_cache\_settings
Configures settings related to caching on the origin response. The following parameters are available:
| Parameter | Type | Description |
| --------------------- | ------- | -------------------------------------------------------------------- |
| strip\_etags | Boolean | Strip ETag headers from the origin response before caching. |
| strip\_set\_cookie | Boolean | Strip Set-Cookie headers from the origin response before caching. |
| strip\_last\_modified | Boolean | Strip Last-Modified headers from the origin response before caching. |
Note
If `strip_etags` or `strip_last_modified` is `true` after all matching rules are applied, [Smart Edge Revalidation ↗](https://blog.cloudflare.com/introducing-smart-edge-revalidation/) is disabled for the origin response.
API information
API action: `set_cache_settings`.
```json
"action_parameters": {
"strip_etags": true,
"strip_set_cookie": true,
"strip_last_modified": true
}
```
Refer to [Create a rule via API](https://developers.cloudflare.com/cache/how-to/cache-response-rules/create-api/) for complete API examples.
---
### Action: set\_cache\_tags
Modifies the cache tags associated with the response. Cache tags can be used for targeted [cache purging](https://developers.cloudflare.com/cache/how-to/purge-cache/purge-by-tags/).
| Parameter | Type | Description |
| ---------- | ------ | --------------------------------------------------------------------------------------- |
| operation | String | **Required.** One of: add, remove, set. |
| values | Array | A list of cache tag strings. Mutually exclusive with expression. |
| expression | String | An expression that evaluates to an array of cache tags. Mutually exclusive with values. |
API information
API action: `set_cache_tags`.
```json
"action_parameters": {
"operation": "set",
"values": ["api-response", "dynamic-content"]
}
```
```json
"action_parameters": {
"operation": "add",
"expression": "split(http.response.headers[\"Surrogate-Keys\"][0], \",\", 1)"
}
```
Refer to [Create a rule via API](https://developers.cloudflare.com/cache/how-to/cache-response-rules/create-api/) for complete API examples.
---
### Action: set\_cache\_control
Modifies Cache-Control header directives in the origin response.
#### Supported directives
**Directives with duration value (seconds):**
* `max-age`
* `s-maxage`
* `stale-if-error`
* `stale-while-revalidate`
**Directives with optional qualifiers (header names):**
* `private`
* `no-cache`
**Boolean directives:**
* `no-store`
* `no-transform`
* `must-revalidate`
* `proxy-revalidate`
* `must-understand`
* `public`
* `immutable`
#### Directive configuration
The available parameters depend on the directive type.
##### Directives with duration value
Applies to `max-age`, `s-maxage`, `stale-if-error`, and `stale-while-revalidate`.
| Parameter | Type | Description |
| ---------------- | ------- | ------------------------------------------------------------------------------------------------------------------------------- |
| operation | String | **Required.** set or remove. |
| cloudflare\_only | Boolean | When enabled, this setting only affects how Cloudflare caches your content. Your visitors still receive the original directive. |
| value | Integer | Duration in seconds. **Required when operation is set.** |
##### Directives with optional qualifiers
Applies to `private` and `no-cache`.
| Parameter | Type | Description |
| ---------------- | ------- | ------------------------------------------------------------------------------------------------------------------------------- |
| operation | String | **Required.** set or remove. |
| cloudflare\_only | Boolean | When enabled, this setting only affects how Cloudflare caches your content. Your visitors still receive the original directive. |
| qualifiers | Array | Optional list of header names to qualify the directive. |
##### Boolean directives
Applies to `no-store`, `no-transform`, `must-revalidate`, `proxy-revalidate`, `must-understand`, `public`, and `immutable`.
| Parameter | Type | Description |
| ---------------- | ------- | ------------------------------------------------------------------------------------------------------------------------------- |
| operation | String | **Required.** set or remove. |
| cloudflare\_only | Boolean | When enabled, this setting only affects how Cloudflare caches your content. Your visitors still receive the original directive. |
API information
API action: `set_cache_control`.
```json
"action_parameters": {
"max-age": {
"operation": "set",
"value": 3600,
"cloudflare_only": true
},
"stale-if-error": {
"operation": "remove"
}
}
```
Refer to [Create a rule via API](https://developers.cloudflare.com/cache/how-to/cache-response-rules/create-api/) for complete API examples.
Was this helpful?
YesNo
## On this page
[Docs](https://developers.cloudflare.com/)
```json
{"@context":"https://schema.org","@type":"TechArticle","@id":"https://developers.cloudflare.com/cache/how-to/cache-response-rules/settings/#page","headline":"Cache Response Rules settings · Cloudflare Cache (CDN) docs","description":"Available settings for cache response rules.","url":"https://developers.cloudflare.com/cache/how-to/cache-response-rules/settings/","inLanguage":"en","image":"https://developers.cloudflare.com/og-docs.png","dateModified":"2026-04-16","publisher":{"@type":"Organization","name":"Cloudflare","url":"https://www.cloudflare.com/"},"isPartOf":{"@type":"WebSite","@id":"https://developers.cloudflare.com/#website","name":"Cloudflare Docs","url":"https://developers.cloudflare.com/"}}
```
---
---
description: Create cache response rules using Terraform.
title: Terraform example
image: https://developers.cloudflare.com/og-docs.png
---
[Skip to content](#main-content)
> Documentation Index
> Fetch the complete documentation index at: https://developers.cloudflare.com/cache/llms.txt
> Use this file to discover all available pages before exploring further.
# Terraform example
Last updated Apr 16, 2026|Copy as Markdown|[View as Markdown](https://developers.cloudflare.com/cache/how-to/cache-response-rules/terraform-example/index.md)|[Agent setup](https://developers.cloudflare.com/agent-setup/)
The following example defines a single Cache Response Rule for a zone using Terraform. The rule strips Set-Cookie and ETag headers from JavaScript file responses before caching.
Terraform `cloudflare_ruleset` resource
```tf
# Cache Response Rule to strip headers from JS responses
resource "cloudflare_ruleset" "cache_response_rules_example" {
zone_id = ""
name = "Cache Response Rules"
description = "Configure cache settings for origin responses"
kind = "zone"
phase = "http_response_cache_settings"
rules {
ref = "strip_js_headers"
description = "Strip caching headers from JS file responses"
expression = "http.request.uri.path.extension eq \"js\""
action = "set_cache_settings"
action_parameters {
strip_etags = true
strip_set_cookie = true
}
}
rules {
ref = "tag_api_responses"
description = "Tag API responses for targeted purging"
expression = "starts_with(http.request.uri.path, \"/api/\")"
action = "set_cache_tags"
action_parameters {
operation = "set"
values = ["api-response", "dynamic-content"]
}
}
rules {
ref = "cache_control_200"
description = "Set cache-control for successful responses"
expression = "http.response.code eq 200"
action = "set_cache_control"
action_parameters {
s_maxage {
operation = "set"
value = 86400
cloudflare_only = true
}
must_revalidate {
operation = "set"
}
}
}
}
```
Use the `ref` field to get stable rule IDs across updates when using Terraform. Adding this field prevents Terraform from recreating the rule on changes. For more information, refer to [Troubleshooting](https://developers.cloudflare.com/terraform/troubleshooting/rule-id-changes/#how-to-keep-the-same-rule-id-between-modifications) in the Terraform documentation.
For additional guidance on using Terraform with Cloudflare, refer to [Terraform](https://developers.cloudflare.com/terraform/).
Was this helpful?
YesNo
## On this page
[Docs](https://developers.cloudflare.com/)
```json
{"@context":"https://schema.org","@type":"TechArticle","@id":"https://developers.cloudflare.com/cache/how-to/cache-response-rules/terraform-example/#page","headline":"Cache Response Rules Terraform example · Cloudflare Cache (CDN) docs","description":"Create cache response rules using Terraform.","url":"https://developers.cloudflare.com/cache/how-to/cache-response-rules/terraform-example/","inLanguage":"en","image":"https://developers.cloudflare.com/og-docs.png","dateModified":"2026-04-16","publisher":{"@type":"Organization","name":"Cloudflare","url":"https://www.cloudflare.com/"},"isPartOf":{"@type":"WebSite","@id":"https://developers.cloudflare.com/#website","name":"Cloudflare Docs","url":"https://developers.cloudflare.com/"},"keywords":["Terraform"]}
```
---
---
description: Control what and how Cloudflare caches with Cache Rules.
title: Cache Rules
image: https://developers.cloudflare.com/og-docs.png
---
[Skip to content](#main-content)
> Documentation Index
> Fetch the complete documentation index at: https://developers.cloudflare.com/cache/llms.txt
> Use this file to discover all available pages before exploring further.
# Cache Rules
Last updated Jul 23, 2026|Copy as Markdown|[View as Markdown](https://developers.cloudflare.com/cache/how-to/cache-rules/index.md)|[Agent setup](https://developers.cloudflare.com/agent-setup/)
Use Cache Rules to customize cache settings on Cloudflare. Cache Rules allows you to make adjustments to what is eligible to cache, how long it should be cached and where, as well as trigger specific interactions with Cloudflare's cache and other Rules products for matching requests.
Cache Rules can be created in the [dashboard](https://developers.cloudflare.com/cache/how-to/cache-rules/create-dashboard/), via [API](https://developers.cloudflare.com/cache/how-to/cache-rules/create-api/) or [Terraform](https://developers.cloudflare.com/cache/how-to/cache-rules/terraform-example/).
Notes
Cache Rules require that you [proxy the DNS records](https://developers.cloudflare.com/dns/proxy-status/) of your domain (or subdomain) through Cloudflare.
Rules can be versioned. Refer to the [Version Management](https://developers.cloudflare.com/version-management/) documentation for more information.
## Rules templates
Cloudflare provides you with rules templates for common use cases.
1. In the Cloudflare dashboard, go to the Rules **Overview** page.
[Go to **Overview** ↗](https://dash.cloudflare.com/?to=/:account/:zone/rules/overview)
2. Select **Templates**, and then select one of the available templates.
You can also refer to the [Examples gallery](https://developers.cloudflare.com/rules/examples/) in the developer docs.
## Availability
The following table describes Cache Rules availability per plan.
| | Free | Pro | Business | Enterprise |
| --------------- | ---- | --- | -------- | ---------- |
| Availability | Yes | Yes | Yes | Yes |
| Number of rules | 10 | 25 | 50 | 300 |
## Cache Rules and cache keys
When a Cache Rule sets a [custom cache key](https://developers.cloudflare.com/cache/how-to/cache-keys/), the resulting cache entry is indexed by that key rather than the request URL alone. Depending on what the custom cache key includes, this may affect [single-file purge](https://developers.cloudflare.com/cache/how-to/purge-cache/purge-by-single-file/):
* **Custom cache keys that only change how the query string is handled** (for example, ignoring the query string) generally work with dashboard single-file purge.
* **Custom cache keys that include headers, cookies, or other request properties** will prevent dashboard single-file purge from working, because the dashboard cannot send those values in a purge request.
* **Even without Cache Rules**, Cloudflare's default cache key includes certain request headers. Dashboard single-file purge may not work for resources cached with those headers present.
To purge resources that cannot be cleared via dashboard single-file purge, you have the following options:
* Use the API to [purge by URL](https://developers.cloudflare.com/api/resources/cache/methods/purge/#purge-cached-content-by-url), including all headers, cookies, and query strings that are part of your custom cache key. If any header or cookie is missing from the purge request, it is treated as an empty value in the cache key.
* [Purge by host](https://developers.cloudflare.com/cache/how-to/purge-cache/purge-by-hostname/), which clears all resources for a hostname and is not affected by custom cache keys.
* [Purge by prefix](https://developers.cloudflare.com/cache/how-to/purge-cache/purge%5Fby%5Fprefix/), which purges all resources under a URL path and is not affected by custom cache keys.
* [Purge by tag](https://developers.cloudflare.com/cache/how-to/purge-cache/purge-by-tags/), which is not affected by custom cache keys.
* [Purge everything](https://developers.cloudflare.com/cache/how-to/purge-cache/purge-everything/), which clears all cached resources for the zone.
For more information, refer to [Cache keys](https://developers.cloudflare.com/cache/how-to/cache-keys/) and [Purge cache key resources](https://developers.cloudflare.com/cache/how-to/purge-cache/purge-cache-key/).
## Troubleshooting
When troubleshooting Cache Rules, use [Cloudflare Trace](https://developers.cloudflare.com/rules/trace-request/) to determine if a rule is triggering for a specific URL.
Was this helpful?
YesNo
## On this page
[Docs](https://developers.cloudflare.com/)
```json
{"@context":"https://schema.org","@type":"TechArticle","@id":"https://developers.cloudflare.com/cache/how-to/cache-rules/#page","headline":"Cache Rules · Cloudflare Cache (CDN) docs","description":"Control what and how Cloudflare caches with Cache Rules.","url":"https://developers.cloudflare.com/cache/how-to/cache-rules/","inLanguage":"en","image":"https://developers.cloudflare.com/og-docs.png","dateModified":"2026-07-23","publisher":{"@type":"Organization","name":"Cloudflare","url":"https://www.cloudflare.com/"},"isPartOf":{"@type":"WebSite","@id":"https://developers.cloudflare.com/#website","name":"Cloudflare Docs","url":"https://developers.cloudflare.com/"}}
```
---
---
description: Create cache rules using the Rulesets API.
title: Create a rule via API
image: https://developers.cloudflare.com/og-docs.png
---
[Skip to content](#main-content)
> Documentation Index
> Fetch the complete documentation index at: https://developers.cloudflare.com/cache/llms.txt
> Use this file to discover all available pages before exploring further.
# Create a rule via API
Last updated Jun 27, 2026|Copy as Markdown|[View as Markdown](https://developers.cloudflare.com/cache/how-to/cache-rules/create-api/index.md)|[Agent setup](https://developers.cloudflare.com/agent-setup/)
Use the [Rulesets API](https://developers.cloudflare.com/ruleset-engine/rulesets-api/) to create a cache rule via API. To configure Cloudflare’s API refer to the [API documentation](https://developers.cloudflare.com/fundamentals/api/get-started/).
## Basic rule settings
When creating a cache rule via API, make sure you:
* Set the rule action to `set_cache_settings`.
* Define the parameters in the `action_parameters` field according to the [settings](https://developers.cloudflare.com/cache/how-to/cache-rules/settings/) you wish to override for matching requests.
* Deploy the rule to the `http_request_cache_settings` phase entry point ruleset.
## Procedure
1. Use the [List zone rulesets](https://developers.cloudflare.com/api/resources/rulesets/methods/list/) method to obtain the list of rules already present in the `http_request_cache_settings` phase entry point ruleset.
2. If the phase ruleset does not exist, create it using the [Create a zone ruleset](https://developers.cloudflare.com/api/resources/rulesets/methods/create/) operation. In the new ruleset properties, set the following values:
* kind: `zone`
* phase: `http_request_cache_settings`
3. Use the [Update a zone ruleset](https://developers.cloudflare.com/api/resources/rulesets/methods/update/) operation to add a cache rule to the list of ruleset rules. Alternatively, include the rule in the [Create a zone ruleset](https://developers.cloudflare.com/api/resources/rulesets/methods/create/) request mentioned in the previous step.
4. (Optional) To update an existing cache rule, use the [Update a zone ruleset rule](https://developers.cloudflare.com/api/resources/rulesets/methods/update/) operation. For an example, refer to the section below.
## Example requests
These examples are setting all the Cache Rules of a zone to a single rule, since using these examples directly will cause any existing rules to be deleted.
Example: Cache everything for example.com
```bash
curl "https://api.cloudflare.com/client/v4/zones/$ZONE_ID/rulesets/$RULESET_ID" \
--request PUT \
--header "Authorization: Bearer $CLOUDFLARE_API_TOKEN" \
--json '{
"rules": [
{
"expression": "(http.host eq \"example.com\")",
"description": "cache everything for example.com",
"action": "set_cache_settings",
"action_parameters": {
"cache": true
}
}
]
}'
```
Example: Extend read timeout for Android clients
```bash
curl "https://api.cloudflare.com/client/v4/zones/$ZONE_ID/rulesets/$RULESET_ID" \
--request PUT \
--header "Authorization: Bearer $CLOUDFLARE_API_TOKEN" \
--json '{
"rules": [
{
"expression": "(http.user_agent contains \"Android\")",
"description": "extend read timeout for android clients",
"action": "set_cache_settings",
"action_parameters": {
"cache": true,
"read_timeout": 300
}
}
]
}'
```
Example: Disable Cache Reserve for frequently updated assets
```bash
curl "https://api.cloudflare.com/client/v4/zones/$ZONE_ID/rulesets/$RULESET_ID" \
--request PUT \
--header "Authorization: Bearer $CLOUDFLARE_API_TOKEN" \
--json '{
"rules": [
{
"expression": "(starts_with(http.request.uri, \"/feed/\"))",
"description": "disable cache reserve for frequently updated assets",
"action": "set_cache_settings",
"action_parameters": {
"cache": true,
"cache_reserve": {
"enabled": false
}
}
}
]
}'
```
Example: Turn off default cache TTLs
```bash
curl "https://api.cloudflare.com/client/v4/zones/$ZONE_ID/rulesets/$RULESET_ID" \
--request PUT \
--header "Authorization: Bearer $CLOUDFLARE_API_TOKEN" \
--json '{
"rules": [
{
"expression": "(http.host eq \"example.com\")",
"description": "turn off default cache ttls",
"action": "set_cache_settings",
"action_parameters": {
"cache": true,
"edge_ttl": {
"mode": "bypass_by_default"
}
}
}
]
}'
```
Example: Cache expected Vary responses
```bash
curl "https://api.cloudflare.com/client/v4/zones/$ZONE_ID/rulesets/phases/http_request_cache_settings/entrypoint" \
--request PUT \
--header "Authorization: Bearer $CLOUDFLARE_API_TOKEN" \
--json '{
"rules": [
{
"expression": "(http.host eq \"example.com\")",
"description": "cache expected vary responses",
"action": "set_cache_settings",
"action_parameters": {
"cache": true,
"vary": {
"default": {
"action": "bypass"
},
"headers": {
"accept": {
"action": "normalize",
"media_types": [
"text/html",
"application/json"
]
},
"accept-language": {
"action": "normalize",
"languages": [
"en",
"fr",
"de"
]
}
}
}
}
}
]
}'
```
Example: Update the position of an existing rule
```bash
curl "https://api.cloudflare.com/client/v4/zones/$ZONE_ID/rulesets/$RULESET_ID/rules/$RULE_ID" \
--request PATCH \
--header "Authorization: Bearer $CLOUDFLARE_API_TOKEN" \
--json '{
"expression": "(http.host eq \"example.com\")",
"description": "cache everything for example.com",
"action": "set_cache_settings",
"action_parameters": {
"cache": true
},
"enabled": true,
"position": {
"before": "da5e8e506c8e7877fe06cdf4c41add54"
}
}'
```
## Required API token permissions
The API token used in API requests to manage Cache Rules must have the following permissions:
* _Zone_ \> _Cache Rules_ \> _Edit_
* _Account Rulesets_ \> _Edit_
* _Account Filter Lists_ \> _Edit_
Was this helpful?
YesNo
## On this page
[Docs](https://developers.cloudflare.com/)
```json
{"@context":"https://schema.org","@type":"TechArticle","@id":"https://developers.cloudflare.com/cache/how-to/cache-rules/create-api/#page","headline":"Create a cache rule via API · Cloudflare Cache (CDN) docs","description":"Create cache rules using the Rulesets API.","url":"https://developers.cloudflare.com/cache/how-to/cache-rules/create-api/","inLanguage":"en","image":"https://developers.cloudflare.com/og-docs.png","dateModified":"2026-06-27","publisher":{"@type":"Organization","name":"Cloudflare","url":"https://www.cloudflare.com/"},"isPartOf":{"@type":"WebSite","@id":"https://developers.cloudflare.com/#website","name":"Cloudflare Docs","url":"https://developers.cloudflare.com/"}}
```
---
---
description: Create cache rules in the Cloudflare dashboard.
title: Create a rule in the dashboard
image: https://developers.cloudflare.com/og-docs.png
---
[Skip to content](#main-content)
> Documentation Index
> Fetch the complete documentation index at: https://developers.cloudflare.com/cache/llms.txt
> Use this file to discover all available pages before exploring further.
# Create a rule in the dashboard
Last updated Apr 16, 2026|Copy as Markdown|[View as Markdown](https://developers.cloudflare.com/cache/how-to/cache-rules/create-dashboard/index.md)|[Agent setup](https://developers.cloudflare.com/agent-setup/)
1. In the Cloudflare dashboard, go to the **Cache Rules** page.
[Go to **Cache Rules** ↗](https://dash.cloudflare.com/?to=/:account/:zone/caching/cache-rules)
2. Select **Create rule**.
3. (Optional) Select one of the rule templates that address common use cases. Then, review and adjust the proposed rule configuration.
4. Enter a descriptive name for the rule in **Rule name**.
5. Under **When incoming requests match**, select **All incoming requests** if you want the rule to apply to all traffic or **Custom filter expression** if you want the rule to only apply to traffic matching the custom expression.
6. If you selected **Custom filter expression**, under **When incoming requests match**, define the [rule expression](https://developers.cloudflare.com/ruleset-engine/rules-language/expressions/edit-expressions/#expression-builder). Use the **Field** drop-down list to choose an HTTP property and select an **Operator**. Refer to [Available settings](https://developers.cloudflare.com/cache/how-to/cache-rules/settings/) for the list of available fields and operators.
7. Following the selection of the field and operator, enter the corresponding value that will trigger the Cache Rule. For example, if the selected field is `Hostname` and the operator is `equals`, a value of `cloudflare.com` would mean the rule matches any request to that hostname.

Note
Rules can be further customized by using the **Edit expression** option. You can find more information in [Edit expressions in the dashboard](https://developers.cloudflare.com/ruleset-engine/rules-language/expressions/edit-expressions/).
8. Under **Then**, in the **Cache eligibility** section, select [**Bypass cache**](https://developers.cloudflare.com/cache/how-to/cache-rules/settings/#bypass-cache) if you want matching requests to not be cacheable, or **Eligible for cache** if you want Cloudflare to attempt to cache them. Note that [cache-control headers](https://developers.cloudflare.com/cache/concepts/cache-control/) can also impact cache eligibility.
9. If you selected **Eligible for cache** in the previous step, you can customize the options described in the [Available settings](https://developers.cloudflare.com/cache/how-to/cache-rules/settings/) section.
10. Under **Place at**, from the dropdown, you can select the order of your rule. From the main page, you can also change the order of the rules you have created.
11. To save and deploy your rule, select **Deploy**. If you are not ready to deploy your rule, select **Save as Draft**.
If you are matching a hostname in your rule expression, you may be prompted to create a proxied DNS record for that hostname. Refer to [Troubleshooting](https://developers.cloudflare.com/rules/reference/troubleshooting/#this-rule-may-not-apply-to-your-traffic) for more information.
Was this helpful?
YesNo
## On this page
[Docs](https://developers.cloudflare.com/)
```json
{"@context":"https://schema.org","@type":"TechArticle","@id":"https://developers.cloudflare.com/cache/how-to/cache-rules/create-dashboard/#page","headline":"Create a cache rule in the dashboard · Cloudflare Cache (CDN) docs","description":"Create cache rules in the Cloudflare dashboard.","url":"https://developers.cloudflare.com/cache/how-to/cache-rules/create-dashboard/","inLanguage":"en","image":"https://developers.cloudflare.com/og-docs.png","dateModified":"2026-04-16","publisher":{"@type":"Organization","name":"Cloudflare","url":"https://www.cloudflare.com/"},"isPartOf":{"@type":"WebSite","@id":"https://developers.cloudflare.com/#website","name":"Cloudflare Docs","url":"https://developers.cloudflare.com/"}}
```
---
---
description: Browser Cache TTL
title: Browser Cache TTL
image: https://developers.cloudflare.com/og-docs.png
---
[Skip to content](#main-content)
> Documentation Index
> Fetch the complete documentation index at: https://developers.cloudflare.com/cache/llms.txt
> Use this file to discover all available pages before exploring further.
# Browser Cache TTL
Browser Cache TTL
Last updated Oct 13, 2025|Copy as Markdown|[View as Markdown](https://developers.cloudflare.com/cache/how-to/cache-rules/examples/browser-cache-ttl/index.md)|[Agent setup](https://developers.cloudflare.com/agent-setup/)
Note
If you are migrating from Page Rules and you want to keep Page Rules behavior, you need to create two specific rules before creating this rule. For more details refer to [Migration from Page Rules](https://developers.cloudflare.com/cache/how-to/cache-rules/page-rules-migration/).
[Create a cache rule](https://developers.cloudflare.com/cache/how-to/cache-rules/create-dashboard/) to adjust browser cache TTL for caching resources in the browser to one day for any hostname containing `example.com`:
* **When incoming requests match**: Custom filter expression
* Using the Expression Builder:
`Hostname contains "example.com"`
* Using the Expression Editor:
`(http.host contains "example.com")`
* **Then**:
* **Cache eligibility**: Eligible for cache
* **Browser TTL**: Override origin and use this TTL
* **Input time-to-live (TTL)**: _1 day_
Was this helpful?
YesNo
## On this page
[Docs](https://developers.cloudflare.com/)
```json
{"@context":"https://schema.org","@type":"TechArticle","@id":"https://developers.cloudflare.com/cache/how-to/cache-rules/examples/browser-cache-ttl/#page","headline":"Browser Cache TTL · Cloudflare Cache (CDN) docs","description":"Browser Cache TTL","url":"https://developers.cloudflare.com/cache/how-to/cache-rules/examples/browser-cache-ttl/","inLanguage":"en","image":"https://developers.cloudflare.com/og-docs.png","dateModified":"2025-10-13","publisher":{"@type":"Organization","name":"Cloudflare","url":"https://www.cloudflare.com/"},"isPartOf":{"@type":"WebSite","@id":"https://developers.cloudflare.com/#website","name":"Cloudflare Docs","url":"https://developers.cloudflare.com/"}}
```
---
---
description: Bypass Cache on Cookie
title: Bypass Cache on Cookie
image: https://developers.cloudflare.com/og-docs.png
---
[Skip to content](#main-content)
> Documentation Index
> Fetch the complete documentation index at: https://developers.cloudflare.com/cache/llms.txt
> Use this file to discover all available pages before exploring further.
# Bypass Cache on Cookie
Bypass Cache on Cookie
Last updated Apr 16, 2026|Copy as Markdown|[View as Markdown](https://developers.cloudflare.com/cache/how-to/cache-rules/examples/bypass-cache-on-cookie/index.md)|[Agent setup](https://developers.cloudflare.com/agent-setup/)
Note
If you are migrating from Page Rules and you want to keep Page Rules behavior, you need to create two specific rules before creating this rule. For more details refer to [Migration from Page Rules](https://developers.cloudflare.com/cache/how-to/cache-rules/page-rules-migration/).
[Create a cache rule](https://developers.cloudflare.com/cache/how-to/cache-rules/create-dashboard/) to bypass cache for requests containing cookie `test_cookie` for any hostname containing `example.com`:
* **When incoming requests match**: Custom filter expression
* Using the Expression Builder:
`Hostname contains "example.com" AND Cookie contains "test-cookie"`
* Using the Expression Editor:
`(http.host contains "example.com" and http.cookie contains "test-cookie")`
* **Then**:
* **Cache eligibility**: Bypass cache
Was this helpful?
YesNo
## On this page
[Docs](https://developers.cloudflare.com/)
```json
{"@context":"https://schema.org","@type":"TechArticle","@id":"https://developers.cloudflare.com/cache/how-to/cache-rules/examples/bypass-cache-on-cookie/#page","headline":"Bypass Cache on Cookie · Cloudflare Cache (CDN) docs","description":"Bypass Cache on Cookie","url":"https://developers.cloudflare.com/cache/how-to/cache-rules/examples/bypass-cache-on-cookie/","inLanguage":"en","image":"https://developers.cloudflare.com/og-docs.png","dateModified":"2026-04-16","publisher":{"@type":"Organization","name":"Cloudflare","url":"https://www.cloudflare.com/"},"isPartOf":{"@type":"WebSite","@id":"https://developers.cloudflare.com/#website","name":"Cloudflare Docs","url":"https://developers.cloudflare.com/"},"keywords":["Cookies"]}
```
---
---
description: Cache everything for hostnames in a list
title: Cache everything for hostnames in a list
image: https://developers.cloudflare.com/og-docs.png
---
[Skip to content](#main-content)
> Documentation Index
> Fetch the complete documentation index at: https://developers.cloudflare.com/cache/llms.txt
> Use this file to discover all available pages before exploring further.
# Cache everything for hostnames in a list
Cache everything for hostnames in a list
Last updated Jun 12, 2026|Copy as Markdown|[View as Markdown](https://developers.cloudflare.com/cache/how-to/cache-rules/examples/cache-by-hostname-list/index.md)|[Agent setup](https://developers.cloudflare.com/agent-setup/)
[Create a cache rule](https://developers.cloudflare.com/cache/how-to/cache-rules/create-dashboard/) to cache everything for hostnames that match a [custom hostname list](https://developers.cloudflare.com/waf/tools/lists/custom-lists/#lists-with-hostnames):
* **When incoming requests match**: Custom filter expression
* Using the Expression Builder:
`Hostname is in list "my_hostnames"`
* Using the Expression Editor:
`(http.host in $my_hostnames)`
* **Then**:
* **Cache eligibility**: Eligible for cache
Note
The **is in list** operator requires an Enterprise plan. You must first [create a hostname list](https://developers.cloudflare.com/waf/tools/lists/create-dashboard/) in your account before you can reference it in a cache rule expression.
Was this helpful?
YesNo
## On this page
[Docs](https://developers.cloudflare.com/)
```json
{"@context":"https://schema.org","@type":"TechArticle","@id":"https://developers.cloudflare.com/cache/how-to/cache-rules/examples/cache-by-hostname-list/#page","headline":"Cache everything for hostnames in a list · Cloudflare Cache (CDN) docs","description":"Cache everything for hostnames in a list","url":"https://developers.cloudflare.com/cache/how-to/cache-rules/examples/cache-by-hostname-list/","inLanguage":"en","image":"https://developers.cloudflare.com/og-docs.png","dateModified":"2026-06-12","publisher":{"@type":"Organization","name":"Cloudflare","url":"https://www.cloudflare.com/"},"isPartOf":{"@type":"WebSite","@id":"https://developers.cloudflare.com/#website","name":"Cloudflare Docs","url":"https://developers.cloudflare.com/"}}
```
---
---
description: Cache Deception Armor
title: Cache Deception Armor
image: https://developers.cloudflare.com/og-docs.png
---
[Skip to content](#main-content)
> Documentation Index
> Fetch the complete documentation index at: https://developers.cloudflare.com/cache/llms.txt
> Use this file to discover all available pages before exploring further.
# Cache Deception Armor
Cache Deception Armor
Last updated Apr 16, 2026|Copy as Markdown|[View as Markdown](https://developers.cloudflare.com/cache/how-to/cache-rules/examples/cache-deception-armor/index.md)|[Agent setup](https://developers.cloudflare.com/agent-setup/)
Note
If you are migrating from Page Rules and you want to keep Page Rules behavior, you need to create two specific rules before creating this rule. For more details refer to [Migration from Page Rules](https://developers.cloudflare.com/cache/how-to/cache-rules/page-rules-migration/).
[Create a cache rule](https://developers.cloudflare.com/cache/how-to/cache-rules/create-dashboard/) to protect against cache deception attacks for any hostname containing `example.com`:
* **When incoming requests match**: Custom filter expression
* Using the Expression Builder:
`Hostname contains "example.com"`
* Using the Expression Editor:
`(http.host contains "example.com")`
* **Then**:
* **Cache eligibility**: Eligible for cache
* **Setting**: Cache key
* **Cache deception armor**: On
Was this helpful?
YesNo
## On this page
[Docs](https://developers.cloudflare.com/)
```json
{"@context":"https://schema.org","@type":"TechArticle","@id":"https://developers.cloudflare.com/cache/how-to/cache-rules/examples/cache-deception-armor/#page","headline":"Cache Deception Armor · Cloudflare Cache (CDN) docs","description":"Cache Deception Armor","url":"https://developers.cloudflare.com/cache/how-to/cache-rules/examples/cache-deception-armor/","inLanguage":"en","image":"https://developers.cloudflare.com/og-docs.png","dateModified":"2026-04-16","publisher":{"@type":"Organization","name":"Cloudflare","url":"https://www.cloudflare.com/"},"isPartOf":{"@type":"WebSite","@id":"https://developers.cloudflare.com/#website","name":"Cloudflare Docs","url":"https://developers.cloudflare.com/"},"keywords":["Security"]}
```
---
---
description: Cache by Device Type
title: Cache by Device Type
image: https://developers.cloudflare.com/og-docs.png
---
[Skip to content](#main-content)
> Documentation Index
> Fetch the complete documentation index at: https://developers.cloudflare.com/cache/llms.txt
> Use this file to discover all available pages before exploring further.
# Cache by Device Type
Cache by Device Type
Last updated Oct 13, 2025|Copy as Markdown|[View as Markdown](https://developers.cloudflare.com/cache/how-to/cache-rules/examples/cache-device-type/index.md)|[Agent setup](https://developers.cloudflare.com/agent-setup/)
Note
If you are migrating from Page Rules and you want to keep Page Rules behavior, you need to create two specific rules before creating this rule. For more details refer to [Migration from Page Rules](https://developers.cloudflare.com/cache/how-to/cache-rules/page-rules-migration/).
[Create a cache rule](https://developers.cloudflare.com/cache/how-to/cache-rules/create-dashboard/) to cache content based on user agent or device type for any hostname containing `example.com`:
* **When incoming requests match**: Custom filter expression
* Using the Expression Builder:
`Hostname contains "example.com"`
* Using the Expression Editor:
`(http.host contains "example.com")`
* **Then**:
* **Cache eligibility**: Eligible for cache
* **Setting**: Cache key
* **Cache by device type**: On
Was this helpful?
YesNo
## On this page
[Docs](https://developers.cloudflare.com/)
```json
{"@context":"https://schema.org","@type":"TechArticle","@id":"https://developers.cloudflare.com/cache/how-to/cache-rules/examples/cache-device-type/#page","headline":"Cache by Device Type · Cloudflare Cache (CDN) docs","description":"Cache by Device Type","url":"https://developers.cloudflare.com/cache/how-to/cache-rules/examples/cache-device-type/","inLanguage":"en","image":"https://developers.cloudflare.com/og-docs.png","dateModified":"2025-10-13","publisher":{"@type":"Organization","name":"Cloudflare","url":"https://www.cloudflare.com/"},"isPartOf":{"@type":"WebSite","@id":"https://developers.cloudflare.com/#website","name":"Cloudflare Docs","url":"https://developers.cloudflare.com/"}}
```
---
---
description: Cache Level (Cache Everything)
title: Cache Level (Cache Everything)
image: https://developers.cloudflare.com/og-docs.png
---
[Skip to content](#main-content)
> Documentation Index
> Fetch the complete documentation index at: https://developers.cloudflare.com/cache/llms.txt
> Use this file to discover all available pages before exploring further.
# Cache Level (Cache Everything)
Cache Level (Cache Everything)
Last updated Oct 13, 2025|Copy as Markdown|[View as Markdown](https://developers.cloudflare.com/cache/how-to/cache-rules/examples/cache-everything/index.md)|[Agent setup](https://developers.cloudflare.com/agent-setup/)
Note
If you are migrating from Page Rules and you want to keep Page Rules behavior, you need to create two specific rules before creating this rule. For more details refer to [Migration from Page Rules](https://developers.cloudflare.com/cache/how-to/cache-rules/page-rules-migration/).
[Create a cache rule](https://developers.cloudflare.com/cache/how-to/cache-rules/create-dashboard/) to adjust cache level for any hostname containing `example.com`:
* **When incoming requests match**: Custom filter expression
* Using the Expression Builder:
`Hostname contains "example.com"`
* Using the Expression Editor:
`(http.host contains "example.com")`
* **Then**:
* **Cache eligibility**: Eligible for cache
Caution
This option caches all HTML regardless of the presence of dynamic content. If you use this approach to cache pages containing dynamic content, visitors may receive information not intended for them. To avoid caching dynamic content, you can add a condition to the rule's matching criteria to prevent it from matching that content. Some examples include:
* Checking for the presence of a cookie.
* Negative matching against known dynamic content file paths.
* Negative matching against dynamic content extensions (or lack of an extension).
Was this helpful?
YesNo
## On this page
[Docs](https://developers.cloudflare.com/)
```json
{"@context":"https://schema.org","@type":"TechArticle","@id":"https://developers.cloudflare.com/cache/how-to/cache-rules/examples/cache-everything/#page","headline":"Cache Level (Cache Everything) · Cloudflare Cache (CDN) docs","description":"Cache Level (Cache Everything)","url":"https://developers.cloudflare.com/cache/how-to/cache-rules/examples/cache-everything/","inLanguage":"en","image":"https://developers.cloudflare.com/og-docs.png","dateModified":"2025-10-13","publisher":{"@type":"Organization","name":"Cloudflare","url":"https://www.cloudflare.com/"},"isPartOf":{"@type":"WebSite","@id":"https://developers.cloudflare.com/#website","name":"Cloudflare Docs","url":"https://developers.cloudflare.com/"}}
```
---
---
description: Cache Everything while ignoring query strings
title: Cache Everything while ignoring query strings
image: https://developers.cloudflare.com/og-docs.png
---
[Skip to content](#main-content)
> Documentation Index
> Fetch the complete documentation index at: https://developers.cloudflare.com/cache/llms.txt
> Use this file to discover all available pages before exploring further.
# Cache Everything while ignoring query strings
Cache Everything while ignoring query strings
Last updated Oct 13, 2025|Copy as Markdown|[View as Markdown](https://developers.cloudflare.com/cache/how-to/cache-rules/examples/cache-everything-ignore-query-strings/index.md)|[Agent setup](https://developers.cloudflare.com/agent-setup/)
Note
If you are migrating from Page Rules and you want to keep Page Rules behavior, you need to create two specific rules before creating this rule. For more details refer to [Migration from Page Rules](https://developers.cloudflare.com/cache/how-to/cache-rules/page-rules-migration/).
[Create a cache rule](https://developers.cloudflare.com/cache/how-to/cache-rules/create-dashboard/) to adjust cache level for any hostname containing `example.com`:
* **When incoming requests match**: Custom filter expression
* Using the Expression Builder:
`Hostname contains "example.com"`
* Using the Expression Editor:
`(http.host contains "example.com")`
* **Then**:
* **Cache eligibility**: Eligible for cache
* **Setting**: Cache key
* **Query string**: Ignore query string
Was this helpful?
YesNo
## On this page
[Docs](https://developers.cloudflare.com/)
```json
{"@context":"https://schema.org","@type":"TechArticle","@id":"https://developers.cloudflare.com/cache/how-to/cache-rules/examples/cache-everything-ignore-query-strings/#page","headline":"Cache Everything while ignoring query strings · Cloudflare Cache (CDN) docs","description":"Cache Everything while ignoring query strings","url":"https://developers.cloudflare.com/cache/how-to/cache-rules/examples/cache-everything-ignore-query-strings/","inLanguage":"en","image":"https://developers.cloudflare.com/og-docs.png","dateModified":"2025-10-13","publisher":{"@type":"Organization","name":"Cloudflare","url":"https://www.cloudflare.com/"},"isPartOf":{"@type":"WebSite","@id":"https://developers.cloudflare.com/#website","name":"Cloudflare Docs","url":"https://developers.cloudflare.com/"}}
```
---
---
description: Cache TTL by status code
title: Cache TTL by status code
image: https://developers.cloudflare.com/og-docs.png
---
[Skip to content](#main-content)
> Documentation Index
> Fetch the complete documentation index at: https://developers.cloudflare.com/cache/llms.txt
> Use this file to discover all available pages before exploring further.
# Cache TTL by status code
Cache TTL by status code
Last updated Oct 13, 2025|Copy as Markdown|[View as Markdown](https://developers.cloudflare.com/cache/how-to/cache-rules/examples/cache-ttl-by-status-code/index.md)|[Agent setup](https://developers.cloudflare.com/agent-setup/)
Note
If you are migrating from Page Rules and you want to keep Page Rules behavior, you need to create two specific rules before creating this rule. For more details refer to [Migration from Page Rules](https://developers.cloudflare.com/cache/how-to/cache-rules/page-rules-migration/).
[Create a cache rule](https://developers.cloudflare.com/cache/how-to/cache-rules/create-dashboard/) to cache responses with status code between `200` and `599` for one day for any hostname containing `example.com`:
* **When incoming requests match**: Custom filter expression
* Using the Expression Builder:
`Hostname contains "example.com"`
* Using the Expression Editor:
`(http.host contains "example.com")`
* **Then**:
* **Cache eligibility**: Eligible for cache
* **Setting**: Edge TTL
* Use cache-control header if present, use default Cloudflare caching behavior if not
* **Status code TTL**:
* **Scope**: _Range_
* **From**: _200_
* **To**: _599_
* **Duration**: _1 day_
Was this helpful?
YesNo
## On this page
[Docs](https://developers.cloudflare.com/)
```json
{"@context":"https://schema.org","@type":"TechArticle","@id":"https://developers.cloudflare.com/cache/how-to/cache-rules/examples/cache-ttl-by-status-code/#page","headline":"Cache TTL by status code · Cloudflare Cache (CDN) docs","description":"Cache TTL by status code","url":"https://developers.cloudflare.com/cache/how-to/cache-rules/examples/cache-ttl-by-status-code/","inLanguage":"en","image":"https://developers.cloudflare.com/og-docs.png","dateModified":"2025-10-13","publisher":{"@type":"Organization","name":"Cloudflare","url":"https://www.cloudflare.com/"},"isPartOf":{"@type":"WebSite","@id":"https://developers.cloudflare.com/#website","name":"Cloudflare Docs","url":"https://developers.cloudflare.com/"}}
```
---
---
description: Custom Cache Key
title: Custom Cache Key
image: https://developers.cloudflare.com/og-docs.png
---
[Skip to content](#main-content)
> Documentation Index
> Fetch the complete documentation index at: https://developers.cloudflare.com/cache/llms.txt
> Use this file to discover all available pages before exploring further.
# Custom Cache Key
Custom Cache Key
Last updated Oct 13, 2025|Copy as Markdown|[View as Markdown](https://developers.cloudflare.com/cache/how-to/cache-rules/examples/custom-cache-key/index.md)|[Agent setup](https://developers.cloudflare.com/agent-setup/)
Note
If you are migrating from Page Rules and you want to keep Page Rules behavior, you need to create two specific rules before creating this rule. For more details refer to [Migration from Page Rules](https://developers.cloudflare.com/cache/how-to/cache-rules/page-rules-migration/).
[Create a cache rule](https://developers.cloudflare.com/cache/how-to/cache-rules/create-dashboard/) to set a custom cache key for all query string parameters, for any hostname containing `example.com`:
* **When incoming requests match**: Custom filter expression
* Using the Expression Builder:
`Hostname contains "example.com"`
* Using the Expression Editor:
`(http.host contains "example.com")`
* **Then**:
* **Cache eligibility**: Eligible for cache
* **Setting**: Cache key
* **Query string**: All query string parameters
Refer to [cache keys](https://developers.cloudflare.com/cache/how-to/cache-keys/) for more information on possible settings when configuring a custom cache key.
Was this helpful?
YesNo
## On this page
[Docs](https://developers.cloudflare.com/)
```json
{"@context":"https://schema.org","@type":"TechArticle","@id":"https://developers.cloudflare.com/cache/how-to/cache-rules/examples/custom-cache-key/#page","headline":"Custom Cache Key · Cloudflare Cache (CDN) docs","description":"Custom Cache Key","url":"https://developers.cloudflare.com/cache/how-to/cache-rules/examples/custom-cache-key/","inLanguage":"en","image":"https://developers.cloudflare.com/og-docs.png","dateModified":"2025-10-13","publisher":{"@type":"Organization","name":"Cloudflare","url":"https://www.cloudflare.com/"},"isPartOf":{"@type":"WebSite","@id":"https://developers.cloudflare.com/#website","name":"Cloudflare Docs","url":"https://developers.cloudflare.com/"}}
```
---
---
description: Edge Cache TTL
title: Edge Cache TTL
image: https://developers.cloudflare.com/og-docs.png
---
[Skip to content](#main-content)
> Documentation Index
> Fetch the complete documentation index at: https://developers.cloudflare.com/cache/llms.txt
> Use this file to discover all available pages before exploring further.
# Edge Cache TTL
Edge Cache TTL
Last updated Oct 13, 2025|Copy as Markdown|[View as Markdown](https://developers.cloudflare.com/cache/how-to/cache-rules/examples/edge-ttl/index.md)|[Agent setup](https://developers.cloudflare.com/agent-setup/)
[Create a cache rule](https://developers.cloudflare.com/cache/how-to/cache-rules/create-dashboard/) to adjust edge cache TTL for caching resources on Cloudflare edge to one day, for any hostname containing `example.com`:
* **When incoming requests match**: Custom filter expression
* Using the Expression Builder:
`Hostname contains "example.com"`
* Using the Expression Editor:
`(http.host contains "example.com")`
* **Then**:
* **Cache eligibility**: Eligible for cache
* **Setting**: Edge TTL
* Ignore cache-control header and use this TTL
* **Input time-to-live (TTL)**: _1 day_
Was this helpful?
YesNo
## On this page
[Docs](https://developers.cloudflare.com/)
```json
{"@context":"https://schema.org","@type":"TechArticle","@id":"https://developers.cloudflare.com/cache/how-to/cache-rules/examples/edge-ttl/#page","headline":"Edge Cache TTL · Cloudflare Cache (CDN) docs","description":"Edge Cache TTL","url":"https://developers.cloudflare.com/cache/how-to/cache-rules/examples/edge-ttl/","inLanguage":"en","image":"https://developers.cloudflare.com/og-docs.png","dateModified":"2025-10-13","publisher":{"@type":"Organization","name":"Cloudflare","url":"https://www.cloudflare.com/"},"isPartOf":{"@type":"WebSite","@id":"https://developers.cloudflare.com/#website","name":"Cloudflare Docs","url":"https://developers.cloudflare.com/"}}
```
---
---
description: Origin Cache Control
title: Origin Cache Control
image: https://developers.cloudflare.com/og-docs.png
---
[Skip to content](#main-content)
> Documentation Index
> Fetch the complete documentation index at: https://developers.cloudflare.com/cache/llms.txt
> Use this file to discover all available pages before exploring further.
# Origin Cache Control
Origin Cache Control
Last updated Oct 13, 2025|Copy as Markdown|[View as Markdown](https://developers.cloudflare.com/cache/how-to/cache-rules/examples/origin-cache-control/index.md)|[Agent setup](https://developers.cloudflare.com/agent-setup/)
[Create a cache rule](https://developers.cloudflare.com/cache/how-to/cache-rules/create-dashboard/) to determine edge cache behavior for any hostname containing `example.com`:
* **When incoming requests match**: Custom filter expression
* Using the Expression Builder:
`Hostname contains "example.com"`
* Using the Expression Editor:
`(http.host contains "example.com")`
* **Then**:
* **Cache eligibility**: Eligible for cache
* **Setting**: Origin Cache Control
* **Enable Origin Cache Control**: Off
Was this helpful?
YesNo
## On this page
[Docs](https://developers.cloudflare.com/)
```json
{"@context":"https://schema.org","@type":"TechArticle","@id":"https://developers.cloudflare.com/cache/how-to/cache-rules/examples/origin-cache-control/#page","headline":"Origin Cache Control · Cloudflare Cache (CDN) docs","description":"Origin Cache Control","url":"https://developers.cloudflare.com/cache/how-to/cache-rules/examples/origin-cache-control/","inLanguage":"en","image":"https://developers.cloudflare.com/og-docs.png","dateModified":"2025-10-13","publisher":{"@type":"Organization","name":"Cloudflare","url":"https://www.cloudflare.com/"},"isPartOf":{"@type":"WebSite","@id":"https://developers.cloudflare.com/#website","name":"Cloudflare Docs","url":"https://developers.cloudflare.com/"}}
```
---
---
description: Query String Sort
title: Query String Sort
image: https://developers.cloudflare.com/og-docs.png
---
[Skip to content](#main-content)
> Documentation Index
> Fetch the complete documentation index at: https://developers.cloudflare.com/cache/llms.txt
> Use this file to discover all available pages before exploring further.
# Query String Sort
Query String Sort
Last updated Oct 13, 2025|Copy as Markdown|[View as Markdown](https://developers.cloudflare.com/cache/how-to/cache-rules/examples/query-string-sort/index.md)|[Agent setup](https://developers.cloudflare.com/agent-setup/)
[Create a cache rule](https://developers.cloudflare.com/cache/how-to/cache-rules/create-dashboard/) to sort query string parameters for caching purposes, for any hostname containing `example.com`:
* **When incoming requests match**: Custom filter expression
* Using the Expression Builder:
`Hostname contains "example.com"`
* Using the Expression Editor:
`(http.host contains "example.com")`
* **Then**:
* **Cache eligibility**: Eligible for cache
* **Setting**: Cache key
* **Sort query string**: On
Was this helpful?
YesNo
## On this page
[Docs](https://developers.cloudflare.com/)
```json
{"@context":"https://schema.org","@type":"TechArticle","@id":"https://developers.cloudflare.com/cache/how-to/cache-rules/examples/query-string-sort/#page","headline":"Query String Sort · Cloudflare Cache (CDN) docs","description":"Query String Sort","url":"https://developers.cloudflare.com/cache/how-to/cache-rules/examples/query-string-sort/","inLanguage":"en","image":"https://developers.cloudflare.com/og-docs.png","dateModified":"2025-10-13","publisher":{"@type":"Organization","name":"Cloudflare","url":"https://www.cloudflare.com/"},"isPartOf":{"@type":"WebSite","@id":"https://developers.cloudflare.com/#website","name":"Cloudflare Docs","url":"https://developers.cloudflare.com/"}}
```
---
---
description: Respect Strong ETags
title: Respect Strong ETags
image: https://developers.cloudflare.com/og-docs.png
---
[Skip to content](#main-content)
> Documentation Index
> Fetch the complete documentation index at: https://developers.cloudflare.com/cache/llms.txt
> Use this file to discover all available pages before exploring further.
# Respect Strong ETags
Respect Strong ETags
Last updated Oct 13, 2025|Copy as Markdown|[View as Markdown](https://developers.cloudflare.com/cache/how-to/cache-rules/examples/respect-strong-etags/index.md)|[Agent setup](https://developers.cloudflare.com/agent-setup/)
[Create a cache rule](https://developers.cloudflare.com/cache/how-to/cache-rules/create-dashboard/) to respect strong ETags for any hostname containing `example.com`:
* **When incoming requests match**: Custom filter expression
* Using the Expression Builder:
`Hostname contains "example.com"`
* Using the Expression Editor:
`(http.host contains "example.com")`
* **Then**:
* **Cache eligibility**: Eligible for cache
* **Setting**: Respect strong ETags
* **Use strong ETag headers**: On
Was this helpful?
YesNo
## On this page
[Docs](https://developers.cloudflare.com/)
```json
{"@context":"https://schema.org","@type":"TechArticle","@id":"https://developers.cloudflare.com/cache/how-to/cache-rules/examples/respect-strong-etags/#page","headline":"Respect Strong ETags · Cloudflare Cache (CDN) docs","description":"Respect Strong ETags","url":"https://developers.cloudflare.com/cache/how-to/cache-rules/examples/respect-strong-etags/","inLanguage":"en","image":"https://developers.cloudflare.com/og-docs.png","dateModified":"2025-10-13","publisher":{"@type":"Organization","name":"Cloudflare","url":"https://www.cloudflare.com/"},"isPartOf":{"@type":"WebSite","@id":"https://developers.cloudflare.com/#website","name":"Cloudflare Docs","url":"https://developers.cloudflare.com/"}}
```
---
---
description: How Cache Rules are ordered and which rule takes priority.
title: Order and priority
image: https://developers.cloudflare.com/og-docs.png
---
[Skip to content](#main-content)
> Documentation Index
> Fetch the complete documentation index at: https://developers.cloudflare.com/cache/llms.txt
> Use this file to discover all available pages before exploring further.
# Order and priority
Last updated Apr 16, 2026|Copy as Markdown|[View as Markdown](https://developers.cloudflare.com/cache/how-to/cache-rules/order/index.md)|[Agent setup](https://developers.cloudflare.com/agent-setup/)
Cache rules affect requests differently from Page Rules. This is how they are applied:
1. Cache Rules are stackable. This means that multiple matching rules can be combined and applied to the same request. For example, if multiple cache rules match the same URL, then the features set in those cache rules will all be applied in order. If several matching rules set a value for the same setting, the value in the last matching rule wins. For an example of a similar scenario where multiple rules match, refer to the [Origin Rules FAQ](https://developers.cloudflare.com/rules/origin-rules/faq/#what-happens-if-more-than-one-origin-rule-matches-the-current-request).
2. For conflicting settings (for example, bypass cache versus eligible for cache), the last matching rule wins. For example, if cache rule #1 is set to cache everything on `example.com/images` and cache rule #2 is set to bypass cache on `example.com`, then cache will be bypassed for all URLs that match `example.com`, since rule #2 is the last matching rule.
3. If you have Page Rules implemented for caching on the same path, Cache Rules will take precedence by design.
4. Cache rules can be more specific than website-wide settings in the cache configuration tab, so they take precedence over website-wide settings on requests they match against. For example, if browser cache TTL is set to 4 hours for the entire website `example.com` and there is a cache rule matching requests with a path of `/feed` setting browser cache TTL to 10 seconds, the cache rule will override the website-wide setting for requests to `https://example.com/feed`.
## Execution order of Rules products
The execution order of Rules features is the following:
* [Single Redirects](https://developers.cloudflare.com/rules/url-forwarding/single-redirects/)
* [URL Rewrite Rules](https://developers.cloudflare.com/rules/transform/url-rewrite/)
* [Configuration Rules](https://developers.cloudflare.com/rules/configuration-rules/)
* [Origin Rules](https://developers.cloudflare.com/rules/origin-rules/)
* [Bulk Redirects](https://developers.cloudflare.com/rules/url-forwarding/bulk-redirects/)
* [Managed Transforms](https://developers.cloudflare.com/rules/transform/managed-transforms/)
* [Request Header Transform Rules](https://developers.cloudflare.com/rules/transform/request-header-modification/)
* [Cache Rules](https://developers.cloudflare.com/cache/how-to/cache-rules/)
* [Snippets](https://developers.cloudflare.com/rules/snippets/)
* [Cloud Connector](https://developers.cloudflare.com/rules/cloud-connector/)
The different types of rules listed above will take precedence over [Page Rules](https://developers.cloudflare.com/rules/page-rules/). This means that Page Rules will be overridden if there is a match for both Page Rules and the Rules products listed above.
Generally speaking, for [non-terminating actions](https://developers.cloudflare.com/ruleset-engine/rules-language/actions/) the last change made by rules in the same [phase](https://developers.cloudflare.com/ruleset-engine/about/phases/) will win (later rules can overwrite changes done by previous rules). However, for terminating actions (_Block_, _Redirect_, or one of the challenge actions), rule evaluation will stop and the action will be executed immediately.
For example, if multiple rules with the _Redirect_ action match, Cloudflare will always use the URL redirect of the first rule that matches. Also, if you configure URL redirects using different Cloudflare products (Single Redirects and Bulk Redirects), the product executed first will apply, if there is a rule match (in this case, Single Redirects).
Refer to the [Phases list](https://developers.cloudflare.com/ruleset-engine/reference/phases-list/) for the product execution order.
Caution
Using Cloudflare challenges along with Rules features may cause challenge loops. Refer to [Rules troubleshooting](https://developers.cloudflare.com/rules/reference/troubleshooting/) for more information.
Was this helpful?
YesNo
## On this page
[Docs](https://developers.cloudflare.com/)
```json
{"@context":"https://schema.org","@type":"TechArticle","@id":"https://developers.cloudflare.com/cache/how-to/cache-rules/order/#page","headline":"Order and priority · Cloudflare Cache (CDN) docs","description":"How Cache Rules are ordered and which rule takes priority.","url":"https://developers.cloudflare.com/cache/how-to/cache-rules/order/","inLanguage":"en","image":"https://developers.cloudflare.com/og-docs.png","dateModified":"2026-04-16","publisher":{"@type":"Organization","name":"Cloudflare","url":"https://www.cloudflare.com/"},"isPartOf":{"@type":"WebSite","@id":"https://developers.cloudflare.com/#website","name":"Cloudflare Docs","url":"https://developers.cloudflare.com/"}}
```
---
---
description: Migrate caching Page Rules to Cache Rules.
title: Migration from Page Rules
image: https://developers.cloudflare.com/og-docs.png
---
[Skip to content](#main-content)
> Documentation Index
> Fetch the complete documentation index at: https://developers.cloudflare.com/cache/llms.txt
> Use this file to discover all available pages before exploring further.
# Migration from Page Rules
Last updated Apr 16, 2026|Copy as Markdown|[View as Markdown](https://developers.cloudflare.com/cache/how-to/cache-rules/page-rules-migration/index.md)|[Agent setup](https://developers.cloudflare.com/agent-setup/)
If you are migrating from Page Rules, there is a behavior change between Page Rules and Cache Rules.
When you create a new Cache Rule and select **Eligible for cache**, the Cache Everything feature is enabled by default. With Page Rules, you had to specifically enable the Cache Everything option.
To maintain the same behavior you had with Page Rules (that is, not enabling Cache Everything), you need to create these two specific rules in this order before creating any additional rules.
Multiple matching cache rules can be combined and applied to the same request. After rule 1 matches, Cloudflare will keep evaluating other cache rules checking for matches. For more information, refer to [Order and priority](https://developers.cloudflare.com/cache/how-to/cache-rules/order/).
## Rule 1
1. Enter a rule name, for instance `bypass everything`.
2. In **When incoming requests match**, select **All incoming requests**.
3. Under **Then**, in the **Cache eligibility** section, select [Bypass cache](https://developers.cloudflare.com/cache/how-to/cache-rules/settings/#bypass-cache).
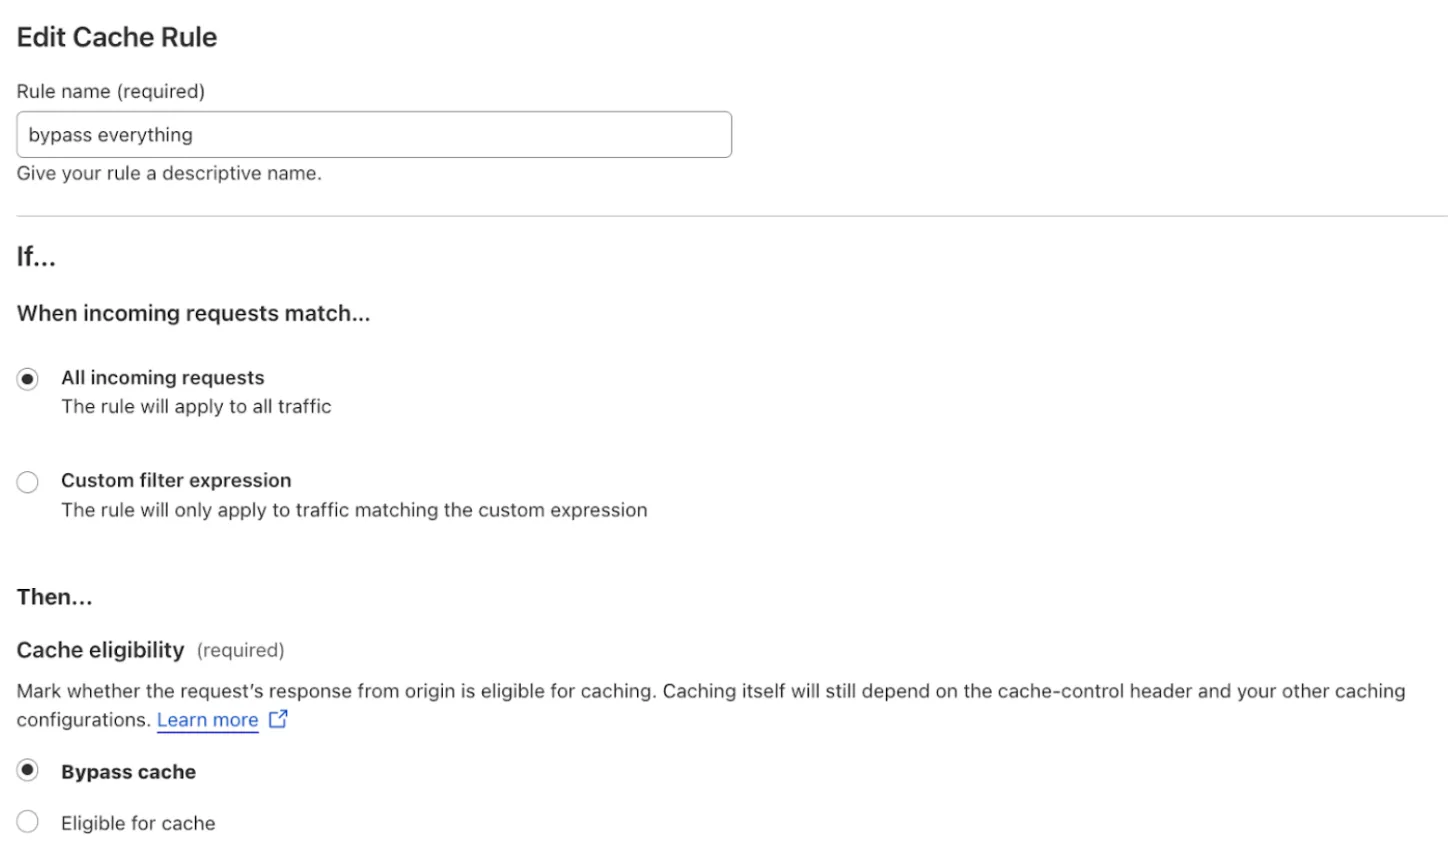
## Rule 2
1. Enter a rule name, for instance `cache all default cacheable extensions`.
2. In **When incoming requests match**, select **Custom filter expression**.
3. Define the following rule:
* **Field**: `File extension`
* **Operator**: `is in`
* **Value**: `7z, avi, avif, apk, bin, bmp, bz2, class, css, csv, doc, docx, dmg, ejs, eot, eps, exe, flac, gif, gz, ico, iso, jar, jpg, jpeg, js, mid, midi, mkv, mp3, mp4, ogg, otf, pdf, pict, pls, png, ppt, pptx, ps, rar, svg, svgz, swf, tar, tif, tiff, ttf, webm, webp, woff, woff2, xls, xlsx, zip, zst`
If you prefer, you can select **Edit expression** and paste the following expression:
```txt
(http.request.uri.path.extension in {"7z" "avi" "avif" "apk" "bin" "bmp" "bz2" "class" "css" "csv" "doc" "docx" "dmg" "ejs" "eot" "eps" "exe" "flac" "gif" "gz" "ico" "iso" "jar" "jpg" "jpeg" "js" "mid" "midi" "mkv" "mp3" "mp4" "ogg" "otf" "pdf" "pict" "pls" "png" "ppt" "pptx" "ps" "rar" "svg" "svgz" "swf" "tar" "tif" "tiff" "ttf" "webm" "webp" "woff" "woff2" "xls" "xlsx" "zip" "zst"})
```
1. Under **Then**, in the **Cache eligibility** section, select [**Eligible for cache**](https://developers.cloudflare.com/cache/how-to/cache-rules/settings/#eligible-for-cache-settings).
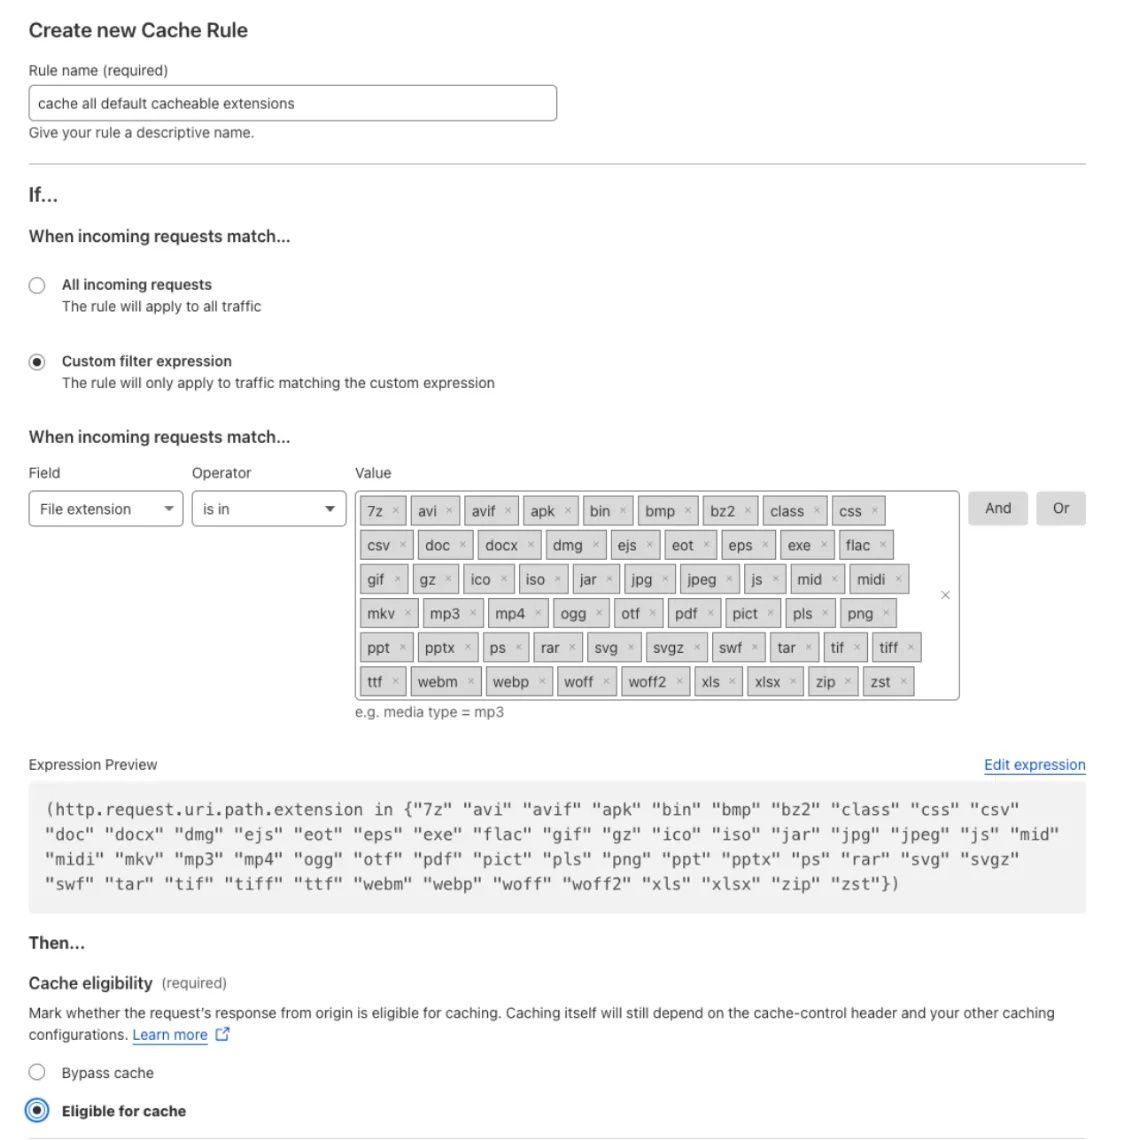
Note
Remember to create the rules in the specified order: first, the `bypass everything` rule, and then the `cache all default cacheable file extensions` rule.
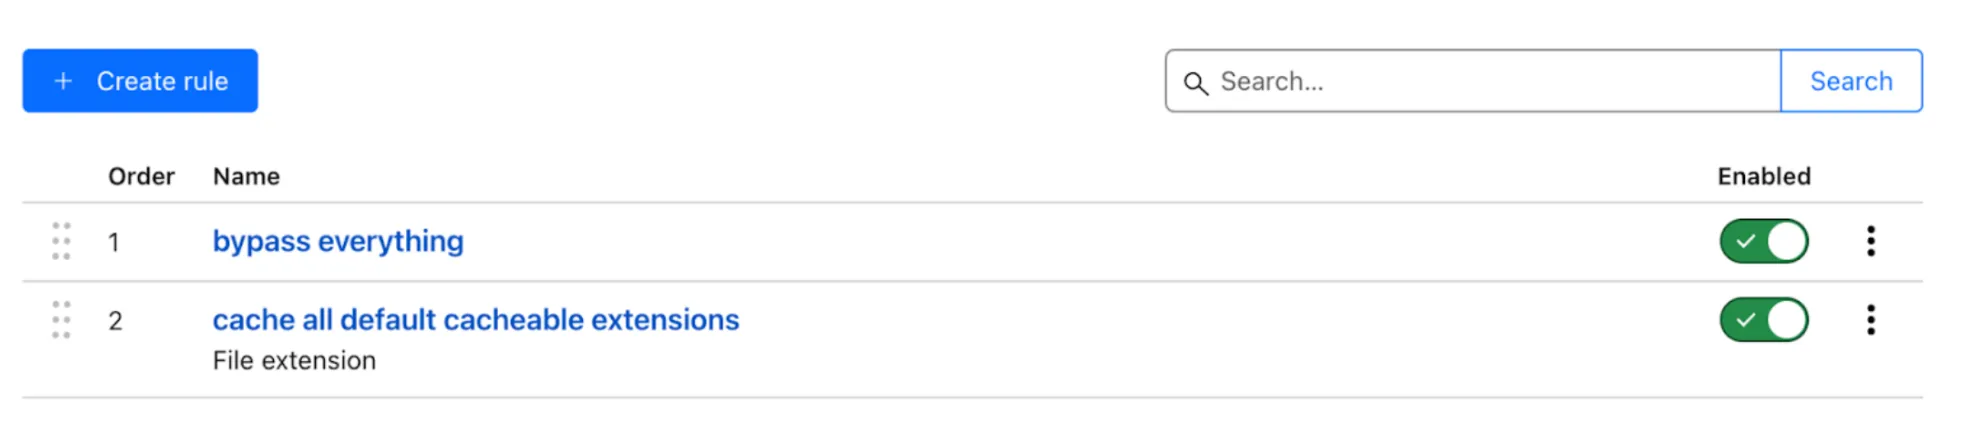
Was this helpful?
YesNo
## On this page
[Docs](https://developers.cloudflare.com/)
```json
{"@context":"https://schema.org","@type":"TechArticle","@id":"https://developers.cloudflare.com/cache/how-to/cache-rules/page-rules-migration/#page","headline":"Migration from Page Rules · Cloudflare Cache (CDN) docs","description":"Migrate caching Page Rules to Cache Rules.","url":"https://developers.cloudflare.com/cache/how-to/cache-rules/page-rules-migration/","inLanguage":"en","image":"https://developers.cloudflare.com/og-docs.png","dateModified":"2026-04-16","publisher":{"@type":"Organization","name":"Cloudflare","url":"https://www.cloudflare.com/"},"isPartOf":{"@type":"WebSite","@id":"https://developers.cloudflare.com/#website","name":"Cloudflare Docs","url":"https://developers.cloudflare.com/"},"keywords":["Migration"]}
```
---
---
description: Available settings for Cache Rules.
title: Available settings
image: https://developers.cloudflare.com/og-docs.png
---
[Skip to content](#main-content)
> Documentation Index
> Fetch the complete documentation index at: https://developers.cloudflare.com/cache/llms.txt
> Use this file to discover all available pages before exploring further.
# Available settings
Last updated Jul 23, 2026|Copy as Markdown|[View as Markdown](https://developers.cloudflare.com/cache/how-to/cache-rules/settings/index.md)|[Agent setup](https://developers.cloudflare.com/agent-setup/)
These are the settings that you can configure when creating a cache rule.
## Fields
The fields available for Cache Rule matching expressions in the **Expression Builder** are:
* URI Full - `http.request.full_uri`
* URI - `http.request.uri`
* URI Path - `http.request.uri.path`
* URI Query String - `http.request.uri.query`
* Cookie - `http.cookie`
* Hostname - `http.host`
* Referer - `http.referer`
* SSL/HTTPS - `ssl`
* User Agent - `http.user_agent`
* X-Forwarded-For - `http.x_forwarded_for`
* Request Headers - `http.request.headers`
* Cookie value of - `http.request.cookies`
* File extension - `http.request.uri.path.extension`
If you select the [Edit expression](https://developers.cloudflare.com/ruleset-engine/rules-language/expressions/edit-expressions/#expression-editor) option, you can enter any of the [available fields](https://developers.cloudflare.com/ruleset-engine/rules-language/fields/reference/).
Note
[Single-file purge](https://developers.cloudflare.com/cache/how-to/purge-cache/purge-by-single-file/) may not work as expected if your Cache Rule sets a [custom cache key](https://developers.cloudflare.com/cache/how-to/cache-keys/) (because the dashboard cannot send the headers or cookies that are part of the key), or if your rule expression matches only `GET` requests (because purge requests use a different HTTP method internally).
For more information and alternatives, refer to [Purge by single-file limitations](https://developers.cloudflare.com/cache/how-to/purge-cache/purge-by-single-file/#limitations-and-alternatives).
## Operators
The operators available for Cache Rule expressions are:
* wildcard
* strict wildcard
* equals
* does not equal
* contains
* does not contain
* matches regex
* does not match regex
* starts with
* ends with
* does not start with
* does not end with
* is in
* is not in
* is in list
* is not in list
Note
Not all operators are available for every selected field.
Note
The **is in list** and **is not in list** operators are available for the Hostname field on Enterprise plans. They allow you to match requests against [custom lists](https://developers.cloudflare.com/waf/tools/lists/custom-lists/) — for example, a hostname list containing all the domains you want to apply a particular caching configuration to. Refer to [Use lists in expressions](https://developers.cloudflare.com/waf/tools/lists/use-in-expressions/) for details on using lists in rule expressions.
## Cache eligibility
In **Cache eligibility**, you have the option to select **Bypass cache** if you want matching requests to not be cached, or **Eligible for cache** if you want Cloudflare to attempt to cache them.
### Bypass cache
When creating a cache rule, you have the option to select **Bypass cache** if you want matching incoming requests to not be cached. Alternatively, you can use [Development Mode](https://developers.cloudflare.com/cache/reference/development-mode/), if you want to bypass cache for shorter periods.
Note
When using Custom Cache Rules with a Bypass setting, the response header may return [DYNAMIC](https://developers.cloudflare.com/cache/concepts/cache-responses/#dynamic) rather than explicitly indicating a bypass. This occurs because the rule makes the content ineligible for caching, even if the origin response is otherwise cacheable.
### Eligible for cache settings
When you select **Eligible for cache**, you can change the configuration settings described below.
Note
If you use cache rules, image transformations, and zone versioning simultaneously, some settings may not be applied correctly.
#### Edge TTL
Edge Cache TTL refers to the maximum cache time-to-live (TTL), or how long an asset should be considered fresh or available to serve from Cloudflare’s cache in response to requests. This setting has three primary options:
* **Use cache control-header if present, bypass cache if not**: If a cache-control header is present on the response, follow its directives. If not, skip caching entirely.
* **Use cache-control header if present, use default Cloudflare caching behavior if not**: If a cache-control header is present on the response, follow its directives. If not, cache in accordance with our [default edge TTL settings](https://developers.cloudflare.com/cache/how-to/configure-cache-status-code/#edge-ttl).
* **Ignore cache-control header and use this TTL**: Completely ignore any cache-control header on the response and instead cache the response for a duration specified in the timing dropdown.
Additionally, you can select how long you would like a particular matching status code's content to be cached in Cloudflare's global network. In **Status Code TTL** section you can define the TTL duration for one or more status codes of responses from the origin server. This setting can be applied to a _Single code_ status code, to a _Greater than or equal_ or _Less than or equal_ status code, or to a _Range_ of status codes. Status code TTLs are similar to **Ignore cache-control header and use this TTL** in that the cache-control header on the response will be ignored in favor of the TTL specified by the cache rule. For more information, refer to [Status code TTL](https://developers.cloudflare.com/cache/how-to/configure-cache-status-code/).
API information
API configuration object name: `"edge_ttl"`.
| API values | Configuration |
| ------------------- | ---------------------------------------------------------------------------------------------------------------------------------------------------------------- |
| respect\_origin | Use cache-control header if present, use default [Cloudflare caching behavior](https://developers.cloudflare.com/cache/concepts/default-cache-behavior/) if not. |
| override\_origin | Ignore cache-control header and use this TTL. |
| bypass\_by\_default | Use cache control-header if present, bypass cache if not. |
| | |
```json
"action_parameters": {
"cache": true,
"edge_ttl": {
"status_code_ttl": [
{
"status_code_range": {
"to": 299
},
"value": 86400
},
{
"status_code_range": {
"from": 300,
"to": 499
},
"value": 0 // no-cache
},
{
"status_code_range": {
"from": 500
},
"value": -1 // no-store
}
],
"mode": "respect_origin"
}
}
```
Refer to [Create a cache rule via API](https://developers.cloudflare.com/cache/how-to/cache-rules/create-api/#example-requests) for complete API examples.
#### Browser TTL
Browser TTL refers to the maximum cache time-to-live (TTL) that an asset should be considered available to serve from the browser’s cache.
Select if you want to **Bypass cache**, **Respect origin**, or **Override origin**. If you wish to override the browser TTL value, define how long resources cached by client browsers will remain valid from the dropdown menu. For more information, refer to [Browser Cache TTL](https://developers.cloudflare.com/cache/how-to/edge-browser-cache-ttl/#browser-cache-ttl).
API information
API configuration object name: `"browser_ttl"`.
API values for the `"mode"` property: `"respect_origin"`, `"override_origin"`, `"bypass_by_default"`.
API values for the `"default"` property (integer): values available depend on your plan. Refer to [Browser Cache TTL](https://developers.cloudflare.com/cache/how-to/edge-browser-cache-ttl/#browser-cache-ttl).
```json
"action_parameters": {
"cache": true,
"browser_ttl" : {
"mode": "override_origin",
"default": 1000
}
}
```
Refer to [Create a cache rule via API](https://developers.cloudflare.com/cache/how-to/cache-rules/create-api/#example-requests) for complete API examples.
#### Cache Key
Cache keys refer to the criteria that Cloudflare uses to determine how to store resources in our cache. Customizing the Cache Key allows you to determine how Cloudflare can reuse particular cache entries across requests or share the cache entries for more granularity for end users.
There is no explicit length limit for cache keys. However, the total request size (including headers used in the cache key) must not exceed Cloudflare's [request limits](https://developers.cloudflare.com/fundamentals/reference/connection-limits/#request-limits). Including large values (such as cookies) in the cache key may increase per-request latency. The maximum number of query string parameters in a custom cache key configuration is 100.
Define the request components used to define a [custom Cache Key](https://developers.cloudflare.com/cache/how-to/cache-keys/), customizing the following options:
* You can switch on or off [Cache deception armor](https://developers.cloudflare.com/cache/cache-security/cache-deception-armor/), [Cache by device type](https://developers.cloudflare.com/automatic-platform-optimization/reference/cache-device-type/), and [Sort query string](https://developers.cloudflare.com/cache/how-to/cache-keys/#query-string).
Enterprise customers have these additional options for custom Cache Keys:
* In the **Query string** section, you can select **All query string parameters**, **All query string parameters except** and enter an exception, **No query parameters except** and enter the parameters, or **Ignore query string** (also available for Pay-as-you-go customers).
* In the **Headers** section, you can specify header names along with their values. For custom headers, values are optional; however, for the following restricted headers, you must include one to three specific values:
* `accept`
* `accept-charset`
* `accept-encoding`
* `accept-datetime`
* `accept-language`
* `referer`
* `user-agent`
To check for a header's presence without including its value, use the **Check presence of** option. You can also choose whether to **Include origin header**.
* In the **Cookie** section, you can include cookie names and their values, and check for the presence of another cookie.
* In the **Host** section, you can select **Use original host** and **Resolved host**. In the **User** section, you can select **Device type**, **Country**, and **Language**. Using **Resolved host** means the Cache Key will contain whatever hostname was used to resolve the origin IP which can be different depending on whether the [resolve override](https://developers.cloudflare.com/rules/origin-rules/features/#dns-record) feature is on or not.
Note
When [URL normalization](https://developers.cloudflare.com/rules/normalization/) is enabled, we recommend also enabling [Normalize URLs to origin](https://developers.cloudflare.com/rules/normalization/manage/), especially if you are setting custom Cache Keys or using cache by device type, which also modifies the Cache Key. This helps ensure the URL in the Cache Key matches the URL sent to the origin, preventing cache poisoning and ensuring consistent behavior.
API information
API configuration object name: `"cache_key"`.
API values: `"ignore_query_strings_order"`, `"cache_deception_armor"`, `"cache_by_device_type"`, `"custom_key"` (`"header"`, `"cookie"`, `"host"`, `"query_string"`, `"user"`).
```json
"action_parameters": {
"cache": true,
"cache_key": {
"ignore_query_strings_order": true,
"cache_deception_armor": true,
"custom_key": {
"query_string": {
"include": [
"*"
]
},
"header": {
"include": [
"header1"
],
"check_presence": [
"header_1"
],
"contains": {
"accept-encoding": ["br", "zstd"]
}
},
"cookie": {
"include": [
"cookieName1"
],
"check_presence": [
"cookie_1"
]
},
"user": {
"device_type": true,
"geo": true,
"lang": true
},
"host": {
"resolved": false
}
}
}
}
```
Refer to [Create a cache rule via API](https://developers.cloudflare.com/cache/how-to/cache-rules/create-api/#example-requests) for complete API examples.
#### Cache Reserve Eligibility
Cache Reserve eligibility allows you to specify which website resources should be eligible for our persistent cache called [Cache Reserve](https://developers.cloudflare.com/cache/advanced-configuration/cache-reserve/). If the request matches and also meets [eligibility criteria](https://developers.cloudflare.com/cache/advanced-configuration/cache-reserve/#cache-reserve-asset-eligibility), Cloudflare will write the resource to cache reserve. This requires an add-on cache reserve plan.
This rule can also be used to specify Cache Reserve eligibility for website resources based on their size. For example, by specifying that all assets which are eligible be 100 MB and above, Cloudflare will look for eligible assets at or above 100 MB for Cache Reserve eligibility and only persistently store those assets.
Note
Cloudflare will still enforce the plan-based [cacheable file limits](https://developers.cloudflare.com/cache/concepts/default-cache-behavior/#customization-options-and-limits) when using this configuration.
API information
API configuration object name: `"cache_reserve"`.
API property name for enabling Cache Reserve: `"eligible"` (boolean).
```json
"action_parameters": {
"cache": true
"cache_reserve": {
"eligible": true,
"minimum_file_size": 100000
}
}
```
Note
If `minimum_file_size` is omitted and `eligible` is true, Cloudflare will use 0 bytes by default.
Refer to [Create a cache rule via API](https://developers.cloudflare.com/cache/how-to/cache-rules/create-api/#example-requests) for complete API examples.
#### Caching on Port (Enterprise-only)
Cloudflare supports several [network ports](https://developers.cloudflare.com/fundamentals/reference/network-ports/#network-ports-compatible-with-cloudflares-proxy) by default, like 80 or 443\. Some ports, traditionally admin ports, are supported but have caching disabled as they are used to manage sensitive information that should be ineligible for cache. Enterprise customers wanting to enable caching on these admin ports can cache on these ports by entering their desired port.
Note
Cloudflare supports many ports by default and will cache on them without needing this rule to be configured. For ports that Cloudflare supports, but for which caching is disabled, use this rule.
API information
API configuration property name: `"additional_cacheable_ports"` (array of integer values).
```json
"action_parameters": {
"cache": true
"additional_cacheable_ports": [8443, 8080]
}
}
```
Refer to [Create a cache rule via API](https://developers.cloudflare.com/cache/how-to/cache-rules/create-api/#example-requests) for complete API examples.
#### Proxy Read Timeout (Enterprise-only)
Defines a timeout value between two successive read operations to your origin server. The default value can be found in the [Connection limits](https://developers.cloudflare.com/fundamentals/reference/connection-limits/) table. If you are attempting to reduce [HTTP 524](https://developers.cloudflare.com/support/troubleshooting/http-status-codes/cloudflare-5xx-errors/error-524/) errors because of timeouts from an origin server, try increasing this timeout value using the API endpoint below.
API information
API configuration property name: `"read_timeout"` (integer).
```json
"action_parameters": {
"cache": true,
"read_timeout": 900
}
```
Refer to [Create a cache rule via API](https://developers.cloudflare.com/cache/how-to/cache-rules/create-api/#example-requests) for complete API examples.
#### Serve stale content while revalidating
Defines if Cloudflare will serve stale content while updating the latest content from the origin server. If serving stale content is disabled, Cloudflare will not serve stale content while getting the latest content from the origin.
API information
API configuration property name: `"serve_stale"` \> `"disable_stale_while_updating"` (boolean).
```json
"action_parameters": {
"cache": true,
"serve_stale": {
"disable_stale_while_updating": true
}
}
```
Refer to [Create a cache rule via API](https://developers.cloudflare.com/cache/how-to/cache-rules/create-api/#example-requests) for complete API examples.
#### Respect Strong ETags
Turn on or off byte-for-byte equivalency checks between the Cloudflare cache and the origin server. When enabled, Cloudflare will use [strong ETag](https://developers.cloudflare.com/cache/reference/etag-headers/#strong-etags) header validation to ensure that resources in the Cloudflare cache and on the origin server are byte-for-byte identical. If disabled, Cloudflare converts ETag headers into [weak ETag](https://developers.cloudflare.com/cache/reference/etag-headers/#weak-etags) headers.
API information
API configuration property name: `"respect_strong_etags"` (boolean).
```json
"action_parameters": {
"cache": true,
"respect_strong_etags": true
}
```
Refer to [Create a cache rule via API](https://developers.cloudflare.com/cache/how-to/cache-rules/create-api/#example-requests) for complete API examples.
#### Origin error page pass-through
Turn on or off Cloudflare error pages generated from error HTTP status codes sent from the origin server. If enabled, this setting enables the use of error pages issued by the origin.
API information
API configuration property name: `"origin_error_page_passthru"` (boolean).
```json
"action_parameters": {
"cache": true,
"origin_error_page_passthru": true
}
```
Refer to [Create a cache rule via API](https://developers.cloudflare.com/cache/how-to/cache-rules/create-api/#example-requests) for complete API examples.
#### Origin Cache Control (Enterprise-only)
When this option is enabled, Cloudflare will aim to strictly adhere to [RFC 7234 ↗](https://datatracker.ietf.org/doc/html/rfc7234). Enterprise customers have the ability to select if Cloudflare will adhere to this behavior. Free, Pro, and Business customers have this option enabled by default and cannot disable it.
API information
API configuration property name: `"origin_cache_control"` (boolean).
```json
"action_parameters": {
"cache": true
"origin_cache_control": true
}
```
Refer to [Create a cache rule via API](https://developers.cloudflare.com/cache/how-to/cache-rules/create-api/#example-requests) for complete API examples.
#### Vary
The `Vary` response header lets your origin cache multiple versions of the same URL based on request headers. Use the `vary` object to configure how Cloudflare handles each header your origin lists in its `Vary` response. For how Vary affects cache keys and how normalization works, refer to [Vary](https://developers.cloudflare.com/cache/concepts/vary/).
The `vary` object supports these keys:
| Key | Required | Description |
| ------- | -------- | ---------------------------------------------------------------------------------------------- |
| default | Yes | Configuration for any header name in the origin Vary response that is not included in headers. |
| headers | No | A map of lowercase request header names to configuration objects. |
If the `vary` object is omitted, this Cache Rules Vary setting is turned off. Other Vary behavior, such as `Vary: *`, [Vary for images](https://developers.cloudflare.com/cache/advanced-configuration/vary-for-images/), and compression handling, is unaffected. If the `vary` object is present, `default` is required. An empty `vary` object is invalid.
Each header configuration object, and the `default` object, must include an `action` key set to one of `normalize`, `passthrough`, or `bypass`. Refer to [Actions](https://developers.cloudflare.com/cache/concepts/vary/#actions) for guidance on when to use each.
Additional parameters can be specified for certain header names:
| Header | Additional key | Description |
| --------------- | -------------- | ------------------------------------------------------------------------------------------- |
| accept | media\_types | List of MIME types to include when normalizing the Accept header. Maximum 10 items. |
| accept-language | languages | List of languages to include when normalizing the Accept-Language header. Maximum 20 items. |
For most deployments, start with a restrictive `default` and explicit per-header configuration:
* Use `default` set to `bypass` to avoid caching variants for unexpected origin `Vary` headers.
* Add explicit `headers` entries for the headers you expect your origin to vary on.
* Use `normalize` for `accept`, `accept-language`, and `accept-encoding` unless your origin requires raw header values.
* Use `media_types` and `languages` allowlists when you know the exact variants your origin can serve.
* Use `passthrough` only when exact raw header values should select different cached versions.
* Use `bypass` for high-cardinality headers such as `user-agent`, cookies, or request headers with per-user values.
The following limits and validation rules apply:
* Header names in `headers` must be lowercase.
* Header names can contain letters, numbers, underscores, and hyphens.
* Header names cannot exceed 128 characters.
* Header names beginning with `cf-` or `cf_` are not allowed.
* Certain hop-by-hop or cache-control headers, such as `connection`, `host`, and `cache-control`, are not allowed.
* `headers` can contain up to 50 entries.
* `accept.media_types` can contain up to 10 entries.
* `accept-language.languages` can contain up to 20 entries.
* Values in `media_types` and `languages` must be non-empty printable ASCII.
API information
API configuration object name: `"vary"`.
The following example normalizes `accept` and `accept-language`, and bypasses cache for any other header in the origin `Vary` response:
```json
"action_parameters": {
"cache": true,
"vary": {
"default": {
"action": "bypass"
},
"headers": {
"accept": {
"action": "normalize",
"media_types": ["text/html", "application/json"]
},
"accept-language": {
"action": "normalize",
"languages": ["en", "fr", "de"]
}
}
}
}
```
Refer to [Create a cache rule via API](https://developers.cloudflare.com/cache/how-to/cache-rules/create-api/#example-requests) for complete API examples, or to the [Terraform example](https://developers.cloudflare.com/cache/how-to/cache-rules/terraform-example/).
Was this helpful?
YesNo
## On this page
[Docs](https://developers.cloudflare.com/)
```json
{"@context":"https://schema.org","@type":"TechArticle","@id":"https://developers.cloudflare.com/cache/how-to/cache-rules/settings/#page","headline":"Cache Rules settings · Cloudflare Cache (CDN) docs","description":"Available settings for Cache Rules.","url":"https://developers.cloudflare.com/cache/how-to/cache-rules/settings/","inLanguage":"en","image":"https://developers.cloudflare.com/og-docs.png","dateModified":"2026-07-23","publisher":{"@type":"Organization","name":"Cloudflare","url":"https://www.cloudflare.com/"},"isPartOf":{"@type":"WebSite","@id":"https://developers.cloudflare.com/#website","name":"Cloudflare Docs","url":"https://developers.cloudflare.com/"}}
```
---
---
description: Create Cache Rules using Terraform.
title: Terraform example
image: https://developers.cloudflare.com/og-docs.png
---
[Skip to content](#main-content)
> Documentation Index
> Fetch the complete documentation index at: https://developers.cloudflare.com/cache/llms.txt
> Use this file to discover all available pages before exploring further.
# Terraform example
Last updated Jun 27, 2026|Copy as Markdown|[View as Markdown](https://developers.cloudflare.com/cache/how-to/cache-rules/terraform-example/index.md)|[Agent setup](https://developers.cloudflare.com/agent-setup/)
The following example defines a single cache rule for a zone using Terraform. The rule configures several cache settings and sets a custom cache key for incoming requests addressed at `example.net`.
Terraform `cloudflare_ruleset` resource
```tf
# Cache rule configuring cache settings and defining custom cache keys
resource "cloudflare_ruleset" "cache_rules_example" {
zone_id = ""
name = "Set cache settings"
description = "Set cache settings for incoming requests"
kind = "zone"
phase = "http_request_cache_settings"
rules = [
{
ref = "cache_settings_custom_cache_key"
description = "Set cache settings and custom cache key for example.net"
expression = "(http.host eq \"example.net\")"
action = "set_cache_settings"
action_parameters = {
edge_ttl = {
mode = "override_origin"
default = 60
status_code_ttl = [
{
status_code = 200
value = 50
},
{
status_code_range = {
from = 201
to = 300
}
value = 30
}
]
}
browser_ttl = {
mode = "respect_origin"
}
serve_stale = {
disable_stale_while_updating = true
}
respect_strong_etags = true
cache_key = {
ignore_query_strings_order = false
cache_deception_armor = true
custom_key = {
query_string = {
exclude = {
all = true
}
}
header = {
include = ["habc", "hdef"]
check_presence = ["habc_t", "hdef_t"]
exclude_origin = true
}
cookie = {
include = ["cabc", "cdef"]
check_presence = ["cabc_t", "cdef_t"]
}
user = {
device_type = true
geo = false
}
host = {
resolved = true
}
}
}
origin_error_page_passthru = false
}
}
]
}
```
Use the `ref` field to get stable rule IDs across updates when using Terraform. Adding this field prevents Terraform from recreating the rule on changes. For more information, refer to [Troubleshooting](https://developers.cloudflare.com/terraform/troubleshooting/rule-id-changes/#how-to-keep-the-same-rule-id-between-modifications) in the Terraform documentation.
The following example configures [Vary](https://developers.cloudflare.com/cache/concepts/vary/). It normalizes `Accept` and `Accept-Language`, and bypasses cache for any other header in the origin `Vary` response.
Terraform example: Cache expected Vary responses
```tf
variable "zone_id" {
type = string
}
resource "cloudflare_ruleset" "cache_vary_example" {
zone_id = var.zone_id
name = "Set cache settings"
description = "Set cache settings for incoming requests"
kind = "zone"
phase = "http_request_cache_settings"
rules = [
{
ref = "cache_vary"
description = "Cache expected Vary responses"
expression = "(http.host eq \"example.com\")"
action = "set_cache_settings"
action_parameters = {
cache = true
vary = {
default = {
action = "bypass"
}
headers = {
"accept" = {
action = "normalize"
media_types = [
"text/html",
"application/json"
]
}
"accept-language" = {
action = "normalize"
languages = [
"en",
"fr",
"de"
]
}
}
}
}
}
]
}
```
Use the `ref` field to get stable rule IDs across updates when using Terraform. Adding this field prevents Terraform from recreating the rule on changes. For more information, refer to [Troubleshooting](https://developers.cloudflare.com/terraform/troubleshooting/rule-id-changes/#how-to-keep-the-same-rule-id-between-modifications) in the Terraform documentation.
For additional guidance on using Terraform with Cloudflare, refer to [Terraform](https://developers.cloudflare.com/terraform/).
Was this helpful?
YesNo
## On this page
[Docs](https://developers.cloudflare.com/)
```json
{"@context":"https://schema.org","@type":"TechArticle","@id":"https://developers.cloudflare.com/cache/how-to/cache-rules/terraform-example/#page","headline":"Cache Rules — Terraform example · Cloudflare Cache (CDN) docs","description":"Create Cache Rules using Terraform.","url":"https://developers.cloudflare.com/cache/how-to/cache-rules/terraform-example/","inLanguage":"en","image":"https://developers.cloudflare.com/og-docs.png","dateModified":"2026-06-27","publisher":{"@type":"Organization","name":"Cloudflare","url":"https://www.cloudflare.com/"},"isPartOf":{"@type":"WebSite","@id":"https://developers.cloudflare.com/#website","name":"Cloudflare Docs","url":"https://developers.cloudflare.com/"},"keywords":["Terraform"]}
```
---
---
description: Cache responses based on origin HTTP status codes.
title: Cache by status code
image: https://developers.cloudflare.com/og-docs.png
---
[Skip to content](#main-content)
> Documentation Index
> Fetch the complete documentation index at: https://developers.cloudflare.com/cache/llms.txt
> Use this file to discover all available pages before exploring further.
# Cache by status code
Last updated Apr 16, 2026|Copy as Markdown|[View as Markdown](https://developers.cloudflare.com/cache/how-to/configure-cache-status-code/index.md)|[Agent setup](https://developers.cloudflare.com/agent-setup/)
Customers can set cache time-to-live (TTL) based on the response status from the origin web server. Cache TTL refers to the duration of a resource in the Cloudflare network before being marked as `STALE` or discarded from cache. Status codes are returned by a resource's origin.
Setting cache TTL based on response status overrides the [default cache behavior (standard caching)](https://developers.cloudflare.com/cache/concepts/default-cache-behavior/) for static files and overrides cache instructions sent by the origin web server. To cache non-static assets, set a [Cache Level of Cache Everything using a Cache Rule](https://developers.cloudflare.com/cache/how-to/cache-rules/create-api/#example-requests). Setting `no-store` **Cache-Control** or a low TTL (using `max-age`/`s-maxage`) increases requests to origin web servers and decreases performance.
## Caching limits
The maximum caching limit for Free, Pro, and Business customers is 512 MB per file, and the maximum caching limit for Enterprise customers is 5 GB per file. If you need to raise the limits, contact your Customer Success Manager.
## Edge TTL
By default, Cloudflare caches certain HTTP response codes with the following Edge Cache TTL when a `cache-control` directive or `expires` response header are not present.
| HTTP status code | Default TTL |
| ---------------- | ----------- |
| 200, 206, 301 | 120m |
| 302, 303 | 20m |
| 404, 410 | 3m |
All other status codes are not cached by default.
## Set cache TTL by response status via the Cloudflare dashboard
To set cache TTL by response status, [create a Cache Rule](https://developers.cloudflare.com/cache/how-to/cache-rules/) for [**Cache TTL by status code**](https://developers.cloudflare.com/cache/how-to/cache-rules/settings/#edge-ttl).
## Set cache TTL by response status via the Cloudflare API
```bash
curl --request PUT \
"https://api.cloudflare.com/client/v4/zones/{zone_id}/rulesets/{ruleset_id}" \
--header "Authorization: Bearer " \
--header "Content-Type: application/json" \
--data '{
"rules": [
{
"expression": "(http.host eq \"www.example.com\")",
"description": "set cache TTL by response status",
"action": "set_cache_settings",
"action_parameters": {
"cache": true,
"edge_ttl": {
"status_code_ttl": [
{
"status_code_range": {
"to": 299
},
"value": 86400
},
{
"status_code_range": {
"from": 300,
"to": 499
},
"value": 0 // no-cache
},
{
"status_code_range": {
"from": 500
},
"value": -1 // no-store
}
],
"mode": "respect_origin"
}
}
}
]
}'
```
### Syntax
Provide a JSON object containing status codes and their corresponding TTLs. Each key-value pair in the cache TTL by status cache rule has the following syntax:
* `status_code`: An integer value such as 200 or 500\. `status_code` matches the exact status code from the origin web server. Valid status codes are between 100-999.
* `status_code_range`: Integer values for `from` and `to`. `status_code_range` matches any status code from the origin web server within the specified range.
* `value`: An integer value that defines the duration an asset is valid in seconds or one of the following strings: `no-store` (equivalent to `-1`), `no-cache` (equivalent to `0`).
## Set cache TTL by response status via a Cloudflare Worker
The **cacheTtlByStatus** option is a version of the **cacheTtl** feature that designates a cache TTL for a request’s response status code (for example, `{ "200-299": 86400, 404: 1, "500-599": 0 }`).
## TTL handling for 304 and 200 status codes
1. If a TTL is not explicitly set for status code `304`, we automatically set it to match the TTL of status code `200` (if the user has defined one for `200`).
2. If a user explicitly sets a different TTL for `304` than for `200`, the following behavior will occur:
* When a `200` response is received, the asset is cached with the TTL specified for status `200`.
* Once the asset expires and we revalidate with the origin, if the origin returns a `304`, the cache TTL is updated to the value set for `304`.
For example, if a user specifies a TTL of one hour for status `200` and 0 seconds (cache and always revalidate) for status `304`, the asset will be cached for 1 hour. After it expires, we revalidate with the origin. If the origin returns a `304`, each subsequent request will trigger revalidation. If the origin continues to return `304`, this cycle will persist.
This behavior is likely undesirable unless the user has a specific use case. Therefore, users should ensure that the TTL for `304` matches the TTL for `200` unless they intentionally require this behavior.
Was this helpful?
YesNo
## On this page
[Docs](https://developers.cloudflare.com/)
```json
{"@context":"https://schema.org","@type":"TechArticle","@id":"https://developers.cloudflare.com/cache/how-to/configure-cache-status-code/#page","headline":"Cache by status code · Cloudflare Cache (CDN) docs","description":"Cache responses based on origin HTTP status codes.","url":"https://developers.cloudflare.com/cache/how-to/configure-cache-status-code/","inLanguage":"en","image":"https://developers.cloudflare.com/og-docs.png","dateModified":"2026-04-16","publisher":{"@type":"Organization","name":"Cloudflare","url":"https://www.cloudflare.com/"},"isPartOf":{"@type":"WebSite","@id":"https://developers.cloudflare.com/#website","name":"Cloudflare Docs","url":"https://developers.cloudflare.com/"},"keywords":["REST API"]}
```
---
---
description: Configure edge and browser cache TTL for your resources.
title: Edge and Browser Cache TTL
image: https://developers.cloudflare.com/og-docs.png
---
[Skip to content](#main-content)
> Documentation Index
> Fetch the complete documentation index at: https://developers.cloudflare.com/cache/llms.txt
> Use this file to discover all available pages before exploring further.
# Edge and Browser Cache TTL
Last updated Apr 16, 2026|Copy as Markdown|[View as Markdown](https://developers.cloudflare.com/cache/how-to/edge-browser-cache-ttl/index.md)|[Agent setup](https://developers.cloudflare.com/agent-setup/)
## Edge Cache TTL
Edge Cache TTL (Time to Live) specifies the maximum time to cache a resource in the Cloudflare global network. Edge Cache TTL is not visible in response headers and the minimum Edge Cache TTL depends on plan type.
| | Free | Pro | Business | Enterprise |
| ---------------------- | ------- | ------ | -------- | ---------- |
| Availability | Yes | Yes | Yes | Yes |
| Minimum Edge Cache TTL | 2 hours | 1 hour | 1 second | 1 second |
For more information on how to set up Edge Cache TTL, refer to [Cache rules](https://developers.cloudflare.com/cache/how-to/cache-rules/settings/#edge-ttl).
## Browser Cache TTL
The Browser Cache TTL sets the expiration for resources cached in a visitor’s browser. By default, Cloudflare honors the cache expiration set in your `Expires` and `Cache-Control` headers but overrides those headers if:
* The value of the `Expires` or `Cache-Control` header from the origin web server is less than the Browser Cache TTL Cloudflare setting.
* The origin web server does not send a `Cache-Control` or an `Expires` header.
Unless specifically set in a cache rule, Cloudflare does not override or insert `Cache-Control` headers if you set **Browser Cache TTL** to **Respect Existing Headers**.
Note
* Setting high Browser Cache TTL values means that the assets will be cached for a long time by users’ browsers.
* If you modify cached assets, the new assets may not be displayed to repeat visitors before the Browser Cache TTL expires.
* Purging Cloudflare’s cache does not affect assets stored by a visitor’s browser.
| | Free | Pro | Business | Enterprise |
| -------------------------------------- | --------- | --------- | --------- | ---------- |
| Availability | Yes | Yes | Yes | Yes |
| Minimum Browser Cache TTL (Page Rules) | 2 minutes | 2 minutes | 2 minutes | 30 seconds |
| Minimum Browser Cache TTL | 1 second | 1 second | 1 second | 1 second |
| Default Browser Cache TTL | 4 hours | 4 hours | 4 hours | 4 hours |
For more information on setting the Browser Cache TTL, refer to [Set Browser Cache TTL](https://developers.cloudflare.com/cache/how-to/edge-browser-cache-ttl/set-browser-ttl/).
Was this helpful?
YesNo
## On this page
[Docs](https://developers.cloudflare.com/)
```json
{"@context":"https://schema.org","@type":"TechArticle","@id":"https://developers.cloudflare.com/cache/how-to/edge-browser-cache-ttl/#page","headline":"Edge and Browser Cache TTL · Cloudflare Cache (CDN) docs","description":"Configure edge and browser cache TTL for your resources.","url":"https://developers.cloudflare.com/cache/how-to/edge-browser-cache-ttl/","inLanguage":"en","image":"https://developers.cloudflare.com/og-docs.png","dateModified":"2026-04-16","publisher":{"@type":"Organization","name":"Cloudflare","url":"https://www.cloudflare.com/"},"isPartOf":{"@type":"WebSite","@id":"https://developers.cloudflare.com/#website","name":"Cloudflare Docs","url":"https://developers.cloudflare.com/"}}
```
---
---
description: Set how long browsers cache resources from your site.
title: Set Browser Cache TTL
image: https://developers.cloudflare.com/og-docs.png
---
[Skip to content](#main-content)
> Documentation Index
> Fetch the complete documentation index at: https://developers.cloudflare.com/cache/llms.txt
> Use this file to discover all available pages before exploring further.
# Set Browser Cache TTL
Last updated Apr 16, 2026|Copy as Markdown|[View as Markdown](https://developers.cloudflare.com/cache/how-to/edge-browser-cache-ttl/set-browser-ttl/index.md)|[Agent setup](https://developers.cloudflare.com/agent-setup/)
Specify a time for a visitor’s Browser Cache TTL to accelerate the page load for repeat visitors to your website. To configure cache duration within Cloudflare’s data centers, refer to [Edge Cache TTL](https://developers.cloudflare.com/cache/how-to/cache-rules/settings/#edge-ttl).
By default, Cloudflare honors the cache expiration set in your `Expires` and `Cache-Control` headers. Cloudflare overrides any `Cache-Control` or `Expires` headers with values set via the **Browser Cache TTL** option under **Caching** on your dashboard if:
* The value of the `Cache-Control` header from the origin web server is less than the **Browser Cache TTL** setting. This means that **Browser cache TTL** value needs to be higher than origin `max-age`.
* The origin web server does not send a `Cache-Control` or an `Expires` header.
Unless specifically set in a [Cache Rule](https://developers.cloudflare.com/cache/how-to/cache-rules/), Cloudflare does not override or insert `Cache-Control` headers if you set **Browser Cache TTL** to **Respect Existing Headers**.
Nevertheless, the value you set via Cache Rule will be ignored if `Cache-Control: max-age` is higher. In other words, you can override to make browsers cache longer than Cloudflare's edge but not less.
## Set Browser Cache TTL
Note
If you modify cached assets, the new asset is not displayed to repeat visitors before the Browser Cache TTL duration. [Purging Cloudflare’s cache](https://developers.cloudflare.com/cache/how-to/purge-cache/) does not affect assets cached in a visitor’s browser.
1. In the Cloudflare dashboard, go to the **Caching** page.
[Go to **Configuration** ↗](https://dash.cloudflare.com/?to=/:account/:zone/caching/configuration)
2. Under **Browser Cache TTL**, select the desired cache expiration time from the drop-down menu.
The **Respect Existing Headers** option tells Cloudflare to honor the settings in the `Cache-Control` headers from your origin web server.
Was this helpful?
YesNo
## On this page
[Docs](https://developers.cloudflare.com/)
```json
{"@context":"https://schema.org","@type":"TechArticle","@id":"https://developers.cloudflare.com/cache/how-to/edge-browser-cache-ttl/set-browser-ttl/#page","headline":"Set Browser Cache TTL · Cloudflare Cache (CDN) docs","description":"Set how long browsers cache resources from your site.","url":"https://developers.cloudflare.com/cache/how-to/edge-browser-cache-ttl/set-browser-ttl/","inLanguage":"en","image":"https://developers.cloudflare.com/og-docs.png","dateModified":"2026-04-16","publisher":{"@type":"Organization","name":"Cloudflare","url":"https://www.cloudflare.com/"},"isPartOf":{"@type":"WebSite","@id":"https://developers.cloudflare.com/#website","name":"Cloudflare Docs","url":"https://developers.cloudflare.com/"}}
```
---
---
description: Remove cached content from Cloudflare edge servers.
title: Purge cache
image: https://developers.cloudflare.com/og-docs.png
---
[Skip to content](#main-content)
> Documentation Index
> Fetch the complete documentation index at: https://developers.cloudflare.com/cache/llms.txt
> Use this file to discover all available pages before exploring further.
# Purge cache
Last updated Apr 16, 2026|Copy as Markdown|[View as Markdown](https://developers.cloudflare.com/cache/how-to/purge-cache/index.md)|[Agent setup](https://developers.cloudflare.com/agent-setup/)
Cloudflare's Instant Purge ensures that updates to your content are reflected immediately. Multiple options are available for purging content, with single-file cache purging (purge by URL) being the recommended method. However, the following additional options are also available:
* [Purge by single-file](https://developers.cloudflare.com/cache/how-to/purge-cache/purge-by-single-file/)
* [Purge everything](https://developers.cloudflare.com/cache/how-to/purge-cache/purge-everything/)
* [Purge cache by cache-tags](https://developers.cloudflare.com/cache/how-to/purge-cache/purge-by-tags/)
* [Purge cache by hostname](https://developers.cloudflare.com/cache/how-to/purge-cache/purge-by-hostname/)
* [Purge cache by prefix (URL)](https://developers.cloudflare.com/cache/how-to/purge-cache/purge%5Fby%5Fprefix/)
* [Purge cache key resources](https://developers.cloudflare.com/cache/how-to/purge-cache/purge-cache-key/)
* [Purge varied images](https://developers.cloudflare.com/cache/how-to/purge-cache/purge-varied-images/)
* [Purge zone versions via API](https://developers.cloudflare.com/cache/how-to/purge-cache/purge-zone-versions/)
Note
If versioning is active on your zone and multiple environments are configured, you can select the specific environment you want to purge. For more details, refer to the [Version Management](https://developers.cloudflare.com/version-management/) documentation.
## Availability and limits
| | Free | Pro | Business | Enterprise |
| ------------- | ------------------------------------------------ | ------------------------------------------------ | ------------------------------------------------ | ------------------------------------------------ |
| Availability | Yes | Yes | Yes | Yes |
| Purge options | URL, Hostname, Tag, Prefix, and Purge Everything | URL, Hostname, Tag, Prefix, and Purge Everything | URL, Hostname, Tag, Prefix, and Purge Everything | URL, Hostname, Tag, Prefix, and Purge Everything |
### Hostname, tag, prefix URL, and purge everything limits
The current purge limits are applied per **account**:
| | Free | Pro | Business | Enterprise |
| -------------------------- | --------------------- | --------------------- | ---------------------- | ---------------------- |
| Requests | 5 requests per minute | 5 requests per second | 10 requests per second | 50 requests per second |
| Bucket size | 25 | 25 | 50 | 500 |
| Max operations per request | 100 | 100 | 100 | 100 |
If your account includes zones with different Cloudflare plans, the above limits are shared between all the zones with the same plan. For example, all the zones in your account with a Pro plan will share the limits for the Pro plan, and all the zones in your account with a Business plan will share the limits for the Business plan.
### Single-file purge limits
The current purge limits are applied per **account**:
| | Free | Pro | Business | Enterprise |
| -------------------------- | ------------------- | -------------------- | -------------------- | -------------------- |
| URLs | 800 URLs per second | 1500 URLs per second | 1500 URLs per second | 3000 URLs per second |
| Max operations per request | 100 | 100 | 100 | 500 |
If your account includes zones with different Cloudflare plans, the above limits are shared between all the zones with the same plan. For example, all the zones in your account with a Pro plan will share the limits for the Pro plan, and all the zones in your account with a Business plan will share the limits for the Business plan.
Note that the thresholds for URLs are calculated using a moving average.
### Token bucket rate limiting
Cloudflare uses token bucket rate limiting to limit the number of purge requests flowing through the system at any given time, ensuring a steady and manageable flow.
Each account tier has a defined request rate (for example, Free: 5 requests per minute, Business: 10 requests per second), and requests are only allowed if there are available tokens in the bucket. Tokens refill at a consistent rate, but each bucket has a maximum capacity (for example, Free: 25 tokens, Enterprise: 500 tokens), allowing short bursts of requests if tokens have accumulated.
If the bucket is empty, further requests must wait until new tokens are added. This system maintains fair usage while allowing occasional bursts within the bucket's capacity.
If you are an Enterprise customer and you need more operations, reach out to your account team for support.
Was this helpful?
YesNo
## On this page
[Docs](https://developers.cloudflare.com/)
```json
{"@context":"https://schema.org","@type":"TechArticle","@id":"https://developers.cloudflare.com/cache/how-to/purge-cache/#page","headline":"Purge cache · Cloudflare Cache (CDN) docs","description":"Remove cached content from Cloudflare edge servers.","url":"https://developers.cloudflare.com/cache/how-to/purge-cache/","inLanguage":"en","image":"https://developers.cloudflare.com/og-docs.png","dateModified":"2026-04-16","publisher":{"@type":"Organization","name":"Cloudflare","url":"https://www.cloudflare.com/"},"isPartOf":{"@type":"WebSite","@id":"https://developers.cloudflare.com/#website","name":"Cloudflare Docs","url":"https://developers.cloudflare.com/"}}
```
---
---
description: Purge cached resources by URL prefix.
title: Purge cache by prefix (URL)
image: https://developers.cloudflare.com/og-docs.png
---
[Skip to content](#main-content)
> Documentation Index
> Fetch the complete documentation index at: https://developers.cloudflare.com/cache/llms.txt
> Use this file to discover all available pages before exploring further.
# Purge cache by prefix (URL)
Last updated Apr 16, 2026|Copy as Markdown|[View as Markdown](https://developers.cloudflare.com/cache/how-to/purge-cache/purge%5Fby%5Fprefix/index.md)|[Agent setup](https://developers.cloudflare.com/agent-setup/)
You can instantly purge their cache by URL prefix or path separators in their URL. For an example URL like `https://www.example.com/foo/bar/baz/qux.jpg`, valid purge requests include:
* `www.example.com`
* `www.example.com/foo`
* `www.example.com/foo/bar`
* `www.example.com/foo/bar/baz`
* `www.example.com/foo/bar/baz/qux.jpg`
Purging by prefix is useful in different scenarios, such as:
* Purging everything within a directory.
* Increasing control over cached objects in a path.
* Simplifying the number of purge calls sent.
1. In the Cloudflare dashboard, go to the **Configuration** page.
[Go to **Configuration** ↗](https://dash.cloudflare.com/?to=/:account/:zone/caching/configuration)
2. Under **Purge Cache**, select **Custom Purge**. The **Custom Purge** window appears.
3. Under **Purge by**, select **Prefix**.
4. Follow the syntax instructions.
* One prefix per line.
* Maximum 30 prefixes per API call.
5. Enter the appropriate value(s) in the text field using the format shown in the example.
6. Select **Purge**.
For information on rate limits, refer to the [Availability and limits](https://developers.cloudflare.com/cache/how-to/purge-cache/#availability-and-limits) section.
Warning
If you have a [Transform Rule](https://developers.cloudflare.com/rules/transform/) in place that is modifying part of a URL path, you must use the post-transformed (origin) URL when performing a prefix purge so that purge can take effect.
## Resulting cache status
Purging by prefix deletes the resource, causing `CF-Cache-Status` header to show [MISS](https://developers.cloudflare.com/cache/concepts/cache-responses/#miss) for the subsequent request.
If [tiered cache](https://developers.cloudflare.com/cache/how-to/tiered-cache/) is used, purging by prefix may return `EXPIRED`, as the lower tier tries to revalidate with the upper tier to reduce load on the latter. Depending on whether the upper tier has the resource or not, and whether the end user is reaching the lower tier or the upper tier, `EXPIRED` or `MISS` are returned.
## Limitations
There are several limitations regarding purge by prefix:
* Path separators are limited to 31 for a prefix `(example.com/a/b/c/d/e/f/g/h/i/j/k/l/m…)`.
* Purge requests are limited to 30 prefixes per request.
* [Purge rate-limits apply](https://developers.cloudflare.com/api/resources/cache/methods/purge/).
* URI query strings & fragments cannot purge by prefix:
* `www.example.com/foo?a=b` (query string)
* `www.example.com/foo#bar` (fragment)
Warning
Because purge by prefix purges a directory, any URI for a resource within the purged directory is purged regardless of query string or fragment (though fragments are not generally sent by browsers). Purge by prefix rules do not accept fragments and query strings.
Example: If you purge `foo.com/bar`, any asset that starts with `foo.com/bar` will be purged, for example, `foo.com/bar/baz`, `foo.com/bar?good=bad`, etc. and purging `foo.com/bar?good=bad` itself will not work.
## Purge by prefix normalization
Using purge by prefix normalization, when a purge by prefix request comes into Cloudflare for a normalized URL path, the purge service respects the [URL normalization](https://developers.cloudflare.com/rules/normalization/) and purges the normalized URL.
### How does URL Normalization work
Take the following website as an example: `https://cloudflare.com/انشاء-موقع-الكتروني/img_1.jpg`. The table below shows you how Cloudflare’s cache views these paths with [normalization on/off](https://developers.cloudflare.com/rules/normalization/).
| Request from visitor to EDGE | What Cloudflare cache sees with Normalize Incoming URLs ON | What Cloudflare cache sees with Normalize Incoming URLs OFF | | [https://cloudflare.com/انشاء-موقع-الكتروني/img\_1.jpg ↗](https://cloudflare.com/%D8%A7%D9%86%D8%B4%D8%A7%D8%A1-%D9%85%D9%88%D9%82%D8%B9-%D8%A7%D9%84%D9%83%D8%AA%D8%B1%D9%88%D9%86%D9%8A/img%5F1.jpg) | [https://cloudflare.com/%D8%A7%D9%86%D8%B4%D8%A7%D8%A1-%D9%85%D9%88%D9%82%D8%B9-%D8%A7%D9%84%D9%83%D8%AA%D8%B1%D9%88%D9%86%D9%8A/img\_1.jpg ↗](https://cloudflare.com/%D8%A7%D9%86%D8%B4%D8%A7%D8%A1-%D9%85%D9%88%D9%82%D8%B9-%D8%A7%D9%84%D9%83%D8%AA%D8%B1%D9%88%D9%86%D9%8A/img%5F1.jpg) | [https://cloudflare.com/انشاء-موقع-الكتروني/img\_1.jpg ↗](https://cloudflare.com/%D8%A7%D9%86%D8%B4%D8%A7%D8%A1-%D9%85%D9%88%D9%82%D8%B9-%D8%A7%D9%84%D9%83%D8%AA%D8%B1%D9%88%D9%86%D9%8A/img%5F1.jpg) |
| ------------------------------------------------------------------------------------------------------------------------------------------------------------------------------------------------------------------------------------------------------------------------------------------- | ------------------------------------------------------------------------------------------------------------------------------------------------------------------------------------------------------------------------------------------------------------------------------------------- | ------------------------------------------------------------------------------------------------------------------------------------------------------------------------------------------------------------------------------------------------------------------------------------------- | --------------------------------------------------------------------------------------------------------------------------------------------------------------------------------------------------------- | ------------------------------------------------------------------------------------------------------------------------------------------------------------------------------------------------------------------------------------------------------------------------------------------- | ------------------------------------------------------------------------------------------------------------------------------------------------------------------------------------------------------ |
| [https://cloudflare.com/%D8%A7%D9%86%D8%B4%D8%A7%D8%A1-%D9%85%D9%88%D9%82%D8%B9-%D8%A7%D9%84%D9%83%D8%AA%D8%B1%D9%88%D9%86%D9%8A/img\_1.jpg ↗](https://cloudflare.com/%D8%A7%D9%86%D8%B4%D8%A7%D8%A1-%D9%85%D9%88%D9%82%D8%B9-%D8%A7%D9%84%D9%83%D8%AA%D8%B1%D9%88%D9%86%D9%8A/img%5F1.jpg) | [https://cloudflare.com/%D8%A7%D9%86%D8%B4%D8%A7%D8%A1-%D9%85%D9%88%D9%82%D8%B9-%D8%A7%D9%84%D9%83%D8%AA%D8%B1%D9%88%D9%86%D9%8A/img\_1.jpg ↗](https://cloudflare.com/%D8%A7%D9%86%D8%B4%D8%A7%D8%A1-%D9%85%D9%88%D9%82%D8%B9-%D8%A7%D9%84%D9%83%D8%AA%D8%B1%D9%88%D9%86%D9%8A/img%5F1.jpg) | [https://cloudflare.com/%D8%A7%D9%86%D8%B4%D8%A7%D8%A1-%D9%85%D9%88%D9%82%D8%B9-%D8%A7%D9%84%D9%83%D8%AA%D8%B1%D9%88%D9%86%D9%8A/img\_1.jpg ↗](https://cloudflare.com/%D8%A7%D9%86%D8%B4%D8%A7%D8%A1-%D9%85%D9%88%D9%82%D8%B9-%D8%A7%D9%84%D9%83%D8%AA%D8%B1%D9%88%D9%86%D9%8A/img%5F1.jpg) | | | |
| [https://cloudflare.com/hello/img\_1.jpg ↗](https://cloudflare.com/hello/img%5F1.jpg) | [https://cloudflare.com/hello/img\_1.jpg ↗](https://cloudflare.com/hello/img%5F1.jpg) | [https://cloudflare.com/hello/img\_1.jpg ↗](https://cloudflare.com/hello/img%5F1.jpg) | | | |
As shown above, with URL normalization **ON**, visitors to the two URLs, `https://cloudflare.com/%D8%A7%D9%86%D8%B4%D8%A7%D8%A1-%D9%85%D9%88%D9%82%D8%B9-%D8%A7%D9%84%D9%83%D8%AA%D8%B1%D9%88%D9%86%D9%8A/img_1.jpg` and `https://cloudflare.com/انشاء-موقع-الكتروني/img_1.jpg`, will be served the same cached asset. Purging `https://cloudflare.com/%D8%A7%D9%86%D8%B4%D8%A7%D8%A1-%D9%85%D9%88%D9%82%D8%B9-%D8%A7%D9%84%D9%83%D8%AA%D8%B1%D9%88%D9%86%D9%8A/img_1.jpg` will instantly purge that asset for both visitors.
Was this helpful?
YesNo
## On this page
[Docs](https://developers.cloudflare.com/)
```json
{"@context":"https://schema.org","@type":"TechArticle","@id":"https://developers.cloudflare.com/cache/how-to/purge-cache/purge_by_prefix/#page","headline":"Purge cache by prefix (URL) · Cloudflare Cache (CDN) docs","description":"Purge cached resources by URL prefix.","url":"https://developers.cloudflare.com/cache/how-to/purge-cache/purge_by_prefix/","inLanguage":"en","image":"https://developers.cloudflare.com/og-docs.png","dateModified":"2026-04-16","publisher":{"@type":"Organization","name":"Cloudflare","url":"https://www.cloudflare.com/"},"isPartOf":{"@type":"WebSite","@id":"https://developers.cloudflare.com/#website","name":"Cloudflare Docs","url":"https://developers.cloudflare.com/"}}
```
---
---
description: Purge all cached resources for a specific hostname.
title: Purge cache by hostname
image: https://developers.cloudflare.com/og-docs.png
---
[Skip to content](#main-content)
> Documentation Index
> Fetch the complete documentation index at: https://developers.cloudflare.com/cache/llms.txt
> Use this file to discover all available pages before exploring further.
# Purge cache by hostname
Last updated Apr 16, 2026|Copy as Markdown|[View as Markdown](https://developers.cloudflare.com/cache/how-to/purge-cache/purge-by-hostname/index.md)|[Agent setup](https://developers.cloudflare.com/agent-setup/)
Purging by hostname means that all assets at URLs with a host that matches one of the provided values will be instantly purged from the cache.
1. In the Cloudflare dashboard, go to the **Configuration** page.
[Go to **Configuration** ↗](https://dash.cloudflare.com/?to=/:account/:zone/caching/configuration)
2. Under **Purge Cache**, select **Custom Purge**. The **Custom Purge** window appears.
3. Under **Purge by**, select **Hostname**.
4. Follow the syntax instructions:
* One hostname per line.
* Separated by commas.
* You can purge up to 30 hostnames at a time.
5. Enter the appropriate value(s) in the text field using the format shown in the example.
6. Select **Purge**.
For information on rate limits, refer to the [Availability and limits](https://developers.cloudflare.com/cache/how-to/purge-cache/#availability-and-limits) section.
## Resulting cache status
Purging by hostname deletes the resource, resulting in the `CF-Cache-Status` header being set to [MISS](https://developers.cloudflare.com/cache/concepts/cache-responses/#miss) for subsequent requests.
If [tiered cache](https://developers.cloudflare.com/cache/how-to/tiered-cache/) is used, purging by hostname may return `EXPIRED`, as the lower tier tries to revalidate with the upper tier to reduce load on the latter. Depending on whether the upper tier has the resource or not, and whether the end user is reaching the lower tier or the upper tier, `EXPIRED` or `MISS` are returned.
Was this helpful?
YesNo
## On this page
[Docs](https://developers.cloudflare.com/)
```json
{"@context":"https://schema.org","@type":"TechArticle","@id":"https://developers.cloudflare.com/cache/how-to/purge-cache/purge-by-hostname/#page","headline":"Purge cache by hostname · Cloudflare Cache (CDN) docs","description":"Purge all cached resources for a specific hostname.","url":"https://developers.cloudflare.com/cache/how-to/purge-cache/purge-by-hostname/","inLanguage":"en","image":"https://developers.cloudflare.com/og-docs.png","dateModified":"2026-04-16","publisher":{"@type":"Organization","name":"Cloudflare","url":"https://www.cloudflare.com/"},"isPartOf":{"@type":"WebSite","@id":"https://developers.cloudflare.com/#website","name":"Cloudflare Docs","url":"https://developers.cloudflare.com/"}}
```
---
---
description: Purge a single cached file by URL.
title: Purge by single-file
image: https://developers.cloudflare.com/og-docs.png
---
[Skip to content](#main-content)
> Documentation Index
> Fetch the complete documentation index at: https://developers.cloudflare.com/cache/llms.txt
> Use this file to discover all available pages before exploring further.
# Purge by single-file
Last updated Jul 23, 2026|Copy as Markdown|[View as Markdown](https://developers.cloudflare.com/cache/how-to/purge-cache/purge-by-single-file/index.md)|[Agent setup](https://developers.cloudflare.com/agent-setup/)
With purge by single-file, cached resources are instantly removed from the stored assets in your Content Delivery Network (CDN) across all data centers. New requests for the purged asset receive the latest version from your origin web server and add it back to your CDN cache within the specific Cloudflare data center that served the request.
For information on single-file purge rate limits, refer to the [limits](https://developers.cloudflare.com/cache/how-to/purge-cache/#single-file-purge-limits) section.
## How to purge a single file
1. In the Cloudflare dashboard, go to the **Configuration** page.
[Go to **Configuration** ↗](https://dash.cloudflare.com/?to=/:account/:zone/caching/configuration)
2. Under **Purge Cache**, select **Custom Purge**. The **Custom Purge** window appears.
3. Under **Purge by**, select **URL**.
4. Enter the appropriate value(s) in the text field using the format shown in the example. Be aware that the host part of the URL is not case-sensitive, meaning it will always be converted to lowercase according to RFC standards. However, the path portion is case-sensitive. For example, `https://EXAMPLE.com/helloHI` would be treated as `https://example.com/helloHI`.
5. Perform any additional instructions to complete the form.
6. Review your entries.
7. Select **Purge**.
## Limitations and alternatives
Single-file purge works for most resources, but there are situations where it cannot clear cached content. This section explains when single-file purge does not work and what to use instead.
### Custom cache keys
If you use [Cache Rules](https://developers.cloudflare.com/cache/how-to/cache-rules/) to set a [custom cache key](https://developers.cloudflare.com/cache/how-to/cache-keys/) that includes headers, cookies, or other request properties, single-file purge via the dashboard will not invalidate the cached resource. This is because the dashboard cannot send those values in a purge request. Custom cache keys that only change how the query string is handled (for example, ignoring the query string) generally work with dashboard single-file purge.
**What to do instead:**
* **Use the API** to [purge files by URL](https://developers.cloudflare.com/api/resources/cache/methods/purge/#purge-cached-content-by-url), including all headers and cookies that are part of your custom cache key. If any header or cookie is missing from the purge request, Cloudflare treats it as an empty value in the cache key.
* **Use purge by prefix** ([purge by prefix](https://developers.cloudflare.com/cache/how-to/purge-cache/purge%5Fby%5Fprefix/)) to clear all resources under a URL path.
* **Use purge by tag** ([purge by tag](https://developers.cloudflare.com/cache/how-to/purge-cache/purge-by-tags/)) if your resources are tagged.
* **Use purge everything** ([purge everything](https://developers.cloudflare.com/cache/how-to/purge-cache/purge-everything/)) to clear all cached resources for the zone.
### Cache Rules that match on request properties
Single-file purge may also not work as expected if your Cache Rules match only on `GET` requests, or match on properties that are not present during a purge. For example, a Cache Rule with the expression `(http.host eq "example.com" and http.request.method eq "GET")` will not match during a single-file purge.
**What to do instead:**
Update your Cache Rule expression to also match on the `PURGE` method, for example `(http.host eq "example.com" and (http.request.method eq "GET" or http.request.method eq "PURGE"))`. This allows the rule to apply to both client requests and purge requests.
For rules that match on fields which cannot be evaluated during purge (such as `cf.bot_management.score`), use [purge by prefix](https://developers.cloudflare.com/cache/how-to/purge-cache/purge%5Fby%5Fprefix/), [purge by tag](https://developers.cloudflare.com/cache/how-to/purge-cache/purge-by-tags/), or [purge everything](https://developers.cloudflare.com/cache/how-to/purge-cache/purge-everything/).
### Resources with special headers
A single-file purge performed through your Cloudflare dashboard does not clear objects that contain any of the following:
* [Origin header ↗](https://developer.mozilla.org/en-US/docs/Web/HTTP/Reference/Headers/Origin)
* Any of these request headers:
* `X-Forwarded-Host`
* `X-Host`
* `X-Forwarded-Scheme`
* `X-Original-URL`
* `X-Rewrite-URL`
* `Forwarded`
You can purge objects with these characteristics using an API call to [purge files by URL](https://developers.cloudflare.com/api/resources/cache/methods/purge/). In the `headers` object of the request body, include the header values that match those used in the cached resource's cache key.
## Additional notes
Caution
Always use UTF-8 encoded URLs for single-file cache purges. Wildcards are not supported on single file purge, and you must use purge by hostname, prefix, or implement cache tags as an alternative solution.
Caution
If you have a [Transform Rule](https://developers.cloudflare.com/rules/transform/) in place that is modifying part of a URL path, you must use the non-transform (end user) URL when performing single file purge so that purge can take effect.
Note
For information on how to use single-file purge to purge assets cached by a Workers fetch, refer to [Single file purge assets cached by a Worker](https://developers.cloudflare.com/workers/reference/how-the-cache-works/#single-file-purge-assets-cached-by-a-worker).
For information on how to purge assets cached by [Cache API](https://developers.cloudflare.com/workers/runtime-apis/cache/) operations, refer to [Purge assets stored with the Cache API](https://developers.cloudflare.com/workers/reference/how-the-cache-works/#purge-assets-stored-with-the-cache-api).
## Resulting cache status
Purging by single-file deletes the resource, resulting in the `CF-Cache-Status` header being set to [MISS](https://developers.cloudflare.com/cache/concepts/cache-responses/#miss) for subsequent requests.
Was this helpful?
YesNo
## On this page
[Docs](https://developers.cloudflare.com/)
```json
{"@context":"https://schema.org","@type":"TechArticle","@id":"https://developers.cloudflare.com/cache/how-to/purge-cache/purge-by-single-file/#page","headline":"Purge by single-file · Cloudflare Cache (CDN) docs","description":"Purge a single cached file by URL.","url":"https://developers.cloudflare.com/cache/how-to/purge-cache/purge-by-single-file/","inLanguage":"en","image":"https://developers.cloudflare.com/og-docs.png","dateModified":"2026-07-23","publisher":{"@type":"Organization","name":"Cloudflare","url":"https://www.cloudflare.com/"},"isPartOf":{"@type":"WebSite","@id":"https://developers.cloudflare.com/#website","name":"Cloudflare Docs","url":"https://developers.cloudflare.com/"}}
```
---
---
description: Purge cached resources by cache tag headers.
title: Purge cache by cache-tags
image: https://developers.cloudflare.com/og-docs.png
---
[Skip to content](#main-content)
> Documentation Index
> Fetch the complete documentation index at: https://developers.cloudflare.com/cache/llms.txt
> Use this file to discover all available pages before exploring further.
# Purge cache by cache-tags
Last updated Apr 16, 2026|Copy as Markdown|[View as Markdown](https://developers.cloudflare.com/cache/how-to/purge-cache/purge-by-tags/index.md)|[Agent setup](https://developers.cloudflare.com/agent-setup/)
Cache-tag purging makes multi-file purging easier because you can instantly bulk purge by adding cache-tags to your assets, such as webpages, image files, and more.
## General workflow for cache-tags
1. Add tags to the `Cache-Tag` HTTP response header from your origin web server for your web content, such as pages, static assets, etc.
2. [Ensure your web traffic is proxied](https://developers.cloudflare.com/dns/proxy-status/) through Cloudflare.
3. Cloudflare associates the tags in the `Cache-Tag` HTTP header with the content being cached.
4. Use specific cache-tags to instantly purge your Cloudflare CDN cache of all content containing that cache-tag from your dashboard or [using our API](https://developers.cloudflare.com/api/resources/cache/methods/purge/).
5. Cloudflare forces a [cache MISS](https://developers.cloudflare.com/cache/concepts/cache-responses/#miss) on content with the purged cache-tag.
Warning
Be careful when purging. A cache MISS can cause execution delays by requiring a fetch from your origin server.
## Add Cache-Tag HTTP response headers
You add cache-tags to your web content in `Cache-Tag` HTTP response headers to allow the client and server to pass additional information in requests or responses. HTTP headers consist of a specific case-insensitive name followed by a colon `:` and the valid value, for example, `Cache-Tag:tag1,tag2,tag3`. Use commas to separate the tags when you want to use multiple cache-tags.
When your content reaches our edge network, Cloudflare:
* Removes the `Cache-Tag` HTTP header before sending the response to your website visitor or passing the response to a [Worker](https://developers.cloudflare.com/workers/). Your end users or Worker never see `Cache-Tag` HTTP headers on your Cloudflare-enabled website.
* Removes whitespaces from the header and any before and after cache-tag names: `tag1`, `tag2` and `tag1,tag2` are considered the same.
* Removes all repeated and trailing commas before applying cache-tags: `tag1,,,tag2` and `tag1,tag2` are considered the same.
## A few things to remember
* A single HTTP response can have more than one `Cache-Tag` HTTP header field.
* The minimum length of a cache-tag is one byte.
* Individual tags do not have a maximum length, but the aggregate `Cache-Tag` HTTP header cannot exceed 16 KB after the header field name, which is approximately 1,000 unique tags. Length includes whitespace and commas but does not include the header field name.
* For cache purges, the maximum length of a cache-tag in an API call is 1,024 characters.
* The `Cache-Tag` HTTP header must only contain printable ASCII encoded characters.
* Spaces are not allowed in cache-tags.
* Case is not sensitive. For example, `Tag1` and `tag1` are considered the same.
## Purge using cache-tags
1. In the Cloudflare dashboard, go to the **Configuration** page.
[Go to **Configuration** ↗](https://dash.cloudflare.com/?to=/:account/:zone/caching/configuration)
2. Under **Purge Cache**, select **Custom Purge**. The **Custom Purge** window appears.
3. Under **Purge by**, select **Tag**.
4. In the text box, enter your tags to use to purge the cached resources. To purge multiple cache-tagged resources, separate each tag with a comma or have one tag per line.
5. Select **Purge**.
For information on rate limits, refer to the [Availability and limits](https://developers.cloudflare.com/cache/how-to/purge-cache/#availability-and-limits) section.
## Resulting cache status
Purging by tag deletes the resource, resulting in the `CF-Cache-Status` header being set to [MISS](https://developers.cloudflare.com/cache/concepts/cache-responses/#miss) for subsequent requests.
If [Tiered Cache](https://developers.cloudflare.com/cache/how-to/tiered-cache/) is used, purging by tag may return `EXPIRED`, as the lower tier tries to revalidate with the upper tier to reduce load on the latter. Depending on whether the upper tier has the resource or not, and whether the end user is reaching the lower tier or the upper tier, `EXPIRED` or `MISS` are returned.
Was this helpful?
YesNo
## On this page
[Docs](https://developers.cloudflare.com/)
```json
{"@context":"https://schema.org","@type":"TechArticle","@id":"https://developers.cloudflare.com/cache/how-to/purge-cache/purge-by-tags/#page","headline":"Purge cache by cache-tags · Cloudflare Cache (CDN) docs","description":"Purge cached resources by cache tag headers.","url":"https://developers.cloudflare.com/cache/how-to/purge-cache/purge-by-tags/","inLanguage":"en","image":"https://developers.cloudflare.com/og-docs.png","dateModified":"2026-04-16","publisher":{"@type":"Organization","name":"Cloudflare","url":"https://www.cloudflare.com/"},"isPartOf":{"@type":"WebSite","@id":"https://developers.cloudflare.com/#website","name":"Cloudflare Docs","url":"https://developers.cloudflare.com/"}}
```
---
---
description: Purge cached resources by custom cache key.
title: Purge cache key resources
image: https://developers.cloudflare.com/og-docs.png
---
[Skip to content](#main-content)
> Documentation Index
> Fetch the complete documentation index at: https://developers.cloudflare.com/cache/llms.txt
> Use this file to discover all available pages before exploring further.
# Purge cache key resources
Last updated Apr 16, 2026|Copy as Markdown|[View as Markdown](https://developers.cloudflare.com/cache/how-to/purge-cache/purge-cache-key/index.md)|[Agent setup](https://developers.cloudflare.com/agent-setup/)
Instantly purge resources that use Cache Keys via the [Cloudflare API](https://developers.cloudflare.com/api/resources/cache/methods/purge/). If you use [Cloudflare's Purge by URL](https://developers.cloudflare.com/api/resources/cache/methods/purge/#purge-cached-content-by-url), include the headers and query strings that are in your custom Cache Key.
Currently, it is not possible to purge a URL stored through Cache API that uses a custom cache key set by a Worker. Instead, use a [custom key created by Cache Rules](https://developers.cloudflare.com/cache/how-to/cache-rules/settings/#cache-key). Alternatively, purge your assets using purge everything, purge by tag, purge by host or purge by prefix.
To instantly purge by `device_type`, `geo`, or `lang` use `CF-Device-Type`, `CF-IPCountry` or `accept-language`, respectively. [Purge by Tag / Host](https://developers.cloudflare.com/api/resources/cache/methods/purge/#purge-cached-content-by-tag-host-or-prefix) and [Purge Everything](https://developers.cloudflare.com/api/resources/cache/methods/purge/#purge-all-cached-content) are not impacted by the use of custom Cache Keys.
## Purge by device type
For a Cache Key based on device type, purge the asset by passing the `CF-Device-Type` header with the API purge request (valid headers include mobile, desktop, and tablet).
Refer to the example API request below to instantly purge all mobile assets on the root webpage.
Required API token permissions
At least one of the following [token permissions](https://developers.cloudflare.com/fundamentals/api/reference/permissions/) is required:
* `Cache Purge`
```bash
curl "https://api.cloudflare.com/client/v4/zones/$ZONE_ID/purge_cache" \
--request POST \
--header "Authorization: Bearer $CLOUDFLARE_API_TOKEN" \
--json '{
"files": [
{
"url": "http://my.website.com/",
"headers": {
"CF-Device-Type": "mobile"
}
}
]
}'
```
## Purge by geo
Instantly purge resources for a location-based Cache Key by specifying the two-letter country code. Spain is used in the example below.
Required API token permissions
At least one of the following [token permissions](https://developers.cloudflare.com/fundamentals/api/reference/permissions/) is required:
* `Cache Purge`
```bash
curl "https://api.cloudflare.com/client/v4/zones/$ZONE_ID/purge_cache" \
--request POST \
--header "Authorization: Bearer $CLOUDFLARE_API_TOKEN" \
--json '{
"files": [
{
"url": "http://my.website.com/",
"headers": {
"CF-IPCountry": "ES"
}
}
]
}'
```
## Purge by language
For a Cache Key based on language, purge the asset by passing the `accept-language` header. Refer to the example API request below to instantly purge all assets in Chinese (PRC).
Required API token permissions
At least one of the following [token permissions](https://developers.cloudflare.com/fundamentals/api/reference/permissions/) is required:
* `Cache Purge`
```bash
curl "https://api.cloudflare.com/client/v4/zones/$ZONE_ID/purge_cache" \
--request POST \
--header "Authorization: Bearer $CLOUDFLARE_API_TOKEN" \
--json '{
"files": [
{
"url": "http://my.website.com/",
"headers": {
"accept-language": "zh-CN"
}
}
]
}'
```
Was this helpful?
YesNo
## On this page
[Docs](https://developers.cloudflare.com/)
```json
{"@context":"https://schema.org","@type":"TechArticle","@id":"https://developers.cloudflare.com/cache/how-to/purge-cache/purge-cache-key/#page","headline":"Purge cache key resources · Cloudflare Cache (CDN) docs","description":"Purge cached resources by custom cache key.","url":"https://developers.cloudflare.com/cache/how-to/purge-cache/purge-cache-key/","inLanguage":"en","image":"https://developers.cloudflare.com/og-docs.png","dateModified":"2026-04-16","publisher":{"@type":"Organization","name":"Cloudflare","url":"https://www.cloudflare.com/"},"isPartOf":{"@type":"WebSite","@id":"https://developers.cloudflare.com/#website","name":"Cloudflare Docs","url":"https://developers.cloudflare.com/"},"keywords":["Geolocation"]}
```
---
---
description: Purge all cached content for your entire zone.
title: Purge everything
image: https://developers.cloudflare.com/og-docs.png
---
[Skip to content](#main-content)
> Documentation Index
> Fetch the complete documentation index at: https://developers.cloudflare.com/cache/llms.txt
> Use this file to discover all available pages before exploring further.
# Purge everything
Last updated Apr 16, 2026|Copy as Markdown|[View as Markdown](https://developers.cloudflare.com/cache/how-to/purge-cache/purge-everything/index.md)|[Agent setup](https://developers.cloudflare.com/agent-setup/)
To maintain optimal site performance, Cloudflare strongly recommends using single-file (by URL) purging instead of a complete cache purge.
Purging everything instantly clears all resources from your CDN cache in all Cloudflare data centers. Each new request for a purged resource returns to your origin server to validate the resource. If Cloudflare cannot validate the resource, Cloudflare fetches the latest version from the origin server and replaces the cached version. When a site with heavy traffic contains a lot of assets, requests to your origin server can increase substantially and result in slow site performance.
1. In the Cloudflare dashboard, go to the **Configuration** page.
[Go to **Configuration** ↗](https://dash.cloudflare.com/?to=/:account/:zone/caching/configuration)
2. Under **Purge Cache**, select **Purge Everything**. A warning window appears.
3. If you agree, select **Purge Everything**.
Note
When purging everything for a non-production cache environment, all files for that specific cache environment will be purged. However, when purging everything for the production environment, all files will be purged across all environments.
For information on rate limits, refer to the [Availability and limits](https://developers.cloudflare.com/cache/how-to/purge-cache/#availability-and-limits) section.
## Resulting cache status
Purge Everything invalidates the resource, resulting in the `CF-Cache-Status` header indicating [EXPIRED](https://developers.cloudflare.com/cache/concepts/cache-responses/#expired) for subsequent requests.
Was this helpful?
YesNo
## On this page
[Docs](https://developers.cloudflare.com/)
```json
{"@context":"https://schema.org","@type":"TechArticle","@id":"https://developers.cloudflare.com/cache/how-to/purge-cache/purge-everything/#page","headline":"Purge everything · Cloudflare Cache (CDN) docs","description":"Purge all cached content for your entire zone.","url":"https://developers.cloudflare.com/cache/how-to/purge-cache/purge-everything/","inLanguage":"en","image":"https://developers.cloudflare.com/og-docs.png","dateModified":"2026-04-16","publisher":{"@type":"Organization","name":"Cloudflare","url":"https://www.cloudflare.com/"},"isPartOf":{"@type":"WebSite","@id":"https://developers.cloudflare.com/#website","name":"Cloudflare Docs","url":"https://developers.cloudflare.com/"}}
```
---
---
description: Purge cached image variants created by Vary for Images.
title: Purge varied images
image: https://developers.cloudflare.com/og-docs.png
---
[Skip to content](#main-content)
> Documentation Index
> Fetch the complete documentation index at: https://developers.cloudflare.com/cache/llms.txt
> Use this file to discover all available pages before exploring further.
# Purge varied images
Last updated Apr 16, 2026|Copy as Markdown|[View as Markdown](https://developers.cloudflare.com/cache/how-to/purge-cache/purge-varied-images/index.md)|[Agent setup](https://developers.cloudflare.com/agent-setup/)
Purging varied images instantly purges all content variants for that URL. This behavior occurs so that if an image changes, you can easily update the cache with a single purge request instead of trying to determine the potential number of out-of-date variants. The behavior is true regardless of [purge type](https://developers.cloudflare.com/cache/how-to/purge-cache/) used, such as [single file](https://developers.cloudflare.com/cache/how-to/purge-cache/purge-by-single-file/), [tag](https://developers.cloudflare.com/cache/how-to/purge-cache/purge-by-tags/), or [hostname](https://developers.cloudflare.com/cache/how-to/purge-cache/purge-by-hostname/).
Was this helpful?
YesNo
## On this page
[Docs](https://developers.cloudflare.com/)
```json
{"@context":"https://schema.org","@type":"TechArticle","@id":"https://developers.cloudflare.com/cache/how-to/purge-cache/purge-varied-images/#page","headline":"Purge varied images · Cloudflare Cache (CDN) docs","description":"Purge cached image variants created by Vary for Images.","url":"https://developers.cloudflare.com/cache/how-to/purge-cache/purge-varied-images/","inLanguage":"en","image":"https://developers.cloudflare.com/og-docs.png","dateModified":"2026-04-16","publisher":{"@type":"Organization","name":"Cloudflare","url":"https://www.cloudflare.com/"},"isPartOf":{"@type":"WebSite","@id":"https://developers.cloudflare.com/#website","name":"Cloudflare Docs","url":"https://developers.cloudflare.com/"}}
```
---
---
description: Purge cache for specific zone versions using the API.
title: Purge zone versions via API
image: https://developers.cloudflare.com/og-docs.png
---
[Skip to content](#main-content)
> Documentation Index
> Fetch the complete documentation index at: https://developers.cloudflare.com/cache/llms.txt
> Use this file to discover all available pages before exploring further.
# Purge zone versions via API
Last updated Apr 16, 2026|Copy as Markdown|[View as Markdown](https://developers.cloudflare.com/cache/how-to/purge-cache/purge-zone-versions/index.md)|[Agent setup](https://developers.cloudflare.com/agent-setup/)
To purge zone versions via the Cloudflare API, follow these steps:
## Step 1: Retrieve the environment ID
First, retrieve your zone's environment ID by sending a request to the following API endpoint:
```bash
https://api.cloudflare.com/client/v4/zones//environments
```
This API call will return a JSON response similar to the example below:
```json
{
"result": {
"environments": [
{
"name": "Production",
"ref": "12abcd3e45f678940a573f51834a54",
"version": 0,
"expression": "(cf.zone.name eq \"example.com\")",
"locked_on_deployment": false,
"position": {
"before": "5d41402abc4b2a76b9719d911017c"
}
},
{
"name": "Staging",
"ref": "5d41402abc4b2a76b9719d911017c",
"version": 0,
"expression": "((cf.edge.server_ip in {1.2.3.4 5.6.7.8})) and (cf.zone.name eq \"example.com\")",
"locked_on_deployment": false,
"position": {
"before": "49f0bad299687c62334182178bfd",
"after": "12abcd3e45f678940a573f51834a54"
}
},
{
"name": "Development",
"ref": "49f0bad299687c62334182178bfd",
"version": 0,
"expression": "((any(http.request.cookies[\"development\"][*] eq \"true\"))) and (cf.zone.name eq \"example.com\")",
"locked_on_deployment": false,
"position": {
"after": "5d41402abc4b2a76b9719d911017c"
}
}
]
},
"success": true,
"errors": [],
"messages": []
}
```
In this particular example, we have three environments: Production, Staging, and Development. You can find the environment ID in the `ref` field.
## Step 2: Purge cache per environment
To purge the Production environment, use the general cache purge endpoint:
```bash
https://api.cloudflare.com/client/v4/zones//purge_cache/
```
To purge non-production environments, you must use a new `purge_cache` endpoint and specify the environment you would like to purge.
To purge the Staging environment from the example above, send a request to the following endpoint:
```bash
https://api.cloudflare.com/client/v4/zones//environments/5d41402abc4b2a76b9719d911017c/purge_cache/
```
To purge the Development environment from the example above, send a request to the following endpoint:
```bash
https://api.cloudflare.com/client/v4/zones//environments/49f0bad299687c62334182178bfd/purge_cache/
```
Note
When purging everything for a non-production cache environment, all files for that specific cache environment will be purged. However, when purging everything for the production environment, all files will be purged across all environments.
Was this helpful?
YesNo
## On this page
[Docs](https://developers.cloudflare.com/)
```json
{"@context":"https://schema.org","@type":"TechArticle","@id":"https://developers.cloudflare.com/cache/how-to/purge-cache/purge-zone-versions/#page","headline":"Purge zone versions via API · Cloudflare Cache (CDN) docs","description":"Purge cache for specific zone versions using the API.","url":"https://developers.cloudflare.com/cache/how-to/purge-cache/purge-zone-versions/","inLanguage":"en","image":"https://developers.cloudflare.com/og-docs.png","dateModified":"2026-04-16","publisher":{"@type":"Organization","name":"Cloudflare","url":"https://www.cloudflare.com/"},"isPartOf":{"@type":"WebSite","@id":"https://developers.cloudflare.com/#website","name":"Cloudflare Docs","url":"https://developers.cloudflare.com/"}}
```
---
---
description: Set caching levels to control query string behavior.
title: Caching levels
image: https://developers.cloudflare.com/og-docs.png
---
[Skip to content](#main-content)
> Documentation Index
> Fetch the complete documentation index at: https://developers.cloudflare.com/cache/llms.txt
> Use this file to discover all available pages before exploring further.
# Caching levels
Last updated Apr 16, 2026|Copy as Markdown|[View as Markdown](https://developers.cloudflare.com/cache/how-to/set-caching-levels/index.md)|[Agent setup](https://developers.cloudflare.com/agent-setup/)
Caching levels determine how much of your website’s static content Cloudflare should cache. Cloudflare’s CDN caches static content according to the levels below.
* **No Query String**: Delivers resources from cache when there is no query string. Example URL: `example.com/pic.jpg`
* **Ignore Query String**: Delivers the same resource to everyone independent of the query string. Example URL: `example.com/pic.jpg?ignore=this-query-string`
* **Standard (Default)**: Delivers a different resource each time the query string changes. Example URL: `example.com/pic.jpg?with=query`
You can adjust the caching level from the dashboard under **Caching** \> **Configuration** \> **Caching level**.
Note
Ignore Query String only disregards the query string for static file extensions. For example, Cloudflare serves the `style.css` resource to requests for either `style.css?this` or `style.css?that`.
## API Caching level values
If you are using the API to change the cache level, the values will differ from those shown in the dashboard. Refer to the table below to see how the API values map to the values shown in the dashboard.
| Dashboard | API |
| ------------------- | ---------- |
| No Query String | Basic |
| Ignore Query String | Simplified |
| Standard (Default) | Aggressive |
Was this helpful?
YesNo
## On this page
[Docs](https://developers.cloudflare.com/)
```json
{"@context":"https://schema.org","@type":"TechArticle","@id":"https://developers.cloudflare.com/cache/how-to/set-caching-levels/#page","headline":"Caching levels · Cloudflare Cache (CDN) docs","description":"Set caching levels to control query string behavior.","url":"https://developers.cloudflare.com/cache/how-to/set-caching-levels/","inLanguage":"en","image":"https://developers.cloudflare.com/og-docs.png","dateModified":"2026-04-16","publisher":{"@type":"Organization","name":"Cloudflare","url":"https://www.cloudflare.com/"},"isPartOf":{"@type":"WebSite","@id":"https://developers.cloudflare.com/#website","name":"Cloudflare Docs","url":"https://developers.cloudflare.com/"}}
```
---
---
description: Reduce origin requests with tiered cache topology.
title: Tiered Cache
image: https://developers.cloudflare.com/og-docs.png
---
[Skip to content](#main-content)
> Documentation Index
> Fetch the complete documentation index at: https://developers.cloudflare.com/cache/llms.txt
> Use this file to discover all available pages before exploring further.
# Tiered Cache
Last updated Jun 5, 2026|Copy as Markdown|[View as Markdown](https://developers.cloudflare.com/cache/how-to/tiered-cache/index.md)|[Agent setup](https://developers.cloudflare.com/agent-setup/)
Tiered Cache uses the size of the Cloudflare network to reduce requests to customer origins by dramatically increasing cache hit ratios. With data centers around the world, Cloudflare caches content very close to end users. However, if a piece of content is not in cache, the Cloudflare edge data centers must contact the origin server to receive the cacheable content.
Tiered Cache works by dividing Cloudflare’s data centers into a hierarchy of lower-tiers and upper-tiers. If content is not cached in lower-tier data centers (generally the ones closest to a visitor), the lower-tier must ask an upper-tier to see if it has the content. If the upper-tier does not have the content, only the upper-tier can ask the origin for content. This practice improves bandwidth efficiency by limiting the number of data centers that can ask the origin for content, which reduces origin load and makes websites more cost-effective to operate.
Additionally, Tiered Cache concentrates connections to origin servers so they come from a small number of data centers rather than the full set of network locations. This results in fewer open connections using server resources.
To enable Tiered Cache, refer to [Enable Tiered Cache](https://developers.cloudflare.com/cache/how-to/tiered-cache/#enable-tiered-cache).
## Tiered Cache Topology
Cloudflare allows you to select your cache topology so that you have control over how your origin connects to Cloudflare’s data centers. This will help ensure higher cache hit ratios, fewer origin connections, and a reduction of Internet latency. Below you can find details about the options we have available.
### Smart Tiered Cache
Smart Shield
This functionality is now offered as part of Cloudflare's origin server safeguard, Smart Shield. [Learn more](https://developers.cloudflare.com/smart-shield/).
Smart Tiered Cache dynamically selects the single closest upper tier for each of your website’s origins with no configuration required, using our in-house performance and routing data. Cloudflare collects latency data for each request to an origin, and uses the latency data to determine how well any upper-tier data center is connected with an origin. As a result, Cloudflare can select the data center with the lowest latency to be the upper-tier for an origin.
#### Public cloud origins
Origins hosted on public cloud providers (AWS, GCP, Azure, or Oracle Cloud) often use [anycast ↗](https://www.cloudflare.com/en-gb/learning/cdn/glossary/anycast-network/) or regional unicast networking, which prevents Smart Tiered Cache from determining the origin location through latency probing alone. To solve this, you can set a **cloud region hint** that tells Smart Tiered Cache which cloud provider and region your origin is in. Smart Tiered Cache then selects a primary upper-tier data center close to that cloud region, plus a fallback in a different location for resilience. To set up a cloud region hint, refer to [Set a cloud region hint](https://developers.cloudflare.com/cache/how-to/tiered-cache/#set-a-cloud-region-hint).
#### Load Balancing interaction
While Smart Tiered Cache selects one Upper Tier per origin, when using Load Balancing, Smart Tiered Cache will select the single best Upper Tier for the entire [Load Balancing Pool](https://developers.cloudflare.com/load-balancing/understand-basics/load-balancing-components/#pools).
#### Caveats
You need to be careful when updating your origin IPs/DNS records while Smart Tiered Cache is enabled. Depending on the changes made, it may cause the existing assigned upper tiers to change, resulting in an increased `MISS` rate as cache is refilled in the new upper tiers. If the origin is switched to a network behind anycast, it will significantly reduce the effectiveness of Smart Tiered Cache unless you set a [cloud region hint](https://developers.cloudflare.com/cache/how-to/tiered-cache/#set-a-cloud-region-hint).
### Generic Global Tiered Cache
Generic Global topology allows for all of Cloudflare’s global data centers to serve as a network of upper-tiers. This topology may help reduce the long tail latencies for far-away visitors.
### Regional Tiered Cache
Smart Shield
This functionality is now offered as part of Cloudflare's origin server safeguard, Smart Shield. [Learn more](https://developers.cloudflare.com/smart-shield/).
Regional Tiered Cache provides an additional layer of caching for customers who have a global traffic footprint and want to serve content faster by avoiding network latency when there is a cache `MISS` in a lower-tier, resulting in an upper-tier fetch in a data center located far away.
Regional Tiered Cache instructs Cloudflare to check a regional hub data center near the lower tier before going to the upper tier that may be outside of the region.
This can help improve performance for **Smart** and **Custom Tiered Cache** topologies with upper-tiers in one or two regions. Regional Tiered Cache is not beneficial for customers with many upper tiers in many regions like Generic Global Tiered Cache.
### Custom Tiered Cache
Custom Tiered cache allows Enterprise customers to work with their account team to set a custom topology that fits your specific needs, for instance you have close upper tiers or you have a unique traffic pattern. If you want a custom topology, please engage your account team.
## Availability
| | Free | Pro | Business | Enterprise |
| ----------------------- | ---- | --- | -------- | ---------- |
| Tiered Cache | Yes | Yes | Yes | Yes |
| Smart Topology | Yes | Yes | Yes | Yes |
| Generic Global Topology | No | No | No | Yes |
| Regional Tiered Cache | No | No | No | Yes |
| Custom Topology | No | No | No | Yes |
## Bandwidth Alliance
Enterprise customers can override Bandwidth Alliance configuration with Tiered Cache. For all other users, the Bandwidth Alliance takes precedence. Tiered Cache is still a valuable option to enable because the Bandwidth Alliance may not always be an available option, and in those instances, the Tiered Cache configuration will be used.
## Enable Tiered Cache
You can enable Tiered Cache in the dashboard or via API.
### Enable Tiered Cache in the dashboard
1. In the Cloudflare dashboard, go to the **Tiered Cache** page.
[Go to **Tiered Cache** ↗](https://dash.cloudflare.com/?to=/:account/:zone/caching/tiered-cache)
2. From **Tiered Cache**, toggle the button to **enabled**.
3. In **Tiered Cache Topology**, you can control how your origin connects to Cloudflare’s data centers. You can select:
* **Upper Tier Cache** \- You have the option to choose between Smart or Generic Global Tiered Cache Topology.
* **Middle Tier Cache** \- If you have selected Smart or Custom Tiered Cache Topology, you can now enable Regional Tiered Cache.
* **Custom Tiered Cache** \- Allows you to work with Cloudflare’s support team to set a custom topology that fits your specific needs.
* **Disable Tiered Cache**.
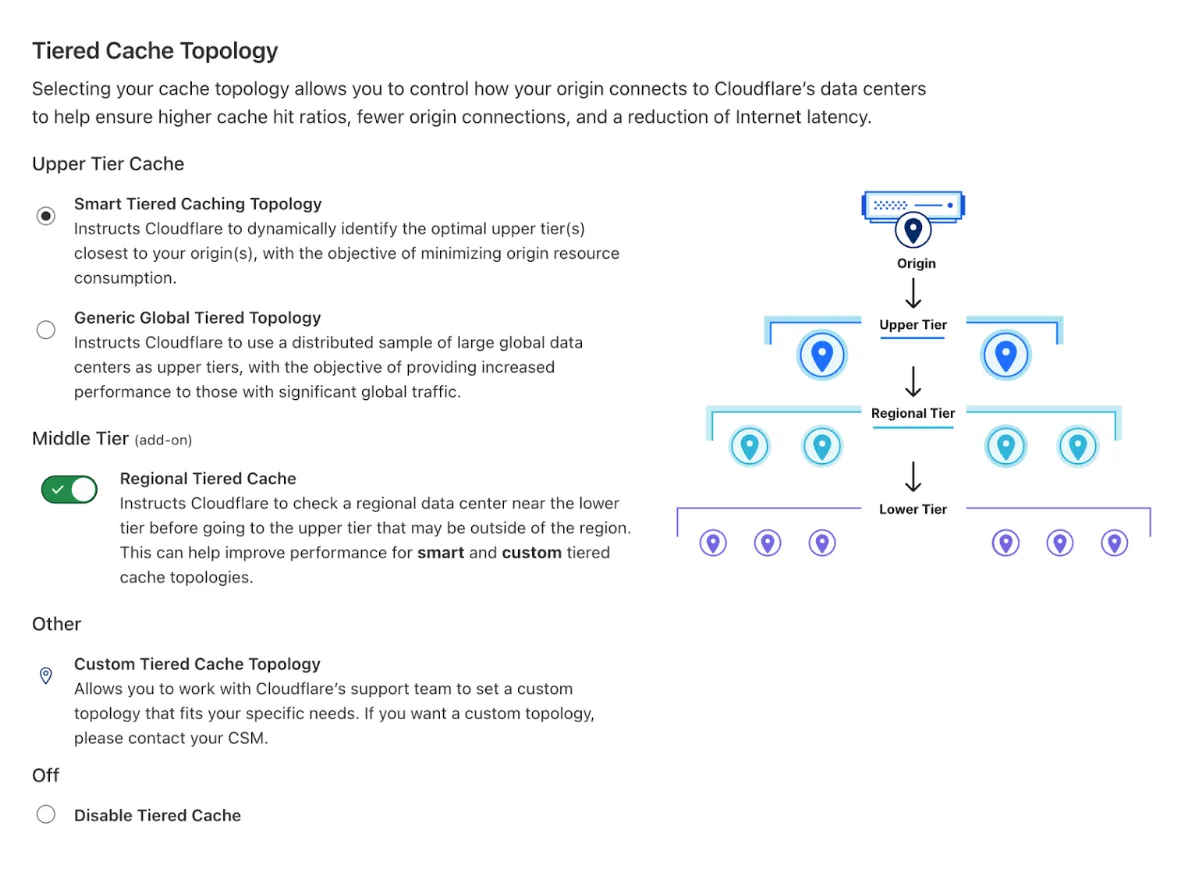
### Enable Tiered Cache via API
To enable Tiered Cache via API use the following cURL example:
```bash
curl "https://api.cloudflare.com/client/v4/zones/$ZONE_ID/argo/tiered_caching" \
--request PATCH \
--header "Authorization: Bearer $CLOUDFLARE_API_TOKEN" \
--json '{
"value": "on"
}'
```
You can also configure Tiered Cache Topology via API, for instance:
Enable Smart Tiered Cache
Required API token permissions
At least one of the following [token permissions](https://developers.cloudflare.com/fundamentals/api/reference/permissions/) is required:
* `Zone Settings Write`
* `Zone Write`
```bash
curl "https://api.cloudflare.com/client/v4/zones/$ZONE_ID/cache/tiered_cache_smart_topology_enable" \
--request PATCH \
--header "Authorization: Bearer $CLOUDFLARE_API_TOKEN" \
--json '{
"value": "on"
}'
```
Enable Regional Tiered Cache
Required API token permissions
At least one of the following [token permissions](https://developers.cloudflare.com/fundamentals/api/reference/permissions/) is required:
* `Zone Settings Write`
* `Zone Write`
```bash
curl "https://api.cloudflare.com/client/v4/zones/$ZONE_ID/cache/regional_tiered_cache" \
--request PATCH \
--header "Authorization: Bearer $CLOUDFLARE_API_TOKEN" \
--json '{
"value": "on"
}'
```
For more API examples and configuration options for Tiered Cache, refer to the [API documentation](https://developers.cloudflare.com/api/resources/argo/subresources/tiered%5Fcaching/methods/get/).
### Set a cloud region hint
If your origin is hosted on a public cloud provider, set a cloud region hint so Smart Tiered Cache can select the optimal upper tier for your cloud region. For background on why this is needed, refer to [Public cloud origins](https://developers.cloudflare.com/cache/how-to/tiered-cache/#smart-tiered-cache).
Cloud region hints are available on all plan types (Free, Pro, Business, and Enterprise) at no additional cost. Supported providers: AWS, GCP, Azure, and Oracle Cloud.
#### Set a cloud region hint in the dashboard
1. Go to **Caching** \> **Tiered Cache** \> **Origin Configuration**.
[Go to **Tiered Cache** ↗](https://dash.cloudflare.com/?to=/:account/:zone/caching/tiered-cache)
2. Find your origin IP or hostname and select **Set Region Hint**.
3. Select your cloud provider and region (for example, `aws:us-east-1` or `gcp:europe-west1`).
#### List supported cloud regions via API
To see all available cloud providers and regions, use the supported regions endpoint:
```bash
curl "https://api.cloudflare.com/client/v4/zones/$ZONE_ID/cache/origin_cloud_regions/supported_regions" \
--request GET \
--header "Authorization: Bearer $CLOUDFLARE_API_TOKEN"
```
#### Set a cloud region hint via API
```bash
curl "https://api.cloudflare.com/client/v4/zones/$ZONE_ID/cache/origin_cloud_regions" \
--request PATCH \
--header "Authorization: Bearer $CLOUDFLARE_API_TOKEN" \
--json '{
"ip": "203.0.113.1",
"vendor": "aws",
"region": "us-east-1"
}'
```
Note
Custom Tiered Cache settings take precedence over cloud region hint mappings. If you have a custom topology configured, the cloud region hint will not override it.
Note
To confirm that Tiered Cache is working, make sure you have the value of [CacheTieredFill](https://developers.cloudflare.com/logs/logpush/logpush-job/datasets/zone/http%5Frequests/#cachetieredfill) in your http\_requests logs, this will indicate if Tiered Cache was used to serve the request.
Was this helpful?
YesNo
## On this page
[Docs](https://developers.cloudflare.com/)
```json
{"@context":"https://schema.org","@type":"TechArticle","@id":"https://developers.cloudflare.com/cache/how-to/tiered-cache/#page","headline":"Tiered Cache · Cloudflare Cache (CDN) docs","description":"Reduce origin requests with tiered cache topology.","url":"https://developers.cloudflare.com/cache/how-to/tiered-cache/","inLanguage":"en","image":"https://developers.cloudflare.com/og-docs.png","dateModified":"2026-06-05","publisher":{"@type":"Organization","name":"Cloudflare","url":"https://www.cloudflare.com/"},"isPartOf":{"@type":"WebSite","@id":"https://developers.cloudflare.com/#website","name":"Cloudflare Docs","url":"https://developers.cloudflare.com/"},"keywords":["REST API","Logging"]}
```
---
---
description: View cache hit rates and bandwidth savings in Cache Analytics.
title: Cache Analytics
image: https://developers.cloudflare.com/og-docs.png
---
[Skip to content](#main-content)
> Documentation Index
> Fetch the complete documentation index at: https://developers.cloudflare.com/cache/llms.txt
> Use this file to discover all available pages before exploring further.
# Cache Analytics
Last updated May 7, 2026|Copy as Markdown|[View as Markdown](https://developers.cloudflare.com/cache/performance-review/cache-analytics/index.md)|[Agent setup](https://developers.cloudflare.com/agent-setup/)
Cache Analytics shows how much of your site's traffic is served from Cloudflare's cache versus your origin server. When content is served from cache, visitors get faster page loads and your origin web server handles less traffic. Use Cache Analytics to identify resources that are [missing from cache](https://developers.cloudflare.com/cache/concepts/cache-responses/#miss), [expired](https://developers.cloudflare.com/cache/concepts/cache-responses/#expired) (cached copy is outdated), or [ineligible for caching](https://developers.cloudflare.com/cache/concepts/cache-responses/#noneunknown) (not eligible for caching). You can filter by hostname, review the top URLs that miss cache, and query up to three days of data.
## Availability
| | Free | Pro | Business | Enterprise |
| ---------------- | ---- | ------ | -------- | ---------- |
| Availability | No | Yes | Yes | Yes |
| Retention period | N/A | 7 days | 30 days | 30 days |
## Access Cache Analytics
In the Cloudflare dashboard, go to the **Caching** page.
[Go to **Overview** ↗](https://dash.cloudflare.com/?to=/:account/:zone/caching)
## Requests vs Data Transfer
You can decide whether to focus on **Requests** or **Data Transfer**:
* **Requests** (default view) helps assess performance. Each cache [MISS](https://developers.cloudflare.com/cache/concepts/cache-responses/#miss) means the request must go to your origin server instead of being served from Cloudflare's cache, which adds latency.
* **Data Transfer** is useful for cost analysis, since most hosting providers charge for data sent from their servers (egress bandwidth).
You can switch between these views while keeping other analytics filters applied.
For best practices related to Cache Analytics, refer to [Cache performance](https://developers.cloudflare.com/cache/performance-review/cache-performance/).
## Add filters
Create filters to narrow the data to specific traffic segments. Example filters include **Cache status**, **Host**, **Path**, or **Content type**.
To add filters, under **Cache Performance**, select **Add filter**. Select **Apply** when you are done.
## Review cache status
The **Requests summary** graph shows how your traffic changes over time, such as in response to a high-traffic event or a recent configuration change. The Requests summary is based on a sample of requests, not the full dataset. Totals are extrapolated from the sample to represent overall traffic. For more information on how sampling works, refer to [Understanding sampling in Cloudflare Analytics](https://developers.cloudflare.com/analytics/sampling/).
**Served by Cloudflare** indicates content served by Cloudflare that did not require contacting your origin web server. **Served by Origin** indicates traffic served from the origin web server.
Revalidated requests — where Cloudflare checks with your origin to confirm cached content is still current — are counted differently depending on the view. In the **Data Transfer** view, revalidated requests count as **Served by Cloudflare** because the response body is served from cache, not re-downloaded from the origin. In the **Requests** view, revalidated requests count as **Served by Origin** because Cloudflare still contacts the origin server to verify the content.
**Cache status** graphs break down why traffic is served from Cloudflare versus the origin web server, organized by content type.
For a breakdown of cache statuses and their descriptions, refer to [Cloudflare cache responses](https://developers.cloudflare.com/cache/concepts/cache-responses/).
## Review requests by source
Cache Analytics shows the most frequent values (top N) for several request attributes. Apply filters before reviewing these metrics to focus on specific traffic. For example, filtering to only view traffic with an Expired or Revalidated cache status shows which URLs were primarily responsible for those statuses.
### Empty content types
Finding an **empty** content type in your analytics is common. Responses to redirect status codes (`301`/`302`) typically do not include content, so they have no content type. Similarly, many HTTP error responses, such as `403`, do not return `text/html` and are also reported as empty.
Was this helpful?
YesNo
## On this page
[Docs](https://developers.cloudflare.com/)
```json
{"@context":"https://schema.org","@type":"TechArticle","@id":"https://developers.cloudflare.com/cache/performance-review/cache-analytics/#page","headline":"Cache Analytics · Cloudflare Cache (CDN) docs","description":"View cache hit rates and bandwidth savings in Cache Analytics.","url":"https://developers.cloudflare.com/cache/performance-review/cache-analytics/","inLanguage":"en","image":"https://developers.cloudflare.com/og-docs.png","dateModified":"2026-05-07","publisher":{"@type":"Organization","name":"Cloudflare","url":"https://www.cloudflare.com/"},"isPartOf":{"@type":"WebSite","@id":"https://developers.cloudflare.com/#website","name":"Cloudflare Docs","url":"https://developers.cloudflare.com/"}}
```
---
---
description: Measure and improve cache performance for your site.
title: Cache performance
image: https://developers.cloudflare.com/og-docs.png
---
[Skip to content](#main-content)
> Documentation Index
> Fetch the complete documentation index at: https://developers.cloudflare.com/cache/llms.txt
> Use this file to discover all available pages before exploring further.
# Cache performance
Last updated May 7, 2026|Copy as Markdown|[View as Markdown](https://developers.cloudflare.com/cache/performance-review/cache-performance/index.md)|[Agent setup](https://developers.cloudflare.com/agent-setup/)
## Optimize cache ratios
Your cache ratio measures how often Cloudflare serves content from cache instead of contacting your origin server. A higher ratio means faster responses for visitors and less traffic to your origin.
Depending on the [cache status](https://developers.cloudflare.com/cache/concepts/cache-responses/) you receive, you can make modifications to improve your cache ratio.
* **Dynamic**: The resource was not eligible for caching. This is the default response for many file types including HTML. To cache additional content, refer to [Cache Rules](https://developers.cloudflare.com/cache/how-to/cache-rules/).
* **Revalidated**: The resource was in cache but Cloudflare confirmed with your origin that it was still current before serving it. To address an atypical quantity of revalidated content, consider [increasing your Edge Cache TTLs](https://developers.cloudflare.com/cache/how-to/cache-rules/settings/#edge-ttl) (how long Cloudflare considers cached content fresh before checking your origin).
* **Expired**: The cached resource's TTL elapsed before it was requested again. Consider [extending Edge Cache TTLs](https://developers.cloudflare.com/cache/how-to/cache-rules/settings/#edge-ttl) for these resources via a Cache Rule, or configure your origin to return [revalidation headers](https://developers.cloudflare.com/cache/concepts/cache-control/) (`Last-Modified` or `ETag`) so Cloudflare can confirm content is still current without downloading it again.
* **Miss**: The resource was not found in cache and was served from your origin. Although tricky to optimize, there are a few potential remedies:
* [Enable Tiered Cache](https://developers.cloudflare.com/cache/how-to/tiered-cache/#enable-tiered-cache) to check an upper-tier Cloudflare data center before contacting your origin server.
* [Create a custom cache key](https://developers.cloudflare.com/cache/how-to/cache-rules/examples/custom-cache-key/) so that multiple URLs match the same cached resource, for example by ignoring the query string.
## Troubleshoot cache performance with example reports
Use [Cache Analytics](https://developers.cloudflare.com/cache/performance-review/cache-analytics/) to identify cache performance issues. The following examples show how to filter for common problems and resolve them.
* Not caching HTML.
* Identify the issue: Select **Add filter** and select **Cache status equals Dynamic**.
* Resolution: Set a Cloudflare Cache Rule to [cache dynamic content](https://developers.cloudflare.com/cache/how-to/cache-rules/examples/cache-everything/).
Caution
This option caches all HTML regardless of the presence of dynamic content (content that changes per visitor, such as time of visit, location, or device). If you use this approach to cache pages containing dynamic content, visitors may receive information not intended for them. To avoid caching dynamic content, add a condition to the rule's matching criteria to exclude it. Some examples include:
* Checking for the presence of a cookie.
* Excluding requests that match known dynamic content file paths.
* Excluding requests with dynamic content extensions (or no extension).
* Short cache expiration TTL.
* Identify the issue: Select **Add filter** and select **Cache status equals Revalidated**.
* Resolution: [Increase Cloudflare's Edge Cache TTL via a Cache Rule](https://developers.cloudflare.com/cache/how-to/cache-rules/examples/edge-ttl/).
* Need to enable Tiered Cache or custom cache key.
* Identify the issue: Select **Add filter** and select **Cache status equals Miss**.
* Resolution: [Enable Tiered Cache](https://developers.cloudflare.com/cache/how-to/tiered-cache/#enable-tiered-cache) or [create a custom cache key](https://developers.cloudflare.com/cache/how-to/cache-rules/examples/custom-cache-key/).
Was this helpful?
YesNo
## On this page
[Docs](https://developers.cloudflare.com/)
```json
{"@context":"https://schema.org","@type":"TechArticle","@id":"https://developers.cloudflare.com/cache/performance-review/cache-performance/#page","headline":"Cache performance · Cloudflare Cache (CDN) docs","description":"Measure and improve cache performance for your site.","url":"https://developers.cloudflare.com/cache/performance-review/cache-performance/","inLanguage":"en","image":"https://developers.cloudflare.com/og-docs.png","dateModified":"2026-05-07","publisher":{"@type":"Organization","name":"Cloudflare","url":"https://www.cloudflare.com/"},"isPartOf":{"@type":"WebSite","@id":"https://developers.cloudflare.com/#website","name":"Cloudflare Docs","url":"https://developers.cloudflare.com/"}}
```
---
---
description: This reference architecture discusses the traditional challenges customers face with web applications, how the Cloudflare CDN resolves these challenges, and CDN architecture and design.
title: Content Delivery Network (CDN) Reference Architecture
image: https://developers.cloudflare.com/og-docs.png
---
[Skip to content](#main-content)
> Documentation Index
> Fetch the complete documentation index at: https://developers.cloudflare.com/reference-architecture/llms.txt
> Use this file to discover all available pages before exploring further.
# Content Delivery Network (CDN) Reference Architecture
Last updated Apr 16, 2026|Copy as Markdown|[View as Markdown](https://developers.cloudflare.com/reference-architecture/architectures/cdn/index.md)|[Agent setup](https://developers.cloudflare.com/agent-setup/)
## Introduction
Every day, users of the Internet enjoy the benefits of performance and reliability provided by [content delivery networks ↗](https://www.cloudflare.com/learning/cdn/what-is-a-cdn/) (CDNs). CDNs have become a must-have to combat latency and a requirement for any major company delivering content to users on the Internet. While providing performance and reliability for customers, CDNs also enable companies to further secure their applications and cut costs. This document discusses the traditional challenges customers face with web applications, how the Cloudflare CDN resolves these challenges, and CDN architecture and design.
### Who is this document for and what will you learn?
This reference architecture is designed for IT or network professionals with some responsibility over or familiarity with their organization's existing infrastructure. It is useful to have some experience with technologies and concepts important to content delivery, including caching, DNS and firewalls.
To build a stronger baseline understanding of Cloudflare, we recommend the following resources:
* What is Cloudflare? | [Website ↗](https://www.cloudflare.com/what-is-cloudflare/) (5 minute read) or [video ↗](https://youtu.be/XHvmX3FhTwU?feature=shared) (2 minutes)
* What is a CDN? | [Website ↗](https://www.cloudflare.com/learning/cdn/what-is-a-cdn/) (5 minute read)
* Analyst Report: [Cloudflare named Leader in 2024 GigaOm Radar for Content Delivery Networks ↗](https://www.cloudflare.com/lp/gigaom-radar-cdn/) (20 minute read)
Those who read this reference architecture will learn:
* How Cloudflare CDN can significantly improve the delivery of content to your customers
* How anycast IP routing is important in ensuring reliable CDN performance
* The range of tiered caching options and how to choose the one for your needs
## Traditional challenges deploying web applications
Over the last several years, especially with the advent of the COVID-19 pandemic and the focus on remote work, there has been a significant growth in Internet traffic, further growing the need to efficiently manage network traffic, cut latency, and increase performance.
Companies running their applications in the cloud or on-premise are faced with the challenges of:
1. Implementing solutions to increase performance
2. As demand grows, scaling out their architecture to meet availability and redundancy concerns
3. Securing their environments and applications from growing Internet threats
4. Reining in growing costs related to doing all of the above
With companies serving customers across the globe, the above challenges require a significant undertaking. Traditionally, a website/application is deployed centrally and replicated to another region for availability, or the website/application is deployed across a handful of servers, sometimes across multiple data centers for resiliency.
The servers hosting the websites are called origin servers. When clients access a website, they make a request for resources from the server. Navigating to one website can generate hundreds of requests from the browser for HTML, CSS, images, videos, etc. With versions of HTTP prior to HTTP/2, each of these HTTP requests would also require a new TCP connection.
Enhancements in HTTP/2 and HTTP/3 allow for multiplexing multiple requests to the same server over a single TCP connection, thus saving server resources. However, compute and network resources are still consumed as servers respond to these requests. As more clients access the website, the following can result:
* The origin server starts to become overloaded with requests, impacting availability; companies start looking at scaling out to handle the additional load
* As each request has to make its way to the origin server, performance and user experience is impacted due to latency
* The latency for end users becomes proportional to the distance between the client and origin server, thus resulting in varying experiences based on client location. This is especially true for specific countries that may experience latency due to traffic from or to that country, like China.
* As origin servers respond to the increasing requests, bandwidth, egress, and compute costs increase drastically
* Even as customers scale out to handle the increased demand in traffic, they are left exposed to both infrastructure-level and application-level distributed denial-of-service (DDoS) attacks
In Figure 1 below, there is no CDN present and there is an origin server sitting in the US. As clients access the website, the first step is DNS resolution, typically done by the user’s ISP. The next step is the HTTP request sent directly to the origin server. The user experience will vary depending on their location. For example, you can see the latency is much lower for users in the US, where the origin server is located. For users outside the US, the latency increases, thus resulting in a higher round-trip time (RTT).
As more clients make requests to the origin server, the load on the network and server increases, resulting in higher latency and higher costs for resource and bandwidth use.
From a security perspective, the origin server is also vulnerable to DDoS attacks at both the infrastructure and application layer. A DDoS attack could be initiated from a botnet sending millions of requests to the origin server, consuming resources and preventing it from serving legitimate clients.
Further, in terms of resiliency, if the origin server temporarily goes offline, all content is inaccessible to users.

Figure 1: HTTP Request with no CDN
## How a CDN tackles web application challenges
A CDN helps address the challenges customers face around latency, performance, availability, redundancy, security, and costs. A CDN's core goal is to decrease latency and increase performance for websites and applications by caching content as close as possible to end users or those accessing the content.
CDNs decrease latency and increase performance by having many data center locations across the globe that cache the content from the origin. The goal is to have content cached as close as possible to users, so content is cached at the edge of the CDN provider's network.
### Impacts
* **Improved website load time**: Instead of every client making a request to the origin server, which could be located a considerable distance away, the request is routed to a local server that responds with cached content, thus decreasing latency and increasing overall performance. Regardless of where the origin server and clients are located, performance will be more consistent for all users, as the CDN will serve locally cached content when possible.
* **Increased content availability and redundancy:** Because every client request no longer needs to be sent to the origin server, CDNs provide not only performance benefits, but also availability and redundancy. Requests are load balanced over local servers with cached content; these servers respond to local requests, significantly decreasing overall load on the origin server. The origin server only is contacted when needed (when content is not cached or for dynamic non-cacheable content).
* **Improved website security:** A CDN acts as a reverse proxy and sits in front of origin servers. Thus it can provide enhanced security such as DDoS mitigation, improvements to security certificates, and other optimizations.
* **Reduced bandwidth costs:** Because CDNs use cached content to respond to requests, the number of requests sent to the origin server is reduced, thus also reducing associated bandwidth costs.
### Routing requests to CDN nodes
An important difference in some CDN implementations is how they route traffic to the respective local CDN nodes. Routing requests to CDN nodes can be done via two different methods:
**DNS unicast routing**
In this method, recursive DNS queries redirect requests to CDN nodes; the client’s DNS resolver forwards requests to the CDN’s authoritative nameserver. CDNs based on DNS unicast routing are not ideal in that clients may be geographically dispersed from the DNS resolver. Decisions on closest-proximity CDN nodes are based on the client's DNS server instead of client’s IP address. Also, if any changes are needed for the DNS response, there is a dependency on DNS time to live (TTL) expiration.
Further, since DNS routing uses unicast addresses, traffic is routed directly to a specific node, creating possible concerns when there are traffic spikes, as in a DDoS attack.
Another challenge with DNS-based CDNs is that DNS is not very graceful upon failover. Typically a new session or application must be started for the DNS resolver with a different IP address to take over.
**Anycast routing**
The Cloudflare CDN, which is discussed in more detail in the next section, uses anycast routing. Anycast allows for nodes on a network to have the same IP address. The same IP address is announced from multiple nodes in different locations, and client redirection is handled via the Internet’s routing protocol, BGP.
Using an anycast-based CDN has several advantages:
* Incoming traffic is routed to the nearest data center with the capacity to process the requests efficiently.
* Availability and redundancy is inherently provided. Since multiple nodes have the same IP address, if one node were to fail, requests are simply routed to another node in close proximity.
* Because anycast distributes traffic across multiple data centers, it increases the overall surface area, thus preventing any one location from becoming overwhelmed with requests. For this reason, anycast networks are very resilient to DDoS attacks.
## Introducing the Cloudflare CDN
Cloudflare provides a Software as a Service (SaaS) model for CDN. With Cloudflare’s SaaS model, customers benefit from the Cloudflare CDN without having to manage or maintain any infrastructure or software.
The benefits of the Cloudflare CDN can be attributed to the below two points, discussed in more detail in this section.
1. CDNs inherently increase performance by caching content on servers close to the user
2. The unique Cloudflare architecture and integrated ecosystem
Figure 2 shows a simplified view of the Cloudflare CDN. Clients are receiving their response back from a server on Cloudflare’s global anycast network closest to where the clients are located, thus drastically reducing the latency and RTT. The diagram depicts a consistent end-user experience regardless of the physical location of the clients and origin.

Figure 2: HTTP request to Cloudflare CDN with anycast
## Cloudflare CDN architecture and design
Figure 3 is a view of the Cloudflare CDN on the global anycast network. In addition to using anycast for network performance and resiliency, the Cloudflare CDN leverages Tiered Cache to deliver optimized results while saving costs for customers. Customers can also [enable Argo Smart Routing](https://developers.cloudflare.com/argo-smart-routing/get-started/) to find the fastest network path to route requests to the origin server. These capabilities are discussed in detail in the remainder of this document.

Figure 3: Cloudflare CDN with Tiered Cache on global anycast network
In the above diagram, there are a few important key points to understand about the Cloudflare CDN and the global anycast network it resides on:
* An important differentiator is that Cloudflare utilizes one global network and runs every service on every server in every Cloudflare data center, thus providing end users the closest proximity to Cloudflare’s services, with the highest scale, resiliency, and performance.
* Cloudflare is a reverse proxy, meaning it receives requests from clients and proxies the requests back to the customer’s origin servers. Thus, every request traverses through Cloudflare’s network before reaching the customer’s network. Since Cloudflare has hardened and protected its infrastructure at the edge (ingress), all customers are consequently also protected from infrastructure-level and volumetric DDoS attacks. Requests and traffic must go through the protected Cloudflare network before reaching the customer’s origin server.
* The Cloudflare CDN leverages the Cloudflare global anycast network. Thus the incoming request is routed to and answered by the node closest to the user.
* The inherent benefits of anycast are decreased latency, network resiliency, higher availability, and increased security due to larger surface area for absorbing both legitimate traffic loads and DDoS attacks. Cloudflare’s global anycast network spans [hundreds of cities worldwide ↗](https://www.cloudflare.com/network/), reaching 95% of the world’s Internet-connected population within 50 milliseconds while providing over 405 Tbps network capacity and DDoS protection capability.
* Edge nodes within the Cloudflare network cache content from the origin server and are able to respond to requests via a cached copy. Cloudflare also provides [DNS](https://developers.cloudflare.com/dns/), [DDoS protection](https://developers.cloudflare.com/ddos-protection/), [WAF](https://developers.cloudflare.com/waf/), and other performance, reliability, and security services using the same edge architecture.
* [Argo](https://developers.cloudflare.com/argo-smart-routing/) uses optimized routing and caching technology across the Cloudflare network to deliver responses to users more quickly, reliably, and securely. Argo includes Smart Routing and [Tiered Cache](https://developers.cloudflare.com/cache/how-to/tiered-cache/). Cloudflare leverages Argo to provide an enhanced CDN solution.
### Tiered Cache
Once a site is onboarded, standard caching is configured by default. With standard caching, each data center acts as a direct reverse proxy for the origin servers. A cache miss in any data center results in a request being sent to the origin server from the ingress data center.
Although standard caching works, it is not the most optimal design — cached content closer to the client may already exist in other Cloudflare data centers, and origin servers are sometimes unnecessarily overloaded as a result. Thus, it is best to enable Tiered Cache, which is included with every Cloudflare plan. With Tiered Cache, certain data centers are reverse proxies to the origin for other data centers, resulting in more cache hits and faster response times.
Tiered Cache leverages the scale of Cloudflare’s network to minimize requests to customer origins. When a request comes into a Cloudflare data center, if the requested content is not locally cached, other Cloudflare data centers are checked for the cached content.
Cloudflare data centers have shorter distances and faster paths between them than the connections between data centers and customer origin servers, optimizing the response to the client with a significant improvement in cache hit ratio. The Cloudflare CDN leverages Argo Smart Routing data to determine the best upper tier data centers to use for Tiered Cache. Argo Smart Routing can also be enabled as an add-on to provide the fastest paths between data centers and origin servers for cache misses and other types of dynamic traffic.
The Cloudflare CDN allows customers to configure tiered caching. Note that depending on the Cloudflare plan, different topologies are available for Tiered Cache. By default, tiered caching is disabled and can be enabled under the caching tab of the main menu.
#### Tiered Cache topologies
The different cache topologies allow customers to control how Cloudflare interacts with origin servers to help ensure higher cache hit ratios, fewer origin connections, and reduced latency.
| **Smart Tiered Cache Topology (all plans)** | **Generic Global Tiered Topology (Enterprise only)** | **Custom Tiered Cache Topology (Enterprise only)** |
| --------------------------------------------------------------------------------------------------------------------------------------------------------------------- | ------------------------------------------------------------------------------------------------------------------------------------------------- | -------------------------------------------------------------------------------------------------------------------------------------------------------------------------- |
| Recommended for most deployments. It is the default configuration once Tiered Cache is enabled. | Recommended for those who have high traffic that is spread across the globe and desire the highest cache usage and best performance possible. | Recommended for customers who have additional data on their user base and have specific geographic regions they would like to focus on. |
| Ideal for customers who want to leverage CDN for performance but minimize requests to origin servers and bandwidth utilization between Cloudflare and origin servers. | Generic Global Tiered Topology balances between cache efficiency and latency. Instructs Cloudflare to use all Tier 1 data centers as upper tiers. | Custom Tiered Cache Topology allows customers to set a custom topology that fits specific needs (ex: upper tiers in specific geographic locations serving more customers). |
| Cloudflare will dynamically find the single best upper tier for an origin using Argo performance and routing data. | | Engage your account team to build a custom topology. |
### Traffic flow: Tiered Cache, Smart Tiered Cache topology
In Figure 4, Tiered Caching is enabled with Smart Tiered Cache Topology. The diagram depicts two separate traffic flows, summarized below. The first traffic flow (Client 1) is a request from a client that comes into Data Center 1\. The second traffic flow (Client 2) is a subsequent request for the same resource into a different data center, Data Center 2.

Figure 4: HTTP requests and traffic flow through Cloudflare CDN
| Request 1 | Request 2 |
| --------------------------------------------------------------------------------------------------------------------------------------------------------------------------------------------------------------------------------------------------------------------------------------------------------------------------------------------- | -------------------------------------------------------------------------------------------------------------------------------------------------------------------- |
| First request received in Data Center 1 results in cache miss, as request had not been made previously by any client. | Second request by a different client received in Data Center 3 results in cache miss, as request had not been made previously by any client served by Data Center 3. |
| No cached content found, so Data Center 1 checks with its upper tier data center to request a copy of the content. | No cached content found, so Data Center 3 checks with the upper tier data center to request a copy of the content. |
| Upper tier data center also does not have content cached locally, so it makes a request to the origin server for content. Upon receiving the content, the upper tier data center caches it locally and relays the content to the requesting lower tier data center. The lower tier data center caches the content and responds to the client. | Cached content found at the upper tier data center. Data Center 3 retrieves and caches this content locally and responds to the client. |
In Figure 4, the top end user traffic flow displays the traffic flow when a client request is received by a data center closest to the client, Data Center 1\. Since there is nothing locally cached on the ingress data center and tiered caching is enabled, a request is sent to the upper tier data center to request a copy of the content to cache. Because the upper tier data center also does not have the content cached, it sends the request to the origin server, caches the received content upon response, and responds to the lower tier data center with the cached content. The lower tier data center caches the content and responds to the client.
Notice that when a new request for the same content is made to another data center (bottom end user traffic flow), Data Center 3, the content is not locally cached; however, the content is retrieved from the upper tier data center, where it was cached from the first request for the same content.
With the upper tier data center returning the cached content for the second request, the trip to the origin server is prevented, resulting in higher cache hit ratios, faster response times, saved bandwidth cost between the Cloudflare network and the origin server, and reduced load on the origin server responding to requests.
### Regional Tiered Cache
The main difference between Smart Tiered Cache and Global tiered cache is the number of upper tiers that can talk to the origin servers. With Smart Tiered Cache the closest upper tier to the origin is selected using Argo performance and routing data. This means that all requests that experience a cache `MISS` at a lower tier will funnel through this single upper tier and have a higher percentage chance of a cache `HIT` to avoid sending traffic to an origin server. However, the downside to this architecture is that the lower tier could be located across the globe from the upper tier. Even if the upper tier can fulfill the request from its cache, the distance between the upper tier and lower tier could still add latency to the response depending on the distance traveled. To summarize, Smart Tiered Cache ensures that all requests for cache flow through a single upper tier cache location which increases cache `HIT` percentages, and reduces requests to the origin server, however it can result in higher latencies fulfilling those requests since the upper tier could be located far away from the lower tier that originated the request.
With Generic Global Tiered Cache, Cloudflare uses its largest data centers around the globe as upper tier cache which means, in general, that the upper tier cache is much closer to the lower tier cache. This can greatly reduce latency when lower tiers need to pass requests to upper tiers. However, this ultimately will increase the amount of requests serviced by the origin as each upper tier cache will need to populate from the origin. To summarize, Generic Global Tiered cache can improve response times when cache is populated, but will also increase load on the origin servers.
Regional Tiered Cache combines the best of both of these strategies together by adding an additional layer of cache to the architecture. Using the Regional Tiered Cache option with Smart Tiered Caching means that while a single upper tier cache location exists closest to the origin, a Regional Tier layer has been added between the upper and lower tier that is geographically closer to the lower tier. Now, requests from lower tiers will now check a Regional Tier for cache before being sent to an upper tier. A single Regional Tier can accept requests from several lower tier caches and because of that, can greatly improve performance and latency for globally available applications.
Regional Tiered Caching is recommended for use with Smart Tiered Caching and Custom Tiered Caching. However, Regional Tiered Cache is not beneficial for customers with many upper tiers in many regions like Generic Global Tiered Cache.
#### Traffic flow: Tiered Cache, Smart Tiered Cache with Regional Tiered Cache
In Figure 5, Tiered Caching is enabled with Smart Tiered Cache Topology. The diagram depicts the topology of Smart Tiered Cache with Regional Tiered Cache enabled. Lower tier caches, when they experience a cache `MISS` will first send those requests to a more local, regional hub data center to see if the cache can handle the request. If not, the request will continue on to the upper tier and then origin server, if necessary.

Figure 5: Cloudflare CDN with Tiered Cache and Regional Tiered Cache
### Argo Smart Routing
Argo Smart Routing is a service that finds optimized routes across the Cloudflare network to deliver responses to users more quickly. As discussed earlier, Cloudflare CDN leverages Argo Smart Routing to determine the best upper tier data centers for Tiered Cache.
In addition, Argo Smart Routing can be enabled to ensure the fastest paths over the Cloudflare network are taken between upper tier data centers and origin servers at all times. Without Argo Smart Routing, communication between upper tier data centers to origin servers are still intelligently routed around problems on the Internet to ensure origin reachability.
Argo Smart Routing accelerates traffic by taking into account real-time data and network intelligence from routing nearly 50 million HTTP requests per second; it ensures the fastest and most reliable network paths are traversed over the Cloudflare network to the origin server. On average, Argo Smart Routing accounts for 30% faster performance on web assets.
#### Traffic Flow: Tiered Cache, Smart Tiered Cache Topology with Argo Smart Routing
Figure 6 details the traffic flow when Tiered Cache and Argo Smart Routing are not enabled. The request comes into the closest data center, and, because content is not locally cached and Tiered Cache is not enabled, the request is sent directly to the origin server for the content. Also, since Argo Smart Routing is not enabled, a reliable, but perhaps not the fastest, path is taken when communicating with the origin server.

Figure 6: Cloudflare CDN without Tiered Cache or Argo Smart Routing
Figure 7 articulates the traffic flow with both Tiered Cache and Argo Smart Routing enabled. When a request is received by Data Center 1 and there is a cache miss, the cache of the upper tier data center, Data Center 6, is checked. If the cached content is not found at the upper tier data center, with Argo Smart Routing enabled, the request is sent on the fastest path from the upper tier data center to the origin.
The fastest path is determined by the Argo network intelligence capabilities, which take into account real-time network data such as congestion, latency, and RTT.
**With the Cloudflare CDN, Argo Smart Routing is used when:**
1. There is a cache miss and the request needs to be sent to the origin server to retrieve the content.
2. There is a request for non-cacheable content, such as dynamic content (ex: APIs), and the request must go to the origin server.

Figure 7: Cloudflare CDN with Tiered Cache and Argo Smart Routing
### Cache Reserve
Expanding on the idea of Tiered Cache, Cache Reserve further utilizes the scale and speed of the Cloudflare network while additionally leveraging R2, Cloudflare’s persistent object storage, to cache content even longer. Cache Reserve helps customers reduce bills by eliminating egress fees from origins while also providing multiple layers of resiliency and protection to make sure that content is reliably available which improves website performance by having content load faster. Basically, Cache Reserve is an additional higher tier of cache with longer retention duration.
While Cache Reserve can function without Tiered Cache enabled, it is recommended that Tiered Cache be enabled with Cache Reserve. Tiered Cache will funnel, and potentially eliminate, requests to Cache Reserve which eliminates redundant read operations and redundant storage of cached content reducing egress and storage fees. Enabling Cache Reserve via the Cloudflare dashboard will check and provide a warning if you try to use Cache Reserve without Tiered Cache enabled.
Cache Reserve has a retention period of 30 days which means it will hold cached content for 30 days regardless of cached headers or TTL policy. The TTL policy still affects the content’s freshness which means when content cache TTL expires inside of Cache Reserve, the content will need to be revalidated by checking the origin for any updates. The TTL policy can be set by any number of methods, such as Cache-Control, CDN-Cache-Control response headers, Edge Cache TTL, cache TTL by status code, or Cache Rules. Every time cache is read from Cache Reserve, the retention timer is reset to 30 days. After 30 days, if the cached content has not been read from Cache Reserve, the cache will be deleted.
There are three main criteria to match for content to be considered cacheable via Cache Reserve:
1. The content must be cacheable. See the [Cache documentation](https://developers.cloudflare.com/cache/) for more details on cacheable content.
2. TTL is set to at least 10 hours. This can be set by any method from the previous paragraph.
3. The Content-Length header must be used in the response header. Please note, this means that the \[Transfer-Method “chunked” will prevent Cache Reserve from being populated.
When combined with Tiered Caching and Argo Smart Routing, Cache Reserve can be a powerful tool for increasing cache hits and in turn reducing load on origin servers while also improving performance by bringing the content closer to the end user.
Note
Using [Image Resizing](https://developers.cloudflare.com/images/optimization/transformations/overview/) with Cache Reserve will not result in resized images being stored in Cache Reserve since Image Resizing takes place after reading from Cache Reserve. Resized images will be cached in other available tiers when they are served after resizing.
### Traffic flow: Cache Reserve topology
Figure 8 illustrates how Cache Reserve can help reduce load on an origin server while also helping repopulate cache stores in both upper and lower tier data centers.

Figure 8: Cloudflare CDN with Tiered Cache and Cache Reserve
### China Network & Global Acceleration for clients in China
Latency depends not just on how far the client is from the origin or cache, but can also be significantly affected by the geographic region of the traffic — like China. To address these latency challenges, Cloudflare provides two key solutions:
1. [China Network](https://developers.cloudflare.com/china-network/) provides in-China caching for end users located in China, regardless of the origin location. This solution is provided by collaborating with JD Cloud and uses their data centers to ensure the fastest and most reliable cache performance for Chinese users compared to data centers outside of China.
2. [Global Acceleration](https://developers.cloudflare.com/china-network/concepts/global-acceleration/) offers reliable and secure connectivity to streamline content from origins to JD Cloud data centers in China. This is particularly beneficial for dynamic content like web applications and API calls.
## Summary
To summarize, the Cloudflare CDN is SaaS that helps address the challenges customers face around latency, performance, availability, redundancy, security, and costs. The Cloudflare CDN leverages Cloudflare’s global anycast network and Tiered Cache to deliver optimized results while saving costs for customers. Customers can also (enable Argo Smart)\[argo-smart-routing/get-started/\] Routing to ensure the fastest network path is used to route requests to the origin server and also choose to enable Cache Reserve to increase cache hits to further save costs and increase performance of their website or application.
Was this helpful?
YesNo
## On this page
[Docs](https://developers.cloudflare.com/)
```json
{"@context":"https://schema.org","@type":"TechArticle","@id":"https://developers.cloudflare.com/reference-architecture/architectures/cdn/#page","headline":"Content Delivery Network (CDN) Reference Architecture · Cloudflare Reference Architecture docs","description":"This reference architecture discusses the traditional challenges customers face with web applications, how the Cloudflare CDN resolves these challenges, and CDN architecture and design.","url":"https://developers.cloudflare.com/reference-architecture/architectures/cdn/","inLanguage":"en","image":"https://developers.cloudflare.com/og-docs.png","dateModified":"2026-04-16","publisher":{"@type":"Organization","name":"Cloudflare","url":"https://www.cloudflare.com/"},"isPartOf":{"@type":"WebSite","@id":"https://developers.cloudflare.com/#website","name":"Cloudflare Docs","url":"https://developers.cloudflare.com/"}}
```
---
---
description: Scan cached content for child sexual abuse material.
title: CSAM Scanning Tool
image: https://developers.cloudflare.com/og-docs.png
---
[Skip to content](#main-content)
> Documentation Index
> Fetch the complete documentation index at: https://developers.cloudflare.com/cache/llms.txt
> Use this file to discover all available pages before exploring further.
# CSAM Scanning Tool
Last updated May 1, 2026|Copy as Markdown|[View as Markdown](https://developers.cloudflare.com/cache/reference/csam-scanning/index.md)|[Agent setup](https://developers.cloudflare.com/agent-setup/)
The Child Sexual Abuse Material (CSAM) Scanning Tool allows website owners to proactively identify and take action on CSAM located on their website. By enabling this tool, Cloudflare will compare content served for your website through the Cloudflare cache to known lists of CSAM. These lists are provided to Cloudflare by leading child safety advocacy groups such as the National Center for Missing and Exploited Children (NCMEC).
Remember, by enabling the Service, you agree to the [Service-Specific Terms ↗](https://www.cloudflare.com/service-specific-terms-application-services/#csam-scanning-tool-terms) for the CSAM Scanning Tool. You agree to use this tool solely for the purposes of preventing the spread of CSAM.
---
## Why would a URL be blocked?
Because knowingly distributing or viewing CSAM is illegal, the owner of the website has enabled Cloudflare's CSAM scanning tool to proactively identify and block images identified as CSAM located on their website.
---
## Configure the CSAM scanning tool
To enable the tool:
1. Log into the [Cloudflare dashboard ↗](https://dash.cloudflare.com/).
2. Select your account and zone.
3. Go to **Caching** \> **Configuration**.
4. For **CSAM Scanning Tool**, select **Configure**.
You must provide an email address, which will be used to notify you in the event Cloudflare detects a positive match.
---
## What happens when a match is detected?
When a potential match is detected with the tool:
1. An email is sent to you once per day to inform you of any detections made in the past 24 hours. This email will include the file paths of any content that was matched.
2. If possible, a block is placed to prevent further serving of the matched content. If a block fails, we will indicate that the content has not been blocked in the email.
---
## What action should I take when a match is detected?
You are responsible for understanding and complying with any legal obligations you have as a website owner when made aware of any potential CSAM. Although legal obligations vary based on the provider and the jurisdiction, website owners often have obligations to report apparent CSAM, to remove content, and to preserve records. Some of those possible obligations are as follows:
* You likely have an obligation to report apparent CSAM to the appropriate authorities. You can file a report to NCMEC with additional information via NCMEC's CyberTip reporting form or find the preferred reporting portal for your jurisdiction via the INHOPE website.
* You may need to preserve and securely store a copy of the content and related data in the case NCMEC or law enforcement reach out for additional details.
* You likely have an obligation to securely preserve certain information related to your report for one year in the case of an investigation. To ensure that access to the content is limited, take care not to store this information anywhere accessible to anyone but those within your organization responsible for legal requests.
* You should remove the content and notify Cloudflare of the removal.
* Once any preservation obligations have been fulfilled, you should remove the content from your website. This is especially important if Cloudflare's notice to you indicates that our block was unsuccessful.
---
## How do I have a block removed from my website?
To disable a block, either because you have determined that the blocked content is not CSAM (a false positive) or because you have taken down the blocked content, view [Blocked Content in the Security Center](https://developers.cloudflare.com/fundamentals/reference/report-abuse/blocked-content/) in the Cloudflare Dashboard and request reviews on the relevant blocks. A request to remove a block must be accompanied by a representation from you confirming that the blocked content is not CSAM or has been removed.
These actions are available to users with the following roles:
* Admin
* Super Admin
* Trust & Safety
---
## Additional Resources
[CSAM Scanning Tool Supplemental Terms ↗](https://www.cloudflare.com/supplemental-terms/)
[National Center for Missing and Exploited Children (NCMEC) ↗](https://www.missingkids.org/)
[NCMEC CyberTipline ↗](https://www.missingkids.org/gethelpnow/cybertipline)
[INHOPE ↗](https://www.inhope.org/)
Was this helpful?
YesNo
## On this page
[Docs](https://developers.cloudflare.com/)
```json
{"@context":"https://schema.org","@type":"TechArticle","@id":"https://developers.cloudflare.com/cache/reference/csam-scanning/#page","headline":"CSAM Scanning Tool · Cloudflare Cache (CDN) docs","description":"Scan cached content for child sexual abuse material.","url":"https://developers.cloudflare.com/cache/reference/csam-scanning/","inLanguage":"en","image":"https://developers.cloudflare.com/og-docs.png","dateModified":"2026-05-01","publisher":{"@type":"Organization","name":"Cloudflare","url":"https://www.cloudflare.com/"},"isPartOf":{"@type":"WebSite","@id":"https://developers.cloudflare.com/#website","name":"Cloudflare Docs","url":"https://developers.cloudflare.com/"},"keywords":["Security"]}
```
---
---
description: Bypass the cache temporarily with Development Mode.
title: Development Mode
image: https://developers.cloudflare.com/og-docs.png
---
[Skip to content](#main-content)
> Documentation Index
> Fetch the complete documentation index at: https://developers.cloudflare.com/cache/llms.txt
> Use this file to discover all available pages before exploring further.
# Development Mode
Last updated Apr 16, 2026|Copy as Markdown|[View as Markdown](https://developers.cloudflare.com/cache/reference/development-mode/index.md)|[Agent setup](https://developers.cloudflare.com/agent-setup/)
Development Mode temporarily suspends Cloudflare's edge caching and [Polish](https://developers.cloudflare.com/images/polish/) features for three hours unless disabled beforehand. Development Mode allows customers to immediately observe changes to their [cacheable content](https://developers.cloudflare.com/cache/concepts/default-cache-behavior/#default-cached-file-extensions) like images, CSS, or JavaScript.
Note
To bypass cache for longer than three hours, use bypass cache in [Cache Rules](https://developers.cloudflare.com/cache/how-to/cache-rules/settings/#bypass-cache).
## Enable Development Mode
Development Mode temporarily bypasses Cloudflare's cache and does not purge cached files. To instantly purge your Cloudflare cache, refer to [purge cache](https://developers.cloudflare.com/cache/how-to/purge-cache/).
1. In the Cloudflare dashboard, go to the **Configuration** page.
[Go to **Configuration** ↗](https://dash.cloudflare.com/?to=/:account/:zone/caching/configuration)
2. Toggle **Development Mode** to **On**.
Was this helpful?
YesNo
## On this page
[Docs](https://developers.cloudflare.com/)
```json
{"@context":"https://schema.org","@type":"TechArticle","@id":"https://developers.cloudflare.com/cache/reference/development-mode/#page","headline":"Development Mode · Cloudflare Cache (CDN) docs","description":"Bypass the cache temporarily with Development Mode.","url":"https://developers.cloudflare.com/cache/reference/development-mode/","inLanguage":"en","image":"https://developers.cloudflare.com/og-docs.png","dateModified":"2026-04-16","publisher":{"@type":"Organization","name":"Cloudflare","url":"https://www.cloudflare.com/"},"isPartOf":{"@type":"WebSite","@id":"https://developers.cloudflare.com/#website","name":"Cloudflare Docs","url":"https://developers.cloudflare.com/"}}
```
---
---
description: How ETag headers work with Cloudflare caching.
title: Using ETag Headers with Cloudflare
image: https://developers.cloudflare.com/og-docs.png
---
[Skip to content](#main-content)
> Documentation Index
> Fetch the complete documentation index at: https://developers.cloudflare.com/cache/llms.txt
> Use this file to discover all available pages before exploring further.
# Using ETag Headers with Cloudflare
Last updated Apr 16, 2026|Copy as Markdown|[View as Markdown](https://developers.cloudflare.com/cache/reference/etag-headers/index.md)|[Agent setup](https://developers.cloudflare.com/agent-setup/)
ETag headers identify whether the version of a resource cached in the browser is the same as the resource at the origin web server. A visitor's browser stores ETags. When a visitor revisits a site, the browser compares each ETag to the one it stored. Matching values cause a `304 Not-Modified HTTP` response that indicates the cached resource version is current. Cloudflare supports both strong and weak ETags configured at your origin web server.
## Weak ETags
Weak ETag headers indicate a cached resource is semantically equivalent to the version on the web server but not necessarily byte-for-byte identical.
Note
When using weak ETag headers, it is necessary to disable certain features such as [Email Obfuscation](https://developers.cloudflare.com/waf/tools/scrape-shield/email-address-obfuscation/) and [Automatic HTTPS Rewrites](https://developers.cloudflare.com/ssl/edge-certificates/additional-options/automatic-https-rewrites/) to prevent Cloudflare from removing the ETag headers set by your origin web server. For a comprehensive list of the features you need to disable, refer to the [Notes about end-to-end compression](https://developers.cloudflare.com/speed/optimization/content/compression/#notes-about-end-to-end-compression).
## Strong ETags
Strong ETag headers ensure the resource in browser cache and on the web server are byte-for-byte identical. Use [Cache Rules](https://developers.cloudflare.com/cache/how-to/cache-rules/) to enable strong ETag headers.
### Behavior with Respect Strong ETags enabled
When you enable **Respect Strong ETags** in a cache rule, Cloudflare will use strong ETag header validation to ensure that resources in the Cloudflare cache and on the origin server are byte-for-byte identical.
However, in some situations Cloudflare will convert strong ETags to weak ETags. For example, given the following conditions:
* **Respect Strong ETags** is enabled
* [Brotli compression](https://developers.cloudflare.com/speed/optimization/content/compression/) is enabled
* The origin server's response includes an `etag: "foobar"` strong ETag header
The Cloudflare network will take the following actions, depending on the visitor's `accept-encoding` header and the compression used in the origin server's response:
| accept-encodingheader from visitor | Compression used in origin server response | Cloudflare actions |
| ---------------------------------- | ------------------------------------------ | ------------------------------------------------------------------------------------------------------ |
| gzip, br | GZIP | Return GZIP-compressed response to visitor with strong ETag header: etag: "foobar". |
| gzip, br | Brotli | Return Brotli-compressed response to visitor with strong ETag header: etag: "foobar". |
| br | GZIP | Decompress GZIP and return uncompressed response to visitor with weak ETag header: etag: W/"foobar". |
| gzip | Brotli | Decompress Brotli and return uncompressed response to visitor with weak ETag header: etag: W/"foobar". |
| gzip | (none) | Return uncompressed response to visitor with strong ETag header: etag: "foobar". |
| gzip, br, zstd | Zstandard | Return zstd-compressed response to visitor with strong ETag header: etag: "foobar". |
| gzip, br | Zstandard | Decompress zstd and return br response to visitor with weak ETag header: etag: W/"foobar". |
| zstd | Brotli/GZIP | Decompress zstd and return zstd response to visitor with weak ETag header: etag: W/"foobar". |
Enabling **Respect Strong ETags** in Cloudflare automatically disables Rocket Loader, Email Obfuscation, and Automatic HTTPS Rewrites.
### Behavior with Respect Strong ETags disabled
When **Respect Strong ETags** is disabled, Cloudflare will preserve strong ETag headers set by the origin web server if all the following conditions apply:
* The origin server sends a response compressed using GZIP or Brotli, or an uncompressed response.
* If the origin server sends a compressed response, the visitor accepts the same compression (GZIP, Brotli), according to the `accept-encoding` header.
* [Rocket Loader](https://developers.cloudflare.com/speed/optimization/content/rocket-loader/) and [Email Obfuscation](https://developers.cloudflare.com/waf/tools/scrape-shield/email-address-obfuscation/) features are disabled.
In all other situations, Cloudflare will either convert strong ETag headers to weak ETag headers or remove the strong ETag. For example, given the following conditions:
* **Respect Strong ETags** is disabled
* [Brotli compression](https://developers.cloudflare.com/speed/optimization/content/compression/) is enabled
* The origin server's response includes an `etag: "foobar"` strong ETag header
The Cloudflare network will take the following actions, depending on the visitor's `accept-encoding` header and the compression used in the origin server's response:
| accept-encodingheader from visitor | Compression used in origin server response | Cloudflare actions |
| ---------------------------------- | ------------------------------------------ | ----------------------------------------------------------------------------------------------------------------------------------------------- |
| gzip, br | GZIP | Decompress GZIP and return Brotli-compressed response to visitor (since Brotli compression is enabled) with weak ETag header: etag: W/"foobar". |
| gzip, br | Brotli | Return Brotli-compressed response to visitor with strong ETag header: etag: "foobar". |
| br | GZIP | Decompress GZIP and return Brotli-compressed response to visitor with weak ETag header: etag: W/"foobar". |
| gzip | Brotli | Decompress Brotli and return GZIP-compressed response to visitor with weak ETag header: etag: W/"foobar". |
| gzip | (none) | Compress origin response using GZIP and return it to visitor with weak ETag header: etag: W/"foobar". |
| gzip, br, zstd | Zstandard | Return zstd-compressed response to visitor with strong ETag header: etag: "foobar". |
| gzip, br | Zstandard | Decompress zstd and return uncompressed response to visitor with weak ETag header: etag: W/"foobar". |
| zstd | Brotli | Decompress zstd and return uncompressed response to visitor with weak ETag header: etag: W/"foobar". |
Refer to [Content compression](https://developers.cloudflare.com/speed/optimization/content/compression/) for more information.
## Important remarks
* You must set the value in a strong ETag header using double quotes (for example, `etag: "foobar"`). If you use an incorrect format, Cloudflare will remove the ETag header instead of converting it to a weak ETag.
* If a resource is cacheable and there is a cache miss, Cloudflare does not send ETag headers to the origin server. This is because Cloudflare requires the full response body to fill its cache.
* If your origin (or R2) applies compression based on `accept-encoding`, the first compression type will be cached. Consider whether strong ETags fit your use case, or use cache key rules to handle different compression types.
Was this helpful?
YesNo
## On this page
[Docs](https://developers.cloudflare.com/)
```json
{"@context":"https://schema.org","@type":"TechArticle","@id":"https://developers.cloudflare.com/cache/reference/etag-headers/#page","headline":"Using ETag Headers with Cloudflare · Cloudflare Cache (CDN) docs","description":"How ETag headers work with Cloudflare caching.","url":"https://developers.cloudflare.com/cache/reference/etag-headers/","inLanguage":"en","image":"https://developers.cloudflare.com/og-docs.png","dateModified":"2026-04-16","publisher":{"@type":"Organization","name":"Cloudflare","url":"https://www.cloudflare.com/"},"isPartOf":{"@type":"WebSite","@id":"https://developers.cloudflare.com/#website","name":"Cloudflare Docs","url":"https://developers.cloudflare.com/"}}
```
---
---
description: Troubleshoot Always Online cached page issues.
title: Always Online
image: https://developers.cloudflare.com/og-docs.png
---
[Skip to content](#main-content)
> Documentation Index
> Fetch the complete documentation index at: https://developers.cloudflare.com/cache/llms.txt
> Use this file to discover all available pages before exploring further.
# Always Online
Last updated May 22, 2026|Copy as Markdown|[View as Markdown](https://developers.cloudflare.com/cache/troubleshooting/always-online/index.md)|[Agent setup](https://developers.cloudflare.com/agent-setup/)
Observe the following best practices when enabling Always Online with Internet Archive integration.
* **Allow requests from the Internet Archive IP addresses.** Origin servers receive requests from the Internet Archive IPs. Make sure you are not blocking requests from the Internet Archive IP range: `207.241.224.0/20` and `208.70.24.0/21`.
* **The Internet Archive does not consider your origin server's cache-control header.** When the Internet Archive is crawling sites, it will crawl sites regardless of their cache-control, since the Internet Archive does not cache assets, but archives them.
* **Consider potential conflicts with Cloudflare features that transform URIs.** Always Online with Internet Archive integration may cause issues with Cache Rules and other Cloudflare features that transform URIs due to the way the Internet Archive crawls pages to archive. Specifically, some redirects that take place at the edge may cause the Internet Archive's crawler not to archive the target URL. Before enabling Origin Cache Control, review [how Cloudflare caches resources by default](https://developers.cloudflare.com/cache/concepts/default-cache-behavior/) as well as any Cache Rules you have configured so that you can avoid these issues. If you experience problems, disable Always Online.
* **Do not block Known Bots or Verified Bots via a WAF custom rule.** If you block either of these bot lists, the Internet Archive will not be able to crawl.
Do not use Always Online with:
* API traffic.
* An [IP Access rule](https://developers.cloudflare.com/waf/tools/ip-access-rules/) or a [WAF custom rule](https://developers.cloudflare.com/waf/custom-rules/) that blocks the United States or
* Bypass Cache cache rules. Always Online ignores Bypass Cache cache rules and serves Always Online cached assets.
## Limitations
There are limitations with the Always Online functionality:
1. Always Online is not immediately active for sites recently added due to:
* DNS record propagation, which can take 24-72 hours
* Always Online has not initially crawled the website
2. Cloudflare cannot show private content behind logins or handle form submission (POSTs) if your origin web server is offline.
Always Online does not trigger for HTTP response codes such as [404](https://developers.cloudflare.com/support/troubleshooting/http-status-codes/4xx-client-error/error-404/), [503](https://developers.cloudflare.com/support/troubleshooting/http-status-codes/cloudflare-5xx-errors/error-503/), or [500](https://developers.cloudflare.com/support/troubleshooting/http-status-codes/cloudflare-5xx-errors/error-500/) errors such as database connection errors or internal server errors. This is because these status codes indicate the origin is reachable and responding — Always Online only activates when Cloudflare cannot connect to your origin at all (resulting in Cloudflare-generated [520–527](https://developers.cloudflare.com/support/troubleshooting/http-status-codes/cloudflare-5xx-errors/error-520/) status codes). If your origin returns a 5xx error, the origin is online by definition and Always Online will not intervene.
## Frequently asked questions
1. How can I know if a page has been crawled?
* You can go to the [Internet Archive ↗](https://web.archive.org/) and search for the page URL to see if it has been crawled or not.
* You can also check this via the [Internet Archive Availability API ↗](https://archive.org/help/wayback%5Fapi.php).
2. Why were not pages x, y, and z crawled?
* Since Cloudflare only requests to crawl the most popular pages on the site, it is possible that there will be missing pages. If you really want to archive a page, then you can visit the [Internet Archive ↗](https://web.archive.org/save) save page and ask them to crawl a particular page.
3. What IP addresses do we need to allowlist to make sure crawling works?
* IP Range: `207.241.224.0/20` and `208.70.24.0/21`. Note that this ip range belongs to Internet Archive and NOT Cloudflare, since it is the Internet Archive that does the crawling.
4. What user agent should the origin expect to see?
* Currently the Internet Archive uses: `Mozilla/5.0 (Windows NT 10.0; Win64; x64) AppleWebKit/605.1.15 (KHTML, like Gecko) Chrome/89.0.4389.82 Safari/605.1.15`.
Was this helpful?
YesNo
## On this page
[Docs](https://developers.cloudflare.com/)
```json
{"@context":"https://schema.org","@type":"TechArticle","@id":"https://developers.cloudflare.com/cache/troubleshooting/always-online/#page","headline":"Always Online - Troubleshooting · Cloudflare Cache (CDN) docs","description":"Troubleshoot Always Online cached page issues.","url":"https://developers.cloudflare.com/cache/troubleshooting/always-online/","inLanguage":"en","image":"https://developers.cloudflare.com/og-docs.png","dateModified":"2026-05-22","publisher":{"@type":"Organization","name":"Cloudflare","url":"https://www.cloudflare.com/"},"isPartOf":{"@type":"WebSite","@id":"https://developers.cloudflare.com/#website","name":"Cloudflare Docs","url":"https://developers.cloudflare.com/"}}
```
---
---
description: In Orange-to-Orange (O2O) setups — where a SaaS provider uses Cloudflare for SaaS and their customer also has their own Cloudflare zone — the __cf_bm Bot Management cookie returned from the origin-facing Cloudflare zone can cause the eyeball-facing zone to bypass cache. This occurs because the Set-Cookie header in the response triggers Cloudflare's default behavior of not caching responses with Set-Cookie.
title: Bot Management cookie causes cache bypass in O2O setups
image: https://developers.cloudflare.com/og-docs.png
---
[Skip to content](#main-content)
> Documentation Index
> Fetch the complete documentation index at: https://developers.cloudflare.com/cache/llms.txt
> Use this file to discover all available pages before exploring further.
# Bot Management cookie causes cache bypass in O2O setups
Last updated Jun 30, 2026|Copy as Markdown|[View as Markdown](https://developers.cloudflare.com/cache/troubleshooting/bot-management-o2o-cache-bypass/index.md)|[Agent setup](https://developers.cloudflare.com/agent-setup/)
In [Orange-to-Orange (O2O)](https://developers.cloudflare.com/cloudflare-for-platforms/cloudflare-for-saas/saas-customers/how-it-works/) setups — where a SaaS provider uses [Cloudflare for SaaS](https://developers.cloudflare.com/cloudflare-for-platforms/cloudflare-for-saas/) and their customer also has their own Cloudflare zone — the `__cf_bm` Bot Management cookie returned from the origin-facing Cloudflare zone can cause the eyeball-facing zone to bypass cache. This occurs because the `Set-Cookie` header in the response triggers Cloudflare's default behavior of not caching responses with `Set-Cookie`.
If you are seeing unexpectedly low cache hit rates in an O2O setup with Bot Management enabled, this may be the cause.
Was this helpful?
YesNo
## On this page
[Docs](https://developers.cloudflare.com/)
```json
{"@context":"https://schema.org","@type":"TechArticle","@id":"https://developers.cloudflare.com/cache/troubleshooting/bot-management-o2o-cache-bypass/#page","headline":"Bot Management cookie causes cache bypass in O2O setups · Cloudflare Cache (CDN) docs","description":"In Orange-to-Orange (O2O) setups — where a SaaS provider uses Cloudflare for SaaS and their customer also has their own Cloudflare zone — the __cf_bm Bot Management cookie returned from the origin-facing Cloudflare zone can cause the eyeball-facing zone to bypass cache. This occurs because the Set-Cookie header in the response triggers Cloudflare's default behavior of not caching responses with Set-Cookie.","url":"https://developers.cloudflare.com/cache/troubleshooting/bot-management-o2o-cache-bypass/","inLanguage":"en","image":"https://developers.cloudflare.com/og-docs.png","dateModified":"2026-06-30","publisher":{"@type":"Organization","name":"Cloudflare","url":"https://www.cloudflare.com/"},"isPartOf":{"@type":"WebSite","@id":"https://developers.cloudflare.com/#website","name":"Cloudflare Docs","url":"https://developers.cloudflare.com/"}}
```
---
---
description: Troubleshoot login failures, missing session cookies, and challenge loops caused by caching dynamic content.
title: Dynamic content and login issues
image: https://developers.cloudflare.com/og-docs.png
---
[Skip to content](#main-content)
> Documentation Index
> Fetch the complete documentation index at: https://developers.cloudflare.com/cache/llms.txt
> Use this file to discover all available pages before exploring further.
# Dynamic content and login issues
Last updated Apr 17, 2026|Copy as Markdown|[View as Markdown](https://developers.cloudflare.com/cache/troubleshooting/dynamic-content-and-login-issues/index.md)|[Agent setup](https://developers.cloudflare.com/agent-setup/)
Dynamic pages such as login forms, checkout flows, and authenticated application routes can break when they are cached too aggressively.
Common symptoms include:
* Users can load the login page, but the sign-in form fails after submission.
* Sessions do not persist after a successful sign-in.
* The origin sends a `Set-Cookie` header, but the browser never stores the cookie.
* A challenge page appears, but after solving it the user returns to the login page or loses form state.
## Cached login page strips session cookies
One common cause is a [Cache Rule](https://developers.cloudflare.com/cache/how-to/cache-rules/) or legacy Page Rule configured to cache dynamic HTML.
This usually happens when all of the following are true:
* The page is configured as **Eligible for cache** or **Cache Everything**.
* The response is dynamic HTML such as `/login` or `/account`.
* The origin sends a `Set-Cookie` header.
* An [Edge TTL](https://developers.cloudflare.com/cache/how-to/cache-rules/settings/#edge-ttl) or status-code TTL overrides origin cache directives.
In this configuration, Cloudflare can cache the response and remove the `Set-Cookie` header before the response is stored at the edge. As a result, the browser receives the login page but never gets the session cookie required for the next request.
### How to confirm
Check the response for the login page or other dynamic route.
If you see both of the following, the page is probably cached when it should not be:
* `CF-Cache-Status: HIT` or `CF-Cache-Status: EXPIRED`
* No `Set-Cookie` header in the response, even though your origin usually sets one
You may also see framework-specific failures after form submission, for example:
* A redirect back to the login page
* A `403` or `500` after sign-in
* CSRF validation errors
* Missing server-side session state
This issue is common with frameworks that rely on a session or CSRF cookie on the first page load, including JavaServer Faces, ASP.NET, PHP session handlers, Django, Rails, and Laravel.
### Resolution
Do not cache login pages or other authenticated HTML.
Instead:
1. Restrict **Eligible for cache** or **Cache Everything** to static paths only.
2. Add a more specific Cache Rule that bypasses or disables caching for routes such as `/login`, `/account`, `/cart`, `/checkout`, and application API paths.
3. If the origin must control caching, remove any Edge TTL override that forces the page to be cached.
4. Verify the fixed response now returns `CF-Cache-Status: DYNAMIC`, `MISS`, or `BYPASS`, and preserves `Set-Cookie`.
For more information on cookie behavior, refer to [Interaction of Set-Cookie response header with Cache](https://developers.cloudflare.com/cache/concepts/cache-behavior/#interaction-of-set-cookie-response-header-with-cache).
## Challenge loops on login or form flows
Security challenges can also interrupt dynamic flows.
Two common patterns are:
* A challenge is triggered on the initial `GET` request for the login page. The user solves the challenge, but the application loses the original session or CSRF context.
* A challenge is triggered on the `POST` request that submits the login form or other sensitive action. The browser may have to repeat the request after the challenge, which can break the original form submission.
### How to confirm
Check whether a [WAF custom rule](https://developers.cloudflare.com/waf/custom-rules/), [managed rule](https://developers.cloudflare.com/waf/managed-rules/), or [rate limiting rule](https://developers.cloudflare.com/waf/rate-limiting-rules/) applies to the login path.
If the issue only affects routes such as `/login`, `/signin`, `/checkout`, or `/api/auth/*`, and the application works when the challenge is disabled for those paths, the challenge is likely interrupting the flow.
### Resolution
Use one of the following approaches:
1. Exclude the login or form submission path from the challenge rule.
2. Narrow the rule expression so it applies to suspicious traffic only.
3. If you must protect the route, use a less disruptive control on the page load and apply stronger actions elsewhere in the flow.
When debugging, also verify that rules are not matching Cloudflare-generated paths such as `/cdn-cgi/*`.
For more information on challenge-related behavior, refer to [Rules troubleshooting](https://developers.cloudflare.com/rules/reference/troubleshooting/) and [Cloudflare WAF troubleshooting](https://developers.cloudflare.com/waf/troubleshooting/).
Was this helpful?
YesNo
## On this page
[Docs](https://developers.cloudflare.com/)
```json
{"@context":"https://schema.org","@type":"TechArticle","@id":"https://developers.cloudflare.com/cache/troubleshooting/dynamic-content-and-login-issues/#page","headline":"Dynamic content and login issues · Cloudflare Cache (CDN) docs","description":"Troubleshoot login failures, missing session cookies, and challenge loops caused by caching dynamic content.","url":"https://developers.cloudflare.com/cache/troubleshooting/dynamic-content-and-login-issues/","inLanguage":"en","image":"https://developers.cloudflare.com/og-docs.png","dateModified":"2026-04-17","publisher":{"@type":"Organization","name":"Cloudflare","url":"https://www.cloudflare.com/"},"isPartOf":{"@type":"WebSite","@id":"https://developers.cloudflare.com/#website","name":"Cloudflare Docs","url":"https://developers.cloudflare.com/"},"keywords":["Cookies","Debugging"]}
```
---
---
description: In HTTP request logs, cacheResponseBytes reflects the uncompressed response size from cache or origin. edgeResponseBytes reflects the final compressed response size sent to the client. Because Cloudflare applies compression (gzip, Brotli) before delivering to the client, edgeResponseBytes is typically smaller than cacheResponseBytes.
title: edgeResponseBytes and cacheResponseBytes discrepancy
image: https://developers.cloudflare.com/og-docs.png
---
[Skip to content](#main-content)
> Documentation Index
> Fetch the complete documentation index at: https://developers.cloudflare.com/cache/llms.txt
> Use this file to discover all available pages before exploring further.
# edgeResponseBytes and cacheResponseBytes discrepancy
Last updated Jun 30, 2026|Copy as Markdown|[View as Markdown](https://developers.cloudflare.com/cache/troubleshooting/edge-vs-cache-response-bytes/index.md)|[Agent setup](https://developers.cloudflare.com/agent-setup/)
In [HTTP request logs](https://developers.cloudflare.com/logs/logpush/logpush-job/datasets/zone/http%5Frequests/), `cacheResponseBytes` reflects the uncompressed response size from cache or origin. `edgeResponseBytes` reflects the final compressed response size sent to the client. Because Cloudflare applies compression (gzip, Brotli) before delivering to the client, `edgeResponseBytes` is typically smaller than `cacheResponseBytes`.
Was this helpful?
YesNo
## On this page
[Docs](https://developers.cloudflare.com/)
```json
{"@context":"https://schema.org","@type":"TechArticle","@id":"https://developers.cloudflare.com/cache/troubleshooting/edge-vs-cache-response-bytes/#page","headline":"edgeResponseBytes and cacheResponseBytes discrepancy · Cloudflare Cache (CDN) docs","description":"In HTTP request logs, cacheResponseBytes reflects the uncompressed response size from cache or origin. edgeResponseBytes reflects the final compressed response size sent to the client. Because Cloudflare applies compression (gzip, Brotli) before delivering to the client, edgeResponseBytes is typically smaller than cacheResponseBytes.","url":"https://developers.cloudflare.com/cache/troubleshooting/edge-vs-cache-response-bytes/","inLanguage":"en","image":"https://developers.cloudflare.com/og-docs.png","dateModified":"2026-06-30","publisher":{"@type":"Organization","name":"Cloudflare","url":"https://www.cloudflare.com/"},"isPartOf":{"@type":"WebSite","@id":"https://developers.cloudflare.com/#website","name":"Cloudflare Docs","url":"https://developers.cloudflare.com/"}}
```
---
---
description: Learn how to resolve issues with MP4 videos not playing on iOS and Safari.
title: Issues with MP4 videos on iOS and Safari
image: https://developers.cloudflare.com/og-docs.png
---
[Skip to content](#main-content)
> Documentation Index
> Fetch the complete documentation index at: https://developers.cloudflare.com/cache/llms.txt
> Use this file to discover all available pages before exploring further.
# Issues with MP4 videos on iOS and Safari
Last updated May 4, 2026|Copy as Markdown|[View as Markdown](https://developers.cloudflare.com/cache/troubleshooting/mp4-videos-on-ios-and-safari/index.md)|[Agent setup](https://developers.cloudflare.com/agent-setup/)
When traffic is proxied through Cloudflare, Safari on macOS and iOS devices may fail to load MP4 video files.
This issue occurs because Safari handles HTTP range requests differently than other browsers, particularly in how it processes ETags during video streaming.
Safari and iOS devices rely on HTTP range requests to support video features such as seeking to specific timestamps and resuming interrupted downloads.
When Cloudflare's caching layer processes these range requests with weak ETags, Safari may reject the cached response entirely, resulting in videos that fail to load or display as black screens.
To resolve this issue, configure two cache rules in the following order.
## 1\. Create the strong ETags rule
Create a [cache rule](https://developers.cloudflare.com/cache/how-to/cache-rules/create-dashboard/) that applies to all MP4 files, marks them as eligible for cache, and turns on the Respect Strong ETags setting.
1. In the Cloudflare dashboard, go to the **Cache Rules** page.
[Go to **Cache Rules** ↗](https://dash.cloudflare.com/?to=/:account/:zone/caching/cache-rules)
2. Select **Create rule** \> **Cache rules**.
3. Enter a descriptive name for the rule in **Rule name**.
4. In the **When incoming requests match…** section, create a filter that applies to all MP4 files, for example `URI Full` `Wildcard` `*.mp4`.
5. Select **Eligible for cache** in the **Cache eligibility** section.
6. Select **\+ Add Setting** for **Respect strong ETags** and turn on the toggle.
7. Select **Last** as **Place at**.
## 2\. Create the bypass cache rule
Create another cache rule that applies to all MP4 files and bypasses cache entirely.
1. In the Cloudflare dashboard, go to the **Cache Rules** page.
[Go to **Cache Rules** ↗](https://dash.cloudflare.com/?to=/:account/:zone/caching/cache-rules)
2. Select **Create rule** \> **Cache rules**.
3. Enter a descriptive name for the rule in **Rule name**.
4. In the **When incoming requests match…** section, create the same filter for MP4 files, for example `URI Full` `Wildcard` `*.mp4`.
5. Select **Bypass cache** in the **Cache eligibility** section.
6. Select **Last** as **Place at**.
## Why this order matters
The first rule preserves strong ETags for MP4 files, which satisfies Safari's requirements for range request handling. The second rule bypasses cache so that Cloudflare forwards range requests to the origin server instead of serving cached responses with potentially mismatched ETags.
The first rule must appear above the second rule in the Cache Rules list.
Was this helpful?
YesNo
## On this page
[Docs](https://developers.cloudflare.com/)
```json
{"@context":"https://schema.org","@type":"TechArticle","@id":"https://developers.cloudflare.com/cache/troubleshooting/mp4-videos-on-ios-and-safari/#page","headline":"Issues with MP4 videos on iOS and Safari · Cloudflare Cache (CDN) docs","description":"Learn how to resolve issues with MP4 videos not playing on iOS and Safari.","url":"https://developers.cloudflare.com/cache/troubleshooting/mp4-videos-on-ios-and-safari/","inLanguage":"en","image":"https://developers.cloudflare.com/og-docs.png","dateModified":"2026-05-04","publisher":{"@type":"Organization","name":"Cloudflare","url":"https://www.cloudflare.com/"},"isPartOf":{"@type":"WebSite","@id":"https://developers.cloudflare.com/#website","name":"Cloudflare Docs","url":"https://developers.cloudflare.com/"}}
```
---
---
description: Deliver secure, fast content in Mainland China through Cloudflare and JD Cloud data centers.
title: Cloudflare China Network
image: https://developers.cloudflare.com/og-docs.png
---
[Skip to content](#main-content)
> Documentation Index
> Fetch the complete documentation index at: https://developers.cloudflare.com/china-network/llms.txt
> Use this file to discover all available pages before exploring further.
# Cloudflare China Network
Last updated Apr 30, 2026|Copy as Markdown|[View as Markdown](https://developers.cloudflare.com/china-network/index.md)|[Agent setup](https://developers.cloudflare.com/agent-setup/)
Delivering content quickly and securely to users in Mainland China requires infrastructure within China itself. Traffic routed through servers outside the country faces significant latency and reliability issues due to China's network boundaries.
The [Cloudflare China Network ↗](https://www.cloudflare.com/application-services/products/china-network/) solves this by running selected Cloudflare performance and security products on data centers located in Mainland China, operated by Cloudflare's partner JD Cloud. The data centers cover most populated regions in China.
You can use the same configurations and dashboard experience that you use with Cloudflare everywhere else in the world.
Chapters
* 
**Introduction**3s
* 
**How does it work?**50s
* 
**ICP regulations**1m36s
* 
**China Express**1m58s
## Main features
The Cloudflare China Network provides:
* A single solution for both performance improvement and security services such as [WAF](https://developers.cloudflare.com/waf/), [DDoS](https://developers.cloudflare.com/ddos-protection/), and [bot management](https://developers.cloudflare.com/bots/).
* A unified experience for managing network traffic and security posture. You can manage all configurations on the same dashboard.
* The same customer support capabilities as Cloudflare's global network. You may also have access to premium service and local language support.
* [In-China Authoritative DNS and in-China nameservers](https://developers.cloudflare.com/china-network/concepts/china-dns/) to reduce the time it takes for a user's browser to start receiving content (Time to First Byte).
* [Global Acceleration](https://developers.cloudflare.com/china-network/concepts/global-acceleration/), a suite of connectivity and performance offerings that simplify deploying your global assets in China.
## Availability
The Cloudflare China Network is available as a separate subscription for customers on an [Enterprise plan ↗](https://www.cloudflare.com/plans/enterprise/).
## Important notes
* Not all Cloudflare products are available in the Cloudflare China Network. Refer to [Available products and features](https://developers.cloudflare.com/china-network/reference/available-products/) for details.
* IPv6 support is mandatory for all Internet-facing services operating in Mainland China. The Cloudflare China Network automatically enables IPv6 on your domains to fulfill this requirement.
* All the content inside of Mainland China is monitored by local authorities and must comply with local regulations.
* You must have a valid [ICP (Internet Content Provider) filing or license](https://developers.cloudflare.com/china-network/concepts/icp/) for each apex domain you wish to onboard to Cloudflare.
Was this helpful?
YesNo
## On this page
[Docs](https://developers.cloudflare.com/)
```json
{"@context":"https://schema.org","@type":"WebPage","@id":"https://developers.cloudflare.com/china-network/#page","headline":"Overview · Cloudflare China Network docs","description":"Deliver secure, fast content in Mainland China through Cloudflare and JD Cloud data centers.","url":"https://developers.cloudflare.com/china-network/","inLanguage":"en","image":"https://developers.cloudflare.com/og-docs.png","dateModified":"2026-04-30","publisher":{"@type":"Organization","name":"Cloudflare","url":"https://www.cloudflare.com/"},"isPartOf":{"@type":"WebSite","@id":"https://developers.cloudflare.com/#website","name":"Cloudflare Docs","url":"https://developers.cloudflare.com/"}}
```
---
---
description: Set up the Cloudflare China Network package on your Enterprise plan.
title: Get started
image: https://developers.cloudflare.com/og-docs.png
---
[Skip to content](#main-content)
> Documentation Index
> Fetch the complete documentation index at: https://developers.cloudflare.com/china-network/llms.txt
> Use this file to discover all available pages before exploring further.
# Get started
Last updated Apr 17, 2026|Copy as Markdown|[View as Markdown](https://developers.cloudflare.com/china-network/get-started/index.md)|[Agent setup](https://developers.cloudflare.com/agent-setup/)
## 1\. Contract required services and agree to supplemental terms
1. Ensure that you have a Cloudflare Enterprise plan. If you do not have an Enterprise plan yet, you must upgrade.
2. Add the Cloudflare China Network package (a separate subscription) to your Enterprise plan.
3. Agree to the [China Service Supplemental Terms ↗](https://www.cloudflare.com/supplemental-terms/#china-service).
Contact your sales team for more information on these steps.
## 2\. Obtain ICP and vet domain content
1. Obtain [Internet Content Provider filings or licenses](https://developers.cloudflare.com/china-network/concepts/icp/#obtain-an-icp-number) for all the apex domains you wish to onboard.
2. Present valid ICP filings or licenses for the zones you are onboarding.
3. Ensure that your websites [display their ICP number in the page footer](https://developers.cloudflare.com/china-network/concepts/icp/#display-your-icp-number).
4. Prepare the required information for JD Cloud to review your domains' content. JD Cloud, our partner, is required to review and vet the content of all domains on their network before China Network is enabled. You will need to provide the following information:
* Customer and company name
* Domain name
* ICP license/filing number
* A general description of the content of each domain (for example, Marketing website)
* A signed Self Attestation letter (provided by your sales team)
## 3\. Onboard your domains to the Cloudflare China Network
After content vetting is complete, [add your domains to Cloudflare](https://developers.cloudflare.com/fundamentals/manage-domains/add-site/).
For first-time enablement of a zone, it will take approximately 24-48 hours to fully onboard to China Network. Afterwards, you can enable and disable China Network within your Cloudflare dashboard.
Was this helpful?
YesNo
## On this page
[Docs](https://developers.cloudflare.com/)
```json
{"@context":"https://schema.org","@type":"TechArticle","@id":"https://developers.cloudflare.com/china-network/get-started/#page","headline":"Get started · Cloudflare China Network docs","description":"Set up the Cloudflare China Network package on your Enterprise plan.","url":"https://developers.cloudflare.com/china-network/get-started/","inLanguage":"en","image":"https://developers.cloudflare.com/og-docs.png","dateModified":"2026-04-17","publisher":{"@type":"Organization","name":"Cloudflare","url":"https://www.cloudflare.com/"},"isPartOf":{"@type":"WebSite","@id":"https://developers.cloudflare.com/#website","name":"Cloudflare Docs","url":"https://developers.cloudflare.com/"},"keywords":["Compliance"]}
```
---
---
description: Watch videos about Cloudflare China Network features and configuration.
title: Videos
image: https://developers.cloudflare.com/og-docs.png
---
[Skip to content](#main-content)
> Documentation Index
> Fetch the complete documentation index at: https://developers.cloudflare.com/china-network/llms.txt
> Use this file to discover all available pages before exploring further.
# Videos
Last updated Apr 15, 2026|Copy as Markdown|[View as Markdown](https://developers.cloudflare.com/china-network/videos/index.md)|[Agent setup](https://developers.cloudflare.com/agent-setup/)
### [Introduction to the China Network](https://developers.cloudflare.com/learning-paths/china-network-overview/series/china-network-main-features-1/)
Watch to learn how Cloudflare's China Network can help you improve performance, compliance, and connectivity for your users in Mainland China.
### [Accelerate dynamic traffic outside of Mainland China](https://developers.cloudflare.com/learning-paths/china-network-overview/series/china-express-overview-2/)
Watch to learn more about Cloudflare's CDN Global Acceleration (formerly China Express).
Was this helpful?
YesNo
## On this page
[Docs](https://developers.cloudflare.com/)
```json
{"@context":"https://schema.org","@type":"WebPage","@id":"https://developers.cloudflare.com/china-network/videos/#page","headline":"Videos · Cloudflare China Network docs","description":"Watch videos about Cloudflare China Network features and configuration.","url":"https://developers.cloudflare.com/china-network/videos/","inLanguage":"en","image":"https://developers.cloudflare.com/og-docs.png","dateModified":"2026-04-15","publisher":{"@type":"Organization","name":"Cloudflare","url":"https://www.cloudflare.com/"},"isPartOf":{"@type":"WebSite","@id":"https://developers.cloudflare.com/#website","name":"Cloudflare Docs","url":"https://developers.cloudflare.com/"}}
```
---
---
description: Review FAQs for Cloudflare's China Network.
title: FAQ
image: https://developers.cloudflare.com/og-docs.png
---
[Skip to content](#main-content)
> Documentation Index
> Fetch the complete documentation index at: https://developers.cloudflare.com/china-network/llms.txt
> Use this file to discover all available pages before exploring further.
# FAQ
Last updated Apr 16, 2026|Copy as Markdown|[View as Markdown](https://developers.cloudflare.com/china-network/faq/index.md)|[Agent setup](https://developers.cloudflare.com/agent-setup/)
## Prerequisites and onboarding
### What are the requirements to enable Cloudflare China Network service from Cloudflare?
Refer to [Get started](https://developers.cloudflare.com/china-network/get-started/) for more information.
### Can I use my current account to access Cloudflare China Network service?
Yes, you can use your current Cloudflare account and dashboard.
### What are the requirements for requesting a Cloudflare China Network PoC?
Cloudflare requires that you have a valid [ICP (Internet Content Provider)](https://developers.cloudflare.com/china-network/concepts/icp/) number and content vetting approval from JD Cloud to provide you with a Cloudflare China Network PoC (Proof of Concept). If you are interested in a PoC, please contact your sales team.
## Data storage
### Will my Cloudflare account or configuration information be stored in China?
Cloudflare has taken numerous steps to ensure your security and the integrity of your data in China. Your identification information such as email addresses, password hashes, and billing information are never stored on Cloudflare China Network or shared with the Cloudflare partner except for Zone configuration information and bindings with Cloudflare’s Developer Suite which are stored on the China Network operated by our partners in China upon your enabling the China Service for a particular Zone.
## Compliance
### Does Cloudflare have an MIIT license to provide CDN services in China?
As a US company, Cloudflare does not have a license from China's Ministry of Industry and Information Technology (MIIT). However, Cloudflare's partner JD Cloud has all the licenses required by the MIIT to operate and provide CDN services in China.
### Can Cloudflare or JD Cloud help me to get the ICP?
No, neither Cloudflare nor JD Cloud is responsible for [ICP (Internet Content Provider)](https://developers.cloudflare.com/china-network/concepts/icp/) applications. However, Cloudflare can help provide referrals to ICP partners specialized in ICP applications. For more information, refer to [Obtain an ICP number](https://developers.cloudflare.com/china-network/concepts/icp/#obtain-an-icp-number).
### Why is my ICP filing/license revoked?
The application and revocation of ICP filings or licenses is managed by China's local authorities. Usually, either the customer or the agency processing the ICP application will receive a notification with more details. Cloudflare cannot provide the ICP revocation reasons.
### What would happen if my ICP filing/license got revoked?
Cloudflare's partner JD Cloud and the local authorities continuously track the status of the ICP. If your ICP gets revoked, JD Cloud may terminate or suspend your access to the China Service at any time and without liability, in accordance with China local regulations. To mitigate the impact on your Internet properties, Cloudflare will reroute the traffic for the affected domains to the nearest data centers outside of China.
### What is content vetting and why do I need JD Cloud to vet my domain's content before onboarding?
The JD Cloud network is proxying content inside of China for customers who have purchased Cloudflare China Network. To ensure compliance with China’s Internet regulations and with [JD Cloud's service terms ↗](https://docs.jdcloud.com/cn/product-service-agreement/starshield-terms-of-service), JD Cloud must review the content of all the domains before onboarding those domains to their network. They can approve or reject any domain based on the nature of its content. For more information, contact your sales team.
## Products and features
### How does IPv6 work on China Network?
All sites hosted in Mainland China must have IPv6 enabled. China Network automatically enables IPv6 for domains to fulfill this requirement and it is not possible to disable it. According to internal testing, IPv6 connections in Mainland China are more reliable and offer better latency.
### Is Turnstile available in Mainland China?
[Turnstile](https://developers.cloudflare.com/turnstile/) is not supported in Mainland China. Therefore, both China Network zones and [global zones](https://developers.cloudflare.com/fundamentals/concepts/accounts-and-zones/#zones) with users visiting your content from Mainland China may experience issues with Turnstile.
### Is Pages available in Mainland China?
[Pages](https://developers.cloudflare.com/pages/) is not available in Mainland China due to pages.dev certificate not residing within Mainland China. However, Pages from a global zone may potentially be extended into Mainland China.
Was this helpful?
YesNo
## On this page
[Docs](https://developers.cloudflare.com/)
```json
{"@context":"https://schema.org","@type":"TechArticle","@id":"https://developers.cloudflare.com/china-network/faq/#page","headline":"FAQ · Cloudflare China Network docs","description":"Review FAQs for Cloudflare's China Network.","url":"https://developers.cloudflare.com/china-network/faq/","inLanguage":"en","image":"https://developers.cloudflare.com/og-docs.png","dateModified":"2026-04-16","publisher":{"@type":"Organization","name":"Cloudflare","url":"https://www.cloudflare.com/"},"isPartOf":{"@type":"WebSite","@id":"https://developers.cloudflare.com/#website","name":"Cloudflare Docs","url":"https://developers.cloudflare.com/"},"keywords":["Compliance"]}
```
---
---
description: Resolve DNS queries in Mainland China to improve Time to First Byte performance.
title: China Authoritative DNS
image: https://developers.cloudflare.com/og-docs.png
---
[Skip to content](#main-content)
> Documentation Index
> Fetch the complete documentation index at: https://developers.cloudflare.com/china-network/llms.txt
> Use this file to discover all available pages before exploring further.
# China Authoritative DNS
Last updated Apr 30, 2026|Copy as Markdown|[View as Markdown](https://developers.cloudflare.com/china-network/concepts/china-dns/index.md)|[Agent setup](https://developers.cloudflare.com/agent-setup/)
By default, Cloudflare China Network resolves each DNS request at the data center closest to the client. For clients outside of Mainland China, the closest global Cloudflare data center handles the request. For clients in Mainland China, a JD Cloud data center handles the request.
## In-China Nameserver
Cloudflare can deploy DNS service in Mainland China to improve Time to First Byte (TTFB) performance. With this option enabled, DNS queries resolve at data centers in Mainland China instead of at global DNS servers.
## When to use
Before you enable China Authoritative DNS, confirm that the majority (over 90%) of your traffic comes from Mainland China.
Caution
After you enable China Authoritative DNS, all DNS requests — including those from users outside of China — route to JD Cloud data centers in Mainland China instead of to the nearest global data center. This can increase latency for users outside of China.
## Comparison
The following table compares the default DNS offering with the In-China Nameserver option.
| DNS option | Behavior |
| ------------ | --------------------------------------------- |
| Default | Uses the DNS server closest to the end user. |
| In-China DNS | Uses only DNS in China, operated by JD Cloud. |
## General setup
After you [enable the Cloudflare China Network service](https://developers.cloudflare.com/china-network/get-started/), do the following:
1. Contact your Cloudflare sales team to enable the feature. Currently you cannot enable it in the Cloudflare dashboard.
The current China Network supports both a [full setup](https://developers.cloudflare.com/dns/zone-setups/full-setup/) and a [partial setup](https://developers.cloudflare.com/dns/zone-setups/partial-setup/).
2. Update your domain registrar with the assigned in-China nameservers.
* For a full setup: These nameservers are displayed in the Cloudflare dashboard.
* For a partial setup: Create a `CNAME` record pointing to `.cdn.cloudflareanycast.net` for global default DNS setting and `.cdn.cloudflarecn.net` for In-China DNS.
Example 1: China Network zone named `example.cn` that requires In-China DNS
If you have two DNS records, `www` and `media`, pointing to two different origin servers, your Authoritative DNS server will have the following DNS records:
* CNAME `www.example.cn` to `www.example.cn.cdn.cloudflarecn.net`
* CNAME `media.example.cn` to `media.example.cn.cdn.cloudflarecn.net`
Example 2: China Network zone named `example.com` that requires global default DNS setting
If you have two DNS records, `www` and `media`, pointing to two different origin servers, your Authoritative DNS server will have the following DNS records:
* CNAME `www.example.com` to `www.example.com.cdn.cloudflareanycast.net`
* CNAME `media.example.com` to `media.example.com.cdn.cloudflareanycast.net`
3. Test your configuration by checking if the domain resolves correctly.
For further assistance, contact your account team.
Was this helpful?
YesNo
## On this page
[Docs](https://developers.cloudflare.com/)
```json
{"@context":"https://schema.org","@type":"TechArticle","@id":"https://developers.cloudflare.com/china-network/concepts/china-dns/#page","headline":"China Authoritative DNS · Cloudflare China Network docs","description":"Resolve DNS queries in Mainland China to improve Time to First Byte performance.","url":"https://developers.cloudflare.com/china-network/concepts/china-dns/","inLanguage":"en","image":"https://developers.cloudflare.com/og-docs.png","dateModified":"2026-04-30","publisher":{"@type":"Organization","name":"Cloudflare","url":"https://www.cloudflare.com/"},"isPartOf":{"@type":"WebSite","@id":"https://developers.cloudflare.com/#website","name":"Cloudflare Docs","url":"https://developers.cloudflare.com/"},"keywords":["DNS"]}
```
---
---
description: Simplify global asset deployment in China with connectivity from CMI, CBC Tech, and JD Cloud.
title: Global Acceleration
image: https://developers.cloudflare.com/og-docs.png
---
[Skip to content](#main-content)
> Documentation Index
> Fetch the complete documentation index at: https://developers.cloudflare.com/china-network/llms.txt
> Use this file to discover all available pages before exploring further.
# Global Acceleration
Last updated Apr 30, 2026|Copy as Markdown|[View as Markdown](https://developers.cloudflare.com/china-network/concepts/global-acceleration/index.md)|[Agent setup](https://developers.cloudflare.com/agent-setup/)
Note
Global Acceleration is a service offering that can be an add-on to China Network and also extends Zero Trust services into China.
Organizations that serve content or connect employees in Mainland China face connectivity challenges due to China's network infrastructure and regulatory requirements. Global Acceleration is a suite of connectivity offerings that address these challenges by providing optimized network paths into and out of China. Global Acceleration is provided by Cloudflare's partners including China Mobile International (CMI), CBC Tech, and JD Cloud.
Chapters
* 
**Introduction**17s
* 
**Dynamic content outside of Mainland China**38s
* 
**Access to global services**1m43s
* 
**Private network connectivity**2m54s
* 
**Summary**3m43s
Global Acceleration can support the following scenarios:
| Service | Scenario |
| --------------------------------------------------------------------------------------- | -------------------------------------------------------------------------------------------------- |
| [CDN Global Acceleration](#cdn-global-acceleration) | Improved performance for dynamic content (API responses, personalized pages) on China Network CDN. |
| [Cloudflare One Client Global Acceleration](#cloudflare-one-client-global-acceleration) | Cloudflare One Client used in Mainland China. |
| [Cloudflare WAN Global Acceleration](#cloudflare-wan-global-acceleration) | Cloudflare WAN used in Mainland China. |
| [ICP](#icp-services) | China Network prerequisite. |
| [MLPS](#mlps-services) | China cybersecurity compliance certification. |
| [Travel SIM](#travel-sim) | Temporary Cloudflare One Client access for employees traveling to Mainland China. |
## CDN Global Acceleration
CDN Global Acceleration provides stable and reliable connections for dynamic content — such as API responses and personalized pages — entering and exiting China, improving performance for users within the country.
## Cloudflare One Client Global Acceleration
Cloudflare One Client Global Acceleration (formerly WARP Global Acceleration) enables [Cloudflare One Client](https://developers.cloudflare.com/cloudflare-one/team-and-resources/devices/cloudflare-one-client/) access within China, allowing remote employees to maintain secure and consistent connections.
## Cloudflare WAN Global Acceleration
Cloudflare WAN Global Acceleration (formerly Magic WAN Global Acceleration) enables [Cloudflare WAN](https://developers.cloudflare.com/cloudflare-wan/) access within China, allowing in-office employees to maintain secure and reliable connectivity.
## ICP services
The Internet Content Provider (ICP) service simplifies the process of acquiring an [ICP filing or license](https://developers.cloudflare.com/china-network/concepts/icp/) for your domains. An ICP is a regulatory requirement for all websites operating in Mainland China.
## MLPS services
The Multi-Level Protection Scheme (MLPS) service add-on streamlines the process of obtaining MLPS Level 3 certification, a China cybersecurity compliance standard required for certain applications handling sensitive data.
## Travel SIM
Travel SIM offers temporary, seamless Cloudflare One Client access for individual employees traveling to China, ensuring uninterrupted connectivity during their visit.
---
## General process
### 1\. Validate prerequisites
Ensure that you have a Cloudflare [Enterprise plan ↗](https://www.cloudflare.com/plans/enterprise/) and [China Network](https://developers.cloudflare.com/china-network/), if you want CDN Global Acceleration. Cloudflare One Client and Cloudflare WAN entitlements are required for Cloudflare One Client Connection or Cloudflare WAN Global Acceleration.
### 2\. Sign contract
Contact your Cloudflare account team. They will assist you with contracting with us, or our local China partners, depending on the service.
### 3\. Deploy Global Acceleration
Our local China partners will assist you to deploy Global Acceleration.
Was this helpful?
YesNo
## On this page
[Docs](https://developers.cloudflare.com/)
```json
{"@context":"https://schema.org","@type":"TechArticle","@id":"https://developers.cloudflare.com/china-network/concepts/global-acceleration/#page","headline":"Global Acceleration · Cloudflare China Network docs","description":"Simplify global asset deployment in China with connectivity from CMI, CBC Tech, and JD Cloud.","url":"https://developers.cloudflare.com/china-network/concepts/global-acceleration/","inLanguage":"en","image":"https://developers.cloudflare.com/og-docs.png","dateModified":"2026-04-30","publisher":{"@type":"Organization","name":"Cloudflare","url":"https://www.cloudflare.com/"},"isPartOf":{"@type":"WebSite","@id":"https://developers.cloudflare.com/#website","name":"Cloudflare Docs","url":"https://developers.cloudflare.com/"}}
```
---
---
description: Obtain and display an ICP license number required for websites operating in China.
title: Internet Content Provider (ICP)
image: https://developers.cloudflare.com/og-docs.png
---
[Skip to content](#main-content)
> Documentation Index
> Fetch the complete documentation index at: https://developers.cloudflare.com/china-network/llms.txt
> Use this file to discover all available pages before exploring further.
# Internet Content Provider (ICP)
Last updated Apr 30, 2026|Copy as Markdown|[View as Markdown](https://developers.cloudflare.com/china-network/concepts/icp/index.md)|[Agent setup](https://developers.cloudflare.com/agent-setup/)
To operate a website in China, you need government permission called an Internet Content Provider (ICP) number. Think of it as a permit — without one, your site can be shut down.
The ICP system is a licensing regime established by the Telecommunications Regulations of the People's Republic of China (中华人民共和国电信条例), introduced in September 2000.
Under the ICP regime, all websites with their own domain name that operate inside China must obtain a license. This applies whether the site is hosted on a server in Mainland China or delivered to visitors in China through a CDN. Licenses are issued at the provincial level. You can use the Ministry of Industry and Information Technology (MIIT) website to [check if a domain already has an ICP number ↗](https://beian.miit.gov.cn/#/Integrated/recordQuery) (only available in Chinese).
All public websites in Mainland China must have an ICP number [displayed on the website's home page](#display-your-icp-number). Websites with the same apex domain can share the same ICP number. China-based hosting providers are instructed to shut down any website (often without notice) without an ICP number.
## Types of ICP
To host web services in Mainland China, you are legally required to acquire an **ICP filing** or an **ICP license** in China. An ICP filing covers non-commercial (informational) sites, while an ICP license is required for sites that sell goods or services.
The type of ICP you must obtain depends on the type of website you are providing to customers in China:
| | ICP filing | ICP license |
| ------------------ | ------------------------------------------------------------------------------------------------------------------------------------------------------------------------------------------------------------- | ---------------------------------------------------------------------------------------------------------------------------------------------------------------------------------------------------- |
| Definition | An ICP filing, known in Chinese as “Bei’An,” is the first level of ICP registration. An ICP filing enables the holder to host a website on a server or CDN in Mainland China for informational purposes only. | An ICP license, known as “ICP Zheng” in Chinese, allows online platforms or third-party sellers selling goods and services to deploy their website on a hosting server or CDN within Mainland China. |
| Website Purpose | Non-commercial and non-transactional purposes. | Commercial and transactional purposes. |
| Eligibility | Representative officeWholly foreign-owned enterpriseJoint ventureLocal companyIndividuals (personal website) | Joint venture (foreign company with less than 50% ownership)Local company |
| Example format | Beijing ICP preparation XXXXXXXX number | Beijing ICP license XXXXXXXX number |
| Other requirements | N/A | Companies acquiring an ICP license must already have obtained an ICP filing. |
| Timeline | 1-2 months | 2-3 months |
If you wish to host a marketing-related website, you only need an ICP filing.
---
## Obtain an ICP number
Cloudflare recommends that you apply for an ICP license through your hosting or cloud services provider, who will register the ICP number on your behalf. You will need to provide the following documents to your provider:
| For Individuals | For Commercial Companies |
| ---------------------------------------------------------------------------------------------------------------------------- | ------------------------------------------------------------------- |
| – ICP application form– Copy of your personal ID– Forms to authenticate website information– Copy of your domain certificate | – Copy of your business license– Your organization code certificate |
After all required documents are submitted, it can take four to eight weeks to obtain an ICP number, depending on the type of website and the province where the company is registered. Registration with the MIIT is free, but your provider may charge a processing fee.
After receiving the ICP number and the certificate, add it to your website's home page.
## Display your ICP number
After you obtain an ICP number, you must display it in the footer of your website, like in the following example:
Was this helpful?
YesNo
## On this page
[Docs](https://developers.cloudflare.com/)
```json
{"@context":"https://schema.org","@type":"TechArticle","@id":"https://developers.cloudflare.com/china-network/concepts/icp/#page","headline":"Internet Content Provider (ICP) · Cloudflare China Network docs","description":"Obtain and display an ICP license number required for websites operating in China.","url":"https://developers.cloudflare.com/china-network/concepts/icp/","inLanguage":"en","image":"https://developers.cloudflare.com/og-docs.png","dateModified":"2026-04-30","publisher":{"@type":"Organization","name":"Cloudflare","url":"https://www.cloudflare.com/"},"isPartOf":{"@type":"WebSite","@id":"https://developers.cloudflare.com/#website","name":"Cloudflare Docs","url":"https://developers.cloudflare.com/"},"keywords":["Compliance"]}
```
---
---
description: Cloudflare products and features supported on the China Network operated by JD Cloud.
title: Available products and features
image: https://developers.cloudflare.com/og-docs.png
---
[Skip to content](#main-content)
> Documentation Index
> Fetch the complete documentation index at: https://developers.cloudflare.com/china-network/llms.txt
> Use this file to discover all available pages before exploring further.
# Available products and features
Last updated Jun 10, 2026|Copy as Markdown|[View as Markdown](https://developers.cloudflare.com/china-network/reference/available-products/index.md)|[Agent setup](https://developers.cloudflare.com/agent-setup/)
The following products and features are available on the Cloudflare China Network operated by JD Cloud:
## Application Services
| Product/Feature | Description |
| ----------------------------------------------------------------------------------------------------------- | -------------------------------------------------------------------------------------------------------------------------------------------------------- |
| [Authoritative DNS](https://developers.cloudflare.com/china-network/concepts/china-dns/) | Authoritative DNS resolution inside Mainland China. |
| [CDN/Cache](https://developers.cloudflare.com/cache/) | Core cache features. Static cache only. Does not support Cache Reserve or Tiered Cache. |
| [Image Transformations](https://developers.cloudflare.com/images/) | Optimize image format at the edge to fit a domain's layout. |
| [DDoS Protection](https://developers.cloudflare.com/ddos-protection/) | Layer 7 (application layer) protection against DDoS attacks such as HTTP flood attacks, WordPress Pingback attacks, HULK attacks, and LOIC attacks. |
| [Managed rules](https://developers.cloudflare.com/waf/managed-rules/) | Pre-configured OWASP rulesets and Cloudflare managed rulesets. |
| [Custom rules](https://developers.cloudflare.com/waf/custom-rules/) | Custom WAF rules. Supports uploaded content scanning and managed challenges. |
| [Rate limiting rules](https://developers.cloudflare.com/waf/rate-limiting-rules/) | Define rate limits for incoming requests matching an expression, and the action to take when those rate limits are reached. |
| [Content scanning](https://developers.cloudflare.com/waf/detections/malicious-uploads/) | Attempts to detect content objects, such as uploaded files, and scans them for malicious signatures like malware. |
| [Client-side security](https://developers.cloudflare.com/client-side-security/) (formerly Page Shield) | Simplifies external script management by tracking loaded resources like scripts and providing alerts when it detects new resources or malicious scripts. |
| [Bot Management](https://developers.cloudflare.com/bots/)[1](#user-content-fn-1) | Provides bot identification and protection for a domain. Only supports certain Machine Learning (ML) models. |
| [Argo Smart Routing](https://developers.cloudflare.com/argo-smart-routing/) | Layer 7 (application layer) traffic smart-routed more efficiently to origin. |
| [Rules](https://developers.cloudflare.com/rules/)[2](#user-content-fn-2) | Make adjustments to requests and responses, configure Cloudflare settings, and trigger specific actions for matching requests. |
| [Load Balancing](https://developers.cloudflare.com/load-balancing/additional-options/load-balancing-china/) | Maximize application performance and availability. |
## Developer Services
| Product/Feature | Description |
| ---------------------------------------------------------------------------------------------------------- | -------------------------------------------------------------------------------------------------------------------------------------------------- |
| [Workers](https://developers.cloudflare.com/workers/) | A serverless execution environment running on the Cloudflare global network. |
| [Workers KV](https://developers.cloudflare.com/kv/) | Configuration data, service routing metadata, personalization (A/B testing). |
| [R2](https://developers.cloudflare.com/r2/)[3](#user-content-fn-3) | Object storage for all your data. |
| [Assets](https://developers.cloudflare.com/workers/static-assets/) | Upload static assets (HTML, CSS, images and other files) as part of your Worker — Cloudflare will handle caching and serving them to web browsers. |
| [Environment variables](https://developers.cloudflare.com/workers/configuration/environment-variables/) | Attach text strings or JSON values to your Worker. |
| [Images](https://developers.cloudflare.com/images/optimization/binding/)[4](#user-content-fn-4) | Store, transform, optimize, and deliver images at scale. |
| [mTLS](https://developers.cloudflare.com/workers/runtime-apis/bindings/mtls/) | Securely connect to backend servers over [mTLS ↗](https://www.cloudflare.com/learning/access-management/what-is-mutual-tls/). |
| [Rate Limiting](https://developers.cloudflare.com/workers/runtime-apis/bindings/rate-limit/) | Define rate limits and write code around them in your Worker. |
| [Secrets](https://developers.cloudflare.com/workers/configuration/secrets/) | Attach encrypted text values to your Worker. |
| [Service bindings](https://developers.cloudflare.com/workers/runtime-apis/bindings/service-bindings/) | Service bindings allow one Worker to call into another, without going through a publicly-accessible URL. |
| [Tail Workers](https://developers.cloudflare.com/workers/observability/logs/tail-workers/) | Receives information about the execution of other Workers. |
| [Version metadata](https://developers.cloudflare.com/workers/runtime-apis/bindings/version-metadata/) | Access metadata associated with a version from inside the Workers runtime. |
| [Workers for Platforms](https://developers.cloudflare.com/cloudflare-for-platforms/workers-for-platforms/) | Deploy custom code on behalf of your users or let your users directly deploy their own code to your platform, managing infrastructure. |
## Network Services
| Feature | Description |
| --------------------------------------------------------------------------------- | ----------------------------------------------------------------------------------------------------------- |
| [IPv6](https://developers.cloudflare.com/network/ipv6-compatibility/) | All data centers have IPv6 support by default. |
| [SSL/TLS](https://developers.cloudflare.com/ssl/) | Customer Certificate, Dedicated Certificate, Universal Certificate, Custom, ACM (Dedicated), Universal SSL. |
| [HTTP/3 (QUIC) ↗](https://www.cloudflare.com/learning/performance/what-is-http3/) | The latest version of the HTTP protocol to optimize page loading performance. |
| [WebSockets](https://developers.cloudflare.com/workers/runtime-apis/websockets/) | Real-time communication with Cloudflare Workers serverless functions. |
## Zero Trust Services
Refer to [Global Acceleration](https://developers.cloudflare.com/china-network/concepts/global-acceleration/) for more information.
## Other Services
| Feature | Description |
| -------------------------------------------------------------------- | ---------------------------------------------------------------- |
| [Instant Logs](https://developers.cloudflare.com/logs/instant-logs/) | Live Tail your Cloudflare HTTP logs in the Cloudflare dashboard. |
| [Logpush](https://developers.cloudflare.com/logs/logpush/) | Push your Cloudflare HTTP logs to a storage service. |
For more details or specific product features, refer to the [FAQ](https://developers.cloudflare.com/china-network/faq/#products-and-features) page or contact your account team.
## Footnotes
1. [Turnstile](https://developers.cloudflare.com/turnstile/) is not available within Mainland China. [↩](#user-content-fnref-1)
2. [Origin Rules](https://developers.cloudflare.com/rules/origin-rules/) require that China Network is enabled on both the original zone (the one visitors are accessing) and the target zone. Otherwise, visitors will receive a [1016 error](https://developers.cloudflare.com/support/troubleshooting/http-status-codes/cloudflare-1xxx-errors/error-1016/) along with an [HTTP 530 status code](https://developers.cloudflare.com/support/troubleshooting/http-status-codes/cloudflare-5xx-errors/error-530/). [↩](#user-content-fnref-2)
3. R2 buckets cannot be created within Mainland China and [custom domains](https://developers.cloudflare.com/r2/buckets/public-buckets/#add-your-domain-to-cloudflare) are not supported within Mainland China. However, R2 can be extended into Mainland China through [Global Acceleration](https://developers.cloudflare.com/china-network/concepts/global-acceleration/). [↩](#user-content-fnref-3)
4. Image Resizing works [within Workers](https://developers.cloudflare.com/images/optimization/transformations/transform-via-workers/), but may not be available [through URL format](https://developers.cloudflare.com/images/optimization/features/). [↩](#user-content-fnref-4)
Was this helpful?
YesNo
## On this page
[Docs](https://developers.cloudflare.com/)
```json
{"@context":"https://schema.org","@type":"TechArticle","@id":"https://developers.cloudflare.com/china-network/reference/available-products/#page","headline":"Available products and features · Cloudflare China Network docs","description":"Cloudflare products and features supported on the China Network operated by JD Cloud.","url":"https://developers.cloudflare.com/china-network/reference/available-products/","inLanguage":"en","image":"https://developers.cloudflare.com/og-docs.png","dateModified":"2026-06-10","publisher":{"@type":"Organization","name":"Cloudflare","url":"https://www.cloudflare.com/"},"isPartOf":{"@type":"WebSite","@id":"https://developers.cloudflare.com/#website","name":"Cloudflare Docs","url":"https://developers.cloudflare.com/"}}
```
---
---
description: China data center locations, network IP addresses, and API endpoints.
title: Infrastructure
image: https://developers.cloudflare.com/og-docs.png
---
[Skip to content](#main-content)
> Documentation Index
> Fetch the complete documentation index at: https://developers.cloudflare.com/china-network/llms.txt
> Use this file to discover all available pages before exploring further.
# Infrastructure
Last updated Apr 15, 2026|Copy as Markdown|[View as Markdown](https://developers.cloudflare.com/china-network/reference/infrastructure/index.md)|[Agent setup](https://developers.cloudflare.com/agent-setup/)
## China data centers
For up-to-date information, refer to the [Cloudflare China Network ↗](https://www.cloudflare.com/china-network/) page.
### Network IP addresses
Cloudflare publishes a list of IP addresses for JD Cloud data centers, used by Cloudflare when connecting to the origin networks of customers to retrieve assets. These addresses are not the same IP addresses returned to website visitors as part of DNS resolution.
You can obtain the list of JD Cloud data center IP addresses via Cloudflare API. Use the [Cloudflare/JD Cloud IP Details](https://developers.cloudflare.com/api/resources/ips/methods/list/) operation with the `networks=jdcloud` query string parameter:
```bash
curl "https://api.cloudflare.com/client/v4/ips?networks=jdcloud" \
--request GET
```
```json
{
"result": {
"ipv4_cidrs": [
// (...)
],
"ipv6_cidrs": [
// (...)
],
"jdcloud_cidrs": [
// (...)
],
"etag": ""
},
"success": true,
"errors": [],
"messages": []
}
```
The `jdcloud_cidrs` array lists the IP addresses of JD Cloud data centers.
Cloudflare will add new IP addresses to this list 30 days in advance before connecting from those IP addresses to an origin server. If you are using the China Network on JD Cloud, you should update your firewalls to reflect any IP address changes at least once every 30 days.
Was this helpful?
YesNo
## On this page
[Docs](https://developers.cloudflare.com/)
```json
{"@context":"https://schema.org","@type":"TechArticle","@id":"https://developers.cloudflare.com/china-network/reference/infrastructure/#page","headline":"Infrastructure · Cloudflare China Network docs","description":"China data center locations, network IP addresses, and API endpoints.","url":"https://developers.cloudflare.com/china-network/reference/infrastructure/","inLanguage":"en","image":"https://developers.cloudflare.com/og-docs.png","dateModified":"2026-04-15","publisher":{"@type":"Organization","name":"Cloudflare","url":"https://www.cloudflare.com/"},"isPartOf":{"@type":"WebSite","@id":"https://developers.cloudflare.com/#website","name":"Cloudflare Docs","url":"https://developers.cloudflare.com/"}}
```
---
---
description: Manage DNS records, nameservers, and DNSSEC with Cloudflare DNS.
title: Cloudflare DNS
image: https://developers.cloudflare.com/og-docs.png
---
[Skip to content](#main-content)
> Documentation Index
> Fetch the complete documentation index at: https://developers.cloudflare.com/dns/llms.txt
> Use this file to discover all available pages before exploring further.
# Cloudflare DNS
Last updated Jul 16, 2026|Copy as Markdown|[View as Markdown](https://developers.cloudflare.com/dns/index.md)|[Agent setup](https://developers.cloudflare.com/agent-setup/)
Leverage Cloudflare's global network to deliver excellent performance and reliability to your domain.
Available on all plans
Cloudflare DNS is a fast, resilient, and easy-to-manage authoritative DNS service. It delivers excellent performance and reliability to your domain while also protecting your business from [DDoS attacks ↗](https://www.cloudflare.com/learning/ddos/what-is-a-ddos-attack/) and [route leaks and hijacking ↗](https://www.cloudflare.com/learning/security/glossary/bgp-hijacking/). To know where to begin, refer to [Get started](https://developers.cloudflare.com/dns/get-started/).
Enterprise customers can also use Cloudflare DNS for their private network with [Internal DNS](https://developers.cloudflare.com/dns/internal-dns/) and proxy public hostnames to [private origins (Beta)](https://developers.cloudflare.com/dns/private-origins/).
---
## Features
[DNS records](https://developers.cloudflare.com/dns/manage-dns-records/how-to/create-dns-records/)
DNS records make resources available on your domain, and allow you to configure services such as email.
Use DNS records
[DNSSEC](https://developers.cloudflare.com/dns/dnssec/)
DNS Security Extensions (DNSSEC) adds cryptographic signatures to your DNS records, preventing anyone else from redirecting traffic intended for your domain.
Cloudflare also supports [Multi-signer DNSSEC](https://developers.cloudflare.com/dns/dnssec/multi-signer-dnssec/).
Use DNSSEC
[CNAME flattening](https://developers.cloudflare.com/dns/cname-flattening/)
CNAME flattening delivers better performance and allows you to add a CNAME record at your apex domain (`example.com`). Paid accounts can choose to flatten all CNAME records on their domain.
Use CNAME flattening
Refer to [DNS features and availability](https://developers.cloudflare.com/dns/reference/all-features/) for a complete list of features and their availability according to different Cloudflare plans.
---
## Related products
[Registrar](https://developers.cloudflare.com/registrar/)
Before you can start using Cloudflare DNS you must first have a domain. Buy and renew your domain at cost with Cloudflare Registrar.
[DNS Resolver](https://developers.cloudflare.com/1.1.1.1/)
Cloudflare DNS focuses on businesses and their domain administration. If you are a consumer and want a more private way to browse the Internet, check out 1.1.1.1, Cloudflare's public DNS Resolver.
Was this helpful?
YesNo
## On this page
[Docs](https://developers.cloudflare.com/)
```json
{"@context":"https://schema.org","@type":"WebPage","@id":"https://developers.cloudflare.com/dns/#page","headline":"Cloudflare DNS · Cloudflare DNS docs","description":"Manage DNS records, nameservers, and DNSSEC with Cloudflare DNS.","url":"https://developers.cloudflare.com/dns/","inLanguage":"en","image":"https://developers.cloudflare.com/og-docs.png","dateModified":"2026-07-16","publisher":{"@type":"Organization","name":"Cloudflare","url":"https://www.cloudflare.com/"},"isPartOf":{"@type":"WebSite","@id":"https://developers.cloudflare.com/#website","name":"Cloudflare Docs","url":"https://developers.cloudflare.com/"}}
```
---
---
description: Set up Cloudflare DNS for your domain.
title: Get started
image: https://developers.cloudflare.com/og-docs.png
---
[Skip to content](#main-content)
> Documentation Index
> Fetch the complete documentation index at: https://developers.cloudflare.com/dns/llms.txt
> Use this file to discover all available pages before exploring further.
# Get started
Last updated Apr 16, 2026|Copy as Markdown|[View as Markdown](https://developers.cloudflare.com/dns/get-started/index.md)|[Agent setup](https://developers.cloudflare.com/agent-setup/)
You can use Cloudflare DNS with a variety of [setups](https://developers.cloudflare.com/dns/zone-setups/). For an overview of what these setups are and an introduction to specific DNS terminology, refer to [Concepts](https://developers.cloudflare.com/dns/concepts/).
In the most common setup (full), you [add your domain](https://developers.cloudflare.com/fundamentals/manage-domains/add-site/), import your [DNS records](https://developers.cloudflare.com/dns/manage-dns-records/), and [update your nameservers](https://developers.cloudflare.com/dns/nameservers/update-nameservers/) to make Cloudflare your primary authoritative DNS provider.
Note
Make sure to [review your DNS records](https://developers.cloudflare.com/dns/zone-setups/full-setup/setup/#2-review-your-dns-records) before updating your nameservers. If you activate your domain on Cloudflare _without_ setting up the correct DNS records, your domain may not be reachable.
Once the setup is completed:
* You [manage DNS records](https://developers.cloudflare.com/dns/manage-dns-records/how-to/create-dns-records/) through the Cloudflare dashboard or API. This is how you control which resources are available on the apex domain (`example.com`) or specific subdomains (`blog.example.com`) of your website, as well as control other configurations.
* Cloudflare [responds to all DNS queries](https://developers.cloudflare.com/fundamentals/concepts/how-cloudflare-works/) for your hostnames and your DNS records are propagated across the [Cloudflare global network ↗](https://www.cloudflare.com/network/), speeding up your domain.
## Resources
The following links introduce important concepts and will guide you through actions you may need to take while having your website or application on Cloudflare.
* [DNS records](https://developers.cloudflare.com/dns/manage-dns-records/): DNS records contain information about your domain and are used to make your website or application available to visitors and other web services.
* [Nameservers](https://developers.cloudflare.com/dns/nameservers/): In the context of Cloudflare DNS, nameservers refer to authoritative nameservers. When a nameserver is authoritative for `example.com`, it means that DNS resolvers will consider responses from this nameserver when a user tries to access `example.com`.
* [Proxy status](https://developers.cloudflare.com/dns/proxy-status/): Proxy status affects how Cloudflare treats incoming HTTP/S requests to A, AAAA, and CNAME records. When a record is proxied, Cloudflare responds with [anycast IPs](https://developers.cloudflare.com/fundamentals/concepts/cloudflare-ip-addresses/), which speeds up and protects HTTP/S traffic with our [cache](https://developers.cloudflare.com/cache/)/[CDN ↗](https://www.cloudflare.com/learning/cdn/what-is-a-cdn/), [DDoS protection](https://developers.cloudflare.com/ddos-protection/), [WAF](https://developers.cloudflare.com/waf/), and [more](https://developers.cloudflare.com/directory/?product-group=Application+performance%2CApplication+security).
## Further reading
* [How Cloudflare works](https://developers.cloudflare.com/fundamentals/concepts/how-cloudflare-works/): An overview of how Cloudflare works as a DNS provider and as a reverse proxy.
* [DNS analytics](https://developers.cloudflare.com/dns/additional-options/analytics/): An overview of the different data sources and insights you can get when using Cloudflare DNS.
* [Troubleshooting](https://developers.cloudflare.com/dns/troubleshooting/): A full resources list for when something is not working.
Was this helpful?
YesNo
## On this page
[Docs](https://developers.cloudflare.com/)
```json
{"@context":"https://schema.org","@type":"WebPage","@id":"https://developers.cloudflare.com/dns/get-started/#page","headline":"Get started with Cloudflare DNS · Cloudflare DNS docs","description":"Set up Cloudflare DNS for your domain.","url":"https://developers.cloudflare.com/dns/get-started/","inLanguage":"en","image":"https://developers.cloudflare.com/og-docs.png","dateModified":"2026-04-16","publisher":{"@type":"Organization","name":"Cloudflare","url":"https://www.cloudflare.com/"},"isPartOf":{"@type":"WebSite","@id":"https://developers.cloudflare.com/#website","name":"Cloudflare Docs","url":"https://developers.cloudflare.com/"}}
```
---
---
description: Understand key DNS concepts with Cloudflare's technical documentation. Learn about nameservers, DNS records, DNSSEC, and more.
title: Concepts
image: https://developers.cloudflare.com/og-docs.png
---
[Skip to content](#main-content)
> Documentation Index
> Fetch the complete documentation index at: https://developers.cloudflare.com/dns/llms.txt
> Use this file to discover all available pages before exploring further.
# Concepts
Last updated Apr 16, 2026|Copy as Markdown|[View as Markdown](https://developers.cloudflare.com/dns/concepts/index.md)|[Agent setup](https://developers.cloudflare.com/agent-setup/)
The Domain Name System (DNS) translates human-readable domain names (like `example.com`) into IP addresses that computers use to locate each other on the Internet. This page covers key DNS concepts used throughout the Cloudflare DNS documentation. For more concepts and broader descriptions, refer to the [Cloudflare Learning Center ↗](https://www.cloudflare.com/learning/dns/what-is-dns/).
## Domain
Also known as domain name, a domain is the string of text that identifies a specific website, such as `google.com` or `facebook.com`. Every time you access a website from your web browser, a DNS query (a lookup request to translate the domain into an address) takes place and the DNS service maps the domain to the actual IP address where the website is [hosted](https://developers.cloudflare.com/fundamentals/manage-domains/).
## Registrar
Before you can start using the Cloudflare DNS service, you must first have a domain. You obtain a domain through a registrar, a service that handles the reservation of domain names as explained in the [Learning Center ↗](https://www.cloudflare.com/learning/dns/glossary/what-is-a-domain-name-registrar/).
Very often the same company that offers domain registration also offers web hosting and DNS management.
You can register a domain name at cost (without markup fees) through [Cloudflare Registrar](https://developers.cloudflare.com/registrar/). Every domain acquired through Cloudflare Registrar must also use Cloudflare as their [primary authoritative DNS](#authoritative-dns).
## Nameserver
DNS resolution — the process of translating a domain name into an IP address — involves several types of servers. In this documentation, nameserver usually refers to the Cloudflare authoritative nameservers, the servers that hold the definitive DNS records for your domain and provide the final answer in DNS resolution. For more context on the different server types involved, refer to the [article about DNS server types ↗](https://www.cloudflare.com/learning/dns/dns-server-types/).
Refer to [Nameservers](https://developers.cloudflare.com/dns/nameservers/) for details on the different nameserver offerings.
## Authoritative DNS
Authoritative DNS refers to the service whose nameservers provide the final answer mapping a hostname (such as `example.com` or `blog.example.com`) to the IP address that hosts the corresponding content or resources.
The speed and reliability of your authoritative DNS service directly affects how available, resilient, and responsive your website or application is. If the authoritative DNS is slow or unreachable, visitors may not be able to reach your site. Cloudflare DNS is an authoritative DNS service that runs on Cloudflare's global network, distributing DNS answers from data centers worldwide. Refer to [How Cloudflare works](https://developers.cloudflare.com/fundamentals/concepts/how-cloudflare-works/) for details.
## DNS setups
It is also possible that one same company will use more than one DNS provider. Usually, this relates to making a domain more resilient - if one provider faces an outage, the nameservers operated by the other DNS provider will most likely still be available.
In this context, you can have a primary DNS setup, when you use Cloudflare to manage your [DNS records](#dns-records), or a [secondary DNS setup](https://developers.cloudflare.com/dns/zone-setups/zone-transfers/cloudflare-as-secondary/), when your DNS records are managed on a different provider and Cloudflare simply receives zone transfers containing your DNS records.
When you have a primary DNS setup, you can either use only Cloudflare (also known as [Full setup](https://developers.cloudflare.com/dns/zone-setups/full-setup/)), or you can use Cloudflare and another provider, where the other provider is the one to receive [outgoing zone transfers](https://developers.cloudflare.com/dns/zone-setups/zone-transfers/cloudflare-as-primary/) from Cloudflare.
Finally, as Cloudflare also works as a [reverse proxy](https://developers.cloudflare.com/fundamentals/concepts/how-cloudflare-works/#cloudflare-as-a-reverse-proxy), you can use a [CNAME setup](https://developers.cloudflare.com/dns/zone-setups/partial-setup/) (also known as partial) when you do not want Cloudflare to be [authoritative](#authoritative-dns) for your domain but you still want to proxy individual subdomains through Cloudflare.
## DNS records
DNS records are instructions that live in the authoritative DNS servers and provide information about a [zone](#zone). This includes what IP address is associated with a particular domain, but can also cover many other use cases, such as directing emails to a mail server or validating ownership of a domain.
For more details about using DNS records within Cloudflare, refer to [Manage DNS records](https://developers.cloudflare.com/dns/manage-dns-records/how-to/create-dns-records/) and [DNS record types](https://developers.cloudflare.com/dns/manage-dns-records/reference/dns-record-types/).
## Zone
A DNS zone is an administrative boundary that defines who controls the DNS records for a given domain and its subdomains. For example, the zone for `example.com` contains the records for `example.com` and its subdomains like `blog.example.com`. Read more in the ["What is a DNS zone?" Learning Center article ↗](https://www.cloudflare.com/learning/dns/glossary/dns-zone/).
Each domain added to a Cloudflare account is listed on the account home page as a zone. The exact properties and behaviors of your zone depend on its [DNS setup](https://developers.cloudflare.com/dns/zone-setups/).
Different Cloudflare products and features are configurable at the zone level. Refer to [Fundamentals](https://developers.cloudflare.com/fundamentals/manage-domains/add-site/) for details.
### Zone apex
The zone apex is the highest-level domain within a zone — the starting point from which all DNS records in that zone are managed.
In most cases, the zone apex is the same as the apex domain (for example, `example.com`). However, with [subdomain delegation](https://developers.cloudflare.com/dns/zone-setups/subdomain-setup/) (available on Enterprise plans), a subdomain like `sub.example.com` can be its own zone, making that subdomain the zone apex.
Example 1
DNS management for **example.com**:
| Type | Name | Content | Proxy status | TTL |
| ---- | ---- | --------- | ------------ | ---- |
| A | blog | 192.0.2.1 | Proxied | Auto |
Zone apex: `example.com`
Full record name: `blog.example.com`
Example 2
DNS management for **sub.example.com**:
| Type | Name | Content | Proxy status | TTL |
| ---- | ---- | --------- | ------------ | ---- |
| A | blog | 192.0.2.1 | Proxied | Auto |
Zone apex: `sub.example.com`
Full record name: `blog.sub.example.com`
To create a DNS record at the zone apex, use `@` for the record **Name**. The `@` symbol is a DNS convention that represents the zone apex itself. For details, refer to [Create zone apex record](https://developers.cloudflare.com/dns/manage-dns-records/how-to/create-zone-apex/).
Record at the zone apex
DNS management for **example.com**:
| Type | Name | Content | Proxy status | TTL |
| ---- | ---- | --------- | ------------ | ---- |
| A | @ | 192.0.2.1 | Proxied | Auto |
Zone apex: `example.com`
Full record name: `example.com`
DNS management for **sub.example.com**:
| Type | Name | Content | Proxy status | TTL |
| ---- | ---- | --------- | ------------ | ---- |
| A | @ | 192.0.2.1 | Proxied | Auto |
Zone apex: `sub.example.com`
Full record name: `sub.example.com`
## DNSSEC
Without additional protection, DNS responses can be spoofed — an attacker could return a forged response and redirect visitors to a malicious site. DNSSEC (DNS Security Extensions) addresses this by adding cryptographic signatures to DNS records. These signatures can then be checked to verify that a record came from the correct DNS server, preventing anyone else from issuing false DNS records on your behalf and redirecting traffic intended for your domain. You can read more about it in the [article about DNS security ↗](https://www.cloudflare.com/learning/dns/dns-security/).
For help setting up DNSSEC in Cloudflare, refer to [Enable DNSSEC](https://developers.cloudflare.com/dns/dnssec/).
Was this helpful?
YesNo
## On this page
[Docs](https://developers.cloudflare.com/)
```json
{"@context":"https://schema.org","@type":"TechArticle","@id":"https://developers.cloudflare.com/dns/concepts/#page","headline":"DNS concepts · Cloudflare DNS docs","description":"Understand key DNS concepts with Cloudflare's technical documentation. Learn about nameservers, DNS records, DNSSEC, and more.","url":"https://developers.cloudflare.com/dns/concepts/","inLanguage":"en","image":"https://developers.cloudflare.com/og-docs.png","dateModified":"2026-04-16","publisher":{"@type":"Organization","name":"Cloudflare","url":"https://www.cloudflare.com/"},"isPartOf":{"@type":"WebSite","@id":"https://developers.cloudflare.com/#website","name":"Cloudflare Docs","url":"https://developers.cloudflare.com/"}}
```
---
---
description: Available DNS zone setup types and how to configure them.
title: DNS setups
image: https://developers.cloudflare.com/og-docs.png
---
[Skip to content](#main-content)
> Documentation Index
> Fetch the complete documentation index at: https://developers.cloudflare.com/dns/llms.txt
> Use this file to discover all available pages before exploring further.
# DNS setups
Last updated Jun 24, 2026|Copy as Markdown|[View as Markdown](https://developers.cloudflare.com/dns/zone-setups/index.md)|[Agent setup](https://developers.cloudflare.com/agent-setup/)
When using Cloudflare DNS, you have a few options for your DNS zone setup:
* [Primary setup (Full)](https://developers.cloudflare.com/dns/zone-setups/full-setup/) (most common): Use Cloudflare as your primary DNS provider and manage your DNS records on Cloudflare.
* [CNAME setup (Partial)](https://developers.cloudflare.com/dns/zone-setups/partial-setup/): Keep your primary DNS provider and only use Cloudflare's reverse proxy for individual subdomains.
* [Zone transfers](https://developers.cloudflare.com/dns/zone-setups/zone-transfers/): Use Cloudflare and another DNS provider together across your entire zone to increase availability and fault tolerance. DNS records will be transferred between providers using [AXFR ↗](https://datatracker.ietf.org/doc/html/rfc5936) or [IXFR ↗](https://datatracker.ietf.org/doc/html/rfc1995).
* [Subdomain setup](https://developers.cloudflare.com/dns/zone-setups/subdomain-setup/): With your apex domain (`example.com`) on a CNAME setup (partial) or primary setup (full), independently manage the settings for a delegated subdomain (`blog.example.com`) within a separate zone and, potentially, a separate account.
When configuring a subdomain setup, its availability will depend on both the parent zone setup and the setup used for the child zone. A child zone holds DNS management for a delegated subdomain.
| Parent zone | Child zone | Available |
| ------------------------------------------------------------------------------------------------------------------------------------------------------------------------------- | ------------------------------------------------------------------------------------------------------ | --------- |
| [Full](https://developers.cloudflare.com/dns/zone-setups/full-setup/) or [Secondary](https://developers.cloudflare.com/dns/zone-setups/zone-transfers/cloudflare-as-secondary/) | [Full](https://developers.cloudflare.com/dns/zone-setups/full-setup/) | Yes |
| [Full](https://developers.cloudflare.com/dns/zone-setups/full-setup/) or [Secondary](https://developers.cloudflare.com/dns/zone-setups/zone-transfers/cloudflare-as-secondary/) | [Secondary](https://developers.cloudflare.com/dns/zone-setups/zone-transfers/cloudflare-as-secondary/) | Yes |
| [Full](https://developers.cloudflare.com/dns/zone-setups/full-setup/) or [Secondary](https://developers.cloudflare.com/dns/zone-setups/zone-transfers/cloudflare-as-secondary/) | [Partial](https://developers.cloudflare.com/dns/zone-setups/partial-setup/) | No |
| [Partial](https://developers.cloudflare.com/dns/zone-setups/partial-setup/) | [Full](https://developers.cloudflare.com/dns/zone-setups/full-setup/) | Yes |
| [Partial](https://developers.cloudflare.com/dns/zone-setups/partial-setup/) | [Secondary](https://developers.cloudflare.com/dns/zone-setups/zone-transfers/cloudflare-as-secondary/) | Yes |
| [Partial](https://developers.cloudflare.com/dns/zone-setups/partial-setup/) | [Partial](https://developers.cloudflare.com/dns/zone-setups/partial-setup/) | Yes |
For details, refer to [setup](https://developers.cloudflare.com/dns/zone-setups/subdomain-setup/setup/).
---
## Zone status
The possible statuses for a zone are the following:
* Initializing
* Pending
* Active
* Moved
* Deleted
* Purged
For details on each status and how a zone can transition from one status to the other, consider the [Reference page](https://developers.cloudflare.com/dns/zone-setups/reference/domain-status/).
Do not use pending zones in production
If you have a paid plan, make sure not to use pending zones for production traffic. Cloudflare responds to DNS queries for pending zones on the assigned Cloudflare nameserver IPs but there are associated risks, especially if you do not use [zone holds](https://developers.cloudflare.com/fundamentals/account/account-security/zone-holds/).
---
## Common use cases and availability
If you are unsure of which setup to use, consider the questions below for an overview of common use cases and their correspondence to each setup and [different pricing plans ↗](https://www.cloudflare.com/plans/#overview).
Are you on a Free or Pro plan?
If you are on a Free or Pro plan, [primary setup (full)](https://developers.cloudflare.com/dns/zone-setups/full-setup/) is the only one available. This is the recommended and most common option.
Will you be using Cloudflare with other DNS providers?
If you are on a Business or Enterprise plan, you can use [CNAME setup (partial)](https://developers.cloudflare.com/dns/zone-setups/partial-setup/) to keep your primary DNS provider and only proxy individual subdomains through Cloudflare.
If you are on an Enterprise plan, you also have the option to use [zone transfers](https://developers.cloudflare.com/dns/zone-setups/zone-transfers/) to set up Cloudflare as either a primary or a secondary DNS provider.
Do you need to manage subdomains separately?
If you are on an Enterprise plan, you can use [subdomain setup](https://developers.cloudflare.com/dns/zone-setups/subdomain-setup/) to manage the Cloudflare settings for one or more subdomains separately from your domain apex.
## Configure DNS-only zones via API
You can configure zones to operate in DNS-only mode (no HTTP proxying) at the account level or per zone using the API.
**Account-level default** (applies to zones created after the setting is applied):
```bash
curl --request PATCH \
https://api.cloudflare.com/client/v4/accounts/{account_id}/dns_settings \
--header "Content-Type: application/json" \
--data '{"zone_defaults":{"zone_mode":"dns_only"}}'
```
**Per-zone** (for existing zones):
```bash
curl --request PATCH \
https://api.cloudflare.com/client/v4/zones/{zone_id}/dns_settings \
--header "Content-Type: application/json" \
--data '{"zone_mode":"dns_only"}'
```
Note
If you run your own authoritative nameservers but still want to benefit from Cloudflare's global anycast network, check out [DNS Firewall](https://developers.cloudflare.com/dns/dns-firewall/).
Was this helpful?
YesNo
## On this page
[Docs](https://developers.cloudflare.com/)
```json
{"@context":"https://schema.org","@type":"TechArticle","@id":"https://developers.cloudflare.com/dns/zone-setups/#page","headline":"DNS setups · Cloudflare DNS docs","description":"Available DNS zone setup types and how to configure them.","url":"https://developers.cloudflare.com/dns/zone-setups/","inLanguage":"en","image":"https://developers.cloudflare.com/og-docs.png","dateModified":"2026-06-24","publisher":{"@type":"Organization","name":"Cloudflare","url":"https://www.cloudflare.com/"},"isPartOf":{"@type":"WebSite","@id":"https://developers.cloudflare.com/#website","name":"Cloudflare Docs","url":"https://developers.cloudflare.com/"}}
```
---
---
description: Convert a full DNS setup to a partial CNAME setup.
title: Convert full setup to partial setup
image: https://developers.cloudflare.com/og-docs.png
---
[Skip to content](#main-content)
> Documentation Index
> Fetch the complete documentation index at: https://developers.cloudflare.com/dns/llms.txt
> Use this file to discover all available pages before exploring further.
# Convert full setup to partial setup
Last updated May 5, 2026|Copy as Markdown|[View as Markdown](https://developers.cloudflare.com/dns/zone-setups/conversions/convert-full-to-partial/index.md)|[Agent setup](https://developers.cloudflare.com/agent-setup/)
If you initially configured a [primary setup (full)](https://developers.cloudflare.com/dns/zone-setups/full-setup/), you can later convert your zone to use a CNAME setup (also known as partial setup). This guide assumes your zone is already in an [active status](https://developers.cloudflare.com/dns/zone-setups/reference/domain-status/#active).
A CNAME setup allows you to use [Cloudflare's reverse proxy](https://developers.cloudflare.com/fundamentals/concepts/how-cloudflare-works/) on individual subdomains while using a different authoritative DNS provider.
---
## Before you begin
### Consider CNAME setup limitations
* A CNAME setup requires a CNAME record for each proxied hostname but, following [RFC 1912 ↗](https://datatracker.ietf.org/doc/html/rfc1912#section-2.4), CNAME records are not allowed on the zone apex (`example.com`). With a CNAME setup, you can only proxy the zone apex if your authoritative DNS provider supports [CNAME flattening ↗](https://blog.cloudflare.com/introducing-cname-flattening-rfc-compliant-cnames-at-a-domains-root/) (or an equivalent like ALIAS/ANAME records), or if you create A/AAAA records pointing the apex directly to Cloudflare [anycast IP addresses](https://developers.cloudflare.com/fundamentals/concepts/cloudflare-ip-addresses/). Otherwise, you can only proxy subdomains.
Caution
Cloudflare only recommends the A/AAAA approach if you use [Static IPs](https://developers.cloudflare.com/byoip/concepts/static-ips/) or [Bring Your Own IP (BYOIP)](https://developers.cloudflare.com/byoip/), because standard Cloudflare anycast IPs can change.
* Once your zone is using CNAME setup, on the dashboard, you will only be able to create A, AAAA, and CNAME records, which are the DNS record types that can be [proxied](https://developers.cloudflare.com/dns/proxy-status/).
### Plan for SSL/TLS certificates
Universal SSL deletion
If you are using [Universal SSL](https://developers.cloudflare.com/ssl/edge-certificates/universal-ssl/), converting to a CNAME setup will delete your existing Universal SSL certificates.
New Universal SSL certificates will be [provisioned](https://developers.cloudflare.com/ssl/edge-certificates/universal-ssl/enable-universal-ssl/#partial-dns-setup) for your proxied subdomains only after each CNAME record pointing to `{your-hostname}.cdn.cloudflare.net` is in place, and domain ownership is verified with the TXT record, as [explained below](#2-convert-the-zone).
To avoid downtime, replace your Universal SSL certificates with an [advanced certificate](https://developers.cloudflare.com/ssl/edge-certificates/advanced-certificate-manager/), which will persist during the transition. After the conversion, you can optionally configure [delegated DCV](https://developers.cloudflare.com/ssl/edge-certificates/changing-dcv-method/methods/delegated-dcv/#setup).
---
## 1\. Prepare new DNS provider
1. Export a zone file
To export records using the dashboard:
1. In the Cloudflare dashboard, go to the **DNS Records** page.
[Go to **Records** ↗](https://dash.cloudflare.com/?to=/:account/:zone/dns/records)
2. Select **Import and Export**.
3. Select **Export**.
To export records using the API, send a [GET request](https://developers.cloudflare.com/api/resources/dns/subresources/records/methods/export/).
Required API token permissions
At least one of the following [token permissions](https://developers.cloudflare.com/fundamentals/api/reference/permissions/) is required:
* `DNS Read`
* `DNS Write`
```bash
curl "https://api.cloudflare.com/client/v4/zones/$ZONE_ID/dns_records/export" \
--request GET \
--header "Authorization: Bearer $CLOUDFLARE_API_TOKEN"
```
2. Import the zone file into your new primary DNS provider.
3. At your new authoritative DNS provider, create or update records so that you have CNAME records pointing to `{your-hostname}.cdn.cloudflare.net` for every hostname you wish to proxy through Cloudflare.
Example CNAME record at authoritative DNS provider
The CNAME record for `www.example.com` would be:
```txt
www.example.com CNAME www.example.com.cdn.cloudflare.net
```
## 2\. Convert the zone
1. On the Cloudflare dashboard, go to the zone's **Overview** page.
2. Select **Convert to CNAME DNS Setup** and then **Convert** to confirm.
3. Save the information from the **Verification TXT Record** and add the record at your new authoritative DNS provider. If you lose the information, you can also access it on the [**DNS Records** ↗](https://dash.cloudflare.com/?to=/:account/:zone/dns/records) page, under **Verification TXT Record**.
Example verification record
A verification record for `example.com` might be:
| Type | Name | Content |
| ---- | ----------------------------- | ------------------- |
| TXT | cloudflare-verify.example.com | 966215192-518620144 |
1. Use the [Edit Zone endpoint](https://developers.cloudflare.com/api/resources/zones/methods/edit/) with `type` set to `partial` to convert the zone type.
2. Take note of the value returned under `verification_key` in the API response and add the corresponding TXT record at your new authoritative DNS provider.
Example verification record
A verification record for `example.com` might be:
| Type | Name | Content |
| ---- | ----------------------------- | ------------------- |
| TXT | cloudflare-verify.example.com | 966215192-518620144 |
Note
If your authoritative DNS provider automatically appends DNS record `name` fields with your domain, make sure to only insert `cloudflare-verify` as the record name. Otherwise, it may result in an incorrect record name, such as `cloudflare-verify.example.com.example.com`.
The verification record must remain in place for as long as your domain is active on a CNAME setup on Cloudflare.
## 3\. Update your nameservers
Update the nameservers at your domain registrar to point to your new authoritative DNS provider. Make sure to remove the Cloudflare nameservers.
## 4\. Clean up DNS records on Cloudflare
In Cloudflare, remove all records that are not of type A, AAAA, or CNAME, and also remove any A, AAAA, or CNAME records for hostnames you do not want to proxy after the conversion. After this cleanup, only the A, AAAA, or CNAME records for hostnames you want to proxy should remain in Cloudflare, and those same hostnames should have CNAME records pointing to `{your-hostname}.cdn.cloudflare.net` at your new authoritative DNS provider.
Was this helpful?
YesNo
## On this page
[Docs](https://developers.cloudflare.com/)
```json
{"@context":"https://schema.org","@type":"TechArticle","@id":"https://developers.cloudflare.com/dns/zone-setups/conversions/convert-full-to-partial/#page","headline":"Convert full setup to partial setup · Cloudflare DNS docs","description":"Convert a full DNS setup to a partial CNAME setup.","url":"https://developers.cloudflare.com/dns/zone-setups/conversions/convert-full-to-partial/","inLanguage":"en","image":"https://developers.cloudflare.com/og-docs.png","dateModified":"2026-05-05","publisher":{"@type":"Organization","name":"Cloudflare","url":"https://www.cloudflare.com/"},"isPartOf":{"@type":"WebSite","@id":"https://developers.cloudflare.com/#website","name":"Cloudflare Docs","url":"https://developers.cloudflare.com/"}}
```
---
---
description: If you initially configured a full setup you can later convert your zone to use incoming zone transfers (Cloudflare as secondary).
title: Convert full setup to secondary setup
image: https://developers.cloudflare.com/og-docs.png
---
[Skip to content](#main-content)
> Documentation Index
> Fetch the complete documentation index at: https://developers.cloudflare.com/dns/llms.txt
> Use this file to discover all available pages before exploring further.
# Convert full setup to secondary setup
Last updated Jun 5, 2026|Copy as Markdown|[View as Markdown](https://developers.cloudflare.com/dns/zone-setups/conversions/convert-full-to-secondary/index.md)|[Agent setup](https://developers.cloudflare.com/agent-setup/)
If you initially configured a [primary setup (full)](https://developers.cloudflare.com/dns/zone-setups/full-setup/), you can later convert your zone to use [incoming zone transfers (Cloudflare as secondary)](https://developers.cloudflare.com/dns/zone-setups/zone-transfers/cloudflare-as-secondary/setup/).
Subdomain setup
If you also use subdomain setup[1](#user-content-fn-1), consider the [available combinations](https://developers.cloudflare.com/dns/zone-setups/subdomain-setup/setup/#available-setups) and whether your zone conversion could have any implications.
## Footnotes
1. Meaning you have one or more subdomains (`sub.example.com`) added to Cloudflare as their own zone, separate from your apex domain (`example.com`). [↩](#user-content-fnref-1)
Follow the steps below to achieve this conversion.
## 1\. Prepare DNS records
1. [Export a zone file](https://developers.cloudflare.com/dns/manage-dns-records/how-to/import-and-export/#export-records).
2. Import the zone file into your new primary DNS provider.
3. At your Cloudflare zone, use the [Update DNS Settings](https://developers.cloudflare.com/api/resources/dns/subresources/settings/subresources/zone/methods/edit/) endpoint to enable [secondary DNS overrides](https://developers.cloudflare.com/dns/zone-setups/zone-transfers/cloudflare-as-secondary/proxy-traffic/). Set the value for `secondary_overrides` to `true`.
Note
Enabling secondary DNS overrides is necessary in case you have DNS records that you wish to keep [proxied](https://developers.cloudflare.com/dns/proxy-status/).
## 2\. Prepare the zone transfers
1. Make adjustments to DNSSEC according to your option for [DNSSEC with secondary setup](https://developers.cloudflare.com/dns/zone-setups/zone-transfers/cloudflare-as-secondary/dnssec-for-secondary/).
2. (Optional) Create a Transaction Signature (TSIG).
A Transaction Signature (TSIG) authenticates communication between a primary and secondary DNS server.
Note
The TSIG names configured at your primary and secondary DNS providers have to be exactly the same. Any differences in TSIG names will cause zone transfers to fail.
While optional, this step is highly recommended.
To create a TSIG using the dashboard:
1. In the Cloudflare dashboard, go to the account **Settings** page.
[Go to **Configurations** ↗](https://dash.cloudflare.com/?to=/:account/configurations)
2. Go to **DNS Settings**.
3. Under **DNS Zone Transfers**, for **TSIG**, select **Create**.
4. Enter the following information:
* **TSIG name**: The name of the TSIG object using domain name syntax (more details in [RFC 8945 section 4.2 ↗](https://datatracker.ietf.org/doc/html/rfc8945#section-4.2)).
* **Secret (optional)**: Get a shared secret to add to your third-party nameservers. If left blank, this field generates a random secret.
* **Algorithm**: Choose a TSIG signing algorithm.
5. Select **Create**.
To create a TSIG using the API, send a [POST](https://developers.cloudflare.com/api/resources/dns/subresources/zone%5Ftransfers/subresources/tsigs/methods/create/) request.
3. Create a peer server.
To create a peer server using the dashboard:
1. In the Cloudflare dashboard, go to the account **Settings** page.
[Go to **Configurations** ↗](https://dash.cloudflare.com/?to=/:account/configurations)
2. Go to **DNS Settings**.
3. Under **DNS Zone Transfers**, for **Peer DNS servers**, select **Create**.
4. Enter the following information, paying particular attention to:
* **IP**: Specifies where Cloudflare sends transfer requests to.
* **Port**: Specifies the IP Port for the transfer IP.
* **Enable incremental (IXFR) zone transfers**: Specifies if Cloudflare sends IXFR requests in addition to the default AXFR requests.
* **Link an existing TSIG**: If desired, link the TSIG you [previously created](https://developers.cloudflare.com/dns/zone-setups/zone-transfers/cloudflare-as-secondary/setup/#1-create-tsig-optional).
5. Select **Create**.
To create a peer DNS server using the API, send a [POST request](https://developers.cloudflare.com/api/resources/dns/subresources/zone%5Ftransfers/subresources/peers/).
## 3\. Convert the zone and initiate zone transfers
1. Use the [Edit Zone endpoint](https://developers.cloudflare.com/api/resources/zones/methods/edit/) with `type` set to `secondary` to convert the zone type. The existing records will remain in place.
2. In the Cloudflare dashboard, go to the **DNS Settings** page.
[Go to **Settings** ↗](https://dash.cloudflare.com/?to=/:account/:zone/dns/settings)
3. Select **Manage linked peers** under **DNS Zone Transfers**.
4. Link the peer server you created in the previous steps and select **Save**.
5. Back on the [**DNS Settings** ↗](https://dash.cloudflare.com/?to=/:account/:zone/dns/settings) page, select **Initiate zone transfer**.
6. Confirm the DNS records are transferring as expected.
7. Go to the [**DNS Records** ↗](https://dash.cloudflare.com/?to=/:account/:zone/dns/records) page and take note of your new **Cloudflare Nameservers**.
8. At your domain registrar (or parent zone), [update your nameservers](https://developers.cloudflare.com/dns/nameservers/update-nameservers/) to include the `secondary.cloudflare.com` nameservers.
Was this helpful?
YesNo
## On this page
[Docs](https://developers.cloudflare.com/)
```json
{"@context":"https://schema.org","@type":"TechArticle","@id":"https://developers.cloudflare.com/dns/zone-setups/conversions/convert-full-to-secondary/#page","headline":"Convert full setup to secondary setup · Cloudflare DNS docs","description":"If you initially configured a full setup you can later convert your zone to use incoming zone transfers (Cloudflare as secondary).","url":"https://developers.cloudflare.com/dns/zone-setups/conversions/convert-full-to-secondary/","inLanguage":"en","image":"https://developers.cloudflare.com/og-docs.png","dateModified":"2026-06-05","publisher":{"@type":"Organization","name":"Cloudflare","url":"https://www.cloudflare.com/"},"isPartOf":{"@type":"WebSite","@id":"https://developers.cloudflare.com/#website","name":"Cloudflare Docs","url":"https://developers.cloudflare.com/"}}
```
---
---
description: If you initially set up a partial domain on Cloudflare, you can later migrate it to a full setup.
title: Convert partial setup to full setup
image: https://developers.cloudflare.com/og-docs.png
---
[Skip to content](#main-content)
> Documentation Index
> Fetch the complete documentation index at: https://developers.cloudflare.com/dns/llms.txt
> Use this file to discover all available pages before exploring further.
# Convert partial setup to full setup
Last updated May 5, 2026|Copy as Markdown|[View as Markdown](https://developers.cloudflare.com/dns/zone-setups/conversions/convert-partial-to-full/index.md)|[Agent setup](https://developers.cloudflare.com/agent-setup/)
If you initially set up a partial domain on Cloudflare, you can later migrate it to a [primary setup](https://developers.cloudflare.com/dns/zone-setups/full-setup/) (also know as full setup).
Subdomain setup
If you also use subdomain setup[1](#user-content-fn-1), consider the [available combinations](https://developers.cloudflare.com/dns/zone-setups/subdomain-setup/setup/#available-setups) and whether your zone conversion could have any implications.
## Footnotes
1. Meaning you have one or more subdomains (`sub.example.com`) added to Cloudflare as their own zone, separate from your apex domain (`example.com`). [↩](#user-content-fnref-1)
## 1\. Prepare Cloudflare SSL/TLS
In the Cloudflare dashboard, either order an [advanced certificate](https://developers.cloudflare.com/ssl/edge-certificates/advanced-certificate-manager/manage-certificates/) or [upload a custom SSL certificate](https://developers.cloudflare.com/ssl/edge-certificates/custom-certificates/uploading/) for your website or application.
You should also verify that the [status](https://developers.cloudflare.com/ssl/reference/certificate-statuses/) of your SSL certificate is **Active**.
Note
It is possible to use [Universal SSL](https://developers.cloudflare.com/ssl/edge-certificates/universal-ssl/) instead, but you should consider the following:
* Universal certificates can take at least [15 minutes](https://developers.cloudflare.com/ssl/edge-certificates/universal-ssl/enable-universal-ssl/#full-dns-setup) to be issued.
* You should make sure to add Cloudflare nameservers to your registrar within 72 hours of the conversion process.
* Universal SSL only supports first-level subdomains. You can use [Advanced certificates](https://developers.cloudflare.com/ssl/edge-certificates/advanced-certificate-manager/) with the [Total TLS](https://developers.cloudflare.com/ssl/edge-certificates/additional-options/total-tls/) option to automatically issue certificates for any proxied hostname.
* To minimize downtime, it is recommended having a certificate in place beforehand.
## 2\. Update settings in authoritative DNS
At least 24 hours prior to converting your zone, disable DNSSEC at your authoritative DNS provider.
Note
As a best practice, you should also delete the previous [zone activation TXT record](https://developers.cloudflare.com/dns/zone-setups/partial-setup/setup/#1-convert-your-zone-and-review-dns-records) at your authoritative DNS provider. To locate this value in the Cloudflare dashboard, go to the [**DNS Records** ↗](https://dash.cloudflare.com/?to=/:account/:zone/dns/records) page and find the **Verification TXT Record**.
## 3\. Convert to full setup
In the Cloudflare dashboard:
1. In the Cloudflare dashboard, select your partial zone (CNAME setup) and go to the **DNS Settings** page.
[Go to **Settings** ↗](https://dash.cloudflare.com/?to=/:account/:zone/dns/settings)
2. Select **Convert to Primary DNS** (this will not affect how your traffic is proxied).
3. Import your records into Cloudflare DNS and verify that they have been configured correctly. Usually, you will want to import [unproxied records](https://developers.cloudflare.com/dns/proxy-status/).
## 4\. Activate full setup
Get your assigned Cloudflare nameservers from the [**DNS Records** ↗](https://dash.cloudflare.com/?to=/:account/:zone/dns/records) page and [update your nameservers](https://developers.cloudflare.com/dns/nameservers/update-nameservers/) at your registrar.
Caution
If you are counting on Universal SSL certificates to cover your website or application, make sure to add Cloudflare nameservers to your registrar within 72 hours of the conversion process.
Cloudflare recommends that you also [enable DNSSEC](https://developers.cloudflare.com/dns/dnssec/) from the [**DNS Settings** ↗](https://dash.cloudflare.com/?to=/:account/:zone/dns/settings) page and add the DS record to your registrar.
Once all the DNS TTLs expire, all your DNS queries will be answered by the Cloudflare global network.
Start proxying additional hostnames by enabling the [proxy status](https://developers.cloudflare.com/dns/proxy-status/) (also known as orange-clouding) for specific DNS records. Previously proxied subdomains will continue to be proxied without any interruption.
Was this helpful?
YesNo
## On this page
[Docs](https://developers.cloudflare.com/)
```json
{"@context":"https://schema.org","@type":"TechArticle","@id":"https://developers.cloudflare.com/dns/zone-setups/conversions/convert-partial-to-full/#page","headline":"Convert partial setup to full setup · Cloudflare DNS docs","description":"If you initially set up a partial domain on Cloudflare, you can later migrate it to a full setup.","url":"https://developers.cloudflare.com/dns/zone-setups/conversions/convert-partial-to-full/","inLanguage":"en","image":"https://developers.cloudflare.com/og-docs.png","dateModified":"2026-05-05","publisher":{"@type":"Organization","name":"Cloudflare","url":"https://www.cloudflare.com/"},"isPartOf":{"@type":"WebSite","@id":"https://developers.cloudflare.com/#website","name":"Cloudflare Docs","url":"https://developers.cloudflare.com/"}}
```
---
---
description: If you initially set up a partial zone on Cloudflare, you can later convert it to use a secondary setup.
title: Convert partial setup to secondary setup
image: https://developers.cloudflare.com/og-docs.png
---
[Skip to content](#main-content)
> Documentation Index
> Fetch the complete documentation index at: https://developers.cloudflare.com/dns/llms.txt
> Use this file to discover all available pages before exploring further.
# Convert partial setup to secondary setup
Last updated May 5, 2026|Copy as Markdown|[View as Markdown](https://developers.cloudflare.com/dns/zone-setups/conversions/convert-partial-to-secondary/index.md)|[Agent setup](https://developers.cloudflare.com/agent-setup/)
If you initially set up a [partial zone (CNAME setup)](https://developers.cloudflare.com/dns/zone-setups/partial-setup/) on Cloudflare, you can later convert it to use a [secondary setup](https://developers.cloudflare.com/dns/zone-setups/zone-transfers/cloudflare-as-secondary/).
Subdomain setup
If you also use subdomain setup[1](#user-content-fn-1), consider the [available combinations](https://developers.cloudflare.com/dns/zone-setups/subdomain-setup/setup/#available-setups) and whether your zone conversion could have any implications.
## Footnotes
1. Meaning you have one or more subdomains (`sub.example.com`) added to Cloudflare as their own zone, separate from your apex domain (`example.com`). [↩](#user-content-fnref-1)
This page will guide you through this conversion using [export and import](https://developers.cloudflare.com/dns/manage-dns-records/how-to/import-and-export/) and API calls.
## Before you begin
Make sure you consider the following:
* Proxying traffic with secondary zones requires a setting that is not turned on by default. Refer to [Secondary DNS override](https://developers.cloudflare.com/dns/zone-setups/zone-transfers/cloudflare-as-secondary/proxy-traffic/) to learn more. The steps below include enabling this setting.
* There are a few options for [DNSSEC with incoming zone transfers](https://developers.cloudflare.com/dns/zone-setups/zone-transfers/cloudflare-as-secondary/dnssec-for-secondary/). If you want to use DNSSEC, plan for which option you will configure and confirm that your other DNS provider(s) support the setup.
* You can prepare SSL/TLS in advance by either ordering an [advanced certificate](https://developers.cloudflare.com/ssl/edge-certificates/advanced-certificate-manager/manage-certificates/) or [uploading a custom certificate](https://developers.cloudflare.com/ssl/edge-certificates/custom-certificates/uploading/). You should confirm that the certificate covers all your proxied hostnames and that the [status of your SSL certificate ↗](https://dash.cloudflare.com/?to=/:account/:zone/ssl-tls/edge-certificates) is **Active**.
## 1\. Prepare a zone file
1. Export a zone file from the authoritative DNS provider you were using with your CNAME setup (partial).
2. Edit the zone file to remove any occurrences of the `cdn.cloudflare.net` suffix.
* If the `CNAME` target is only appending the Cloudflare suffix to the same hostname at which it is created, replace it by the records on the Cloudflare partial zone.
Example
Original record in authoritative DNS provider:
| Type | Name | Content |
| ----- | --------------- | ---------------------------------- |
| CNAME | www.example.com | www.example.com.cdn.cloudflare.net |
Records in the Cloudflare partial zone:
| Type | Name | Content |
| ---- | --------------- | ------- |
| A | www.example.com | |
| A | www.example.com | |
Final records adjusted in the zone file:
| Type | Name | Content |
| ---- | --------------- | ------- |
| A | www.example.com | |
| A | www.example.com | |
* If the `CNAME` record points to a different hostname, keep this record but remove the `cdn.cloudflare.net` suffix, and also bring the records from the Cloudflare partial zone.
Example
Original record in authoritative DNS provider:
| Type | Name | Content |
| ----- | --------------- | --------------------------------------------- |
| CNAME | www.example.com | other-hostname.example.com.cdn.cloudflare.net |
Records in the Cloudflare partial zone (CNAME setup):
| Type | Name | Content |
| ---- | -------------------------- | ------- |
| A | other-hostname.example.com | |
| A | other-hostname.example.com | |
Final records adjusted in the zone file:
| Type | Name | Content |
| ----- | -------------------------- | -------------------------- |
| CNAME | www.example.com | other-hostname.example.com |
| A | other-hostname.example.com | |
| A | other-hostname.example.com | |
## 2\. Configure the Cloudflare zone
1. Use the [Import DNS Records endpoint](https://developers.cloudflare.com/api/resources/dns/subresources/records/methods/import/) with a properly [formatted zone file](https://developers.cloudflare.com/dns/manage-dns-records/how-to/import-and-export/#format-your-zone-file) to import the records into your partial zone.
The zone file size limit is 256 KiB (262144 bytes).
Existing and already proxied records will not be overwritten by the import.
2. Use the [Update DNS Settings endpoint](https://developers.cloudflare.com/api/resources/dns/subresources/settings/subresources/zone/methods/edit/) with `secondary_overrides` set to `true`, to enable Secondary DNS Override.
Caution
This step is essential so that Cloudflare can keep the proxy status of the records after the conversion.
1. Use the [Edit Zone endpoint](https://developers.cloudflare.com/api/resources/zones/methods/edit/) with `type` set to `secondary`, to convert the zone type.
You can verify if it answers as expected by querying the new assigned secondary nameservers. You can find your nameservers on the [**DNS Records** ↗](https://dash.cloudflare.com/?to=/:account/:zone/dns/records) page, and they should follow a format like `ns0123.secondary.cloudflare.com`.
```bash
# Replace ns0123 with your actual Cloudflare nameservers
dig example.com @ns0123.secondary.cloudflare.com
```
1. At your registrar, [update your nameservers](https://developers.cloudflare.com/dns/nameservers/update-nameservers/) to point to the Cloudflare nameservers.
Once the time to live (TTL) of previous `NS` records is expired and this information is evicted from resolvers' cache, your zone will be properly delegated to Cloudflare. In order to update DNS records, you must configure [zone transfers](https://developers.cloudflare.com/dns/zone-setups/zone-transfers/) in the next steps.
## 3\. Configure the zone transfers
1. Remove all references to `cdn.cloudflare.net` from your primary DNS provider. You can do this by importing the same zone file you prepared in [Step 1](#1-prepare-a-zone-file) onto your primary zone.
Caution
If you keep any DNS records that still refer `cdn.cloudflare.net`, HTTP traffic for the respective hostnames will break.
1. Enable outgoing zone transfers at your primary provider and create a peer DNS server on your Cloudflare account.
To create a peer server using the dashboard:
1. In the Cloudflare dashboard, go to the account **Settings** page.
[Go to **Configurations** ↗](https://dash.cloudflare.com/?to=/:account/configurations)
2. Go to **DNS Settings**.
3. Under **DNS Zone Transfers**, for **Peer DNS servers**, select **Create**.
4. Enter the following information, paying particular attention to:
* **IP**: Specifies where Cloudflare sends transfer requests to.
* **Port**: Specifies the IP Port for the transfer IP.
* **Enable incremental (IXFR) zone transfers**: Specifies if Cloudflare sends IXFR requests in addition to the default AXFR requests.
* **Link an existing TSIG**: If desired, link the TSIG you [previously created](https://developers.cloudflare.com/dns/zone-setups/zone-transfers/cloudflare-as-secondary/setup/#1-create-tsig-optional).
5. Select **Create**.
To create a peer DNS server using the API, send a [POST request](https://developers.cloudflare.com/api/resources/dns/subresources/zone%5Ftransfers/subresources/peers/).
1. Link your Cloudflare zone to the peer DNS server you just created.
1. In the Cloudflare dashboard, go to the **DNS Settings** page.
[Go to **Settings** ↗](https://dash.cloudflare.com/?to=/:account/:zone/dns/settings)
2. Under **DNS Zone Transfers**, select **Manage linked peers**.
3. Choose a value for **Zone refresh**, which controls the number of seconds between zone updates from your primary DNS server.
Caution
Cloudflare will not use the REFRESH value inside the SOA record that is served by your primary provider. Instead the value of zone refresh configured for your secondary zone on Cloudflare will be used to determine the interval after which the SOA serial of the primary zone will be checked for changes.
4. Select the peer server you previously created. If needed, you can link more than one peer server to a zone.
5. Select **Save** to confirm.
Use the [Update Secondary Zone Configuration endpoint](https://developers.cloudflare.com/api/resources/dns/subresources/zone%5Ftransfers/subresources/peers/methods/update/) to link your Cloudflare zone to the peer DNS server.
1. On the [**DNS Settings** ↗](https://dash.cloudflare.com/?to=/:account/:zone/dns/settings) page, confirm the linked peer is listed under **DNS Zone Transfers**, and select **Initiate zone transfer**. Alternatively, you can use the [Force AXFR endpoint](https://developers.cloudflare.com/api/resources/dns/subresources/zone%5Ftransfers/subresources/force%5Faxfr/methods/create/).
Was this helpful?
YesNo
## On this page
[Docs](https://developers.cloudflare.com/)
```json
{"@context":"https://schema.org","@type":"TechArticle","@id":"https://developers.cloudflare.com/dns/zone-setups/conversions/convert-partial-to-secondary/#page","headline":"Convert partial setup to secondary setup · Cloudflare DNS docs","description":"If you initially set up a partial zone on Cloudflare, you can later convert it to use a secondary setup.","url":"https://developers.cloudflare.com/dns/zone-setups/conversions/convert-partial-to-secondary/","inLanguage":"en","image":"https://developers.cloudflare.com/og-docs.png","dateModified":"2026-05-05","publisher":{"@type":"Organization","name":"Cloudflare","url":"https://www.cloudflare.com/"},"isPartOf":{"@type":"WebSite","@id":"https://developers.cloudflare.com/#website","name":"Cloudflare Docs","url":"https://developers.cloudflare.com/"}}
```
---
---
description: If you initially set up incoming zone transfers (Cloudflare as secondary), you can later convert your zone to use a full setup.
title: Convert secondary setup to full setup
image: https://developers.cloudflare.com/og-docs.png
---
[Skip to content](#main-content)
> Documentation Index
> Fetch the complete documentation index at: https://developers.cloudflare.com/dns/llms.txt
> Use this file to discover all available pages before exploring further.
# Convert secondary setup to full setup
Last updated May 5, 2026|Copy as Markdown|[View as Markdown](https://developers.cloudflare.com/dns/zone-setups/conversions/convert-secondary-to-full/index.md)|[Agent setup](https://developers.cloudflare.com/agent-setup/)
If you initially set up [incoming zone transfers (Cloudflare as secondary)](https://developers.cloudflare.com/dns/zone-setups/zone-transfers/cloudflare-as-secondary/setup/), you can later convert your zone to use a [primary setup](https://developers.cloudflare.com/dns/zone-setups/full-setup/) (also know as full setup).
Subdomain setup
If you also use subdomain setup[1](#user-content-fn-1), consider the [available combinations](https://developers.cloudflare.com/dns/zone-setups/subdomain-setup/setup/#available-setups) and whether your zone conversion could have any implications.
## Footnotes
1. Meaning you have one or more subdomains (`sub.example.com`) added to Cloudflare as their own zone, separate from your apex domain (`example.com`). [↩](#user-content-fnref-1)
Follow the steps below to achieve this conversion.
## 1\. Stop transferring the zone
1. In the Cloudflare dashboard, go to the **DNS Settings** page.
[Go to **Settings** ↗](https://dash.cloudflare.com/?to=/:account/:zone/dns/settings)
2. Under **DNS Zone Transfers**, and select **Manage linked peers**.
3. Unlink the peer and select **Save**.
At this point, your zone will be read-only.
## 2\. Prepare for the conversion
1. Plan for [DNSSEC settings](https://developers.cloudflare.com/dns/zone-setups/zone-transfers/cloudflare-as-secondary/dnssec-for-secondary/). If you were previously using [Pre-signed DNSSEC](https://developers.cloudflare.com/dns/zone-setups/zone-transfers/cloudflare-as-secondary/dnssec-for-secondary/#set-up-pre-signed-dnssec), consider disabling DNSSEC before starting the conversion.
Caution
Leaving Pre-signed DNSSEC enabled after converting to a full zone can prevent DNS records from propagating to Cloudflare's edge, causing your zone to return `REFUSED` responses. If you experience this after converting, verify by querying your assigned nameservers using [digwebinterface.com ↗](https://digwebinterface.com/), then check the [DNSSEC Details endpoint](https://developers.cloudflare.com/api/resources/dns/subresources/dnssec/methods/get/) for `dnssec_presigned: true` and disable it using the [Edit DNSSEC Status endpoint](https://developers.cloudflare.com/api/resources/dns/subresources/dnssec/methods/edit/) with `dnssec_presigned` set to `false`.
2. Make sure the [proxy statuses](https://developers.cloudflare.com/dns/proxy-status/) of your DNS records are consistently set:
* If you have [Secondary DNS override](https://developers.cloudflare.com/dns/zone-setups/zone-transfers/cloudflare-as-secondary/proxy-traffic/), confirm each record has the appropriate setting (**Proxied** or **DNS only**).
* If [Secondary DNS override](https://developers.cloudflare.com/dns/zone-setups/zone-transfers/cloudflare-as-secondary/proxy-traffic/) is disabled, make sure all of your DNS records are listed as **DNS only**.
3. (Optional) For consistency, use the [Update DNS Settings](https://developers.cloudflare.com/api/resources/dns/subresources/settings/subresources/zone/methods/edit/) endpoint to specify SOA record fields according to your needs. Once Cloudflare automatically generates an SOA record for your zone on primary setup (full), the field overrides will be considered.
## 3\. Convert your zone
1. Use the [Edit Zone endpoint](https://developers.cloudflare.com/api/resources/zones/methods/edit/) with `type` set to `full` to convert the zone type. Existing DNS records will not be affected.
2. Go to the [**DNS Records** ↗](https://dash.cloudflare.com/?to=/:account/:zone/dns/records) page and take note of your new **Cloudflare Nameservers**.
3. At your domain registrar (or parent zone), [update your nameservers](https://developers.cloudflare.com/dns/nameservers/update-nameservers/). Replace the nameservers ending in `secondary.cloudflare.com` by the ones ending in `ns.cloudflare.com`.
Note
If Cloudflare will be your only primary DNS provider, remove any other nameservers as well.
4. Delete the previous SOA record to make sure Cloudflare generates a new one.
5. (Optional) If Cloudflare was previously not signing your records and you wish to use DNSSEC, follow the steps to [Enable DNSSEC](https://developers.cloudflare.com/dns/dnssec/#enable-dnssec).
Was this helpful?
YesNo
## On this page
[Docs](https://developers.cloudflare.com/)
```json
{"@context":"https://schema.org","@type":"TechArticle","@id":"https://developers.cloudflare.com/dns/zone-setups/conversions/convert-secondary-to-full/#page","headline":"Convert secondary setup to full setup · Cloudflare DNS docs","description":"If you initially set up incoming zone transfers (Cloudflare as secondary), you can later convert your zone to use a full setup.","url":"https://developers.cloudflare.com/dns/zone-setups/conversions/convert-secondary-to-full/","inLanguage":"en","image":"https://developers.cloudflare.com/og-docs.png","dateModified":"2026-05-05","publisher":{"@type":"Organization","name":"Cloudflare","url":"https://www.cloudflare.com/"},"isPartOf":{"@type":"WebSite","@id":"https://developers.cloudflare.com/#website","name":"Cloudflare Docs","url":"https://developers.cloudflare.com/"}}
```
---
---
description: If you initially set up incoming zone transfers (Cloudflare as secondary), you can later convert your zone to use a partial setup.
title: Convert secondary setup to partial setup
image: https://developers.cloudflare.com/og-docs.png
---
[Skip to content](#main-content)
> Documentation Index
> Fetch the complete documentation index at: https://developers.cloudflare.com/dns/llms.txt
> Use this file to discover all available pages before exploring further.
# Convert secondary setup to partial setup
Last updated May 5, 2026|Copy as Markdown|[View as Markdown](https://developers.cloudflare.com/dns/zone-setups/conversions/convert-secondary-to-partial/index.md)|[Agent setup](https://developers.cloudflare.com/agent-setup/)
If you initially set up [incoming zone transfers (Cloudflare as secondary)](https://developers.cloudflare.com/dns/zone-setups/zone-transfers/cloudflare-as-secondary/setup/), you can later convert your zone to use a CNAME setup (partial).
Subdomain setup
If you also use subdomain setup[1](#user-content-fn-1), consider the [available combinations](https://developers.cloudflare.com/dns/zone-setups/subdomain-setup/setup/#available-setups) and whether your zone conversion could have any implications.
## Footnotes
1. Meaning you have one or more subdomains (`sub.example.com`) added to Cloudflare as their own zone, separate from your apex domain (`example.com`). [↩](#user-content-fnref-1)
Follow the steps below to achieve this conversion.
## 1\. Stop transferring the zone
1. In the Cloudflare dashboard, go to the **DNS Settings** page.
[Go to **Settings** ↗](https://dash.cloudflare.com/?to=/:account/:zone/dns/settings)
2. Under **DNS Zone Transfers**, and select **Manage linked peers**.
3. Unlink the peer and select **Save**.
At this point, your zone will be read-only.
## 2\. Configure your authoritative DNS provider
1. (Optional) If you are also migrating to a new authoritative DNS provider, export a zone file from the previous provider and import it into the new one.
2. At your authoritative DNS provider, create `CNAME` records pointing to `{your-hostname}.cdn.cloudflare.net` for every hostname you wish to proxy through Cloudflare.
Example CNAME record at authoritative DNS provider
The `CNAME` record for `www.example.com` would be:
```txt
www.example.com CNAME www.example.com.cdn.cloudflare.net
```
3. At your authoritative DNS provider, remove any previously existing `A`, `AAAA`, or `CNAME` records referencing the hostnames you want to proxy through Cloudflare. For these hostnames, leave only the records pointing to `{your-hostname}.cdn.cloudflare.net`.
## 3\. Convert your Cloudflare zone
1. Back at your Cloudflare zone, confirm that you have all the `A`, `AAAA`, or `CNAME` [DNS records](https://developers.cloudflare.com/dns/manage-dns-records/how-to/create-dns-records/) needed for the hostnames you pointed to `{your-hostname}.cdn.cloudflare.net` in the previous step. You can also delete any DNS records that have a different type, as they will no longer resolve once you convert your zone to a CNAME setup (partial).
2. Use the [Edit Zone endpoint](https://developers.cloudflare.com/api/resources/zones/methods/edit/) with `type` set to `partial` to convert the zone type. Existing DNS records will not be affected.
3. On the [**DNS Records** ↗](https://dash.cloudflare.com/?to=/:account/:zone/dns/records) page, get the **Verification TXT Record** and add it at your authoritative DNS provider.
Example verification record
A verification record for `sub.example.com` might be:
| Type | Name | Content |
| ---- | --------------------------------- | ------------------- |
| TXT | cloudflare-verify.sub.example.com | 966215192-518620144 |
If your authoritative DNS provider automatically appends DNS record `name` fields with your domain, make sure to only insert `cloudflare-verify` as the record name. Otherwise, it may result in an incorrect record name, such as `cloudflare-verify.sub.example.com.sub.example.com`.
After creating the record, you can use this [Dig Web Interface link ↗](https://digwebinterface.com/?type=TXT&ns=auth&nameservers=) to search (`dig`) for `cloudflare-verify.` and validate if it is working.
Note
The verification record must remain in place for as long as you want your CNAME setup (partial) to be active on Cloudflare.
## 4\. Update nameservers
At your domain registrar (or parent zone), [update the nameservers](https://developers.cloudflare.com/dns/nameservers/update-nameservers/). In a CNAME setup (partial), only the nameservers of your external DNS provider should be listed.
* Remove any `secondary.cloudflare.com` nameservers if you used to have them.
* If you are also migrating to a new authoritative DNS provider, add your new nameservers.
Was this helpful?
YesNo
## On this page
[Docs](https://developers.cloudflare.com/)
```json
{"@context":"https://schema.org","@type":"TechArticle","@id":"https://developers.cloudflare.com/dns/zone-setups/conversions/convert-secondary-to-partial/#page","headline":"Convert secondary setup to partial setup · Cloudflare DNS docs","description":"If you initially set up incoming zone transfers (Cloudflare as secondary), you can later convert your zone to use a partial setup.","url":"https://developers.cloudflare.com/dns/zone-setups/conversions/convert-secondary-to-partial/","inLanguage":"en","image":"https://developers.cloudflare.com/og-docs.png","dateModified":"2026-05-05","publisher":{"@type":"Organization","name":"Cloudflare","url":"https://www.cloudflare.com/"},"isPartOf":{"@type":"WebSite","@id":"https://developers.cloudflare.com/#website","name":"Cloudflare Docs","url":"https://developers.cloudflare.com/"}}
```
---
---
description: Use Cloudflare as your primary DNS provider.
title: Primary setup (Full)
image: https://developers.cloudflare.com/og-docs.png
---
[Skip to content](#main-content)
> Documentation Index
> Fetch the complete documentation index at: https://developers.cloudflare.com/dns/llms.txt
> Use this file to discover all available pages before exploring further.
# Primary setup (Full)
Last updated Apr 16, 2026|Copy as Markdown|[View as Markdown](https://developers.cloudflare.com/dns/zone-setups/full-setup/index.md)|[Agent setup](https://developers.cloudflare.com/agent-setup/)
Cloudflare DNS offers a few different [setup options](https://developers.cloudflare.com/dns/zone-setups/). A primary setup (also known as full) is the most common and the only one available for Free or Pro plans.
In a primary setup, Cloudflare is your primary authoritative DNS provider, which means that, when a visitor tries to access your website or application, DNS resolvers will consider the [DNS records](https://developers.cloudflare.com/dns/manage-dns-records/) that you have on Cloudflare.
For this to work, you must go through a few steps that involve not only Cloudflare, but also your registrar and your previous DNS provider (if you were using one). Refer to [Set up a primary zone](https://developers.cloudflare.com/dns/zone-setups/full-setup/setup/) for detailed instructions.
## Availability
| | Free | Pro | Business | Enterprise |
| ------------ | ---- | --- | -------- | ---------- |
| Availability | Yes | Yes | Yes | Yes |
Was this helpful?
YesNo
## On this page
[Docs](https://developers.cloudflare.com/)
```json
{"@context":"https://schema.org","@type":"TechArticle","@id":"https://developers.cloudflare.com/dns/zone-setups/full-setup/#page","headline":"Primary setup (Full) · Cloudflare DNS docs","description":"Use Cloudflare as your primary DNS provider.","url":"https://developers.cloudflare.com/dns/zone-setups/full-setup/","inLanguage":"en","image":"https://developers.cloudflare.com/og-docs.png","dateModified":"2026-04-16","publisher":{"@type":"Organization","name":"Cloudflare","url":"https://www.cloudflare.com/"},"isPartOf":{"@type":"WebSite","@id":"https://developers.cloudflare.com/#website","name":"Cloudflare Docs","url":"https://developers.cloudflare.com/"}}
```
---
---
description: If you want to use Cloudflare as your primary DNS provider and manage your DNS records, your domain should be using a full setup.
title: Set up a primary zone (Full setup)
image: https://developers.cloudflare.com/og-docs.png
---
[Skip to content](#main-content)
> Documentation Index
> Fetch the complete documentation index at: https://developers.cloudflare.com/dns/llms.txt
> Use this file to discover all available pages before exploring further.
# Set up a primary zone (Full setup)
Last updated May 5, 2026|Copy as Markdown|[View as Markdown](https://developers.cloudflare.com/dns/zone-setups/full-setup/setup/index.md)|[Agent setup](https://developers.cloudflare.com/agent-setup/)
Cloudflare DNS offers a few different [setup options](https://developers.cloudflare.com/dns/zone-setups/). A primary setup (also known as full) is the most common and the only one available for Free or Pro plans. For details, refer to [About](https://developers.cloudflare.com/dns/zone-setups/full-setup/). For more introductory context, refer to [Concepts](https://developers.cloudflare.com/dns/concepts/).
## Before you begin
Make sure that you:
* Create a Cloudflare account — If you have not already, [sign up for a Cloudflare account](https://developers.cloudflare.com/fundamentals/account/create-account/).
* Own a domain name — You need a registered domain (for example, `example.com`). If you do not have one, you can [register a domain at-cost through Cloudflare Registrar ↗](https://dash.cloudflare.com/?to=/:account/domains/register). Domains purchased through Cloudflare Registrar automatically use Cloudflare for authoritative DNS, so you can skip the rest of this tutorial.
## 1\. Add your domain to Cloudflare
1. Log in to the [Cloudflare dashboard ↗](https://dash.cloudflare.com).
[Go to **Domains** ↗](https://dash.cloudflare.com/?to=/:account/domains/overview)
2. Select **Onboard a domain**.
3. Enter your apex domain (for example, `example.com`) and choose how you would like to add your DNS records.
4. Select **Continue** and choose a [plan ↗](https://www.cloudflare.com/plans/#compare-features).
Required API token permissions
At least one of the following [token permissions](https://developers.cloudflare.com/fundamentals/api/reference/permissions/) is required:
* `Zone Zone Edit`
* `Zone DNS Edit`
```bash
curl "https://api.cloudflare.com/client/v4/zones" \
--request POST \
--header "Authorization: Bearer $CLOUDFLARE_API_TOKEN" \
--json '{
"name": "",
"account": {
"id": ""
}
}'
```
Note
If Cloudflare is unable to identify your domain as a registered domain, make sure you are using an existing [top-level domain ↗](https://www.cloudflare.com/learning/dns/top-level-domain/) (`.com`, `.net`, `.biz`, or others).
Cloudflare requires your apex domain to be one level below a valid TLD defined in the [Public Suffix List (PSL) ↗](https://github.com/publicsuffix/list/blob/master/public%5Fsuffix%5Flist.dat). Enterprise customers can onboard lower-level subdomains using [Subdomain setup](https://developers.cloudflare.com/dns/zone-setups/subdomain-setup/).
DNS records quick scan
Cloudflare can [automatically scan for your records](https://developers.cloudflare.com/dns/zone-setups/reference/dns-quick-scan/) and add them to the [DNS zone](https://developers.cloudflare.com/dns/concepts/#zone) for you, or you can add records manually. These records show up under your domain on the [**DNS Records** ↗](https://dash.cloudflare.com/?to=/:account/:zone/dns/records) page of the dashboard.
Note
If you add a zone via the [API](https://developers.cloudflare.com/api/resources/zones/methods/create/), you can manually invoke the quick scan with the [Trigger DNS Records Scan endpoint](https://developers.cloudflare.com/api/resources/dns/subresources/records/methods/scan%5Ftrigger/).
## 2\. Review your DNS records
Your DNS records must be accurate for your domain to work properly. If you don't know what DNS records are, consider the video below for a quick explanation.
Note
If you activate your domain on Cloudflare _without_ setting up the correct DNS records for your domain, your visitors may experience [DNS\_PROBE\_FINISHED\_NXDOMAIN](https://developers.cloudflare.com/dns/troubleshooting/dns-probe-finished-nxdomain/) errors.
### Common records
Since the quick scan is not guaranteed to find all existing DNS records, you need to review your records, paying special attention to the following:
* [Zone apex records (example.com)](https://developers.cloudflare.com/dns/manage-dns-records/how-to/create-zone-apex/)
More about zone apex records
Zone apex refers to the domain or subdomain that you are [adding to Cloudflare](https://developers.cloudflare.com/dns/concepts/#zone).
Usually, the zone apex record makes your domain accessible by visitors. In this case, the necessary record type ([A, AAAA, or CNAME](https://developers.cloudflare.com/dns/manage-dns-records/reference/dns-record-types/#ip-address-resolution)) and its content will depend on the provider that [hosts](https://developers.cloudflare.com/fundamentals/manage-domains/#host-your-domain) your website or application.
If you are using Cloudflare Workers, refer to [Custom domains](https://developers.cloudflare.com/workers/configuration/routing/custom-domains/).
If you are using other providers, look for their guidance on how to connect domains managed on external DNS services. Then, make sure you have the records required by your hosting provider on your [DNS records table](https://developers.cloudflare.com/dns/manage-dns-records/#dns-records-table) at Cloudflare.
* [Subdomain records (www.example.com or blog.example.com)](https://developers.cloudflare.com/dns/manage-dns-records/how-to/create-subdomain/)
More about subdomain records
Most subdomains serve a specific purpose within the overall context of your website. For example, `blog.example.com` might be your blog, `support.example.com` could be your customer help portal, and `store.example.com` would be your e-commerce site.
Even if you do not require specific subdomains, you might want to set up at least a subdomain record on `www`. It will usually point to the same content as what you have on the apex domain (`example.com`) or use a [redirect](https://developers.cloudflare.com/fundamentals/manage-domains/manage-subdomains/#redirect-a-subdomain-to-the-apex-domain). Having a subdomain DNS record on `www` helps guarantee that a visitor who types `www.` in front of your domain address can still find your website or application.
* [Email records](https://developers.cloudflare.com/dns/manage-dns-records/how-to/email-records/)
More about email records
Depending on your business needs, you can configure DNS records so that you can use your domain to receive emails, receive and send emails from your domain, or prevent others from sending emails on your behalf (spoofing).
Below are some examples of what those DNS records might look like. The exact values for your DNS mail records depend on your email provider. If you have issues, review the [Troubleshooting](https://developers.cloudflare.com/dns/troubleshooting/email-issues/) and contact your email service provider to confirm your DNS records are correct.
| Type | Name | Content | Proxy status | TTL |
| ---- | -------------- | ----------------------------- | ------------ | ---- |
| A | mail | 192.0.2.1 | DNS Only | Auto |
| MX | example.com | 5 john.mx.example-server.test | DNS Only | Auto |
| TXT | \_dmarc | "v=DMARC1; p=reject; sp=... | DNS Only | Auto |
| TXT | \*.\_domainkey | "v=DKIM1; k=rsa; p=..." | DNS Only | Auto |
| TXT | example.com | "v=spf1 ip4:..." | DNS Only | Auto |
### Proxy status
Each A, AAAA, and CNAME record has a [proxy status](https://developers.cloudflare.com/dns/proxy-status/) toggle:
* **Proxied** (orange cloud): web traffic goes through the Cloudflare network, which provides caching, DDoS protection, and other security features.
* **DNS only** (gray cloud): Cloudflare returns the DNS record value but does not proxy traffic. Use this for CNAME records that verify your domain for third-party services.
## 3\. Change your nameservers
Your domain will be assigned two authoritative Cloudflare nameservers. Nameservers are specialized servers that store your domain's DNS records and "answer" requests from browsers by providing the specific IP address needed to connect to your website.
Caution
If your domain is particularly sensitive to downtime, review our suggestions to [minimize downtime](https://developers.cloudflare.com/fundamentals/performance/minimize-downtime/).
### 3.1\. Get nameserver names
Your assigned nameservers are displayed as part of the onboarding flow. If you need to find them once again, go the zone **Overview** page.
[Go to **Overview** ↗](https://dash.cloudflare.com/?to=/:account/:zone/)
Required API token permissions
At least one of the following [token permissions](https://developers.cloudflare.com/fundamentals/api/reference/permissions/) is required:
* `Trust and Safety Write`
* `Trust and Safety Read`
* `Zero Trust: PII Read`
* `Zaraz Edit`
* `Zaraz Read`
* `Zaraz Admin`
* `Access: Apps and Policies Revoke`
* `Access: Apps and Policies Write`
* `Access: Apps and Policies Read`
* `Access: Apps and Policies Revoke`
* `Access: Mutual TLS Certificates Write`
* `Access: Organizations, Identity Providers, and Groups Write`
* `Zone Settings Write`
* `Zone Settings Read`
* `Zone Read`
* `DNS Read`
* `Workers Scripts Write`
* `Workers Scripts Read`
* `Zone Write`
* `Workers Routes Write`
* `Workers Routes Read`
* `Stream Write`
* `Stream Read`
* `SSL and Certificates Write`
* `SSL and Certificates Read`
* `Logs Write`
* `Logs Read`
* `Cache Purge`
* `Page Rules Write`
* `Page Rules Read`
* `Load Balancers Write`
* `Load Balancers Read`
* `Firewall Services Write`
* `Firewall Services Read`
* `DNS Write`
* `Apps Write`
* `Analytics Read`
* `Access: Apps and Policies Write`
* `Access: Apps and Policies Read`
```bash
curl "https://api.cloudflare.com/client/v4/zones/$ZONE_ID" \
--request GET \
--header "Authorization: Bearer $CLOUDFLARE_API_TOKEN"
```
Note
Cloudflare automatically assigns nameservers to a domain and these assignments cannot be changed. For more details, refer to [Nameserver assignments](https://developers.cloudflare.com/dns/nameservers/nameserver-options/#assignment-method).
### 3.2\. Log in to your registrar
Log in to the admin account for your domain registrar. If you do not know your provider, use [ICANN Lookup ↗](https://lookup.icann.org/).
Note
Depending on your use case, you may have to perform this step on the DNS records management of your domain parent zone, or at a domain reseller, instead. Refer to [Nameservers](https://developers.cloudflare.com/dns/nameservers/update-nameservers/#specific-processes) for details.
### 3.3\. Turn off DNSSEC
If your domain has [DNSSEC](https://developers.cloudflare.com/dns/dnssec/)[1](#user-content-fn-1) active, you must [turn it off](https://developers.cloudflare.com/dns/dnssec/#disable-dnssec) at your registrar before replacing nameservers. Changing nameservers while DNSSEC is active can cause your domain to become unreachable. You can [re-enable DNSSEC through Cloudflare](https://developers.cloudflare.com/dns/dnssec/#enable-dnssec) after your domain is active.
Provider-specific DNSSEC instructions
This is not an exhaustive list, but the following links may be helpful:
* [DNSimple ↗](https://support.dnsimple.com/articles/cloudflare-ds-record/)
* [Domaindiscount24 ↗](https://support.domaindiscount24.com/hc/articles/4409759478161)
* [DreamHost ↗](https://help.dreamhost.com/hc/en-us/articles/219539467)
* [Dynadot ↗](https://www.dynadot.com/help/question/set-DNSSEC)
* [Enom ↗](https://support.enom.com/support/solutions/articles/201000065386)
* [Gandi ↗](https://docs.gandi.net/en/domain%5Fnames/advanced%5Fusers/dnssec.html)
* [GoDaddy ↗](https://www.godaddy.com/help/add-a-ds-record-23865)
* [Hostinger ↗](https://www.hostinger.com/support/3667267-how-to-use-dnssec-records-at-hostinger/)
* [Hover ↗](https://support.hover.com/support/solutions/articles/201000064716)
* [Infomaniak ↗](https://faq.infomaniak.com/2187)
* [InMotion Hosting ↗](https://www.inmotionhosting.com/support/edu/cpanel/enable-dnssec-cloudflare/)
* [INWX ↗](https://kb.inwx.com/en-us/3-nameserver/131)
* [Joker.com ↗](https://joker.com/faq/books/jokercom-faq-en/page/dnssec)
* [Name.com ↗](https://www.name.com/support/articles/205439058-managing-dnssec)
* [Namecheap ↗](https://www.namecheap.com/support/knowledgebase/article.aspx/9722/2232/managing-dnssec-for-domains-pointed-to-custom-dns/)
* [NameISP ↗](https://support.nameisp.com/knowledgebase/dns)
* [Namesilo ↗](https://www.namesilo.com/support/v2/articles/domain-manager/ds-records)
* [OVH ↗](https://help.ovhcloud.com/csm/en-dns-secure-domain-dnssec?id=kb%5Farticle%5Fview&sysparm%5Farticle=KB0051637)
* [Squarespace ↗](https://support.squarespace.com/hc/articles/4404183898125-Nameservers-and-DNSSEC-for-Squarespace-managed-domains#toc-dnssec)
* [Registro.br ↗](https://registro.br/tecnologia/dnssec/?secao=tutoriais-dns)
* [Porkbun ↗](https://kb.porkbun.com/article/93-how-to-install-dnssec) (do not fill out **keyData**)
* [TransIP ↗](https://www.transip.eu/knowledgebase/150-secure-domains-custom-nameservers-dnssec/)
Note
If your previous provider allows you to add DNSKEY records on the zone apex and use these records in responses to DNS queries, refer to this [migration tutorial](https://developers.cloudflare.com/dns/dnssec/dnssec-active-migration/) to learn how to migrate a zone with DNSSEC enabled.
### 3.4\. Update your registrar
1. Remove your existing authoritative nameservers.
2. Add the nameservers provided by Cloudflare. If their names are not **copied exactly**, your DNS will not resolve correctly.
Provider-specific instructions
This is not an exhaustive list of provider-specific instructions, but the following links may be helpful:
* [Ionos ↗](https://www.ionos.com/help/domains/using-your-own-name-servers/using-your-own-name-servers-for-a-domain/)
* [101Domain ↗](https://help.101domain.com/kb/managing-name-server-records)
* [Amazon ↗](https://docs.aws.amazon.com/Route53/latest/DeveloperGuide/domain-name-servers-glue-records.html#domain-name-servers-glue-records-adding-changing)
* [Blacknight ↗](https://help.blacknight.com/hc/articles/4413036322321-How-do-I-change-the-nameservers-for-my-domain)
* [BlueHost ↗](https://www.bluehost.com/help/article/custom-nameservers)
* [DirectNIC ↗](https://directnic.com/knowledge/article/33:how%2Bdo%2Bi%2Bmodify%2Bname%2Bservers%2Bfor%2Bmy%2Bdomain%2Bname%253F)
* [DNSMadeEasy ↗](http://www.dnsmadeeasy.com/support/faq/)
* [Domain.com ↗](https://www.domain.com/help/article/domain-management-how-to-update-nameservers)
* [Dotster ↗](https://www.dotster.com/help/article/domain-management-how-to-update-nameservers)
* [DreamHost ↗](https://help.dreamhost.com/hc/en-us/articles/360038897151)
* [EasyDNS ↗](https://kb.easydns.com/knowledge/settingchanging-nameservers/)
* [Enom ↗](https://help.enom.com/hc/en-us/articles/115000486451-Nameservers-NS)
* [Fast Domain ↗](https://www.fastdomain.com/hosting/help/transfer%5Fclient%5Fstart)
* [FlokiNET ↗](https://billing.flokinet.is/index.php?rp=/knowledgebase/57/Nameserver-and-DNS-records.html)
* [Gandi ↗](https://docs.gandi.net/en/domain%5Fnames/common%5Foperations/changing%5Fnameservers.html)
* [GoDaddy ↗](https://www.godaddy.com/help/change-nameservers-for-your-domain-names-664)
* [HostGator ↗](https://www.hostgator.com/help/article/changing-name-servers)
* [Hostico ↗](https://hostico.ro/docs/setarea-nameserverelor-din-contul-de-client-hostico/)
* [HostMonster ↗](https://my.hostmonster.com/cgi/help/222)
* [Hover ↗](https://support.hover.com/support/solutions/articles/201000064742-changing-your-domain-nameservers)
* [Internetdbs ↗](https://faq.internetbs.net/hc/en-gb/articles/4516921367837-How-to-update-Nameservers-for-a-domain)
* [iPage ↗](https://www.ipage.com/help/article/domain-management-how-to-update-nameservers)
* [MelbourneIT ↗](https://support.melbourneit.au/docs/how-do-i-manage-my-dns-on-cpanel)
* [Moniker ↗](https://support.moniker.com/hc/en-gb/articles/10101271418653-How-to-update-Nameservers-for-a-domain)
* [Name.com ↗](https://www.name.com/support/articles/205934457-registering-custom-nameservers)
* [Namecheap ↗](https://www.namecheap.com/support/knowledgebase/article.aspx/767/10/how-can-i-change-the-nameservers-for-my-domain)
* [Network Solutions ↗](https://www.networksolutions.com/manage-it/edit-nameservers.jsp)
* [OVH ↗](https://docs.ovh.com/gb/en/domains/web%5Fhosting%5Fgeneral%5Finformation%5Fabout%5Fdns%5Fservers/#step-2-edit-your-domains-dns-servers)
* [Porkbun ↗](https://kb.porkbun.com/article/22-how-to-change-your-nameservers)
* [Rackspace ↗](https://support.rackspace.com/how-to/rackspace-name-servers/)
* [Register ↗](https://www.register.com/knowledge)
* [Squarespace ↗](https://support.squarespace.com/hc/articles/4404183898125-Nameservers-and-DNSSEC-for-Squarespace-managed-domains#toc-open-the-domain-s-advanced-settings)
* [Site5 ↗](https://kb.site5.com/dns-2/custom-nameservers/)
* [Softlayer ↗](https://cloud.ibm.com/docs/dns?topic=dns-add-edit-or-delete-custom-name-servers-for-a-domain)
* [Yola ↗](https://helpcenter.yola.com/hc/articles/360012492660-Changing-your-name-servers)
To avoid common issues, refer to our [Nameserver replacement checklist](https://developers.cloudflare.com/dns/zone-setups/full-setup/troubleshooting/).
### 3.5\. Verify changes
Wait up to 24 hours while your registrar updates your nameservers.
When your domain is **Active**:
* You will receive an email from Cloudflare.
* Your domain will have a [status](https://developers.cloudflare.com/dns/zone-setups/reference/domain-status/) of **Active** on the **Domains** page of your account.
* Online tools such as [https://www.whatsmydns.net/ ↗](https://www.whatsmydns.net/) will show your Cloudflare-assigned nameservers (most of these tools use cached query results, so it may take longer for them to show the updated nameservers).
* CLI commands will show your Cloudflare-assigned nameservers
```txt
*macOS/Linux*
whois
dig ns @1.1.1.1
dig ns @8.8.8.8
dig +trace
*Windows*
nslookup -type=ns 1.1.1.1
nslookup -type=ns 8.8.8.8
```
Note
If you see unexpected results, refer to our [troubleshooting suggestions](https://developers.cloudflare.com/dns/zone-setups/full-setup/troubleshooting/) and check with your domain registrar.
## 4\. Re-enable DNSSEC
If you turned off DNSSEC before updating your nameservers, you can now [re-enable DNSSEC through Cloudflare](https://developers.cloudflare.com/dns/dnssec/) to protect your domain from spoofing.
## Footnotes
1. A security feature that protects DNS records from spoofing [↩](#user-content-fnref-1)
Was this helpful?
YesNo
## On this page
[Docs](https://developers.cloudflare.com/)
```json
{"@context":"https://schema.org","@type":"TechArticle","@id":"https://developers.cloudflare.com/dns/zone-setups/full-setup/setup/#page","headline":"Change your nameservers (Full setup) · Cloudflare DNS docs","description":"If you want to use Cloudflare as your primary DNS provider and manage your DNS records, your domain should be using a full setup.","url":"https://developers.cloudflare.com/dns/zone-setups/full-setup/setup/","inLanguage":"en","image":"https://developers.cloudflare.com/og-docs.png","dateModified":"2026-05-05","publisher":{"@type":"Organization","name":"Cloudflare","url":"https://www.cloudflare.com/"},"isPartOf":{"@type":"WebSite","@id":"https://developers.cloudflare.com/#website","name":"Cloudflare Docs","url":"https://developers.cloudflare.com/"}}
```
---
---
description: Learn how to troubleshoot issues with a primary setup (full)
title: Troubleshooting
image: https://developers.cloudflare.com/og-docs.png
---
[Skip to content](#main-content)
> Documentation Index
> Fetch the complete documentation index at: https://developers.cloudflare.com/dns/llms.txt
> Use this file to discover all available pages before exploring further.
# Troubleshooting
Last updated Apr 16, 2026|Copy as Markdown|[View as Markdown](https://developers.cloudflare.com/dns/zone-setups/full-setup/troubleshooting/index.md)|[Agent setup](https://developers.cloudflare.com/agent-setup/)
If you see unexpected results when [changing your nameservers](https://developers.cloudflare.com/dns/zone-setups/full-setup/setup/), review the following troubleshooting questions.
## Is a DS record present at your registrar?
You need to remove any pre-Cloudflare **DS** records at your registrar to update your authoritative nameservers. This will disable DNSSEC and allow Cloudflare to resolve your domain name.
You can then [re-enable DNSSEC](https://developers.cloudflare.com/dns/zone-setups/full-setup/setup/#4-re-enable-dnssec) in Cloudflare and at your registrar after you have changed your nameservers.
## Do the nameservers at your registrar exactly match the values provided by Cloudflare?
If the nameservers in your registrar do not exactly match those provided by Cloudflare, your domain will not resolve correctly.
## Are additional nameservers listed at your registrar?
If so, you should remove these nameservers.
You should have only Cloudflare nameservers listed at your registrar.
## Have you waited longer than 24 hours?
For some registrars, you will need to wait up to 24 hours for updates to your nameservers.
Was this helpful?
YesNo
## On this page
[Docs](https://developers.cloudflare.com/)
```json
{"@context":"https://schema.org","@type":"TechArticle","@id":"https://developers.cloudflare.com/dns/zone-setups/full-setup/troubleshooting/#page","headline":"Troubleshooting primary setup (full) · Cloudflare DNS docs","description":"Learn how to troubleshoot issues with a primary setup (full)","url":"https://developers.cloudflare.com/dns/zone-setups/full-setup/troubleshooting/","inLanguage":"en","image":"https://developers.cloudflare.com/og-docs.png","dateModified":"2026-04-16","publisher":{"@type":"Organization","name":"Cloudflare","url":"https://www.cloudflare.com/"},"isPartOf":{"@type":"WebSite","@id":"https://developers.cloudflare.com/#website","name":"Cloudflare Docs","url":"https://developers.cloudflare.com/"}}
```
---
---
description: Use Cloudflare with your existing DNS provider via CNAME setup.
title: CNAME setup (Partial)
image: https://developers.cloudflare.com/og-docs.png
---
[Skip to content](#main-content)
> Documentation Index
> Fetch the complete documentation index at: https://developers.cloudflare.com/dns/llms.txt
> Use this file to discover all available pages before exploring further.
# CNAME setup (Partial)
Last updated Apr 29, 2026|Copy as Markdown|[View as Markdown](https://developers.cloudflare.com/dns/zone-setups/partial-setup/index.md)|[Agent setup](https://developers.cloudflare.com/agent-setup/)
A CNAME setup (also known as partial setup) allows you to use [Cloudflare's reverse proxy](https://developers.cloudflare.com/fundamentals/concepts/how-cloudflare-works/) while maintaining your primary and authoritative DNS provider.
Use this option to proxy only individual subdomains through Cloudflare when you cannot change your authoritative DNS provider. You will be able to create A, AAAA, and CNAME records, which are the DNS record types that can be [proxied](https://developers.cloudflare.com/dns/proxy-status/).
Availability
A CNAME setup (partial) is only available to customers on a Business or Enterprise plan. Partial setups are not supported on Cloudflare Registrar domains.
Once you are on a CNAME setup (partial), the actual resolution of your records to Cloudflare depends on CNAME records [added at your authoritative DNS provider](https://developers.cloudflare.com/dns/zone-setups/partial-setup/setup/#3-add-dns-records). Check your authoritative DNS provider to know which records are pointing to `{your-hostname}.cdn.cloudflare.net`.
## How to
* [Set up a partial zone (CNAME setup)](https://developers.cloudflare.com/dns/zone-setups/partial-setup/setup/)
* [Convert a CNAME setup (partial) to a primary setup (full)](https://developers.cloudflare.com/dns/zone-setups/conversions/convert-partial-to-full/)
* [Convert a CNAME setup (partial) to a secondary setup](https://developers.cloudflare.com/dns/zone-setups/conversions/convert-partial-to-secondary/)
* [Create DNS records of other types](https://developers.cloudflare.com/dns/zone-setups/partial-setup/setup/#other-record-types)
## Availability
| | Free | Pro | Business | Enterprise |
| ------------ | ---- | --- | -------- | ---------- |
| Availability | No | No | Yes | Yes |
## Reference
### DNS resolution
When you have a partial zone ([CNAME setup](https://developers.cloudflare.com/dns/zone-setups/partial-setup/)), Cloudflare resolves [DNS records differently](https://developers.cloudflare.com/dns/zone-setups/partial-setup/dns-resolution/) than for primary zones (full setup).
### CNAME flattening
A CNAME setup (partial) requires the proxied hostname to be pointed to Cloudflare via a CNAME record. Since [CNAME records are not allowed on the zone apex ↗](https://datatracker.ietf.org/doc/html/rfc1912#section-2.4) (`example.com`), you can only proxy your zone apex to Cloudflare if your authoritative DNS provider supports [CNAME Flattening ↗](https://blog.cloudflare.com/introducing-cname-flattening-rfc-compliant-cnames-at-a-domains-root/).
If your authoritative DNS provider does not support CNAME Flattening, redirect its traffic — for example, with an `.htaccess` file — to a subdomain proxied to Cloudflare. Alternatively, you can use [static IPs or BYOIPs](https://developers.cloudflare.com/fundamentals/concepts/cloudflare-ip-addresses/#customize-cloudflare-ip-addresses).
### DDoS protection
[DDoS protection](https://developers.cloudflare.com/ddos-protection/) for attacks against DNS infrastructure is only available for domains on [primary setup (full)](https://developers.cloudflare.com/dns/zone-setups/full-setup/). Domains on the CNAME setup (partial) are not using Cloudflare authoritative nameservers.
### Domain ownership
Enterprise customers can use [zone holds](https://developers.cloudflare.com/fundamentals/account/account-security/zone-holds/) to prevent other teams in the organization from adding zones that are already active in another Cloudflare account. For CNAME setups (partial), if the same zone is added to different accounts, the last account to complete the setup will gain ownership.
Was this helpful?
YesNo
## On this page
[Docs](https://developers.cloudflare.com/)
```json
{"@context":"https://schema.org","@type":"TechArticle","@id":"https://developers.cloudflare.com/dns/zone-setups/partial-setup/#page","headline":"CNAME setup (Partial) · Cloudflare DNS docs","description":"Use Cloudflare with your existing DNS provider via CNAME setup.","url":"https://developers.cloudflare.com/dns/zone-setups/partial-setup/","inLanguage":"en","image":"https://developers.cloudflare.com/og-docs.png","dateModified":"2026-04-29","publisher":{"@type":"Organization","name":"Cloudflare","url":"https://www.cloudflare.com/"},"isPartOf":{"@type":"WebSite","@id":"https://developers.cloudflare.com/#website","name":"Cloudflare Docs","url":"https://developers.cloudflare.com/"}}
```
---
---
description: How DNS resolution works for partial CNAME setups.
title: DNS resolution
image: https://developers.cloudflare.com/og-docs.png
---
[Skip to content](#main-content)
> Documentation Index
> Fetch the complete documentation index at: https://developers.cloudflare.com/dns/llms.txt
> Use this file to discover all available pages before exploring further.
# DNS resolution
Last updated Apr 16, 2026|Copy as Markdown|[View as Markdown](https://developers.cloudflare.com/dns/zone-setups/partial-setup/dns-resolution/index.md)|[Agent setup](https://developers.cloudflare.com/agent-setup/)
When you have a partial zone ([CNAME setup](https://developers.cloudflare.com/dns/zone-setups/partial-setup/)), Cloudflare handles DNS records a bit differently from primary zones (full setup) in order to internally resolve the origin server where proxied HTTP requests are sent to.
## Records within the same zone
When you [create a new DNS record](https://developers.cloudflare.com/dns/manage-dns-records/how-to/create-dns-records/#create-dns-records) in a partial zone, Cloudflare automatically checks whether any of your CNAME records point to existing A, AAAA, or CNAME records within the same zone.
For example, Cloudflare would show a warning if you had the following records in your partial zone:
```txt
sub1.partialzone.com CNAME sub2.partialzone.com
sub2.partialzone.com A 192.0.2.1
```
Since Cloudflare contains both the CNAME and its target, our DNS resolution will send incoming HTTP requests to `sub1.partialzone.com` to the origin `192.0.2.1`.
This can cause issues if you already have DNS records for `sub2.partialzone.com` at your authoritative DNS provider. These records may point to `192.0.2.4`, another IP address, or another domain but - because Cloudflare contains the initial record and the target - it never queries your authoritative DNS provider for the record for `sub2.partialzone.com`.
flowchart TD
accTitle: DNS resolution flow with CNAME target in same partial zone
A[Request to sub1.partialzone.com] --> B[CNAME record for sub1.partialzone.com to sub2.partialzone.com]
subgraph Cloudflare
B --> C[A record for sub2.partialzone.com to 192.0.2.1]
end
C --> D[192.0.2.1]
subgraph Authoritative DNS
E[A record for sub2.partialzone.com to 192.0.2.4]
end
When you avoid this situation - meaning you do not have the **target** of the CNAME record within your partial zone - this DNS resolution would happen differently.
flowchart TD
accTitle: DNS resolution flow with CNAME target not in partial zone
A[Request to sub1.partialzone.com] --> B[CNAME record for sub1.partialzone.com to sub2.partialzone.com]
B --> C[A record for sub2.partialzone.com to 192.0.2.4]
C --> D[192.0.2.4]
subgraph Cloudflare
B
end
subgraph Authoritative DNS
C
end
---
## Records pointing to a partial zone within the same account
You could also [create a CNAME record](https://developers.cloudflare.com/dns/manage-dns-records/how-to/create-dns-records/#create-dns-records) in a zone (partial or full) that points to a record in another partial zone within your account.
In this case, Cloudflare will always resolve the CNAME target based on the value at your authoritative DNS provider of the CNAME target zone.
flowchart TD
accTitle: DNS resolution flow with CNAME target in a zone within the same account
A[Request to www\.alice.com] --> B[CNAME record for www\.alice.com to www\.partialzone.com]
B --> C[A record for www\.partialzone.com to 192.0.2.4]
C --> D[192.0.2.4]
subgraph Cloudflare account
subgraph Cloudflare zone 1
B
end
subgraph Cloudflare zone 2
E[A record for www\.partialzone.com to 203.0.113.1]
end
end
subgraph Authoritative DNS
C
end
### Auth DNS points to `cdn.cloudflare.net`
Considering the following scenario:
* The target zone (Cloudflare zone 2 in this example) is a partial zone and the DNS record on the partial zone is proxied.
* The DNS record on the authoritative DNS server points to `cdn.cloudflare.net`
If such setup is in place, the subdomain (`www.partialzone.com` in this example) will resolve to a Cloudflare proxy IP, which will ultimately result in an error. Consider using [custom hostnames](https://developers.cloudflare.com/cloudflare-for-platforms/cloudflare-for-saas/domain-support/) and [O2O](https://developers.cloudflare.com/cloudflare-for-platforms/cloudflare-for-saas/saas-customers/how-it-works/) setup instead.
flowchart TD
accTitle: DNS resolution flow with CNAME target in a zone within the same account and auth DNS pointing to cdn.cloudflare.net
A[Request to www\.alice.com] --> B[CNAME record for www\.alice.com to www\.partialzone.com]
B --> C[CNAME record for www\.partialzone.com to www\.partialzone.com.cdn.cloudflare.net]
C --> D[Cloudflare proxy IP]
subgraph Cloudflare account
subgraph Cloudflare zone 1
B
end
subgraph Cloudflare zone 2
E[Proxied A record for www\.partialzone.com to 203.0.113.1]
end
end
subgraph Authoritative DNS
C
end
Was this helpful?
YesNo
## On this page
[Docs](https://developers.cloudflare.com/)
```json
{"@context":"https://schema.org","@type":"TechArticle","@id":"https://developers.cloudflare.com/dns/zone-setups/partial-setup/dns-resolution/#page","headline":"DNS resolution in partial zones · Cloudflare DNS docs","description":"How DNS resolution works for partial CNAME setups.","url":"https://developers.cloudflare.com/dns/zone-setups/partial-setup/dns-resolution/","inLanguage":"en","image":"https://developers.cloudflare.com/og-docs.png","dateModified":"2026-04-16","publisher":{"@type":"Organization","name":"Cloudflare","url":"https://www.cloudflare.com/"},"isPartOf":{"@type":"WebSite","@id":"https://developers.cloudflare.com/#website","name":"Cloudflare Docs","url":"https://developers.cloudflare.com/"}}
```
---
---
description: A CNAME setup (also known as partial) allows you to use Cloudflare's reverse proxy while maintaining your primary and authoritative DNS provider.
title: Setup
image: https://developers.cloudflare.com/og-docs.png
---
[Skip to content](#main-content)
> Documentation Index
> Fetch the complete documentation index at: https://developers.cloudflare.com/dns/llms.txt
> Use this file to discover all available pages before exploring further.
# Setup
Last updated May 5, 2026|Copy as Markdown|[View as Markdown](https://developers.cloudflare.com/dns/zone-setups/partial-setup/setup/index.md)|[Agent setup](https://developers.cloudflare.com/agent-setup/)
A CNAME setup (also known as partial setup) allows you to use [Cloudflare's reverse proxy](https://developers.cloudflare.com/fundamentals/concepts/how-cloudflare-works/) while maintaining your primary and authoritative DNS provider.
Use this option to proxy only individual subdomains through Cloudflare when you cannot change your authoritative DNS provider. You will be able to create A, AAAA, and CNAME records, which are the DNS record types that can be [proxied](https://developers.cloudflare.com/dns/proxy-status/).
Availability
A CNAME setup (partial) is only available to customers on a Business or Enterprise plan. Partial setups are not supported on Cloudflare Registrar domains.
---
## Before you begin
1. Create a Cloudflare account and add your domain.
2. Choose **Business** or **Enterprise** as your plan.
3. If you are onboarding a new domain to Cloudflare, ignore the instructions to change your nameservers.
4. (Recommended) Plan for SSL/TLS certificates:
If you are only using [Universal SSL](https://developers.cloudflare.com/ssl/edge-certificates/universal-ssl/) prior to converting your zone, a certificate will be provisioned for your subdomains only after each of the respective DNS records ([step 3](#3-add-dns-records) below) are [proxied](https://developers.cloudflare.com/dns/proxy-status/). Refer to [Enable Universal SSL](https://developers.cloudflare.com/ssl/edge-certificates/universal-ssl/enable-universal-ssl/#partial-dns-setup) for details.
If your domain is sensitive to downtime, instead of using Universal SSL, consider using an [advanced certificate](https://developers.cloudflare.com/ssl/edge-certificates/advanced-certificate-manager/) with [delegated DCV](https://developers.cloudflare.com/ssl/edge-certificates/changing-dcv-method/methods/delegated-dcv/#setup).
## 1\. Convert your zone and review DNS records
Make sure you have the correct plan
Make sure your zone is on the Business or Enterprise plan. If you have Free or Pro, the options mentioned below will not be displayed.
1. On the **Overview** page, select **Convert to CNAME DNS Setup**.
2. Select **Convert** to confirm.
3. Save the information from the **Verification TXT Record**. If you lose the information, you can also access it on the [**DNS Records** ↗](https://dash.cloudflare.com/?to=/:account/:zone/dns/records) page, under **Verification TXT Record**.
4. Make sure that you have all the DNS records (A, AAAA, or CNAME) for subdomains that you want to proxy through Cloudflare.
If you are adding a zone for the first time via API you can add it directly with a `type` of `partial`, without converting it.
Required API token permissions
At least one of the following [token permissions](https://developers.cloudflare.com/fundamentals/api/reference/permissions/) is required:
* `Zone Zone Edit`
* `Zone DNS Edit`
```bash
curl "https://api.cloudflare.com/client/v4/zones" \
--request POST \
--header "Authorization: Bearer $CLOUDFLARE_API_TOKEN" \
--json '{
"name": "example.com",
"account": {
"id": "YOUR_ACCOUNT_ID"
},
"type": "partial"
}'
```
## 2\. Verify ownership for your domain
Add the **Verification TXT Record** at your authoritative DNS provider. Cloudflare will verify the TXT record and send a confirmation email. This can take up to a few hours.
Example verification record
A verification record for `example.com` might be:
| Type | Name | Content |
| ---- | ----------------------------- | ------------------- |
| TXT | cloudflare-verify.example.com | 966215192-518620144 |
Note
If your authoritative DNS provider automatically appends DNS record `name` fields with your domain, make sure to only insert `cloudflare-verify` as the record name. Otherwise, it may result in an incorrect record name, such as `cloudflare-verify.example.com.example.com`.
After creating the record, you can use this [Dig Web Interface link ↗](https://digwebinterface.com/?type=TXT&ns=auth&nameservers=) to search (`dig`) for `cloudflare-verify.` and validate if it is working.
The verification record must remain in place for as long as your domain is active on a CNAME setup on Cloudflare.
If your organization has multiple Cloudflare accounts, also consider using zone holds to have more control over [domain ownership](https://developers.cloudflare.com/dns/zone-setups/partial-setup/#domain-ownership).
## 3\. Add DNS records
1. At your authoritative DNS provider:
1. Create CNAME records pointing to `{your-hostname}.cdn.cloudflare.net` for every hostname you wish to proxy through Cloudflare.
Example CNAME record at authoritative DNS provider
The CNAME record for `www.example.com` would be:
```txt
www.example.com CNAME www.example.com.cdn.cloudflare.net
```
2. Remove any previously existing A, AAAA, or CNAME records referencing the hostnames you want to proxy through Cloudflare. For these hostnames, leave only the records pointing to `{your-hostname}.cdn.cloudflare.net`.
3. Repeat this process for each subdomain that should be proxied to Cloudflare.
---
## Other record types
If you are preparing a conversion from CNAME setup (partial) to primary setup (full), or if you have a more specific use case, you can use the [Create DNS Record](https://developers.cloudflare.com/api/resources/dns/subresources/records/methods/create/) API endpoint to create DNS records of any supported type.
Was this helpful?
YesNo
## On this page
[Docs](https://developers.cloudflare.com/)
```json
{"@context":"https://schema.org","@type":"TechArticle","@id":"https://developers.cloudflare.com/dns/zone-setups/partial-setup/setup/#page","headline":"Set up a partial zone (CNAME setup) · Cloudflare DNS docs","description":"A CNAME setup (also known as partial) allows you to use Cloudflare's reverse proxy while maintaining your primary and authoritative DNS provider.","url":"https://developers.cloudflare.com/dns/zone-setups/partial-setup/setup/","inLanguage":"en","image":"https://developers.cloudflare.com/og-docs.png","dateModified":"2026-05-05","publisher":{"@type":"Organization","name":"Cloudflare","url":"https://www.cloudflare.com/"},"isPartOf":{"@type":"WebSite","@id":"https://developers.cloudflare.com/#website","name":"Cloudflare Docs","url":"https://developers.cloudflare.com/"}}
```
---
---
description: How Cloudflare scans and imports DNS records automatically.
title: Records quick scan
image: https://developers.cloudflare.com/og-docs.png
---
[Skip to content](#main-content)
> Documentation Index
> Fetch the complete documentation index at: https://developers.cloudflare.com/dns/llms.txt
> Use this file to discover all available pages before exploring further.
# Records quick scan
Last updated Apr 16, 2026|Copy as Markdown|[View as Markdown](https://developers.cloudflare.com/dns/zone-setups/reference/dns-quick-scan/index.md)|[Agent setup](https://developers.cloudflare.com/agent-setup/)
To help all customers get started when a new zone is created, Cloudflare offers a DNS records quick scan.
Where to find the quick scan
On the dashboard, quick scan is only available as you are onboarding a new domain. Via API, you can manually invoke quick scan with the [Trigger DNS Records Scan endpoint](https://developers.cloudflare.com/api/resources/dns/subresources/records/methods/scan%5Ftrigger/).
## How quick scan works
The scan is built upon a list of recurring patterns of DNS records **Type** and **Name**, that Cloudflare identifies as being used in existing active zones.
Since DNS record names are automatically appended with the domain that the records are set for, two completely different domains - `example.com` and `domain.test`, for example - would probably have a few matches if the lists of DNS records on their zones were compared side by side and the criterion was **Type**/**Name** combination.
Example
DNS management for **example.com**:
| Type | Name | Content |
| --------- | -------------- | ---------------------- |
| **A** | **@** | 192.0.2.0 |
| **CNAME** | **www** | example.com |
| **A** | **mail** | 192.0.2.100 |
| **MX** | **@** | mail.example.com |
| _CNAME_ | _my-store1900_ | example-shop.saas.test |
DNS management for **domain.test**:
| Type | Name | Content |
| --------- | ------------------------ | ----------------- |
| **A** | **@** | 192.0.2.8 |
| **CNAME** | **www** | domain.test |
| _CNAME_ | _specific-internal-name_ | services.test.dev |
| **A** | **mail** | 192.0.2.20 |
| **MX** | **@** | mail.domain.test |
The DNS records **Content** would be different for each zone but, based on record **Type** and **Name**, Cloudflare can identify recurring patterns and expect to find the same pairs when a new domain is added.
The [use cases section](#use-case-examples) below provides some examples of DNS records **Type**/**Name** combinations that the scan usually finds.
## Limitations
Since the DNS records quick scan is not tailored to the specific zone you are adding to Cloudflare, there can be cases where not all records are picked up.
For example, if you have very specific hostnames - such as `my-store1900.example.com` instead of `store.example.com` \- or if you have set up a [DKIM record ↗](https://www.cloudflare.com/learning/dns/dns-records/dns-dkim-record/) that uses a more custom name - `this._domainkey` instead of `default._domainkey` \- it is expected that the scan will not find the specific DNS records.
Important
You should always [review your DNS records](https://developers.cloudflare.com/dns/zone-setups/full-setup/setup/#2-review-your-dns-records) and manually add any missing ones before changing your nameservers.
## Use case examples
### Address records
| Type | Name | Content | TTL |
| ---- | ---- | ------- | ----- |
| A | @ | | |
The value `@` indicates the domain apex - in the example above, `domain.test` or `example.com`.
Virtually all zones on a [primary setup (full)](https://developers.cloudflare.com/dns/zone-setups/full-setup/) are expected to have at least one [address record ↗](https://www.cloudflare.com/learning/dns/dns-records/dns-a-record/) pointing to the IP address where the website or application is hosted.
### www records
| Type | Name | Content | TTL |
| ----- | ---- | -------- | ----- |
| CNAME | www | | |
| Type | Name | Content | TTL |
| ---- | ---- | ------- | ----- |
| A | www | | |
Since it is still common that visitors type `www.` in their browsers expecting to reach the domain, zones will usually have a [CNAME](https://developers.cloudflare.com/dns/manage-dns-records/reference/dns-record-types/#cname) or an [A](https://developers.cloudflare.com/dns/manage-dns-records/reference/dns-record-types/#a-and-aaaa) record named `www`. This allows queries for `www.` to return the expected result.
### Email records
| Type | Name | Mail server | TTL | Priority |
| ---- | ---- | ---------------- | ----- | ---------- |
| MX | @ | webmail. | | |
| Type | Name | Content | TTL |
| ----- | ---- | -------- | ----- |
| CNAME | mail | | |
| Type | Name | Content | TTL |
| ---- | ------- | ------- | ----- |
| A | webmail | | |
Mail exchanger (`MX`) and other record types combined with names like `mail`, `webmail`, or `smtp`, are also commonly found. As explained in the [Set up email records page](https://developers.cloudflare.com/dns/manage-dns-records/how-to/email-records/), there are several DNS records that can be used to make sure email reaches your mail server and to prevent other email senders from spoofing your domain.
Was this helpful?
YesNo
## On this page
[Docs](https://developers.cloudflare.com/)
```json
{"@context":"https://schema.org","@type":"TechArticle","@id":"https://developers.cloudflare.com/dns/zone-setups/reference/dns-quick-scan/#page","headline":"Records quick scan · Cloudflare DNS docs","description":"How Cloudflare scans and imports DNS records automatically.","url":"https://developers.cloudflare.com/dns/zone-setups/reference/dns-quick-scan/","inLanguage":"en","image":"https://developers.cloudflare.com/og-docs.png","dateModified":"2026-04-16","publisher":{"@type":"Organization","name":"Cloudflare","url":"https://www.cloudflare.com/"},"isPartOf":{"@type":"WebSite","@id":"https://developers.cloudflare.com/#website","name":"Cloudflare Docs","url":"https://developers.cloudflare.com/"}}
```
---
---
description: Zone status values and what they mean.
title: Zone status
image: https://developers.cloudflare.com/og-docs.png
---
[Skip to content](#main-content)
> Documentation Index
> Fetch the complete documentation index at: https://developers.cloudflare.com/dns/llms.txt
> Use this file to discover all available pages before exploring further.
# Zone status
Last updated Apr 21, 2026|Copy as Markdown|[View as Markdown](https://developers.cloudflare.com/dns/zone-setups/reference/domain-status/index.md)|[Agent setup](https://developers.cloudflare.com/agent-setup/)
Review information on the different statuses that your [zone](https://developers.cloudflare.com/dns/concepts/#zone) can have after you [add your website or application](https://developers.cloudflare.com/fundamentals/manage-domains/add-site/) to Cloudflare.
Zone status is also referred to as domain status. An **active** domain status is a requirement for your [application services configurations](https://developers.cloudflare.com/fundamentals/manage-domains/add-site/) to be applied. Refer to [How Cloudflare works](https://developers.cloudflare.com/fundamentals/concepts/how-cloudflare-works/) for details.
If your zone status changes, you will receive an email at the address associated with your account.
The following diagram gives you an overview of the different statuses applicable and how your zone may transition from one status to the other. For zones with an active paid subscription, the time to automatic deletion or purge may not correspond to this diagram. Refer to the sections below for details.
flowchart LR
accTitle: Zone status flow
accDescr: Diagram of the different statuses applicable to Cloudflare zones and the transitions from one status to the other.
A[Initializing]
B[Pending]
C[Active]
D[Moved]
E[Deleted]
F[Purged]
A-- Plan selection --> B
B-- Zone authentication --> C
C-- DNS checks fail --> D
D-- Moved for 7 days --> E
E-- Deleted for 7 days --> F
B-- Pending for 28 days --> E
A-- Initializing for 28 days --> E
Note
If you use the API to add your website or application to Cloudflare, your zone will be created directly in a **Pending** status. **Initializing** only applies to domains added via the dashboard.
## Initializing (Finish setup)
You have initiated the setup via dashboard, but did not select a plan for your zone. Your zone status is presented as **Finish setup** on the Cloudflare dashboard.
In this state, Cloudflare does not respond to any DNS queries for your domain.
If your zone is in **Finish setup** for over 28 days, it will be automatically [deleted](#deleted).
Note
If you have mistakenly added a zone to your account via dashboard, you can safely [remove it](https://developers.cloudflare.com/fundamentals/manage-domains/remove-domain/) after selecting the Free plan.
## Pending
Your zone status is presented as **Pending Nameserver Update** on the Cloudflare dashboard.
Cloudflare responds to DNS queries for pending zones on the assigned Cloudflare nameserver IPs, but your zone is still not active and cannot be used to [proxy traffic to Cloudflare](https://developers.cloudflare.com/dns/proxy-status/limitations/#pending-domains).
### Causes
* [Primary setup (Full)](https://developers.cloudflare.com/dns/zone-setups/full-setup/): You have either not [changed your authoritative nameservers](https://developers.cloudflare.com/dns/nameservers/update-nameservers/) or your change has not yet been authenticated by Cloudflare.
* [CNAME setup (Partial)](https://developers.cloudflare.com/dns/zone-setups/partial-setup/): You have either not added the verification TXT record to your authoritative DNS provider or the record has not yet been authenticated by Cloudflare.
* [Cloudflare as Secondary DNS provider](https://developers.cloudflare.com/dns/zone-setups/zone-transfers/cloudflare-as-secondary/): When you have either not [changed your authoritative nameservers](https://developers.cloudflare.com/dns/nameservers/update-nameservers/) to include the Cloudflare Secondary nameservers or your change has not yet been authenticated by Cloudflare.
After you add your domain, Cloudflare performs checks on a schedule to confirm you have updated your nameservers. The first check occurs after 60 seconds and the following attempts happen at gradually increased intervals. You can re-trigger the check [via API](https://developers.cloudflare.com/api/resources/zones/subresources/activation%5Fcheck/methods/trigger/) or on the Dashboard, in the respective domain [Overview page ↗](https://dash.cloudflare.com/?to=/:account/:zone/).
The activation check behavior depends on your zone setup:
| Zone setup | Activation requirement |
| ---------------------------------------------------------------------------------------------------------------------------------------------------------------------------------------------------------------------------------------------------------------------------------------------------------------------------------- | --------------------------------------------------------------------------------------------------------------------------------------------------- |
| [Primary setup (full)](https://developers.cloudflare.com/dns/zone-setups/full-setup/) without [multi-provider DNS](https://developers.cloudflare.com/dns/nameservers/nameserver-options/#multi-provider-dns) | At the registrar (or parent zone), only the assigned Cloudflare nameservers must be listed. Any nameservers from other DNS providers cause failure. |
| [Primary setup (full)](https://developers.cloudflare.com/dns/zone-setups/full-setup/) with [multi-provider DNS](https://developers.cloudflare.com/dns/nameservers/nameserver-options/#multi-provider-dns) enabled, or [secondary setup](https://developers.cloudflare.com/dns/zone-setups/zone-transfers/cloudflare-as-secondary/) | At the registrar (or parent zone), the assigned Cloudflare nameservers must be present. Nameservers from other DNS providers are allowed. |
| [CNAME setup (partial)](https://developers.cloudflare.com/dns/zone-setups/partial-setup/) | The verification TXT record must be present on your authoritative DNS provider. Nameservers at the registrar are not changed. |
### Expected behavior for different plans
If your domain is on the Free plan, it will be automatically deleted if it is not activated within 28 days.
Any pending zone with a paid plan (Pro, Business, Enterprise) will remain pending until the plan is removed, or the domain is activated or [removed from Cloudflare](https://developers.cloudflare.com/fundamentals/manage-domains/remove-domain/).
Do not use pending zones in production
Make sure not to use pending zones for production traffic. Cloudflare responds to DNS queries for pending zones on the assigned Cloudflare nameserver IPs but there are associated risks, especially if you do not use [zone holds](https://developers.cloudflare.com/fundamentals/account/account-security/zone-holds/).
For Enterprise zones, if you want to adjust settings before zone activation, Logpush for [DNS logs](https://developers.cloudflare.com/logs/logpush/logpush-job/datasets/zone/dns%5Flogs/) and [DNS Zone Transfer](https://developers.cloudflare.com/dns/zone-setups/zone-transfers/) configuration work as expected in pending state.
## Active
Cloudflare has authenticated your [nameserver changes](https://developers.cloudflare.com/dns/nameservers/update-nameservers/) or [verification TXT record](https://developers.cloudflare.com/dns/zone-setups/partial-setup/setup/#2-verify-ownership-for-your-domain) and you can proxy domain traffic through Cloudflare. For more details refer to [How Cloudflare works](https://developers.cloudflare.com/fundamentals/concepts/how-cloudflare-works/) and [Domain configurations](https://developers.cloudflare.com/fundamentals/manage-domains/add-site/).
## Moved
Your domain has failed multiple DNS checks, where either the Cloudflare nameservers are no longer present on your domain's `NS` records ([Primary setup (Full)](https://developers.cloudflare.com/dns/zone-setups/full-setup/)) or no `SOA` record is returned for the zone ([CNAME setup (Partial)](https://developers.cloudflare.com/dns/zone-setups/partial-setup/)).
### Expected behavior for different plans
If your domain is on the Free plan, it will be automatically deleted 7 days after it entered the moved status.
For moved zones with a paid plan (Pro, Business, Enterprise), deletion will occur after 7 days if any of the following is observed:
* The paid plan is removed.
* The domain is activated in another Cloudflare account.
You can also [manually remove](https://developers.cloudflare.com/fundamentals/manage-domains/remove-domain/) your domain from Cloudflare.
## Deleted
Your zone has been archived. Cloudflare still responds to DNS queries for deleted zones on the assigned Cloudflare nameserver IPs (for non-deleted DNS records) and you can re-add the domain to Cloudflare by following the [regular onboarding flow](https://developers.cloudflare.com/fundamentals/manage-domains/add-site/).
New nameserver assignment
When you re-add a previously deleted domain, Cloudflare assigns a new nameserver pair as a security measure. If you are not using Cloudflare Registrar, make sure to [update your registrar](https://developers.cloudflare.com/dns/nameservers/update-nameservers/) with the new nameservers after re-adding the domain. Refer to [nameserver assignment](https://developers.cloudflare.com/dns/nameservers/nameserver-options/#assignment-method) for details.
After being deleted for seven days, zones are automatically [purged](#purged).
## Purged
After a zone is deleted for seven days, it will be purged. Cloudflare does not respond to DNS queries for purged zones and, unlike [deleted zones](#deleted), this status cannot be reverted. In this case, even if you re-add the domain to the same Cloudflare account, none of the zone settings are expected to be restored.
Was this helpful?
YesNo
## On this page
[Docs](https://developers.cloudflare.com/)
```json
{"@context":"https://schema.org","@type":"TechArticle","@id":"https://developers.cloudflare.com/dns/zone-setups/reference/domain-status/#page","headline":"Zone status · Cloudflare DNS docs","description":"Zone status values and what they mean.","url":"https://developers.cloudflare.com/dns/zone-setups/reference/domain-status/","inLanguage":"en","image":"https://developers.cloudflare.com/og-docs.png","dateModified":"2026-04-21","publisher":{"@type":"Organization","name":"Cloudflare","url":"https://www.cloudflare.com/"},"isPartOf":{"@type":"WebSite","@id":"https://developers.cloudflare.com/#website","name":"Cloudflare Docs","url":"https://developers.cloudflare.com/"}}
```
---
---
description: Remove a zone from your Cloudflare account.
title: Zone removal
image: https://developers.cloudflare.com/og-docs.png
---
[Skip to content](#main-content)
> Documentation Index
> Fetch the complete documentation index at: https://developers.cloudflare.com/dns/llms.txt
> Use this file to discover all available pages before exploring further.
# Zone removal
Last updated Apr 16, 2026|Copy as Markdown|[View as Markdown](https://developers.cloudflare.com/dns/zone-setups/removal/index.md)|[Agent setup](https://developers.cloudflare.com/agent-setup/)
If domains on Free zones remain in the [Pending](https://developers.cloudflare.com/dns/zone-setups/reference/domain-status/#pending) or [Moved](https://developers.cloudflare.com/dns/zone-setups/reference/domain-status/#moved) status for too long, Cloudflare automatically removes them from your account and the Cloudflare network. Refer to [zone statuses](https://developers.cloudflare.com/dns/zone-setups/reference/domain-status/) for more details.
You can also [manually remove a domain](https://developers.cloudflare.com/fundamentals/manage-domains/remove-domain/) from Cloudflare.
If you need to re-add a domain to your account, follow the [regular onboarding flow](https://developers.cloudflare.com/fundamentals/manage-domains/add-site/). Cloudflare will assign a new nameserver pair when you re-add the domain, so you must [update your registrar](https://developers.cloudflare.com/dns/nameservers/update-nameservers/) with the new nameservers. Refer to [nameserver assignment](https://developers.cloudflare.com/dns/nameservers/nameserver-options/#assignment-method) for details.
Purged zones
By default, your zone will be automatically purged seven days after the removal. In this case, even if you re-add the domain to the same Cloudflare account, none of the zone settings are expected to be restored. Refer to [zone statuses](https://developers.cloudflare.com/dns/zone-setups/reference/domain-status/) for more details.
Was this helpful?
YesNo
## On this page
[Docs](https://developers.cloudflare.com/)
```json
{"@context":"https://schema.org","@type":"TechArticle","@id":"https://developers.cloudflare.com/dns/zone-setups/removal/#page","headline":"Zone removal · Cloudflare DNS docs","description":"Remove a zone from your Cloudflare account.","url":"https://developers.cloudflare.com/dns/zone-setups/removal/","inLanguage":"en","image":"https://developers.cloudflare.com/og-docs.png","dateModified":"2026-04-16","publisher":{"@type":"Organization","name":"Cloudflare","url":"https://www.cloudflare.com/"},"isPartOf":{"@type":"WebSite","@id":"https://developers.cloudflare.com/#website","name":"Cloudflare Docs","url":"https://developers.cloudflare.com/"}}
```
---
---
description: Add a subdomain as a standalone zone in Cloudflare.
title: Subdomain setup
image: https://developers.cloudflare.com/og-docs.png
---
[Skip to content](#main-content)
> Documentation Index
> Fetch the complete documentation index at: https://developers.cloudflare.com/dns/llms.txt
> Use this file to discover all available pages before exploring further.
# Subdomain setup
Last updated Jun 24, 2026|Copy as Markdown|[View as Markdown](https://developers.cloudflare.com/dns/zone-setups/subdomain-setup/index.md)|[Agent setup](https://developers.cloudflare.com/agent-setup/)
When you use a subdomain setup, you can manage the [Cloudflare configurations](https://developers.cloudflare.com/fundamentals/concepts/how-cloudflare-works/) for one or more subdomains separately from those associated with your apex domain. This means that, on your [account homepage ↗](https://dash.cloudflare.com/?to=/:account/), you would find websites like `example.com` or `blog.example.com` listed as separate zones.
Note
This is different from simply creating a subdomain for a site you already have in Cloudflare. If you do not need separate Cloudflare configuration for your subdomain, refer to [Create a subdomain record](https://developers.cloudflare.com/dns/manage-dns-records/how-to/create-subdomain/).
You might use this setup when you want to share access to a specific subdomain's settings with different teams, but have stricter controls on your apex domain. For example, a subdomain setup could allow your documentation team to manage the Cloudflare configuration for `docs.example.com`, while preventing them from adjusting any settings on `example.com`.
Subdomain setups are also useful when different subdomains require entirely different settings. For example, you may have different requirements for `docs.example.com`, `blog.example.com`, and `community.example.com`.
## Availability
| | Free | Pro | Business | Enterprise |
| ------------ | ---- | --- | -------- | ---------- |
| Availability | No | No | No | Yes |
Setup combinations
The availability of different setups depends on both the parent zone setup and the setup used for the child zone. Review the [available setups](https://developers.cloudflare.com/dns/zone-setups/subdomain-setup/setup/#available-setups) to understand what combinations are supported.
### Access applications
To use subdomain setups with [Cloudflare Access](https://developers.cloudflare.com/cloudflare-one/access-controls/policies/), note that:
* If the child zone is in a pending state when you create the Access application, your configuration will not automatically apply when you activate the zone. You must also re-save the Access application once your subdomain setup is active.
* If you split out a subdomain which already has an Access application, you will also need to re-save the Access application to associate it with the new child zone.
## Resources
* [Setup](https://developers.cloudflare.com/dns/zone-setups/subdomain-setup/setup/)
* [Enable DNSSEC](https://developers.cloudflare.com/dns/zone-setups/subdomain-setup/dnssec/)
* [Migrate to new account](https://developers.cloudflare.com/dns/zone-setups/subdomain-setup/move-to-new-account/)
* [Rollback](https://developers.cloudflare.com/dns/zone-setups/subdomain-setup/rollback/)
## FAQ
### Why does my parent zone show DNS queries for child zone hostnames?
If you have both a parent zone (for example, `example.com`) and a child subdomain zone (for example, `sub.example.com`) on Cloudflare, the parent zone's DNS analytics may show queries for hostnames belonging to the child zone.
This is normal DNS behavior — recursive resolvers query the parent zone first to get the referral (NS records) pointing to the child zone's nameservers. These referral queries appear in the parent zone's analytics even though the authoritative answer comes from the child zone.
Was this helpful?
YesNo
## On this page
[Docs](https://developers.cloudflare.com/)
```json
{"@context":"https://schema.org","@type":"TechArticle","@id":"https://developers.cloudflare.com/dns/zone-setups/subdomain-setup/#page","headline":"Subdomain setup · Cloudflare DNS docs","description":"Add a subdomain as a standalone zone in Cloudflare.","url":"https://developers.cloudflare.com/dns/zone-setups/subdomain-setup/","inLanguage":"en","image":"https://developers.cloudflare.com/og-docs.png","dateModified":"2026-06-24","publisher":{"@type":"Organization","name":"Cloudflare","url":"https://www.cloudflare.com/"},"isPartOf":{"@type":"WebSite","@id":"https://developers.cloudflare.com/#website","name":"Cloudflare Docs","url":"https://developers.cloudflare.com/"}}
```
---
---
description: Enable DNSSEC for a subdomain zone.
title: Enable DNSSEC
image: https://developers.cloudflare.com/og-docs.png
---
[Skip to content](#main-content)
> Documentation Index
> Fetch the complete documentation index at: https://developers.cloudflare.com/dns/llms.txt
> Use this file to discover all available pages before exploring further.
# Enable DNSSEC
Last updated Apr 16, 2026|Copy as Markdown|[View as Markdown](https://developers.cloudflare.com/dns/zone-setups/subdomain-setup/dnssec/index.md)|[Agent setup](https://developers.cloudflare.com/agent-setup/)
As opposed to the [normal process](https://developers.cloudflare.com/dns/dnssec/) for enabling DNSSEC, DNSSEC with a subdomain setup requires a few additional steps.
## Requirements
To use DNSSEC for a subdomain setup, DNSSEC must be enabled on the parent zone. After enabling DNSSEC on the parent zone, you should wait the minimum TTL value (specified in the [SOA record ↗](https://www.cloudflare.com/learning/dns/dns-records/dns-soa-record/) of the parent zone) to ensure DNS resolvers provide the same DNS query responses.
## Setup
1. [Create](https://developers.cloudflare.com/dns/zone-setups/subdomain-setup/setup/#how-to) the child zone.
2. Make sure the child zone is [active](https://developers.cloudflare.com/dns/zone-setups/reference/domain-status/) on Cloudflare and that DNS resolution is working properly for your subdomain.
3. [Enable DNSSEC](https://developers.cloudflare.com/dns/dnssec/) for the child zone and save the information provided within the DS record output.
4. On the [**DNS Records** ↗](https://dash.cloudflare.com/?to=/:account/:zone/dns/records) page of the parent zone, [add the DS record](https://developers.cloudflare.com/dns/manage-dns-records/how-to/create-dns-records/) from the previous step.
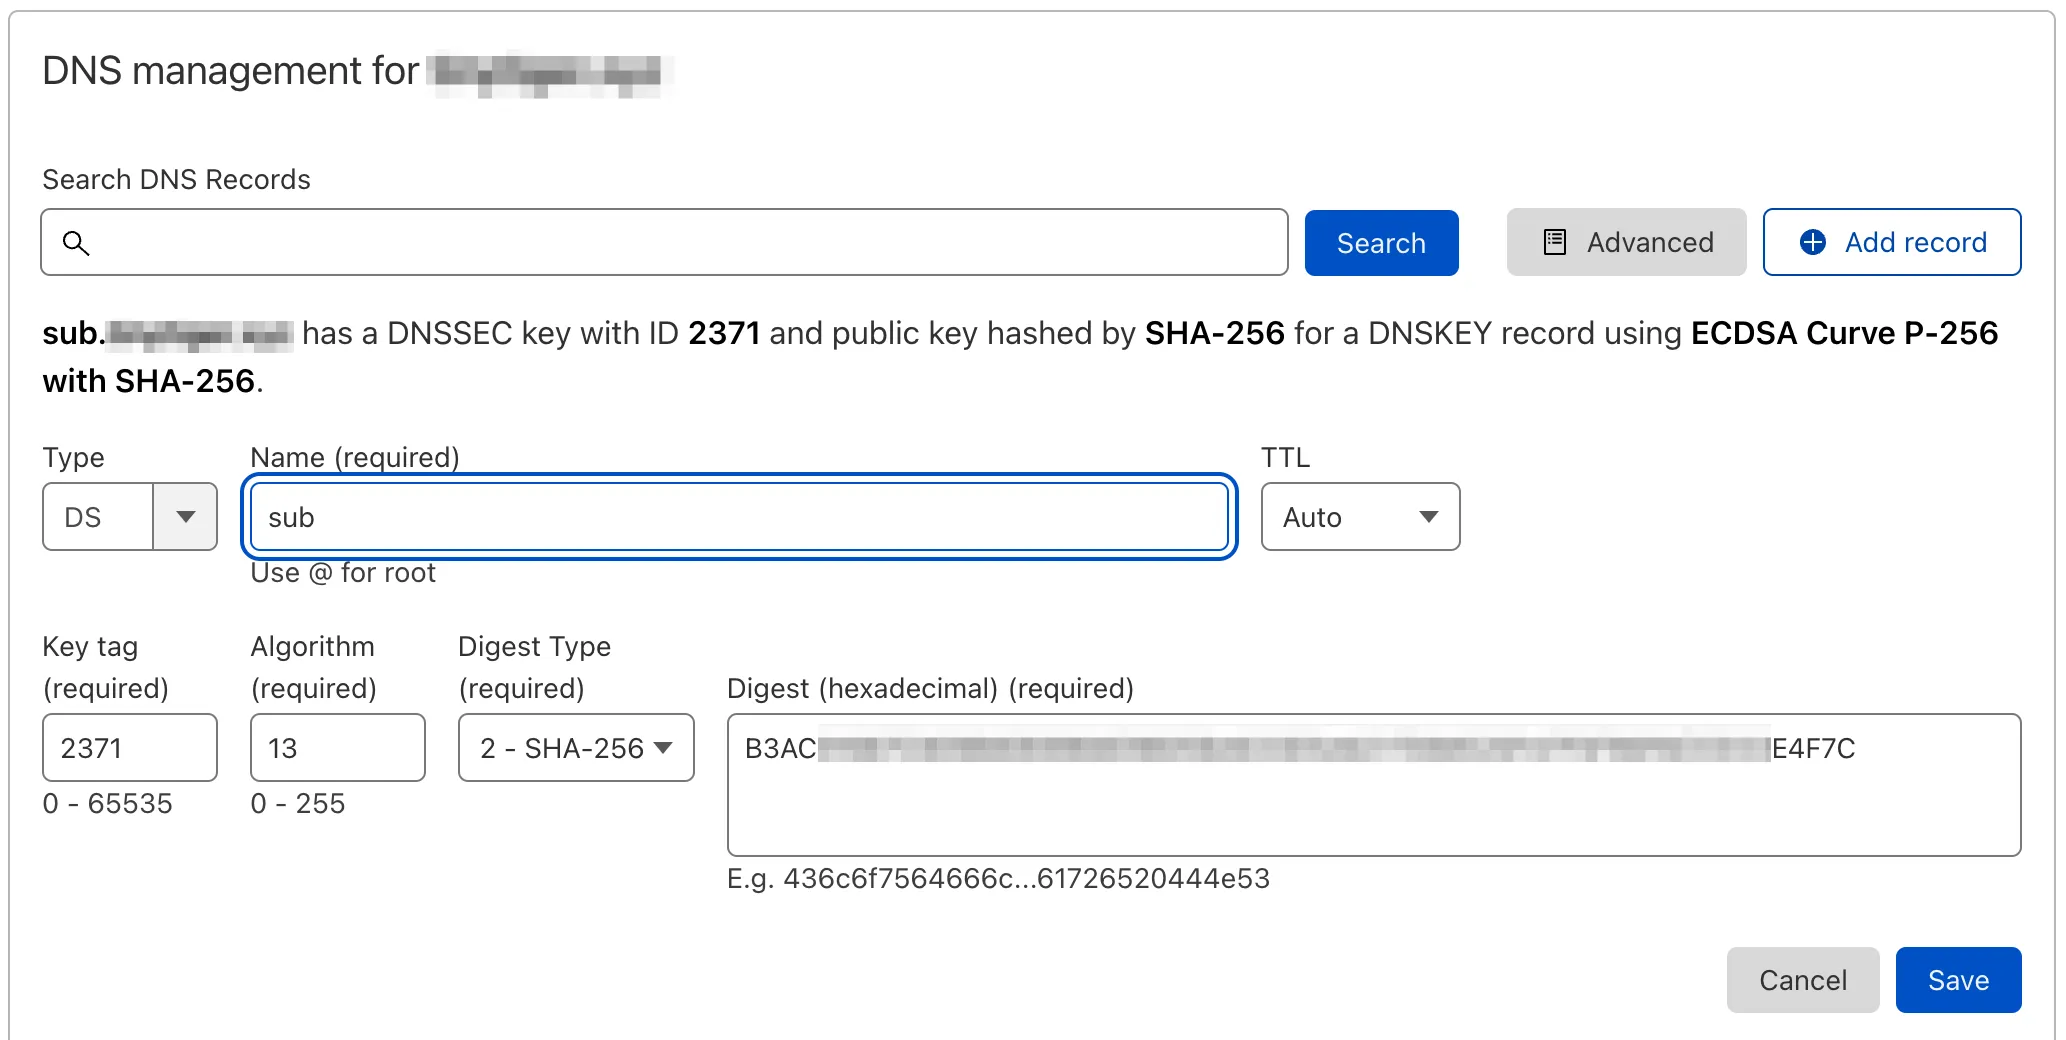
5. Add an A record to the child zone to validate DNS resolution.
6. Wait two to six hours. Then, [test the A record](https://developers.cloudflare.com/dns/dnssec/troubleshooting/#test-dnssec-with-dig) added in the previous step using multiple DNS resolvers with DNSSEC validation (`1.1.1.1`, `8.8.8.8`, and `9.9.9.9`). For example, if the A record is for `test.child.example.com`: `dig test.child.example.com +dnssec @1.1.1.1`.
Was this helpful?
YesNo
## On this page
[Docs](https://developers.cloudflare.com/)
```json
{"@context":"https://schema.org","@type":"TechArticle","@id":"https://developers.cloudflare.com/dns/zone-setups/subdomain-setup/dnssec/#page","headline":"Enable DNSSEC - subdomain setup · Cloudflare DNS docs","description":"Enable DNSSEC for a subdomain zone.","url":"https://developers.cloudflare.com/dns/zone-setups/subdomain-setup/dnssec/","inLanguage":"en","image":"https://developers.cloudflare.com/og-docs.png","dateModified":"2026-04-16","publisher":{"@type":"Organization","name":"Cloudflare","url":"https://www.cloudflare.com/"},"isPartOf":{"@type":"WebSite","@id":"https://developers.cloudflare.com/#website","name":"Cloudflare Docs","url":"https://developers.cloudflare.com/"}}
```
---
---
description: Move a subdomain zone to a different Cloudflare account.
title: Migrate to new account
image: https://developers.cloudflare.com/og-docs.png
---
[Skip to content](#main-content)
> Documentation Index
> Fetch the complete documentation index at: https://developers.cloudflare.com/dns/llms.txt
> Use this file to discover all available pages before exploring further.
# Migrate to new account
Last updated Apr 16, 2026|Copy as Markdown|[View as Markdown](https://developers.cloudflare.com/dns/zone-setups/subdomain-setup/move-to-new-account/index.md)|[Agent setup](https://developers.cloudflare.com/agent-setup/)
When using a [subdomain setup](https://developers.cloudflare.com/dns/zone-setups/subdomain-setup/), you can have your subdomain as a separate zone within the same account as the parent domain or within a different account.
If you have already [created a standalone subdomain zone](https://developers.cloudflare.com/dns/zone-setups/subdomain-setup/setup/) within the same account, you can still move it to a separate account.
1. [Add the subdomain](https://developers.cloudflare.com/fundamentals/manage-domains/add-site/) to a new Cloudflare account.
2. In the original subdomain zone, [export](https://developers.cloudflare.com/dns/manage-dns-records/how-to/import-and-export/#export-records) the DNS records.
3. Review the exported records, delete any unnecessary ones, and [import](https://developers.cloudflare.com/dns/manage-dns-records/how-to/import-and-export/#import-records) them into the new subdomain zone.
4. Update the `NS` records in the parent zone to refer to the newly assigned nameservers of the child zone.
Was this helpful?
YesNo
## On this page
[Docs](https://developers.cloudflare.com/)
```json
{"@context":"https://schema.org","@type":"TechArticle","@id":"https://developers.cloudflare.com/dns/zone-setups/subdomain-setup/move-to-new-account/#page","headline":"Migrate subdomain to a new account · Cloudflare DNS docs","description":"Move a subdomain zone to a different Cloudflare account.","url":"https://developers.cloudflare.com/dns/zone-setups/subdomain-setup/move-to-new-account/","inLanguage":"en","image":"https://developers.cloudflare.com/og-docs.png","dateModified":"2026-04-16","publisher":{"@type":"Organization","name":"Cloudflare","url":"https://www.cloudflare.com/"},"isPartOf":{"@type":"WebSite","@id":"https://developers.cloudflare.com/#website","name":"Cloudflare Docs","url":"https://developers.cloudflare.com/"}}
```
---
---
description: Roll back a subdomain zone setup.
title: Rollback
image: https://developers.cloudflare.com/og-docs.png
---
[Skip to content](#main-content)
> Documentation Index
> Fetch the complete documentation index at: https://developers.cloudflare.com/dns/llms.txt
> Use this file to discover all available pages before exploring further.
# Rollback
Last updated Apr 16, 2026|Copy as Markdown|[View as Markdown](https://developers.cloudflare.com/dns/zone-setups/subdomain-setup/rollback/index.md)|[Agent setup](https://developers.cloudflare.com/agent-setup/)
Refer to the following process to understand how you can rollback a [subdomain setup](https://developers.cloudflare.com/dns/zone-setups/subdomain-setup/) and recreate the corresponding subdomain DNS records in an existing parent zone within Cloudflare.
## Before you begin
* This guide assumes both your child domain (`blog.example.com`) and its parent domain (`example.com`) are in Cloudflare.
* In the child zone, review and [export](https://developers.cloudflare.com/dns/manage-dns-records/how-to/import-and-export/#export-records) the DNS records.
Important
This process may incur in downtime, as it is not possible to add address records (A/AAAA) while still having [corresponding NS records at the same name](https://developers.cloudflare.com/dns/manage-dns-records/troubleshooting/existing-ns-record/) within the parent zone.
## Steps
1. (Optional) In the parent zone, migrate over any settings - [WAF custom rules](https://developers.cloudflare.com/waf/custom-rules/), [Rules](https://developers.cloudflare.com/rules/), [Workers](https://developers.cloudflare.com/workers/), and more - that might be needed for the child domain.
2. (Optional) If necessary, [order an advanced SSL certificate](https://developers.cloudflare.com/ssl/edge-certificates/advanced-certificate-manager/) that covers the child domain and any deeper subdomains.
3. In the parent zone, go to the [**DNS Records** ↗](https://dash.cloudflare.com/?to=/:account/:zone/dns/records) page.
4. Delete one of the `NS` records defined for the child domain.
5. Edit the remaining `NS` record to create the subdomain address record.
6. [Import](https://developers.cloudflare.com/dns/manage-dns-records/how-to/import-and-export/#import-records) the records you had obtained [before you began](#before-you-begin).
Was this helpful?
YesNo
## On this page
[Docs](https://developers.cloudflare.com/)
```json
{"@context":"https://schema.org","@type":"TechArticle","@id":"https://developers.cloudflare.com/dns/zone-setups/subdomain-setup/rollback/#page","headline":"Rollback subdomain setup · Cloudflare DNS docs","description":"Roll back a subdomain zone setup.","url":"https://developers.cloudflare.com/dns/zone-setups/subdomain-setup/rollback/","inLanguage":"en","image":"https://developers.cloudflare.com/og-docs.png","dateModified":"2026-04-16","publisher":{"@type":"Organization","name":"Cloudflare","url":"https://www.cloudflare.com/"},"isPartOf":{"@type":"WebSite","@id":"https://developers.cloudflare.com/#website","name":"Cloudflare Docs","url":"https://developers.cloudflare.com/"}}
```
---
---
description: Set up a subdomain zone in Cloudflare.
title: Setup
image: https://developers.cloudflare.com/og-docs.png
---
[Skip to content](#main-content)
> Documentation Index
> Fetch the complete documentation index at: https://developers.cloudflare.com/dns/llms.txt
> Use this file to discover all available pages before exploring further.
# Setup
Last updated Apr 29, 2026|Copy as Markdown|[View as Markdown](https://developers.cloudflare.com/dns/zone-setups/subdomain-setup/setup/index.md)|[Agent setup](https://developers.cloudflare.com/agent-setup/)
Availability
Subdomain setup is only available for Enterprise accounts. If you only want to create a subdomain for your site in Cloudflare, refer to [Create a subdomain record](https://developers.cloudflare.com/dns/manage-dns-records/how-to/create-subdomain/).
[Subdomain setup](https://developers.cloudflare.com/dns/zone-setups/subdomain-setup/) relies on a process known as delegation. When, in a parent domain such as `example.com`, an [NS record ↗](https://www.cloudflare.com/learning/dns/dns-records/dns-ns-record/) is created for a subdomain `blog.example.com`, this means that DNS management for the subdomain can be done separately, in its own [DNS zone](https://developers.cloudflare.com/dns/concepts/#zone).
flowchart TD
accTitle: Example of parent zone and subdomains
A[example.com] --> B[docs.example.com]
A[example.com] --> C[blog.example.com]
subgraph Parent domain
A
end
subgraph Subdomains
B
C
end
---
## Available setups
When configuring a subdomain setup, its availability will depend on both the parent zone setup and the setup used for the child zone. A child zone holds DNS management for a delegated subdomain.
| Parent zone | Child zone | Available |
| ------------------------------------------------------------------------------------------------------------------------------------------------------------------------------- | ------------------------------------------------------------------------------------------------------ | --------- |
| [Full](https://developers.cloudflare.com/dns/zone-setups/full-setup/) or [Secondary](https://developers.cloudflare.com/dns/zone-setups/zone-transfers/cloudflare-as-secondary/) | [Full](https://developers.cloudflare.com/dns/zone-setups/full-setup/) | Yes |
| [Full](https://developers.cloudflare.com/dns/zone-setups/full-setup/) or [Secondary](https://developers.cloudflare.com/dns/zone-setups/zone-transfers/cloudflare-as-secondary/) | [Secondary](https://developers.cloudflare.com/dns/zone-setups/zone-transfers/cloudflare-as-secondary/) | Yes |
| [Full](https://developers.cloudflare.com/dns/zone-setups/full-setup/) or [Secondary](https://developers.cloudflare.com/dns/zone-setups/zone-transfers/cloudflare-as-secondary/) | [Partial](https://developers.cloudflare.com/dns/zone-setups/partial-setup/) | No |
| [Partial](https://developers.cloudflare.com/dns/zone-setups/partial-setup/) | [Full](https://developers.cloudflare.com/dns/zone-setups/full-setup/) | Yes |
| [Partial](https://developers.cloudflare.com/dns/zone-setups/partial-setup/) | [Secondary](https://developers.cloudflare.com/dns/zone-setups/zone-transfers/cloudflare-as-secondary/) | Yes |
| [Partial](https://developers.cloudflare.com/dns/zone-setups/partial-setup/) | [Partial](https://developers.cloudflare.com/dns/zone-setups/partial-setup/) | Yes |
Subdomain zones in partial setup are not delegated
Subdomains using a CNAME setup (partial) represent an exception in the sense that delegation does not apply in this context. As explained in the dedicated [CNAME setup (Partial) section](https://developers.cloudflare.com/dns/zone-setups/partial-setup/), this setup is intended to simply proxy individual subdomains through Cloudflare. For completeness, however, this is listed as an option in this table and the [how-to guide](https://developers.cloudflare.com/dns/zone-setups/subdomain-setup/setup/parent-on-partial/) has detailed explanation on how to achieve a subdomain zone using a CNAME setup (partial).
This table assumes zones that are in an [active status](https://developers.cloudflare.com/dns/zone-setups/reference/domain-status/). For example, if you need to add the parent zone to Cloudflare when its child zone already exists in a CNAME setup (partial), you can [convert the parent zone to a CNAME setup (partial)](https://developers.cloudflare.com/dns/zone-setups/partial-setup/setup/#1-convert-your-zone-and-review-dns-records) while it is still in pending status.
---
## How to
Refer to the following guides to learn how to configure a subdomain setup depending on the setup used for the parent zone:
* [Parent zone on full setup](https://developers.cloudflare.com/dns/zone-setups/subdomain-setup/setup/parent-on-full/)
* [Parent zone on partial setup](https://developers.cloudflare.com/dns/zone-setups/subdomain-setup/setup/parent-on-partial/)
Although the how-to guides in this documentation are focused on both parent domains and subdomains existing in Cloudflare, it is also possible to achieve a subdomain setup in Cloudflare while the parent domain exists in a different DNS provider.
---
## SSL/TLS certificates
When using subdomain setup, you should consider possible interactions between parent zone and child zone configurations that could impact [SSL/TLS certificates](https://developers.cloudflare.com/ssl/) provisioning.
If a certificate is already active on the child zone for a specific hostname (`subdomain.example.com`), any certificate pack containing that exact hostname in the parent zone (`example.com`) will fail validation.
## Access applications
To use subdomain setups with [Cloudflare Access](https://developers.cloudflare.com/cloudflare-one/access-controls/policies/), note that:
* If the child zone is in a pending state when you create the Access application, your configuration will not automatically apply when you activate the zone. You must also re-save the Access application once your subdomain setup is active.
* If you split out a subdomain which already has an Access application, you will also need to re-save the Access application to associate it with the new child zone.
Was this helpful?
YesNo
## On this page
[Docs](https://developers.cloudflare.com/)
```json
{"@context":"https://schema.org","@type":"TechArticle","@id":"https://developers.cloudflare.com/dns/zone-setups/subdomain-setup/setup/#page","headline":"Subdomain delegation and available setups · Cloudflare DNS docs","description":"Set up a subdomain zone in Cloudflare.","url":"https://developers.cloudflare.com/dns/zone-setups/subdomain-setup/setup/","inLanguage":"en","image":"https://developers.cloudflare.com/og-docs.png","dateModified":"2026-04-29","publisher":{"@type":"Organization","name":"Cloudflare","url":"https://www.cloudflare.com/"},"isPartOf":{"@type":"WebSite","@id":"https://developers.cloudflare.com/#website","name":"Cloudflare Docs","url":"https://developers.cloudflare.com/"}}
```
---
---
description: Set up subdomain zone when parent uses full setup.
title: Parent zone on full setup
image: https://developers.cloudflare.com/og-docs.png
---
[Skip to content](#main-content)
> Documentation Index
> Fetch the complete documentation index at: https://developers.cloudflare.com/dns/llms.txt
> Use this file to discover all available pages before exploring further.
# Parent zone on full setup
Last updated Apr 16, 2026|Copy as Markdown|[View as Markdown](https://developers.cloudflare.com/dns/zone-setups/subdomain-setup/setup/parent-on-full/index.md)|[Agent setup](https://developers.cloudflare.com/agent-setup/)
When the parent zone is using a [primary setup (full)](https://developers.cloudflare.com/dns/zone-setups/full-setup/)[1](#user-content-fn-1), the steps to set up your child zone depend on whether the subdomain already exists in the parent domain.
Note
The following steps are similar if your Cloudflare parent zone is in a secondary setup, with the only difference that you will use your external primary DNS provider to make any necessary adjustments to DNS records.
## Subdomain does not exist
If you have not yet created DNS records covering your subdomain in the parent zone:
1. Add the subdomain to a Cloudflare account as a new zone. It can be the same account where the parent zone exists or a different one.
2. Complete the configuration accordingly for [full](https://developers.cloudflare.com/dns/zone-setups/full-setup/setup/) or [secondary](https://developers.cloudflare.com/dns/zone-setups/zone-transfers/cloudflare-as-secondary/setup/) setup.
3. Get the nameserver names for the subdomain. These can be found within your newly created child zone on the [**DNS Records** ↗](https://dash.cloudflare.com/?to=/:account/:zone/dns/records) page, and will **not** be the same nameservers as the ones used in the parent zone.
4. On the [**DNS Records** ↗](https://dash.cloudflare.com/?to=/:account/:zone/dns/records) page of the parent zone, [add](https://developers.cloudflare.com/dns/manage-dns-records/how-to/create-dns-records/) two `NS` records for the subdomain you want to delegate.
For example, if you delegated `www.example.com`, you might add the following records to `example.com`:
| **Type** | **Name** | **Content** |
| -------- | -------- | ------------------------- |
| NS | www | john.ns.cloudflare.com |
| NS | www | melinda.ns.cloudflare.com |
5. After a few minutes, the child zone will be active.
6. Create the various DNS records needed for your child zone.
7. (Optional) [Enable DNSSEC](https://developers.cloudflare.com/dns/zone-setups/subdomain-setup/dnssec/) on the child zone.
## Subdomain already exists
If you have already created DNS records covering your subdomain in the parent zone:
1. Add the subdomain to a Cloudflare account as a new zone. It can be the same account where the parent zone exists or a different one.
2. Complete the configuration accordingly for [full](https://developers.cloudflare.com/dns/zone-setups/full-setup/setup/) or [secondary](https://developers.cloudflare.com/dns/zone-setups/zone-transfers/cloudflare-as-secondary/setup/) setup.
3. In your child zone, make sure you have all DNS records that relate to the subdomain. This includes all DNS records deeper than the delegated subdomain. For example, if you are delegating `www.example.com`, you should also move over records for `api.www.example.com`.
Note
If your child zone is on a primary setup (full), consider [exporting](https://developers.cloudflare.com/dns/manage-dns-records/how-to/import-and-export/#export-records) records from the parent zone, deleting all unnecessary records, and then [importing](https://developers.cloudflare.com/dns/manage-dns-records/how-to/import-and-export/#import-records) the records into your new zone.
4. If the parent zone is on Cloudflare, make sure that you migrate over any settings ([WAF custom rules](https://developers.cloudflare.com/waf/custom-rules/), [Rules](https://developers.cloudflare.com/rules/), [Workers](https://developers.cloudflare.com/workers/), and more) that might be needed for the child zone.
5. In the child zone, [order an advanced SSL certificate](https://developers.cloudflare.com/ssl/edge-certificates/advanced-certificate-manager/) that covers the child subdomain and any deeper subdomains (if present).
6. Get the nameserver names for the subdomain. These can be found within your newly created child zone on the [**DNS Records** ↗](https://dash.cloudflare.com/?to=/:account/:zone/dns/records) page, and will **not** be the same nameservers as the ones used in the parent zone.
Note
If the parent zone is on Cloudflare, steps 7 and 9 below can be achieved via API. Use the [Batch DNS records](https://developers.cloudflare.com/api/resources/dns/subresources/records/methods/batch/) endpoint to delete and create or update DNS records within a single request. Refer to [Batch record changes](https://developers.cloudflare.com/dns/manage-dns-records/how-to/batch-record-changes/) for further guidance.
7. On the [**DNS Records** ↗](https://dash.cloudflare.com/?to=/:account/:zone/dns/records) page of the parent zone, update existing address records (`A/AAAA`) on your subdomain to `NS` records. If you only have one address record, update the existing one and add a new `NS` record. If you have multiple address records, update any two of them.
For example, to delegate the subdomain `www.example.com`, the updated records in the parent zone `example.com` should contain `NS` records similar to the following:
| **Type** | **Name** | **Content** |
| -------- | -------- | ---------------------- |
| NS | www | john.ns.cloudflare.com |
| NS | www | adam.ns.cloudflare.com |
In this example, `john.ns.cloudflare.com` and `adam.ns.cloudflare.com` represent the subdomain nameservers that you got from step 6.
8. Flush the address records of your subdomain in public resolvers ([1.1.1.1 ↗](https://1.1.1.1/purge-cache/) and [8.8.8.8 ↗](https://developers.google.com/speed/public-dns/cache)).
9. On the [**DNS Records** ↗](https://dash.cloudflare.com/?to=/:account/:zone/dns/records) page of the parent zone, [delete](https://developers.cloudflare.com/dns/manage-dns-records/how-to/create-dns-records/#delete-dns-records) all the remaining records on the delegated subdomain, except the `NS` records that you created in step 7.
Also delete all DNS records deeper than the delegated subdomain. For example, if you are delegating `www.example.com`, records for `api.www.example.com` should only exist in the new child zone.
10. Within a short period of time, the child zone should be active.
11. (Optional) [Enable DNSSEC](https://developers.cloudflare.com/dns/zone-setups/subdomain-setup/dnssec/) on the child zone.
## Footnotes
1. Meaning that Cloudflare is your Authoritative DNS provider. [↩](#user-content-fnref-1)
Was this helpful?
YesNo
## On this page
[Docs](https://developers.cloudflare.com/)
```json
{"@context":"https://schema.org","@type":"TechArticle","@id":"https://developers.cloudflare.com/dns/zone-setups/subdomain-setup/setup/parent-on-full/#page","headline":"Set up a child zone in Cloudflare with parent on full setup · Cloudflare DNS docs","description":"Set up subdomain zone when parent uses full setup.","url":"https://developers.cloudflare.com/dns/zone-setups/subdomain-setup/setup/parent-on-full/","inLanguage":"en","image":"https://developers.cloudflare.com/og-docs.png","dateModified":"2026-04-16","publisher":{"@type":"Organization","name":"Cloudflare","url":"https://www.cloudflare.com/"},"isPartOf":{"@type":"WebSite","@id":"https://developers.cloudflare.com/#website","name":"Cloudflare Docs","url":"https://developers.cloudflare.com/"}}
```
---
---
description: Set up subdomain zone when parent uses partial setup.
title: Parent zone on partial setup
image: https://developers.cloudflare.com/og-docs.png
---
[Skip to content](#main-content)
> Documentation Index
> Fetch the complete documentation index at: https://developers.cloudflare.com/dns/llms.txt
> Use this file to discover all available pages before exploring further.
# Parent zone on partial setup
Last updated Apr 16, 2026|Copy as Markdown|[View as Markdown](https://developers.cloudflare.com/dns/zone-setups/subdomain-setup/setup/parent-on-partial/index.md)|[Agent setup](https://developers.cloudflare.com/agent-setup/)
When the parent zone is using a [CNAME setup (partial)](https://developers.cloudflare.com/dns/zone-setups/partial-setup/)[1](#user-content-fn-2), the steps to set up your child zone depend on whether the subdomain already exists in the parent domain.
## Subdomain does not exist
If you have not yet created a DNS record covering your subdomain in the parent zone:
1. Add the subdomain to a Cloudflare account as a new zone. It can be the same account where the parent zone exists or a different one.
2. Complete the configuration accordingly for [full](https://developers.cloudflare.com/dns/zone-setups/full-setup/setup/) or [secondary](https://developers.cloudflare.com/dns/zone-setups/zone-transfers/cloudflare-as-secondary/setup/) setup.
3. After creating the DNS records on the child zone, add the Cloudflare nameservers as `NS` records at your external DNS provider.
4. Within a short period of time, the child zone should be active.
1. Add the subdomain to a Cloudflare account as a new zone. It can be the same account where the parent zone exists or a different one.
2. Select either Business or Enterprise as your zone plan and complete the onboarding flow according to your needs.
3. On the [Overview page ↗](https://dash.cloudflare.com/?to=/:account/:zone), select **Convert to CNAME DNS Setup**.
4. Confirm that you have created all the [DNS records](https://developers.cloudflare.com/dns/manage-dns-records/how-to/create-dns-records/) needed for your child zone.
5. On the [**DNS Records** ↗](https://dash.cloudflare.com/?to=/:account/:zone/dns/records) page, get the **Verification TXT Record** and add it at your authoritative DNS provider.
Example verification record
A verification record for `sub.example.com` might be:
| Type | Name | Content |
| ---- | --------------------------------- | ------------------- |
| TXT | cloudflare-verify.sub.example.com | 966215192-518620144 |
If your authoritative DNS provider automatically appends DNS record `name` fields with your domain, make sure to only insert `cloudflare-verify` as the record name. Otherwise, it may result in an incorrect record name, such as `cloudflare-verify.sub.example.com.sub.example.com`.
After creating the record, you can use this [Dig Web Interface link ↗](https://digwebinterface.com/?type=TXT&ns=auth&nameservers=) to search (`dig`) for `cloudflare-verify.` and validate if it is working.
That record must remain in place for as long as your subdomain is active on the CNAME setup (partial) on Cloudflare.
1. Within a short period of time, the child zone should be active.
2. At your authoritative DNS provider, add `CNAME` records pointing to `{your-hostname}.cdn.cloudflare.net` for the subdomain you have added and any deeper subdomain records you want to proxy through Cloudflare.
Example CNAME record at authoritative DNS provider
The `CNAME` record for `sub.example.com` would be:
```txt
sub.example.com CNAME sub.example.com.cdn.cloudflare.net
```
## Subdomain already exists
If you have already created a DNS record covering your subdomain in the parent zone:
1. Add the subdomain to a Cloudflare account as a new zone. It can be the same account where the parent zone exists or a different one.
2. Complete the configuration accordingly for [full](https://developers.cloudflare.com/dns/zone-setups/full-setup/setup/) or [secondary](https://developers.cloudflare.com/dns/zone-setups/zone-transfers/cloudflare-as-secondary/setup/) setup.
3. In your child zone, [re-create all DNS records](https://developers.cloudflare.com/dns/manage-dns-records/how-to/create-dns-records/) that relate to your subdomain. This includes all DNS records deeper than the delegated subdomain, meaning that if you are delegating `www.example.com`, you should also move over records for `api.www.example.com`.
Note
If your child zone is on a primary setup (full), consider [exporting](https://developers.cloudflare.com/dns/manage-dns-records/how-to/import-and-export/#export-records) records from the parent zone, deleting all unnecessary records, and then [importing](https://developers.cloudflare.com/dns/manage-dns-records/how-to/import-and-export/#import-records) the records into your new zone.
4. Make sure that you migrate over any settings ([WAF custom rules](https://developers.cloudflare.com/waf/custom-rules/), [Rules](https://developers.cloudflare.com/rules/), [Workers](https://developers.cloudflare.com/workers/), and more) that might be needed for the child zone.
5. In the child zone, [order an advanced SSL certificate](https://developers.cloudflare.com/ssl/edge-certificates/advanced-certificate-manager/) that covers the child subdomain and any deeper subdomains.
6. Get the Cloudflare nameservers for the subdomain and add them as `NS` records at your external DNS provider.
7. Within a short period of time, the child zone should be active.
8. On the [**DNS Records** ↗](https://dash.cloudflare.com/?to=/:account/:zone/dns/records) page of the parent zone, [delete](https://developers.cloudflare.com/dns/manage-dns-records/how-to/create-dns-records/#delete-dns-records) any `A`, `AAAA`, or `CNAME` records referencing the subdomain or any of its deeper subdomains.
1. Add the subdomain to a Cloudflare account as a new zone. It can be the same account where the parent zone exists or a different one.
2. Select either Business or Enterprise as your zone plan and complete the onboarding flow according to your needs.
3. On the [Overview page ↗](https://dash.cloudflare.com/?to=/:account/:zone), select **Convert to CNAME DNS Setup**.
4. In your child zone, [re-create all DNS records](https://developers.cloudflare.com/dns/manage-dns-records/how-to/create-dns-records/) that relate to your subdomain. This includes all DNS records deeper than the subdomain you used to create the zone - if you are creating a zone for `www.example.com`, you should also move over records for `api.www.example.com`.
Note
Cloudflare recommends [exporting](https://developers.cloudflare.com/dns/manage-dns-records/how-to/import-and-export/#export-records) records from the parent zone, deleting all unnecessary records, and then [importing](https://developers.cloudflare.com/dns/manage-dns-records/how-to/import-and-export/#import-records) the records into your new zone.
5. Make sure that you migrate over any settings ([WAF custom rules](https://developers.cloudflare.com/waf/custom-rules/), [Rules](https://developers.cloudflare.com/rules/), [Workers](https://developers.cloudflare.com/workers/), and more) that might be needed for the child zone.
6. In the child zone, [order an advanced SSL certificate](https://developers.cloudflare.com/ssl/edge-certificates/advanced-certificate-manager/) that covers the child subdomain and any deeper subdomains.
7. On the [**DNS Records** ↗](https://dash.cloudflare.com/?to=/:account/:zone/dns/records) page, get the **Verification TXT Record** and add it at your authoritative DNS provider.
Example verification record
A verification record for `sub.example.com` might be:
| Type | Name | Content |
| ---- | --------------------------------- | ------------------- |
| TXT | cloudflare-verify.sub.example.com | 966215192-518620144 |
If your authoritative DNS provider automatically appends DNS record `name` fields with your domain, make sure to only insert `cloudflare-verify` as the record name. Otherwise, it may result in an incorrect record name, such as `cloudflare-verify.sub.example.com.sub.example.com`.
After creating the record, you can use this [Dig Web Interface link ↗](https://digwebinterface.com/?type=TXT&ns=auth&nameservers=) to search (`dig`) for `cloudflare-verify.` and validate if it is working.
That record must remain in place for as long as your subdomain is active on the CNAME setup (partial) on Cloudflare.
1. Within a short period of time, the child zone should be active.
2. On the [**DNS Records** ↗](https://dash.cloudflare.com/?to=/:account/:zone/dns/records) page of the parent zone, [delete](https://developers.cloudflare.com/dns/manage-dns-records/how-to/create-dns-records/#delete-dns-records) any previous `A`, `AAAA`, or `CNAME` records referencing the subdomain or any of its deeper subdomains.
3. At your authoritative DNS provider, confirm you have `CNAME` records pointing to `{your-hostname}.cdn.cloudflare.net` for the subdomain you have added and any deeper subdomain records you want to proxy through Cloudflare.
Example CNAME record at authoritative DNS provider
The `CNAME` record for `sub.example.com` would be:
```txt
sub.example.com CNAME sub.example.com.cdn.cloudflare.net
```
## Footnotes
1. Meaning that another DNS provider - not Cloudflare - maintains your Authoritative DNS. [↩](#user-content-fnref-2)
Was this helpful?
YesNo
## On this page
[Docs](https://developers.cloudflare.com/)
```json
{"@context":"https://schema.org","@type":"TechArticle","@id":"https://developers.cloudflare.com/dns/zone-setups/subdomain-setup/setup/parent-on-partial/#page","headline":"Set up a child zone in Cloudflare with parent on partial setup · Cloudflare DNS docs","description":"Set up subdomain zone when parent uses partial setup.","url":"https://developers.cloudflare.com/dns/zone-setups/subdomain-setup/setup/parent-on-partial/","inLanguage":"en","image":"https://developers.cloudflare.com/og-docs.png","dateModified":"2026-04-16","publisher":{"@type":"Organization","name":"Cloudflare","url":"https://www.cloudflare.com/"},"isPartOf":{"@type":"WebSite","@id":"https://developers.cloudflare.com/#website","name":"Cloudflare Docs","url":"https://developers.cloudflare.com/"}}
```
---
---
description: Troubleshoot issues when adding a domain to Cloudflare, including DNSSEC conflicts, registrar errors, and restriction codes.
title: Cannot add domain
image: https://developers.cloudflare.com/og-docs.png
---
[Skip to content](#main-content)
> Documentation Index
> Fetch the complete documentation index at: https://developers.cloudflare.com/dns/llms.txt
> Use this file to discover all available pages before exploring further.
# Cannot add domain
Last updated Apr 16, 2026|Copy as Markdown|[View as Markdown](https://developers.cloudflare.com/dns/zone-setups/troubleshooting/cannot-add-domain/index.md)|[Agent setup](https://developers.cloudflare.com/agent-setup/)
If you encounter issues [adding a domain](https://developers.cloudflare.com/fundamentals/manage-domains/add-site/) to Cloudflare, follow these troubleshooting steps.
## Disable DNSSEC
Cloudflare cannot provide authoritative DNS resolution for a domain — a [domain on a primary setup (full)](https://developers.cloudflare.com/dns/zone-setups/full-setup/) — when **DNSSEC** is enabled at your domain registrar.
If you do not disable **DNSSEC** before changing your nameservers, you might experience the following issues:
* DNS does not resolve after switching to Cloudflare's nameservers.
* DNS query response status is `SERVFAIL`.
* The domain remains in a [Pending status](https://developers.cloudflare.com/dns/zone-setups/reference/domain-status/).
If you experience these issues, refer to [Configuring DNSSEC](https://developers.cloudflare.com/dns/dnssec) and [Troubleshooting DNSSEC](https://developers.cloudflare.com/dns/dnssec/troubleshooting/).
---
## Register the domain
If the issue is with your registrar, you may receive the following error messages:
* `exampledomain.com is not a registered domain (Code: 1049)`
* `We were unable to identify bad.psl-example as a registered domain. Please ensure you are providing the root domain and not any subdomains (e.g., example.com, not subdomain.example.com) (Code: 1099)`
* `Failed to lookup registrar and hosting information of exampledomain.com at this time. Please contact Cloudflare Support or try again later. (Code: 1110)`
If you receive these error messages, make sure that:
* You are providing the apex domain (also known as "root domain", e.g. `example.com`) and not a subdomain (`www.example.com`).
* Your domain is fully registered and its registration data lists its nameservers.
* Your domain uses a verified [top-level domain (TLD) ↗](https://publicsuffix.org/list/).
---
## Resolve DNS for apex domain
Before a domain can be added to Cloudflare, the domain must return `NS` records for valid, working nameservers. `NS` records can be checked via third-party online tools such as [https://www.whatsmydns.net ↗](https://www.whatsmydns.net/) or via a command-line terminal using a dig command:
```sh
dig +short ns cloudflare.com
```
```sh
ns3.cloudflare.com.
ns4.cloudflare.com.
ns5.cloudflare.com.
ns6.cloudflare.com.
ns7.cloudflare.com.
```
Additionally, the domain must return a valid `SOA` record when queried. `SOA` records can be checked via third-party online tools such as [https://www.whatsmydns.net ↗](https://www.whatsmydns.net/) or via a command-line terminal:
```sh
dig +short soa cloudflare.com
```
```sh
ns3.cloudflare.com. dns.cloudflare.com. 2029202248 10000 2400 604800 300
```
---
## Check if the domain is restricted at Cloudflare
If Cloudflare has temporary or permanent restrictions on a domain, you will receive the following errors:
* **Error 1105**
* **Message**: `Error with Cloudflare request: [1105] This zone is temporarily restricted and cannot be added to Cloudflare at this time, please contact Cloudflare Support.`
* **Cause**: We have seen too many attempts to add a domain to Cloudflare
* **Resolution**: Wait 3 hours before attempting to re-add the domain to Cloudflare. Support cannot speed up this process.
* **Error 1093 or 1116**
* **Message**: `This zone cannot be added to Cloudflare at this time, please contact Cloudflare Support. (Code: 1093)`
* **Cause**: You may have entered a subdomain (`www.example.com`) instead of the apex domain (also known as "root domain", e.g. `example.com`).
* **Resolution**: Verify that you are entering the apex domain. If you are and still experience issues, contact [Cloudflare Support](https://developers.cloudflare.com/support/contacting-cloudflare-support/).
* **Error 1097**
* **Message**: `This web property cannot be added to Cloudflare at this time. If you are an Enterprise customer, contact your Customer Success Manager. Otherwise, email abusereply@cloudflare.com with a detailed explanation of your association with this zone. (Code: 1097)`
* **Resolution**: Contact [abusereply@cloudflare.com](mailto:abusereply@cloudflare.com) with a detailed explanation of your association with this zone.
* **Error: Cannot be found** OR **`` is not a registered domain (code: 1049)**
* This can happen if the domain has not been registered yet. Some domains, like `.gov` domains, have special requirements that require the domain be added first.
* **Resolution:** Contact [Cloudflare Support](https://developers.cloudflare.com/support/contacting-cloudflare-support/) if you require assistance adding a `.gov` and/or other domains that require manual registration.
---
## Contact the zone owner in case of zone hold error
Enterprise customers can use the [zone hold](https://developers.cloudflare.com/fundamentals/account/account-security/zone-holds/) feature to prevent domains to be added in any other account. If you get the following error when adding your domain, it means that a zone hold is active:
```plaintext
The zone name provided is subject to a hold which disallows the creation of this zone.
Please contact the owner of the Cloudflare account that manages this domain to have this hold removed.
```
In this case, you need to remove the zone hold if you own the Cloudflare account in which the zone is active, or contact the owner of the Cloudflare account that has the zone active.
If you are not the owner of the Cloudflare account that has the hold on the zone, using an online WHOIS tool might help you finding the owner of a website.
See this [external WHOIS tool ↗](https://www.godaddy.com/whois) or this [other external tool ↗](https://www.whois.com/whois/).
The owner might be your hosting provider, or a SaaS service provider.
You can also use the [Cloudflare Forgot Email? ↗](https://dash.cloudflare.com/forgot-email) page, and check the documentation related to the [Forgot Email? feature](https://developers.cloudflare.com/fundamentals/user-profiles/change-password-or-email/#forgot-your-email-address).
Was this helpful?
YesNo
## On this page
[Docs](https://developers.cloudflare.com/)
```json
{"@context":"https://schema.org","@type":"TechArticle","@id":"https://developers.cloudflare.com/dns/zone-setups/troubleshooting/cannot-add-domain/#page","headline":"Cannot add domain to Cloudflare · Cloudflare DNS docs","description":"Troubleshoot issues when adding a domain to Cloudflare, including DNSSEC conflicts, registrar errors, and restriction codes.","url":"https://developers.cloudflare.com/dns/zone-setups/troubleshooting/cannot-add-domain/","inLanguage":"en","image":"https://developers.cloudflare.com/og-docs.png","dateModified":"2026-04-16","publisher":{"@type":"Organization","name":"Cloudflare","url":"https://www.cloudflare.com/"},"isPartOf":{"@type":"WebSite","@id":"https://developers.cloudflare.com/#website","name":"Cloudflare Docs","url":"https://developers.cloudflare.com/"}}
```
---
---
description: Learn how to bulk delete DNS records in Cloudflare with a script so you can start from zero instead of using the quick scan results.
title: Delete all DNS records
image: https://developers.cloudflare.com/og-docs.png
---
[Skip to content](#main-content)
> Documentation Index
> Fetch the complete documentation index at: https://developers.cloudflare.com/dns/llms.txt
> Use this file to discover all available pages before exploring further.
# Delete all DNS records
Last updated Apr 16, 2026|Copy as Markdown|[View as Markdown](https://developers.cloudflare.com/dns/zone-setups/troubleshooting/delete-all-records/index.md)|[Agent setup](https://developers.cloudflare.com/agent-setup/)
When you connect your domain to Cloudflare, the [DNS records quick scan](https://developers.cloudflare.com/dns/zone-setups/reference/dns-quick-scan/) may automatically add several records to your zone.
If you realize most of them are not applicable and want to bulk delete DNS records, follow the steps below. This method assumes you are familiar with [API calls fundamentals](https://developers.cloudflare.com/fundamentals/api/).
Bulk deletion available in the dashboard
You can delete records in bulk via the dashboard, which removes the need for custom scripts as the one below. Refer to [Batch record changes](https://developers.cloudflare.com/dns/manage-dns-records/how-to/batch-record-changes/#delete-records-in-bulk) for details.
1. Make sure you have [an API token](https://developers.cloudflare.com/fundamentals/api/get-started/create-token/) that allows you to edit DNS for your zone.
2. Get your [zone ID](https://developers.cloudflare.com/fundamentals/account/find-account-and-zone-ids/).
3. Run the following script, replacing `` and `` with the values you got from the previous steps.
Warning
This script uses [jq ↗](https://jqlang.github.io/jq/) to format `JSON` outputs for readability. Refer to [Make API calls](https://developers.cloudflare.com/fundamentals/api/how-to/make-api-calls/) for details.
```bash
zoneid=
bearer=
curl --silent "https://api.cloudflare.com/client/v4/zones/$zoneid/dns_records?per_page=50000" \
--header "Authorization: Bearer $bearer" \
| jq --raw-output '.result[].id' | while read id
do
curl --silent --request DELETE "https://api.cloudflare.com/client/v4/zones/$zoneid/dns_records/$id" \
--header "Authorization: Bearer $bearer"
done
```
Was this helpful?
YesNo
## On this page
[Docs](https://developers.cloudflare.com/)
```json
{"@context":"https://schema.org","@type":"TechArticle","@id":"https://developers.cloudflare.com/dns/zone-setups/troubleshooting/delete-all-records/#page","headline":"Delete all DNS records · Cloudflare DNS docs","description":"Learn how to bulk delete DNS records in Cloudflare with a script so you can start from zero instead of using the quick scan results.","url":"https://developers.cloudflare.com/dns/zone-setups/troubleshooting/delete-all-records/","inLanguage":"en","image":"https://developers.cloudflare.com/og-docs.png","dateModified":"2026-04-16","publisher":{"@type":"Organization","name":"Cloudflare","url":"https://www.cloudflare.com/"},"isPartOf":{"@type":"WebSite","@id":"https://developers.cloudflare.com/#website","name":"Cloudflare Docs","url":"https://developers.cloudflare.com/"}}
```
---
---
description: Learn why a domain may be removed from Cloudflare and how to recover it using audit logs and registrar verification.
title: Domain deleted from Cloudflare
image: https://developers.cloudflare.com/og-docs.png
---
[Skip to content](#main-content)
> Documentation Index
> Fetch the complete documentation index at: https://developers.cloudflare.com/dns/llms.txt
> Use this file to discover all available pages before exploring further.
# Domain deleted from Cloudflare
Last updated Apr 16, 2026|Copy as Markdown|[View as Markdown](https://developers.cloudflare.com/dns/zone-setups/troubleshooting/domain-deleted/index.md)|[Agent setup](https://developers.cloudflare.com/agent-setup/)
Domain deletion commonly occurs for the following reasons:
* A user with access to the domain removed it.
* The nameservers no longer point to Cloudflare. Cloudflare continuously monitors domain registration.
* The domain was not authenticated (pending for 28 days).
---
## Check Audit Logs
Cloudflare [Audit Logs](https://developers.cloudflare.com/fundamentals/account/account-security/review-audit-logs/) contain information about domain deletion.
Note
_Delete_ is an **Action** that denotes domain deletion but is also commonly used for deletion of other various account settings. Therefore, ensure that **Resource** says _Zone_.
---
## Check registrar for Cloudflare nameservers
If your domain was using a [primary setup (full)](https://developers.cloudflare.com/dns/zone-setups/full-setup/), your registrar needs to use Cloudflare nameservers as the authoritative nameservers for your domain.
1. Use either the command-line based `whois` application provided with your operating system or a website such as [ICANN Lookup ↗](https://lookup.icann.org/).
* If you are unable to find the nameserver details for your domain, reach out to your domain registrar or domain provider to provide the domain registration information.
* Ensure Cloudflare's nameservers are the only two nameservers listed in the domain registration details.
* Ensure nameservers are spelled correctly in the domain registration.
2. Confirm that the nameservers exactly match the nameservers provided within the **Cloudflare Nameservers** card on the [**DNS Records** ↗](https://dash.cloudflare.com/?to=/:account/:zone/dns/records) page.
3. If you identify incorrect information, log in to your domain provider's portal to make updates or contact your domain provider for assistance.
---
## Recover a deleted domain
To recover a deleted domain, [re-add it in Cloudflare](https://developers.cloudflare.com/fundamentals/manage-domains/add-site/) just like you would for a new domain.
Caution
Cloudflare support is unable to restore DNS or settings for deleted domains.
Was this helpful?
YesNo
## On this page
[Docs](https://developers.cloudflare.com/)
```json
{"@context":"https://schema.org","@type":"TechArticle","@id":"https://developers.cloudflare.com/dns/zone-setups/troubleshooting/domain-deleted/#page","headline":"Domain deleted from Cloudflare · Cloudflare DNS docs","description":"Learn why a domain may be removed from Cloudflare and how to recover it using audit logs and registrar verification.","url":"https://developers.cloudflare.com/dns/zone-setups/troubleshooting/domain-deleted/","inLanguage":"en","image":"https://developers.cloudflare.com/og-docs.png","dateModified":"2026-04-16","publisher":{"@type":"Organization","name":"Cloudflare","url":"https://www.cloudflare.com/"},"isPartOf":{"@type":"WebSite","@id":"https://developers.cloudflare.com/#website","name":"Cloudflare Docs","url":"https://developers.cloudflare.com/"}}
```
---
---
description: Troubleshoot a Cloudflare zone that stays in Pending Nameserver Update status after changing nameservers, including stale DNSSEC DS records.
title: Zone stuck in Pending Nameserver Update
image: https://developers.cloudflare.com/og-docs.png
---
[Skip to content](#main-content)
> Documentation Index
> Fetch the complete documentation index at: https://developers.cloudflare.com/dns/llms.txt
> Use this file to discover all available pages before exploring further.
# Zone stuck in Pending Nameserver Update
Last updated Apr 23, 2026|Copy as Markdown|[View as Markdown](https://developers.cloudflare.com/dns/zone-setups/troubleshooting/pending-nameservers/index.md)|[Agent setup](https://developers.cloudflare.com/agent-setup/)
If your nameservers are correctly set to Cloudflare but your zone remains in **Pending Nameserver Update** status, stale DNSSEC DS records at your registrar are the most common cause.
## Stale DNSSEC DS records
DS records belong to your **registrar** (where the domain is registered), not to Cloudflare. When you change DNS providers, DS records from the previous provider often remain at the registrar and cause Cloudflare's zone verification to fail.
**To check for stale DS records:**
```sh
dig DS yourdomain.com
```
If DS records are returned and you did not configure Cloudflare DNSSEC, these are stale records from your previous provider.
**To remove stale DS records:**
1. Log in to your domain registrar's control panel.
2. Find DNSSEC settings (may be under **Advanced DNS** or **Security**).
3. Remove all existing DS records.
4. Wait up to 24 hours for the DS removal to propagate.
After the stale DS records are removed and expire from cache, your Cloudflare zone will activate automatically. You can then turn on DNSSEC in the Cloudflare dashboard if needed.
For more information on DNSSEC configuration, refer to [Configure DNSSEC](https://developers.cloudflare.com/dns/dnssec/) and [Troubleshoot DNSSEC](https://developers.cloudflare.com/dns/dnssec/troubleshooting/).
Was this helpful?
YesNo
## On this page
[Docs](https://developers.cloudflare.com/)
```json
{"@context":"https://schema.org","@type":"TechArticle","@id":"https://developers.cloudflare.com/dns/zone-setups/troubleshooting/pending-nameservers/#page","headline":"Zone stuck in Pending Nameserver Update · Cloudflare DNS docs","description":"Troubleshoot a Cloudflare zone that stays in Pending Nameserver Update status after changing nameservers, including stale DNSSEC DS records.","url":"https://developers.cloudflare.com/dns/zone-setups/troubleshooting/pending-nameservers/","inLanguage":"en","image":"https://developers.cloudflare.com/og-docs.png","dateModified":"2026-04-23","publisher":{"@type":"Organization","name":"Cloudflare","url":"https://www.cloudflare.com/"},"isPartOf":{"@type":"WebSite","@id":"https://developers.cloudflare.com/#website","name":"Cloudflare Docs","url":"https://developers.cloudflare.com/"}}
```
---
---
description: Transfer DNS zones between Cloudflare and other providers.
title: DNS Zone transfers
image: https://developers.cloudflare.com/og-docs.png
---
[Skip to content](#main-content)
> Documentation Index
> Fetch the complete documentation index at: https://developers.cloudflare.com/dns/llms.txt
> Use this file to discover all available pages before exploring further.
# DNS Zone transfers
Last updated Jul 24, 2026|Copy as Markdown|[View as Markdown](https://developers.cloudflare.com/dns/zone-setups/zone-transfers/index.md)|[Agent setup](https://developers.cloudflare.com/agent-setup/)
Zone transfers allow you to use multiple DNS providers for the same domain to increase availability and fault tolerance. If one provider has an outage, the other can still answer DNS queries, keeping your domain available.
With zone transfers, your providers synchronize DNS records between themselves using one of two protocols:
* **Authoritative zone transfer ([AXFR ↗](https://www.rfc-editor.org/rfc/rfc5936.html))**: Copies the entire zone from the primary to the secondary provider, even if only one record changes.
* **Incremental zone transfer ([IXFR ↗](https://www.rfc-editor.org/rfc/rfc1995.html))**: Transfers only the changes since the last transfer, rather than the entire zone.
Cloudflare supports both protocols.
You have two configuration options for zone transfers:
* [Cloudflare as Primary](https://developers.cloudflare.com/dns/zone-setups/zone-transfers/cloudflare-as-primary/): Cloudflare is your primary DNS provider and performs outgoing zone transfers to your secondary DNS provider(s).
* [Cloudflare as Secondary](https://developers.cloudflare.com/dns/zone-setups/zone-transfers/cloudflare-as-secondary/): Cloudflare is your secondary DNS provider and initiates incoming zone transfers from your primary DNS provider.
## Peer DNS server
A peer DNS server is the external DNS provider that participates in zone transfers with Cloudflare. The same peer can be linked to multiple primary and secondary zones. Each peer can be associated with only one Transaction Signature (TSIG) — an authentication mechanism that uses a shared secret to verify zone transfer messages between providers.
The maximum number of linked peers per zone is 30.
You can manage peers via the [API](https://developers.cloudflare.com/api/resources/dns/subresources/zone%5Ftransfers/subresources/peers/methods/list/) or the dashboard:
1. In the Cloudflare dashboard, go to the account **Settings** page.
[Go to **Configurations** ↗](https://dash.cloudflare.com/?to=/:account/configurations)
2. Refer to **DNS Settings** \> **DNS Zone Transfers**.
The fields below configure how Cloudflare communicates with the peer. When Cloudflare is primary, it sends NOTIFY messages to alert the peer that zone data has changed. When Cloudflare is secondary, it sends AXFR/IXFR requests to retrieve updated records from the peer.
| Field | Cloudflare as Primary (Outgoing) | Cloudflare as Secondary (Incoming) |
| ------------ | ----------------------------------------------------------- | -------------------------------------------------------- |
| Name | Human readable name of peer | Human readable name of peer |
| IP | If configured, where Cloudflare sends the NOTIFY to | Where Cloudflare sends the AXFR/IXFR transfer request to |
| Port | IP Port for NOTIFY IP | IP Port for transfer IP |
| TSIG ID | Attached TSIG object | Attached TSIG object |
| IXFR enabled | Cloudflare always supports IXFR for outgoing zone transfers | Specifies if Cloudflare only sends AXFR or AXFR and IXFR |
## Availability
Zone transfers are only available to customers on an Enterprise plan.
Was this helpful?
YesNo
## On this page
[Docs](https://developers.cloudflare.com/)
```json
{"@context":"https://schema.org","@type":"TechArticle","@id":"https://developers.cloudflare.com/dns/zone-setups/zone-transfers/#page","headline":"DNS Zone transfers · Cloudflare DNS docs","description":"Transfer DNS zones between Cloudflare and other providers.","url":"https://developers.cloudflare.com/dns/zone-setups/zone-transfers/","inLanguage":"en","image":"https://developers.cloudflare.com/og-docs.png","dateModified":"2026-07-24","publisher":{"@type":"Organization","name":"Cloudflare","url":"https://www.cloudflare.com/"},"isPartOf":{"@type":"WebSite","@id":"https://developers.cloudflare.com/#website","name":"Cloudflare Docs","url":"https://developers.cloudflare.com/"}}
```
---
---
description: Manage access control lists for DNS zone transfers.
title: Access Control Lists (ACLs)
image: https://developers.cloudflare.com/og-docs.png
---
[Skip to content](#main-content)
> Documentation Index
> Fetch the complete documentation index at: https://developers.cloudflare.com/dns/llms.txt
> Use this file to discover all available pages before exploring further.
# Access Control Lists (ACLs)
Last updated Apr 16, 2026|Copy as Markdown|[View as Markdown](https://developers.cloudflare.com/dns/zone-setups/zone-transfers/access-control-lists/index.md)|[Agent setup](https://developers.cloudflare.com/agent-setup/)
Access Control Lists (ACLs) define allowed source IP addresses from where servers accept incoming data or control messages.
When setting up new DNS zone transfers ([incoming](https://developers.cloudflare.com/dns/zone-setups/zone-transfers/cloudflare-as-secondary/) or [outgoing](https://developers.cloudflare.com/dns/zone-setups/zone-transfers/cloudflare-as-primary/)), you will need to update the ACL at your other DNS provider(s) to allow Cloudflare to communicate with their server(s). You can find the Cloudflare IP addresses you need to allow at your other DNS provider(s) at [Cloudflare IP addresses](https://developers.cloudflare.com/dns/zone-setups/zone-transfers/access-control-lists/cloudflare-ip-addresses/).
For your Cloudflare account, you only need to [create a new ACL](https://developers.cloudflare.com/dns/zone-setups/zone-transfers/access-control-lists/create-new-list/) if you want to specify additional NOTIFY IPs that Cloudflare should listen to.
Was this helpful?
YesNo
## On this page
[Docs](https://developers.cloudflare.com/)
```json
{"@context":"https://schema.org","@type":"TechArticle","@id":"https://developers.cloudflare.com/dns/zone-setups/zone-transfers/access-control-lists/#page","headline":"Access Control Lists (ACLs) · Cloudflare DNS docs","description":"Manage access control lists for DNS zone transfers.","url":"https://developers.cloudflare.com/dns/zone-setups/zone-transfers/access-control-lists/","inLanguage":"en","image":"https://developers.cloudflare.com/og-docs.png","dateModified":"2026-04-16","publisher":{"@type":"Organization","name":"Cloudflare","url":"https://www.cloudflare.com/"},"isPartOf":{"@type":"WebSite","@id":"https://developers.cloudflare.com/#website","name":"Cloudflare Docs","url":"https://developers.cloudflare.com/"}}
```
---
---
description: IP addresses used by Cloudflare for DNS zone transfers and NOTIFY messages.
title: Cloudflare IP addresses
image: https://developers.cloudflare.com/og-docs.png
---
[Skip to content](#main-content)
> Documentation Index
> Fetch the complete documentation index at: https://developers.cloudflare.com/dns/llms.txt
> Use this file to discover all available pages before exploring further.
Cloudflare is updating the source IP addresses used for DNS zone transfers (AXFR/IXFR) and NOTIFY messages. You must update your allow lists before **December 1, 2026** to avoid service disruption.
# Cloudflare IP addresses
Last updated Apr 16, 2026|Copy as Markdown|[View as Markdown](https://developers.cloudflare.com/dns/zone-setups/zone-transfers/access-control-lists/cloudflare-ip-addresses/index.md)|[Agent setup](https://developers.cloudflare.com/agent-setup/)
Depending on your setup ([Cloudflare as Primary](#cloudflare-as-primary) or [Cloudflare as Secondary](#cloudflare-as-secondary)), you need to configure slightly different Cloudflare IP addresses at your other DNS provider.
## Source IP addresses
Cloudflare's AXFR/IXFR zone transfer requests and NOTIFY messages originate from the following IP addresses. These need to be allowed at your other DNS servers.
```txt
104.30.167.163
104.30.167.173
2a09:bac0:1000:c47::/64
```
Action required: IP address migration
Since April 15, 2026, Cloudflare sends from the new IP addresses listed above and temporarily falls back to the old IP addresses if the new ones are blocked.
**On December 1, 2026, the old IP addresses will stop working.** Only the new IP addresses listed above will be used.
If you have an existing configuration, add the new IP addresses to your allow list first, verify that transfers and NOTIFY messages are working from the new addresses, and only then remove the old IP addresses.
Old source IP addresses (deprecated — removed December 1, 2026)
```txt
198.41.144.240/28
198.41.150.240/28
2a06:98c0:3601::/48
2a06:98c0:1401::/48
```
## Cloudflare as Primary
If you are using Cloudflare for Primary DNS — meaning that you are setting up Cloudflare to send [outgoing zone transfers](https://developers.cloudflare.com/dns/zone-setups/zone-transfers/cloudflare-as-primary/) — you need to update the following settings at your secondary DNS provider.
### Allow range
Cloudflare's NOTIFY messages originate from the [source IP addresses](#source-ip-addresses) listed above. Allow them at your secondary DNS servers.
### Transfer IP
Cloudflare will listen to AXFR/IXFR zone transfer requests and SOA queries from your Secondary DNS server on this IP address.
```txt
172.65.64.6
```
## Cloudflare as Secondary
If you are using Cloudflare for Secondary DNS — meaning that you are setting up Cloudflare to receive [incoming zone transfers](https://developers.cloudflare.com/dns/zone-setups/zone-transfers/cloudflare-as-secondary/) — you need to update the following settings at your primary DNS provider.
### Allow range
Cloudflare's AXFR/IXFR zone transfer requests originate from the [source IP addresses](#source-ip-addresses) listed above. Allow them at your primary DNS servers.
### Notify IPs
Notify IPs are the IP addresses where you notify Cloudflare's Secondary DNS to initiate a pull of new zone information from your Primary DNS servers:
```txt
172.65.30.82
172.65.50.145
2606:4700:60:0:317:26ee:3bdf:5774
2606:4700:60:0:35a:4be3:4144:c5ee
```
### BIND server configuration
To run a BIND server as a primary, add the following statements to your zone file:
```txt
allow-transfer {104.30.167.163;104.30.167.173;2a09:bac0:1000:c47::/64;}
also-notify { 172.65.30.82;172.65.50.145;2606:4700:60:0:317:26ee:3bdf:5774;2606:4700:60:0:35a:4be3:4144:c5ee;}
```
Caution
If you are updating an existing BIND configuration, first add the new IP addresses alongside the old ones in your `allow-transfer` directive. Verify that zone transfers are completing successfully from the new addresses, and only then remove the old IP addresses. The old IP addresses will stop working on **December 1, 2026**.
Was this helpful?
YesNo
## On this page
[Docs](https://developers.cloudflare.com/)
```json
{"@context":"https://schema.org","@type":"TechArticle","@id":"https://developers.cloudflare.com/dns/zone-setups/zone-transfers/access-control-lists/cloudflare-ip-addresses/#page","headline":"Cloudflare IP addresses - Access Control Lists (ACLs) · Cloudflare DNS docs","description":"IP addresses used by Cloudflare for DNS zone transfers and NOTIFY messages.","url":"https://developers.cloudflare.com/dns/zone-setups/zone-transfers/access-control-lists/cloudflare-ip-addresses/","inLanguage":"en","image":"https://developers.cloudflare.com/og-docs.png","dateModified":"2026-04-16","publisher":{"@type":"Organization","name":"Cloudflare","url":"https://www.cloudflare.com/"},"isPartOf":{"@type":"WebSite","@id":"https://developers.cloudflare.com/#website","name":"Cloudflare Docs","url":"https://developers.cloudflare.com/"}}
```
---
---
description: Create an ACL for DNS zone transfers.
title: Create ACL
image: https://developers.cloudflare.com/og-docs.png
---
[Skip to content](#main-content)
> Documentation Index
> Fetch the complete documentation index at: https://developers.cloudflare.com/dns/llms.txt
> Use this file to discover all available pages before exploring further.
# Create ACL
Last updated Apr 16, 2026|Copy as Markdown|[View as Markdown](https://developers.cloudflare.com/dns/zone-setups/zone-transfers/access-control-lists/create-new-list/index.md)|[Agent setup](https://developers.cloudflare.com/agent-setup/)
You need to create an Access Control List (ACL) if Cloudflare is your [secondary DNS provider](https://developers.cloudflare.com/dns/zone-setups/zone-transfers/cloudflare-as-secondary/). The ACL will specify additional NOTIFY IPs that Cloudflare should listen to.
An ACL is configured at the account level, which means that it will apply to every primary and secondary zone in your account.
To create a new ACL using the dashboard:
1. In the Cloudflare dashboard, go to the account **Settings** page.
[Go to **Configurations** ↗](https://dash.cloudflare.com/?to=/:account/configurations)
2. Go to **DNS Settings**.
3. Under **DNS Zone Transfers**, for **ACL**, select **Create**.
4. Enter the following information:
* **ACL name**: Provide a descriptive name.
* **IP range**: Enter a range of IPv4 or IPv6 addresses (limited to a maximum of /24 for IPv4 and /64 for IPv6).
5. Select **Create**.
To create a new ACL using the API, send a [POST](https://developers.cloudflare.com/api/resources/dns/subresources/zone%5Ftransfers/subresources/acls/methods/create/) request.
Was this helpful?
YesNo
## On this page
[Docs](https://developers.cloudflare.com/)
```json
{"@context":"https://schema.org","@type":"TechArticle","@id":"https://developers.cloudflare.com/dns/zone-setups/zone-transfers/access-control-lists/create-new-list/#page","headline":"Create a new Access Control List · Cloudflare DNS docs","description":"Create an ACL for DNS zone transfers.","url":"https://developers.cloudflare.com/dns/zone-setups/zone-transfers/access-control-lists/create-new-list/","inLanguage":"en","image":"https://developers.cloudflare.com/og-docs.png","dateModified":"2026-04-16","publisher":{"@type":"Organization","name":"Cloudflare","url":"https://www.cloudflare.com/"},"isPartOf":{"@type":"WebSite","@id":"https://developers.cloudflare.com/#website","name":"Cloudflare Docs","url":"https://developers.cloudflare.com/"}}
```
---
---
description: Use Cloudflare as the primary DNS with zone transfers to secondaries.
title: Cloudflare as Primary
image: https://developers.cloudflare.com/og-docs.png
---
[Skip to content](#main-content)
> Documentation Index
> Fetch the complete documentation index at: https://developers.cloudflare.com/dns/llms.txt
> Use this file to discover all available pages before exploring further.
# Cloudflare as Primary
Last updated Apr 16, 2026|Copy as Markdown|[View as Markdown](https://developers.cloudflare.com/dns/zone-setups/zone-transfers/cloudflare-as-primary/index.md)|[Agent setup](https://developers.cloudflare.com/agent-setup/)
With outgoing zone transfers, you can use Cloudflare as your primary DNS provider and configure one or more peer DNS servers as secondary DNS providers.
When you [make edits](https://developers.cloudflare.com/dns/manage-dns-records/how-to/create-dns-records/) to Cloudflare DNS, those DNS records will be transferred from Cloudflare to your secondary provider via zone transfer using [AXFR ↗](https://datatracker.ietf.org/doc/html/rfc5936) or [IXFR ↗](https://datatracker.ietf.org/doc/html/rfc1995)
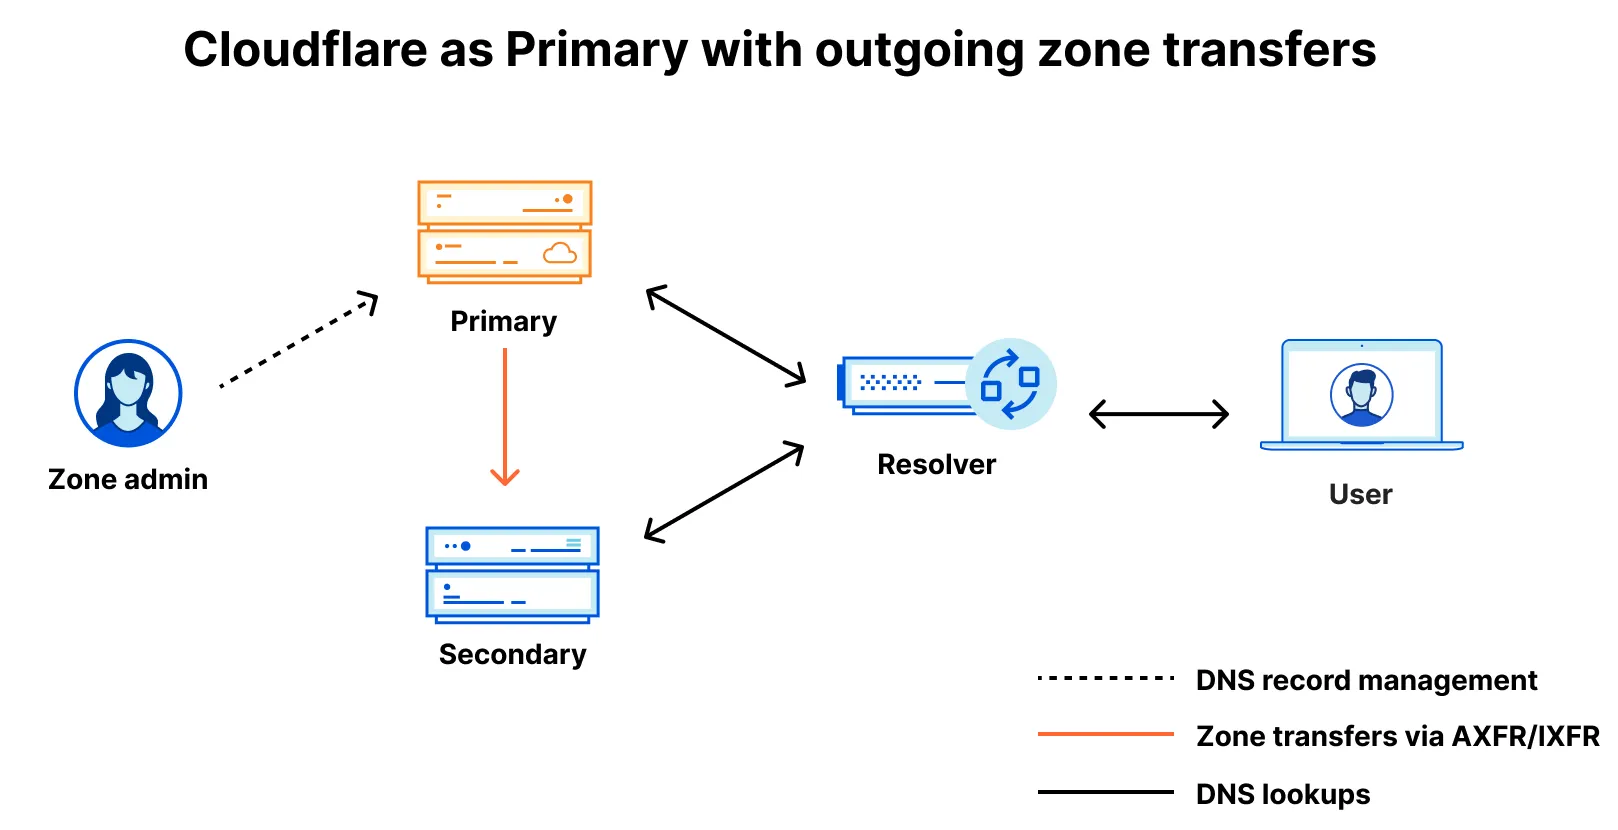
## How to
* [Set up outgoing zone transfers](https://developers.cloudflare.com/dns/zone-setups/zone-transfers/cloudflare-as-primary/setup/)
## Availability
Outgoing zone transfers are available to Enterprise customers who are currently using Cloudflare as their [authoritative DNS provider](https://developers.cloudflare.com/dns/zone-setups/full-setup/). For more details on activation and pricing, contact your account team.
## Notes
If you use [Cloudflare Load Balancing](https://developers.cloudflare.com/load-balancing/), only proxied Load Balancer DNS records will be transferred.
Was this helpful?
YesNo
## On this page
[Docs](https://developers.cloudflare.com/)
```json
{"@context":"https://schema.org","@type":"TechArticle","@id":"https://developers.cloudflare.com/dns/zone-setups/zone-transfers/cloudflare-as-primary/#page","headline":"Cloudflare as Primary · Cloudflare DNS docs","description":"Use Cloudflare as the primary DNS with zone transfers to secondaries.","url":"https://developers.cloudflare.com/dns/zone-setups/zone-transfers/cloudflare-as-primary/","inLanguage":"en","image":"https://developers.cloudflare.com/og-docs.png","dateModified":"2026-04-16","publisher":{"@type":"Organization","name":"Cloudflare","url":"https://www.cloudflare.com/"},"isPartOf":{"@type":"WebSite","@id":"https://developers.cloudflare.com/#website","name":"Cloudflare Docs","url":"https://developers.cloudflare.com/"}}
```
---
---
description: With outgoing zone transfers, you keep Cloudflare as your primary DNS provider and use one or more secondary providers for increased availability and fault tolerance.
title: Set up DNSSEC with Cloudflare as Primary
image: https://developers.cloudflare.com/og-docs.png
---
[Skip to content](#main-content)
> Documentation Index
> Fetch the complete documentation index at: https://developers.cloudflare.com/dns/llms.txt
> Use this file to discover all available pages before exploring further.
# Set up DNSSEC with Cloudflare as Primary
Last updated May 5, 2026|Copy as Markdown|[View as Markdown](https://developers.cloudflare.com/dns/zone-setups/zone-transfers/cloudflare-as-primary/dnssec-for-primary/index.md)|[Agent setup](https://developers.cloudflare.com/agent-setup/)
With [outgoing zone transfers](https://developers.cloudflare.com/dns/zone-setups/zone-transfers/cloudflare-as-primary/), you keep Cloudflare as your primary DNS provider and use one or more secondary providers for increased availability and fault tolerance.
If you want to use DNSSEC with outgoing zone transfers, you should configure [multi-signer DNSSEC](https://developers.cloudflare.com/dns/dnssec/multi-signer-dnssec/). After setting up [Cloudflare as primary](https://developers.cloudflare.com/dns/zone-setups/zone-transfers/cloudflare-as-primary/setup/), follow the steps below to enable DNSSEC.
## Before you begin
Note that:
* This process requires that your other DNS provider(s) also support multi-signer DNSSEC.
* Although you can complete a few steps via the dashboard, currently the whole process can only be completed using the API.
* Enabling **DNSSEC** and **Multi-signer DNSSEC** in [**DNS Settings** ↗](https://dash.cloudflare.com/?to=/:account/:zone/dns/settings) only replaces the first step below. You still have to follow the rest of this tutorial to complete the setup.
## Steps
1. Use the [Edit DNSSEC Status endpoint](https://developers.cloudflare.com/api/resources/dns/subresources/dnssec/methods/edit/) to enable DNSSEC and activate multi-signer DNSSEC for your zone. This is done by setting `status` to `active` and `dnssec_multi_signer` to `true`, as in the following example.
Required API token permissions
At least one of the following [token permissions](https://developers.cloudflare.com/fundamentals/api/reference/permissions/) is required:
* `DNS Write`
```bash
curl "https://api.cloudflare.com/client/v4/zones/$ZONE_ID/dnssec" \
--request PATCH \
--header "Authorization: Bearer $CLOUDFLARE_API_TOKEN" \
--json '{
"status": "active",
"dnssec_multi_signer": true
}'
```
1. Add the ZSK(s) of your external provider(s) to Cloudflare by creating a DNSKEY record on your zone.
```bash
curl 'https://api.cloudflare.com/client/v4/zones/{zone_id}/dns_records' \
--header "X-Auth-Email: " \
--header "X-Auth-Key: " \
--header "Content-Type: application/json" \
--data '{
"type": "DNSKEY",
"name": "",
"data": {
"flags": 256,
"protocol": 3,
"algorithm": 13,
"public_key": ""
},
"ttl": 3600
}'
```
1. Once the DNSKEY record is transferred out from Cloudflare to your secondary provider, get Cloudflare's ZSK and manually add it to the DNSKEY record.
Currently, the ZSK is not automatically transferred out. You can use either the API or a query from one of the assigned Cloudflare nameservers to obtain it.
API example:
```bash
curl 'https://api.cloudflare.com/client/v4/zones/{zone_id}/dnssec/zsk' \
--header "X-Auth-Email: " \
--header "X-Auth-Key: "
```
Command line query example:
```sh
$ dig dnskey @ +noall +answer | grep 256
```
1. Add DS records to your registrar, one for each provider. You can see your Cloudflare DS record on the [**DNS Settings** ↗](https://dash.cloudflare.com/?to=/:account/:zone/dns/settings) page, under **DS Record**.
The nameserver settings at your registrar should include the nameservers of all providers you will be using for your multi-signer DNSSEC setup.
Was this helpful?
YesNo
## On this page
[Docs](https://developers.cloudflare.com/)
```json
{"@context":"https://schema.org","@type":"TechArticle","@id":"https://developers.cloudflare.com/dns/zone-setups/zone-transfers/cloudflare-as-primary/dnssec-for-primary/#page","headline":"Set up multi-signer DNSSEC with outgoing zone transfers · Cloudflare DNS docs","description":"With outgoing zone transfers, you keep Cloudflare as your primary DNS provider and use one or more secondary providers for increased availability and fault tolerance.","url":"https://developers.cloudflare.com/dns/zone-setups/zone-transfers/cloudflare-as-primary/dnssec-for-primary/","inLanguage":"en","image":"https://developers.cloudflare.com/og-docs.png","dateModified":"2026-05-05","publisher":{"@type":"Organization","name":"Cloudflare","url":"https://www.cloudflare.com/"},"isPartOf":{"@type":"WebSite","@id":"https://developers.cloudflare.com/#website","name":"Cloudflare Docs","url":"https://developers.cloudflare.com/"}}
```
---
---
description: With outgoing zone transfers, you can keep Cloudflare as your primary DNS provider and use one or more secondary providers for increased availability.
title: Setup
image: https://developers.cloudflare.com/og-docs.png
---
[Skip to content](#main-content)
> Documentation Index
> Fetch the complete documentation index at: https://developers.cloudflare.com/dns/llms.txt
> Use this file to discover all available pages before exploring further.
# Setup
Last updated May 5, 2026|Copy as Markdown|[View as Markdown](https://developers.cloudflare.com/dns/zone-setups/zone-transfers/cloudflare-as-primary/setup/index.md)|[Agent setup](https://developers.cloudflare.com/agent-setup/)
With [outgoing zone transfers](https://developers.cloudflare.com/dns/zone-setups/zone-transfers/cloudflare-as-primary/), you can keep Cloudflare as your primary DNS provider and use one or more secondary providers for increased availability and fault tolerance.
## Before you begin
Make sure your account team has enabled your zone for outgoing zone transfers.
Consider the [expected behaviors](https://developers.cloudflare.com/dns/zone-setups/zone-transfers/cloudflare-as-primary/transfer-criteria/) for different record types, and review your [existing DNS records](https://developers.cloudflare.com/dns/manage-dns-records/how-to/create-dns-records/) to make sure all of them have the desired **Proxy status**.
If using the API, you may also want to [locate your Zone and Account IDs](https://developers.cloudflare.com/fundamentals/account/find-account-and-zone-ids/).
---
## 1\. Create TSIG (optional)
A Transaction Signature (TSIG) authenticates communication between a primary and secondary DNS server.
Note
The TSIG names configured at your primary and secondary DNS providers have to be exactly the same. Any differences in TSIG names will cause zone transfers to fail.
While optional, this step is highly recommended.
To create a TSIG using the dashboard:
1. In the Cloudflare dashboard, go to the account **Settings** page.
[Go to **Configurations** ↗](https://dash.cloudflare.com/?to=/:account/configurations)
2. Go to **DNS Settings**.
3. Under **DNS Zone Transfers**, for **TSIG**, select **Create**.
4. Enter the following information:
* **TSIG name**: The name of the TSIG object using domain name syntax (more details in [RFC 8945 section 4.2 ↗](https://datatracker.ietf.org/doc/html/rfc8945#section-4.2)).
* **Secret (optional)**: Get a shared secret to add to your third-party nameservers. If left blank, this field generates a random secret.
* **Algorithm**: Choose a TSIG signing algorithm.
5. Select **Create**.
To create a TSIG using the API, send a [POST](https://developers.cloudflare.com/api/resources/dns/subresources/zone%5Ftransfers/subresources/tsigs/methods/create/) request.
## 2\. Create Peer DNS Server (optional)
You only need to create a peer DNS server if you want:
* Your secondary nameservers to receive **NOTIFYs** for changes to your Cloudflare DNS records.
* A **TSIG** to sign zone transfer requests and **NOTIFYs**.
To create a peer using the dashboard:
1. In the Cloudflare dashboard, go to the account **Settings** page.
[Go to **Configurations** ↗](https://dash.cloudflare.com/?to=/:account/configurations)
2. Go to **DNS Settings**.
3. Under **DNS Zone Transfers**, for **Peer DNS servers**, select **Create**.
4. Enter the following information, paying particular attention to:
* **IP**: If configured, specifies where Cloudflare sends NOTIFY requests to.
* **Port**: Specifies the IP Port for the NOTIFY IP.
* **Enable incremental (IXFR) zone transfers**: Does not apply when you are using Cloudflare as your primary DNS provider (Cloudflare zones always accept IXFR requests).
* **Link an existing TSIG**: If desired, link the TSIG you [previously created](#1-create-tsig-optional).
5. Select **Create**.
To create a peer DNS server using the API, send a [POST](https://developers.cloudflare.com/api/resources/dns/subresources/zone%5Ftransfers/subresources/peers/methods/create/) request.
## 3\. Link peer to primary zone (optional)
If you previously [created a peer DNS server](#2-create-peer-dns-server-optional), you should link it to your primary zone.
Note
The maximum number of linked peers per zone is 30.
To link a primary zone to a peer using the dashboard:
1. In the Cloudflare dashboard, go to the **DNS Settings** page.
[Go to **Settings** ↗](https://dash.cloudflare.com/?to=/:account/:zone/dns/settings)
2. For **DNS Zone Transfers**, select **Manage linked peers**.
3. Select a peer.
4. Select **Save**.
To link a primary zone to a peer using the API, send a [POST](https://developers.cloudflare.com/api/resources/dns/subresources/zone%5Ftransfers/subresources/incoming/methods/create/) request with the ID of the peer you [previously created](#2-create-peer-dns-server-optional).
Multiple peers and TSIG
If you link more than one peer to a zone and at least one of them has TSIG configured, all peers are expected to also use the same TSIG.
## 4\. Update your secondary DNS provider
Your secondary DNS provider should send zone transfer requests (via AXFR or IXFR) to [this IP](https://developers.cloudflare.com/dns/zone-setups/zone-transfers/access-control-lists/cloudflare-ip-addresses/#transfer-ip) on port 53 and from the IP address specified in your [peer configuration](#2-create-peer-dns-server-optional).
It should also have updated [Access Control Lists (ACLs)](https://developers.cloudflare.com/dns/zone-setups/zone-transfers/access-control-lists/cloudflare-ip-addresses/#allow-range) to prevent NOTIFY messages sent from Cloudflare IP ranges from being blocked.
## 5\. Add secondary nameservers within Cloudflare
Using the information from your secondary DNS provider, [create NS records](https://developers.cloudflare.com/dns/manage-dns-records/how-to/create-dns-records/#create-dns-records) on your zone apex listing your secondary nameservers.
By default, Cloudflare ignores NS records added to the zone apex. To modify this behavior, enable [multi-provider DNS](https://developers.cloudflare.com/dns/nameservers/nameserver-options/#multi-provider-dns).
Note
If your account [zone defaults](https://developers.cloudflare.com/dns/additional-options/dns-zone-defaults/) are already defined to have **Multi-provider DNS** enabled, this step may not be necessary.
1. In the Cloudflare dashboard, go to the **DNS Settings** page.
[Go to **Settings** ↗](https://dash.cloudflare.com/?to=/:account/:zone/dns/settings)
2. Enable **Multi-provider DNS**.
Send the following `PATCH` request replacing the placeholders with your zone ID and authentication information:
Required API token permissions
At least one of the following [token permissions](https://developers.cloudflare.com/fundamentals/api/reference/permissions/) is required:
* `Zone DNS Settings Write`
* `DNS Write`
```bash
curl "https://api.cloudflare.com/client/v4/zones/$ZONE_ID/dns_settings" \
--request PATCH \
--header "Authorization: Bearer $CLOUDFLARE_API_TOKEN" \
--json '{
"multi_provider": true
}'
```
Note
In case you want to keep Cloudflare as the only authoritative DNS provider, do not enable multi-provider DNS. In this way, your secondary DNS is kept hidden and up-to-date with the Cloudflare primary, as a backup option for disaster recovery scenarios.
## 6\. Enable outgoing zone transfers
When you enable outgoing zone transfers, this will send a DNS NOTIFY message to your secondary DNS provider.
1. In the Cloudflare dashboard, go to the **DNS Settings** page.
[Go to **Settings** ↗](https://dash.cloudflare.com/?to=/:account/:zone/dns/settings)
2. For **Outgoing Zone Transfers**, switch the toggle to **On**.
To enable outgoing zone transfers using the API, send a [POST](https://developers.cloudflare.com/api/resources/dns/subresources/zone%5Ftransfers/subresources/outgoing/methods/enable/) request.
## 7\. Add secondary nameservers to registrar
At your registrar, add the nameservers of your secondary DNS provider.
Was this helpful?
YesNo
## On this page
[Docs](https://developers.cloudflare.com/)
```json
{"@context":"https://schema.org","@type":"TechArticle","@id":"https://developers.cloudflare.com/dns/zone-setups/zone-transfers/cloudflare-as-primary/setup/#page","headline":"Set up outgoing zone transfers (Cloudflare as Primary) · Cloudflare DNS docs","description":"With outgoing zone transfers, you can keep Cloudflare as your primary DNS provider and use one or more secondary providers for increased availability.","url":"https://developers.cloudflare.com/dns/zone-setups/zone-transfers/cloudflare-as-primary/setup/","inLanguage":"en","image":"https://developers.cloudflare.com/og-docs.png","dateModified":"2026-05-05","publisher":{"@type":"Organization","name":"Cloudflare","url":"https://www.cloudflare.com/"},"isPartOf":{"@type":"WebSite","@id":"https://developers.cloudflare.com/#website","name":"Cloudflare Docs","url":"https://developers.cloudflare.com/"}}
```
---
---
description: Which records transfer when Cloudflare is primary.
title: Records transfer
image: https://developers.cloudflare.com/og-docs.png
---
[Skip to content](#main-content)
> Documentation Index
> Fetch the complete documentation index at: https://developers.cloudflare.com/dns/llms.txt
> Use this file to discover all available pages before exploring further.
# Records transfer
Last updated Apr 16, 2026|Copy as Markdown|[View as Markdown](https://developers.cloudflare.com/dns/zone-setups/zone-transfers/cloudflare-as-primary/transfer-criteria/index.md)|[Agent setup](https://developers.cloudflare.com/agent-setup/)
Consider the sections below to understand the expected behaviors, depending on DNS record type and proxied status.
## Proxied records
For each [proxied DNS record](https://developers.cloudflare.com/dns/proxy-status/) in your zone, Cloudflare will transfer out two `A` and two `AAAA` records.
These records correspond to the [Cloudflare IP addresses ↗](https://www.cloudflare.com/ips) used for proxying traffic.
## DNS-only CNAME records
As explained in [DNS record types](https://developers.cloudflare.com/dns/manage-dns-records/reference/dns-record-types/#cname), Cloudflare uses a process called [CNAME flattening](https://developers.cloudflare.com/dns/cname-flattening/) to return the final IP address instead of the CNAME target. CNAME flattening improves performance and is also what allows you to set a CNAME record on the zone apex.
Depending on the [settings](https://developers.cloudflare.com/dns/cname-flattening/set-up-cname-flattening/) you have, when you use DNS-only CNAME records with outgoing zone transfers, you can expect the following:
* For DNS-only CNAME records on the zone apex, Cloudflare will always transfer out the flattened IP addresses.
* For DNS-only CNAME records on subdomains, Cloudflare will only transfer out flattened IP addresses if the setting [**CNAME flattening for all CNAME records**](https://developers.cloudflare.com/dns/cname-flattening/set-up-cname-flattening/#for-all-cname-records) is enabled.
Per-record CNAME flattening
For records using [per-record CNAME flattening](https://developers.cloudflare.com/dns/cname-flattening/set-up-cname-flattening/#per-record) (meaning **CNAME flattening for all CNAME records** is disabled), Cloudflare will transfer out the CNAME, not the flattened IP address.
## Records that are not transferred
The following records are not transferred out when you use Cloudflare as primary:
* [CAA records](https://developers.cloudflare.com/ssl/edge-certificates/caa-records/)
* TXT records used for TLS certificate validation
* DNS-only [Load Balancing](https://developers.cloudflare.com/load-balancing/load-balancers/dns-records/) records
Note
Proxied Load Balancing records are transferred as explained in [Proxied records](#proxied-records).
Was this helpful?
YesNo
## On this page
[Docs](https://developers.cloudflare.com/)
```json
{"@context":"https://schema.org","@type":"TechArticle","@id":"https://developers.cloudflare.com/dns/zone-setups/zone-transfers/cloudflare-as-primary/transfer-criteria/#page","headline":"Records transfer · Cloudflare DNS docs","description":"Which records transfer when Cloudflare is primary.","url":"https://developers.cloudflare.com/dns/zone-setups/zone-transfers/cloudflare-as-primary/transfer-criteria/","inLanguage":"en","image":"https://developers.cloudflare.com/og-docs.png","dateModified":"2026-04-16","publisher":{"@type":"Organization","name":"Cloudflare","url":"https://www.cloudflare.com/"},"isPartOf":{"@type":"WebSite","@id":"https://developers.cloudflare.com/#website","name":"Cloudflare Docs","url":"https://developers.cloudflare.com/"}}
```
---
---
description: Use Cloudflare as a secondary DNS provider.
title: Cloudflare as Secondary
image: https://developers.cloudflare.com/og-docs.png
---
[Skip to content](#main-content)
> Documentation Index
> Fetch the complete documentation index at: https://developers.cloudflare.com/dns/llms.txt
> Use this file to discover all available pages before exploring further.
# Cloudflare as Secondary
Last updated Apr 16, 2026|Copy as Markdown|[View as Markdown](https://developers.cloudflare.com/dns/zone-setups/zone-transfers/cloudflare-as-secondary/index.md)|[Agent setup](https://developers.cloudflare.com/agent-setup/)
With incoming zone transfers, you can keep your primary DNS provider and use Cloudflare as a secondary DNS provider.
When you make edits in your primary DNS provider, those DNS records will be transferred from your primary DNS provider to Cloudflare via zone transfer using [AXFR ↗](https://datatracker.ietf.org/doc/html/rfc5936) or [IXFR ↗](https://datatracker.ietf.org/doc/html/rfc1995).
flowchart LR
accTitle: Cloudflare as Secondary DNS
A((Zone Admin)) --DNS record management--> B[Primary DNS provider]
B --Zone transfer--> C[Cloudflare DNS]
B & C <--DNS lookups--> D[Resolver] <--DNS lookups--> E((User))
## How to
* [Set up incoming zone transfers](https://developers.cloudflare.com/dns/zone-setups/zone-transfers/cloudflare-as-secondary/setup/)
* Proxy traffic through Cloudflare with [Secondary DNS Override](https://developers.cloudflare.com/dns/zone-setups/zone-transfers/cloudflare-as-secondary/proxy-traffic/)
## Availability
Secondary DNS is only available to Enterprise customers. For more details on activation and pricing, contact your account team.
Was this helpful?
YesNo
## On this page
[Docs](https://developers.cloudflare.com/)
```json
{"@context":"https://schema.org","@type":"TechArticle","@id":"https://developers.cloudflare.com/dns/zone-setups/zone-transfers/cloudflare-as-secondary/#page","headline":"Cloudflare as Secondary · Cloudflare DNS docs","description":"Use Cloudflare as a secondary DNS provider.","url":"https://developers.cloudflare.com/dns/zone-setups/zone-transfers/cloudflare-as-secondary/","inLanguage":"en","image":"https://developers.cloudflare.com/og-docs.png","dateModified":"2026-04-16","publisher":{"@type":"Organization","name":"Cloudflare","url":"https://www.cloudflare.com/"},"isPartOf":{"@type":"WebSite","@id":"https://developers.cloudflare.com/#website","name":"Cloudflare Docs","url":"https://developers.cloudflare.com/"}}
```
---
---
description: Set up alerts for secondary DNS zone transfer events.
title: Alerts
image: https://developers.cloudflare.com/og-docs.png
---
[Skip to content](#main-content)
> Documentation Index
> Fetch the complete documentation index at: https://developers.cloudflare.com/dns/llms.txt
> Use this file to discover all available pages before exploring further.
# Alerts
Last updated Apr 16, 2026|Copy as Markdown|[View as Markdown](https://developers.cloudflare.com/dns/zone-setups/zone-transfers/cloudflare-as-secondary/alerts/index.md)|[Agent setup](https://developers.cloudflare.com/agent-setup/)
You can configure alerts to receive notifications for changes in your secondary DNS.
Secondary DNS all Primaries Failing
**Who is it for?**
Enterprise customers who have at least one secondary zone in their account and want to receive a notification if all of their primary nameservers are failing.
**Other options / filters**
None.
**Included with**
Purchase of Secondary DNS
**What should you do if you receive one?**
1. Confirm that your primary nameservers are up and running.
2. Confirm that the [Access Control Lists (ACLs)](https://developers.cloudflare.com/dns/zone-setups/zone-transfers/access-control-lists/cloudflare-ip-addresses/) on your primary nameservers are configured correctly.
3. Confirm that your primary nameservers are configured correctly in your Cloudflare account (correct IP, port, TSIG).
Secondary DNS Primaries Failing
**Who is it for?**
Enterprise customers who have at least one secondary zone and want to receive a notification if at least one of their primary nameservers is failing while transfers from at least one other primary are still successful.
**Other options / filters**
None.
**Included with**
Purchase of Secondary DNS.
**What should you do if you receive one?**
1. Confirm that your primary nameservers are up and running.
2. Confirm that the [Access Control Lists (ACLs)](https://developers.cloudflare.com/dns/zone-setups/zone-transfers/access-control-lists/cloudflare-ip-addresses/) on your primary nameservers are configured correctly.
3. Confirm that your primary nameservers are configured correctly in your Cloudflare account (correct IP, port, TSIG).
Secondary DNS Successfully Updated
**Who is it for?**
Enterprise customers who have at least one secondary zone in their account and want to receive a notification on successful zone transfers.
**Other options / filters**
None.
**Included with**
Purchase of Secondary DNS.
**What should you do if you receive one?**
No action needed. Everything is working correctly.
Secondary DNS Warning
**Who is it for?**
Customers who are using Cloudflare for Secondary DNS and want to receive notifications about warnings issued by the transferred zone.
**Other options / filters**
None.
**Included with**
Enterprise plans.
**What should you do if you receive one?**
Actions for failure notifications will depend on the type of failure.
Refer to [Cloudflare Notifications](https://developers.cloudflare.com/notifications/get-started/) for more information on how to set up an alert.
Was this helpful?
YesNo
## On this page
[Docs](https://developers.cloudflare.com/)
```json
{"@context":"https://schema.org","@type":"TechArticle","@id":"https://developers.cloudflare.com/dns/zone-setups/zone-transfers/cloudflare-as-secondary/alerts/#page","headline":"Alerts for Secondary DNS · Cloudflare DNS docs","description":"Set up alerts for secondary DNS zone transfer events.","url":"https://developers.cloudflare.com/dns/zone-setups/zone-transfers/cloudflare-as-secondary/alerts/","inLanguage":"en","image":"https://developers.cloudflare.com/og-docs.png","dateModified":"2026-04-16","publisher":{"@type":"Organization","name":"Cloudflare","url":"https://www.cloudflare.com/"},"isPartOf":{"@type":"WebSite","@id":"https://developers.cloudflare.com/#website","name":"Cloudflare Docs","url":"https://developers.cloudflare.com/"}}
```
---
---
description: DNSSEC options for secondary DNS zones.
title: DNSSEC options
image: https://developers.cloudflare.com/og-docs.png
---
[Skip to content](#main-content)
> Documentation Index
> Fetch the complete documentation index at: https://developers.cloudflare.com/dns/llms.txt
> Use this file to discover all available pages before exploring further.
# DNSSEC options
Last updated Apr 22, 2026|Copy as Markdown|[View as Markdown](https://developers.cloudflare.com/dns/zone-setups/zone-transfers/cloudflare-as-secondary/dnssec-for-secondary/index.md)|[Agent setup](https://developers.cloudflare.com/agent-setup/)
[DNS Security Extensions (DNSSEC) ↗](https://www.cloudflare.com/learning/dns/dns-security/) increase security by adding cryptographic signatures to DNS records. When you use multiple providers and Cloudflare is secondary, you have a few options to enable DNSSEC for records served by Cloudflare.
* **[Multi-signer DNSSEC](https://developers.cloudflare.com/dns/dnssec/multi-signer-dnssec/setup/)**: Both Cloudflare and your primary DNS provider know the signing keys of each other and perform their own live-signing of DNS records, in accordance with [RFC 8901 ↗](https://www.rfc-editor.org/rfc/rfc8901.html).
* **[Live signing](#set-up-live-signing-dnssec)**: If your domain is not delegated to your primary provider's nameservers and Cloudflare secondary nameservers are the only nameservers authoritatively responding to DNS queries (hidden primary setup), you can choose this option to allow Cloudflare to perform live-signing of your DNS records.
* **[Pre-signed](#set-up-pre-signed-dnssec)**: Your primary DNS provider signs records and transfers out the signatures. Cloudflare then serves these records and signatures as is, without doing any signing. By default, Cloudflare uses [NSEC records ↗](https://www.cloudflare.com/dns/dnssec/how-dnssec-works/) and not NSEC3 - refer to [NSEC3 support](https://developers.cloudflare.com/dns/dnssec/enable-nsec3/) if needed. Also, Pre-signed DNSSEC does not support [Secondary DNS Overrides](https://developers.cloudflare.com/dns/zone-setups/zone-transfers/cloudflare-as-secondary/proxy-traffic/) nor [Load Balancing](https://developers.cloudflare.com/load-balancing/).
---
## Set up multi-signer DNSSEC
Refer to [Set up multi-signer DNSSEC](https://developers.cloudflare.com/dns/dnssec/multi-signer-dnssec/setup/) and follow the instructions, considering the note about Cloudflare as Secondary.
---
## Set up live signing DNSSEC
If you use Cloudflare secondary nameservers as the only nameservers authoritatively responding to DNS queries (hidden primary setup), you can enable live signing DNSSEC to have Cloudflare sign the records for your zone.
In this setup, DNSSEC on your primary DNS provider does not need to be enabled.
1. In the Cloudflare dashboard, go to the **DNS Settings** page.
[Go to **Settings** ↗](https://dash.cloudflare.com/?to=/:account/:zone/dns/settings)
2. Under **DNSSEC with Secondary DNS** select **Live signing**. You will then have access to several necessary values to create a **DS** record at your registrar.
3. Add the **DS** record to your registrar. If Algorithm 13 - Cloudflare's preferred cipher choice - is not listed by your registrar, it may also be called _ECDSA Curve P-256 with SHA-256_.
Provider-specific DNSSEC instructions
This is not an exhaustive list, but the following links may be helpful:
* [DNSimple ↗](https://support.dnsimple.com/articles/cloudflare-ds-record/)
* [Domaindiscount24 ↗](https://support.domaindiscount24.com/hc/articles/4409759478161)
* [DreamHost ↗](https://help.dreamhost.com/hc/en-us/articles/219539467)
* [Dynadot ↗](https://www.dynadot.com/help/question/set-DNSSEC)
* [Enom ↗](https://support.enom.com/support/solutions/articles/201000065386)
* [Gandi ↗](https://docs.gandi.net/en/domain%5Fnames/advanced%5Fusers/dnssec.html)
* [GoDaddy ↗](https://www.godaddy.com/help/add-a-ds-record-23865)
* [Hostinger ↗](https://www.hostinger.com/support/3667267-how-to-use-dnssec-records-at-hostinger/)
* [Hover ↗](https://support.hover.com/support/solutions/articles/201000064716)
* [Infomaniak ↗](https://faq.infomaniak.com/2187)
* [InMotion Hosting ↗](https://www.inmotionhosting.com/support/edu/cpanel/enable-dnssec-cloudflare/)
* [INWX ↗](https://kb.inwx.com/en-us/3-nameserver/131)
* [Joker.com ↗](https://joker.com/faq/books/jokercom-faq-en/page/dnssec)
* [Name.com ↗](https://www.name.com/support/articles/205439058-managing-dnssec)
* [Namecheap ↗](https://www.namecheap.com/support/knowledgebase/article.aspx/9722/2232/managing-dnssec-for-domains-pointed-to-custom-dns/)
* [NameISP ↗](https://support.nameisp.com/knowledgebase/dns)
* [Namesilo ↗](https://www.namesilo.com/support/v2/articles/domain-manager/ds-records)
* [OVH ↗](https://help.ovhcloud.com/csm/en-dns-secure-domain-dnssec?id=kb%5Farticle%5Fview&sysparm%5Farticle=KB0051637)
* [Squarespace ↗](https://support.squarespace.com/hc/articles/4404183898125-Nameservers-and-DNSSEC-for-Squarespace-managed-domains#toc-dnssec)
* [Registro.br ↗](https://registro.br/tecnologia/dnssec/?secao=tutoriais-dns)
* [Porkbun ↗](https://kb.porkbun.com/article/93-how-to-install-dnssec) (do not fill out **keyData**)
* [TransIP ↗](https://www.transip.eu/knowledgebase/150-secure-domains-custom-nameservers-dnssec/)
1. Use the [Edit DNSSEC Status endpoint](https://developers.cloudflare.com/api/resources/dns/subresources/dnssec/methods/edit/) and set a `status` of `active` for your zone.
Required API token permissions
At least one of the following [token permissions](https://developers.cloudflare.com/fundamentals/api/reference/permissions/) is required:
* `DNS Write`
```bash
curl "https://api.cloudflare.com/client/v4/zones/$ZONE_ID/dnssec" \
--request PATCH \
--header "Authorization: Bearer $CLOUDFLARE_API_TOKEN" \
--json '{
"status": "active"
}'
```
1. Use the [DNSSEC Details endpoint](https://developers.cloudflare.com/api/resources/dns/subresources/dnssec/methods/get/) to get the necessary values to create a **DS** record at your registrar.
2. Add the **DS** record to your registrar. If Algorithm 13 - Cloudflare's preferred cipher choice - is not listed by your registrar, it may also be called _ECDSA Curve P-256 with SHA-256_.
Provider-specific DNSSEC instructions
This is not an exhaustive list, but the following links may be helpful:
* [DNSimple ↗](https://support.dnsimple.com/articles/cloudflare-ds-record/)
* [Domaindiscount24 ↗](https://support.domaindiscount24.com/hc/articles/4409759478161)
* [DreamHost ↗](https://help.dreamhost.com/hc/en-us/articles/219539467)
* [Dynadot ↗](https://www.dynadot.com/help/question/set-DNSSEC)
* [Enom ↗](https://support.enom.com/support/solutions/articles/201000065386)
* [Gandi ↗](https://docs.gandi.net/en/domain%5Fnames/advanced%5Fusers/dnssec.html)
* [GoDaddy ↗](https://www.godaddy.com/help/add-a-ds-record-23865)
* [Hostinger ↗](https://www.hostinger.com/support/3667267-how-to-use-dnssec-records-at-hostinger/)
* [Hover ↗](https://support.hover.com/support/solutions/articles/201000064716)
* [Infomaniak ↗](https://faq.infomaniak.com/2187)
* [InMotion Hosting ↗](https://www.inmotionhosting.com/support/edu/cpanel/enable-dnssec-cloudflare/)
* [INWX ↗](https://kb.inwx.com/en-us/3-nameserver/131)
* [Joker.com ↗](https://joker.com/faq/books/jokercom-faq-en/page/dnssec)
* [Name.com ↗](https://www.name.com/support/articles/205439058-managing-dnssec)
* [Namecheap ↗](https://www.namecheap.com/support/knowledgebase/article.aspx/9722/2232/managing-dnssec-for-domains-pointed-to-custom-dns/)
* [NameISP ↗](https://support.nameisp.com/knowledgebase/dns)
* [Namesilo ↗](https://www.namesilo.com/support/v2/articles/domain-manager/ds-records)
* [OVH ↗](https://help.ovhcloud.com/csm/en-dns-secure-domain-dnssec?id=kb%5Farticle%5Fview&sysparm%5Farticle=KB0051637)
* [Squarespace ↗](https://support.squarespace.com/hc/articles/4404183898125-Nameservers-and-DNSSEC-for-Squarespace-managed-domains#toc-dnssec)
* [Registro.br ↗](https://registro.br/tecnologia/dnssec/?secao=tutoriais-dns)
* [Porkbun ↗](https://kb.porkbun.com/article/93-how-to-install-dnssec) (do not fill out **keyData**)
* [TransIP ↗](https://www.transip.eu/knowledgebase/150-secure-domains-custom-nameservers-dnssec/)
---
## Set up pre-signed DNSSEC
### Prerequisites
* Your secondary zone in Cloudflare already exists and zone transfers from your primary DNS provider are working correctly.
* You have considered whether your primary DNS provider uses NSEC or NSEC3, and have enabled [NSEC3 support](https://developers.cloudflare.com/dns/dnssec/enable-nsec3/) if needed.
* Your primary DNS provider transfers out DNSSEC related records, such as RRSIG, DNSKEY, and NSEC.
### Steps
1. Enable DNSSEC at your primary DNS provider.
2. Enable DNSSEC for your zone at Cloudflare, using either the Dashboard or the API.
Caution
Pre-signed DNSSEC does not support [Secondary DNS Overrides](https://developers.cloudflare.com/dns/zone-setups/zone-transfers/cloudflare-as-secondary/proxy-traffic/) nor [Load Balancing](https://developers.cloudflare.com/load-balancing/). Once you enable pre-signed DNSSEC, Cloudflare will treat all your DNS records as DNS-only.
1. In the Cloudflare dashboard, go to the **DNS Settings** page.
[Go to **Settings** ↗](https://dash.cloudflare.com/?to=/:account/:zone/dns/settings)
2. Under **DNSSEC with Secondary DNS** select **Pre-signed**.
Use the [Edit DNSSEC Status endpoint](https://developers.cloudflare.com/api/resources/dns/subresources/dnssec/methods/edit/) and set the `dnssec_presigned` value to `true`.
Required API token permissions
At least one of the following [token permissions](https://developers.cloudflare.com/fundamentals/api/reference/permissions/) is required:
* `DNS Write`
```bash
curl "https://api.cloudflare.com/client/v4/zones/$ZONE_ID/dnssec" \
--request PATCH \
--header "Authorization: Bearer $CLOUDFLARE_API_TOKEN" \
--json '{
"dnssec_presigned": true
}'
```
1. Make sure Cloudflare nameservers are added at your registrar. You can see your Cloudflare nameservers on the dashboard by going to the [**DNS Records** ↗](https://dash.cloudflare.com/?to=/:account/:zone/dns/records) page.
2. Make sure there is a DS record added at your registrar. The DS record is obtained from your primary DNS provider (the signer of the zone) and is what indicates to DNS resolvers that your zone has DNSSEC enabled.
Was this helpful?
YesNo
## On this page
[Docs](https://developers.cloudflare.com/)
```json
{"@context":"https://schema.org","@type":"TechArticle","@id":"https://developers.cloudflare.com/dns/zone-setups/zone-transfers/cloudflare-as-secondary/dnssec-for-secondary/#page","headline":"DNSSEC for Secondary DNS · Cloudflare DNS docs","description":"DNSSEC options for secondary DNS zones.","url":"https://developers.cloudflare.com/dns/zone-setups/zone-transfers/cloudflare-as-secondary/dnssec-for-secondary/","inLanguage":"en","image":"https://developers.cloudflare.com/og-docs.png","dateModified":"2026-04-22","publisher":{"@type":"Organization","name":"Cloudflare","url":"https://www.cloudflare.com/"},"isPartOf":{"@type":"WebSite","@id":"https://developers.cloudflare.com/#website","name":"Cloudflare Docs","url":"https://developers.cloudflare.com/"}}
```
---
---
description: Proxy traffic through Cloudflare on secondary zones.
title: Proxy traffic
image: https://developers.cloudflare.com/og-docs.png
---
[Skip to content](#main-content)
> Documentation Index
> Fetch the complete documentation index at: https://developers.cloudflare.com/dns/llms.txt
> Use this file to discover all available pages before exploring further.
# Proxy traffic
Last updated May 12, 2026|Copy as Markdown|[View as Markdown](https://developers.cloudflare.com/dns/zone-setups/zone-transfers/cloudflare-as-secondary/proxy-traffic/index.md)|[Agent setup](https://developers.cloudflare.com/agent-setup/)
When you set up [incoming zone transfers](https://developers.cloudflare.com/dns/zone-setups/zone-transfers/cloudflare-as-secondary/setup/) on a secondary zone, you cannot enable the proxy on any transferred DNS records by default.
With Secondary DNS override, you can use Cloudflare as your secondary DNS provider but still get the [performance and security benefits](https://developers.cloudflare.com/fundamentals/concepts/how-cloudflare-works/#cloudflare-as-a-reverse-proxy) of Cloudflare's proxy. Additionally it lets you override any A and AAAA records on your zone apex with a CNAME record.
Note
Only A, AAAA, and CNAME records can be proxied.
## Prerequisites
Before you set up Secondary DNS override, make sure that you have:
* [Set up a secondary DNS zone](https://developers.cloudflare.com/dns/zone-setups/zone-transfers/cloudflare-as-secondary/setup/) and confirmed your DNS records are transferred correctly.
* Set your [DNSSEC with Secondary DNS ↗](https://dash.cloudflare.com/?to=/:account/:zone/dns/settings/) option to either **Unsigned** or **Live Signing**. If set to [Pre-signed](https://developers.cloudflare.com/dns/zone-setups/zone-transfers/cloudflare-as-secondary/dnssec-for-secondary/#set-up-pre-signed-dnssec), Cloudflare will treat all your DNS records as unproxied (DNS only).
* Removed all nameservers from your registrar except for those provided by Cloudflare (highly recommended).
Caution
If you use Secondary DNS override and keep other nameservers at your registrar, DNS responses will be inconsistent across DNS providers, which goes against [official standards ↗](https://www.iana.org/help/nameserver-requirements).
## Set up Secondary DNS override
1. In the Cloudflare dashboard, go to the **DNS Settings** page.
[Go to **Settings** ↗](https://dash.cloudflare.com/?to=/:account/:zone/dns/settings)
2. Enable **Secondary DNS override**.
3. On the [**DNS Records** ↗](https://dash.cloudflare.com/?to=/:account/:zone/dns/records) page, for specific A, AAAA, or CNAME records, select the grey cloud icon to set their **Proxy status** to **Proxied**.
1. To enable Secondary DNS override on a zone, use the following PATCH request:
Required API token permissions
At least one of the following [token permissions](https://developers.cloudflare.com/fundamentals/api/reference/permissions/) is required:
* `Zone DNS Settings Write`
* `DNS Write`
```bash
curl "https://api.cloudflare.com/client/v4/zones/$ZONE_ID/dns_settings" \
--request PATCH \
--header "Authorization: Bearer $CLOUDFLARE_API_TOKEN" \
--json '{
"secondary_overrides": true
}'
```
1. For specific A, AAAA, or CNAME records, send a [POST](https://developers.cloudflare.com/api/resources/dns/subresources/records/methods/create/) request with the `proxied` status as `true`.
* Make sure the added record has the same name as the transferred record you intend to proxy. Cloudflare only looks at the name and the proxy status, so the record content does not matter.
Zone transfers interaction
Zone transfers from the primary (including content or TTL changes) do not change the proxy status of records you set to proxied. The override persists until the record is deleted on the primary.
## Proxied A and AAAA records
After proxying (orange clouding) a Secondary DNS record, any additional records under that hostname transferred from the primary DNS provider are automatically proxied. This applies to all A and AAAA records under that domain.
## CNAME record on the zone apex
You can also add a CNAME record on the zone apex (supported through [CNAME Flattening](https://developers.cloudflare.com/dns/cname-flattening/)) and either proxy that record or keep it on DNS Only.
Once you create a CNAME record at the apex, existing A or AAAA records on the zone apex will be deactivated. You can view those deactivated records by clicking **View Inactive Records**. To re-activate the A or AAAA records at the root, remove the CNAME record.
## Verify that your records are proxied
Query DNS at your assigned Secondary DNS nameserver to confirm the DNS response Cloudflare returns. Records proxied by Cloudflare return [Cloudflare IPs ↗](https://www.cloudflare.com/ips/).
Was this helpful?
YesNo
## On this page
[Docs](https://developers.cloudflare.com/)
```json
{"@context":"https://schema.org","@type":"TechArticle","@id":"https://developers.cloudflare.com/dns/zone-setups/zone-transfers/cloudflare-as-secondary/proxy-traffic/#page","headline":"Proxy traffic with Secondary DNS override · Cloudflare DNS docs","description":"Proxy traffic through Cloudflare on secondary zones.","url":"https://developers.cloudflare.com/dns/zone-setups/zone-transfers/cloudflare-as-secondary/proxy-traffic/","inLanguage":"en","image":"https://developers.cloudflare.com/og-docs.png","dateModified":"2026-05-12","publisher":{"@type":"Organization","name":"Cloudflare","url":"https://www.cloudflare.com/"},"isPartOf":{"@type":"WebSite","@id":"https://developers.cloudflare.com/#website","name":"Cloudflare Docs","url":"https://developers.cloudflare.com/"}}
```
---
---
description: With incoming zone transfers, you can keep your primary DNS provider and use Cloudflare as a secondary DNS provider.
title: Setup
image: https://developers.cloudflare.com/og-docs.png
---
[Skip to content](#main-content)
> Documentation Index
> Fetch the complete documentation index at: https://developers.cloudflare.com/dns/llms.txt
> Use this file to discover all available pages before exploring further.
# Setup
Last updated Jun 24, 2026|Copy as Markdown|[View as Markdown](https://developers.cloudflare.com/dns/zone-setups/zone-transfers/cloudflare-as-secondary/setup/index.md)|[Agent setup](https://developers.cloudflare.com/agent-setup/)
With [incoming zone transfers](https://developers.cloudflare.com/dns/zone-setups/zone-transfers/cloudflare-as-secondary/), you can keep your primary DNS provider and use Cloudflare as a secondary DNS provider.
Normal incoming zone transfers only provide DNS resolution. If you also want your traffic to benefit from Cloudflare's performance and security features, you need to [set up Secondary DNS Override](https://developers.cloudflare.com/dns/zone-setups/zone-transfers/cloudflare-as-secondary/proxy-traffic/).
## Before you begin
* You should already have a registered domain, set up with your primary DNS provider.
* Review the available options and plan for how you will use [DNSSEC with Cloudflare as secondary](https://developers.cloudflare.com/dns/zone-setups/zone-transfers/cloudflare-as-secondary/dnssec-for-secondary/).
* Make sure you have completed the following tasks at your primary DNS provider and at Cloudflare.
Caution
Cloudflare begins answering authoritatively for a secondary zone as soon as it is created, even before the first zone transfer (AXFR) completes. If you delegate to Cloudflare nameservers before the first successful transfer, resolvers may cache empty or negative responses (default minimum TTL: 1800 s).
**Best practice:** Verify your zone transfer has completed successfully before updating NS delegation at your registrar. You can confirm by querying Cloudflare's assigned nameservers directly for expected records.
## At your primary DNS provider
Your primary DNS provider should allow traffic from the IP address and port specified in your [peer server configuration](#2-create-peer-server).
It should also have updated [Access Control Lists (ACLs)](https://developers.cloudflare.com/dns/zone-setups/zone-transfers/access-control-lists/cloudflare-ip-addresses/#cloudflare-as-secondary) to prevent zone transfers from being blocked.
We strongly recommend configuring [DNS NOTIFY ↗](https://datatracker.ietf.org/doc/html/rfc1996) at your primary DNS provider to ensure your secondary zone on Cloudflare is updated with the most recent changes as quickly as possible. In order to do so, set up [Cloudflare NOTIFY IPs](https://developers.cloudflare.com/dns/zone-setups/zone-transfers/access-control-lists/cloudflare-ip-addresses/#notify-ips) at your primary DNS provider.
You will also need the following information from your Primary DNS provider:
* **Primary IP address**: The IP address that Cloudflare sends zone transfer requests to (via AXFR or IXFR).
* **Zone transfer type**: Will zone transfers be full (AXFR) or incremental (IXFR)?
* **TSIG name** (optional): A descriptive name of the TSIG following domain name syntax ([RFC 8945 section 4.2 ↗](https://datatracker.ietf.org/doc/html/rfc8945#section-4.2)).
Note
The TSIG names configured at your primary and secondary DNS providers have to be exactly the same. Any differences in TSIG names will cause zone transfers to fail.
* **TSIG secret** (optional): The secret string used to authenticate zone transfers.
* **TSIG algorithm** (optional): The algorithm used to authenticate zone transfers.
### At Cloudflare
Make sure your account team has enabled your zone for Secondary DNS.
Get the following values from your Cloudflare account:
* [Account ID](https://developers.cloudflare.com/fundamentals/account/find-account-and-zone-ids/)
* [Zone ID](https://developers.cloudflare.com/fundamentals/account/find-account-and-zone-ids/)
* [Nameserver names](https://developers.cloudflare.com/dns/zone-setups/full-setup/setup/#31-get-nameserver-names), which should have **secondary** in the name.
---
## 1\. Create TSIG (optional)
A Transaction Signature (TSIG) authenticates communication between a primary and secondary DNS server.
Note
The TSIG names configured at your primary and secondary DNS providers have to be exactly the same. Any differences in TSIG names will cause zone transfers to fail.
While optional, this step is highly recommended.
To create a TSIG using the dashboard:
1. In the Cloudflare dashboard, go to the account **Settings** page.
[Go to **Configurations** ↗](https://dash.cloudflare.com/?to=/:account/configurations)
2. Go to **DNS Settings**.
3. Under **DNS Zone Transfers**, for **TSIG**, select **Create**.
4. Enter the following information:
* **TSIG name**: The name of the TSIG object using domain name syntax (more details in [RFC 8945 section 4.2 ↗](https://datatracker.ietf.org/doc/html/rfc8945#section-4.2)).
* **Secret (optional)**: Get a shared secret to add to your third-party nameservers. If left blank, this field generates a random secret.
* **Algorithm**: Choose a TSIG signing algorithm.
5. Select **Create**.
To create a TSIG using the API, send a [POST](https://developers.cloudflare.com/api/resources/dns/subresources/zone%5Ftransfers/subresources/tsigs/methods/create/) request.
## 2\. Create Peer Server
To create a peer server using the dashboard:
1. In the Cloudflare dashboard, go to the account **Settings** page.
[Go to **Configurations** ↗](https://dash.cloudflare.com/?to=/:account/configurations)
2. Go to **DNS Settings**.
3. Under **DNS Zone Transfers**, for **Peer DNS servers**, select **Create**.
4. Enter the following information, paying particular attention to:
* **IP**: Specifies where Cloudflare sends transfer requests to.
* **Port**: Specifies the IP Port for the transfer IP.
* **Enable incremental (IXFR) zone transfers**: Specifies if Cloudflare sends IXFR requests in addition to the default AXFR requests.
* **Link an existing TSIG**: If desired, link the TSIG you [previously created](https://developers.cloudflare.com/dns/zone-setups/zone-transfers/cloudflare-as-secondary/setup/#1-create-tsig-optional).
5. Select **Create**.
To create a peer DNS server using the API, send a [POST request](https://developers.cloudflare.com/api/resources/dns/subresources/zone%5Ftransfers/subresources/peers/).
## 3\. Create the Secondary Zone
To create a secondary zone using the dashboard:
1. Log in to the [Cloudflare dashboard ↗](https://dash.cloudflare.com/login) and select your account.
2. Select **Onboard a domain**.
3. Enter your zone name and choose **Secondary DNS** (if this option is not available, contact your account team).
4. Select **Continue**.
5. Select your plan type.
6. Choose a value for **Zone refresh**, which controls the number of seconds between zone updates from your primary DNS server.
Caution
Cloudflare will not use the REFRESH value inside the SOA record that is served by your primary provider. Instead the value of zone refresh configured for your secondary zone on Cloudflare will be used to determine the interval after which the SOA serial of the primary zone will be checked for changes.
7. Select the peer server you [previously created](#2-create-peer-server). If needed, you can link more than one peer server to a zone.
Note
The maximum number of linked peers per zone is 30.
8. Select **Continue**.
9. Review the list of transferred records and select **Continue**.
Note
If no records appear, you may have misconfigured the TSIG or the IP address of the peer server or the [Access Control List](https://developers.cloudflare.com/dns/zone-setups/zone-transfers/access-control-lists/cloudflare-ip-addresses/#cloudflare-as-secondary) was improperly configured at your primary DNS provider.
10. Select **Initiate zone transfer**.
To create a secondary zone using the API, send a [POST](https://developers.cloudflare.com/api/resources/dns/subresources/zone%5Ftransfers/subresources/incoming/methods/create/) request with the `type` parameter set to `"secondary"`.
## 4\. Update registrar
At your registrar, add the secondary nameservers [specified in the Cloudflare dashboard](https://developers.cloudflare.com/dns/zone-setups/full-setup/setup/#31-get-nameserver-names). Do not remove your primary DNS provider's nameservers.
When you have added the Cloudflare nameservers, go into your new secondary zone and select **Done, check nameservers**.
## 5\. Create notifications (optional)
To increase the reliability of your incoming zone transfers, [set up notifications](https://developers.cloudflare.com/notifications/get-started/#create-a-notification) to be notified when your primaries are failing, when records are updated, [and more](https://developers.cloudflare.com/notifications/notification-available/#dns).
## 6\. Proxy traffic through Cloudflare (optional)
Normal incoming zone transfers only provide DNS resolution. If you also want your traffic to benefit from Cloudflare's performance and security features, you need to [set up Secondary DNS Override](https://developers.cloudflare.com/dns/zone-setups/zone-transfers/cloudflare-as-secondary/proxy-traffic/).
Was this helpful?
YesNo
## On this page
[Docs](https://developers.cloudflare.com/)
```json
{"@context":"https://schema.org","@type":"TechArticle","@id":"https://developers.cloudflare.com/dns/zone-setups/zone-transfers/cloudflare-as-secondary/setup/#page","headline":"Set up incoming zone transfers (Cloudflare as Secondary) · Cloudflare DNS docs","description":"With incoming zone transfers, you can keep your primary DNS provider and use Cloudflare as a secondary DNS provider.","url":"https://developers.cloudflare.com/dns/zone-setups/zone-transfers/cloudflare-as-secondary/setup/","inLanguage":"en","image":"https://developers.cloudflare.com/og-docs.png","dateModified":"2026-06-24","publisher":{"@type":"Organization","name":"Cloudflare","url":"https://www.cloudflare.com/"},"isPartOf":{"@type":"WebSite","@id":"https://developers.cloudflare.com/#website","name":"Cloudflare Docs","url":"https://developers.cloudflare.com/"}}
```
---
---
description: Learn how to troubleshoot issues with secondary nameservers.
title: Troubleshooting
image: https://developers.cloudflare.com/og-docs.png
---
[Skip to content](#main-content)
> Documentation Index
> Fetch the complete documentation index at: https://developers.cloudflare.com/dns/llms.txt
> Use this file to discover all available pages before exploring further.
# Troubleshooting
Last updated Apr 16, 2026|Copy as Markdown|[View as Markdown](https://developers.cloudflare.com/dns/zone-setups/zone-transfers/troubleshooting/index.md)|[Agent setup](https://developers.cloudflare.com/agent-setup/)
When [updating your registrar](https://developers.cloudflare.com/dns/zone-setups/zone-transfers/cloudflare-as-secondary/setup/#4-update-registrar) with the Cloudflare secondary nameservers (`nsXXXX.secondary.cloudflare.com`), you get an error.
Note
The exact error message depends on the system. Some examples would be: `Entity reference not found`,` Authorization error`, `Unable to create foreign nameserver`.
Upon contacting your registrar, their services confirm that the Cloudflare nameservers cannot be added at this time.
---
## Cause
This issue may arise when one of the Cloudflare nameservers used for secondary setup is removed from the Verisign side.
---
## Solution
The Cloudflare engineering team needs to be engaged [through Support](https://developers.cloudflare.com/support/contacting-cloudflare-support/) to make sure the nameserver gets registered again manually at Verisign.
Was this helpful?
YesNo
## On this page
[Docs](https://developers.cloudflare.com/)
```json
{"@context":"https://schema.org","@type":"TechArticle","@id":"https://developers.cloudflare.com/dns/zone-setups/zone-transfers/troubleshooting/#page","headline":"Troubleshooting secondary nameservers · Cloudflare DNS docs","description":"Learn how to troubleshoot issues with secondary nameservers.","url":"https://developers.cloudflare.com/dns/zone-setups/zone-transfers/troubleshooting/","inLanguage":"en","image":"https://developers.cloudflare.com/og-docs.png","dateModified":"2026-04-16","publisher":{"@type":"Organization","name":"Cloudflare","url":"https://www.cloudflare.com/"},"isPartOf":{"@type":"WebSite","@id":"https://developers.cloudflare.com/#website","name":"Cloudflare Docs","url":"https://developers.cloudflare.com/"}}
```
---
---
description: Enterprise DNS with advanced nameservers and DNSSEC controls.
title: Foundation DNS
image: https://developers.cloudflare.com/og-docs.png
---
[Skip to content](#main-content)
> Documentation Index
> Fetch the complete documentation index at: https://developers.cloudflare.com/dns/llms.txt
> Use this file to discover all available pages before exploring further.
# Foundation DNS
Last updated Apr 16, 2026|Copy as Markdown|[View as Markdown](https://developers.cloudflare.com/dns/foundation-dns/index.md)|[Agent setup](https://developers.cloudflare.com/agent-setup/)
Foundation DNS is the Cloudflare DNS offering for enterprise customers.
With Foundation DNS, you get access to increased reliability, security, and insights. Features include the following:
* [Advanced nameservers](https://developers.cloudflare.com/dns/foundation-dns/advanced-nameservers/) that provide:
* Strategically distributed IPs to enhance resiliency
* Reduced exposure to incidents or software regression
* More consistent nameserver assignment
* [DNSSEC keys](https://developers.cloudflare.com/dns/foundation-dns/dnssec-keys/) unique to your account
* Additional DNS settings, including:
* [Zone defaults](https://developers.cloudflare.com/dns/additional-options/dns-zone-defaults/)
* [Account custom nameservers](https://developers.cloudflare.com/dns/nameservers/custom-nameservers/account-custom-nameservers/)
* Custom [SOA record](https://developers.cloudflare.com/dns/manage-dns-records/reference/dns-record-types/#soa) and [Nameserver TTL](https://developers.cloudflare.com/dns/nameservers/nameserver-options/#nameserver-ttl)
## Availability
Foundation DNS is only available to Enterprise customers.
Note
Both advanced nameservers and unique ZSK/KSK are opt-in configurations. Refer to [set up advanced nameservers](https://developers.cloudflare.com/dns/foundation-dns/setup/) and [DNSSEC keys](https://developers.cloudflare.com/dns/foundation-dns/dnssec-keys/) for details.
## Related resources
* [Release blog post ↗](https://blog.cloudflare.com/foundation-dns-launch)
* [Product page ↗](https://www.cloudflare.com/dns/foundation-dns/)
Was this helpful?
YesNo
## On this page
[Docs](https://developers.cloudflare.com/)
```json
{"@context":"https://schema.org","@type":"TechArticle","@id":"https://developers.cloudflare.com/dns/foundation-dns/#page","headline":"Foundation DNS · Cloudflare DNS docs","description":"Enterprise DNS with advanced nameservers and DNSSEC controls.","url":"https://developers.cloudflare.com/dns/foundation-dns/","inLanguage":"en","image":"https://developers.cloudflare.com/og-docs.png","dateModified":"2026-04-16","publisher":{"@type":"Organization","name":"Cloudflare","url":"https://www.cloudflare.com/"},"isPartOf":{"@type":"WebSite","@id":"https://developers.cloudflare.com/#website","name":"Cloudflare Docs","url":"https://developers.cloudflare.com/"}}
```
---
---
description: Advanced nameserver features for Foundation DNS.
title: Advanced nameservers
image: https://developers.cloudflare.com/og-docs.png
---
[Skip to content](#main-content)
> Documentation Index
> Fetch the complete documentation index at: https://developers.cloudflare.com/dns/llms.txt
> Use this file to discover all available pages before exploring further.
# Advanced nameservers
Last updated Jun 24, 2026|Copy as Markdown|[View as Markdown](https://developers.cloudflare.com/dns/foundation-dns/advanced-nameservers/index.md)|[Agent setup](https://developers.cloudflare.com/agent-setup/)
Advanced nameservers included with [Foundation DNS](https://developers.cloudflare.com/dns/foundation-dns/) offer improved resiliency and more consistent nameserver assignment.
Consider the sections below for details about advanced nameservers, and refer to [Set up advanced nameservers](https://developers.cloudflare.com/dns/foundation-dns/setup/) to learn how to enable this feature.
Note
The advantages that come with Foundation DNS [advanced nameservers](https://developers.cloudflare.com/dns/foundation-dns/advanced-nameservers/) are currently not available for [custom nameservers](https://developers.cloudflare.com/dns/nameservers/custom-nameservers/). Make sure you only use one at a time.
Also, [some behaviors are different](https://developers.cloudflare.com/dns/foundation-dns/setup/#differences-from-standard-nameservers) when compared to standard nameservers.
## Anycast network groups
To increase resiliency, the advertisement of advanced nameserver IPs is organized into three anycast network groups.
Two groups consist of IPs advertised from geographically distributed data centers, and a third group consists of IPs advertised from all data centers in the Cloudflare network.
United Kingdom example
| IPs | Group | Data centers |
| ------------- | ----- | --------------------------------- |
| 108.162.198.1 | A | London and Edinburgh |
| 172.64.40.1 | B | Manchester |
| 162.159.60.1 | C | Manchester, London, and Edinburgh |
In DNS resolution, a resolver eventually acquires a list of all IPs where authoritative nameservers for a domain can be reached, and will then usually prefer the IP with the best resolution performance.
When, instead of advertising all IPs in all data centers, this group logic is applied, resiliency is improved because, if one of the data centers experiences a localized issue, the resolver can fall back to an IP advertised by the next closest data center. The third group adds another layer of redundancy, further enhancing resiliency.
Refer to [our blog post ↗](https://blog.cloudflare.com/foundation-dns-launch) for an in-depth explanation of the distributed groups logic.
Note
The IPs assigned to each nameserver are static, meaning they will not change without notification.
## Dedicated release process
Zones using advanced nameservers are less exposed to incidents or software regression.
The dedicated release process means that only changes that have been in production for a while will reach advanced nameservers.
## Nameservers hosting and assignment
While standard Cloudflare nameservers are hosted under `ns.cloudflare.com` or `secondary.cloudflare.com`, advanced nameservers use different domains:
* `foundationdns.com`
* `foundationdns.net`
* `foundationdns.org`
Using the different TLDs (`.com`, `.net`, and `.org`) and making these available only to enterprise accounts allows for better predictability and consistency in nameserver assignment.
There should also be less conflicts when guaranteeing that directly descending zones do not have the same nameserver set.
Descending zones example
Consider the domain `example.com`, and subdomains `abc.example.com` and `123.example.com`:
* `abc.example.com` and `123.example.com` directly descend from `example.com` and cannot have the same nameservers as `example.com`.
* `abc.example.com` and `123.example.com` are sibling domains and can have the same nameservers.
* `new.abc.example.com` directly descends from both `abc.example.com` and `example.com`, and cannot have the same nameservers as them, but can have the same nameservers as `123.example.com`.
## Custom Nameserver compatibility
Advanced Nameserver features — such as multiple anycast network groups or dedicated release process — are currently available for Cloudflare-branded nameservers. Support of these features for [Custom Nameservers](https://developers.cloudflare.com/dns/nameservers/custom-nameservers/) is on the roadmap. Contact your account team for the latest availability.
Was this helpful?
YesNo
## On this page
[Docs](https://developers.cloudflare.com/)
```json
{"@context":"https://schema.org","@type":"TechArticle","@id":"https://developers.cloudflare.com/dns/foundation-dns/advanced-nameservers/#page","headline":"Advanced nameservers · Cloudflare DNS docs","description":"Advanced nameserver features for Foundation DNS.","url":"https://developers.cloudflare.com/dns/foundation-dns/advanced-nameservers/","inLanguage":"en","image":"https://developers.cloudflare.com/og-docs.png","dateModified":"2026-06-24","publisher":{"@type":"Organization","name":"Cloudflare","url":"https://www.cloudflare.com/"},"isPartOf":{"@type":"WebSite","@id":"https://developers.cloudflare.com/#website","name":"Cloudflare Docs","url":"https://developers.cloudflare.com/"}}
```
---
---
description: DNSSEC key management for Foundation DNS zones.
title: DNSSEC keys
image: https://developers.cloudflare.com/og-docs.png
---
[Skip to content](#main-content)
> Documentation Index
> Fetch the complete documentation index at: https://developers.cloudflare.com/dns/llms.txt
> Use this file to discover all available pages before exploring further.
# DNSSEC keys
Last updated Apr 16, 2026|Copy as Markdown|[View as Markdown](https://developers.cloudflare.com/dns/foundation-dns/dnssec-keys/index.md)|[Agent setup](https://developers.cloudflare.com/agent-setup/)
With [Foundation DNS](https://developers.cloudflare.com/dns/foundation-dns/), you can request that the ZSK/KSK pair that is used for [DNSSEC](https://developers.cloudflare.com/dns/dnssec/) is unique to your Cloudflare account. To opt in to this feature, contact your account team.
All zones within your Cloudflare account - regardless of using [standard](https://developers.cloudflare.com/dns/nameservers/#standard-nameservers) or [advanced nameservers](https://developers.cloudflare.com/dns/foundation-dns/advanced-nameservers/) \- will use the dedicated Zone Signing Key (ZSK) and Key Signing Key (KSK) for DNSSEC. These keys are set at the account level.
## Further reading
For more background information, refer to [How DNSSEC works ↗](https://www.cloudflare.com/learning/dns/dnssec/how-dnssec-works/).
For details about DNSSEC settings at Cloudflare, refer to the [DNSSEC documentation](https://developers.cloudflare.com/dns/dnssec/).
Was this helpful?
YesNo
## On this page
[Docs](https://developers.cloudflare.com/)
```json
{"@context":"https://schema.org","@type":"TechArticle","@id":"https://developers.cloudflare.com/dns/foundation-dns/dnssec-keys/#page","headline":"DNSSEC keys · Cloudflare DNS docs","description":"DNSSEC key management for Foundation DNS zones.","url":"https://developers.cloudflare.com/dns/foundation-dns/dnssec-keys/","inLanguage":"en","image":"https://developers.cloudflare.com/og-docs.png","dateModified":"2026-04-16","publisher":{"@type":"Organization","name":"Cloudflare","url":"https://www.cloudflare.com/"},"isPartOf":{"@type":"WebSite","@id":"https://developers.cloudflare.com/#website","name":"Cloudflare Docs","url":"https://developers.cloudflare.com/"}}
```
---
---
description: Set up advanced nameservers for your Foundation DNS zone.
title: Set up advanced nameservers
image: https://developers.cloudflare.com/og-docs.png
---
[Skip to content](#main-content)
> Documentation Index
> Fetch the complete documentation index at: https://developers.cloudflare.com/dns/llms.txt
> Use this file to discover all available pages before exploring further.
# Set up advanced nameservers
Last updated Apr 17, 2026|Copy as Markdown|[View as Markdown](https://developers.cloudflare.com/dns/foundation-dns/setup/index.md)|[Agent setup](https://developers.cloudflare.com/agent-setup/)
Advanced nameservers included with [Foundation DNS](https://developers.cloudflare.com/dns/foundation-dns/) are an opt-in configuration.
Note
After enabling advanced nameservers, standard nameservers still respond to DNS queries.
## Before you begin
Before opting in for advanced nameservers, consider the following:
* The advantages that come with Foundation DNS [advanced nameservers](https://developers.cloudflare.com/dns/foundation-dns/advanced-nameservers/) are currently not available for [custom nameservers](https://developers.cloudflare.com/dns/nameservers/custom-nameservers/). Make sure you only use one at a time.
### Differences from standard nameservers
Some behaviors are different from standard Cloudflare nameservers:
* Wildcard records are still supported but, with advanced nameservers, a wildcard record (`*.example.com`) will not apply to a subdomain that is an empty non-terminal. An empty non-terminal is a node in the DNS tree that has no records associated with it but has descendants that do, as exemplified below. This behavior is in compliance with [RFC 4592 ↗](https://www.rfc-editor.org/rfc/rfc4592.html), which defines the role of empty non-terminals in wildcard resolution.
Example
DNS management for **example.com**
| **Type** | **Name** | **Content** |
| -------- | -------- | ----------- |
| A | \* | 192.0.2.1 |
| A | a.b | 192.0.2.5 |
In this example, `a.b.example.com` is a descendant of `b.example.com`, and `b.example.com` is an empty non-terminal. This means that the wildcard `*.example.com` will not apply to `b.example.com`.
* Subdomain delegation: once a subdomain is delegated via NS records, Cloudflare will not serve any other records (such as A, TXT, or CNAME) on that subdomain from the parent zone, even if those records exist.
Example
DNS management for **example.com**
| **Type** | **Name** | **Content** |
| -------- | -------- | ---------------------------------- |
| NS | www | ns1.externalhost.com |
| NS | www | ns2.externalhost.com |
| TXT | www | "5bb16e6b5a444eedb48ace40c471bcc9" |
| A | www | 192.0.2.1 |
In this example, the TXT record and the A record for `www.example.com` will not be served.
## Enable on a zone
To enable advanced nameservers on an existing zone:
1. Opt for advanced nameservers on your zone:
1. In the Cloudflare dashboard, go to the **DNS Records** page.
[Go to **Records** ↗](https://dash.cloudflare.com/?to=/:account/:zone/dns/records)
2. In the **Cloudflare nameservers** card, enable **Advanced nameservers**.
3. After you refresh the page, the card will display the values for your advanced nameservers `NS` records.
Use the [Update DNS Settings](https://developers.cloudflare.com/api/resources/dns/subresources/settings/subresources/zone/methods/edit/) endpoint to send a PATCH request like the following:
Required API token permissions
At least one of the following [token permissions](https://developers.cloudflare.com/fundamentals/api/reference/permissions/) is required:
* `Zone DNS Settings Write`
* `DNS Write`
```bash
curl "https://api.cloudflare.com/client/v4/zones/$ZONE_ID/dns_settings" \
--request PATCH \
--header "Authorization: Bearer $CLOUDFLARE_API_TOKEN" \
--json '{
"foundation_dns": true
}'
```
The response body will contain your assigned nameservers in the `nameservers` object. You will use these nameservers in the next step.
2. Update the authoritative nameservers at your registrar. This step depends on whether you are using [Cloudflare Registrar](https://developers.cloudflare.com/registrar/):
* If you are using Cloudflare Registrar, [contact Cloudflare Support](https://developers.cloudflare.com/support/contacting-cloudflare-support/) to have your nameservers updated.
* If you are using a different registrar or if your zone is delegated, [manually update your nameservers](https://developers.cloudflare.com/dns/nameservers/update-nameservers/#specific-processes).
Caution
Make sure the values for your assigned nameservers are copied exactly.
Was this helpful?
YesNo
## On this page
[Docs](https://developers.cloudflare.com/)
```json
{"@context":"https://schema.org","@type":"TechArticle","@id":"https://developers.cloudflare.com/dns/foundation-dns/setup/#page","headline":"Set up advanced nameservers · Cloudflare DNS docs","description":"Set up advanced nameservers for your Foundation DNS zone.","url":"https://developers.cloudflare.com/dns/foundation-dns/setup/","inLanguage":"en","image":"https://developers.cloudflare.com/og-docs.png","dateModified":"2026-04-17","publisher":{"@type":"Organization","name":"Cloudflare","url":"https://www.cloudflare.com/"},"isPartOf":{"@type":"WebSite","@id":"https://developers.cloudflare.com/#website","name":"Cloudflare Docs","url":"https://developers.cloudflare.com/"}}
```
---
---
description: Manage Cloudflare nameservers for your zones.
title: Nameservers
image: https://developers.cloudflare.com/og-docs.png
---
[Skip to content](#main-content)
> Documentation Index
> Fetch the complete documentation index at: https://developers.cloudflare.com/dns/llms.txt
> Use this file to discover all available pages before exploring further.
# Nameservers
Last updated Apr 22, 2026|Copy as Markdown|[View as Markdown](https://developers.cloudflare.com/dns/nameservers/index.md)|[Agent setup](https://developers.cloudflare.com/agent-setup/)
Nameservers are DNS servers that answer DNS queries about the domains they are authoritative for. When a visitor types your domain into a browser, the [DNS resolution process ↗](https://www.cloudflare.com/learning/dns/what-is-dns/) passes through several server types and eventually reaches the authoritative nameservers for the final answer.
In the context of Cloudflare DNS, nameservers refer to authoritative nameservers — the servers that hold the definitive DNS records for your domain and provide the final response in DNS resolution. When a nameserver is authoritative for `example.com`, DNS resolvers will consider responses from this nameserver when a user tries to access `example.com`.
Note
The IPs assigned to each nameserver are static, meaning they will not change without notification.
## Authoritative nameservers offering
Within Cloudflare, and depending on your plan, you can choose between using Cloudflare-branded nameservers or setting up your own custom nameservers. The names for Cloudflare-branded nameservers are automatically assigned and cannot be changed.
Regardless of the type you choose, for these nameservers to be authoritative for your domain, you need to [update your domain nameservers](https://developers.cloudflare.com/dns/nameservers/update-nameservers/), typically where you registered your domain. Updating your nameservers is required to activate your domain on Cloudflare and use most of Cloudflare's [application services](https://developers.cloudflare.com/fundamentals/concepts/how-cloudflare-works/), such as proxying, caching, and security features.
Cloudflare Registrar
If you acquired your domain from [Cloudflare Registrar](https://developers.cloudflare.com/registrar/), your domain already uses Cloudflare nameservers, automatically protecting and speeding up your content or services. If you need to update your nameservers to use a different DNS provider, you will have to [transfer your domain from Cloudflare](https://developers.cloudflare.com/registrar/account-options/transfer-out-from-cloudflare/).
### Standard nameservers
Unless your account has a specific [DNS zone defaults](https://developers.cloudflare.com/dns/additional-options/dns-zone-defaults/) configuration, when you add a domain on a [primary (full)](https://developers.cloudflare.com/dns/zone-setups/full-setup/) or [secondary](https://developers.cloudflare.com/dns/zone-setups/zone-transfers/cloudflare-as-secondary/) DNS setup, Cloudflare automatically assigns two standard nameservers for your zone.
Standard nameservers are hosted on `ns.cloudflare.com` and follow the pattern `.ns.cloudflare.com`.
To know the reason behind these nameserver names, refer to [our blog ↗](https://blog.cloudflare.com/whats-the-story-behind-the-names-of-cloudflares-name-servers/).
### Advanced nameservers
Enterprise accounts on [Foundation DNS](https://developers.cloudflare.com/dns/foundation-dns/) have access to advanced nameservers.
[Advanced nameservers](https://developers.cloudflare.com/dns/foundation-dns/advanced-nameservers/) are hosted on `foundationdns.com`, `foundationdns.net`, and `foundationdns.org`.
Each zone that uses advanced nameservers is assigned a set of three nameservers names: `.foundationdns.com`, `.foundationdns.net`, and `.foundationdns.org`.
### Custom nameservers
With [custom nameservers](https://developers.cloudflare.com/dns/nameservers/custom-nameservers/), your nameservers are hosted on your own domain (or domains) and, in this sense, are not Cloudflare branded.
You provide fully qualified domain names — complete domain names like `ns1.example.com` — for your nameservers, and Cloudflare assigns one IPv4 and one IPv6 address to each.
Caution
The advantages that come with Foundation DNS [advanced nameservers](https://developers.cloudflare.com/dns/foundation-dns/advanced-nameservers/) are currently not available for [custom nameservers](https://developers.cloudflare.com/dns/nameservers/custom-nameservers/). Make sure you only use one at a time.
Was this helpful?
YesNo
## On this page
[Docs](https://developers.cloudflare.com/)
```json
{"@context":"https://schema.org","@type":"TechArticle","@id":"https://developers.cloudflare.com/dns/nameservers/#page","headline":"Nameservers · Cloudflare DNS docs","description":"Manage Cloudflare nameservers for your zones.","url":"https://developers.cloudflare.com/dns/nameservers/","inLanguage":"en","image":"https://developers.cloudflare.com/og-docs.png","dateModified":"2026-04-22","publisher":{"@type":"Organization","name":"Cloudflare","url":"https://www.cloudflare.com/"},"isPartOf":{"@type":"WebSite","@id":"https://developers.cloudflare.com/#website","name":"Cloudflare Docs","url":"https://developers.cloudflare.com/"}}
```
---
---
description: Advanced nameserver features for Foundation DNS.
title: Advanced nameservers
image: https://developers.cloudflare.com/og-docs.png
---
[Skip to content](#main-content)
> Documentation Index
> Fetch the complete documentation index at: https://developers.cloudflare.com/dns/llms.txt
> Use this file to discover all available pages before exploring further.
# Advanced nameservers
Last updated Jun 24, 2026|Copy as Markdown|[View as Markdown](https://developers.cloudflare.com/dns/foundation-dns/advanced-nameservers/index.md)|[Agent setup](https://developers.cloudflare.com/agent-setup/)
Advanced nameservers included with [Foundation DNS](https://developers.cloudflare.com/dns/foundation-dns/) offer improved resiliency and more consistent nameserver assignment.
Consider the sections below for details about advanced nameservers, and refer to [Set up advanced nameservers](https://developers.cloudflare.com/dns/foundation-dns/setup/) to learn how to enable this feature.
Note
The advantages that come with Foundation DNS [advanced nameservers](https://developers.cloudflare.com/dns/foundation-dns/advanced-nameservers/) are currently not available for [custom nameservers](https://developers.cloudflare.com/dns/nameservers/custom-nameservers/). Make sure you only use one at a time.
Also, [some behaviors are different](https://developers.cloudflare.com/dns/foundation-dns/setup/#differences-from-standard-nameservers) when compared to standard nameservers.
## Anycast network groups
To increase resiliency, the advertisement of advanced nameserver IPs is organized into three anycast network groups.
Two groups consist of IPs advertised from geographically distributed data centers, and a third group consists of IPs advertised from all data centers in the Cloudflare network.
United Kingdom example
| IPs | Group | Data centers |
| ------------- | ----- | --------------------------------- |
| 108.162.198.1 | A | London and Edinburgh |
| 172.64.40.1 | B | Manchester |
| 162.159.60.1 | C | Manchester, London, and Edinburgh |
In DNS resolution, a resolver eventually acquires a list of all IPs where authoritative nameservers for a domain can be reached, and will then usually prefer the IP with the best resolution performance.
When, instead of advertising all IPs in all data centers, this group logic is applied, resiliency is improved because, if one of the data centers experiences a localized issue, the resolver can fall back to an IP advertised by the next closest data center. The third group adds another layer of redundancy, further enhancing resiliency.
Refer to [our blog post ↗](https://blog.cloudflare.com/foundation-dns-launch) for an in-depth explanation of the distributed groups logic.
Note
The IPs assigned to each nameserver are static, meaning they will not change without notification.
## Dedicated release process
Zones using advanced nameservers are less exposed to incidents or software regression.
The dedicated release process means that only changes that have been in production for a while will reach advanced nameservers.
## Nameservers hosting and assignment
While standard Cloudflare nameservers are hosted under `ns.cloudflare.com` or `secondary.cloudflare.com`, advanced nameservers use different domains:
* `foundationdns.com`
* `foundationdns.net`
* `foundationdns.org`
Using the different TLDs (`.com`, `.net`, and `.org`) and making these available only to enterprise accounts allows for better predictability and consistency in nameserver assignment.
There should also be less conflicts when guaranteeing that directly descending zones do not have the same nameserver set.
Descending zones example
Consider the domain `example.com`, and subdomains `abc.example.com` and `123.example.com`:
* `abc.example.com` and `123.example.com` directly descend from `example.com` and cannot have the same nameservers as `example.com`.
* `abc.example.com` and `123.example.com` are sibling domains and can have the same nameservers.
* `new.abc.example.com` directly descends from both `abc.example.com` and `example.com`, and cannot have the same nameservers as them, but can have the same nameservers as `123.example.com`.
## Custom Nameserver compatibility
Advanced Nameserver features — such as multiple anycast network groups or dedicated release process — are currently available for Cloudflare-branded nameservers. Support of these features for [Custom Nameservers](https://developers.cloudflare.com/dns/nameservers/custom-nameservers/) is on the roadmap. Contact your account team for the latest availability.
Was this helpful?
YesNo
## On this page
[Docs](https://developers.cloudflare.com/)
```json
{"@context":"https://schema.org","@type":"TechArticle","@id":"https://developers.cloudflare.com/dns/foundation-dns/advanced-nameservers/#page","headline":"Advanced nameservers · Cloudflare DNS docs","description":"Advanced nameserver features for Foundation DNS.","url":"https://developers.cloudflare.com/dns/foundation-dns/advanced-nameservers/","inLanguage":"en","image":"https://developers.cloudflare.com/og-docs.png","dateModified":"2026-06-24","publisher":{"@type":"Organization","name":"Cloudflare","url":"https://www.cloudflare.com/"},"isPartOf":{"@type":"WebSite","@id":"https://developers.cloudflare.com/#website","name":"Cloudflare Docs","url":"https://developers.cloudflare.com/"}}
```
---
---
description: Use your own branded nameservers with Cloudflare.
title: Custom nameservers
image: https://developers.cloudflare.com/og-docs.png
---
[Skip to content](#main-content)
> Documentation Index
> Fetch the complete documentation index at: https://developers.cloudflare.com/dns/llms.txt
> Use this file to discover all available pages before exploring further.
# Custom nameservers
Last updated Apr 16, 2026|Copy as Markdown|[View as Markdown](https://developers.cloudflare.com/dns/nameservers/custom-nameservers/index.md)|[Agent setup](https://developers.cloudflare.com/agent-setup/)
With custom (or vanity) nameservers, a domain can use Cloudflare DNS without using Cloudflare-branded nameservers. For instance, you can configure `ns1.example.com` and `ns2.example.com` as nameservers for `example.com`.
To use custom nameservers, a zone must be using Cloudflare as Primary ([Full setup](https://developers.cloudflare.com/dns/zone-setups/full-setup/)) or [Secondary](https://developers.cloudflare.com/dns/zone-setups/zone-transfers/cloudflare-as-secondary/) DNS provider.
## Configuration scope
* [Set up zone custom nameservers](https://developers.cloudflare.com/dns/nameservers/custom-nameservers/zone-custom-nameservers/)
* [Set up account custom nameservers](https://developers.cloudflare.com/dns/nameservers/custom-nameservers/account-custom-nameservers/)
* [Set up tenant custom nameservers](https://developers.cloudflare.com/dns/nameservers/custom-nameservers/tenant-custom-nameservers/)
## Availability
* Zone custom nameservers are available for zones on Business or Enterprise plans. Via API or on the dashboard.
* Account custom nameservers are available for customers on Business (after [contacting Cloudflare Support](https://developers.cloudflare.com/support/contacting-cloudflare-support/)) or Enterprise plans. Once configured, account custom nameservers can be used by all zones in the account, regardless of the zone plan. Via API or on the dashboard.
* Tenant custom nameservers, if created by the tenant owner, will be available to all zones belonging to any account that is part of the tenant. Via API only.
## Restrictions
Custom nameservers are organized in different sets (`ns_set`). Each namesever set must have at least two and no more than five custom nameserver names.
The advantages that come with Foundation DNS [advanced nameservers](https://developers.cloudflare.com/dns/foundation-dns/advanced-nameservers/) are currently not available for [custom nameservers](https://developers.cloudflare.com/dns/nameservers/custom-nameservers/). Make sure you only use one at a time.
Was this helpful?
YesNo
## On this page
[Docs](https://developers.cloudflare.com/)
```json
{"@context":"https://schema.org","@type":"TechArticle","@id":"https://developers.cloudflare.com/dns/nameservers/custom-nameservers/#page","headline":"Custom nameservers · Cloudflare DNS docs","description":"Use your own branded nameservers with Cloudflare.","url":"https://developers.cloudflare.com/dns/nameservers/custom-nameservers/","inLanguage":"en","image":"https://developers.cloudflare.com/og-docs.png","dateModified":"2026-04-16","publisher":{"@type":"Organization","name":"Cloudflare","url":"https://www.cloudflare.com/"},"isPartOf":{"@type":"WebSite","@id":"https://developers.cloudflare.com/#website","name":"Cloudflare Docs","url":"https://developers.cloudflare.com/"}}
```
---
---
description: With account-level custom nameservers, you can use the same custom nameservers for different zones in the account. The domain or domains that provide the nameservers names do not have to exist as zones in Cloudflare.
title: Set up account custom nameservers
image: https://developers.cloudflare.com/og-docs.png
---
[Skip to content](#main-content)
> Documentation Index
> Fetch the complete documentation index at: https://developers.cloudflare.com/dns/llms.txt
> Use this file to discover all available pages before exploring further.
# Set up account custom nameservers
Last updated Jul 28, 2026|Copy as Markdown|[View as Markdown](https://developers.cloudflare.com/dns/nameservers/custom-nameservers/account-custom-nameservers/index.md)|[Agent setup](https://developers.cloudflare.com/agent-setup/)
Account custom nameservers (ACNS) allow you to define account-level custom nameservers and use them for different zones within a Cloudflare account.
ACNS are organized in different sets (`ns_set`) and ACNS names can be provided by any domain, even if the domain does not exist as a zone in Cloudflare.
For instance, if the ACNS are `ns1.example.com` and `ns2.vanity.test`, the domains `example.com` and `vanity.test` are not required to be zones in Cloudflare.
## Availability
Account custom nameservers are available for customers on Business (after [contacting Cloudflare Support](https://developers.cloudflare.com/support/contacting-cloudflare-support/)) or Enterprise plans. Once configured, account custom nameservers can be used by all zones in the account, regardless of the zone plan. Via API or on the dashboard.
Note
The advantages that come with Foundation DNS [advanced nameservers](https://developers.cloudflare.com/dns/foundation-dns/advanced-nameservers/) are currently not available for [custom nameservers](https://developers.cloudflare.com/dns/nameservers/custom-nameservers/). Make sure you only use one at a time.
## Configuration conditions
For this configuration to be possible, a few conditions apply:
* You can create up to five different account custom nameserver sets. Each nameserver set must have between two and five different nameserver names (`ns_name`), and each name cannot belong to more than one set. For example, if `ns1.example.com` is part of `ns_set 1` it cannot be part of `ns_set 2` or vice versa.
* [Subdomain setup](https://developers.cloudflare.com/dns/zone-setups/subdomain-setup/) or [reverse zones](https://developers.cloudflare.com/dns/additional-options/reverse-zones/) can use account custom nameservers as long as they use a different nameserver set (`ns_set`) than their parent, child, or any other zone in their direct hierarchy tree.
Note
Account owners that want to [use their own IP prefix](https://developers.cloudflare.com/byoip/) for the account custom nameservers should contact their account team.
* Choosing a set from `ns_set 1` through `ns_set 5` will influence how Cloudflare assigns nameservers to your new zones if you configure [DNS zone defaults](https://developers.cloudflare.com/dns/nameservers/nameserver-options/#dns-zone-defaults).
## Enable account custom nameservers
### 1\. Set up ACNS names and sets
1. Create ACNS names and sets:
1. In the Cloudflare dashboard, go to the account **Settings** page.
[Go to **Configurations** ↗](https://dash.cloudflare.com/?to=/:account/configurations)
2. Go to **DNS Settings**.
3. For **Account custom nameservers**, select **Configure custom nameservers**.
4. Insert a fully qualified domain name for **Nameserver name** and choose a **Nameserver set**. Follow the [configuration conditions](#configuration-conditions).
Use the [Add account custom nameserver endpoint](https://developers.cloudflare.com/api/resources/custom%5Fnameservers/methods/create/) to create account custom nameservers. Follow the [conditions](#configuration-conditions) for `ns_name` and `ns_set`.
Note
If the parameter `ns_set` is omitted, the default set `1` will be assigned.
Cloudflare will assign an IPv4 and an IPv6 address to each ACNS name, and these nameservers will be listed as options that you can [use on existing zones](#2-use-acns-on-existing-zones) or [set up as default for new zones in the account](#3-optional-make-acns-default-for-new-zones).
1. Make sure `A/AAAA` records with the assigned IPv4 and IPv6 exist at the authoritative DNS of the domain that provides the ACNS names.
* If the domain uses Cloudflare DNS, the respective `A` and `AAAA` records are automatically created.
* If the domain or domains that are used for the account custom nameservers do not exist within the same account, you must manually create the `A/AAAA` records on the configured nameserver names (for example, `ns1.example.com`) at the authoritative DNS provider.
| Type | Name | Content |
| ---- | --------------- | ------- |
| A | ns1.example.com | |
1. Update the registrar of the domain that provides the ACNS names. This step depends on whether you are using [Cloudflare Registrar](https://developers.cloudflare.com/registrar/):
* If you are using Cloudflare Registrar for the domain that provides the ACNS names, [contact Cloudflare Support](https://developers.cloudflare.com/support/contacting-cloudflare-support/) to add the account custom nameservers and IP addresses as glue records to the domain.
* If you are not using Cloudflare Registrar for the domain that provides the ACNS names, add the account custom nameservers and IP addresses to your domain's registrar as glue records ([RFC 1912 ↗](https://www.rfc-editor.org/rfc/rfc1912.html)). If you do not add these records, DNS lookups for your domain will fail.
### 2\. Use ACNS on existing zones
1. Choose an ACNS set as custom nameservers for a zone:
1. In the Cloudflare dashboard, go to the **DNS Settings** page.
[Go to **Settings** ↗](https://dash.cloudflare.com/?to=/:account/:zone/dns/settings)
2. For **Custom nameservers**, select **Configure**.
3. Select **Use your account custom nameservers** and choose a nameserver set from the list.
4. Select **Save** to confirm.
Use the endpoint [Update DNS Settings for a Zone](https://developers.cloudflare.com/api/resources/dns/subresources/settings/subresources/zone/methods/edit/) and configure the `nameservers` object accordingly for each zone.
1. Make sure the nameservers are updated:
* If your domain uses [Cloudflare Registrar](https://developers.cloudflare.com/registrar/), [contact Cloudflare Support](https://developers.cloudflare.com/support/contacting-cloudflare-support/) to update your nameservers.
* If your domain uses a different registrar, update the nameservers at your registrar to use the account custom nameservers.
* If your zone is delegated, update the corresponding `NS` record at the parent zone.
### 3\. (Optional) Make ACNS default for new zones
To make ACNS the default option for all new zones added to your account from now on:
1. In the Cloudflare dashboard, go to the account **Settings** page.
[Go to **Configurations** ↗](https://dash.cloudflare.com/?to=/:account/configurations)
2. Go to **DNS Settings**.
3. For **DNS zone defaults**, select **Configure defaults**.
4. Change the **Nameserver assignment method** to **Account custom nameservers**.
Refer to [DNS zone defaults](https://developers.cloudflare.com/dns/nameservers/nameserver-options/#dns-zone-defaults) for details.
Use the endpoint [Update DNS Settings for an Account](https://developers.cloudflare.com/api/resources/dns/subresources/settings/subresources/account/methods/edit/). Within the `zone_defaults` object, set the following:
```txt
"zone_defaults": {
"nameservers": {
"type": "custom.account"
}
}
```
## Disable account custom nameservers
### 1\. Remove ACNS assignment from zones
To remove ACNS from a zone, first update your nameservers to stop using ACNS:
* If you are using [Cloudflare Registrar](https://developers.cloudflare.com/registrar/), [contact Cloudflare Support](https://developers.cloudflare.com/support/contacting-cloudflare-support/) to set your nameservers back to the regular Cloudflare branded nameservers.
* If you are not using [Cloudflare Registrar](https://developers.cloudflare.com/registrar/), modify the domain's registrar to use your regular Cloudflare branded nameservers.
* If you are using [Cloudflare Registrar](https://developers.cloudflare.com/registrar/), use the [Update DNS settings endpoint](https://developers.cloudflare.com/api/resources/dns/subresources/settings/subresources/zone/methods/edit/) to set the `type` parameter in the `nameservers` object to `"cloudflare.standard"`. Then, [contact Cloudflare Support](https://developers.cloudflare.com/support/contacting-cloudflare-support/) to set your nameservers back to the regular Cloudflare branded nameservers.
* If you are not using [Cloudflare Registrar](https://developers.cloudflare.com/registrar/), modify the domain's registrar to use your regular Cloudflare branded nameservers and then use the [Update DNS settings endpoint](https://developers.cloudflare.com/api/resources/dns/subresources/settings/subresources/zone/methods/edit/) to set the `type` parameter in the `nameservers` object to `"cloudflare.standard"`.
### 2\. Delete ACNS names or sets
Following the [configuration conditions](#configuration-conditions), each set must have between two and five different nameserver names. When you delete all names or leave a set with only one nameserver name, the set will no longer be listed as an option for the zones in your account.
1. In the Cloudflare dashboard, go to the account **Settings** page.
[Go to **Configurations** ↗](https://dash.cloudflare.com/?to=/:account/configurations)
2. Go to **DNS Settings**.
3. For **Account custom nameservers**, select **Delete** next to the ACNS name.
Use the [Delete account custom nameserver endpoint](https://developers.cloudflare.com/api/resources/custom%5Fnameservers/methods/delete/) to delete a specific ACNS.
Was this helpful?
YesNo
## On this page
[Docs](https://developers.cloudflare.com/)
```json
{"@context":"https://schema.org","@type":"TechArticle","@id":"https://developers.cloudflare.com/dns/nameservers/custom-nameservers/account-custom-nameservers/#page","headline":"Account custom nameservers · Cloudflare DNS docs","description":"With account-level custom nameservers, you can use the same custom nameservers for different zones in the account. The domain or domains that provide the nameservers names do not have to exist as zones in Cloudflare.","url":"https://developers.cloudflare.com/dns/nameservers/custom-nameservers/account-custom-nameservers/","inLanguage":"en","image":"https://developers.cloudflare.com/og-docs.png","dateModified":"2026-07-28","publisher":{"@type":"Organization","name":"Cloudflare","url":"https://www.cloudflare.com/"},"isPartOf":{"@type":"WebSite","@id":"https://developers.cloudflare.com/#website","name":"Cloudflare Docs","url":"https://developers.cloudflare.com/"}}
```
---
---
description: With tenant-level custom nameservers, you can use the same custom nameservers for different zones and across different accounts, as long as the accounts are part of the [tenant](/tenant/). The domain or domains that provide the nameservers names do not have to exist as zones in Cloudflare.
title: Set up tenant custom nameservers
image: https://developers.cloudflare.com/og-docs.png
---
[Skip to content](#main-content)
> Documentation Index
> Fetch the complete documentation index at: https://developers.cloudflare.com/dns/llms.txt
> Use this file to discover all available pages before exploring further.
# Set up tenant custom nameservers
Last updated Apr 16, 2026|Copy as Markdown|[View as Markdown](https://developers.cloudflare.com/dns/nameservers/custom-nameservers/tenant-custom-nameservers/index.md)|[Agent setup](https://developers.cloudflare.com/agent-setup/)
Tenant custom nameservers (TCNS) allow you to define tenant-level custom nameservers and use them for different accounts within a Cloudflare tenant.
TCNS are organized in different sets (`ns_set`) and TCNS names can be provided by any domain, even if the domain does not exist as a zone in Cloudflare.
For instance, if the TCNS are `ns1.example.com` and `ns2.vanity.test`, the domains `example.com` and `vanity.test` are not required to be zones in Cloudflare.
## Availability
Tenant custom nameservers, if created by the tenant owner, will be available to all zones belonging to any account that is part of the tenant. Via API only.
## Configuration conditions
For this configuration to be possible, a few conditions apply:
* Tenant owners can create up to five different tenant custom nameserver sets. Each nameserver set must have between two and five different nameserver names (`ns_name`), and each name cannot belong to more than one set. For example, if `ns1.example.com` is part of `ns_set 1` it cannot be part of `ns_set 2` or vice versa.
* [Subdomain setup](https://developers.cloudflare.com/dns/zone-setups/subdomain-setup/) or [reverse zones](https://developers.cloudflare.com/dns/additional-options/reverse-zones/) can use tenant custom nameservers as long as they use a different nameserver set (`ns_set`) than their parent, child, or any other zone in their direct hierarchy tree.
Note
Tenant owners that want to [use their own IP prefix](https://developers.cloudflare.com/byoip/) for the tenant custom nameservers should contact their account team.
## For account owners
### Enable tenant custom nameservers on a zone
If you are an account owner and your account is part of a tenant that has custom nameservers, do the following:
1. Use the endpoint [Update DNS Settings for a Zone](https://developers.cloudflare.com/api/resources/dns/subresources/settings/subresources/zone/methods/edit/) and configure the `nameservers` object accordingly.
```txt
"nameservers": {
"type": "custom.tenant"
}
```
Note
If the parameter `ns_set` is omitted, the default set `1` will be assigned.
2. If you are **not** using [Cloudflare Registrar](https://developers.cloudflare.com/registrar/), update the nameservers at your registrar to use the TCNS names. If you are using [Cloudflare Registrar](https://developers.cloudflare.com/registrar/), no further action is needed.
To make these TCNS the default namerservers for all new zones added to your account from now on, use the endpoint [Update DNS Settings for an Account](https://developers.cloudflare.com/api/resources/dns/subresources/settings/subresources/account/methods/edit/). Within the `zone_defaults` object, set the following:
```txt
"zone_defaults": {
"nameservers": {
"type": "custom.tenant"
}
}
```
### Disable tenant custom nameservers on a zone
* If you are using [Cloudflare Registrar](https://developers.cloudflare.com/registrar/), use the [Update DNS settings endpoint](https://developers.cloudflare.com/api/resources/dns/subresources/settings/subresources/zone/methods/edit/) to set the `type` parameter in the `nameservers` object to a different value. Then, [contact Cloudflare Support](https://developers.cloudflare.com/support/contacting-cloudflare-support/) to set your nameservers back to the nameservers you chose to use.
* If you are not using Cloudflare Registrar, use the [Update DNS settings endpoint](https://developers.cloudflare.com/api/resources/dns/subresources/settings/subresources/zone/methods/edit/) to choose a different nameserver type, and also remove the TCNS at your domain's registrar.
## For tenant owners
### Create tenant custom nameservers
If you are a tenant owner and you want to make TCNS available for accounts within your tenant, do the following:
1. Observe the [conditions](#configuration-conditions) for `ns_name` and `ns_set`, and create TCNS in your tenant by using the following POST command:
```bash
curl https://api.cloudflare.com/client/v4/tenants/{tenant_id}/custom_ns \
--header "X-Auth-Email: " \
--header "X-Auth-Key: " \
--header "Content-Type: application/json" \
--data '{
"ns_name": "",
"ns_set":
}'
```
Note
If the parameter `ns_set` is omitted, the default set `1` will be assigned.
1. Add the account custom nameservers and IP addresses to your domain's registrar as glue (A and AAAA) records ([RFC 1912 ↗](https://www.rfc-editor.org/rfc/rfc1912.html)).
2. If the domain or domains that are used for the tenant custom nameservers do not exist within the same account, you must create the `A/AAAA` records on the configured nameserver names (for example, `ns1.example.com`) at the authoritative DNS provider.
| Type | Name | Content |
| ---- | --------------- | ------- |
| A | ns1.example.com | |
### Get a list of all TCNS names
To get a list of all TCNS names in your tenant account, use the following API request:
```bash
curl https://api.cloudflare.com/client/v4/tenants/{tenant_id}/custom_ns \
--header "X-Auth-Email: " \
--header "X-Auth-Key: "
```
Was this helpful?
YesNo
## On this page
[Docs](https://developers.cloudflare.com/)
```json
{"@context":"https://schema.org","@type":"TechArticle","@id":"https://developers.cloudflare.com/dns/nameservers/custom-nameservers/tenant-custom-nameservers/#page","headline":"Tenant custom nameservers · Cloudflare DNS docs","description":"With tenant-level custom nameservers, you can use the same custom nameservers for different zones and across different accounts, as long as the accounts are part of the tenant. The domain or domains that provide the nameservers names do not have to exist as zones in Cloudflare.","url":"https://developers.cloudflare.com/dns/nameservers/custom-nameservers/tenant-custom-nameservers/","inLanguage":"en","image":"https://developers.cloudflare.com/og-docs.png","dateModified":"2026-04-16","publisher":{"@type":"Organization","name":"Cloudflare","url":"https://www.cloudflare.com/"},"isPartOf":{"@type":"WebSite","@id":"https://developers.cloudflare.com/#website","name":"Cloudflare Docs","url":"https://developers.cloudflare.com/"}}
```
---
---
description: With zone-level custom nameservers, each custom nameserver name must be a subdomain of the zone where the custom nameservers are configured. These custom nameservers can only be used within the respective zone.
title: Set up zone custom nameservers
image: https://developers.cloudflare.com/og-docs.png
---
[Skip to content](#main-content)
> Documentation Index
> Fetch the complete documentation index at: https://developers.cloudflare.com/dns/llms.txt
> Use this file to discover all available pages before exploring further.
# Set up zone custom nameservers
Last updated Apr 16, 2026|Copy as Markdown|[View as Markdown](https://developers.cloudflare.com/dns/nameservers/custom-nameservers/zone-custom-nameservers/index.md)|[Agent setup](https://developers.cloudflare.com/agent-setup/)
With zone custom nameservers (ZCNS), each custom nameserver name must be a subdomain of the zone where the custom nameservers are configured.
For example, for a zone `domain.test`, the ZCNS can be `ns1.domain.test` and `ns2.domain.test` but they cannot use a different TLD (`ns1.domain.org`) nor a different domain (`ns1.example.com`).
## Availability
Zone custom nameservers are available for zones on Business or Enterprise plans. Via API or on the dashboard.
## Use zone custom nameservers
### Primary zones (full setup)
To create zone custom nameservers:
1. In the Cloudflare dashboard, go to the **DNS Records** page.
[Go to **Records** ↗](https://dash.cloudflare.com/?to=/:account/:zone/dns/records)
2. On **Custom nameservers**, select **Configure**.
3. Select **Create custom nameservers just for `your-domain.com`** and enter the subdomains used for the ZCNS names (for example, `ns1`, `ns2`, `ns3`).
4. Select **Save** to confirm.
Use the [Edit zone endpoint](https://developers.cloudflare.com/api/resources/zones/methods/edit/) and specify the custom nameservers in the payload:
```txt
"vanity_name_servers": ["ns1.example.com","ns2.example.com"]
```
Cloudflare will assign an IPv4 and an IPv6 address to each ZCNS name and automatically create the associated `A` or `AAAA` records.
The next step depends on whether you are using [Cloudflare Registrar](https://developers.cloudflare.com/registrar/) for your domain:
* If you are using Cloudflare Registrar for your domain, [contact Cloudflare Support](https://developers.cloudflare.com/support/contacting-cloudflare-support/) to add the custom nameservers and IP addresses as glue records to the domain.
* If you are not using Cloudflare Registrar for your domain, add the zone custom nameservers at your registrar as your authoritative nameservers and as glue (A and AAAA) records ([RFC 1912 ↗](https://www.rfc-editor.org/rfc/rfc1912.html)). If you do not add these records, DNS lookups for your domain will fail.
### Secondary zones
If you are using [Cloudflare as a secondary DNS provider](https://developers.cloudflare.com/dns/zone-setups/zone-transfers/cloudflare-as-secondary/), you can still set up zone custom nameservers. After following the [steps above](https://developers.cloudflare.com/dns/nameservers/custom-nameservers/zone-custom-nameservers/#primary-zones-full-setup) to create zone custom nameservers, do the following:
1. Get the ZCNS IPs. You can find them on the [**DNS Records** ↗](https://dash.cloudflare.com/?to=/:account/:zone/dns/records) page or you can use the [Zone details endpoint](https://developers.cloudflare.com/api/resources/zones/methods/get/) to get the `vanity_name_servers_ips`.
2. At your primary DNS provider, add [NS records](https://developers.cloudflare.com/dns/manage-dns-records/reference/dns-record-types/#ns) and, on the subdomains that you used as ZCNS names, add `A/AAAA` records.
3. At your registrar, add the zone custom nameservers as your authoritative nameservers and as glue (A and AAAA) records ([RFC 1912 ↗](https://www.rfc-editor.org/rfc/rfc1912.html)).
## Remove zone custom nameservers
To remove zone custom nameservers (and their associated, read-only DNS records):
1. In the Cloudflare dashboard, go to the **DNS Records** page.
[Go to **Records** ↗](https://dash.cloudflare.com/?to=/:account/:zone/dns/records)
2. On **Custom nameservers**, select **Disable**.
Use the [Edit zone endpoint](https://developers.cloudflare.com/api/resources/zones/methods/edit/) and include an empty array in the payload:
```txt
"vanity_name_servers": []
```
Cloudflare will remove your ZCNS and their associated read-only `A` or `AAAA` records.
If you are not using Cloudflare Registrar for your domain, make sure to adjust your nameservers at the registrar, parent zone, or Primary DNS provider accordingly.
Was this helpful?
YesNo
## On this page
[Docs](https://developers.cloudflare.com/)
```json
{"@context":"https://schema.org","@type":"TechArticle","@id":"https://developers.cloudflare.com/dns/nameservers/custom-nameservers/zone-custom-nameservers/#page","headline":"Zone custom nameservers · Cloudflare DNS docs","description":"With zone-level custom nameservers, each custom nameserver name must be a subdomain of the zone where the custom nameservers are configured. These custom nameservers can only be used within the respective zone.","url":"https://developers.cloudflare.com/dns/nameservers/custom-nameservers/zone-custom-nameservers/","inLanguage":"en","image":"https://developers.cloudflare.com/og-docs.png","dateModified":"2026-04-16","publisher":{"@type":"Organization","name":"Cloudflare","url":"https://www.cloudflare.com/"},"isPartOf":{"@type":"WebSite","@id":"https://developers.cloudflare.com/#website","name":"Cloudflare Docs","url":"https://developers.cloudflare.com/"}}
```
---
---
description: Available nameserver configuration options.
title: Nameserver options
image: https://developers.cloudflare.com/og-docs.png
---
[Skip to content](#main-content)
> Documentation Index
> Fetch the complete documentation index at: https://developers.cloudflare.com/dns/llms.txt
> Use this file to discover all available pages before exploring further.
# Nameserver options
Last updated Jul 24, 2026|Copy as Markdown|[View as Markdown](https://developers.cloudflare.com/dns/nameservers/nameserver-options/index.md)|[Agent setup](https://developers.cloudflare.com/agent-setup/)
Refer to the sections below to learn about different Cloudflare nameserver options. Note that the availability of these options depends on your plan. Also, if you acquired your domain from Cloudflare Registrar, your domain already uses and [must remain](https://developers.cloudflare.com/registrar/faq/#can-i-change-my-nameservers) on Cloudflare nameservers.
## Assignment method
When you add a domain on a [primary (full)](https://developers.cloudflare.com/dns/zone-setups/full-setup/) or [secondary](https://developers.cloudflare.com/dns/zone-setups/zone-transfers/cloudflare-as-secondary/) DNS setup, Cloudflare automatically assigns your nameservers.
The default assignment method is to use [standard nameservers](https://developers.cloudflare.com/dns/nameservers/#standard-nameservers) and favor consistent nameserver names across all zones within an account. Nonetheless, in case there are conflicts, you may get different nameserver names, even for domains that are within the same account.
Caution
To prevent domain hijacking, you can no longer preset Cloudflare nameservers at your registrar before creating the respective zone in Cloudflare. If you preset your nameservers and then add the domain, your domain will be assigned a new pair of nameservers.
These nameserver assignments cannot be changed. However, depending on your subscription, you may have different options for better nameserver consistency.
### Nameserver consistency
The level of consistency you can expect when adding new zones depends on the configured nameserver type.
* For [standard nameservers](https://developers.cloudflare.com/dns/nameservers/#standard-nameservers), since a conflict can be caused by anyone adding the same zone to any other Cloudflare account, the likelihood of your new zone being assigned different nameserver names than your previously existing zones is higher.
* If you use [account custom nameservers](https://developers.cloudflare.com/dns/nameservers/custom-nameservers/account-custom-nameservers/), the only conflict would be between a parent and a child zone, which makes consistent assignment across new zones more likely.
* With [tenant custom nameservers](https://developers.cloudflare.com/dns/nameservers/custom-nameservers/tenant-custom-nameservers/) or [Foundation DNS advanced nameservers](https://developers.cloudflare.com/dns/foundation-dns/advanced-nameservers/#nameservers-hosting-and-assignment), there can still be conflicts caused by two zones with the same name being added to different accounts, but, since access to these features is more restricted, the likelihood of your new zone being assigned different nameserver names than your previously existing zones is lower.
### DNS zone defaults
If you have an Enterprise account, you also have the option to [configure your own DNS zone defaults](https://developers.cloudflare.com/dns/additional-options/dns-zone-defaults/) and change how Cloudflare handles nameserver assignment when you add a new zone to your account:
* **Standard nameservers randomized**: instead of attempting consistency, Cloudflare assigns random pairs of nameserver names every time you add a new domain to your account.
* **Advanced nameservers**: Cloudflare uses the same method as the default - trying to keep nameserver names consistent for different zones within an account - but uses the specific [Foundation DNS nameservers](https://developers.cloudflare.com/dns/foundation-dns/advanced-nameservers/).
* **Account custom nameservers**: Cloudflare automatically assigns a set of [account custom nameservers](https://developers.cloudflare.com/dns/nameservers/custom-nameservers/account-custom-nameservers/) that you have previously configured for your account. In this method, **Set 1** will be attempted first and, in case of any conflicts, Cloudflare will cycle through the other nameserver sets, in ascending order.
Caution
DNS zone defaults are only applied at the moment a new zone is created and will not impact already existing zones, nor zones that existed previously and are being revived.
Any of the values specified as default can later be adjusted within each zone, on the respective [**DNS Settings** ↗](https://dash.cloudflare.com/?to=/:account/:zone/dns/settings) or [**DNS Records** ↗](https://dash.cloudflare.com/?to=/:account/:zone/dns/records) page.
## Multi-provider DNS
Multi-provider DNS is an optional setting for zones using [primary setup (full)](https://developers.cloudflare.com/dns/zone-setups/full-setup/) and is an enforced default behavior for zones using [secondary setup](https://developers.cloudflare.com/dns/zone-setups/zone-transfers/cloudflare-as-secondary/).
When you enable multi-provider DNS on a primary zone:
* Cloudflare will no longer ignore `NS` records created on the zone apex, as in the example below.
| Type | Name | Nameserver |
| ---- | ---- | ---------------- |
| NS | @ | ns1.external.com |
This means that responses to DNS queries made to the zone apex and requesting `NS` records will contain both Cloudflare's and your other DNS providers' nameservers.
* Cloudflare will activate a primary zone (full setup) even if its [nameservers listed at the registrar](https://developers.cloudflare.com/dns/nameservers/update-nameservers/) include nameservers from other DNS providers.
Caution
If you choose this option and you also want to use DNSSEC on your zone, make sure to set up [multi-signer DNSSEC](https://developers.cloudflare.com/dns/dnssec/multi-signer-dnssec/).
## Nameserver TTL
For both Cloudflare nameservers (standard or advanced) and custom nameservers, the `NS` record time-to-live (TTL) is controlled by the specific setting on the **DNS Records** page, under **DNS record options**.
Foundation DNS
**DNS record options** are part of [Foundation DNS](https://developers.cloudflare.com/dns/foundation-dns/). If you are an Enterprise customer and **Nameserver TTL** is not displayed on your Cloudflare dashboard, reach out to your account team.
The default TTL is 24 hours (or 86,400 seconds), but you have the option to lower this value depending on your needs. For example, shorter TTLs can be useful when you are changing nameservers or migrating a zone. Accepted values range from 30 to 86,400 seconds.
This setting can also be configured as a [DNS zone default](https://developers.cloudflare.com/dns/additional-options/dns-zone-defaults/), meaning new zones created in your account will automatically start with the value you define.
Was this helpful?
YesNo
## On this page
[Docs](https://developers.cloudflare.com/)
```json
{"@context":"https://schema.org","@type":"TechArticle","@id":"https://developers.cloudflare.com/dns/nameservers/nameserver-options/#page","headline":"Multi-provider DNS and nameserver options · Cloudflare DNS docs","description":"Available nameserver configuration options.","url":"https://developers.cloudflare.com/dns/nameservers/nameserver-options/","inLanguage":"en","image":"https://developers.cloudflare.com/og-docs.png","dateModified":"2026-07-24","publisher":{"@type":"Organization","name":"Cloudflare","url":"https://www.cloudflare.com/"},"isPartOf":{"@type":"WebSite","@id":"https://developers.cloudflare.com/#website","name":"Cloudflare Docs","url":"https://developers.cloudflare.com/"}}
```
---
---
description: Update your domain registrar to use Cloudflare nameservers.
title: Update nameservers
image: https://developers.cloudflare.com/og-docs.png
---
[Skip to content](#main-content)
> Documentation Index
> Fetch the complete documentation index at: https://developers.cloudflare.com/dns/llms.txt
> Use this file to discover all available pages before exploring further.
# Update nameservers
Last updated Apr 16, 2026|Copy as Markdown|[View as Markdown](https://developers.cloudflare.com/dns/nameservers/update-nameservers/index.md)|[Agent setup](https://developers.cloudflare.com/agent-setup/)
To use Cloudflare DNS as an authoritative DNS provider - be it in a [primary (full)](https://developers.cloudflare.com/dns/zone-setups/full-setup/) or [secondary](https://developers.cloudflare.com/dns/zone-setups/zone-transfers/cloudflare-as-secondary/) setup -, your domain nameservers must point to nameservers that you get from your Cloudflare account. Updating your nameservers is required to activate your domain on Cloudflare and use most of our [application services](https://developers.cloudflare.com/fundamentals/concepts/how-cloudflare-works/).
Cloudflare Registrar
If you acquired your domain from [Cloudflare Registrar](https://developers.cloudflare.com/registrar/), your domain already uses Cloudflare nameservers, automatically protecting and speeding up your content or services. If you need to update your nameservers to use a different DNS provider, you will have to [transfer your domain from Cloudflare](https://developers.cloudflare.com/registrar/account-options/transfer-out-from-cloudflare/).
---
## Specific processes
Although Cloudflare will [provide you the nameservers](https://developers.cloudflare.com/dns/nameservers/#authoritative-nameservers-offering) or allow you to create your own [custom nameservers](https://developers.cloudflare.com/dns/nameservers/custom-nameservers/), the final step to make Cloudflare an authoritative DNS provider for your domain may have to be done outside of Cloudflare. If you are not using [Cloudflare Registrar](https://developers.cloudflare.com/registrar/), consider which of the following sections correspond to your use case.
Custom or advanced nameservers
If you are using Cloudflare Registrar with [custom nameservers](https://developers.cloudflare.com/dns/nameservers/custom-nameservers/) or [advanced nameservers](https://developers.cloudflare.com/dns/foundation-dns/setup/), note that you must [reach out to support](https://developers.cloudflare.com/support/contacting-cloudflare-support/) to have the nameservers updated accordingly.
### Your domain uses a different registrar
If you have acquired your domain from a [registrar ↗](https://www.cloudflare.com/learning/dns/glossary/what-is-a-domain-name-registrar/) other than Cloudflare Registrar - and it has not been [delegated](#your-domain-is-delegated) \- you need to update your nameservers at your registrar.
If you do not know who your registrar is, you can use a Whois search, such as [ICANN Lookup ↗](https://lookup.icann.org/). If the registrar indicated on your Whois search result is not a service that you have interacted directly with, you may [have acquired your domain from a reseller](#you-have-acquired-your-domain-from-a-reseller).
Provider-specific instructions
This is not an exhaustive list of provider-specific instructions, but the following links may be helpful:
* [Ionos ↗](https://www.ionos.com/help/domains/using-your-own-name-servers/using-your-own-name-servers-for-a-domain/)
* [101Domain ↗](https://help.101domain.com/kb/managing-name-server-records)
* [Amazon ↗](https://docs.aws.amazon.com/Route53/latest/DeveloperGuide/domain-name-servers-glue-records.html#domain-name-servers-glue-records-adding-changing)
* [Blacknight ↗](https://help.blacknight.com/hc/articles/4413036322321-How-do-I-change-the-nameservers-for-my-domain)
* [BlueHost ↗](https://www.bluehost.com/help/article/custom-nameservers)
* [DirectNIC ↗](https://directnic.com/knowledge/article/33:how%2Bdo%2Bi%2Bmodify%2Bname%2Bservers%2Bfor%2Bmy%2Bdomain%2Bname%253F)
* [DNSMadeEasy ↗](http://www.dnsmadeeasy.com/support/faq/)
* [Domain.com ↗](https://www.domain.com/help/article/domain-management-how-to-update-nameservers)
* [Dotster ↗](https://www.dotster.com/help/article/domain-management-how-to-update-nameservers)
* [DreamHost ↗](https://help.dreamhost.com/hc/en-us/articles/360038897151)
* [EasyDNS ↗](https://kb.easydns.com/knowledge/settingchanging-nameservers/)
* [Enom ↗](https://help.enom.com/hc/en-us/articles/115000486451-Nameservers-NS)
* [Fast Domain ↗](https://www.fastdomain.com/hosting/help/transfer%5Fclient%5Fstart)
* [FlokiNET ↗](https://billing.flokinet.is/index.php?rp=/knowledgebase/57/Nameserver-and-DNS-records.html)
* [Gandi ↗](https://docs.gandi.net/en/domain%5Fnames/common%5Foperations/changing%5Fnameservers.html)
* [GoDaddy ↗](https://www.godaddy.com/help/change-nameservers-for-your-domain-names-664)
* [HostGator ↗](https://www.hostgator.com/help/article/changing-name-servers)
* [Hostico ↗](https://hostico.ro/docs/setarea-nameserverelor-din-contul-de-client-hostico/)
* [HostMonster ↗](https://my.hostmonster.com/cgi/help/222)
* [Hover ↗](https://support.hover.com/support/solutions/articles/201000064742-changing-your-domain-nameservers)
* [Internetdbs ↗](https://faq.internetbs.net/hc/en-gb/articles/4516921367837-How-to-update-Nameservers-for-a-domain)
* [iPage ↗](https://www.ipage.com/help/article/domain-management-how-to-update-nameservers)
* [MelbourneIT ↗](https://support.melbourneit.au/docs/how-do-i-manage-my-dns-on-cpanel)
* [Moniker ↗](https://support.moniker.com/hc/en-gb/articles/10101271418653-How-to-update-Nameservers-for-a-domain)
* [Name.com ↗](https://www.name.com/support/articles/205934457-registering-custom-nameservers)
* [Namecheap ↗](https://www.namecheap.com/support/knowledgebase/article.aspx/767/10/how-can-i-change-the-nameservers-for-my-domain)
* [Network Solutions ↗](https://www.networksolutions.com/manage-it/edit-nameservers.jsp)
* [OVH ↗](https://docs.ovh.com/gb/en/domains/web%5Fhosting%5Fgeneral%5Finformation%5Fabout%5Fdns%5Fservers/#step-2-edit-your-domains-dns-servers)
* [Porkbun ↗](https://kb.porkbun.com/article/22-how-to-change-your-nameservers)
* [Rackspace ↗](https://support.rackspace.com/how-to/rackspace-name-servers/)
* [Register ↗](https://www.register.com/knowledge)
* [Squarespace ↗](https://support.squarespace.com/hc/articles/4404183898125-Nameservers-and-DNSSEC-for-Squarespace-managed-domains#toc-open-the-domain-s-advanced-settings)
* [Site5 ↗](https://kb.site5.com/dns-2/custom-nameservers/)
* [Softlayer ↗](https://cloud.ibm.com/docs/dns?topic=dns-add-edit-or-delete-custom-name-servers-for-a-domain)
* [Yola ↗](https://helpcenter.yola.com/hc/articles/360012492660-Changing-your-name-servers)
### You have acquired your domain from a reseller
Some services, such as website builders ([Squarespace ↗](https://support.squarespace.com/hc/articles/115003671428-Who-s-my-domain-provider), for example), are not registrars but act as a [reseller ↗](https://www.icann.org/resources/pages/reseller-2013-05-03-en), allowing you to buy domains directly from them.
In that case, you may have to update your nameservers in the reseller platform, not at the registrar.
Note
Refer to [Squarespace documentation ↗](https://support.squarespace.com/hc/articles/4404183898125-Nameservers-and-DNSSEC-for-Squarespace-managed-domains#toc-open-the-domain-s-advanced-settings) on how to update nameservers in their platform.
### Your domain is delegated
If you are onboarding a subdomain `shop.example.com` as a [child domain](https://developers.cloudflare.com/dns/zone-setups/subdomain-setup/), the parent domain (`example.com`) must delegate authority to the child domain.
Delegation means that `shop.example.com` has specific `NS` records set up for it within the DNS records management of the parent zone (`example.com`).
If that is the case, when setting up your zone in Cloudflare or opting for a different set of [nameservers](https://developers.cloudflare.com/dns/nameservers/), you have to update the `NS` records in the parent domain, and not at the registrar.
---
## Restricted nameserver management
Some providers act as registrars but do not expose nameserver settings. If you cannot change nameservers at your registrar or hosting platform, you can either:
* Transfer your domain to a registrar that allows nameserver management.
* Transfer your domain to Cloudflare Registrar. All domains on [Cloudflare Registrar](https://developers.cloudflare.com/registrar/) automatically use Cloudflare nameservers.
* Use a [CNAME setup (partial)](https://developers.cloudflare.com/dns/zone-setups/partial-setup/) instead. This option does not require nameserver changes and is available on Business and Enterprise plans.
---
## Further guidance
This page covers specific workflows that customers who do not use Cloudflare Registrar[1](#user-content-fn-1) might have to follow to update their domain nameservers. For complete tutorials, refer to the pages below. Full setup is the most common option, and the only one available for customers on the Free or Pro plans.
* [Primary setup (Full)](https://developers.cloudflare.com/dns/zone-setups/full-setup/)
* [CNAME setup (Partial)](https://developers.cloudflare.com/dns/zone-setups/partial-setup/)
* [DNS Zone transfers](https://developers.cloudflare.com/dns/zone-setups/zone-transfers/)
* [Subdomain setup](https://developers.cloudflare.com/dns/zone-setups/subdomain-setup/)
* [Reference](https://developers.cloudflare.com/dns/zone-setups/reference/)
* [Troubleshooting](https://developers.cloudflare.com/dns/zone-setups/troubleshooting/)
* [DNS setup conversions](https://developers.cloudflare.com/dns/zone-setups/conversions/)
* [Zone removal](https://developers.cloudflare.com/dns/zone-setups/removal/)
## Footnotes
1. If you acquired your domain from Cloudflare Registrar, your domain already uses and must remain on Cloudflare nameservers. For details, refer to [Registrar](https://developers.cloudflare.com/registrar/faq/#can-i-change-my-nameservers). [↩](#user-content-fnref-1)
Was this helpful?
YesNo
## On this page
[Docs](https://developers.cloudflare.com/)
```json
{"@context":"https://schema.org","@type":"TechArticle","@id":"https://developers.cloudflare.com/dns/nameservers/update-nameservers/#page","headline":"Update nameservers · Cloudflare DNS docs","description":"Update your domain registrar to use Cloudflare nameservers.","url":"https://developers.cloudflare.com/dns/nameservers/update-nameservers/","inLanguage":"en","image":"https://developers.cloudflare.com/og-docs.png","dateModified":"2026-04-16","publisher":{"@type":"Organization","name":"Cloudflare","url":"https://www.cloudflare.com/"},"isPartOf":{"@type":"WebSite","@id":"https://developers.cloudflare.com/#website","name":"Cloudflare Docs","url":"https://developers.cloudflare.com/"}}
```
---
---
description: Manage DNS records for your Cloudflare zones.
title: DNS records
image: https://developers.cloudflare.com/og-docs.png
---
[Skip to content](#main-content)
> Documentation Index
> Fetch the complete documentation index at: https://developers.cloudflare.com/dns/llms.txt
> Use this file to discover all available pages before exploring further.
# DNS records
Last updated Jun 24, 2026|Copy as Markdown|[View as Markdown](https://developers.cloudflare.com/dns/manage-dns-records/index.md)|[Agent setup](https://developers.cloudflare.com/agent-setup/)
DNS records contain information about your domain and are used to make your website or application available to visitors and other web services.
Each DNS record belongs to a different type, and each type serves a different purpose. For background about the different types of DNS records, refer to the [Learning Center ↗](https://www.cloudflare.com/learning/dns/dns-records/). To quickly find reference information about a specific type, refer to [DNS record types](https://developers.cloudflare.com/dns/manage-dns-records/reference/dns-record-types/).
Depending on the providers you used to [get your domain name](https://developers.cloudflare.com/fundamentals/manage-domains/#get-a-domain-name) and [host your website or application](https://developers.cloudflare.com/fundamentals/manage-domains/#host-your-domain), it is expected that DNS records were automatically created on your behalf. According to your [setup](https://developers.cloudflare.com/dns/zone-setups/), you can use Cloudflare to manage your DNS records.
## DNS records table
When managing your records at Cloudflare, besides the common record fields described below, you may also find an option for [Proxy status](https://developers.cloudflare.com/dns/proxy-status/) and [CNAME flattening](https://developers.cloudflare.com/dns/cname-flattening/). These are specific features offered by Cloudflare.
Record fields
* **Type**: Defines the purpose of a record. Different types of record require different information in their corresponding `Content` field.
* **Name**: Identifies the resource that the record resolves to. Depending on the purpose of the record, the value you want to add to this field will also change.
* **Content**: Contains the core value of a record, depending on the record type.
* **TTL**: Controls how long each record is cached by DNS resolvers.
Example
DNS management for **example.com**:
| Type | Name | Content | Proxy status | TTL |
| ---- | ---- | --------- | ------------ | ---- |
| A | blog | 192.0.2.1 | Proxied | Auto |
In this example, an IP address resolution record of type `A` is indicating that the resources that correspond to the subdomain `blog.example.com` can be reached on the IPv4 address `192.0.2.1`.
Also, as this record is [proxied](https://developers.cloudflare.com/dns/proxy-status/), Cloudflare automatically defines for how long this information should be cached by DNS resolvers.
## DNS records quota
Cloudflare limits the number of DNS records you can create. Depending on your plan, this limit is enforced either per zone or per account — not both.
DNS records that other Cloudflare services create on your behalf — for example, the `TXT` and `MX` records added by [Email Routing](https://developers.cloudflare.com/email-service/) — also count toward your quota. To avoid disrupting those services, they are enforced against your record limit with a small buffer, so a zone may occasionally hold slightly more records than its limit would otherwise allow.
To create new records yourself through the dashboard or API, your zone must still be within its record limit.
### Per-zone quota
By default, there is a limit to the number of records you can create on a single zone.
* Free zones created before `2024-09-01 00:00:00 UTC`: 1,000
* Free zones created on or after `2024-09-01 00:00:00 UTC`: 200
* Pro: 3,500
* Business: 3,500
* Enterprise: falls under the [per-account quota](#per-account-quota) (no separate per-zone limit).
You can retrieve a zone's current quota (if applicable) and usage [via the API](https://developers.cloudflare.com/api/resources/dns/subresources/usage/subresources/zone/methods/get/).
### Per-account quota
Enterprise accounts have a quota on the total number of records across all of their zones, instead of the per-zone limit. This lets you distribute records across your zones however you like, regardless of each zone's plan.
Public zones and [internal zones](https://developers.cloudflare.com/dns/internal-dns/) are counted separately, each with a default account quota of 1,000,000 records.
You can retrieve your current account quota and usage [via the API](https://developers.cloudflare.com/api/resources/dns/subresources/usage/subresources/account/methods/get/).
For more DNS records
If you are an Enterprise customer and require a higher account quota, contact your account team. Cloudflare can support millions of DNS records.
## Resources
### How to
* [Manage DNS records](https://developers.cloudflare.com/dns/manage-dns-records/how-to/create-dns-records/)
* [Create zone apex record](https://developers.cloudflare.com/dns/manage-dns-records/how-to/create-zone-apex/)
* [Create subdomain records](https://developers.cloudflare.com/dns/manage-dns-records/how-to/create-subdomain/)
* [Set up email records](https://developers.cloudflare.com/dns/manage-dns-records/how-to/email-records/)
* [Import and export records](https://developers.cloudflare.com/dns/manage-dns-records/how-to/import-and-export/)
* [Batch record changes](https://developers.cloudflare.com/dns/manage-dns-records/how-to/batch-record-changes/)
* [Dynamically update DNS records](https://developers.cloudflare.com/dns/manage-dns-records/how-to/managing-dynamic-ip-addresses/)
* [Round-robin DNS](https://developers.cloudflare.com/dns/manage-dns-records/how-to/round-robin-dns/)
* [Delegate subdomains](https://developers.cloudflare.com/dns/manage-dns-records/how-to/subdomains-outside-cloudflare/)
### Reference
* [DNS record types](https://developers.cloudflare.com/dns/manage-dns-records/reference/dns-record-types/)
* [Time to Live (TTL)](https://developers.cloudflare.com/dns/manage-dns-records/reference/ttl/)
* [Record attributes](https://developers.cloudflare.com/dns/manage-dns-records/reference/record-attributes/)
* [Wildcard DNS records](https://developers.cloudflare.com/dns/manage-dns-records/reference/wildcard-dns-records/)
* [Shadowed records](https://developers.cloudflare.com/dns/manage-dns-records/reference/shadowed-records/)
* [Vendor-specific DNS records](https://developers.cloudflare.com/dns/manage-dns-records/reference/vendor-specific-records/)
### Troubleshooting
* [Records with the same name](https://developers.cloudflare.com/dns/manage-dns-records/troubleshooting/records-with-same-name/)
* [Unexpected DNS records](https://developers.cloudflare.com/dns/manage-dns-records/troubleshooting/unexpected-dns-records/)
* [Exposed IP addresses](https://developers.cloudflare.com/dns/manage-dns-records/troubleshooting/exposed-ip-address/)
* [Verify a domain with CNAME](https://developers.cloudflare.com/dns/manage-dns-records/troubleshooting/cname-domain-verification/)
* [NS records already exist](https://developers.cloudflare.com/dns/manage-dns-records/troubleshooting/existing-ns-record/)
* [Stale response for upstream DNS resolution](https://developers.cloudflare.com/dns/manage-dns-records/troubleshooting/stale-response/)
Was this helpful?
YesNo
## On this page
[Docs](https://developers.cloudflare.com/)
```json
{"@context":"https://schema.org","@type":"WebPage","@id":"https://developers.cloudflare.com/dns/manage-dns-records/#page","headline":"DNS records · Cloudflare DNS docs","description":"Manage DNS records for your Cloudflare zones.","url":"https://developers.cloudflare.com/dns/manage-dns-records/","inLanguage":"en","image":"https://developers.cloudflare.com/og-docs.png","dateModified":"2026-06-24","publisher":{"@type":"Organization","name":"Cloudflare","url":"https://www.cloudflare.com/"},"isPartOf":{"@type":"WebSite","@id":"https://developers.cloudflare.com/#website","name":"Cloudflare Docs","url":"https://developers.cloudflare.com/"}}
```
---
---
description: Create, update, and delete multiple DNS records at once.
title: Batch record changes
image: https://developers.cloudflare.com/og-docs.png
---
[Skip to content](#main-content)
> Documentation Index
> Fetch the complete documentation index at: https://developers.cloudflare.com/dns/llms.txt
> Use this file to discover all available pages before exploring further.
# Batch record changes
Last updated Apr 16, 2026|Copy as Markdown|[View as Markdown](https://developers.cloudflare.com/dns/manage-dns-records/how-to/batch-record-changes/index.md)|[Agent setup](https://developers.cloudflare.com/agent-setup/)
Cloudflare allows you to apply several changes to your zone records in just one action. You can [use the dashboard](#use-the-dashboard) to delete DNS records or update their proxy status in bulk, or [use the API](#use-the-api) to perform further batched operations.
Propagation through the Cloudflare network
Although Cloudflare will execute the batched operations in a single [database transaction ↗](https://en.wikipedia.org/wiki/Database%5Ftransaction), Cloudflare's distributed KV store must treat each record change as a single key-value pair. This means that the propagation of changes is not atomic. Refer to our [blog post ↗](https://blog.cloudflare.com/batched-dns-changes/) for details.
## Availability and limits
Batch DNS record changes is available on all plans.
The number of records that you can operate with in one action depends on your zone plan:
* Free: 200
* Pro: 3,500
* Business: 3,500
* Enterprise: 3,500
---
## Use the dashboard
### Edit proxy status in bulk
`A`,`AAAA`, and `CNAME` records can be [proxied](https://developers.cloudflare.com/dns/proxy-status/). The **Proxy status** of a DNS record affects [how Cloudflare responds to DNS queries](https://developers.cloudflare.com/fundamentals/concepts/how-cloudflare-works/) to that record.
Note
If you have multiple `A/AAAA` records on the same name and at least one of them is proxied, Cloudflare will treat all `A/AAAA` records on this name as being proxied.
1. In the Cloudflare dashboard, go to the **DNS Records** page.
[Go to **Records** ↗](https://dash.cloudflare.com/?to=/:account/:zone/dns/records)
2. Select the DNS records you want to set the proxy status for. Note that only `A`, `AAAA`, and `CNAME` records can be proxied.
3. Select **Edit records**.
4. Choose the proxy status you want to apply to the selected records.
5. Select **Save** to confirm.
You can only set records to either **Proxied** or **DNS only** in bulk. This means that if your selection includes both proxied and DNS-only records, some of them will have the proxy status updated while others will keep their original value:
For example, if you select the following records and then edit their proxy status in bulk, choosing **Proxied** in [step 4 above](#edit-proxy-status-in-bulk), the outcome will be:
| Selected records | Original proxy status | Resulting proxy status |
| ---------------- | --------------------- | ---------------------- |
| www | DNS only | Proxied |
| blog | DNS only | Proxied |
| docs | Proxied | Proxied |
### Delete records in bulk
Caution
Deleting DNS records can cause downtime and cannot be reverted. Make sure you only select DNS records that you can safely delete.
1. In the Cloudflare dashboard, go to the **DNS Records** page.
[Go to **Records** ↗](https://dash.cloudflare.com/?to=/:account/:zone/dns/records)
2. Select the DNS records you want to delete.
3. Select **Delete records**.
4. In the **Delete DNS records** prompt, type in `DELETE` and select **Delete** to confirm.
## Use the API
Note
This option requires familiarity with API usage and concepts. For further information about the Cloudflare API, refer to [Fundamentals](https://developers.cloudflare.com/fundamentals/api/get-started/).
The [Batched DNS record changes](https://developers.cloudflare.com/api/resources/dns/subresources/records/methods/batch/) endpoint allows you to trigger the execution of `DELETES`, `PATCHES`, `PUTS`, and `POSTS` in a single request.
[Tags and comments](https://developers.cloudflare.com/dns/manage-dns-records/reference/record-attributes/) are also supported with batch changes.
The operations you specify within the `/batch` request body are always executed in the following order:
1. Deletes
2. Patches
3. Puts
4. Posts
Within each of these four lists, each individual action is executed following the DNS records order you provide. If any of the individual action fails, no changes are applied and the API returns the first error it encountered.
### Aspects to consider
Propagation through the Cloudflare network
Although Cloudflare will execute the batched operations in a single [database transaction ↗](https://en.wikipedia.org/wiki/Database%5Ftransaction), Cloudflare's distributed KV store must treat each record change as a single key-value pair. This means that the propagation of changes is not atomic. Refer to our [blog post ↗](https://blog.cloudflare.com/batched-dns-changes/) for details.
For each operation that you list in the `/batch` request body, consider the required information and how unspecified fields will behave:
* **`deletes`**: only the `id` is required for each record object. You can keep additional parameters such as `name` for readability, but any other fields aside from `id` will be ignored in this case.
* **`patches`**: aside from each record `id`, you should specify the fields you want to update. All unspecified fields will remain as they are.
* **`puts`**: you must specify each record `id`, `content`, `name`, and `type`. You should also specify any other fields you want to set to a value that is not the default. Any unspecified fields will assume their default value for each [record type](https://developers.cloudflare.com/dns/manage-dns-records/reference/dns-record-types/). This operation works as an overwrite, so all fields in a given record are always affected.
* **`posts`**: since you are creating a new record, `id` is not required. For field definitions, refer to the [Create DNS Record](https://developers.cloudflare.com/api/resources/dns/subresources/records/methods/create/) endpoint and select the desired record type under the request body specification.
### Example request
In this example, the `proxied` field for the first record listed under `"puts"` will assume the default value (`false`).
```bash
{
"deletes": [
{
"id": "2bff0ebc4df64beaa44b0dca93e37a28"
},
{
"id": "31d1d6e79ce04b8d93cbc5a13401d728"
}
],
"patches": [
{
"id": "62276440f783445380480484648c1017",
"content": "192.0.2.46"
},
{
"id": "c942d948dc2343b9b97aed78479c9fb9",
"name": "update.example.com",
"proxied": true
}
],
"puts": [
{
"id": "a50364543094428abde0f14061d42b0e",
"content": "192.0.2.50",
"name": "change.example.com",
"type": "A",
"ttl:": 1
},
{
"id": "3bce0920f19d43949498bd067b05dfa9",
"content": "192.0.2.45",
"name": "no-change.example.com",
"type": "A",
"proxied": false,
"ttl:": 3000
}
],
"posts": [
{
"name": "@",
"type": "A",
"content": "192.0.2.41",
"proxied": false,
"ttl": 3000
},
{
"name": "a.example.com",
"type": "A",
"content": "192.0.2.42",
"proxied": true
}
]
}
```
Was this helpful?
YesNo
## On this page
[Docs](https://developers.cloudflare.com/)
```json
{"@context":"https://schema.org","@type":"TechArticle","@id":"https://developers.cloudflare.com/dns/manage-dns-records/how-to/batch-record-changes/#page","headline":"Batch record changes · Cloudflare DNS docs","description":"Create, update, and delete multiple DNS records at once.","url":"https://developers.cloudflare.com/dns/manage-dns-records/how-to/batch-record-changes/","inLanguage":"en","image":"https://developers.cloudflare.com/og-docs.png","dateModified":"2026-04-16","publisher":{"@type":"Organization","name":"Cloudflare","url":"https://www.cloudflare.com/"},"isPartOf":{"@type":"WebSite","@id":"https://developers.cloudflare.com/#website","name":"Cloudflare Docs","url":"https://developers.cloudflare.com/"}}
```
---
---
description: Create, edit, and delete DNS records for your zone.
title: Manage DNS records
image: https://developers.cloudflare.com/og-docs.png
---
[Skip to content](#main-content)
> Documentation Index
> Fetch the complete documentation index at: https://developers.cloudflare.com/dns/llms.txt
> Use this file to discover all available pages before exploring further.
# Manage DNS records
Last updated May 6, 2026|Copy as Markdown|[View as Markdown](https://developers.cloudflare.com/dns/manage-dns-records/how-to/create-dns-records/index.md)|[Agent setup](https://developers.cloudflare.com/agent-setup/)
Consider the sections below for step-by-step instructions on managing DNS records at Cloudflare.
To better understand what DNS records are, refer to [Overview](https://developers.cloudflare.com/dns/manage-dns-records/). For context around common records you want to review when getting started at Cloudflare, refer to [review DNS records](https://developers.cloudflare.com/dns/zone-setups/full-setup/setup/#2-review-your-dns-records).
Note
If your domain is added to Cloudflare by a hosting partner, manage your DNS records via the hosting partner.
---
## Basic operations
### Create DNS records
To create a DNS record in the dashboard:
1. In the Cloudflare dashboard, go to the **DNS Records** page.
[Go to **Records** ↗](https://dash.cloudflare.com/?to=/:account/:zone/dns/records)
2. Select **Add record**.
3. Choose a record [**Type**](https://developers.cloudflare.com/dns/manage-dns-records/reference/dns-record-types/).
4. Complete the required fields, which vary per record. Particularly important fields (for some records) include:
* **Proxy status**: For `A`, `AAAA`, and `CNAME` records, decide whether hostname traffic is [proxied through Cloudflare](https://developers.cloudflare.com/dns/proxy-status/).
* **TTL**: Short for [_Time to Live_](https://developers.cloudflare.com/dns/manage-dns-records/reference/ttl/), this field controls how long each record is valid and — as a result — how long it takes for record updates to reach your end users.
* **Comment** and **Tag**: [Record attributes](https://developers.cloudflare.com/dns/manage-dns-records/reference/record-attributes/) meant for your reference.
* **Private network routing**: Some Enterprise customers also have access to [private network routing](https://developers.cloudflare.com/dns/private-origins/private-network-routing/). For `A` and `AAAA` records, this feature allows you to proxy HTTP/HTTPS traffic from public hostnames to origins in your private network.
5. Select **Save**.
To create records with the API, use a [POST request](https://developers.cloudflare.com/api/resources/dns/subresources/records/methods/create/). For field definitions, select a record type under the request body specification.
For specific API examples, refer to [DNS record types](https://developers.cloudflare.com/dns/manage-dns-records/reference/dns-record-types/).
### Edit DNS records
To edit DNS records in the dashboard:
1. In the Cloudflare dashboard, go to the **DNS Records** page.
[Go to **Records** ↗](https://dash.cloudflare.com/?to=/:account/:zone/dns/records)
2. On a specific record, select **Edit**.
3. Make any necessary changes.
4. Select **Save**.
To update part of a record with the API, use a [PATCH request](https://developers.cloudflare.com/api/resources/dns/subresources/records/methods/edit/). If you want to overwrite the entire existing record, use a [PUT request](https://developers.cloudflare.com/api/resources/dns/subresources/records/methods/update/).
### Delete DNS records
To delete DNS records in the dashboard:
1. In the Cloudflare dashboard, go to the **DNS Records** page.
[Go to **Records** ↗](https://dash.cloudflare.com/?to=/:account/:zone/dns/records)
2. On a specific record, select **Edit**.
3. Select **Delete**.
4. Select **Delete** again to confirm.
To delete records with the API, use a [DELETE request](https://developers.cloudflare.com/api/resources/dns/subresources/records/methods/delete/).
---
## Use cases
### Update an origin IP address
If your hosting provider changes or your origin IP address changes, update the **Content** value of the relevant DNS records (usually `A` or `AAAA` records).
If you are not sure which IP address to use, refer to your hosting provider's documentation.
### Originless setups
If you need a placeholder address for an originless setup (also referred to as parked domain or redirect-only), you can use the reserved IPv6 address `100::` or the reserved IPv4 address `192.0.2.0` in a [proxied](https://developers.cloudflare.com/dns/proxy-status/) DNS record.
This allows you to route requests using products such as [Redirect Rules](https://developers.cloudflare.com/rules/url-forwarding/), [Page Rules](https://developers.cloudflare.com/rules/page-rules/), or [Workers](https://developers.cloudflare.com/workers/).
Note
The address `192.0.2.0` comes from an IPv4 range reserved for documentation ([RFC 5737 ↗](https://www.rfc-editor.org/rfc/rfc5737)), and `100::` comes from the IPv6 discard prefix `0100::/64` ([RFC 6666 ↗](https://www.rfc-editor.org/rfc/rfc6666)). Neither address is expected to route to a real server on properly configured networks, which makes them safe to use as placeholder values. Because the DNS record is proxied, Cloudflare intercepts the request before it reaches the origin address.
---
## Further guidance
* [Manage DNS records](https://developers.cloudflare.com/dns/manage-dns-records/how-to/create-dns-records/)
* [Create zone apex record](https://developers.cloudflare.com/dns/manage-dns-records/how-to/create-zone-apex/)
* [Create subdomain records](https://developers.cloudflare.com/dns/manage-dns-records/how-to/create-subdomain/)
* [Set up email records](https://developers.cloudflare.com/dns/manage-dns-records/how-to/email-records/)
* [Import and export records](https://developers.cloudflare.com/dns/manage-dns-records/how-to/import-and-export/)
* [Batch record changes](https://developers.cloudflare.com/dns/manage-dns-records/how-to/batch-record-changes/)
* [Dynamically update DNS records](https://developers.cloudflare.com/dns/manage-dns-records/how-to/managing-dynamic-ip-addresses/)
* [Round-robin DNS](https://developers.cloudflare.com/dns/manage-dns-records/how-to/round-robin-dns/)
* [Delegate subdomains](https://developers.cloudflare.com/dns/manage-dns-records/how-to/subdomains-outside-cloudflare/)
Was this helpful?
YesNo
## On this page
[Docs](https://developers.cloudflare.com/)
```json
{"@context":"https://schema.org","@type":"TechArticle","@id":"https://developers.cloudflare.com/dns/manage-dns-records/how-to/create-dns-records/#page","headline":"Manage DNS records · Cloudflare DNS docs","description":"Create, edit, and delete DNS records for your zone.","url":"https://developers.cloudflare.com/dns/manage-dns-records/how-to/create-dns-records/","inLanguage":"en","image":"https://developers.cloudflare.com/og-docs.png","dateModified":"2026-05-06","publisher":{"@type":"Organization","name":"Cloudflare","url":"https://www.cloudflare.com/"},"isPartOf":{"@type":"WebSite","@id":"https://developers.cloudflare.com/#website","name":"Cloudflare Docs","url":"https://developers.cloudflare.com/"}}
```
---
---
description: Add DNS records for subdomains.
title: Create subdomain records
image: https://developers.cloudflare.com/og-docs.png
---
[Skip to content](#main-content)
> Documentation Index
> Fetch the complete documentation index at: https://developers.cloudflare.com/dns/llms.txt
> Use this file to discover all available pages before exploring further.
# Create subdomain records
Last updated Apr 16, 2026|Copy as Markdown|[View as Markdown](https://developers.cloudflare.com/dns/manage-dns-records/how-to/create-subdomain/index.md)|[Agent setup](https://developers.cloudflare.com/agent-setup/)
Most subdomains serve a specific purpose within the overall context of your website. For example, `blog.example.com` might be your blog, `support.example.com` could be your customer help portal, and `store.example.com` would be your e-commerce site.
Even if you do not require specific subdomains, you might want to set up at least a subdomain record on `www`. It will usually point to the same content as what you have on the apex domain (`example.com`) or use a [redirect](https://developers.cloudflare.com/fundamentals/manage-domains/manage-subdomains/#redirect-a-subdomain-to-the-apex-domain). Having a subdomain DNS record on `www` helps guarantee that a visitor who types `www.` in front of your domain address can still find your website or application.
## Subdomain records
To host content on a subdomain of your domain, first ensure that your [hosting provider](https://developers.cloudflare.com/fundamentals/manage-domains/#host-your-domain) can serve content for the given hostname (`.example.com`).
Then, you would create a corresponding [IP address resolution record](https://developers.cloudflare.com/dns/manage-dns-records/reference/dns-record-types/#ip-address-resolution) (`A`, `AAAA`, or `CNAME`), specifying the label for your subdomain (`blog`, `www`, or `store`, for example) as the record **Name**.
| Type | Name | IPv4 address | Proxy status |
| ---- | ---- | ------------ | ------------ |
| A | blog | 192.0.2.1 | Proxied |
1. In the Cloudflare dashboard, go to the **DNS Records** page.
[Go to **Records** ↗](https://dash.cloudflare.com/?to=/:account/:zone/dns/records)
2. Select **Add record**.
3. Select `A`, `AAAA`, or `CNAME` as the record **Type**, according to your needs:
* To point to an IPv4 address, select `A`, use your subdomain (`blog`) for the record **Name**, and insert the IPv4 address in the respective field.
* To point to an IPv6 address, select `AAAA`, use your subdomain (`blog`) for the record **Name**, and insert the IPv6 address in the respective field.
* To point to a [fully qualified domain name (FQDN) ↗](https://en.wikipedia.org/wiki/Fully%5Fqualified%5Fdomain%5Fname) (such as `your-site.host.example.com`), select `CNAME`, use your subdomain (`blog`) for the record **Name**, and insert the fully qualified domain name in the **Target** field.
4. Specify the [**Proxy status**](https://developers.cloudflare.com/dns/proxy-status/) and [**TTL**](https://developers.cloudflare.com/dns/manage-dns-records/reference/ttl/) according to your needs.
5. Select **Save** to confirm.
Use the [Create DNS Record API endpoint](https://developers.cloudflare.com/api/resources/dns/subresources/records/methods/create/).
For field definitions, refer to the [API documentation](https://developers.cloudflare.com/api/resources/dns/subresources/records/methods/create/) (visible once you select the record type under the request body specification).
* To point to an IPv4 address, select **A Record**, use your subdomain (`blog`) for the field `name`, and use the IPv4 address for the field `content`.
* To point to an IPv6 address, select **AAAA Record**, use your subdomain (`blog`) for the field `name`, and use the IPv6 address for the field `content`.
* To point to a [fully qualified domain name (FQDN) ↗](https://en.wikipedia.org/wiki/Fully%5Fqualified%5Fdomain%5Fname) (such as `your-site.host.example.com`), select **CNAME Record**, use your subdomain (`blog`) for the field `name`, and use the fully qualified domain name for the field `content`.
## Subdomain redirects
For more guidance on redirecting a subdomain — either to your main domain or another location — refer to [Set up subdomain redirects](https://developers.cloudflare.com/fundamentals/manage-domains/manage-subdomains/#set-up-redirects).
## SSL/TLS for subdomains
While DNS is what communicates where your website or application can be reached, SSL/TLS is what enables websites and applications to establish connections in a secure way.
If your subdomains are not correctly covered by an SSL/TLS certificate, your visitors will find a warning on their browser stating that your website or application is not secure.
If your main domain is using Cloudflare's [Universal SSL certificate](https://developers.cloudflare.com/ssl/edge-certificates/universal-ssl/), that certificate also covers all first-level subdomains (`blog.example.com`).
For deeper subdomains (`dev.blog.example.com`), use a [different type of certificate](https://developers.cloudflare.com/ssl/edge-certificates/universal-ssl/limitations/#full-setup).
Proxy status
Cloudflare can only serve an SSL/TLS certificate for a DNS record when you set the record's [proxy status](https://developers.cloudflare.com/dns/proxy-status/) to **Proxied**. If you do not do this, the origin server your record points to will be responsible for supporting SSL/TLS connections.
## Customize subdomain behavior
If you want to customize Cloudflare settings for individual subdomains, your approach will vary depending on your plan.
Enterprise customers can set up custom settings and access for a specific subdomain within Cloudflare with [Subdomain support](https://developers.cloudflare.com/dns/zone-setups/subdomain-setup/).
All other customers can set up subdomain-specific [Configuration Rules](https://developers.cloudflare.com/rules/configuration-rules/) or [Page Rules](https://developers.cloudflare.com/rules/page-rules/) to alter Cloudflare settings.
If you want a subdomain's DNS settings managed totally outside of Cloudflare — meaning this subdomain can be managed by individuals without access to your Cloudflare account — refer to [Delegating subdomains outside of Cloudflare](https://developers.cloudflare.com/dns/manage-dns-records/how-to/subdomains-outside-cloudflare/).
Was this helpful?
YesNo
## On this page
[Docs](https://developers.cloudflare.com/)
```json
{"@context":"https://schema.org","@type":"TechArticle","@id":"https://developers.cloudflare.com/dns/manage-dns-records/how-to/create-subdomain/#page","headline":"Create subdomain records · Cloudflare DNS docs","description":"Add DNS records for subdomains.","url":"https://developers.cloudflare.com/dns/manage-dns-records/how-to/create-subdomain/","inLanguage":"en","image":"https://developers.cloudflare.com/og-docs.png","dateModified":"2026-04-16","publisher":{"@type":"Organization","name":"Cloudflare","url":"https://www.cloudflare.com/"},"isPartOf":{"@type":"WebSite","@id":"https://developers.cloudflare.com/#website","name":"Cloudflare Docs","url":"https://developers.cloudflare.com/"}}
```
---
---
description: Create a DNS record for your zone apex.
title: Create zone apex record
image: https://developers.cloudflare.com/og-docs.png
---
[Skip to content](#main-content)
> Documentation Index
> Fetch the complete documentation index at: https://developers.cloudflare.com/dns/llms.txt
> Use this file to discover all available pages before exploring further.
# Create zone apex record
Last updated Apr 17, 2026|Copy as Markdown|[View as Markdown](https://developers.cloudflare.com/dns/manage-dns-records/how-to/create-zone-apex/index.md)|[Agent setup](https://developers.cloudflare.com/agent-setup/)
When you add a domain to Cloudflare, you may also need to create or review the DNS record on your zone apex. Zone apex refers to the domain (`example.com`) or subdomain (`blog.example.com`) that you are [adding to Cloudflare](https://developers.cloudflare.com/dns/concepts/#zone).
Usually, the zone apex record makes your domain accessible by visitors. In this case, the necessary record type ([A, AAAA, or CNAME](https://developers.cloudflare.com/dns/manage-dns-records/reference/dns-record-types/#ip-address-resolution)) and its content will depend on the provider that [hosts](https://developers.cloudflare.com/fundamentals/manage-domains/#host-your-domain) your website or application. If you are using Cloudflare Pages, refer to [Custom domains](https://developers.cloudflare.com/pages/configuration/custom-domains/). If you are using other providers, look for their guidance on how to connect domains managed on external DNS services.
### ANAME or ALIAS
ANAME or ALIAS are DNS records used by specific DNS providers. If your previous provider was using ANAME or ALIAS, you can recreate these records on Cloudflare as CNAME records. Cloudflare's [CNAME flattening](https://developers.cloudflare.com/dns/cname-flattening/)[1](#user-content-fn-1) allows you to create CNAME records at your [zone apex](https://developers.cloudflare.com/dns/concepts/#zone-apex), removing the need for those other record types.
## Footnotes
1. A process in which Cloudflare returns an IP address instead of the target hostname that a CNAME record points to. [↩](#user-content-fnref-1)
## Zone apex record
To create a zone apex record, use `@` for the record **Name**, as in the following example.
| Type | Name | IPv4 address | Proxy status |
| ---- | ---- | ------------ | ------------ |
| A | @ | 192.0.2.1 | Proxied |
1. In the Cloudflare dashboard, go to the **DNS Records** page.
[Go to **Records** ↗](https://dash.cloudflare.com/?to=/:account/:zone/dns/records)
2. Select **Add record**.
3. Select `A`, `AAAA`, or `CNAME` as the record **Type**, according to your needs:
* To point to an IPv4 address, select `A`, use your zone apex (`@`) for the record **Name**, and insert the IPv4 address in the respective field.
* To point to an IPv6 address, select `AAAA`, use your zone apex (`@`) for the record **Name**, and insert the IPv6 address in the respective field.
* To point to a [fully qualified domain name (FQDN) ↗](https://en.wikipedia.org/wiki/Fully%5Fqualified%5Fdomain%5Fname) (such as `your-site.host.example.com`), select `CNAME`, use your zone apex (`@`) for the record **Name**, and insert the fully qualified domain name in the **Target** field.
4. Specify the [**Proxy status**](https://developers.cloudflare.com/dns/proxy-status/) and [**TTL**](https://developers.cloudflare.com/dns/manage-dns-records/reference/ttl/) according to your needs.
5. Select **Save** to confirm.
Use the [Create DNS Record API endpoint](https://developers.cloudflare.com/api/resources/dns/subresources/records/methods/create/).
For field definitions, refer to the [API documentation](https://developers.cloudflare.com/api/resources/dns/subresources/records/methods/create/) (visible once you select the record type under the request body specification).
* To point to an IPv4 address, select **A Record**, use your zone apex (`@`) for the field `name`, and use the IPv4 address for the field `content`.
* To point to an IPv6 address, select **AAAA Record**, use your zone apex (`@`) for the field `name`, and use the IPv6 address for the field `content`.
* To point to a [fully qualified domain name (FQDN) ↗](https://en.wikipedia.org/wiki/Fully%5Fqualified%5Fdomain%5Fname) (such as `your-site.host.example.com`), select **CNAME Record**, use your zone apex (`@`) for the field `name`, and use the fully qualified domain name for the field `content`.
## Domain redirects
Once you create a domain, you may want to route that traffic to other places.
For more guidance, refer to [Redirect domain to subdomain](https://developers.cloudflare.com/fundamentals/manage-domains/manage-subdomains/#redirect-the-apex-domain-to-a-subdomain) or [Redirect one domain to another](https://developers.cloudflare.com/fundamentals/manage-domains/redirect-domain/).
## Get free SSL certificates
While DNS is what communicates where your website or application can be reached, SSL/TLS is what enables websites and applications to establish connections in a secure way.
If your domain is not correctly covered by an SSL/TLS certificate, your visitors will find a warning on their browser stating that your website or application is not secure.
Cloudflare offers free, unshared, publicly trusted [Universal SSL certificates](https://developers.cloudflare.com/ssl/edge-certificates/universal-ssl/) to all Cloudflare domains.
Was this helpful?
YesNo
## On this page
[Docs](https://developers.cloudflare.com/)
```json
{"@context":"https://schema.org","@type":"TechArticle","@id":"https://developers.cloudflare.com/dns/manage-dns-records/how-to/create-zone-apex/#page","headline":"Create zone apex record · Cloudflare DNS docs","description":"Create a DNS record for your zone apex.","url":"https://developers.cloudflare.com/dns/manage-dns-records/how-to/create-zone-apex/","inLanguage":"en","image":"https://developers.cloudflare.com/og-docs.png","dateModified":"2026-04-17","publisher":{"@type":"Organization","name":"Cloudflare","url":"https://www.cloudflare.com/"},"isPartOf":{"@type":"WebSite","@id":"https://developers.cloudflare.com/#website","name":"Cloudflare Docs","url":"https://developers.cloudflare.com/"}}
```
---
---
description: Configure MX, SPF, DKIM, and DMARC records for email.
title: Set up email records
image: https://developers.cloudflare.com/og-docs.png
---
[Skip to content](#main-content)
> Documentation Index
> Fetch the complete documentation index at: https://developers.cloudflare.com/dns/llms.txt
> Use this file to discover all available pages before exploring further.
# Set up email records
Last updated Apr 16, 2026|Copy as Markdown|[View as Markdown](https://developers.cloudflare.com/dns/manage-dns-records/how-to/email-records/index.md)|[Agent setup](https://developers.cloudflare.com/agent-setup/)
There are three reasons to set up email records for your domain:
* To make sure your domain can [receive email](#receive-email).
* To make sure your domain can [send and receive email](#send-and-receive-email).
* To prevent other email senders from [spoofing your domain](#prevent-domain-spoofing).
The exact values for your DNS mail records depend on your email provider. If you have issues, review the [Troubleshooting](https://developers.cloudflare.com/dns/troubleshooting/email-issues/) and contact your email service provider to confirm your DNS records are correct.
---
## Receive email
If you only need to **receive** emails, Cloudflare offers [Email Routing](https://developers.cloudflare.com/email-service/) for free email forwarding to custom email addresses.
## Send and receive email
To **send and receive** emails from your domain, you need an SMTP provider. Then, create two DNS records within Cloudflare, following the steps below:
1. Get the IP address and MX record details from your SMTP provider ([vendor-specific guidelines](https://developers.cloudflare.com/dns/manage-dns-records/reference/vendor-specific-records/)).
2. [Add an A or AAAA record](https://developers.cloudflare.com/dns/manage-dns-records/how-to/create-dns-records/) for your mail subdomain that points to the IP address of your mail server.
| **Type** | **Name** | **IPv4 address** | **Proxy status** |
| -------- | -------- | ---------------- | ---------------- |
| A | mail | 192.0.2.1 | DNS only |
API example
Required API token permissions
At least one of the following [token permissions](https://developers.cloudflare.com/fundamentals/api/reference/permissions/) is required:
* `DNS Write`
```bash
curl "https://api.cloudflare.com/client/v4/zones/$ZONE_ID/dns_records" \
--request POST \
--header "Authorization: Bearer $CLOUDFLARE_API_TOKEN" \
--json '{
"type": "A",
"name": "mail.example.com",
"content": "192.0.2.1",
"ttl": 3600,
"proxied": false
}'
```
```json
{
"result": {
"id": "",
"zone_id": "",
"zone_name": "example.com",
"name": "mail.example.com",
"type": "A",
"content": "192.0.2.1",
"proxiable": true,
"proxied": false,
"ttl": 3600,
"locked": false,
"meta": {
"source": "primary"
},
"comment": null,
"tags": [],
"created_on": "2023-01-17T20:37:05.368097Z",
"modified_on": "2023-01-17T20:37:05.368097Z"
},
"success": true,
"errors": [],
"messages": []
}
```
3. [Add an MX record](https://developers.cloudflare.com/dns/manage-dns-records/how-to/create-dns-records/) that points to that subdomain.
| **Type** | **Name** | **Mail server** | **TTL** | **Priority** |
| -------- | -------- | ---------------- | ------- | ------------ |
| MX | @ | mail.example.com | Auto | 5 |
API example
Required API token permissions
At least one of the following [token permissions](https://developers.cloudflare.com/fundamentals/api/reference/permissions/) is required:
* `DNS Write`
```bash
curl "https://api.cloudflare.com/client/v4/zones/$ZONE_ID/dns_records" \
--request POST \
--header "Authorization: Bearer $CLOUDFLARE_API_TOKEN" \
--json '{
"type": "MX",
"name": "example.com",
"content": "mail.example.com",
"priority": 5,
"ttl": 3600
}'
```
```json
{
"result": {
"id": "",
"zone_id": "",
"zone_name": "example.com",
"name": "example.com",
"type": "MX",
"content": "mail.example.com",
"priority": 5,
"proxiable": false,
"proxied": false,
"ttl": 3600,
"locked": false,
"meta": {
"source": "primary"
},
"comment": null,
"tags": [],
"created_on": "2023-01-17T20:54:23.660869Z",
"modified_on": "2023-01-17T20:54:23.660869Z"
},
"success": true,
"errors": [],
"messages": []
}
```
Note
If you encounter issues with your email setup, refer to our [troubleshooting guide](https://developers.cloudflare.com/dns/troubleshooting/email-issues/).
---
## Prevent domain spoofing
Without email authentication records, anyone can send email that appears to come from your domain — a technique known as domain spoofing. To prevent this, you add DNS TXT records (text-based entries in your domain's DNS settings) that allow receiving mail servers to verify whether an email actually came from you:
* [Sender Policy Framework (SPF) ↗](https://www.cloudflare.com/learning/dns/dns-records/dns-spf-record/): Lists the IP addresses and domains authorized to send email on behalf of your domain.
* [DomainKeys Identified Mail (DKIM) ↗](https://www.cloudflare.com/learning/dns/dns-records/dns-dkim-record/): Authenticates the sender's domain and verifies that email content was not altered in transit, using a cryptographic signature.
* [Domain-based Message Authentication Reporting and Conformance (DMARC) ↗](https://www.cloudflare.com/learning/dns/dns-records/dns-dmarc-record/): Tells receiving servers what to do when SPF or DKIM checks fail (for example, reject or quarantine the email), and sends you aggregate reports about your email traffic.
Note
For additional background on email security records, refer to the [introductory blog post ↗](https://blog.cloudflare.com/tackling-email-spoofing/).
### Configure email security records
Refer to [Security records](https://developers.cloudflare.com/dmarc-management/security-records/) to learn how to set up your email security records.
## Proxy SMTP traffic
By default, Cloudflare does not proxy email traffic on port 25 (SMTP). You can only proxy outgoing email if you have [Spectrum](https://developers.cloudflare.com/spectrum/) configured for [SMTP](https://developers.cloudflare.com/spectrum/reference/configuration-options/#smtp).
Was this helpful?
YesNo
## On this page
[Docs](https://developers.cloudflare.com/)
```json
{"@context":"https://schema.org","@type":"TechArticle","@id":"https://developers.cloudflare.com/dns/manage-dns-records/how-to/email-records/#page","headline":"Set up email records · Cloudflare DNS docs","description":"Configure MX, SPF, DKIM, and DMARC records for email.","url":"https://developers.cloudflare.com/dns/manage-dns-records/how-to/email-records/","inLanguage":"en","image":"https://developers.cloudflare.com/og-docs.png","dateModified":"2026-04-16","publisher":{"@type":"Organization","name":"Cloudflare","url":"https://www.cloudflare.com/"},"isPartOf":{"@type":"WebSite","@id":"https://developers.cloudflare.com/#website","name":"Cloudflare Docs","url":"https://developers.cloudflare.com/"}}
```
---
---
description: Import and export DNS records using zone files.
title: Import and export records
image: https://developers.cloudflare.com/og-docs.png
---
[Skip to content](#main-content)
> Documentation Index
> Fetch the complete documentation index at: https://developers.cloudflare.com/dns/llms.txt
> Use this file to discover all available pages before exploring further.
# Import and export records
Last updated Apr 16, 2026|Copy as Markdown|[View as Markdown](https://developers.cloudflare.com/dns/manage-dns-records/how-to/import-and-export/index.md)|[Agent setup](https://developers.cloudflare.com/agent-setup/)
Use import and export to have more control over your DNS records and make processes like migrating a domain or bulk editing [record comments](https://developers.cloudflare.com/dns/manage-dns-records/reference/record-attributes/) easier.
## Import records
### Limits
* The zone file size limit is 256 KiB (262144 bytes).
* The API rate limit is three requests per minute per user.
### Format your zone file
Create a [BIND zone file ↗](https://en.wikipedia.org/wiki/Zone%5Ffile) for your domain. If you need help, use a [third-party tool ↗](https://pgl.yoyo.org/as/bind-zone-file-creator.php).
If you are using certain record types — for example, `CNAME`, `DNAME`, `MX`, `NS`, `PTR`, or `SRV` records — make sure that the **content** of those records contains fully qualified domain names ending in a trailing period (as in `example.com.`). For more details, refer to [RFC 1035 ↗](https://www.rfc-editor.org/rfc/rfc1035#section-5.1) or this [post on Stack Exchange ↗](https://superuser.com/questions/348282/fqdn-format-in-bind-zone#348284).
### Import zone file to Cloudflare
To import a zone file using the dashboard:
1. In the Cloudflare dashboard, go to the **DNS Records** page.
[Go to **Records** ↗](https://dash.cloudflare.com/?to=/:account/:zone/dns/records)
2. Select **Import and Export**.
3. For **Import DNS records**, select your [formatted file](#format-your-zone-file).
4. If you do not want [applicable records](https://developers.cloudflare.com/dns/proxy-status/) proxied, unselect **Proxy imported DNS records**.
To import records using the API, send a [POST request](https://developers.cloudflare.com/api/resources/dns/subresources/records/methods/import/) with a properly [formatted file](#format-your-zone-file).
Required API token permissions
At least one of the following [token permissions](https://developers.cloudflare.com/fundamentals/api/reference/permissions/) is required:
* `DNS Write`
```bash
curl "https://api.cloudflare.com/client/v4/zones/$ZONE_ID/dns_records/import" \
--request POST \
--header "Authorization: Bearer $CLOUDFLARE_API_TOKEN" \
--form "file=@your_formatted_file.txt"
```
---
## Export records
You can also bulk export records from Cloudflare.
To export records using the dashboard:
1. In the Cloudflare dashboard, go to the **DNS Records** page.
[Go to **Records** ↗](https://dash.cloudflare.com/?to=/:account/:zone/dns/records)
2. Select **Import and Export**.
3. Select **Export**.
To export records using the API, send a [GET request](https://developers.cloudflare.com/api/resources/dns/subresources/records/methods/export/).
Required API token permissions
At least one of the following [token permissions](https://developers.cloudflare.com/fundamentals/api/reference/permissions/) is required:
* `DNS Read`
* `DNS Write`
```bash
curl "https://api.cloudflare.com/client/v4/zones/$ZONE_ID/dns_records/export" \
--request GET \
--header "Authorization: Bearer $CLOUDFLARE_API_TOKEN"
```
---
## DNS record attributes
When exporting or importing a zone file, Cloudflare formats [comments and tags](https://developers.cloudflare.com/dns/manage-dns-records/reference/record-attributes/) using the following structure, appending the attributes as inline comment using the `;` character after each record in accordance with [RFC 1035 section 5 ↗](https://datatracker.ietf.org/doc/html/rfc1035#section-5-1):
| Combination | Description |
| --------------------- | ------------------------------------------------------------------------------------------------------------------------------------------------------------------------------------------------------------------------------------------------------------------------------------------------------------------------------------------------------------------------------------------------------------------------------------------------------------------------------------------- |
| **Only tags** | Tag names contain a [small set](https://developers.cloudflare.com/dns/manage-dns-records/reference/record-attributes/#tags) of characters.Additionally, tag values must be contained by a double quote (") if they contain ", \=, ,, or \\. When enclosed within double quotes ("), tag values are represented as JSON strings, so other quotes within the value can be escaped as \\".A tag with an empty value can be represented either as my-tag-name:"", my-tag-name:, or my-tag-name. |
| **Only a comment** | Comments have [fewer limitations](https://developers.cloudflare.com/dns/manage-dns-records/reference/record-attributes/#comments) on characters, meaning that the comment is included verbatim.If the comment includes the string cf\_tags=, you need to include an additional cf\_tags= at the end of the line. |
| **Comment and tags** | The zone file comment would be of the form ; cf\_tags=, as described above. Note the added space character before cf\_tags=. |
| **Neither attribute** | The comment in the zone file may be empty or omitted entirely. Comments in the zone file that do not immediately follow a record are also ignored. |
```txt
; Only tags
a.example.com. 60 IN A 1.1.1.1 ; cf_tags=awesome
b.example.com. 60 IN A 1.1.1.1 ; cf_tags=tag1,tag2:value2,tag3:"value,with,commas",tag4:"value with \"escaped\" quotation marks"
; Only a comment
c.example.com. 60 IN A 1.1.1.1 ; just a comment without tags
d.example.com. 60 IN A 1.1.1.1 ; this comment contains cf_tags= as text cf_tags=
; Comments and tags
e.example.com. 60 IN A 1.1.1.1 ; simple example cf_tags=important,ticket:THIS-12345
f.example.com. 60 IN A 1.1.1.1 ; this is the comment cf_tags=tag1:value1,tag2:value2,tag-without-value,another-tag-without-value,tag-with-quoted-value:"because of the comma, quotes are needed"
; Neither attribute
g.example.com. 60 IN A 1.1.1.1
```
### Reserved cf- tags
When exporting and importing, special tags starting by `cf-` allow you to control specific Cloudflare configurations. On export, these tags are automatically added to reflect the current configuration for each record on your zone.
```txt
;; CNAME Records
a.cloudflaredocs.com. 1 IN CNAME example.com. ; cf_tags=test:1,cf-flatten-cname
b.cloudflaredocs.com. 1 IN CNAME example.com. ; cf_tags=cf-proxied:false
c.cloudflaredocs.com. 1 IN CNAME example.com. ; cf_tags=tag-without-value,cf-proxied:true
```
#### cf-proxied
On export, [proxied DNS records](https://developers.cloudflare.com/dns/proxy-status/) will present a tag `cf-proxied:true` while DNS-only records will have this tag set to `cf-proxied:false`.
When importing zone files, the value in the `cf-proxied` tag will take precedence in determining whether a record should be proxied. This means that:
* If the tag is present, its value will be considered for the respective record regardless of the **Proxy imported DNS records** option being selected (via dashboard), or the `proxied` parameter being generally set to `true` or `false` (via API).
* If the tag is absent, the proxied status will fall back to the general import option, meaning **Proxy imported DNS records** selected or not (via dashboard) or the `proxied` parameter set to `true` or `false` (via API).
#### cf-flatten-cname
If you are on a paid zone and want to use [Per-record CNAME flattening](https://developers.cloudflare.com/dns/cname-flattening/set-up-cname-flattening/#per-record), use the tag `cf-flatten-cname` next to each flattened CNAME record in your zone file. On export, this tag is automatically added to reflect the record configuration that you have on your zone.
## DNS zone file directives
A DNS zone file can be constructed using directives in addition to resource records (RRs). Directives start with `$` and are standardized - `$ORIGIN` and `$INCLUDE` are defined in [RFC 1035 ↗](https://www.rfc-editor.org/rfc/rfc1035#section-5.1), and `$TTL` is defined in [RFC 2308 ↗](https://www.rfc-editor.org/rfc/rfc2308). Additionally, BIND provides the [non-standard ↗](https://bind9.readthedocs.io/en/latest/chapter3.html#bind-primary-file-extension-the-generate-directive) `$GENERATE` directive.
Cloudflare supports `$ORIGIN`, `$TTL`, and `$GENERATE` directives.
`$INCLUDE` is not supported. When a zone file contains a `$INCLUDE` directive, Cloudflare responds with a parsing error `$INCLUDE directive not allowed`.
Was this helpful?
YesNo
## On this page
[Docs](https://developers.cloudflare.com/)
```json
{"@context":"https://schema.org","@type":"TechArticle","@id":"https://developers.cloudflare.com/dns/manage-dns-records/how-to/import-and-export/#page","headline":"Import and export records · Cloudflare DNS docs","description":"Import and export DNS records using zone files.","url":"https://developers.cloudflare.com/dns/manage-dns-records/how-to/import-and-export/","inLanguage":"en","image":"https://developers.cloudflare.com/og-docs.png","dateModified":"2026-04-16","publisher":{"@type":"Organization","name":"Cloudflare","url":"https://www.cloudflare.com/"},"isPartOf":{"@type":"WebSite","@id":"https://developers.cloudflare.com/#website","name":"Cloudflare Docs","url":"https://developers.cloudflare.com/"}}
```
---
---
description: Update DNS records automatically for dynamic IP addresses.
title: Dynamically update DNS records
image: https://developers.cloudflare.com/og-docs.png
---
[Skip to content](#main-content)
> Documentation Index
> Fetch the complete documentation index at: https://developers.cloudflare.com/dns/llms.txt
> Use this file to discover all available pages before exploring further.
# Dynamically update DNS records
Last updated Apr 16, 2026|Copy as Markdown|[View as Markdown](https://developers.cloudflare.com/dns/manage-dns-records/how-to/managing-dynamic-ip-addresses/index.md)|[Agent setup](https://developers.cloudflare.com/agent-setup/)
Most Internet service providers and some hosting providers dynamically update their customer's IP addresses. If this situation applies to you, you need an automated solution to dynamically update your DNS records in Cloudflare.
## Cloudflare API
Create a script to monitor IP address changes and then have that script push changes to the [Cloudflare API](https://developers.cloudflare.com/api/resources/dns/subresources/records/methods/update/).
## ddclient
[ddclient ↗](https://github.com/ddclient/ddclient) is a third-party Perl client used to update dynamic DNS entries for accounts on various DNS providers.
Was this helpful?
YesNo
## On this page
[Docs](https://developers.cloudflare.com/)
```json
{"@context":"https://schema.org","@type":"TechArticle","@id":"https://developers.cloudflare.com/dns/manage-dns-records/how-to/managing-dynamic-ip-addresses/#page","headline":"Dynamically update DNS records · Cloudflare DNS docs","description":"Update DNS records automatically for dynamic IP addresses.","url":"https://developers.cloudflare.com/dns/manage-dns-records/how-to/managing-dynamic-ip-addresses/","inLanguage":"en","image":"https://developers.cloudflare.com/og-docs.png","dateModified":"2026-04-16","publisher":{"@type":"Organization","name":"Cloudflare","url":"https://www.cloudflare.com/"},"isPartOf":{"@type":"WebSite","@id":"https://developers.cloudflare.com/#website","name":"Cloudflare Docs","url":"https://developers.cloudflare.com/"}}
```
---
---
description: Distribute traffic across multiple origins with round-robin DNS.
title: Round-robin DNS
image: https://developers.cloudflare.com/og-docs.png
---
[Skip to content](#main-content)
> Documentation Index
> Fetch the complete documentation index at: https://developers.cloudflare.com/dns/llms.txt
> Use this file to discover all available pages before exploring further.
# Round-robin DNS
Last updated Apr 16, 2026|Copy as Markdown|[View as Markdown](https://developers.cloudflare.com/dns/manage-dns-records/how-to/round-robin-dns/index.md)|[Agent setup](https://developers.cloudflare.com/agent-setup/)
To randomly distribute traffic across multiple servers, set up multiple DNS `A` or `AAAA` records for the same hostname.
Use this setup for simple, [round-robin load balancing ↗](https://www.cloudflare.com/learning/dns/glossary/round-robin-dns/). If you need more fine-grained control over traffic distribution — including automatic failover, intelligent routing, and more — set up our [add-on load balancing service](https://developers.cloudflare.com/load-balancing/).
## Example scenario
The following example illustrates how you would distribute traffic intended for `www.example.com`. Though the example uses `A` records, you could also use `AAAA` records.
After [creating an account](https://developers.cloudflare.com/fundamentals/account/create-account/) and [updating your nameservers](https://developers.cloudflare.com/dns/zone-setups/full-setup/setup/) for `example.com`, you might [create multiple subdomain DNS records](https://developers.cloudflare.com/dns/manage-dns-records/how-to/create-dns-records/) for `www`:
| Type | Name | IPv4 address |
| ---- | ---- | ------------ |
| A | www | 192.0.2.1 |
| A | www | 192.0.2.2 |
| A | www | 192.0.2.3 |
The exact behavior of your DNS routing would depend on the [proxy status](https://developers.cloudflare.com/dns/proxy-status/) of each record.
### All records unproxied
If all associated records were unproxied, any request to Cloudflare's nameservers would return the three `A` records you previously added.
Each client (oftentimes a browser), would decide which IP address to send the request to. If one IP address fails, the client would choose another option. All requests would be sent directly to the origin server (either `192.0.2.1`, `192.0.2.2`, or `192.0.2.3`, using the example above).
### All records proxied (recommended)
If all associated records were proxied, any request to Cloudflare's nameservers would return two `A` records from Cloudflare's list of IP addresses.
Each client (oftentimes a browser) would decide which Cloudflare IP address to send the request to. Cloudflare would then receive that request and — if Cloudflare needed to contact your origin server — we would pick one of the three IP addresses specified in your DNS records (either `192.0.2.1`, `192.0.2.2`, or `192.0.2.3`, using the example above).
Beyond reducing requests to your origin server, this setup allows your application to take advantage of Cloudflare's [Zero downtime failover](https://developers.cloudflare.com/fundamentals/security/protect-your-origin-server/#zero-downtime-failover). When a request to one IP address fails, Cloudflare automatically retries the request to other IP addresses associated with the same hostname. This behavior prevents end users from experiencing downtime.
### Unproxied and proxied records
If you have a mix of proxied and unproxied records associated with the same hostname, requests happen as if you had [all proxied records](#all-records-proxied-recommended).
This approach is not typically recommended because it can lead to unexpected behavior. For example, if you had two unproxied records and one proxied record, Cloudflare would treat all records as proxied. However, if you deleted the single proxied record, your remaining two unproxied records would immediately be treated as unproxied.
We recommend either using all proxied or all unproxied records to avoid surprises when you make changes to your DNS records.
Was this helpful?
YesNo
## On this page
[Docs](https://developers.cloudflare.com/)
```json
{"@context":"https://schema.org","@type":"TechArticle","@id":"https://developers.cloudflare.com/dns/manage-dns-records/how-to/round-robin-dns/#page","headline":"Round-robin DNS · Cloudflare DNS docs","description":"Distribute traffic across multiple origins with round-robin DNS.","url":"https://developers.cloudflare.com/dns/manage-dns-records/how-to/round-robin-dns/","inLanguage":"en","image":"https://developers.cloudflare.com/og-docs.png","dateModified":"2026-04-16","publisher":{"@type":"Organization","name":"Cloudflare","url":"https://www.cloudflare.com/"},"isPartOf":{"@type":"WebSite","@id":"https://developers.cloudflare.com/#website","name":"Cloudflare Docs","url":"https://developers.cloudflare.com/"}}
```
---
---
description: Delegate subdomains to external DNS providers.
title: Delegate subdomains
image: https://developers.cloudflare.com/og-docs.png
---
[Skip to content](#main-content)
> Documentation Index
> Fetch the complete documentation index at: https://developers.cloudflare.com/dns/llms.txt
> Use this file to discover all available pages before exploring further.
# Delegate subdomains
Last updated Apr 16, 2026|Copy as Markdown|[View as Markdown](https://developers.cloudflare.com/dns/manage-dns-records/how-to/subdomains-outside-cloudflare/index.md)|[Agent setup](https://developers.cloudflare.com/agent-setup/)
Subdomain delegation allows different individuals, teams, or organizations to manage different subdomains of a site.
Note
DNS delegation is not possible for Cloudflare domains using a [CNAME setup (partial)](https://developers.cloudflare.com/dns/zone-setups/partial-setup).
For instance, consider `example.com` as a Cloudflare domain with `www.example.com` managed in Cloudflare's **DNS** app and `blog.example.com` delegated to nameservers outside of Cloudflare. In this example, `blog.example.com` can now be managed by individuals who do not have access to Cloudflare credentials for the `example.com` domain.
Caution
Cloudflare's CDN and security services are not applied to delegated subdomains.
## Availability
| | Free | Pro | Business | Enterprise |
| ------------ | ---- | --- | -------- | ---------- |
| Availability | Yes | Yes | Yes | Yes |
---
## Delegate a subdomain (outgoing)
To delegate a subdomain such as `blog.example.com`, tell DNS resolvers where to find the zone file:
1. Log in to the [Cloudflare dashboard ↗](https://dash.cloudflare.com) and select your account.
2. Select the domain that contains the subdomain to be delegated.
3. Go to the **DNS Records** page.
[Go to **Records** ↗](https://dash.cloudflare.com/?to=/:account/:zone/dns/records)
4. Create `NS` records for the subdomain. For example:
* `blog.example.com NS ns1.externalhost.com`
* `blog.example.com NS ns2.externalhost.com`
* `blog.example.com NS ns3.externalhost.com`
Note
The `A` records for the subdomain are only required as glue records for nameservers that are located in the subdomain of the current zone that is being delegated.
5. (Optional) If the delegated nameserver has DNSSEC enabled, [add the DS record](https://developers.cloudflare.com/dns/dnssec/#1-activate-dnssec-in-cloudflare) in Cloudflare.
### Limits
When creating NS records, there are limits on the number of nameservers that can be associated with a single delegation name.
According to DNS standards defined in [RFC 1912 ↗](https://www.rfc-editor.org/rfc/rfc1912.html), a delegation should not include more than seven nameserver names for the same delegation name.
To align with these standards and maintain platform stability:
* Cloudflare supports up to 10 NS records per delegation name, but the best practice is to keep the set at seven or fewer.
* Creating more than 10 NS records for the same name is not supported. Requests that exceed this limit may be rejected or fail validation.
Example
DNS management for **example.com**:
| Type | Name | Content |
| ---- | ---- | --------------------- |
| NS | blog | ns1.externalhost.com |
| NS | blog | ns2.externalhost.com |
| NS | blog | ns3.externalhost.com |
| NS | blog | ns4.externalhost.com |
| NS | blog | ns5.externalhost.com |
| NS | blog | ns6.externalhost.com |
| NS | blog | ns7.externalhost.com |
| NS | blog | ns8.externalhost.com |
| NS | blog | ns9.externalhost.com |
| NS | blog | ns10.externalhost.com |
In this example, Cloudflare would prevent you from adding another NS record for the delegation name `blog`.
## Delegate a subdomain (incoming)
To delegate a subdomain from an external DNS provider to Cloudflare, refer to [subdomain setups](https://developers.cloudflare.com/dns/zone-setups/subdomain-setup/setup/).
Was this helpful?
YesNo
## On this page
[Docs](https://developers.cloudflare.com/)
```json
{"@context":"https://schema.org","@type":"TechArticle","@id":"https://developers.cloudflare.com/dns/manage-dns-records/how-to/subdomains-outside-cloudflare/#page","headline":"Delegate subdomains · Cloudflare DNS docs","description":"Delegate subdomains to external DNS providers.","url":"https://developers.cloudflare.com/dns/manage-dns-records/how-to/subdomains-outside-cloudflare/","inLanguage":"en","image":"https://developers.cloudflare.com/og-docs.png","dateModified":"2026-04-16","publisher":{"@type":"Organization","name":"Cloudflare","url":"https://www.cloudflare.com/"},"isPartOf":{"@type":"WebSite","@id":"https://developers.cloudflare.com/#website","name":"Cloudflare Docs","url":"https://developers.cloudflare.com/"}}
```
---
---
description: DNS record types supported by Cloudflare.
title: DNS record types
image: https://developers.cloudflare.com/og-docs.png
---
[Skip to content](#main-content)
> Documentation Index
> Fetch the complete documentation index at: https://developers.cloudflare.com/dns/llms.txt
> Use this file to discover all available pages before exploring further.
# DNS record types
Last updated Jun 2, 2026|Copy as Markdown|[View as Markdown](https://developers.cloudflare.com/dns/manage-dns-records/reference/dns-record-types/index.md)|[Agent setup](https://developers.cloudflare.com/agent-setup/)
This page provides information about some of the different types of DNS records that you can manage on Cloudflare. For guidance on how to add, edit, or delete DNS records, refer to [Manage DNS records](https://developers.cloudflare.com/dns/manage-dns-records/how-to/create-dns-records/).
Note
Each DNS record has a maximum wire format size of 4,096 bytes. Wire format refers to how a record is encoded when transmitted over the DNS protocol ([RFC 1035 ↗](https://www.rfc-editor.org/rfc/rfc1035.html#section-3.2.1)).
If you have multiple records with the same name and type, their combined content length must not exceed 8,192 characters.
---
## IP address resolution
At least one **IP address resolution** record is required for each domain on Cloudflare. These records are the only ones you can [proxy](https://developers.cloudflare.com/dns/proxy-status/) through Cloudflare.
### A and AAAA
[A and AAAA records ↗](https://www.cloudflare.com/learning/dns/dns-records/dns-a-record/) map a domain name to one or multiple IPv4 or IPv6 address(es).
These records include the following fields:
* **Name**: A subdomain or the zone apex (`@`).
* The name must be composed of labels of 63 characters or less (`label1.label2.label3`), where the fully qualified domain name (`label1.label2.label3.example.com`) does not exceed 253 characters.
* DNS labels can contain any octet (byte value). However, for compatibility with hostnames and TLS certificates, it is recommended to use only letters, digits, and hyphens (LDH rule). This is not a DNS protocol requirement, meaning DNS will work even if you do not follow these conventions.
* There is no requirement to start with a letter or end with a letter or digit.
* Underscores are valid in DNS and commonly used for service records.
* **IPv4/IPv6 address**: Your origin server address (cannot be a [Cloudflare IP ↗](https://www.cloudflare.com/ips))
Note
Cloudflare uses the [canonical notation ↗](https://www.rfc-editor.org/rfc/rfc5952.html#section-4.2) to store DNS records. This means that an AAAA record with content `fe80::0:0:1` is stored and returned as `fe80::1`, for example.
Alternative notations of IPv4 addresses (`1.1` for `1.0.0.1`, for example) are not supported for A records.
* **TTL**: Time to live, which controls how long DNS resolvers should cache a response before revalidating it.
* If the **Proxy Status** is **Proxied**, this value defaults to **Auto**, which is 300 seconds.
* If the **Proxy Status** is **DNS Only**, you can customize the value.
* **Proxy status**: For more details, refer to [Proxied DNS records](https://developers.cloudflare.com/dns/proxy-status/).
* **Private network routing**: Some Enterprise customers also have access to [private network routing](https://developers.cloudflare.com/dns/private-origins/private-network-routing/). For `A` and `AAAA` records, this feature allows you to proxy HTTP/HTTPS traffic from public hostnames to origins in your private network.
#### Example API call
When creating A or AAAA records [using the API](https://developers.cloudflare.com/dns/manage-dns-records/how-to/create-dns-records/#create-dns-records):
* The `content` of the records is an IP address (IPv4 for A or IPv6 for AAAA).
* The `proxied` field affects the record's [proxy status](https://developers.cloudflare.com/dns/proxy-status/).
For field definitions, refer to the [API documentation](https://developers.cloudflare.com/api/resources/dns/subresources/records/methods/create/) (visible once you select the record type under the request body specification).
Required API token permissions
At least one of the following [token permissions](https://developers.cloudflare.com/fundamentals/api/reference/permissions/) is required:
* `DNS Write`
```bash
curl "https://api.cloudflare.com/client/v4/zones/$ZONE_ID/dns_records" \
--request POST \
--header "Authorization: Bearer $CLOUDFLARE_API_TOKEN" \
--json '{
"type": "A",
"name": "www.example.com",
"content": "192.0.2.1",
"ttl": 3600,
"proxied": false
}'
```
```json
{
"result": {
"id": "",
"zone_id": "",
"zone_name": "example.com",
"name": "www.example.com",
"type": "A",
"content": "192.0.2.1",
"proxiable": true,
"proxied": false,
"ttl": 1,
"locked": false,
"meta": {
"source": "primary"
},
"comment": null,
"tags": [],
"created_on": "2023-01-17T20:37:05.368097Z",
"modified_on": "2023-01-17T20:37:05.368097Z"
},
"success": true,
"errors": [],
"messages": []
}
```
### CNAME
[CNAME records ↗](https://www.cloudflare.com/learning/dns/dns-records/dns-cname-record/) map a domain name to another (canonical) domain name. They can be used to resolve other record types present on the target domain name.
These records include the following fields:
* **Name**: A subdomain or the zone apex (`@`).
* The name must be composed of labels of 63 characters or less (`label1.label2.label3`), where the fully qualified domain name (`label1.label2.label3.example.com`) does not exceed 253 characters.
* DNS labels can contain any octet (byte value). However, for compatibility with hostnames and TLS certificates, it is recommended to use only letters, digits, and hyphens (LDH rule). This is not a DNS protocol requirement, meaning DNS will work even if you do not follow these conventions.
* There is no requirement to start with a letter or end with a letter or digit.
* Underscores are valid in DNS and commonly used for service records.
\- **Target**: The hostname where traffic should be directed (`example.com`). - **TTL**: Time to live, which controls how long DNS resolvers should cache a response before revalidating it.
* If the **Proxy Status** is **Proxied**, this value defaults to **Auto**, which is 300 seconds. - If the **Proxy Status** is **DNS Only**, you can customize the value. - **Proxy status**: For more details, refer to [Proxied DNS records](https://developers.cloudflare.com/dns/proxy-status/).
#### Proxied CNAME records
Observe the following aspects, especially before changing a CNAME record from [proxied](https://developers.cloudflare.com/dns/proxy-status/) to DNS-only or vice versa:
* If a hostname is meant to proxy traffic, you can use CNAME records to point to other CNAME records (`www.example2.com` \--> `www.example1.com` \--> `www.example.com`), but the final record must point to a hostname with a valid IP address (and therefore a valid A or AAAA record). Also, queries for other record types on the same name are not supported.
Example
DNS management for **example.com**:
| Type | Name | Content | Proxy status |
| ----- | ---- | -------------------- | ------------ |
| CNAME | abc | target.external.test | Proxied |
DNS management for **external.test**:
| Type | Name | Content |
| ---- | ------ | ------------------ |
| A | target | 192.0.2.1 |
| TXT | target | "some TXT content" |
In this example, a query for TXT in `abc.example.com` will **not** return the TXT content in the target zone.
* Cloudflare uses a process called CNAME flattening to deliver better performance. This process supports a few features and can interact with [different setups that depend on CNAME records](https://developers.cloudflare.com/dns/cname-flattening/#aspects-to-keep-in-mind). Refer to the [CNAME flattening section](https://developers.cloudflare.com/dns/cname-flattening/) to learn more about this.
* If you encounter a CNAME record that you cannot proxy — usually associated with another CDN provider — a proxied version of that record will cause connectivity errors. Cloudflare is purposely preventing that record from being proxied to protect you from a misconfiguration. Refer to [proxying limitations](https://developers.cloudflare.com/dns/proxy-status/limitations/#proxy-eligibility) for details.
Note
Specific CNAME record values with traffic proxied through Cloudflare will enable O2O routing for the Shopify SaaS provider. Refer to the [Shopify provider guide](https://developers.cloudflare.com/cloudflare-for-platforms/cloudflare-for-saas/saas-customers/provider-guides/shopify/) for more information.
#### Example API call
When creating CNAME records [using the API](https://developers.cloudflare.com/dns/manage-dns-records/how-to/create-dns-records/#create-dns-records):
* The `content` of the records is a [fully qualified domain name ↗](https://en.wikipedia.org/wiki/Fully%5Fqualified%5Fdomain%5Fname).
* The `proxied` field affects the record's [proxy status](https://developers.cloudflare.com/dns/proxy-status/).
For field definitions, refer to the [API documentation](https://developers.cloudflare.com/api/resources/dns/subresources/records/methods/create/) (visible once you select the record type under the request body specification).
Required API token permissions
At least one of the following [token permissions](https://developers.cloudflare.com/fundamentals/api/reference/permissions/) is required:
* `DNS Write`
```bash
curl "https://api.cloudflare.com/client/v4/zones/$ZONE_ID/dns_records" \
--request POST \
--header "Authorization: Bearer $CLOUDFLARE_API_TOKEN" \
--json '{
"type": "CNAME",
"name": "www.example.com",
"content": "www.another-example.com",
"ttl": 3600,
"proxied": false
}'
```
```json
{
"result": {
"id": "",
"zone_id": "",
"zone_name": "example.com",
"name": "www.example.com",
"type": "CNAME",
"content": "www.another-example.com",
"proxiable": true,
"proxied": false,
"ttl": 1,
"locked": false,
"meta": {
"source": "primary"
},
"comment": null,
"tags": [],
"created_on": "2023-01-17T20:37:05.368097Z",
"modified_on": "2023-01-17T20:37:05.368097Z"
},
"success": true,
"errors": [],
"messages": []
}
```
---
## Email authentication
These records are recommended regardless of whether your domain sends email messages. Creating [secure email records ↗](https://blog.cloudflare.com/tackling-email-spoofing/) can help protect your domain against email spoofing.
If your domain is not used to send email messages, learn more about creating recommended [restrictive records ↗](https://www.cloudflare.com/learning/dns/dns-records/protect-domains-without-email/).
### MX
A mail exchange (MX) record is required to deliver email to a mail server.
* [MX record syntax ↗](https://www.cloudflare.com/learning/dns/dns-records/dns-mx-record/)
* [Create an MX record](https://developers.cloudflare.com/dns/manage-dns-records/how-to/email-records/#send-and-receive-email)
For field definitions, refer to the [API documentation](https://developers.cloudflare.com/api/resources/dns/subresources/records/methods/create/) (visible once you select the record type under the request body specification).
### DKIM
A DomainKeys Identified Mail (DKIM) record ensures email authenticity by cryptographically signing emails:
* [DKIM record syntax ↗](https://www.cloudflare.com/learning/dns/dns-records/dns-dkim-record/)
* [Create a DKIM record](https://developers.cloudflare.com/dmarc-management/security-records/#create-security-records)
### SPF
A Sender Policy Framework (SPF) record lists authorized IP addresses and domains that can send email on behalf of your domain.
* [SPF record syntax ↗](https://www.cloudflare.com/learning/dns/dns-records/dns-spf-record/)
* [Create an SPF record](https://developers.cloudflare.com/dmarc-management/security-records/#create-security-records)
### DMARC
A Domain-based Message Authentication Reporting and Conformance (DMARC) record helps generate aggregate reports about your email traffic and provide clear instructions for how email receivers should treat non-conforming emails.
* [DMARC record syntax ↗](https://www.cloudflare.com/learning/dns/dns-records/dns-dmarc-record/)
* [Create a DMARC record](https://developers.cloudflare.com/dmarc-management/security-records/#create-security-records)
---
## Specialized records
### TXT
A [text (TXT) record ↗](https://www.cloudflare.com/learning/dns/dns-records/dns-txt-record/) lets you enter text into the DNS system.
As the content of TXT records consist of one or more text strings delimited by double quotes (`"`), you might find a validation error if you add inconsistent quotation marks (for example, `"this` or `"these" ones"`). For new records, if you save your TXT content without any quotes, Cloudflare will automatically add double quotes. For details, refer to [What is a DNS TXT record ↗](https://www.cloudflare.com/learning/dns/dns-records/dns-txt-record/).
At Cloudflare, TXT records are most commonly used to demonstrate domain ownership prior to issuing SSL/TLS certificates for [your domain](https://developers.cloudflare.com/ssl/edge-certificates/changing-dcv-method/) or a [Cloudflare for SaaS domain](https://developers.cloudflare.com/cloudflare-for-platforms/cloudflare-for-saas/security/certificate-management/issue-and-validate/).
You could also use TXT to create email authentication records, but we recommend that you use our [Email security Wizard](https://developers.cloudflare.com/dns/manage-dns-records/how-to/email-records/#prevent-domain-spoofing) instead.
For field definitions, refer to the [API documentation](https://developers.cloudflare.com/api/resources/dns/subresources/records/methods/create/) (visible once you select the record type under the request body specification).
### CAA
A [Certificate Authority Authorization (CAA) record](https://developers.cloudflare.com/ssl/edge-certificates/caa-records/) specifies which Certificate Authorities (CAs) are allowed to issue certificates for a domain.
For field definitions, refer to the [API documentation](https://developers.cloudflare.com/api/resources/dns/subresources/records/methods/create/) (visible once you select the record type under the request body specification).
### SRV
A [service record (SRV) ↗](https://www.cloudflare.com/learning/dns/dns-records/dns-srv-record/) specifies a host and port for specific services like voice over IP (VOIP), instant messaging, and more.
#### Example API call
For field definitions, refer to the [API documentation](https://developers.cloudflare.com/api/resources/dns/subresources/records/methods/create/) (visible once you select the record type under the request body specification).
Required API token permissions
At least one of the following [token permissions](https://developers.cloudflare.com/fundamentals/api/reference/permissions/) is required:
* `DNS Write`
```bash
curl "https://api.cloudflare.com/client/v4/zones/$ZONE_ID/dns_records" \
--request POST \
--header "Authorization: Bearer $CLOUDFLARE_API_TOKEN" \
--json '{
"type": "SRV",
"name": "_xmpp._tcp.example.com",
"data": {
"priority": 10,
"weight": 5,
"port": 5223,
"target": "server.example.com"
}
}'
```
```json
{
"result": {
"id": "",
"zone_id": "",
"zone_name": "example.com",
"name": "_xmpp._tcp.example.com",
"type": "SRV",
"content": "5 5223 server.example.com",
"priority": 10,
"proxiable": false,
"proxied": false,
"ttl": 1,
"locked": false,
"data": {
"port": 5223,
"priority": 10,
"target": "server.example.com",
"weight": 5
},
"meta": {
"auto_added": false,
"managed_by_apps": false,
"managed_by_argo_tunnel": false,
"source": "primary"
},
"comment": null,
"tags": [],
"created_on": "2022-11-08T15:57:39.585977Z",
"modified_on": "2022-11-08T15:57:39.585977Z"
},
"success": true,
"errors": [],
"messages": []
}
```
### SVCB and HTTPS
Service Binding (SVCB) and HTTPS Service (HTTPS) records allow you to provide a client with information about how it should connect to a server upfront, without the need of an initial plaintext HTTP connection.
If your domain has [HTTP/2 or HTTP/3 enabled](https://developers.cloudflare.com/speed/optimization/protocol/), [proxied DNS records](https://developers.cloudflare.com/dns/proxy-status/), and is also using [Universal SSL](https://developers.cloudflare.com/ssl/edge-certificates/universal-ssl/), Cloudflare automatically generates HTTPS records on the fly, to advertise to clients how they should connect to your server.
#### Proxied vs DNS-only names
For [proxied (orange cloud)](https://developers.cloudflare.com/dns/proxy-status/) names, Cloudflare synthesizes HTTPS records automatically when Universal SSL is enabled. Manually-added HTTPS records on proxied names are not served — Cloudflare uses the auto-generated records instead.
If you have disabled Universal SSL (for example, because you use [Advanced Certificates](https://developers.cloudflare.com/ssl/edge-certificates/advanced-certificate-manager/) exclusively), Cloudflare will not generate HTTPS records for proxied names.
For [DNS-only (grey cloud)](https://developers.cloudflare.com/dns/proxy-status/) names, you can manually add HTTPS records and Cloudflare will serve them. However, **all records with the same name must be DNS-only** for the manual HTTPS record to be served.
Example: Manual HTTPS records and proxy status
For Cloudflare to serve a manually-added HTTPS record, every record with the same name must be DNS-only (grey cloud).
**Will work** — All records with the same name are DNS-only:
| Type | Name | Content | Proxy status |
| ----- | ----------- | ------------- | ------------ |
| A | example.com | 192.0.2.1 | DNS only |
| HTTPS | example.com | 1 . alpn="h3" | \- |
The HTTPS record will be served because the A record is DNS-only.
**Will not work** — Mixed proxy status for the same name:
| Type | Name | Content | Proxy status |
| ----- | ----------- | ------------- | ------------ |
| AAAA | example.com | 2001:db8::1 | Proxied |
| HTTPS | example.com | 1 . alpn="h3" | \- |
The HTTPS record will **not** be served because the AAAA record with the same name is proxied.
For more details and context, refer to the [announcement blog post ↗](https://blog.cloudflare.com/speeding-up-https-and-http-3-negotiation-with-dns/) and [RFC 9460 ↗](https://www.rfc-editor.org/rfc/rfc9460.html).
For field definitions, refer to the [API documentation](https://developers.cloudflare.com/api/resources/dns/subresources/records/methods/create/) (visible once you select the record type under the request body specification).
### PTR
A [pointer (PTR) record ↗](https://www.cloudflare.com/learning/dns/dns-records/dns-ptr-record/) specifies the allowed hosts for a given IP address.
Within Cloudflare, PTR records are used for reverse DNS lookups and should preferably be added to [reverse zones](https://developers.cloudflare.com/dns/additional-options/reverse-zones/).
For field definitions, refer to the [API documentation](https://developers.cloudflare.com/api/resources/dns/subresources/records/methods/create/) (visible once you select the record type under the request body specification).
### SOA
A start of authority (SOA) record stores information about your domain such as admin email address, when the domain was last updated, and more. Refer to [What is a DNS SOA record ↗](https://www.cloudflare.com/learning/dns/dns-records/dns-soa-record/) for an example.
If you are using Cloudflare for your [authoritative DNS](https://developers.cloudflare.com/dns/zone-setups/full-setup/), you do not need to create an SOA record. Cloudflare creates this record automatically when you start using Cloudflare's authoritative nameservers.
With Enterprise accounts, you also have the option to change the SOA record values that Cloudflare will use:
* As a DNS zone default: Define the SOA record values that Cloudflare will use for all new zones added to your account. Refer to [Configure DNS zone defaults](https://developers.cloudflare.com/dns/additional-options/dns-zone-defaults/) for step-by-step guidance.
* For existing zones: Override the defaults or Cloudflare-generated values under **DNS record options** on the [**DNS Records** ↗](https://dash.cloudflare.com/?to=/:account/:zone/dns/records) page.
Refer to the following list for information about each SOA record field:
SOA record fields
* **`MNAME`**: The primary nameserver for the zone. Secondary nameservers receive zone updates from the nameserver specified in this field.
* **`RNAME`**: The email address of the administrator responsible for the zone.
The `@` symbol is replaced by the first dot. If an email address contains a dot before `@`, this should be represented as `\.`.
| Email | RNAME |
| -------------------- | ---------------------- |
| john@example.com | john.example.com |
| john.doe@example.com | john\\.doe.example.com |
* **`Serial`**: The serial number for the zone. Secondary nameservers initiate zone transfers if this number increases.
* **`Refresh`**: Time (in seconds) after which a secondary nameserver should query the primary for the `SOA` record, to detect zone changes. Only relevant if DNS NOTIFY ([RFC 1996 ↗](https://www.rfc-editor.org/rfc/rfc1996.html)) is not configured.
| Default | Minimum | Maximum |
| ------- | ------- | ------- |
| 10000 | 600 | 86400 |
* **`Retry`**: Time (in seconds) after which a secondary nameserver should retry getting the serial number from the primary nameserver after a failed attempt. Any specified values must not be greater than `Refresh`.
| Default | Minimum | Maximum |
| ------- | ------- | ------- |
| 2400 | 600 | 3600 |
* **`Expire`**: Time (in seconds) after which a secondary nameserver should stop answering queries for a zone if the primary does not respond. Any specified values must not be smaller than `Refresh`.
| Default | Minimum | Maximum |
| ------- | ------- | ------- |
| 604800 | 86400 | 2419200 |
* **`Record TTL`**: The [time to live](https://developers.cloudflare.com/dns/manage-dns-records/reference/ttl/) of the SOA record.
| Default | Minimum | Maximum |
| ------- | ------- | ------- |
| 3600 | 1800 | 3600 |
* **`Minimum TTL`**: The TTL for caching negative responses. Refer to [RFC 2308 ↗](https://www.rfc-editor.org/rfc/rfc2308.html#section-4) for details.
| Default | Minimum | Maximum |
| ------- | ------- | ------- |
| 1800 | 60 | 86400 |
Note
When you query the SOA record itself, the TTL in the response is the smaller of the `Record TTL` and the `Minimum TTL` values. For example, if `Record TTL` is `3600` and `Minimum TTL` is `1800`, the SOA record is returned with a TTL of `1800`.
### NS
A [nameserver (NS) record ↗](https://www.cloudflare.com/learning/dns/dns-records/dns-ns-record/) indicates which server should be used for authoritative DNS.
You only need to add NS records to your DNS records table in Cloudflare when you are using [subdomain setup](https://developers.cloudflare.com/dns/zone-setups/subdomain-setup/) or [delegating subdomains outside of Cloudflare](https://developers.cloudflare.com/dns/manage-dns-records/how-to/subdomains-outside-cloudflare/).
For field definitions, refer to the [API documentation](https://developers.cloudflare.com/api/resources/dns/subresources/records/methods/create/) (visible once you select the record type under the request body specification).
Note
Your assigned Cloudflare nameservers, custom nameservers, and their corresponding [nameserver TTLs](https://developers.cloudflare.com/dns/nameservers/nameserver-options/#nameserver-ttl) are controlled via dedicated sections on the [**DNS Records** ↗](https://dash.cloudflare.com/?to=/:account/:zone/dns/records) page. For details, refer to [Nameservers](https://developers.cloudflare.com/dns/nameservers/).
#### Limits
When creating NS records, there are limits on the number of nameservers that can be associated with a single delegation name.
According to DNS standards defined in [RFC 1912 ↗](https://www.rfc-editor.org/rfc/rfc1912.html), a delegation should not include more than seven nameserver names for the same delegation name.
To align with these standards and maintain platform stability:
* Cloudflare supports up to 10 NS records per delegation name, but the best practice is to keep the set at seven or fewer.
* Creating more than 10 NS records for the same name is not supported. Requests that exceed this limit may be rejected or fail validation.
Example
DNS management for **example.com**:
| Type | Name | Content |
| ---- | ---- | --------------------- |
| NS | blog | ns1.externalhost.com |
| NS | blog | ns2.externalhost.com |
| NS | blog | ns3.externalhost.com |
| NS | blog | ns4.externalhost.com |
| NS | blog | ns5.externalhost.com |
| NS | blog | ns6.externalhost.com |
| NS | blog | ns7.externalhost.com |
| NS | blog | ns8.externalhost.com |
| NS | blog | ns9.externalhost.com |
| NS | blog | ns10.externalhost.com |
In this example, Cloudflare would prevent you from adding another NS record for the delegation name `blog`.
### DS and DNSKEY
[DS and DNSKEY ↗](https://www.cloudflare.com/learning/dns/dns-records/dnskey-ds-records/) records help implement DNSSEC, which cryptographically signs DNS records to prevent domain spoofing.
Most Cloudflare domains do not need to add these records and should instead follow our [DNSSEC setup guide](https://developers.cloudflare.com/dns/dnssec/).
For field definitions, refer to the [API documentation](https://developers.cloudflare.com/api/resources/dns/subresources/records/methods/create/) (visible once you select the record type under the request body specification).
### Other
Cloudflare also supports other record types that are less common, such as URI, NAPTR, and certificate-related record types (SSHFP, TLSA, SMIMEA, and CERT). Refer to our [blog post ↗](https://blog.cloudflare.com/additional-record-types-available-with-cloudflare-dns/) for more information.
Was this helpful?
YesNo
## On this page
[Docs](https://developers.cloudflare.com/)
```json
{"@context":"https://schema.org","@type":"TechArticle","@id":"https://developers.cloudflare.com/dns/manage-dns-records/reference/dns-record-types/#page","headline":"DNS record types · Cloudflare DNS docs","description":"DNS record types supported by Cloudflare.","url":"https://developers.cloudflare.com/dns/manage-dns-records/reference/dns-record-types/","inLanguage":"en","image":"https://developers.cloudflare.com/og-docs.png","dateModified":"2026-06-02","publisher":{"@type":"Organization","name":"Cloudflare","url":"https://www.cloudflare.com/"},"isPartOf":{"@type":"WebSite","@id":"https://developers.cloudflare.com/#website","name":"Cloudflare Docs","url":"https://developers.cloudflare.com/"}}
```
---
---
description: Attributes and metadata for DNS records.
title: Record attributes
image: https://developers.cloudflare.com/og-docs.png
---
[Skip to content](#main-content)
> Documentation Index
> Fetch the complete documentation index at: https://developers.cloudflare.com/dns/llms.txt
> Use this file to discover all available pages before exploring further.
# Record attributes
Last updated Apr 16, 2026|Copy as Markdown|[View as Markdown](https://developers.cloudflare.com/dns/manage-dns-records/reference/record-attributes/index.md)|[Agent setup](https://developers.cloudflare.com/agent-setup/)
Use DNS record comments and tags to categorize and clarify the purpose of DNS records within Cloudflare.
Comments provide a unique descriptions for specific records, whereas tags group similar records into categories.
These attributes are particularly useful when:
* Multiple teams are managing DNS records within the same zone.
* Your zone contains a large number of DNS records.
* You want to filter your DNS records based on matching attributes (for example, when they are managed by the same team or used for the same application).
Note
The information in record attributes will not impact DNS record resolution or propagation timing and is only meant for your private reference. This information is only visible to [members](https://developers.cloudflare.com/fundamentals/manage-members/manage/) of your Cloudflare account and is not visible publicly.
---
## Availability
Comments and tags are only supported for [primary zones (full setup)](https://developers.cloudflare.com/dns/zone-setups/full-setup/) and [partial zones (CNAME setup)](https://developers.cloudflare.com/dns/zone-setups/partial-setup/).
### Record comments
| | Free | Pro | Business | Enterprise |
| ------------------- | ---- | --- | -------- | ---------- |
| Availability | Yes | Yes | Yes | Yes |
| Character limit | 100 | 500 | 500 | 500 |
| Comments per record | 1 | 1 | 1 | 1 |
### Record tags
| | Free | Pro | Business | Enterprise |
| -------------------------------------------------- | ---- | --- | -------- | ---------- |
| Availability | No | Yes | Yes | Yes |
| Name character limit (everything before the colon) | N/A | 32 | 32 | 32 |
| Value character limit (everything after the colon) | N/A | 100 | 100 | 100 |
| Tags per record | N/A | 20 | 20 | 20 |
---
## Add or edit record attributes
Create or edit record attributes just like any other aspect of DNS records, whether through the [dashboard](https://developers.cloudflare.com/dns/manage-dns-records/how-to/create-dns-records/) or [API](https://developers.cloudflare.com/api/resources/dns/subresources/records/methods/create/).
You can also add or edit attributes by [exporting and re-importing](https://developers.cloudflare.com/dns/manage-dns-records/how-to/import-and-export/#dns-record-attributes) your records, or using the [Batch record changes API](https://developers.cloudflare.com/dns/manage-dns-records/how-to/batch-record-changes/#use-the-api).
When exporting and importing, special tags starting by `cf-` allow you to control specific Cloudflare configurations. On export, these tags are automatically added to reflect the current configuration for each record on your zone. Refer to [reserved cf- tags](https://developers.cloudflare.com/dns/manage-dns-records/how-to/import-and-export/#reserved-cf--tags) for details.
---
## Reference
### Comments
Comments are treated as [graphic Unicode characters ↗](https://en.wikipedia.org/wiki/Graphic%5Fcharacter), meaning that they are case-sensitive and do not have any character limitations. However, comments do not support newline (`\n`) or carriage return (`\r`) characters.
### Tags
Tags are treated as an array of `name:value` pairs, meaning that tag names are not case-sensitive and can only contain letters, numbers, `-`, and `_`. For tag values, the same character restrictions apply as for comments.
Was this helpful?
YesNo
## On this page
[Docs](https://developers.cloudflare.com/)
```json
{"@context":"https://schema.org","@type":"TechArticle","@id":"https://developers.cloudflare.com/dns/manage-dns-records/reference/record-attributes/#page","headline":"DNS record comments and tags · Cloudflare DNS docs","description":"Attributes and metadata for DNS records.","url":"https://developers.cloudflare.com/dns/manage-dns-records/reference/record-attributes/","inLanguage":"en","image":"https://developers.cloudflare.com/og-docs.png","dateModified":"2026-04-16","publisher":{"@type":"Organization","name":"Cloudflare","url":"https://www.cloudflare.com/"},"isPartOf":{"@type":"WebSite","@id":"https://developers.cloudflare.com/#website","name":"Cloudflare Docs","url":"https://developers.cloudflare.com/"}}
```
---
---
description: DNS records at or below a subdomain delegation point, where authority belongs to the delegated nameservers rather than your zone.
title: Shadowed records
image: https://developers.cloudflare.com/og-docs.png
---
[Skip to content](#main-content)
> Documentation Index
> Fetch the complete documentation index at: https://developers.cloudflare.com/dns/llms.txt
> Use this file to discover all available pages before exploring further.
# Shadowed records
Last updated Jul 6, 2026|Copy as Markdown|[View as Markdown](https://developers.cloudflare.com/dns/manage-dns-records/reference/shadowed-records/index.md)|[Agent setup](https://developers.cloudflare.com/agent-setup/)
When you add an `NS` record to your zone, you create a **subdomain delegation**: you delegate authority for that subdomain (and everything below it) to another set of nameservers. Any record you keep at or below that delegation point is **shadowed**. It stays stored in your zone, but the delegation places authority for that name with the delegated nameservers, so the record is not part of the authoritative data your zone is meant to serve.
Shadow metadata tells you which records are shadowed, which `NS` records do the shadowing, and how many records each delegation shadows. It is exposed as fields on API responses and as warnings in the Cloudflare dashboard, and is not returned unless you explicitly request it.
Note
The delegated nameservers are not necessarily from a different provider. A delegation can point at Cloudflare's nameservers, as in the case of a [subdomain setup](https://developers.cloudflare.com/dns/zone-setups/subdomain-setup/).
## Why shadowed records matter
Because a delegation moves authority for a subdomain elsewhere, any record you place at or below it is not authoritative, even though it still appears in your zone. Consider this example:
```txt
sub.example.com NS ns1.example.org.
www.sub.example.com A 192.0.2.1
```
The `NS` delegation at `sub.example.com` delegates authority for everything at or below it, including `www.sub.example.com`, to the external nameservers. Those nameservers, not your zone, are responsible for answering that name, so the `A` record you added here is not the authoritative record for `www.sub.example.com`.
The problem works in both directions. Adding an `NS` delegation can shadow records you already depend on, and adding records under an existing delegation produces records your zone is no longer authoritative for. In both cases no error is returned, which is what makes shadow metadata useful for spotting the issue.
Shadowed records arise in exactly two ways:
* You added a delegation over records that already existed at or below that name, for example when you point a subdomain at an external provider but leave the original records in place.
* You added records at or below a name that was already delegated, for example expecting them to resolve from the parent zone.
## Glue records
A glue record is an `A` or `AAAA` record that some delegations need in order to work. Glue is required only when a delegation's nameserver hostname falls within the delegated zone itself. Most delegations point at nameservers in a different zone (for example, `ns1.example.org` for a delegation of `sub.example.com`) and need no glue, because the resolver can look those nameservers up independently. Without glue in the in-zone case, a resolver asking "where is `ns1.sub.example.com`?" would follow the delegation for `sub.example.com` — which it cannot reach until it already knows `ns1.sub.example.com`. This is a circular dependency.
Consider this example:
```txt
sub.example.com NS ns1.sub.example.com.
ns1.sub.example.com A 192.0.2.1
```
The `A` record for `ns1.sub.example.com` is glue. It is shadowed (the `sub.example.com` delegation takes effect first), but it is still served. The parent zone includes it in the additional section of the referral response, alongside the `NS` delegation, so resolvers can bootstrap the subdomain lookup without getting stuck in a circular dependency.
Glue is only meaningful for `A` and `AAAA` records. A `CNAME` record at the same name as an `NS` target is not treated as glue.
## Unreachable glue records
A glue record becomes unreachable when a shallower delegation takes authority for the name the glue is meant to support. The shallower delegation (one closer to the zone apex, with fewer labels in its name) takes authority for everything below it, so your zone cannot serve the glue even in the additional section of a referral. The API reports these records with `dead_glue: true`.
Consider this example:
```txt
sub.example.com NS ns1.sub.example.com.
a.sub.example.com NS ns1.a.sub.example.com.
ns1.a.sub.example.com A 192.0.2.1
```
The `A` record for `ns1.a.sub.example.com` looks like glue for the `a.sub` delegation. However, the shallower `sub.example.com` delegation takes authority for everything under `sub.example.com`, including `a.sub.example.com`. Your zone's authority stops at that shallower delegation, so the glue for `ns1.a.sub.example.com` is outside it and is never served.
Unreachable glue does not cause resolution failures. It is either a leftover you can safely remove, or a signal that the shallower delegation was created in error.
Caution
Before removing a record flagged as unreachable glue, verify that the external nameserver for the shallower delegation (`sub.example.com` in the example above) already holds the correct records for the deeper subdomain.
## Shadow metadata fields
Shadow metadata fields are returned in each record's `meta` object when applicable. They are computed on demand at read time and are never stored.
### `shadowed_by`
Type: array of strings (record IDs)
Present on any record that is hidden by one or more `NS` delegations. The array contains the IDs of the `NS` records whose delegations shadow this record. Multiple IDs appear when several `NS` records share the same delegation name, or when delegations exist at more than one parent level above the record.
`shadowed_by` is always present on glue records, because glue records are shadowed by definition.
Apex records (records whose name equals the zone name) are never shadowed and never carry this field.
An `NS` record at the same name as a delegation is not considered shadowed by that delegation — it is the delegation. It can carry `shadowed_by` only when a delegation exists at a shallower parent level.
### `is_glue`
Type: boolean
Present and set to `true` on `A` or `AAAA` records whose name matches the target of one of the `NS` records that shadows them. These records are required glue for the delegation. Even though they are shadowed, they are still served: the parent zone includes them in the additional section of referral responses so resolvers can reach the delegated nameservers.
This field is omitted when the record is not glue.
### `dead_glue`
Type: boolean
Present and set to `true` on glue records that are never actually served, because a shallower delegation intercepts authority before the zone can answer for that name. A record with `dead_glue: true` also carries `is_glue: true`.
This field is omitted when the record is live glue or is not glue at all.
### `shadowed_records_count`
Type: integer
Present on non-apex `NS` records that form a delegation. Reports how many records in the zone are shadowed by that delegation (records at or below the delegation name, excluding the delegation's own `NS` records and hidden records).
The count is capped at 10,000\. A value of 10,000 means "at least 10,000". The field is omitted when the count is zero.
The following table shows which shadow metadata fields apply to each record type:
| Record type | shadowed\_by | is\_glue | dead\_glue | shadowed\_records\_count |
| ------------------------------------- | -------------------------- | ------------------------------ | ------------------------------------------------------------ | ------------------------ |
| A | Yes, if below a delegation | Yes, if name matches NS target | Yes, if glue and a shallower delegation intercepts authority | No |
| AAAA | Yes, if below a delegation | Yes, if name matches NS target | Yes, if glue and a shallower delegation intercepts authority | No |
| NS (apex) | No | No | No | No |
| NS (non-apex, at delegation name) | No | No | No | Yes |
| NS (non-apex, below a delegation) | Yes | No | No | No |
| CNAME, MX, TXT, SRV, CAA, HTTPS, SVCB | Yes, if below a delegation | No | No | No |
## Request shadow metadata
Add `include_shadow_metadata=true` to any DNS records API request:
```sh
curl "https://api.cloudflare.com/client/v4/zones/$ZONE_ID/dns_records?include_shadow_metadata=true" \
--header "Authorization: Bearer $CLOUDFLARE_API_TOKEN"
```
Shadow metadata is available on all record API responses: individual record reads, create and update responses, list requests, and batch requests. For list and batch requests, shadow metadata is computed only when the page or batch contains 1,000 records or fewer. Requests above that limit return records without shadow metadata.
### Find records shadowed by a delegation
To list only the records shadowed by a specific delegation, pass `shadowed_by_name` together with `include_shadow_metadata=true`:
```sh
curl "https://api.cloudflare.com/client/v4/zones/$ZONE_ID/dns_records?include_shadow_metadata=true&shadowed_by_name=sub.example.com" \
--header "Authorization: Bearer $CLOUDFLARE_API_TOKEN"
```
The value must be a subdomain of the zone (not the zone apex). The filter returns all records at or below that name. The `NS` records at exactly the delegation name are excluded (they form the delegation, not the shadowed set). `NS` records at names below the delegation — for example, a further delegation at `a.sub.example.com` when filtering by `sub.example.com` — are themselves shadowed and are included.
Note
`shadowed_by_name` requires `include_shadow_metadata=true`. Supplying `shadowed_by_name` without it returns an error.
### Find delegations shadowing a record
To find the `NS` delegations that shadow a specific record, pass `shadowing_name`:
```sh
curl "https://api.cloudflare.com/client/v4/zones/$ZONE_ID/dns_records?shadowing_name=www.sub.example.com" \
--header "Authorization: Bearer $CLOUDFLARE_API_TOKEN"
```
The filter returns `NS` records at the provided name and at each of its ancestor names within the zone, excluding the zone apex. In this example, the API searches for `NS` records at `www.sub.example.com` and `sub.example.com`. The value must be a subdomain of the zone (not the zone apex).
Unlike `shadowed_by_name`, this filter does not require `include_shadow_metadata=true`.
## Example response
The following is an excerpt showing shadow metadata fields on three records in a zone containing:
```txt
sub.example.com NS ns1.sub.example.com.
ns1.sub.example.com A 192.0.2.1
www.sub.example.com A 192.0.2.2
```
```json
[
{
"type": "NS",
"name": "sub.example.com",
"content": "ns1.sub.example.com.",
"meta": {
"shadowed_records_count": 2
}
},
{
"type": "A",
"name": "ns1.sub.example.com",
"content": "192.0.2.1",
"meta": {
"shadowed_by": [""],
"is_glue": true
}
},
{
"type": "A",
"name": "www.sub.example.com",
"content": "192.0.2.2",
"meta": {
"shadowed_by": [""]
}
}
]
```
The `NS` record carries `shadowed_records_count: 2` (two records are shadowed by it). The glue `A` record carries both `shadowed_by` and `is_glue: true`. The non-glue `A` record carries only `shadowed_by`.
Was this helpful?
YesNo
## On this page
[Docs](https://developers.cloudflare.com/)
```json
{"@context":"https://schema.org","@type":"TechArticle","@id":"https://developers.cloudflare.com/dns/manage-dns-records/reference/shadowed-records/#page","headline":"Shadowed records · Cloudflare DNS docs","description":"DNS records at or below a subdomain delegation point, where authority belongs to the delegated nameservers rather than your zone.","url":"https://developers.cloudflare.com/dns/manage-dns-records/reference/shadowed-records/","inLanguage":"en","image":"https://developers.cloudflare.com/og-docs.png","dateModified":"2026-07-06","publisher":{"@type":"Organization","name":"Cloudflare","url":"https://www.cloudflare.com/"},"isPartOf":{"@type":"WebSite","@id":"https://developers.cloudflare.com/#website","name":"Cloudflare Docs","url":"https://developers.cloudflare.com/"}}
```
---
---
description: How DNS Time to Live values affect record caching.
title: Time to Live (TTL)
image: https://developers.cloudflare.com/og-docs.png
---
[Skip to content](#main-content)
> Documentation Index
> Fetch the complete documentation index at: https://developers.cloudflare.com/dns/llms.txt
> Use this file to discover all available pages before exploring further.
# Time to Live (TTL)
Last updated Apr 16, 2026|Copy as Markdown|[View as Markdown](https://developers.cloudflare.com/dns/manage-dns-records/reference/ttl/index.md)|[Agent setup](https://developers.cloudflare.com/agent-setup/)
**Time to Live (TTL)** is a field on [DNS records](https://developers.cloudflare.com/dns/manage-dns-records/how-to/create-dns-records/) that controls how long each record is cached and — as a result — how long it takes for record updates to reach your end users.
Longer TTLs speed up [DNS lookups ↗](https://www.cloudflare.com/learning/dns/what-is-dns/) by increasing the chance of cached results, but a longer TTL also means that updates to your records take longer to go into effect.
## Proxied records
By default, all [proxied records](https://developers.cloudflare.com/dns/proxy-status/) have a TTL of **Auto**, which is set to 300 seconds. This value cannot be edited.
Since only [records used for IP address resolution](https://developers.cloudflare.com/dns/manage-dns-records/reference/dns-record-types/#ip-address-resolution) can be proxied, this setting ensures that potential changes to the assigned [anycast IP address](https://developers.cloudflare.com/fundamentals/concepts/cloudflare-ip-addresses/) will take effect quickly, as recursive resolvers will not cache them for longer than 300 seconds (five minutes).
Note
It may take longer than 5 minutes for you to actually experience record changes, as your local DNS cache may take longer to update.
## Unproxied records
For **DNS only** records, you can choose a TTL between **30 seconds** (Enterprise) or **60 seconds** (non-Enterprise) and **1 day**.
A TTL of **Auto** is set to 300 seconds (five minutes).
## Nameserver TTL
[Nameserver TTL](https://developers.cloudflare.com/dns/nameservers/nameserver-options/#nameserver-ttl) is a separate feature and only affects Cloudflare nameservers and custom nameservers. For other [NS records](https://developers.cloudflare.com/dns/manage-dns-records/reference/dns-record-types/#ns) on your DNS records table, TTL is controlled by their respective TTL fields.
Was this helpful?
YesNo
## On this page
[Docs](https://developers.cloudflare.com/)
```json
{"@context":"https://schema.org","@type":"TechArticle","@id":"https://developers.cloudflare.com/dns/manage-dns-records/reference/ttl/#page","headline":"Time to Live (TTL) · Cloudflare DNS docs","description":"How DNS Time to Live values affect record caching.","url":"https://developers.cloudflare.com/dns/manage-dns-records/reference/ttl/","inLanguage":"en","image":"https://developers.cloudflare.com/og-docs.png","dateModified":"2026-04-16","publisher":{"@type":"Organization","name":"Cloudflare","url":"https://www.cloudflare.com/"},"isPartOf":{"@type":"WebSite","@id":"https://developers.cloudflare.com/#website","name":"Cloudflare Docs","url":"https://developers.cloudflare.com/"}}
```
---
---
description: DNS records for common third-party services.
title: Vendor-specific DNS records
image: https://developers.cloudflare.com/og-docs.png
---
[Skip to content](#main-content)
> Documentation Index
> Fetch the complete documentation index at: https://developers.cloudflare.com/dns/llms.txt
> Use this file to discover all available pages before exploring further.
# Vendor-specific DNS records
Last updated Apr 16, 2026|Copy as Markdown|[View as Markdown](https://developers.cloudflare.com/dns/manage-dns-records/reference/vendor-specific-records/index.md)|[Agent setup](https://developers.cloudflare.com/agent-setup/)
This article requires prior knowledge of DNS record management via the Cloudflare dashboard. To learn more, refer to Cloudflare's article on [managing DNS records](https://developers.cloudflare.com/dns/manage-dns-records/how-to/create-dns-records/).
## Google
### Google Workspace MX records
Google Workspace requires [specific MX records ↗](https://support.google.com/a/answer/174125) added to your DNS provider.
Once you [add these records to Cloudflare](https://developers.cloudflare.com/dns/manage-dns-records/how-to/create-dns-records/):
* [Test the configuration ↗](https://toolbox.googleapps.com/apps/checkmx/check)
* Do not add other `MX` records other than those provided by Google.
### Google Workspace service URLs
If you want to customize the service addresses URLs associated with Google Workspace, refer to [Google's documentation ↗](https://support.google.com/a/answer/53340).
Caution
Google enforces HTTPS on its services. If you find errors about redirect loops when browsing to your site through Cloudflare, use Cloudflare's [Full encryption mode](https://developers.cloudflare.com/ssl/origin-configuration/ssl-modes/full/).
### Google site verification
To add a site verification record in Cloudflare, follow [Google's documentation ↗](https://support.google.com/a/answer/7173990).
---
## Amazon
### Amazon Route53
AWS customers must [update their domain's nameservers ↗](https://docs.aws.amazon.com/Route53/latest/DeveloperGuide/domain-name-servers-glue-records.html) to point to their new Cloudflare nameservers.
### Amazon S3 bucket
Find the [URL ↗](https://docs.aws.amazon.com/AmazonS3/latest/userguide/access-bucket-intro.html) for your bucket.
Then, [create a CNAME record](https://developers.cloudflare.com/dns/manage-dns-records/how-to/create-dns-records/) in Cloudflare. For example, if the full host URL of the bucket is `files.example.com.s3.amazonaws.com`, you would add a `CNAME` record similar to the following:
```txt
files CNAME files.example.com.s3.amazonaws.com
```
Caution
AWS states in their [documentation ↗](https://docs.aws.amazon.com/AmazonS3/latest/userguide/VirtualHosting.html#VirtualHostingCustomURLs) that the CNAME and the bucket name must be the same. To avoid potential compromise if you set it up differently, use a [host header origin rule](https://developers.cloudflare.com/rules/origin-rules/features/#host-header) to explicitly route all requests to the correct bucket.
### Amazon Simple Email Service (SES)
For help setting up DKIM in SES, refer to the [Amazon documentation ↗](https://docs.aws.amazon.com/ses/latest/dg/creating-identities.html).
### Amazon ELB configuration
Refer to [Amazon's ELB help content ↗](http://docs.amazonwebservices.com/ElasticLoadBalancing/latest/DeveloperGuide/using-domain-names-with-elb.html) for guidance on ELB configuration at Amazon, but generally you should:
Add a [CNAME record](https://developers.cloudflare.com/dns/manage-dns-records/how-to/create-dns-records/) to Cloudflare for the hostname you receive from AWS, for example:
| Type | Name | Target | Proxy status |
| ----- | ---- | -------------------------------------------- | ------------ |
| CNAME | elb | ..\_elb.amazonaws.com | Proxied |
### Amazon Amplify
To use Cloudflare DNS with AWS Amplify, refer to the [Amplify help content ↗](https://docs.aws.amazon.com/amplify/latest/userguide/to-add-a-custom-domain-managed-by-a-third-party-dns-provider.html) and follow the instructions for **manual configuration**.
At Cloudflare, you will need at least two `CNAME` records:
* A DNS-only `CNAME` to validate your domain ownership, which should look like the following:
| Type | Name | Target | Proxy status |
| ----- | ---------------- | ---------------------------------------------- | ------------ |
| CNAME | | .mhbtsbpdnt.acm-validation.aws | DNS only |
CNAME flattening
If your Cloudflare zone is on a paid plan, also make sure that the **Flatten** option turned off for the validation `CNAME` record, and that you zone is **not** using [CNAME flattening for all CNAME records](https://developers.cloudflare.com/dns/cname-flattening/set-up-cname-flattening/#for-all-cname-records).
* One `CNAME` for the apex domain (`example.com`) and/or for each of the subdomains (`blog.example.com`) that you want to manage on Cloudflare. For details refer to [Manage DNS records](https://developers.cloudflare.com/dns/manage-dns-records/how-to/create-dns-records/). These records can be proxied.
| Type | Name | Target |
| ----- | ---- | ---------------------------------- |
| CNAME | @ | .cloudfront.net |
| Type | Name | Target |
| ----- | ---- | ---------------------------------- |
| CNAME | blog | .cloudfront.net |
---
## Microsoft
### Microsoft 365
For information about the records to Microsoft 365, refer to [Microsoft's documentation ↗](https://learn.microsoft.com/en-us/microsoft-365/admin/get-help-with-domains/information-for-dns-records).
### Microsoft Azure
Follow Microsoft's instructions on [configuring Azure DNS settings ↗](https://learn.microsoft.com/en-us/azure/app-service/app-service-web-tutorial-custom-domain).
Then, add Azure's required records to [Cloudflare DNS](https://developers.cloudflare.com/dns/manage-dns-records/how-to/create-dns-records/).
---
## Miscellaneous vendors
### ClickFunnels
You can configure Cloudflare to work with ClickFunnels. The process requires updating your Cloudflare DNS settings.
* [Adding a Cloudflare subdomain ↗](https://help.clickfunnels.com/hc/en-us/articles/360005906774-Adding-A-Cloudflare-Subdomain-)
* [Adding a Cloudflare domain ↗](https://help.clickfunnels.com/hc/en-us/articles/360005906094-Cloudflare-CNAME-Record)
### Discourse
To use Discourse with Cloudflare, refer to [Using Discourse with Cloudflare: Best Practices ↗](https://community.cloudflare.com/t/using-discourse-with-cloudflare-best-practices/602890).
### Forward Email
To use Cloudflare with Forward Email, refer to [Forward Email configuration with Cloudflare ↗](https://forwardemail.net/guides/cloudflare).
### Mailchimp
For help with Mailchimp, refer to [Use a custom domain with Mailchimp ↗](https://mailchimp.com/help/connect-domain/).
Note
When you [add records to Cloudflare DNS](https://developers.cloudflare.com/dns/manage-dns-records/how-to/create-dns-records/), those records should be [DNS-only (unproxied)](https://developers.cloudflare.com/dns/proxy-status/#dns-only-records) until Mailchimp verifies your domain. Then, you can switch your DNS records to **Proxied**.
### Ning custom domain
For help with Ning, refer to [Use a custom domain with Ning ↗](https://www.ning.com/help/use-your-own-domain-e-g-example-com-for-your-ning-network/).
Note
When you [add records to Cloudflare DNS](https://developers.cloudflare.com/dns/manage-dns-records/how-to/create-dns-records/), those records should be [DNS-only (unproxied)](https://developers.cloudflare.com/dns/proxy-status/#dns-only-records) until Ning verifies your domain. Then, you can switch your DNS records to **Proxied**.
### Rackspace CloudFiles
Configure Rackspace CloudFiles via _CNAME record_. Consult the [Rackspace documentation ↗](https://docs.rackspace.com/support/how-to/using-cnames-with-cloud-files-containers/).
Refer to Rackspace CloudFiles's documentation to [get a CNAME value ↗](https://docs.rackspace.com/support/how-to/using-cnames-with-cloud-files-containers/), then [add that record within Cloudflare](https://developers.cloudflare.com/dns/manage-dns-records/how-to/create-dns-records/).
Caution
The `CNAME` record needs to be [DNS-only (unproxied)](https://developers.cloudflare.com/dns/proxy-status/#dns-only-records) since rackcdn.com is not compatible with Cloudflare.
### SendGrid
Refer to SendGrid's documentation for how to [make SendGrid compatible with Cloudflare ↗](https://docs.sendgrid.com/ui/sending-email/content-delivery-networks#using-cloudflare).
Note
You may need to refer to Cloudflare's documentation for updated navigation instructions regarding [adding DNS records](https://developers.cloudflare.com/dns/manage-dns-records/how-to/create-dns-records/) and creating [Configuration rules](https://developers.cloudflare.com/rules/configuration-rules/create-dashboard/).
### SmugMug
For help with SmugMug, refer to [Use a custom domain with SmugMug ↗](https://www.smugmughelp.com/en/articles/363-use-a-custom-domain).
Note
When you [add records to Cloudflare DNS](https://developers.cloudflare.com/dns/manage-dns-records/how-to/create-dns-records/), those records should be [DNS-only (unproxied)](https://developers.cloudflare.com/dns/proxy-status/#dns-only-records) until SmugMug verifies your domain. Then, you can switch your DNS records to **Proxied**.
### Squarespace
First, make sure you [update your nameservers](https://developers.cloudflare.com/dns/zone-setups/full-setup/) and your domain is [active](https://developers.cloudflare.com/dns/zone-setups/reference/domain-status/).
Then, set up your Squarespace DNS records:
1. Get your Squarespace DNS information by following [these instructions ↗](https://support.squarespace.com/hc/articles/213469948).
2. In Cloudflare, [add those records](https://developers.cloudflare.com/dns/manage-dns-records/how-to/create-dns-records/):
* All `A` records should be [Proxied](https://developers.cloudflare.com/dns/proxy-status/)
* The `CNAME` record for `www` should also be **Proxied**.
* The `CNAME` record for `verify.squarespace.com` should be **DNS-only**.
3. If set up properly, your Squarespace DNS Settings page will now indicate that your 'Settings contain problems.' **This is the expected behavior**.
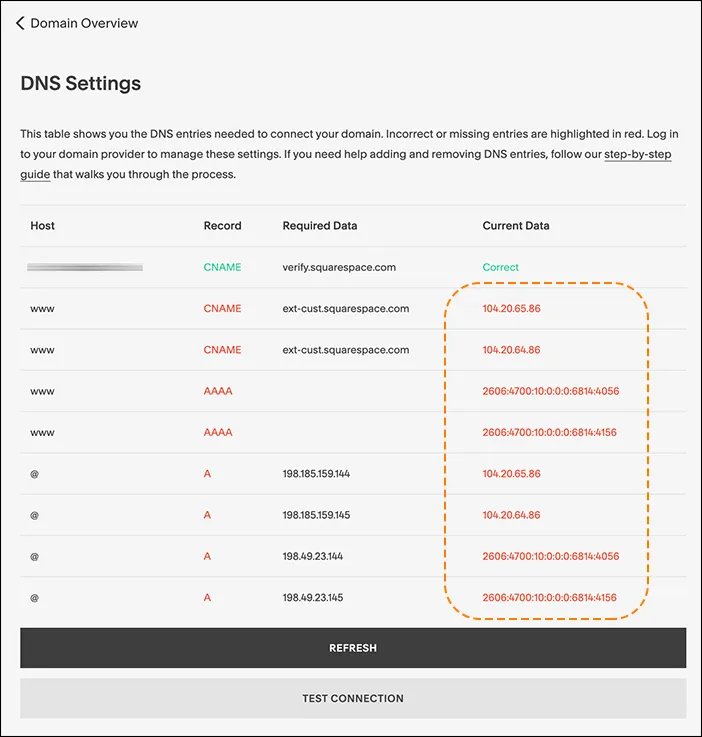
#### Pending domain owner verification
The `CNAME` record you added for `verify.squarespace.com` should be **DNS-only**.
If you proxy this record, Squarespace will not be able to verify your domain ownership and show you a `This website is pending domain owner verification` error. To fix the issue, [edit](https://developers.cloudflare.com/dns/manage-dns-records/how-to/create-dns-records/#edit-dns-records) the `CNAME` record and change the **Proxy status** to **DNS-only**.
### Tumblr custom domain
Refer to Tumblr's documentation to [get DNS record values ↗](https://help.tumblr.com/hc/en-us/articles/231256548-Custom-Domains). Then, [add records to Cloudflare DNS](https://developers.cloudflare.com/dns/manage-dns-records/how-to/create-dns-records/).
Note
When you [add records to Cloudflare DNS](https://developers.cloudflare.com/dns/manage-dns-records/how-to/create-dns-records/), those records should be [DNS-only (unproxied)](https://developers.cloudflare.com/dns/proxy-status/#dns-only-records) until Tumblr verifies your domain. Then, you can switch your DNS records to **Proxied**.
### Unbounce
Refer to Unbounce's documentation to [get a CNAME value ↗](https://documentation.unbounce.com/hc/en-us/articles/204011950), then [add that record within Cloudflare](https://developers.cloudflare.com/dns/manage-dns-records/how-to/create-dns-records/).
Caution
If Cloudflare is activated via one of our hosting partners, your `CNAME` record should be [DNS-only (unproxied)](https://developers.cloudflare.com/dns/proxy-status/#dns-only-records).
### Wix
You can use Cloudflare with [Wix websites ↗](https://www.wix.com/), though your setup needs to be different than with most website builders.
This is because Wix [does not support ↗](https://support.wix.com/en/article/request-cloudflare-support) using Cloudflare nameservers (which is the normal part of a [primary setup (full)](https://developers.cloudflare.com/dns/zone-setups/full-setup/) or with domains bought through [Cloudflare Registrar](https://developers.cloudflare.com/registrar/)).
#### Using domain pointing
If you want to manage your DNS through Cloudflare or you bought a domain through [Cloudflare Registrar](https://developers.cloudflare.com/registrar/), you can connect that domain to Wix through [domain pointing ↗](https://support.wix.com/en/article/connecting-a-domain-to-wix-using-the-pointing-method).
This method means your website is using Cloudflare for DNS only, so all your DNS records should be [DNS-only (unproxied)](https://developers.cloudflare.com/dns/proxy-status/#dns-only-records).
### WPEngine
For help configuring WPEngine sites, refer to:
* [Configuring DNS with WPEngine ↗](https://wpengine.com/support/wordpress-best-practice-configuring-dns-for-wp-engine/)
* [Cloudflare best practices ↗](https://wpengine.com/support/cloudflare-best-practices/)
### Zoho
To use Cloudflare with Zoho, refer to [Zoho configuration with Cloudflare ↗](https://www.zoho.com/mail/help/adminconsole/cloudflare.html).
Was this helpful?
YesNo
## On this page
[Docs](https://developers.cloudflare.com/)
```json
{"@context":"https://schema.org","@type":"TechArticle","@id":"https://developers.cloudflare.com/dns/manage-dns-records/reference/vendor-specific-records/#page","headline":"Vendor-specific DNS records · Cloudflare DNS docs","description":"DNS records for common third-party services.","url":"https://developers.cloudflare.com/dns/manage-dns-records/reference/vendor-specific-records/","inLanguage":"en","image":"https://developers.cloudflare.com/og-docs.png","dateModified":"2026-04-16","publisher":{"@type":"Organization","name":"Cloudflare","url":"https://www.cloudflare.com/"},"isPartOf":{"@type":"WebSite","@id":"https://developers.cloudflare.com/#website","name":"Cloudflare Docs","url":"https://developers.cloudflare.com/"}}
```
---
---
description: How wildcard DNS records work on Cloudflare.
title: Wildcard DNS records
image: https://developers.cloudflare.com/og-docs.png
---
[Skip to content](#main-content)
> Documentation Index
> Fetch the complete documentation index at: https://developers.cloudflare.com/dns/llms.txt
> Use this file to discover all available pages before exploring further.
# Wildcard DNS records
Last updated Apr 16, 2026|Copy as Markdown|[View as Markdown](https://developers.cloudflare.com/dns/manage-dns-records/reference/wildcard-dns-records/index.md)|[Agent setup](https://developers.cloudflare.com/agent-setup/)
Normal DNS records map a domain name to one or multiple IP addresses or other associated resources to a specific domain name (a one-to-many mapping). Wildcard DNS records allow you to have a many-to-many mapping, for example if you had hundreds or thousands of subdomains you wanted to point to the same resources.
Within Cloudflare, wildcard DNS records can be either [proxied or DNS-only](https://developers.cloudflare.com/dns/proxy-status/).
## Create a Wildcard record
To create a wildcard DNS record, [create a DNS record](https://developers.cloudflare.com/dns/manage-dns-records/how-to/create-dns-records/) with an `*` in the **Name** field.
| Type | Name | IPv4 address | Proxy status |
| ---- | ---- | ------------ | ------------ |
| A | \* | 192.0.2.1 | Proxied |
Caution
If your project is on [Cloudflare Pages](https://developers.cloudflare.com/pages/), note that wildcard custom domains are not supported. Refer to [known issues](https://developers.cloudflare.com/pages/platform/known-issues/#custom-domains) for details.
You can also create a wildcard DNS record specifically for a deeper subdomain. For example, if you wanted to create a wildcard record on `*.www.example.com`, you would create a record with `*.www` in the name field.
| Type | Name | IPv4 address | Proxy status |
| ----- | ------ | ------------ | ------------ |
| CNAME | \*.www | example.com | Proxied |
### Aspects to consider
#### Wildcards are only supported on the first label
This means that a hostname such as `subdomain.*.example.com` is not a wildcard on the level of the asterisk character. If you create a DNS record with that name, the asterisk is interpreted as the literal character `*` and not as the wildcard operator.
#### Wildcards are multi-level by default
If you create a DNS record on `*.*.example.com`, only the first asterisk is interpreted as a wildcard while the second one is interpreted as the literal `*` character. A record `*.example.com` is already multi-level by default, meaning it would cover `abc.example.com` as well as `123.abc.example.com`, as long as there are no [specific DNS records](#specific-dns-records-take-precedence-over-wildcard-records) that would take precedence.
#### Specific DNS records take precedence over wildcard records
A wildcard record applies only when no exact record exists at the queried name. If a record or delegation exists, the wildcard does not apply.
Example 1 - specific or below
If you have only these two records on your domain:
| Type | Name | Content |
| ---- | ---- | ------------ |
| A | \* | 192.0.2.1 |
| TXT | abc | |
The `A` wildcard record will be used for queries going to any subdomain of `example.com` except `abc.example.com` or anything below that specific label (`123.abc.example.com` or `deeper.label.abc.example.com`, and so on).
The wildcard will still be used for deeper labels that are not below the specific record on `abc.example.com` — for example, `deeper.label.xyz.example.com`.
Example 2 - implicit parent
If you have only these two records on your domain:
| Type | Name | Content |
| ---- | ------- | ------------ |
| A | \* | 192.0.2.1 |
| TXT | 123.abc | |
In this example, `123.abc.example.com` is a descendant of `abc.example.com`, and `abc.example.com` has no records associated with it. The behavior will depend on the type of nameservers you are using:
* Standard nameservers: The wildcard `*.example.com` will still apply to `abc.example.com`.
* [Advanced nameservers](https://developers.cloudflare.com/dns/foundation-dns/setup/)[1](#user-content-fn-1): In compliance with [RFC 4592 ↗](https://www.rfc-editor.org/rfc/rfc4592.html), the wildcard `*.example.com` will not apply to `abc.example.com`.
## Availability
Customers on all plans can create and proxy wildcard DNS records.
## Limitations
If you are using a [CNAME setup (partial)](https://developers.cloudflare.com/dns/zone-setups/partial-setup/) for your DNS, Cloudflare does not automatically provision SSL/TLS certificates for your wildcard record.
For wildcard hostname certificates, certificate issuance and renewal varies based on the type of certificate you are using:
* **Universal**: Perform DCV using [TXT validation method](https://developers.cloudflare.com/ssl/edge-certificates/changing-dcv-method/methods/txt/).
* **Advanced**: In most cases, you can opt for [Delegated DCV](https://developers.cloudflare.com/ssl/edge-certificates/changing-dcv-method/methods/delegated-dcv/), which greatly simplifies certificate management.
If you cannot use Delegated DCV, you need to use [TXT based DCV](https://developers.cloudflare.com/ssl/edge-certificates/changing-dcv-method/methods/txt/) for certificate issuance and renewal. This means you will need to place one TXT DCV token for every hostname on the certificate. If one or more of the hostnames on the certificate fails to validate, the certificate will not be issued or renewed.
This means that a wildcard certificate covering `example.com` and `*.example.com` will require two DCV tokens to be placed at the authoritative DNS provider. Similarly, a certificate with five hostnames in the SAN (including a wildcard) will require five DCV tokens to be placed at the authoritative DNS provider.
## Additional information
For more information on wildcard records — as well as more details about their limitations — refer to the [introductory blog post ↗](https://blog.cloudflare.com/wildcard-proxy-for-everyone/).
## Footnotes
1. An opt-in configuration available for Enterprise customers. [↩](#user-content-fnref-1)
Was this helpful?
YesNo
## On this page
[Docs](https://developers.cloudflare.com/)
```json
{"@context":"https://schema.org","@type":"TechArticle","@id":"https://developers.cloudflare.com/dns/manage-dns-records/reference/wildcard-dns-records/#page","headline":"Wildcard DNS records · Cloudflare DNS docs","description":"How wildcard DNS records work on Cloudflare.","url":"https://developers.cloudflare.com/dns/manage-dns-records/reference/wildcard-dns-records/","inLanguage":"en","image":"https://developers.cloudflare.com/og-docs.png","dateModified":"2026-04-16","publisher":{"@type":"Organization","name":"Cloudflare","url":"https://www.cloudflare.com/"},"isPartOf":{"@type":"WebSite","@id":"https://developers.cloudflare.com/#website","name":"Cloudflare Docs","url":"https://developers.cloudflare.com/"}}
```
---
---
description: Troubleshoot domain verification failures caused by proxied CNAME records, CNAME flattening, or NS record conflicts.
title: Verify a domain with CNAME
image: https://developers.cloudflare.com/og-docs.png
---
[Skip to content](#main-content)
> Documentation Index
> Fetch the complete documentation index at: https://developers.cloudflare.com/dns/llms.txt
> Use this file to discover all available pages before exploring further.
# Verify a domain with CNAME
Last updated Apr 16, 2026|Copy as Markdown|[View as Markdown](https://developers.cloudflare.com/dns/manage-dns-records/troubleshooting/cname-domain-verification/index.md)|[Agent setup](https://developers.cloudflare.com/agent-setup/)
When configuring services from external providers - such as email services, for example - it is possible that they require you to verify your domain by placing a CNAME record at your zone, similar to the following:
```txt
._domainkey.example.com CNAME .
```
Consider the sections below if this is not working correctly for you.
## Causes
You may find issues if you have one of the following:
* The CNAME record you created for domain verification is set to [**Proxied**](https://developers.cloudflare.com/dns/proxy-status/).
* The CNAME record is correctly set to DNS only (not proxied) but, in your [zone settings ↗](https://dash.cloudflare.com/?to=/:account/:zone/dns/settings), [**CNAME flattening for all CNAME records**](https://developers.cloudflare.com/dns/cname-flattening/set-up-cname-flattening/#for-all-cname-records) is on.
* The CNAME record is correctly set to DNS only (not proxied) but CNAME flattening is set [for that record specifically](https://developers.cloudflare.com/dns/cname-flattening/set-up-cname-flattening/#per-record).
* An [NS record ↗](https://www.cloudflare.com/learning/dns/dns-records/dns-ns-record/) exists, causing a different DNS provider to be authoritative for the subdomain.
## Solution
Make sure that:
* In your zone DNS settings: [**CNAME flattening for all CNAME records**](https://developers.cloudflare.com/dns/cname-flattening/) is turned off.
* On the DNS records table: you have filled in the CNAME record fields correctly, proxy status is set to **DNS only**, and **Flatten** is turned off.
* You have the correct NS configuration, and either:
* Make sure that the CNAME record is set as expected with the DNS provider that the NS record points to.
* Review your configuration for other DNS records that may be affected by the NS record. Once you are aware of any consequences or have made any necessary adjustments, remove the NS record so that the CNAME is resolved to the target you configured on Cloudflare.
Was this helpful?
YesNo
## On this page
[Docs](https://developers.cloudflare.com/)
```json
{"@context":"https://schema.org","@type":"TechArticle","@id":"https://developers.cloudflare.com/dns/manage-dns-records/troubleshooting/cname-domain-verification/#page","headline":"Cannot verify a domain with CNAME · Cloudflare DNS docs","description":"Troubleshoot domain verification failures caused by proxied CNAME records, CNAME flattening, or NS record conflicts.","url":"https://developers.cloudflare.com/dns/manage-dns-records/troubleshooting/cname-domain-verification/","inLanguage":"en","image":"https://developers.cloudflare.com/og-docs.png","dateModified":"2026-04-16","publisher":{"@type":"Organization","name":"Cloudflare","url":"https://www.cloudflare.com/"},"isPartOf":{"@type":"WebSite","@id":"https://developers.cloudflare.com/#website","name":"Cloudflare Docs","url":"https://developers.cloudflare.com/"}}
```
---
---
description: Resolve conflicts with existing NS records.
title: NS records already exist
image: https://developers.cloudflare.com/og-docs.png
---
[Skip to content](#main-content)
> Documentation Index
> Fetch the complete documentation index at: https://developers.cloudflare.com/dns/llms.txt
> Use this file to discover all available pages before exploring further.
# NS records already exist
Last updated Apr 16, 2026|Copy as Markdown|[View as Markdown](https://developers.cloudflare.com/dns/manage-dns-records/troubleshooting/existing-ns-record/index.md)|[Agent setup](https://developers.cloudflare.com/agent-setup/)
As you try to create a new DNS record, Cloudflare displays the following error:
```txt
NS records with that host already exist. (Code:81056)
```
## Causes
When a child domain (`blog.example.com`) of your domain (`example.com`) has been set up as a separate [subdomain zone](https://developers.cloudflare.com/dns/zone-setups/subdomain-setup/), corresponding `NS` records must have been placed within the parent zone.
When you are managing DNS records for the parent zone (in this example, `example.com`), you cannot create IP address resolution records (`A`, `AAAA`, or `CNAME`) with a name that specifies the same subdomain that already exists as a separate subdomain zone.
| Type | Name | Content | TTL |
| ---- | ---- | --------- | ---- |
| A | blog | 192.0.2.0 | Auto |
## Solution
Before creating such records, remove any `NS` records with the same name.
Important
This action might be reverting an existing subdomain setup and may incur in downtime. Refer to [Rollback subdomain setup](https://developers.cloudflare.com/dns/zone-setups/subdomain-setup/rollback/) for more guidance.
Was this helpful?
YesNo
## On this page
[Docs](https://developers.cloudflare.com/)
```json
{"@context":"https://schema.org","@type":"TechArticle","@id":"https://developers.cloudflare.com/dns/manage-dns-records/troubleshooting/existing-ns-record/#page","headline":"Existing NS records block new record creation · Cloudflare DNS docs","description":"Resolve conflicts with existing NS records.","url":"https://developers.cloudflare.com/dns/manage-dns-records/troubleshooting/existing-ns-record/","inLanguage":"en","image":"https://developers.cloudflare.com/og-docs.png","dateModified":"2026-04-16","publisher":{"@type":"Organization","name":"Cloudflare","url":"https://www.cloudflare.com/"},"isPartOf":{"@type":"WebSite","@id":"https://developers.cloudflare.com/#website","name":"Cloudflare Docs","url":"https://developers.cloudflare.com/"}}
```
---
---
description: Understand and resolve warnings about DNS records that expose your origin server IP address.
title: Exposed IP addresses
image: https://developers.cloudflare.com/og-docs.png
---
[Skip to content](#main-content)
> Documentation Index
> Fetch the complete documentation index at: https://developers.cloudflare.com/dns/llms.txt
> Use this file to discover all available pages before exploring further.
# Exposed IP addresses
Last updated Apr 17, 2026|Copy as Markdown|[View as Markdown](https://developers.cloudflare.com/dns/manage-dns-records/troubleshooting/exposed-ip-address/index.md)|[Agent setup](https://developers.cloudflare.com/agent-setup/)
When your DNS records are [proxied](https://developers.cloudflare.com/dns/proxy-status/), Cloudflare speeds up and protects your site.
A `dig` query against your proxied apex domain returns a Cloudflare IP address. This way, your origin server's IP address remains concealed from the public. Proxy benefits only apply to HTTP traffic.
When your server's IP address is exposed, your server is more vulnerable to direct attacks. It is still possible (but more difficult) for attackers to determine your origin server IP address when proxying traffic to Cloudflare.
---
## Dashboard warnings
The Cloudflare dashboard displays warnings when DNS records may expose your origin server's IP address. These warnings do not block or affect traffic to your site.
When your zone has DNS records that are not proxied, the **DNS Records** page displays the following banner:
`Proxying is required for most security and performance features. Set your DNS records to proxied by clicking "Edit" in the table below, to benefit from DDoS protection, security rules, caching, and more.`
Individual DNS records may also display warnings. The specific message depends on whether the record can be proxied.
---
## DNS records that should be proxied
Cloudflare recommends [proxying](https://developers.cloudflare.com/dns/proxy-status/) any record that handles HTTP traffic so that a `dig` query returns a Cloudflare IP address instead of your origin server IP address.
To take advantage of Cloudflare's performance and security benefits, proxy `A`, `AAAA`, and `CNAME` records.
---
## DNS records that should be DNS-only
Some DNS records need to remain DNS-only. For example, you may have to host multiple services (for example, a website and email) on the same physical server.
When a DNS-only record points to the same origin server as a proxied record, a `dig` query against that record reveals your origin server's IP address. This makes it easier for potential attackers to target your origin server directly.
To mitigate this risk:
* Analyze the impact of hosting multiple services on the same origin server in cases when you cannot avoid having DNS-only records.
* Proxy all records that share the same origin IP address as your apex domain and can be safely proxied through Cloudflare.
Was this helpful?
YesNo
## On this page
[Docs](https://developers.cloudflare.com/)
```json
{"@context":"https://schema.org","@type":"TechArticle","@id":"https://developers.cloudflare.com/dns/manage-dns-records/troubleshooting/exposed-ip-address/#page","headline":"Exposed IP addresses · Cloudflare DNS docs","description":"Understand and resolve warnings about DNS records that expose your origin server IP address.","url":"https://developers.cloudflare.com/dns/manage-dns-records/troubleshooting/exposed-ip-address/","inLanguage":"en","image":"https://developers.cloudflare.com/og-docs.png","dateModified":"2026-04-17","publisher":{"@type":"Organization","name":"Cloudflare","url":"https://www.cloudflare.com/"},"isPartOf":{"@type":"WebSite","@id":"https://developers.cloudflare.com/#website","name":"Cloudflare Docs","url":"https://developers.cloudflare.com/"},"keywords":["Proxying"]}
```
---
---
description: Handle multiple DNS records with the same name.
title: Records with the same name
image: https://developers.cloudflare.com/og-docs.png
---
[Skip to content](#main-content)
> Documentation Index
> Fetch the complete documentation index at: https://developers.cloudflare.com/dns/llms.txt
> Use this file to discover all available pages before exploring further.
# Records with the same name
Last updated Jul 20, 2026|Copy as Markdown|[View as Markdown](https://developers.cloudflare.com/dns/manage-dns-records/troubleshooting/records-with-same-name/index.md)|[Agent setup](https://developers.cloudflare.com/agent-setup/)
Occasionally, Cloudflare will not allow you to [create new DNS records](https://developers.cloudflare.com/dns/manage-dns-records/how-to/create-dns-records/#create-dns-records) with the same value in the **Name** field.
This error can occur due to the special requirements of CNAME records[1](#user-content-fn-1).
## Causes
You will encounter this error if you try to do one of the following:
* Create a CNAME record with a **Name** matching the name of an existing A/AAAA[2](#user-content-fn-2) or CNAME record.
* Create an A/AAAA record with a **Name** matching the name of an existing CNAME record.
* Create a [Spectrum](https://developers.cloudflare.com/spectrum/) application for a name that already has a manually-created `A`, `AAAA`, or `CNAME` record. Spectrum provisions and manages its own DNS record for the application, so Cloudflare does not support having both on the same name. Multiple Spectrum applications can, however, share the same name. Refer to [Spectrum Troubleshooting](https://developers.cloudflare.com/spectrum/reference/troubleshooting/#cannot-create-spectrum-application--dns-record-already-exists) for recommended workarounds.
Cloudflare prevents you from creating this combination of records because if a CNAME record is provided for a hostname DNS servers expect only that CNAME record to provide DNS information for that hostname.
Adding additional records would send conflicting information to DNS servers. For a technical explanation of the mechanism behind this, refer to [RFC 1034 ↗](https://www.rfc-editor.org/rfc/rfc1034).
## Solution
Review your existing DNS records to find the matching value in the **Name** field. Then, decide whether you want to keep the current record or delete it and make a new one.
Note
CNAME records are the only IP resolution record with this type of limitation. You can have more than one A/AAAA record per hostname, which is a way some domains do [simple load balancing](https://developers.cloudflare.com/dns/manage-dns-records/how-to/round-robin-dns/) for incoming requests.
## Footnotes
1. [CNAME records ↗](https://www.cloudflare.com/learning/dns/dns-records/dns-cname-record/) map a domain name to another (canonical) domain name. They can be used to resolve other record types present on the target domain name.
[↩](#user-content-fnref-1)
2. [A and AAAA records ↗](https://www.cloudflare.com/learning/dns/dns-records/dns-a-record/) map a domain name to one or multiple IPv4 or IPv6 address(es).
[↩](#user-content-fnref-2)
Was this helpful?
YesNo
## On this page
[Docs](https://developers.cloudflare.com/)
```json
{"@context":"https://schema.org","@type":"TechArticle","@id":"https://developers.cloudflare.com/dns/manage-dns-records/troubleshooting/records-with-same-name/#page","headline":"Cannot add DNS records with the same name · Cloudflare DNS docs","description":"Handle multiple DNS records with the same name.","url":"https://developers.cloudflare.com/dns/manage-dns-records/troubleshooting/records-with-same-name/","inLanguage":"en","image":"https://developers.cloudflare.com/og-docs.png","dateModified":"2026-07-20","publisher":{"@type":"Organization","name":"Cloudflare","url":"https://www.cloudflare.com/"},"isPartOf":{"@type":"WebSite","@id":"https://developers.cloudflare.com/#website","name":"Cloudflare Docs","url":"https://developers.cloudflare.com/"}}
```
---
---
description: Fix stale DNS responses from upstream resolvers.
title: Stale response for upstream DNS resolution
image: https://developers.cloudflare.com/og-docs.png
---
[Skip to content](#main-content)
> Documentation Index
> Fetch the complete documentation index at: https://developers.cloudflare.com/dns/llms.txt
> Use this file to discover all available pages before exploring further.
# Stale response for upstream DNS resolution
Last updated Apr 16, 2026|Copy as Markdown|[View as Markdown](https://developers.cloudflare.com/dns/manage-dns-records/troubleshooting/stale-response/index.md)|[Agent setup](https://developers.cloudflare.com/agent-setup/)
In one of the scenarios below, you notice that stale DNS responses are used. Depending on the scenario and other aspects of your configuration, this can cause wrong content or no content to be returned.
* A proxied CNAME record ([flattened by default](https://developers.cloudflare.com/dns/cname-flattening/)).
* A DNS-only CNAME record that has flattening turned on. This can happen either via the specific record configuration or as a consequence of the [zone settings](https://developers.cloudflare.com/dns/cname-flattening/set-up-cname-flattening/).
* A [Workers](https://developers.cloudflare.com/workers/) script making a subrequest to an external hostname[1](#user-content-fn-1).
## Cause
In the event that an upstream DNS server takes too long to respond, or the upstream returns a SERVFAIL, Cloudflare will use the expired DNS response from the cache and then attempt to update that cache asynchronously.
## Solutions
* If possible, temporarily replace the proxied CNAME with a proxied A record. This may not always be possible, especially if the upstream target is a load balancer or if it returns dynamic responses.
* Report the issues to the zone owner or DNS provider for the upstream target that is unresponsive.
* You can also raise the issue through the DNS Operations Analysis and Research Center (DNS OARC). Consider its [chat platform ↗](https://www.dns-oarc.net/oarc/services/chat) or [email lists ↗](https://www.dns-oarc.net/oarc/lists).
## Footnotes
1. A hostname that is not using Cloudflare as its [authoritative DNS provider](https://developers.cloudflare.com/dns/concepts/#authoritative-dns). [↩](#user-content-fnref-1)
Was this helpful?
YesNo
## On this page
[Docs](https://developers.cloudflare.com/)
```json
{"@context":"https://schema.org","@type":"TechArticle","@id":"https://developers.cloudflare.com/dns/manage-dns-records/troubleshooting/stale-response/#page","headline":"Stale response for upstream DNS resolution · Cloudflare DNS docs","description":"Fix stale DNS responses from upstream resolvers.","url":"https://developers.cloudflare.com/dns/manage-dns-records/troubleshooting/stale-response/","inLanguage":"en","image":"https://developers.cloudflare.com/og-docs.png","dateModified":"2026-04-16","publisher":{"@type":"Organization","name":"Cloudflare","url":"https://www.cloudflare.com/"},"isPartOf":{"@type":"WebSite","@id":"https://developers.cloudflare.com/#website","name":"Cloudflare Docs","url":"https://developers.cloudflare.com/"}}
```
---
---
description: Identify and remove unexpected DNS records.
title: Unexpected DNS records
image: https://developers.cloudflare.com/og-docs.png
---
[Skip to content](#main-content)
> Documentation Index
> Fetch the complete documentation index at: https://developers.cloudflare.com/dns/llms.txt
> Use this file to discover all available pages before exploring further.
# Unexpected DNS records
Last updated Apr 16, 2026|Copy as Markdown|[View as Markdown](https://developers.cloudflare.com/dns/manage-dns-records/troubleshooting/unexpected-dns-records/index.md)|[Agent setup](https://developers.cloudflare.com/agent-setup/)
## Additional records after import
You find several unexpected DNS records after adding your domain to Cloudflare.
### Cause
A wildcard (`*`) record at your previous authoritative DNS provider may have been imported into Cloudflare in a way that creates additional records.
### Solution
To solve this issue, you can do one of the following:
* [Delete records in bulk](https://developers.cloudflare.com/dns/manage-dns-records/how-to/batch-record-changes/#delete-records-in-bulk).
* Remove and re-add your domain:
1. [Remove your domain](https://developers.cloudflare.com/fundamentals/manage-domains/remove-domain/) from Cloudflare.
2. Delete the wildcard record from your authoritative DNS.
3. [Re-add](https://developers.cloudflare.com/fundamentals/manage-domains/add-site/) the domain.
---
## acme\_challenge TXT records
You might notice TXT records like `_acme-challenge.` are returned by your domain but cannot be found on the Cloudflare dashboard.
### Cause
These records are automatically created to allow Cloudflare edge certificates ([universal](https://developers.cloudflare.com/ssl/edge-certificates/universal-ssl/), [advanced](https://developers.cloudflare.com/ssl/edge-certificates/advanced-certificate-manager/), and [backup](https://developers.cloudflare.com/ssl/edge-certificates/backup-certificates/)) to be provisioned. `_acme-challenge` records are required by certificate authorities (CAs) so that they can verify your domain ownership before issuing the SSL/TLS certificate. For details, refer to [Domain control validation (DCV)](https://developers.cloudflare.com/ssl/edge-certificates/changing-dcv-method/).
### Solution
As these records are tied to the certificates, they cannot be deleted via the Cloudflare dashboard.
If you need more `_acme-challenge.` TXT records in order to provision certificates on your side, you can [manually add them](https://developers.cloudflare.com/dns/manage-dns-records/how-to/create-dns-records/) under [DNS records ↗](https://dash.cloudflare.com/?to=/:account/:zone/dns/records).
If you want to remove these records:
* [Disable Universal SSL](https://developers.cloudflare.com/ssl/edge-certificates/universal-ssl/disable-universal-ssl/) to remove the records related to universal and backup certificates.
* [Delete advanced certificates](https://developers.cloudflare.com/ssl/edge-certificates/advanced-certificate-manager/manage-certificates/#delete-a-certificate) to remove the records related to advanced certificates.
---
## \_dc-mx and dc-##### subdomains
You notice a `_dc-mx` or `dc-#####` subdomain that you did not create (for example, `_dc-mx.a1b2c3d4e5f6.example.com`). This response does not appear in your Cloudflare DNS records table, but will appear in `dig` responses.
### Cause
When your `MX` or `SRV` record resolves to a domain configured to [proxy](https://developers.cloudflare.com/dns/proxy-status/) through Cloudflare, Cloudflare dynamically inserts a record into DNS responses that resolves to the origin IP address. This record is added at query time to ensure that mail or service traffic bypasses the Cloudflare proxy and reaches your server directly.
The prefix of the auto-generated record depends on the record type that triggered it:
* **MX records:** Cloudflare inserts a record with the `_dc-mx` prefix (for example, `_dc-mx.a1b2c3d4e5f6.example.com`).
* **SRV records:** Cloudflare inserts a record with the `dc-` prefix (for example, `dc-a1b2c3d4e5f6.example.com`).
#### How \_dc-mx records work
Before using Cloudflare, suppose your DNS records for mail are as follows:
`example.com MX example.com`
`example.com A 192.0.2.1`
After using Cloudflare and proxying the `A` record, Cloudflare provides DNS responses with a [Cloudflare IP address](https://developers.cloudflare.com/fundamentals/concepts/cloudflare-ip-addresses/) (`203.0.113.1` in the example below):
`example.com MX example.com`
`example.com A 203.0.113.1`
Since proxying mail traffic through Cloudflare would break your mail services, Cloudflare detects this situation and dynamically inserts a `_dc-mx` record into DNS responses:
`example.com MX _dc-mx.a1b2c3d4e5f6.example.com`
`_dc-mx.a1b2c3d4e5f6.example.com A 192.0.2.1`
`example.com A 203.0.113.1`
You can verify this behavior by querying your domain's MX records (replace `example.com` with your domain):
```sh
dig example.com mx +short
```
```sh
100 _dc-mx.a1b2c3d4e5f6.example.com.
```
The `_dc-mx` record resolves directly to your origin IP:
```sh
dig _dc-mx.a1b2c3d4e5f6.example.com a +short
```
```sh
192.0.2.1
```
### Solution
These records are safe — they ensure your mail traffic reaches your server correctly.
If you want to avoid a `_dc-mx` or `dc-#####` response, you must address the underlying proxy conflict:
* If no mail is received for the domain, delete the `MX` record.
* If mail is received for the domain, update the `MX` record to resolve to a separate `A` record for a mail subdomain that is not proxied by Cloudflare:
`example.com MX mail.example.com`
`mail.example.com A 192.0.2.1`
`example.com A 203.0.113.1`
Caution
If your mail server resides on the same IP as your web server, your MX record will expose your origin IP address, since it is not hidden behind the Cloudflare proxy.
---
## Incorrect results for DNS queries
You notice DNS queries returning incorrect results even after you waited for the [TTL](https://developers.cloudflare.com/dns/manage-dns-records/reference/ttl/) to expire.
### Cause
Third-party tools can sometimes fail to return correct DNS results if a recursive DNS cache fails to refresh.
### Solution
In this circumstance, purge your public DNS cache via these methods:
* [Purge your DNS cache at OpenDNS ↗](http://www.opendns.com/support/cache/)
* [Purge your DNS cache at Google ↗](https://developers.google.com/speed/public-dns/cache)
* [Purge your DNS cache locally ↗](https://docs.cpanel.net/knowledge-base/dns/how-to-clear-your-dns-cache/)
Was this helpful?
YesNo
## On this page
[Docs](https://developers.cloudflare.com/)
```json
{"@context":"https://schema.org","@type":"TechArticle","@id":"https://developers.cloudflare.com/dns/manage-dns-records/troubleshooting/unexpected-dns-records/#page","headline":"Unexpected DNS records · Cloudflare DNS docs","description":"Identify and remove unexpected DNS records.","url":"https://developers.cloudflare.com/dns/manage-dns-records/troubleshooting/unexpected-dns-records/","inLanguage":"en","image":"https://developers.cloudflare.com/og-docs.png","dateModified":"2026-04-16","publisher":{"@type":"Organization","name":"Cloudflare","url":"https://www.cloudflare.com/"},"isPartOf":{"@type":"WebSite","@id":"https://developers.cloudflare.com/#website","name":"Cloudflare Docs","url":"https://developers.cloudflare.com/"}}
```
---
---
description: Control whether Cloudflare proxies traffic for DNS records.
title: Proxy status
image: https://developers.cloudflare.com/og-docs.png
---
[Skip to content](#main-content)
> Documentation Index
> Fetch the complete documentation index at: https://developers.cloudflare.com/dns/llms.txt
> Use this file to discover all available pages before exploring further.
# Proxy status
Last updated Apr 21, 2026|Copy as Markdown|[View as Markdown](https://developers.cloudflare.com/dns/proxy-status/index.md)|[Agent setup](https://developers.cloudflare.com/agent-setup/)
While your [DNS records](https://developers.cloudflare.com/dns/manage-dns-records/) contain information about your domain, the proxy status controls whether HTTP/HTTPS traffic for that record routes through Cloudflare's network or goes directly to your origin server.
When a record is **Proxied**, Cloudflare sits between your visitors and your server — optimizing, caching, and protecting traffic along the way. When a record is **DNS-only**, Cloudflare responds with your server's actual IP address and does not route HTTP/HTTPS traffic through its network.
Only [records used for IP address resolution](https://developers.cloudflare.com/dns/manage-dns-records/reference/dns-record-types/#ip-address-resolution) — A, AAAA, and CNAME records — can be proxied. Other record types (such as MX or TXT) are always DNS-only.
Cloudflare recommends proxying all A, AAAA, and CNAME records that serve web traffic. Records used for other purposes, such as [CNAME records that prove your domain ownership](https://developers.cloudflare.com/dns/manage-dns-records/troubleshooting/cname-domain-verification/), should not be proxied.
Note
Proxying is on by default when you onboard a domain via the dashboard.
### Benefits
When you set a DNS record to **Proxied** — shown as an orange cloud icon in the dashboard, also known as "orange-clouded" — Cloudflare can:
* Protect your origin server (the server hosting your website or application) from [DDoS attacks ↗](https://www.cloudflare.com/learning/ddos/what-is-a-ddos-attack/).
* [Optimize, cache, and protect](https://developers.cloudflare.com/fundamentals/manage-domains/add-site/) all requests to your application.
* Apply your Cloudflare product configurations (such as [WAF](https://developers.cloudflare.com/waf/) rules, [caching](https://developers.cloudflare.com/cache/), and [redirect rules](https://developers.cloudflare.com/rules/url-forwarding/)) to incoming traffic.
Caution
When you [add a domain](https://developers.cloudflare.com/fundamentals/manage-domains/add-site/) to Cloudflare, Cloudflare protection will be in a [pending state](https://developers.cloudflare.com/dns/zone-setups/reference/domain-status/) until we can verify ownership. This could take up to 24 hours to complete. Refer to [Limitations](https://developers.cloudflare.com/dns/proxy-status/limitations/#pending-domains) for further guidance.
### Example
DNS management for **example.com**:
| Type | Name | Content | Proxy status | TTL |
| ---- | ---- | --------- | ------------ | ---- |
| A | blog | 192.0.2.1 | Proxied | Auto |
| A | shop | 192.0.2.2 | DNS only | Auto |
In the example DNS table above, there are two DNS records. The record with the name `blog` has proxy on, while the record named `shop` has the proxy off (that is, **DNS only**).
This means that:
* A DNS query to the proxied record `blog.example.com` will be answered with Cloudflare [anycast IP addresses](https://developers.cloudflare.com/fundamentals/concepts/cloudflare-ip-addresses/) — shared IP addresses used to route traffic through a nearby data center — instead of `192.0.2.1`. This ensures that HTTP/HTTPS requests for this name will be sent to Cloudflare's network and can be proxied, which allows the [benefits listed above](#benefits).
* A DNS query to the DNS-only record `shop.example.com` will be answered with the actual origin IP address, `192.0.2.2`. This exposes your origin IP address to anyone who queries the record, which removes a layer of protection against targeted attacks. Cloudflare also cannot provide HTTP/HTTPS analytics on those requests (only DNS analytics).
For further context, refer to [How Cloudflare works](https://developers.cloudflare.com/fundamentals/concepts/how-cloudflare-works/).
---
## Proxied records
The sections below describe specific behaviors and expected outcomes when you have DNS records set to proxied. There may also be some [limitations](https://developers.cloudflare.com/dns/proxy-status/limitations/) in specific scenarios.
### Predefined time to live
By default, all proxied records have a time to live (TTL) of **Auto**, which is set to 300 seconds. This value cannot be edited.
This short TTL ensures that if Cloudflare changes the [anycast IP address](https://developers.cloudflare.com/fundamentals/concepts/cloudflare-ip-addresses/) assigned to your record, the change takes effect quickly. Recursive resolvers — the DNS servers that look up records on behalf of end users — will not cache the old address for longer than 300 seconds (five minutes).
Note
It may take longer than five minutes for you to actually experience record changes, as your local DNS cache may take longer to update. Also, Cloudflare reserves the right to change the TTL value at any time, although it is very rare and only done when necessary.
### Mix proxied and unproxied
If you have multiple A or AAAA records on the same name and at least one of them is proxied, Cloudflare will treat all A or AAAA records on this name as being proxied.
Example
DNS management for **example.com**:
| Type | Name | Content | Proxy status | TTL |
| ---- | ---- | --------- | ------------ | ---- |
| A | blog | 192.0.2.1 | Proxied | Auto |
| A | blog | 192.0.2.5 | DNS only | Auto |
In this example, all traffic intended for `blog.example.com` will be treated as if both records were **Proxied**.
Cloudflare will also proxy a request if a hostname on a CNAME chain — where one CNAME record points to another — is proxied.
Example
Consider that the same Cloudflare account has two different zones, `example.com` and `example.net`.
DNS management for **example.com**:
| Type | Name | Content | Proxy status | TTL |
| ----- | ----------- | ------------------ | ------------ | ---- |
| CNAME | example.com | origin.example.net | DNS only | Auto |
DNS management for **example.net**:
| Type | Name | Content | Proxy status | TTL |
| ----- | ------------------ | -------- | ------------ | ---- |
| CNAME | origin.example.net | | Proxied | Auto |
In this example, all traffic intended for `example.com` will be treated as **Proxied**.
Note
CNAME to a different Cloudflare account is prohibited and will result in a [Error 1014 (CNAME Cross-User Banned)](https://developers.cloudflare.com/support/troubleshooting/http-status-codes/cloudflare-1xxx-errors/error-1014/)
### CNAME records
With [CNAME flattening](https://developers.cloudflare.com/dns/cname-flattening/), Cloudflare follows the CNAME chain to find the final IP address, helping DNS queries resolve faster. Proxied [CNAME records](https://developers.cloudflare.com/dns/manage-dns-records/reference/dns-record-types/#cname) are flattened by default, as they return Cloudflare anycast IPs.
In some cases, Cloudflare will show a warning message or [prevent](https://developers.cloudflare.com/dns/proxy-status/limitations/#proxy-eligibility) you from proxying a CNAME record. This happens to avoid misconfigurations and is generally related to other CDN providers or to specific records used for [DKIM ↗](https://www.cloudflare.com/learning/dns/dns-records/dns-dkim-record/) (email authentication) validation.
Note
Specific CNAME record values with traffic proxied through Cloudflare will enable O2O routing for the Shopify SaaS provider. Refer to the [Shopify provider guide](https://developers.cloudflare.com/cloudflare-for-platforms/cloudflare-for-saas/saas-customers/provider-guides/shopify/) for more information.
### Protocol optimization
For proxied records, if your domain has [HTTP/2 or HTTP/3 enabled](https://developers.cloudflare.com/speed/optimization/protocol/) and is also using [Universal SSL](https://developers.cloudflare.com/ssl/edge-certificates/universal-ssl/), Cloudflare automatically generates [HTTPS Service (HTTPS) records](https://developers.cloudflare.com/dns/manage-dns-records/reference/dns-record-types/#svcb-and-https) on the fly. These DNS records provide clients with information about how to connect to your server upfront, without the need for an initial plaintext HTTP connection to discover supported protocols.
Note
Both HTTP/2 and HTTP/3 configurations also require that you have an SSL/TLS certificate served by Cloudflare. This means that disabling [Universal SSL](https://developers.cloudflare.com/ssl/edge-certificates/universal-ssl/), for example, could impact this behavior.
### Request and response size limits
Cloudflare enforces size limits on proxied requests. These limits vary by plan and cannot be bypassed while traffic is proxied. For the full list of connection and request limits, refer to [Connection limits](https://developers.cloudflare.com/fundamentals/reference/connection-limits/).
### Connection timeouts
Cloudflare enforces a default [Proxy Read Timeout](https://developers.cloudflare.com/fundamentals/reference/connection-limits/) between Cloudflare and your origin server. If your origin does not send an HTTP response within the defined time limit, Cloudflare returns a [524 error](https://developers.cloudflare.com/support/troubleshooting/http-status-codes/cloudflare-5xx-errors/error-524/). Enterprise customers can [increase the timeout value](https://developers.cloudflare.com/cache/how-to/cache-rules/settings/#proxy-read-timeout-enterprise-only).
---
## DNS-only records
When an A, AAAA, or CNAME record is **DNS-only** — shown as a gray cloud icon in the dashboard, also known as "gray-clouded" — DNS queries for these will resolve to the record's actual origin IP address, as described in the [example](#example).
**DNS-only** is only recommended for records that do not serve web traffic, such as records used for email routing or third-party domain verification. For records that serve web traffic, **DNS-only** means your origin IP addresses are visible to anyone who queries the record, potentially exposing your server to bad actors and [DDoS attacks ↗](https://www.cloudflare.com/learning/ddos/what-is-a-ddos-attack/). Cloudflare also cannot [optimize, cache, and protect](https://developers.cloudflare.com/fundamentals/concepts/how-cloudflare-works/) those requests or provide HTTP/HTTPS analytics on them.
Note
If you have multiple `A/AAAA` records on the same name and at least one of them is proxied, Cloudflare will treat all `A/AAAA` records on this name as being proxied.
### When to use DNS-only
Certain DNS records should be DNS-only because the services they support are not compatible with Cloudflare's HTTP proxy. Common examples include email records, domain verification records, SaaS-hosted websites, and non-HTTP services.
For a detailed list of scenarios, refer to [Use cases](https://developers.cloudflare.com/dns/proxy-status/use-cases/). For hard constraints on proxying, refer to [Proxying limitations](https://developers.cloudflare.com/dns/proxy-status/limitations/).
Was this helpful?
YesNo
## On this page
[Docs](https://developers.cloudflare.com/)
```json
{"@context":"https://schema.org","@type":"TechArticle","@id":"https://developers.cloudflare.com/dns/proxy-status/#page","headline":"Proxy status · Cloudflare DNS docs","description":"Control whether Cloudflare proxies traffic for DNS records.","url":"https://developers.cloudflare.com/dns/proxy-status/","inLanguage":"en","image":"https://developers.cloudflare.com/og-docs.png","dateModified":"2026-04-21","publisher":{"@type":"Organization","name":"Cloudflare","url":"https://www.cloudflare.com/"},"isPartOf":{"@type":"WebSite","@id":"https://developers.cloudflare.com/#website","name":"Cloudflare Docs","url":"https://developers.cloudflare.com/"},"keywords":["Proxying"]}
```
---
---
description: Bypass Cloudflare's reverse proxy for all zones at once.
title: Enforce DNS-only
image: https://developers.cloudflare.com/og-docs.png
---
[Skip to content](#main-content)
> Documentation Index
> Fetch the complete documentation index at: https://developers.cloudflare.com/dns/llms.txt
> Use this file to discover all available pages before exploring further.
# Enforce DNS-only
Last updated Jun 24, 2026|Copy as Markdown|[View as Markdown](https://developers.cloudflare.com/dns/proxy-status/enforce-dns-only/index.md)|[Agent setup](https://developers.cloudflare.com/agent-setup/)
The enforce DNS-only setting is an account-level break-glass mechanism that allows you to bypass Cloudflare's reverse proxy for all zones in your account in a single action. When enabled, Cloudflare responds to DNS queries with the underlying record content — origin IP addresses for proxied `A` and `AAAA` records, and CNAME targets for proxied `CNAME` records — instead of Cloudflare's anycast IP addresses, effectively setting all [proxied DNS records](https://developers.cloudflare.com/dns/proxy-status/) to DNS-only without modifying the records themselves.
This setting is intended for emergency situations only, such as during an outage when you need to quickly route traffic directly to your origins.
Caution
Enabling this setting exposes your origin IP addresses and removes all Cloudflare protections — including DDoS mitigation, WAF, caching, and all other proxy-based features — for every zone in your account. Use with extreme caution and only after proper [preparation](#preparation).
## Key characteristics
* Account-level: Affects all zones in the account simultaneously.
* Non-destructive: Does not modify your DNS records. Disabling the setting restores normal proxy behavior.
* API-only: Available through the API only, not in the Cloudflare dashboard.
Auto TTL for proxied records
Due to DNS caching by recursive resolvers, the transitions from proxied to DNS-only and back may not be instantaneous. Since all proxied records have a TTL of **Auto**, this value (five minutes by default) determines how long resolvers may continue to serve Cloudflare's anycast IPs or your origin IP addresses.
## Zone types
Enforce DNS-only works across all zone setup types:
* [Full setup](https://developers.cloudflare.com/dns/zone-setups/full-setup/): Proxied records in the zone are generally affected, considering a few [exceptions](https://developers.cloudflare.com/dns/proxy-status/enforce-dns-only/#excluded).
* [Partial (CNAME) setup](https://developers.cloudflare.com/dns/zone-setups/partial-setup/): Proxied records in the zone are generally affected, considering a few [exceptions](https://developers.cloudflare.com/dns/proxy-status/enforce-dns-only/#excluded).
* [Secondary zones](https://developers.cloudflare.com/dns/zone-setups/zone-transfers/cloudflare-as-secondary/): If Secondary DNS Overrides is enabled and you have manually set a record's proxy status to proxied, that record will be affected. This also applies to any other `A` or `AAAA` records on the same name. Refer to [Secondary DNS Overrides](https://developers.cloudflare.com/dns/zone-setups/zone-transfers/cloudflare-as-secondary/proxy-traffic/) for details.
Zone transfers interaction
While enforce DNS-only is active, zone transfers from the primary (including content or TTL changes) do not change the proxy status of affected records. When you [disable enforce DNS-only](#disable-enforce-dns-only), the records return to proxied.
## Preparation
Before relying on enforce DNS-only as part of your incident response plan, you should:
* Verify origin server capacity: Without Cloudflare proxying, your origin servers handle all traffic directly, including traffic that Cloudflare would normally cache or filter. Ensure your infrastructure can sustain this load.
* Review exposed record content: When enforce DNS-only is active, all origin IPs configured in proxied `A` and `AAAA` records, as well as the targets of proxied `CNAME` records, become publicly visible through DNS queries. If your origins rely on IP obscurity for security, plan accordingly.
* Test in advance: Use the API in a staging or test account to confirm that you understand the behavior before you need it in an emergency.
Verify SSL certificates
If your origins serve HTTPS traffic, ensure they have publicly trusted SSL certificates installed for the relevant hostnames. Cloudflare [Origin CA certificates](https://developers.cloudflare.com/ssl/origin-configuration/origin-ca/) are only trusted by Cloudflare and will cause certificate errors for direct client connections.
## Enable enforce DNS-only
Use the [Update DNS Settings](https://developers.cloudflare.com/api/resources/dns/subresources/settings/subresources/account/methods/edit/) endpoint to enable enforce DNS-only for your account:
Required API token permissions
At least one of the following [token permissions](https://developers.cloudflare.com/fundamentals/api/reference/permissions/) is required:
* `Account DNS Settings Write`
```bash
curl "https://api.cloudflare.com/client/v4/accounts/$ACCOUNT_ID/dns_settings" \
--request PATCH \
--header "Authorization: Bearer $CLOUDFLARE_API_TOKEN" \
--json '{
"enforce_dns_only": true
}'
```
Once enabled, Cloudflare responds to DNS queries for all proxied records with the underlying record content — your configured origin IP addresses for `A` and `AAAA` records, and the configured CNAME target for `CNAME` records — instead of Cloudflare's anycast IPs.
## Disable enforce DNS-only
To restore normal proxy behavior, set `enforce_dns_only` to `false`:
Required API token permissions
At least one of the following [token permissions](https://developers.cloudflare.com/fundamentals/api/reference/permissions/) is required:
* `Account DNS Settings Write`
```bash
curl "https://api.cloudflare.com/client/v4/accounts/$ACCOUNT_ID/dns_settings" \
--request PATCH \
--header "Authorization: Bearer $CLOUDFLARE_API_TOKEN" \
--json '{
"enforce_dns_only": false
}'
```
After you disable the setting, Cloudflare resumes responding to DNS queries with anycast IP addresses for proxied records and all proxy-based features are restored.
## Other Cloudflare products
Refer to the sections below in case you use other Cloudflare products that rely on DNS records.
### Included
Enforce DNS-only affects the following records:
* [Load Balancing](https://developers.cloudflare.com/load-balancing/): proxied LB records visible on the DNS records table but managed through the [Load Balancing configurations](https://developers.cloudflare.com/load-balancing/load-balancers/create-load-balancer/).
* Proxied DNS records that match a [Worker route](https://developers.cloudflare.com/workers/configuration/routing/routes/).
* [Cloudflare for SaaS](https://developers.cloudflare.com/cloudflare-for-platforms/cloudflare-for-saas/) fallback origin: The proxied DNS record you designate as the [fallback origin](https://developers.cloudflare.com/cloudflare-for-platforms/cloudflare-for-saas/start/getting-started/#1-create-fallback-origin) for custom hostnames.
### Excluded
Enforce DNS-only does not affect the following records:
* [R2](https://developers.cloudflare.com/r2/) custom domains: Read-only proxied records added to the DNS records table when you set up [R2 custom domains](https://developers.cloudflare.com/r2/buckets/public-buckets/#connect-a-bucket-to-a-custom-domain).
* [Spectrum](https://developers.cloudflare.com/spectrum/) applications: DNS records managed by the Spectrum application.
* [Tunnel](https://developers.cloudflare.com/tunnel/): CNAME records pointing to a tunnel subdomain. Refer to [Tunnel routing](https://developers.cloudflare.com/tunnel/routing/#create-a-dns-record) or [Cloudflare One](https://developers.cloudflare.com/cloudflare-one/networks/connectors/cloudflare-tunnel/routing-to-tunnel/dns/) for details.
* [Web3 gateways](https://developers.cloudflare.com/web3/): Read-only proxied records managed by the [Web3 gateway configuration](https://developers.cloudflare.com/web3/reference/gateway-dns-records/).
* [Workers](https://developers.cloudflare.com/workers/) custom domains: Read-only proxied records added to the DNS records table when you set up Workers [custom domains](https://developers.cloudflare.com/workers/configuration/routing/custom-domains/).
Custom domain or route match
Proxied records that match a Worker [route](https://developers.cloudflare.com/workers/configuration/routing/routes/) are regular DNS records and will be [affected](#included) by the enforce DNS-only setting.
## What to expect
* Changes take effect immediately at Cloudflare's edge — there is no DNS propagation delay.
* Functionally equivalent to setting all proxied records to DNS-only.
## Check current status
Use the [Show DNS Settings](https://developers.cloudflare.com/api/resources/dns/subresources/settings/subresources/account/methods/get/) endpoint to verify the current value:
Required API token permissions
At least one of the following [token permissions](https://developers.cloudflare.com/fundamentals/api/reference/permissions/) is required:
* `Account DNS Settings Write`
* `Account DNS Settings Read`
```bash
curl "https://api.cloudflare.com/client/v4/accounts/$ACCOUNT_ID/dns_settings" \
--request GET \
--header "Authorization: Bearer $CLOUDFLARE_API_TOKEN"
```
## Related resources
* [Proxy status](https://developers.cloudflare.com/dns/proxy-status/) \- Understand how proxied and DNS-only records behave.
* [Batch record changes](https://developers.cloudflare.com/dns/manage-dns-records/how-to/batch-record-changes/#edit-proxy-status-in-bulk) \- Change proxy status for multiple records in bulk within a single zone.
Was this helpful?
YesNo
## On this page
[Docs](https://developers.cloudflare.com/)
```json
{"@context":"https://schema.org","@type":"TechArticle","@id":"https://developers.cloudflare.com/dns/proxy-status/enforce-dns-only/#page","headline":"Enforce DNS-only · Cloudflare DNS docs","description":"Bypass Cloudflare's reverse proxy for all zones at once.","url":"https://developers.cloudflare.com/dns/proxy-status/enforce-dns-only/","inLanguage":"en","image":"https://developers.cloudflare.com/og-docs.png","dateModified":"2026-06-24","publisher":{"@type":"Organization","name":"Cloudflare","url":"https://www.cloudflare.com/"},"isPartOf":{"@type":"WebSite","@id":"https://developers.cloudflare.com/#website","name":"Cloudflare Docs","url":"https://developers.cloudflare.com/"}}
```
---
---
description: Limitations when proxying DNS records through Cloudflare.
title: Proxying limitations
image: https://developers.cloudflare.com/og-docs.png
---
[Skip to content](#main-content)
> Documentation Index
> Fetch the complete documentation index at: https://developers.cloudflare.com/dns/llms.txt
> Use this file to discover all available pages before exploring further.
# Proxying limitations
Last updated Apr 21, 2026|Copy as Markdown|[View as Markdown](https://developers.cloudflare.com/dns/proxy-status/limitations/index.md)|[Agent setup](https://developers.cloudflare.com/agent-setup/)
This page describes expected limitations when proxying DNS records. For further information about proxying, refer to [How Cloudflare DNS works](https://developers.cloudflare.com/fundamentals/concepts/how-cloudflare-works/).
For guidance on when to proxy records and when to use DNS only, refer to [Use cases](https://developers.cloudflare.com/dns/proxy-status/use-cases/).
## Proxy eligibility
Only A, AAAA, and CNAME records that serve HTTP or HTTPS traffic can be proxied. Other DNS record types cannot be proxied.
If you encounter a [CNAME record](https://developers.cloudflare.com/dns/manage-dns-records/reference/dns-record-types/#cname) that you cannot proxy — usually associated with another CDN provider — a proxied version of that record will cause connectivity errors. Cloudflare is purposely preventing that record from being proxied to protect you from a misconfiguration.
Non-proxiable targets
* Exact match:
* `dkim2.mcsv.net` ([Mailchimp documentation ↗](https://mailchimp.com/help/set-up-email-domain-authentication/))
* `dkim3.mcsv.net` ([Mailchimp documentation ↗](https://mailchimp.com/help/set-up-email-domain-authentication/))
* `zmverify.zoho.com` ([Zoho documentation ↗](https://www.zoho.com/mail/help/adminconsole/domain-verification.html))
* `dkim.infusionmail.com` ([Keap documentation ↗](https://help.keap.com/help/dmarc))
* Exact match or subdomain of:
* `dkim.amazonses.com` ([Amazon SES documentation ↗](https://docs.aws.amazon.com/ses/latest/dg/creating-identities.html#just-verify-domain-proc))
* Subdomain of:
* `onmicrosoft.com` ([Microsoft documentation ↗](https://learn.microsoft.com/defender-office-365/email-authentication-dkim-configure))
* `dkim.intercom.io` ([Intercom documentation ↗](https://www.intercom.com/help/articles/9744849-connect-your-email-support-channel))
* `acm-validations.aws` ([AWS certificate manager documentation ↗](https://docs.aws.amazon.com/acm/latest/userguide/dns-validation.html))
### Pre-signed DNSSEC
If you use Cloudflare as your [secondary DNS provider](https://developers.cloudflare.com/dns/zone-setups/zone-transfers/cloudflare-as-secondary/) and leverage [Secondary DNS Overrides](https://developers.cloudflare.com/dns/zone-setups/zone-transfers/cloudflare-as-secondary/proxy-traffic/) to set records to proxied, note that opting for [Pre-signed DNSSEC](https://developers.cloudflare.com/dns/zone-setups/zone-transfers/cloudflare-as-secondary/dnssec-for-secondary/) will cause Cloudflare to treat your records as DNS-only.
## Ports and protocols
To proxy HTTP/HTTPS traffic on [non-standard ports](https://developers.cloudflare.com/fundamentals/reference/network-ports/) or to proxy a TCP or UDP based application, use [Cloudflare Spectrum](https://developers.cloudflare.com/spectrum/).
## Pending domains
When you [add a domain](https://developers.cloudflare.com/fundamentals/manage-domains/add-site/) to Cloudflare, Cloudflare protection will be in a [pending state](https://developers.cloudflare.com/dns/zone-setups/reference/domain-status/) until we can verify ownership. This could take up to 24 hours to complete.
This means that DNS records — even those set to [proxy traffic through Cloudflare](#proxy-eligibility) — will be [DNS-only](https://developers.cloudflare.com/dns/proxy-status/#dns-only-records) until your zone has been activated and any requests to your DNS records will return your origin server's IP address.
If this warning is still present after 24 hours, refer to [Troubleshooting](https://developers.cloudflare.com/dns/troubleshooting/).
For enhanced security, we recommend rolling your origin IP addresses at your hosting provider after your zone has been activated. This action prevents your origin IPs from being leaked during onboarding.
## Windows authentication
Because Microsoft Integrated Windows Authentication, NTLM, and Kerberos violate HTTP/1.1 specifications, they are not compatible with proxied DNS records. NTLM authenticates at the TCP connection level (Layer 4), and Cloudflare does not guarantee that consecutive requests from the same client reuse the same TCP connection to the origin. This can cause repeated authentication prompts or authentication loops.
Was this helpful?
YesNo
## On this page
[Docs](https://developers.cloudflare.com/)
```json
{"@context":"https://schema.org","@type":"TechArticle","@id":"https://developers.cloudflare.com/dns/proxy-status/limitations/#page","headline":"Proxying limitations · Cloudflare DNS docs","description":"Limitations when proxying DNS records through Cloudflare.","url":"https://developers.cloudflare.com/dns/proxy-status/limitations/","inLanguage":"en","image":"https://developers.cloudflare.com/og-docs.png","dateModified":"2026-04-21","publisher":{"@type":"Organization","name":"Cloudflare","url":"https://www.cloudflare.com/"},"isPartOf":{"@type":"WebSite","@id":"https://developers.cloudflare.com/#website","name":"Cloudflare Docs","url":"https://developers.cloudflare.com/"},"keywords":["Proxying"]}
```
---
---
description: Common scenarios for proxied and DNS-only records.
title: Use cases
image: https://developers.cloudflare.com/og-docs.png
---
[Skip to content](#main-content)
> Documentation Index
> Fetch the complete documentation index at: https://developers.cloudflare.com/dns/llms.txt
> Use this file to discover all available pages before exploring further.
# Use cases
Last updated Apr 23, 2026|Copy as Markdown|[View as Markdown](https://developers.cloudflare.com/dns/proxy-status/use-cases/index.md)|[Agent setup](https://developers.cloudflare.com/agent-setup/)
This page lists common scenarios where DNS records should be proxied or set to DNS only, and describes aspects to keep in mind depending on your configuration. For background on how proxy status works, refer to [Proxy status](https://developers.cloudflare.com/dns/proxy-status/).
## Proxied records
You should proxy all A, AAAA, and CNAME records that serve HTTP or HTTPS web traffic. This includes records for:
* Your website or web application (for example, `example.com`, `www.example.com`)
* Subdomains that serve web content (for example, `blog.example.com`, `app.example.com`)
* API endpoints that accept HTTP/HTTPS requests and do not require origin IP validation
Proxied records benefit from [DDoS protection ↗](https://www.cloudflare.com/learning/ddos/what-is-a-ddos-attack/), [caching](https://developers.cloudflare.com/cache/), [WAF](https://developers.cloudflare.com/waf/), and other Cloudflare security and performance features.
When traffic is proxied through Cloudflare, the following behaviors apply. You may need to adjust your origin configuration, depending on your use case.
### Source IP changes
Your origin server sees Cloudflare IP addresses as the source of all requests instead of the end-user's IP address. Applications that rely on the source IP for authentication, rate limiting, or geolocation will not function as expected without additional configuration.
Cloudflare includes the original visitor IP address in the [CF-Connecting-IP](https://developers.cloudflare.com/fundamentals/reference/http-headers/) and `X-Forwarded-For` request headers. Configure your origin server to read the visitor IP from these headers. For more information, refer to [Restoring original visitor IPs](https://developers.cloudflare.com/support/troubleshooting/restoring-visitor-ips/restoring-original-visitor-ips/).
### Client certificate (mTLS) validation
When a record is proxied, TLS terminates at Cloudflare's global network. Cloudflare establishes a separate TLS connection to your origin server. This means the origin never receives the end-user's client certificate during the TLS handshake. You can achieve mTLS through the following:
* [Client certificates (mTLS)](https://developers.cloudflare.com/ssl/client-certificates/): validate client certificates between your end-users and Cloudflare.
* [Authenticated Origin Pulls](https://developers.cloudflare.com/ssl/origin-configuration/authenticated-origin-pull/): Verify that traffic reaching your origin comes from Cloudflare.
* [Forward a client certificate](https://developers.cloudflare.com/ssl/client-certificates/forward-a-client-certificate/): Forward client certificate details to your origin via HTTP headers.
### Header modifications
Cloudflare adds and modifies HTTP request headers when proxying traffic, including headers for [visitor IP identification](https://developers.cloudflare.com/fundamentals/reference/http-headers/), diagnostics, and connection management. Applications that expect a fixed number of headers or parse headers by position instead of by name may experience errors.
For a full list of headers that Cloudflare adds or modifies, refer to [HTTP request headers](https://developers.cloudflare.com/fundamentals/reference/http-headers/).
## DNS only
The following records should be set to DNS-only because the services they support are not compatible with Cloudflare's HTTP proxy. Proxying these records causes the associated service to break.
### Email
MX records cannot be proxied. If an A or AAAA record is used exclusively for email (for example, `mail.example.com`), it should also be set to DNS-only.
Cloudflare does not proxy SMTP traffic on port `25` by default. Proxying a record that handles email traffic causes mail servers to connect to Cloudflare's IP addresses instead of your mail server. This prevents email delivery.
Use a dedicated hostname for email that is separate from your proxied web traffic hostname. If your MX record points to the same hostname as your website, Cloudflare [dynamically prepends](https://developers.cloudflare.com/dns/manage-dns-records/troubleshooting/unexpected-dns-records/#%5Fdc-mx-and-dc--subdomains) `_dc-mx` to the hostname in the response for the MX record. This ensures that mail or service traffic bypasses the Cloudflare proxy and reaches your server directly.
Note
You can proxy SMTP traffic if you have [Cloudflare Spectrum](https://developers.cloudflare.com/spectrum/) configured for [SMTP](https://developers.cloudflare.com/spectrum/reference/configuration-options/#smtp).
### Domain verification
Third-party services often require CNAME or TXT records to verify domain ownership. Proxying a verification CNAME record returns Cloudflare IP addresses instead of the expected verification target. The third-party service cannot match the response and verification fails.
Common services that require DNS-only verification records:
* Google Workspace
* AWS Certificate Manager (`acm-validations.aws`)
* Squarespace (`verify.squarespace.com`)
* Amazon Amplify
Set domain verification records to **DNS Only** until verification completes. Some services require the record to be DNS-only permanently.
### SaaS-hosted websites
If your site is hosted on a SaaS platform (for example, [Wix](https://developers.cloudflare.com/dns/manage-dns-records/reference/vendor-specific-records/#wix), Squarespace, Webflow), the platform serves your site from its own infrastructure. Proxying the DNS record pointing to a SaaS platform causes one or more of the following issues:
* **SSL errors**: Both Cloudflare and the SaaS platform attempt to terminate SSL, which causes certificate mismatches or handshake failures.
* **Redirect loops**: Both services try to redirect HTTP to HTTPS, which creates an infinite loop.
* **Broken pages or assets**: The platform rejects requests that do not come directly from the expected DNS resolution.
If your SaaS platform does not explicitly support Cloudflare's proxy, set the record to **DNS-only**. Refer to [vendor-specific DNS records](https://developers.cloudflare.com/dns/manage-dns-records/reference/vendor-specific-records/) for platform-specific guidance.
Note
Some SaaS platforms are integrated with Cloudflare through [Cloudflare for SaaS](https://developers.cloudflare.com/cloudflare-for-platforms/cloudflare-for-saas/). For example, Shopify uses [O2O](https://developers.cloudflare.com/cloudflare-for-platforms/cloudflare-for-saas/saas-customers/provider-guides/shopify/), which allows proxied records to work correctly.
### Non-HTTP services
Records used for FTP, SSH, RDP, game servers, or other non-HTTP protocols must be DNS-only. Cloudflare's proxy only handles HTTP and HTTPS traffic. Proxying these records routes the traffic to Cloudflare, which drops the non-HTTP connection.
To proxy non-HTTP protocols, use [Cloudflare Spectrum](https://developers.cloudflare.com/spectrum/).
### Other CDN or proxy providers
If a CNAME record points to another CDN or proxy provider (for example, AWS CloudFront, Akamai, Fastly), proxying it through Cloudflare can cause conflicts between the two proxies:
* **SSL negotiation failures**: Both proxies attempt to terminate TLS, which creates certificate chain errors.
* **Routing loops**: Each proxy forwards requests back to the other.
* **Connectivity errors**: The upstream CDN rejects requests from Cloudflare's IP addresses.
Cloudflare automatically [prevents proxying](https://developers.cloudflare.com/dns/proxy-status/limitations/#proxy-eligibility) for some known targets. For targets that are not automatically blocked, set the record to **DNS-only** if you experience connectivity issues.
### API and webhook origin validation
Some third-party services validate the origin IP address of incoming API calls or webhook deliveries. When you proxy the DNS record for an endpoint that sends outbound requests or receives webhooks, the remote service sees Cloudflare's IP addresses instead of your server's IP address. This causes the validation to fail.
If a third-party service requires IP-based validation and does not accept [Cloudflare's IP ranges ↗](https://www.cloudflare.com/ips/), set the record for that service to **DNS-only**.
Was this helpful?
YesNo
## On this page
[Docs](https://developers.cloudflare.com/)
```json
{"@context":"https://schema.org","@type":"TechArticle","@id":"https://developers.cloudflare.com/dns/proxy-status/use-cases/#page","headline":"Use cases · Cloudflare DNS docs","description":"Common scenarios for proxied and DNS-only records.","url":"https://developers.cloudflare.com/dns/proxy-status/use-cases/","inLanguage":"en","image":"https://developers.cloudflare.com/og-docs.png","dateModified":"2026-04-23","publisher":{"@type":"Organization","name":"Cloudflare","url":"https://www.cloudflare.com/"},"isPartOf":{"@type":"WebSite","@id":"https://developers.cloudflare.com/#website","name":"Cloudflare Docs","url":"https://developers.cloudflare.com/"}}
```
---
---
description: Protect your domain from DNS spoofing with DNSSEC.
title: DNSSEC
image: https://developers.cloudflare.com/og-docs.png
---
[Skip to content](#main-content)
> Documentation Index
> Fetch the complete documentation index at: https://developers.cloudflare.com/dns/llms.txt
> Use this file to discover all available pages before exploring further.
# DNSSEC
Last updated Jun 24, 2026|Copy as Markdown|[View as Markdown](https://developers.cloudflare.com/dns/dnssec/index.md)|[Agent setup](https://developers.cloudflare.com/agent-setup/)
DNS Security Extensions (DNSSEC) adds an extra layer of authentication to DNS, ensuring requests are not routed to a spoofed domain.
For additional background on DNSSEC, visit the [Cloudflare Learning Center ↗](https://www.cloudflare.com/learning/dns/dns-security/).
---
## Disable DNSSEC
If you are onboarding an existing domain to Cloudflare, make sure DNSSEC **is disabled** at your registrar (where you purchased your domain name). Otherwise, your domain will experience connectivity errors when you change your nameservers.
Provider-specific DNSSEC instructions
This is not an exhaustive list, but the following links may be helpful:
* [DNSimple ↗](https://support.dnsimple.com/articles/cloudflare-ds-record/)
* [Domaindiscount24 ↗](https://support.domaindiscount24.com/hc/articles/4409759478161)
* [DreamHost ↗](https://help.dreamhost.com/hc/en-us/articles/219539467)
* [Dynadot ↗](https://www.dynadot.com/help/question/set-DNSSEC)
* [Enom ↗](https://support.enom.com/support/solutions/articles/201000065386)
* [Gandi ↗](https://docs.gandi.net/en/domain%5Fnames/advanced%5Fusers/dnssec.html)
* [GoDaddy ↗](https://www.godaddy.com/help/add-a-ds-record-23865)
* [Hostinger ↗](https://www.hostinger.com/support/3667267-how-to-use-dnssec-records-at-hostinger/)
* [Hover ↗](https://support.hover.com/support/solutions/articles/201000064716)
* [Infomaniak ↗](https://faq.infomaniak.com/2187)
* [InMotion Hosting ↗](https://www.inmotionhosting.com/support/edu/cpanel/enable-dnssec-cloudflare/)
* [INWX ↗](https://kb.inwx.com/en-us/3-nameserver/131)
* [Joker.com ↗](https://joker.com/faq/books/jokercom-faq-en/page/dnssec)
* [Name.com ↗](https://www.name.com/support/articles/205439058-managing-dnssec)
* [Namecheap ↗](https://www.namecheap.com/support/knowledgebase/article.aspx/9722/2232/managing-dnssec-for-domains-pointed-to-custom-dns/)
* [NameISP ↗](https://support.nameisp.com/knowledgebase/dns)
* [Namesilo ↗](https://www.namesilo.com/support/v2/articles/domain-manager/ds-records)
* [OVH ↗](https://help.ovhcloud.com/csm/en-dns-secure-domain-dnssec?id=kb%5Farticle%5Fview&sysparm%5Farticle=KB0051637)
* [Squarespace ↗](https://support.squarespace.com/hc/articles/4404183898125-Nameservers-and-DNSSEC-for-Squarespace-managed-domains#toc-dnssec)
* [Registro.br ↗](https://registro.br/tecnologia/dnssec/?secao=tutoriais-dns)
* [Porkbun ↗](https://kb.porkbun.com/article/93-how-to-install-dnssec) (do not fill out **keyData**)
* [TransIP ↗](https://www.transip.eu/knowledgebase/150-secure-domains-custom-nameservers-dnssec/)
Why you have to disable DNSSEC
When your domain has [DNSSEC enabled ↗](https://www.cloudflare.com/learning/dns/dns-security/#what-is-dnssec), your DNS provider digitally signs all your DNS records. This action prevents anyone else from issuing false DNS records on your behalf and redirecting traffic intended for your domain.
However, having a single set of signed records also prevents Cloudflare from issuing new DNS records on your behalf (which is part of using Cloudflare for your authoritative nameservers). So if you change your nameservers without disabling DNSSEC, DNSSEC will prevent Cloudflare's DNS records from resolving properly.
Note
If your previous provider allows you to add DNSKEY records on the zone apex and use these records in responses to DNS queries, refer to this [migration tutorial](https://developers.cloudflare.com/dns/dnssec/dnssec-active-migration/) to learn how to migrate a zone with DNSSEC enabled.
---
## Enable DNSSEC
When you enable DNSSEC, Cloudflare signs your zone, publishes your public signing keys, and generates your **DS** record.
### 1\. Activate DNSSEC in Cloudflare
1. In the Cloudflare dashboard, go to the **DNS Settings** page.
[Go to **Settings** ↗](https://dash.cloudflare.com/?to=/:account/:zone/dns/settings)
2. For **DNSSEC**, click **Enable DNSSEC**.
3. In the dialog, you have access to several necessary values to help you create a **DS** record at your registrar. Once you close the dialog, you can access this information by clicking **DS record** on the **DNSSEC** card.
### 2\. Add DS record to your registrar
Add the **DS** record to your registrar. If Algorithm 13 - Cloudflare's preferred cipher choice - is not listed by your registrar, it may also be called _ECDSA Curve P-256 with SHA-256_.
Provider-specific DNSSEC instructions
This is not an exhaustive list, but the following links may be helpful:
* [DNSimple ↗](https://support.dnsimple.com/articles/cloudflare-ds-record/)
* [Domaindiscount24 ↗](https://support.domaindiscount24.com/hc/articles/4409759478161)
* [DreamHost ↗](https://help.dreamhost.com/hc/en-us/articles/219539467)
* [Dynadot ↗](https://www.dynadot.com/help/question/set-DNSSEC)
* [Enom ↗](https://support.enom.com/support/solutions/articles/201000065386)
* [Gandi ↗](https://docs.gandi.net/en/domain%5Fnames/advanced%5Fusers/dnssec.html)
* [GoDaddy ↗](https://www.godaddy.com/help/add-a-ds-record-23865)
* [Hostinger ↗](https://www.hostinger.com/support/3667267-how-to-use-dnssec-records-at-hostinger/)
* [Hover ↗](https://support.hover.com/support/solutions/articles/201000064716)
* [Infomaniak ↗](https://faq.infomaniak.com/2187)
* [InMotion Hosting ↗](https://www.inmotionhosting.com/support/edu/cpanel/enable-dnssec-cloudflare/)
* [INWX ↗](https://kb.inwx.com/en-us/3-nameserver/131)
* [Joker.com ↗](https://joker.com/faq/books/jokercom-faq-en/page/dnssec)
* [Name.com ↗](https://www.name.com/support/articles/205439058-managing-dnssec)
* [Namecheap ↗](https://www.namecheap.com/support/knowledgebase/article.aspx/9722/2232/managing-dnssec-for-domains-pointed-to-custom-dns/)
* [NameISP ↗](https://support.nameisp.com/knowledgebase/dns)
* [Namesilo ↗](https://www.namesilo.com/support/v2/articles/domain-manager/ds-records)
* [OVH ↗](https://help.ovhcloud.com/csm/en-dns-secure-domain-dnssec?id=kb%5Farticle%5Fview&sysparm%5Farticle=KB0051637)
* [Squarespace ↗](https://support.squarespace.com/hc/articles/4404183898125-Nameservers-and-DNSSEC-for-Squarespace-managed-domains#toc-dnssec)
* [Registro.br ↗](https://registro.br/tecnologia/dnssec/?secao=tutoriais-dns)
* [Porkbun ↗](https://kb.porkbun.com/article/93-how-to-install-dnssec) (do not fill out **keyData**)
* [TransIP ↗](https://www.transip.eu/knowledgebase/150-secure-domains-custom-nameservers-dnssec/)
Note:
Cloudflare automatically adds **DS** records for domains using Cloudflare Registrar or those using `.ch` and `.cz` top-level domains.
---
## Other DNSSEC setup options
If you are using Cloudflare as your Secondary DNS provider and want to configure DNSSEC on your secondary zone(s), you have [three options](https://developers.cloudflare.com/dns/zone-setups/zone-transfers/cloudflare-as-secondary/dnssec-for-secondary/) depending on your setup.
If you want to set up DNSSEC on a subdomain zone, refer to [Subdomain DNSSEC](https://developers.cloudflare.com/dns/zone-setups/subdomain-setup/dnssec/).
---
## Migrate to Cloudflare with DNSSEC active
If your current DNS provider supports adding external DNSKEY records, you can use the [active migration](https://developers.cloudflare.com/dns/dnssec/dnssec-active-migration/) path for zero-downtime DNSSEC migration using multi-signer DNSSEC.
If your current provider does not support this, use the following approach. This involves a brief window without DNSSEC protection.
1. Remove the DS record at your registrar.
2. Wait for the DS record TTL to fully expire at the parent zone.
* Verify with `dig DS example.com` — commonly 24–48 hours for most TLDs.
3. Change your nameservers to Cloudflare.
4. Wait for the previous NS record TTL to expire (typically one hour or less).
5. [Enable DNSSEC in Cloudflare](#enable-dnssec) and add the new DS record at your registrar.
Caution
If you change nameservers before the old DS TTL has fully expired, validating resolvers will return SERVFAIL because the cached DS records will not match Cloudflare's DNSSEC keys.
## Roll back DNSSEC
If you need to disable DNSSEC after enabling it:
1. Remove the DS record at your registrar (or disable DNSSEC if using Cloudflare Registrar).
2. Keep zone signing enabled in Cloudflare until the DS TTL has fully expired at the parent zone.
3. The rollback window depends on the DS TTL, which varies by TLD.
Note
If you use Cloudflare Registrar, Cloudflare automatically submits DS records via CDS/CDNSKEY scanning, which can take one to two days. There is currently no way to manually control the exact timing of DS publication.
---
## Limitations
If your registrar does not support DNSSEC with Cloudflare's preferred cipher choice (Algorithm 13), you have several options:
* Contact your registrar to ask for DNSSEC with modern encryption.
* Transfer your domain to a different registrar that supports DNSSEC with Algorithm 13
* File a [complaint with ICANN ↗](https://www.icann.org/compliance/complaint), citing your registrar's lack of compliance.
If your top-level domain does not support DNSSEC with Algorithm 13 (also known as _ECDSA Curve P-256 with SHA-256_), [contact that top-level domain ↗](https://www.iana.org/domains/root/db).
Was this helpful?
YesNo
## On this page
[Docs](https://developers.cloudflare.com/)
```json
{"@context":"https://schema.org","@type":"TechArticle","@id":"https://developers.cloudflare.com/dns/dnssec/#page","headline":"DNSSEC · Cloudflare DNS docs","description":"Protect your domain from DNS spoofing with DNSSEC.","url":"https://developers.cloudflare.com/dns/dnssec/","inLanguage":"en","image":"https://developers.cloudflare.com/og-docs.png","dateModified":"2026-06-24","publisher":{"@type":"Organization","name":"Cloudflare","url":"https://www.cloudflare.com/"},"isPartOf":{"@type":"WebSite","@id":"https://developers.cloudflare.com/#website","name":"Cloudflare Docs","url":"https://developers.cloudflare.com/"}}
```
---
---
description: Follow this tutorial to migrate an existing DNS zone to Cloudflare without having to disable DNSSEC.
title: Migrate an existing zone with DNSSEC enabled
image: https://developers.cloudflare.com/og-docs.png
---
[Skip to content](#main-content)
> Documentation Index
> Fetch the complete documentation index at: https://developers.cloudflare.com/dns/llms.txt
> Use this file to discover all available pages before exploring further.
# Migrate an existing zone with DNSSEC enabled
Last updated May 5, 2026|Copy as Markdown|[View as Markdown](https://developers.cloudflare.com/dns/dnssec/dnssec-active-migration/index.md)|[Agent setup](https://developers.cloudflare.com/agent-setup/)
Follow this tutorial to migrate an existing DNS zone to Cloudflare without having to disable DNSSEC.
Caution
This procedure involves cross-importing the [zone signing keys (ZSKs) ↗](https://www.cloudflare.com/learning/dns/dns-records/dnskey-ds-records/) from one provider to the other. To learn more about this, consider this article [about multi-signer DNSSEC](https://developers.cloudflare.com/dns/dnssec/multi-signer-dnssec/about/) or refer to [RFC 8901 ↗](https://www.rfc-editor.org/rfc/rfc8901.html).
This is an advanced procedure and assume some familiarity with [DNS concepts](https://developers.cloudflare.com/dns/concepts/), [API operations](https://developers.cloudflare.com/fundamentals/api/), and basic setup steps. Assumed knowledge that is not detailed in this tutorial can be referenced through the linked content in each of the steps.
## Requirement
The provider you are migrating from must allow you to add DNSKEY records on the zone apex and use these records in responses to DNS queries.
## 1\. Set up Cloudflare
1. [Add your zone to Cloudflare](https://developers.cloudflare.com/fundamentals/manage-domains/add-site/).
To add your zone using the API, refer to the [Create Zone endpoint](https://developers.cloudflare.com/api/resources/zones/methods/create/).
2. [Review the records found by the automatic scan](https://developers.cloudflare.com/dns/manage-dns-records/how-to/create-dns-records/) or [import your zone file](https://developers.cloudflare.com/dns/manage-dns-records/how-to/import-and-export/).
To import the zone file using the API, refer to the [Import DNS Records endpoint](https://developers.cloudflare.com/api/resources/dns/subresources/records/methods/import/).
3. On the [**DNS Settings** ↗](https://dash.cloudflare.com/?to=/:account/:zone/dns/settings) page, select **Enable DNSSEC**. Or use the following [API request](https://developers.cloudflare.com/api/resources/dns/subresources/dnssec/methods/edit/).
Required API token permissions
At least one of the following [token permissions](https://developers.cloudflare.com/fundamentals/api/reference/permissions/) is required:
* `DNS Write`
```bash
curl "https://api.cloudflare.com/client/v4/zones/$ZONE_ID/dnssec" \
--request PATCH \
--header "Authorization: Bearer $CLOUDFLARE_API_TOKEN" \
--json '{
"status": "active"
}'
```
1. On the [**DNS Settings** ↗](https://dash.cloudflare.com/?to=/:account/:zone/dns/settings) page, enable **Multi-signer DNSSEC**. Or use the following [API request](https://developers.cloudflare.com/api/resources/dns/subresources/dnssec/methods/edit/).
Required API token permissions
At least one of the following [token permissions](https://developers.cloudflare.com/fundamentals/api/reference/permissions/) is required:
* `DNS Write`
```bash
curl "https://api.cloudflare.com/client/v4/zones/$ZONE_ID/dnssec" \
--request PATCH \
--header "Authorization: Bearer $CLOUDFLARE_API_TOKEN" \
--json '{
"dnssec_multi_signer": true
}'
```
## 2\. Cross-import ZSKs
1. Add the [ZSK ↗](https://www.cloudflare.com/learning/dns/dns-records/dnskey-ds-records/) of your previous provider to Cloudflare by creating a DNSKEY record on your zone.
You can do this [on the dashboard](https://developers.cloudflare.com/dns/manage-dns-records/how-to/create-dns-records/#create-dns-records) or through the [Create DNS Record endpoint](https://developers.cloudflare.com/api/resources/dns/subresources/records/methods/create/), as in the following example.
Required API token permissions
At least one of the following [token permissions](https://developers.cloudflare.com/fundamentals/api/reference/permissions/) is required:
* `DNS Write`
```bash
curl "https://api.cloudflare.com/client/v4/zones/$ZONE_ID/dns_records" \
--request POST \
--header "Authorization: Bearer $CLOUDFLARE_API_TOKEN" \
--json '{
"type": "DNSKEY",
"name": "",
"data": {
"flags": 256,
"protocol": 3,
"algorithm": 13,
"public_key": ""
},
"ttl": 3600
}'
```
1. Get Cloudflare's ZSK using either the API or a query from one of the assigned Cloudflare nameservers.
API example:
```bash
curl https://api.cloudflare.com/client/v4/zones/{zone_id}/dnssec/zsk \
--header "X-Auth-Email: " \
--header "X-Auth-Key: "
```
Command line query example:
```sh
dig dnskey @ +noall +answer | grep 256
```
1. Add Cloudflare's ZSK that you fetched in the last step to your previous provider.
Note
You can check if both providers are responding with both ZSKs by running one `dig` command for each, as in the following example. You can also use [Dig Web Interface ↗](https://www.digwebinterface.com/?type=DNSKEY).
```sh
dig dnskey @ +noall +answer
dig dnskey @ +noall +answer
```
Both queries should return both ZSKs (identified with tag `256`).
Example
```sh
dig multisigner.info dnskey @dns1.p01.nsone.net. +noall +answer
```
```sh
multisigner.info. 3600 IN DNSKEY 257 3 13 t+4DJBmA==
multisigner.info. 3600 IN DNSKEY 256 3 13 pxEU0xOg==
multisigner.info. 3600 IN DNSKEY 256 3 13 oJMXhSA==
```
```sh
dig multisigner.info dnskey @ashley.ns.cloudflare.com +noall +answer
```
```sh
multisigner.info. 3600 IN DNSKEY 257 3 13 mdsseKGQ==
multisigner.info. 3600 IN DNSKEY 256 3 13 oJMXhSA==
multisigner.info. 3600 IN DNSKEY 256 3 13 pxEU0xOg==
```
## 3\. Set up registrar
1. Add Cloudflare DS record to your registrar. You can see your Cloudflare DS record on the [**DNS Settings** ↗](https://dash.cloudflare.com/?to=/:account/:zone/dns/settings) page, under **DS Record**.
2. Add Cloudflare assigned nameservers to your registrar. You can see your Cloudflare nameservers on the [**DNS Records** ↗](https://dash.cloudflare.com/?to=/:account/:zone/dns/records) page
At this point your zone is in a [multi-signer DNSSEC setup](https://developers.cloudflare.com/dns/dnssec/multi-signer-dnssec/).
## 4\. Remove previous provider
1. Remove your previous provider's DS record from your registrar.
2. Remove your previous provider's nameservers from your registrar.
3. After waiting at least one and a half times the [TTL ↗](https://www.cloudflare.com/learning/cdn/glossary/time-to-live-ttl/) of your previous provider DS record, you can remove the DNSKEY record (containing your previous provider ZSK) that you added to your Cloudflare zone in [step 2](#2-cross-import-zsks).
Note
You can find out the TTL of your previous provider DS record by running a `dig` command, as in the following example, or by using this [Dig Web Interface link ↗](https://www.digwebinterface.com/?type=DS).
```sh
dig multisigner.info ds +noall +answer
```
```sh
multisigner.info. 3600 IN DS 2371 13 2 227B4C7FF3E1D49D59BAF39BDA54CA0839DE700DD9896076AA3E6AD7 19A0CF55
multisigner.info. 3600 IN DS 48553 13 2 893709B51A9C53D011A4054B15FC5454BEDF68E739BB3B3FA1E333DA 7B8DACFE
```
In this example, both DS records have a TTL of `3600` seconds. Cloudflare's DS record always has the key tag set to `2371`, so the second line of the response is the DS record of the other provider.
Was this helpful?
YesNo
## On this page
[Docs](https://developers.cloudflare.com/)
```json
{"@context":"https://schema.org","@type":"TechArticle","@id":"https://developers.cloudflare.com/dns/dnssec/dnssec-active-migration/#page","headline":"DNSSEC migration tutorial · Cloudflare DNS docs","description":"Follow this tutorial to migrate an existing DNS zone to Cloudflare without having to disable DNSSEC.","url":"https://developers.cloudflare.com/dns/dnssec/dnssec-active-migration/","inLanguage":"en","image":"https://developers.cloudflare.com/og-docs.png","dateModified":"2026-05-05","publisher":{"@type":"Organization","name":"Cloudflare","url":"https://www.cloudflare.com/"},"isPartOf":{"@type":"WebSite","@id":"https://developers.cloudflare.com/#website","name":"Cloudflare Docs","url":"https://developers.cloudflare.com/"},"keywords":["Migration"]}
```
---
---
description: Possible DNSSEC states and their meanings.
title: DNSSEC states
image: https://developers.cloudflare.com/og-docs.png
---
[Skip to content](#main-content)
> Documentation Index
> Fetch the complete documentation index at: https://developers.cloudflare.com/dns/llms.txt
> Use this file to discover all available pages before exploring further.
# DNSSEC states
Last updated Apr 16, 2026|Copy as Markdown|[View as Markdown](https://developers.cloudflare.com/dns/dnssec/dnssec-states/index.md)|[Agent setup](https://developers.cloudflare.com/agent-setup/)
This page describes different DNSSEC states and how they relate to the responses you get from the [DNSSEC details API endpoint](https://developers.cloudflare.com/api/resources/dns/subresources/dnssec/methods/get/).
| State | API response | Description |
| ---------------- | -------------------------------------------------------- | ---------------------------------------------------------------------------------------------------------------------------------------------------------------------------------------------------------------------------- |
| Pending | "status":"pending" "modified\_on": | DNSSEC has been enabled but the Cloudflare DS record has not been added at the registrar. |
| Active | "status":"active" "modified\_on": | DNSSEC has been enabled and the Cloudflare DS record is present at the registrar. |
| Pending-disabled | "status":"pending-disabled" "modified\_on": | DNSSEC has been disabled but the Cloudflare DS record is still added at the registrar. |
| Disabled | "status":"disabled" "modified\_on": | DNSSEC has been disabled and the Cloudflare DS record has been removed from the registrar. |
| Deleted | "status":"disabled" "modified\_on": null | DNSSEC has never been enabled for the zone or DNSSEC has been disabled and then deleted using the [Delete DNSSEC records endpoint](https://developers.cloudflare.com/api/resources/dns/subresources/dnssec/methods/delete/). |
Caution
Once you have enabled DNSSEC on a zone for the first time, you cannot transition directly from an `active` state to a `deleted` state. You can only [delete DNSSEC records](https://developers.cloudflare.com/api/resources/dns/subresources/dnssec/methods/delete/) once your zone DNSSEC is in a `disabled` state. Cloudflare prevents you from deleting DNSSEC records before removing the DS record from the registrar to avoid DNS resolution issues.
In both `pending` and `active` states, Cloudflare signs the zone and responds with RRSIG, NSEC, DNSKEY, CDS, and CDNSKEY record types.
In `pending-disabled` and `disabled` states, Cloudflare still signs the zone and serves RRSIG, NSEC, and DNSKEY record types, but the CDS and CDNSKEY records are set to zero ([RFC 8078 ↗](https://www.rfc-editor.org/rfc/rfc8078.html#section-4)), signaling to the registrar that DNSSEC should be disabled.
In `deleted` state, Cloudflare does **not** sign the zone and does **not** respond with RRSIG, NSEC, DNSKEY, CDS, and CDNSKEY record types.
Refer to [How DNSSEC works ↗](https://www.cloudflare.com/dns/dnssec/how-dnssec-works/) to learn more about the authentication process and records involved.
Was this helpful?
YesNo
## On this page
[Docs](https://developers.cloudflare.com/)
```json
{"@context":"https://schema.org","@type":"TechArticle","@id":"https://developers.cloudflare.com/dns/dnssec/dnssec-states/#page","headline":"DNSSEC states · Cloudflare DNS docs","description":"Possible DNSSEC states and their meanings.","url":"https://developers.cloudflare.com/dns/dnssec/dnssec-states/","inLanguage":"en","image":"https://developers.cloudflare.com/og-docs.png","dateModified":"2026-04-16","publisher":{"@type":"Organization","name":"Cloudflare","url":"https://www.cloudflare.com/"},"isPartOf":{"@type":"WebSite","@id":"https://developers.cloudflare.com/#website","name":"Cloudflare Docs","url":"https://developers.cloudflare.com/"}}
```
---
---
description: Learn how to enable NSEC3 support with Cloudflare to meet compliance requirements.
title: NSEC3 support
image: https://developers.cloudflare.com/og-docs.png
---
[Skip to content](#main-content)
> Documentation Index
> Fetch the complete documentation index at: https://developers.cloudflare.com/dns/llms.txt
> Use this file to discover all available pages before exploring further.
# NSEC3 support
Last updated Apr 17, 2026|Copy as Markdown|[View as Markdown](https://developers.cloudflare.com/dns/dnssec/enable-nsec3/index.md)|[Agent setup](https://developers.cloudflare.com/agent-setup/)
As explained in [our blog ↗](https://blog.cloudflare.com/black-lies/), Cloudflare's implementation of negative answers with NSEC is protected against zone walking[1](#user-content-fn-1). This implementation, also referred to as Compact Denial of Existence ([RFC 9824 ↗](https://www.rfc-editor.org/rfc/rfc9824.html)), removes the need for NSEC3 and is significantly more efficient.
However, if you must use NSEC3 for compliance reasons, you can enable it as explained below.
## Enable NSEC3
Use the [Edit DNSSEC Status endpoint](https://developers.cloudflare.com/api/resources/dns/subresources/dnssec/methods/edit/), setting `status` to `active` and `dnssec_use_nsec3` to `true`. You should replace the values started by `$` with your zone ID and authentication credentials. To learn more about using the Cloudflare API, refer to [Fundamentals](https://developers.cloudflare.com/fundamentals/api/get-started/).
Required API token permissions
At least one of the following [token permissions](https://developers.cloudflare.com/fundamentals/api/reference/permissions/) is required:
* `DNS Write`
```bash
curl "https://api.cloudflare.com/client/v4/zones/$ZONE_ID/dnssec" \
--request PATCH \
--header "Authorization: Bearer $CLOUDFLARE_API_TOKEN" \
--json '{
"dnssec_use_nsec3": true,
"status": "active"
}'
```
### Pre-signed DNSSEC
If you use Cloudflare as a secondary DNS provider with [pre-signed DNSSEC](https://developers.cloudflare.com/dns/zone-setups/zone-transfers/cloudflare-as-secondary/dnssec-for-secondary/), setting `dnssec_use_nsec3` to `true` means that Cloudflare will use NSEC3 records as transferred in from your primary DNS provider.
Otherwise, NSEC3 records will be generated and signed at request time.
## Verify NSEC3 is in use
To validate that NSEC3 is being used, consider the following scenarios:
### Non-existent zone name
A command like the following would trigger a signed negative response using NSEC3 for proof of non-existence. Look for NSEC3 records under the `Authority Section` of the response.
```sh
dig +dnssec doesnotexist.example.com
```
### Non-existent record type at an existing name
If the name `www` exists but the type TXT does not, the example below would trigger a signed NODATA response using NSEC3\. Look for NSEC3 records under the `Authority Section` of the response.
```sh
dig +dnssec www.example.com TXT
```
## Availability
NSEC3 is only available for zones on the Enterprise plan.
## Footnotes
1. A method where an attacker exploits NSEC negative answers to obtain all names in a given zone. This is possible when such negative answers provide information on the previous and next names in a chain. [↩](#user-content-fnref-1)
Was this helpful?
YesNo
## On this page
[Docs](https://developers.cloudflare.com/)
```json
{"@context":"https://schema.org","@type":"TechArticle","@id":"https://developers.cloudflare.com/dns/dnssec/enable-nsec3/#page","headline":"NSEC3 support · Cloudflare DNS docs","description":"Learn how to enable NSEC3 support with Cloudflare to meet compliance requirements.","url":"https://developers.cloudflare.com/dns/dnssec/enable-nsec3/","inLanguage":"en","image":"https://developers.cloudflare.com/og-docs.png","dateModified":"2026-04-17","publisher":{"@type":"Organization","name":"Cloudflare","url":"https://www.cloudflare.com/"},"isPartOf":{"@type":"WebSite","@id":"https://developers.cloudflare.com/#website","name":"Cloudflare Docs","url":"https://developers.cloudflare.com/"}}
```
---
---
description: How multi-signer DNSSEC works with multiple DNS providers.
title: About
image: https://developers.cloudflare.com/og-docs.png
---
[Skip to content](#main-content)
> Documentation Index
> Fetch the complete documentation index at: https://developers.cloudflare.com/dns/llms.txt
> Use this file to discover all available pages before exploring further.
# About
Last updated Apr 16, 2026|Copy as Markdown|[View as Markdown](https://developers.cloudflare.com/dns/dnssec/multi-signer-dnssec/about/index.md)|[Agent setup](https://developers.cloudflare.com/agent-setup/)
Multi-signer DNSSEC consists of two models that allow different authoritative DNS providers to serve the same zone and have DNSSEC enabled at the same time.
This means better compatibility with DNS features that require live-signing of DNS records (at query time), and also allows you to [migrate zones to Cloudflare without having to disable DNSSEC](https://developers.cloudflare.com/dns/dnssec/dnssec-active-migration/).
You can [set up multi-signer DNSSEC](https://developers.cloudflare.com/dns/dnssec/multi-signer-dnssec/setup/) using either one of the models described in [RFC 8901 ↗](https://www.rfc-editor.org/rfc/rfc8901.html).
## How it works
Note
This is a simplified explanation to give you context and clarify what is involved in a [multi-signer DNSSEC setup](https://developers.cloudflare.com/dns/dnssec/multi-signer-dnssec/setup/). For technical details refer to [RFC 8901 ↗](https://www.rfc-editor.org/rfc/rfc8901.html). To read more about DNSSEC, refer to [How DNSSEC works ↗](https://www.cloudflare.com/dns/dnssec/how-dnssec-works/).
Multi-signer DNSSEC looks into the chain of trust that is necessary for DNSSEC validation and leverages that to guarantee that validation is completed even when multiple providers are involved.
An example case where validation would otherwise be an issue is if a resolver has cached a [DNSKEY record set ↗](https://www.cloudflare.com/learning/dns/dns-records/dnskey-ds-records/) from one provider but receives a response signed by another provider.
To avoid issues in that case, when you set up multi-signer DNSSEC, you adjust:
1. The Zone Signing Keys (ZSK) that your DNS providers have in their DNSKEY record sets.
2. Who is responsible for the Secure Entry Point (SEP), Key Signing Keys (KSK), and Delegation Signer (DS) record.
When these configurations are adjusted in a way that (a) all involved providers have each other's public Zone Signing Keys (ZSK), and that (b) Delegation Signer (DS) records reference the necessary Key Signing Keys (KSK), then live-signing of zones by multiple providers is no longer a problem.
### Model 1
Whereas in both models all providers have each other's Zone Signing Keys (ZSK) added to their DNSKEY record set, in model 1, only one Key Signing Key (KSK) is used to sign such DNSKEY record sets. Management of this KSK and its reference by the DS record (that is, the Secure Entry Point) is the responsibility of the zone owner or only one provider (designated by the zone owner).
### Model 2
In model 2, on the other hand, each provider uses its own KSK to sign its own DNSKEY record set, and these KSKs are then referenced by the DS record (Secure Entry Point).
---
## What happens when multi-signer DNSSEC is on
When you turn on multi-signer DNSSEC on Cloudflare, the following changes occur:
1. **Internal flag**: Cloudflare sets an internal flag that allows you to add DNSKEY records to your zone.
2. **External ZSKs included**: When you add DNSKEY records from your secondary provider, Cloudflare includes them in the DNSKEY RRset.
3. **Signing with Cloudflare's KSK**: Cloudflare signs the external ZSKs with Cloudflare's KSK, creating a Multi-signer DNSSEC Model 2 RRset.
4. **CDS/CDNSKEY generation**: If you add your other provider's KSK (not required but recommended), Cloudflare produces CDS/CDNSKEY RRsets for compatibility with validation tools.
This configuration ensures that resolvers can validate responses from either provider, as all ZSK DNSKEYs are signed by the appropriate KSKs referenced in the DS records.
---
## Best practices
When setting up multi-signer DNSSEC, follow the best practices below to help you achieve a smooth deployment.
### Use model 2
Cloudflare recommends model 2 for multi-signer setups. In this model, each provider has their own KSK DNSKEY, resulting in two DS records (one for each provider). This provides better independence and flexibility.
### Understand DNSKEY flags
* **ZSKs (Zone Signing Keys)**: flag `256`
* **KSKs (Key Signing Keys)**: flag `257`
When exchanging keys between providers, ensure you are adding the correct key type (typically ZSKs) to the DNSKEY RRset.
### Adhere to TTLs
Always wait for the TTL duration after making changes to DNSKEYs and DS records before proceeding to the next step. This ensures that cached records expire before new records take effect, preventing validation failures.
### Verify provider compatibility
Not all DNS providers support adding external DNSKEYs to their DNSKEY RRset. Before starting a multi-signer migration:
* Verify that your other provider supports multi-signer DNSSEC.
* Confirm they can add Cloudflare's ZSK to their DNSKEY records.
* Test the configuration in a non-production environment if possible.
Some third-party providers may not support the required functionality.
### Test thoroughly
Multi-signer DNSSEC involves coordinating cryptographic keys across multiple providers. Before deploying to production:
1. Verify that both providers have each other's ZSKs in their DNSKEY RRsets.
2. Confirm that both DS records are present at the registrar.
3. Use DNSSEC validation tools to test resolution from both providers.
4. Monitor for validation errors during the transition period.
Was this helpful?
YesNo
## On this page
[Docs](https://developers.cloudflare.com/)
```json
{"@context":"https://schema.org","@type":"TechArticle","@id":"https://developers.cloudflare.com/dns/dnssec/multi-signer-dnssec/about/#page","headline":"About multi-signer DNSSEC · Cloudflare DNS docs","description":"How multi-signer DNSSEC works with multiple DNS providers.","url":"https://developers.cloudflare.com/dns/dnssec/multi-signer-dnssec/about/","inLanguage":"en","image":"https://developers.cloudflare.com/og-docs.png","dateModified":"2026-04-16","publisher":{"@type":"Organization","name":"Cloudflare","url":"https://www.cloudflare.com/"},"isPartOf":{"@type":"WebSite","@id":"https://developers.cloudflare.com/#website","name":"Cloudflare Docs","url":"https://developers.cloudflare.com/"}}
```
---
---
description: Configure multi-signer DNSSEC for your zone.
title: Set up multi-signer DNSSEC
image: https://developers.cloudflare.com/og-docs.png
---
[Skip to content](#main-content)
> Documentation Index
> Fetch the complete documentation index at: https://developers.cloudflare.com/dns/llms.txt
> Use this file to discover all available pages before exploring further.
# Set up multi-signer DNSSEC
Last updated Apr 16, 2026|Copy as Markdown|[View as Markdown](https://developers.cloudflare.com/dns/dnssec/multi-signer-dnssec/setup/index.md)|[Agent setup](https://developers.cloudflare.com/agent-setup/)
This page explains how you can enable [multi-signer DNSSEC](https://developers.cloudflare.com/dns/dnssec/multi-signer-dnssec/about/) with Cloudflare, using the [model 2](https://developers.cloudflare.com/dns/dnssec/multi-signer-dnssec/about/#model-2) as described in [RFC 8901 ↗](https://www.rfc-editor.org/rfc/rfc8901.html).
## Before you begin
Note that:
* This process requires that your other DNS provider(s) also support multi-signer DNSSEC.
* Although you can complete a few steps via the dashboard, currently the whole process can only be completed using the API.
* Enabling **DNSSEC** and **Multi-signer DNSSEC** on the [**DNS Settings** ↗](https://dash.cloudflare.com/?to=/:account/:zone/dns/settings) page only replaces the first step in [1\. Set up Cloudflare zone](#1-set-up-cloudflare-zone). You still have to follow the rest of this tutorial to complete the setup.
## 1\. Set up Cloudflare zone
### Cloudflare as Primary (full setup)
If you use Cloudflare as a primary DNS provider, meaning that you manage your DNS records in Cloudflare, do the following:
1. In the Cloudflare dashboard, go to the **DNS Settings** page.
[Go to **Settings** ↗](https://dash.cloudflare.com/?to=/:account/:zone/dns/settings)
2. Select **Enable DNSSEC** and **Confirm**.
Note
For the purpose of this tutorial, you will update your registrar with the DS record later, in [Step 3](https://developers.cloudflare.com/dns/dnssec/multi-signer-dnssec/setup/#3-set-up-registrar).
1. Also enable **Multi-signer DNSSEC** and **Multi-provider DNS**.
2. Go to the [**DNS Records** ↗](https://dash.cloudflare.com/?to=/:account/:zone/dns/records) page and create the following records at your zone apex (meaning you should use `@` in the record **Name** field):
* A [DNSKEY record](https://developers.cloudflare.com/dns/manage-dns-records/reference/dns-record-types/#ds-and-dnskey) with the zone signing key(s) (ZSKs) of your external provider(s).
* An [NS record](https://developers.cloudflare.com/dns/manage-dns-records/reference/dns-record-types/#ns) with your external provider nameservers.
1. Use the [Edit DNSSEC Status endpoint](https://developers.cloudflare.com/api/resources/dns/subresources/dnssec/methods/edit/) to enable DNSSEC and activate multi-signer DNSSEC for your zone. Set `status` to `active` and `dnssec_multi_signer` to `true`, as in the following example.
Required API token permissions
At least one of the following [token permissions](https://developers.cloudflare.com/fundamentals/api/reference/permissions/) is required:
* `DNS Write`
```bash
curl "https://api.cloudflare.com/client/v4/zones/$ZONE_ID/dnssec" \
--request PATCH \
--header "Authorization: Bearer $CLOUDFLARE_API_TOKEN" \
--json '{
"status": "active",
"dnssec_multi_signer": true
}'
```
1. Add the ZSK(s) of your external provider(s) to Cloudflare by creating a DNSKEY record on your zone.
Required API token permissions
At least one of the following [token permissions](https://developers.cloudflare.com/fundamentals/api/reference/permissions/) is required:
* `DNS Write`
```bash
curl "https://api.cloudflare.com/client/v4/zones/$ZONE_ID/dns_records" \
--request POST \
--header "Authorization: Bearer $CLOUDFLARE_API_TOKEN" \
--json '{
"type": "DNSKEY",
"name": "",
"data": {
"flags": 256,
"protocol": 3,
"algorithm": 13,
"public_key": ""
},
"ttl": 3600
}'
```
1. Add your external provider(s) nameservers as NS records on your zone apex.
Required API token permissions
At least one of the following [token permissions](https://developers.cloudflare.com/fundamentals/api/reference/permissions/) is required:
* `DNS Write`
```bash
curl "https://api.cloudflare.com/client/v4/zones/$ZONE_ID/dns_records" \
--request POST \
--header "Authorization: Bearer $CLOUDFLARE_API_TOKEN" \
--json '{
"type": "NS",
"name": "",
"content": "",
"ttl": 86400
}'
```
1. Enable the usage of the nameservers you added in the previous step by using the API request below.
Caution
This step is required. Without turning on this setting, Cloudflare will ignore any `NS` records created on the zone apex. This means that responses to DNS queries made to the zone apex and requesting `NS` records will only contain Cloudflare nameservers.
Required API token permissions
At least one of the following [token permissions](https://developers.cloudflare.com/fundamentals/api/reference/permissions/) is required:
* `Zone DNS Settings Write`
* `DNS Write`
```bash
curl "https://api.cloudflare.com/client/v4/zones/$ZONE_ID/dns_settings" \
--request PATCH \
--header "Authorization: Bearer $CLOUDFLARE_API_TOKEN" \
--json '{
"multi_provider": true
}'
```
### Cloudflare as Secondary
If you use Cloudflare as a secondary DNS provider, do the following:
1. In the Cloudflare dashboard, go to the **DNS Settings** page.
[Go to **Settings** ↗](https://dash.cloudflare.com/?to=/:account/:zone/dns/settings)
2. For **DNSSEC with Secondary DNS** select **Live signing**.
Note
For the purpose of this tutorial, you will update your registrar with the DS record later, in [Step 3](https://developers.cloudflare.com/dns/dnssec/multi-signer-dnssec/setup/#3-set-up-registrar).
1. Also enable **Multi-signer DNSSEC**.
2. Add the zone signing key(s) (ZSKs) of your external provider(s) to a DNSKEY record at your primary DNS provider. This record should be transferred successfully to Cloudflare.
3. Add your external provider(s) nameservers as NS records on your zone apex at your primary DNS provider. These records should be transferred successfully to Cloudflare.
1. Use the [Edit DNSSEC Status endpoint](https://developers.cloudflare.com/api/resources/dns/subresources/dnssec/methods/edit/) to enable DNSSEC and activate multi-signer DNSSEC for your zone. Set `status` to `active` and `dnssec_multi_signer` to `true`, as in the following example.
Required API token permissions
At least one of the following [token permissions](https://developers.cloudflare.com/fundamentals/api/reference/permissions/) is required:
* `DNS Write`
```bash
curl "https://api.cloudflare.com/client/v4/zones/$ZONE_ID/dnssec" \
--request PATCH \
--header "Authorization: Bearer $CLOUDFLARE_API_TOKEN" \
--json '{
"status": "active",
"dnssec_multi_signer": true
}'
```
1. Add the ZSK(s) of your external provider(s) to a DNSKEY record at your primary DNS provider. This record should be transferred successfully to Cloudflare.
2. Add your external provider(s) nameservers as NS records on your zone apex at your primary DNS provider. These records should be transferred successfully to Cloudflare.
## 2\. Set up external provider
1. Get Cloudflare's ZSK using either the API or a query from one of the assigned Cloudflare nameservers.
API example:
```bash
curl "https://api.cloudflare.com/client/v4/zones/{zone_id}/dnssec/zsk" \
--header "X-Auth-Email: " \
--header "X-Auth-Key: "
```
Command line query example:
```sh
$ dig dnskey @ +noall +answer | grep 256
```
1. Add Cloudflare's ZSK that you fetched in the previous step to the DNSKEY record set of your external provider(s).
2. Add Cloudflare's nameservers to the NS record set at your external provider(s).
## 3\. Set up registrar
1. Add DS records to your registrar, one for each provider. You can see your Cloudflare DS record on the [**DNS Settings** ↗](https://dash.cloudflare.com/?to=/:account/:zone/dns/settings) page, under **DS Record**.
2. Update the nameserver settings at your registrar to include the nameservers of all providers you will be using for your multi-signer DNSSEC setup.
Was this helpful?
YesNo
## On this page
[Docs](https://developers.cloudflare.com/)
```json
{"@context":"https://schema.org","@type":"TechArticle","@id":"https://developers.cloudflare.com/dns/dnssec/multi-signer-dnssec/setup/#page","headline":"Set up multi-signer DNSSEC · Cloudflare DNS docs","description":"Configure multi-signer DNSSEC for your zone.","url":"https://developers.cloudflare.com/dns/dnssec/multi-signer-dnssec/setup/","inLanguage":"en","image":"https://developers.cloudflare.com/og-docs.png","dateModified":"2026-04-16","publisher":{"@type":"Organization","name":"Cloudflare","url":"https://www.cloudflare.com/"},"isPartOf":{"@type":"WebSite","@id":"https://developers.cloudflare.com/#website","name":"Cloudflare Docs","url":"https://developers.cloudflare.com/"}}
```
---
---
description: Learn how to troubleshoot issues with DNSSEC
title: Troubleshooting
image: https://developers.cloudflare.com/og-docs.png
---
[Skip to content](#main-content)
> Documentation Index
> Fetch the complete documentation index at: https://developers.cloudflare.com/dns/llms.txt
> Use this file to discover all available pages before exploring further.
# Troubleshooting
Last updated Apr 16, 2026|Copy as Markdown|[View as Markdown](https://developers.cloudflare.com/dns/dnssec/troubleshooting/index.md)|[Agent setup](https://developers.cloudflare.com/agent-setup/)
Learn more about how to troubleshoot issues with DNSSEC.
## Test DNSSEC with Dig
`Dig` is a command-line tool to query a nameserver for DNS records.
For instance, `dig` can ask a DNS resolver for the IP address of `www.cloudflare.com`:
```sh
dig www.cloudflare.com +short
```
```sh
198.41.215.162
198.41.214.162
```
The option `+short` outputs the result only.
Use `+dnssec` to verify that the DNS records are signed:
```sh
dig www.cloudflare.com +dnssec +short
```
```sh
198.41.214.162
198.41.215.162
A 13 3 300 20180927180434 20180925160434 35273 cloudflare.com. DYYZ/bhHSAIlpvu/HEUsxlzkC9NsswbCQ7dcfcuiNBrbhYV7k3AI8t46 QMnOlfhwT6jqsfN7ePV6Fwpym3B0pg==
```
In this example, the last line of output is the `RRSIG` record. `RRSIG` is the DNSSEC signature attached to the record. With the `RRSIG`, a DNS resolver determines whether a DNS response is trusted.
`Dig` can also retrieve the public key used to verify the DNS record, `DNSKEY`:
```sh
dig DNSKEY cloudflare.com +short
```
```sh
257 3 13 mdsswUyr3DPW132mOi8V9xESWE8jTo0dxCjjnopKl+GqJxpVXckHAeF+ KkxLbxILfDLUT0rAK9iUzy1L53eKGQ==
256 3 13 koPbw9wmYZ7ggcjnQ6ayHyhHaDNMYELKTqT+qRGrZpWSccr/lBcrm10Z 1PuQHB3Azhii+sb0PYFkH1ruxLhe5g==
```
A domain's DNS records are all signed with the same public key. Therefore, query for the apex domain (`cloudflare.com`) public key, not the subdomain (`www.cloudflare.com`) public key.
The DNS response includes two records:
* `DNSKEY` record **256** is the public key called zone signing key (ZSK). ZSKs are used to verify the DNS record signatures for `A`, `MX`, `CNAME`, `SRV`, etc.
* `DNSKEY` record **257** is called the key signing key (KSK). KSKs are used to verify the signatures of the `DNSKEY`, `CDS`, and `CDNSKEY` records.
Note
Details on how to verify the signatures with the public key are beyond the scope of this article.
When not using the `+short` option with `dig`, a DNS response is DNSSEC authenticated if the `ad` flag appears in the response header:
```sh
dig www.cloudflare.com
```
```sh
[...]
;; ->>HEADER<<- opcode: QUERY, status: NOERROR, id: 65326
;; flags: qr rd ra ad; QUERY: 1, ANSWER: 2, AUTHORITY: 0, ADDITIONAL: 1
[...]
;; QUESTION SECTION:
;www.cloudflare.com. IN A
[...]
;; ANSWER SECTION:
www.cloudflare.com. 15 IN A 198.41.215.162
www.cloudflare.com. 15 IN A 198.41.214.162
```
---
## Troubleshoot DNSSEC validation using DNSViz
Note
DNSViz is a public, free online tool to visualize and help discover issues with your DNSSEC configuration and is **not** associated with Cloudflare.
To visualize and discover potential issues with DNSSEC:
1. Go to [https://dnsviz.net/ ↗](https://dnsviz.net/).
2. Enter a domain name in the text field that appears.
3. If DNSViz has never analyzed the site before, select **Analyze**.
4. If the site has been analyzed by DNSViz before, select **Update Now**.
### Example with missing or incorrect RRSIG record on authoritative nameserver
Below is an example of how dnsviz.net will display incorrect delegation when no valid DNSKEY records are provided by the authoritative nameserver to match the DS record published by the TLD nameserver:
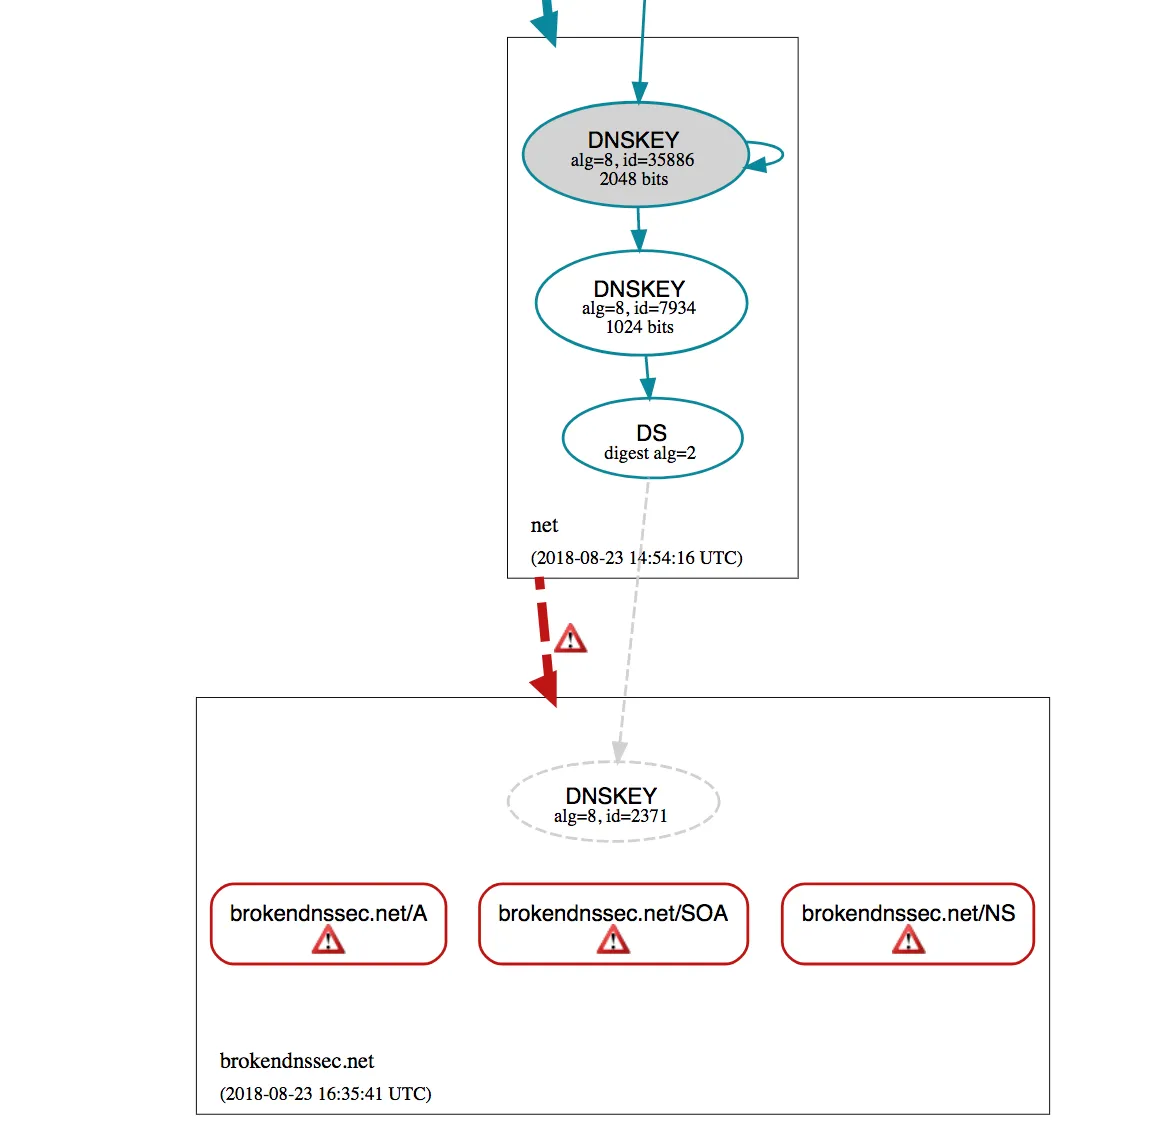
---
## View the DNSSEC chain of trust with Dig
Full verification of domain signatures (for example, `cloudflare.com`) involves verifying the key signing key at the top-level domain (for example, `.com`).
Similar verification is then performed by checking the key-signing key of `.com` at the root server level. DNSSEC root keys are distributed to DNS clients to complete the chain of trust.
When DNSSEC is enabled, a `DS` record is required at the registrar's DNS. The `DS` record contains a hash of the public key signing key as well as metadata about the key.
Use `dig` to find a `DS` record:
```sh
dig +short DS cloudflare.com
```
```sh
2371 13 2 32996839A6D808AFE3EB4A795A0E6A7A39A76FC52FF228B22B76F6D6 3826F2B9
```
When using the `+trace` option, `dig` confirms whether an answer is returned by the nameserver for `cloudflare.com` or the nameserver for `.com`. In this example, the `DS` record for `cloudflare.com` is returned by `e.gtld-servers.net`:
```sh
dig DS cloudflare.com +trace
```
```sh
[...]
cloudflare.com. 86400 IN DS 2371 13 2 32996839A6D808AFE3EB4A795A0E6A7A39A76FC52FF228B22B76F6D6 3826F2B9
[...]
com. 172800 IN NS e.gtld-servers.net.
[...]
;; Received 1213 bytes from 2001:502:1ca1::30#53(e.gtld-servers.net) in 37 ms
```
An easier alternative to manually running the steps above is to use the third-party tool [DNSViz](#troubleshoot-dnssec-validation-using-dnsviz).
---
## Troubleshoot DNSSEC validation with Dig
Issues occur if authoritative DNS providers are changed without updating or removing old DNSSEC records at the registrar:
```sh
dig A brokendnssec.net @1.0.0.1
```
```sh
;; flags: qr rd ra; QUERY: 1, ANSWER: 0, AUTHORITY: 0, ADDITIONAL: 0
;; ->>HEADER<<- opcode: QUERY, status: SERVFAIL, id: 10663
```
Confirm whether a `SERVFAIL` response is related to DNSSEC by running `dig` with the `+cd` option. The `+cd` option provides DNS results without any DNSSEC validation in place.
```sh
dig A brokendnssec.net @1.0.0.1 +dnssec +cd +short
```
```sh
104.20.49.61
104.20.48.61
```
In this example, DNSSEC is misconfigured if a proper DNS response is received when using the `+cd` option but queries using DNSSEC return a `SERVFAIL` response. This issue often happens when authoritative nameservers are changed but `DS` records are not updated. The issue can also occur if an attacker attempts to forge a response to a query.
---
## Delete remaining DNSKEY records after disabling DNSSEC
After disabling DNSSEC, DNSKEY records continue to appear in DNS queries and zone transfers. In the `disabled` state, Cloudflare still signs the zone and serves RRSIG, NSEC, and DNSKEY records. This is expected behavior and **not a misconfiguration or error**. Refer to [DNSSEC states](https://developers.cloudflare.com/dns/dnssec/dnssec-states/) and [RFC 8078 ↗](https://www.rfc-editor.org/rfc/rfc8078.html#section-4) for details.
However, some security vendors or audit tools may flag these DNSKEY records as problematic, reporting "DNSKEY record found but no DS record found" with a security outcome of "Provably Insecure". You can remove the DNSKEY records using the API.
### How to remove remaining DNSKEY records
Make sure DNSSEC is fully turned off
As a rule of thumb, after removing the DS record from your registrar, wait at least 1.5 times its [TTL](https://developers.cloudflare.com/dns/manage-dns-records/reference/ttl/) before removing the DNSKEY records. If the DS TTL is 24 hours, wait 36 hours.
Removing DNSKEY records while DNSSEC is still enabled will break DNS resolution.
Use the [Delete DNSSEC API](https://developers.cloudflare.com/api/resources/dns/subresources/dnssec/methods/delete/) to transition the zone to the `deleted` state. This stops all zone signing and removes all DNSSEC record types (RRSIG, NSEC, DNSKEY, CDS, and CDNSKEY):
Required API token permissions
At least one of the following [token permissions](https://developers.cloudflare.com/fundamentals/api/reference/permissions/) is required:
* `DNS Write`
```bash
curl "https://api.cloudflare.com/client/v4/zones/$ZONE_ID/dnssec" \
--request DELETE \
--header "Authorization: Bearer $CLOUDFLARE_API_TOKEN"
```
For more information on DNSSEC states, refer to [DNSSEC states](https://developers.cloudflare.com/dns/dnssec/dnssec-states/).
### Verify DNSKEY removal
After removing the DNSKEY records, verify they no longer appear in DNS responses. An empty response confirms removal.
```sh
dig DNSKEY example.com +short
```
If DNSKEY records still appear, wait for the [time-to-live (TTL)](https://developers.cloudflare.com/dns/manage-dns-records/reference/ttl/) to expire. DNSKEY records typically have longer TTL values (often 3600 seconds or more), so propagation may take one hour or longer.
---
## Next steps
If a problem is discovered with DNSSEC implementation, contact the domain's registrar and confirm the DS record matches what the authoritative DNS provider has specified. If Cloudflare is the authoritative DNS provider, follow the instructions for [configuring DNSSEC with Cloudflare](https://developers.cloudflare.com/dns/dnssec/).
Was this helpful?
YesNo
## On this page
[Docs](https://developers.cloudflare.com/)
```json
{"@context":"https://schema.org","@type":"TechArticle","@id":"https://developers.cloudflare.com/dns/dnssec/troubleshooting/#page","headline":"Troubleshooting DNSSEC · Cloudflare DNS docs","description":"Learn how to troubleshoot issues with DNSSEC","url":"https://developers.cloudflare.com/dns/dnssec/troubleshooting/","inLanguage":"en","image":"https://developers.cloudflare.com/og-docs.png","dateModified":"2026-04-16","publisher":{"@type":"Organization","name":"Cloudflare","url":"https://www.cloudflare.com/"},"isPartOf":{"@type":"WebSite","@id":"https://developers.cloudflare.com/#website","name":"Cloudflare Docs","url":"https://developers.cloudflare.com/"}}
```
---
---
description: DNSSEC key types, rotation, and validation behavior.
title: Validation and keys
image: https://developers.cloudflare.com/og-docs.png
---
[Skip to content](#main-content)
> Documentation Index
> Fetch the complete documentation index at: https://developers.cloudflare.com/dns/llms.txt
> Use this file to discover all available pages before exploring further.
# Validation and keys
Last updated Apr 16, 2026|Copy as Markdown|[View as Markdown](https://developers.cloudflare.com/dns/dnssec/validation-and-key-management/index.md)|[Agent setup](https://developers.cloudflare.com/agent-setup/)
Refer to the sections below for an overview of some technical concepts and how they apply to Cloudflare DNSSEC. For broader content on DNSSEC, refer to [How DNSSEC works ↗](https://www.cloudflare.com/dns/dnssec/how-dnssec-works/).
## Chain of trust
DNSSEC validation follows a chain of trust from the root DNS servers to your zone:
1. A resolver queries your parent registry (for example, `.com`) for your DS record.
2. The DS record contains a hash of your Key Signing Key (KSK).
3. The resolver expects all Zone Signing Keys (ZSK) to be signed by that specific KSK.
4. If Cloudflare uses a different KSK, validation fails when resolvers query Cloudflare nameservers.
This is why you cannot simply keep your existing DS record when migrating to Cloudflare. The cryptographic chain of trust requires either:
* [Disabling DNSSEC](https://developers.cloudflare.com/dns/dnssec/) before migration and re-enabling it on Cloudflare
* Using the [multi-signer DNSSEC](https://developers.cloudflare.com/dns/dnssec/multi-signer-dnssec/about/) approach to coordinate keys between providers.
---
## Automatic DS record updates
When you enable DNSSEC, Cloudflare automatically publishes **CDS** (Child Delegation Signer) and **CDNSKEY** (Child DNSKEY) records in your zone. These records automate the chain of trust management between your domain and the Top-Level Domain registry.
| Record | Purpose | Contents |
| ----------- | ---------------------- | ---------------------------------------------------------------------------------- |
| **CDS** | High-level instruction | A hashed version of the public key (same data as a DS record) |
| **CDNSKEY** | Public key instruction | The full public Key Signing Key (KSK) for the parent to generate its own DS record |
Registrars that support [RFC 8078 ↗](https://www.rfc-editor.org/rfc/rfc8078.html) periodically scan your domain for these records and automatically update the DS record at the registry level. This eliminates manual DS record management and ensures seamless key rollovers.
Note
Not all registrars support automatic CDS/CDNSKEY scanning. If your registrar does not support RFC 8078, you must manually add the DS record.
---
## DNSKEY flags
* **ZSKs (Zone Signing Keys)**: flag `256`
* **KSKs (Key Signing Keys)**: flag `257`
Was this helpful?
YesNo
## On this page
[Docs](https://developers.cloudflare.com/)
```json
{"@context":"https://schema.org","@type":"TechArticle","@id":"https://developers.cloudflare.com/dns/dnssec/validation-and-key-management/#page","headline":"Validation and keys · Cloudflare DNS docs","description":"DNSSEC key types, rotation, and validation behavior.","url":"https://developers.cloudflare.com/dns/dnssec/validation-and-key-management/","inLanguage":"en","image":"https://developers.cloudflare.com/og-docs.png","dateModified":"2026-04-16","publisher":{"@type":"Organization","name":"Cloudflare","url":"https://www.cloudflare.com/"},"isPartOf":{"@type":"WebSite","@id":"https://developers.cloudflare.com/#website","name":"Cloudflare Docs","url":"https://developers.cloudflare.com/"}}
```
---
---
description: Resolve CNAME records at the zone apex to comply with DNS standards.
title: CNAME flattening
image: https://developers.cloudflare.com/og-docs.png
---
[Skip to content](#main-content)
> Documentation Index
> Fetch the complete documentation index at: https://developers.cloudflare.com/dns/llms.txt
> Use this file to discover all available pages before exploring further.
# CNAME flattening
Last updated Jun 24, 2026|Copy as Markdown|[View as Markdown](https://developers.cloudflare.com/dns/cname-flattening/index.md)|[Agent setup](https://developers.cloudflare.com/agent-setup/)
CNAME flattening speeds up CNAME resolution and allows you to use a [CNAME record](https://developers.cloudflare.com/dns/manage-dns-records/reference/dns-record-types/#cname) at your [zone apex](https://developers.cloudflare.com/dns/concepts/#zone-apex) (`example.com`).
Note
This functionality is also what allows you to use a [root custom domain](https://developers.cloudflare.com/pages/configuration/custom-domains/) with a Cloudflare Pages site.
## How it works
With CNAME flattening, Cloudflare finds the IP address that a CNAME points to. This process could involve a single lookup or multiple (if your CNAME points to another CNAME). Cloudflare then returns the final IP address instead of a CNAME record, helping DNS queries resolve faster.
For more details on the steps involved in CNAME flattening, review the [CNAME flattening diagram](https://developers.cloudflare.com/dns/cname-flattening/cname-flattening-diagram/) and refer to the [Cloudflare blog post ↗](https://blog.cloudflare.com/introducing-cname-flattening-rfc-compliant-cnames-at-a-domains-root/).
Note
For information about CNAME flattening in [Internal DNS](https://developers.cloudflare.com/dns/internal-dns/), refer to [internal DNS records](https://developers.cloudflare.com/dns/internal-dns/internal-zones/internal-dns-records/).
## Aspects to keep in mind
* CNAME flattening happens by default in some cases. Refer to [Setup](https://developers.cloudflare.com/dns/cname-flattening/set-up-cname-flattening/) for details.
* CNAME to a different Cloudflare account is prohibited and will result in [Error 1014: CNAME Cross-User Banned](https://developers.cloudflare.com/support/troubleshooting/http-status-codes/cloudflare-1xxx-errors/error-1014/)
* If a CNAME target is being used to verify a domain for a third-party service, turning on [CNAME flattening for all CNAME records](https://developers.cloudflare.com/dns/cname-flattening/set-up-cname-flattening/#for-all-cname-records) may cause the verification to fail since the CNAME record itself will not be returned directly.
* If the final CNAME target has no A/AAAA records (a dangling CNAME), CNAME flattening returns an empty response (NODATA) because there is no IP address to flatten to. This can make it appear as if the DNS record is not propagating. Ensure your CNAME targets resolve to valid A/AAAA records.
Was this helpful?
YesNo
## On this page
[Docs](https://developers.cloudflare.com/)
```json
{"@context":"https://schema.org","@type":"TechArticle","@id":"https://developers.cloudflare.com/dns/cname-flattening/#page","headline":"CNAME flattening · Cloudflare DNS docs","description":"Resolve CNAME records at the zone apex to comply with DNS standards.","url":"https://developers.cloudflare.com/dns/cname-flattening/","inLanguage":"en","image":"https://developers.cloudflare.com/og-docs.png","dateModified":"2026-06-24","publisher":{"@type":"Organization","name":"Cloudflare","url":"https://www.cloudflare.com/"},"isPartOf":{"@type":"WebSite","@id":"https://developers.cloudflare.com/#website","name":"Cloudflare Docs","url":"https://developers.cloudflare.com/"}}
```
---
---
description: Consider an example use case and the main steps involved in CNAME flattening.
title: Example diagram
image: https://developers.cloudflare.com/og-docs.png
---
[Skip to content](#main-content)
> Documentation Index
> Fetch the complete documentation index at: https://developers.cloudflare.com/dns/llms.txt
> Use this file to discover all available pages before exploring further.
# Example diagram
Last updated Apr 16, 2026|Copy as Markdown|[View as Markdown](https://developers.cloudflare.com/dns/cname-flattening/cname-flattening-diagram/index.md)|[Agent setup](https://developers.cloudflare.com/agent-setup/)
With CNAME flattening, Cloudflare returns an IP address instead of the target hostname that a CNAME record points to. This process supports a few features and delivers better performance and flexibility, as mentioned in the [CNAME flattening concept page](https://developers.cloudflare.com/dns/cname-flattening/).
Consider the diagram below to have an overview of the steps that may be involved in CNAME flattening.
Note
Note that this is a simpler scenario. Cases where CNAME flattening is optional and/or the target hostname is not external to Cloudflare work differently.
## Example use case
* `domain.test` is a zone on Cloudflare and has the following CNAME record:
| Type | Name | Content | TTL |
| ----- | ----------- | -------------------- | ---- |
| CNAME | domain.test | external-origin.test | 3600 |
* `external-origin.test` is a zone on a different DNS provider and has the following A record:
| Type | Name | Content | TTL |
| ---- | -------------------- | --------- | ---- |
| A | external-origin.test | 192.0.2.1 | 7200 |
In this case, the process to respond to queries for `domain.test` directly with the IP address can be represented by the following diagram:
flowchart BT
accTitle: CNAME flattening diagram
accDescr: Diagram of CNAME flattening process when there is a request for a domain in Cloudflare and the zone has a CNAME record at apex that points to an external A record.
A((User)) <--query for domain.test--> B[Resolver] --> C
C["Question:
domain.test IN A"]
subgraph Y[Cloudflare DNS]
direction RL
D{{Look up record}} --> G["Answer:
domain.test 3600 CNAME external-origin.test
This means that domain.test is a CNAME at the zone apex.
Forced CNAME flattening is enabled."] --- H{{Resolve external-origin.test}}
K{{Append answer with overwritten query name}} --> L["Answer:
domain.test 7200 IN A 192.0.2.1"] --- M{Proxy status}
M --Proxied--> O["Answer:
domain.test 300 IN A {$Cloudflare IP 1}domain.test 300 IN A {$Cloudflare IP 2}"]
M --DNS only--> N["Answer:
domain.test 3600 IN A 192.0.2.1"]
end
subgraph Z [External DNS provider]
J["Answer:
external-origin.test 7200 IN A 192.0.2.1"]
end
C --> D
H --- J --- K
O --> B
N --> B
## Aspects to consider
* If the CNAME record is proxied in Cloudflare, the answer is made up of multiple [Cloudflare IPs ↗](https://www.cloudflare.com/ips/) and its Time to Live (TTL) is set to `300`.
* If the CNAME record in Cloudflare is not proxied, the flattened answer consists of the IP address from the external DNS provider and its TTL corresponds to the lower value between the external record and the Cloudflare CNAME record.
Was this helpful?
YesNo
## On this page
[Docs](https://developers.cloudflare.com/)
```json
{"@context":"https://schema.org","@type":"TechArticle","@id":"https://developers.cloudflare.com/dns/cname-flattening/cname-flattening-diagram/#page","headline":"CNAME flattening diagram · Cloudflare DNS docs","description":"Consider an example use case and the main steps involved in CNAME flattening.","url":"https://developers.cloudflare.com/dns/cname-flattening/cname-flattening-diagram/","inLanguage":"en","image":"https://developers.cloudflare.com/og-docs.png","dateModified":"2026-04-16","publisher":{"@type":"Organization","name":"Cloudflare","url":"https://www.cloudflare.com/"},"isPartOf":{"@type":"WebSite","@id":"https://developers.cloudflare.com/#website","name":"Cloudflare Docs","url":"https://developers.cloudflare.com/"}}
```
---
---
description: Configure CNAME flattening for your zone.
title: Setup
image: https://developers.cloudflare.com/og-docs.png
---
[Skip to content](#main-content)
> Documentation Index
> Fetch the complete documentation index at: https://developers.cloudflare.com/dns/llms.txt
> Use this file to discover all available pages before exploring further.
# Setup
Last updated Apr 16, 2026|Copy as Markdown|[View as Markdown](https://developers.cloudflare.com/dns/cname-flattening/set-up-cname-flattening/index.md)|[Agent setup](https://developers.cloudflare.com/agent-setup/)
Note
If the CNAME target is on the same zone as the CNAME record, Cloudflare proceeds with CNAME flattening and ignores the **CNAME Flattening** setting.
## For your zone apex
CNAME flattening occurs by default for all plans when your domain uses a CNAME record for its zone apex (`example.com`, meaning the record **Name** is set to `@`).
## For all CNAME records
For zones on paid plans, you can choose to flatten all CNAME records. This option is useful for DNS-only (unproxied) CNAME records. [Proxied records](https://developers.cloudflare.com/dns/proxy-status/) are flattened by default as they return Cloudflare anycast IPs.
1. In the Cloudflare dashboard, go to the **DNS Settings** page.
[Go to **Settings** ↗](https://dash.cloudflare.com/?to=/:account/:zone/dns/settings)
2. Turn on the option **CNAME flattening for all CNAME records**.
Make a `PATCH` request to the [Update DNS Settings](https://developers.cloudflare.com/api/resources/dns/subresources/settings/subresources/zone/methods/edit/) endpoint and set `flatten_all_cnames` to `true` in the request body.
Caution
If a CNAME target is being used to verify a domain for a third-party service, turning on [CNAME flattening for all CNAME records](https://developers.cloudflare.com/dns/cname-flattening/set-up-cname-flattening/#for-all-cname-records) may cause the verification to fail since the CNAME record itself will not be returned directly.
## Per record
Paid zones also have the option of flattening specific CNAME records.
If you use this option, a special [tag](https://developers.cloudflare.com/dns/manage-dns-records/reference/record-attributes/) `cf-flatten-cname` will be added to the respective flattened CNAME records in your zone file, allowing you to [export and import records](https://developers.cloudflare.com/dns/manage-dns-records/how-to/import-and-export/) without losing this configuration.
1. On the [**DNS Settings** ↗](https://dash.cloudflare.com/?to=/:account/:zone/dns/settings) page, make sure that **CNAME flattening for all CNAME records** is turned off.
2. Go to the [**DNS Records** ↗](https://dash.cloudflare.com/?to=/:account/:zone/dns/records) page and find the CNAME record you would like to flatten.
3. Select **Edit** and turn on the **Flatten** option.
4. Select **Save** to confirm.
Unavailable flatten option
For the following cases, **Flatten** will not be available:
* The record is at the [zone apex](#for-your-zone-apex).
* The record is already proxied, which means it will be flattened by default.
* **CNAME flattening for all CNAME records** is turned on, which means you cannot override it per record.
With the available [API endpoints](https://developers.cloudflare.com/api/resources/dns/subresources/records/methods/create/), specify the following for each CNAME record in the request body:
```txt
"settings": {
"flatten_cname": true
}
```
Was this helpful?
YesNo
## On this page
[Docs](https://developers.cloudflare.com/)
```json
{"@context":"https://schema.org","@type":"TechArticle","@id":"https://developers.cloudflare.com/dns/cname-flattening/set-up-cname-flattening/#page","headline":"Set up CNAME flattening · Cloudflare DNS docs","description":"Configure CNAME flattening for your zone.","url":"https://developers.cloudflare.com/dns/cname-flattening/set-up-cname-flattening/","inLanguage":"en","image":"https://developers.cloudflare.com/og-docs.png","dateModified":"2026-04-16","publisher":{"@type":"Organization","name":"Cloudflare","url":"https://www.cloudflare.com/"},"isPartOf":{"@type":"WebSite","@id":"https://developers.cloudflare.com/#website","name":"Cloudflare Docs","url":"https://developers.cloudflare.com/"}}
```
---
---
description: Connect Cloudflare's application services to your private network by proxying public hostnames to private origins.
title: Private origins (beta)
image: https://developers.cloudflare.com/og-docs.png
---
[Skip to content](#main-content)
> Documentation Index
> Fetch the complete documentation index at: https://developers.cloudflare.com/dns/llms.txt
> Use this file to discover all available pages before exploring further.
# Private origins (beta)
Last updated May 7, 2026|Copy as Markdown|[View as Markdown](https://developers.cloudflare.com/dns/private-origins/index.md)|[Agent setup](https://developers.cloudflare.com/agent-setup/)
Proxy HTTP/HTTPS traffic from public hostnames to origins in your private network.
Enterprise-only
Connect Cloudflare's application services to your private network through secure tunnels. The CDN, WAF, Cache, and other proxied features apply to this traffic the same way they apply to traffic destined for public origins.
Getting started takes three steps. Follow the [setup guide](https://developers.cloudflare.com/dns/private-origins/set-up-via-cloudflare-wan/) to configure a tunnel, create a DNS record with [private network routing](https://developers.cloudflare.com/dns/private-origins/private-network-routing/), and verify end-to-end connectivity.
Closed beta
This feature is in closed beta. Contact your account team to request access.
---
## Resources
* [Set up a private origin via Cloudflare WAN](https://developers.cloudflare.com/dns/private-origins/set-up-via-cloudflare-wan/)
* [Private network routing](https://developers.cloudflare.com/dns/private-origins/private-network-routing/)
* [Troubleshooting](https://developers.cloudflare.com/dns/private-origins/troubleshooting/)
---
## Related products
[Cloudflare WAN](https://developers.cloudflare.com/cloudflare-wan/)
Connect your private network to Cloudflare with IPsec tunnels.
Was this helpful?
YesNo
## On this page
[Docs](https://developers.cloudflare.com/)
```json
{"@context":"https://schema.org","@type":"WebPage","@id":"https://developers.cloudflare.com/dns/private-origins/#page","headline":"Private origins (beta) · Cloudflare DNS docs","description":"Connect Cloudflare's application services to your private network by proxying public hostnames to private origins.","url":"https://developers.cloudflare.com/dns/private-origins/","inLanguage":"en","image":"https://developers.cloudflare.com/og-docs.png","dateModified":"2026-05-07","publisher":{"@type":"Organization","name":"Cloudflare","url":"https://www.cloudflare.com/"},"isPartOf":{"@type":"WebSite","@id":"https://developers.cloudflare.com/#website","name":"Cloudflare Docs","url":"https://developers.cloudflare.com/"},"keywords":["Private networks"]}
```
---
---
description: Route DNS record traffic to private origins through tunnels.
title: Private network routing
image: https://developers.cloudflare.com/og-docs.png
---
[Skip to content](#main-content)
> Documentation Index
> Fetch the complete documentation index at: https://developers.cloudflare.com/dns/llms.txt
> Use this file to discover all available pages before exploring further.
# Private network routing
Last updated May 7, 2026|Copy as Markdown|[View as Markdown](https://developers.cloudflare.com/dns/private-origins/private-network-routing/index.md)|[Agent setup](https://developers.cloudflare.com/agent-setup/)
Private network routing allows you to proxy HTTP/HTTPS traffic from public hostnames to origins in your private network. When you enable this setting on a DNS record, Cloudflare routes traffic through your configured tunnel instead of over the public Internet.
For an end-to-end setup walkthrough using Cloudflare WAN (formerly Magic WAN) IPsec, refer to [Set up a private origin via Cloudflare WAN](https://developers.cloudflare.com/dns/private-origins/set-up-via-cloudflare-wan/).
Closed beta
This feature is in closed beta. Contact your account team to request access.
## Aspects to consider
Before you enable private network routing, consider the following:
* You need an active tunnel connection to Cloudflare through one of the supported on-ramp methods. Refer to [Cloudflare WAN](https://developers.cloudflare.com/cloudflare-wan/on-ramps/) for further guidance.
* Private network routing is available for `A` (IPv4) and `AAAA` (IPv6) records only. Records must be [proxied](https://developers.cloudflare.com/dns/proxy-status/).
* If you have multiple `A` or `AAAA` records on the same name, and at least one of them has private network routing enabled, all records on that name will use private network routing. This is consistent with the [proxy status behavior](https://developers.cloudflare.com/dns/proxy-status/#mix-proxied-and-unproxied) in these cases.
## IP ranges
The following private address ranges are automatically detected:
| Range | Description |
| -------------- | ------------------------------------------------------------------- |
| 10.0.0.0/8 | Private ([RFC 1918 ↗](https://www.rfc-editor.org/rfc/rfc1918.html)) |
| 172.16.0.0/12 | Private ([RFC 1918 ↗](https://www.rfc-editor.org/rfc/rfc1918.html)) |
| 192.168.0.0/16 | Private ([RFC 1918 ↗](https://www.rfc-editor.org/rfc/rfc1918.html)) |
| fc00::/7 | Private ([RFC 4193 ↗](https://www.rfc-editor.org/rfc/rfc4193.html)) |
| 100.64.0.0/10 | CGNAT ([RFC 6598 ↗](https://www.rfc-editor.org/rfc/rfc6598.html)) |
When you use an IP address from one of these ranges, the **Use private network routing** toggle turns on automatically. You can also turn it on manually for public IP addresses that are only reachable through your tunnel.
## Enable private network routing
Virtual networks
Traffic routes through your default virtual network. Selecting a specific virtual network is not supported.
1. In the Cloudflare dashboard, go to the **DNS Records** page.
[Go to **Records** ↗](https://dash.cloudflare.com/?to=/:account/:zone/dns/records)
2. Select **Add record** or select **Edit** on an existing `A` or `AAAA` record.
3. Enter the origin IP address.
4. Verify that **Proxy status** is enabled (orange cloud).
5. Turn on **Use private network routing**.
For [private IP addresses](#ip-ranges) (for example, `10.0.0.50`), the toggle turns on automatically. For public IP addresses used with private infrastructure, turn on the toggle manually.
6. Select **Save**.
To create a record with private routing enabled, use a [POST request](https://developers.cloudflare.com/api/resources/dns/subresources/records/methods/create/) and set `private_routing` to `true`:
Required API token permissions
At least one of the following [token permissions](https://developers.cloudflare.com/fundamentals/api/reference/permissions/) is required:
* `DNS Write`
```bash
curl "https://api.cloudflare.com/client/v4/zones/$ZONE_ID/dns_records" \
--request POST \
--header "Authorization: Bearer $CLOUDFLARE_API_TOKEN" \
--json '{
"type": "A",
"name": "app.example.com",
"content": "10.0.0.50",
"proxied": true,
"private_routing": true
}'
```
To enable private routing on an existing record, use a [PATCH request](https://developers.cloudflare.com/api/resources/dns/subresources/records/methods/edit/):
Required API token permissions
At least one of the following [token permissions](https://developers.cloudflare.com/fundamentals/api/reference/permissions/) is required:
* `DNS Write`
```bash
curl "https://api.cloudflare.com/client/v4/zones/$ZONE_ID/dns_records/$DNS_RECORD_ID" \
--request PATCH \
--header "Authorization: Bearer $CLOUDFLARE_API_TOKEN" \
--json '{
"private_routing": true
}'
```
### API field behavior
If you use the API to create or edit DNS records with private network routing, consider the following:
| Scenario | private\_routing value |
| ------------------------------------- | ---------------------- |
| Proxied A/AAAA record with private IP | Auto-set to true |
| Proxied A/AAAA record with public IP | Defaults to false |
| Non-A/AAAA record types | Field not supported |
Also, if you manually set `private_routing: false` on a proxied `A`/`AAAA` record with private IP, the API will return an error.
Was this helpful?
YesNo
## On this page
[Docs](https://developers.cloudflare.com/)
```json
{"@context":"https://schema.org","@type":"TechArticle","@id":"https://developers.cloudflare.com/dns/private-origins/private-network-routing/#page","headline":"Private network routing · Cloudflare DNS docs","description":"Route DNS record traffic to private origins through tunnels.","url":"https://developers.cloudflare.com/dns/private-origins/private-network-routing/","inLanguage":"en","image":"https://developers.cloudflare.com/og-docs.png","dateModified":"2026-05-07","publisher":{"@type":"Organization","name":"Cloudflare","url":"https://www.cloudflare.com/"},"isPartOf":{"@type":"WebSite","@id":"https://developers.cloudflare.com/#website","name":"Cloudflare Docs","url":"https://developers.cloudflare.com/"},"keywords":["Private networks"]}
```
---
---
description: Proxy public hostnames to private origins through a Cloudflare WAN IPsec tunnel.
title: Set up a private origin via Cloudflare WAN
image: https://developers.cloudflare.com/og-docs.png
---
[Skip to content](#main-content)
> Documentation Index
> Fetch the complete documentation index at: https://developers.cloudflare.com/dns/llms.txt
> Use this file to discover all available pages before exploring further.
# Set up a private origin via Cloudflare WAN
Last updated May 7, 2026|Copy as Markdown|[View as Markdown](https://developers.cloudflare.com/dns/private-origins/set-up-via-cloudflare-wan/index.md)|[Agent setup](https://developers.cloudflare.com/agent-setup/)
This guide walks you through proxying public hostnames to origins on a private network. The private network is reachable through a [Cloudflare WAN](https://developers.cloudflare.com/cloudflare-wan/) (formerly Magic WAN) IPsec tunnel. The CDN, WAF, Cache, and other proxied features apply to this traffic the same way they apply to traffic destined for public origins.
Closed beta
This feature is in closed beta. To request access, contact your Cloudflare account team.
## Before you begin
Confirm the following before you start:
* **Active Cloudflare WAN subscription**: This capability requires a Cloudflare WAN subscription on your account.
* **Access to private origins enabled on your account**: This is a separate entitlement from standard authoritative DNS access. Contact your Cloudflare account team to request access.
* **IPsec tunnels configured**: Set up two anycast IPsec tunnels for redundancy, each with a different Cloudflare anycast endpoint. Refer to [Configure tunnel endpoints](https://developers.cloudflare.com/cloudflare-wan/configuration/how-to/configure-tunnel-endpoints/). Two settings are important for this use case:
* Leave **Automatic return routing** disabled. It does not apply to the public-to-private origin traffic pattern, where requests originate on the Internet and reach your origin through Cloudflare's reverse proxy.
* Keep the default **Health check** settings (type `reply`, direction `bidirectional`, rate `mid`). These defaults are required for tunnel health to track correctly in this use case.
* **Static routes configured**: Add two static routes for the private prefix you want to reach — one per tunnel — with different priorities so traffic fails over to the backup tunnel if the primary goes down. For example, set priority `100` on the route through your primary tunnel and `101` on the route through your backup tunnel (lower numbers are higher priority). Refer to [Configure routes](https://developers.cloudflare.com/cloudflare-wan/configuration/how-to/configure-routes/).
* **Cloudflare Source IP set to a private range**: The Cloudflare Source IP is the IP that Cloudflare uses when sending proxied requests into your private network. If it is left as a public range, your network cannot route the return traffic back through the tunnel and requests time out. Refer to [Configure Cloudflare source IPs](https://developers.cloudflare.com/cloudflare-wan/configuration/how-to/configure-cloudflare-source-ips/).
## 1\. Verify your Cloudflare Source IP allocation
A misconfigured Cloudflare Source IP is the most common cause of failure. If the Source IP is left as a public range, the network where your origin lives has no return route and requests time out before reaching the application.
Go to [Configure Cloudflare source IPs](https://developers.cloudflare.com/cloudflare-wan/configuration/how-to/configure-cloudflare-source-ips/) and verify that the Source IP is set to a private range, such as `100.64.0.0/12` (the default) or another private `/12` you have selected.
## 2\. Create a DNS record with private network routing
Create an `A` or `AAAA` record that points to the private IP address of your origin, with proxy status enabled and **Use private network routing** turned on. This tells Cloudflare to send traffic for the hostname through your Cloudflare WAN tunnel instead of over the public Internet.
For the dashboard and API steps, refer to [Private network routing](https://developers.cloudflare.com/dns/private-origins/private-network-routing/).
## 3\. Verify end-to-end connectivity
After the DNS record is in place, validate the path from the Cloudflare network through your tunnel to the origin.
### Check tunnel health
In the Cloudflare dashboard, confirm that your IPsec tunnel is healthy. Refer to [Check tunnel health on the dashboard](https://developers.cloudflare.com/cloudflare-wan/configuration/common-settings/check-tunnel-health-dashboard/).
### Send a request from an external client
From a machine outside your private network, send an HTTPS request to the proxied hostname:
```bash
curl -v https:///
```
A successful response confirms that Cloudflare accepted the request, applied your proxied features, and reached the origin through the tunnel.
### Confirm traffic on the origin
On the origin VM, verify that requests are arriving from the Cloudflare Source IP range. For example, to watch for incoming traffic from `100.64.0.0/12` on port `443`:
```bash
sudo tcpdump -n -i any 'src net 100.64.0.0/12 and dst port 443'
```
Replace `100.64.0.0/12` with the Source IP range configured for your account, and adjust the port to match the listener on your origin.
## Common pitfalls
| Symptom | Cause and fix |
| --------------------------------------------------- | ------------------------------------------------------------------------------------------------------------------------------------------------------------------------------------ |
| Connection timeouts from clients | Cloudflare Source IP is set to a public range. Set it to a private /12. |
| Request times out, no response on the origin | The network where your origin lives has no return route for the Cloudflare Source IP range. Add a route that sends that range back through the tunnel. |
| Tunnel shows IKE established but health checks fail | ICMP is blocked on the path or the health check is misconfigured. Allow ICMP between the tunnel endpoints and confirm the health check direction is bidirectional and type is reply. |
| Traffic tries to route over the public Internet | The **Use private network routing** toggle is not turned on for the DNS record. Edit the record and turn the toggle on. |
## Next steps
* [Configure tunnel health alerts](https://developers.cloudflare.com/cloudflare-wan/configuration/common-settings/configure-tunnel-health-alerts/) to get notified when a tunnel goes down.
* Review the [Private network routing](https://developers.cloudflare.com/dns/private-origins/private-network-routing/) reference for dashboard and API details.
* If you run into tunnel issues, refer to [Tunnel health troubleshooting](https://developers.cloudflare.com/cloudflare-wan/troubleshooting/tunnel-health/) and [IPsec troubleshooting](https://developers.cloudflare.com/cloudflare-wan/troubleshooting/ipsec-troubleshoot/).
Was this helpful?
YesNo
## On this page
[Docs](https://developers.cloudflare.com/)
```json
{"@context":"https://schema.org","@type":"TechArticle","@id":"https://developers.cloudflare.com/dns/private-origins/set-up-via-cloudflare-wan/#page","headline":"Set up a private origin via Cloudflare WAN · Cloudflare DNS docs","description":"Proxy public hostnames to private origins through a Cloudflare WAN IPsec tunnel.","url":"https://developers.cloudflare.com/dns/private-origins/set-up-via-cloudflare-wan/","inLanguage":"en","image":"https://developers.cloudflare.com/og-docs.png","dateModified":"2026-05-07","publisher":{"@type":"Organization","name":"Cloudflare","url":"https://www.cloudflare.com/"},"isPartOf":{"@type":"WebSite","@id":"https://developers.cloudflare.com/#website","name":"Cloudflare Docs","url":"https://developers.cloudflare.com/"},"keywords":["Private networks"]}
```
---
---
description: Troubleshoot common private network routing and private origin issues.
title: Troubleshooting
image: https://developers.cloudflare.com/og-docs.png
---
[Skip to content](#main-content)
> Documentation Index
> Fetch the complete documentation index at: https://developers.cloudflare.com/dns/llms.txt
> Use this file to discover all available pages before exploring further.
# Troubleshooting
Last updated May 6, 2026|Copy as Markdown|[View as Markdown](https://developers.cloudflare.com/dns/private-origins/troubleshooting/index.md)|[Agent setup](https://developers.cloudflare.com/agent-setup/)
## Error 1002: DNS points to prohibited IP
This error occurs when you proxy a private IP address without the necessary entitlement. Contact your account team to request access.
## Setting seems off but traffic routes through tunnel
Check for other records on the same name.
Private network routing applies per name, not per record. If you have multiple `A` or `AAAA` records on the same name and at least one of them has private network routing enabled, all records on that name will use private network routing.
## Traffic not reaching origin
If traffic is not reaching your private origin:
1. Verify your tunnel is active and healthy in the Cloudflare dashboard.
2. Confirm the origin IP is routable within your private network.
3. Check that `private_routing` is set to `true` on the DNS record.
4. Verify the record has proxy status enabled.
## Connection timeouts from clients
Cloudflare Source IP is set to a public range. Set it to a private `/12`. Refer to [Configure Cloudflare source IPs](https://developers.cloudflare.com/cloudflare-wan/configuration/how-to/configure-cloudflare-source-ips/).
## Request times out with no response on the origin
The network where your origin lives has no return route for the Cloudflare Source IP range. Add a route that sends that range back through the tunnel.
## Tunnel shows IKE established but health checks fail
ICMP is blocked on the path or the health check is misconfigured. Allow ICMP between the tunnel endpoints and confirm the health check direction is `bidirectional` and type is `reply`.
## Traffic tries to route over the public Internet
The **Use private network routing** toggle is not turned on for the DNS record. Edit the record and turn the toggle on. Refer to [Private network routing](https://developers.cloudflare.com/dns/private-origins/private-network-routing/) for dashboard and API steps.
Was this helpful?
YesNo
## On this page
[Docs](https://developers.cloudflare.com/)
```json
{"@context":"https://schema.org","@type":"TechArticle","@id":"https://developers.cloudflare.com/dns/private-origins/troubleshooting/#page","headline":"Troubleshooting · Cloudflare DNS docs","description":"Troubleshoot common private network routing and private origin issues.","url":"https://developers.cloudflare.com/dns/private-origins/troubleshooting/","inLanguage":"en","image":"https://developers.cloudflare.com/og-docs.png","dateModified":"2026-05-06","publisher":{"@type":"Organization","name":"Cloudflare","url":"https://www.cloudflare.com/"},"isPartOf":{"@type":"WebSite","@id":"https://developers.cloudflare.com/#website","name":"Cloudflare Docs","url":"https://developers.cloudflare.com/"},"keywords":["Private networks"]}
```
---
---
description: Resolve private hostnames within your network with Internal DNS.
title: Internal DNS
image: https://developers.cloudflare.com/og-docs.png
---
[Skip to content](#main-content)
> Documentation Index
> Fetch the complete documentation index at: https://developers.cloudflare.com/dns/llms.txt
> Use this file to discover all available pages before exploring further.
# Internal DNS
Last updated Jul 16, 2026|Copy as Markdown|[View as Markdown](https://developers.cloudflare.com/dns/internal-dns/index.md)|[Agent setup](https://developers.cloudflare.com/agent-setup/)
Simplify private network management with Cloudflare DNS for your internal resources.
Enterprise-only
Manage DNS records that should only be accessible within your private network. Internal DNS [zones](https://developers.cloudflare.com/dns/internal-dns/internal-zones/) and [views](https://developers.cloudflare.com/dns/internal-dns/dns-views/) pair up with [Gateway resolver policies](https://developers.cloudflare.com/cloudflare-one/traffic-policies/resolver-policies/) so that you can control how a DNS query should be responded to according to query context, such as query source IP.
Internal DNS is included with [Cloudflare Gateway](https://developers.cloudflare.com/cloudflare-one/traffic-policies/) for Enterprise customers. There is no additional SKU or separate subscription required.
## Architecture overview
You can use different [connectivity options](https://developers.cloudflare.com/dns/internal-dns/connectivity/) to on-ramp your traffic to Cloudflare. Then, Cloudflare Gateway resolver acts as an interface between the DNS client and internal DNS zones.
Internal DNS zones do not get assigned Cloudflare nameservers and can only be queried via Cloudflare Gateway resolver.
flowchart LR
accTitle: Internal DNS query overview
accDescr: Diagram comparing internal DNS query with public DNS
A[Client]
subgraph Cloudflare account
subgraph Gateway
B[Default 1.1.1.1 resolver]
X[Resolver policy selecting an internal DNS view]
end
subgraph Authoritative DNS
Y[(Public DNS)]
Z[(Internal DNS)]
end
end
C[Public resolver]
B --Query--> Y
X --Query + View ID--> Z
A --Query--> B
A --Query--> X
C --Query--> Y
Internal DNS zones are grouped into DNS views, which are selected by the resolver policy you define. Views are usually logical groupings relevant to your organization, such as different geographical locations.
flowchart LR
accTitle: Internal DNS views and zones
accDescr: Diagram exemplifying Internal DNS views and zones relationship
subgraph Internal DNS
subgraph View 111 - London
Y[Zone 600 example.local]
Z[Zone 601 local]
end
subgraph View 110 - San Francisco
X[Zone 101 example.com]
B[Zone 100 example.local]
S[Zone 102 com]
end
W[Zone 701 net]
end
Internal DNS zones contain the [DNS records](https://developers.cloudflare.com/dns/internal-dns/internal-zones/internal-dns-records/) that should be used to resolve an internal DNS query. Also, if no internal record is found within a matching internal zone, Cloudflare will check if the matching internal zone is [referencing another internal zone](https://developers.cloudflare.com/dns/internal-dns/internal-zones/reference-zones/).
flowchart LR
accTitle: Internal DNS zones and internal records
accDescr: Diagram exemplifying Internal DNS zones and records relationship
subgraph View 111 - London
subgraph Zone 601 - local
S["@ A 192.0.2.10"]
T["ghi.example A 192.0.2.15"]
end
subgraph Zone 600 - example.local
X["@ A 192.0.2.1"]
Y["abc A 192.0.2.6"]
Z["def A 192.0.2.9"]
end
end
In this example, a query for `ghi.example.local` routed to view ID 111 would go to zone 600, which presents the longest matching zone name (`example.local`). Zone 600 does not contain a record for `ghi` but, if it is referencing zone 601, Cloudflare will then look for the queried record within the reference zone.
## Resources
* [Get started](https://developers.cloudflare.com/dns/internal-dns/get-started/)
* [Internal zones](https://developers.cloudflare.com/dns/internal-dns/internal-zones/)
* [Manage DNS views](https://developers.cloudflare.com/dns/internal-dns/dns-views/)
* [Connect to Gateway resolver](https://developers.cloudflare.com/dns/internal-dns/connectivity/)
* [Analytics and logs](https://developers.cloudflare.com/dns/internal-dns/analytics/)
## Related products
[Cloudflare Gateway](https://developers.cloudflare.com/cloudflare-one/traffic-policies/)
Set up policies to inspect DNS, Network, HTTP, and Egress traffic.
[Cloudflare WAN](https://developers.cloudflare.com/cloudflare-wan/)
Improve security and performance for your entire corporate networking, reducing cost and operation complexity.
Was this helpful?
YesNo
## On this page
[Docs](https://developers.cloudflare.com/)
```json
{"@context":"https://schema.org","@type":"WebPage","@id":"https://developers.cloudflare.com/dns/internal-dns/#page","headline":"Internal DNS · Cloudflare DNS docs","description":"Resolve private hostnames within your network with Internal DNS.","url":"https://developers.cloudflare.com/dns/internal-dns/","inLanguage":"en","image":"https://developers.cloudflare.com/og-docs.png","dateModified":"2026-07-16","publisher":{"@type":"Organization","name":"Cloudflare","url":"https://www.cloudflare.com/"},"isPartOf":{"@type":"WebSite","@id":"https://developers.cloudflare.com/#website","name":"Cloudflare Docs","url":"https://developers.cloudflare.com/"},"keywords":["Private networks"]}
```
---
---
description: View analytics and logs for Internal DNS queries.
title: Analytics and logs
image: https://developers.cloudflare.com/og-docs.png
---
[Skip to content](#main-content)
> Documentation Index
> Fetch the complete documentation index at: https://developers.cloudflare.com/dns/llms.txt
> Use this file to discover all available pages before exploring further.
# Analytics and logs
Last updated Apr 17, 2026|Copy as Markdown|[View as Markdown](https://developers.cloudflare.com/dns/internal-dns/analytics/index.md)|[Agent setup](https://developers.cloudflare.com/agent-setup/)
Internal DNS leverages [Gateway analytics](https://developers.cloudflare.com/cloudflare-one/insights/analytics/gateway/). Below you can find information about specific fields and different methods you can use to access this data.
## GraphQL
For detailed metrics, use the [GraphQL API](https://developers.cloudflare.com/analytics/graphql-api/). Refer to the GraphQL Analytics API documentation for guidance on how to [get started](https://developers.cloudflare.com/analytics/graphql-api/getting-started/).
The [fields](https://developers.cloudflare.com/analytics/graphql-api/getting-started/querying-basics/) added to cover Internal DNS are the following:
* `InternalDNSFallbackStrategy`: The fallback strategy applied to the internal DNS response. Empty if no fallback strategy was applied.
* `InternalDNSRCode`: The response code sent back by the internal DNS service.
* `InternalDNSViewID`: The view identifier that was sent to the internal DNS service.
* `InternalDNSZoneID`: The internal zone identifier returned by the internal DNS service.
## Logs
Leverage Logpush jobs for [Gateway DNS](https://developers.cloudflare.com/logs/logpush/logpush-job/datasets/account/gateway%5Fdns/#internaldnsfallbackstrategy). For help setting up Logpush, refer to [Logpush](https://developers.cloudflare.com/logs/logpush/) documentation.
You can also set up [Logpush filters](https://developers.cloudflare.com/logs/logpush/logpush-job/filters/) to only push logs related to a specific [internal zone](https://developers.cloudflare.com/dns/internal-dns/internal-zones/) or [view](https://developers.cloudflare.com/dns/internal-dns/dns-views/) ID.
Was this helpful?
YesNo
## On this page
[Docs](https://developers.cloudflare.com/)
```json
{"@context":"https://schema.org","@type":"TechArticle","@id":"https://developers.cloudflare.com/dns/internal-dns/analytics/#page","headline":"Analytics and logs · Cloudflare DNS docs","description":"View analytics and logs for Internal DNS queries.","url":"https://developers.cloudflare.com/dns/internal-dns/analytics/","inLanguage":"en","image":"https://developers.cloudflare.com/og-docs.png","dateModified":"2026-04-17","publisher":{"@type":"Organization","name":"Cloudflare","url":"https://www.cloudflare.com/"},"isPartOf":{"@type":"WebSite","@id":"https://developers.cloudflare.com/#website","name":"Cloudflare Docs","url":"https://developers.cloudflare.com/"},"keywords":["Analytics","GraphQL"]}
```
---
---
description: Connect to the Internal DNS Gateway resolver.
title: Connect to Gateway resolver
image: https://developers.cloudflare.com/og-docs.png
---
[Skip to content](#main-content)
> Documentation Index
> Fetch the complete documentation index at: https://developers.cloudflare.com/dns/llms.txt
> Use this file to discover all available pages before exploring further.
# Connect to Gateway resolver
Last updated Apr 17, 2026|Copy as Markdown|[View as Markdown](https://developers.cloudflare.com/dns/internal-dns/connectivity/index.md)|[Agent setup](https://developers.cloudflare.com/agent-setup/)
To connect to Cloudflare Gateway resolver - which is [required to reach private resources in Internal DNS](https://developers.cloudflare.com/dns/internal-dns/#architecture-overview) \- you can use the following options:
* DNS endpoints supported with [DNS locations](https://developers.cloudflare.com/cloudflare-one/networks/resolvers-and-proxies/dns/locations/)
* DNS over UDP/TCP port 53 (IPv4 or IPv6)
* DNS over TLS
* DNS over HTTPS
* [Proxy Auto-Configuration (PAC) files](https://developers.cloudflare.com/cloudflare-one/networks/resolvers-and-proxies/proxy-endpoints/)
* [WARP device client](https://developers.cloudflare.com/cloudflare-one/team-and-resources/devices/cloudflare-one-client/)
* [Clientless browser isolation](https://developers.cloudflare.com/cloudflare-one/remote-browser-isolation/setup/clientless-browser-isolation/#filter-dns-queries)
* [Cloudflare WAN](https://developers.cloudflare.com/cloudflare-wan/zero-trust/cloudflare-gateway/)
Was this helpful?
YesNo
## On this page
[Docs](https://developers.cloudflare.com/)
```json
{"@context":"https://schema.org","@type":"TechArticle","@id":"https://developers.cloudflare.com/dns/internal-dns/connectivity/#page","headline":"Connect to Gateway resolver · Cloudflare DNS docs","description":"Connect to the Internal DNS Gateway resolver.","url":"https://developers.cloudflare.com/dns/internal-dns/connectivity/","inLanguage":"en","image":"https://developers.cloudflare.com/og-docs.png","dateModified":"2026-04-17","publisher":{"@type":"Organization","name":"Cloudflare","url":"https://www.cloudflare.com/"},"isPartOf":{"@type":"WebSite","@id":"https://developers.cloudflare.com/#website","name":"Cloudflare Docs","url":"https://developers.cloudflare.com/"},"keywords":["Private networks"]}
```
---
---
description: Manage DNS views to return different responses by network.
title: Manage DNS views
image: https://developers.cloudflare.com/og-docs.png
---
[Skip to content](#main-content)
> Documentation Index
> Fetch the complete documentation index at: https://developers.cloudflare.com/dns/llms.txt
> Use this file to discover all available pages before exploring further.
# Manage DNS views
Last updated Jul 16, 2026|Copy as Markdown|[View as Markdown](https://developers.cloudflare.com/dns/internal-dns/dns-views/index.md)|[Agent setup](https://developers.cloudflare.com/agent-setup/)
Internal DNS views are logical groupings of [internal DNS zones](https://developers.cloudflare.com/dns/internal-dns/internal-zones/). As explained in the [architecture overview](https://developers.cloudflare.com/dns/internal-dns/#architecture-overview), DNS views are referenced by [Gateway resolver policies](https://developers.cloudflare.com/cloudflare-one/traffic-policies/resolver-policies/) to define how a specific query should be resolved.
Refer to the sections below for details on how to manage your DNS views, or consider the [get started](https://developers.cloudflare.com/dns/internal-dns/get-started/) for a complete workflow.
## Configuration conditions
When setting up DNS views, observe the following conditions:
* DNS views can be empty, with no [internal zones](https://developers.cloudflare.com/dns/internal-dns/internal-zones/) linked to them.
* A DNS view cannot contain public DNS zones.1
* Each internal DNS zone name must be unique within a given DNS view.
* Each DNS view name must be unique within a given Cloudflare account.
1 DNS zones that contain public DNS records and are accessible by public resolvers.
## Create a view
1. In the Cloudflare dashboard, go to the **Internal DNS** page.
[Go to **Internal DNS** ↗](https://dash.cloudflare.com/?to=/:account/internal-dns)
2. Go to **Internal DNS Views**.
3. Select **Create a view**.
4. Give your view a descriptive name.
1. Select **Manage zones** to add zones to your view. Select the internal zones that should be used to resolve queries sent by Gateway resolver to this view.
2. Choose **Save** to confirm.
Use the [Create Internal DNS View](https://developers.cloudflare.com/api/resources/dns/subresources/settings/subresources/account/subresources/views/methods/create/) endpoint. For each view you create, list all the internal zones that should be grouped under that view.
Note
DNS views are managed at the account level. Make sure your API token includes **Account** \> **DNS Views** \> **Edit** permission.
## Delete a view
DNS views can be deleted even if they still have internal zones linked to them. The internal DNS zones will continue to exist but will be unlinked once the view is deleted.
It is also possible to delete a DNS view that is being referenced by a Gateway resolver policy. In this case, queries matching the policy will return SERVFAIL.
1. In the Cloudflare dashboard, go to the **Internal DNS** page.
[Go to **Internal DNS** ↗](https://dash.cloudflare.com/?to=/:account/internal-dns)
2. Go to **Internal DNS Views**.
3. Find the view you want to delete.
4. Select the three dots in the corresponding row and choose _Delete_.
5. In the confirmation dialog, select **Delete** again to proceed.
Use the [Delete Internal DNS View](https://developers.cloudflare.com/api/resources/dns/subresources/settings/subresources/account/subresources/views/methods/delete/) endpoint.
## Other API actions
* [Update a DNS view](https://developers.cloudflare.com/api/resources/dns/subresources/settings/subresources/account/subresources/views/methods/edit/) (`PATCH`)
* [Get view details](https://developers.cloudflare.com/api/resources/dns/subresources/settings/subresources/account/subresources/views/methods/get/) (`GET`)
* [List DNS views](https://developers.cloudflare.com/api/resources/dns/subresources/settings/subresources/account/subresources/views/methods/list/) (`GET`)
Was this helpful?
YesNo
## On this page
[Docs](https://developers.cloudflare.com/)
```json
{"@context":"https://schema.org","@type":"TechArticle","@id":"https://developers.cloudflare.com/dns/internal-dns/dns-views/#page","headline":"Manage DNS views · Cloudflare DNS docs","description":"Manage DNS views to return different responses by network.","url":"https://developers.cloudflare.com/dns/internal-dns/dns-views/","inLanguage":"en","image":"https://developers.cloudflare.com/og-docs.png","dateModified":"2026-07-16","publisher":{"@type":"Organization","name":"Cloudflare","url":"https://www.cloudflare.com/"},"isPartOf":{"@type":"WebSite","@id":"https://developers.cloudflare.com/#website","name":"Cloudflare Docs","url":"https://developers.cloudflare.com/"},"keywords":["Private networks"]}
```
---
---
description: Set up Internal DNS for private name resolution.
title: Get started
image: https://developers.cloudflare.com/og-docs.png
---
[Skip to content](#main-content)
> Documentation Index
> Fetch the complete documentation index at: https://developers.cloudflare.com/dns/llms.txt
> Use this file to discover all available pages before exploring further.
# Get started
Last updated Jul 16, 2026|Copy as Markdown|[View as Markdown](https://developers.cloudflare.com/dns/internal-dns/get-started/index.md)|[Agent setup](https://developers.cloudflare.com/agent-setup/)
Follow this guide to get started with Internal DNS.
## Before you begin
* Make sure you have an Enterprise account with access to [Gateway resolver policies](https://developers.cloudflare.com/cloudflare-one/traffic-policies/resolver-policies/) and [Internal DNS](https://developers.cloudflare.com/dns/internal-dns/).
* Consider the different ways in which you can [connect to Gateway resolver](https://developers.cloudflare.com/dns/internal-dns/connectivity/).
Caution
If using WARP, make sure your internal DNS zones or their TLDs are not listed in your [Local Domain Fallback configuration](https://developers.cloudflare.com/cloudflare-one/team-and-resources/devices/cloudflare-one-client/configure/route-traffic/local-domains/). Otherwise, DNS queries for a matching domain will be sent to the local DNS server specified in the fallback, instead of being sent to Cloudflare.
* If you will be using an API token for authentication, make sure you have the following permissions:
API token configuration
**Permissions**
* _Account_ \- _DNS Views_ \- _Edit_
* _Zone_ \- _DNS_ \- _Edit_
* _Account_ \- _Account Settings_ \- _Edit_
* _Zone_ \- _DNS Settings_ \- _Edit_
* _Zone_ \- _Zone_ \- _Edit_
**Account Resources**
* _Include_ \- _(Your account)_
**Zone Resources**
* _Include_ \- _Specific zones_
When creating a token for Internal DNS, we recommend scoping it to specific internal zones rather than using "All zones". This follows the principle of least privilege. If you create new internal zones later, you will need to update the token scope to include them. Support for automatic zone-type scoping (for example, "all internal zones") is planned for a future release.
About authentication
Internal DNS uses the same authentication model as the rest of Cloudflare DNS. There is no separate role or special permission group for internal zones. You use standard DNS permissions scoped to the specific zones you want to manage.
One important distinction: a zone-scoped token cannot create a zone because the zone does not exist yet to be scoped to. To create an internal zone via API, you need a token with **Zone > Zone > Edit** scoped to **All zones** or at the account level. After the zone exists, switch to a zone-scoped token for managing records and settings.
## 1\. Set up your internal DNS zone
1. In the Cloudflare dashboard, go to the **Internal DNS** page.
[Go to **Internal DNS** ↗](https://dash.cloudflare.com/?to=/:account/internal-dns)
2. Select **Create an internal zone**.
3. Give your internal zone a name.
Internal zone configuration conditions
* Internal zones can contain the same [DNS record types](https://developers.cloudflare.com/dns/manage-dns-records/reference/dns-record-types/) that Cloudflare supports for public zones.
* An internal zone can have the same name as a public zone in the same account.
* Each internal zone can be linked to multiple [views](https://developers.cloudflare.com/dns/internal-dns/dns-views/).1
* There can be several internal zones with the same name in one account. However, two internal zones with the same name cannot be linked to the same view.
* Internal zones are not subject to any top-level domain (TLD) restrictions. This means that an internal zone can be created if its TLD is not registered publicly (for example, `xyz.local`), if it is created on the TLD itself (`local`), or even if on the root (`.`).
1 Logical groupings of internal DNS zones that are referenced by Gateway resolver policies to define how a specific query should be resolved.
1. Add DNS records to your internal zone using your preferred option:
* [Import](https://developers.cloudflare.com/dns/manage-dns-records/how-to/import-and-export/) a formatted BIND file.
* Select **Add a record** and choose **Create** under the record type you want to add. Refer to [DNS record types](https://developers.cloudflare.com/dns/manage-dns-records/reference/dns-record-types/) for details.
1. Repeat this process for each internal zone you wish to add.
Note
Creating multiple internal DNS records in batch is currently only supported via API.
1. Use the [Create Zone](https://developers.cloudflare.com/api/resources/zones/methods/create/) endpoint to create an [internal zone](https://developers.cloudflare.com/dns/internal-dns/internal-zones/). Specify your account ID and set the `type` to `internal`.
Internal zone configuration conditions
* Internal zones can contain the same [DNS record types](https://developers.cloudflare.com/dns/manage-dns-records/reference/dns-record-types/) that Cloudflare supports for public zones.
* An internal zone can have the same name as a public zone in the same account.
* Each internal zone can be linked to multiple [views](https://developers.cloudflare.com/dns/internal-dns/dns-views/).1
* There can be several internal zones with the same name in one account. However, two internal zones with the same name cannot be linked to the same view.
* Internal zones are not subject to any top-level domain (TLD) restrictions. This means that an internal zone can be created if its TLD is not registered publicly (for example, `xyz.local`), if it is created on the TLD itself (`local`), or even if on the root (`.`).
1 Logical groupings of internal DNS zones that are referenced by Gateway resolver policies to define how a specific query should be resolved.
Example
Required API token permissions
At least one of the following [token permissions](https://developers.cloudflare.com/fundamentals/api/reference/permissions/) is required:
* `Zone Zone Edit`
* `Zone DNS Edit`
```bash
curl "https://api.cloudflare.com/client/v4/zones" \
--request POST \
--header "Authorization: Bearer $CLOUDFLARE_API_TOKEN" \
--json '{
"account": {
"id": ""
},
"name": "",
"type": "internal"
}'
```
1. Add DNS records to your internal zone using your preferred option:
* [Import](https://developers.cloudflare.com/api/resources/dns/subresources/records/methods/import/) a formatted BIND file. Refer to the [DNS records how-to](https://developers.cloudflare.com/dns/manage-dns-records/how-to/import-and-export/) for guidance.
* Use other API endpoints, such as [/batch](https://developers.cloudflare.com/api/resources/dns/subresources/records/methods/batch/), to manage DNS records. Refer to [Batch record changes](https://developers.cloudflare.com/dns/manage-dns-records/how-to/batch-record-changes/#use-the-api) for details.
1. Repeat this process for each internal zone you wish to add.
### (Optional) Reference a zone from another zone
During an [internal DNS query resolution](https://developers.cloudflare.com/dns/internal-dns/#architecture-overview), if no internal record is found within a matching internal zone, Cloudflare will check if the matching internal zone is referencing another internal zone. Successive references can be followed with a maximum of five references in a chain.
For details, refer to [reference zones](https://developers.cloudflare.com/dns/internal-dns/internal-zones/reference-zones/).
1. In the Cloudflare dashboard, go to the **Internal DNS** page.
[Go to **Internal DNS** ↗](https://dash.cloudflare.com/?to=/:account/internal-dns)
2. Select a zone.
3. Within the selected zone, go to **Reference zone**.
4. Select **Add reference zone**.
5. Find the zone you want to use as reference and choose **Select** in the respective row.
1. Use the [Update DNS settings](https://developers.cloudflare.com/api/resources/dns/subresources/settings/subresources/zone/methods/edit/) endpoint to add a reference from an internal zone to another internal zone. In `--json`, specify the `internal_dns` object with the parameter `reference_zone_id`.
In the following example, internal zone A (ID `8a904aeb565c42cfa207d98f6edea2f3`) is referencing internal zone B (ID `8e64c6fb4b514f3faf64de81efc11e51`).
Required API token permissions
At least one of the following [token permissions](https://developers.cloudflare.com/fundamentals/api/reference/permissions/) is required:
* `Zone DNS Settings Write`
* `DNS Write`
```bash
curl "https://api.cloudflare.com/client/v4/zones/8a904aeb565c42cfa207d98f6edea2f3/dns_settings" \
--request PATCH \
--header "Authorization: Bearer $CLOUDFLARE_API_TOKEN" \
--json '{
"internal_dns": {
"reference_zone_id": "8e64c6fb4b514f3faf64de81efc11e51"
}
}'
```
## 2\. Link your internal zone to a view
Since the resolver policy will require a [DNS view](https://developers.cloudflare.com/dns/internal-dns/dns-views/), you must have at least one view to be able to route requests to internal zones.
1. In the Cloudflare dashboard, go to the **Internal DNS** page.
[Go to **Internal DNS** ↗](https://dash.cloudflare.com/?to=/:account/internal-dns)
2. Go to **Internal DNS Views**.
3. Select **Create a view**.
4. Give your view a descriptive name.
DNS view configuration conditions
* DNS views can be empty, with no [internal zones](https://developers.cloudflare.com/dns/internal-dns/internal-zones/) linked to them.
* A DNS view cannot contain public DNS zones.1
* Each internal DNS zone name must be unique within a given DNS view.
* Each DNS view name must be unique within a given Cloudflare account.
1 DNS zones that contain public DNS records and are accessible by public resolvers.
1. Select **Manage zones** to add zones to your view. Select the internal zones that should be used to resolve queries sent by Gateway resolver to this view.
2. Choose **Save** to confirm.
1. Use the [Create Internal DNS View](https://developers.cloudflare.com/api/resources/dns/subresources/settings/subresources/account/subresources/views/methods/create/) endpoint. For each view you create, list all the internal zones that should be grouped under that view.
DNS view configuration conditions
* DNS views can be empty, with no [internal zones](https://developers.cloudflare.com/dns/internal-dns/internal-zones/) linked to them.
* A DNS view cannot contain public DNS zones.1
* Each internal DNS zone name must be unique within a given DNS view.
* Each DNS view name must be unique within a given Cloudflare account.
1 DNS zones that contain public DNS records and are accessible by public resolvers.
## 3\. Configure Gateway policies
Note
The Gateway configuration must exist within the same Cloudflare account where the internal zone exists.
Besides selecting an internal DNS view when setting up your resolver policies, you can also enable the **fallback through public DNS** option.
1. In [Cloudflare One ↗](https://one.dash.cloudflare.com/), go to **Traffic policies** \> **Firewall policies** \> **Resolver policies**.
2. Select **Add a policy** and enter a name and description.
3. Create an expression for the traffic you wish to route. For guidance about selectors, operators, and values, refer to [Gateway resolver policies](https://developers.cloudflare.com/cloudflare-one/traffic-policies/resolver-policies/#selectors).
4. Select **Use Internal DNS**. Choose the view that queries matching the expression should be sent to.
5. (Optional) Adjust the option to **Fallback through public DNS** according to your use case.
* Off: Gateway DNS resolver returns the response as-is to the client.
* On: In case the response from the internal zone is REFUSED, NXDOMAIN, or a response with a CNAME type, Gateway DNS resolver sends the query to Cloudflare 1.1.1.1 public resolver and tries to resolve the query via public DNS.
1. Select **Create policy** to confirm.
Use the API endpoints under [Zero Trust > Gateway > Rules](https://developers.cloudflare.com/api/resources/zero%5Ftrust/subresources/gateway/subresources/rules/) to set up resolver policies. For guidance about selectors, operators, and values, refer to [Gateway](https://developers.cloudflare.com/cloudflare-one/traffic-policies/resolver-policies/#selectors).
Use the rule settings object to define `resolve_dns_internally`, specifying `view_id` and `fallback` option. The fallback options behave as follows:
* `none`: Gateway DNS resolver returns the response as-is to the client.
* `public_dns`: In case the response from the internal zone is REFUSED, NXDOMAIN, or a response with a CNAME type, Gateway DNS resolver sends the query to Cloudflare 1.1.1.1 public resolver and tries to resolve the query via public DNS.
Once you add the Gateway resolver policy, it will be listed in the respective internal view under **Resolver policies referencing this view**.
## Manage with Terraform
You can also manage Internal DNS resources with the [Cloudflare Terraform provider ↗](https://registry.terraform.io/providers/cloudflare/cloudflare/latest/docs). The patterns are identical to public DNS zones — the only difference is setting `type = "internal"` on the `cloudflare_zone` resource.
Use a zone-scoped API token for day-to-day management and an account-level token for creating new zones. If your token is scoped to specific zones, remember to update it when you add new internal zones. For a complete working example, refer to the [Terraform provider documentation ↗](https://registry.terraform.io/providers/cloudflare/cloudflare/latest/docs).
Was this helpful?
YesNo
## On this page
[Docs](https://developers.cloudflare.com/)
```json
{"@context":"https://schema.org","@type":"TechArticle","@id":"https://developers.cloudflare.com/dns/internal-dns/get-started/#page","headline":"Get started · Cloudflare DNS docs","description":"Set up Internal DNS for private name resolution.","url":"https://developers.cloudflare.com/dns/internal-dns/get-started/","inLanguage":"en","image":"https://developers.cloudflare.com/og-docs.png","dateModified":"2026-07-16","publisher":{"@type":"Organization","name":"Cloudflare","url":"https://www.cloudflare.com/"},"isPartOf":{"@type":"WebSite","@id":"https://developers.cloudflare.com/#website","name":"Cloudflare Docs","url":"https://developers.cloudflare.com/"},"keywords":["Private networks"]}
```
---
---
description: Explore internal DNS zones in Cloudflare. These zones organize DNS records for resources accessible only within your private network, queried via Cloudflare Gateway.
title: Internal zones
image: https://developers.cloudflare.com/og-docs.png
---
[Skip to content](#main-content)
> Documentation Index
> Fetch the complete documentation index at: https://developers.cloudflare.com/dns/llms.txt
> Use this file to discover all available pages before exploring further.
# Internal zones
Last updated Apr 17, 2026|Copy as Markdown|[View as Markdown](https://developers.cloudflare.com/dns/internal-dns/internal-zones/index.md)|[Agent setup](https://developers.cloudflare.com/agent-setup/)
Internal DNS zones are groupings of internal DNS records. While [public DNS records](https://developers.cloudflare.com/dns/manage-dns-records/) contain information about resources that you want to make available to the public Internet, [internal DNS records](https://developers.cloudflare.com/dns/internal-dns/internal-zones/internal-dns-records/) allow you to manage resources that should only be available within your private network.
Refer to [Manage internal zones](https://developers.cloudflare.com/dns/internal-dns/internal-zones/setup/) for a full list of configuration conditions and step-by-step instructions.
Internal DNS zones do not get assigned Cloudflare nameservers and can only be queried via [Cloudflare Gateway](https://developers.cloudflare.com/cloudflare-one/traffic-policies/resolver-policies/) when linked to a [DNS view](https://developers.cloudflare.com/dns/internal-dns/dns-views/). The Gateway configuration must exist within the same Cloudflare account where the internal zone exists.
## Resources
* [Manage internal zones](https://developers.cloudflare.com/dns/internal-dns/internal-zones/setup/)
* [Manage internal DNS records](https://developers.cloudflare.com/dns/internal-dns/internal-zones/internal-dns-records/)
* [Reference zones](https://developers.cloudflare.com/dns/internal-dns/internal-zones/reference-zones/)
Was this helpful?
YesNo
## On this page
[Docs](https://developers.cloudflare.com/)
```json
{"@context":"https://schema.org","@type":"TechArticle","@id":"https://developers.cloudflare.com/dns/internal-dns/internal-zones/#page","headline":"Internal zones · Cloudflare DNS docs","description":"Explore internal DNS zones in Cloudflare. These zones organize DNS records for resources accessible only within your private network, queried via Cloudflare Gateway.","url":"https://developers.cloudflare.com/dns/internal-dns/internal-zones/","inLanguage":"en","image":"https://developers.cloudflare.com/og-docs.png","dateModified":"2026-04-17","publisher":{"@type":"Organization","name":"Cloudflare","url":"https://www.cloudflare.com/"},"isPartOf":{"@type":"WebSite","@id":"https://developers.cloudflare.com/#website","name":"Cloudflare Docs","url":"https://developers.cloudflare.com/"},"keywords":["Private networks"]}
```
---
---
description: Manage internal DNS records in Cloudflare. Learn about supported DNS record types and CNAME flattening.
title: Manage internal DNS records
image: https://developers.cloudflare.com/og-docs.png
---
[Skip to content](#main-content)
> Documentation Index
> Fetch the complete documentation index at: https://developers.cloudflare.com/dns/llms.txt
> Use this file to discover all available pages before exploring further.
# Manage internal DNS records
Last updated Apr 17, 2026|Copy as Markdown|[View as Markdown](https://developers.cloudflare.com/dns/internal-dns/internal-zones/internal-dns-records/index.md)|[Agent setup](https://developers.cloudflare.com/agent-setup/)
Internal zones can contain the same [DNS record types](https://developers.cloudflare.com/dns/manage-dns-records/reference/dns-record-types/) that Cloudflare supports for public zones.
You can manage internal DNS records in the same way as you would manage public DNS records, with the difference that [proxy status](https://developers.cloudflare.com/dns/proxy-status/) does not apply to internal DNS records.
Refer to [Manage DNS records](https://developers.cloudflare.com/dns/manage-dns-records/how-to/create-dns-records/) or to the [API documentation](https://developers.cloudflare.com/api/resources/dns/subresources/records/) for further guidance.
## CNAME flattening in Internal DNS
With [CNAME flattening](https://developers.cloudflare.com/dns/cname-flattening/), Cloudflare finds the final target content that a CNAME points to and then returns this content instead of a CNAME record. With Internal DNS, CNAME flattening is applied by default and cannot be turned off.
Cloudflare will try to flatten the CNAME record considering both the specified [DNS view](https://developers.cloudflare.com/dns/internal-dns/dns-views/) and any existing [reference zones](https://developers.cloudflare.com/dns/internal-dns/internal-zones/reference-zones/). If the reference zone then has another CNAME, the record will again be considered from the perspective of the original view.
Example
* Query for the `A` record on `abc.example.local` with view ID 111.
* Zone 600 references zone 700, which is not linked to any view.
flowchart LR
accTitle: Internal DNS zones and CNAME flattening example
accDescr: Diagram exemplifying Internal DNS zones and containing CNAME and A records
subgraph Internal DNS
subgraph Zone 700 - net
A["@ A 192.0.2.10"]
B["xyz CNAME def.example.local"]
end
subgraph View 111 - London
subgraph Zone 600 - example.local
X["@ A 192.0.2.1"]
Y["abc CNAME xyz.net"]
U["def TXT 15192-51"]
Z["def A 192.0.2.9"]
end
end
end
After finding the CNAME record that points to `xyz.net`, Cloudflare cannot resolve it within zone 600\. However, since this zone is referencing zone 700, this will be considered in the resolution.
The record in zone 700 points to `def.example.local`, which Cloudflare will then try to resolve in the original view. As an `A` record can be found for `def.example.local`, Cloudflare will return the corresponding IP address - in this example, `192.0.2.9`.
If it is not possible to flatten the CNAME record, the following will happen:
1. The CNAME record is returned to [Gateway resolver](https://developers.cloudflare.com/dns/internal-dns/#architecture-overview) as-is.
2. Gateway resolver will process the returned record, depending on the **Fallback through public DNS** configuration:
* On: Gateway will try to resolve the query by sending it to Cloudflare's public DNS resolver ([1.1.1.1](https://developers.cloudflare.com/1.1.1.1/)).
* Off: Gateway will return the response as-is to the client.
Was this helpful?
YesNo
## On this page
[Docs](https://developers.cloudflare.com/)
```json
{"@context":"https://schema.org","@type":"TechArticle","@id":"https://developers.cloudflare.com/dns/internal-dns/internal-zones/internal-dns-records/#page","headline":"Manage internal DNS records · Cloudflare DNS docs","description":"Manage internal DNS records in Cloudflare. Learn about supported DNS record types and CNAME flattening.","url":"https://developers.cloudflare.com/dns/internal-dns/internal-zones/internal-dns-records/","inLanguage":"en","image":"https://developers.cloudflare.com/og-docs.png","dateModified":"2026-04-17","publisher":{"@type":"Organization","name":"Cloudflare","url":"https://www.cloudflare.com/"},"isPartOf":{"@type":"WebSite","@id":"https://developers.cloudflare.com/#website","name":"Cloudflare Docs","url":"https://developers.cloudflare.com/"},"keywords":["Private networks"]}
```
---
---
description: Learn about reference zones. Cloudflare Internal DNS allows zones to reference others for query resolution when no direct record is found.
title: Reference zones
image: https://developers.cloudflare.com/og-docs.png
---
[Skip to content](#main-content)
> Documentation Index
> Fetch the complete documentation index at: https://developers.cloudflare.com/dns/llms.txt
> Use this file to discover all available pages before exploring further.
# Reference zones
Last updated Jul 16, 2026|Copy as Markdown|[View as Markdown](https://developers.cloudflare.com/dns/internal-dns/internal-zones/reference-zones/index.md)|[Agent setup](https://developers.cloudflare.com/agent-setup/)
During an [internal DNS query resolution](https://developers.cloudflare.com/dns/internal-dns/#architecture-overview), if no internal record is found within a matching internal zone, Cloudflare will check if the matching internal zone is referencing another internal zone. Successive references can be followed with a maximum of five references in a chain.
Note
A wildcard record (`*.example.local`) in the matching internal zone will take precedence over an exact match in a reference zone.
## Configuration conditions
* Each internal zone can only reference one other zone.
* The same zone can be referenced by multiple internal zones.
* Public zones cannot be used as reference zones.
* Reference zones do not have to be linked to the same [DNS view](https://developers.cloudflare.com/dns/internal-dns/dns-views/) as the zone referencing them. They may also not be linked to any view at all.
## Set up
1. In the Cloudflare dashboard, go to the **Internal DNS** page.
[Go to **Internal DNS** ↗](https://dash.cloudflare.com/?to=/:account/internal-dns)
2. Select a zone.
3. Within the selected zone, go to **Reference zone**.
4. Select **Add reference zone**. If your zone already has a reference zone set up, you must first remove it. As explained in the [configuration conditions](#configuration-conditions), each internal zone can only reference one other zone at a time.
5. Find the zone you want to use as reference and choose **Select** in the respective row.
Use the [Update DNS settings](https://developers.cloudflare.com/api/resources/dns/subresources/settings/subresources/zone/methods/edit/) endpoint. In `--json`, specify the `internal_dns` object with the parameter `reference_zone_id`.
Note
If your API token is scoped to specific zones, make sure it includes both the zone you are updating and the zone you are referencing.
In the following example, internal zone A (ID `8a904aeb565c42cfa207d98f6edea2f3`) is referencing internal zone B (ID `8e64c6fb4b514f3faf64de81efc11e51`).
Required API token permissions
At least one of the following [token permissions](https://developers.cloudflare.com/fundamentals/api/reference/permissions/) is required:
* `Zone DNS Settings Write`
* `DNS Write`
```bash
curl "https://api.cloudflare.com/client/v4/zones/8a904aeb565c42cfa207d98f6edea2f3/dns_settings" \
--request PATCH \
--header "Authorization: Bearer $CLOUDFLARE_API_TOKEN" \
--json '{
"internal_dns": {
"reference_zone_id": "8e64c6fb4b514f3faf64de81efc11e51"
}
}'
```
A third zone (C) could also point to zone B as a reference, but zone A cannot add another zone as a reference while also having zone B configured as its reference zone.
Was this helpful?
YesNo
## On this page
[Docs](https://developers.cloudflare.com/)
```json
{"@context":"https://schema.org","@type":"TechArticle","@id":"https://developers.cloudflare.com/dns/internal-dns/internal-zones/reference-zones/#page","headline":"Reference zones · Cloudflare DNS docs","description":"Learn about reference zones. Cloudflare Internal DNS allows zones to reference others for query resolution when no direct record is found.","url":"https://developers.cloudflare.com/dns/internal-dns/internal-zones/reference-zones/","inLanguage":"en","image":"https://developers.cloudflare.com/og-docs.png","dateModified":"2026-07-16","publisher":{"@type":"Organization","name":"Cloudflare","url":"https://www.cloudflare.com/"},"isPartOf":{"@type":"WebSite","@id":"https://developers.cloudflare.com/#website","name":"Cloudflare Docs","url":"https://developers.cloudflare.com/"},"keywords":["Private networks"]}
```
---
---
description: Understand how to set up and manage internal DNS zones with Cloudflare. Explore configuration conditions, zone creation, and available API endpoints.
title: Manage internal zones
image: https://developers.cloudflare.com/og-docs.png
---
[Skip to content](#main-content)
> Documentation Index
> Fetch the complete documentation index at: https://developers.cloudflare.com/dns/llms.txt
> Use this file to discover all available pages before exploring further.
# Manage internal zones
Last updated Jul 16, 2026|Copy as Markdown|[View as Markdown](https://developers.cloudflare.com/dns/internal-dns/internal-zones/setup/index.md)|[Agent setup](https://developers.cloudflare.com/agent-setup/)
Refer to the following sections to learn how to manage your [internal DNS zones](https://developers.cloudflare.com/dns/internal-dns/internal-zones/).
## Configuration conditions
When setting up internal zones, observe the following conditions:
* Internal zones can contain the same [DNS record types](https://developers.cloudflare.com/dns/manage-dns-records/reference/dns-record-types/) that Cloudflare supports for public zones.
* An internal zone can have the same name as a public zone in the same account.
* Each internal zone can be linked to multiple [views](https://developers.cloudflare.com/dns/internal-dns/dns-views/).1
* There can be several internal zones with the same name in one account. However, two internal zones with the same name cannot be linked to the same view.
* Internal zones are not subject to any top-level domain (TLD) restrictions. This means that an internal zone can be created if its TLD is not registered publicly (for example, `xyz.local`), if it is created on the TLD itself (`local`), or even if on the root (`.`).
1 Logical groupings of internal DNS zones that are referenced by Gateway resolver policies to define how a specific query should be resolved.
## Create an internal zone
1. In the Cloudflare dashboard, go to the **Internal DNS** page.
[Go to **Internal DNS** ↗](https://dash.cloudflare.com/?to=/:account/internal-dns)
2. Select **Create an internal zone**.
3. Give your internal zone a name.
1. Add DNS records to your internal zone using your preferred option:
* [Import](https://developers.cloudflare.com/dns/manage-dns-records/how-to/import-and-export/) a formatted BIND file.
* Select **Add a record** and choose **Create** under the record type you want to add. Refer to [DNS record types](https://developers.cloudflare.com/dns/manage-dns-records/reference/dns-record-types/) for details.
1. Repeat this process for each internal zone you wish to add.
Note
Creating multiple internal DNS records in batch is currently only supported via API.
1. Use the [Create Zone](https://developers.cloudflare.com/api/resources/zones/methods/create/) endpoint to create an [internal zone](https://developers.cloudflare.com/dns/internal-dns/internal-zones/). Specify your account ID and set the `type` to `internal`.
Example
Required API token permissions
At least one of the following [token permissions](https://developers.cloudflare.com/fundamentals/api/reference/permissions/) is required:
* `Zone Zone Edit`
* `Zone DNS Edit`
```bash
curl "https://api.cloudflare.com/client/v4/zones" \
--request POST \
--header "Authorization: Bearer $CLOUDFLARE_API_TOKEN" \
--json '{
"account": {
"id": ""
},
"name": "",
"type": "internal"
}'
```
1. Add DNS records to your internal zone using your preferred option:
* [Import](https://developers.cloudflare.com/api/resources/dns/subresources/records/methods/import/) a formatted BIND file. Refer to the [DNS records how-to](https://developers.cloudflare.com/dns/manage-dns-records/how-to/import-and-export/) for guidance.
* Use other API endpoints, such as [/batch](https://developers.cloudflare.com/api/resources/dns/subresources/records/methods/batch/), to manage DNS records. Refer to [Batch record changes](https://developers.cloudflare.com/dns/manage-dns-records/how-to/batch-record-changes/#use-the-api) for details.
1. Repeat this process for each internal zone you wish to add.
## Other API actions
The API endpoints to manage internal zones are the same as for managing public zones. The main difference is that the zone type must be set to `internal`.
Note
When creating API tokens for Internal DNS, we recommend scoping them to specific internal zones rather than using "All zones". This follows the principle of least privilege. If you create new internal zones later, you will need to update the token scope to include them.
Refer to the following API documentation for details:
* [Update an internal zone](https://developers.cloudflare.com/api/resources/zones/methods/edit/) (`PATCH`)
* [Get internal zone details](https://developers.cloudflare.com/api/resources/zones/methods/get/) (`GET`)
* [List internal zones](https://developers.cloudflare.com/api/resources/zones/methods/list/) (`GET`)
* [Delete an internal zone](https://developers.cloudflare.com/api/resources/zones/methods/delete/) (`DELETE`)
Was this helpful?
YesNo
## On this page
[Docs](https://developers.cloudflare.com/)
```json
{"@context":"https://schema.org","@type":"TechArticle","@id":"https://developers.cloudflare.com/dns/internal-dns/internal-zones/setup/#page","headline":"Manage internal zones · Cloudflare DNS docs","description":"Understand how to set up and manage internal DNS zones with Cloudflare. Explore configuration conditions, zone creation, and available API endpoints.","url":"https://developers.cloudflare.com/dns/internal-dns/internal-zones/setup/","inLanguage":"en","image":"https://developers.cloudflare.com/og-docs.png","dateModified":"2026-07-16","publisher":{"@type":"Organization","name":"Cloudflare","url":"https://www.cloudflare.com/"},"isPartOf":{"@type":"WebSite","@id":"https://developers.cloudflare.com/#website","name":"Cloudflare Docs","url":"https://developers.cloudflare.com/"},"keywords":["Private networks"]}
```
---
---
description: Protect and accelerate authoritative nameservers with DNS-level caching and DDoS mitigation.
title: DNS Firewall
image: https://developers.cloudflare.com/og-docs.png
---
[Skip to content](#main-content)
> Documentation Index
> Fetch the complete documentation index at: https://developers.cloudflare.com/dns/llms.txt
> Use this file to discover all available pages before exploring further.
# DNS Firewall
Last updated May 5, 2026|Copy as Markdown|[View as Markdown](https://developers.cloudflare.com/dns/dns-firewall/index.md)|[Agent setup](https://developers.cloudflare.com/agent-setup/)
Speed up and protect entire authoritative nameservers
Enterprise-only paid add-on
Cloudflare DNS Firewall proxies all DNS queries to your nameservers through Cloudflare’s global network. This action protects upstream nameservers from DDoS attacks and reduces load by caching DNS responses.
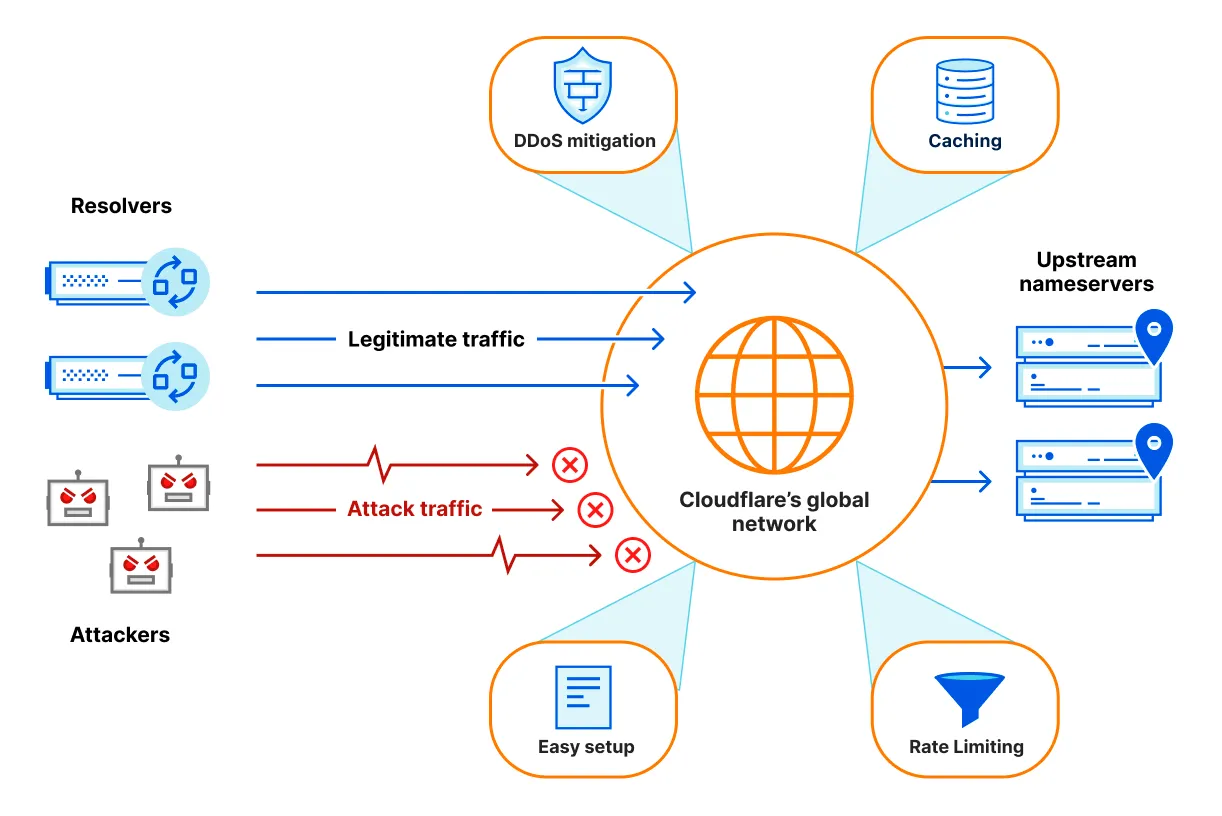
DNS Firewall is for customers who need to speed up and protect entire authoritative nameservers. If you need to speed up and protect individual zones, refer to Cloudflare DNS [Setups](https://developers.cloudflare.com/dns/zone-setups/).
---
## How DNS Firewall works
When a DNS query for your domain takes place:
1. Queries go to the Cloudflare data center that is closest to the website visitor. This is determined by the location of the DNS resolver.
2. Cloudflare tries to return a DNS response from cache.
3. If the response is not available in cache, Cloudflare queries the upstream authoritative nameservers.
4. After returning the response from the nameservers, Cloudflare temporarily caches it for subsequent DNS queries.
---
## Benefits
DNS Firewall provides the following benefits while allowing your organization total control over your authoritative nameservers:
* DDoS mitigation
* High availability
* Global distribution
* Enhanced performance
* Bandwidth savings
* [Rate limiting per data center](https://developers.cloudflare.com/dns/dns-firewall/setup/#additional-options)
* Minimum and maximum cache TTL specification
* DNS [ANY ↗](https://datatracker.ietf.org/doc/html/rfc8482) query type block
Was this helpful?
YesNo
## On this page
[Docs](https://developers.cloudflare.com/)
```json
{"@context":"https://schema.org","@type":"WebPage","@id":"https://developers.cloudflare.com/dns/dns-firewall/#page","headline":"DNS Firewall · Cloudflare DNS docs","description":"Protect and accelerate authoritative nameservers with DNS-level caching and DDoS mitigation.","url":"https://developers.cloudflare.com/dns/dns-firewall/","inLanguage":"en","image":"https://developers.cloudflare.com/og-docs.png","dateModified":"2026-05-05","publisher":{"@type":"Organization","name":"Cloudflare","url":"https://www.cloudflare.com/"},"isPartOf":{"@type":"WebSite","@id":"https://developers.cloudflare.com/#website","name":"Cloudflare Docs","url":"https://developers.cloudflare.com/"},"keywords":["Caching"]}
```
---
---
description: Access DNS Firewall query analytics and configure Logpush for DNS logs.
title: Analytics and logs
image: https://developers.cloudflare.com/og-docs.png
---
[Skip to content](#main-content)
> Documentation Index
> Fetch the complete documentation index at: https://developers.cloudflare.com/dns/llms.txt
> Use this file to discover all available pages before exploring further.
# Analytics and logs
Last updated May 5, 2026|Copy as Markdown|[View as Markdown](https://developers.cloudflare.com/dns/dns-firewall/analytics/index.md)|[Agent setup](https://developers.cloudflare.com/agent-setup/)
Consider the sections below to learn how to access analytics and logs for your DNS Firewall.
## Analytics
DNS Firewall analytics allow you to evaluate data about DNS queries to your account.
### Availability and limits
The historical data available covers 62 days and the maximum time interval you can get data for is also 62 days.
### Dashboard
For a quick summary, view your DNS Firewall analytics on the dashboard. The DNS analytics dashboard contains [four main panels](#panels). The filters and time frame that you specify at the top of the page apply to all of them.
In the Cloudflare dashboard, go to the **DNS Firewall Analytics** page.
[Go to **Analytics** ↗](https://dash.cloudflare.com/?to=/:account/dns-firewall/analytics)
#### Available dimensions
* Query name
* Query type (same as DNS record type)
* Cluster
* Cluster IP
* Response code
* Response reason (refer to [descriptions](#response-reasons) below)
* Response cached (cached or uncached)
* Response stale (stale or fresh)
* Data center
* Source IP
* Upstream nameserver IP
* Protocol (UDP or TCP)
* IP version (IPv4 or IPv6)
#### Panels
The filters and time frame that you specify at the top of the page apply to all of the available panels.
* **Query summary**: the number of queries and their distribution over time. This information is segmented by each of the [available dimensions](#available-dimensions). You can select the dimensions through the different tabs above the graph and quickly filter for or exclude a certain value from the results by hovering over it and selecting **Filter** or **Exclude**.
* **Query statistics**: an overview of query metrics. Namely, **Total queries**, **Cached queries**, **Uncached queries**, and **Stale cache queries**.
Processing time and response time
Processing time refers to the total time taken to handle a query within DNS Firewall, meaning cached queries served directly from Cloudflare's servers. For uncached queries, the metric used is response time, which considers the time to get the answers from your upstream nameservers. The processing and response times are displayed in milliseconds.
90th percentile (p90)
Aside from the average for both processing and response times, `p90` values show you the maximum time that 90% of queries took to resolve. For example, if the p90 is 1 millisecond, it means 90% of the queries were resolved in 1 millisecond or less.
* **DNS queries by data center**: a map indicating which Cloudflare data centers have handled DNS queries to your account. You can also find a list of the top ten results and quickly filter for or exclude a certain data center from the results by hovering over it and selecting **Filter** or **Exclude**.
* **Top query statistics**: a breakdown of the top queries grouped by the [available dimensions](#available-dimensions). You can expand each card to list more results and search for specific values.
### GraphQL
Use the [GraphQL API](https://developers.cloudflare.com/analytics/graphql-api/) to access DNS Firewall analytics. Refer to the GraphQL Analytics API documentation for guidance on how to [get started](https://developers.cloudflare.com/analytics/graphql-api/getting-started/).
The DNS Firewall analytics has two [schemas](https://developers.cloudflare.com/analytics/graphql-api/getting-started/querying-basics/):
* `dnsFirewallAnalyticsAdaptive`: Retrieve information about individual DNS Firewall queries.
* `dnsFirewallAnalyticsAdaptiveGroups`: Get reports on aggregate information only.
### API Legacy
You can also use the DNS Firewall API [reports endpoint](https://developers.cloudflare.com/api/resources/dns%5Ffirewall/subresources/analytics/subresources/reports/).
---
## Logs
You can [set up Logpush](https://developers.cloudflare.com/logs/logpush/) to deliver [DNS Firewall logs](https://developers.cloudflare.com/logs/logpush/logpush-job/datasets/account/dns%5Ffirewall%5Flogs/) to a storage service, SIEM, or log management provider.
## Response reasons
When analyzing why Cloudflare DNS Firewall responded in one way or another to a specific query, consider the `responseReason` log field.
The following table provides a description for each of the values that might be returned as a response reason:
| Value | Description |
| ------------------------- | ----------------------------------------------------------------------------------------------------------------------------------------------------------------------------------------------- |
| success | Response was successfully served, either from Cloudflare cache or forwarded from the upstream. |
| upstream\_failure | Response could not be fetched from the upstream due to the upstream failing to respond. |
| upstream\_servfail | Response could not be fetched from the upstream due to the upstream responding with SERVFAIL. |
| invalid\_query | Query is invalid and cannot be processed. |
| any\_type\_blocked | Query of type ANY was blocked according to your [DNS Firewall settings](https://developers.cloudflare.com/dns/dns-firewall/setup/) ([RFC 8482 ↗](https://www.rfc-editor.org/rfc/rfc8482.html)). |
| rate\_limit | Query was rate limited according to your [DNS Firewall settings](https://developers.cloudflare.com/dns/dns-firewall/setup/). |
| chaos\_success | Response for [Chaos class ↗](https://en.wikipedia.org/wiki/Chaosnet) was successfully served. |
| attack\_mitigation\_block | Query was blocked as part of [random prefix attack mitigation](https://developers.cloudflare.com/dns/dns-firewall/random-prefix-attacks/). |
| unknown | There was an unknown error. |
Was this helpful?
YesNo
## On this page
[Docs](https://developers.cloudflare.com/)
```json
{"@context":"https://schema.org","@type":"WebPage","@id":"https://developers.cloudflare.com/dns/dns-firewall/analytics/#page","headline":"Analytics and logs · Cloudflare DNS docs","description":"Access DNS Firewall query analytics and configure Logpush for DNS logs.","url":"https://developers.cloudflare.com/dns/dns-firewall/analytics/","inLanguage":"en","image":"https://developers.cloudflare.com/og-docs.png","dateModified":"2026-05-05","publisher":{"@type":"Organization","name":"Cloudflare","url":"https://www.cloudflare.com/"},"isPartOf":{"@type":"WebSite","@id":"https://developers.cloudflare.com/#website","name":"Cloudflare Docs","url":"https://developers.cloudflare.com/"},"keywords":["Analytics","GraphQL","Logging"]}
```
---
---
description: Find answers to common questions about Cloudflare's DNS Firewall, including cache behavior, EDNS support, and setting PTR records.
title: DNS Firewall FAQ
image: https://developers.cloudflare.com/og-docs.png
---
[Skip to content](#main-content)
> Documentation Index
> Fetch the complete documentation index at: https://developers.cloudflare.com/dns/llms.txt
> Use this file to discover all available pages before exploring further.
# DNS Firewall FAQ
Last updated Jul 10, 2026|Copy as Markdown|[View as Markdown](https://developers.cloudflare.com/dns/dns-firewall/faq/index.md)|[Agent setup](https://developers.cloudflare.com/agent-setup/)
Consider the answers for frequently asked questions about Cloudflare DNS Firewall.
## How does DNS Firewall choose a backend nameserver to query upstream?
DNS Firewall alternates between a customer's nameservers, using an algorithm that is more likely to send queries to the faster upstream nameservers than slower nameservers.
## How long does DNS Firewall cache a stale object?
DNS Firewall sets cache longevity according to allocated memory.
As long as there is enough allocated memory, Cloudflare does not clear items from the cache forcefully, even when the TTL expires. This feature allows Cloudflare to serve stale objects from cache if your nameservers are offline.
## Does the DNS Firewall cache SERVFAIL?
Yes. `SERVFAIL` is treated like any other negative answer for caching purposes. The default TTL is 30 seconds. You can set a different negative cache TTL on your cluster in the Cloudflare dashboard, or via the [API](https://developers.cloudflare.com/api/resources/dns%5Ffirewall/methods/edit/) (`negative_cache_ttl` parameter).
## Does DNS Firewall support EDNS Client Subnet (ECS)?
Yes. Often, DNS providers want to see a client's IP via EDNS Client Subnet (ECS) ([RFC 7871 ↗](https://www.rfc-editor.org/rfc/rfc7871.html)) because they serve geographically specific DNS answers based on the client's IP. With EDNS Client Subnet enabled, the DNS Firewall will forward the client's IP subnet along with the DNS query to the upstream nameserver.
When EDNS is enabled, the DNS Firewall gives out the geographically correct answer in cache based on the client IP subnet. To do this, the DNS Firewall segments its cache. For example:
1. A resolver says it is looking for an answer for client `192.0.2.0/24`.
2. The DNS Firewall will proxy the request to the upstream nameserver for the answer.
3. The DNS Firewall will cache the answer from the upstream nameserver, but only for that `/24`.
4. `203.0.113.0/24` now asks the same DNS question and the answer is again returned from the upstream nameserver instead of the cache.
Note
EDNS limits the effectiveness of the DNS cache.
Some resolvers might not be sending any EDNS data. When you enable ECS fallback on your cluster in the Cloudflare dashboard — or set the `ecs_fallback` parameter to `true` via the [API](https://developers.cloudflare.com/api/resources/dns%5Ffirewall/methods/edit/) — DNS Firewall will forward the IP subnet of the resolver instead, only if there is no EDNS data present in the incoming DNS query.
## Does DNS Firewall cache negative answers?
Yes. The default TTL is 30 seconds. You can configure the negative cache TTL on your cluster in the Cloudflare dashboard, or via the [API](https://developers.cloudflare.com/api/resources/dns%5Ffirewall/methods/edit/) (`negative_cache_ttl` parameter). This will affect the TTL of responses with status `REFUSED`, `NXDOMAIN`, or `SERVFAIL`.
## How can I set PTR records for nameserver hostnames?
To set up PTR records for the DNS Firewall cluster IPs that point to your nameserver hostnames, use the following API endpoints:
* [Show DNS Firewall Cluster Reverse DNS](https://developers.cloudflare.com/api/resources/dns%5Ffirewall/subresources/reverse%5Fdns/methods/get/)
* [Update DNS Firewall Cluster Reverse DNS](https://developers.cloudflare.com/api/resources/dns%5Ffirewall/subresources/reverse%5Fdns/methods/edit/)
Was this helpful?
YesNo
## On this page
[Docs](https://developers.cloudflare.com/)
```json
{"@context":"https://schema.org","@type":"TechArticle","@id":"https://developers.cloudflare.com/dns/dns-firewall/faq/#page","headline":"FAQs — DNS Firewall · Cloudflare DNS docs","description":"Find answers to common questions about Cloudflare's DNS Firewall, including cache behavior, EDNS support, and setting PTR records.","url":"https://developers.cloudflare.com/dns/dns-firewall/faq/","inLanguage":"en","image":"https://developers.cloudflare.com/og-docs.png","dateModified":"2026-07-10","publisher":{"@type":"Organization","name":"Cloudflare","url":"https://www.cloudflare.com/"},"isPartOf":{"@type":"WebSite","@id":"https://developers.cloudflare.com/#website","name":"Cloudflare Docs","url":"https://developers.cloudflare.com/"},"keywords":["Caching"]}
```
---
---
description: Block random prefix DNS queries that target your upstream authoritative nameservers.
title: Random prefix attack mitigation
image: https://developers.cloudflare.com/og-docs.png
---
[Skip to content](#main-content)
> Documentation Index
> Fetch the complete documentation index at: https://developers.cloudflare.com/dns/llms.txt
> Use this file to discover all available pages before exploring further.
# Random prefix attack mitigation
Last updated Apr 15, 2026|Copy as Markdown|[View as Markdown](https://developers.cloudflare.com/dns/dns-firewall/random-prefix-attacks/index.md)|[Agent setup](https://developers.cloudflare.com/agent-setup/)
Random prefix attacks are when someone sends a lot of traffic to subdomains that are highly unlikely to exist (`12345.example.com`, `abcdefg.example.com`), but are still associated with your main domain (`example.com`).
Usually, a DNS query to each random subdomain (or prefix) is not repeated, so it cannot be cached by resolvers or any other proxies and always reaches the authoritative nameservers. Rate limiting or blocking queries based on source IP can introduce a high amount of false positives, since random prefix attacks commonly are conducted via public resolvers. This makes these attacks particularly effective and hard to mitigate.
As part of [DNS Firewall](https://developers.cloudflare.com/dns/dns-firewall/), Cloudflare can protect your upstream authoritative nameservers from these attacks by blocking DNS queries that are determined to be part of an attack and thus preventing them from reaching your authoritative nameservers, where they could cause harm by overloading resources. This protection is an opt-in feature because of the potential for false positives.
## Resources
* [Background information](https://developers.cloudflare.com/dns/dns-firewall/random-prefix-attacks/about/)
* [Setup](https://developers.cloudflare.com/dns/dns-firewall/random-prefix-attacks/setup/)
## Limitations
To reduce the impact of false positives, Cloudflare does not block entire [public suffixes ↗](https://publicsuffix.org/) (such as `com`). However, it can block domains directly under them (such as `example.com`).
In addition, the default setting for the automatic mitigation ensures that it will only be deployed if upstream authoritative nameservers are determined to be unresponsive (and likely overloaded by an attack). This means that, as long as your authoritative nameservers can handle the traffic during a random prefix attack, Cloudflare will not actively block queries in order to avoid false positives. This setting is called `"only_when_upstream_unhealthy"` and is always true if not explicitly disabled during [Setup](https://developers.cloudflare.com/dns/dns-firewall/random-prefix-attacks/setup/).
Because Cloudflare does not know which domains and subdomains exist as DNS records on an upstream nameserver, this feature takes a best effort approach by blocking DNS queries to affected subdomains in order to allow upstream nameservers to keep responding to DNS queries to unaffected subdomains.
Was this helpful?
YesNo
## On this page
[Docs](https://developers.cloudflare.com/)
```json
{"@context":"https://schema.org","@type":"TechArticle","@id":"https://developers.cloudflare.com/dns/dns-firewall/random-prefix-attacks/#page","headline":"Random prefix attack mitigation · Cloudflare DNS docs","description":"Block random prefix DNS queries that target your upstream authoritative nameservers.","url":"https://developers.cloudflare.com/dns/dns-firewall/random-prefix-attacks/","inLanguage":"en","image":"https://developers.cloudflare.com/og-docs.png","dateModified":"2026-04-15","publisher":{"@type":"Organization","name":"Cloudflare","url":"https://www.cloudflare.com/"},"isPartOf":{"@type":"WebSite","@id":"https://developers.cloudflare.com/#website","name":"Cloudflare Docs","url":"https://developers.cloudflare.com/"}}
```
---
---
description: Learn about random prefix attacks. As part of DNS Firewall, Cloudflare can protect your upstream authoritative nameservers from these attacks.
title: About
image: https://developers.cloudflare.com/og-docs.png
---
[Skip to content](#main-content)
> Documentation Index
> Fetch the complete documentation index at: https://developers.cloudflare.com/dns/llms.txt
> Use this file to discover all available pages before exploring further.
# About
Last updated Apr 15, 2026|Copy as Markdown|[View as Markdown](https://developers.cloudflare.com/dns/dns-firewall/random-prefix-attacks/about/index.md)|[Agent setup](https://developers.cloudflare.com/agent-setup/)
Random prefix attacks are when someone sends a lot of traffic to subdomains that are highly unlikely to exist (`12345.example.com`, `abcdefg.example.com`), but are still associated with your main domain (`example.com`).
Usually, a DNS query to each random subdomain (or prefix) is not repeated, so it cannot be cached by resolvers or any other proxies and always reaches the authoritative nameservers. Rate limiting or blocking queries based on source IP can introduce a high amount of false positives, since random prefix attacks commonly are conducted via public resolvers. This makes these attacks particularly effective and hard to mitigate.
## Attack characteristics
### Queries for nonexistent domains
If the request only involved nonexistent domains, the `NXDOMAIN` errors would only be served by the top-level domain (TLD) nameservers for `com.`. This means that the queries never reach the authoritative nameservers.
flowchart TD
accTitle: Random prefix attacks diagram
A[End user query to example.com] --"1)"--> B[1.1.1.1 resolver]
B --"2)"--> C[com. TLD NS]
C --"3)" NXDOMAIN error--> B
B --"4)" NXDOMAIN error--> A
D[Authoritative NS]
### Queries for nonexistent subdomains
These attacks are successful because they target subdomains, which require a response from a domain's authoritative nameservers.
flowchart TD
accTitle: Random prefix attacks diagram
A[End user query to random.example.com] --"1)"--> B[1.1.1.1 resolver]
B -- "2)" --> C[com. TLD NS]
C -- "3)" Query Authoritative NS --> B
B -- "4)" --> D[Authoritative NS]
D --"5)" NXDOMAIN error--> B
B --"6)" NXDOMAIN error--> A
With an attack against a subdomain of an existing domain, the resolver is forced to fully resolve it against the authoritative nameservers since these random subdomains are likely not cached by the resolver or any other proxy. If an attacker sends enough of these queries, and the authoritative nameservers cannot handle the query load, it will become unresponsive or even fall over, taking all zones it is hosting down, not just the attacked zone.
This attack is difficult to mitigate for a few reasons. From the perspective of the authoritative nameservers, the attacker appears to be Cloudflare (`1.1.1.1`) since that is the source of the queries. Blocking Cloudflare is not an option since that will block legitimate traffic.
## Solution
When you [enable random prefix attack mitigations](https://developers.cloudflare.com/dns/dns-firewall/random-prefix-attacks/setup/), Cloudflare monitors incoming queries for potential random prefix attacks.
When we detect an attack, we will temporarily stop querying your upstream nameservers for subdomains, sub-subdomains, and more. Cloudflare will then respond with cached responses (if their TTL has not yet expired).
Was this helpful?
YesNo
## On this page
[Docs](https://developers.cloudflare.com/)
```json
{"@context":"https://schema.org","@type":"TechArticle","@id":"https://developers.cloudflare.com/dns/dns-firewall/random-prefix-attacks/about/#page","headline":"About random prefix attacks - DNS Firewall · Cloudflare DNS docs","description":"Learn about random prefix attacks. As part of DNS Firewall, Cloudflare can protect your upstream authoritative nameservers from these attacks.","url":"https://developers.cloudflare.com/dns/dns-firewall/random-prefix-attacks/about/","inLanguage":"en","image":"https://developers.cloudflare.com/og-docs.png","dateModified":"2026-04-15","publisher":{"@type":"Organization","name":"Cloudflare","url":"https://www.cloudflare.com/"},"isPartOf":{"@type":"WebSite","@id":"https://developers.cloudflare.com/#website","name":"Cloudflare Docs","url":"https://developers.cloudflare.com/"}}
```
---
---
description: Enable automatic mitigation of random prefix attacks in the Cloudflare dashboard or via the API.
title: Setup
image: https://developers.cloudflare.com/og-docs.png
---
[Skip to content](#main-content)
> Documentation Index
> Fetch the complete documentation index at: https://developers.cloudflare.com/dns/llms.txt
> Use this file to discover all available pages before exploring further.
# Setup
Last updated Jul 10, 2026|Copy as Markdown|[View as Markdown](https://developers.cloudflare.com/dns/dns-firewall/random-prefix-attacks/setup/index.md)|[Agent setup](https://developers.cloudflare.com/agent-setup/)
In order to enable automatic mitigation of [random prefix attacks](https://developers.cloudflare.com/dns/dns-firewall/random-prefix-attacks/about/):
1. Set up [DNS Firewall](https://developers.cloudflare.com/dns/dns-firewall/setup/).
2. Enable attack mitigation on your DNS Firewall cluster.
1. In the Cloudflare dashboard, go to the **DNS Firewall Clusters** page.
[Go to **Clusters** ↗](https://dash.cloudflare.com/?to=/:account/dns-firewall/clusters)
2. Select the cluster you want to update, then select **Edit**.
3. Turn on **Attack mitigation** and choose whether Cloudflare should only mitigate attacks when the upstream is unhealthy.
4. Select **Save**.
Send a [PATCH request](https://developers.cloudflare.com/api/resources/dns%5Ffirewall/methods/edit/) to update your DNS Firewall cluster:
Required API token permissions
At least one of the following [token permissions](https://developers.cloudflare.com/fundamentals/api/reference/permissions/) is required:
* `DNS Firewall Write`
```bash
curl "https://api.cloudflare.com/client/v4/accounts/$ACCOUNT_ID/dns_firewall/$DNS_FIREWALL_ID" \
--request PATCH \
--header "Authorization: Bearer $CLOUDFLARE_API_TOKEN" \
--json '{
"attack_mitigation": {
"enabled": true,
"only_when_upstream_unhealthy": true
}
}'
```
Once you turn on attack mitigation, Cloudflare returns a `REFUSED` response to queries that are part of a random prefix attack.
Note
If you do not specify otherwise, Cloudflare automatically sets the `only_when_upstream_unhealthy` parameter to true, which means that Cloudflare will only mitigate attacks when we detect that the upstream is unresponsive (possibly as a result of an attack).
Was this helpful?
YesNo
## On this page
[Docs](https://developers.cloudflare.com/)
```json
{"@context":"https://schema.org","@type":"TechArticle","@id":"https://developers.cloudflare.com/dns/dns-firewall/random-prefix-attacks/setup/#page","headline":"Protect against random prefix attacks · Cloudflare DNS docs","description":"Enable automatic mitigation of random prefix attacks in the Cloudflare dashboard or via the API.","url":"https://developers.cloudflare.com/dns/dns-firewall/random-prefix-attacks/setup/","inLanguage":"en","image":"https://developers.cloudflare.com/og-docs.png","dateModified":"2026-07-10","publisher":{"@type":"Organization","name":"Cloudflare","url":"https://www.cloudflare.com/"},"isPartOf":{"@type":"WebSite","@id":"https://developers.cloudflare.com/#website","name":"Cloudflare Docs","url":"https://developers.cloudflare.com/"}}
```
---
---
description: Set up DNS Firewall to protect upstream nameservers from DDoS attacks and reduce load by caching DNS responses.
title: Setup
image: https://developers.cloudflare.com/og-docs.png
---
[Skip to content](#main-content)
> Documentation Index
> Fetch the complete documentation index at: https://developers.cloudflare.com/dns/llms.txt
> Use this file to discover all available pages before exploring further.
# Setup
Last updated Jul 10, 2026|Copy as Markdown|[View as Markdown](https://developers.cloudflare.com/dns/dns-firewall/setup/index.md)|[Agent setup](https://developers.cloudflare.com/agent-setup/)
## Prerequisites
Prior to setting up DNS Firewall, you need:
* Account access to DNS Firewall (provided by your Enterprise account team).
* Access to **DNS Administrator** or **Super Administrator** privileges on your account.
* Newly updated IP addresses for your nameservers (protects against previously compromised IP addresses).
## Configure DNS Firewall
### Create a DNS Firewall cluster
1. In the Cloudflare dashboard, go to the **DNS Firewall Clusters** page.
[Go to **Clusters** ↗](https://dash.cloudflare.com/?to=/:account/dns-firewall/clusters)
2. Select **Add Firewall Cluster**.
3. Fill out the required fields, including:
* **IP Addresses**: The upstream IPv4 and/or IPv6 addresses of your authoritative nameservers.
* **Minimum Cache TTL**: Recommended setting of **30 seconds**.
* **Maximum Cache TTL**: Recommended setting of **4 hours**. Larger values increase the cache hit ratio, but also increase the time required for DNS changes to propagate.
* **ANY queries**: Recommended setting is **Off** because these are often used as part of DDoS attacks. Also refer to this [blog post ↗](https://blog.cloudflare.com/rfc8482-saying-goodbye-to-any/).
4. Optionally, configure any of the [additional options](#additional-options) available on the same form.
5. Select **Continue**.
6. On the following screen, save the values for **Your new DNS Firewall IP Addresses**.
Note:
If you forget to save your new IP addresses, find your cluster and click **IP Addresses**.
If you delete your cluster, the assigned set of IPs will be lost. If you recreate the cluster you will get a different set of IPs.
You can also create a DNS Firewall cluster by sending a [POST request](https://developers.cloudflare.com/api/resources/dns%5Ffirewall/methods/create/) to the API.
### Update registrar settings
Update the `A/AAAA` glue records for your nameserver hostnames at your registrar with your DNS Firewall cluster IP addresses.
### Update DNS servers
At your DNS servers, update the `A/AAAA` records for your nameserver hostnames in your DNS zone file with your DNS Firewall cluster IP addresses.
### Test DNS resolution
Confirm that your nameservers are functioning correctly by running a `dig` command.
### Update security policies
Configure security policy in your DNS servers and Firewall to allow only [Cloudflare IPs ↗](https://cloudflare.com/ips) and TCP/UDP port 53.
## Additional options
Beyond the required fields, you can configure the following settings on your DNS Firewall cluster — in the Cloudflare dashboard when you create or edit a cluster, or via the API:
* **Rate limit** (queries per second per data center).
* **Negative cache TTL** for `REFUSED`, `NXDOMAIN`, and `SERVFAIL` responses.
* **EDNS Client Subnet (ECS) fallback** — forward the resolver's IP subnet when the incoming query does not include ECS data. Refer to the [FAQ](https://developers.cloudflare.com/dns/dns-firewall/faq/#does-dns-firewall-support-edns-client-subnet-ecs) for details.
* **Attack mitigation** for [random prefix attacks](https://developers.cloudflare.com/dns/dns-firewall/random-prefix-attacks/).
For the full parameter reference, refer to the [Create](https://developers.cloudflare.com/api/resources/dns%5Ffirewall/methods/create/) and [Update](https://developers.cloudflare.com/api/resources/dns%5Ffirewall/methods/edit/) DNS Firewall Cluster API endpoints.
Was this helpful?
YesNo
## On this page
[Docs](https://developers.cloudflare.com/)
```json
{"@context":"https://schema.org","@type":"TechArticle","@id":"https://developers.cloudflare.com/dns/dns-firewall/setup/#page","headline":"Set up DNS Firewall · Cloudflare DNS docs","description":"Set up DNS Firewall to protect upstream nameservers from DDoS attacks and reduce load by caching DNS responses.","url":"https://developers.cloudflare.com/dns/dns-firewall/setup/","inLanguage":"en","image":"https://developers.cloudflare.com/og-docs.png","dateModified":"2026-07-10","publisher":{"@type":"Organization","name":"Cloudflare","url":"https://www.cloudflare.com/"},"isPartOf":{"@type":"WebSite","@id":"https://developers.cloudflare.com/#website","name":"Cloudflare Docs","url":"https://developers.cloudflare.com/"}}
```
---
---
description: Troubleshoot common Cloudflare DNS issues.
title: Troubleshooting
image: https://developers.cloudflare.com/og-docs.png
---
[Skip to content](#main-content)
> Documentation Index
> Fetch the complete documentation index at: https://developers.cloudflare.com/dns/llms.txt
> Use this file to discover all available pages before exploring further.
# Troubleshooting
Last updated Apr 16, 2026|Copy as Markdown|[View as Markdown](https://developers.cloudflare.com/dns/troubleshooting/index.md)|[Agent setup](https://developers.cloudflare.com/agent-setup/)
The following topics are useful for troubleshooting DNS issues.
Filter resources...
[**FAQs — DNS Firewall**](https://developers.cloudflare.com/dns/dns-firewall/faq/)
[**Troubleshooting DNSSEC**](https://developers.cloudflare.com/dns/dnssec/troubleshooting/)
[**FAQ**](https://developers.cloudflare.com/dns/faq/)
[**Cannot verify a domain with CNAME**](https://developers.cloudflare.com/dns/manage-dns-records/troubleshooting/cname-domain-verification/)
[**Existing NS records block new record creation**](https://developers.cloudflare.com/dns/manage-dns-records/troubleshooting/existing-ns-record/)
[**Exposed IP addresses**](https://developers.cloudflare.com/dns/manage-dns-records/troubleshooting/exposed-ip-address/)
[**Cannot add DNS records with the same name**](https://developers.cloudflare.com/dns/manage-dns-records/troubleshooting/records-with-same-name/)
[**Stale response for upstream DNS resolution**](https://developers.cloudflare.com/dns/manage-dns-records/troubleshooting/stale-response/)
[**Unexpected DNS records**](https://developers.cloudflare.com/dns/manage-dns-records/troubleshooting/unexpected-dns-records/)
[**Troubleshooting**](https://developers.cloudflare.com/dns/private-origins/troubleshooting/)
[**Enforce DNS-only**](https://developers.cloudflare.com/dns/proxy-status/enforce-dns-only/)
[**Available debug endpoints**](https://developers.cloudflare.com/dns/troubleshooting/dns-debug-endpoints/)
[**General DNS issues**](https://developers.cloudflare.com/dns/troubleshooting/dns-issues/)
[**Fix DNS\_PROBE\_FINISHED\_NXDOMAIN**](https://developers.cloudflare.com/dns/troubleshooting/dns-probe-finished-nxdomain/)
[**Fix DNS\_PROBE\_POSSIBLE error**](https://developers.cloudflare.com/dns/troubleshooting/dns-probe-possible/)
[**Troubleshooting email issues**](https://developers.cloudflare.com/dns/troubleshooting/email-issues/)
[**Troubleshooting primary setup (full)**](https://developers.cloudflare.com/dns/zone-setups/full-setup/troubleshooting/)
[**Cannot add domain to Cloudflare**](https://developers.cloudflare.com/dns/zone-setups/troubleshooting/cannot-add-domain/)
[**Delete all DNS records**](https://developers.cloudflare.com/dns/zone-setups/troubleshooting/delete-all-records/)
[**Domain deleted from Cloudflare**](https://developers.cloudflare.com/dns/zone-setups/troubleshooting/domain-deleted/)
[**Zone stuck in Pending Nameserver Update**](https://developers.cloudflare.com/dns/zone-setups/troubleshooting/pending-nameservers/)
[**Troubleshooting secondary nameservers**](https://developers.cloudflare.com/dns/zone-setups/zone-transfers/troubleshooting/)
Was this helpful?
YesNo
## On this page
[Docs](https://developers.cloudflare.com/)
```json
{"@context":"https://schema.org","@type":"WebPage","@id":"https://developers.cloudflare.com/dns/troubleshooting/#page","headline":"Troubleshooting · Cloudflare DNS docs","description":"Troubleshoot common Cloudflare DNS issues.","url":"https://developers.cloudflare.com/dns/troubleshooting/","inLanguage":"en","image":"https://developers.cloudflare.com/og-docs.png","dateModified":"2026-04-16","publisher":{"@type":"Organization","name":"Cloudflare","url":"https://www.cloudflare.com/"},"isPartOf":{"@type":"WebSite","@id":"https://developers.cloudflare.com/#website","name":"Cloudflare Docs","url":"https://developers.cloudflare.com/"}}
```
---
---
description: Use dig commands against Cloudflare nameservers to find your public IP, connected data center, DNS software version, and more.
title: Available debug endpoints
image: https://developers.cloudflare.com/og-docs.png
---
[Skip to content](#main-content)
> Documentation Index
> Fetch the complete documentation index at: https://developers.cloudflare.com/dns/llms.txt
> Use this file to discover all available pages before exploring further.
# Available debug endpoints
Last updated Apr 17, 2026|Copy as Markdown|[View as Markdown](https://developers.cloudflare.com/dns/troubleshooting/dns-debug-endpoints/index.md)|[Agent setup](https://developers.cloudflare.com/agent-setup/)
The following debug endpoints are available via `dig` or other DNS query tools.
Note
For all commands, replace `alex.ns.cloudflare.com` with your Cloudflare-assigned nameservers.
## Get your public IP address
```sh
dig @alex.ns.cloudflare.com chaos txt myip.cloudflare +short
```
This command returns your public IP address, meaning the IP address that Cloudflare receives the DNS query from. This is useful for debugging when you need to know your own IP.
## Find your connected data center
```sh
dig @alex.ns.cloudflare.com chaos txt id.server +short
```
This command returns the Cloudflare data center you are connecting to, for DNS queries sent from where you execute this command.
## Check the DNS software version
```sh
dig @alex.ns.cloudflare.com chaos txt version.bind +short
```
This command returns the version of Cloudflare's authoritative DNS software that is running on the data center you are connected to. Usually, the same version is present on all Cloudflare data centers. However, since Cloudflare performs staged releases, different versions can exist on different data centers.
## Get your IP, ASN, and country code
```sh
dig @alex.ns.cloudflare.com txt whoami.cloudflare.net +short
```
This command returns your public IP (same as the first command), your ASN, and the associated country code, all indicating where you are sending the query from.
Was this helpful?
YesNo
## On this page
[Docs](https://developers.cloudflare.com/)
```json
{"@context":"https://schema.org","@type":"TechArticle","@id":"https://developers.cloudflare.com/dns/troubleshooting/dns-debug-endpoints/#page","headline":"Available debug endpoints · Cloudflare DNS docs","description":"Use dig commands against Cloudflare nameservers to find your public IP, connected data center, DNS software version, and more.","url":"https://developers.cloudflare.com/dns/troubleshooting/dns-debug-endpoints/","inLanguage":"en","image":"https://developers.cloudflare.com/og-docs.png","dateModified":"2026-04-17","publisher":{"@type":"Organization","name":"Cloudflare","url":"https://www.cloudflare.com/"},"isPartOf":{"@type":"WebSite","@id":"https://developers.cloudflare.com/#website","name":"Cloudflare Docs","url":"https://developers.cloudflare.com/"},"keywords":["Debugging"]}
```
---
---
description: Troubleshoot common DNS resolution errors like "This site can't be reached", err_name_not_resolved, and Error 1001 when using Cloudflare.
title: General DNS issues
image: https://developers.cloudflare.com/og-docs.png
---
[Skip to content](#main-content)
> Documentation Index
> Fetch the complete documentation index at: https://developers.cloudflare.com/dns/llms.txt
> Use this file to discover all available pages before exploring further.
# General DNS issues
Last updated Apr 16, 2026|Copy as Markdown|[View as Markdown](https://developers.cloudflare.com/dns/troubleshooting/dns-issues/index.md)|[Agent setup](https://developers.cloudflare.com/agent-setup/)
In web browsers such as Safari or Chrome, there are several commonly observable DNS errors:
* `This site can't be reached`
* `This webpage is not available`
* `err_name_not_resolved`
* `Can't find the server`
* [Error 1001 DNS resolution error](https://developers.cloudflare.com/support/troubleshooting/http-status-codes/cloudflare-1xxx-errors/error-1001/)
## Common causes and resolutions
Below are the most common causes for DNS resolution errors along with suggested solutions.
### Mistyped domain or subdomain
Verify that the domain or subdomain was correctly spelled in the request URL.
### Missing DNS records
Ensure that you have the necessary DNS records for the domain or subdomain that is presenting the error.
[Go to **Records** ↗](https://dash.cloudflare.com/?to=/:account/:zone/dns/records)
This includes having the following records:
* The [zone apex](https://developers.cloudflare.com/dns/manage-dns-records/how-to/create-zone-apex/) (e.g., `example.com`) record.
* Existing [subdomains](https://developers.cloudflare.com/dns/manage-dns-records/how-to/create-subdomain/) (`www.example.com`, `blog.example.com`) records.
Note
If you have a [CNAME setup (partial)](https://developers.cloudflare.com/dns/zone-setups/partial-setup), ensure your DNS records also exist in your authoritative nameservers.
### DNSSEC was not disabled before the domain was added to Cloudflare
DNS resolution failures occur if [DNSSEC is not disabled](https://developers.cloudflare.com/dns/dnssec/#disable-dnssec) at your domain provider before you add the domain to Cloudflare.
### Nameservers no longer point to Cloudflare
If you manage DNS records via the Cloudflare dashboard and your domain stops pointing to Cloudflare's nameservers, DNS resolution will stop functioning.
This can occur if your domain registrar switches the nameservers for your domain to point to their default nameservers. To confirm if this is the problem, [check whether your domain uses Cloudflare's nameservers](https://developers.cloudflare.com/dns/zone-setups/full-setup/setup/#35-verify-changes).
### Unresolved IP address
In rare cases, the DNS resolver in the client requesting the URL might fail to resolve a DNS record to a valid IP address.
Reload the page after a short wait to note if the problem disappears. This issue is unrelated to Cloudflare, but using [Cloudflare's DNS resolver](https://developers.cloudflare.com/1.1.1.1/setup/) may help. Contact your hosting provider for additional help with your current DNS resolver.
### Newly created record still does not resolve
If you recently created a DNS record and resolvers still return `NXDOMAIN` (Non-Existent Domain) or no answer, it is likely because a negative response is currently stored in the resolver's cache.
When a resolver is queried for a hostname that has no DNS records yet, it caches the empty response so it does not have to ask the authoritative nameserver again immediately. This is known as negative caching.
For newly created records:
* The resolver might not have cached the new record yet. Instead, it is using a prior `NXDOMAIN` cache entry that says "this record does not exist," which was generated if the hostname was queried before you created the record.
* The duration of this negative cache is determined by the `MINIMUM` field in your zone's SOA record (per [RFC 2308 ↗](https://datatracker.ietf.org/doc/html/rfc2308)), not the TTL of the record you just created. Different resolvers may cache for varying durations.
This means:
* Lowering the TTL on your new record will not speed up resolution if a negative cache entry already exists; the resolver will only see your new TTL after the old negative entry expires.
* Flushing your local DNS cache only affects your specific device; the upstream recursive resolver (for example, your ISP or a public provider) still holds the negative result.
* Propagation appears uneven because different resolvers may have queried the name at different times, apply different negative cache TTLs, or have no negative cache entry at all.
The exact behavior differs per resolver, but to estimate how long you need to wait, query your zone's SOA record and look at the last value (the `MINIMUM` field). You must wait for that interval to pass since the last `NXDOMAIN` query before the new record will consistently resolve.
You can check if a negative cache entry is active by querying for the non-existent (or newly created) hostname:
```sh
dig +noall +answer +authority mynewrecord.example.com
```
If the record is still negatively cached, the response will include the zone's SOA record in the authority section with a TTL indicating how many seconds remain before the entry expires:
```txt
example.com. 256 IN SOA ...
```
In this example, the negative cache response will continue for 256 more seconds.
To verify the record resolves correctly, you can purge the cache for public resolvers and query the record. If this works, other resolvers will eventually start resolving as well:
* [Purge 1.1.1.1 cache ↗](https://one.one.one.one/purge-cache/)
* [Purge 8.8.8.8 cache ↗](https://dns.google/cache)
* [Query 8.8.8.8 ↗](https://dns.google/)
* [Query and refresh OpenDNS cache ↗](https://cachecheck.opendns.com/)
#### Further debugging
To verify the record was correctly created, query Cloudflare's authoritative nameservers directly:
```sh
# Find the authoritative nameservers for your zone
dig @1.1.1.1 example.com NS +short
```
```sh
# Query the authoritative nameserver for your new record
dig @hera.ns.cloudflare.com mynewrecord.example.com A
```
Querying the authoritative nameserver directly bypasses resolver caching. If the record is returned, resolvers will eventually start returning it as well. If the record does not appear, verify the record exists in the Cloudflare dashboard and that the hostname matches exactly.
### Account recovery
If you are locked out of the Cloudflare account that contains your DNS configuration, refer to [Account recovery](https://developers.cloudflare.com/fundamentals/user-profiles/account-recovery/).
Was this helpful?
YesNo
## On this page
[Docs](https://developers.cloudflare.com/)
```json
{"@context":"https://schema.org","@type":"TechArticle","@id":"https://developers.cloudflare.com/dns/troubleshooting/dns-issues/#page","headline":"General DNS issues · Cloudflare DNS docs","description":"Troubleshoot common DNS resolution errors like \"This site can't be reached\", err\\_name\\_not\\_resolved, and Error 1001 when using Cloudflare.","url":"https://developers.cloudflare.com/dns/troubleshooting/dns-issues/","inLanguage":"en","image":"https://developers.cloudflare.com/og-docs.png","dateModified":"2026-04-16","publisher":{"@type":"Organization","name":"Cloudflare","url":"https://www.cloudflare.com/"},"isPartOf":{"@type":"WebSite","@id":"https://developers.cloudflare.com/#website","name":"Cloudflare Docs","url":"https://developers.cloudflare.com/"}}
```
---
---
description: Learn how to fix the DNS_PROBE_FINISHED_NXDOMAIN browser error, which indicates the domain does not exist.
title: DNS_PROBE_FINISHED_NXDOMAIN
image: https://developers.cloudflare.com/og-docs.png
---
[Skip to content](#main-content)
> Documentation Index
> Fetch the complete documentation index at: https://developers.cloudflare.com/dns/llms.txt
> Use this file to discover all available pages before exploring further.
# DNS\_PROBE\_FINISHED\_NXDOMAIN
Last updated Apr 16, 2026|Copy as Markdown|[View as Markdown](https://developers.cloudflare.com/dns/troubleshooting/dns-probe-finished-nxdomain/index.md)|[Agent setup](https://developers.cloudflare.com/agent-setup/)
If you or your visitors experience `DNS_PROBE_FINISHED_NXDOMAIN` errors after you [activate your domain on Cloudflare](https://developers.cloudflare.com/dns/zone-setups/full-setup/setup/), review your DNS records in Cloudflare.
Note
If your domain is added to Cloudflare by a hosting partner, manage your DNS records via the hosting partner.
## Background
`DNS_PROBE_FINISHED_NXDOMAIN` indicates that the DNS lookup completed and the result was that the domain does not exist. `DNS_PROBE_FINISHED` means that the DNS probe ran to completion and `NXDOMAIN` stands for non-existent domain. Together, these messages mean that the DNS resolver determined the requested domain has no associated [DNS records](https://developers.cloudflare.com/dns/manage-dns-records/).
Though visitors sometimes encounter this error — or similarly worded messages from Safari, Edge, or Firefox — because of network or local DNS issues, it might point to an issue with your DNS records in Cloudflare.
## Potential solutions
If you experience `DNS_PROBE_FINISHED_NXDOMAIN` errors with a newly activated domain, review your DNS settings in the Cloudflare dashboard.
Check your expected apex domain (`example.com`) and any active subdomains (`www.example.com` or `blog.example.com`). If they do not resolve correctly, you may need to [add a record on the zone apex](https://developers.cloudflare.com/dns/manage-dns-records/how-to/create-zone-apex/) or a [subdomain record](https://developers.cloudflare.com/dns/manage-dns-records/how-to/create-subdomain/) in Cloudflare DNS.
If you have the correct records set up, make sure those records are also pointing to the correct origin IP address.
After making changes to your DNS records, you may need to wait a few minutes for those changes to take effect.
Note
For additional troubleshooting help, refer to the [Community troubleshooting guide ↗](https://community.cloudflare.com/t/community-tip-fixing-the-dns-probe-finished-nxdomain-error/42818).
Was this helpful?
YesNo
## On this page
[Docs](https://developers.cloudflare.com/)
```json
{"@context":"https://schema.org","@type":"TechArticle","@id":"https://developers.cloudflare.com/dns/troubleshooting/dns-probe-finished-nxdomain/#page","headline":"Fix DNS_PROBE_FINISHED_NXDOMAIN · Cloudflare DNS docs","description":"Learn how to fix the DNS\\_PROBE\\_FINISHED\\_NXDOMAIN browser error, which indicates the domain does not exist.","url":"https://developers.cloudflare.com/dns/troubleshooting/dns-probe-finished-nxdomain/","inLanguage":"en","image":"https://developers.cloudflare.com/og-docs.png","dateModified":"2026-04-16","publisher":{"@type":"Organization","name":"Cloudflare","url":"https://www.cloudflare.com/"},"isPartOf":{"@type":"WebSite","@id":"https://developers.cloudflare.com/#website","name":"Cloudflare Docs","url":"https://developers.cloudflare.com/"}}
```
---
---
description: Learn how to fix the DNS_PROBE_POSSIBLE browser error when using Cloudflare DNS.
title: DNS_PROBE_POSSIBLE
image: https://developers.cloudflare.com/og-docs.png
---
[Skip to content](#main-content)
> Documentation Index
> Fetch the complete documentation index at: https://developers.cloudflare.com/dns/llms.txt
> Use this file to discover all available pages before exploring further.
# DNS\_PROBE\_POSSIBLE
Last updated Apr 16, 2026|Copy as Markdown|[View as Markdown](https://developers.cloudflare.com/dns/troubleshooting/dns-probe-possible/index.md)|[Agent setup](https://developers.cloudflare.com/agent-setup/)
If you or your visitors experience `DNS_PROBE_POSSIBLE` errors after you [activate your domain on Cloudflare](https://developers.cloudflare.com/dns/zone-setups/full-setup/setup/), review your DNS records in Cloudflare.
Note
If your domain is added to Cloudflare by a hosting partner, manage your DNS records via the hosting partner.
## Background
`DNS_PROBE_POSSIBLE` means that the resolver could not find [DNS records](https://developers.cloudflare.com/dns/manage-dns-records/) for the requested hostname.
Though visitors sometimes encounter this error — or similarly worded messages from Safari, Edge, or Firefox — because of network or local DNS issues, it might point to an issue with your DNS records in Cloudflare.
## Potential solutions
If you experience `DNS_PROBE_POSSIBLE` errors with a newly activated domain, review your DNS settings in the Cloudflare dashboard.
Check your expected apex domain (`example.com`) and any active subdomains (`www.example.com` or `blog.example.com`). If they do not resolve correctly, you may need to [add a record on the zone apex](https://developers.cloudflare.com/dns/manage-dns-records/how-to/create-zone-apex/) or a [subdomain record](https://developers.cloudflare.com/dns/manage-dns-records/how-to/create-subdomain/) in Cloudflare DNS.
If you have the correct records set up, make sure those records are also pointing to the correct origin IP address.
After making changes to your DNS records, you may need to wait a few minutes for those changes to take effect.
Was this helpful?
YesNo
## On this page
[Docs](https://developers.cloudflare.com/)
```json
{"@context":"https://schema.org","@type":"TechArticle","@id":"https://developers.cloudflare.com/dns/troubleshooting/dns-probe-possible/#page","headline":"Fix DNS_PROBE_POSSIBLE error · Cloudflare DNS docs","description":"Learn how to fix the DNS\\_PROBE\\_POSSIBLE browser error when using Cloudflare DNS.","url":"https://developers.cloudflare.com/dns/troubleshooting/dns-probe-possible/","inLanguage":"en","image":"https://developers.cloudflare.com/og-docs.png","dateModified":"2026-04-16","publisher":{"@type":"Organization","name":"Cloudflare","url":"https://www.cloudflare.com/"},"isPartOf":{"@type":"WebSite","@id":"https://developers.cloudflare.com/#website","name":"Cloudflare Docs","url":"https://developers.cloudflare.com/"}}
```
---
---
description: Resolve email delivery issues related to DNS configuration.
title: Email issues
image: https://developers.cloudflare.com/og-docs.png
---
[Skip to content](#main-content)
> Documentation Index
> Fetch the complete documentation index at: https://developers.cloudflare.com/dns/llms.txt
> Use this file to discover all available pages before exploring further.
# Email issues
Last updated Jun 9, 2026|Copy as Markdown|[View as Markdown](https://developers.cloudflare.com/dns/troubleshooting/email-issues/index.md)|[Agent setup](https://developers.cloudflare.com/agent-setup/)
If you have issues sending or receiving mail, follow these troubleshooting steps.
## Are your records correct?
To check that your MX records are resolving correctly, run the following `dig` command in your terminal (replace `example.com` with your domain):
```sh
dig example.com mx +short
```
Alternatively, you can use a third-party tool to look up your MX records. For a list of options, refer to [Recommended third-party tools](https://developers.cloudflare.com/dns/reference/recommended-third-party-tools/).
This returns a list of mail servers for your domain. Compare the output to the MX records on your Cloudflare DNS records page.
[Go to **Records** ↗](https://dash.cloudflare.com/?to=/:account/:zone/dns/records)
If the mail server listed does not match your email provider's expected value, update the MX record content to the correct value. Check your email provider's setup documentation for the correct MX record values.
If your DNS query returns records you do not recognize, such as `_dc-mx` or `dc-#####` subdomains, refer to [Unexpected DNS records](https://developers.cloudflare.com/dns/manage-dns-records/troubleshooting/unexpected-dns-records/#%5Fdc-mx-and-dc--subdomains).
## Are DNS records missing?
If `dig` returns no results for your domain's MX records, your records may not have been created or may have been accidentally deleted.
Even if your MX records are correct, missing email authentication records can cause delivery failures:
* **Missing `SPF` record:** receiving servers cannot verify that your domain authorizes the sending server, which may cause messages to be rejected or marked as spam.
* **Missing `DKIM` record:** messages cannot be cryptographically verified as originating from your domain, which reduces trust with receiving servers.
* **Missing `DMARC` record:** receiving servers have no policy for handling messages that fail `SPF` or `DKIM` checks, which can lead to inconsistent delivery or spoofing of your domain.
Refer to [Set up email records](https://developers.cloudflare.com/dns/manage-dns-records/how-to/email-records/) to add missing records.
## Do your MX records point to a delegated subdomain?
`NS` records [delegate a subdomain](https://developers.cloudflare.com/dns/manage-dns-records/how-to/subdomains-outside-cloudflare/#delegate-a-subdomain-outgoing) to another DNS provider. If your MX record points to a subdomain that is delegated via `NS` records (for example, `mail.example.com`), the mail server records are managed by that external provider, not Cloudflare. Confirm that the external provider has the correct `A` or `AAAA` records for the mail subdomain.
## Is CNAME flattening turned on?
Some email providers require `CNAME` records for features like DKIM authentication or autodiscover. When [CNAME flattening](https://developers.cloudflare.com/dns/cname-flattening/) is turned on — either globally for all `CNAME` records or individually on a specific record — the `CNAME` is flattened to an `A` record, which can prevent email providers from reading the record correctly.
If your email provider requires `CNAME` records and those records are not resolving as expected, you may need to turn off [CNAME flattening](https://developers.cloudflare.com/dns/cname-flattening/set-up-cname-flattening/).
## Is your mail hostname proxied?
Mail protocols such as SMTP, IMAP, and POP3 do not work through Cloudflare's standard HTTP proxy.
If the hostname used for mail resolves to a Cloudflare IP address, the record is proxied and mail clients will not be able to connect correctly.
Common examples include:
* `mail.example.com` used for SMTP, IMAP, or POP3
* Any hostname targeted by your `MX` record
* Autodiscover or mail service hostnames that must return the provider's actual DNS target
To fix this issue:
1. Go to the **DNS Records** page.
[Go to **Records** ↗](https://dash.cloudflare.com/?to=/:account/:zone/dns/records)
2. Locate the mail-related hostname.
3. Change the [proxy status](https://developers.cloudflare.com/dns/proxy-status/) to **DNS only**.
Your `MX` record itself is always DNS-only, but the hostname it points to must also resolve to a DNS-only target.
## Common provider record values
If you are not sure whether the DNS content itself is correct, compare it with the values from your provider.
Common examples include:
| Provider | MX records | SPF record |
| ---------------- | -------------------------------------------------------------------------------------------------------------------------------------------------------------------- | ---------------------------------------------- |
| Google Workspace | ASPMX.L.GOOGLE.COM (priority 1), ALT1.ASPMX.L.GOOGLE.COM and ALT2.ASPMX.L.GOOGLE.COM (priority 5), ALT3.ASPMX.L.GOOGLE.COM and ALT4.ASPMX.L.GOOGLE.COM (priority 10) | v=spf1 include:\_spf.google.com \~all |
| Microsoft 365 | .mail.protection.outlook.com (priority 0) | v=spf1 include:spf.protection.outlook.com -all |
| iCloud Mail | mx01.mail.icloud.com and mx02.mail.icloud.com (priority 10) | v=spf1 include:icloud.com \~all |
| Mailgun | mxa.mailgun.org and mxb.mailgun.org (priority 10) | v=spf1 include:mailgun.org \~all |
Always confirm the exact values with your provider before making changes.
## Is Cloudflare Spectrum turned on?
Cloudflare does not proxy email traffic (SMTP, port 25) by default. Unless you have explicitly configured [Cloudflare Spectrum](https://developers.cloudflare.com/spectrum/reference/configuration-options#smtp) to proxy SMTP traffic, email is delivered directly to your mail server and does not pass through the Cloudflare network. DNS records used for email should be set to [DNS only](https://developers.cloudflare.com/dns/proxy-status/) to ensure mail traffic is not affected by the proxy.
[Go to **Spectrum** ↗](https://dash.cloudflare.com/?to=/:account/:zone/spectrum)
## Is Email Routing turned on?
If [Email Routing](https://developers.cloudflare.com/email-service/) is turned on, Cloudflare manages your MX records and may create additional DNS records automatically.
[Go to **Email Routing** ↗](https://dash.cloudflare.com/?to=/:account/:zone/email/routing)
If Email Routing is turned on but you use a different mail provider, the Email Routing MX records may conflict with your provider's records. You can [turn off Email Routing](https://developers.cloudflare.com/email-service/configuration/domains/#remove-a-domain-from-email-routing) to remove the managed records and configure your own.
---
## Best practices for MX records on Cloudflare
If possible, do not host a mail service on the same server as the web resource you want to protect, since emails sent to non-existent addresses get bounced back to the attacker and reveal the mail server IP address.
Cloudflare recommends using non-contiguous IPs from different IP ranges.
---
## Contact your mail provider for assistance
If your email does not work shortly after editing DNS records, contact your mail administrator or mail provider with the specific error or bounce message you are receiving. They can confirm whether the issue is with DNS resolution, mail server configuration, or message delivery.
If your provider confirms the issue is related to Cloudflare, [contact Cloudflare support](https://developers.cloudflare.com/support/contacting-cloudflare-support/).
Was this helpful?
YesNo
## On this page
[Docs](https://developers.cloudflare.com/)
```json
{"@context":"https://schema.org","@type":"TechArticle","@id":"https://developers.cloudflare.com/dns/troubleshooting/email-issues/#page","headline":"Troubleshooting email issues · Cloudflare DNS docs","description":"Resolve email delivery issues related to DNS configuration.","url":"https://developers.cloudflare.com/dns/troubleshooting/email-issues/","inLanguage":"en","image":"https://developers.cloudflare.com/og-docs.png","dateModified":"2026-06-09","publisher":{"@type":"Organization","name":"Cloudflare","url":"https://www.cloudflare.com/"},"isPartOf":{"@type":"WebSite","@id":"https://developers.cloudflare.com/#website","name":"Cloudflare Docs","url":"https://developers.cloudflare.com/"}}
```
---
---
description: Find answers to common questions about Cloudflare's authoritative DNS.
title: FAQ
image: https://developers.cloudflare.com/og-docs.png
---
[Skip to content](#main-content)
> Documentation Index
> Fetch the complete documentation index at: https://developers.cloudflare.com/dns/llms.txt
> Use this file to discover all available pages before exploring further.
# FAQ
Last updated Jun 24, 2026|Copy as Markdown|[View as Markdown](https://developers.cloudflare.com/dns/faq/index.md)|[Agent setup](https://developers.cloudflare.com/agent-setup/)
The sections below cover frequently asked questions about Cloudflare authoritative DNS. For DNS Firewall, refer to [DNS Firewall FAQ](https://developers.cloudflare.com/dns/dns-firewall/faq/).
---
## Cloudflare offerings
### Is Cloudflare a free DNS (domain nameserver) provider?
Yes. Cloudflare offers [free DNS services ↗](https://www.cloudflare.com/dns) to customers on all plans. Note that:
* You do not need to change your hosting provider to use Cloudflare.
* You do not need to move away from your registrar. The only change you make with your registrar is to point the authoritative nameservers to the Cloudflare nameservers.
### Does Cloudflare charge for or limit DNS queries?
Cloudflare never limits or caps DNS queries, but the pricing depends on your plan level.
For customers on Free, Pro, or Business plans, Cloudflare does not charge for DNS queries. For customers on Enterprise plans, Cloudflare uses the number of monthly DNS queries as a pricing input to generate a custom quote.
### Does Cloudflare offer domain masking?
No. Cloudflare does not offer domain masking or DNS redirect services (your hosting provider might). However, we do offer URL forwarding through [Bulk Redirects](https://developers.cloudflare.com/rules/url-forwarding/bulk-redirects/).
### Can subdomains be added directly to Cloudflare?
Yes. Enterprise customers can add subdomains directly to Cloudflare via [subdomain support](https://developers.cloudflare.com/dns/zone-setups/subdomain-setup/).
### Does Cloudflare support EDNS0 (extension mechanisms for DNS)?
Yes, EDNS0 is a building block for modern DNS implementations and is enabled for all Cloudflare customers. EDNS0 adds support for signaling if the DNS Resolver (recursive DNS provider) supports larger message sizes and DNSSEC.
EDNS0 is the first approved set of mechanisms for [DNS extensions ↗](http://en.wikipedia.org/wiki/Extension%5Fmechanisms%5Ffor%5FDNS), originally published as [RFC 2671 ↗](https://www.rfc-editor.org/rfc/rfc2671.html).
---
## Nameservers
### Where can I find my Cloudflare nameservers?
On the **DNS Records** page, locate the **Cloudflare Nameservers** card.
[Go to **Records** ↗](https://dash.cloudflare.com/?to=/:account/:zone/dns/records)
Also, the IP address associated with a specific Cloudflare nameserver can be retrieved via a dig command or a third-party DNS lookup tool hosted online such as [whatsmydns.net ↗](https://www.whatsmydns.net/):
```sh
dig kate.ns.cloudflare.com
```
```sh
kate.ns.cloudflare.com. 68675 IN A 173.245.58.124.
```
### Where do I change my nameservers to point to Cloudflare?
Make the change at your registrar, which is where you registered your domain. This may or may not be your hosting provider - refer to [Update nameservers](https://developers.cloudflare.com/dns/nameservers/update-nameservers/) for further context.
If you do not know who your registrar is for the domain, a WHOIS search can help. You can use [ICANN Lookup ↗](https://lookup.icann.org/), for example.
Caution
Some country code TLDs may not be supported by ICANN Lookup. If that is the case, use a different WHOIS search tool.
Once you identify your registrar, follow their instructions.
Provider-specific instructions
This is not an exhaustive list of provider-specific instructions, but the following links may be helpful:
* [Ionos ↗](https://www.ionos.com/help/domains/using-your-own-name-servers/using-your-own-name-servers-for-a-domain/)
* [101Domain ↗](https://help.101domain.com/kb/managing-name-server-records)
* [Amazon ↗](https://docs.aws.amazon.com/Route53/latest/DeveloperGuide/domain-name-servers-glue-records.html#domain-name-servers-glue-records-adding-changing)
* [Blacknight ↗](https://help.blacknight.com/hc/articles/4413036322321-How-do-I-change-the-nameservers-for-my-domain)
* [BlueHost ↗](https://www.bluehost.com/help/article/custom-nameservers)
* [DirectNIC ↗](https://directnic.com/knowledge/article/33:how%2Bdo%2Bi%2Bmodify%2Bname%2Bservers%2Bfor%2Bmy%2Bdomain%2Bname%253F)
* [DNSMadeEasy ↗](http://www.dnsmadeeasy.com/support/faq/)
* [Domain.com ↗](https://www.domain.com/help/article/domain-management-how-to-update-nameservers)
* [Dotster ↗](https://www.dotster.com/help/article/domain-management-how-to-update-nameservers)
* [DreamHost ↗](https://help.dreamhost.com/hc/en-us/articles/360038897151)
* [EasyDNS ↗](https://kb.easydns.com/knowledge/settingchanging-nameservers/)
* [Enom ↗](https://help.enom.com/hc/en-us/articles/115000486451-Nameservers-NS)
* [Fast Domain ↗](https://www.fastdomain.com/hosting/help/transfer%5Fclient%5Fstart)
* [FlokiNET ↗](https://billing.flokinet.is/index.php?rp=/knowledgebase/57/Nameserver-and-DNS-records.html)
* [Gandi ↗](https://docs.gandi.net/en/domain%5Fnames/common%5Foperations/changing%5Fnameservers.html)
* [GoDaddy ↗](https://www.godaddy.com/help/change-nameservers-for-your-domain-names-664)
* [HostGator ↗](https://www.hostgator.com/help/article/changing-name-servers)
* [Hostico ↗](https://hostico.ro/docs/setarea-nameserverelor-din-contul-de-client-hostico/)
* [HostMonster ↗](https://my.hostmonster.com/cgi/help/222)
* [Hover ↗](https://support.hover.com/support/solutions/articles/201000064742-changing-your-domain-nameservers)
* [Internetdbs ↗](https://faq.internetbs.net/hc/en-gb/articles/4516921367837-How-to-update-Nameservers-for-a-domain)
* [iPage ↗](https://www.ipage.com/help/article/domain-management-how-to-update-nameservers)
* [MelbourneIT ↗](https://support.melbourneit.au/docs/how-do-i-manage-my-dns-on-cpanel)
* [Moniker ↗](https://support.moniker.com/hc/en-gb/articles/10101271418653-How-to-update-Nameservers-for-a-domain)
* [Name.com ↗](https://www.name.com/support/articles/205934457-registering-custom-nameservers)
* [Namecheap ↗](https://www.namecheap.com/support/knowledgebase/article.aspx/767/10/how-can-i-change-the-nameservers-for-my-domain)
* [Network Solutions ↗](https://www.networksolutions.com/manage-it/edit-nameservers.jsp)
* [OVH ↗](https://docs.ovh.com/gb/en/domains/web%5Fhosting%5Fgeneral%5Finformation%5Fabout%5Fdns%5Fservers/#step-2-edit-your-domains-dns-servers)
* [Porkbun ↗](https://kb.porkbun.com/article/22-how-to-change-your-nameservers)
* [Rackspace ↗](https://support.rackspace.com/how-to/rackspace-name-servers/)
* [Register ↗](https://www.register.com/knowledge)
* [Squarespace ↗](https://support.squarespace.com/hc/articles/4404183898125-Nameservers-and-DNSSEC-for-Squarespace-managed-domains#toc-open-the-domain-s-advanced-settings)
* [Site5 ↗](https://kb.site5.com/dns-2/custom-nameservers/)
* [Softlayer ↗](https://cloud.ibm.com/docs/dns?topic=dns-add-edit-or-delete-custom-name-servers-for-a-domain)
* [Yola ↗](https://helpcenter.yola.com/hc/articles/360012492660-Changing-your-name-servers)
### Why have I received an email: (mydomain) stopped using Cloudflare's nameservers?
For domains where Cloudflare hosts the DNS, Cloudflare continuously checks whether the domain uses Cloudflare's nameservers for DNS resolution. If Cloudflare's nameservers are not used, the [domain status](https://developers.cloudflare.com/dns/zone-setups/reference/domain-status/) is updated from **Active** to **Moved** and an email is sent to the customer.
This is important because, if a domain is in a **Moved** state for a [long enough period of time](https://developers.cloudflare.com/dns/zone-setups/reference/domain-status/), it will be deleted from Cloudflare.
To recover a deleted domain, [re-add it in Cloudflare](https://developers.cloudflare.com/fundamentals/manage-domains/add-site/) just like you would for a new domain.
Caution
Cloudflare support is unable to restore DNS or settings for deleted domains.
---
## DNS records
### Does Cloudflare limit the number of DNS records a domain can have?
Yes. Refer to [DNS records quota](https://developers.cloudflare.com/dns/manage-dns-records/#dns-records-quota) for current limits per plan and details on how quotas are enforced.
### How long does it take for a DNS change I made to push out?
By default, any changes or additions you make to your Cloudflare zone file will take effect globally within 5 minutes, usually much less.
Depending on the Time-to-Live (TTL) set on the previous [DNS record](https://developers.cloudflare.com/dns/manage-dns-records/how-to/create-dns-records/), old data may still remain cached until the TTL expires. Proxied records expire after 5 minutes ("Automatic"), but the TTL for unproxied records can be customized.
If changes to records with large TTLs are anticipated, it may make sense to reduce the TTL ahead of time so that the change takes effect as quickly as possible.
### Why can't I make ANY queries to Cloudflare DNS servers?
`ANY` queries are special and often misunderstood. They are usually used to get all record types available on a DNS name, but what they return is just any type in the cache of recursive resolvers. This can cause confusion when they are used for debugging.
Because of Cloudflare's many advanced DNS features like CNAME flattening, it can be complex and even impossible to give correct answers to `ANY` queries. For example, when DNS records dynamically come and go or are stored remotely, it can be taxing or even impossible to get all the results at the same time.
Refer to [Deprecating the DNS ANY meta-query type ↗](https://blog.cloudflare.com/deprecating-dns-any-meta-query-type/) for details. The decision to block `ANY` does not affect DNS Firewall customers.
### How do I add ANAME records on Cloudflare?
ANAME or ALIAS are DNS records used by specific DNS providers. If your previous provider was using ANAME or ALIAS, you can recreate these records on Cloudflare as CNAME records. Cloudflare's [CNAME flattening](https://developers.cloudflare.com/dns/cname-flattening/)[1](#user-content-fn-1) allows you to create CNAME records at your [zone apex](https://developers.cloudflare.com/dns/concepts/#zone-apex), removing the need for those other record types.
## Footnotes
1. A process in which Cloudflare returns an IP address instead of the target hostname that a CNAME record points to. [↩](#user-content-fnref-1)
### Why does my TXT record show a double quote in the middle of the value?
This is expected behavior. Per [RFC 4408 ↗](https://www.rfc-editor.org/rfc/rfc4408#section-3.1.3) and the DNS protocol specification ([RFC 1035 ↗](https://www.rfc-editor.org/rfc/rfc1035#section-3.3.14)), a single DNS TXT record is composed of one or more character strings, each with a maximum length of 255 characters. When the value you enter exceeds 255 characters, it must be split into multiple strings. Each string is enclosed in double quotes (`"`), so the resulting record may appear to have a quote in the middle — for example, `"first part" "second part"`.
This splitting is required by the DNS protocol and is performed by all DNS providers, even if some do not display it in their UI or API. For all major TXT record use cases (such as SPF, DKIM, and DMARC), the receiving application will concatenate the strings back together, so the behavior of the record is not affected.
### Why are Cloudflare's A or AAAA records / IP addresses for my domain's DNS responses appearing?
For DNS records proxied to Cloudflare, Cloudflare's IP addresses are returned in DNS queries instead of your original server IP address. This allows Cloudflare to optimize, cache, and protect all requests for your website.
Was this helpful?
YesNo
## On this page
[Docs](https://developers.cloudflare.com/)
```json
{"@context":"https://schema.org","@type":"TechArticle","@id":"https://developers.cloudflare.com/dns/faq/#page","headline":"FAQ · Cloudflare DNS docs","description":"Find answers to common questions about Cloudflare's authoritative DNS.","url":"https://developers.cloudflare.com/dns/faq/","inLanguage":"en","image":"https://developers.cloudflare.com/og-docs.png","dateModified":"2026-06-24","publisher":{"@type":"Organization","name":"Cloudflare","url":"https://www.cloudflare.com/"},"isPartOf":{"@type":"WebSite","@id":"https://developers.cloudflare.com/#website","name":"Cloudflare Docs","url":"https://developers.cloudflare.com/"}}
```
---
---
description: Track the latest updates and changes to Cloudflare DNS features.
title: Changelog
image: https://developers.cloudflare.com/og-docs.png
---
[Skip to content](#main-content)
> Documentation Index
> Fetch the complete documentation index at: https://developers.cloudflare.com/dns/llms.txt
> Use this file to discover all available pages before exploring further.
# Changelog
Last updated Apr 16, 2026|Copy as Markdown|[View as Markdown](https://developers.cloudflare.com/dns/changelog/index.md)|[Agent setup](https://developers.cloudflare.com/agent-setup/)
[Subscribe to RSS](https://developers.cloudflare.com/changelog/rss/dns.xml)
## 2026-07-15
**Internal DNS is now generally available**
[Internal DNS](https://developers.cloudflare.com/dns/internal-dns/) is now generally available. Internal DNS provides authoritative and recursive DNS for private networks on the same global network and control plane you already use for public DNS, Zero Trust, and application services.
#### Why it matters
* **Consolidate DNS operations.** Public and private DNS run on one platform, with one API, one audit trail, and one place to set policy.
* **Simplify split-horizon DNS.** Internal and external resolution are defined as separate [views](https://developers.cloudflare.com/dns/internal-dns/dns-views/) over shared zones, managed from a single control plane — so there is no drift to chase down.
* **Extend Zero Trust to DNS.** Resolver policies decide which users and devices resolve against which view, enforced by the same [Gateway](https://developers.cloudflare.com/cloudflare-one/traffic-policies/) that already governs the rest of your traffic.
Setting up Internal DNS takes three steps: create a zone, create a view, and define a resolver policy.
```json
POST /zones
{
"account": {
"id": ""
},
"name": "corp.internal",
"type": "internal"
}
```
Internal DNS is included with [Cloudflare Gateway](https://developers.cloudflare.com/cloudflare-one/traffic-policies/) for Enterprise customers. To get started, refer to the [Internal DNS documentation](https://developers.cloudflare.com/dns/internal-dns/).
## 2026-07-09
**New DNS Firewall UX with more dashboard settings**
The DNS Firewall page in the Cloudflare dashboard has been refreshed, bringing several settings that were previously API-only into the UI and modernizing how you view and manage your DNS Firewall clusters.

#### What is new
* **More settings in the dashboard**: cluster options that were previously only configurable through the API — such as attack mitigation, rate limiting, negative TTL, and resolver subnet — are now available directly in the dashboard.
* **Better table experience**: the DNS Firewall cluster table has been revised to surface cluster details at a glance, with resizable columns and the option to show or hide columns to tailor the view to your workflow.
* **New create and edit UX**: adding and editing clusters now uses a modernized form that groups related settings together, making configuration faster and clearer.
#### Availability
Available to all DNS Firewall customers as part of their existing subscription.
#### Where to find it
In the Cloudflare dashboard, go to the **DNS Firewall** page.
[Go to **Clusters** ↗](https://dash.cloudflare.com/?to=/:account/dns-firewall/clusters)
For more information, refer to [DNS Firewall](https://developers.cloudflare.com/dns/dns-firewall/).
## 2026-06-10
**Account-level DNS records quota**
Cloudflare now enforces DNS records quotas at the account level for Enterprise accounts. Instead of a per-zone limit, these accounts have a quota on the total number of records across all of their zones, letting you distribute records across your zones however you like — regardless of each zone's plan. Public and internal zones are counted separately, each with a default quota of 1,000,000 records.
Accounts without an account-level quota are unaffected: existing per-zone quotas behave exactly as before.
For more details, refer to [DNS records quota](https://developers.cloudflare.com/dns/manage-dns-records/#dns-records-quota).
## 2026-05-20
**New DNS records UX is rolling out**
Starting today, everyone can opt in to a refreshed DNS records page in the Cloudflare dashboard. Over the coming weeks, the new experience will become the default for Free plan users first, followed by paid plans.
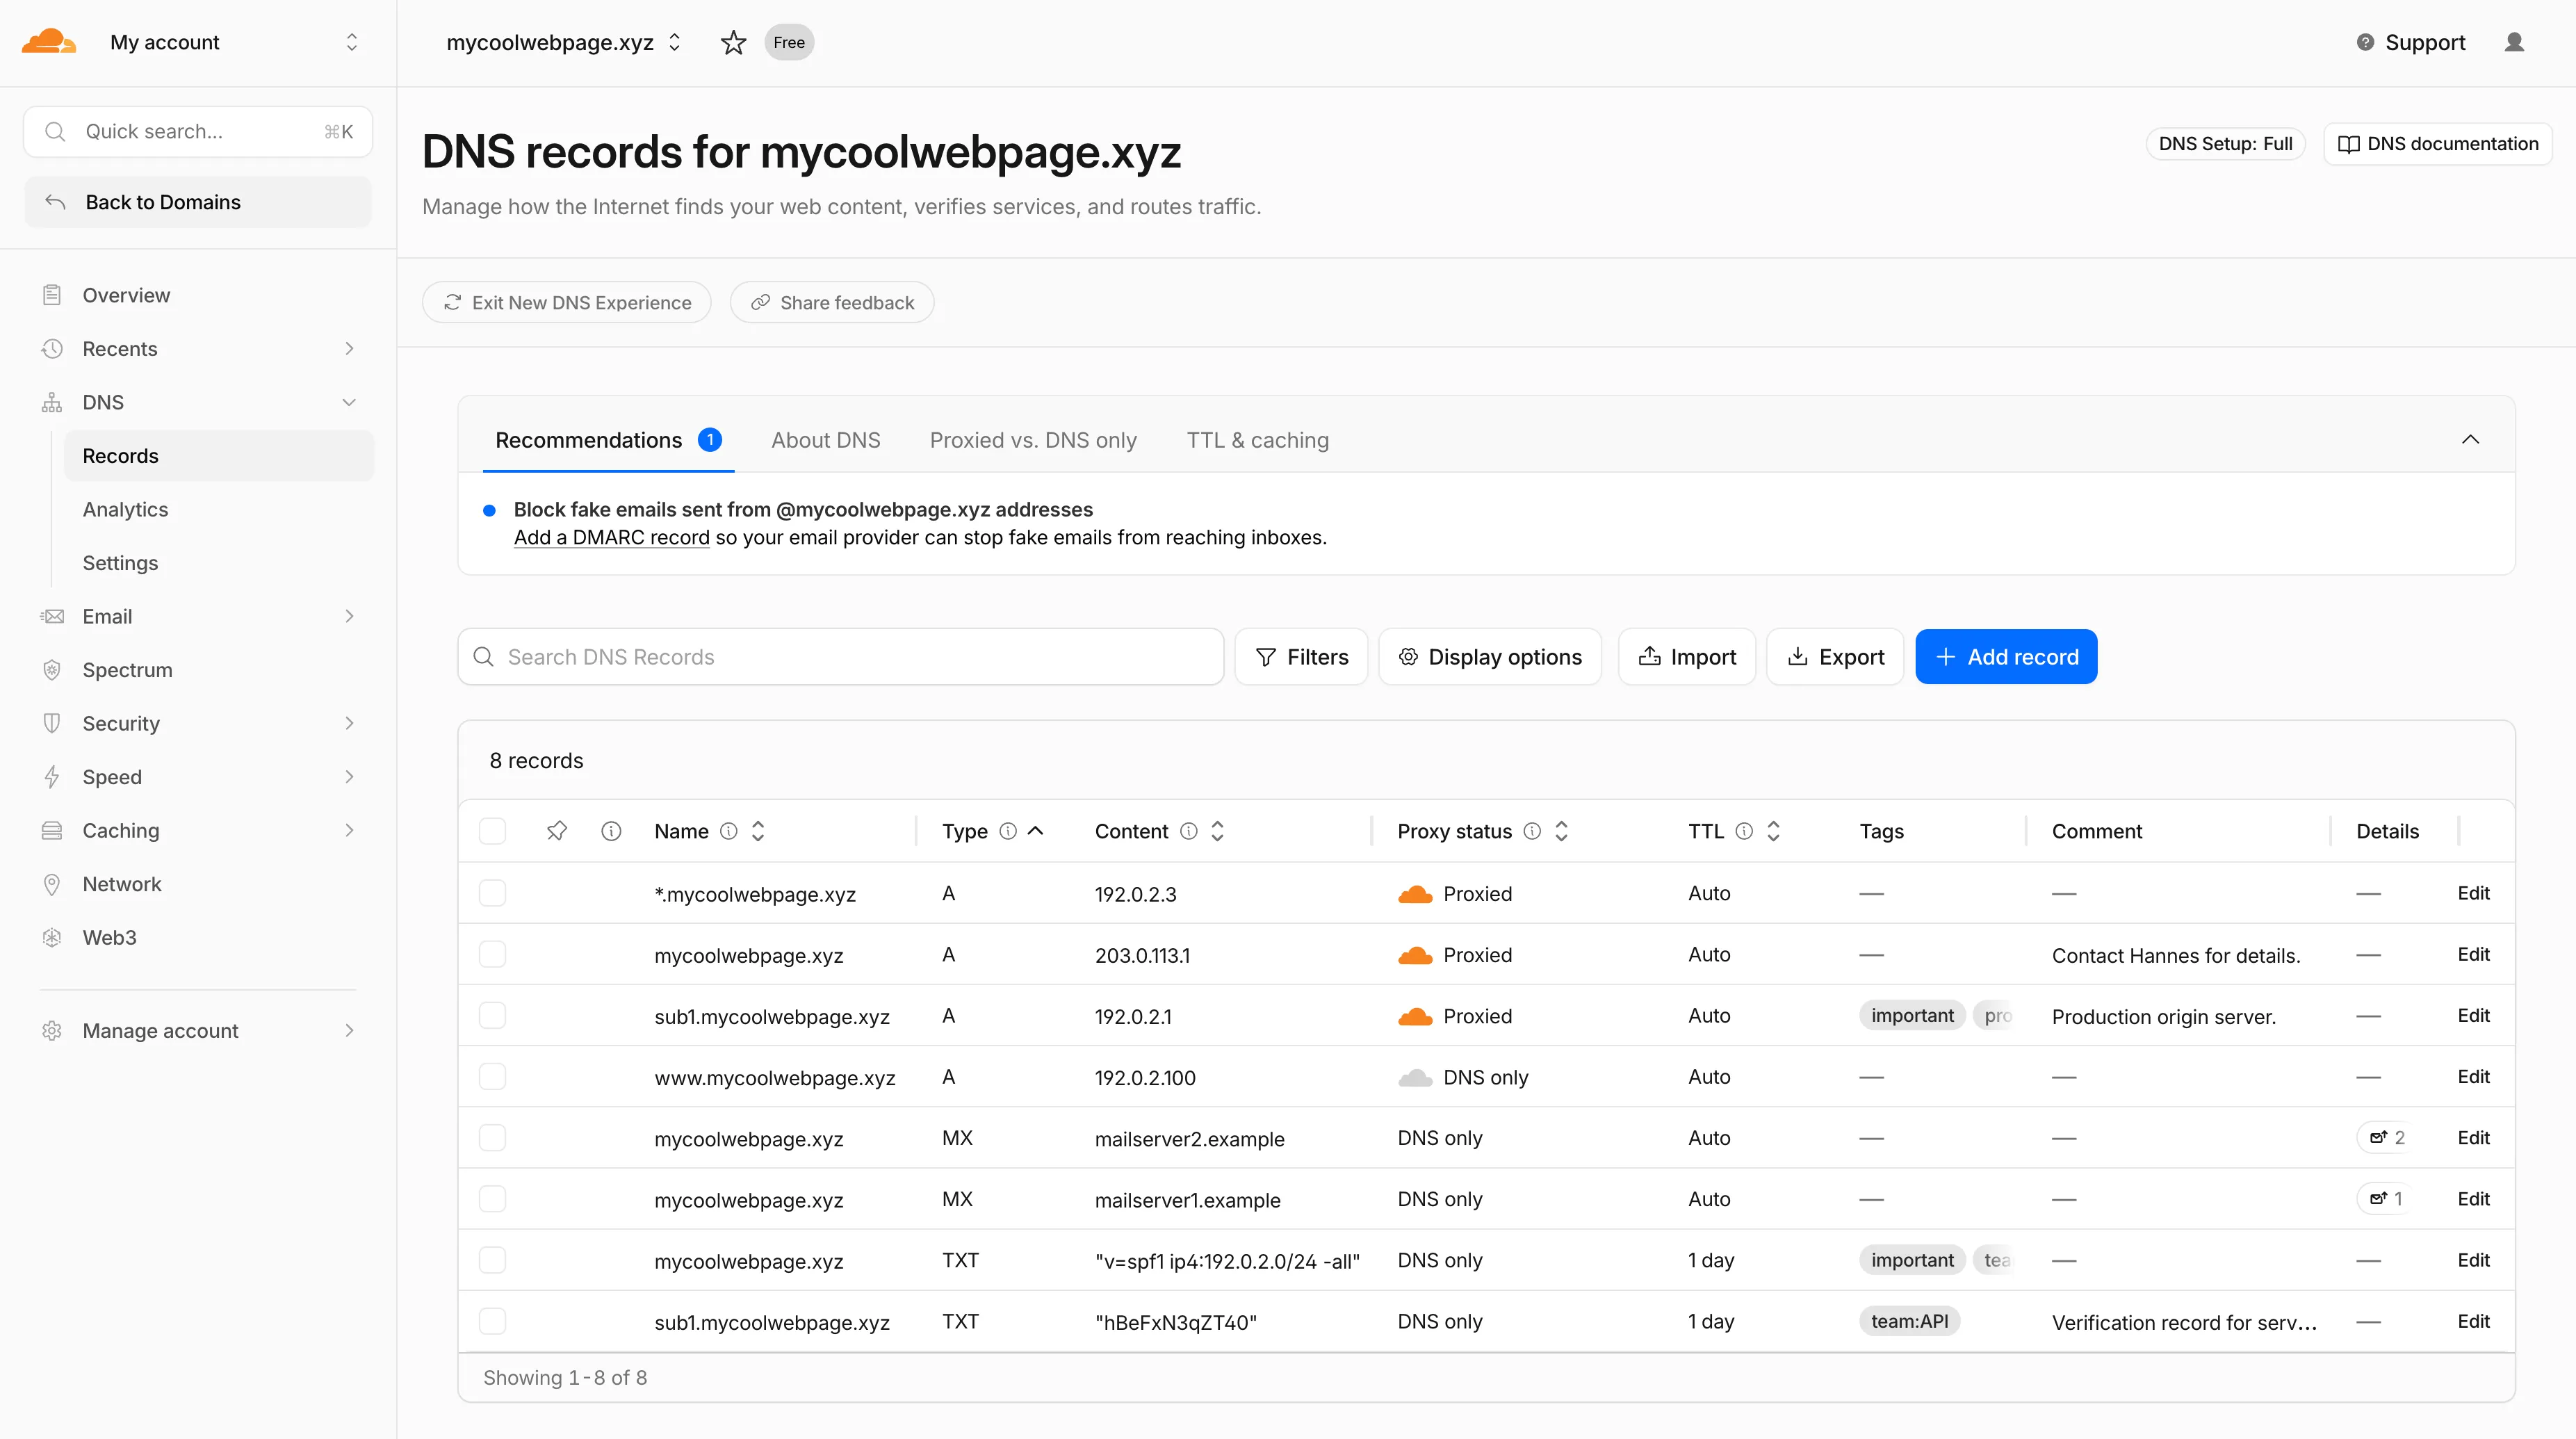
#### What is new
* **Better table experience**: resizable and hideable columns, row pinning, advanced filters with logical operators (AND/OR), configurable pagination, and expanded input fields so long values are no longer cut off.
* **First-class mobile experience**: responsive layout with a touch-friendly, card-based UI and compact controls for small screens.
* **DNS quick reference**: bite-sized explainers for DNS, proxy status, and TTL, available directly in the product to help users configure records without leaving the page.
* **Modern frontend**: a refactor onto Cloudflare's new UI framework that improves performance and lays the foundation for future improvements.
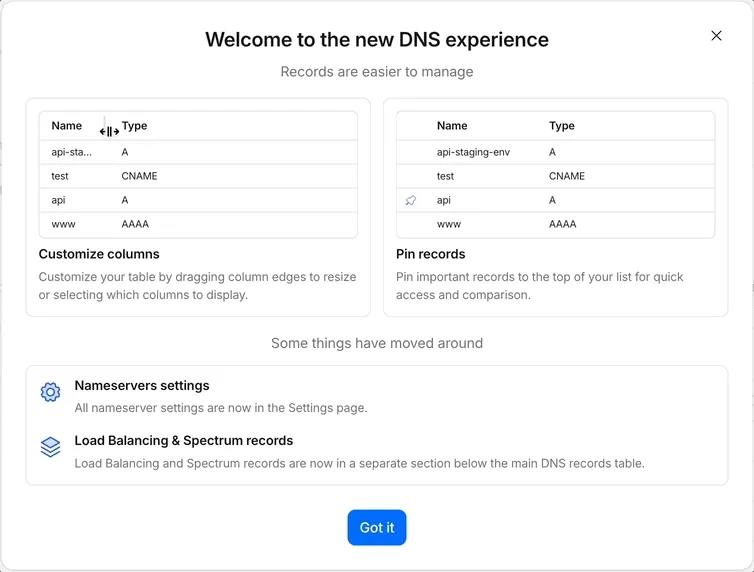
#### Rollout plan
Dates are subject to change based on feedback received during the rollout.
* **20 May - 05 June**: ramped rollout to Free, then Pro and Business plans.
* **08 June - 03 July**: ramped rollout to Enterprise plans.
#### Share your feedback
Once the new experience is turned on for your account, look for the feedback link at the top of the DNS records page in the Cloudflare dashboard and let us know what you think. Your input helps us prioritize the next round of improvements.
## 2026-04-28
**Account-level enforce DNS-only**
You can now disable Cloudflare's reverse proxy across all zones in your account simultaneously using the new `enforce_dns_only` setting. When enabled, Cloudflare responds to DNS queries for all proxied records with your origin IP addresses instead of Cloudflare's anycast IPs. This account-level kill switch is designed for incident response scenarios where you need to quickly route traffic directly to your origin servers.
Caution
Enabling this setting exposes your origin IP addresses and removes all Cloudflare protections — including DDoS mitigation, WAF, caching, and all other proxy-based features — for every zone in your account. Use with extreme caution and only after proper [preparations](https://developers.cloudflare.com/dns/proxy-status/enforce-dns-only/#preparation).
#### Key characteristics
* **Account-level** — Affects all zones in the account simultaneously with a single API call.
* **Non-destructive** — Does not modify your DNS records. Disabling the setting restores normal proxy behavior.
* **API-only** — Available through the API only, not in the Cloudflare dashboard.
#### What's affected
**Included:** Standard proxied A, AAAA, and CNAME records, Load Balancing records, and records matching Worker routes.
**Excluded:** Spectrum applications, Cloudflare Tunnel CNAMEs, R2 custom domains, Web3 gateways, and Workers custom domains continue to operate normally.
#### Before you enable
* Verify your origin servers can handle direct traffic without Cloudflare's caching and filtering.
* Review which origin IPs will become publicly visible through DNS queries.
* Test the API in a staging account before relying on it for incident response.
#### Availability
Available via API to all Cloudflare customers.
For information on how to use it, refer to [Enforce DNS-only developer documentation](https://developers.cloudflare.com/dns/proxy-status/enforce-dns-only/) .
## 2026-03-31
**Internal DNS - now in open beta**
Internal DNS is now in open beta.
#### Who can use it?
Internal DNS is bundled as a part of Cloudflare Gateway and is now available to every Enterprise customer with one of the following subscriptions:
* Cloudflare Zero Trust Enterprise
* Cloudflare Gateway Enterprise
To learn more and get started, refer to the [Internal DNS documentation](https://developers.cloudflare.com/dns/internal-dns/).
## 2026-03-20
**DNS Analytics for Customer Metadata Boundary set to EU region**
DNS Analytics is now available for customers with [Customer Metadata Boundary](https://developers.cloudflare.com/data-localization/metadata-boundary/) (CMB) set to EU. Query your DNS analytics data while keeping metadata stored in the EU region.
This update includes:
* **DNS Analytics** — Access the same DNS analytics experience for zones in CMB=EU accounts.
* **EU data residency** — Analytics data is stored and queried from the EU region, meeting data localization requirements.
* **DNS Firewall Analytics** — DNS Firewall analytics is now supported for CMB=EU customers.
#### Availability
Available to customers with the [Data Localization Suite](https://developers.cloudflare.com/data-localization/) who have Customer Metadata Boundary configured for the EU region.
#### Where to find it
* **Authoritative DNS:** In the Cloudflare dashboard, select your zone and go to the **Analytics** page.
[Go to **Analytics** ↗](https://dash.cloudflare.com/?to=/:account/:zone/dns/analytics)
* **DNS Firewall:** In the Cloudflare dashboard, go to the **DNS Firewall Analytics** page.
[Go to **Analytics** ↗](https://dash.cloudflare.com/?to=/:account/dns-firewall/analytics)
For more information, refer to [DNS Analytics](https://developers.cloudflare.com/dns/additional-options/analytics/) and [DNS Firewall Analytics](https://developers.cloudflare.com/dns/dns-firewall/analytics/).
## 2025-09-16
**DNS Firewall Analytics — now in the Cloudflare dashboard**
#### What's New
Access [GraphQL-powered DNS Firewall analytics](https://developers.cloudflare.com/dns/dns-firewall/analytics/) directly in the Cloudflare dashboard.
#### Explore Four Interactive Panels
* **Query summary**: Describes trends over time, segmented by dimensions.
* **Query statistics**: Describes totals, cached/uncached queries, and processing/response times.
* **DNS queries by data center**: Describes global view and the top 10 data centers.
* **Top query statistics**: Shows a breakdown by key dimensions, with search and expand options (up to top 100 items).
Additional features:
* Apply filters and time ranges once. Changes reflect across all panels.
* Filter by dimensions like query name, query type, cluster, data center, protocol (UDP/TCP), IP version, response code/reason, and more.
* Access up to 62 days of historical data with flexible intervals.
#### Availability
Available to all DNS Firewall customers as part of their existing subscription.
#### Where to Find It
* In the Cloudflare dashboard, go to the **DNS Firewall** page.
[Go to **Analytics** ↗](https://dash.cloudflare.com/?to=/:account/dns-firewall/analytics)
* Refer to the [DNS Firewall Analytics](https://developers.cloudflare.com/dns/dns-firewall/analytics/) to learn more.
## 2025-06-19
**Account-level DNS analytics now available via GraphQL Analytics API**
Authoritative DNS analytics are now available on the **account level** via the [Cloudflare GraphQL Analytics API](https://developers.cloudflare.com/analytics/graphql-api/).
This allows users to query DNS analytics across multiple zones in their account, by using the `accounts` filter.
Here is an example to retrieve the most recent DNS queries across all zones in your account that resulted in an `NXDOMAIN` response over a given time frame. Please replace `a30f822fcd7c401984bf85d8f2a5111c` with your actual account ID.
```graphql
query GetLatestNXDOMAINResponses {
viewer {
accounts(filter: { accountTag: "a30f822fcd7c401984bf85d8f2a5111c" }) {
dnsAnalyticsAdaptive(
filter: {
date_geq: "2025-06-16"
date_leq: "2025-06-18"
responseCode: "NXDOMAIN"
}
limit: 10000
orderBy: [datetime_DESC]
) {
zoneTag
queryName
responseCode
queryType
datetime
}
}
}
}
```
To learn more and get started, refer to the [DNS Analytics documentation](https://developers.cloudflare.com/dns/additional-options/analytics/#analytics).
## 2025-06-16
**Internal DNS (beta) now manageable in the Cloudflare dashboard**
Participating beta testers can now fully configure [Internal DNS](https://developers.cloudflare.com/dns/internal-dns/) directly in the [Cloudflare dashboard ↗](https://dash.cloudflare.com/?to=/:account/internal-dns).
#### Internal DNS enables customers to:
* Map internal hostnames to private IPs for services, devices, and applications not exposed to the public Internet
* Resolve internal DNS queries securely through [Cloudflare Gateway](https://developers.cloudflare.com/cloudflare-one/traffic-policies/)
* Use split-horizon DNS to return different responses based on network context
* Consolidate internal and public DNS zones within a single management platform
#### What’s new in this release:
* Beta participants can now create and manage internal zones and views in the Cloudflare dashboard
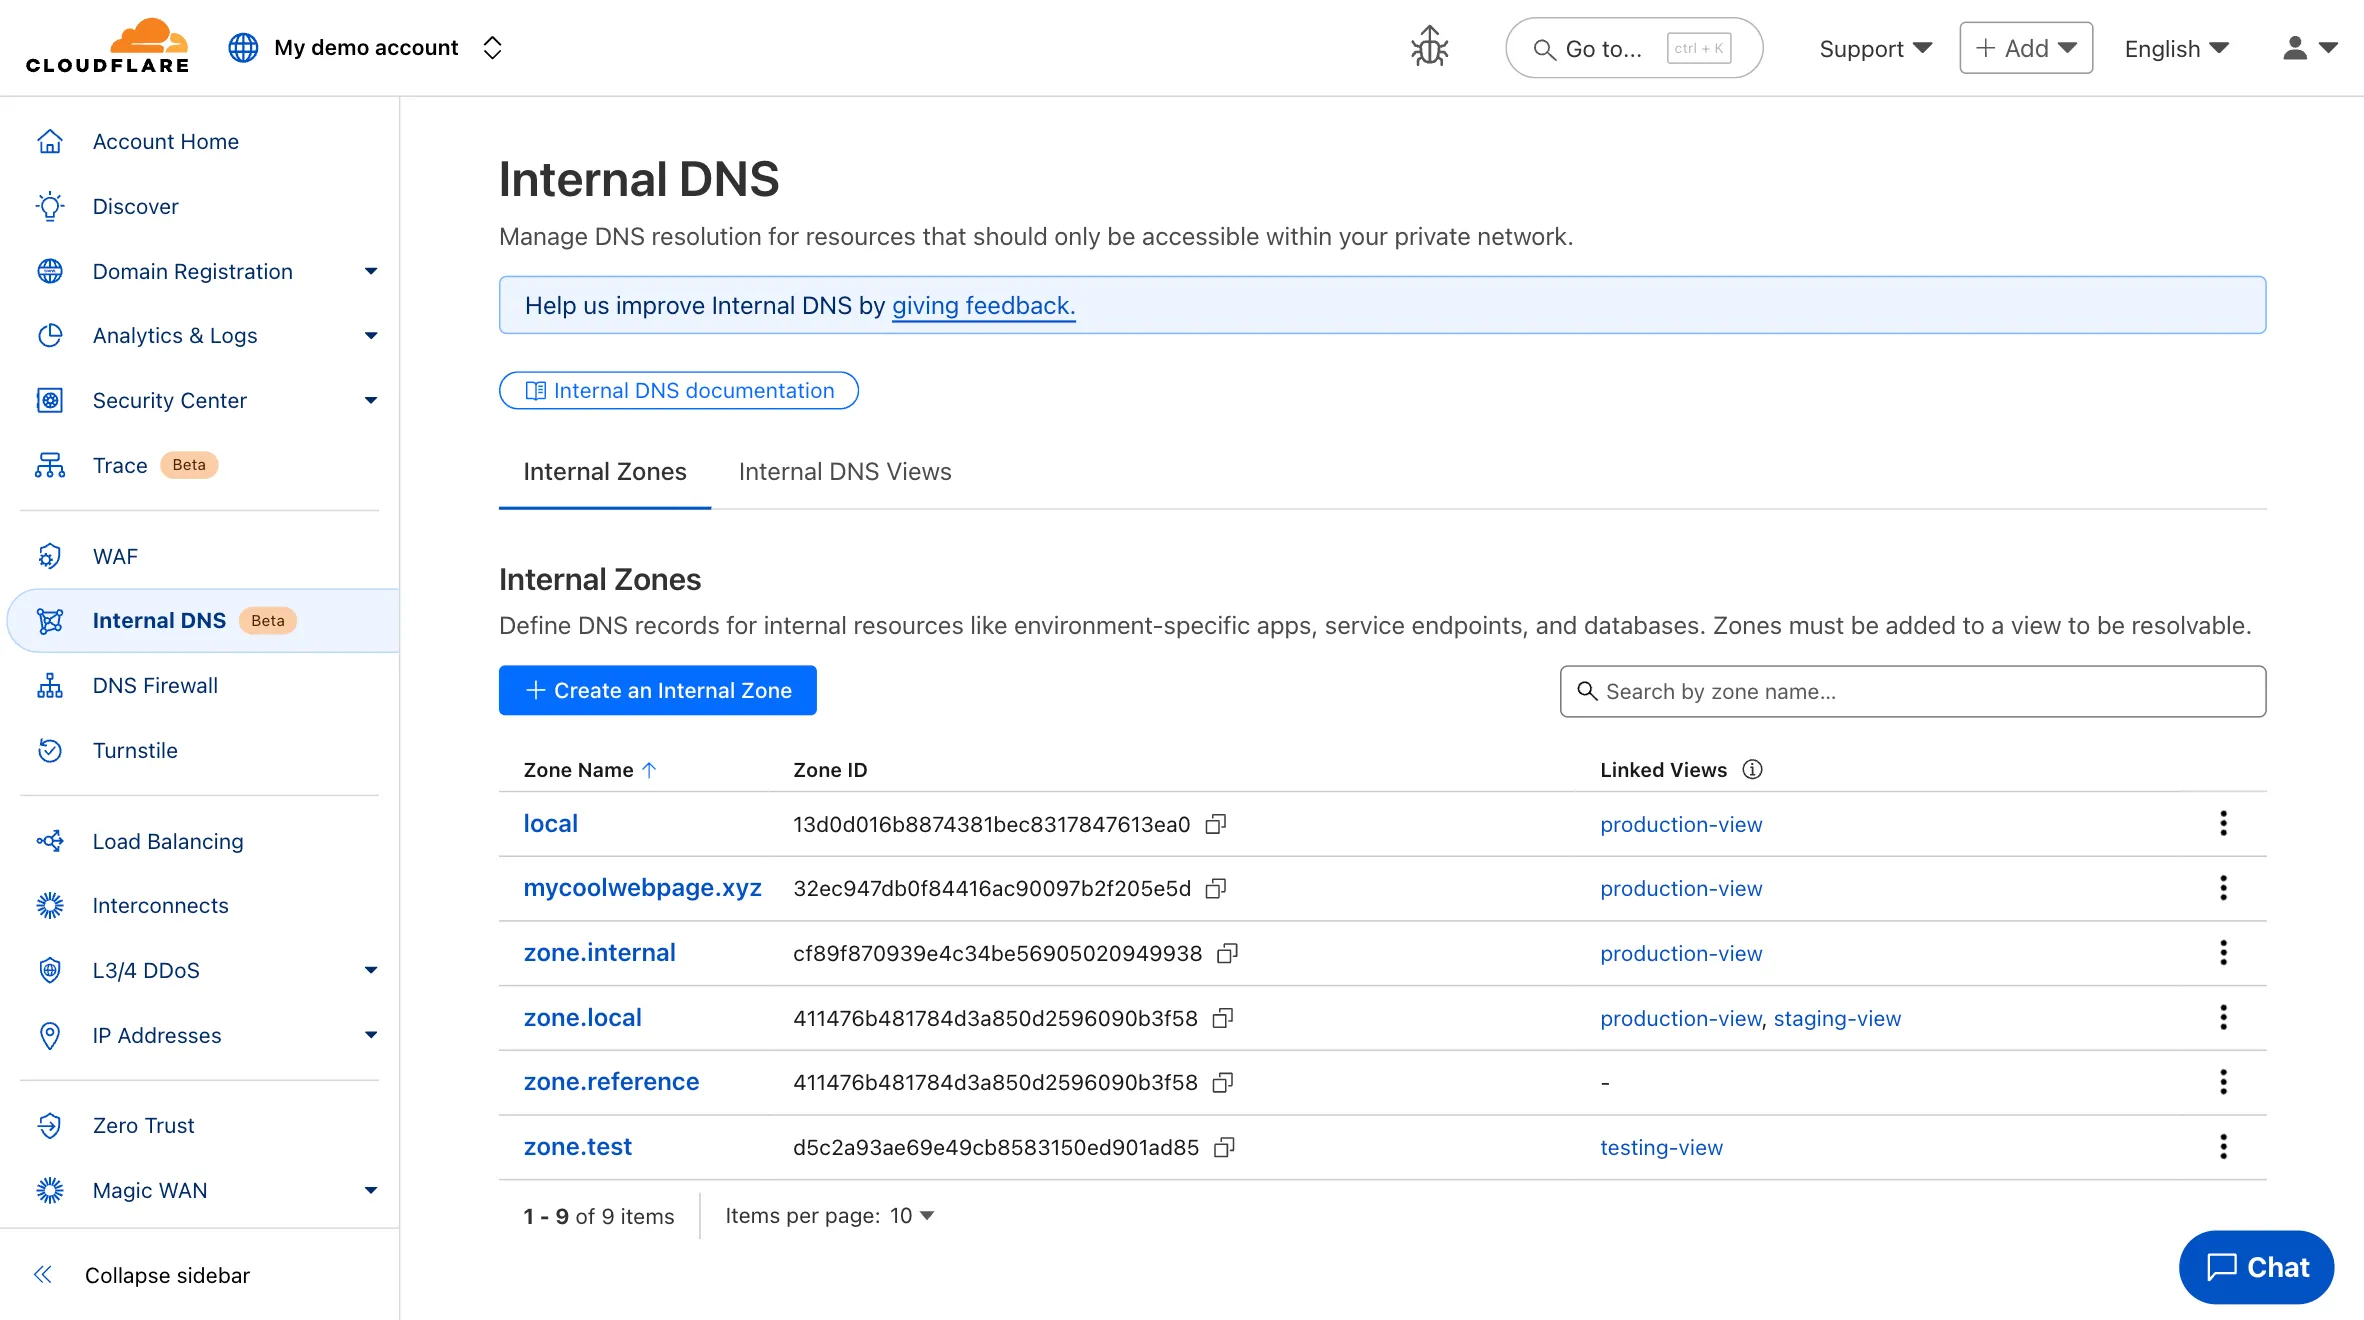
Note
The Internal DNS beta is currently only available to Enterprise customers.
To learn more and get started, refer to the [Internal DNS documentation](https://developers.cloudflare.com/dns/internal-dns/).
## 2025-06-11
**NSEC3 support for DNSSEC**
Enterprise customers can now select NSEC3 as method for proof of non-existence on their zones.
What's new:
* **NSEC3 support for live-signed zones** – For both primary and secondary zones that are configured to be live-signed (also known as "on-the-fly signing"), NSEC3 can now be selected as proof of non-existence.
* **NSEC3 support for pre-signed zones** – Secondary zones that are transferred to Cloudflare in a [pre-signed setup](https://developers.cloudflare.com/dns/zone-setups/zone-transfers/cloudflare-as-secondary/dnssec-for-secondary/#set-up-pre-signed-dnssec) now also support NSEC3 as proof of non-existence.
For more information and how to enable NSEC3, refer to the [NSEC3 documentation](https://developers.cloudflare.com/dns/dnssec/enable-nsec3/).
## 2025-06-03
**Improved onboarding for Shopify merchants**
Shopify merchants can now onboard to **O2O** automatically, without needing to contact support or community members.
What's new:
* **Automatic enablement** – O2O is available for all mutual Cloudflare and Shopify customers.
* **Branded record display** – Merchants see a Shopify logo in DNS records, complete with helpful tooltips.

* **Checkout protection** – Workers and Snippets are blocked from running on the checkout path to reduce risk and improve security.
For more information, refer to the [provider guide](https://developers.cloudflare.com/cloudflare-for-platforms/cloudflare-for-saas/saas-customers/provider-guides/shopify/).
## 2025-02-02
**Removed unused meta fields from DNS records**
Cloudflare is removing five fields from the `meta` object of DNS records. These fields have been unused for more than a year and are no longer set on new records. This change may take up to four weeks to fully roll out.
The affected fields are:
* the `auto_added` boolean
* the `managed_by_apps` boolean and corresponding `apps_install_id`
* the `managed_by_argo_tunnel` boolean and corresponding `argo_tunnel_id`
An example record returned from the API would now look like the following:
```json
{
"result": {
"id": "",
"zone_id": "",
"zone_name": "example.com",
"name": "www.example.com",
"type": "A",
"content": "192.0.2.1",
"proxiable": true,
"proxied": false,
"ttl": 1,
"locked": false,
"meta": {
"auto_added": false,
"managed_by_apps": false,
"managed_by_argo_tunnel": false,
"source": "primary"
},
"comment": null,
"tags": [],
"created_on": "2025-03-17T20:37:05.368097Z",
"modified_on": "2025-03-17T20:37:05.368097Z"
},
"success": true,
"errors": [],
"messages": []
}
```
For more guidance, refer to [Manage DNS records](https://developers.cloudflare.com/dns/manage-dns-records/).
## 2025-01-27
**Zone IDs and names on individual DNS records**
Records returned by the API will no longer contain the `zone_id` and `zone_name` fields. This change may take up to four weeks to fully roll out. The affected fields were deprecated with an End of Life (EOL) date of November 30, 2024.
## 2024-10-15
**Quote validation for TXT records added via dashboard**
When creating [TXT records](https://developers.cloudflare.com/dns/manage-dns-records/reference/dns-record-types/#txt) via the dashboard you will now find:
* Field validation errors if double quotes `"` are added inconsistently.
* Automatically quoted TXT content upon save if no quotes exist in the record content field.
## 2024-10-07
**API support for per-record CNAME flattening**
Paid zones now have the option to flatten specific CNAME records. When using the API, specify the setting `cname_flatten` as `true` or `false`. Refer to the [documentation](https://developers.cloudflare.com/dns/cname-flattening/set-up-cname-flattening/#per-record) for details.
Was this helpful?
YesNo
## On this page
[Docs](https://developers.cloudflare.com/)
```json
{"@context":"https://schema.org","@type":"BlogPosting","@id":"https://developers.cloudflare.com/dns/changelog/#page","headline":"Changelog · Cloudflare DNS docs","description":"Track the latest updates and changes to Cloudflare DNS features.","url":"https://developers.cloudflare.com/dns/changelog/","inLanguage":"en","image":"https://developers.cloudflare.com/og-docs.png","dateModified":"2026-04-16","publisher":{"@type":"Organization","name":"Cloudflare","url":"https://www.cloudflare.com/"},"isPartOf":{"@type":"WebSite","@id":"https://developers.cloudflare.com/#website","name":"Cloudflare Docs","url":"https://developers.cloudflare.com/"}}
```
---
---
description: Definitions for terms used across Cloudflare DNS documentation.
title: Glossary
image: https://developers.cloudflare.com/og-docs.png
---
[Skip to content](#main-content)
> Documentation Index
> Fetch the complete documentation index at: https://developers.cloudflare.com/dns/llms.txt
> Use this file to discover all available pages before exploring further.
# Glossary
Last updated Apr 16, 2026|Copy as Markdown|[View as Markdown](https://developers.cloudflare.com/dns/glossary/index.md)|[Agent setup](https://developers.cloudflare.com/agent-setup/)
Review the definitions for terms used across Cloudflare's DNS documentation.
| Term | Definition |
| ------------------------ | ------------------------------------------------------------------------------------------------------------------------------------------------------------------------------------------------------------------------------------------------------------------------------------------------------------------------------------------------------------------------------------------------------------------------------------------------------------------------------------------------------------------------------------------------------------------------------------ |
| active zone | A DNS zone that is active on Cloudflare requires changing its nameservers to Cloudflare's for management. |
| apex domain | Apex domain is used to refer to a domain that does not contain a subdomain part, such as example.com (without www.). It is also known as "root domain" or "naked domain". |
| CNAME setup | Also known as partial setup, a CNAME setup allows you to use Cloudflare's reverse proxy without using Cloudflare for your authoritative nameservers. |
| DNS over HTTPS | DNS over HTTPS (DoH) is a standard for encrypting DNS traffic via the HTTPS protocol, preventing tracking and spoofing of DNS queries. |
| DNS over TLS | DNS over TLS (DoT) is a standard for encrypting DNS traffic using its own port (853) and TLS encryption. |
| DNS record | DNS records are instructions that live in authoritative DNS servers and provide information about a domain, including what IP address is associated with that domain and how to handle requests for that domain. |
| DNS server | DNS servers translate human-readable domain names into IP addresses, eliminating the need to remember complex IP addresses. |
| DNS zone | A portion of the DNS namespace that is managed by a specific organization or administrator. |
| Domain Name System (DNS) | The Domain Name System (DNS) is the phonebook of the Internet. DNS translates domain names to IP addresses. |
| EDNS Client Subnet (ECS) | ECS is a DNS extension that enables recursive DNS resolvers to include client IP address information in their DNS queries. Not all resolvers use ECS but, if they do, usually a part of the IP address is omitted. Sending ECS headers is generally intended to reduce latency and speed up content delivery in connection to [CDNs](https://developers.cloudflare.com/glossary/?term=cdn) and [load balancers](https://www.cloudflare.com/learning/performance/what-is-load-balancing/). The ECS mechanism is specified in [RFC 7871](https://www.rfc-editor.org/rfc/rfc7871.html). |
| hostname | The name given to a server or node on a network, often the public DNS name of a server. |
| nameserver | A nameserver is a dedicated server that translates human readable hostnames (www.example.com) into IP addresses. Nameservers like root servers, TLD servers, and [authoritative nameservers](https://developers.cloudflare.com/dns/nameservers/) are fundamental components of the Domain Name System (DNS). |
| proxy status | The proxy status of a DNS record defines whether requests for your domain will route through Cloudflare (proxied) or not (DNS-only). When a [DNS record is proxied](https://developers.cloudflare.com/dns/proxy-status/), requests are processed according to your configurations, and Cloudflare can optimize, cache, and protect your domain. Refer to [How Cloudflare works](https://developers.cloudflare.com/fundamentals/concepts/how-cloudflare-works/) for details. |
| zone apex | Zone apex refers to the domain or subdomain on which the control of DNS records starts. |
Was this helpful?
YesNo
## On this page
[Docs](https://developers.cloudflare.com/)
```json
{"@context":"https://schema.org","@type":"TechArticle","@id":"https://developers.cloudflare.com/dns/glossary/#page","headline":"Glossary · Cloudflare DNS docs","description":"Definitions for terms used across Cloudflare DNS documentation.","url":"https://developers.cloudflare.com/dns/glossary/","inLanguage":"en","image":"https://developers.cloudflare.com/og-docs.png","dateModified":"2026-04-16","publisher":{"@type":"Organization","name":"Cloudflare","url":"https://www.cloudflare.com/"},"isPartOf":{"@type":"WebSite","@id":"https://developers.cloudflare.com/#website","name":"Cloudflare Docs","url":"https://developers.cloudflare.com/"}}
```
---
---
description: View DNS query analytics and configure Logpush for DNS logs.
title: Analytics and logs
image: https://developers.cloudflare.com/og-docs.png
---
[Skip to content](#main-content)
> Documentation Index
> Fetch the complete documentation index at: https://developers.cloudflare.com/dns/llms.txt
> Use this file to discover all available pages before exploring further.
# Analytics and logs
Last updated Apr 17, 2026|Copy as Markdown|[View as Markdown](https://developers.cloudflare.com/dns/additional-options/analytics/index.md)|[Agent setup](https://developers.cloudflare.com/agent-setup/)
When you use Cloudflare DNS, you can access data about DNS queries through a variety of sources.
---
## Analytics
DNS analytics allow you to evaluate data about DNS queries to your zone.
You can [use the dashboard](#view-on-the-dashboard) to get insights quickly based on a [predefined set of dimensions](#available-dimensions), or [use the API](#explore-with-the-api) to have access to all fields available in the GraphQL DNS analytics schemas.
When using GraphQL, you also have the option to get data for DNS queries across all zones within a given Cloudflare account.
### Availability and limits
| | Free | Pro | Business | Enterprise |
| ------------------------------- | ------ | ------- | -------- | ---------- |
| Availability | Yes | Yes | Yes | Yes |
| Maximum time interval (zone) | 7 days | 31 days | 31 days | 62 days |
| Maximum time interval (account) | 7 days | 7 days | 7 days | 62 days |
| Historical data (zone) | 8 days | 31 days | 31 days | 62 days |
| Historical data (account) | 8 days | 8 days | 8 days | 62 days |
### View on the dashboard
For a quick summary, view your DNS analytics on the dashboard:
[Go to **Analytics** ↗](https://dash.cloudflare.com/?to=/:account/:zone/dns/analytics)
The DNS analytics dashboard contains [four main panels](#panels). The filters and time frame that you specify at the top of the page apply to all of them.
#### Available dimensions
* Query name
* Query type (same as DNS record type)
* Response code
* Data center
* Source IP
* Destination IP
* Protocol
* IP version
#### Panels
* **Query overview**: the number of queries and their distribution over time. This information is segmented by each of the [available dimensions](#available-dimensions) and the graph displays the top five values. You can select the dimensions through the different tabs above the graph and quickly filter for or exclude a certain value from the results by hovering over it and selecting **Filter** or **Exclude**.
* **Query statistics**: an overview of query metrics based on your filters and selected time frame. Namely, **Total queries**, **Average queries per second**, and **Average processing time**. The average processing time is displayed in milliseconds and includes upstream queries in the case of [flattened CNAME records](https://developers.cloudflare.com/dns/cname-flattening/).
Note
Processing time is different from response time. Response time would have to include information that is not available to Cloudflare, such as how long the query takes from the client to the resolver and from the resolver to Cloudflare (as your authoritative DNS provider).
* **DNS queries by data center**: a map indicating which Cloudflare data centers have handled DNS queries to your zone in the selected time period. You can also find a list of the ten top results and quickly filter for or exclude a certain data center from the results by hovering over it and selecting **Filter** or **Exclude**.
* **Queries by source**: a breakdown of the top five, ten, or fifteen results - based on your selection - and grouped by the [available dimensions](#available-dimensions).
### Explore with the API
For more detailed metrics, use the [GraphQL API](https://developers.cloudflare.com/analytics/graphql-api/). Refer to the GraphQL Analytics API documentation for guidance on how to [get started](https://developers.cloudflare.com/analytics/graphql-api/getting-started/).
The DNS analytics has two [schemas](https://developers.cloudflare.com/analytics/graphql-api/getting-started/querying-basics/):
* `dnsAnalyticsAdaptive`: Retrieve information about individual DNS queries.
* `dnsAnalyticsAdaptiveGroups`: Get reports on aggregate information only.
To get account-level data, you can set up queries similar to the following:
Get the last 10,000 queries resulting in NXDOMAIN
```graphql
query GetLastNXDOMAINResponses {
viewer {
accounts(filter: { accountTag: "83a4527361bcdec24566fd7f837b6de5" }) {
dnsAnalyticsAdaptive(
limit: 10000
filter: {
date_geq: "2025-06-16",
responseCode: "NXDOMAIN",
date_leq: "2025-06-18"
}
orderBy: [datetime_DESC]
) {
zoneTag
queryName
responseCode
queryType
datetime
}
}
}
}
```
Get the overall query count per account
```graphql
query GetTotalDNSQueryCount {
viewer {
accounts(filter: { accountTag: "83a4527361bcdec24566fd7f837b6de5" }) {
dnsAnalyticsAdaptiveGroups(
filter: {
date_geq: "2025-05-01"
date_leq: "2025-05-30"
}
limit: 1
) {
count
}
}
}
}
```
---
## Logs
Logs let Enterprise customers view [detailed information](https://developers.cloudflare.com/logs/logpush/logpush-job/datasets/zone/dns%5Flogs/) about individual DNS queries.
For help setting up Logpush, refer to [Logpush](https://developers.cloudflare.com/logs/logpush/) documentation.
Was this helpful?
YesNo
## On this page
[Docs](https://developers.cloudflare.com/)
```json
{"@context":"https://schema.org","@type":"TechArticle","@id":"https://developers.cloudflare.com/dns/additional-options/analytics/#page","headline":"Analytics and logs · Cloudflare DNS docs","description":"View DNS query analytics and configure Logpush for DNS logs.","url":"https://developers.cloudflare.com/dns/additional-options/analytics/","inLanguage":"en","image":"https://developers.cloudflare.com/og-docs.png","dateModified":"2026-04-17","publisher":{"@type":"Organization","name":"Cloudflare","url":"https://www.cloudflare.com/"},"isPartOf":{"@type":"WebSite","@id":"https://developers.cloudflare.com/#website","name":"Cloudflare Docs","url":"https://developers.cloudflare.com/"},"keywords":["Analytics","GraphQL"]}
```
---
---
description: Set default DNS settings applied to new zones in your account.
title: Configure DNS zone defaults
image: https://developers.cloudflare.com/og-docs.png
---
[Skip to content](#main-content)
> Documentation Index
> Fetch the complete documentation index at: https://developers.cloudflare.com/dns/llms.txt
> Use this file to discover all available pages before exploring further.
# Configure DNS zone defaults
Last updated Apr 16, 2026|Copy as Markdown|[View as Markdown](https://developers.cloudflare.com/dns/additional-options/dns-zone-defaults/index.md)|[Agent setup](https://developers.cloudflare.com/agent-setup/)
While there are default values for DNS settings that Cloudflare applies to all new zones, Enterprise accounts have the option to configure their own DNS zone defaults according to their preference.
Caution
DNS zone defaults are only applied at the moment a new zone is created and will not impact already existing zones, nor zones that existed previously and are being revived.
Any of the values specified as default can later be adjusted within each zone, on the respective [**DNS Settings** ↗](https://dash.cloudflare.com/?to=/:account/:zone/dns/settings) or [**DNS Records** ↗](https://dash.cloudflare.com/?to=/:account/:zone/dns/records) page.
## Steps
1. In the Cloudflare dashboard, go to the account **Settings** page.
[Go to **Configurations** ↗](https://dash.cloudflare.com/?to=/:account/configurations)
2. Go to **DNS Settings**. If these options are not displayed on your Cloudflare dashboard, you may need to reach out to your account team to have them added.
3. For **DNS zone defaults**, select **Configure defaults**.
The values you select for the listed settings will be automatically applied to new zones as you add them to your Cloudflare account.
## Available settings
* [Nameserver assignment](https://developers.cloudflare.com/dns/nameservers/nameserver-options/#assignment-method): Select your preferred nameserver type or assignment method that you want Cloudflare to use for your new zones. This setting applies both to primary zones ([full setup](https://developers.cloudflare.com/dns/zone-setups/full-setup/)) and [secondary zones](https://developers.cloudflare.com/dns/zone-setups/zone-transfers/cloudflare-as-secondary/).
For primary zones:
* [Multi-provider DNS](https://developers.cloudflare.com/dns/nameservers/nameserver-options/#multi-provider-dns): Control whether or not Cloudflare will consider `NS` records you add on the zone apex and if zones that contain external nameservers listed in the registrar will be activated.
* [Nameserver TTL](https://developers.cloudflare.com/dns/nameservers/nameserver-options/#nameserver-ttl): Control how long, in seconds, your nameserver (`NS`) records are cached. The default time-to-live (TTL) is 24 hours. This setting applies both to Cloudflare nameservers and [custom nameservers](https://developers.cloudflare.com/dns/nameservers/custom-nameservers/).
* [SOA record](https://developers.cloudflare.com/dns/manage-dns-records/reference/dns-record-types/#soa): Adjust values for the start of authority (SOA) record that Cloudflare creates for your zone.
For secondary zones:
* [Secondary DNS override](https://developers.cloudflare.com/dns/zone-setups/zone-transfers/cloudflare-as-secondary/proxy-traffic/): Enable the options to use Cloudflare [proxy](https://developers.cloudflare.com/dns/proxy-status/) and add `CNAME` records at your zone apex.
Multi-provider DNS does not apply as a setting for secondary zones, as this is already a required behavior for this setup. `SOA` record and the `NS` record TTL are defined on your external DNS provider and only transferred into Cloudflare.
Was this helpful?
YesNo
## On this page
[Docs](https://developers.cloudflare.com/)
```json
{"@context":"https://schema.org","@type":"TechArticle","@id":"https://developers.cloudflare.com/dns/additional-options/dns-zone-defaults/#page","headline":"Configure DNS zone defaults · Cloudflare DNS docs","description":"Set default DNS settings applied to new zones in your account.","url":"https://developers.cloudflare.com/dns/additional-options/dns-zone-defaults/","inLanguage":"en","image":"https://developers.cloudflare.com/og-docs.png","dateModified":"2026-04-16","publisher":{"@type":"Organization","name":"Cloudflare","url":"https://www.cloudflare.com/"},"isPartOf":{"@type":"WebSite","@id":"https://developers.cloudflare.com/#website","name":"Cloudflare Docs","url":"https://developers.cloudflare.com/"}}
```
---
---
description: Set up reverse DNS zones and PTR records.
title: Reverse zones and PTR records
image: https://developers.cloudflare.com/og-docs.png
---
[Skip to content](#main-content)
> Documentation Index
> Fetch the complete documentation index at: https://developers.cloudflare.com/dns/llms.txt
> Use this file to discover all available pages before exploring further.
# Reverse zones and PTR records
Last updated Apr 17, 2026|Copy as Markdown|[View as Markdown](https://developers.cloudflare.com/dns/additional-options/reverse-zones/index.md)|[Agent setup](https://developers.cloudflare.com/agent-setup/)
If you control your own IP prefix(es), you can set up reverse zones with PTR records to allow reverse DNS lookups.
## PTR records
PTR records specify the allowed hosts for a given IP address. They are the opposite of [A records ↗](https://www.cloudflare.com/learning/dns/dns-records/dns-a-record) and used for reverse DNS lookups.
Historically, PTR records prevented outbound SMTP servers from being blocked by spam filters. However, more modern DNS records — [SPF, DKIM, and DMARC](https://developers.cloudflare.com/dns/manage-dns-records/how-to/email-records/#prevent-domain-spoofing) — provide better verifications of domain ownership.
Now, PTR records are primarily useful for those who own a dedicated IP space. They can help populate trace routes and security tools with human-readable domain names.
As PTR records are mainly used for reverse DNS lookups, they should preferably be added to reverse zones.
## Availability
The following Cloudflare customers can create reverse zones.
* Customers with an IPv4 or IPv6 address space can add the IPv4 or IPv6 reverse zone for their IP space to their account, and create the required PTR records for forward resolution.
* DNS Firewall customers need to contact their account team to add PTR records for the IPs used for their DNS Firewall clusters.
If your account does not meet these qualifications and you do not own the IP prefix you want to add PTR records on, contact the owner of the IP address based on a [whois lookup ↗](https://lookup.icann.org/).
## Set up a reverse zone
To set up a reverse zone, you need to create a reverse DNS zone and add PTR records for forward resolution.
### 1\. Create a reverse DNS zone
1. Within your account, click **Add** \> **Connect a domain**.
2. For your site name, use the reverse IP address:
* For IPv4 /24 prefixes, the pattern is:
* **IP prefix**: `...0/24`
* **Reverse zone address**: `...in-addr.arpa`
* For IPv4 /16 prefixes, the pattern is:
* **IP prefix**: `..0.0/16`
* **Reverse zone address**: `..in-addr.arpa`
Example
* **IPv4 prefix**: `198.51.100.0/24`
* **Reverse zone**: `100.51.198.in-addr.arpa`
* For IPv6, consider the following examples:
* **IPv6 prefix**: `2001:DB8::0/32`
* **Reverse zone**: `8.b.d.0.1.0.0.2.ip6.arpa`
* **IPv6 prefix**: `2001:DB8::0/48`
* **Reverse zone**: `0.0.0.0.8.b.d.0.1.0.0.2.ip6.arpa`
3. If you are adding less than 200 PTR records, select the **Free** plan. If you are adding more, select a paid plan.
4. Skip the rest of the onboarding process.
### 2\. Add PTR records
1. In the Cloudflare dashboard, go to the **DNS Records** page.
[Go to **Records** ↗](https://dash.cloudflare.com/?to=/:account/:zone/dns/records)
2. For each IP within the prefix, add a PTR record using the least significant octet(s) as the subdomain.
IPv4 example
Suppose you have the following configuration:
* **Reverse zone**: `100.51.198.in-addr.arpa`
* **IP address**: `198.51.100.123`
The subdomain for the PTR record would be `123`, making the full domain for forward lookup `123.100.51.198.in-addr.arpa`.
| Type | Name | Domain name | TTL |
| ---- | ---- | ----------- | ---- |
| PTR | 123 | example.com | Auto |
IPv6 example
Suppose you have the following configuration:
* **Reverse zone**: `0.0.0.0.8.b.d.0.1.0.0.2.ip6.arpa`
* **IP address**: `2001:DB8::5`
The subdomain for the PTR record would be `5.0.0.0.0.0.0.0.0.0.0.0.0.0.0.0.0.0.0.0`, making the full domain for forward lookup `5.0.0.0.0.0.0.0.0.0.0.0.0.0.0.0.0.0.0.0.0.0.0.0.8.b.d.0.1.0.0.2.ip6.arpa`.
| Type | Name | Domain name | TTL |
| ---- | --------------------------------------- | ----------- | ---- |
| PTR | 5.0.0.0.0.0.0.0.0.0.0.0.0.0.0.0.0.0.0.0 | example.com | Auto |
### 3\. Set Cloudflare nameservers
Add the two Cloudflare nameservers provided for the zone at your Regional Internet Registry (RIR). The exact steps to update your nameservers will depend on the registry you are using.
After this process, your reverse zone will be activated and you can perform reverse DNS lookups.
## Other resources
While setting up reverse zones, the following third-party tools may be useful:
* [Reverse DNS record generator ↗](https://www.whatsmydns.net/reverse-dns-generator)
* [IPv6 subnet calculator ↗](https://www.internex.at/de/toolbox/ipv6)
Was this helpful?
YesNo
## On this page
[Docs](https://developers.cloudflare.com/)
```json
{"@context":"https://schema.org","@type":"TechArticle","@id":"https://developers.cloudflare.com/dns/additional-options/reverse-zones/#page","headline":"Reverse zones and PTR records · Cloudflare DNS docs","description":"Set up reverse DNS zones and PTR records.","url":"https://developers.cloudflare.com/dns/additional-options/reverse-zones/","inLanguage":"en","image":"https://developers.cloudflare.com/og-docs.png","dateModified":"2026-04-17","publisher":{"@type":"Organization","name":"Cloudflare","url":"https://www.cloudflare.com/"},"isPartOf":{"@type":"WebSite","@id":"https://developers.cloudflare.com/#website","name":"Cloudflare Docs","url":"https://developers.cloudflare.com/"},"keywords":["IPv4","IPv6"]}
```
---
---
description: Review information on all Cloudflare DNS features and their availability.
title: Features and plans
image: https://developers.cloudflare.com/og-docs.png
---
[Skip to content](#main-content)
> Documentation Index
> Fetch the complete documentation index at: https://developers.cloudflare.com/dns/llms.txt
> Use this file to discover all available pages before exploring further.
# Features and plans
Last updated Apr 16, 2026|Copy as Markdown|[View as Markdown](https://developers.cloudflare.com/dns/reference/all-features/index.md)|[Agent setup](https://developers.cloudflare.com/agent-setup/)
Cloudflare provides the following features for different [plans ↗](https://www.cloudflare.com/plans/).
## Features
### Advanced nameservers
**Link:** [Advanced nameservers](https://developers.cloudflare.com/dns/foundation-dns/advanced-nameservers/)
**Feature availability**
* **Free:** No
* **Pro:** No
* **Business:** No
* **Enterprise:** Included with [Foundation DNS](https://developers.cloudflare.com/dns/foundation-dns/)
### CNAME flattening
**Link:** [CNAME flattening](https://developers.cloudflare.com/dns/cname-flattening/)
**Feature availability**
* **Free:** Yes
* **Pro:** Yes
* **Business:** Yes
* **Enterprise:** Yes
**Can customize**
Pro plans and above can customize
* **Free:** No
* **Pro:** Yes
* **Business:** Yes
* **Enterprise:** Yes
### Custom nameservers
**Link:** [Custom nameservers](https://developers.cloudflare.com/dns/nameservers/custom-nameservers/)
**Feature availability**
* **Free:** No
* **Pro:** No
* **Business:** Yes
* **Enterprise:** Yes
### DNS analytics
**Link:** [DNS analytics](https://developers.cloudflare.com/dns/additional-options/analytics/)
**Feature availability**
* **Free:** Yes
* **Pro:** Yes
* **Business:** Yes
* **Enterprise:** Yes
**Maximum time interval (zone)**
* **Free:** 7 days
* **Pro:** 31 days
* **Business:** 31 days
* **Enterprise:** 62 days
**Maximum time interval (account)**
* **Free:** 7 days
* **Pro:** 7 days
* **Business:** 7 days
* **Enterprise:** 62 days
**Historical data (zone)**
* **Free:** 8 days
* **Pro:** 31 days
* **Business:** 31 days
* **Enterprise:** 62 days
**Historical data (account)**
* **Free:** 8 days
* **Pro:** 8 days
* **Business:** 8 days
* **Enterprise:** 62 days
### DNSSEC
**Link:** [DNSSEC](https://developers.cloudflare.com/dns/dnssec/)
**Feature availability**
* **Free:** Yes
* **Pro:** Yes
* **Business:** Yes
* **Enterprise:** Yes
### DNS Firewall
**Link:** [DNS Firewall](https://developers.cloudflare.com/dns/dns-firewall/)
**Feature availability**
* **Free:** No
* **Pro:** No
* **Business:** No
* **Enterprise:** Paid add-on
**Historical data**
* **Free:** N/A
* **Pro:** N/A
* **Business:** N/A
* **Enterprise:** 62 days
**Maximum time interval**
* **Free:** N/A
* **Pro:** N/A
* **Business:** N/A
* **Enterprise:** 62 days
### Full zone setup
**Link:** [Full zone setup](https://developers.cloudflare.com/dns/zone-setups/full-setup/)
**Feature availability**
* **Free:** Yes
* **Pro:** Yes
* **Business:** Yes
* **Enterprise:** Yes
### Partial zone setup
**Link:** [Partial zone setup](https://developers.cloudflare.com/dns/zone-setups/partial-setup/)
**Feature availability**
* **Free:** No
* **Pro:** No
* **Business:** Yes
* **Enterprise:** Yes
### DNS records management
**Link:** [DNS records management](https://developers.cloudflare.com/dns/manage-dns-records/)
**Feature availability**
* **Free:** Yes
* **Pro:** Yes
* **Business:** Yes
* **Enterprise:** Yes
**Number of records per zone**
* **Free:** 1,000 for zones created before `2024-09-01 00:00:00 UTC`
200 for zones created on or after `2024-09-01 00:00:00 UTC`
* **Pro:** 3,500
* **Business:** 3,500
* **Enterprise:** 3,500 (can be increased)
### DNS record comments
**Link:** [DNS record comments](https://developers.cloudflare.com/dns/manage-dns-records/reference/record-attributes/)
**Feature availability**
* **Free:** Yes
* **Pro:** Yes
* **Business:** Yes
* **Enterprise:** Yes
**Character limit**
* **Free:** 100
* **Pro:** 500
* **Business:** 500
* **Enterprise:** 500
**Comments per record**
* **Free:** 1
* **Pro:** 1
* **Business:** 1
* **Enterprise:** 1
### DNS record tags
**Link:** [DNS record tags](https://developers.cloudflare.com/dns/manage-dns-records/reference/record-attributes/)
**Feature availability**
* **Free:** No
* **Pro:** Yes
* **Business:** Yes
* **Enterprise:** Yes
**Name character limit (everything before the colon)**
* **Free:** N/A
* **Pro:** 32
* **Business:** 32
* **Enterprise:** 32
**Value character limit (everything after the colon)**
* **Free:** N/A
* **Pro:** 100
* **Business:** 100
* **Enterprise:** 100
**Tags per record**
* **Free:** N/A
* **Pro:** 20
* **Business:** 20
* **Enterprise:** 20
### DNS zone transfers
**Link:** [DNS zone transfers](https://developers.cloudflare.com/dns/zone-setups/zone-transfers/)
**Feature availability**
* **Free:** No
* **Pro:** No
* **Business:** No
* **Enterprise:** Yes
### Subdomain zone setup
**Link:** [Subdomain zone setup](https://developers.cloudflare.com/dns/zone-setups/subdomain-setup/)
**Feature availability**
* **Free:** No
* **Pro:** No
* **Business:** No
* **Enterprise:** Yes
### Subdomain delegation
**Link:** [Subdomain delegation](https://developers.cloudflare.com/dns/manage-dns-records/how-to/subdomains-outside-cloudflare/)
**Feature availability**
* **Free:** Yes
* **Pro:** Yes
* **Business:** Yes
* **Enterprise:** Yes
### Reverse zones
**Link:** [Reverse zones](https://developers.cloudflare.com/dns/additional-options/reverse-zones/)
**Feature availability**
* **Free:** Yes
* **Pro:** Yes
* **Business:** Yes
* **Enterprise:** Yes
Was this helpful?
YesNo
## On this page
[Docs](https://developers.cloudflare.com/)
```json
{"@context":"https://schema.org","@type":"TechArticle","@id":"https://developers.cloudflare.com/dns/reference/all-features/#page","headline":"Features and plans · Cloudflare DNS docs","description":"Review information on all Cloudflare DNS features and their availability.","url":"https://developers.cloudflare.com/dns/reference/all-features/","inLanguage":"en","image":"https://developers.cloudflare.com/og-docs.png","dateModified":"2026-04-16","publisher":{"@type":"Organization","name":"Cloudflare","url":"https://www.cloudflare.com/"},"isPartOf":{"@type":"WebSite","@id":"https://developers.cloudflare.com/#website","name":"Cloudflare Docs","url":"https://developers.cloudflare.com/"}}
```
---
---
description: API properties that you can use in API requests for Cloudflare DNS analytics.
title: Analytics API properties
image: https://developers.cloudflare.com/og-docs.png
---
[Skip to content](#main-content)
> Documentation Index
> Fetch the complete documentation index at: https://developers.cloudflare.com/dns/llms.txt
> Use this file to discover all available pages before exploring further.
# Analytics API properties
Last updated Apr 16, 2026|Copy as Markdown|[View as Markdown](https://developers.cloudflare.com/dns/reference/analytics-api-properties/index.md)|[Agent setup](https://developers.cloudflare.com/agent-setup/)
This page describes API properties that you can use in requests to the [DNS analytics API](https://developers.cloudflare.com/api/resources/dns/subresources/analytics/subresources/reports/methods/get/).
Warning
The [DNS analytics API](https://developers.cloudflare.com/api/resources/dns/subresources/analytics/subresources/reports/methods/get/), along with the following [API properties](https://developers.cloudflare.com/dns/reference/analytics-api-properties/), will be deprecated soon.
To access the new analytics dashboard, go to [**DNS Analytics** ↗](https://dash.cloudflare.com//?to=/:account/:zone/dns/analytics). Refer to [Analytics and logs](https://developers.cloudflare.com/dns/additional-options/analytics/) for details.
## Metrics
A metric is a numerical value based on an attribute of the data, for example a query count.
In API requests, metrics are set in the `metrics` parameter. If you need to list multiple metrics, separate them with commas.
| Metric | Name | Example | Unit |
| ------------------ | ----------------------------- | ------- | -------------------- |
| queryCount | Query count | 1000 | Count |
| uncachedCount | Uncached query count | 1 | Count |
| staleCount | Stale query count | 1 | Count |
| responseTimeAvg | Average response time | 1.0 | Time in milliseconds |
| responseTimeMedian | Median response time | 1.0 | Time in milliseconds |
| responseTime90th | 90th percentile response time | 1.0 | Time in milliseconds |
| responseTime99th | 99th percentile response time | 1.0 | Time in milliseconds |
## Dimensions
Dimensions can be used to break down the data by given attributes.
In API requests, dimensions are set in the `dimensions` parameter. If you need to list multiple dimensions, separate them with commas.
| Dimension | Name | Example | Notes |
| ------------------ | -------------------- | ----------- | ------------------------------------------------------------------------------------------------------------------------------------------- |
| queryName | Query Name | example.com | |
| queryType | Query Type | AAAA | [Types defined by IANA ↗](http://www.iana.org/assignments/dns-parameters/dns-parameters.xhtml#dns-parameters-4). Unknown types are empty. |
| responseCode | Response Code | NOERROR | [Response codes defined by IANA ↗](http://www.iana.org/assignments/dns-parameters/dns-parameters.xhtml#dns-parameters-6). Always uppercase. |
| responseCached | Response Cached | Cached | Either Cached or Uncached. |
| coloName | Colo Name | SJC | PoP code. |
| origin | Origin | 2001:db8::1 | Origin used to resolve the query. Empty if N/A or if the query was answered from cache. |
| dayOfWeek | Day Of Week | 1 | Break down by day of week. Monday is 1, and Sunday is 7. |
| tcp | TCP | 1 | Either 1 or 0 depending on the protocol used. |
| ipVersion | IP Version | 6 | IP protocol version used (currently 4 or 6). |
| querySizeBucket | Query Size Bucket | 16-31 | Query size bucket by multiples of 16. |
| responseSizeBucket | Response Size Bucket | 16-31 | Response size bucket by multiples of 16. |
## Filters
Filters use the form `dimension operator expression`, where each part corresponds to the following:
* **Dimension**: Specifies the [dimension](#dimensions) to filter on. For example, `queryName`.
* **Operator**: Defines the type of filter match to use. Operators are specific to dimensions.
* **Expression**: States the values to include or exclude from the results. Expressions use regular expression (regex) syntax.
### Filter operators
| Operator | Name | Example | Description | URL Encoded |
| -------- | ------------------------ | ---------------------- | ------------------------------------------------------------------ | ----------- |
| \== | Equals | queryName==example.com | Return results where queryName is exactly example.com. | %3D%3D |
| != | Does not equal | responseCode!=NOERROR | Return results where responseCode is different from NOERROR. | !%3D |
| \> | Greater than | dimension>1000 | Return results where a dimension is greater than 1000. | %3E |
| < | Less than | dimension<1000 | Return results where a dimension is less than 1000. | %3C |
| \>= | Greater than or equal to | dimension>=1000 | Return results where a dimension is greater than or equal to 1000. | %3E%3D |
| <= | Less than or equal to | dimension<=1000 | Return results where a dimension is less than or equal to 1000. | %3C%3D |
### Combining filters
Combine filters using `OR` and `AND` boolean logic:
* `AND` takes precedence over `OR` in all expressions.
* The `OR` operator is defined using a comma `,` or the `OR` keyword surrounded by whitespace.
* The `AND` operator is defined using a semicolon `;` or the `AND` keyword surrounded by whitespace.
Note
Note that the semicolon is a reserved character in URLs ([RFC 1738 ↗](https://www.rfc-editor.org/rfc/rfc1738)) and should be percent-encoded as `%3B`.
Examples using OR
* `responseCode==NOERROR,responseCode==NXDOMAIN` indicates that response code is either `NOERROR` or `NXDOMAIN`.
* `coloName==SJC OR coloName==LAX` indicates queries in either `SJC` or `LAX`.
Examples using AND
* `responseCode==NOERROR;queryType==AAAA` indicates that response code is `NOERROR` and query type is `AAAA`.
* `queryType==AAAA AND coloName==SJC` indicates `AAAA` queries in `SJC`.
Was this helpful?
YesNo
## On this page
[Docs](https://developers.cloudflare.com/)
```json
{"@context":"https://schema.org","@type":"TechArticle","@id":"https://developers.cloudflare.com/dns/reference/analytics-api-properties/#page","headline":"Analytics API properties · Cloudflare DNS docs","description":"API properties that you can use in API requests for Cloudflare DNS analytics.","url":"https://developers.cloudflare.com/dns/reference/analytics-api-properties/","inLanguage":"en","image":"https://developers.cloudflare.com/og-docs.png","dateModified":"2026-04-16","publisher":{"@type":"Organization","name":"Cloudflare","url":"https://www.cloudflare.com/"},"isPartOf":{"@type":"WebSite","@id":"https://developers.cloudflare.com/#website","name":"Cloudflare Docs","url":"https://developers.cloudflare.com/"}}
```
---
---
description: Migrate and manage DNS on Cloudflare.
title: Concepts
image: https://developers.cloudflare.com/og-docs.png
---
[Skip to content](#main-content)
> Documentation Index
> Fetch the complete documentation index at: https://developers.cloudflare.com/learning-paths/llms.txt
> Use this file to discover all available pages before exploring further.
# Concepts
Last updated Apr 23, 2026|Copy as Markdown|[View as Markdown](https://developers.cloudflare.com/learning-paths/dns-best-practices/concepts/index.md)|[Agent setup](https://developers.cloudflare.com/agent-setup/)
Migrating your DNS from an on-premises BIND solution to a cloud-based provider like Cloudflare can offer significant benefits in terms of performance, security, and manageability. However, a successful migration requires careful planning and execution. This guide outlines best practices to ensure a smooth transition.
## Objectives
By the end of this module, you will be able to:
* Plan and take inventory of your DNS migration.
* Prepare for the migration with minimal downtime.
* Learn how to make the actual switch to Cloudflare.
* Verify and stabilize after your migration.
Was this helpful?
YesNo
## On this page
[Docs](https://developers.cloudflare.com/)
```json
{"@context":"https://schema.org","@type":"WebPage","@id":"https://developers.cloudflare.com/learning-paths/dns-best-practices/concepts/#page","headline":"Concepts · Cloudflare Learning Paths","description":"Migrate and manage DNS on Cloudflare.","url":"https://developers.cloudflare.com/learning-paths/dns-best-practices/concepts/","inLanguage":"en","image":"https://developers.cloudflare.com/og-docs.png","dateModified":"2026-04-23","publisher":{"@type":"Organization","name":"Cloudflare","url":"https://www.cloudflare.com/"},"isPartOf":{"@type":"WebSite","@id":"https://developers.cloudflare.com/#website","name":"Cloudflare Docs","url":"https://developers.cloudflare.com/"}}
```
---
---
description: Learn how to onboard your templates to use Domain Connect with Cloudflare as DNS provider.
title: Domain Connect
image: https://developers.cloudflare.com/og-docs.png
---
[Skip to content](#main-content)
> Documentation Index
> Fetch the complete documentation index at: https://developers.cloudflare.com/dns/llms.txt
> Use this file to discover all available pages before exploring further.
# Domain Connect
Last updated Apr 16, 2026|Copy as Markdown|[View as Markdown](https://developers.cloudflare.com/dns/reference/domain-connect/index.md)|[Agent setup](https://developers.cloudflare.com/agent-setup/)
If you are a service provider, consider this page for information on how Cloudflare supports [Domain Connect ↗](https://www.domainconnect.org/) and how you can onboard your template.
## What is Domain Connect
Domain Connect is an open standard that allows service providers - such as email or web hosting platforms - to make it easier for their end users to configure functionality, without having to manually edit DNS records.
This is achieved with templates that close the gap between necessary configurations (required by the service provider) and necessary DNS records changes (that must happen at the authoritative DNS provider).
In practice, this means that when a user that owns `example.com` and has Cloudflare as their authoritative DNS wants to use your service, instead of having to manually update their DNS records, they will only have to authenticate themselves and the necessary changes will be applied automatically.
## Setup
### Before you begin
* Note that Cloudflare only supports the [Domain Connect synchronous flow ↗](https://www.domainconnect.org/getting-started/).
* Domain Connect templates and tools are published on GitHub, so you must have a GitHub account and be familiar with [GitHub forks and pull requests ↗](https://docs.github.com/en/pull-requests/collaborating-with-pull-requests/working-with-forks).
### 1\. Add templates to the repository
Domain Connect templates are published and maintained on a GitHub repository.
1. Create a fork of the [templates repository ↗](https://github.com/Domain-Connect/Templates).
2. Add your template. You can create a copy of one of the existing templates and edit it according to your needs.
* Refer to the [Domain Connect Specification ↗](https://github.com/Domain-Connect/spec/blob/master/Domain%20Connect%20Spec%20Draft.adoc) for details on the different available fields.
Note
Not all fields (properties) are supported by Cloudflare, and some will be mandatory for onboarding your template. Refer to the [properties support](#properties-support) section below for details.
* If present, you must set the `syncBlock` field on your template to `false`. This means the template flow will be synchronous, which is the only option supported by Cloudflare.
* You must also provide a synchronous public key domain (`syncPubKeyDomain` [1](#user-content-fn-1)). When your template is in use, synchronous calls will be digitally signed.
3. Make sure you follow the naming format defined by Domain Connect: `..json`.
Tip
You can use Domain Connect's [linter tool ↗](https://github.com/Domain-Connect/dc-template-linter) with the option `-cloudflare` enabled to check your template against Cloudflare specific rules.
1. Submit a pull request to have your templates added to the repository.
Once your pull request has been reviewed and merged, contact Cloudflare as specified below.
### 2\. Contact Cloudflare to onboard your template
When your template is onboarded, a graphical user interface flow will be available to your end users.
Send an email to `domain-connect@cloudflare.com`, including the following information:
1. List of templates you want to onboard, with their corresponding GitHub hyperlinks.
2. Fully qualified domain names to query for the `syncPubKeyDomain`[1](#user-content-fn-1) TXT records.
3. A logo to be displayed as part of the Domain Connect flow. Preferably in `SVG` format.
4. The default [proxy status](https://developers.cloudflare.com/dns/proxy-status/) you would like Cloudflare to set for `A`, `AAAA`, and `CNAME` records that are part of your templates. Proxying other record types is not supported.
Note
Proxy status is applied per template. If needed, organize the records in different templates to specify a different default proxy status per template. Once the records have been created, the domain owner can always change the proxy status for `A`, `AAAA`, and `CNAME` records later.
5. (Optional) A Cloudflare [account ID](https://developers.cloudflare.com/fundamentals/account/find-account-and-zone-ids/) for you to test the flow.
If you have a [DNS provider discovery ↗](https://github.com/Domain-Connect/spec/blob/master/Domain%20Connect%20Spec%20Draft.adoc#dns-provider-discovery) automation in place and will not list new DNS providers manually, Cloudflare can initially restrict your template to be exposed to the specified account only. Once you confirm everything is working as expected, Cloudflare will publish your template on the discovery endpoint, to be picked up by your automation.
## Properties support
In the [Domain Connect Specification ↗](https://github.com/Domain-Connect/spec/blob/master/Domain%20Connect%20Spec%20Draft.adoc) you will find the following properties:
* Properties that you can use with your [apply template URL ↗](https://github.com/Domain-Connect/spec/blob/master/Domain%20Connect%20Spec%20Draft.adoc#apply-template).
* Properties for [defining the template itself ↗](https://github.com/Domain-Connect/spec/blob/master/Domain%20Connect%20Spec%20Draft.adoc#template-definition).
* Properties for defining the individual [DNS records ↗](https://github.com/Domain-Connect/spec/blob/master/Domain%20Connect%20Spec%20Draft.adoc#template-record).
While most of these are supported by Cloudflare, some are required and others are not supported.
Linter tool
Use Domain Connect's [linter tool ↗](https://github.com/Domain-Connect/dc-template-linter) with the option `-cloudflare` enabled to check your template against Cloudflare specific rules.
### Apply template URL
For the full list, refer to the [Domain Connect Specification ↗](https://github.com/Domain-Connect/spec/blob/master/Domain%20Connect%20Spec%20Draft.adoc). Below are the details specific to Cloudflare.
* **Redirect URI**: Domain Connect's documentation states that it must be scoped to the `syncRedirectDomain` from the template, or the request must be signed. Cloudflare requires the request to be signed and, as such, does not check if the `redirect_uri` is scoped to the `syncRedirectDomain`.
* **State**: Is not supported and will be ignored.
* **Service Name**: Is not supported and will be ignored.
* **Signature**: Required. It also must be the last query parameter.
* **Key**: Required. You must publish your public key and place it in a DNS TXT record on a domain specified in the template as `syncPubKeyDomain`. To allow for key rotation, the hostname of the TXT record must be appended as another variable on the query string of the form.
### Template definition
For the full list, refer to the [Domain Connect Specification ↗](https://github.com/Domain-Connect/spec/blob/master/Domain%20Connect%20Spec%20Draft.adoc). Below are the details specific to Cloudflare.
* **Service Provider Name**: Will be displayed on the user interface.
* **Service Name**: Will **not** be displayed on the user interface.
* **Logo**: If present, will be displayed on the user interface.
* **Synchronous Block**: Is not supported and will be ignored. Cloudflare only supports the synchronous flow.
* **Shared**: Is not supported and will be ignored.
* **Shared Service Name**: Is not supported and will be ignored.
* **Synchronous Public Key Domain**: Required. Cloudflare only supports the synchronous flow and always checks for signature.
* **Synchronous Redirect Domains**: Is not supported and will be ignored. Cloudflare looks at the `redirect_uri` provided in the signed apply template URL.
* **Multiple Instance**: Is not supported and will be ignored.
* **Warn Phishing**: Is not supported and will be ignored.
* **Host Required**: Is not supported and will be ignored.
### DNS records
For the full list, refer to the [Domain Connect Specification ↗](https://github.com/Domain-Connect/spec/blob/master/Domain%20Connect%20Spec%20Draft.adoc). Below are the details specific to Cloudflare.
* **Essential**: Is not supported and will be ignored.
* **TXT Conflict Matching Mode**: Is not supported and will be ignored.
* **TXT Conflict Matching Prefix**: Is not supported and will be ignored.
#### Custom record types
The following record types are described in the [extensions/exclusions ↗](https://github.com/Domain-Connect/spec/blob/master/Domain%20Connect%20Spec%20Draft.adoc#extensionsexclusions) section of the Domain Connect Specification. Below are the details specific to Cloudflare.
* **APEXCNAME**: This custom record type is not supported and will cause the onboarding to fail. You can use a standard CNAME record instead, as Cloudflare automatically applies [CNAME flattening](https://developers.cloudflare.com/dns/cname-flattening/) at the zone apex.
* **REDIR301** and **REDIR302**: When applied, these records are converted to zone-specific [bulk redirect](https://developers.cloudflare.com/rules/url-forwarding/bulk-redirects/) rules. If a zone has existing bulk redirects before applying the template, they will be replaced.
## Template updates
Since September, 2024, template updates are picked up by an automation.
The automation compares the template version number in Cloudflare with the authoritative source of the template on the Internet. This check runs multiple times a day. Although Cloudflare cannot guarantee when exactly each update will be picked up, the process is expected to take no longer than eight hours.
Note
The authoritative source must be in raw `json` format for the automation to work correctly, as in [this example ↗](https://raw.githubusercontent.com/Domain-Connect/Templates/master/exampleservice.domainconnect.org.template1.json).
If the source template is unavailable, or technically invalid, Cloudflare will keep the previous template in use until the updated version is fixed.
You can contact Cloudflare to opt out of the automatic updates. Once the automation is disabled, you can request template updates individually, by writing to `domain-connect@cloudflare.com`.
### Troubleshooting
Send an email to `domain-connect@cloudflare.com` with the following information:
1. Detailed description of what is wrong, including:
* Date and time when the issue occurred.
* The `providerId` and `serviceId` of the template.
* Description of what the request did.
* Description of what you expected to happen.
2. A [HAR file](https://developers.cloudflare.com/support/troubleshooting/general-troubleshooting/gathering-information-for-troubleshooting-sites/#generate-a-har-file) attachment containing the problematic update.
### Validation errors
The most common issues after template onboarding are validation errors, typically caused by `syncPubKeyDomain` TXT records.
You can fix these by republishing the signature, using tools such as the one provided by [Domain Connect ↗](https://exampleservice.domainconnect.org/sig). Additionally, you can test signature validation with this [public key debug tool ↗](https://github.com/kerolasa/dc-debug-pubkey).
## Footnotes
1. A domain that can be queried for `TXT` records containing a public key to verify your digital signature. Refer to [digitally signed requests ↗](https://github.com/Domain-Connect/spec/blob/master/Domain%20Connect%20Spec%20Draft.adoc#digitally-sign-requests) for details. [↩](#user-content-fnref-1) [↩2](#user-content-fnref-1-2)
Was this helpful?
YesNo
## On this page
[Docs](https://developers.cloudflare.com/)
```json
{"@context":"https://schema.org","@type":"TechArticle","@id":"https://developers.cloudflare.com/dns/reference/domain-connect/#page","headline":"Domain Connect · Cloudflare DNS docs","description":"Learn how to onboard your templates to use Domain Connect with Cloudflare as DNS provider.","url":"https://developers.cloudflare.com/dns/reference/domain-connect/","inLanguage":"en","image":"https://developers.cloudflare.com/og-docs.png","dateModified":"2026-04-16","publisher":{"@type":"Organization","name":"Cloudflare","url":"https://www.cloudflare.com/"},"isPartOf":{"@type":"WebSite","@id":"https://developers.cloudflare.com/#website","name":"Cloudflare Docs","url":"https://developers.cloudflare.com/"}}
```
---
---
description: List of recommended third-party tools for DNS testing and troubleshooting.
title: Recommended third-party tools
image: https://developers.cloudflare.com/og-docs.png
---
[Skip to content](#main-content)
> Documentation Index
> Fetch the complete documentation index at: https://developers.cloudflare.com/dns/llms.txt
> Use this file to discover all available pages before exploring further.
# Recommended third-party tools
Last updated Apr 16, 2026|Copy as Markdown|[View as Markdown](https://developers.cloudflare.com/dns/reference/recommended-third-party-tools/index.md)|[Agent setup](https://developers.cloudflare.com/agent-setup/)
You can use the third-party tools listed below to test and troubleshoot DNS settings.
* [DNSViz ↗](https://dnsviz.net): A web-based tool for visualizing the status of a DNS zone to understand and troubleshoot the deployment of DNS Security Extensions (DNSSEC).
* [Dig Web Interface ↗](https://digwebinterface.com): An online DNS lookup tool based on the command line interface `dig`. Users can skip the process of entering commands with complicated parameters in the terminal by entering the same information in this web tool and getting the same results.
* [dns.google ↗](https://dns.google): A web-based tool, similar to Dig Web Interface, where users can get DNS responses for specific queries.
* [Mess with DNS ↗](https://messwithdns.net): An educational resource that encourages users to experiment with DNS records by providing users with a domain where they are free to play around and break things during the learning process.
Was this helpful?
YesNo
## On this page
[Docs](https://developers.cloudflare.com/)
```json
{"@context":"https://schema.org","@type":"TechArticle","@id":"https://developers.cloudflare.com/dns/reference/recommended-third-party-tools/#page","headline":"Recommended third-party tools · Cloudflare DNS docs","description":"List of recommended third-party tools for DNS testing and troubleshooting.","url":"https://developers.cloudflare.com/dns/reference/recommended-third-party-tools/","inLanguage":"en","image":"https://developers.cloudflare.com/og-docs.png","dateModified":"2026-04-16","publisher":{"@type":"Organization","name":"Cloudflare","url":"https://www.cloudflare.com/"},"isPartOf":{"@type":"WebSite","@id":"https://developers.cloudflare.com/#website","name":"Cloudflare Docs","url":"https://developers.cloudflare.com/"}}
```
---
---
description: Deploy Google measurement tags from your domain for improved ad signal recovery.
title: Google tag gateway for advertisers
image: https://developers.cloudflare.com/og-docs.png
---
[Skip to content](#main-content)
> Documentation Index
> Fetch the complete documentation index at: https://developers.cloudflare.com/google-tag-gateway/llms.txt
> Use this file to discover all available pages before exploring further.
# Google tag gateway for advertisers
Last updated Apr 17, 2026|Copy as Markdown|[View as Markdown](https://developers.cloudflare.com/google-tag-gateway/index.md)|[Agent setup](https://developers.cloudflare.com/agent-setup/)
Google tag gateway for advertisers allows website owners using Cloudflare as a CDN to get the most out of ad measurement tools with just a few clicks. It allows you to deploy Google scripts using your own domain, enhancing data privacy and improving signal measurement recovery. Unlike standard setups where tags are requested from a Google domain, Google tag gateway for advertisers loads the tag from your domain and sends measurement events to your domain, where they are forwarded to Google.
Learn more about why we built it and how it works in our [blog post ↗](https://blog.cloudflare.com/google-tag-gateway-for-advertisers/).
## Pricing
Google tag gateway for advertisers is free to use. Requests routed through the gateway do not count toward usage or billing for other Cloudflare products such as [CDN](https://developers.cloudflare.com/cache/), [WAF](https://developers.cloudflare.com/waf/), or [Bot Management](https://developers.cloudflare.com/bots/).
## Get started
Site owners can enable this feature in one of two ways: through the Google tag console, or through the [Cloudflare dashboard ↗](https://dash.cloudflare.com/?to=/:account/tag-management/google-tag-gateway).
### Configure in Google Tag Manager
The fastest way to set up Google tag gateway for advertisers is in Google Tag Manager. [Follow the steps in Google's Help Center ↗](https://support.google.com/analytics/answer/16061641).
### Configure in the Cloudflare dashboard
Note
Your Cloudflare dashboard user must have one of the following [Account Roles](https://developers.cloudflare.com/fundamentals/manage-members/roles/#account-scoped-roles): Super Administrator, Administrator or Zaraz Admin. If you are using Domain Scoped Roles, your [Domain Role](https://developers.cloudflare.com/fundamentals/manage-members/roles/#domain-scoped-roles) must be Domain Administrator.
1. In the Cloudflare dashboard, go to the **Google Tag Gateway** page.
[Go to **Google Tag Gateway** ↗](https://dash.cloudflare.com/?to=/:account/tag-management/google-tag-gateway)
2. Select your domain.
3. Enable the toggle for **Turn on and configure Google tag gateway**.

1. Add your Google tag ID and the path on your website reserved for the Google tag. The [Google tag ID ↗](https://support.google.com/analytics/answer/9539598?hl=en) can be found in the Google Tag Experience dashboard. The measurement path is an unused path on your site that will load Google Tag Manager and all subsequent measurement requests.
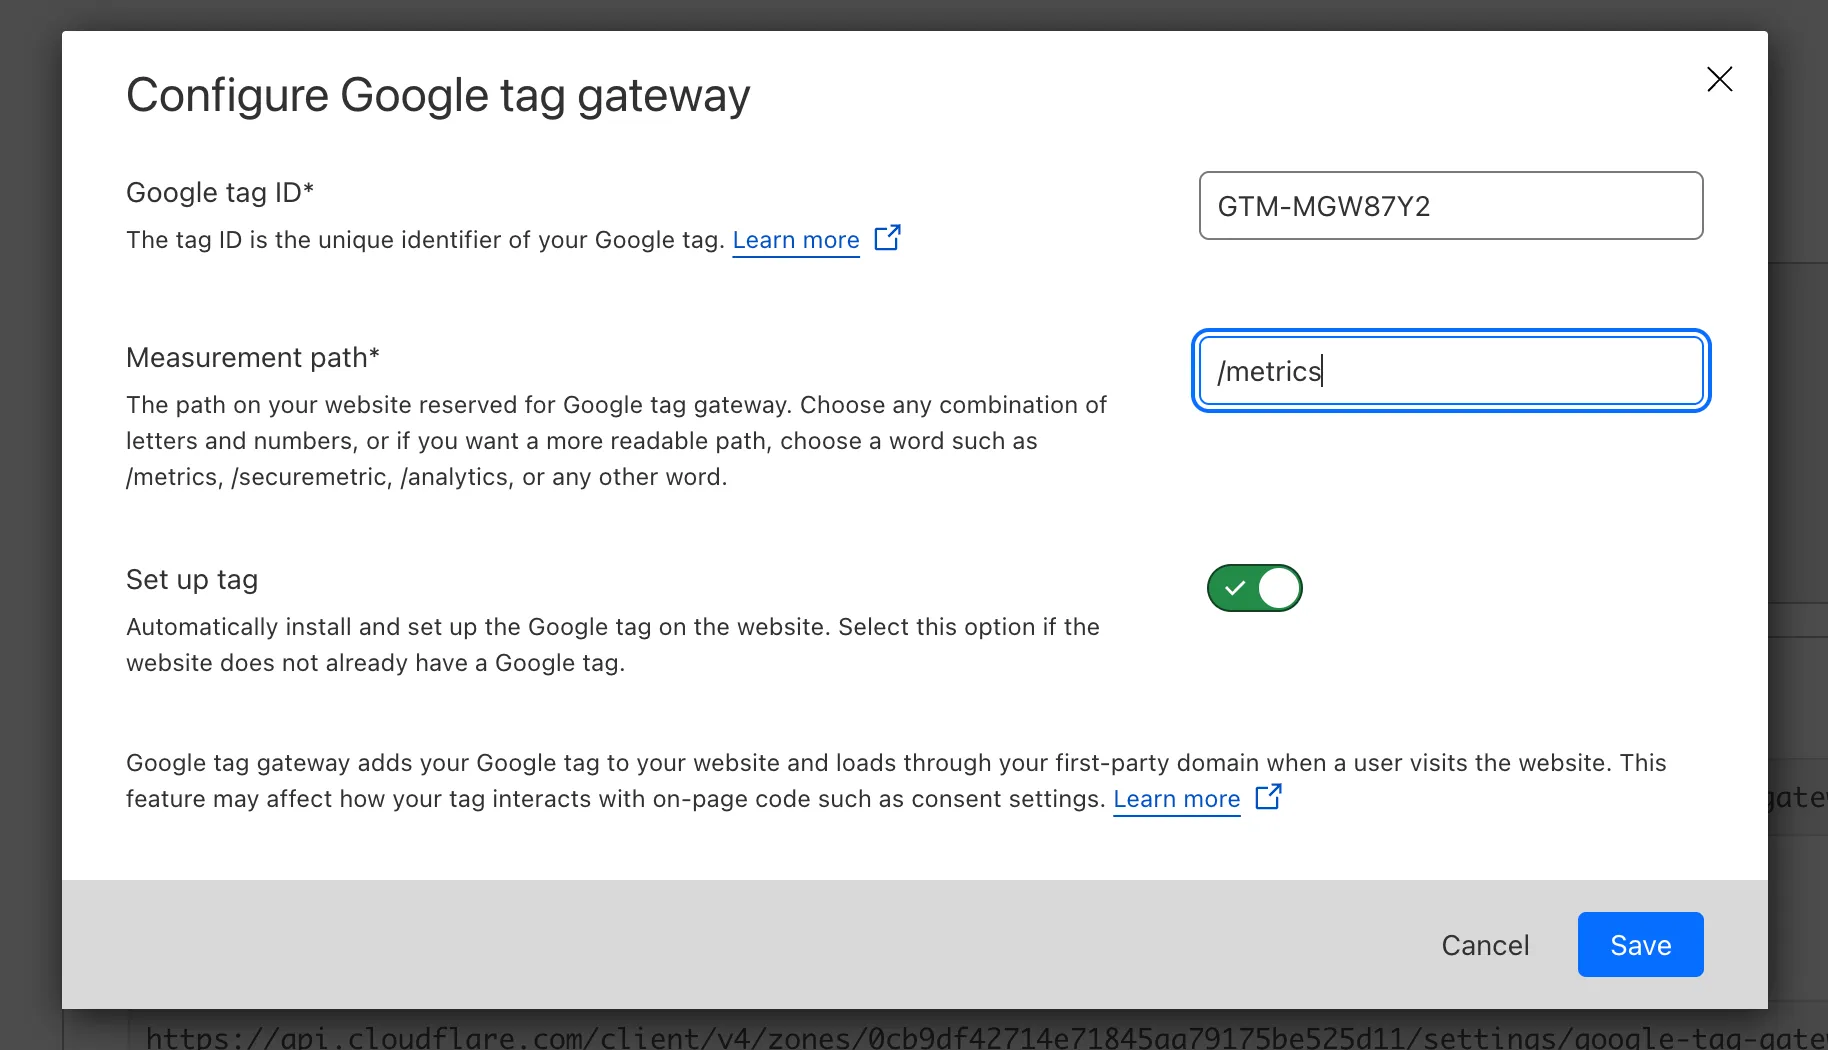
1. Once you click **Save**, Google tag gateway for advertisers will be enabled on your zone. If you already have a GTM script on your website, this First Party Tag will override the existing script.
Now that you have authenticated into your Cloudflare account and configured GTM in first-party mode, your Google Tags will be loaded using `https://your-domain/measurement-path/...`and subsequent measurement requests will be served by Cloudflare.
## Zone-level configuration
Google tag gateway for advertisers is configured at the zone level. When you enable it for a zone (for example, `example.com`), it applies to all hostnames and subdomains within that zone, including custom hostnames. Currently, it is not possible to enable or disable the feature for individual subdomains independently. [Configuration Rules](https://developers.cloudflare.com/rules/configuration-rules/) cannot be used to control or disable the tag injection on specific subdomains.
### Handle subdomain-specific logic with triggers
If you need different tag behavior for specific subdomains (for example, only firing certain tags on `shop.example.com`), you can use [Google Tag Manager triggers ↗](https://support.google.com/tagmanager/answer/7679316) to control when tags fire. For example, you can create a trigger condition like **Page Hostname** equals `shop.example.com` to restrict a tag to a specific subdomain.
This approach lets you maintain a single zone-wide Google tag gateway configuration while still customizing tag behavior per subdomain.
## Related resources
* [Google Developer Docs: Set up Google tag gateway for advertisers ↗](https://developers.google.com/tag-platform/tag-manager/gateway/setup-guide?setup=auto)
* [Google Help Center: Set up Google tag gateway for advertisers in the Google tag with Cloudflare ↗](https://support.google.com/tagmanager/answer/16061406)
* [Google Help Center: Set up Google tag gateway for advertisers in Google Tag Manager with Cloudflare ↗](https://support.google.com/analytics/answer/16061641)
Was this helpful?
YesNo
## On this page
[Docs](https://developers.cloudflare.com/)
```json
{"@context":"https://schema.org","@type":"TechArticle","@id":"https://developers.cloudflare.com/google-tag-gateway/#page","headline":"Google tag gateway for advertisers · Google tag gateway for advertisers docs","description":"Deploy Google measurement tags from your domain for improved ad signal recovery.","url":"https://developers.cloudflare.com/google-tag-gateway/","inLanguage":"en","image":"https://developers.cloudflare.com/og-docs.png","dateModified":"2026-04-17","publisher":{"@type":"Organization","name":"Cloudflare","url":"https://www.cloudflare.com/"},"isPartOf":{"@type":"WebSite","@id":"https://developers.cloudflare.com/#website","name":"Cloudflare Docs","url":"https://developers.cloudflare.com/"},"keywords":["Google"]}
```
---
---
description: Monitor origin server availability and get notified of status changes.
title: Health Checks
image: https://developers.cloudflare.com/og-docs.png
---
[Skip to content](#main-content)
> Documentation Index
> Fetch the complete documentation index at: https://developers.cloudflare.com/health-checks/llms.txt
> Use this file to discover all available pages before exploring further.
# Health Checks
Last updated Jul 23, 2026|Copy as Markdown|[View as Markdown](https://developers.cloudflare.com/health-checks/index.md)|[Agent setup](https://developers.cloudflare.com/agent-setup/)
---
Smart Shield
This functionality is now offered as part of Cloudflare's origin server safeguard, Smart Shield. [Learn more](https://developers.cloudflare.com/smart-shield/).
Standalone Health Checks monitors an IP address or hostname for origin servers or applications and notifies you in near real-time if there happens to be a problem.
A health check is a service that runs on Cloudflare's edge network to monitor whether an origin server is online. This allows you to view the health of your origin servers even if there is only one origin or you do not yet need to balance traffic across your infrastructure.
Health Checks support various configurations to hone in on what you can check, including response codes, protocol types, and intervals. You can specify a particular path if an origin server serves multiple applications or check a larger subset of response codes for your staging environment. All of these options allow you to properly target your Health Check, providing a precise picture of what is wrong with an origin server.
Note
Standalone Health Checks are different from health monitors associated with load balancers. For more details about health monitors, refer to the [Load Balancing documentation](https://developers.cloudflare.com/load-balancing/monitors/).
---
## Features
[Health Checks Analytics](https://developers.cloudflare.com/health-checks/health-checks-analytics/)
You can use Health Checks Analytics to evaluate origin uptime, latency, failure reason, and specific event logs to debug possible origin issues.
Use Health Checks Analytics
---
## Related products
[Load Balancing](https://developers.cloudflare.com/load-balancing/)
Cloudflare Load Balancing distributes traffic across your [endpoints](https://developers.cloudflare.com/load-balancing/understand-basics/load-balancing-components/), which reduces endpoint strain and latency and improves the experience for end users.
---
## Availability
| | Free | Pro | Business | Enterprise |
| ---------------- | ---- | --- | -------- | ---------- |
| Availability | No | Yes | Yes | Yes |
| Number of checks | 0 | 10 | 50 | 1,000 |
| Analytics | No | Yes | Yes | Yes |
---
Was this helpful?
YesNo
## On this page
[Docs](https://developers.cloudflare.com/)
```json
{"@context":"https://schema.org","@type":"WebPage","@id":"https://developers.cloudflare.com/health-checks/#page","headline":"Health Checks · Cloudflare Health Checks docs","description":"Monitor origin server availability and get notified of status changes.","url":"https://developers.cloudflare.com/health-checks/","inLanguage":"en","image":"https://developers.cloudflare.com/og-docs.png","dateModified":"2026-07-23","publisher":{"@type":"Organization","name":"Cloudflare","url":"https://www.cloudflare.com/"},"isPartOf":{"@type":"WebSite","@id":"https://developers.cloudflare.com/#website","name":"Cloudflare Docs","url":"https://developers.cloudflare.com/"}}
```
---
---
description: Create and configure Health Checks to monitor your origin servers.
title: Get started
image: https://developers.cloudflare.com/og-docs.png
---
[Skip to content](#main-content)
> Documentation Index
> Fetch the complete documentation index at: https://developers.cloudflare.com/health-checks/llms.txt
> Use this file to discover all available pages before exploring further.
# Get started
Last updated Apr 16, 2026|Copy as Markdown|[View as Markdown](https://developers.cloudflare.com/health-checks/get-started/index.md)|[Agent setup](https://developers.cloudflare.com/agent-setup/)
Smart Shield
This functionality is now offered as part of Cloudflare's origin server safeguard, Smart Shield. [Learn more](https://developers.cloudflare.com/smart-shield/).
This guide will get you started with creating and managing configured Health Checks.
## Create a Health Check
1. In the Cloudflare dashboard, go to the **Health Checks** page.
[Go to **Health Checks** ↗](https://dash.cloudflare.com/?to=/:account/:zone/traffic/health-checks)
2. Select **Create** and fill out the form, paying special attention to:
* The values for **Interval** and **Check regions**, because decreasing the **Interval** and increasing **Check regions** may increase the load on your origin server.
* **Retries**, which specify the number of retries to attempt in case of a timeout before marking the origin as unhealthy.
* **Response body**, which specifies a substring that must be present in the first 10 KB of the response body for the check to succeed.
3. Select **Save and Deploy**.
## Manage Health Checks
1. Log in to the [Cloudflare dashboard ↗](https://dash.cloudflare.com) and select your account and domain.
2. Go to **Traffic** \> **Health Checks**.
3. Navigate to your health check and select **Edit**.
4. Edit your Health Check.
5. Select **Save**.
Note
You can also enable, disable, or delete configured Health Checks.
Note
Authenticated origin pull is not supported by Standalone Health Checks.
Was this helpful?
YesNo
## On this page
[Docs](https://developers.cloudflare.com/)
```json
{"@context":"https://schema.org","@type":"TechArticle","@id":"https://developers.cloudflare.com/health-checks/get-started/#page","headline":"Get started · Cloudflare Health Checks docs","description":"Create and configure Health Checks to monitor your origin servers.","url":"https://developers.cloudflare.com/health-checks/get-started/","inLanguage":"en","image":"https://developers.cloudflare.com/og-docs.png","dateModified":"2026-04-16","publisher":{"@type":"Organization","name":"Cloudflare","url":"https://www.cloudflare.com/"},"isPartOf":{"@type":"WebSite","@id":"https://developers.cloudflare.com/#website","name":"Cloudflare Docs","url":"https://developers.cloudflare.com/"}}
```
---
---
description: View Health Checks status history and response time analytics.
title: Health Checks Analytics
image: https://developers.cloudflare.com/og-docs.png
---
[Skip to content](#main-content)
> Documentation Index
> Fetch the complete documentation index at: https://developers.cloudflare.com/health-checks/llms.txt
> Use this file to discover all available pages before exploring further.
# Health Checks Analytics
Last updated Apr 17, 2026|Copy as Markdown|[View as Markdown](https://developers.cloudflare.com/health-checks/health-checks-analytics/index.md)|[Agent setup](https://developers.cloudflare.com/agent-setup/)
Smart Shield
This functionality is now offered as part of Cloudflare's origin server safeguard, Smart Shield. [Learn more](https://developers.cloudflare.com/smart-shield/).
Once you have set up a standalone Health Check including notification emails, use Health Check Analytics to debug possible origin issues.
To access health check analytics:
1. In the Cloudflare dashboard, go to the **Health Check Analytics** page.
[Go to **Health Check Analytics** ↗](https://dash.cloudflare.com/?to=/:account/:zone/traffic/health-check-analytics)
You can evaluate origin uptime, latency, failure reason, and specific event logs:
* **Health Checks By Uptime**: Shows the percentage of uptime for individual origins over time.
* **Health Checks By Failure Reason**: Shows a breakdown of failures by the specific reason. Refer to [common error code causes and solutions below](#common-error-codes).
* **Health Checks By Latency**: Shows average latency – measured in round trip time — for individual origins over time.
* **Event Log**: Shows individual health check data.
* Select each record for additional details on **Round trip time**, the **Failure Reason**, the **Average Waterfall** (showing chronological data about request stages), **Response status code**, and more.
* Note that **Global** is not a configured region; it represents the aggregated data from all enabled regions.
## Common error codes
### TCP connection failed
#### Cause
Health Checks failed to establish a TCP connection to your origin server.
#### Solution
This typically occurs when there is a network failure between Cloudflare and your origin, and/or a firewall refuses to allow our connection. Ensure your network and firewall configurations are not interfering with traffic.
### HTTP timeout occurred
#### Cause
The origin failed to return an HTTP response within the timeout configured. This happens if you have the timeout set to a low number. For example, one to two seconds.
#### Solution
Cloudflare recommends increasing the HTTP response timeout to allow the origin server to respond.
### Response code mismatch error
#### Cause
Cloudflare receives an HTTP status code that does not match the values defined in the `expected_codes` property of your Health Check configuration.
#### Solution
Response codes must match the `expected_codes`. Confirm the values are correct by comparing the expected response codes and the status code received in the Event Log.
#### Alternate cause
You may also see this issue if you have a Health Check configured to use HTTP connections and your origin server is redirecting to HTTPS. In this case, the response code will often be `301`, `302`, or `303`.
#### Solution
Change your Cloudflare Health Check configuration to use HTTPS or set the value of `follow_redirect` to `true` so that Cloudflare can resolve the correct status code.
### Response body mismatch error
#### Cause
The response body returns from your origin server and does not include the (case-insensitive) value of `expected_body` configured in your Health Check.
Note
We only read the first 10 KB of the response. If you return a larger response, and the `expected_body` is not in the first 10 KB, the Health Check will fail.
#### Solution
Ensure the `expected_body` is in the first 10 KB of the response body.
### TLS untrusted certificate error
#### Cause
The certificate is not trusted by a public Certificate Authority (CA).
#### Solution
If you’re using a self-signed certificate, Cloudflare recommends either using a publicly trusted certificate or setting the `allow_insecure` property on your Health Check to `true`.
### TLS name mismatch error
#### Cause
Our Health Check (client) was not able to match a name on the server certificate to the hostname of the request.
#### Solution
Inspect your Health Check configuration to confirm that the `header` value set in the Cloudflare Health Check is correct.
### TLS protocol error
#### Cause
This error can occur if you are using an older version of TLS or your origin server is not configured for HTTPS.
#### Solution
Ensure that your origin server supports TLS 1.2 or greater and is configured for HTTPS.
### TLS unrecognized name error
#### Cause
The server did not recognize the name provided by the client. When a host header is set, this is set as the ServerName in the initial TLS handshake. If it is not set, Cloudflare will not provide a ServerName, which can cause this error.
#### Solution
Set the host header in your Health Check object.
### No route to host error
#### Cause
The IP address cannot be reached from Cloudflare’s network. Common causes are ISP or hosting provider network issues (e.g. BGP level), or that the IP does not exist.
#### Solution
Ensure IP is accurate, and check if there is an ISP or hosting provider network issue.
### TCP Timeout
#### Cause
Data transmission was not acknowledged and the retransmit of data did not succeed.
#### Solution
Confirm whether the SYN-ACK for the handshake takes place at your origin and contact [Cloudflare support](https://developers.cloudflare.com/support/contacting-cloudflare-support/).
### Network Unreachable
#### Cause
Cloudflare cannot connect to the origin web server due to network unavailability. This is usually caused by a network issue or incorrect origin IP.
#### Solution
Check the IP entered for the origin in Cloudflare’s Health Checks configuration or the IP returned via DNS for the origin hostname.
### HTTP Invalid Response
#### Cause
Usually caused by an HTTP 502 error or bad gateway.
#### Solution
Ensure the origin web server responds to requests and that no applications have crashed or are under high load.
### DNS Unknown Host
#### Cause
The origin web server hostname does not exist.
#### Solution
Confirm the origin web server resolves to an IP address.
### Connection Reset by Peer
#### Cause
A network error occurred while the client received data from the origin web server.
#### Solution
Confirm whether the origin web server is experiencing a high amount of traffic or an error.
### Monitor Configuration Error
#### Cause
There was a configuration error in the Health Check and no checks were run against the origin.
#### Solution
Review your Health Check configuration to ensure it matches an expected request to your origin.
### DNS Internal
#### Cause
The origin web server's hostname resolves to a non-publicly-routable or restricted IP address (for example, a localhost address). No checks are run against this origin.
#### Solution
Confirm the origin web server hostname resolves to a publicly routable IP address. Note that if the hostname resolves to a public Cloudflare anycast IP (because the hostname is proxied through Cloudflare), the health check will run but will probe Cloudflare's edge rather than your actual origin server. To monitor your origin server directly, configure the health check to use the origin IP address or a non-proxied hostname.
### Other Failure
#### Cause
If the failure cannot be classified as any other type of failure mentioned above.
#### Solution
Contact [Cloudflare support](https://developers.cloudflare.com/support/contacting-cloudflare-support/).
## Set up alerts
You can configure alerts to notify you of any changes in your health check status.
Health Checks status notification
**Who is it for?**
Customers who want to be warned about changes to server health as determined by [health checks](https://developers.cloudflare.com/health-checks/).
**Other options / filters**
Available filters include:
* You can search for and add health checks from your list of health checks.
* You can choose a trigger to fire the notification when your server becomes **unhealthy**, **healthy**, or **either healthy or unhealthy**.
**Included with**
Professional plans or higher.
**What should you do if you receive one?**
Review your [health check analytics](https://developers.cloudflare.com/health-checks/health-checks-analytics/#common-error-codes).
Refer to [Cloudflare Notifications](https://developers.cloudflare.com/notifications/get-started/) for more information on how to set up an alert.
Was this helpful?
YesNo
## On this page
[Docs](https://developers.cloudflare.com/)
```json
{"@context":"https://schema.org","@type":"TechArticle","@id":"https://developers.cloudflare.com/health-checks/health-checks-analytics/#page","headline":"Health Checks Analytics · Cloudflare Health Checks docs","description":"View Health Checks status history and response time analytics.","url":"https://developers.cloudflare.com/health-checks/health-checks-analytics/","inLanguage":"en","image":"https://developers.cloudflare.com/og-docs.png","dateModified":"2026-04-17","publisher":{"@type":"Organization","name":"Cloudflare","url":"https://www.cloudflare.com/"},"isPartOf":{"@type":"WebSite","@id":"https://developers.cloudflare.com/#website","name":"Cloudflare Docs","url":"https://developers.cloudflare.com/"},"keywords":["Analytics"]}
```
---
---
description: Cloudflare data center regions used for Health Checks monitoring.
title: Health Checks regions
image: https://developers.cloudflare.com/og-docs.png
---
[Skip to content](#main-content)
> Documentation Index
> Fetch the complete documentation index at: https://developers.cloudflare.com/health-checks/llms.txt
> Use this file to discover all available pages before exploring further.
# Health Checks regions
Last updated Apr 16, 2026|Copy as Markdown|[View as Markdown](https://developers.cloudflare.com/health-checks/concepts/health-checks-regions/index.md)|[Agent setup](https://developers.cloudflare.com/agent-setup/)
Cloudflare has data centers in [hundreds of cities worldwide ↗](https://www.cloudflare.com/network/). Health checks do not run from every single of these data centers as this would result in numerous requests to your servers. Instead, you are able to choose between one and thirteen regions from which to run health checks. Cloudflare will run Health Checks from three data centers in each region that you select.
Note
The exact location of these data centers are subject to change at any moment.
The Internet is not the same everywhere around the world and your users may not have the same experience on your application according to where they are. Running Health Checks from different regions lets you know the health of your application from the point of view of the Cloudflare network in each of these regions.
Analytics are presented at two levels:
* Regional Aggregates: Combined results from the three data centers within a specific region.
* Global Aggregates: Total results across all configured regions and data centers.
In the event log, entries are labeled by region or as **Global**. We do not provide granular data for individual data centers.
If you select multiple regions or choose **All Regions** (Business and Enterprise Only), you may increase traffic to your servers. Each region sends individual health checks from three data centers.
Was this helpful?
YesNo
## On this page
[Docs](https://developers.cloudflare.com/)
```json
{"@context":"https://schema.org","@type":"TechArticle","@id":"https://developers.cloudflare.com/health-checks/concepts/health-checks-regions/#page","headline":"Health Checks regions · Cloudflare Health Checks docs","description":"Cloudflare data center regions used for Health Checks monitoring.","url":"https://developers.cloudflare.com/health-checks/concepts/health-checks-regions/","inLanguage":"en","image":"https://developers.cloudflare.com/og-docs.png","dateModified":"2026-04-16","publisher":{"@type":"Organization","name":"Cloudflare","url":"https://www.cloudflare.com/"},"isPartOf":{"@type":"WebSite","@id":"https://developers.cloudflare.com/#website","name":"Cloudflare Docs","url":"https://developers.cloudflare.com/"}}
```
---
---
description: Set up notifications for Health Checks status changes.
title: Health Checks notifications
image: https://developers.cloudflare.com/og-docs.png
---
[Skip to content](#main-content)
> Documentation Index
> Fetch the complete documentation index at: https://developers.cloudflare.com/health-checks/llms.txt
> Use this file to discover all available pages before exploring further.
# Health Checks notifications
Last updated Apr 16, 2026|Copy as Markdown|[View as Markdown](https://developers.cloudflare.com/health-checks/how-to/health-checks-notifications/index.md)|[Agent setup](https://developers.cloudflare.com/agent-setup/)
You can [configure notification emails](https://developers.cloudflare.com/health-checks/how-to/health-checks-notifications/#configure-notifications) to be alerted when the Health Check detects that there is a change in the status of your origin server. Cloudflare will send you an email within seconds so you can take the necessary action before customers are impacted.
The email provides information to determine what caused the health status change. You can evaluate when the change happened, the status of the origin server, if and why it is unhealthy, the expected response code, and the received response code.
## Configure notifications
1. In the Cloudflare dashboard, go to the **Health Checks** page.
[Go to **Health Checks** ↗](https://dash.cloudflare.com/?to=/:account/:zone/traffic/health-checks)
2. Select **Configure an alert**.
3. Fill out the **Notification name** and **Description**.
4. Add a Notification email.
5. Select **Next**.
6. Add health checks to include in your alerts.
7. Choose the **Notification trigger**, which determines when you receive alerts.
8. Select **Create**.
Note
A notification is only sent after a change of status in the majority of all selected region(s).
For a single region, this will be 2 of 3 data centers. With 13 regions selected, this will be 7 of 13 regions.
See [common error codes](https://developers.cloudflare.com/health-checks/health-checks-analytics/#common-error-codes) for more information regarding the cause of any changes to your Health Check.
Cloudflare encourages you to view your [Health Checks Analytics](https://developers.cloudflare.com/health-checks/health-checks-analytics/#common-error-codes) to get more context about the health of your servers over time.
Was this helpful?
YesNo
## On this page
[Docs](https://developers.cloudflare.com/)
```json
{"@context":"https://schema.org","@type":"TechArticle","@id":"https://developers.cloudflare.com/health-checks/how-to/health-checks-notifications/#page","headline":"Health Checks notifications · Cloudflare Health Checks docs","description":"Set up notifications for Health Checks status changes.","url":"https://developers.cloudflare.com/health-checks/how-to/health-checks-notifications/","inLanguage":"en","image":"https://developers.cloudflare.com/og-docs.png","dateModified":"2026-04-16","publisher":{"@type":"Organization","name":"Cloudflare","url":"https://www.cloudflare.com/"},"isPartOf":{"@type":"WebSite","@id":"https://developers.cloudflare.com/#website","name":"Cloudflare Docs","url":"https://developers.cloudflare.com/"}}
```
---
---
description: Restrict Health Checks access to specific Cloudflare IP addresses.
title: Zone Lockdown
image: https://developers.cloudflare.com/og-docs.png
---
[Skip to content](#main-content)
> Documentation Index
> Fetch the complete documentation index at: https://developers.cloudflare.com/health-checks/llms.txt
> Use this file to discover all available pages before exploring further.
# Zone Lockdown
Last updated Apr 16, 2026|Copy as Markdown|[View as Markdown](https://developers.cloudflare.com/health-checks/how-to/zone-lockdown/index.md)|[Agent setup](https://developers.cloudflare.com/agent-setup/)
Currently, any Cloudflare customer on a paid plan can configure Health Checks against any host or IP. [Zone Lockdown](https://developers.cloudflare.com/waf/tools/zone-lockdown/) specifies a list of one or more IP addresses, CIDR ranges, or networks that are the only IPs allowed to access a domain, subdomain, or URL. It allows multiple destinations in a single rule as well as IPv4 and IPv6 addresses. IP addresses not specified in the Zone Lockdown rule are denied access to the specified resources.
Customers who use zone lockdown and want their health checks to continue passing can use [WAF custom rules](https://developers.cloudflare.com/waf/custom-rules/create-dashboard/) to bypass zone lockdown.
## Bypass zone lockdown
To bypass zone lockdown using a WAF custom rule:
1. Follow the steps to [create a custom rule in the dashboard](https://developers.cloudflare.com/waf/custom-rules/create-dashboard/).
2. Create a custom rule matching on **user agent**.
Cloudflare Health Checks have a user agent of the following format: `Mozilla/5.0 (compatible;Cloudflare-Healthchecks/1.0;+https://www.cloudflare.com/; healthcheck-id: XXX)` where `XXX` is replaced with the first 16 characters of the Health Check ID.
To allow a specific Health Check, verify if the user agent contains the first 16 characters of the Health Check ID.
3. Set the action to _Skip_ and the corresponding feature to **Zone Lockdown** under **More components to skip**.
### Via the API
This example adds a new WAF custom rule to the ruleset with ID `{ruleset_id}` that skips zone lockdown for incoming requests with a user agent containing `1234567890abcdef`:
```bash
curl "https://api.cloudflare.com/client/v4/{zone_id}/rulesets/{ruleset_id}/rules" \
--header "Authorization: Bearer " \
--header "Content-Type: application/json" \
--data '{
"action": "skip",
"action_parameters": {
"products": [
"zoneLockdown"
]
},
"expression": "http.user_agent contains \"1234567890abcdef\"",
"description": "bypass zone lockdown - specific healthcheck"
}'
```
Was this helpful?
YesNo
## On this page
[Docs](https://developers.cloudflare.com/)
```json
{"@context":"https://schema.org","@type":"TechArticle","@id":"https://developers.cloudflare.com/health-checks/how-to/zone-lockdown/#page","headline":"Zone lockdown migration guide · Cloudflare Health Checks docs","description":"Restrict Health Checks access to specific Cloudflare IP addresses.","url":"https://developers.cloudflare.com/health-checks/how-to/zone-lockdown/","inLanguage":"en","image":"https://developers.cloudflare.com/og-docs.png","dateModified":"2026-04-16","publisher":{"@type":"Organization","name":"Cloudflare","url":"https://www.cloudflare.com/"},"isPartOf":{"@type":"WebSite","@id":"https://developers.cloudflare.com/#website","name":"Cloudflare Docs","url":"https://developers.cloudflare.com/"}}
```
---
---
description: Distribute traffic across origin servers for availability and performance.
title: Cloudflare Load Balancing
image: https://developers.cloudflare.com/og-docs.png
---
[Skip to content](#main-content)
> Documentation Index
> Fetch the complete documentation index at: https://developers.cloudflare.com/load-balancing/llms.txt
> Use this file to discover all available pages before exploring further.
# Cloudflare Load Balancing
Last updated Apr 16, 2026|Copy as Markdown|[View as Markdown](https://developers.cloudflare.com/load-balancing/index.md)|[Agent setup](https://developers.cloudflare.com/agent-setup/)
Maximize application performance and availability
Paid add-on
Cloudflare Load Balancing distributes traffic across your [endpoints](https://developers.cloudflare.com/glossary/?term=endpoint), which reduces endpoint strain and latency and improves the experience for end users.
Note
Enterprise customers can preview this product as a [non-contract service](https://developers.cloudflare.com/billing/understand/preview-services/), which provides full access, free of metered usage fees, limits, and certain other restrictions.
---
## Features
[Load balancing and failover](https://developers.cloudflare.com/load-balancing/load-balancers/)
Distribute traffic evenly across your healthy endpoints, automatically failing over when an endpoint is unhealthy or unresponsive.
Use Load balancing and failover
[Active monitoring](https://developers.cloudflare.com/load-balancing/monitors/)
Monitor your endpoints at configurable intervals and across multiple data centers to look for specific status codes, response text, and timeouts.
Use Active monitoring
[Intelligent routing](https://developers.cloudflare.com/load-balancing/understand-basics/traffic-steering/)
Choose whether to distribute requests based on endpoint latency, a visitor's geographic region, or even a visitor's GPS coordinates.
Use Intelligent routing
[Custom rules](https://developers.cloudflare.com/load-balancing/additional-options/load-balancing-rules/)
Customize the behavior of your load balancer based on the characteristics of individual requests.
Use Custom rules
[Analytics](https://developers.cloudflare.com/load-balancing/reference/load-balancing-analytics/)
Review comprehensive analytics to evaluate traffic flow, assess endpoint health status, and review changes in pools and pool health over time.
Use Analytics
---
## Related products
[Standalone Health Checks](https://developers.cloudflare.com/health-checks/)
Actively monitor whether your origin server is online by sending specific requests at regular intervals.
[DNS](https://developers.cloudflare.com/dns/)
Get enterprise-grade authoritative DNS service with the fastest response time, unparalleled redundancy, and advanced security with built-in DDoS mitigation and DNSSEC.
[Waiting Room](https://developers.cloudflare.com/waiting-room/)
Route excess users to a custom-branded waiting room, helping preserve customer experience and protect origin servers from being overwhelmed with requests.
---
## More resources
### [Plans](https://www.cloudflare.com/plans/#overview)
Compare available Cloudflare plans.
### [Pricing](https://dash.cloudflare.com/?to=/:account/:zone/traffic/load-balancing/)
Explore pricing options for Load Balancing in the dashboard.
### [Reference Architecture](https://developers.cloudflare.com/reference-architecture/architectures/load-balancing/)
Learn more about the structure of Cloudflare Load Balancers and their various configurations.
### [Learning Paths](https://developers.cloudflare.com/learning-paths/)
Module-based guidance on Cloudflare product workflows.
Was this helpful?
YesNo
## On this page
[Docs](https://developers.cloudflare.com/)
```json
{"@context":"https://schema.org","@type":"WebPage","@id":"https://developers.cloudflare.com/load-balancing/#page","headline":"Cloudflare Load Balancing · Cloudflare Load Balancing docs","description":"Distribute traffic across origin servers for availability and performance.","url":"https://developers.cloudflare.com/load-balancing/","inLanguage":"en","image":"https://developers.cloudflare.com/og-docs.png","dateModified":"2026-04-16","publisher":{"@type":"Organization","name":"Cloudflare","url":"https://www.cloudflare.com/"},"isPartOf":{"@type":"WebSite","@id":"https://developers.cloudflare.com/#website","name":"Cloudflare Docs","url":"https://developers.cloudflare.com/"}}
```
---
---
description: Set up Cloudflare Load Balancing for your applications.
title: Get started
image: https://developers.cloudflare.com/og-docs.png
---
[Skip to content](#main-content)
> Documentation Index
> Fetch the complete documentation index at: https://developers.cloudflare.com/load-balancing/llms.txt
> Use this file to discover all available pages before exploring further.
# Get started
Last updated Apr 16, 2026|Copy as Markdown|[View as Markdown](https://developers.cloudflare.com/load-balancing/get-started/index.md)|[Agent setup](https://developers.cloudflare.com/agent-setup/)
Get started with load balancing in one of two ways:
* [Quickstart](https://developers.cloudflare.com/load-balancing/get-started/quickstart/): Get up and running quickly with Load Balancing.
* [Learning path](https://developers.cloudflare.com/learning-paths/load-balancing/concepts/): Check an in-depth walkthrough for how to plan and set up a load balancer.
Was this helpful?
YesNo
## On this page
[Docs](https://developers.cloudflare.com/)
```json
{"@context":"https://schema.org","@type":"WebPage","@id":"https://developers.cloudflare.com/load-balancing/get-started/#page","headline":"Get started · Cloudflare Load Balancing docs","description":"Set up Cloudflare Load Balancing for your applications.","url":"https://developers.cloudflare.com/load-balancing/get-started/","inLanguage":"en","image":"https://developers.cloudflare.com/og-docs.png","dateModified":"2026-04-16","publisher":{"@type":"Organization","name":"Cloudflare","url":"https://www.cloudflare.com/"},"isPartOf":{"@type":"WebSite","@id":"https://developers.cloudflare.com/#website","name":"Cloudflare Docs","url":"https://developers.cloudflare.com/"}}
```
---
---
description: Learn how to enable load balancing.
title: Enable
image: https://developers.cloudflare.com/og-docs.png
---
[Skip to content](#main-content)
> Documentation Index
> Fetch the complete documentation index at: https://developers.cloudflare.com/load-balancing/llms.txt
> Use this file to discover all available pages before exploring further.
# Enable
Last updated Apr 16, 2026|Copy as Markdown|[View as Markdown](https://developers.cloudflare.com/load-balancing/get-started/enable-load-balancing/index.md)|[Agent setup](https://developers.cloudflare.com/agent-setup/)
Load balancing is an add-on for your account, meaning your account needs a [billing profile](https://developers.cloudflare.com/billing/get-started/create-billing-profile/).
To enable [Load Balancing ↗](https://dash.cloudflare.com/?to=/:account/:zone/traffic/load-balancing):
1. In the Cloudflare dashboard, go to the **Load Balancing** page.
[Go to **Load Balancing** ↗](https://dash.cloudflare.com/?to=/:account/load-balancing)
2. Select **Enable Load Balancing** in the **Status** column.
3. Choose your plan options and confirm payment.
Note
Enterprise customers can preview this product as a [non-contract service](https://developers.cloudflare.com/billing/understand/preview-services/), which provides full access, free of metered usage fees, limits, and certain other restrictions.
Was this helpful?
YesNo
## On this page
[Docs](https://developers.cloudflare.com/)
```json
{"@context":"https://schema.org","@type":"TechArticle","@id":"https://developers.cloudflare.com/load-balancing/get-started/enable-load-balancing/#page","headline":"Enable Load Balancing · Cloudflare Load Balancing docs","description":"Learn how to enable load balancing.","url":"https://developers.cloudflare.com/load-balancing/get-started/enable-load-balancing/","inLanguage":"en","image":"https://developers.cloudflare.com/og-docs.png","dateModified":"2026-04-16","publisher":{"@type":"Organization","name":"Cloudflare","url":"https://www.cloudflare.com/"},"isPartOf":{"@type":"WebSite","@id":"https://developers.cloudflare.com/#website","name":"Cloudflare Docs","url":"https://developers.cloudflare.com/"}}
```
---
---
description: Distribute traffic across servers with load balancing.
title: Concepts
image: https://developers.cloudflare.com/og-docs.png
---
[Skip to content](#main-content)
> Documentation Index
> Fetch the complete documentation index at: https://developers.cloudflare.com/learning-paths/llms.txt
> Use this file to discover all available pages before exploring further.
# Concepts
Last updated Apr 23, 2026|Copy as Markdown|[View as Markdown](https://developers.cloudflare.com/learning-paths/load-balancing/concepts/index.md)|[Agent setup](https://developers.cloudflare.com/agent-setup/)
Learn the concepts behind load balancing, whether you are using Cloudflare or another provider.
## Objectives
By the end of this module, you will be able to:
* Explain what load balancing is.
* Describe the differences between load balancers, pools, and servers.
* Explain what pool health is and how it affects load balancer traffic.
* List the different ways your traffic can be routed.
Was this helpful?
YesNo
## On this page
[Docs](https://developers.cloudflare.com/)
```json
{"@context":"https://schema.org","@type":"WebPage","@id":"https://developers.cloudflare.com/learning-paths/load-balancing/concepts/#page","headline":"Concepts · Cloudflare Learning Paths","description":"Distribute traffic across servers with load balancing.","url":"https://developers.cloudflare.com/learning-paths/load-balancing/concepts/","inLanguage":"en","image":"https://developers.cloudflare.com/og-docs.png","dateModified":"2026-04-23","publisher":{"@type":"Organization","name":"Cloudflare","url":"https://www.cloudflare.com/"},"isPartOf":{"@type":"WebSite","@id":"https://developers.cloudflare.com/#website","name":"Cloudflare Docs","url":"https://developers.cloudflare.com/"}}
```
---
---
description: Create a load balancer with pools and monitors in a few steps.
title: Quickstart
image: https://developers.cloudflare.com/og-docs.png
---
[Skip to content](#main-content)
> Documentation Index
> Fetch the complete documentation index at: https://developers.cloudflare.com/load-balancing/llms.txt
> Use this file to discover all available pages before exploring further.
# Quickstart
Last updated Apr 16, 2026|Copy as Markdown|[View as Markdown](https://developers.cloudflare.com/load-balancing/get-started/quickstart/index.md)|[Agent setup](https://developers.cloudflare.com/agent-setup/)
Get up and running quickly with Load Balancing. For more in-depth explanations, refer to the [Learning path](https://developers.cloudflare.com/learning-paths/load-balancing/concepts/).
This guide assumes you are familiar with the Cloudflare [Load Balancing components](https://developers.cloudflare.com/load-balancing/understand-basics/load-balancing-components/).
---
## Before you begin
Make sure you:
* Have access to multiple endpoints (origin servers, private or public IP addresses, virtual IP addresses (VIPs), etc), either physical or cloud-based.
* Have access to Load Balancing, available as an [add-on](https://developers.cloudflare.com/load-balancing/get-started/enable-load-balancing/) for any type of account.
* Have test and production hostnames that are covered by [SSL/TLS certificates](https://developers.cloudflare.com/load-balancing/load-balancers/dns-records/#ssltls-coverage).
## Create a monitor
A monitor issues health monitor requests at regular intervals to evaluate the health of each endpoint within a [pool](https://developers.cloudflare.com/load-balancing/pools/).
When a pool [becomes unhealthy](https://developers.cloudflare.com/load-balancing/understand-basics/health-details/), your load balancer takes that pool out of the endpoint rotation.
**Set up the monitor**
You can create a monitor within the [load balancer workflow](https://developers.cloudflare.com/load-balancing/load-balancers/create-load-balancer/) or in the **Monitors** tab:
1. Go to **Load Balancing**.
2. Select the **Monitors** tab.
3. Select **Create monitor**.
4. Add the following information:
* **Type**: The protocol to use for health monitors
* _Non-enterprise customers_: Choose **HTTP**, **HTTPS**, or **TCP**.
* _Enterprise customers_: Choose **HTTP**, **HTTPS**, **TCP**, **UDP ICMP**, **ICMP Ping**, or **SMTP**.
* **Path**: The endpoint path to run health monitor requests against
* **Port**: The destination port for health monitors
5. For additional settings, select **Advanced health monitor settings**:
* **Interval**:
* By increasing the default, you can improve failover time, but you may also increase load on your endpoints.
* Minimum time in seconds is 60 (Pro), 15 (Business), and 10 (Enterprise).
* **Timeout** and **Retries**:
* The health monitor request will return unhealthy if it exceeds the duration specified in **Timeout** (and exceeds this duration more times than the specified number of **Retries**).
* **Expected Code(s)**: The expected HTTP response codes listed individually (`200`, `302`) or as a range (for example, entering `2xx` would cover all response codes in the `200` range).
* **Response Body**:
* Looks for a case-insensitive substring in the response body.
* Make sure that the value is relatively static and within the first 10 KB of the HTML page.
* **Simulate Zone**:
* It is recommended to use the same zone in which the Load Balancer exists.
* Changes the egress zone settings of a health monitor request to ensure compatibility with features like [Authenticated Origin Pulls (mTLS)](https://developers.cloudflare.com/ssl/origin-configuration/authenticated-origin-pull/), [Argo Smart Routing](https://developers.cloudflare.com/argo-smart-routing/), [Bring your own CA (mTLS)](https://developers.cloudflare.com/ssl/client-certificates/byo-ca/), [Dedicated CDN Egress IPs](https://developers.cloudflare.com/smart-shield/configuration/dedicated-egress-ips/), and [HTTP/2 to Origin](https://developers.cloudflare.com/speed/optimization/protocol/http2-to-origin/).
* **Follow Redirects**:
* Instead of reporting a `301` or `302` code as unhealthy, the health monitor request follows redirects to the final endpoint.
* **Configure Request Header(s)**:
* Useful if your endpoints are expecting specific incoming headers.
* **Header**:
* The HTTP request headers to send in the health monitor. It is recommended that you set a Host header by default. The User-Agent header cannot be overridden. This parameter is only valid for HTTP and HTTPS monitors.
6. Select **Save**.
Note
To increase confidence in pool status, you can also increase the `consecutive_up` and `consecutive_down` fields when [creating a monitor with the API](https://developers.cloudflare.com/api/resources/load%5Fbalancers/subresources/monitors/methods/create/).
To become healthy or unhealthy, monitored endpoints must pass this health monitor request the consecutive number of times specified in these parameters.
**Prepare your servers**
Make sure that your firewall or web server does not block or rate limit your configured health monitors or requests associated with [Cloudflare IP addresses ↗](https://www.cloudflare.com/ips).
Each health monitor has the HTTP user-agent of `"Mozilla/5.0 (compatible; Cloudflare-Traffic-Manager/1.0; +https://www.cloudflare.com/traffic-manager/; pool-id: $poolid)"`, where the `$poolid` is the first 16 characters of the [associated pool](https://developers.cloudflare.com/load-balancing/pools/).
Caution
If you know that your endpoint is healthy but Load Balancing is reporting it as unhealthy, refer to our [Monitor troubleshooting guide](https://developers.cloudflare.com/load-balancing/troubleshooting/load-balancing-faq/#why-is-my-endpoint-or-pool-considered-unhealthy).
**Set up the monitor**
For a full list of monitor properties, refer to [Create Monitor](https://developers.cloudflare.com/api/resources/load%5Fbalancers/subresources/monitors/methods/create/). If you need help with API authentication, refer to [Cloudflare API documentation](https://developers.cloudflare.com/fundamentals/api/).
Required API token permissions
At least one of the following [token permissions](https://developers.cloudflare.com/fundamentals/api/reference/permissions/) is required:
* `Load Balancing: Monitors and Pools Write`
```bash
curl "https://api.cloudflare.com/client/v4/accounts/$ACCOUNT_ID/load_balancers/monitors" \
--request POST \
--header "Authorization: Bearer $CLOUDFLARE_API_TOKEN" \
--json '{
"type": "https",
"description": "Login page monitor",
"method": "GET",
"path": "/health",
"header": {
"Host": [
"example.com"
],
"X-App-ID": [
"abc123"
]
},
"port": 8080,
"timeout": 3,
"retries": 0,
"interval": 90,
"expected_body": "alive",
"expected_codes": "2xx",
"follow_redirects": true,
"allow_insecure": true,
"consecutive_up": 3,
"consecutive_down": 2,
"probe_zone": "example.com"
}'
```
The response contains the complete definition of the new monitor.
```json
{
"success": true,
"errors": [],
"messages": [],
"result": {
"id": ":monitor-id",
"created_on": "2021-01-01T05:20:00.12345Z",
"modified_on": "2021-01-01T05:20:00.12345Z",
"type": "https",
"description": "Login page monitor",
"method": "GET",
"path": "/health",
"header": {
"Host": [
"example.com"
],
"X-App-ID": [
"abc123"
]
},
"port": 8080,
"timeout": 3,
"retries": 0,
"interval": 90,
"expected_body": "alive",
"expected_codes": "2xx",
"follow_redirects": true,
"allow_insecure": true,
"consecutive_up": 3,
"consecutive_down": 2,
"probe_zone": "example.com"
}
}
```
**Prepare your servers**
Make sure that your firewall or web server does not block or rate limit your configured health monitors or requests associated with [Cloudflare IP addresses ↗](https://www.cloudflare.com/ips).
Each health monitor has the HTTP user-agent of `"Mozilla/5.0 (compatible; Cloudflare-Traffic-Manager/1.0; +https://www.cloudflare.com/traffic-manager/; pool-id: $poolid)"`, where the `$poolid` is the first 16 characters of the [associated pool](https://developers.cloudflare.com/load-balancing/pools/).
Caution
If you know that your endpoint is healthy but Load Balancing is reporting it as unhealthy, refer to our [Monitor troubleshooting guide](https://developers.cloudflare.com/load-balancing/troubleshooting/load-balancing-faq/#why-is-my-endpoint-or-pool-considered-unhealthy).
Example monitor configuration
| Field | Value |
| ---------------- | --------- |
| Type | HTTP |
| Path | / |
| Port | 80 |
| Interval | 60 |
| Method | GET |
| Timeout | 5 seconds |
| Retries | 2 |
| Expected Code(s) | 200 |
## Create pools
Within Cloudflare, pools represent your endpoints and how they are organized. As such, a pool can be a group of several endpoints, or you could also have only one endpoint (an origin server, for example) per pool.
If you are familiar with DNS terminology, think of a pool as a “record set,” except Cloudflare only returns addresses that are considered healthy. You can attach health monitors to individual pools for customized monitoring. A pool can have either a single monitor or a monitor group attached — but not both.
You can create a pool within the [load balancer workflow](https://developers.cloudflare.com/load-balancing/load-balancers/create-load-balancer/) or in the **Pools** tab:
1. Go to **Load Balancing**.
2. Select the **Pools** tab and then **Create pool**.
3. For your pool, enter the following information:
* A name (must be unique)
* A description to provide more detail on the name
* A choice for [**Endpoint Steering**](https://developers.cloudflare.com/load-balancing/understand-basics/traffic-steering/origin-level-steering/), which affects how your pool routes traffic to each endpoint
4. For each endpoint, enter the following information:
* A name (must be unique)
* The endpoint address or associated hostname
* (Optional) A [**Virtual Network**](https://developers.cloudflare.com/cloudflare-one/networks/connectors/cloudflare-tunnel/private-net/cloudflared/tunnel-virtual-networks/). Required when the endpoint has a private IP address.
* A [**Weight**](https://developers.cloudflare.com/load-balancing/understand-basics/traffic-steering/origin-level-steering/#weights)
* (Optional) A [hostname](https://developers.cloudflare.com/load-balancing/additional-options/override-http-host-headers/) by clicking **Add host header**
* (Optional) The destination port to which the traffic will be served.
Note
If your endpoint is a website or application hosted on [Cloudflare Pages](https://developers.cloudflare.com/pages/), you will need to fill in the host header field with the project domain for it to resolve correctly.
1. Repeat this process for additional endpoints in the pool.
2. (Optional) Set up coordinates for [Proximity Steering](https://developers.cloudflare.com/load-balancing/understand-basics/traffic-steering/steering-policies/proximity-steering/) on the pool.
3. On the pool, update the following information:
* **Health Threshold**:
The Health Threshold is the number of healthy endpoints for the pool as a whole to be considered _Healthy_ and receive traffic based on pool order in a load balancer. Increasing this number makes the pool more reliable, but also more likely to become unhealthy.
* **Monitor**: Attach a [monitor](https://developers.cloudflare.com/load-balancing/monitors/create-monitor/)
* **Health Monitor Regions**: Choose whether to check pool health from [multiple locations](https://developers.cloudflare.com/load-balancing/monitors/#health-monitor-regions), which increases accuracy but can lead to probe traffic to your endpoint
* **Pool Notifications**: You can set up new alerts - and view existing alerts - to be notified when pools are enabled or disabled, or pools or endpoints have changes in their [health status](https://developers.cloudflare.com/load-balancing/understand-basics/health-details/).
4. When finished, select **Save**.
For a full list of properties, refer to [Create Pool](https://developers.cloudflare.com/api/resources/load%5Fbalancers/subresources/pools/methods/create/). If you need help with API authentication, refer to [Cloudflare API documentation](https://developers.cloudflare.com/fundamentals/api/).
Required API token permissions
At least one of the following [token permissions](https://developers.cloudflare.com/fundamentals/api/reference/permissions/) is required:
* `Load Balancing: Monitors and Pools Write`
```bash
curl "https://api.cloudflare.com/client/v4/accounts/$ACCOUNT_ID/load_balancers/pools" \
--request POST \
--header "Authorization: Bearer $CLOUDFLARE_API_TOKEN" \
--json '{
"description": "Primary data center - Provider XYZ",
"name": "primary-dc-1",
"enabled": false,
"load_shedding": {
"default_percent": 0,
"default_policy": "random",
"session_percent": 0,
"session_policy": "hash"
},
"minimum_origins": 2,
"monitor": "f1aba936b94213e5b8dca0c0dbf1f9cc",
"check_regions": [
"WEU",
"ENAM"
],
"origins": [
{
"name": "app-server-1",
"address": "0.0.0.0",
"enabled": true,
"weight": 0.56,
"header": {
"Host": [
"example.com"
]
}
}
],
"origin_steering": {
"policy": "random"
},
"notification_filter": {
"origin": {
"disable": false,
"healthy": null
},
"pool": {
"disable": false,
"healthy": null
}
}
}'
```
The response contains the complete definition of the new pool.
```json
{
"success": true,
"errors": [],
"messages": [],
"result": {
"id": "17b5962d775c646f3f9725cbc7a53df4",
"created_on": "2021-01-01T05:20:00.12345Z",
"modified_on": "2021-01-01T05:20:00.12345Z",
"description": "Primary data center - Provider XYZ",
"name": "primary-dc-1",
"enabled": false,
"load_shedding": {
"default_percent": 0,
"default_policy": "random",
"session_percent": 0,
"session_policy": "hash"
},
"minimum_origins": 2,
"monitor": "f1aba936b94213e5b8dca0c0dbf1f9cc",
"check_regions": [
"WEU",
"ENAM"
],
"origins": [
{
"name": "app-server-1",
"address": "0.0.0.0",
"enabled": true,
"weight": 0.56,
"header": {
"Host": [
"example.com"
]
}
}
],
"origin_steering": {
"policy": "random"
},
"notification_filter": {
"origin": {
"disable": false,
"healthy": null
},
"pool": {
"disable": false,
"healthy": null
}
}
}
}
```
After creating the pool, you would also want to [create a new notification](https://developers.cloudflare.com/api/resources/alerting/subresources/policies/methods/create/) with the following parameters specified:
```json
"alert_type": "load_balancing_health_alert",
"filters": {
"pool_id": <>,
"new_health": <> ["Unhealthy", "Healthy"],
"event_source": <> ["pool", "origin"]
}
```
## Confirm pool health
Before directing any traffic to your pools, make sure that your pools and monitors are set up correctly. The status of your health check will be _unknown_ until the results of the first check are available.
To confirm pool health using the dashboard:
1. Go to **Load Balancing**.
2. Select the **Pools** tab.
3. For pools and individual endpoints, review the values in the **Health** and **Endpoint Health** columns.
For more information on pool and endpoint health statuses, refer to [How a pool becomes unhealthy](https://developers.cloudflare.com/load-balancing/understand-basics/health-details/#how-a-pool-becomes-unhealthy).
To fetch the latest health status of all pools, use the [List Pools](https://developers.cloudflare.com/api/resources/load%5Fbalancers/subresources/pools/methods/list/) command, paying attention to the `healthy` value for pools and origins (endpoints).
For troubleshooting a specific pool's health, use the [Pool Health Details](https://developers.cloudflare.com/api/resources/load%5Fbalancers/subresources/pools/subresources/health/methods/get/) command.
### Unexpected health status
If you notice that healthy pools are being marked unhealthy:
* Review [how endpoints and pools become unhealthy](https://developers.cloudflare.com/load-balancing/understand-basics/health-details/).
* Refer to the [Troubleshooting section](https://developers.cloudflare.com/load-balancing/troubleshooting/).
## Create a load balancer on a test subdomain
Instead of starting on your production domain, you likely should create a load balancer on a test or staging domain. This may involve temporary changes to your monitors and pools, depending on your infrastructure setup.
Starting with a test domain allows you to verify everything is working correctly before routing production traffic.
To create a Public or a Private load balancer in the dashboard:
### Create a Public load balancer
1. Go to **Load Balancing** and select **Create load balancer**.
2. On the **Load Balancer Setup**, select **Public load balancer**
3. Choose the website to which you want to add this load balancer.
4. On the **Hostname** page:
* Enter a **Hostname**, which is the DNS name at which the load balancer is available. For more details on record priority, refer to [DNS records for load balancing](https://developers.cloudflare.com/load-balancing/load-balancers/dns-records/).
* From the **Data Localization** dropdown, select the [region](https://developers.cloudflare.com/data-localization/how-to/load-balancing/#regional-services) you would like to use on your domain.
* Toggle the orange cloud icon to update the [proxy mode](https://developers.cloudflare.com/load-balancing/understand-basics/proxy-modes/), which affects how traffic is routed and which IP addresses are advertised.
* Add a description for your load balancer.
* If you want [session-based load balancing](https://developers.cloudflare.com/load-balancing/understand-basics/session-affinity/), toggle the **Session Affinity** switch.
* If you want [Adaptive Routing](https://developers.cloudflare.com/load-balancing/understand-basics/adaptive-routing/), toggle the **Adaptive Routing** switch.
5. Select **Next**.
6. On the **Add a Pool** page:
* Select one or more existing pools or [create a new pool](https://developers.cloudflare.com/load-balancing/pools/create-pool/#create-a-pool).
* If you are going to set [traffic steering](https://developers.cloudflare.com/load-balancing/understand-basics/traffic-steering/steering-policies/standard-options/) to **Off**, re-order the pools in your load balancer to adjust the fallback order.
* If needed, update the [**Fallback Pool**](https://developers.cloudflare.com/load-balancing/understand-basics/health-details/#fallback-pools).
* If you choose to set traffic steering to **Random**, you can set [Weights](https://developers.cloudflare.com/load-balancing/understand-basics/traffic-steering/steering-policies/standard-options/#random-steering) (via the API) to your pools to determine the percentage of traffic sent to each pool.
7. Select **Next**.
8. On the **Monitors** page:
* Review the monitors attached to your pools.
* If needed, you can attach an existing monitor or [create a new monitor](https://developers.cloudflare.com/load-balancing/monitors/create-monitor/#create-a-monitor).
9. Select **Next**.
10. On the **Traffic Steering** page, choose an option for [Traffic steering](https://developers.cloudflare.com/load-balancing/understand-basics/traffic-steering/steering-policies/) and select **Next**.
11. On the **Custom Rules** page, select an existing rule or [create a new rule](https://developers.cloudflare.com/load-balancing/additional-options/load-balancing-rules/).
12. Select **Next**.
13. On the **Review** page:
* Review your configuration and make any changes.
* Choose whether to **Save as Draft** or **Save and Deploy**.
### Create a Private load balancer
1. Go to **Load Balancing** and select **Create load balancer**.
2. On the **Load Balancer Setup**, select **Private load balancer**
3. Associate your load balancer with either a Cloudflare private IP or a specified IP address and create a description for your load balancer.
4. On the **Add a Pool** page:
* Select one or more existing pools or [create a new pool](https://developers.cloudflare.com/load-balancing/pools/create-pool/#create-a-pool).
* If you are going to set [traffic steering](https://developers.cloudflare.com/load-balancing/understand-basics/traffic-steering/steering-policies/standard-options/) to **Off**, re-order the pools in your load balancer to adjust the fallback order.
* If needed, update the [**Fallback Pool**](https://developers.cloudflare.com/load-balancing/understand-basics/health-details/#fallback-pools).
* If you choose to set traffic steering to **Random**, you can set [Weights](https://developers.cloudflare.com/load-balancing/understand-basics/traffic-steering/steering-policies/standard-options/#random-steering) (via the API) to your pools to determine the percentage of traffic sent to each pool.
5. Select **Next**.
6. On the **Monitors** page:
* Review the monitors attached to your pools.
* If needed, you can attach an existing monitor or [create a new monitor](https://developers.cloudflare.com/load-balancing/monitors/create-monitor/#create-a-monitor).
7. Select **Next**.
8. On the **Traffic Steering** page, choose an option for [Traffic steering](https://developers.cloudflare.com/load-balancing/understand-basics/traffic-steering/steering-policies/) and select **Next**.
9. Select **Next**.
10. On the **Review** page:
* Review your configuration and make any changes.
* Choose whether to **Save as Draft** or **Save and Deploy**.
For a full list of properties, refer to [Create Load Balancer](https://developers.cloudflare.com/api/resources/load%5Fbalancers/methods/create/). If you need help with API authentication, refer to [Cloudflare API documentation](https://developers.cloudflare.com/fundamentals/api/).
Note
Since load balancers only exist on a zone — and not an account — you may need to get the zone `id` with the [List Zones](https://developers.cloudflare.com/api/resources/zones/methods/list/) command.
Required API token permissions
At least one of the following [token permissions](https://developers.cloudflare.com/fundamentals/api/reference/permissions/) is required:
* `Load Balancers Write`
```bash
curl "https://api.cloudflare.com/client/v4/zones/$ZONE_ID/load_balancers" \
--request POST \
--header "Authorization: Bearer $CLOUDFLARE_API_TOKEN" \
--json '{
"description": "Load Balancer for lb.example.com",
"name": "lb.example.com",
"enabled": true,
"ttl": 30,
"fallback_pool": "17b5962d775c646f3f9725cbc7a53df4",
"default_pools": [
"17b5962d775c646f3f9725cbc7a53df4",
"9290f38c5d07c2e2f4df57b1f61d4196",
"00920f38ce07c2e2f4df50b1f61d4194"
],
"proxied": true,
"steering_policy": "random_steering",
"session_affinity": "cookie",
"session_affinity_attributes": {
"samesite": "Auto",
"secure": "Auto",
"drain_duration": 100,
"zero_downtime_failover": "sticky"
},
"session_affinity_ttl": 5000,
"adaptive_routing": {
"failover_across_pools": true
},
"location_strategy": {
"prefer_ecs": "always",
"mode": "resolver_ip"
},
"random_steering": {
"pool_weights": {
"de90f38ced07c2e2f4df50b1f61d4194": 0.3,
"9290f38c5d07c2e2f4df57b1f61d4196": 0.5
},
"default_weight": 0.2
}
}'
```
The response contains the complete definition of the new load balancer.
```json
{
"success": true,
"errors": [],
"messages": [],
"result": {
"id": "699d98642c564d2e855e9661899b7252",
"created_on": "2021-01-01T05:20:00.12345Z",
"modified_on": "2021-01-01T05:20:00.12345Z",
"description": "Load Balancer for lb.example.com",
"name": "lb.example.com",
"enabled": true,
"ttl": 30,
"fallback_pool": "17b5962d775c646f3f9725cbc7a53df4",
"default_pools": [
"17b5962d775c646f3f9725cbc7a53df4",
"9290f38c5d07c2e2f4df57b1f61d4196",
"00920f38ce07c2e2f4df50b1f61d4194"
],
"proxied": true,
"steering_policy": "random_steering",
"session_affinity": "cookie",
"session_affinity_attributes": {
"samesite": "Auto",
"secure": "Auto",
"drain_duration": 100,
"zero_downtime_failover": "sticky"
},
"session_affinity_ttl": 5000,
"random_steering": {
"pool_weights": {
"de90f38ced07c2e2f4df50b1f61d4194": 0.3,
"9290f38c5d07c2e2f4df57b1f61d4196": 0.5
},
"default_weight": 0.2
}
}
}
```
## Optional - Review load balancing analytics
As you send sample requests to your test domain, review the [load balancing analytics](https://developers.cloudflare.com/load-balancing/reference/load-balancing-analytics/) page to make sure your load balancer is distributing requests like you were expecting.
## Route production traffic
Now that you have set up your load balancer and verified everything is working correctly, you can put the load balancer on a live domain or subdomain:
1. If you update your pools and monitors, review the pool health again to make sure everything is working as expected.
2. Confirm that your production hostname has the correct [priority order](https://developers.cloudflare.com/load-balancing/load-balancers/dns-records/#priority-order) of DNS records and is covered by an [SSL/TLS certificate](https://developers.cloudflare.com/load-balancing/load-balancers/dns-records/#ssltls-coverage).
3. Configure your load balancer to receive production traffic, which could involve either:
* Editing the **Hostname** of your existing load balancer.
* Updating the `CNAME` record sending traffic to your load balancer.
Note
If you have an Enterprise account, also evaluate your application for any excluded paths. For example, you might not want the load balancer to distribute requests directed at your `/admin` path. For any exceptions, set up an [origin rule](https://developers.cloudflare.com/rules/origin-rules/features/#dns-record).
## Optional - Next steps
Your load balancer should be receiving production traffic (and you can confirm this by reviewing the [analytics](https://developers.cloudflare.com/load-balancing/reference/load-balancing-analytics/)).
Though your product is officially set up, you may want to consider the following suggestions.
### Usage-based notifications
Since this is a service with [usage-based billing](https://developers.cloudflare.com/billing/understand/usage-based-billing/), Cloudflare recommends that you set up usage-based billing notifications to avoid unexpected bills.
To set up those notifications:
1. In the Cloudflare dashboard, go to the **Notifications** page.
[Go to **Notifications** ↗](https://dash.cloudflare.com/?to=/:account/notifications)
2. On **Alert Type** of **Usage Based Billing**, click **Select**.
3. Fill out the following information:
* **Name**
* **Product**
* **Notification limit** (exact metric will vary based on product)
* **Notification email**
Note
Some plans also have access to alerts through [PagerDuty](https://developers.cloudflare.com/notifications/get-started/configure-pagerduty/) and [Webhooks](https://developers.cloudflare.com/notifications/get-started/configure-webhooks/).
4. Select **Save**.
### Additional configuration options
You may want to further customize how your load balancer routes traffic or integrate your load balancer with other Cloudflare products:
* [Cloudflare Tunnel (published applications)](https://developers.cloudflare.com/load-balancing/additional-options/cloudflare-tunnel/)
* [Spectrum](https://developers.cloudflare.com/load-balancing/additional-options/spectrum/)
* [Perform planned maintenance](https://developers.cloudflare.com/load-balancing/additional-options/planned-maintenance/)
* [Load shedding](https://developers.cloudflare.com/load-balancing/additional-options/load-shedding/)
* [DNS persistence](https://developers.cloudflare.com/load-balancing/additional-options/dns-persistence/)
* [Load Balancing with the China Network](https://developers.cloudflare.com/load-balancing/additional-options/load-balancing-china/)
* [Override HTTP Host headers](https://developers.cloudflare.com/load-balancing/additional-options/override-http-host-headers/)
* [Custom load balancing rules](https://developers.cloudflare.com/load-balancing/additional-options/load-balancing-rules/)
* [Integrate with PagerDuty](https://developers.cloudflare.com/load-balancing/additional-options/pagerduty-integration/)
* [Additional DNS records](https://developers.cloudflare.com/load-balancing/additional-options/additional-dns-records/)
Was this helpful?
YesNo
## On this page
[Docs](https://developers.cloudflare.com/)
```json
{"@context":"https://schema.org","@type":"TechArticle","@id":"https://developers.cloudflare.com/load-balancing/get-started/quickstart/#page","headline":"Quickstart · Cloudflare Load Balancing docs","description":"Create a load balancer with pools and monitors in a few steps.","url":"https://developers.cloudflare.com/load-balancing/get-started/quickstart/","inLanguage":"en","image":"https://developers.cloudflare.com/og-docs.png","dateModified":"2026-04-16","publisher":{"@type":"Organization","name":"Cloudflare","url":"https://www.cloudflare.com/"},"isPartOf":{"@type":"WebSite","@id":"https://developers.cloudflare.com/#website","name":"Cloudflare Docs","url":"https://developers.cloudflare.com/"}}
```
---
---
description: Configure load balancers to distribute traffic across pools.
title: Load balancers
image: https://developers.cloudflare.com/og-docs.png
---
[Skip to content](#main-content)
> Documentation Index
> Fetch the complete documentation index at: https://developers.cloudflare.com/load-balancing/llms.txt
> Use this file to discover all available pages before exploring further.
# Load balancers
Last updated Apr 16, 2026|Copy as Markdown|[View as Markdown](https://developers.cloudflare.com/load-balancing/load-balancers/index.md)|[Agent setup](https://developers.cloudflare.com/agent-setup/)
A load balancer distributes traffic among pools according to [pool health](https://developers.cloudflare.com/load-balancing/understand-basics/health-details/) and [traffic steering policies](https://developers.cloudflare.com/load-balancing/understand-basics/traffic-steering/steering-policies/). Each load balancer is identified by its DNS hostname (`lb.example.com`, `dev.example.com`, etc.) or IP address.
Note
For an overview of how the Cloudflare Load Balancing solution works, refer to [Load Balancing components](https://developers.cloudflare.com/load-balancing/understand-basics/load-balancing-components/). For more background information on what load balancers are, refer to the Cloudflare [Learning Center ↗](https://www.cloudflare.com/learning/performance/what-is-load-balancing/).
---
## Common configurations
For suggestions, refer to [Common load balancer configurations](https://developers.cloudflare.com/load-balancing/load-balancers/common-configurations/).
## Public vs. Private Load Balancers
Public Load Balancers are designed to handle traffic from the public Internet. When deployed, they automatically receive a hostname, making them immediately accessible. These load balancers can direct traffic to a range of destinations, including public hostnames, public IP addresses, and private IP addresses.
Private Load Balancers, in contrast, are meant for internal use within private networks. They do not automatically receive a hostname, but one can be assigned via Gateway Firewall Policies or through an internal DNS system. Private Load Balancers only accept traffic over a private network on-ramp, such as [the Cloudflare One Client](https://developers.cloudflare.com/warp-client/) or [Cloudflare WAN](https://developers.cloudflare.com/cloudflare-wan/). They are capable of forwarding traffic exclusively to private IP addresses.
## Load balancing and existing DNS records
For details about DNS records, refer to [DNS records for load balancing](https://developers.cloudflare.com/load-balancing/load-balancers/dns-records/).
## HTTP keep-alive (persistent HTTP connection)
Cloudflare maintains keep-alive connections to improve performance and reduce cost of recurring TCP connects in the request transaction as Cloudflare proxies customer traffic from its edge network to the site's origin.
Ensure HTTP Keep-Alive connections are enabled on your origin. Cloudflare reuses open TCP connections for up to 15 minutes (900 seconds) after the last HTTP request. Origin web servers close TCP connections if too many are open. HTTP Keep-Alive helps avoid premature reset of connections for requests proxied by Cloudflare.
### Session cookies
**When using HTTP cookies to track and bind user sessions to a specific server**, configure [Session Affinity](https://developers.cloudflare.com/load-balancing/understand-basics/session-affinity/) to parse HTTP requests by cookie header. Doing so directs each request to the correct application server even when HTTP requests share the same TCP connection due to keep-alive.
**For example, F5 BIG-IP load balancers set a session cookie at the beginning of a TCP connection** (if none exists) and then ignore all cookies from subsequent HTTP requests on the same TCP connection. This tends to break session affinity because Cloudflare sends multiple HTTP sessions on the same TCP connection. Configuring the load balancer to parse HTTP requests by cookie headers avoids this issue.
---
## Create load balancers
For step-by-step guidance, refer to [Create a load balancer](https://developers.cloudflare.com/load-balancing/load-balancers/create-load-balancer/).
---
## Properties
For an up-to-date list of load balancer properties, refer to [Load balancer properties](https://developers.cloudflare.com/api/resources/load%5Fbalancers/methods/get/) in the Cloudflare API documentation.
---
## API commands
The Cloudflare API supports the following commands for load balancers.
| Command | Method | Endpoint |
| ------------------------------------------------------------------------------------------------------------------ | ------ | ------------------------------------ |
| [Create Load Balancer](https://developers.cloudflare.com/api/resources/load%5Fbalancers/methods/create/) | POST | /zones/:zone\_id/load\_balancers |
| [Delete Load Balancer](https://developers.cloudflare.com/api/resources/load%5Fbalancers/methods/delete/) | DELETE | /zones/:zone\_id/load\_balancers/:id |
| [List Load Balancers](https://developers.cloudflare.com/api/resources/load%5Fbalancers/methods/list/) | GET | /zones/:zone\_id/load\_balancers |
| [Load Balancer Details](https://developers.cloudflare.com/api/resources/load%5Fbalancers/methods/get/) | GET | /zones/:zone\_id/load\_balancers/:id |
| [Overwrite specific properties](https://developers.cloudflare.com/api/resources/load%5Fbalancers/methods/edit/) | PATCH | /zones/:zone\_id/load\_balancers/:id |
| [Overwrite entire Load Balancer](https://developers.cloudflare.com/api/resources/load%5Fbalancers/methods/update/) | PUT | /zones/:zone\_id/load\_balancers/:id |
Was this helpful?
YesNo
## On this page
[Docs](https://developers.cloudflare.com/)
```json
{"@context":"https://schema.org","@type":"TechArticle","@id":"https://developers.cloudflare.com/load-balancing/load-balancers/#page","headline":"Load balancers · Cloudflare Load Balancing docs","description":"Configure load balancers to distribute traffic across pools.","url":"https://developers.cloudflare.com/load-balancing/load-balancers/","inLanguage":"en","image":"https://developers.cloudflare.com/og-docs.png","dateModified":"2026-04-16","publisher":{"@type":"Organization","name":"Cloudflare","url":"https://www.cloudflare.com/"},"isPartOf":{"@type":"WebSite","@id":"https://developers.cloudflare.com/#website","name":"Cloudflare Docs","url":"https://developers.cloudflare.com/"}}
```
---
---
description: Common load balancer configurations for active-active and failover.
title: Common configurations
image: https://developers.cloudflare.com/og-docs.png
---
[Skip to content](#main-content)
> Documentation Index
> Fetch the complete documentation index at: https://developers.cloudflare.com/load-balancing/llms.txt
> Use this file to discover all available pages before exploring further.
# Common configurations
Last updated Apr 16, 2026|Copy as Markdown|[View as Markdown](https://developers.cloudflare.com/load-balancing/load-balancers/common-configurations/index.md)|[Agent setup](https://developers.cloudflare.com/agent-setup/)
Consider the following sections to understand how to achieve some commonly used load balancer configurations.
This page assumes you understand the Cloudflare [Load Balancing components](https://developers.cloudflare.com/load-balancing/understand-basics/load-balancing-components/) and how to create and edit each of them.
## Active - Passive Failover
An **active-passive failover** sends traffic to the endpoints in your active pool until a failure threshold (configurable) is reached. At the point of failure, your load balancer then redirects traffic to the passive pool.
This setup ensures uninterrupted service and helps with planned outages, but it might lead to slower traffic overall.
To set up a load balancer with **active-passive failover**:
1. Create a load balancer with two pools (`primary` and `secondary`).
2. In the list of pools, set the following order:
1. `primary`
2. `secondary`
3. For **Traffic Steering**, select [**Off**](https://developers.cloudflare.com/load-balancing/understand-basics/traffic-steering/steering-policies/standard-options/#off---failover).
With this setup, your load balancer will direct all traffic to `primary` until `primary` has fewer available endpoints than specified in its **Health Threshold**. Only then will your load balancer direct traffic to `secondary`.
In the event that all pools are marked down, Cloudflare uses the **fallback pool**, which is the option of last resort for successfully sending traffic to an endpoint. Since the fallback pool is a last resort, its health is not taken into account, and Cloudflare reports its status as **No Health**. You can select the fallback pool via the API or in the Cloudflare dashboard. For more on working with fallback pools, refer to [Pool-level steering](https://developers.cloudflare.com/load-balancing/understand-basics/traffic-steering/steering-policies/).
## Active - Active Failover
An **active-active failover** distributes traffic to endpoints in the same pool until the pool reaches its failure threshold (configurable). At the point of failure, your load balancer would then re-direct traffic to the **fallback pool**.
This setup speeds up overall requests, but is more vulnerable to planned or unplanned outages.
To set up a load balancer with **active-active failover**, either:
* Create a load balancer with a single pool (`primary`) with multiple endpoints (`endpoint-1` and `endpoint-2`) and set the same [**Weight**](https://developers.cloudflare.com/load-balancing/understand-basics/traffic-steering/origin-level-steering/#weights) for each endpoint.
* Create a load balancer with two pools (`primary` and `secondary`) and — for [**Traffic Steering**](https://developers.cloudflare.com/load-balancing/understand-basics/traffic-steering/steering-policies/) — select any option except for **Off**.
Note
For more background reading on server failover and common configurations, refer to [our Learning Center ↗](https://www.cloudflare.com/learning/performance/what-is-server-failover/).
Was this helpful?
YesNo
## On this page
[Docs](https://developers.cloudflare.com/)
```json
{"@context":"https://schema.org","@type":"TechArticle","@id":"https://developers.cloudflare.com/load-balancing/load-balancers/common-configurations/#page","headline":"Common configurations · Cloudflare Load Balancing docs","description":"Common load balancer configurations for active-active and failover.","url":"https://developers.cloudflare.com/load-balancing/load-balancers/common-configurations/","inLanguage":"en","image":"https://developers.cloudflare.com/og-docs.png","dateModified":"2026-04-16","publisher":{"@type":"Organization","name":"Cloudflare","url":"https://www.cloudflare.com/"},"isPartOf":{"@type":"WebSite","@id":"https://developers.cloudflare.com/#website","name":"Cloudflare Docs","url":"https://developers.cloudflare.com/"}}
```
---
---
description: Learn how to set up and maintain load balancers.
title: Manage load balancers
image: https://developers.cloudflare.com/og-docs.png
---
[Skip to content](#main-content)
> Documentation Index
> Fetch the complete documentation index at: https://developers.cloudflare.com/load-balancing/llms.txt
> Use this file to discover all available pages before exploring further.
# Manage load balancers
Last updated Apr 16, 2026|Copy as Markdown|[View as Markdown](https://developers.cloudflare.com/load-balancing/load-balancers/create-load-balancer/index.md)|[Agent setup](https://developers.cloudflare.com/agent-setup/)
A load balancer distributes traffic among pools according to [pool health](https://developers.cloudflare.com/load-balancing/understand-basics/health-details/) and [traffic steering policies](https://developers.cloudflare.com/load-balancing/understand-basics/traffic-steering/steering-policies/). Each load balancer is identified by its DNS hostname (`lb.example.com`, `dev.example.com`, etc.) or IP address.
For more details about load balancers, refer to [Load balancers](https://developers.cloudflare.com/load-balancing/load-balancers/).
## Create a load balancer
To create a Public or a Private load balancer in the dashboard:
### Create a Public load balancer
1. Go to **Load Balancing** and select **Create load balancer**.
2. On the **Load Balancer Setup**, select **Public load balancer**
3. Choose the website to which you want to add this load balancer.
4. On the **Hostname** page:
* Enter a **Hostname**, which is the DNS name at which the load balancer is available. For more details on record priority, refer to [DNS records for load balancing](https://developers.cloudflare.com/load-balancing/load-balancers/dns-records/).
* From the **Data Localization** dropdown, select the [region](https://developers.cloudflare.com/data-localization/how-to/load-balancing/#regional-services) you would like to use on your domain.
* Toggle the orange cloud icon to update the [proxy mode](https://developers.cloudflare.com/load-balancing/understand-basics/proxy-modes/), which affects how traffic is routed and which IP addresses are advertised.
* Add a description for your load balancer.
* If you want [session-based load balancing](https://developers.cloudflare.com/load-balancing/understand-basics/session-affinity/), toggle the **Session Affinity** switch.
* If you want [Adaptive Routing](https://developers.cloudflare.com/load-balancing/understand-basics/adaptive-routing/), toggle the **Adaptive Routing** switch.
5. Select **Next**.
6. On the **Add a Pool** page:
* Select one or more existing pools or [create a new pool](https://developers.cloudflare.com/load-balancing/pools/create-pool/#create-a-pool).
* If you are going to set [traffic steering](https://developers.cloudflare.com/load-balancing/understand-basics/traffic-steering/steering-policies/standard-options/) to **Off**, re-order the pools in your load balancer to adjust the fallback order.
* If needed, update the [**Fallback Pool**](https://developers.cloudflare.com/load-balancing/understand-basics/health-details/#fallback-pools).
* If you choose to set traffic steering to **Random**, you can set [Weights](https://developers.cloudflare.com/load-balancing/understand-basics/traffic-steering/steering-policies/standard-options/#random-steering) (via the API) to your pools to determine the percentage of traffic sent to each pool.
7. Select **Next**.
8. On the **Monitors** page:
* Review the monitors attached to your pools.
* If needed, you can attach an existing monitor or [create a new monitor](https://developers.cloudflare.com/load-balancing/monitors/create-monitor/#create-a-monitor).
9. Select **Next**.
10. On the **Traffic Steering** page, choose an option for [Traffic steering](https://developers.cloudflare.com/load-balancing/understand-basics/traffic-steering/steering-policies/) and select **Next**.
11. On the **Custom Rules** page, select an existing rule or [create a new rule](https://developers.cloudflare.com/load-balancing/additional-options/load-balancing-rules/).
12. Select **Next**.
13. On the **Review** page:
* Review your configuration and make any changes.
* Choose whether to **Save as Draft** or **Save and Deploy**.
### Create a Private load balancer
1. Go to **Load Balancing** and select **Create load balancer**.
2. On the **Load Balancer Setup**, select **Private load balancer**
3. Associate your load balancer with either a Cloudflare private IP or a specified IP address and create a description for your load balancer.
4. On the **Add a Pool** page:
* Select one or more existing pools or [create a new pool](https://developers.cloudflare.com/load-balancing/pools/create-pool/#create-a-pool).
* If you are going to set [traffic steering](https://developers.cloudflare.com/load-balancing/understand-basics/traffic-steering/steering-policies/standard-options/) to **Off**, re-order the pools in your load balancer to adjust the fallback order.
* If needed, update the [**Fallback Pool**](https://developers.cloudflare.com/load-balancing/understand-basics/health-details/#fallback-pools).
* If you choose to set traffic steering to **Random**, you can set [Weights](https://developers.cloudflare.com/load-balancing/understand-basics/traffic-steering/steering-policies/standard-options/#random-steering) (via the API) to your pools to determine the percentage of traffic sent to each pool.
5. Select **Next**.
6. On the **Monitors** page:
* Review the monitors attached to your pools.
* If needed, you can attach an existing monitor or [create a new monitor](https://developers.cloudflare.com/load-balancing/monitors/create-monitor/#create-a-monitor).
7. Select **Next**.
8. On the **Traffic Steering** page, choose an option for [Traffic steering](https://developers.cloudflare.com/load-balancing/understand-basics/traffic-steering/steering-policies/) and select **Next**.
9. Select **Next**.
10. On the **Review** page:
* Review your configuration and make any changes.
* Choose whether to **Save as Draft** or **Save and Deploy**.
For a full list of properties, refer to [Create Load Balancer](https://developers.cloudflare.com/api/resources/load%5Fbalancers/methods/create/). If you need help with API authentication, refer to [Cloudflare API documentation](https://developers.cloudflare.com/fundamentals/api/).
Note
Since load balancers only exist on a zone — and not an account — you may need to get the zone `id` with the [List Zones](https://developers.cloudflare.com/api/resources/zones/methods/list/) command.
Required API token permissions
At least one of the following [token permissions](https://developers.cloudflare.com/fundamentals/api/reference/permissions/) is required:
* `Load Balancers Write`
```bash
curl "https://api.cloudflare.com/client/v4/zones/$ZONE_ID/load_balancers" \
--request POST \
--header "Authorization: Bearer $CLOUDFLARE_API_TOKEN" \
--json '{
"description": "Load Balancer for lb.example.com",
"name": "lb.example.com",
"enabled": true,
"ttl": 30,
"fallback_pool": "17b5962d775c646f3f9725cbc7a53df4",
"default_pools": [
"17b5962d775c646f3f9725cbc7a53df4",
"9290f38c5d07c2e2f4df57b1f61d4196",
"00920f38ce07c2e2f4df50b1f61d4194"
],
"proxied": true,
"steering_policy": "random_steering",
"session_affinity": "cookie",
"session_affinity_attributes": {
"samesite": "Auto",
"secure": "Auto",
"drain_duration": 100,
"zero_downtime_failover": "sticky"
},
"session_affinity_ttl": 5000,
"adaptive_routing": {
"failover_across_pools": true
},
"location_strategy": {
"prefer_ecs": "always",
"mode": "resolver_ip"
},
"random_steering": {
"pool_weights": {
"de90f38ced07c2e2f4df50b1f61d4194": 0.3,
"9290f38c5d07c2e2f4df57b1f61d4196": 0.5
},
"default_weight": 0.2
}
}'
```
The response contains the complete definition of the new load balancer.
```json
{
"success": true,
"errors": [],
"messages": [],
"result": {
"id": "699d98642c564d2e855e9661899b7252",
"created_on": "2021-01-01T05:20:00.12345Z",
"modified_on": "2021-01-01T05:20:00.12345Z",
"description": "Load Balancer for lb.example.com",
"name": "lb.example.com",
"enabled": true,
"ttl": 30,
"fallback_pool": "17b5962d775c646f3f9725cbc7a53df4",
"default_pools": [
"17b5962d775c646f3f9725cbc7a53df4",
"9290f38c5d07c2e2f4df57b1f61d4196",
"00920f38ce07c2e2f4df50b1f61d4194"
],
"proxied": true,
"steering_policy": "random_steering",
"session_affinity": "cookie",
"session_affinity_attributes": {
"samesite": "Auto",
"secure": "Auto",
"drain_duration": 100,
"zero_downtime_failover": "sticky"
},
"session_affinity_ttl": 5000,
"random_steering": {
"pool_weights": {
"de90f38ced07c2e2f4df50b1f61d4194": 0.3,
"9290f38c5d07c2e2f4df57b1f61d4196": 0.5
},
"default_weight": 0.2
}
}
}
```
### Sharing your load balancer with other sites
You can share your load balancer with other sites in your account by [creating a canonical name (CNAME) record](https://developers.cloudflare.com/dns/manage-dns-records/how-to/create-dns-records/). This is useful for sharing configurations with multiple other domains so you do not have to create new load balancers for each site.
You can also configure separate load balancers for each domain and reuse monitors and pools. This is especially useful for changing the failover order for different domains, such as when your `example.co.uk` server has a different failover priority from `example.com` or `example.com.au`.
Note
Sharing load balancers across sites is only supported if the target zone is on a [full DNS setup](https://developers.cloudflare.com/dns/zone-setups/full-setup/). It is not supported if the target zone is on a `CNAME` setup.
---
## Edit a load balancer
To edit a load balancer in the dashboard:
1. Go to **Load Balancing**.
2. On a specific load balancer, select **Edit**.
3. While going through the [creation workflow](#create-a-load-balancer), update settings as needed.
4. On the **Review** step, select **Save**.
When you edit a load balancer with the API, your request type depends on how much you want to edit.
To update specific settings without having to resubmit the entire configuration, use a [PATCH](https://developers.cloudflare.com/api/resources/load%5Fbalancers/methods/edit/) request. For broader changes, use a [PUT](https://developers.cloudflare.com/api/resources/load%5Fbalancers/methods/update/) request.
---
## Delete a load balancer
If you delete or disable a load balancer, your endpoint's response to requests will depend on your [existing DNS records](https://developers.cloudflare.com/load-balancing/load-balancers/dns-records/#disabling-a-load-balancer).
To delete a load balancer in the dashboard:
1. Go to **Load Balancing**.
2. On a specific load balancer, click **Delete**.
To delete a load balancer using the API, send a [DELETE](https://developers.cloudflare.com/api/resources/load%5Fbalancers/methods/delete/) request.
---
## Set up alerts
You can configure alerts to receive notifications for changes in the health status of your pools or endpoints.
Load Balancing Health Alert
**Who is it for?**
Customers who want to be warned about [changes in health status](https://developers.cloudflare.com/load-balancing/understand-basics/health-details/) in their pools or origins.
**Other options / filters**
Available filters include:
* You can search for and add pools from your list of pools, as well as **Include future pools** (if all pools are selected).
* You can choose the trigger that fires the notification when the health status becomes **unhealthy**, **healthy**, or **either unhealthy or healthy**
* You can choose the trigger that fires the notification when the event source health status changes in **pool**, **origin**, or **either pool or origin**.
**Included with**
Purchase of [Load Balancing](https://developers.cloudflare.com/load-balancing/get-started/enable-load-balancing/).
**What should you do if you receive one?**
Evaluate [load balancing analytics](https://developers.cloudflare.com/load-balancing/reference/load-balancing-analytics/) to review changes in health status over time.
Refer to [Cloudflare Notifications](https://developers.cloudflare.com/notifications/get-started/) for more information on how to set up an alert.
Was this helpful?
YesNo
## On this page
[Docs](https://developers.cloudflare.com/)
```json
{"@context":"https://schema.org","@type":"TechArticle","@id":"https://developers.cloudflare.com/load-balancing/load-balancers/create-load-balancer/#page","headline":"Manage load balancers · Cloudflare Load Balancing docs","description":"Learn how to set up and maintain load balancers.","url":"https://developers.cloudflare.com/load-balancing/load-balancers/create-load-balancer/","inLanguage":"en","image":"https://developers.cloudflare.com/og-docs.png","dateModified":"2026-04-16","publisher":{"@type":"Organization","name":"Cloudflare","url":"https://www.cloudflare.com/"},"isPartOf":{"@type":"WebSite","@id":"https://developers.cloudflare.com/#website","name":"Cloudflare Docs","url":"https://developers.cloudflare.com/"}}
```
---
---
description: DNS records created for load balanced hostnames.
title: DNS records
image: https://developers.cloudflare.com/og-docs.png
---
[Skip to content](#main-content)
> Documentation Index
> Fetch the complete documentation index at: https://developers.cloudflare.com/load-balancing/llms.txt
> Use this file to discover all available pages before exploring further.
# DNS records
Last updated Apr 16, 2026|Copy as Markdown|[View as Markdown](https://developers.cloudflare.com/load-balancing/load-balancers/dns-records/index.md)|[Agent setup](https://developers.cloudflare.com/agent-setup/)
When you [create a load balancer](https://developers.cloudflare.com/load-balancing/load-balancers/create-load-balancer/), Cloudflare automatically creates an LB DNS record for the specified **Hostname**. This functionality allows you to use a hostname with or without an existing DNS record. Private load balancers do not receive an automatic DNS record. Instead, you can configure a hostname using your internal DNS system or by applying a [Gateway Firewall override](https://developers.cloudflare.com/cloudflare-one/traffic-policies/dns-policies/#override) to a hostname.
## Supported records
For customers on non-Enterprise plans, Cloudflare supports load balancing for `A`, `AAAA`, and `CNAME` records.
For customers on Enterprise plans, Cloudflare supports load balancing for `A`, `AAAA`, `CNAME`, **MX**, and **SRV** records.
## Priority order
For hostnames with existing DNS records, the LB record takes precedence when it is more or equally specific:
* **Scenario 1**:
* **A, AAAA, or CNAME**: `x.example.com`
* **LB record**: `x.example.com`
* **Outcome**: LB record takes precedence because it is as specific as the DNS record.
* **Scenario 2**:
* **A, AAAA, or CNAME**: `y.example.com`
* **LB record**: `*.example.com` (wildcard record)
* **Outcome**: DNS record takes precedence because it is more specific.
* **Scenario 3**:
* **A, AAAA, or CNAME**: `*.example.com`
* **LB record**: `*.example.com`
* **Outcome**: LB record takes precedence because it is as specific as the DNS record.
Note
This behavior only applies to [supported records](#supported-records) (determined by your plan type).
If the DNS record points to a [SaaS provider](https://developers.cloudflare.com/cloudflare-for-platforms/cloudflare-for-saas/) and an active [custom hostname](https://developers.cloudflare.com/cloudflare-for-platforms/cloudflare-for-saas/domain-support/) exists, the custom hostname will take precedence over the Load Balancing record:
* **Scenario 4**:
* **CNAME**: `x.example.com` with target to a Cloudflare for SaaS provider
* **LB record**: `x.example.com`
* **Active custom hostname on the SaaS provider side**: `x.example.com`
* **Outcome**: Custom hostname takes precedence.
## Disabling a load balancer
When you disable a load balancer, requests to a specific hostname depend on your existing DNS records:
* If you have existing DNS records, these records will be served.
* If there are no existing records, requests to the hostname will fail.
In both cases, disabling your load balancer prevents traffic from going to any associated endpoint or fallback pools.
If you already have an existing `A`, `AAAA`, or `CNAME` record, be aware that the change may take some time to propagate due to [Time to Live (TTL)](https://developers.cloudflare.com/dns/manage-dns-records/reference/ttl/) and any record changes is affected, as your local DNS cache may take longer to update.
## SSL/TLS coverage
Due to internal limitations, on [Partial (CNAME) setup](https://developers.cloudflare.com/dns/zone-setups/partial-setup/) the Cloudflare [Universal SSL certificates](https://developers.cloudflare.com/ssl/edge-certificates/universal-ssl/) do not cover load balancing hostnames by default. This behavior will be corrected in the future.
As a current workaround for a domain or first-level subdomain (`lb.example.com`), create a [proxied CNAME/A/AAAA record](https://developers.cloudflare.com/dns/manage-dns-records/how-to/create-dns-records/) for that hostname.
For example, if your load balancer hostname was `lb.example.com`, you could create the following record solely for the purpose of SSL/TLS coverage.
| Type | Name | IPv4 address | Proxy status |
| ---- | ---- | ------------ | ------------ |
| A | lb | 192.0.2.1 | Proxied |
Based on the [priority order](#priority-order), it would not receive any traffic because it is as equally specific as the LB hostname.
To get coverage for any deeper subdomain (`lb.dev.example.com`), purchase an [advanced certificate](https://developers.cloudflare.com/ssl/edge-certificates/advanced-certificate-manager/).
Was this helpful?
YesNo
## On this page
[Docs](https://developers.cloudflare.com/)
```json
{"@context":"https://schema.org","@type":"TechArticle","@id":"https://developers.cloudflare.com/load-balancing/load-balancers/dns-records/#page","headline":"DNS records for load balancing · Cloudflare Load Balancing docs","description":"DNS records created for load balanced hostnames.","url":"https://developers.cloudflare.com/load-balancing/load-balancers/dns-records/","inLanguage":"en","image":"https://developers.cloudflare.com/og-docs.png","dateModified":"2026-04-16","publisher":{"@type":"Organization","name":"Cloudflare","url":"https://www.cloudflare.com/"},"isPartOf":{"@type":"WebSite","@id":"https://developers.cloudflare.com/#website","name":"Cloudflare Docs","url":"https://developers.cloudflare.com/"}}
```
---
---
description: Pools of origin servers for load balancing traffic distribution.
title: Pools
image: https://developers.cloudflare.com/og-docs.png
---
[Skip to content](#main-content)
> Documentation Index
> Fetch the complete documentation index at: https://developers.cloudflare.com/load-balancing/llms.txt
> Use this file to discover all available pages before exploring further.
# Pools
Last updated Apr 16, 2026|Copy as Markdown|[View as Markdown](https://developers.cloudflare.com/load-balancing/pools/index.md)|[Agent setup](https://developers.cloudflare.com/agent-setup/)
Within Cloudflare, pools represent your endpoints and how they are organized. As such, a pool can be a group of several endpoints, or you could also have only one endpoint (an origin server, for example) per pool.
If you are familiar with DNS terminology, think of a pool as a “record set,” except Cloudflare only returns addresses that are considered healthy. You can attach health monitors to individual pools for customized monitoring. A pool can have either a single monitor or a monitor group attached — but not both.
For more details about how endpoints and pools become unhealthy, refer to [Endpoint and pool health](https://developers.cloudflare.com/load-balancing/understand-basics/health-details/).
Caution
Since load balancing targets are not limited to origin web servers, the term `endpoints` has been introduced. Refer to [Service-Specific Terms ↗](https://www.cloudflare.com/service-specific-terms-other-terms/) for its use in the context of Cloudflare offerings, and to [load balancing concepts](https://developers.cloudflare.com/load-balancing/understand-basics/load-balancing-components/) or [Reference Architecture](https://developers.cloudflare.com/reference-architecture/architectures/load-balancing/) for use case examples.
On the [Load Balancing API](https://developers.cloudflare.com/api/resources/load%5Fbalancers/methods/get/), `origin` has been maintained.
---
## Properties
For an up-to-date list of pool properties, refer to [Pool properties](https://developers.cloudflare.com/api/resources/load%5Fbalancers/subresources/pools/methods/list/) in our API documentation.
---
## Create pools
For step-by-step guidance, refer to [Create pools](https://developers.cloudflare.com/load-balancing/pools/create-pool/).
---
## Per-endpoint Host header override
When your application needs specialized routing (`CNAME` setup or custom hosts like Heroku), change the `Host` header used in health monitor requests. For more details, refer to [Override HTTP Host headers](https://developers.cloudflare.com/load-balancing/additional-options/override-http-host-headers/).
---
## API commands
The Cloudflare API supports the following commands for pools. Examples are given for user-level endpoint but apply to the account-level endpoint as well.
| Command | Method | Endpoint |
| ------------------------------------------------------------------------------------------------------------------------------------------------ | ------ | ---------------------------------------------------------- |
| [Create Pool](https://developers.cloudflare.com/api/resources/load%5Fbalancers/subresources/pools/methods/create/) | POST | accounts/:account\_id/load\_balancers/pools |
| [Delete Pool](https://developers.cloudflare.com/api/resources/load%5Fbalancers/subresources/pools/methods/delete/) | DELETE | accounts/:account\_id/load\_balancers/pools/:id |
| [List Pools](https://developers.cloudflare.com/api/resources/load%5Fbalancers/subresources/pools/methods/list/) | GET | accounts/:account\_id/load\_balancers/pools |
| [Pool Details](https://developers.cloudflare.com/api/resources/load%5Fbalancers/subresources/pools/methods/get/) | GET | accounts/:account\_id/load\_balancers/pools/:id |
| [Pool Health Details](https://developers.cloudflare.com/api/resources/load%5Fbalancers/subresources/pools/subresources/health/methods/get/) | GET | account/:account\_id/load\_balancers/pools/:id/health |
| [Overwrite specific properties](https://developers.cloudflare.com/api/resources/load%5Fbalancers/subresources/pools/methods/edit/) | PATCH | accounts/:account\_id/load\_balancers/pools/:id |
| [Overwrite existing pool](https://developers.cloudflare.com/api/resources/load%5Fbalancers/subresources/pools/methods/update/) | PUT | accounts/:account\_id/load\_balancers/pools/:id |
| [Preview Pool](https://developers.cloudflare.com/api/resources/load%5Fbalancers/subresources/pools/subresources/health/methods/create/) | POST | account/:account\_id/load\_balancers/pools/:id/preview |
| [List Pool References](https://developers.cloudflare.com/api/resources/load%5Fbalancers/subresources/pools/subresources/references/methods/get/) | GET | accounts/:account\_id/load\_balancers/pools/:id/references |
Was this helpful?
YesNo
## On this page
[Docs](https://developers.cloudflare.com/)
```json
{"@context":"https://schema.org","@type":"TechArticle","@id":"https://developers.cloudflare.com/load-balancing/pools/#page","headline":"Pools · Cloudflare Load Balancing docs","description":"Pools of origin servers for load balancing traffic distribution.","url":"https://developers.cloudflare.com/load-balancing/pools/","inLanguage":"en","image":"https://developers.cloudflare.com/og-docs.png","dateModified":"2026-04-16","publisher":{"@type":"Organization","name":"Cloudflare","url":"https://www.cloudflare.com/"},"isPartOf":{"@type":"WebSite","@id":"https://developers.cloudflare.com/#website","name":"Cloudflare Docs","url":"https://developers.cloudflare.com/"}}
```
---
---
description: This tutorial is intended as an introductory example of how you can leverage Cloudflare's global traffic management.
title: Use Pages as an origin for Load Balancing
image: https://developers.cloudflare.com/og-docs.png
---
[Skip to content](#main-content)
> Documentation Index
> Fetch the complete documentation index at: https://developers.cloudflare.com/load-balancing/llms.txt
> Use this file to discover all available pages before exploring further.
# Use Pages as an origin for Load Balancing
Last updated Oct 13, 2025|Copy as Markdown|[View as Markdown](https://developers.cloudflare.com/load-balancing/pools/cloudflare-pages-origin/index.md)|[Agent setup](https://developers.cloudflare.com/agent-setup/)
This tutorial is intended as an introductory example of how you can leverage Cloudflare's global traffic management.
The following sections will guide you through setting up an [active-passive failover](https://developers.cloudflare.com/load-balancing/load-balancers/common-configurations/#active---passive-failover) load balancer with [Cloudflare Pages](https://developers.cloudflare.com/pages/) as one of the [endpoints](https://developers.cloudflare.com/load-balancing/understand-basics/load-balancing-components/#endpoints), while also going into details about the Load Balancing dashboard workflow, and some important field values and troubleshooting.
## Use cases
This setup can be useful if you are migrating your production website or application to Pages or if you just want to have a backup or a personalized web page for when your primary origin goes down.
## Before you begin
Make sure you:
* Are familiar with the Cloudflare [Load Balancing components](https://developers.cloudflare.com/load-balancing/understand-basics/load-balancing-components/).
* Own a domain and use Cloudflare as a [primary DNS provider](https://developers.cloudflare.com/dns/zone-setups/full-setup/).
* Have [deployed a website or application](https://developers.cloudflare.com/pages/get-started/git-integration/) with Cloudflare Pages.
* Have [enabled Load Balancing](https://developers.cloudflare.com/load-balancing/get-started/enable-load-balancing/) in your account.
## Create health monitor
Although you can create all the components in the **Create Load Balancer** workflow, using the **Manage Monitors** and **Manage Pools** sections separately makes it easier to test and troubleshoot the configurations of each of these components before bringing them together in a load balancer.
Monitors define the criteria based on which an endpoint will be considered healthy or not. Start by setting up a monitor as follows.
1. In the Cloudflare dashboard, go to the **Load Balancing** page.
[Go to **Load Balancing** ↗](https://dash.cloudflare.com/?to=/:account/load-balancing)
2. Select the **Monitors** tab and then **Create monitor**.
3. Give the monitor a descriptive name and confirm the other fields are filled in as the following:
| Field | Value |
| ----- | ----- |
| Type | HTTP |
| Path | / |
| Port | 80 |
1. Under **Advanced health check settings**, keep the default values and enable the **Follow Redirects** option.
When you are using a service like Cloudflare Pages, it is possible that requests from the health monitor - as well as the ones from your visitors - are redirected before reaching their destination. Enabling this option prevents the monitor from reporting an unhealthy endpoint when it actually has only been redirected (with a `301` code, for example).
Tip
You can name the monitor after the parameters you have defined. For example: `HTTP - 200 - Follow Redirects`.
This way you can easily remember the criteria a certain monitor is using when you decide to attach it to other endpoints as well.
1. Select **Save** to confirm.
## Create pools
Pools hold information about where the health monitor requests and your visitors requests will be directed to.
To support the [use cases](#use-cases) mentioned above, and assuming you only have one origin server for your production website and one for the Cloudflare Pages instance, create two pools with one endpoint each:
Important
The endpoint pointing to [Cloudflare Pages](https://developers.cloudflare.com/pages/) must have **host header** filled in with the project domain (`.pages.dev`) for it to resolve correctly. You can find a reference table for correct setup in Step 8 below.
Failing to add the host header will result in [response code mismatch error](https://developers.cloudflare.com/load-balancing/troubleshooting/common-error-codes/#response-code-mismatch-error) for the monitor, and [Error 1000: DNS points to prohibited IP](https://developers.cloudflare.com/support/troubleshooting/http-status-codes/cloudflare-1xxx-errors/error-1000/) for visitors (if the load balancer is enabled despite the unhealthy monitor status).
1. In the Cloudflare dashboard, go to the **Load Balancing** page.
[Go to **Load Balancing** ↗](https://dash.cloudflare.com/?to=/:account/load-balancing)
2. Select the **Pools** tab and then **Create monitor**.
3. For the first pool, start by filling out the fields:
* A name for the pool (must be unique). Suggestion: `primary`
* A description to provide more details on the name. Suggestion: `production website`
1. Leave the choice for [**Endpoint Steering**](https://developers.cloudflare.com/load-balancing/understand-basics/traffic-steering/origin-level-steering/) as is. Since each pool will only have one endpoint, this steering method will not interfere in this case.
2. Add your origin server as an endpoint with the following information:
* A name for the endpoint (must be unique). Suggestion: `my-website`.
* The endpoint IP address or hostname.
Caution
As exemplified in Step 8 below, when using Cloudflare as an endpoint, **do not** specify one of Cloudflare's anycast IP addresses. Because these IPs can change at any time, you should use a hostname instead.
* The endpoint [weight](https://developers.cloudflare.com/load-balancing/understand-basics/traffic-steering/origin-level-steering/#weights), which can be set to `1`. Since each pool will only have one endpoint, the endpoint weight will not make a difference in this case.
* A [hostname](https://developers.cloudflare.com/load-balancing/additional-options/override-http-host-headers/) by selecting **Add host header**.
Caution
If your production website is hosted on a platform like Cloudflare Pages, where you have a default subdomain (`example.pages.dev`) and then configure a [custom domain](https://developers.cloudflare.com/pages/configuration/custom-domains) (`my-app.com`), you will need to add a host header to avoid failing the health monitor request.
1. Finish configuring the first pool with the following information:
* Leave the **Health Threshold** set to `1`. Since each pool will only have one endpoint, this is the only possible value for this field.
* Select the **Monitor** configured in the previous step.
* Select **Health Check Regions** to choose from which [locations](https://developers.cloudflare.com/load-balancing/monitors/#health-monitor-regions) Cloudflare should send monitor requests to periodically test the endpoint health.
1. Select **Save**
2. Repeat the process for the second pool using the following values:
| Field | Value |
| -------------------------- | --------------------------------------- |
| Pool name | secondary |
| Description | Pages version |
| Endpoint steering | |
| Endpoint name | my-pages-website |
| Endpoint address | |
| Weight | 1 |
| Host (**Add host header**) | |
| Health threshold | 1 |
| Monitor | |
| Health check regions |