Build a Slackbot
In this tutorial, you will build a Slack ↗ bot using Cloudflare Workers. Your bot will make use of GitHub webhooks to send messages to a Slack channel when issues are updated or created, and allow users to write a command to look up GitHub issues from inside Slack.
This tutorial is recommended for people who are familiar with writing web applications. You will use TypeScript as the programming language and Hono ↗ as the web framework. If you have built an application with tools like Node ↗ and Express ↗, this project will feel very familiar to you. If you are new to writing web applications or have wanted to build something like a Slack bot in the past, but were intimidated by deployment or configuration, Workers will be a way for you to focus on writing code and shipping projects.
If you would like to review the code or how the bot works in an actual Slack channel before proceeding with this tutorial, you can access the final version of the codebase on GitHub ↗. From GitHub, you can add your own Slack API keys and deploy it to your own Slack channels for testing.
All of the tutorials assume you have already completed the Get started guide, which gets you set up with a Cloudflare Workers account, C3 ↗, and Wrangler.
This tutorial assumes that you already have a Slack account, and the ability to create and manage Slack applications.
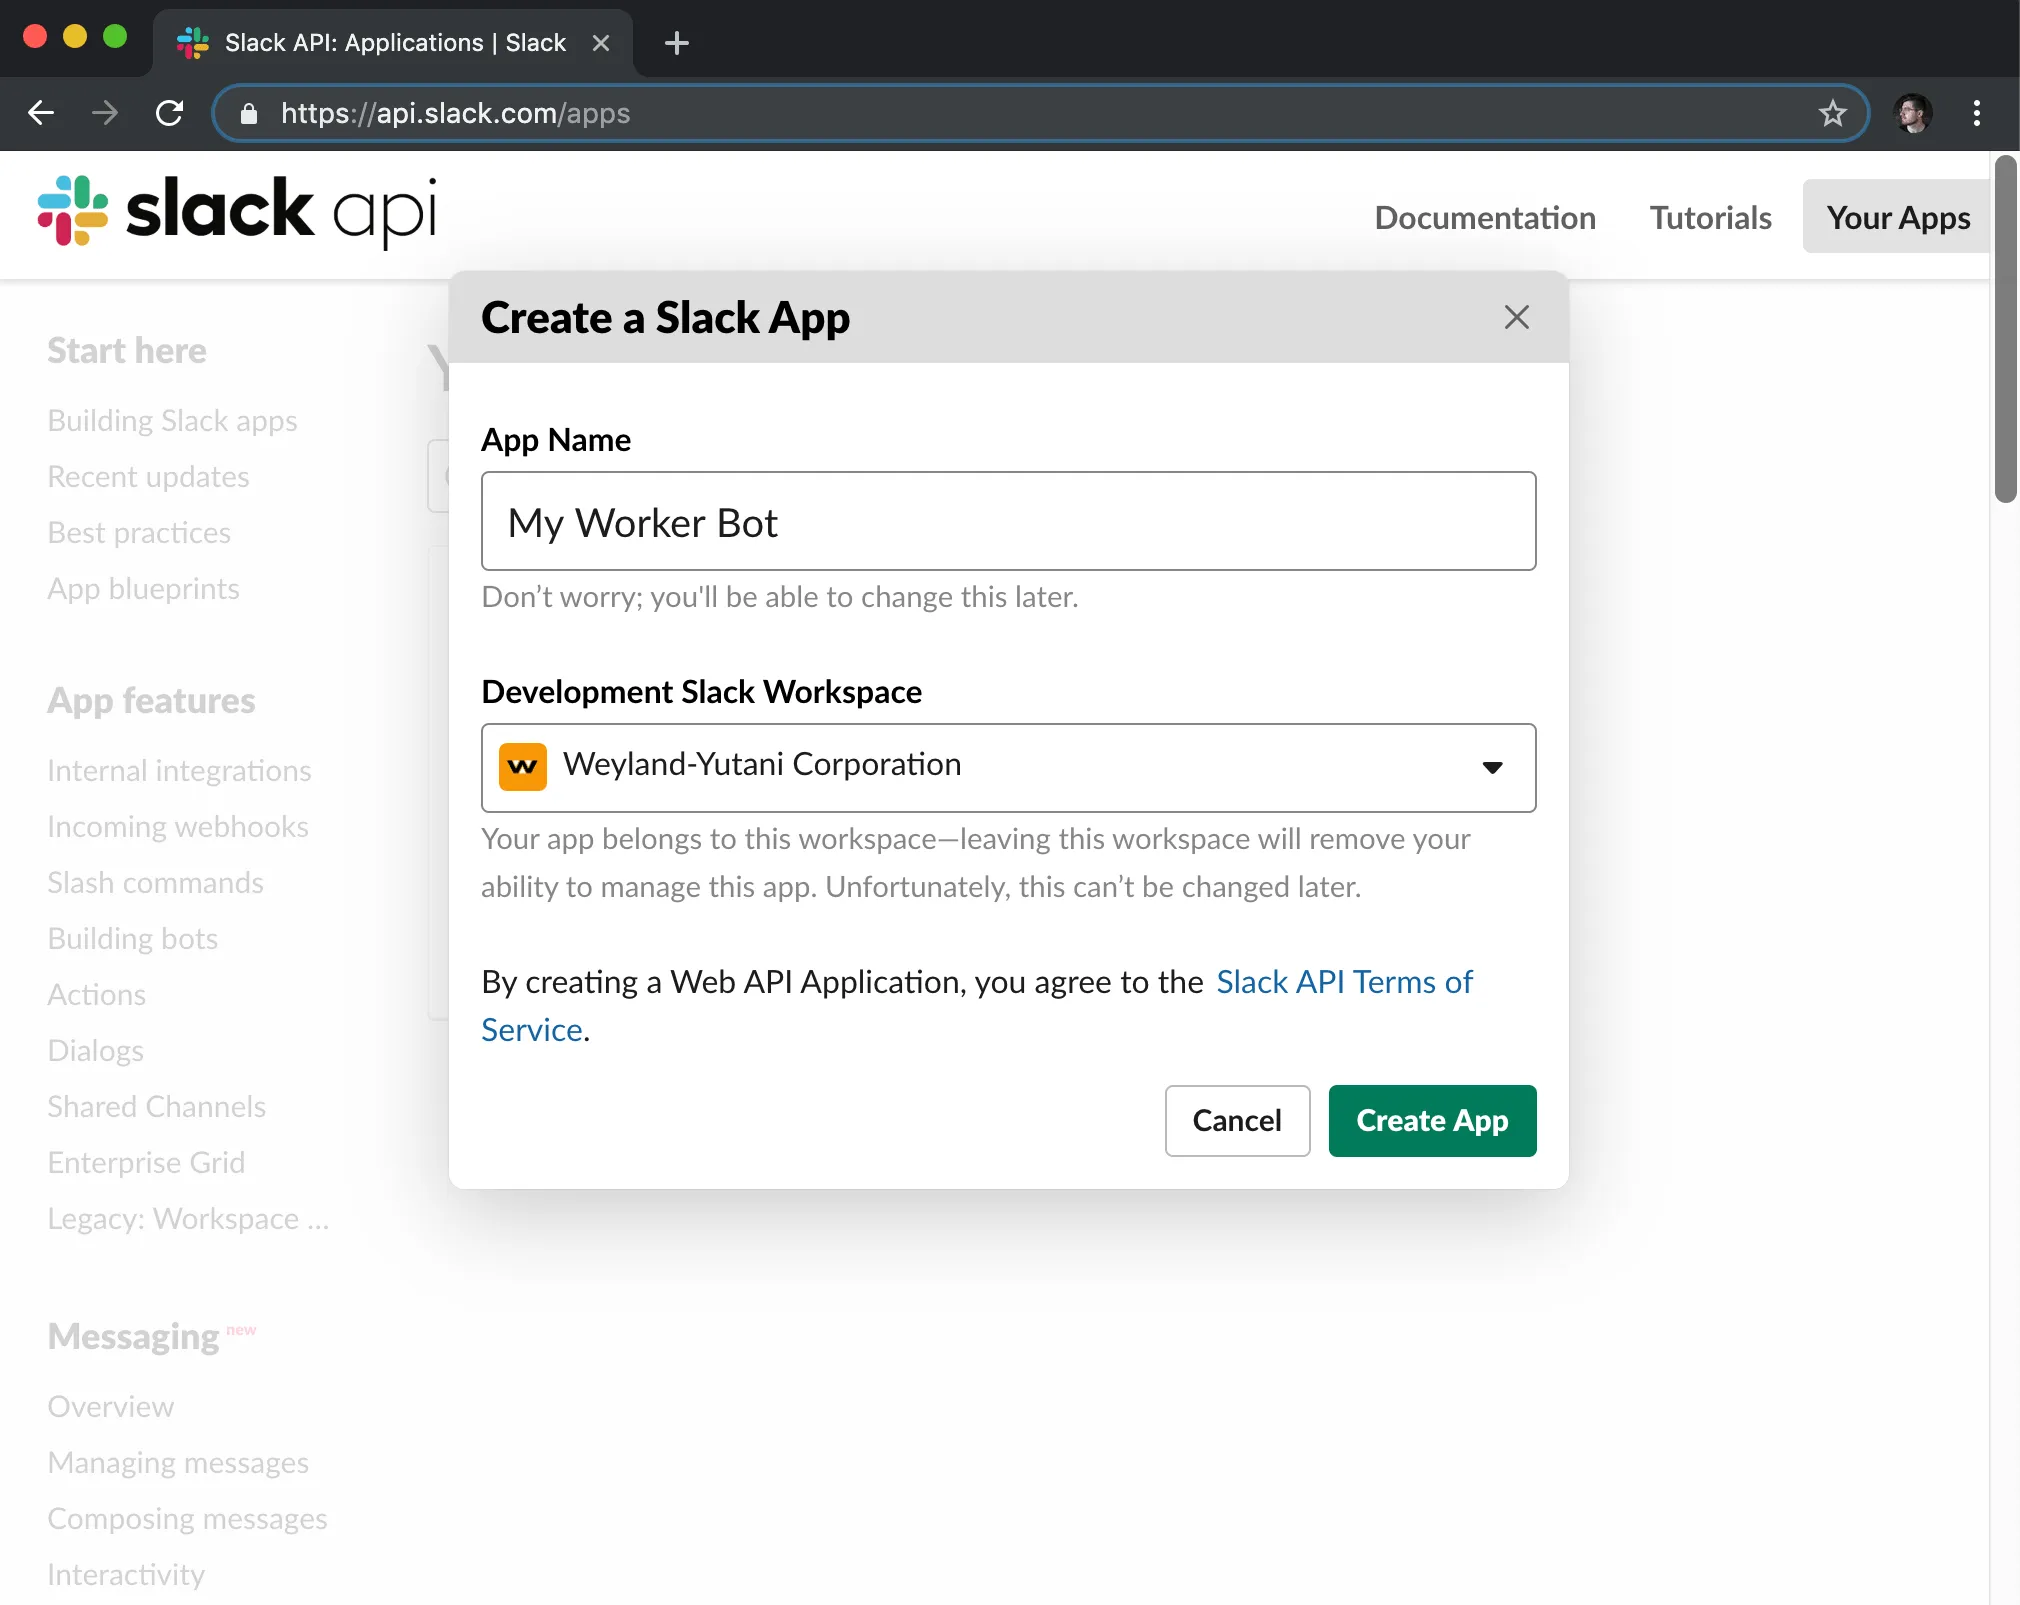
To post messages from your Cloudflare Worker into a Slack channel, you will need to create an application in Slack’s UI. To do this, go to Slack’s API section, at api.slack.com/apps ↗, and select Create New App.
Slack applications have many features. You will make use of two of them, Incoming Webhooks and Slash Commands, to build your Worker-powered Slack bot.
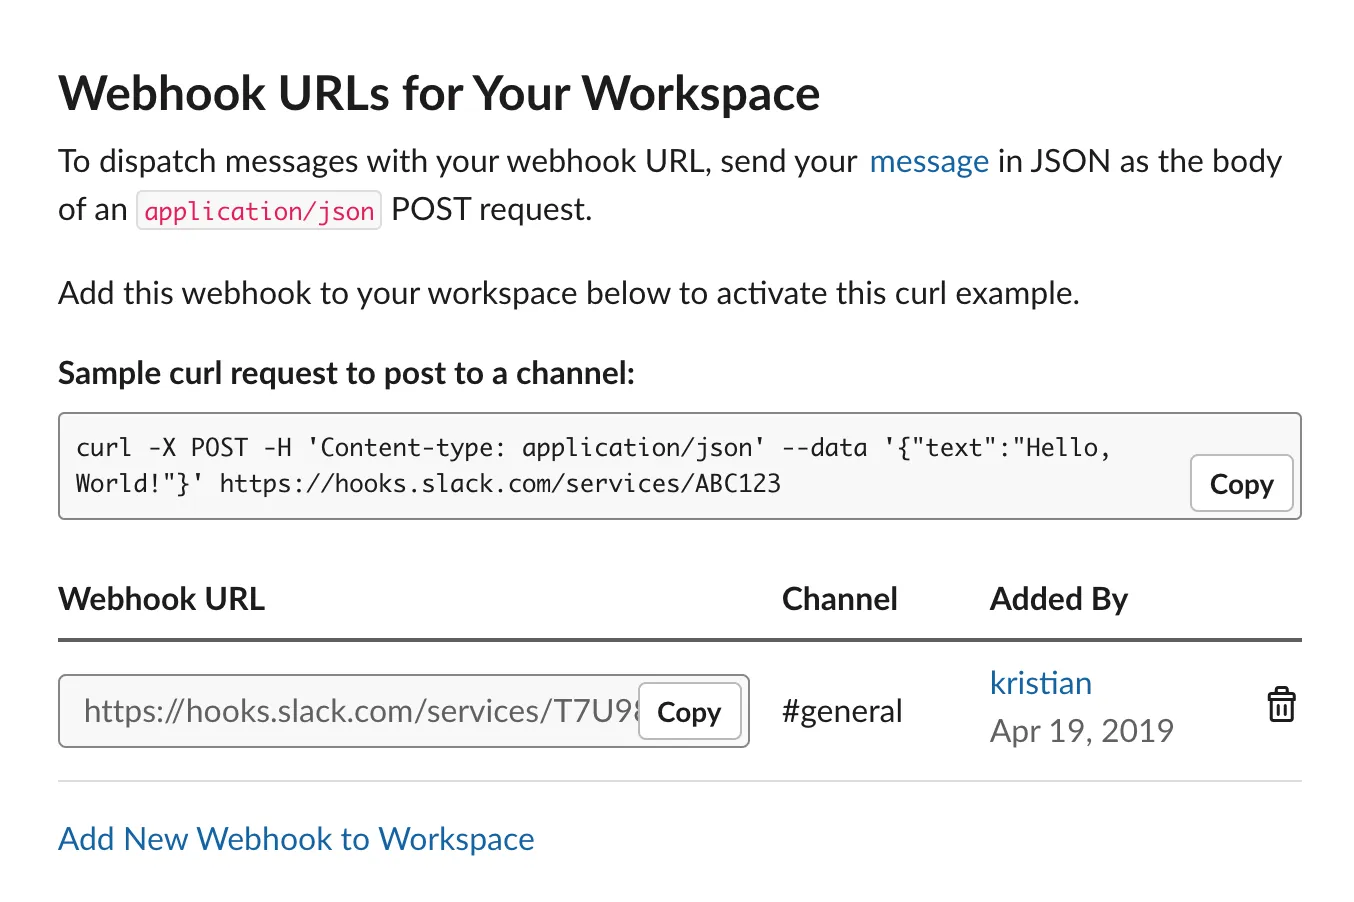
Incoming Webhooks are URLs that you can use to send messages to your Slack channels. Your incoming webhook will be paired with GitHub’s webhook support to send messages to a Slack channel whenever there are updates to issues in a given repository. You will see the code in more detail as you build your application. First, create a Slack webhook:
- On the sidebar of Slack's UI, select Incoming Webhooks.
- In Webhook URLs for your Workspace, select Add New Webhook to Workspace.
- On the following screen, select the channel that you want your webhook to send messages to (you can select a room, like #general or #code, or be messaged directly by your Slack bot when the webhook is called.)
- Authorize the new webhook URL.
After authorizing your webhook URL, you will be returned to the Incoming Webhooks page and can view your new webhook URL. You will add this into your Workers code later. Next, you will add the second component to your Slack bot: a Slash Command.
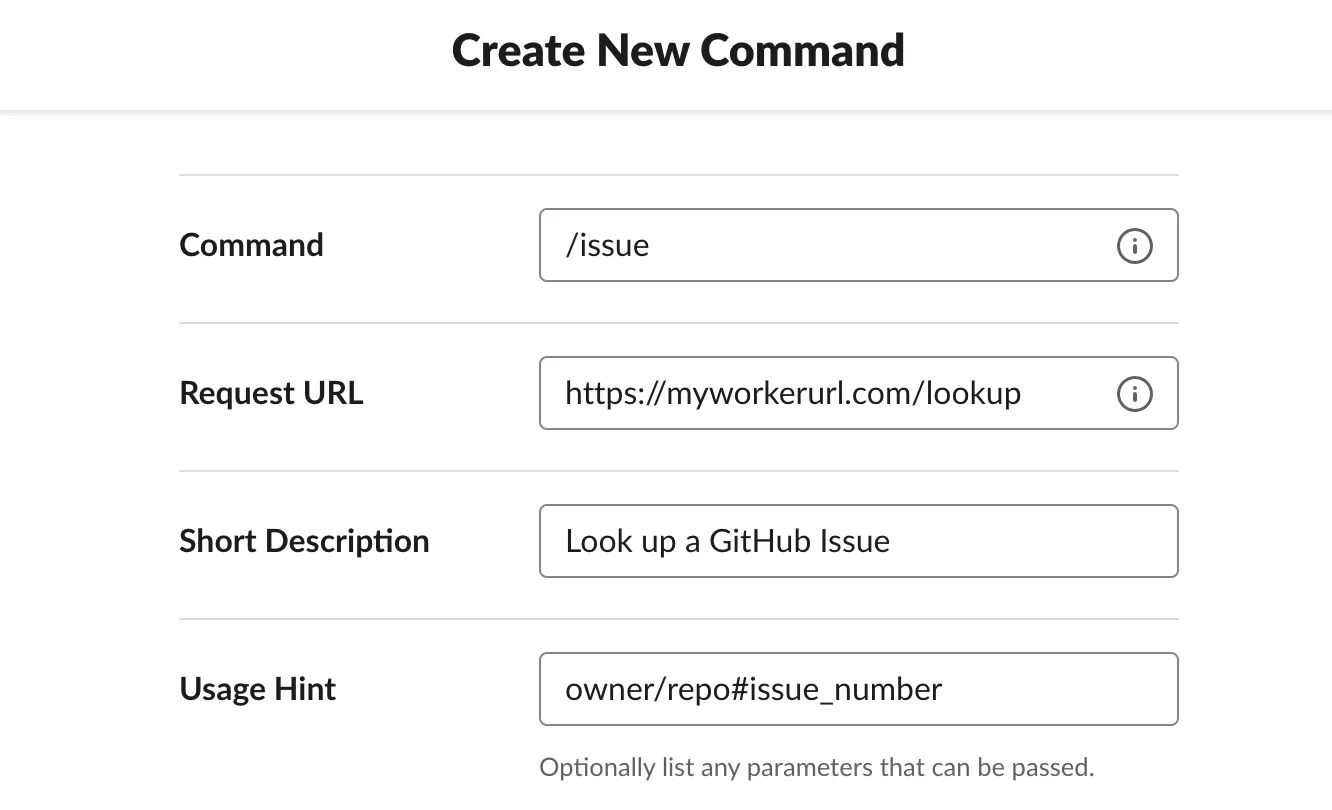
A Slash Command in Slack is a custom-configured command that can be attached to a URL request. For example, if you configured /weather <zip>, Slack would make an HTTP POST request to a configured URL, passing the text <zip> to get the weather for a specified zip code. In your application, you will use the /issue command to look up GitHub issues using the GitHub API ↗. Typing /issue cloudflare/wrangler#1 will send the text cloudflare/wrangler#1 in a HTTP POST request to your application, which the application will use to find the relevant GitHub issue ↗.
- On the Slack sidebar, select Slash Commands.
- Create your first slash command.
For this tutorial, you will use the command /issue. The request URL should be the /lookup path on your application URL: for example, if your application will be hosted at https://myworkerurl.com, the Request URL should be https://myworkerurl.com/lookup.
Your Cloudflare Workers application will be able to handle incoming requests from Slack. It should also be able to receive events directly from GitHub. If a GitHub issue is created or updated, you can make use of GitHub webhooks to send that event to your Workers application and post a corresponding message in Slack.
To configure a webhook:
- Go to your GitHub repository's Settings > Webhooks > Add webhook.
If you have a repository like https://github.com/user/repo, you can access the Webhooks page directly at https://github.com/user/repo/settings/hooks.
- Set the Payload URL to the
/webhookpath on your Worker URL.
For example, if your Worker will be hosted at https://myworkerurl.com, the Payload URL should be https://myworkerurl.com/webhook.
- In the Content type dropdown, select application/json.
The Content type for your payload can either be a URL-encoded payload (application/x-www-form-urlencoded) or JSON (application/json). For the purpose of this tutorial and to make parsing the payload sent to your application, select JSON.
- In Which events would you like to trigger this webhook?, select Let me select individual events.
GitHub webhooks allow you to specify which events you would like to have sent to your webhook. By default, the webhook will send push events from your repository. For the purpose of this tutorial, you will choose Let me select individual events.
- Select the Issues event type.
There are many different event types that can be enabled for your webhook. Selecting Issues will send every issue-related event to your webhook, including when issues are opened, edited, deleted, and more. If you would like to expand your Slack bot application in the future, you can select more of these events after the tutorial.
- Select Add webhook.

When your webhook is created, it will attempt to send a test payload to your application. Since your application is not actually deployed yet, leave the configuration as it is. You will later return to your repository to create, edit, and close some issues to ensure that the webhook is working once your application is deployed.
To initiate the project, use the command line interface C3 (create-cloudflare-cli) ↗.
npm create cloudflare@latest -- slack-botyarn create cloudflare slack-botpnpm create cloudflare@latest slack-botFollow these steps to create a Hono project.
- For What would you like to start with?, select
Framework Starter. - For Which development framework do you want to use?, select
Hono. - For, Do you want to deploy your application?, select
No.
Go to the slack-bot directory:
cd slack-botOpen src/index.ts in an editor to find the following code.
import { Hono } from "hono";
type Bindings = {  [key in keyof CloudflareBindings]: CloudflareBindings[key];};
const app = new Hono<{ Bindings: Bindings }>();
app.get("/", (c) => {  return c.text("Hello Hono!");});
export default app;
This is a minimal application using Hono. If a GET access comes in on the path /, it will return a response with the text Hello Hono!. It also returns a message 404 Not Found with status code 404 if any other path or method is accessed.
To run the application on your local machine, execute the following command.
npm i -- devyarn add devpnpm add devAccess to http://localhost:8787 in your browser after the server has been started, and you can see the message.
Hono helps you to create your Workers application easily and quickly.
Now, let's create a Slack bot on Cloudflare Workers.
You can create your application in several files instead of writing all endpoints and functions in one file. With Hono, it is able to add routing of child applications to the parent application using the function app.route().
For example, imagine the following Web API application.
import { Hono } from "hono";
const app = new Hono();
app.get("/posts", (c) => c.text("Posts!"));app.post("/posts", (c) => c.text("Created!", 201));
export default app;
You can add the routes under /api/v1.
import { Hono } from "hono";import api from "./api";
const app = new Hono();
app.route("/api/v1", api);
export default app;
It will return Posts! when accessing GET /api/v1/posts.
The Slack bot will have two child applications called "route" each.
-
lookuproute will take requests from Slack (sent when a user uses the/issuecommand), and look up the corresponding issue using the GitHub API. This application will be added to/lookupin the main application. -
webhookroute will be called when an issue changes on GitHub, via a configured webhook. This application will be add to/webhookin the main application.
Create the route files in a directory named routes.
mkdir -p src/routestouch src/routes/lookup.tstouch src/routes/webhook.tsThen update the main application.
import { Hono } from "hono";import lookup from "./routes/lookup";import webhook from "./routes/webhook";
const app = new Hono();
app.route("/lookup", lookup);app.route("/webhook", webhook);
export default app;Before implementing the actual functions, you need to define the TypeScript types you will use in this project. Create a new file in the application at src/types.ts and write the code. Bindings is a type that describes the Cloudflare Workers environment variables. Issue is a type for a GitHub issue and User is a type for a GitHub user. You will need these later.
export type Bindings = {  SLACK_WEBHOOK_URL: string;};
export type Issue = {  html_url: string;  title: string;  body: string;  state: string;  created_at: string;  number: number;  user: User;};
type User = { html_url: string; login: string; avatar_url: string;};Start creating the lookup route in src/routes/lookup.ts.
import { Hono } from "hono";
const app = new Hono();
export default app;
To understand how you should design this function, you need to understand how Slack slash commands send data to URLs.
According to the documentation for Slack slash commands ↗, Slack sends an HTTP POST request to your specified URL, with a application/x-www-form-urlencoded content type. For example, if someone were to type /issue cloudflare/wrangler#1, you could expect a data payload in the format:
token=gIkuvaNzQIHg97ATvDxqgjtO&team_id=T0001&team_domain=example&enterprise_id=E0001&enterprise_name=Globular%20Construct%20Inc&channel_id=C2147483705&channel_name=test&user_id=U2147483697&user_name=Steve&command=/issue&text=cloudflare/wrangler#1&response_url=https://hooks.slack.com/commands/1234/5678&trigger_id=13345224609.738474920.8088930838d88f008e0Given this payload body, you need to parse it, and get the value of the text key. With that text, for example, cloudflare/wrangler#1, you can parse that string into known piece of data (owner, repo, and issue_number), and use it to make a request to GitHub’s API, to retrieve the issue data.
With Slack slash commands, you can respond to a slash command by returning structured data as the response to the incoming slash command. In this case, you should use the response from GitHub’s API to present a formatted version of the GitHub issue, including pieces of data like the title of the issue, who created it, and the date it was created. Slack’s new Block Kit ↗ framework will allow you to return a detailed message response, by constructing text and image blocks with the data from GitHub’s API.
To begin, the lookup route should parse the messages coming from Slack. As previously mentioned, the Slack API sends an HTTP POST in URL Encoded format. You can get the variable text by parsing it with c.req.json().
import { Hono } from "hono";
const app = new Hono();
app.post("/", async (c) => {  const { text } = await c.req.parseBody();  if (typeof text !== "string") {    return c.notFound();  }});
export default app;
Given a text variable, that contains text like cloudflare/wrangler#1, you should parse that text, and get the individual parts from it for use with GitHub’s API: owner, repo, and issue_number.
To do this, create a new file in your application, at src/utils/github.ts. This file will contain a number of “utility” functions for working with GitHub’s API. The first of these will be a string parser, called parseGhIssueString:
const ghIssueRegex =  /(?<owner>[\w.-]*)\/(?<repo>[\w.-]*)\#(?<issue_number>\d*)/;
export const parseGhIssueString = (text: string) => {  const match = text.match(ghIssueRegex);  return match ? (match.groups ?? {}) : {};};
parseGhIssueString takes in a text input, matches it against ghIssueRegex, and if a match is found, returns the groups object from that match, making use of the owner, repo, and issue_number capture groups defined in the regex. By exporting this function from src/utils/github.ts, you can make use of it back in src/handlers/lookup.ts:
import { Hono } from "hono";import { parseGhIssueString } from "../utils/github";
const app = new Hono();
app.post("/", async (c) => {  const { text } = await c.req.parseBody();  if (typeof text !== "string") {    return c.notFound();  }
  const { owner, repo, issue_number } = parseGhIssueString(text);});
export default app;With this data, you can make your first API lookup to GitHub. Again, make a new function in src/utils/github.ts, to make a fetch request to the GitHub API for the issue data:
const ghIssueRegex =  /(?<owner>[\w.-]*)\/(?<repo>[\w.-]*)\#(?<issue_number>\d*)/;
export const parseGhIssueString = (text: string) => {  const match = text.match(ghIssueRegex);  return match ? (match.groups ?? {}) : {};};
export const fetchGithubIssue = (  owner: string,  repo: string,  issue_number: string,) => {  const url = `https://api.github.com/repos/${owner}/${repo}/issues/${issue_number}`;  const headers = { "User-Agent": "simple-worker-slack-bot" };  return fetch(url, { headers });};
Back in src/handlers/lookup.ts, use fetchGitHubIssue to make a request to GitHub’s API, and parse the response:
import { Hono } from "hono";import { fetchGithubIssue, parseGhIssueString } from "../utils/github";import { Issue } from "../types";
const app = new Hono();
app.post("/", async (c) => {  const { text } = await c.req.parseBody();  if (typeof text !== "string") {    return c.notFound();  }
  const { owner, repo, issue_number } = parseGhIssueString(text);  const response = await fetchGithubIssue(owner, repo, issue_number);  const issue = await response.json<Issue>();});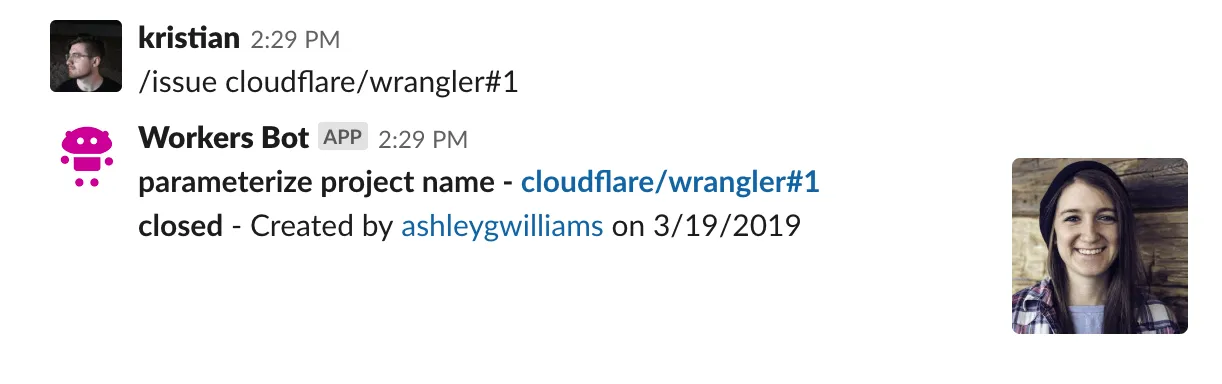
export default app;After you have received a response back from GitHub’s API, the final step is to construct a Slack message with the issue data, and return it to the user. The final result will look something like this:
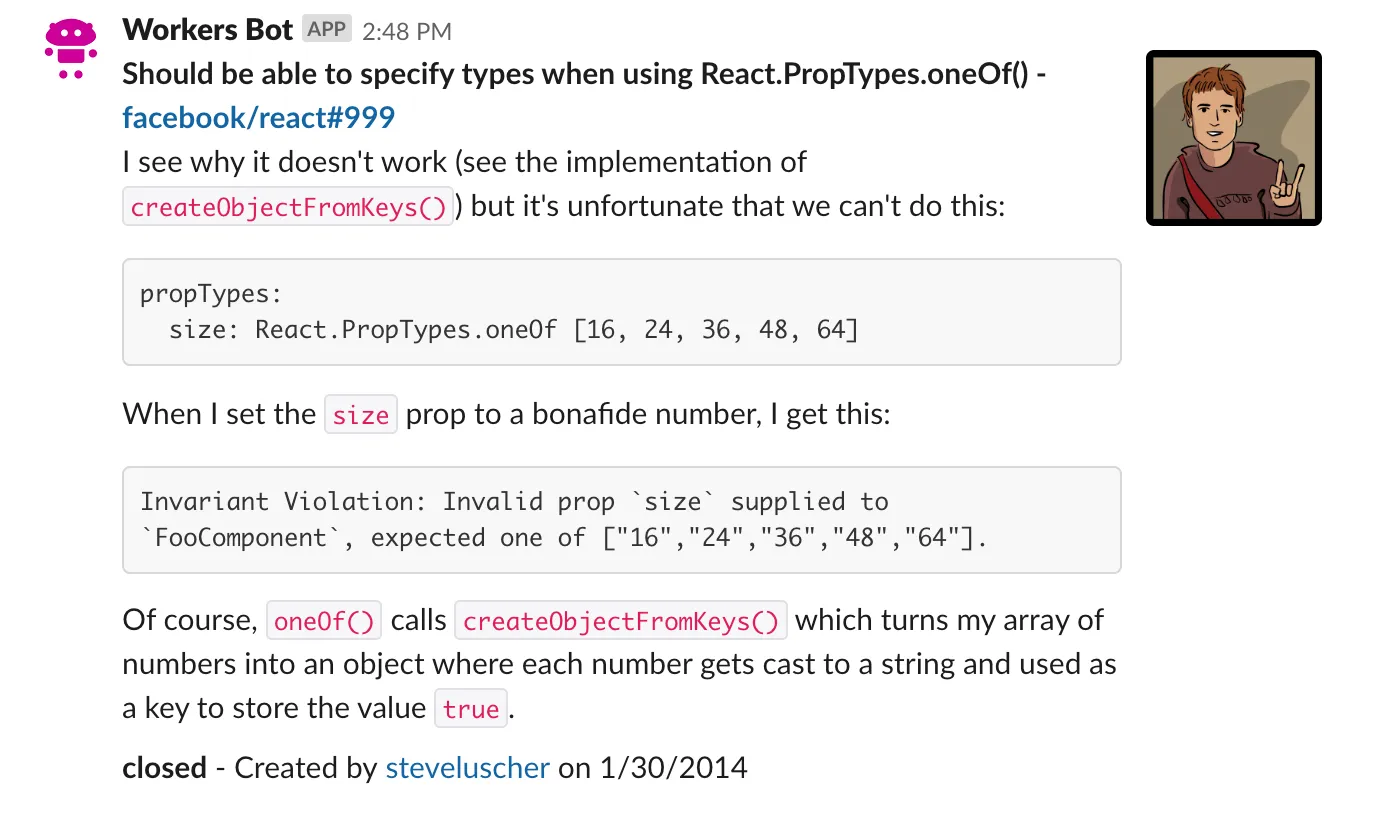
You can see four different pieces in the above screenshot:
- The first line (bolded) links to the issue, and shows the issue title
- The following lines (including code snippets) are the issue body
- The last line of text shows the issue status, the issue creator (with a link to the user’s GitHub profile), and the creation date for the issue
- The profile picture of the issue creator, on the right-hand side
The previously mentioned Block Kit ↗ framework will help take the issue data (in the structure lined out in GitHub’s REST API documentation ↗) and format it into something like the above screenshot.
Create another file, src/utils/slack.ts, to contain the function constructGhIssueSlackMessage, a function for taking issue data, and turning it into a collection of blocks. Blocks are JavaScript objects that Slack will use to format the message:
import { Issue } from "../types";
export const constructGhIssueSlackMessage = (  issue: Issue,  issue_string: string,  prefix_text?: string,) => {  const issue_link = `<${issue.html_url}|${issue_string}>`;  const user_link = `<${issue.user.html_url}|${issue.user.login}>`;  const date = new Date(Date.parse(issue.created_at)).toLocaleDateString();
  const text_lines = [    prefix_text,    `*${issue.title} - ${issue_link}*`,    issue.body,    `*${issue.state}* - Created by ${user_link} on ${date}`,  ];};
Slack messages accept a variant of Markdown, which supports bold text via asterisks (*bolded text*), and links in the format <https://yoururl.com|Display Text>.
Given that format, construct issue_link, which takes the html_url property from the GitHub API issue data (in format https://github.com/cloudflare/wrangler-legacy/issues/1), and the issue_string sent from the Slack slash command, and combines them into a clickable link in the Slack message.
user_link is similar, using issue.user.html_url (in the format https://github.com/signalnerve, a GitHub user) and the user’s GitHub username (issue.user.login), to construct a clickable link to the GitHub user.
Finally, parse issue.created_at, an ISO 8601 string, convert it into an instance of a JavaScript Date, and turn it into a formatted string, in the format MM/DD/YY.
With those variables in place, text_lines is an array of each line of text for the Slack message. The first line is the issue title and the issue link, the second is the issue body, and the final line is the issue state (for example, open or closed), the user link, and the creation date.
With the text constructed, you can finally construct your Slack message, returning an array of blocks for Slack’s Block Kit ↗. In this case, there is only have one block: a section ↗ block with Markdown text, and an accessory image of the user who created the issue. Return that single block inside of an array, to complete the constructGhIssueSlackMessage function:
import { Issue } from "../types";
export const constructGhIssueSlackMessage = (  issue: Issue,  issue_string: string,  prefix_text?: string,) => {  const issue_link = `<${issue.html_url}|${issue_string}>`;  const user_link = `<${issue.user.html_url}|${issue.user.login}>`;  const date = new Date(Date.parse(issue.created_at)).toLocaleDateString();
  const text_lines = [    prefix_text,    `*${issue.title} - ${issue_link}*`,    issue.body,    `*${issue.state}* - Created by ${user_link} on ${date}`,  ];
return [ { type: "section", text: { type: "mrkdwn", text: text_lines.join("\n"), }, accessory: { type: "image", image_url: issue.user.avatar_url, alt_text: issue.user.login, }, }, ];};In src/handlers/lookup.ts, use constructGhIssueSlackMessage to construct blocks, and return them as a new response with c.json() when the slash command is called:
import { Hono } from "hono";import { fetchGithubIssue, parseGhIssueString } from "../utils/github";import { constructGhIssueSlackMessage } from "../utils/slack";import { Issue } from "../types";
const app = new Hono();
app.post("/", async (c) => {  const { text } = await c.req.parseBody();  if (typeof text !== "string") {    return c.notFound();  }
  const { owner, repo, issue_number } = parseGhIssueString(text);  const response = await fetchGithubIssue(owner, repo, issue_number);  const issue = await response.json<Issue>();  const blocks = constructGhIssueSlackMessage(issue, text);
  return c.json({    blocks,    response_type: "in_channel",  });});
export default app;
One additional parameter passed into the response is response_type. By default, responses to slash commands are ephemeral, meaning that they are only seen by the user who writes the slash command. Passing a response_type of in_channel, as seen above, will cause the response to appear for all users in the channel.
If you would like the messages to remain private, remove the response_type line. This will cause response_type to default to ephemeral.
The lookup route is almost complete, but there are a number of errors that can occur in the route, such as parsing the body from Slack, getting the issue from GitHub, or constructing the Slack message itself. Although Hono applications can handle errors without having to do anything, you can customize the response returned in the following way.
import { Hono } from "hono";import { fetchGithubIssue, parseGhIssueString } from "../utils/github";import { constructGhIssueSlackMessage } from "../utils/slack";import { Issue } from "../types";
const app = new Hono();
app.post("/", async (c) => {  const { text } = await c.req.parseBody();  if (typeof text !== "string") {    return c.notFound();  }
  const { owner, repo, issue_number } = parseGhIssueString(text);  const response = await fetchGithubIssue(owner, repo, issue_number);  const issue = await response.json<Issue>();  const blocks = constructGhIssueSlackMessage(issue, text);
  return c.json({    blocks,    response_type: "in_channel",  });});
app.onError((_e, c) => {  return c.text(    "Uh-oh! We couldn't find the issue you provided. " +      "We can only find public issues in the following format: `owner/repo#issue_number`.",  );});
export default app;You are now halfway through implementing the routes for your Workers application. In implementing the next route, src/routes/webhook.ts, you will re-use a lot of the code that you have already written for the lookup route.
At the beginning of this tutorial, you configured a GitHub webhook to track any events related to issues in your repository. When an issue is opened, for example, the function corresponding to the path /webhook on your Workers application should take the data sent to it from GitHub, and post a new message in the configured Slack channel.
In src/routes/webhook.ts, define a blank Hono application. The difference from the lookup route is that the Bindings is passed as a generics for the new Hono(). This is necessary to give the appropriate TypeScript type to SLACK_WEBHOOK_URL which will be used later.
import { Hono } from "hono";import { Bindings } from "../types";
const app = new Hono<{ Bindings: Bindings }>();
export default app;
Much like with the lookup route, you will need to parse the incoming payload inside of request, get the relevant issue data from it (refer to the GitHub API documentation on IssueEvent ↗ for the full payload schema), and send a formatted message to Slack to indicate what has changed. The final version will look something like this:
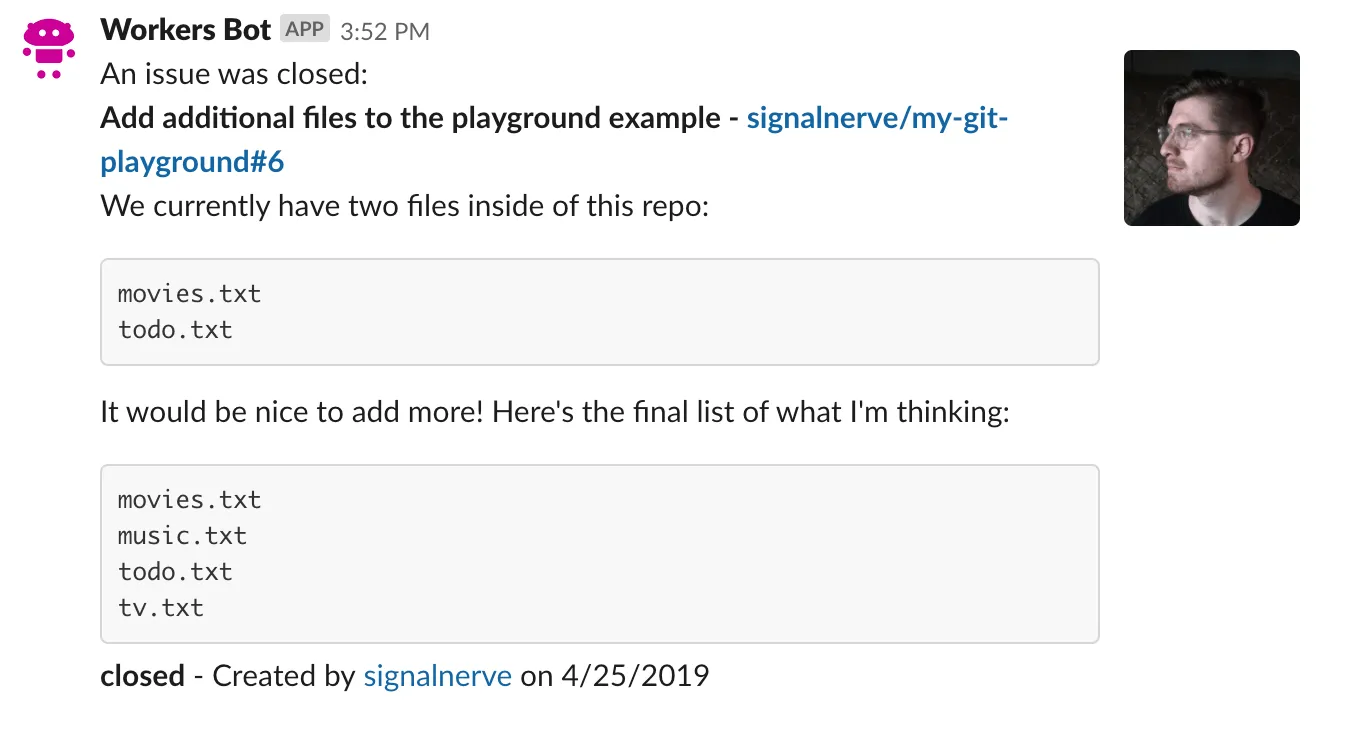
Compare this message format to the format returned when a user uses the /issue slash command. You will see that there is only one actual difference between the two: the addition of an action text on the first line, in the format An issue was $action:. This action, which is sent as part of the IssueEvent from GitHub, will be used as you construct a very familiar looking collection of blocks using Slack’s Block Kit.
To start filling out the route, parse the request body formatted JSON into an object and construct some helper variables:
import { Hono } from "hono";import { constructGhIssueSlackMessage } from "../utils/slack";
const app = new Hono();
app.post("/", async (c) => {  const { action, issue, repository } = await c.req.json();  const prefix_text = `An issue was ${action}:`;  const issue_string = `${repository.owner.login}/${repository.name}#${issue.number}`;});
export default app;
An IssueEvent, the payload sent from GitHub as part of your webhook configuration, includes an action (what happened to the issue: for example, it was opened, closed, locked, etc.), the issue itself, and the repository, among other things.
Use c.req.json() to convert the payload body of the request from JSON into a plain JS object. Use ES6 destructuring to set action, issue and repository as variables you can use in your code. prefix_text is a string indicating what happened to the issue, and issue_string is the familiar string owner/repo#issue_number that you have seen before: while the lookup route directly used the text sent from Slack to fill in issue_string, you will construct it directly based on the data passed in the JSON payload.
The messages your Slack bot sends back to your Slack channel from the lookup and webhook routes are incredibly similar. Because of this, you can re-use the existing constructGhIssueSlackMessage to continue populating src/handlers/webhook.ts. Import the function from src/utils/slack.ts, and pass the issue data into it:
import { Hono } from "hono";import { constructGhIssueSlackMessage } from "../utils/slack";
const app = new Hono();
app.post("/", async (c) => {  const { action, issue, repository } = await c.req.json();  const prefix_text = `An issue was ${action}:`;  const issue_string = `${repository.owner.login}/${repository.name}#${issue.number}`;  const blocks = constructGhIssueSlackMessage(issue, issue_string, prefix_text);});
export default app;
Importantly, the usage of constructGhIssueSlackMessage in this handler adds one additional argument to the function, prefix_text. Update the corresponding function inside of src/utils/slack.ts, adding prefix_text to the collection of text_lines in the message block, if it has been passed in to the function.
Add a utility function, compact, which takes an array, and filters out any null or undefined values from it. This function will be used to remove prefix_text from text_lines if it has not actually been passed in to the function, such as when called from src/handlers/lookup.ts. The full (and final) version of the src/utils/slack.ts looks like this:
import { Issue } from "../types";
const compact = (array: unknown[]) => array.filter((el) => el);
export const constructGhIssueSlackMessage = (  issue: Issue,  issue_string: string,  prefix_text?: string,) => {  const issue_link = `<${issue.html_url}|${issue_string}>`;  const user_link = `<${issue.user.html_url}|${issue.user.login}>`;  const date = new Date(Date.parse(issue.created_at)).toLocaleDateString();
  const text_lines = [    prefix_text,    `*${issue.title} - ${issue_link}*`,    issue.body,    `*${issue.state}* - Created by ${user_link} on ${date}`,  ];
  return [    {      type: "section",      text: {        type: "mrkdwn",        text: compact(text_lines).join("\n"),      },      accessory: {        type: "image",        image_url: issue.user.avatar_url,        alt_text: issue.user.login,      },    },  ];};
Back in src/handlers/webhook.ts, the blocks that are returned from constructGhIssueSlackMessage become the body in a new fetch request, an HTTP POST request to a Slack webhook URL. Once that request completes, return a response with status code 200, and the body text "OK":
import { Hono } from "hono";import { constructGhIssueSlackMessage } from "../utils/slack";import { Bindings } from "../types";
const app = new Hono<{ Bindings: Bindings }>();
app.post("/", async (c) => {  const { action, issue, repository } = await c.req.json();  const prefix_text = `An issue was ${action}:`;  const issue_string = `${repository.owner.login}/${repository.name}#${issue.number}`;  const blocks = constructGhIssueSlackMessage(issue, issue_string, prefix_text);
  const fetchResponse = await fetch(c.env.SLACK_WEBHOOK_URL, {    body: JSON.stringify({ blocks }),    method: "POST",    headers: { "Content-Type": "application/json" },  });
  return c.text("OK");});
export default app;
The constant SLACK_WEBHOOK_URL represents the Slack Webhook URL that you created all the way back in the Incoming Webhook section of this tutorial.
To use this constant inside of your codebase, use the wrangler secret command:
npx wrangler secret put SLACK_WEBHOOK_URLEnter a secret value: https://hooks.slack.com/services/abc123Similarly to the lookup route, the webhook route should include some basic error handling. Unlike lookup, which sends responses directly back into Slack, if something goes wrong with your webhook, it may be useful to actually generate an erroneous response, and return it to GitHub.
To do this, write the custom error handler with app.onError() and return a new response with a status code of 500. The final version of src/routes/webhook.ts looks like this:
import { Hono } from "hono";import { constructGhIssueSlackMessage } from "../utils/slack";import { Bindings } from "../types";
const app = new Hono<{ Bindings: Bindings }>();
app.post("/", async (c) => {  const { action, issue, repository } = await c.req.json();  const prefix_text = `An issue was ${action}:`;  const issue_string = `${repository.owner.login}/${repository.name}#${issue.number}`;  const blocks = constructGhIssueSlackMessage(issue, issue_string, prefix_text);
  const fetchResponse = await fetch(c.env.SLACK_WEBHOOK_URL, {    body: JSON.stringify({ blocks }),    method: "POST",    headers: { "Content-Type": "application/json" },  });
  if (!fetchResponse.ok) throw new Error();
  return c.text("OK");});
app.onError((_e, c) => {  return c.json(    {      message: "Unable to handle webhook",    },    500,  );});
export default app;By completing the preceding steps, you have finished writing the code for your Slack bot. You can now deploy your application.
Wrangler has built-in support for bundling, uploading, and releasing your Cloudflare Workers application. To do this, run the following command which will build and deploy your code.
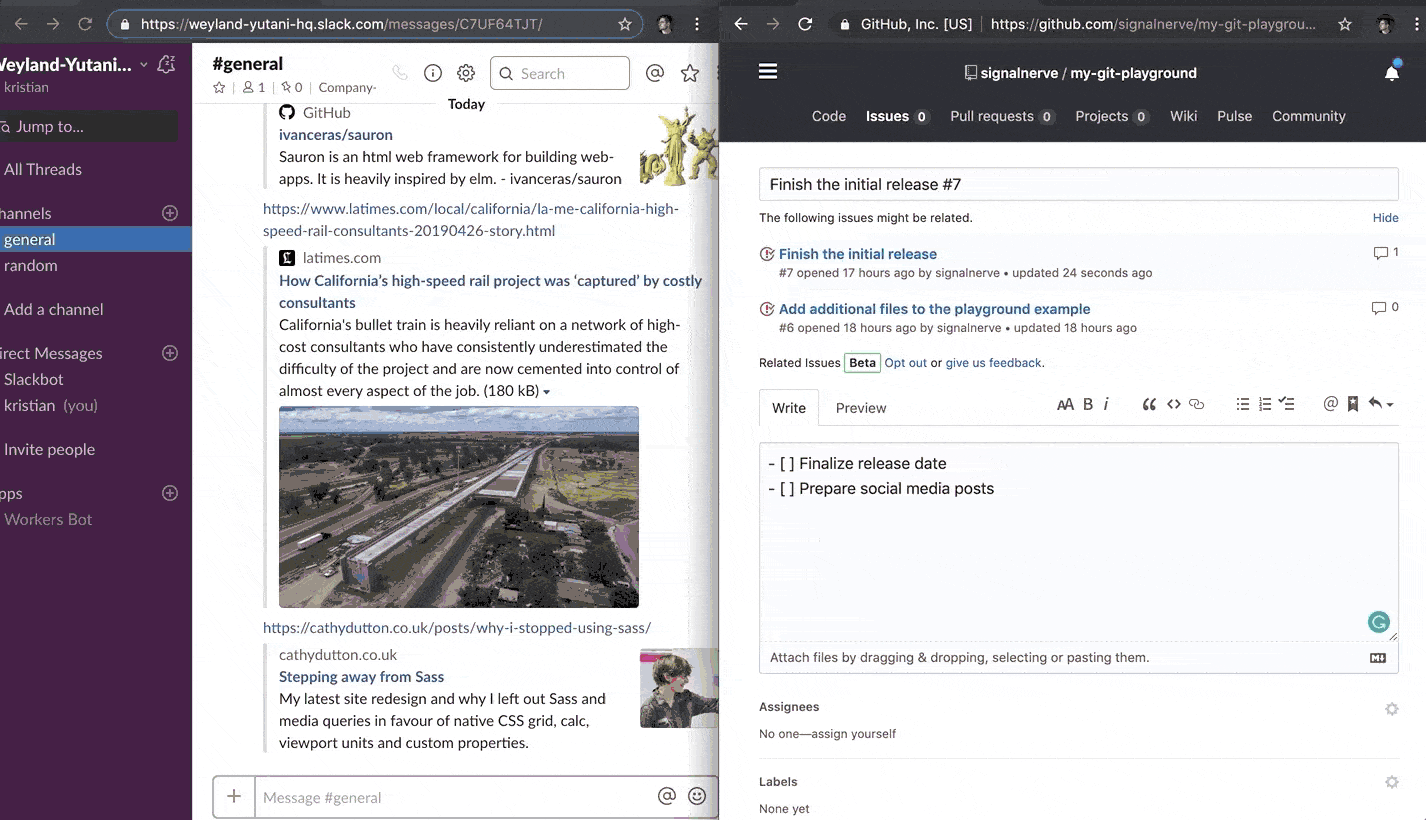
npm i -- deployyarn add deploypnpm add deployDeploying your Workers application should now cause issue updates to start appearing in your Slack channel, as the GitHub webhook can now successfully reach your Workers webhook route:
In this tutorial, you built and deployed a Cloudflare Workers application that can respond to GitHub webhook events, and allow GitHub API lookups within Slack. If you would like to review the full source code for this application, you can find the repository on GitHub ↗.
If you want to get started building your own projects, review the existing list of Quickstart templates.