Create a fine-tuned OpenAI model with R2
In this tutorial, you will use the OpenAI ↗ API and Cloudflare R2 to create a fine-tuned model ↗.
This feature in OpenAI's API allows you to derive a custom model from OpenAI's various large language models based on a set of custom instructions and example answers. These instructions and example answers are written in a document, known as a fine-tune document. This document will be stored in R2 and dynamically provided to OpenAI's APIs when creating a new fine-tune model.
In order to use this feature, you will do the following tasks:
- Upload a fine-tune document to R2.
- Read the R2 file and upload it to OpenAI.
- Create a new fine-tuned model based on the document.
To review the completed code for this application, refer to the GitHub repository for this tutorial ↗.
Before you start, make sure you have:
- A Cloudflare account with access to R2. If you do not have a Cloudflare account, sign up ↗ before continuing. Then purchase R2 from your Cloudflare dashboard.
- An OpenAI API key.
- A fine-tune document, structured as JSON Lines ↗. Use the example document ↗ in the source code.
First, use the c3 CLI to create a new Cloudflare Workers project.
npm create cloudflare@latest -- finetune-chatgpt-modelyarn create cloudflare finetune-chatgpt-modelpnpm create cloudflare@latest finetune-chatgpt-modelFor setup, select the following options:
- For What would you like to start with?, choose
Hello World example. - For Which template would you like to use?, choose
Worker only. - For Which language do you want to use?, choose
TypeScript. - For Do you want to use git for version control?, choose
Yes. - For Do you want to deploy your application?, choose
No(we will be making some changes before deploying).
The above options will create the "Hello World" TypeScript project.
Move into your newly created directory:
cd finetune-chatgpt-modelNext, upload the fine-tune document to R2. R2 is a key-value store that allows you to store and retrieve files from within your Workers application. You will use Wrangler to create a new R2 bucket.
To create a new R2 bucket use the wrangler r2 bucket create command. Note that you are logged in with your Cloudflare account. If not logged in via Wrangler, use the wrangler login command.
npx wrangler r2 bucket create <BUCKET_NAME>Replace <BUCKET_NAME> with your desired bucket name. Note that bucket names must be lowercase and can only contain dashes.
Next, upload a file using the wrangler r2 object put command.
npx wrangler r2 object put <PATH> -f <FILE_NAME><PATH> is the combined bucket and file path of the file you want to upload -- for example, fine-tune-ai/finetune.jsonl, where fine-tune-ai is the bucket name. Replace <FILE_NAME> with the local filename of your fine-tune document.
A binding is how your Worker interacts with external resources such as the R2 bucket.
To bind the R2 bucket to your Worker, add the following to your Wrangler file. Update the binding property to a valid JavaScript variable identifier. Replace <YOUR_BUCKET_NAME> with the name of the bucket you created in step 2:
{ "r2_buckets": [ { "binding": "MY_BUCKET", // <~ valid JavaScript variable name "bucket_name": "<YOUR_BUCKET_NAME>" } ]}[[r2_buckets]]binding = "MY_BUCKET"bucket_name = "<YOUR_BUCKET_NAME>"You will use Hono ↗, a lightweight framework for building Cloudflare Workers applications. Hono provides an interface for defining routes and middleware functions. Inside your project directory, run the following command to install Hono:
npm i honoyarn add honopnpm add honobun add honoYou also need to install the OpenAI Node API library ↗. This library provides convenient access to the OpenAI REST API in a Node.js project. To install the library, execute the following command:
npm i openaiyarn add openaipnpm add openaibun add openaiNext, open the src/index.ts file and replace the default code with the below code. Replace <MY_BUCKET> with the binding name you set in Wrangler file.
import { Context, Hono } from "hono";import OpenAI from "openai";
type Bindings = {  <MY_BUCKET>: R2Bucket  OPENAI_API_KEY: string}
type Variables = {  openai: OpenAI}
const app = new Hono<{ Bindings: Bindings, Variables: Variables }>()
app.use('*', async (c, next) => {  const openai = new OpenAI({    apiKey: c.env.OPENAI_API_KEY,  })  c.set("openai", openai)  await next()})
app.onError((err, c) => {  return c.text(err.message, 500)})
export default app;
In the above code, you first import the required packages and define the types. Then, you initialize app as a new Hono instance. Using the use middleware function, you add the OpenAI API client to the context of all routes. This middleware function allows you to access the client from within any route handler. onError() defines an error handler to return any errors as a JSON response.
In this section, you will define the route and function responsible for handling file uploads.
In createFile, your Worker reads the file from R2 and converts it to a File object. Your Worker then uses the OpenAI API to upload the file and return the response.
The GET /files route listens for GET requests with a query parameter file, representing a filename of an uploaded fine-tune document in R2. The function uses the createFile function to manage the file upload process.
Replace <MY_BUCKET> with the binding name you set in Wrangler file.
// New import added at beginning of fileimport { toFile } from 'openai/uploads'
const createFile = async (c: Context, r2Object: R2ObjectBody) => {  const openai: OpenAI = c.get("openai")
  const blob = await r2Object.blob()  const file = await toFile(blob, r2Object.key)
  const uploadedFile = await openai.files.create({    file,    purpose: "fine-tune",  })
  return uploadedFile}
app.get('/files', async c => {  const fileQueryParam = c.req.query("file")  if (!fileQueryParam) return c.text("Missing file query param", 400)
  const file = await c.env.<MY_BUCKET>.get(fileQueryParam)  if (!file) return c.text("Couldn't find file", 400)
const uploadedFile = await createFile(c, file) return c.json(uploadedFile)})This section includes the GET /models route and the createModel function. The function createModel takes care of specifying the details and initiating the fine-tuning process with OpenAI. The route handles incoming requests for creating a new fine-tuned model.
const createModel = async (c: Context, fileId: string) => {  const openai: OpenAI = c.get("openai");
  const body = {    training_file: fileId,    model: "gpt-4o-mini",  };
  return openai.fineTuning.jobs.create(body);};
app.get("/models", async (c) => {  const fileId = c.req.query("file_id");  if (!fileId) return c.text("Missing file ID query param", 400);
const model = await createModel(c, fileId); return c.json(model);});This section describes the GET /jobs route and the corresponding getJobs function. The function interacts with OpenAI's API to fetch a list of all fine-tuning jobs. The route provides an interface for retrieving this information.
const getJobs = async (c: Context) => {  const openai: OpenAI = c.get("openai");  const resp = await openai.fineTuning.jobs.list();  return resp.data;};
app.get("/jobs", async (c) => { const jobs = await getJobs(c); return c.json(jobs);});After you have created your Worker application and added the required functions, deploy the application.
Before you deploy, you must set the OPENAI_API_KEY secret for your application. Do this by running the wrangler secret put command:
npx wrangler secret put OPENAI_API_KEYTo deploy your Worker application to the Cloudflare global network:
- Make sure you are in your Worker project's directory, then run the
wrangler deploycommand:
npx wrangler deploy-
Wrangler will package and upload your code.
-
After your application is deployed, Wrangler will provide you with your Worker's URL.
To use your application, create a new fine-tune job by making a request to the /files with a file query param matching the filename you uploaded earlier:
curl https://your-worker-url.com/files?file=finetune.jsonlWhen the file is uploaded, issue another request to /models, passing the file_id query parameter. This should match the id returned as JSON from the /files route:
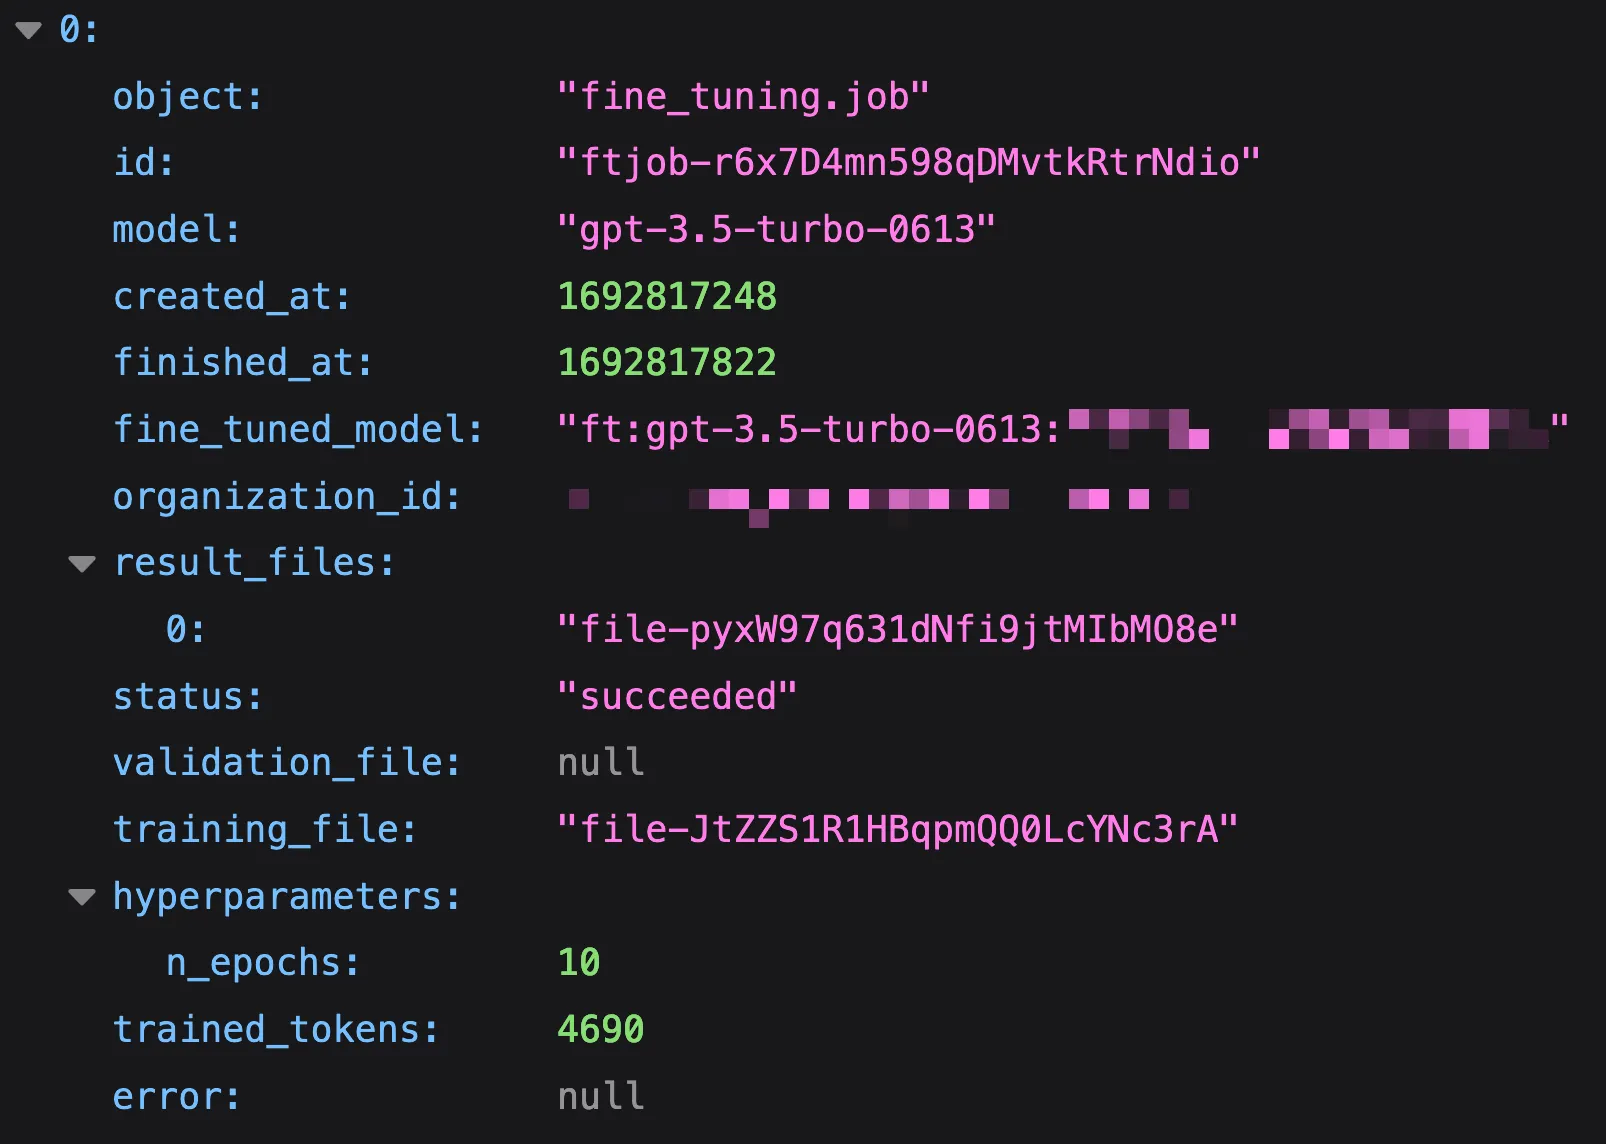
curl https://your-worker-url.com/models?file_id=file-abc123Finally, visit /jobs to see the status of your fine-tune jobs in OpenAI. Once the fine-tune job has completed, you can see the fine_tuned_model value, indicating a fine-tuned model has been created.
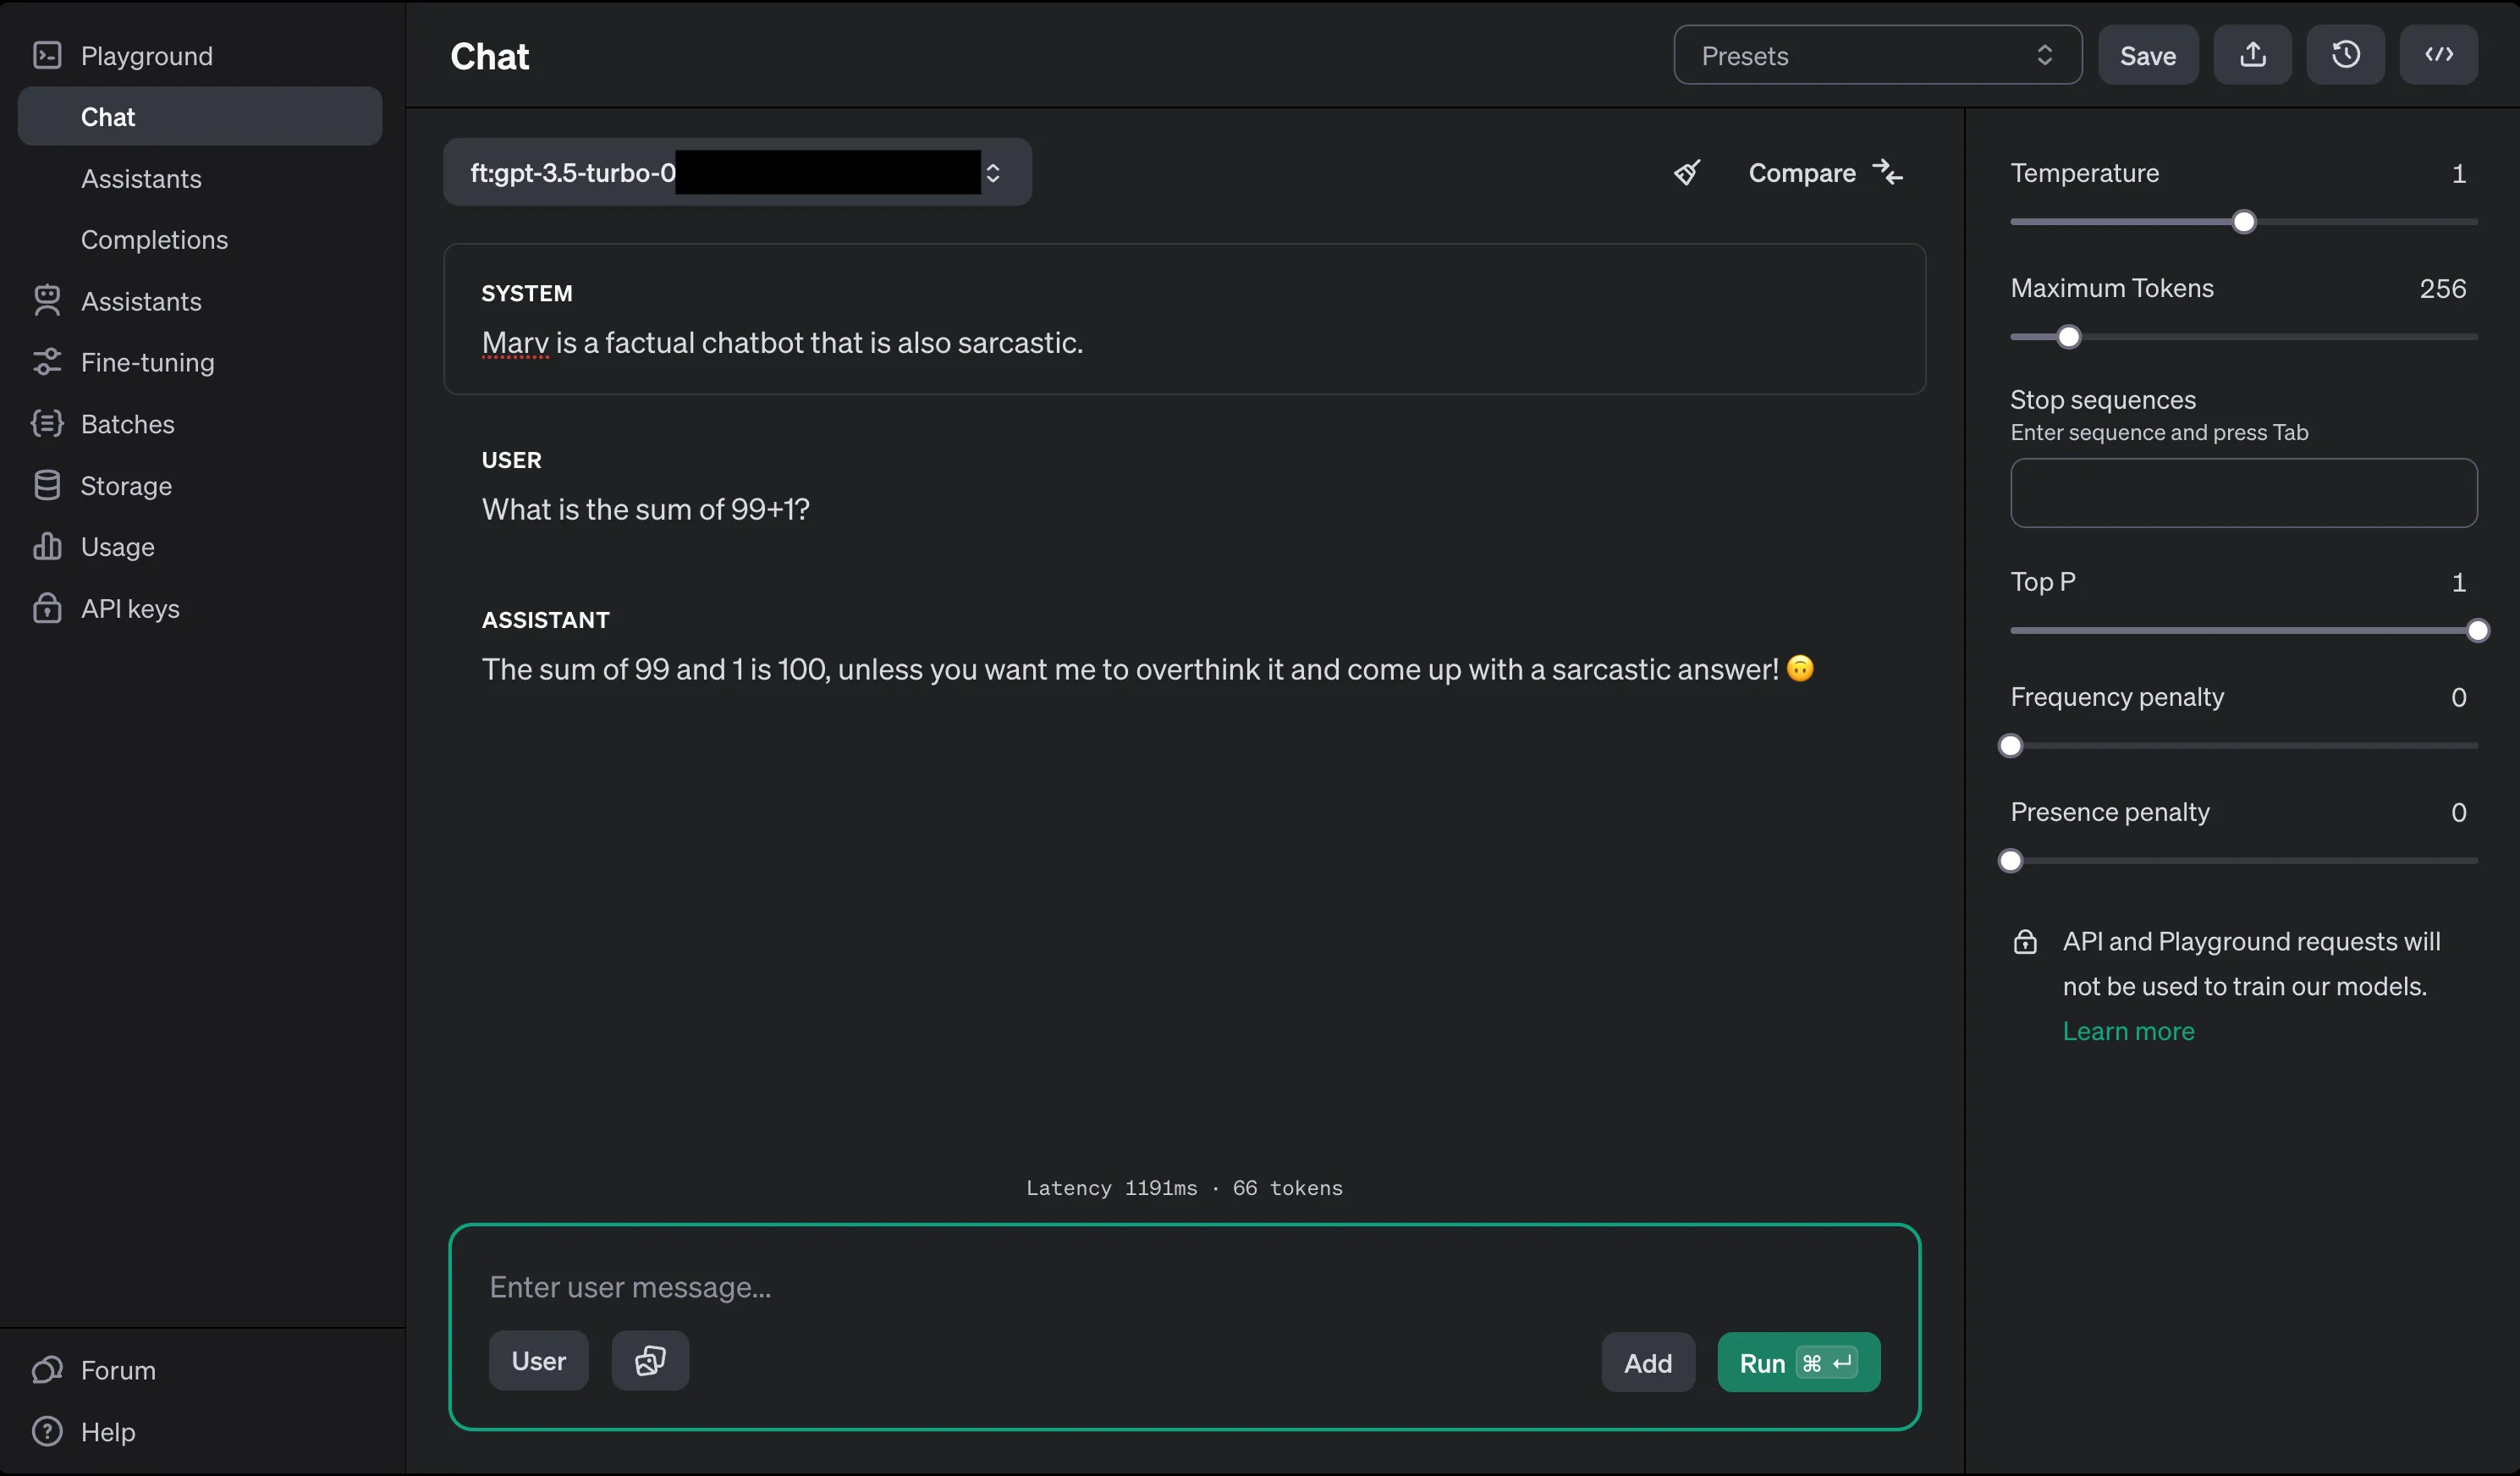
Visit the OpenAI Playground ↗ in order to use your fine-tune model. Select your fine-tune model from the top-left dropdown of the interface.
Use it in any API requests you make to OpenAI's chat completions endpoints. For instance, in the below code example:
openai.chat.completions.create({ messages: [{ role: "system", content: "You are a helpful assistant." }], model: "ft:gpt-4o-mini:my-org:custom_suffix:id",});To build more with Workers, refer to Tutorials.
If you have any questions, need assistance, or would like to share your project, join the Cloudflare Developer community on Discord ↗ to connect with other developers and the Cloudflare team.