Service bindings
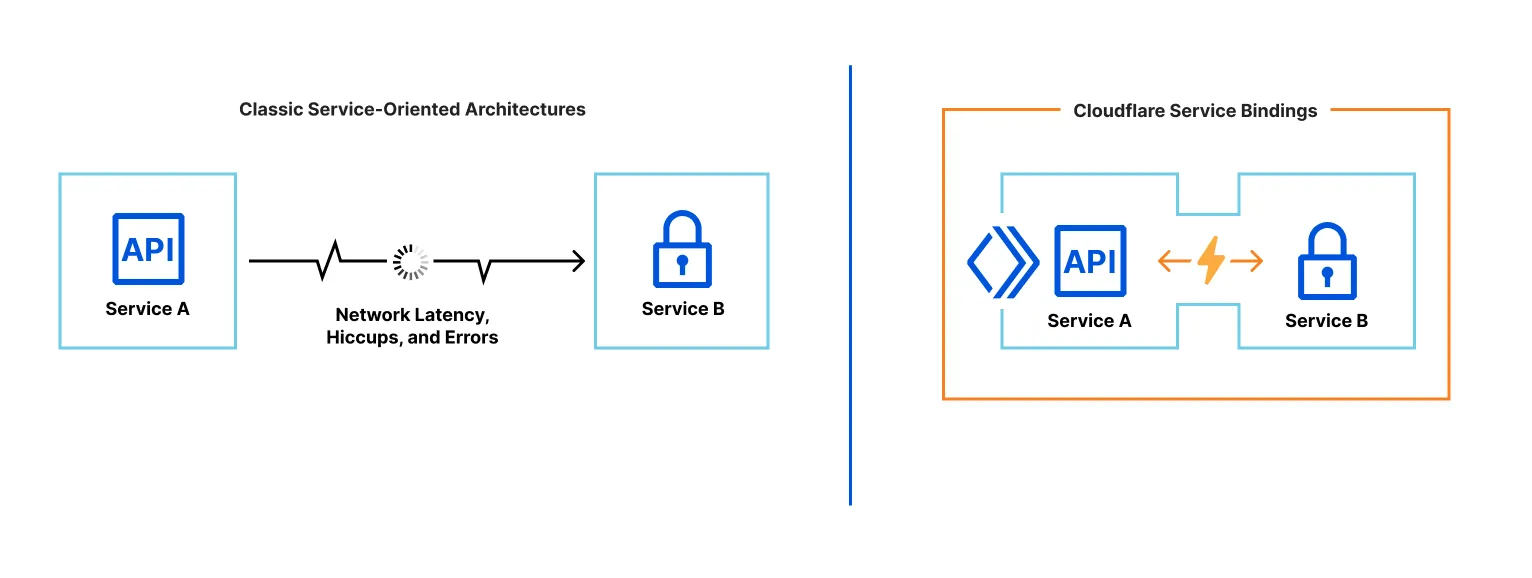
Service bindings allow one Worker to call into another, without going through a publicly-accessible URL. A Service binding allows Worker A to call a method on Worker B, or to forward a request from Worker A to Worker B.
Service bindings provide the separation of concerns that microservice or service-oriented architectures provide, without configuration pain, performance overhead or need to learn RPC protocols.
- Service bindings are fast. When you use Service Bindings, there is zero overhead or added latency. By default, both Workers run on the same thread of the same Cloudflare server. And when you enable Smart Placement, each Worker runs in the optimal location for overall performance.
- Service bindings are not just HTTP. Worker A can expose methods that can be directly called by Worker B. Communicating between services only requires writing JavaScript methods and classes.
- Service bindings don't increase costs. You can split apart functionality into multiple Workers, without incurring additional costs. Learn more about pricing for Service Bindings.
Service bindings are commonly used to:
- Provide a shared internal service to multiple Workers. For example, you can deploy an authentication service as its own Worker, and then have any number of separate Workers communicate with it via Service bindings.
- Isolate services from the public Internet. You can deploy a Worker that is not reachable via the public Internet, and can only be reached via an explicit Service binding that another Worker declares.
- Allow teams to deploy code independently. Team A can deploy their Worker on their own release schedule, and Team B can deploy their Worker separately.
You add a Service binding by modifying the Wrangler configuration file of the caller — the Worker that you want to be able to initiate requests.
For example, if you want Worker A to be able to call Worker B — you'd add the following to the Wrangler configuration file for Worker A:
{ "services": [ { "binding": "<BINDING_NAME>", "service": "<WORKER_NAME>" } ]}[[services]]binding = "<BINDING_NAME>"service = "<WORKER_NAME>"binding: The name of the key you want to expose on theenvobject.service: The name of the target Worker you would like to communicate with. This Worker must be on your Cloudflare account.
Worker A that declares a Service binding to Worker B can call Worker B in two different ways:
- RPC lets you communicate between Workers using function calls that you define. For example,
await env.BINDING_NAME.myMethod(arg1). This is recommended for most use cases, and allows you to create your own internal APIs that your Worker makes available to other Workers. - HTTP lets you communicate between Workers by calling the
fetch()handler from other Workers, sendingRequestobjects and receivingResponseobjects back. For example,env.BINDING_NAME.fetch(request).
This example extends the WorkerEntrypoint class to support RPC-based Service bindings.
First, create the Worker that you want to communicate with. Let's call this "Worker B". Worker B exposes the public method, add(a, b):
{ "$schema": "./node_modules/wrangler/config-schema.json", "name": "worker_b", "main": "./src/workerB.js"}"$schema" = "./node_modules/wrangler/config-schema.json"name = "worker_b"main = "./src/workerB.js"import { WorkerEntrypoint } from "cloudflare:workers";
export default class WorkerB extends WorkerEntrypoint { // Currently, entrypoints without a named handler are not supported async fetch() { return new Response(null, { status: 404 }); }
async add(a, b) { return a + b; }}Next, create the Worker that will call Worker B. Let's call this "Worker A". Worker A declares a binding to Worker B. This is what gives it permission to call public methods on Worker B.
{ "$schema": "./node_modules/wrangler/config-schema.json", "name": "worker_a", "main": "./src/workerA.js", "services": [ { "binding": "WORKER_B", "service": "worker_b" } ]}"$schema" = "./node_modules/wrangler/config-schema.json"name = "worker_a"main = "./src/workerA.js"
[[services]]binding = "WORKER_B"service = "worker_b"export default { async fetch(request, env) { const result = await env.WORKER_B.add(1, 2); return new Response(result); },};To run both Worker A and Worker B in local development, you must run two instances of Wrangler in your terminal. For each Worker, open a new terminal and run npx wrangler@latest dev.
Each Worker is deployed separately.
The Service bindings API is asynchronous — you must await any method you call. If Worker A invokes Worker B via a Service binding, and Worker A does not await the completion of Worker B, Worker B will be terminated early.
For more about the lifecycle of calling a Worker over a Service Binding via RPC, refer to the RPC Lifecycle docs.
Local development is supported for Service bindings. For each Worker, open a new terminal and use wrangler dev in the relevant directory. When running wrangler dev, service bindings will show as connected/not connected depending on whether Wrangler can find a running wrangler dev session for that Worker. For example:
$ wrangler dev...Your worker has access to the following bindings:- Services: - SOME_OTHER_WORKER: some-other-worker [connected] - ANOTHER_WORKER: another-worker [not connected]Wrangler also supports running multiple Workers at once with one command. To try it out, pass multiple -c flags to Wrangler, like this: wrangler dev -c wrangler.json -c ../other-worker/wrangler.json. The first config will be treated as the primary worker, which will be exposed over HTTP as usual at http://localhost:8787. The remaining config files will be treated as secondary and will only be accessible via a service binding from the primary worker.
Workers using Service bindings are deployed separately.
When getting started and deploying for the first time, this means that the target Worker (Worker B in the examples above) must be deployed first, before Worker A. Otherwise, when you attempt to deploy Worker A, deployment will fail, because Worker A declares a binding to Worker B, which does not yet exist.
When making changes to existing Workers, in most cases you should:
- Deploy changes to Worker B first, in a way that is compatible with the existing Worker A. For example, add a new method to Worker B.
- Next, deploy changes to Worker A. For example, call the new method on Worker B, from Worker A.
- Finally, remove any unused code. For example, delete the previously used method on Worker B.
Smart Placement automatically places your Worker in an optimal location that minimizes latency.
You can use Smart Placement together with Service bindings to split your Worker into two services:
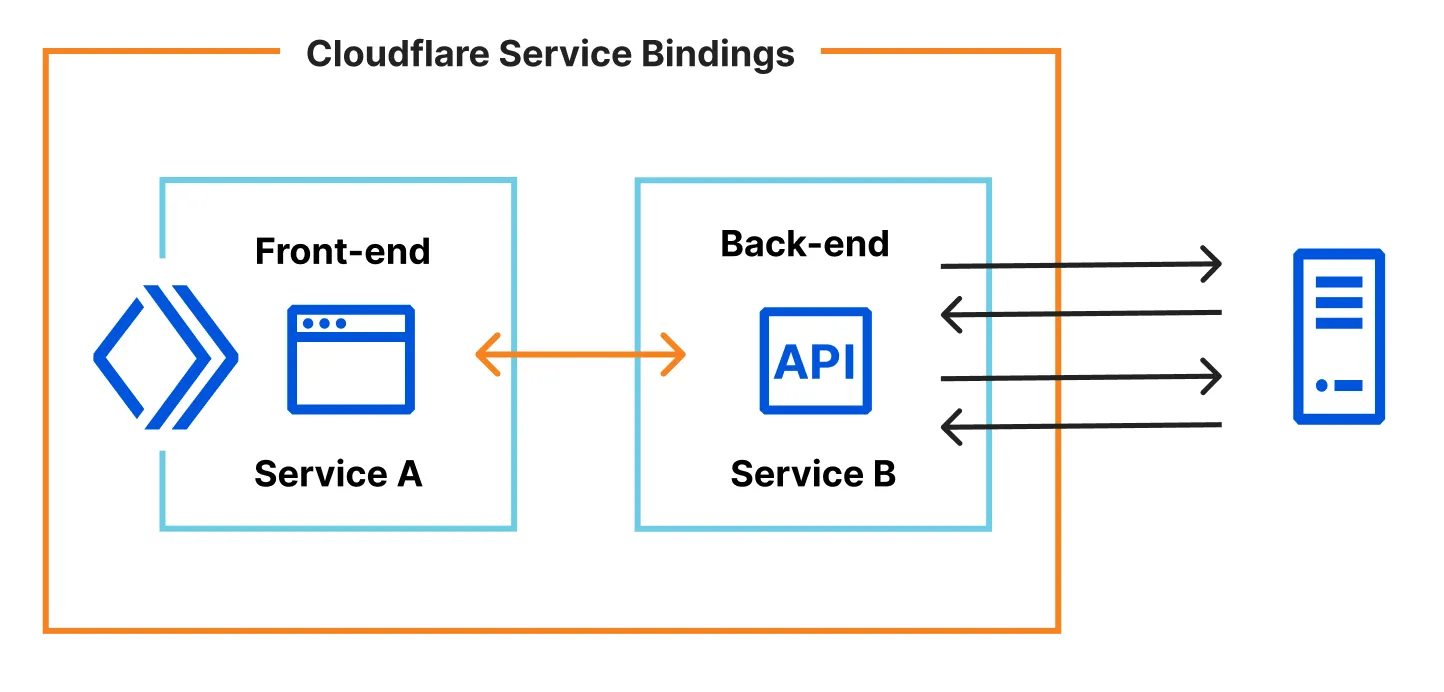
Refer to the docs on Smart Placement for more.
Service bindings have the following limits:
- Each request to a Worker via a Service binding counts toward your subrequest limit.
- A single request has a maximum of 32 Worker invocations, and each call to a Service binding counts towards this limit. Subsequent calls will throw an exception.
- Calling a service binding does not count towards simultaneous open connection limits