MongoDB SSH
You can build Zero Trust rules to secure connections to MongoDB deployments using Cloudflare Access and Cloudflare Tunnel. Cloudflare Tunnel requires a lightweight daemon, cloudflared, running alongisde the deployment and as on the client side.
In this tutorial, a client running cloudflared connects over SSH to a MongoDB deployment running on Kubernetes. The deployment example is structured to connect Compass ↗ to the MongoDB instance. The MongoDB Kubernetes deployment runs both the MongoDB database service and cloudflared as a ingress service that operates like a jump host.
This tutorial covers how to:
- Create a Cloudflare Access rule to secure a MongoDB deployment
- Configure a StatefulSet and service definition for the deployment
- Configure an Cloudflare Tunnel connection to Cloudflare's edge
- Create an SSH configuration file for the client
Time to complete:
50 minutes
You can build a rule in Cloudflare Access to control who can connect to your MongoDB deployment. Cloudflare Access rules are built around a hostname; even though this deployment will be accessible over SSH, the resource will be represented in Cloudflare as a hostname. For example, if you have the website app.com in your Cloudflare account, you can build a rule to secure mongodb.app.com.
-
In Cloudflare One ↗, go to Access controls > Applications.
-
Select Add an application.
-
Select Self-hosted.
-
Enter any name for the application.
-
Select Add public hostname and enter the subdomain where users will connect to your deployment (for example,
mongodb.app.com). -
Add Access policies to control who can reach the deployment. You can build a policy that allows anyone in your organization to connect or you can build more granular policies based on signals like identity provider groups, multifactor method, or country.
-
Follow the remaining self-hosted application creation steps to publish the application.
To be accessible over SSH, the Kubernetes deployment should manage both the MongoDB standalone service and an SSH proxy service. The configuration below will deploy 1 replica of the database service, available at port 27017, as well as an SSH proxy available at port 22.
StatefulSet Configuration
apiVersion: apps/v1kind: StatefulSetmetadata: name: mongodb-standalone namespace: mongodbspec: serviceName: database replicas: 1 selector: matchLabels: app: database template: metadata: labels: app: database selector: mongodb-standalone spec: containers: - name: mongodb-standalone image: mongo command: ["mongod"] args: ["--config=/config/mongod.conf"] ports: - containerPort: 27017 protocol: TCP name: mongod volumeMounts: - name: mongodb-conf mountPath: /config readOnly: true - name: mongodb-data mountPath: /data/db - name: tls mountPath: /etc/tls - name: mongodb-socket mountPath: /socket - name: ssh-proxy image: ubuntu:20.04 command: ["/scripts/entrypoint.sh"] ports: - containerPort: 22 protocol: TCP name: ssh-port volumeMounts: - name: mongodb-socket mountPath: /socket - name: scripts mountPath: /scripts readOnly: true - name: ssh-authorized-keys mountPath: /config/ssh readOnly: true resources: requests: cpu: 20m memory: 32Mi volumes: - name: mongodb-socket emptyDir: {} - name: mongodb-conf configMap: name: mongodb-standalone items: - key: mongod.conf path: mongod.conf - name: tls secret: secretName: tls - name: mongodb-data persistentVolumeClaim: claimName: mongodb-standalone - name: scripts configMap: name: scripts items: - key: entrypoint.sh path: entrypoint.sh mode: 0744 - name: ssh-authorized-keys configMap: name: ssh-proxy-config items: - key: authorized_keys path: authorized_keys mode: 0400The corresponding service definition should also specify the ports and target ports for the containers (in this case, the database service and the SSH proxy service).
Service Definition
apiVersion: v1kind: Servicemetadata: name: database namespace: mongodb labels: app: databasespec: clusterIP: None selector: app: database ports: - protocol: TCP port: 27017 targetPort: 27017---apiVersion: v1kind: Servicemetadata: name: ssh-proxy namespace: mongodb labels: app: databasespec: selector: app: database ports: - protocol: TCP port: 22 targetPort: 22The MongoDB pod and the SSH jump host will share a Unix socket over an empty directory volume. The entrypoint.sh file run by the jump host, example below, will start an OpenSSH server.
#!/bin/shexport TZ=America/Chicagoln -snf /usr/share/zoneinfo/$TZ /etc/localtime && echo $TZ > /etc/timezoneapt-get update -y && apt-get install -y openssh-servermkdir /root/.sshcp /config/ssh/authorized_keys /root/.ssh/authorized_keyschmod 400 /root/.ssh/authorized_keysservice ssh startwhile true;do sleep 30;done;Next, you can use cloudflared to connect to Cloudflare's Edge using Cloudflare Tunnel. Start by downloading and installing the Cloudflare Tunnel daemon, cloudflared.
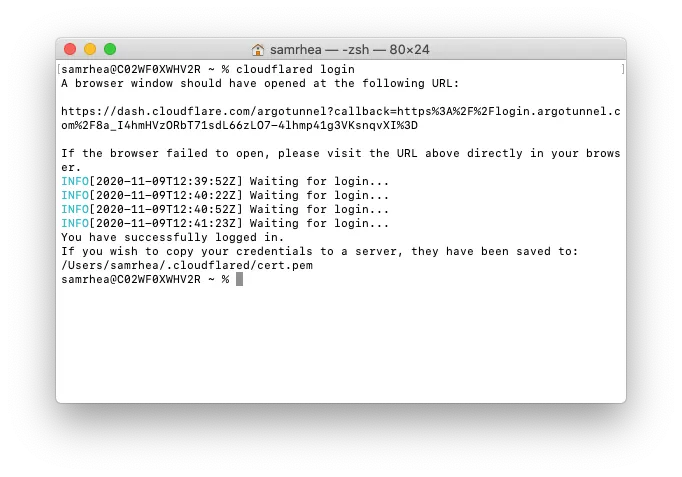
Once installed, run the following command to authenticate the instance of cloudflared into your Cloudflare account.
cloudflared loginThe command will launch a browser window and prompt you to login with your Cloudflare account. Choose a website that you have added into your account.
Once you select one of the sites in your account, Cloudflare will download a certificate file, called cert.pem to authenticate this instance of cloudflared. The cert.pem file uses a certificate to authenticate your instance of cloudflared and includes an API key for your account to perform actions like DNS record changes.
You can now use cloudflared to control Cloudflare Tunnel connections in your Cloudflare account.
You can now create a Tunnel that will connect cloudflared to Cloudflare's edge. You'll configure the details of that Tunnel in the next step.
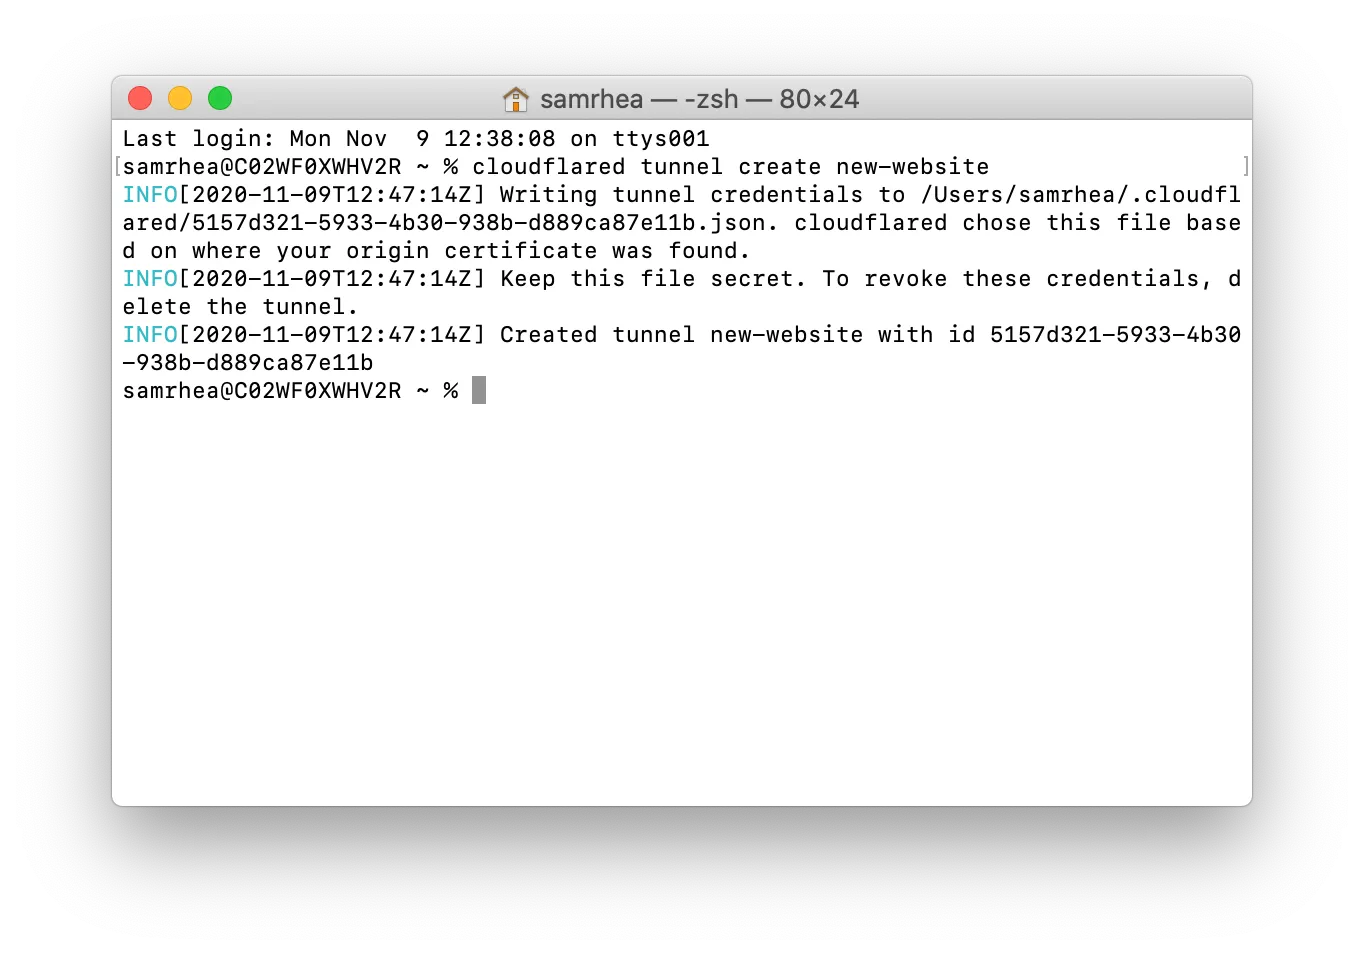
Run the following command to create a Tunnel. You can replace mongodb with any name that you choose. This command requires the cert.pem file.
cloudflared tunnel create mongodb
Cloudflare will create the Tunnel with that name and generate an ID and credentials file for that Tunnel.
The credentials file is separate from the cert.pem file. Unlike the cert.pem file, the credentials file consists of a token that authenticates only the Named Tunnel you just created. Formatted as JSON, the file cannot make changes to your Cloudflare account or create additional Tunnels.
If you are done creating Tunnels, you can delete the cert.pem file, leave only the credentials file, and continue to manage DNS records directly in the Cloudflare dashboard or API. For additional information on the different functions of the two files, refer to the list of useful terms.
Store the JSON file as a Kubernetes secret.
The previous setps used cloudflared to generate a credentials file for your Cloudflare account. When run as a service alongside the MongoDB Kubernetes deployment you will need to use a Docker image of cloudflared. Cloudflare makes an official image available ↗ in DockerHub.
The configuration below will run a single replica of cloudflared as an ingress point alongside the MongoDB and SSH proxy services. cloudflared will proxy traffic to the SSH proxy service. The cloudflared instance will run as its own deployment in a different namespace and, if network policy allows, ingress to any service in the Kubernetes node.
cloudflared Configuration
cloudflared ConfigurationapiVersion: apps/v1kind: Deploymentmetadata: name: dashboard-tunnel namespace: argotunnel labels: app: dashboard-tunnelspec: replicas: 1 selector: matchLabels: app: dashboard-tunnel template: metadata: labels: app: dashboard-tunnel spec: containers: - name: dashboard-tunnel # Image from https://hub.docker.com/r/cloudflare/cloudflared image: cloudflare/cloudflared:2020.11.11 command: ["cloudflared", "tunnel"] args: ["--config", "/etc/tunnel/config.yaml", "run"] ports: - containerPort: 5000 livenessProbe: tcpSocket: port: 5000 initialDelaySeconds: 60 periodSeconds: 60 volumeMounts: - name: dashboard-tunnel-config mountPath: /etc/tunnel - name: tunnel-credentials mountPath: /etc/credentials volumes: - name: dashboard-tunnel-config configMap: name: dashboard-tunnel-config - name: tunnel-credentials secret: secretName: tunnel-credentials---apiVersion: v1kind: ConfigMapmetadata: name: dashboard-tunnel-config namespace: argotunneldata: config.yaml: | tunnel: 9a00ef26-4997-4de2-83db-631efc74245c credentials-file: /etc/credentials/k8s-dashboard.json metrics: :5000 protocol: http2 no-autoupdate: true ingress: - hostname: mongodb.widgetcorp.tech originRequest: bastionMode: true - service: http_status:404Once deployed, you can run cloudflared on the client side to connect to the MongoDB deployment. Add the following lines to your SSH configuration file, replacing the examples with your hostname and details. The --destination value should match the URL of the SSH Proxy service configured previously.
Host mongodb ProxyCommand /usr/local/bin/cloudflared access ssh --hostname mongodb.widgetcorp.tech --destination ssh-proxy.mongodb.svc.cluster.local:22 LocalForward 27000 /socket/mongodb-27017.sock User root IdentityFile /Users/username/.ssh/id_rsaThis is a one-time step. When you next attempt to make an SSH connection to the deployment, cloudflared will launch a browser window and prompt you to authenticate. Once authenticated, you will be connected if you have a valid session. Once the tunnel is established, all requests to localhost:27000 on your machine will be forwarded to /socket/mongodb-27017.sock on the SSH proxy container.
You can then set MongoDB Compass to connect to localhost:27000.