Microsoft Entra ID
You can integrate Microsoft Entra ID (formerly Azure Active Directory) with Cloudflare One and build policies based on user identity and group membership. Users will authenticate to Cloudflare One using their Entra ID credentials.
The following Entra ID values are required to set up the integration:
- Application (client) ID
- Directory (tenant) ID
- Client secret
To retrieve those values:
-
Log in to the Microsoft Entra admin center ↗.
-
Go to Applications > Enterprise applications.
-
Select New application, then select Create your own application.
-
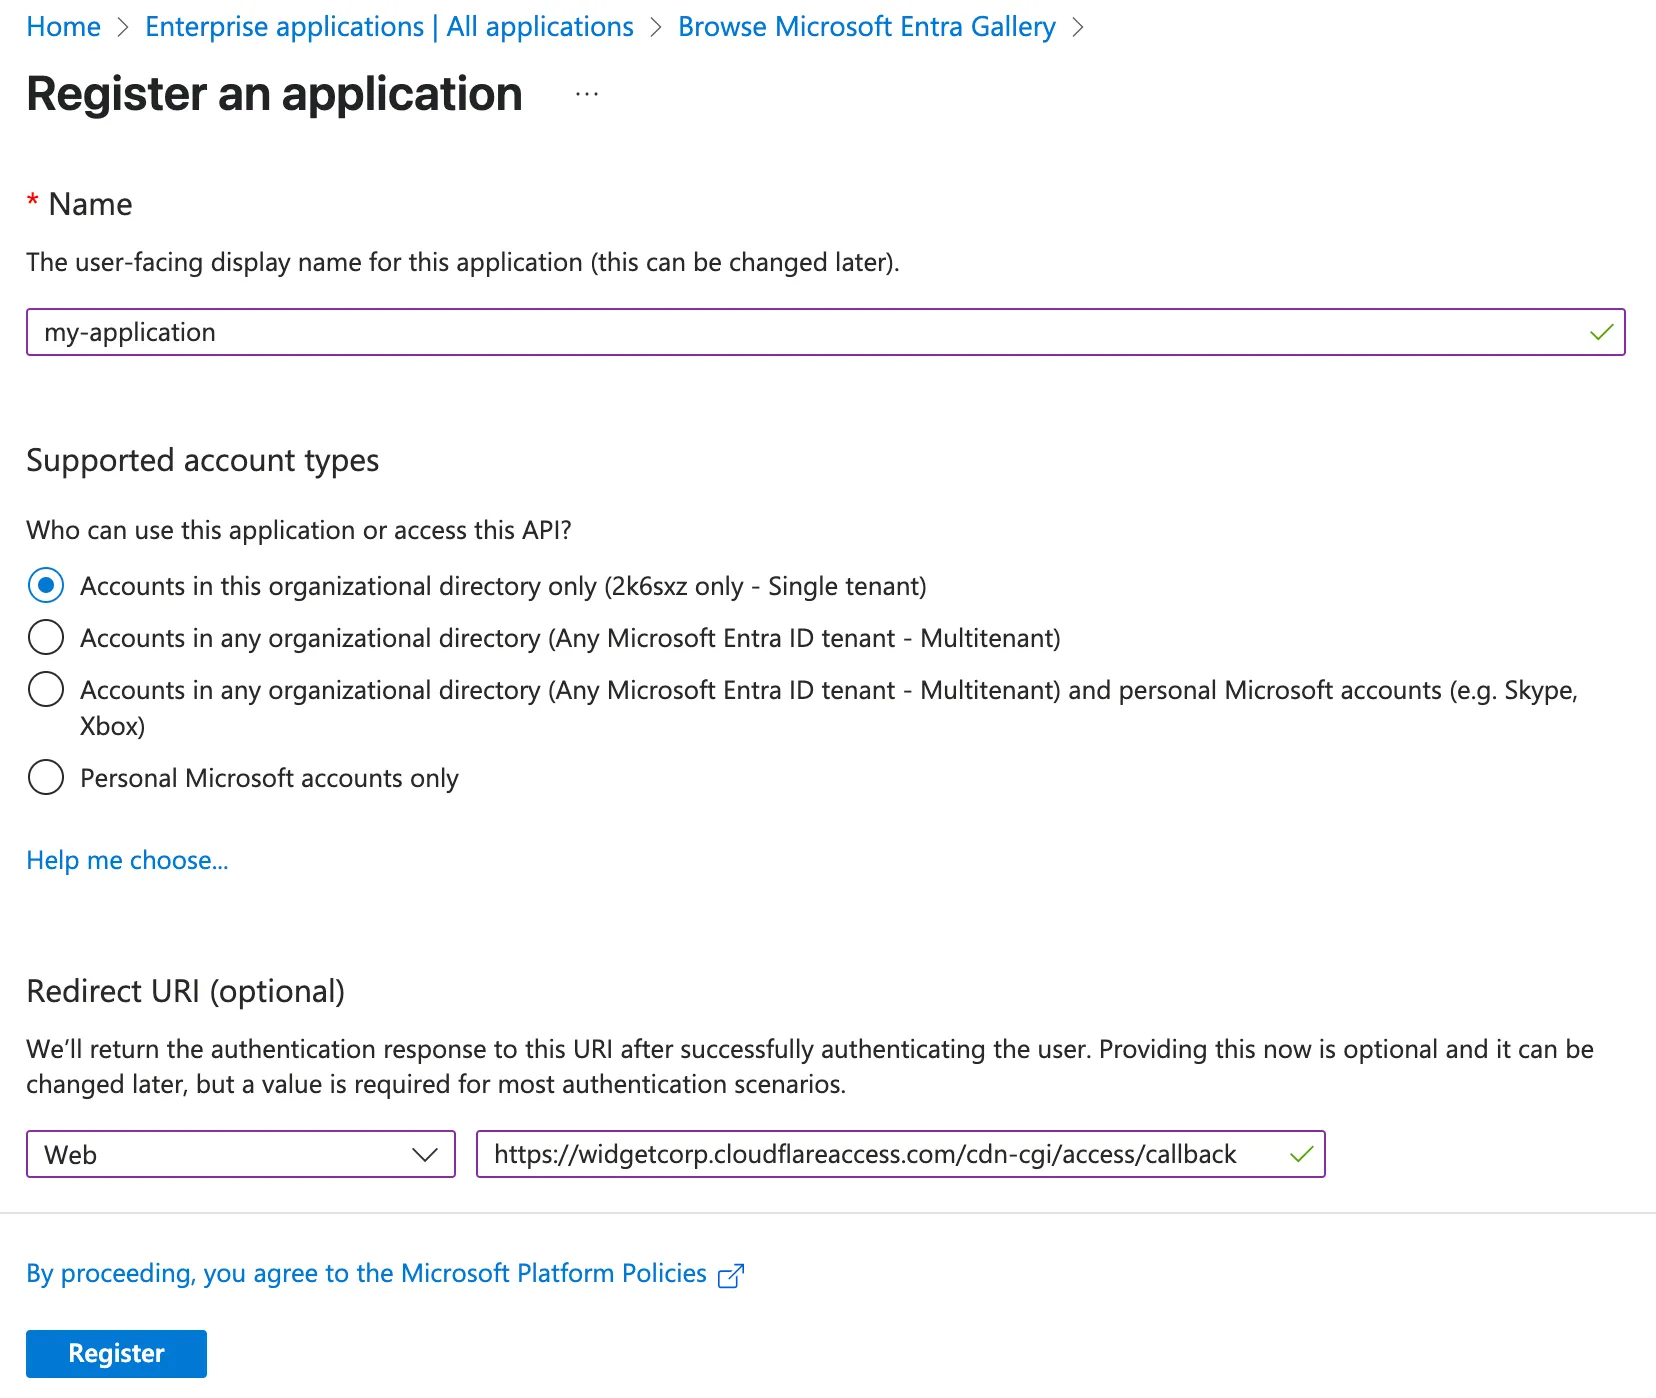
Name your application.
-
Select Register an application to integrate with Microsoft Entra ID (App you're developing). If offered, do not select any of the gallery applications. Select Create.
-
Under Redirect URI, select the Web platform and enter the following URL.
https://<your-team-name>.cloudflareaccess.com/cdn-cgi/access/callbackYou can find your team name in the Cloudflare dashboard ↗ under Settings > Team name and domain > Team name.
-
Select Register.
-
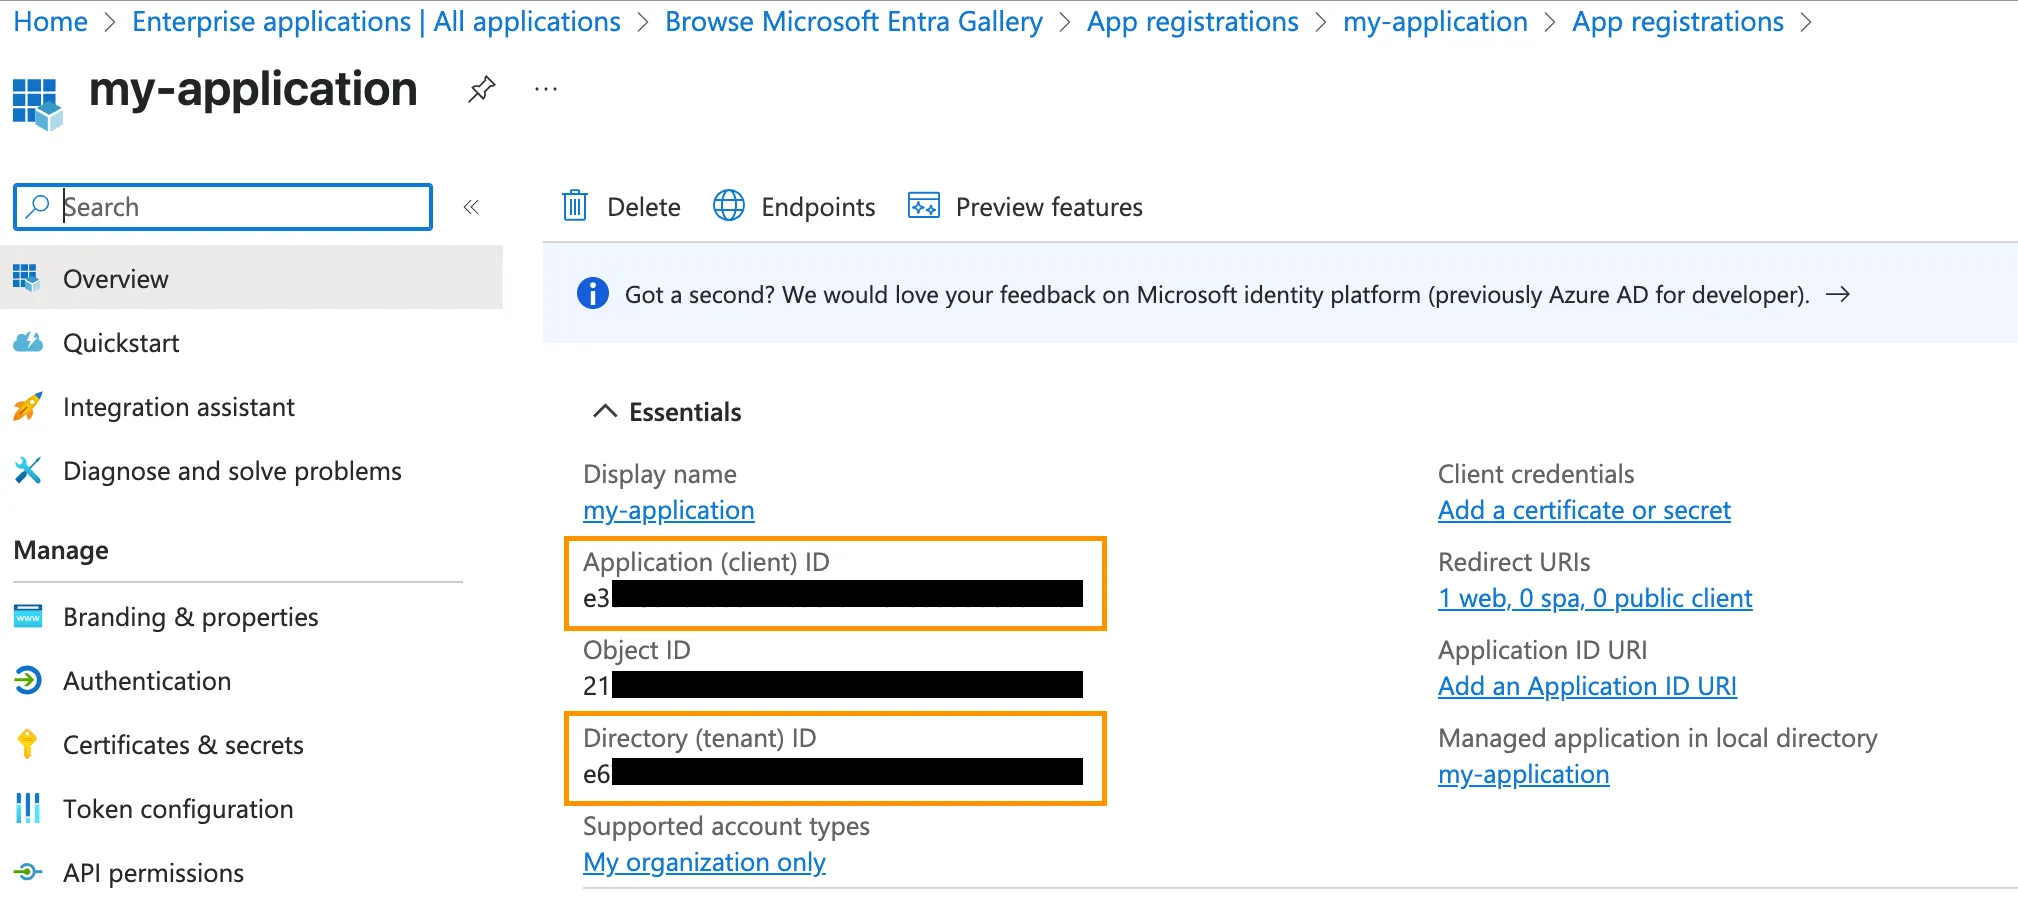
Next, return to Microsoft Entra ID and go to Applications > App registrations.
-
Select All applications and select the app you just created. Copy the Application (client) ID and Directory (tenant) ID. You will need these values when adding Entra ID as an identity provider in step 3.
-
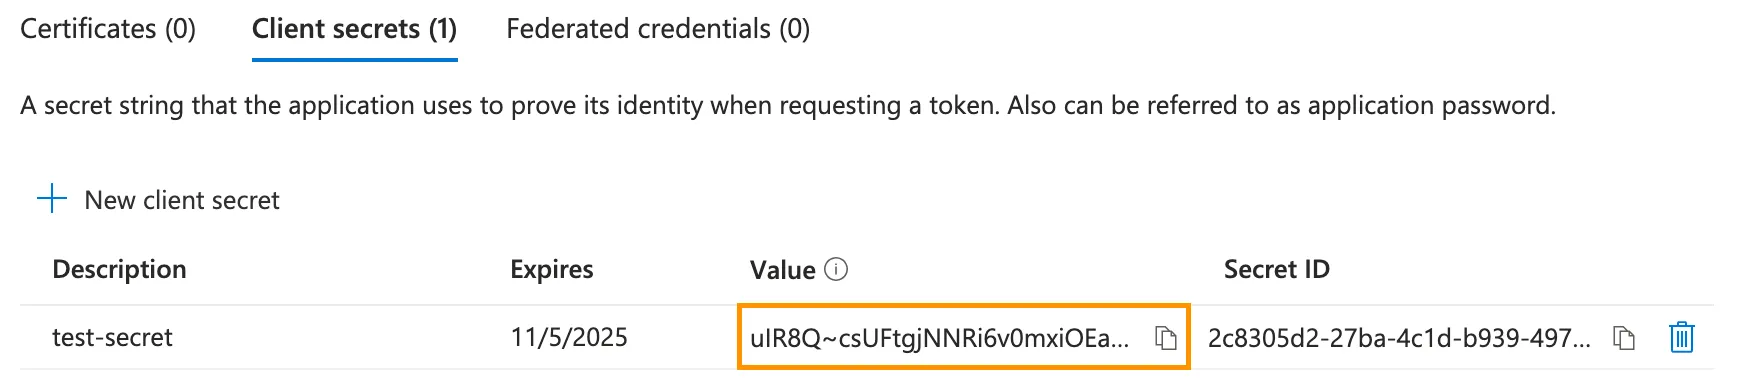
On the same page, under Client credentials, go to Add a certificate or secret. Select New client secret.
-
Name the client secret and choose an expiration period.
-
After the client secret is created, copy its Value field. Store the client secret in a safe place, as it can only be viewed immediately after creation. You will need this client secret value when adding Entra ID as an identity provider in step 3.
-
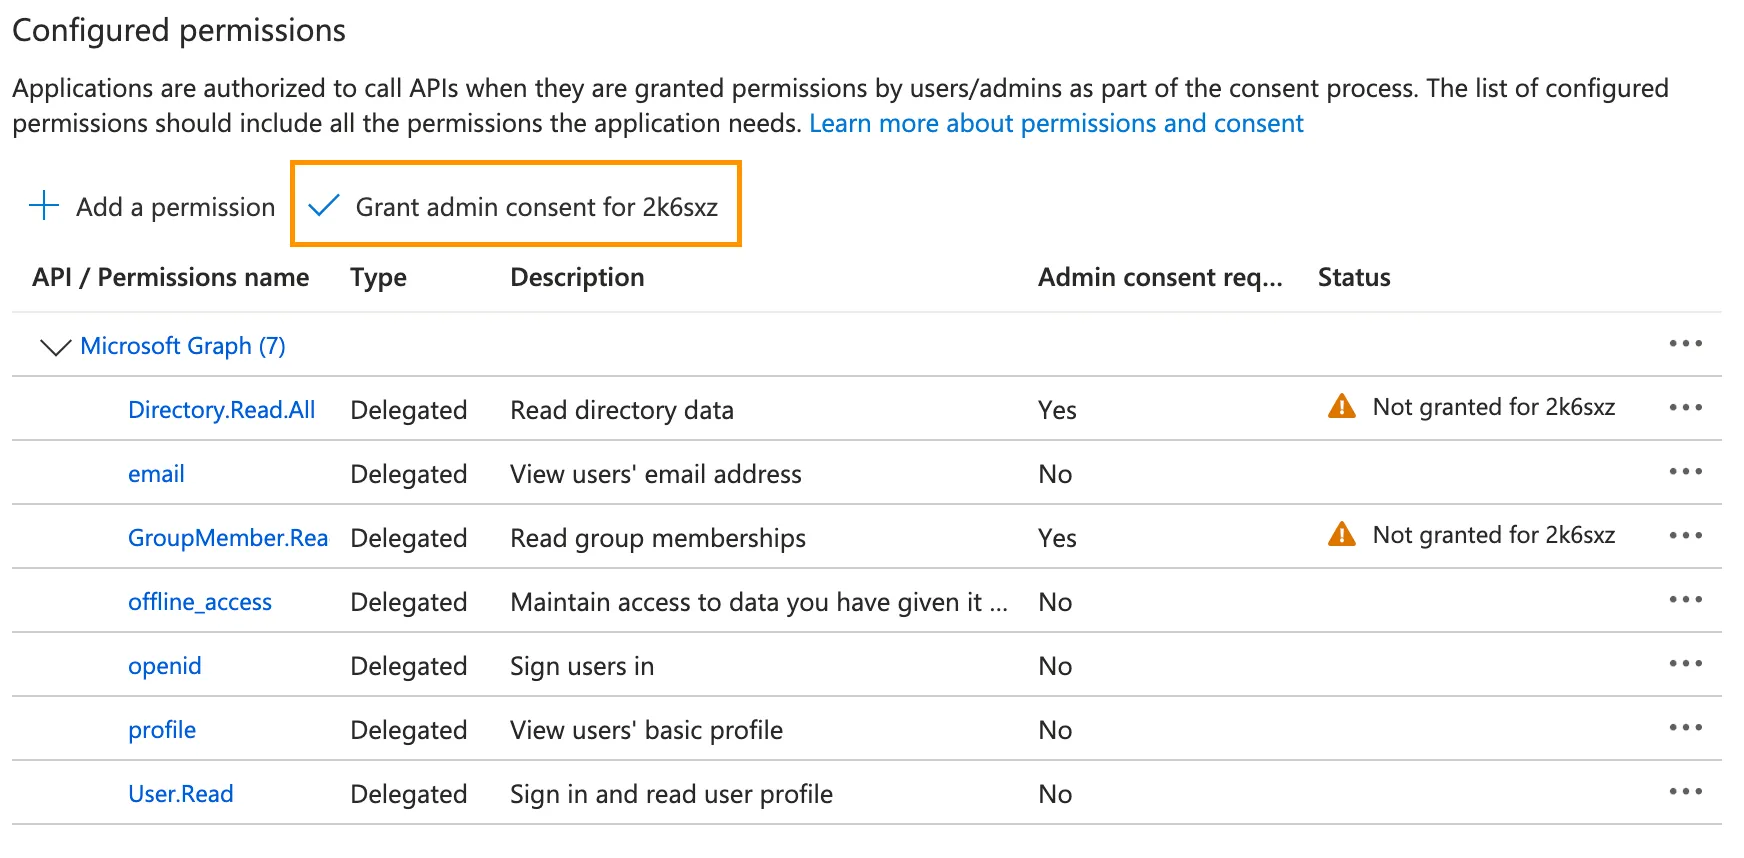
Go to App registrations > All applications > select your application > API permissions.
-
Select Add a permission.
-
Select Microsoft Graph.
-
Select Delegated permissions and enable the following permissions ↗:
emailoffline_accessopenidprofileUser.ReadDirectory.Read.AllGroupMember.Read.All
-
Once all seven permissions are enabled, select Add permissions.
-
Select Grant admin consent.
-
In the Cloudflare dashboard ↗, go to Zero Trust > Integrations > Identity providers.
-
Under Your identity providers, select Add new identity provider.
-
Select Azure AD.
-
Enter the Application (client) ID, Client secret, and Directory (tenant) ID obtained from Microsoft Entra ID.
-
Select Save.
-
To test that your connection is working, select Test.
-
(Optional) Configure the following settings:
- Proof Key for Code Exchange: Perform PKCE ↗ on all login attempts.
- Support Groups: Allow Cloudflare to read a user's Entra ID group membership.
- Entra ID Policy Sync: Refer to our Entra ID Conditional Access tutorial.
- Enable SCIM: Refer to Synchronize users and groups.
- Email claim: Enter the Entra ID claim that you wish to use for user identification (for example,
preferred_username). - OIDC Claims: Enter custom OIDC claims that you wish to add to your users' identity.
Make a POST request to the Identity Providers endpoint:
Required API token permissions
At least one of the following token permissions
is required:
Access: Organizations, Identity Providers, and Groups Write
curl "https://api.cloudflare.com/client/v4/accounts/$ACCOUNT_ID/access/identity_providers" \ --request POST \ --header "Authorization: Bearer $CLOUDFLARE_API_TOKEN" \ --json '{ "name": "Entra ID example", "type": "azureAD", "config": { "client_id": "<your client id>", "client_secret": "<your client secret>", "directory_id": "<your azure directory uuid>", "support_groups": true } }'-
Add the following permission to your
cloudflare_api_token↗:Access: Organizations, Identity Providers, and Groups Write
-
Configure the
cloudflare_zero_trust_access_identity_provider↗ resource:resource "cloudflare_zero_trust_access_identity_provider" "microsoft_entra_id" {account_id = var.cloudflare_account_idname = "Entra ID example"type = "azureAD"config = {client_id = var.entra_id_client_idclient_secret = var.entra_id_client_secretdirectory_id = var.entra_id_directory_idsupport_groups = true}}
If your organization's UPNs do not match users' email addresses, you must add a custom claim for email. For example, if your organization's email format is user@domain.com but the UPN is u908080@domain.com, you must create an email claim if you are configuring email-based policies.
By default, Cloudflare will first look for the unique claim name you created and configured in Cloudflare One to represent email (for example, email_identifier) in the id_token JSON response. If you did not configure a unique claim name, Cloudflare will then look for an email claim. Last, if neither claim exists, Cloudflare will look for the UPN claim.
To receive an email claim in the id_token from Microsoft Entra, you must:
-
In the Microsoft Entra admin center ↗, go to Application > App registration > All applications and select the relevant application.
-
Under Manage, select Token configuration.
-
Add a claim for email.
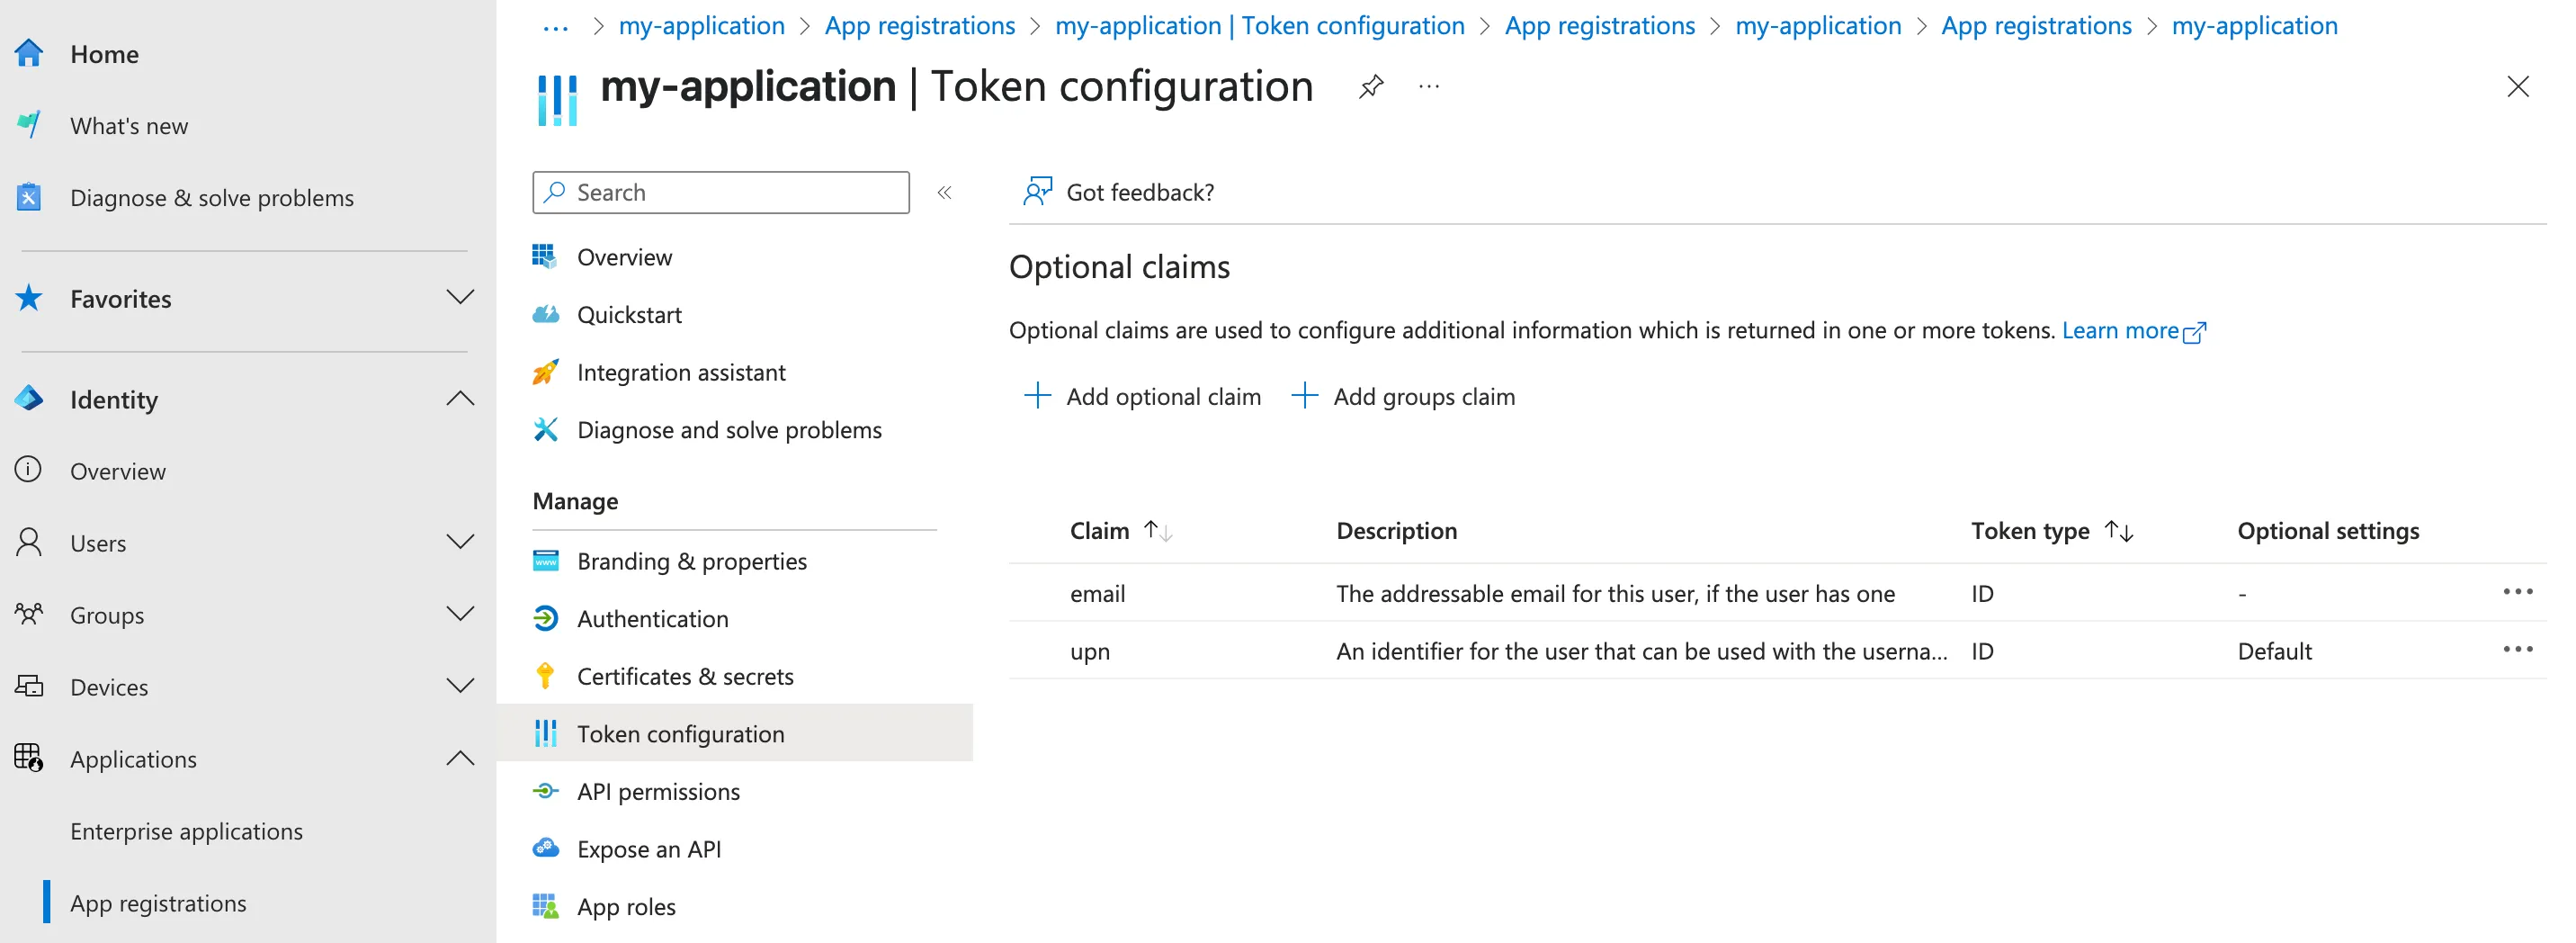
The example above includes both a UPN claim and an email claim. Because an email claim was created in the Microsoft Entra configuration, Cloudflare will look for the
emailkey-value pair in the JSON response. -
If you gave your email claim another name than
email, you must update your configuration in Cloudflare One:a. In the Cloudflare dashboard ↗, go to Zero Trust > Integrations > Identity providers > Azure AD > Edit.
b. Under Optional configurations > Email claim, enter the name of the claim representing your organization's email addresses.
If you are concerned that users' emails or UPNs may change, you can pass the user's object ID (oid) from Microsoft Entra to Cloudflare Access. To configure Access to receive the object ID, refer to custom OIDC claims. No additional configuration is required in Microsoft Entra.
The Microsoft Entra ID integration allows you to synchronize IdP groups and automatically deprovision users using SCIM.
- Microsoft Entra ID P1 or P2 license
-
In the Cloudflare dashboard ↗, go to Zero Trust > Integrations > Identity providers.
-
Find the Entra ID integration and select Edit.
-
Turn on Enable SCIM and Support groups.
-
(Optional) Configure the following settings:
- Enable user deprovisioning: Revoke a user's active session when they are removed from the SCIM application in Entra ID. This will invalidate all active Access sessions and prompt for reauthentication for any Cloudflare One Client session policies.
- Remove user seat on deprovision: Remove a user's seat from your Cloudflare One account when they are removed from the SCIM application in Entra ID.
- SCIM identity update behavior: Choose what happens in Cloudflare One when the user's identity updates in Entra ID.
- Automatic identity updates: Automatically update the User Registry identity when Entra ID sends an updated identity or group membership through SCIM. This identity is used for Gateway policies and Cloudflare One Client device profiles; Access will read the user's updated identity when they reauthenticate.
- Group membership change reauthentication: Revoke a user's active session when their group membership changes in Entra ID. This will invalidate all active Access sessions and prompt for reauthentication for any Cloudflare One Client session policies. Access will read the user's updated group membership when they reauthenticate.
- No action: Update the user's identity the next time they reauthenticate to Access or the Cloudflare One Client.
-
Select Regenerate Secret. Copy the SCIM Endpoint and SCIM Secret. You will need to enter these values into Entra ID.
-
Select Save.
The SCIM secret never expires, but you can manually regenerate the secret at any time.
-
In the Microsoft Entra ID menu, go to Enterprise applications.
-
Select New application > Create your own application.
-
Name your application (for example,
Cloudflare Access SCIM). -
Select Integrate any other application you don't find in the gallery (Non-gallery). If offered, do not select any of the gallery applications. Select Create.
-
After you have created the application, go to Provisioning > select New Configuration.
-
In the Tenant URL field, enter the SCIM Endpoint obtained from your Entra ID integration in Cloudflare One in the previous step.
-
In the Secret token field, enter the SCIM Secret obtained from your Entra ID integration in Cloudflare One in the previous step.
-
Select Test Connection to ensure that the credentials were entered correctly. If the test fails, go to your Entra ID integration in Cloudflare One, select Regenerate Secret, select Save, and enter your new SCIM Secret in the Secret token field.
-
Select Create.
-
Once the SCIM application is created, assign users and groups to the application ↗.
-
Go to Provisioning and select Start provisioning.
-
For Provisioning Mode, the default mode should be set by Microsoft to Automatic.
-
On the Overview page in Entra ID, you will see the synchronization status.
To check which users and groups were synchronized, select Provisioning logs.
To check if user identities were updated in Cloudflare One, view your SCIM provisioning logs.
To monitor the exchange of identity details between Cloudflare Access and Microsoft Entra ID, go to the Cloudflare dashboard ↗ > Zero Trust > Insights > Logs > SCIM provisioning logs and view the SCIM activity logs.
Provisioning attributes define the user properties that Entra ID will synchronize with Cloudflare Access. To modify your provisioning attributes, go to the Attribute mapping and select Provision Microsoft Entra ID Users.
If not already configured, Cloudflare recommends enabling the following user attribute mappings:
| customappsso Attribute | Entra ID Attribute | Recommendation |
|---|---|---|
userName | userPrincipalName or mail | Required. Must match the user's email address in Cloudflare One. |
emails[type eq "work"].value | mail | Required. Must match the user's email address in Cloudflare One. |
name.givenName | givenName | Recommended |
name.familyName | surname | Recommended |
When SCIM synchronization is enabled, your Entra group names will automatically appear in the Access and Gateway policy builders.

If building a Gateway policy, choose the User Group Names selector.
You can create Access and Gateway policies for groups that are not synchronized with SCIM. Entra ID exposes directory groups in a format that consists of random strings, the Object Id, that is distinct from the Name.
-
Make sure you enable Support groups as you set up Microsoft Entra ID in Cloudflare One.
-
In your Microsoft Entra dashboard, note the
Object Idfor the Entra group. In the example below, the group named Admins has an ID of61503835-b6fe-4630-af88-de551dd59a2.
-
If building an Access policy, choose the Azure Groups selector. If building a Gateway policy, choose the User Group IDs selector.
-
In the Value field, enter the
Object Idfor the Entra group.
Access and Gateway policies for an Entra group will also apply to all nested groups ↗. For example, if a user belongs to the group US devs, and US devs is part of the broader group Devs, the user would be allowed or blocked by all policies created for Devs.
For SCIM provisioning, nested groups are not supported ↗. Microsoft Entra ID's SCIM implementation does not send information about nested group memberships to Cloudflare. Only users who are direct members of an explicitly assigned group will be provisioned. To ensure group memberships are correctly synchronized, you must flatten your groups in Entra ID by directly assigning users to the groups you want to provision.
Since the SCIM request from Microsoft does not include nested group information, neither Cloudflare nor Microsoft can provide a notification that nested groups are not being synchronized.
You can require users to re-enter their credentials into Entra ID whenever they re-authenticate their Cloudflare One Client session. To configure this setting:
-
Make a
GETrequest to the Identity Providers endpoint and copy the response for the Entra ID identity provider.
At least one of the following token permissions is required:Required API token permissions
Access: Organizations, Identity Providers, and Groups WriteAccess: Organizations, Identity Providers, and Groups Read
Get an Access identity provider curl "https://api.cloudflare.com/client/v4/accounts/$ACCOUNT_ID/access/identity_providers/$IDENTITY_PROVIDER_ID" \--request GET \--header "Authorization: Bearer $CLOUDFLARE_API_TOKEN" -
Update the Entra ID identity provider using a
PUTrequest. In the request body, include all existing configurations and set thepromptparameter to eitherloginorselect_account. For example:
At least one of the following token permissions is required:Required API token permissions
Access: Organizations, Identity Providers, and Groups Write
Update an Access identity provider curl "https://api.cloudflare.com/client/v4/accounts/$ACCOUNT_ID/access/identity_providers/$IDENTITY_PROVIDER_ID" \--request PUT \--header "Authorization: Bearer $CLOUDFLARE_API_TOKEN" \--json '{"id": "f174e90a-fafe-4643-bbbc-4a0ed4fc8415","type": "azureAD","uid": "f174e90a-fafe-4643-bbbc-4a0ed4fc8415","name": "Entra ID","version": "31e74e9b4f033e16b604552091a72295","config": {"azure_cloud": "default","client_id": "<CLIENT_ID>","conditional_access_enabled": false,"directory_id": "<AZURE_DIRECTORY_ID>","redirect_url": "https://<TEAM_NAME>.cloudflareaccess.com/cdn-cgi/access/callback","prompt": "login","support_groups": true},"scim_config": {"enabled": true,"user_deprovision": true,"seat_deprovision": false,"group_member_deprovision": false,"identity_update_behavior": "automatic"},"scim_base_url": "https://<TEAM_NAME>.cloudflareaccess.com/populations/f174e90a-fafe-4643-bbbc-4a0ed4fc8415/scim/v2"}'