Connect with self-managed SSH keys
If you want to manage your own SSH keys, you can use Cloudflare Tunnel to create a secure, outbound-only connection from your server to Cloudflare's global network. This requires running the cloudflared daemon on the server (or any other host machine within the private network). Users with SSH keys that are trusted by the SSH server can access the server by installing the Cloudflare One Client on their device and enrolling in your Zero Trust organization. Users can SSH directly to the server's private hostname (for example, ssh.internal.local). You control access to the server using network-level Gateway policies instead of application-level Access policies.
- A Cloudflare Zero Trust organization
- Cloudflare One Client installed on user devices.
- Devices enrolled in your Zero Trust organization
This example walks through how to set up an SSH server on a Google Cloud Platform (GCP) virtual machine (VM), but you can use any machine that supports SSH connections. If you already have an SSH server configured, you can skip to Step 2.
Before creating your VM instance you will need to create an SSH key pair.
-
Open a terminal and type the following command:
Terminal window ssh-keygen -t rsa -f ~/.ssh/gcp_ssh -C <username in GCP> -
Enter your passphrase when prompted. It will need to be entered twice.
Two files will be generated:
gcp_sshwhich contains the private key, andgcp_ssh.pubwhich contains the public key. -
In the command line, enter:
Terminal window cat ~/.ssh/gcp_ssh.pub -
Copy the output. This will be used when creating the VM instance in GCP.
Now that the SSH key pair has been created, you can create a VM instance.
- In your Google Cloud Console ↗, create a new project ↗.
- Go to Compute Engine > VM instances.
- Select Create instance.
- Name your VM instance, for example
ssh-server. - Scroll down to Advanced options > Security > Manage Access.
- Under Add manually generated SSH keys, select Add item and paste the public key that you have created.
- Select Create.
- Once your VM instance is running, open the dropdown next to SSH and select Open in browser window.
This section covers how to create a new Cloudflare Tunnel for your SSH server. You can reuse the same tunnel for all services on a private network that are reachable from the cloudflared host.
-
Log in to Cloudflare One ↗ and go to Networks > Connectors > Cloudflare Tunnels.
-
Select Create a tunnel.
-
Choose Cloudflared for the connector type and select Next.
-
Enter a name for your tunnel. We suggest choosing a name that reflects the type of resources you want to connect through this tunnel (for example,
enterprise-VPC-01). -
Select Save tunnel.
-
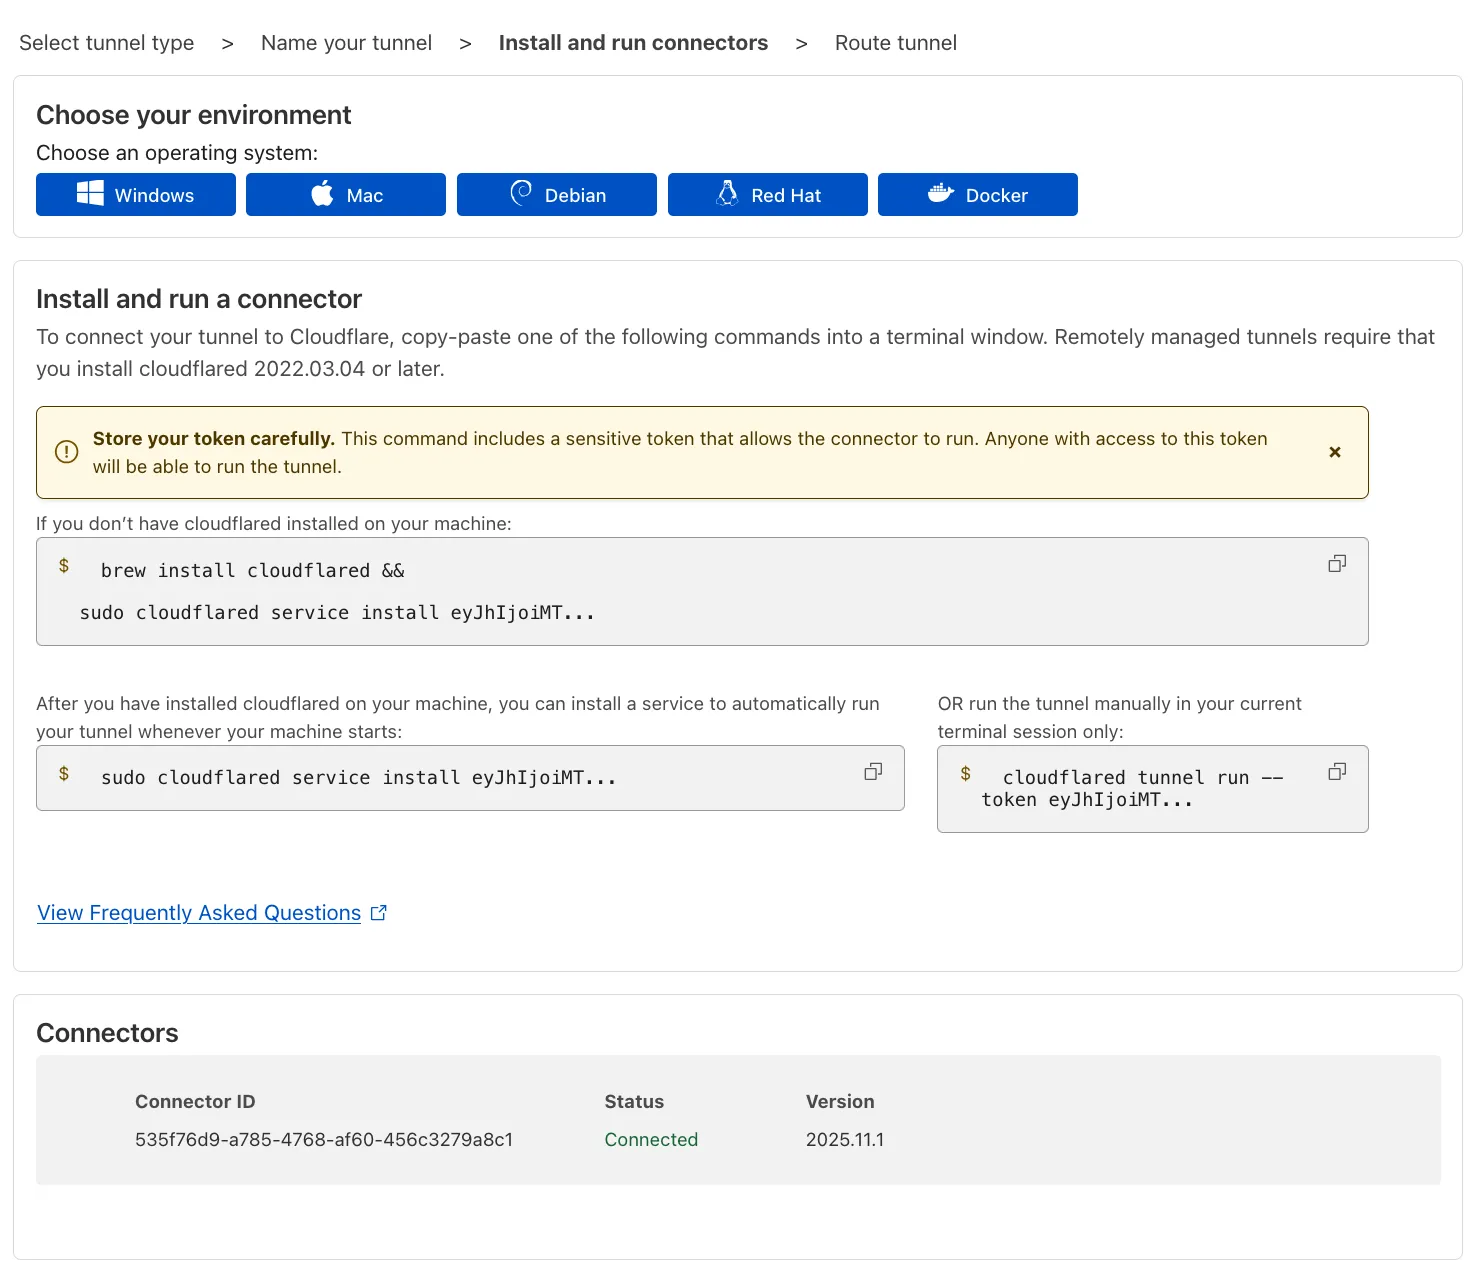
Next, you will need to install
cloudflaredand run it. To do so, check that the environment under Choose an environment reflects the operating system on your machine, then copy the command in the box below and paste it into a terminal window. Run the command. -
Once the command has finished running, your connector will appear in Cloudflare One.
-
Select Next.
Hostname routes allow you to SSH directly to ssh.internal.local without managing static IP routes. Hostname routes are especially useful when your SSH server has an unknown or ephemeral IP address, such as dynamic infrastructure provisioned by cloud providers.
How hostname routing works
When you create a hostname route in Cloudflare Tunnel:
- Users SSH to your private hostname (for example,
ssh user@ssh.internal.local). - Gateway resolves the hostname to an initial resolved IP from a CGNAT range.
- Traffic routes through the WARP tunnel to Cloudflare.
- Gateway network policies evaluate the connection.
- Cloudflared proxies the connection to your SSH server's private IP.
If you do not have a private DNS resolver configured or would rather SSH to an IP address, skip to Step 4.
To add a hostname route to your tunnel:
-
In your tunnel configuration, go to the Hostname routes tab.
-
Enter the hostname of your SSH server (for example,
ssh.internal.local).Hostname format restrictions
- Character limit: Must be less than 255 characters.
- Supported wildcards: A single wildcard (
*) is allowed, and it must represent a full DNS label. Example:*.internal.local - Unsupported wildcards: The following wildcard formats are not supported:
- Partial wildcards such as
*-dev.internal.localordev-*.internal.local. - Wildcards in the middle, such as
foo*bar.internal.localorfoo.*.internal.local. - Multiple wildcards in the hostname, such as
*.*.internal.local.
- Partial wildcards such as
- Wildcard trimming: Leading wildcards (
*) are trimmed off and an implicit dot (.) is assumed. For example,*.internal.localis saved asinternal.localbut will match all subdomains at the wildcard level (coversfoo.internal.localbut notfoo.bar.internal.local). - Dot trimming: Leading and ending dots (
.) are allowed but trimmed off.
-
Select Complete setup.
When Gateway receives a request for your private hostname, it must resolve the hostname to your SSH server's private IP address.
By default, cloudflared uses the private DNS resolver configured on its host machine (for example, in /etc/resolv.conf on Linux). If the machine running cloudflared can already resolve ssh.internal.local to its private IP using the local system resolver, no further configuration is required. You can skip to Step 3.3.
Verify local DNS resolution
To check if cloudflared can successfully resolve ssh.internal.local, run the following command from the cloudflared host:
nslookup ssh.internal.localServer: 127.0.2.2Address: 127.0.2.2#53
Non-authoritative answer:Name: ssh.internal.localAddress: 10.2.0.3The output should contain the server's private IP address (the Internal IP of the GCP VM). If the hostname fails to resolve:
- Make sure that your private DNS resolver has a record that points
ssh.internal.localto the server's private IP. - In GCP, you may need to add a private zone to Cloud DNS ↗ so that
internal.localresolves using your private DNS resolver.
If you need cloudflared to use a specific internal DNS server that is different from the host's default resolver, you must explicitly connect that DNS server to Cloudflare via an IP/CIDR route. You will also need to configure a Gateway resolver policy to route queries to this specific private DNS server.
-
To create an IP/CIDR route for the DNS server:
- Go to Networks > Routes > CIDR.
- Select Add CIDR route.
- Enter the private IP address of your internal DNS resolver.
- Select the Cloudflare Tunnel that connects to the network where this DNS server resides.
- Select Create.
-
To create a resolver policy:
- Go to Traffic policies > Resolver policies.
- Select Create a policy.
- Create an expression that matches the private hostname:
Selector Operator Value Host in ssh.internal.local - Under Configure custom DNS resolvers, enter the private IP address of your internal DNS server.
- From the dropdown menu, select the
- Privaterouting option and the virtual network assigned to the tunnel you selected in the previous step. - Select Create policy.
To connect to private hostnames, Cloudflare One Clients must be configured to forward the following traffic to Cloudflare:
- Initial resolved IPs (CGNAT range:
100.64.0.0/10) - DNS queries for your private hostname
In your WARP device profile, configure Split Tunnels such that the initial resolved IPs route through the WARP tunnel. Configuration depends on your Split Tunnels mode:
- Exclude mode: Delete
100.64.0.0/10from your Split Tunnels list. We recommend adding back the IP ranges that are not explicitly used for Cloudflare One services. This reduces the risk of conflicts with existing private network configurations that may use the CGNAT address space. - Include mode: Add Split Tunnel entries for the following IP addresses:
- IPv4:
100.80.0.0/16 - IPv6:
2606:4700:0cf1:4000::/64
- IPv4:
In Local Domain Fallback, delete the top-level domain for your private hostname. This configures WARP to send the DNS query to Cloudflare Gateway for resolution.
For example, if your SSH hostname is ssh.internal.local, remove internal.local from Local Domain Fallback.
To connect to the SSH server using its IP address (instead of a hostname), add a CIDR route that includes the server's private IP address.
By default, WARP excludes traffic bound for RFC 1918 space ↗, which are IP addresses typically used in private networks and not reachable from the Internet. In order for the Cloudflare One Client to send traffic to your private network, you must configure Split Tunnels so that the IP/CIDR of your private network routes through the Cloudflare One Client.
-
First, check whether your Split Tunnels mode is set to Exclude or Include mode.
-
Edit your Split Tunnel routes depending on the mode:
If you are using Exclude mode:
a. Delete the route containing your private network's IP/CIDR range. For example, if your network uses the default AWS range of
172.31.0.0/16, delete172.16.0.0/12.b. Re-add IP/CIDR ranges that are not explicitly used by your private network. For the AWS example above, you would add new entries for
172.16.0.0/13,172.24.0.0/14,172.28.0.0/15, and172.30.0.0/16. This ensures that only traffic to172.31.0.0/16routes through the Cloudflare One Client.You can use the following calculator to determine which IP addresses to re-add:
Calculator instructions
- In Base CIDR, enter the RFC 1918 range that you deleted from Split Tunnels.
- In Subtracted CIDRs, enter the IP/CIDR range used by your private network.
- Re-add the calculator results to your Split Tunnel Exclude mode list.
By tightening the private IP range included in the Cloudflare One Client, you reduce the risk of breaking a user's access to local resources.
If you are using Include mode:
- Add the required Zero Trust domains or IP addresses to your Split Tunnel include list.
- Add a route to include your private network's IP/CIDR range.
By default, all devices enrolled in your organization can SSH to the server unless you build Gateway network policies to allow or block specific users. You can create policies based on user identity, device posture, location, and other criteria.
- Go to Traffic policies > Traffic settings.
- In Proxy and inspection, turn on Allow Secure Web Gateway to proxy traffic.
- Select TCP.
- Select UDP (required to proxy traffic to internal DNS resolvers).
- (Recommended) To proxy traffic for diagnostic tools such as
pingandtraceroute, select ICMP. You may also need to update your system to allow ICMP traffic throughcloudflared.
-
Add the following permission to your
cloudflare_api_token↗:Zero Trust Write
-
Turn on the TCP and/or UDP proxy using the
cloudflare_zero_trust_device_settings↗ resource:resource "cloudflare_zero_trust_device_settings "global_warp_settings" {account_id = var.cloudflare_account_idgateway_proxy_enabled = truegateway_udp_proxy_enabled = true}
Cloudflare will now proxy traffic from enrolled devices, except for the traffic excluded in your split tunnel settings. For more information on how Gateway forwards traffic, refer to Gateway proxy.
The following example consists of two policies: the first allows specific users to reach your SSH server, and the second blocks all other traffic.
-
Go to Traffic policies > Firewall policies > Network.
-
Select Create a policy.
-
Name your policy (for example,
Allow SSH to internal server). -
Create an expression to match your SSH hostname and authorized users:
Selector Operator Value SNI in ssh.internal.localUser Email in admin@example.com,devops@example.com -
In Action, select Allow.
-
Select Create policy.
To prevent Cloudflare One Client users from accessing your entire private network, we recommend creating a catch-all Gateway block policy for your private IP space. You can then layer on higher priority Allow policies (in either Access or Gateway) which grant users access to specific applications or IPs.
For an additional layer of protection, create a Gateway DNS policy to control DNS resolution:
-
Go to Traffic policies > Firewall Policies > DNS.
-
Select Create a policy.
-
Name your policy (for example,
Allow SSH hostname resolution). -
Create an expression:
Selector Operator Value Host in ssh.internal.localUser Email in admin@example.com,devops@example.com -
In Action, select Allow.
-
Select Create policy.
Once you have set up the tunnel route and the user device, the user can now SSH into the machine. If your SSH server requires an SSH key, the key should be included in the SSH command.
ssh -i ~/.ssh/gcp_ssh <username>@ssh.internal.localThe Cloudflare One Client must be connected to your Zero Trust organization. Users will be able to connect if they match the Gateway network policies you created.
If you cannot connect, verify the following:
-
Confirm DNS resolution - From the device, confirm that you can successfully resolve the private hostname:
Terminal window nslookup ssh.internal.localServer: 127.0.2.2Address: 127.0.2.2#53Non-authoritative answer:Name: ssh.internal.localAddress: 100.80.200.48The query should resolve using WARP's DNS proxy and return a Gateway initial resolved IP. If the query fails to resolve or returns a different IP, check your Local Domain Fallback configuration and Gateway resolver policies.
-
Check Gateway logs - Review your Gateway network logs to see if the connection is being blocked by a policy.
-
Verify tunnel status - Confirm that your tunnel is healthy and connected by checking tunnel status.
-
Test connectivity to initial resolved IP - When you connect to the SSH server using its private hostname, the device should make a connection to the initial resolved IP:
Terminal window ssh -v <username>@ssh.internal.local...Authenticated to ssh.internal.local ([100.80.200.48]:22) using "publickey"....Look for a line showing connection to an IP in the
100.64.0.0/10range. If the request fails, confirm that the initial resolved IP routes through the WARP tunnel. You can also check your tunnel logs to confirm that requests are routing to the server's private IP.