Improving web security for content management systems like WordPress
Content Management Systems make it easy to create, update, and manage content. However, they can also introduce vulnerabilities that may lead to server compromise and data theft.
There are many Cloudflare features that can be used for preventing such attacks, but they can also disrupt normal administrative processes such as logging in or uploading images. With proper configuration, you can protect your site from attacks without losing important functionality.
In this stage, you are reinforcing the zone’s security features, which may cause additional disruption to admin features until exceptions can be applied. For that reason, it’s recommended to make these changes with expected administrative downtime.
The following should be considered an overview of some recommended security actions, and not a comprehensive guide. Refer to the developer documentation for specific products or features for more information.
The WAF Managed Rulesets are pre-configured rulesets that provide immediate protection against a variety of attacks, and are regularly updated. Many rules are turned on by default, but not all. It is recommended that you browse the Cloudflare Managed Ruleset to find any additional rules tagged for your content management system not enabled, and enable them:
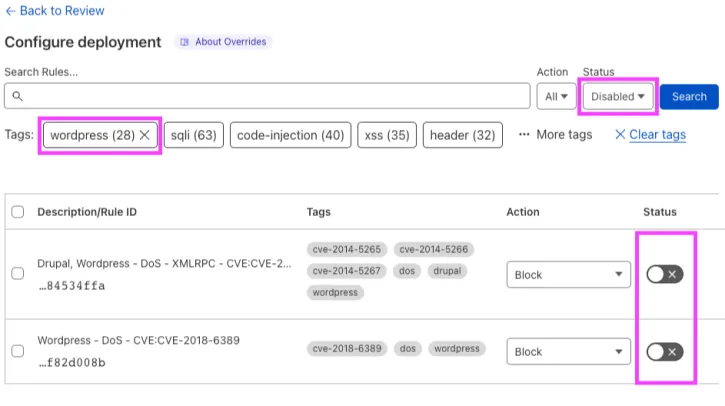
While the feature to customize these managed rulesets required a paid plan, the Free Cloudflare Managed Ruleset ↗ is automatically deployed on any new Cloudflare zone. This ruleset is specially designed to reduce false positives to a minimum across a very broad range of traffic types. As of today, the ruleset contains the following rules:
- Log4J rules matching payloads in the URI and HTTP headers;
- Shellshock rules;
- Rules matching very common WordPress exploits;
Additionally, you can configure many aspects of the OWASP Core Ruleset, including the anomaly threshold, paranoia level, and individual rules. One good practice is to ensure any rules related to XSS and SQL injection are enabled.
Using the principle of least privilege, you can run some test actions from the admin panel to audit what is blocked and what is allowed. With this information, you can create precise exceptions. If the behavior doesn’t match your expectations, make sure to check that:
- The DNS record is proxied
- You don’t have any Rules that would interfere with the WAF (like a Page Rule that is set to Disable Security)
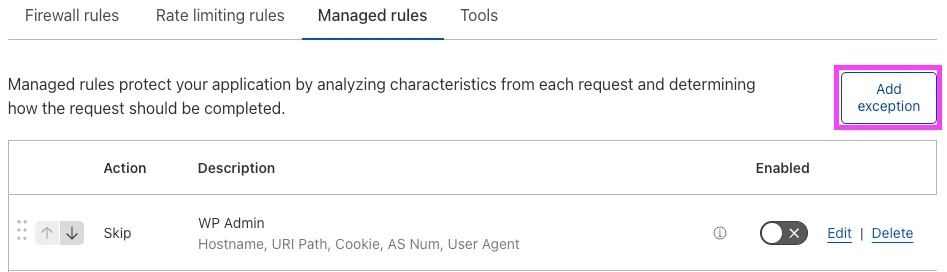
After generating enough requests to have a good sample logged in your Firewall Events, observe the actions that were taken in the Managed rules section:

Next, you can use this information to create a Skip Rule that excludes only the rules that prevent administrative actions:
It is recommended to make this rule as tightly defined as possible, particularly without the additional protections listed below. While the exact content will be site-specific, some possible fields to use are:
- IP Source Address
- AS Num
- Cookie
- User Agent
Make sure to apply the rule only to the admin portion of your CMS. With WordPress for example, you can set a condition like 'URI Path contains /wp-admin/'.
Any of these fields can be spoofed, so this is not a security measure on its own. The purpose is to restore administrative functions only to conditions that may need them, while using other tools and features (including strong passwords on your CMS logins!) to secure access.
Next, you want to use the information from your Firewall logs to select which rules to skip by adding an exception. For WordPress, I’ve chosen the following:
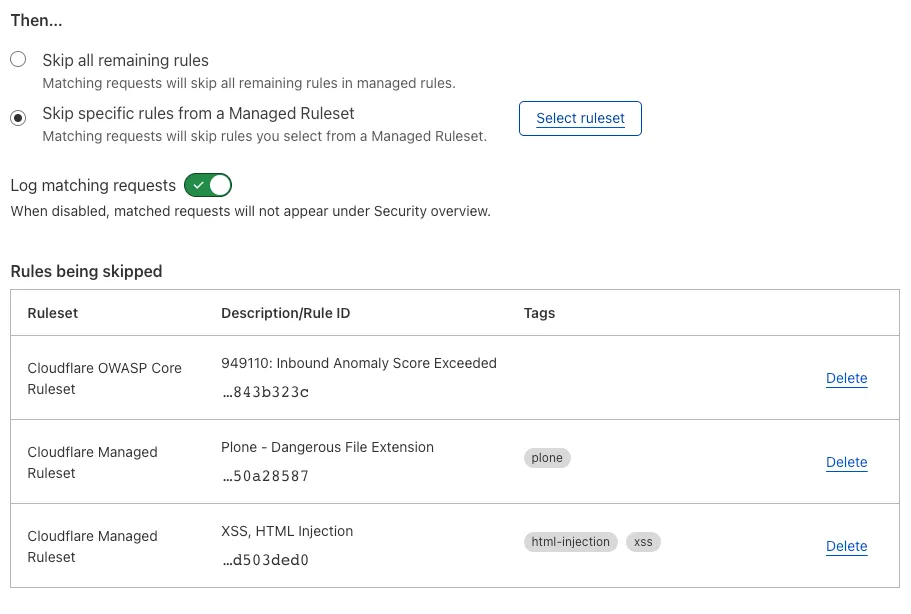
After this is complete, you will want to create a similar rule for any rulesets that prevent you from logging in. In my use case, I only needed to skip “OWASP Core Ruleset 949110.”
Note: You may also want to consider adding a rule to skip the CMS-specific rules you enabled for non-CMS sections of your site if they cause any issues. Just follow the steps above, and set it to skip any of the Cloudflare Managed Ruleset rules that were enabled above. You can set this based on hostname, URI, or cookie, using the operators does not equal, does not match, or does not contain.
Make sure to set your Skip rules to be at a higher priority than the Execute rules.
Now that you’ve elevated your security to protect the publicly accessible parts of your site against attacks and restored necessary administrative capabilities, you can further restrict who can access your admin panel in case of weak or exposed login credentials.
Zero Trust ↗ Web Applications is the best way to limit access to your admin panel. You can restrict access based on user instead of device, and it allows for very granular control. Setup of a Self-hosted web application is very easy, for more information refer to the Self-hosted applications section of the Zero Trust developer documentation.
After configuring a web application, users will be required to authenticate in some way before they can access the restricted content. The default method is through email multifactor authentication:

While designed for authenticating appliances that cannot perform a login, you can use mTLS as another method of multifactor authentication (what you know and what you have) to authenticate based on device certificate.
Do the following:
- Create a client certificate and save both the certificate and key to your device.
- Import the certificate to your computer’s key storage. With macOS Keychain, you can use the steps listed in Test in the browser.
- Enable mTLS by adding the correct host.
- In SSL/TLS > Client Certificates, select Create mTLS Rule.
- Under When incoming requests match, enter a value for the URI Path field to narrow the rule scope to the admin section, otherwise you will block your visitors from accessing the public content.
- Set the rule to Block any requests made to your admin panel if the client certificate is not verified.
- Select Deploy. This creates a WAF custom rule that checks all requests to the admin section for a valid client certificate.
Note: If you have issues getting your certificate to verify, try accessing the page in a private window. If it works, the previous successful TLS state may be cached in your browser.
Rate limiting rules can help protect your login page from an attacker trying to guess your account password with a brute force attack ↗. You can define rate limits for requests matching an expression, as well as the action to perform when those rate limits are reached.
Rate Limiting Rules are now available unmetered, on all plans. For more information, refer to the developer documentation.