Restoring original visitor IPs
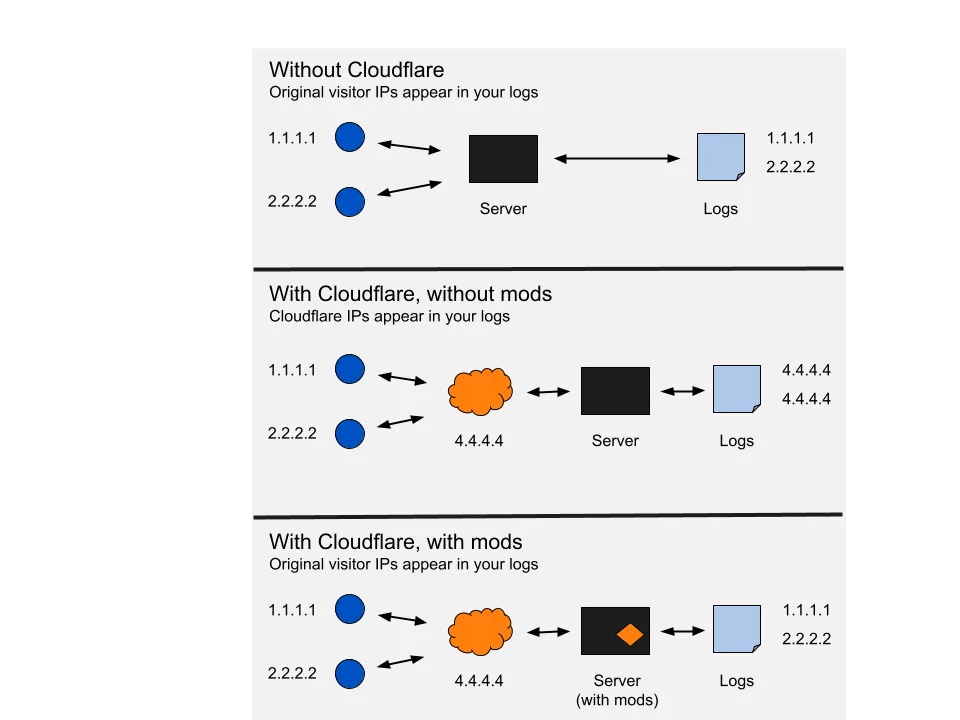
When your website traffic is routed through the Cloudflare network ↗, we act as a reverse proxy. This allows Cloudflare to speed up page load time by routing packets more efficiently and caching static resources (images, JavaScript, CSS, etc.). As a result, when responding to requests and logging them, your origin server returns a Cloudflare IP address ↗.
For example, if you install applications that depend on the incoming IP address of the original visitor, a Cloudflare IP address is logged by default. The original visitor IP address appears in an appended HTTP header called CF-Connecting-IP. By following our web server instructions, you can log the original visitor IP address at your origin server. If this HTTP header is not available when requests reach your origin server, check your Transform Rules and Managed Transforms configuration.
The diagram below illustrates the different ways that IP addresses are handled with and without Cloudflare.
Cloudflare no longer updates and supports mod_cloudflare. However, if you are using an Apache web server with an operating system such as Ubuntu Server 18.04 and Debian 9 Stretch, you can use mod_remoteip to log your visitor’s original IP address.
As this module was created by an outside party, we can't provide technical support for issues related to the plugin.
To install mod_remoteip on your Apache web server:
- Enable mod_remoteip by issuing the following command:
sudo a2enmod remoteip- Update the site configuration to include RemoteIPHeader CF-Connecting-IP, e.g.
/etc/apache2/sites-available/000-default.conf
ServerAdmin webmaster@localhostDocumentRoot /var/www/htmlServerName remoteip.andy.supportRemoteIPHeader CF-Connecting-IPErrorLog ${APACHE_LOG_DIR}/error.logCustomLog ${APACHE_LOG_DIR}/access.log combined- Update combined LogFormat entry in
apache.conf, replacing %h with %a in/etc/apache2/apache2.conf.For example, if your current LogFormat appeared as follows
LogFormat "%h %l %u %t \"%r\" %>s %O \"%{Referer}i\" \"%{User-Agent}i\"" combinedyou would update LogFormat to the following:
LogFormat "%a %l %u %t \"%r\" %>s %O \"%{Referer}i\" \"%{User-Agent}i\"" combined- Define trusted proxy addresses by creating
/etc/apache2/conf-available/remoteip.confby entering the following code and Cloudflare IPs ↗:
RemoteIPHeader CF-Connecting-IPRemoteIPTrustedProxy 192.0.2.1 (example IP address)RemoteIPTrustedProxy 192.0.2.2 (example IP address)(repeat for all Cloudflare IPs listed at https://www.cloudflare.com/ips/)- Enable Apache configuration:
sudo a2enconf remoteipEnabling conf remoteip.To activate the new configuration, you need to run:service apache2 reload- Test Apache configuration:
sudo apache2ctl configtestSyntax OK- Restart Apache:
sudo systemctl restart apache2There are two methods for installing mod_cloudflare: by downloading the Apache extension from GitHub or by adding code to your origin web server.
If you are using an Apache web server, you can download mod_cloudflare from GitHub ↗.
If you can't install mod_cloudflare, or if there is no Cloudflare plugin available for your content management system platform to restore original visitor IP, add this code to your origin web server in or before the <body> tag on any page that needs the original visitor IPs:
<?php if (isset($_SERVER['HTTP_CF_CONNECTING_IP'])) $_SERVER['REMOTE_ADDR'] = $_SERVER['HTTP_CF_CONNECTING_IP'];?>This command will only make the IP address available to scripts that need it. It doesn’t store the IP in your actual server logs.
To remove mod_cloudflare, you should comment out the Apache config line that loads mod_cloudflare.
This varies based on your Linux distribution, but for most people, if you look in /etc/apache2, you should be able to search to find the line:
LoadModule cloudflare_module
Comment or remove this line, then restart apache, and mod_cloudflare should be gone.
If you are running Ubuntu or Debian, you should see.
file/etc/apache2/mods-enabled/cloudflare.load
delete this file to remove mod_cloudflare, then restart Apache.
mod_cloudflare is not needed for Nginx. Use the ngx_http_realip_module NGINX module ↗ and the configuration parameters described in the Web server instructions ↗ instead.
Refer below for instructions on how to configure your web server to log original visitor IPs based on your web server type:
- Make sure the following is installed:
- Red Hat/Fedora
sudo yum install httpd-devel libtool git - Debian/Ubuntu
sudo apt-get install apache2-dev libtool git
- Red Hat/Fedora
- Clone the following for the most recent build of mod_cloudflare:
- Red Hat/Fedora/Debian/Ubuntu:
git clone https://github.com/cloudflare/mod_cloudflare.git; cd mod_cloudflare
- Red Hat/Fedora/Debian/Ubuntu:
- Use the Apache extension tool to convert the .c file into a module:
- Red Hat/Fedora/Debian/Ubuntu:
apxs -a -i -c mod_cloudflare.c
- Red Hat/Fedora/Debian/Ubuntu:
- Restart and verify the module is active:
- Red Hat/Fedora
service httpd restart; httpd -M|grep cloudflare - Debian/Ubuntu:
sudo apachectl restart; apache2ctl -M|grep cloudflare
- Red Hat/Fedora
- If your web server is behind a load balancer, add the following line to your Apache configuration (httpd.conf usually) and replace 123.123.123.123 with your load balancer's IP address:
IfModule cloudflare_moduleCloudFlareRemoteIPHeader X-Forwarded-ForCloudFlareRemoteIPTrustedProxy [insert your load balancer’s IP address]DenyAllButCloudFlare/IfModuleUse the ngx_http_realip_module Nginx module ↗ and the following configuration parameters:
#example IP addressset_real_ip_from 192.0.2.1;
#use any of the following two
real_ip_header CF-Connecting-IP;#real_ip_header X-Forwarded-For;
That list of prefixes needs to be updated regularly, and we publish the full list in Cloudflare IP addresses ↗.
Also refer to: Cloudflare and NGINX ↗.
- Run the following script to install mod_cloudflare as part of EasyApache:
bash <(curl -s https://raw.githubusercontent.com/cloudflare/mod_cloudflare/master/EasyApache/installer.sh) - Upon installing, you will need to recompile your Apache with the new mod_cloudflare plugin.
- To fix this, open up your Apache configuration. This can typically be found in
/etc/apache2/apache2.conf,/etc/httpd/httpd.conf,/usr/local/apache/conf/httpd.confor another location depending on configuration. If you're unsure, ask your hosting provider. - At the very end add:
CloudflareRemoteIPTrustedProxy {LOOPBACK_ADDRESS}So, if your server is located at 127.0.0.1, it will look like:CloudflareRemoteIPTrustedProxy 127.0.0.1 - If you have more than one server to add to the trusted proxy list, you can add them at the end: CloudflareRemoteIPTrustedProxy 127.0.0.1 127.0.0.2
To have Lighttpd automatically rewrite the server IP for the access logs and for your application, you can follow one of the two solutions below.
- Open your lighttpd.conf file and add mod_extforward to the server.modules list. It must come after mod_accesslog to show the real IP in the access logs
- Add the following code block anywhere in the lighttpd.conf file after the server modules list and then restart Lighttpd
$HTTP["remoteip"] == "192.2.0.1 (example IP address)"{extforward.forwarder = ( "all" => "trust" )extforward.headers = ("CF-Connecting-IP")}- Go to your LiteSpeed Web Admin Console.
- Enable the option Use Client IP in Header in Configuration.
- Once enabled, your access logs will now show the correct IP addresses, and even PHP's
$_SERVER['REMOTE_ADDR']variable will contain the client real IP address, instead of a Cloudflare IP address, which in itself will resolve most problems you could hit when enabling Cloudflare on PHP-enabled web sites (like WordPress or vBulletin installs).
Follow the directions in the Microsoft Community ↗.
From IIS 8.5 onwards, custom logging is a built-in option. Refer to IIS Enhanced Logging ↗.
-
In IIS Manager, double click on Logging in the Actions menu of the site you are working on.
-
After this launches, select W3C as the format and then click Select Fields next to the format drop-down in the Log File sub-section.
-
Click on Add Field and add in CF-Connecting-IP header.
-
Click Ok. You should see your new entry reflected under Custom Fields. Click on Apply when you are back in the Logging window.
-
If this is successful, the log file should now have an underscore:You should also see the change in the fields:
-
Restart the site, then W3SVC, then the entire instance if the change doesn’t reflect immediately.When using enhanced logging in IIS 8.5+, it does not restore original visitor IP at the application level.
To have Tomcat7 automatically restore the original visitor IP to your access logs and application you will need to add %{CF-Connecting-IP}i into your log schema.
As an example, you could add the below block to your server.xml file.
<Valve className="org.apache.catalina.valves.AccessLogValve" directory="logs" prefix="localhost_access_log." suffix=".txt" pattern="%{CF-Connecting-IP}i - %h %u %t - "%r" - %s - %b - %{CF-RAY}i"/>Which would result in your logs looking like this:
Visitor IP - Cloudflare IP - [04/Dec/2014:23:18:15 -0500] - "GET / HTTP/1.1" - 200 - 1895 - 193d704b85200296-SJC
Refer to this third-party tutorial on restoring original visitor IP with Magento and Cloudflare ↗.
Similarly, Cloudflare did not write this Magento extension ↗, but some of our customers have found it helpful.
As this plugin was created by an outside party, we can't provide technical support for issues related to the plugin.
To enable correct IP matching when running an Invision Power Board 3 installation through Cloudflare, follow these directions:
Log into your IPB installation's ACP.
- Click System.
- Under Overview, click Security.
- Under Security Center, click Security Settings.Check that Trust IP addresses provided by proxies? is green.
If your network environment means requests are handled through a proxy (such as in an intranet situation in an office or university, or on a load-balanced server cluster), you may need to enable this setting so that the correct IP address is used. However, when enabled, a malicious user can abuse the system to provide a fake IP address. In most environments, this setting should be left off.
If you are using an Apache server, then we would recommend installing mod_remoteip ↗ to restore the visitor IP back to your logs.
If you do not have access to your server to install a mod, then you may be able to modify the core ↗.
More recent versions of MyBB include a Scrutinize User's IP address option.
Admin CP > Configuration > Server and Optimization Options > Scrutinize User's IP address? > Yes
Alternatively, you may install the Cloudflare management plugin ↗ available for MyBB 1.6.
- Navigate to
./inc/functions.php. - Go to line 2790.
- Replace:
if(isset($_SERVER['REMOTE_ADDR']))With:if(isset($_SERVER['HTTP_CF_CONNECTING_IP'])) - Then, replace:
$ip = $_SERVER['REMOTE_ADDR'];With:$ip = $_SERVER['HTTP_CF_CONNECTING_IP'];
A member of the Vanilla team has written a Cloudflare plugin for Vanilla ↗ to restore original visitor IP to the log files for self-hosted sites.
As this plugin was created by an outside party, we can't provide technical support for issues related to the plugin.MediaWiki
- Open
includes/GlobalFunctions.php. At approximately line 370, change the following:$forward = "\t(proxied via {$_SERVER['REMOTE_ADDR']}{$forward})";to$forward = "\t(proxied via {$_SERVER['HTTP_CF_CONNECTING_IP']}{$forward})"; - Open
includes/ProxyTools.php. At approximately line 79, find:if ( isset( $_SERVER['REMOTE_ADDR'] ) ){and replace with:if ( isset( $_SERVER['HTTP_CF_CONNECTING_IP'] ) ){The second step only applies to MediaWiki versions 1.18.0 and older. Newer versions of MediaWiki have completely rewritten ProxyTools.php and the following code is no longer present. - Find at approximately line 80:
$ipchain = array( IP::canonicalize($_SERVER['REMOTE_ADDR']) );Save and upload to your origin web server.
- Go to line 1232 in
GlobalFunctions.php, changeREMOTE_ADDRtoHTTP_CF_CONNECTING_IP. - Next, go to
WebRequest.php, in lines 1151 to line 1159, changeREMOTE_ADDRtoHTTP_CF_CONNECTING_IP.
A XenForo user has created a plugin for Cloudflare ↗.
As this plugin was created by an outside party, we can't provide technical support for issues related to the plugin.
- Open
library/config.php. - At the end, add:
if (isset($_SERVER['HTTP_CF_CONNECTING_IP'])) { $_SERVER['REMOTE_ADDR'] = $_SERVER['HTTP_CF_CONNECTING_IP'];} - Upload and overwrite.
An outside party has created a module for Cloudflare and PunBB ↗ that will restore original visitor IP.
As this plugin was created by an outside party, we can't provide technical support for issues related to the plugin.Cherokee server
- Launch
cherokee-adminon your server. - Navigate to the Cherokee Administration interface in your web browser.
- Select the Virtual Server for the domain that is being serviced by Cloudflare.
- On the Logging tab for your selected Virtual Server, enable Accept Forwarded IPs.
- In the Accept from Hosts box, enter Cloudflare's IP addresses ↗.
You can fix the IP address by changing the PHP IP Server Param field on the Livezilla server configuration to HTTP_CF_CONNECTING_IP.
To restore visitor IP to DataLife Engine:
- Open:/engine/inc/include/functions.inc.phpFind:
$db_ip_split = explode( ".", $_SERVER['REMOTE_ADDR'] );Change to:$db_ip_split = explode(".", $_SERVER['HTTP_CF_CONNECTING_IP'] ); - Find:
$ip_split = explode( ".", $_SERVER['REMOTE_ADDR'] );Change to:$ip_split = explode(".", $_SERVER['HTTP_CF_CONNECTING_IP'] ); - Open:/engine/modules/addcomments.phpFind:
$_SERVER['REMOTE_ADDR'],Change to:$_SERVER['HTTP_CF_CONNECTING_IP'], - Find:
$db_ip_split = explode( ".", $_SERVER['REMOTE_ADDR'] );Change to:$db_ip_split = explode( ".", $_SERVER['HTTP_CF_CONNECTING_IP'] );
An outside developer has created a Cloudflare extension for TYPO3 ↗ that will restore original visitor IP to your logs. The extension will also give the ability to clear your Cloudflare cache.
As this plugin was created by an outside party, we can't provide technical support for issues related to the plugin.
If you use the hosting control panel VestaCP, you have both Nginx and Apache running on your server. Requests are proxied through Nginx before going to Apache.
Because of this Nginx proxy, you actually need to follow the instructions to configure Nginx to return the real visitor IP address. mod_remoteip ↗ for Apache is not needed unless you disable the Nginx server for some requests. Adding mod_remoteip ↗ to Apache will not conflict with the Nginx server configuration.
An outside developer has created a module to restore visitor IP called node_cloudflare. ↗
In order to extract the original client IP in the X_FORWARDED_FOR header, you need to use the following configuration in HAProxy:
- Create a text file
CF_ips.lstcontaining all IP ranges from https://www.cloudflare.com/en-gb/ips/ ↗ - Ensure to disable
option forwardforin HAProxy
HAProxy config:
acl from_cf src -f /path/to/CF_ips.lstacl cf_ip_hdr req.hdr(CF-Connecting-IP) -m foundhttp-request set-header X-Forwarded-For %[req.hdr(CF-Connecting-IP)] if from_cf cf_ip_hdrTo extract the original client IP for your Envoy Gateway, set a Client Traffic Policy ↗ to look for the custom CF-Connecting-IP header.
clientIPDetection: customHeader: name: CF-Connecting-IP failClosed: trueFor more details, refer to Custom header original IP detection extension ↗.
If you are running an application behind Caddy ↗ that relies on the X-Forwarded-For header, you can configure Caddy to override the header with Cloudflare's CF-Connecting-IP header.
It is advised that you also only accept traffic from Cloudflare's IP addresses ↗; otherwise, the header could be spoofed. That's why, in the second example, we handle this as part of the Caddy configuration. Alternatively, you can handle this at the firewall level, which is usually easier to automate. If you already have a firewall or other measure in place to ensure this, your Caddyfile could look like this:
https://example.com { reverse_proxy localhost:8080 { # Sets X-Forwarded-For as the value Cloudflare gives us for CF-Connecting-IP. header_up X-Forwarded-For {http.request.header.CF-Connecting-IP} }}If you want Caddy to handle only accepting traffic from Cloudflare's IP addresses ↗, you can use a configuration like this one:
https://example.com {    # Restrict access to Cloudflare IPs (https://www.cloudflare.com/ips/)    @cloudflare {        remote_ip 173.245.48.0/20 103.21.244.0/22 103.22.200.0/22 103.31.4.0/22 141.101.64.0/18 108.162.192.0/18 190.93.240.0/20 188.114.96.0/20 197.234.240.0/22 198.41.128.0/17 162.158.0.0/15 104.16.0.0/13 104.24.0.0/14 172.64.0.0/13 131.0.72.0/22 2400:cb00::/32 2606:4700::/32 2803:f800::/32 2405:b500::/32 2405:8100::/32 2a06:98c0::/29 2c0f:f248::/32    }
    # Process requests from Cloudflare IPs    handle @cloudflare {        reverse_proxy localhost:8080 {            # Sets X-Forwarded-For as the value Cloudflare gives us for CF-Connecting-IP.            header_up X-Forwarded-For {http.request.header.CF-Connecting-IP}        }    }
# Deny requests from non-Cloudflare IPs handle { respond "Access Denied" 403 }}Was this helpful?
- Resources
- API
- New to Cloudflare?
- Products
- Sponsorships
- Open Source
- Support
- Help Center
- System Status
- Compliance
- GDPR
- Company
- cloudflare.com
- Our team
- Careers
- 2025 Cloudflare, Inc.
- Privacy Policy
- Terms of Use
- Report Security Issues
- Trademark
-
