Gathering information for troubleshooting sites
It is important to capture as much information as possible to diagnose an issue and to provide adequate details to Cloudflare support. This article explains how to gather troubleshooting information commonly requested by Cloudflare Support.
A HTTP Archive (HAR) records all web browser requests including the request and response headers, the body content, and the page load time. Be sure to use Incognito Mode or a Private Browsing window.
Some browsers either require a browser extension or cannot generate a HAR. When installing a browser extension, follow the instructions from the extension provider.
-
In a browser page viewed in Incognito Mode, right-click anywhere and select Inspect Element.
-
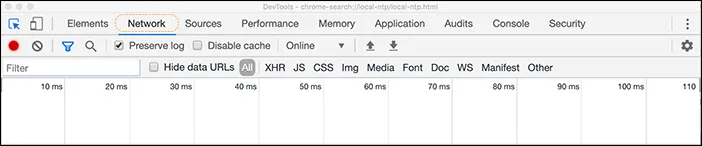
The Chrome DevTools appear either at the bottom, or left side of the browser. Click the Network tab.
-
Check Preserve log. Please also check Disable cache if you are reporting a Cloudflare Cache issue.
-
Click record.

- Browse to the URL that causes issues. Once the issue is experienced, click the "Export HAR" option at the top of DevTools.

- Attach the HAR file to your support ticket.
-
While using a Private Window, use the application menu and select Tools > Web Developer > Network or press Ctrl+Shift+I (Windows/Linux) or Cmd+Option+I (OS X).
-
Browse to the URL that causes issues.
-
After duplicating the issue, right-click and choose Save All As HAR.
-
In a Private window, navigate to Developer tools (use
F12as a shortcut) and select the Network tab. -
Browse to the URL that causes issues.
-
After duplicating the issue, click on Export as HAR followed by Save As....
-
In Safari, ensure a Develop menu appears at the top of a Private Window in the browser window. Otherwise, go to Safari > Preferences > Advanced and select Show Develop Menu in menu bar
-
Navigate to Develop > Show Web Inspector.
-
Browse to the URL that causes issues.
-
Ctrl + click on a resource within Web Inspector and click Export HAR.
For Android:
-
Enable USB Debugging mode on your mobile device.
-
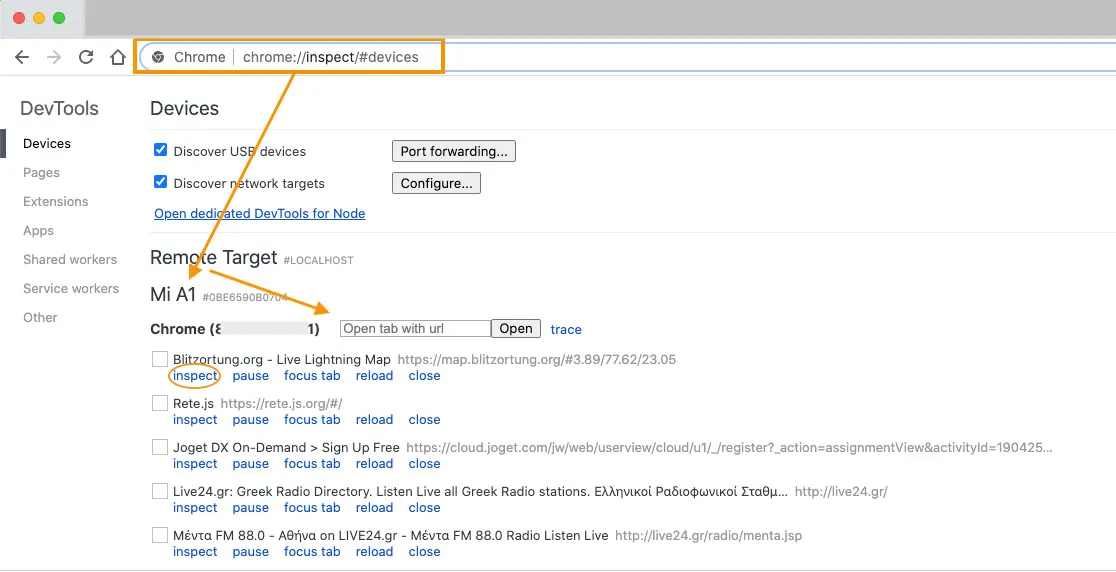
Go to
chrome://inspect/#devices. -
If debugging mode is enabled, you will see your device listed below “Remote Target” like the example below:
-
Type in the URL, select Open and inspect to open Chrome’s DevTools.
-
Select the Network tab in the DevTools window.
-
Check Preserve log. Please also check Disable cache if you are reporting a Cloudflare Cache issue.
-
Click record.

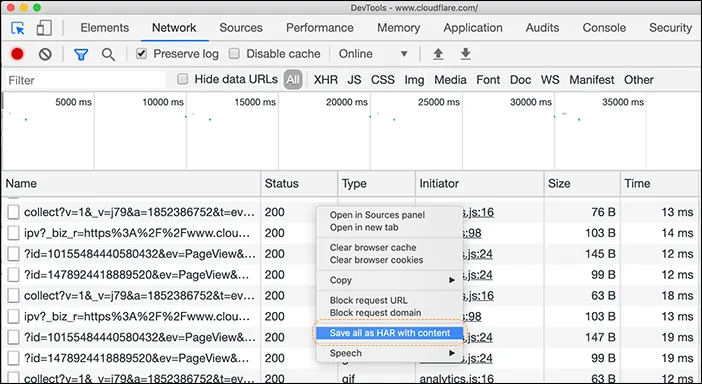
- Browse to the URL that causes issues. Once the issue is experienced, right-click on any of the items within the Network tab and select Save all as HAR with Content.
- Attach the HAR file to your support ticket alongside a screen recording from the affected Samsung device. Instructions on how to do this from Samsung devices can be found in Samsung's documentation here ↗.
For iPhone:
Refer to Okta ↗ or Apple's ↗ support article on how to generate a HAR file from an iOS device. Attach the HAR file to your support ticket alongside a screen recording from the affected iOS device. Apple devices now have built-in screen recording functionality ↗.
In certain situations when request is not issued or cancelled by the browser (for example, due to CORS ↗), we need to get JS console log output, in addition to the HAR file, to identify the root cause.
- Go to the Console tab from the DevTools bar.
- Go to the Console Settings and select Preserve Log.
- Leave the console open and perform the steps that reproduce the issue.
- Right-click on any of the items within the Console tab and select Save as log file.
- Attach the log file to your support ticket.

- Go to the Console tab from the Web Developer Tools bar.
- Go to the Console Settings and select Persist Log and Show Timestamps.
- Leave the console open and perform the steps that reproduce the issue.
- Right click, Select All messages and Export Visible Messages to File.
- Attach the log file to your support ticket.
- Go to the Console tab from the Developer Tools bar.
- Go to the Console Settings and select Preserve Log.
- Leave the console open and perform the steps that reproduce the issue.
- Right click on any of the items within the Console tab and select Save as log file.
- Attach the log file to your support ticket.
- Go to the Console tab from the Web Inspector bar.
- Tick the box Preserve Log.
- Leave the console open and perform the steps that reproduce the issue.
- Select all the messages, right click and Save Selected to a log file.
- Attach the log file to your support ticket.
In some cases, in order to further troubleshoot issues related to protocols (errors such as ERR_QUIC_PROTOCOL_ERROR, ERR_HTTP2_PROTOCOL_ERROR, etc..) our Support team may ask you to provide a NetLog dump ↗.
- Open a new tab and enter the following depending on the browser you're using:
chrome://net-exportedge://net-exportopera://net-export
- Click the Start Logging To Disk button.
- Reproduce the network problem in a different tab.
(the
chrome://net-export/,edge://net-export/oropera://net-exporttab needs to stay open otherwise logging will automatically stop) - Click Stop Logging button.
- Attach the log file to your support ticket.
A map of our data centers ↗ is listed on the Cloudflare status page ↗, sorted by continent.
The three-letter code in the data center name is the IATA code ↗ of the nearest major international airport.
Determine the Cloudflare data center serving requests for your browser by visiting:
http://``_www.example.com_``/cdn-cgi/trace.
Replace www.example.com with your domain and hostname. Note the colo field from the output.
curl ↗ is a command line tool for sending HTTP/HTTPS requests and is useful for troubleshooting:
- HTTP/HTTPS Performance
- HTTP Error Responses
- HTTP Headers
- APIs
- Comparing Server/Proxy Responses
- SSL Certificates
Run the following command to send a standard HTTP GET request to your website (replace www.example.com with your hostname):
curl -svo /dev/null http://www.example.com/This example curl command returns output detailing the HTTP response and request headers but discards the page body output. curl output confirms the HTTP response and whether Cloudflare is currently proxying traffic for the site.
View the sections below for tips on troubleshooting HTTP errors, performance, caching, and SSL/TLS certificates:
When troubleshooting HTTP errors in responses from Cloudflare, test whether your origin caused the errors by sending requests directly to your origin web server. To troubleshoot HTTP errors, run a curl directly to your origin web server IP address (bypassing Cloudflare’s proxy):
curl -svo /dev/null http://example.com --connect-to ::203.0.113.34curl measures latency or performance degradation for HTTP/HTTPS requests via the -w or --write-out curl option ↗. The example curl below measures several performance vectors in the request transaction such as duration of the TLS handshake, DNS lookup, redirects, transfers, etc:
curl -svo /dev/null https://example.com/ -w "\nContent Type: %{content_type} \\nHTTP Code: %{http_code} \\nHTTP Connect:%{http_connect} \\nNumber Connects: %{num_connects} \\nNumber Redirects: %{num_redirects} \\nRedirect URL: %{redirect_url} \\nSize Download: %{size_download} \\nSize Upload: %{size_upload} \\nSSL Verify: %{ssl_verify_result} \\nTime Handshake: %{time_appconnect} \\nTime Connect: %{time_connect} \\nName Lookup Time: %{time_namelookup} \\nTime Pretransfer: %{time_pretransfer} \\nTime Redirect: %{time_redirect} \\nTime Start Transfer: %{time_starttransfer} \\nTime Total: %{time_total} \\nEffective URL: %{url_effective}\n" 2>&1Explanation of this timing output ↗ is found on the Cloudflare blog.
cURL helps review the HTTP response headers that influence caching. In particular, review several HTTP headers when troubleshooting Cloudflare caching:
- CF-Cache-Status
- Cache-Control/Pragma
- Expires
- Last-Modified
- s-maxage
The following curl command shows the SSL certificate served by Cloudflare during an HTTPS request (replace www.example.com with your hostname):
curl -svo /dev/null https://www.example.com/ 2>&1 | egrep -v "^{.*$|^}.*$|^* http.*$"To display the origin certificate (assuming one is installed), replace 203.0.113.34 below with the actual IP address of your origin web server and replace www.example.com with your domain and hostname:
curl -svo /dev/null https://www.example.com --connect-to ::203.0.113.34 2>&1 | egrep -v "^{.*$|^}.*$|^* http.*$"If troubleshooting browser support or confirming what TLS versions are supported, curl allows you to test a specific TLS version by adding the --tlsv1.X ↗ and --tls-max ↗ options to your curl:
--tlsv1.0 --tls-max 1.0--tlsv1.1 --tls-max 1.1--tlsv1.2 --tls-max 1.2--tlsv1.3 --tls-max 1.3
For more details, refer to Pause Cloudflare.
Traceroute is a network diagnostic tool that measures the route latency of packets across a network. Most operating systems support the traceroute command. If you experience connectivity issues with your Cloudflare-proxied website and ask Cloudflare Support for assistance, ensure to provide output from a traceroute.
Review the instructions below for running traceroute on different operating systems. Replace www.example.com with your domain and hostname in the examples below:
-
Open the Start menu.
-
Click Run.
-
To open the command line interface, type cmd and then click OK.
-
At the command line prompt, type:
For IPv4 -
tracert www.example.comFor IPv6 -
tracert -6 www.example.com-
Press Enter.
-
You can copy the results to save in a file or paste in another program.
-
Open a terminal window.
-
At the command line prompt, type:
For IPv4 -
traceroute www.example.comFor IPv6 -
traceroute -6 www.example.com- You can copy the results to save in a file or paste in another program.
- Open the Network Utility application.
- Click the Traceroute tab.
- Type the domain or IP address in the appropriate input field and press Trace.
- You can copy the results to save in a file or paste in another program.
Alternatively, follow the same Linux traceroute instructions above when using the Mac OS terminal program.
The CF-RAY header traces a website request through Cloudflare's network. Provide the CF-RAY of a web request to Cloudflare support when troubleshooting an issue. You can also add CF-RAY to your logs by editing your origin web server configuration with the snippet below that corresponds to your brand of web server:
LogFormat "%h %l %u %t \"%r\" %>s %b \"%{Referer}i\" \"%{User-agent}i\" %{CF-Ray}i" cf_customlog_format cf_custom '$remote_addr - $remote_user [$time_local] ''"$request" $status $body_bytes_sent ''"$http_referer" "$http_user_agent" ''$http_cf_ray';Traceroute (MTR) is a tool that combines traceroute and ping, which is another common method for testing network connectivity and speed. In addition to the hops along the network path, MTR shows constantly updating information about the latency and packet loss along the route to the destination. This helps in troubleshooting network issues by allowing you to see what’s happening along the path in real-time.
MTR works by discovering the network path in a similar manner to traceroute, and then regularly sending packets to continue collecting information to provide an updated view into the network’s health and speed.
Like traceroute, MTR can use ICMP or UDP for outgoing packets but relies on ICMP for return (Type 11: Time Exceeded) packets.
Using MTR on NIX based machines
Generally, we'd use MTR as the following:
mtr -rw <dest_hostname> e.g.: mtr -rw one.one.one.oneor with destination IP:
mtr -rw <dest_IP> e.g.: mtr -rw 1.1.1.1with TCP port
mtr -P <tcp port> -T <destination ip>Please refer to this documentation, which explains more about analysing MTR: How to read MTR ↗.
Why and when do you need Packet Captures?
Issues that happen at the layers 3/4 occur before requests reaching Cloudflare's logging system, so they do not show up in the HTTP logs. Therefore, troubleshooting issues related to connection resets, packet loss or SSL handshake failures can be tricky without a deep investigation at the packet level.
Some HTTP errors generated by Cloudflare, such as 520s, 524s and 525s, show underlying issues at layers 3/4, and might require a packet capture for further investigation.
How to Run a Packet Capture
Cloudflare suggests Wireshark ↗ for running packet captures. For instructions on how to use the tcpdump command line, refer to this ↗ article.
- Close all programs/browser tabs that could be sending data in the background to avoid having to use a lot of display filters later.
- Create your Wireshark capture filter (refer to this ↗ article for more information).
- Select the appropriate interface (e.g. Wi-Fi: en0). If you're not sure which interface to use, Wireshark provides an I/O graph of each interface to give you a hint.
- Click the blue shark fin icon in the top left-hand corner to start your packet capture.
- Reproduce the issue while running capture.
- Click the red square icon in the top left-hand corner to stop your packet capture.
- Save as a
.pcapfile and attach it to your support ticket.
Was this helpful?
- Resources
- API
- New to Cloudflare?
- Products
- Sponsorships
- Open Source
- Support
- Help Center
- System Status
- Compliance
- GDPR
- Company
- cloudflare.com
- Our team
- Careers
- 2025 Cloudflare, Inc.
- Privacy Policy
- Terms of Use
- Report Security Issues
- Trademark
-
