To prevent the accidental exposure of applications, we've updated how Worker preview URLs (<PREVIEW>-<WORKER_NAME>.<SUBDOMAIN>.workers.dev) are handled. We made this change to ensure preview URLs are only active when intentionally configured, improving the default security posture of your Workers.
One-Time Update for Workers with workers.dev Disabled
We performed a one-time update to disable preview URLs for existing Workers where the workers.dev subdomain was also disabled.
Because preview URLs were historically enabled by default, users who had intentionally disabled their workers.dev route may not have realized their Worker was still accessible at a separate preview URL. This update was performed to ensure that using a preview URL is always an intentional, opt-in choice.
If your Worker was affected, its preview URL (<PREVIEW>-<WORKER_NAME>.<SUBDOMAIN>.workers.dev) will now direct to an informational page explaining this change.
How to Re-enable Your Preview URL
If your preview URL was disabled, you can re-enable it via the Cloudflare dashboard by navigating to your Worker's Settings page and toggling on the Preview URL.
Alternatively, you can use Wrangler by adding the preview_urls = true setting to your Wrangler file and redeploying the Worker.
{ "preview_urls": true}
preview_urls = true
Note: You can set preview_urls = true with any Wrangler version that supports the preview URL flag (v3.91.0+). However, we recommend updating to v4.34.0 or newer, as this version defaults preview_urls to false, ensuring preview URLs are always enabled by explicit choice.
Three months ago we announced the public beta of remote bindings for local development. Now, we're excited to say that it's available for everyone in Wrangler, Vite, and Vitest without using an experimental flag!
With remote bindings, you can now connect to deployed resources like R2 buckets and D1 databases while running Worker code on your local machine. This means you can test your local code changes against real data and services, without the overhead of deploying for each iteration.
Example configuration
To enable remote bindings, add "remote" : true to each binding that you want to rely on a remote resource running on Cloudflare:
{ "name": "my-worker", // Set this to today's date "compatibility_date": "2026-07-28", "r2_buckets": [ { "bucket_name": "screenshots-bucket", "binding": "screenshots_bucket", "remote": true, }, ],}
name = "my-worker"# Set this to today's datecompatibility_date = "2026-07-28"[[r2_buckets]]bucket_name = "screenshots-bucket"binding = "screenshots_bucket"remote = true
When remote bindings are configured, your Worker still executes locally, but all binding calls are proxied to the deployed resource that runs on Cloudflare's network.
D1 now detects read-only queries and automatically attempts up to two retries to execute those queries in the event of failures with retryable errors. You can access the number of execution attempts in the returned response metadata property total_attempts.
At the moment, only read-only queries are retried, that is, queries containing only the following SQLite keywords: SELECT, EXPLAIN, WITH. Queries containing any SQLite keyword ↗ that leads to database writes are not retried.
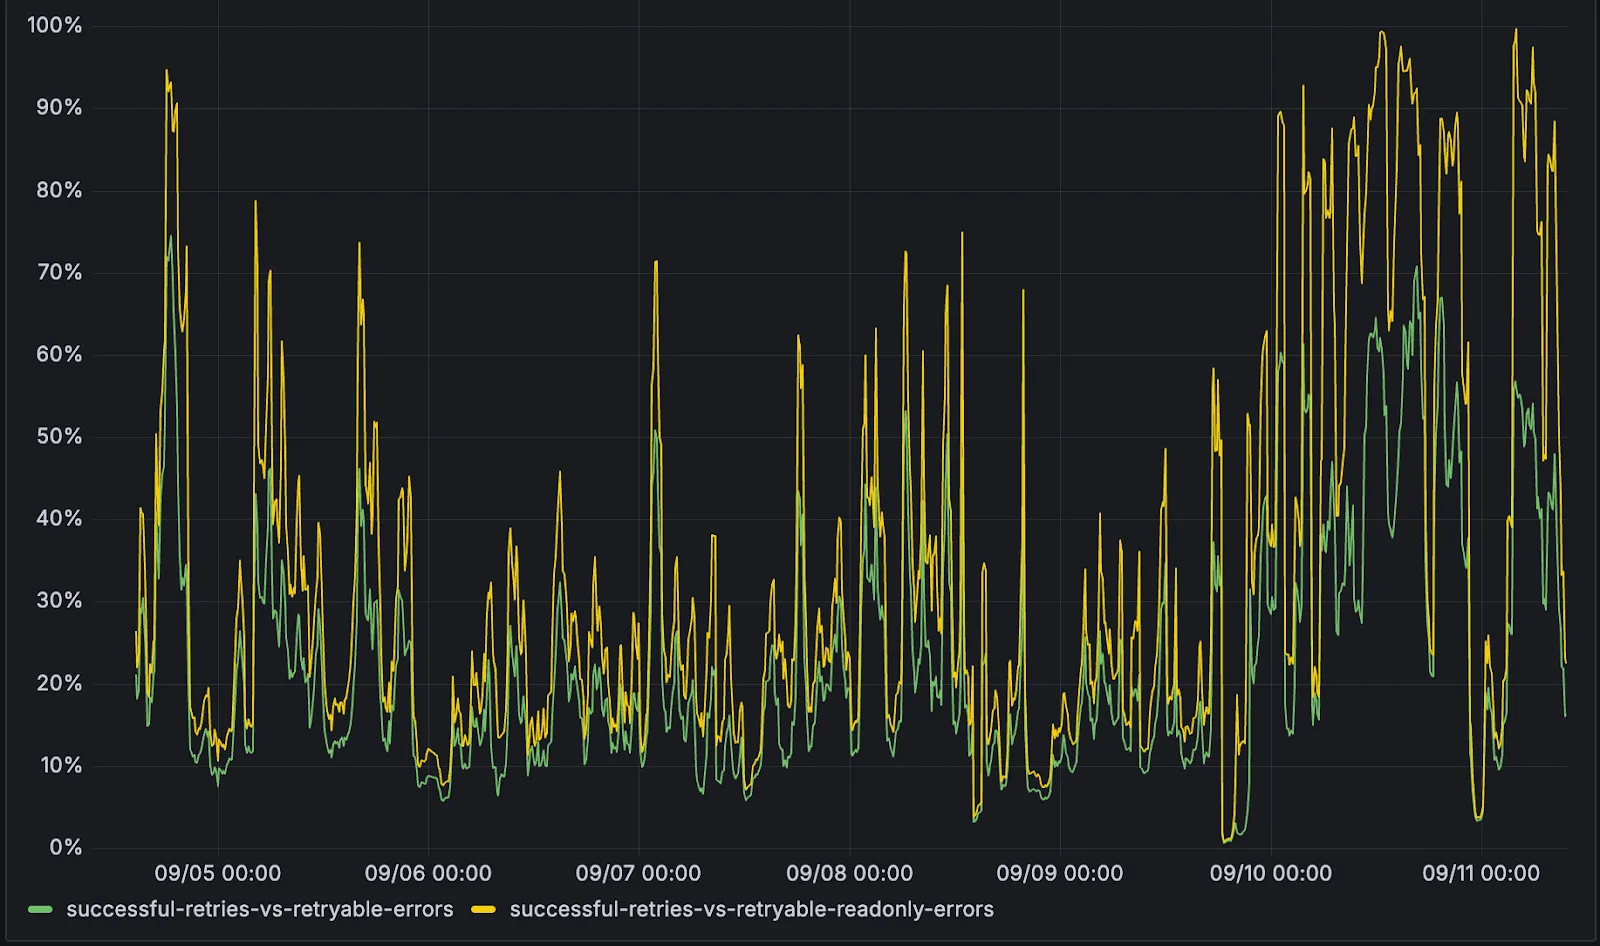
The retry success ratio among read-only retryable errors varies from 5% all the way up to 95%, depending on the underlying error and its duration (like network errors or other internal errors).
The retry success ratio among all retryable errors is lower, indicating that there are write-queries that could be retried. Therefore, we recommend D1 users to continue applying retries in their own code for queries that are not read-only but are idempotent according to the business logic of the application.
D1 ensures that any retry attempt does not cause database writes, making the automatic retries safe from side-effects, even if a query causing changes slips through the read-only detection. D1 achieves this by checking for modifications after every query execution, and if any write occurred due to a retry attempt, the query is rolled back.
The read-only query detection heuristics are simple for now, and there is room for improvement to capture more cases of queries that can be retried, so this is just the beginning.
We've shipped a new release for the Agents SDK ↗ bringing full compatibility with AI SDK v5 ↗ and introducing automatic message migration that handles all legacy formats transparently.
This release includes improved streaming and tool support, tool confirmation detection (for "human in the loop" systems), enhanced React hooks with automatic tool resolution, improved error handling for streaming responses, and seamless migration utilities that work behind the scenes.
This makes it ideal for building production AI chat interfaces with Cloudflare Workers AI models, agent workflows, human-in-the-loop systems, or any application requiring reliable message handling across SDK versions — all while maintaining backward compatibility.
Additionally, we've updated workers-ai-provider v2.0.0, the official provider for Cloudflare Workers AI models, to be compatible with AI SDK v5.
useAgentChat(options)
Creates a new chat interface with enhanced v5 capabilities.
Seamless integration with Cloudflare Workers AI models through the updated workers-ai-provider v2.0.0.
Model Setup with Workers AI
Use Cloudflare Workers AI models directly in your agent workflows:
import { createWorkersAI } from "workers-ai-provider";import { useAgentChat } from "agents/ai-react";// Create Workers AI model (v2.0.0 - same API, enhanced v5 internals)const model = createWorkersAI({ binding: env.AI,})("@cf/meta/llama-3.2-3b-instruct");
Enhanced File and Image Support
Workers AI models now support v5 file handling with automatic conversion:
// Send images and files to Workers AI modelssendMessage({ role: "user", parts: [ { type: "text", text: "Analyze this image:" }, { type: "file", data: imageBuffer, mediaType: "image/jpeg", }, ],});// Workers AI provider automatically converts to proper format
Streaming with Workers AI
Enhanced streaming support with automatic warning detection:
// Streaming with Workers AI modelsconst result = await streamText({ model: createWorkersAI({ binding: env.AI })("@cf/meta/llama-3.2-3b-instruct"), messages, onChunk: (chunk) => { // Enhanced streaming with warning handling console.log(chunk); },});
Import Updates
Update your imports to use the new v5 types:
// Before (AI SDK v4)import type { Message } from "ai";import { useChat } from "ai/react";// After (AI SDK v5)import type { UIMessage } from "ai";// or alias for compatibilityimport type { UIMessage as Message } from "ai";import { useChat } from "@ai-sdk/react";
We've updated our "Built with Cloudflare" button to make it easier to share that you're building on Cloudflare with the world. Embed it in your project's README, blog post, or wherever you want to let people know.
Deploying static site to Workers is now easier. When you run wrangler deploy [directory] or wrangler deploy --assets [directory] without an existing configuration file, Wrangler CLI now guides you through the deployment process with interactive prompts.
Before and after
Before: Required remembering multiple flags and parameters
After: Simple directory deployment with guided setup
wrangler deploy dist# Interactive prompts handle the rest as shown in the example flow below
What's new
Interactive prompts for missing configuration:
Wrangler detects when you're trying to deploy a directory of static assets
Prompts you to confirm the deployment type
Asks for a project name (with smart defaults)
Automatically sets the compatibility date to today
Automatic configuration generation:
Creates a wrangler.jsonc file with your deployment settings
Stores your choices for future deployments
Eliminates the need to remember complex command-line flags
Example workflow
# Deploy your built static sitewrangler deploy dist# Wrangler will prompt:✔ It looks like you are trying to deploy a directory of static assets only. Is this correct? … yes✔ What do you want to name your project? … my-astro-site# Automatically generates a wrangler.jsonc file and adds it to your project:{ "name": "my-astro-site", "compatibility_date": "2025-09-09", "assets": { "directory": "dist" }}# Next time you run wrangler deploy, this will use the configuration in your newly generated wrangler.jsonc filewrangler deploy
Requirements
You must use Wrangler version 4.24.4 or later in order to use this feature
You can now upload up to 100,000 static assets per Worker version
Paid and Workers for Platforms users can now upload up to 100,000 static assets per Worker version, a 5x increase from the previous limit of 20,000.
Customers on the free plan still have the same limit as before — 20,000 static assets per version of your Worker
The individual file size limit of 25 MiB remains unchanged for all customers.
This increase allows you to build larger applications with more static assets without hitting limits.
Wrangler
To take advantage of the increased limits, you must use Wrangler version 4.34.0 or higher.
Earlier versions of Wrangler will continue to enforce the previous 20,000 file limit.
You can now manage Workers, Versions, and Deployments as separate resources with a new, resource-oriented API (Beta).
This new API is supported in the Cloudflare Terraform provider ↗ and the Cloudflare Typescript SDK ↗, allowing platform teams to manage a Worker's infrastructure in Terraform, while development teams handle code deployments from a separate repository or workflow. We also designed this API with AI agents in mind, as a clear, predictable structure is essential for them to reliably build, test, and deploy applications.
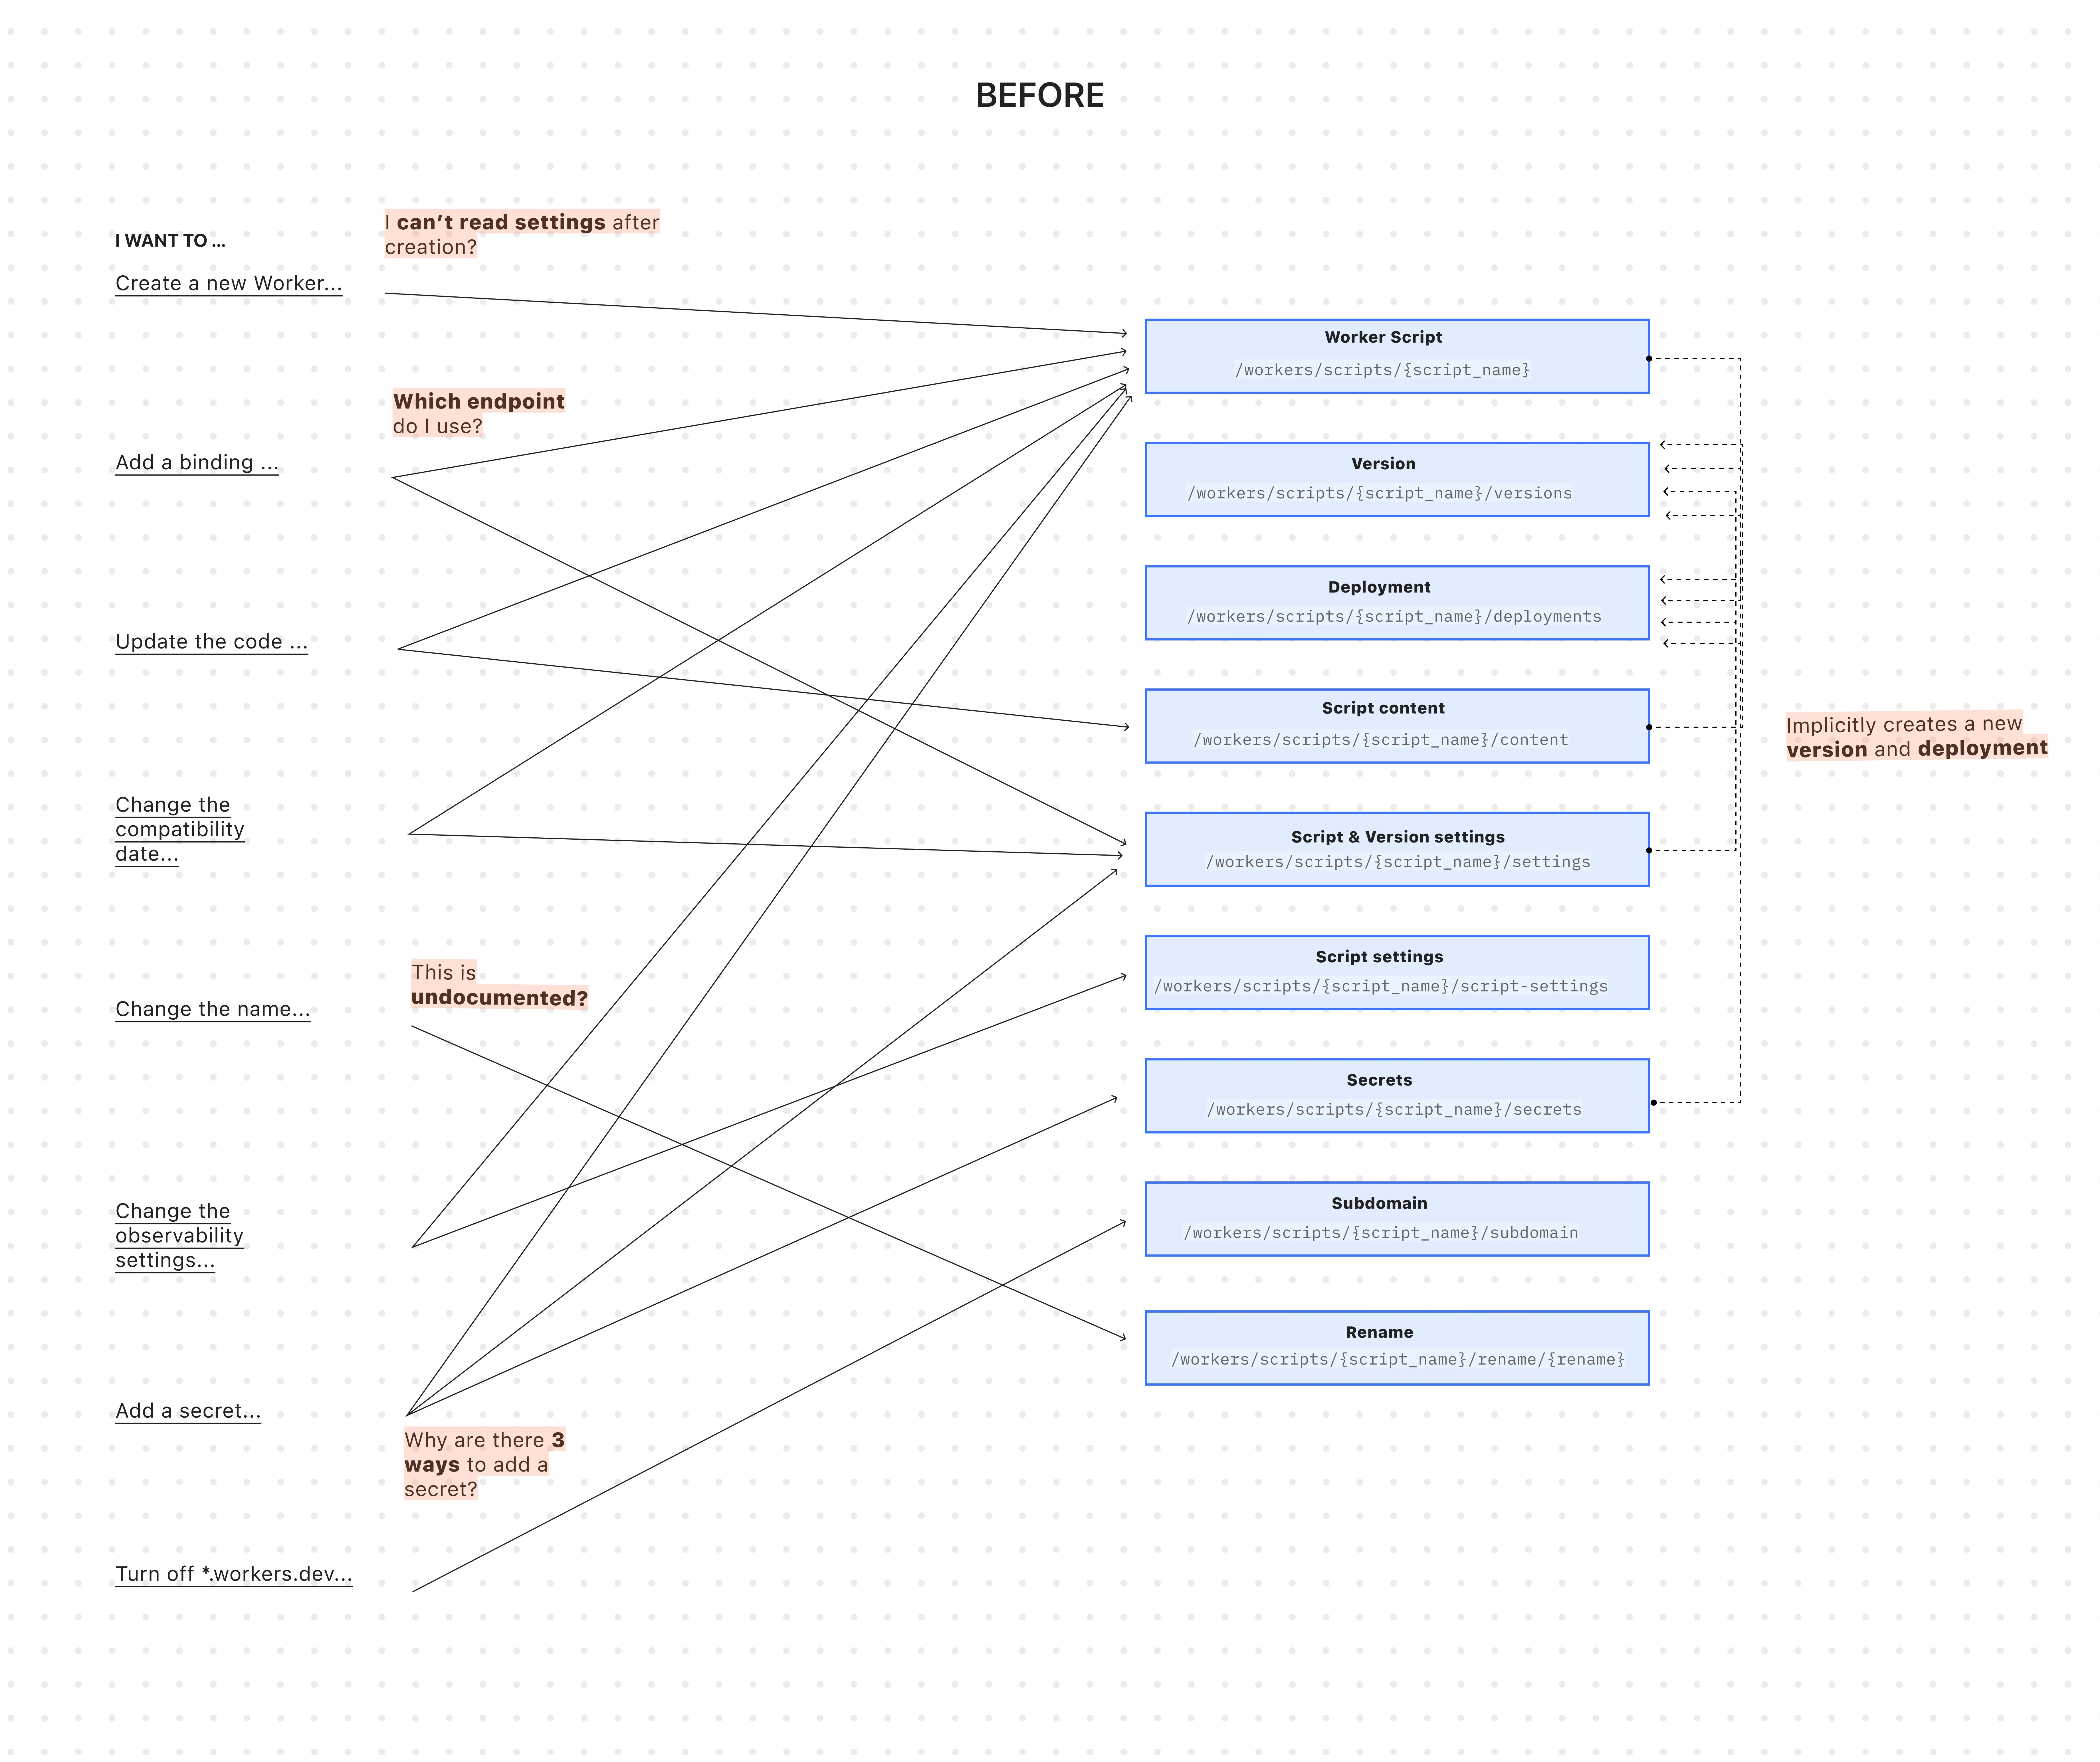
This API worked for creating a basic Worker, uploading all of its code, and deploying it immediately — but came with challenges:
A Worker couldn't exist without code: To create a Worker, you had to upload its code in the same API request. This meant platform teams couldn't provision Workers with the proper settings, and then hand them off to development teams to deploy the actual code.
Several endpoints implicitly created deployments: Simple updates like adding a secret or changing a script's content would implicitly create a new version and immediately deploy it.
Updating a setting was confusing: Configuration was scattered across eight endpoints with overlapping responsibilities. This ambiguity made it difficult for human developers (and even more so for AI agents) to reliably update a Worker via API.
Scripts used names as primary identifiers: This meant simple renames could turn into a risky migration, requiring you to create a brand new Worker and update every reference. If you were using Terraform, this could inadvertently destroy your Worker altogether.
After: Three resources with clear boundaries
The new API introduces cleaner resource management with three core resources: Worker, Versions, and Deployment.
All endpoints now use simple JSON payloads, with script content embedded as base64-encoded strings -- a more consistent and reliable approach than the previous multipart/form-data format.
Worker: The parent resource representing your application. It has a stable UUID and holds persistent settings like name, tags, and logpush. You can now create a Worker to establish its identity and settings before any code is uploaded.
Version: An immutable snapshot of your code and its specific configuration, like bindings and compatibility_date. Creating a new version is a safe action that doesn't affect live traffic.
Deployment: An explicit action that directs traffic to a specific version.
Why this matters
You can now create Workers before uploading code
Workers are now standalone resources that can be created and configured without any code. Platform teams can provision Workers with the right settings, then hand them off to development teams for implementation.
Example: Typescript SDK
// Step 1: Platform team creates the Worker resource (no code needed)const worker = await client.workers.beta.workers.create({ name: "payment-service", account_id: "...", observability: { enabled: true, },});// Step 2: Development team adds code and creates a version laterconst version = await client.workers.beta.workers.versions.create(worker.id, { account_id: "...", main_module: "worker.js", compatibility_date: "$today", bindings: [ /*...*/ ], modules: [ { name: "worker.js", content_type: "application/javascript+module", content_base64: Buffer.from(scriptContent).toString("base64"), }, ],});// Step 3: Deploy explicitly when readyconst deployment = await client.workers.scripts.deployments.create(worker.name, { account_id: "...", strategy: "percentage", versions: [ { percentage: 100, version_id: version.id, }, ],});
Example: Terraform
If you use Terraform, you can now declare the Worker in your Terraform configuration and manage configuration outside of Terraform in your Worker's wrangler.jsonc file and deploy code changes using Wrangler.
resource "cloudflare_worker" "my_worker" { account_id = "..." name = "my-important-service"}# Manage Versions and Deployments here or outside of Terraform# resource "cloudflare_worker_version" "my_worker_version" {}# resource "cloudflare_workers_deployment" "my_worker_deployment" {}
Deployments are always explicit, never implicit
Creating a version and deploying it are now always explicit, separate actions - never implicit side effects. To update version-specific settings (like bindings), you create a new version with those changes. The existing deployed version remains unchanged until you explicitly deploy the new one.
# Step 1: Create a new version with updated settings (doesn't affect live traffic)POST /workers/workers/{id}/versions{ "compatibility_date": "$today", "bindings": [ { "name": "MY_NEW_ENV_VAR", "text": "new_value", "type": "plain_text" } ], "modules": [...]}# Step 2: Explicitly deploy when ready (now affects live traffic)POST /workers/scripts/{script_name}/deployments{ "strategy": "percentage", "versions": [ { "percentage": 100, "version_id": "new_version_id" } ]}
Settings are clearly organized by scope
Configuration is now logically divided: Worker settings (like name and tags) persist across all versions, while Version settings (like bindings and compatibility_date) are specific to each code snapshot.
# Version settings (the "code")POST /workers/workers/{id}/versions{ "compatibility_date": "$today", "bindings": [...], "modules": [...]}
/workers API endpoints now support UUIDs (in addition to names)
The /workers/workers/ path now supports addressing a Worker by both its immutable UUID and its mutable name.
# Both work for the same WorkerGET /workers/workers/29494978e03748669e8effb243cf2515 # UUID (stable for automation)GET /workers/workers/payment-service # Name (convenient for humans)
This dual approach means:
Developers can use readable names for debugging.
Automation can rely on stable UUIDs to prevent errors when Workers are renamed.
Terraform can rename Workers without destroying and recreating them.
The pre-existing Workers REST API remains fully supported. Once the new API exits beta, we'll provide a migration timeline with ample notice and comprehensive migration guides.
Existing Terraform resources and SDK methods will continue to be fully supported through the current major version.
While the Deployments API currently remains on the /scripts/ endpoint, we plan to introduce a new Deployments endpoint under /workers/ to match the new API structure.
JavaScript asset responses have been updated to use the text/javascript Content-Type header instead of application/javascript. While both MIME types are widely supported by browsers, the HTML Living Standard explicitly recommends text/javascript as the preferred type going forward.
This change improves:
Standards alignment: Ensures consistency with the HTML spec and modern web platform guidance.
Interoperability: Some developer tools, validators, and proxies expect text/javascript and may warn or behave inconsistently with application/javascript.
Future-proofing: By following the spec-preferred MIME type, we reduce the risk of deprecation warnings or unexpected behavior in evolving browser environments.
Consistency: Most frameworks, CDNs, and hosting providers now default to text/javascript, so this change matches common ecosystem practice.
Because all major browsers accept both MIME types, this update is backwards compatible and should not cause breakage.
Users will see this change on the next deployment of their assets.
You can now build Workflows using Python. With Python Workflows, you get automatic retries, state persistence, and the ability to run multi-step operations that can span minutes, hours, or weeks using Python’s familiar syntax and the Python Workers runtime.
Python Workflows use the same step-based execution model as JavaScript Workflows, but with Python syntax and access to Python’s ecosystem. Python Workflows also enable DAG (Directed Acyclic Graph) workflows, where you can define complex dependencies between steps using the depends parameter.
Here’s a simple example:
from workers import Response, WorkflowEntrypointclass PythonWorkflowStarter(WorkflowEntrypoint): async def run(self, event, step): @step.do("my first step") async def my_first_step(): # do some work return "Hello Python!" await my_first_step() await step.sleep("my-sleep-step", "10 seconds") @step.do("my second step") async def my_second_step(): # do some more work return "Hello again!" await my_second_step()class Default(WorkerEntrypoint): async def fetch(self, request): await self.env.MY_WORKFLOW.create() return Response("Hello Workflow creation!")
Python Workflows support the same core capabilities as JavaScript Workflows, including sleep scheduling, event-driven workflows, and built-in error handling with configurable retry policies.
You can now create a client (a Durable Object stub) to a Durable Object with the new getByName method, removing the need to convert Durable Object names to IDs and then create a stub.
// Before: (1) translate name to ID then (2) get a client const objectId = env.MY_DURABLE_OBJECT.idFromName("foo"); // or .newUniqueId()const stub = env.MY_DURABLE_OBJECT.get(objectId); // Now: retrieve client to Durable Object directly via its name const stub = env.MY_DURABLE_OBJECT.getByName("foo");// Use client to send request to the remote Durable Objectconst rpcResponse = await stub.sayHello();
Each Durable Object has a globally-unique name, which allows you to send requests to a specific object from anywhere in the world. Thus, a Durable Object can be used to coordinate between multiple clients who need to work together. You can have billions of Durable Objects, providing isolation between application tenants.
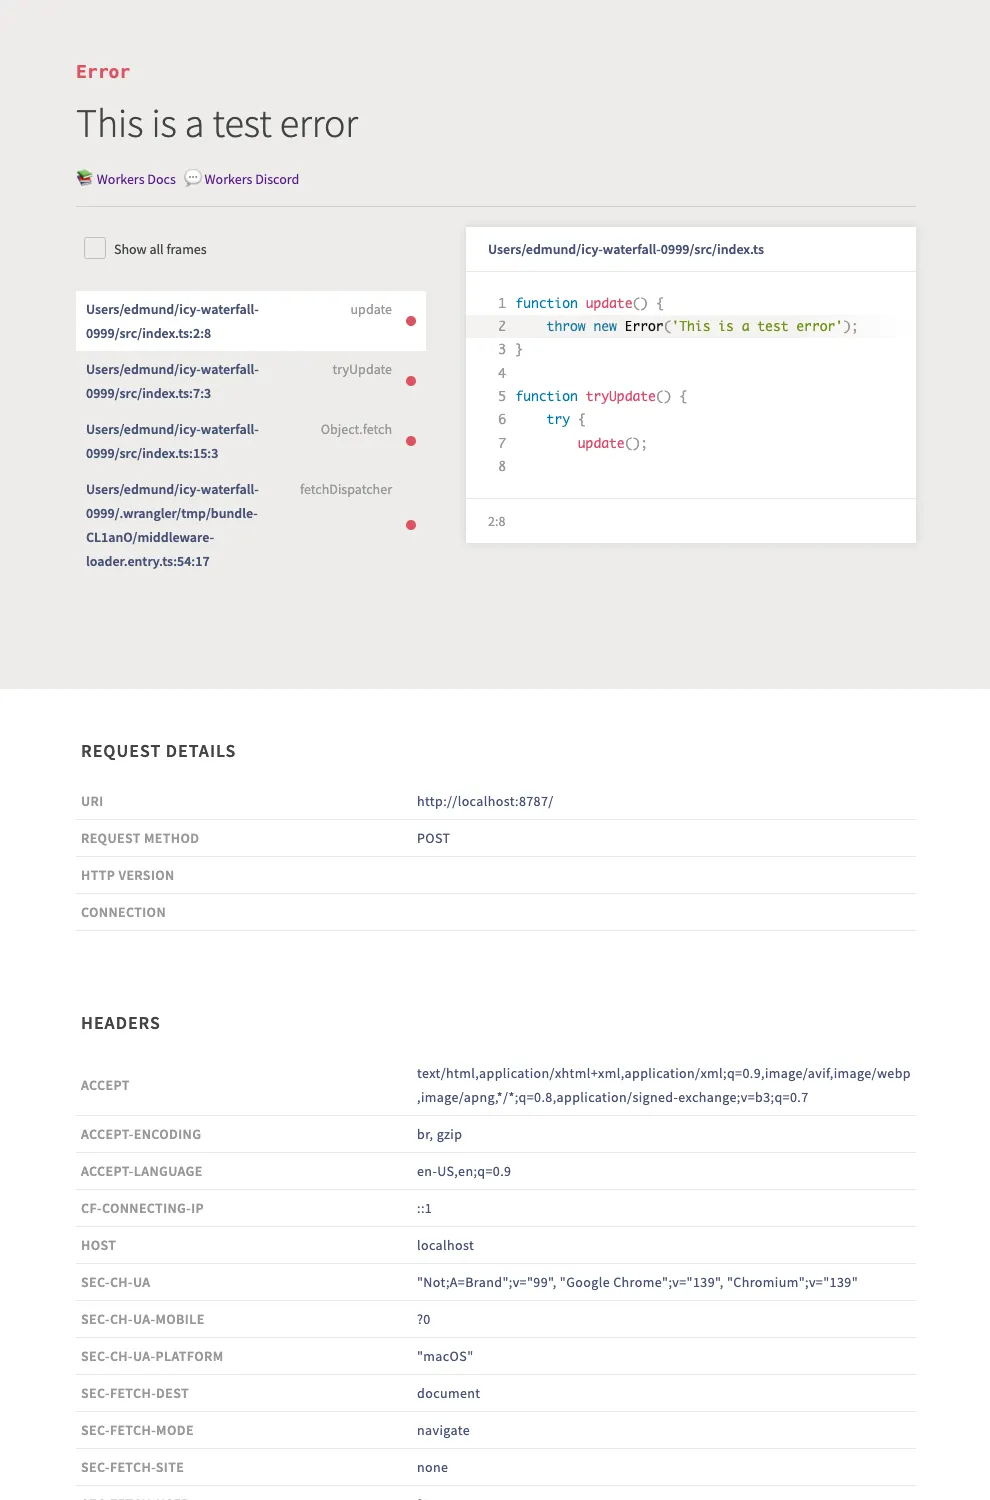
Wrangler's error screen has received several improvements to enhance your debugging experience!
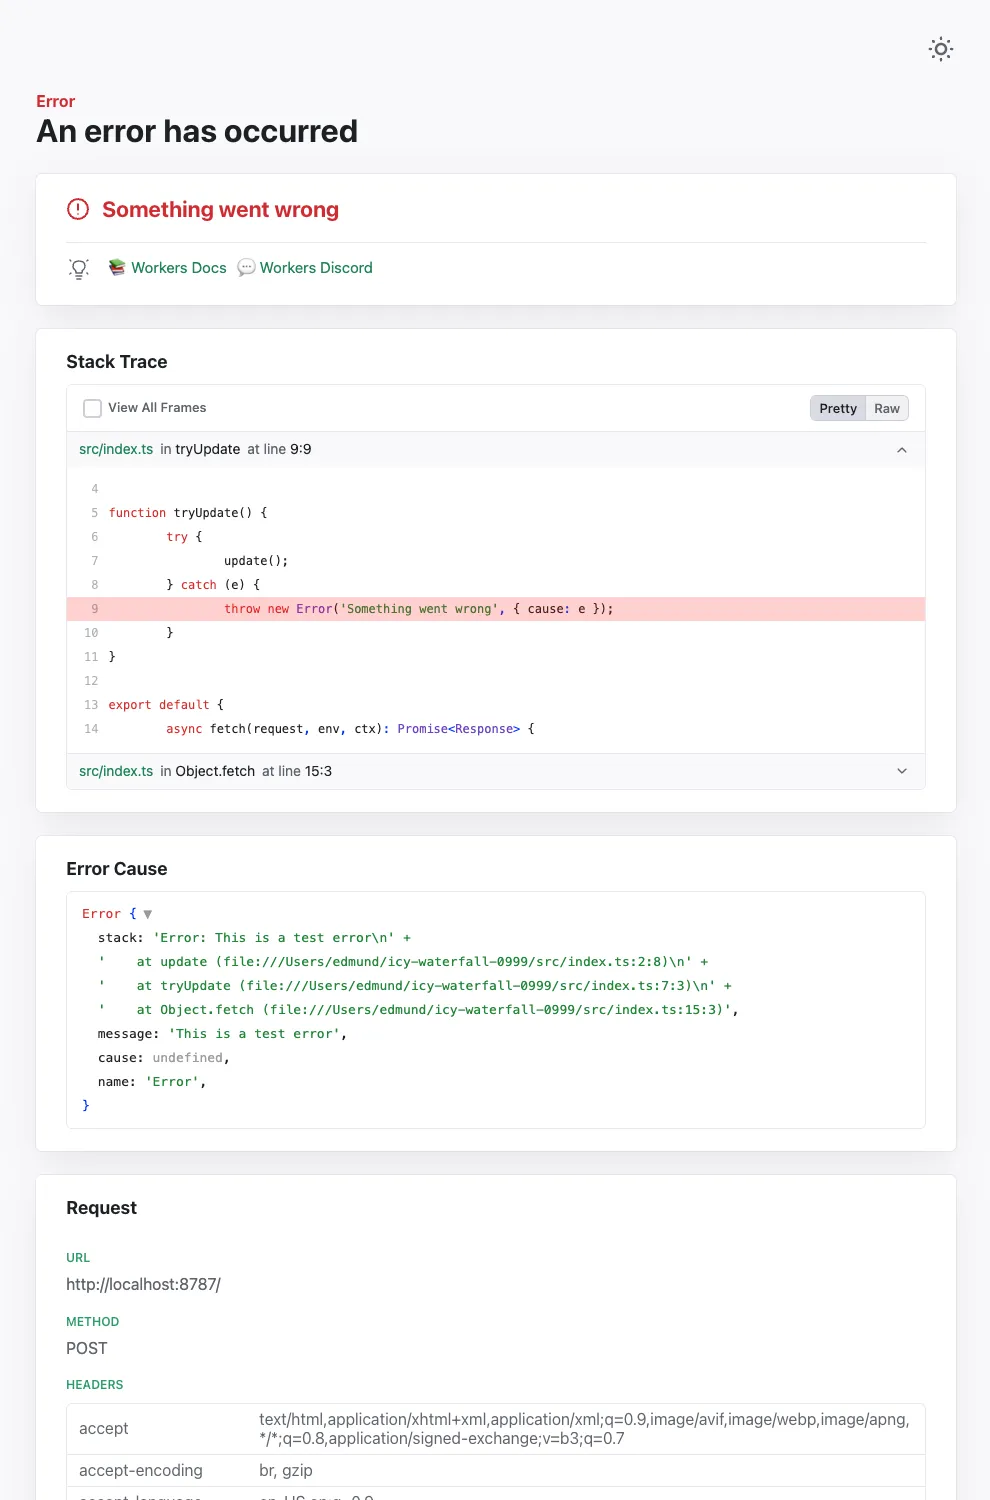
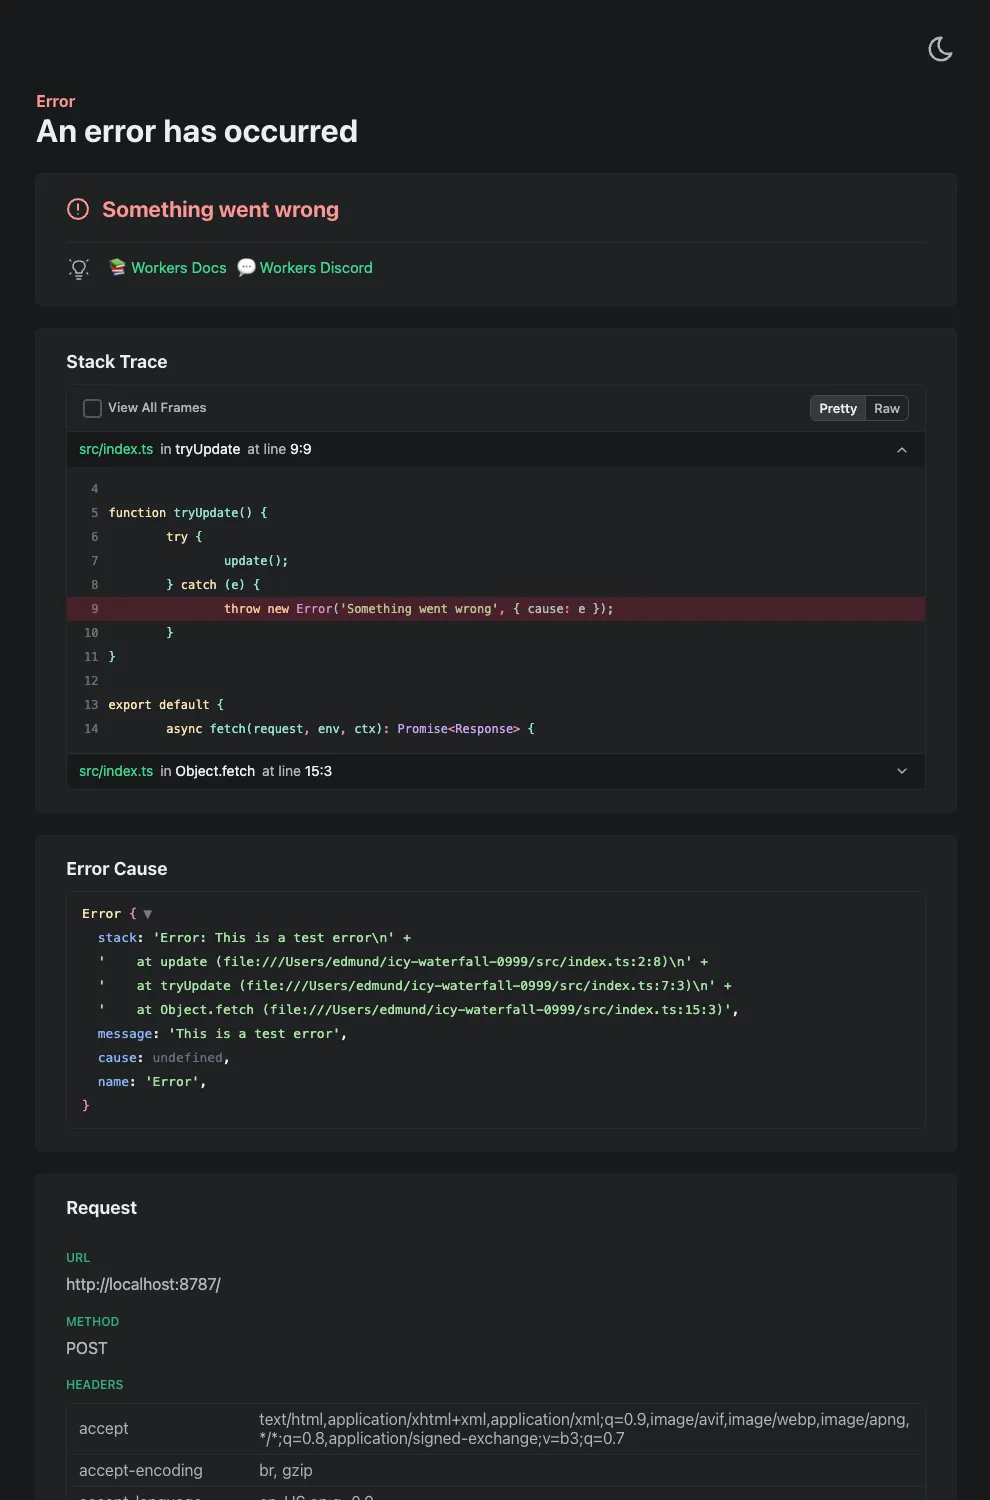
The error screen now features a refreshed design thanks to youch ↗, with support for both light and dark themes, improved source map resolution logic that handles missing source files more reliably, and better error cause display.
Before
After (Light)
After (Dark)
Try it out now with npx wrangler@latest dev in your Workers project.
The node:fs module provides access to a virtual file system in Workers. You can use it to read and write files, create directories, and perform other file system operations.
The virtual file system is ephemeral with each individual request havig its own isolated temporary file space. Files written to the file system will not persist across requests and will not be shared across requests or across different Workers.
Workers running with the nodejs_compat compatibility flag will have access to the node:fs module by default when the compatibility date is set to 2025-09-01 or later. Support for the API can also be enabled using the enable_nodejs_fs_module compatibility flag together with the nodejs_compat flag. The node:fs module can be disabled using the disable_nodejs_fs_module compatibility flag.
import fs from "node:fs";const config = JSON.parse(fs.readFileSync("/bundle/config.json", "utf-8"));export default { async fetch(request) { return new Response(`Config value: ${config.value}`); },};
There are a number of initial limitations to the node:fs implementation:
The glob APIs (e.g. fs.globSync(...)) are not implemented.
The file watching APIs (e.g. fs.watch(...)) are not implemented.
The file timestamps (modified time, access time, etc) are only partially supported. For now, these will always return the Unix epoch.
Refer to the Node.js documentation ↗ for more information on the node:fs module and its APIs.
The Web File System API
The Web File System API provides access to the same virtual file system as the node:fs module, but with a different API surface. The Web File System API is only available in Workers running with the enable_web_file_system compatibility flag. The nodejs_compat compatibility flag is not required to use the Web File System API.
As there are still some parts of the Web File System API that are not fully standardized, there may be some differences between the Workers implementation and the implementations in browsers.
If you're serving Static Assets with a _redirects file containing a rule like /ja/* /:splat, paths with double slashes were previously misinterpreted as external URLs. For example, visiting /ja//example.com would incorrectly redirect to https://example.com instead of /example.com on your domain. This has been fixed and double slashes now correctly resolve as local paths. Note: Cloudflare Pages was not affected by this issue.
We've updated preview URLs for Cloudflare Workers to support long branch names.
Previously, branch and Worker names exceeding the 63-character DNS limit would cause alias generation to fail, leaving pull requests without aliased preview URLs. This particularly impacted teams relying on descriptive branch naming.
Now, Cloudflare automatically truncates long branch names and appends a unique hash, ensuring every pull request gets a working preview link.
How it works
63 characters or less: <branch-name>-<worker-name> → Uses actual branch name as is
64 characters or more: <truncated-branch-name>--<hash>-<worker-name> → Uses truncated name with 4-character hash
Hash generation: The hash is derived from the full branch name to ensure uniqueness
Stable URLs: The same branch always generates the same hash across all commits
Requirements and compatibility
Wrangler 4.30.0 or later: This feature requires updating to wrangler@4.30.0+
No configuration needed: Works automatically with existing preview URL setups
We are changing how Python Workers are structured by default. Previously, handlers were defined at the top-level of a module as on_fetch, on_scheduled, etc. methods, but now they live in an entrypoint class.
Here's an example of how to now define a Worker with a fetch handler:
Resolved several issues with the cloudflare_workers_script resource that resulted in unwarranted plan diffs, including:
Using Durable Objects migrations
Using some bindings such as secret_text
Using smart placement
A resource should never show a plan diff if there isn't an actual change. This fix reduces unnecessary noise in your Terraform plan and is available in Cloudflare Terraform Provider 5.8.0.
Improved File Management
You can now specify content_file and content_sha256 instead of content. This prevents the Workers script content from being stored in the state file which greatly reduces plan diff size and noise. If your workflow synced plans remotely, this should now happen much faster since there is less data to sync. This is available in Cloudflare Terraform Provider 5.7.0.
Fixed an issue where Workers script versions in the SDK did not allow uploading files. This now works, and also has an improved files upload interface:
A minimal implementation of the MessageChannel API ↗ is now available in Workers. This means that you can use MessageChannel to send messages between different parts of your Worker, but not across different Workers.
The MessageChannel and MessagePort APIs will be available by default at the global scope
with any worker using a compatibility date of 2025-08-15 or later. It is also available
using the expose_global_message_channel compatibility flag, or can be explicitly disabled
using the no_expose_global_message_channel compatibility flag.
const { port1, port2 } = new MessageChannel();port2.onmessage = (event) => { console.log('Received message:', event.data);};port2.postMessage('Hello from port2!');
Any value that can be used with the structuredClone(...) API can be sent over the port.
Differences
There are a number of key limitations to the MessageChannel API in Workers:
Transfer lists are currently not supported. This means that you will not be able to transfer
ownership of objects like ArrayBuffer or MessagePort between ports.
The MessagePort is not yet serializable. This means that you cannot send a MessagePort object
through the postMessage method or via JSRPC calls.
The 'messageerror' event is only partially supported. If the 'onmessage' handler throws an
error, the 'messageerror' event will be triggered, however, it will not be triggered when there
are errors serializing or deserializing the message data. Instead, the error will be thrown when
the postMessage method is called on the sending port.
The 'close' event will be emitted on both ports when one of the ports is closed, however it
will not be emitted when the Worker is terminated or when one of the ports is garbage collected.
Now, you can use .env files to provide secrets and override environment variables on the env object during local development with Wrangler and the Cloudflare Vite plugin.
Previously in local development, if you wanted to provide secrets or environment variables during local development, you had to use .dev.vars files.
This is still supported, but you can now also use .env files, which are more familiar to many developers.
Using .env files in local development
You can create a .env file in your project root to define environment variables that will be used when running wrangler dev or vite dev. The .env file should be formatted like a dotenv file, such as KEY="VALUE":
.envbash
TITLE="My Worker"API_TOKEN="dev-token"
When you run wrangler dev or vite dev, the environment variables defined in the .env file will be available in your Worker code via the env object:
If your Worker defines multiple environments, you can set different variables for each environment (ex: production or staging) by creating files named .env.<environment-name>.
When you use wrangler <command> --env <environment-name> or CLOUDFLARE_ENV=<environment-name> vite dev, the corresponding environment-specific file will also be loaded and merged with the .env file.
For example, if you want to set different environment variables for the staging environment, you can create a file named .env.staging:
.env.stagingbash
API_TOKEN="staging-token"
When you run wrangler dev --env staging or CLOUDFLARE_ENV=staging vite dev, the environment variables from .env.staging will be merged onto those from .env.
export default { async fetch(request, env) { const title = env.TITLE; // "My Worker" (from `.env`) const apiToken = env.API_TOKEN; // "staging-token" (from `.env.staging`, overriding the value from `.env`) const response = await fetch( `https://api.example.com/data?token=${apiToken}`, ); return new Response(`Title: ${title} - ` + (await response.text())); },};
Find out more
For more information on how to use .env files with Wrangler and the Cloudflare Vite plugin, see the following documentation:
You can now import waitUntil from cloudflare:workers to extend your Worker's execution beyond the request lifecycle from anywhere in your code.
Previously, waitUntil could only be accessed through the execution context (ctx) parameter passed to your Worker's handler functions. This meant that if you needed to schedule background tasks from deeply nested functions or utility modules, you had to pass the ctx object through multiple function calls to access waitUntil.
Now, you can import waitUntil directly and use it anywhere in your Worker without needing to pass ctx as a parameter:
import { waitUntil } from "cloudflare:workers";export function trackAnalytics(eventData) { const analyticsPromise = fetch("https://analytics.example.com/track", { method: "POST", body: JSON.stringify(eventData), }); // Extend execution to ensure analytics tracking completes waitUntil(analyticsPromise);}
This is particularly useful when you want to:
Schedule background tasks from utility functions or modules
Extend execution for analytics, logging, or cleanup operations
Avoid passing the execution context through multiple layers of function calls
import { waitUntil } from "cloudflare:workers";export default { async fetch(request, env, ctx) { // Background task that should complete even after response is sent cleanupTempData(env.KV_NAMESPACE); return new Response("Hello, World!"); }};function cleanupTempData(kvNamespace) { // This function can now use waitUntil without needing ctx const deletePromise = kvNamespace.delete("temp-key"); waitUntil(deletePromise);}
By setting the value of the cache property to no-cache, you can force Cloudflare's
cache to revalidate its contents with the origin when
making subrequests from Cloudflare Workers.
When no-cache is set, the Worker request will first look for a match in Cloudflare's cache, then:
If there is a match, a conditional request is sent to the origin, regardless of whether or not the match is fresh or stale. If the resource has not changed, the
cached version is returned. If the resource has changed, it will be downloaded from the origin, updated in the cache, and returned.
If there is no match, Workers will make a standard request to the origin and cache the response.
This increases compatibility with NPM packages and JavaScript frameworks that rely on setting the
cache property, which is a cross-platform standard part
of the Request interface. Previously, if you set the cache
property on Request to 'no-cache', the Workers runtime threw an exception.
The latest releases of @cloudflare/agents ↗ brings major improvements to MCP transport protocols support and agents connectivity. Key updates include:
MCP elicitation support
MCP servers can now request user input during tool execution, enabling interactive workflows like confirmations, forms, and multi-step processes. This feature uses durable storage to preserve elicitation state even during agent hibernation, ensuring seamless user interactions across agent lifecycle events.
// Request user confirmation via elicitationconst confirmation = await this.elicitInput({ message: `Are you sure you want to increment the counter by ${amount}?`, requestedSchema: { type: "object", properties: { confirmed: { type: "boolean", title: "Confirm increment", description: "Check to confirm the increment", }, }, required: ["confirmed"], },});
Check out our demo ↗ to see elicitation in action.
HTTP streamable transport for MCP
MCP now supports HTTP streamable transport which is recommended over SSE. This transport type offers:
Better performance: More efficient data streaming and reduced overhead
Improved reliability: Enhanced connection stability and error recover- Automatic fallback: If streamable transport is not available, it gracefully falls back to SSE
The SDK automatically selects the best available transport method, gracefully falling back from streamable-http to SSE when needed.
Enhanced MCP connectivity
Significant improvements to MCP server connections and transport reliability:
Auto transport selection: Automatically determines the best transport method, falling back from streamable-http to SSE as needed
Improved error handling: Better connection state management and error reporting for MCP servers
Reliable prop updates: Centralized agent property updates ensure consistency across different contexts
Lightweight .queue for fast task deferral
You can use .queue() to enqueue background work — ideal for tasks like processing user messages, sending notifications etc.
class MyAgent extends Agent { doSomethingExpensive(payload) { // a long running process that you want to run in the background } queueSomething() { await this.queue("doSomethingExpensive", somePayload); // this will NOT block further execution, and runs in the background await this.queue("doSomethingExpensive", someOtherPayload); // the callback will NOT run until the previous callback is complete // ... call as many times as you want }}
Want to try it yourself? Just define a method like processMessage in your agent, and you’re ready to scale.
New email adapter
Want to build an AI agent that can receive and respond to emails automatically? With the new email adapter and onEmail lifecycle method, now you can.
export class EmailAgent extends Agent { async onEmail(email: AgentEmail) { const raw = await email.getRaw(); const parsed = await PostalMime.parse(raw); // create a response based on the email contents // and then send a reply await this.replyToEmail(email, { fromName: "Email Agent", body: `Thanks for your email! You've sent us "${parsed.subject}". We'll process it shortly.`, }); }}
Custom methods are now automatically wrapped with the agent's context, so calling getCurrentAgent() should work regardless of where in an agent's lifecycle it's called. Previously this would not work on RPC calls, but now just works out of the box.
export class MyAgent extends Agent { async suggestReply(message) { // getCurrentAgent() now correctly works, even when called inside an RPC method const { agent } = getCurrentAgent()!; return generateText({ prompt: `Suggest a reply to: "${message}" from "${agent.name}"`, tools: [replyWithEmoji], }); }}
We’ve shipped a major release for the @cloudflare/sandbox ↗ SDK, turning it into a full-featured, container-based execution platform that runs securely on Cloudflare Workers.
This update adds live streaming of output, persistent Python and JavaScript code interpreters with rich output support (charts, tables, HTML, JSON), file system access, Git operations, full background process control, and the ability to expose running services via public URLs.
This makes it ideal for building AI agents, CI runners, cloud REPLs, data analysis pipelines, or full developer tools — all without managing infrastructure.
Code interpreter (Python, JS, TS)
Create persistent code contexts with support for rich visual + structured outputs.
createCodeContext(options)
Creates a new code execution context with persistent state.
Sandboxes are still experimental. We're using them to explore how isolated, container-like workloads might scale on Cloudflare — and to help define the developer experience around them.
As part of the ongoing open beta for Workers Builds, we’ve increased the available disk space for builds from 8 GB to 20 GB for both Free and Paid plans.
This provides more space for larger projects, dependencies, and build artifacts while improving overall build reliability.
Metric
Free Plan
Paid Plans
Disk Space
20 GB
20 GB
All other build limits — including CPU, memory, build minutes, and timeout remain unchanged.

 The new API introduces cleaner resource management with three core resources: