
Today we announced the public beta ↗ of remote bindings for local development. With remote bindings, you can now connect to deployed resources like R2 buckets and D1 databases while running Worker code on your local machine. This means you can test your local code changes against real data and services, without the overhead of deploying for each iteration.
To enable remote mode, add
"experimental_remote" : trueto each binding that you want to rely on a remote resource running on Cloudflare:JSONC {"name": "my-worker",// Set this to today's date"compatibility_date": "2026-07-07","r2_buckets": [{"bucket_name": "screenshots-bucket","binding": "screenshots_bucket","experimental_remote": true,},],}TOML name = "my-worker"# Set this to today's datecompatibility_date = "2026-07-07"[[r2_buckets]]bucket_name = "screenshots-bucket"binding = "screenshots_bucket"experimental_remote = trueWhen remote bindings are configured, your Worker still executes locally, but all binding calls are proxied to the deployed resource that runs on Cloudflare's network.
You can try out remote bindings for local development today with:
- Wrangler v4.20.3: Use the
wrangler dev --x-remote-bindingscommand. - The Cloudflare Vite Plugin: Refer to the documentation for how to enable in your Vite config.
- The Cloudflare Vitest Plugin: Refer to the documentation for how to enable in your Vitest config.
Have feedback? Join the discussion in our beta announcement ↗ to share feedback or report any issues.
- Wrangler v4.20.3: Use the
For those building Single Page Applications (SPAs) on Workers, you can now explicitly define which routes invoke your Worker script in Wrangler configuration. The
run_worker_firstconfig option has now been expanded to accept an array of route patterns, allowing you to more granularly specify when your Worker script runs.Configuration example:
JSONC {"name": "my-spa-worker",// Set this to today's date"compatibility_date": "2026-07-07","main": "./src/index.ts","assets": {"directory": "./dist/","not_found_handling": "single-page-application","binding": "ASSETS","run_worker_first": ["/api/*", "!/api/docs/*"]}}TOML name = "my-spa-worker"# Set this to today's datecompatibility_date = "2026-07-07"main = "./src/index.ts"[assets]directory = "./dist/"not_found_handling = "single-page-application"binding = "ASSETS"run_worker_first = [ "/api/*", "!/api/docs/*" ]This new routing control was done in partnership with our community and customers who provided great feedback on our public proposal ↗. Thank you to everyone who brought forward use-cases and feedback on the design!
To use advanced routing control with
run_worker_first, you'll need:- Wrangler v4.20.0 and above
- Cloudflare Vite plugin v1.7.0 and above
Mitigations have been put in place for all existing and future deployments of sites with the Cloudflare adapter for Open Next in response to an identified Server-Side Request Forgery (SSRF) vulnerability in the
@opennextjs/cloudflarepackage.The vulnerability stemmed from an unimplemented feature in the Cloudflare adapter for Open Next, which allowed users to proxy arbitrary remote content via the
/_next/imageendpoint.This issue allowed attackers to load remote resources from arbitrary hosts under the victim site's domain for any site deployed using the Cloudflare adapter for Open Next. For example:
https://victim-site.com/_next/image?url=https://attacker.com. In this example, attacker-controlled content fromattacker.comis served through the victim site's domain (victim-site.com), violating the same-origin policy and potentially misleading users or other services.References: https://www.cve.org/cverecord?id=CVE-2025-6087 ↗, https://github.com/opennextjs/opennextjs-cloudflare/security/advisories/GHSA-rvpw-p7vw-wj3m ↗
- SSRF via unrestricted remote URL loading
- Arbitrary remote content loading
- Potential internal service exposure or phishing risks through domain abuse
The following mitigations have been put in place:
Server side updates to Cloudflare's platform to restrict the content loaded via the
/_next/imageendpoint to images. The update automatically mitigates the issue for all existing and any future sites deployed to Cloudflare using the affected version of the Cloudflare adapter for Open NextRoot cause fix: Pull request #727 ↗ to the Cloudflare adapter for Open Next. The patched version of the adapter has been released as
@opennextjs/cloudflare@1.3.0Package dependency update: Pull request cloudflare/workers-sdk#9608 ↗ to create-cloudflare (c3) to use the fixed version of the Cloudflare adapter for Open Next. The patched version of create-cloudflare has been published as
create-cloudflare@2.49.3.In addition to the automatic mitigation deployed on Cloudflare's platform, we encourage affected users to upgrade to
@opennext/cloudflarev1.3.0 and use theremotePatterns↗ filter in Next config if they need to allow-list external urls with images assets.
You can now grant members of your Cloudflare account read-only access to the Workers Platform.
The new "Workers Platform (Read-only)" role grants read-only access to all products typically used as part of Cloudflare's Developer Platform, including Workers, Pages, Durable Objects, KV, R2, Zones, Zone Analytics and Page Rules. When Cloudflare introduces new products to the Workers platform, we will add additional read-only permissions to this role.
Additionally, the role previously named "Workers Admin" has been renamed to "Workers Platform Admin". This change ensures that the name more accurately reflects the permissions granted — this role has always granted access to more than just Workers — it grants read and write access to the products mentioned above, and similarly, as new products are added to the Workers platform, we will add additional read and write permissions to this role.
You can review the updated roles in the developer docs.
Workers Builds connects your Worker to a Git repository, and automates building and deploying your code on each pushed change.
To make CI/CD pipelines even more flexible, Workers Builds now automatically injects default environment variables into your build process (much like the defaults in Cloudflare Pages projects). You can use these variables to customize your build process based on the deployment context, such as the branch or commit.
The following environment variables are injected by default:
Environment Variable Injected value Example use-case CItrueChanging build behavior when run on CI versus locally WORKERS_CI1Changing build behavior when run on Workers Builds versus locally WORKERS_CI_BUILD_UUID<build-uuid-of-current-build>Passing the Build UUID along to custom workflows WORKERS_CI_COMMIT_SHA<sha1-hash-of-current-commit>Passing current commit ID to error reporting, for example, Sentry WORKERS_CI_BRANCH<branch-name-from-push-eventCustomizing build based on branch, for example, disabling debug logging on productionYou can override these default values and add your own custom environment variables by navigating to your Worker > Settings > Environment variables.
Learn more in the Build configuration documentation.
Workers native integrations were originally launched in May 2023 ↗ to connect to popular database and observability providers with your Worker in just a few clicks. We are changing how developers connect Workers to these external services. The Integrations tab in the dashboard has been removed in favor of a more direct, command-line-based approach using Wrangler secrets.
- Integrations tab removed: The integrations setup flow is no longer available in the Workers dashboard.
- Manual secret configuration: New connections should be configured by adding credentials as secrets to your Workers using
npx wrangler secret putcommands.
Existing integrations will continue to work without any changes required. If you have integrations that were previously created through the dashboard, they will remain functional.
If you'd like to modify your existing integration, you can update the secrets, environment variables, or Tail Workers that were created from the original integration setup.
- Update secrets: Use
npx wrangler secret put <SECRET_NAME>to update credential values. - Modify environment variables: Update variables through the dashboard or Wrangler configuration.
- Dashboard management: Access your Worker's settings in the Cloudflare dashboard ↗ to modify connections created by our removed native integrations feature.
If you have previously set up an observability integration with Sentry ↗, the following environment variables were set and are still modifiable:
BLOCKED_HEADERS: headers to exclude sending to SentryEXCEPTION_SAMPLING_RATE: number from 0 - 100, where 0 = no events go through to Sentry, and 100 = all events go through to SentrySTATUS_CODES_TO_SAMPLING_RATES: a map of status codes -- like 400 or with wildcards like 4xx -- to sampling rates described above
For new connections, refer to our step-by-step guides on connecting to popular database and observability providers including: Sentry, Turso, Neon, Supabase, PlanetScale, Upstash, Xata.
With the release of the Cloudflare adapter for Open Next v1.0.0 in May 2025, we already had followups plans to improve performance and size ↗.
@opennextjs/cloudflarev1.2 released on June 5, 2025 delivers on these enhancements. By removingbabelfrom the app code and dropping a dependency on@ampproject/toolbox-optimizer, we were able to reduce generated bundle sizes. Additionally, by stopping preloading of all app routes, we were able to improve the cold start time.This means that users will now see a decrease from 14 to 8MiB (2.3 to 1.6MiB gzipped) in generated bundle size for a Next app created via create-next-app, and typically 100ms faster startup times for their medium-sized apps.
Users only need to update to the latest version of
@opennextjs/cloudflareto automatically benefit from these improvements.Note that we published CVE-2005-6087 ↗ for a SSRF vulnerability in the
@opennextjs/cloudflarepackage. The vulnerability has been fixed from@opennextjs/cloudflarev1.3.0 onwards. Please update to any version after this one.
You can now visualize, explore and modify your Worker’s architecture directly in the Cloudflare dashboard, making it easier to understand how your application connects to Cloudflare resources like D1 databases, Durable Objects, KV namespaces, and more.
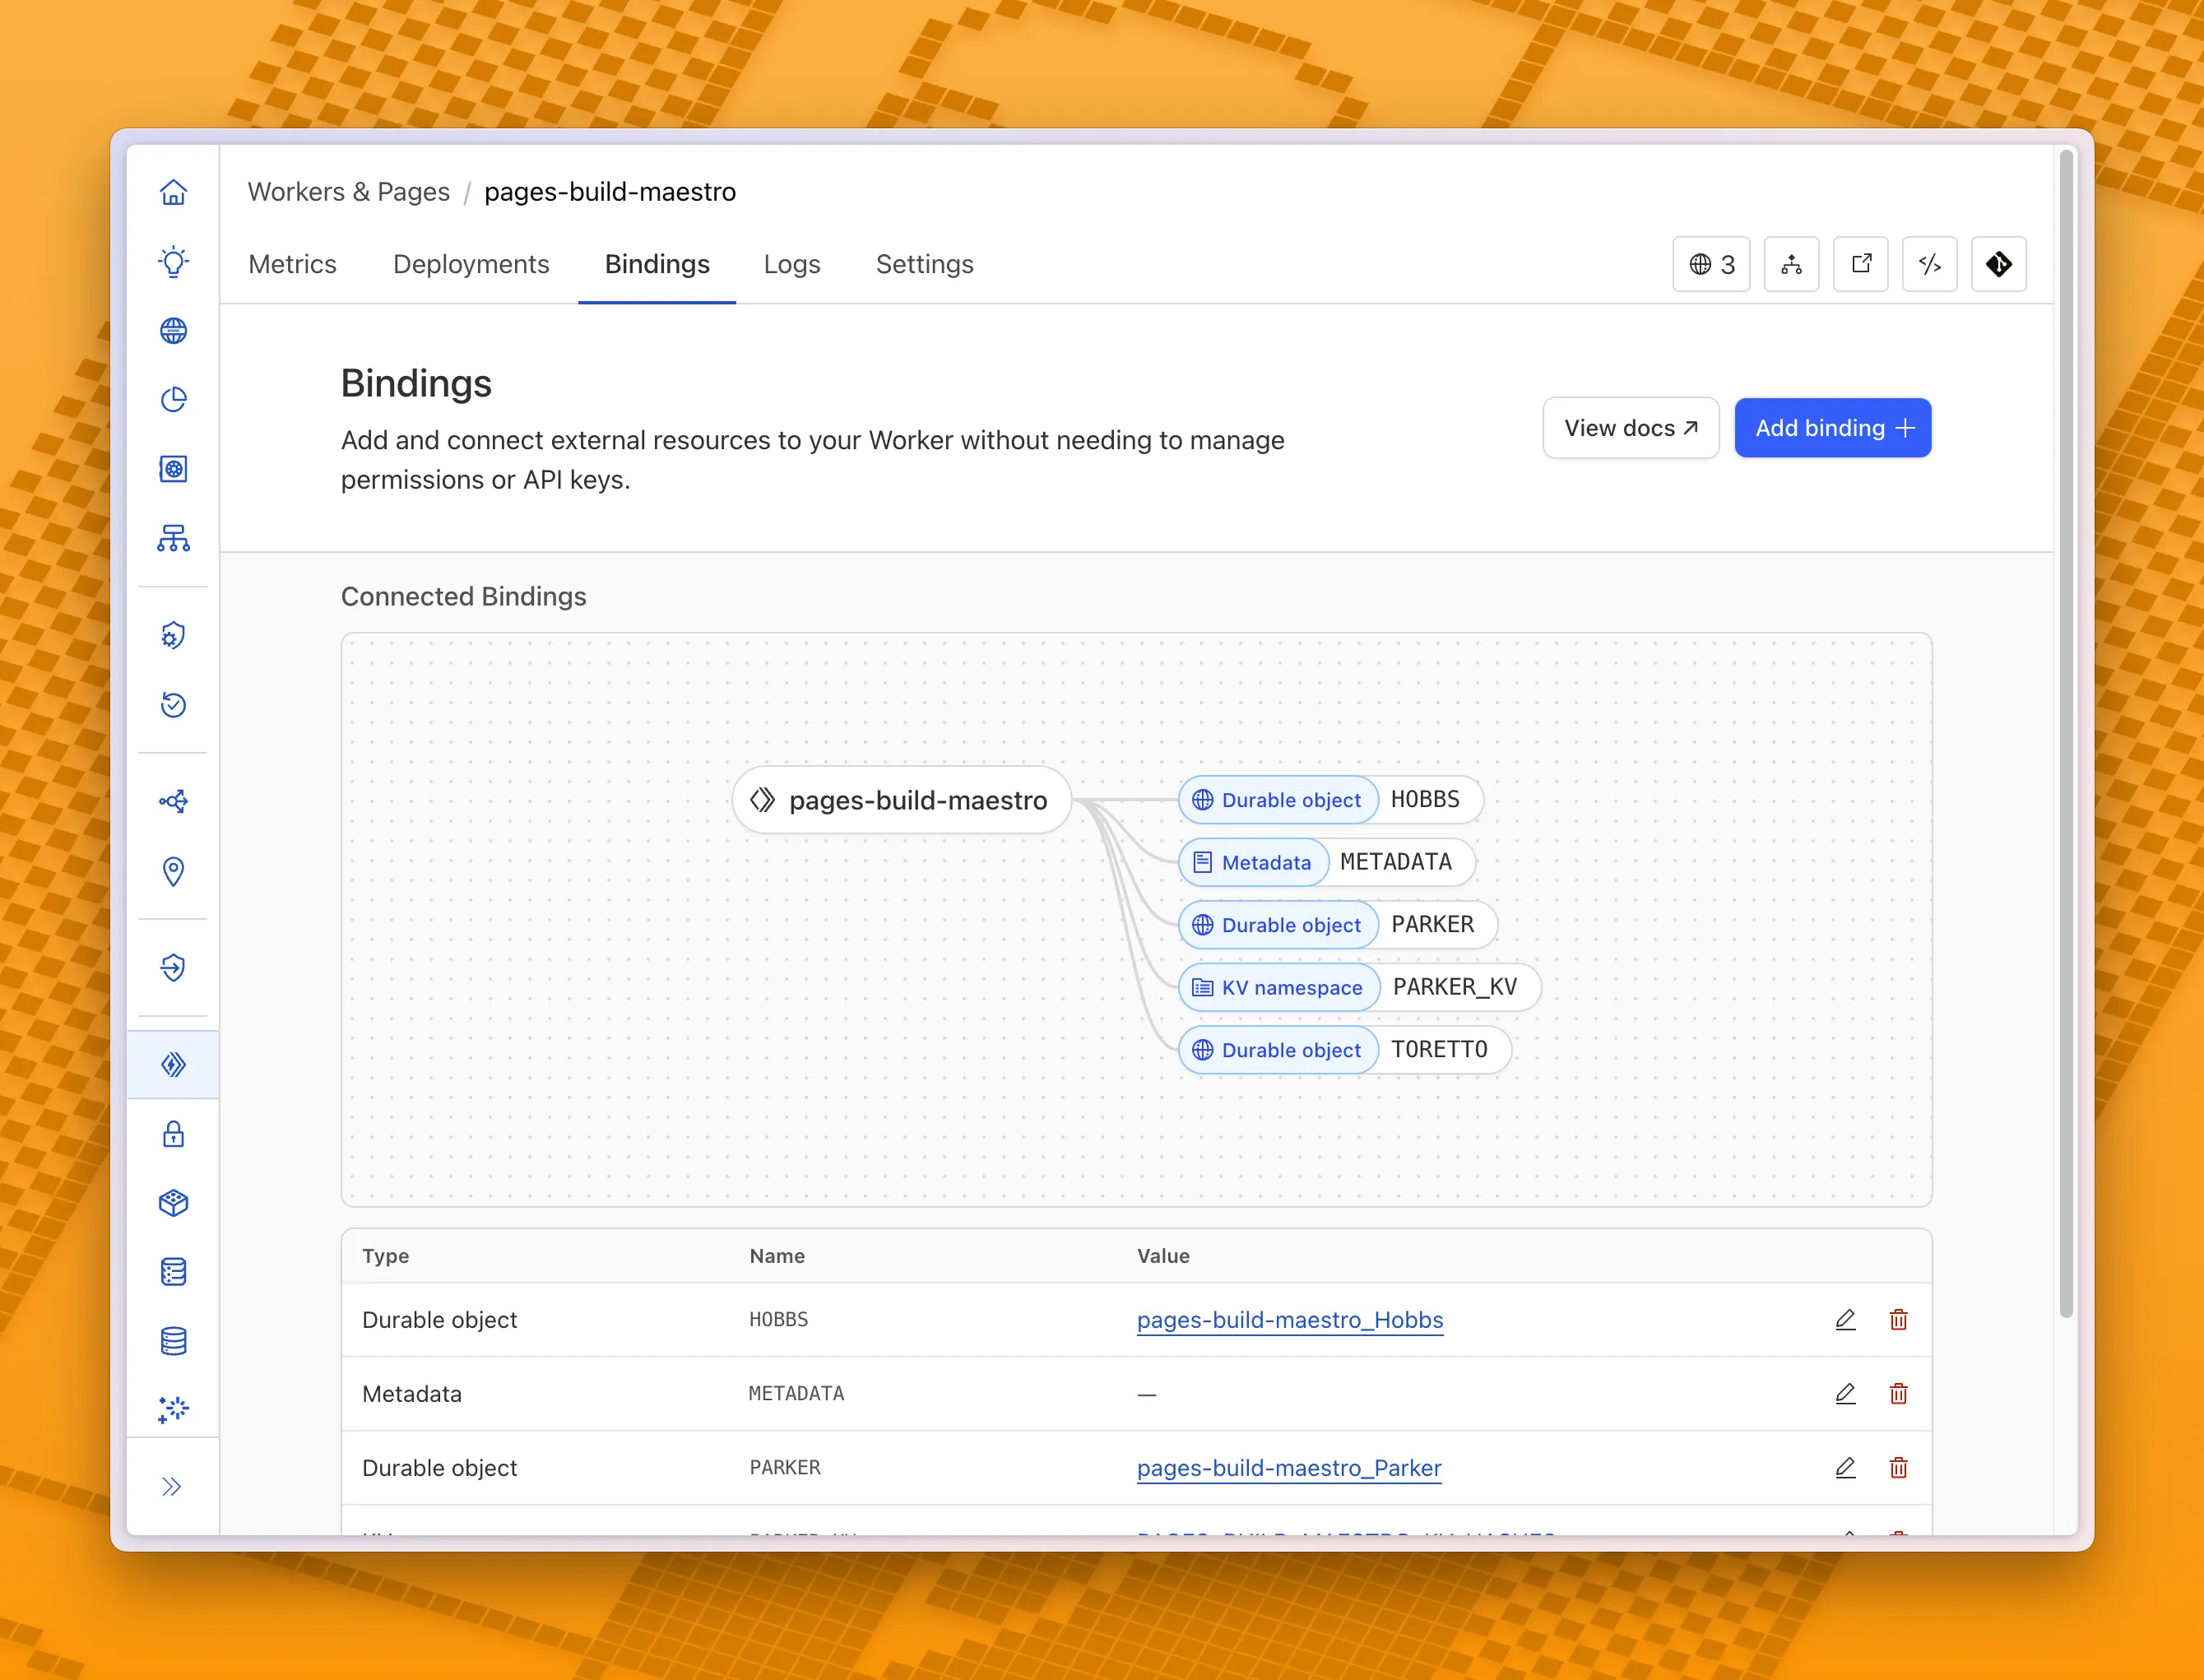
With this new view, you can easily:
- Explore existing bindings in a visual, architecture-style diagram
- Add and manage bindings directly from the same interface
- Discover the full range of compute, storage, AI, and media resources you can attach to your Workers application.
To get started, head to the Cloudflare dashboard ↗ and open the Bindings tab of any Workers application.
You can now debug, profile, view logs, and analyze memory usage for your Worker ↗ using Chrome Devtools ↗ when your Worker runs locally using the Cloudflare Vite plugin ↗.
Previously, this was only possible if your Worker ran locally using the Wrangler CLI ↗, and now you can do all the same things if your Worker uses Vite ↗.
When you run
vite, you'll now see a debug URL in your console:VITE v6.3.5 ready in 461 ms➜ Local: http://localhost:5173/➜ Network: use --host to expose➜ Debug: http://localhost:5173/__debug➜ press h + enter to show helpOpen the URL in Chrome, and an instance of Chrome Devtools will open and connect to your Worker running locally. You can then use Chrome Devtools to debug and introspect performance issues. For example, you can navigate to the Performance tab to understand where CPU time is spent in your Worker:
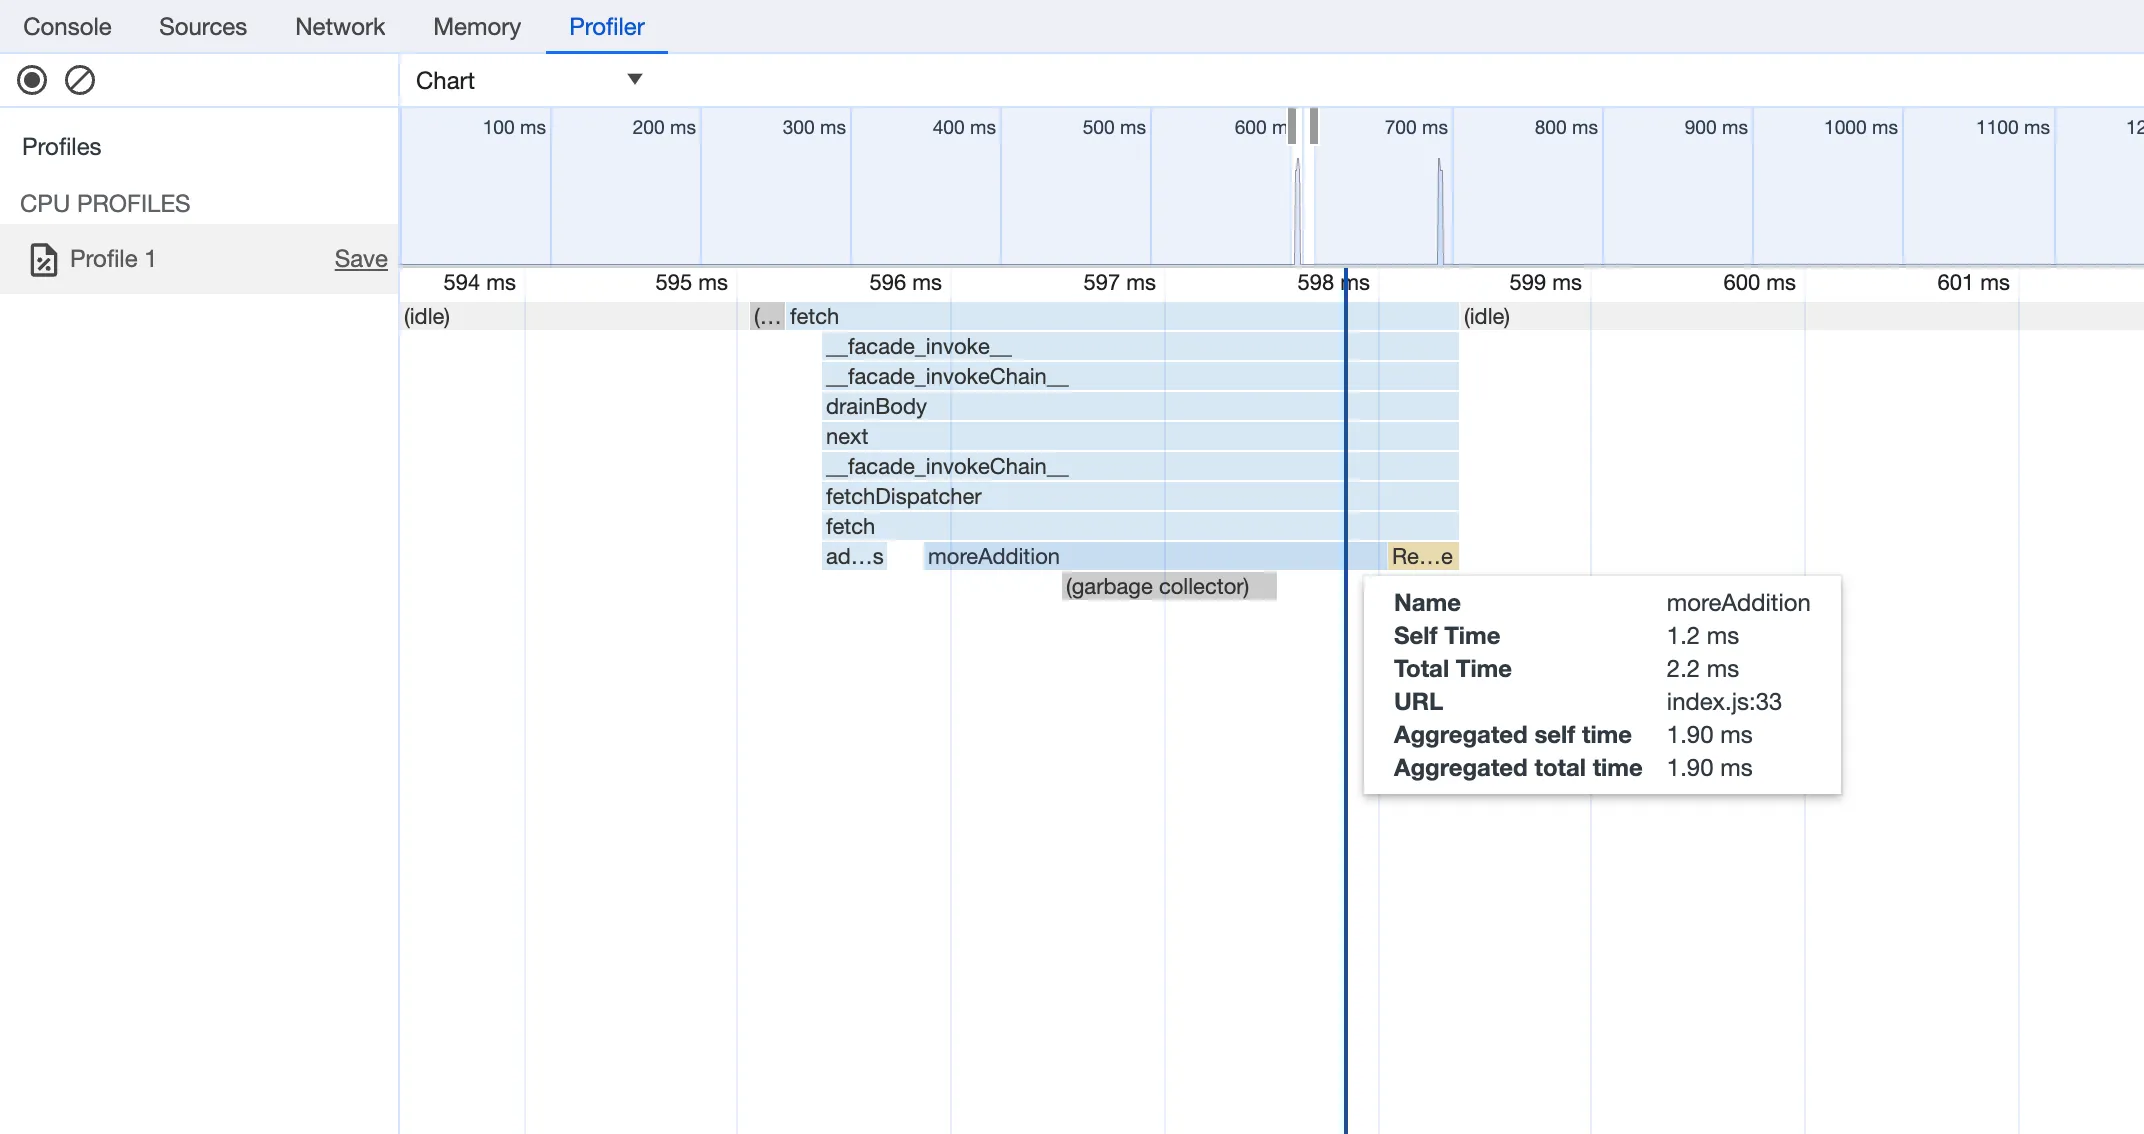
For more information on how to get the most out of Chrome Devtools, refer to the following docs:
Users using Cloudflare's REST API to query their D1 database can see lower end-to-end request latency now that D1 authentication is performed at the closest Cloudflare network data center that received the request. Previously, authentication required D1 REST API requests to proxy to Cloudflare's core, centralized data centers, which added network round trips and latency.
Latency improvements range from 50-500 ms depending on request location and database location and only apply to the REST API. REST API requests and databases outside the United States see a bigger benefit since Cloudflare's primary core data centers reside in the United States.
D1 query endpoints like
/queryand/rawhave the most noticeable improvements since they no longer access Cloudflare's core data centers. D1 control plane endpoints such as those to create and delete databases see smaller improvements, since they still require access to Cloudflare's core data centers for other control plane metadata.
In Cloudflare Workers, you can now attach an event listener to
Requestobjects, using thesignalproperty ↗. This allows you to perform tasks when the request to your Worker is canceled by the client. To use this feature, you must set theenable_request_signalcompatibility flag.You can use a listener to perform cleanup tasks or write to logs before your Worker's invocation ends. For example, if you run the Worker below, and then abort the request from the client, a log will be written:
index.js export default {async fetch(request, env, ctx) {// This sets up an event listener that will be called if the client disconnects from your// worker.request.signal.addEventListener("abort", () => {console.log("The request was aborted!");});const { readable, writable } = new IdentityTransformStream();sendPing(writable);return new Response(readable, {headers: { "Content-Type": "text/plain" },});},};async function sendPing(writable) {const writer = writable.getWriter();const enc = new TextEncoder();for (;;) {// Send 'ping' every second to keep the connection aliveawait writer.write(enc.encode("ping\r\n"));await scheduler.wait(1000);}}index.ts export default {async fetch(request, env, ctx): Promise<Response> {// This sets up an event listener that will be called if the client disconnects from your// worker.request.signal.addEventListener('abort', () => {console.log('The request was aborted!');});const { readable, writable } = new IdentityTransformStream();sendPing(writable);return new Response(readable, { headers: { 'Content-Type': 'text/plain' } });},} satisfies ExportedHandler<Env>;async function sendPing(writable: WritableStream): Promise<void> {const writer = writable.getWriter();const enc = new TextEncoder();for (;;) {// Send 'ping' every second to keep the connection aliveawait writer.write(enc.encode('ping\r\n'));await scheduler.wait(1000);}}For more information see the
Requestdocumentation.
You can now create Durable Objects using Python Workers. A Durable Object is a special kind of Cloudflare Worker which uniquely combines compute with storage, enabling stateful long-running applications which run close to your users. For more info see here.
You can define a Durable Object in Python in a similar way to JavaScript:
Python from workers import DurableObject, Response, WorkerEntrypointfrom urllib.parse import urlparseclass MyDurableObject(DurableObject):def __init__(self, ctx, env):self.ctx = ctxself.env = envdef fetch(self, request):result = self.ctx.storage.sql.exec("SELECT 'Hello, World!' as greeting").one()return Response(result.greeting)class Default(WorkerEntrypoint):async def fetch(self, request):url = urlparse(request.url)id = env.MY_DURABLE_OBJECT.idFromName(url.path)stub = env.MY_DURABLE_OBJECT.get(id)greeting = await stub.fetch(request.url)return greetingDefine the Durable Object in your Wrangler configuration file:
JSONC {"durable_objects": {"bindings": [{"name": "MY_DURABLE_OBJECT","class_name": "MyDurableObject"}]}}TOML [[durable_objects.bindings]]name = "MY_DURABLE_OBJECT"class_name = "MyDurableObject"Then define the storage backend for your Durable Object:
JSONC {"migrations": [{"tag": "v1", // Should be unique for each entry"new_sqlite_classes": [ // Array of new classes"MyDurableObject"]}]}TOML [[migrations]]tag = "v1"new_sqlite_classes = [ "MyDurableObject" ]Then test your new Durable Object locally by running
wrangler dev:Terminal window npx wrangler devConsult the Durable Objects documentation for more details.
FinalizationRegistry ↗ is now available in Workers. You can opt-in using the
enable_weak_refcompatibility flag.This can reduce memory leaks when using WebAssembly-based Workers, which includes Python Workers and Rust Workers. The FinalizationRegistry works by enabling toolchains such as Emscripten ↗ and wasm-bindgen ↗ to automatically free WebAssembly heap allocations. If you are using WASM and seeing Exceeded Memory errors and cannot determine a cause using memory profiling, you may want to enable the FinalizationRegistry.
For more information refer to the
enable_weak_refcompatibility flag documentation.
You can now create Python Workers which are executed via a cron trigger.
This is similar to how it's done in JavaScript Workers, simply define a scheduled event listener in your Worker:
Python from workers import handler@handlerasync def on_scheduled(event, env, ctx):print("cron processed")Define a cron trigger configuration in your Wrangler configuration file:
JSONC {"triggers": {// Schedule cron triggers:// - At every 3rd minute// - At 15:00 (UTC) on first day of the month// - At 23:59 (UTC) on the last weekday of the month"crons": ["*/3 * * * *","0 15 1 * *","59 23 LW * *"]}}TOML [triggers]crons = [ "*/3 * * * *", "0 15 1 * *", "59 23 LW * *" ]Then test your new handler by using Wrangler with the
--test-scheduledflag and making a request to/cdn-cgi/handler/scheduled?cron=*+*+*+*+*:Terminal window npx wrangler dev --test-scheduledcurl "http://localhost:8787/cdn-cgi/handler/scheduled?cron=*+*+*+*+*"Consult the Workers Cron Triggers page for full details on cron triggers in Workers.
-
Previously, a request to the Workers Create Route API always returned
nullfor "script" and an empty string for "pattern" even if the request was successful.Example request curl https://api.cloudflare.com/client/v4/zones/$CF_ACCOUNT_ID/workers/routes \-X PUT \-H "Authorization: Bearer $CF_API_TOKEN" \-H 'Content-Type: application/json' \--data '{ "pattern": "example.com/*", "script": "hello-world-script" }'Example bad response {"result": {"id": "bf153a27ba2b464bb9f04dcf75de1ef9","pattern": "","script": null,"request_limit_fail_open": false},"success": true,"errors": [],"messages": []}Now, it properly returns all values!
Example good response {"result": {"id": "bf153a27ba2b464bb9f04dcf75de1ef9","pattern": "example.com/*","script": "hello-world-script","request_limit_fail_open": false},"success": true,"errors": [],"messages": []}The Workers and Workers for Platforms secrets APIs are now properly documented in the Cloudflare OpenAPI docs. Previously, these endpoints were not publicly documented, leaving users confused on how to directly manage their secrets via the API. Now, you can find the proper endpoints in our public documentation, as well as in our API Library SDKs such as cloudflare-typescript ↗ (>4.2.0) and cloudflare-python ↗ (>4.1.0).
Note the
cloudflare_workers_secretandcloudflare_workers_for_platforms_script_secretTerraform resources ↗ are being removed in a future release. This resource is not recommended for managing secrets. Users should instead use the:- Secrets Store with the "Secrets Store Secret" binding on Workers and Workers for Platforms Script Upload
- "Secret Text" Binding on Workers Script Upload and Workers for Platforms Script Upload
- Workers (and WFP) Secrets API
D1 read replication is available in public beta to help lower average latency and increase overall throughput for read-heavy applications like e-commerce websites or content management tools.
Workers can leverage read-only database copies, called read replicas, by using D1 Sessions API. A session encapsulates all the queries from one logical session for your application. For example, a session may correspond to all queries coming from a particular web browser session. With Sessions API, D1 queries in a session are guaranteed to be sequentially consistent to avoid data consistency pitfalls. D1 bookmarks can be used from a previous session to ensure logical consistency between sessions.
TypeScript // retrieve bookmark from previous session stored in HTTP headerconst bookmark = request.headers.get("x-d1-bookmark") ?? "first-unconstrained";const session = env.DB.withSession(bookmark);const result = await session.prepare(`SELECT * FROM Customers WHERE CompanyName = 'Bs Beverages'`).run();// store bookmark for a future sessionresponse.headers.set("x-d1-bookmark", session.getBookmark() ?? "");Read replicas are automatically created by Cloudflare (currently one in each supported D1 region), are active/inactive based on query traffic, and are transparently routed to by Cloudflare at no additional cost.
To checkout D1 read replication, deploy the following Worker code using Sessions API, which will prompt you to create a D1 database and enable read replication on said database.
To learn more about how read replication was implemented, go to our blog post ↗.
Cloudflare Pipelines is now available in beta, to all users with a Workers Paid plan.
Pipelines let you ingest high volumes of real time data, without managing the underlying infrastructure. A single pipeline can ingest up to 100 MB of data per second, via HTTP or from a Worker. Ingested data is automatically batched, written to output files, and delivered to an R2 bucket in your account. You can use Pipelines to build a data lake of clickstream data, or to store events from a Worker.
Create your first pipeline with a single command:
Create a pipeline $ npx wrangler@latest pipelines create my-clickstream-pipeline --r2-bucket my-bucket🌀 Authorizing R2 bucket "my-bucket"🌀 Creating pipeline named "my-clickstream-pipeline"✅ Successfully created pipeline my-clickstream-pipelineId: 0e00c5ff09b34d018152af98d06f5a1xvcName: my-clickstream-pipelineSources:HTTP:Endpoint: https://0e00c5ff09b34d018152af98d06f5a1xvc.pipelines.cloudflare.com/Authentication: offFormat: JSONWorker:Format: JSONDestination:Type: R2Bucket: my-bucketFormat: newline-delimited JSONCompression: GZIPBatch hints:Max bytes: 100 MBMax duration: 300 secondsMax records: 100,000🎉 You can now send data to your pipeline!Send data to your pipeline's HTTP endpoint:curl "https://0e00c5ff09b34d018152af98d06f5a1xvc.pipelines.cloudflare.com/" -d '[{ ...JSON_DATA... }]'To send data to your pipeline from a Worker, add the following configuration to your config file:{"pipelines": [{"pipeline": "my-clickstream-pipeline","binding": "PIPELINE"}]}Head over to our getting started guide for an in-depth tutorial to building with Pipelines.
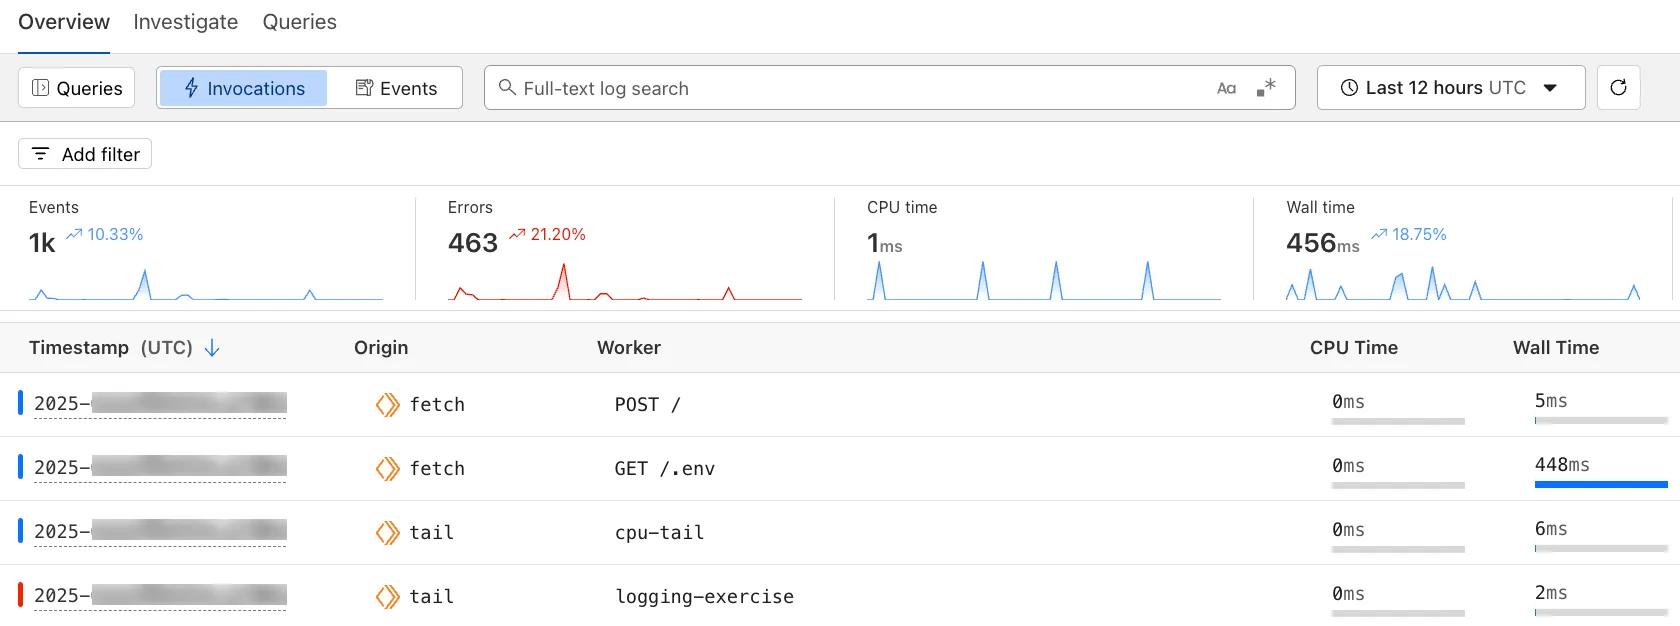
The Workers Observability dashboard ↗ offers a single place to investigate and explore your Workers Logs.
The Overview tab shows logs from all your Workers in one place. The Invocations view groups logs together by invocation, which refers to the specific trigger that started the execution of the Worker (i.e. fetch). The Events view shows logs in the order they were produced, based on timestamp. Previously, you could only view logs for a single Worker.
The Investigate tab presents a Query Builder, which helps you write structured queries to investigate and visualize your logs. The Query Builder can help answer questions such as:
- Which paths are experiencing the most 5XX errors?
- What is the wall time distribution by status code for my Worker?
- What are the slowest requests, and where are they coming from?
- Who are my top N users?
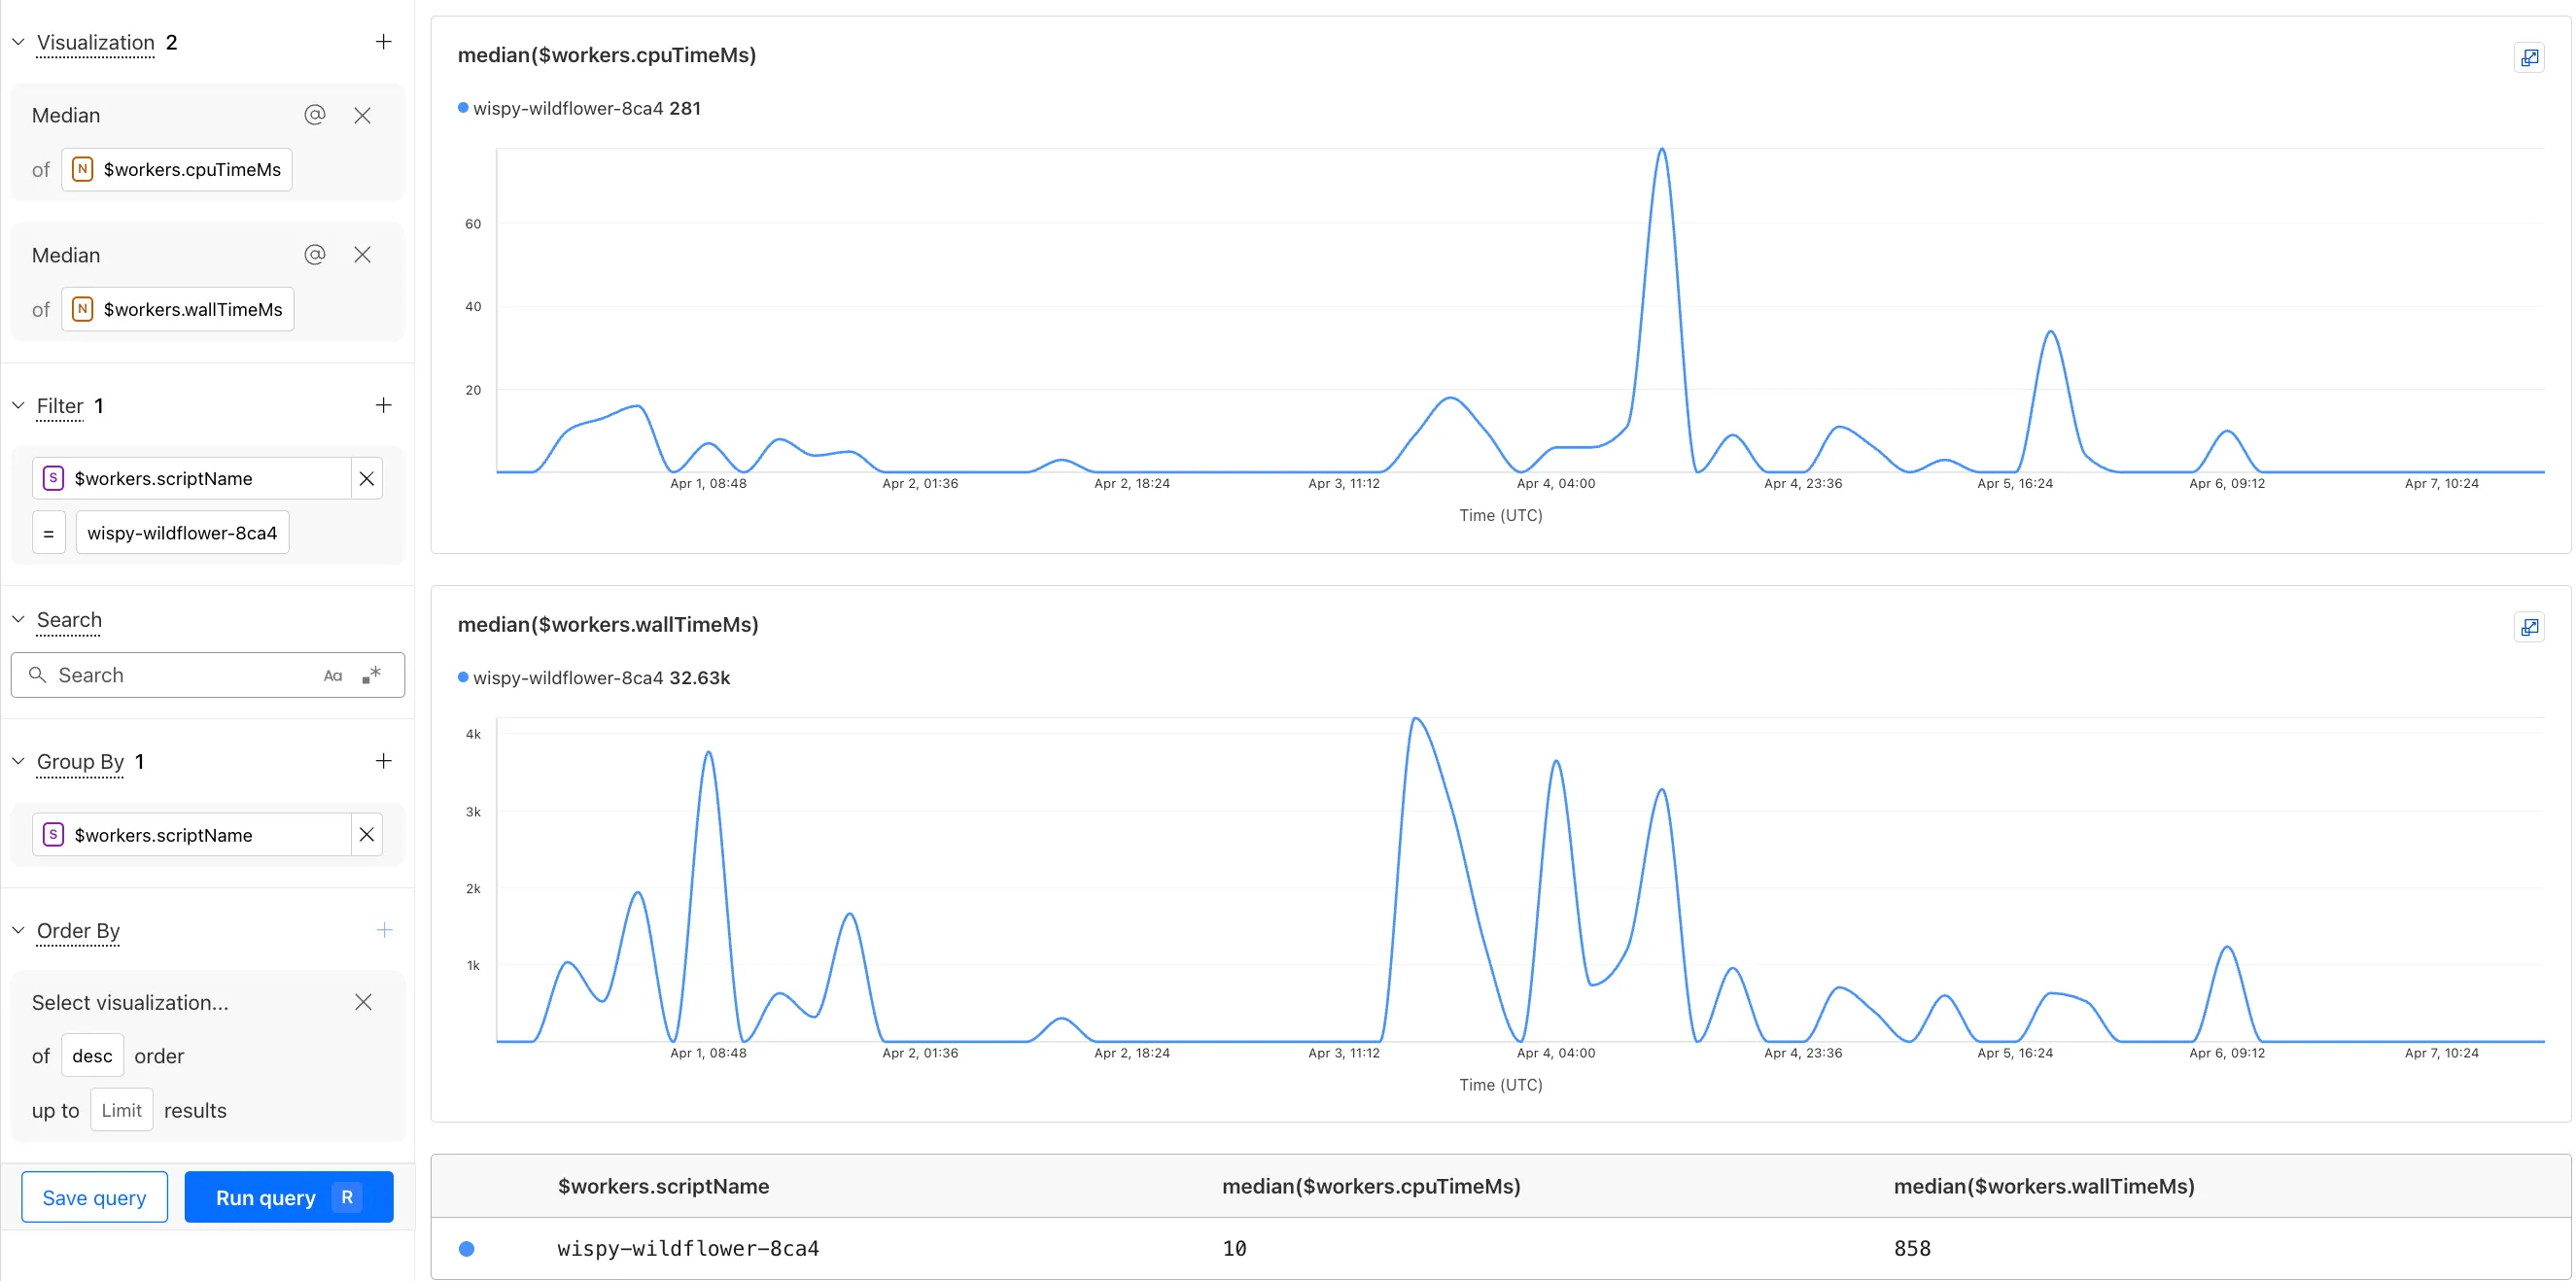
The Query Builder can use any field that you store in your logs as a key to visualize, filter, and group by. Use the Query Builder to quickly access your data, build visualizations, save queries, and share them with your team.
Workers Logs is now Generally Available. With a small change to your Wrangler configuration, Workers Logs ingests, indexes, and stores all logs emitted from your Workers for up to 7 days.
We've introduced a number of changes during our beta period, including:
- Dashboard enhancements with customizable fields as columns in the Logs view and support for invocation-based grouping
- Performance improvements to ensure no adverse impact
- Public API endpoints ↗ for broader consumption
The API documents three endpoints: list the keys in the telemetry dataset, run a query, and list the unique values for a key. For more, visit our REST API documentation ↗.
Visit the docs to learn more about the capabilities and methods exposed by the Query Builder. Start using Workers Logs and the Query Builder today by enabling observability for your Workers:
JSONC {"observability": {"enabled": true,"logs": {"invocation_logs": true,"head_sampling_rate": 1 // optional. default = 1.}}}TOML [observability]enabled = true[observability.logs]invocation_logs = truehead_sampling_rate = 1
You can now observe and investigate the CPU time and Wall time for every Workers Invocations.
- For Workers Logs, CPU time and Wall time are surfaced in the Invocation Log..
- For Tail Workers, CPU time and Wall time are surfaced at the top level of the Workers Trace Events object.
- For Workers Logpush, CPU and Wall time are surfaced at the top level of the Workers Trace Events object. All new jobs will have these new fields included by default. Existing jobs need to be updated to include CPU time and Wall time.
You can use a Workers Logs filter to search for logs where Wall time exceeds 100ms.
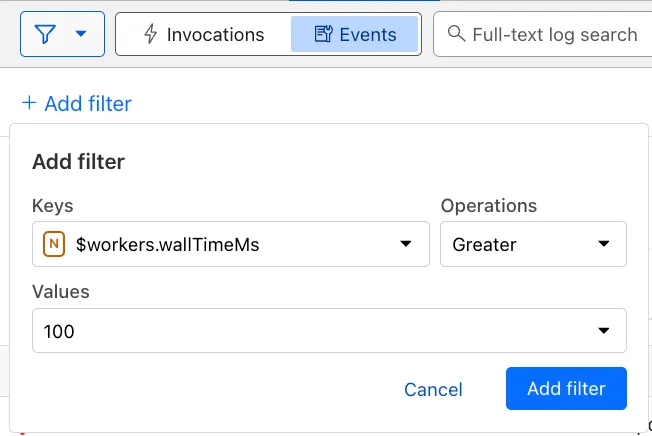
You can also use the Workers Observability Query Builder ↗ to find the median CPU time and median Wall time for all of your Workers.
You can now add a Deploy to Cloudflare button to the README of your Git repository containing a Workers application — making it simple for other developers to quickly set up and deploy your project!
The Deploy to Cloudflare button:
- Creates a new Git repository on your GitHub/ GitLab account: Cloudflare will automatically clone and create a new repository on your account, so you can continue developing.
- Automatically provisions resources the app needs: If your repository requires Cloudflare primitives like a Workers KV namespace, a D1 database, or an R2 bucket, Cloudflare will automatically provision them on your account and bind them to your Worker upon deployment.
- Configures Workers Builds (CI/CD): Every new push to your production branch on your newly created repository will automatically build and deploy courtesy of Workers Builds.
- Adds preview URLs to each pull request: If you'd like to test your changes before deploying, you can push changes to a non-production branch and preview URLs will be generated and posted back to GitHub as a comment.
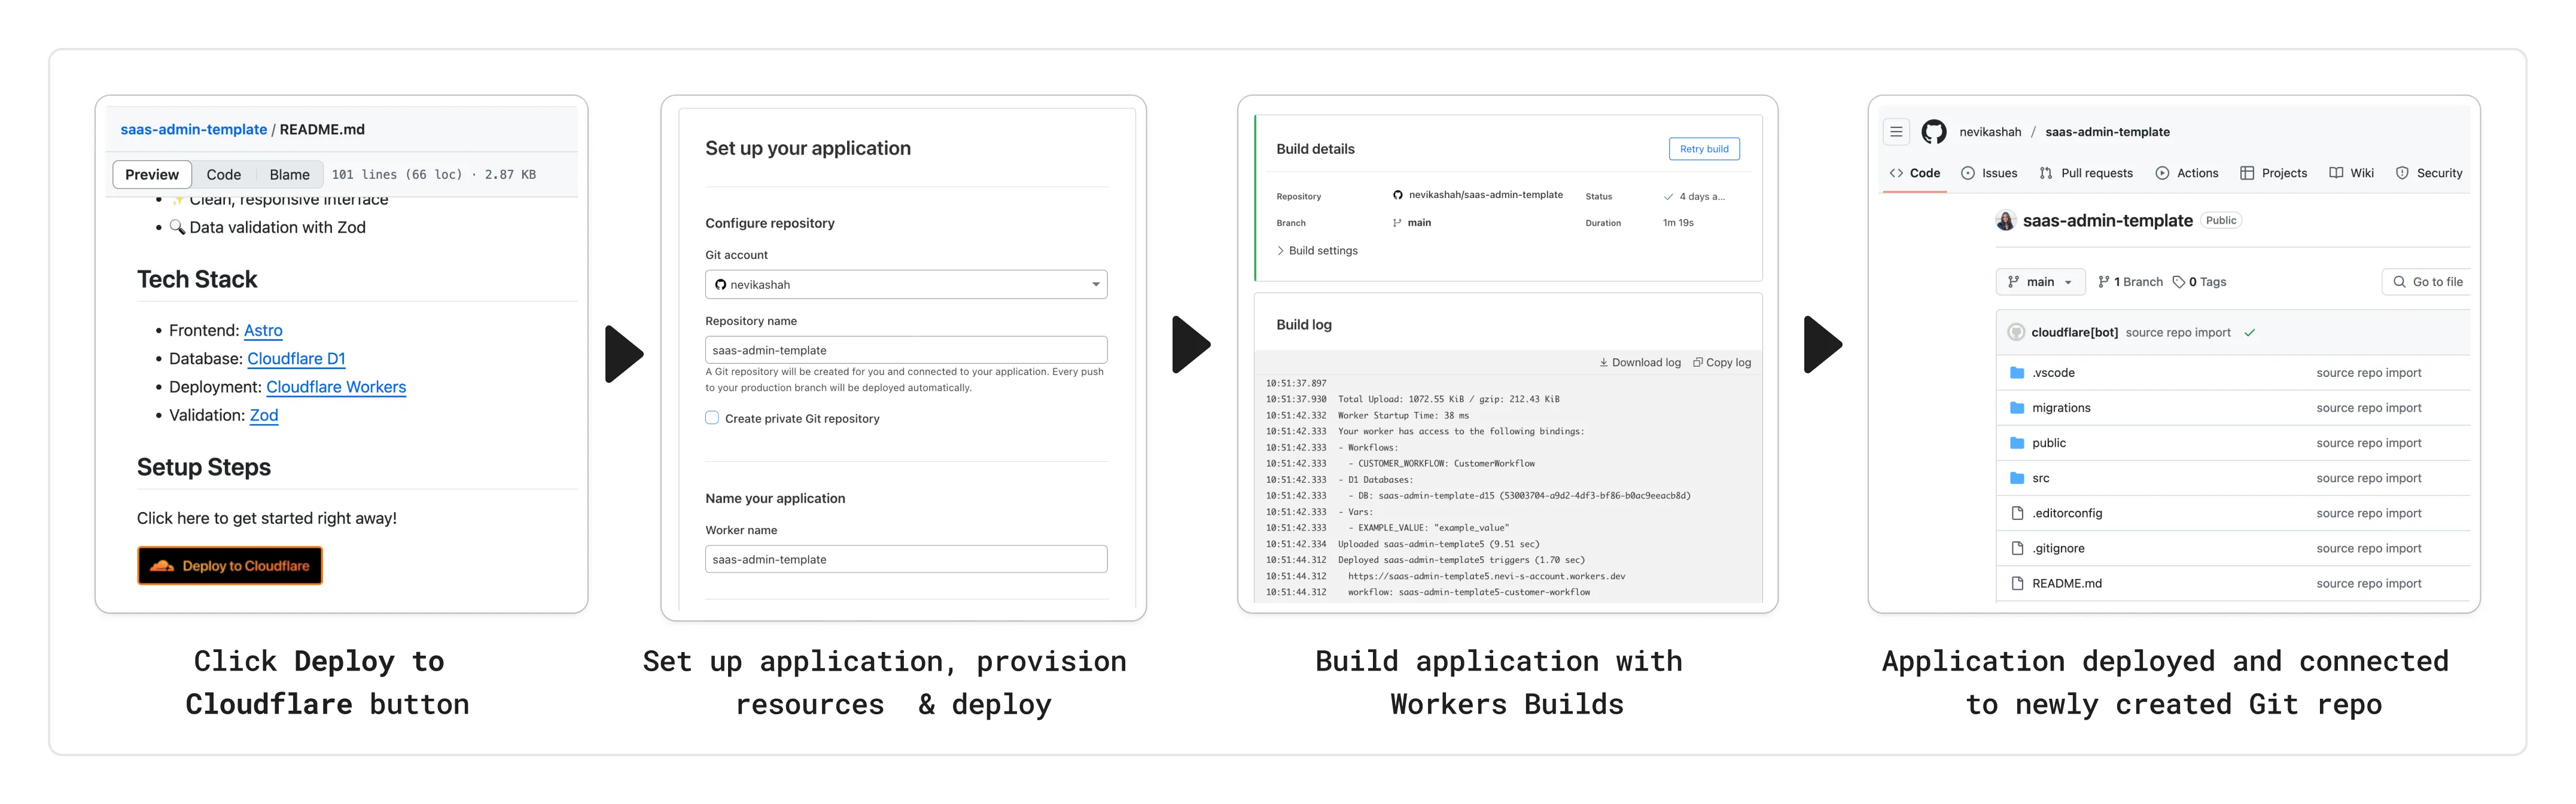
To create a Deploy to Cloudflare button in your README, you can add the following snippet, including your Git repository URL:
[](https://deploy.workers.cloudflare.com/?url=<YOUR_GIT_REPO_URL>)Check out our documentation for more information on how to set up a deploy button for your application and best practices to ensure a successful deployment for other developers.
The following full-stack frameworks now have Generally Available ("GA") adapters for Cloudflare Workers, and are ready for you to use in production:
The following frameworks are now in beta, with GA support coming very soon:
- Next.js, supported through @opennextjs/cloudflare ↗ is now
v1.0-beta. - Angular
- SolidJS (SolidStart)
You can also build complete full-stack apps on Workers without a framework:
- You can “just use Vite" ↗ and React together, and build a back-end API in the same Worker. Follow our React SPA with an API tutorial to learn how.
Get started building today with our framework guides, or read our Developer Week 2025 blog post ↗ about all the updates to building full-stack applications on Workers.
- Next.js, supported through @opennextjs/cloudflare ↗ is now
When using a Worker with the
nodejs_compatcompatibility flag enabled, the following Node.js APIs are now available:This make it easier to reuse existing Node.js code in Workers or use npm packages that depend on these APIs.
The full
node:crypto↗ API is now available in Workers.You can use it to verify and sign data:
JavaScript import { sign, verify } from "node:crypto";const signature = sign("sha256", "-data to sign-", env.PRIVATE_KEY);const verified = verify("sha256", "-data to sign-", env.PUBLIC_KEY, signature);Or, to encrypt and decrypt data:
JavaScript import { publicEncrypt, privateDecrypt } from "node:crypto";const encrypted = publicEncrypt(env.PUBLIC_KEY, "some data");const plaintext = privateDecrypt(env.PRIVATE_KEY, encrypted);See the
node:cryptodocumentation for more information.The following APIs from
node:tlsare now available:This enables secure connections over TLS (Transport Layer Security) to external services.
JavaScript import { connect } from "node:tls";// ... in a request handler ...const connectionOptions = { key: env.KEY, cert: env.CERT };const socket = connect(url, connectionOptions, () => {if (socket.authorized) {console.log("Connection authorized");}});socket.on("data", (data) => {console.log(data);});socket.on("end", () => {console.log("server ends connection");});See the
node:tlsdocumentation for more information.
The Cloudflare Vite plugin has reached v1.0 ↗ and is now Generally Available ("GA").
When you use
@cloudflare/vite-plugin, you can use Vite's local development server and build tooling, while ensuring that while developing, your code runs inworkerd↗, the open-source Workers runtime.This lets you get the best of both worlds for a full-stack app — you can use Hot Module Replacement ↗ from Vite right alongside Durable Objects and other runtime APIs and bindings that are unique to Cloudflare Workers.
@cloudflare/vite-pluginis made possible by the new environment API ↗ in Vite, and was built in partnership with the Vite team ↗.You can build any type of application with
@cloudflare/vite-plugin, using any rendering mode, from single page applications (SPA) and static sites to server-side rendered (SSR) pages and API routes.React Router v7 (Remix) is the first full-stack framework to provide full support for Cloudflare Vite plugin, allowing you to use all parts of Cloudflare's developer platform, without additional build steps.
You can also build complete full-stack apps on Workers without a framework — "just use Vite" ↗ and React together, and build a back-end API in the same Worker. Follow our React SPA with an API tutorial to learn how.
If you're already using Vite ↗ in your build and development toolchain, you can start using our plugin with minimal changes to your
vite.config.ts:vite.config.ts import { defineConfig } from "vite";import { cloudflare } from "@cloudflare/vite-plugin";export default defineConfig({plugins: [cloudflare()],});Take a look at the documentation for our Cloudflare Vite plugin for more information!
The Agents SDK now includes built-in support for building remote MCP (Model Context Protocol) servers directly as part of your Agent. This allows you to easily create and manage MCP servers, without the need for additional infrastructure or configuration.
The SDK includes a new
MCPAgentclass that extends theAgentclass and allows you to expose resources and tools over the MCP protocol, as well as authorization and authentication to enable remote MCP servers.JavaScript export class MyMCP extends McpAgent {server = new McpServer({name: "Demo",version: "1.0.0",});async init() {this.server.resource(`counter`, `mcp://resource/counter`, (uri) => {// ...});this.server.tool("add","Add two numbers together",{ a: z.number(), b: z.number() },async ({ a, b }) => {// ...},);}}TypeScript export class MyMCP extends McpAgent<Env> {server = new McpServer({name: "Demo",version: "1.0.0",});async init() {this.server.resource(`counter`, `mcp://resource/counter`, (uri) => {// ...});this.server.tool("add","Add two numbers together",{ a: z.number(), b: z.number() },async ({ a, b }) => {// ...},);}}See the example ↗ for the full code and as the basis for building your own MCP servers, and the client example ↗ for how to build an Agent that acts as an MCP client.
To learn more, review the announcement blog ↗ as part of Developer Week 2025.
We've made a number of improvements to the Agents SDK, including:
- Support for building MCP servers with the new
MCPAgentclass. - The ability to export the current agent, request and WebSocket connection context using
import { context } from "agents", allowing you to minimize or avoid direct dependency injection when calling tools. - Fixed a bug that prevented query parameters from being sent to the Agent server from the
useAgentReact hook. - Automatically converting the
agentname inuseAgentoruseAgentChatto kebab-case to ensure it matches the naming convention expected byrouteAgentRequest.
To install or update the Agents SDK, run
npm i agents@latestin an existing project, or explore theagents-starterproject:Terminal window npm create cloudflare@latest -- --template cloudflare/agents-starterSee the full release notes and changelog on the Agents SDK repository ↗ and
- Support for building MCP servers with the new
Durable Objects can now be used with zero commitment on the Workers Free plan allowing you to build AI agents with Agents SDK, collaboration tools, and real-time applications like chat or multiplayer games.
Durable Objects let you build stateful, serverless applications with millions of tiny coordination instances that run your application code alongside (in the same thread!) your durable storage. Each Durable Object can access its own SQLite database through a Storage API. A Durable Object class is defined in a Worker script encapsulating the Durable Object's behavior when accessed from a Worker. To try the code below, click the button:
JavaScript import { DurableObject } from "cloudflare:workers";// Durable Objectexport class MyDurableObject extends DurableObject {...async sayHello(name) {return `Hello, ${name}!`;}}// Workerexport default {async fetch(request, env) {// Every unique ID refers to an individual instance of the Durable Object classconst id = env.MY_DURABLE_OBJECT.idFromName("foo");// A stub is a client used to invoke methods on the Durable Objectconst stub = env.MY_DURABLE_OBJECT.get(id);// Methods on the Durable Object are invoked via the stubconst response = await stub.sayHello("world");return response;},};Free plan limits apply to Durable Objects compute and storage usage. Limits allow developers to build real-world applications, with every Worker request able to call a Durable Object on the free plan.
For more information, checkout: