Changelog
New updates and improvements at Cloudflare.

Real-time transcription in RealtimeKit now supports 10 languages with regional variants, powered by Deepgram Nova-3 running on Workers AI.
During a meeting, participant audio is routed through AI Gateway to Nova-3 on Workers AI — so transcription runs on Cloudflare's network end-to-end, reducing latency compared to routing through external speech-to-text services.
Set the language when creating a meeting via
ai_config.transcription.language:{"ai_config": {"transcription": {"language": "fr"}}}Supported languages include English, Spanish, French, German, Hindi, Russian, Portuguese, Japanese, Italian, and Dutch — with regional variants like
en-AU,en-GB,en-IN,en-NZ,es-419,fr-CA,de-CH,pt-BR, andpt-PT. Usemultifor automatic multilingual detection.If you are building voice agents or real-time translation workflows, your agent can now transcribe in the caller's language natively — no extra services or routing logic needed.
Browser Rendering REST API rate limits for Workers Paid plans have been increased from 3 requests per second (180/min) to 10 requests per second (600/min). No action is needed to benefit from the higher limit.

The REST API lets you perform common browser tasks with a single API call, and you can now do it at a higher rate.
- /content - Fetch HTML
- /screenshot - Capture screenshot
- /pdf - Render PDF
- /markdown - Extract Markdown from a webpage
- /snapshot - Take a webpage snapshot
- /scrape - Scrape HTML elements
- /json - Capture structured data using AI
- /links - Retrieve links from a webpage
If you use the Browser Sessions method, increases to concurrent browser and new browser limits are coming soon. Stay tuned.
For full details, refer to the Browser Rendering limits page.
You can now customize how the Markdown Conversion service processes different file types by passing a
conversionOptionsobject.Available options:
- Images: Set the language for AI-generated image descriptions
- HTML: Use CSS selectors to extract specific content, or provide a hostname to resolve relative links
- PDF: Exclude metadata from the output
Use the
env.AIbinding:JavaScript await env.AI.toMarkdown({ name: "page.html", blob: new Blob([html]) },{conversionOptions: {html: { cssSelector: "article.content" },image: { descriptionLanguage: "es" },},},);TypeScript await env.AI.toMarkdown({ name: "page.html", blob: new Blob([html]) },{conversionOptions: {html: { cssSelector: "article.content" },image: { descriptionLanguage: "es" },},},);Or call the REST API:
Terminal window curl https://api.cloudflare.com/client/v4/accounts/{ACCOUNT_ID}/ai/tomarkdown \-H 'Authorization: Bearer {API_TOKEN}' \-F 'files=@index.html' \-F 'conversionOptions={"html": {"cssSelector": "article.content"}}'For more details, refer to Conversion Options.
Each Workflow on Workers Paid now supports 10,000 steps by default, configurable up to 25,000 steps in your
wrangler.jsoncfile:{"workflows": [{"name": "my-workflow","binding": "MY_WORKFLOW","class_name": "MyWorkflow","limits": {"steps": 25000}}]}Previously, each instance was limited to 1,024 steps. Now, Workflows can support more complex, long-running executions without the additional complexity of recursive or child workflow calls.
Note that the maximum persisted state limit per Workflow instance remains 100 MB for Workers Free and 1 GB for Workers Paid. Refer to Workflows limits for more information.
Sandboxes now support real-time filesystem watching via
sandbox.watch(). The method returns a Server-Sent Events ↗ stream backed by native inotify, so your Worker receivescreate,modify,delete, andmoveevents as they happen inside the container.Pass a directory path and optional filters. The returned stream is a standard
ReadableStreamyou can proxy directly to a browser client or consume server-side.JavaScript // Stream events to a browser clientconst stream = await sandbox.watch("/workspace/src", {recursive: true,include: ["*.ts", "*.js"],});return new Response(stream, {headers: { "Content-Type": "text/event-stream" },});TypeScript // Stream events to a browser clientconst stream = await sandbox.watch("/workspace/src", {recursive: true,include: ["*.ts", "*.js"],});return new Response(stream, {headers: { "Content-Type": "text/event-stream" },});Use
parseSSEStreamto iterate over events inside a Worker without forwarding them to a client.JavaScript import { parseSSEStream } from "@cloudflare/sandbox";const stream = await sandbox.watch("/workspace/src", { recursive: true });for await (const event of parseSSEStream(stream)) {console.log(event.type, event.path);}TypeScript import { parseSSEStream } from "@cloudflare/sandbox";import type { FileWatchSSEEvent } from "@cloudflare/sandbox";const stream = await sandbox.watch("/workspace/src", { recursive: true });for await (const event of parseSSEStream<FileWatchSSEEvent>(stream)) {console.log(event.type, event.path);}Each event includes a
typefield (create,modify,delete, ormove) and the affectedpath. Move events also include afromfield with the original path.Option Type Description recursivebooleanWatch subdirectories. Defaults to false.includestring[]Glob patterns to filter events. Omit to receive all events. To update to the latest version:
Terminal window npm i @cloudflare/sandbox@latestFor full API details, refer to the Sandbox file watching reference.
The latest release of the Agents SDK ↗ rewrites observability from scratch with
diagnostics_channel, addskeepAlive()to prevent Durable Object eviction during long-running work, and introduceswaitForMcpConnectionsso MCP tools are always available whenonChatMessageruns.The previous observability system used
console.log()with a customObservability.emit()interface. v0.7.0 replaces it with structured events published to diagnostics channels — silent by default, zero overhead when nobody is listening.Every event has a
type,payload, andtimestamp. Events are routed to seven named channels:Channel Event types agents:statestate:updateagents:rpcrpc,rpc:erroragents:messagemessage:request,message:response,message:clear,message:cancel,message:error,tool:result,tool:approvalagents:scheduleschedule:create,schedule:execute,schedule:cancel,schedule:retry,schedule:error,queue:retry,queue:erroragents:lifecycleconnect,destroyagents:workflowworkflow:start,workflow:event,workflow:approved,workflow:rejected,workflow:terminated,workflow:paused,workflow:resumed,workflow:restartedagents:mcpmcp:client:preconnect,mcp:client:connect,mcp:client:authorize,mcp:client:discoverUse the typed
subscribe()helper fromagents/observabilityfor type-safe access:JavaScript import { subscribe } from "agents/observability";const unsub = subscribe("rpc", (event) => {if (event.type === "rpc") {console.log(`RPC call: ${event.payload.method}`);}if (event.type === "rpc:error") {console.error(`RPC failed: ${event.payload.method} — ${event.payload.error}`,);}});// Clean up when doneunsub();TypeScript import { subscribe } from "agents/observability";const unsub = subscribe("rpc", (event) => {if (event.type === "rpc") {console.log(`RPC call: ${event.payload.method}`);}if (event.type === "rpc:error") {console.error(`RPC failed: ${event.payload.method} — ${event.payload.error}`,);}});// Clean up when doneunsub();In production, all diagnostics channel messages are automatically forwarded to Tail Workers — no subscription code needed in the agent itself:
JavaScript export default {async tail(events) {for (const event of events) {for (const msg of event.diagnosticsChannelEvents) {// msg.channel is "agents:rpc", "agents:workflow", etc.console.log(msg.timestamp, msg.channel, msg.message);}}},};TypeScript export default {async tail(events) {for (const event of events) {for (const msg of event.diagnosticsChannelEvents) {// msg.channel is "agents:rpc", "agents:workflow", etc.console.log(msg.timestamp, msg.channel, msg.message);}}},};The custom
Observabilityoverride interface is still supported for users who need to filter or forward events to external services.For the full event reference, refer to the Observability documentation.
Durable Objects are evicted after a period of inactivity (typically 70-140 seconds with no incoming requests, WebSocket messages, or alarms). During long-running operations — streaming LLM responses, waiting on external APIs, running multi-step computations — the agent can be evicted mid-flight.
keepAlive()prevents this by creating a 30-second heartbeat schedule. The alarm firing resets the inactivity timer. Returns a disposer function that cancels the heartbeat when called.JavaScript const dispose = await this.keepAlive();try {const result = await longRunningComputation();await sendResults(result);} finally {dispose();}TypeScript const dispose = await this.keepAlive();try {const result = await longRunningComputation();await sendResults(result);} finally {dispose();}keepAliveWhile()wraps an async function with automatic cleanup — the heartbeat starts before the function runs and stops when it completes:JavaScript const result = await this.keepAliveWhile(async () => {const data = await longRunningComputation();return data;});TypeScript const result = await this.keepAliveWhile(async () => {const data = await longRunningComputation();return data;});Key details:
- Multiple concurrent callers — Each
keepAlive()call returns an independent disposer. Disposing one does not affect others. - AIChatAgent built-in —
AIChatAgentautomatically callskeepAlive()during streaming responses. You do not need to add it yourself. - Uses the scheduling system — The heartbeat does not conflict with your own schedules. It shows up in
getSchedules()if you need to inspect it.
For the full API reference and when-to-use guidance, refer to Schedule tasks — Keeping the agent alive.
AIChatAgentnow waits for MCP server connections to settle before callingonChatMessage. This ensuresthis.mcp.getAITools()returns the full set of tools, especially after Durable Object hibernation when connections are being restored in the background.JavaScript export class ChatAgent extends AIChatAgent {// Default — waits up to 10 seconds// waitForMcpConnections = { timeout: 10_000 };// Wait foreverwaitForMcpConnections = true;// Disable waitingwaitForMcpConnections = false;}TypeScript export class ChatAgent extends AIChatAgent {// Default — waits up to 10 seconds// waitForMcpConnections = { timeout: 10_000 };// Wait foreverwaitForMcpConnections = true;// Disable waitingwaitForMcpConnections = false;}Value Behavior { timeout: 10_000 }Wait up to 10 seconds (default) { timeout: N }Wait up to NmillisecondstrueWait indefinitely until all connections ready falseDo not wait (old behavior before 0.2.0) For lower-level control, call
this.mcp.waitForConnections()directly insideonChatMessageinstead.- MCP deduplication by name and URL —
addMcpServerwith HTTP transport now deduplicates on both server name and URL. Calling it with the same name but a different URL creates a new connection. URLs are normalized before comparison (trailing slashes, default ports, hostname case). callbackHostoptional for non-OAuth servers —addMcpServerno longer requirescallbackHostwhen connecting to MCP servers that do not use OAuth.- MCP URL security — Server URLs are validated before connection to prevent SSRF. Private IP ranges, loopback addresses, link-local addresses, and cloud metadata endpoints are blocked.
- Custom denial messages —
addToolOutputnow supportsstate: "output-error"witherrorTextfor custom denial messages in human-in-the-loop tool approval flows. requestIdin chat options —onChatMessageoptions now include arequestIdfor logging and correlating events.
To update to the latest version:
Terminal window npm i agents@latest @cloudflare/ai-chat@latest- Multiple concurrent callers — Each
You can now start using AI Gateway with a single API call — no setup required. Use
defaultas your gateway ID, and AI Gateway creates one for you automatically on the first request.To try it out, create an API token with
AI Gateway - Read,AI Gateway - Edit, andWorkers AI - Readpermissions, then run:Terminal window curl -X POST https://gateway.ai.cloudflare.com/v1/$CLOUDFLARE_ACCOUNT_ID/default/compat/chat/completions \--header "cf-aig-authorization: Bearer $CLOUDFLARE_API_TOKEN" \--header 'Content-Type: application/json' \--data '{"model": "workers-ai/@cf/meta/llama-3.3-70b-instruct-fp8-fast","messages": [{"role": "user","content": "What is Cloudflare?"}]}'AI Gateway gives you logging, caching, rate limiting, and access to multiple AI providers through a single endpoint. For more information, refer to Get started.
The latest release of the Agents SDK ↗ lets you define an Agent and an McpAgent in the same Worker and connect them over RPC — no HTTP, no network overhead. It also makes OAuth opt-in for simple MCP connections, hardens the schema converter for production workloads, and ships a batch of
@cloudflare/ai-chatreliability fixes.You can now connect an Agent to an McpAgent in the same Worker using a Durable Object binding instead of an HTTP URL. The connection stays entirely within the Cloudflare runtime — no network round-trips, no serialization overhead.
Pass the Durable Object namespace directly to
addMcpServer:JavaScript import { Agent } from "agents";export class MyAgent extends Agent {async onStart() {// Connect via DO binding — no HTTP, no network overheadawait this.addMcpServer("counter", env.MY_MCP);// With props for per-user contextawait this.addMcpServer("counter", env.MY_MCP, {props: { userId: "user-123", role: "admin" },});}}TypeScript import { Agent } from "agents";export class MyAgent extends Agent {async onStart() {// Connect via DO binding — no HTTP, no network overheadawait this.addMcpServer("counter", env.MY_MCP);// With props for per-user contextawait this.addMcpServer("counter", env.MY_MCP, {props: { userId: "user-123", role: "admin" },});}}The
addMcpServermethod now acceptsstring | DurableObjectNamespaceas the second parameter with full TypeScript overloads, so HTTP and RPC paths are type-safe and cannot be mixed.Key capabilities:
- Hibernation support — RPC connections survive Durable Object hibernation automatically. The binding name and props are persisted to storage and restored on wake-up, matching the behavior of HTTP MCP connections.
- Deduplication — Calling
addMcpServerwith the same server name returns the existing connection instead of creating duplicates. Connection IDs are stable across hibernation restore. - Smaller surface area — The RPC transport internals have been rewritten and reduced from 609 lines to 245 lines.
RPCServerTransportnow usesJSONRPCMessageSchemafrom the MCP SDK for validation instead of hand-written checks.
addMcpServer()no longer eagerly creates an OAuth provider for every connection. For servers that do not require authentication, a simple call is all you need:JavaScript // No callbackHost, no OAuth config — just worksawait this.addMcpServer("my-server", "https://mcp.example.com");TypeScript // No callbackHost, no OAuth config — just worksawait this.addMcpServer("my-server", "https://mcp.example.com");If the server responds with a 401, the SDK throws a clear error:
"This MCP server requires OAuth authentication. Provide callbackHost in addMcpServer options to enable the OAuth flow."The restore-from-storage flow also handles missing callback URLs gracefully, skipping auth provider creation for non-OAuth servers.The schema converter used by
generateTypes()andgetAITools()now handles edge cases that previously caused crashes in production:- Depth and circular reference guards — Prevents stack overflows on recursive or deeply nested schemas
$refresolution — Supports internal JSON Pointers (#/definitions/...,#/$defs/...,#)- Tuple support —
prefixItems(JSON Schema 2020-12) and arrayitems(draft-07) - OpenAPI 3.0
nullable: true— Supported across all schema branches - Per-tool error isolation — One malformed schema cannot crash the full pipeline in
generateTypes()orgetAITools() - Missing
inputSchemafallback —getAITools()falls back to{ type: "object" }instead of throwing
- Tool denial flow — Denied tool approvals (
approved: false) now transition tooutput-deniedwith atool_result, fixing Anthropic provider compatibility. Custom denial messages are supported viastate: "output-error"anderrorText. - Abort/cancel support — Streaming responses now properly cancel the reader loop when the abort signal fires and send a done signal to the client.
- Duplicate message persistence —
persistMessages()now reconciles assistant messages by content and order, preventing duplicate rows when clients resend full history. requestIdinOnChatMessageOptions— Handlers can now send properly-tagged error responses for pre-stream failures.redacted_thinkingpreservation — The message sanitizer no longer strips Anthropicredacted_thinkingblocks./get-messagesreliability — Endpoint handling moved from a prototypeonRequest()override to a constructor wrapper, so it works even when users overrideonRequestwithout callingsuper.onRequest().- Client tool APIs undeprecated —
createToolsFromClientSchemas,clientTools,AITool,extractClientToolSchemas, and thetoolsoption onuseAgentChatare restored for SDK use cases where tools are defined dynamically at runtime. jsonSchemainitialization — FixedjsonSchema not initializederror when callinggetAITools()inonChatMessage.
To update to the latest version:
Terminal window npm i agents@latest @cloudflare/ai-chat@latest
You can now run more Containers concurrently with significantly higher limits on memory, vCPU, and disk.
Limit Previous Limit New Limit Memory for concurrent live Container instances 400GiB 6TiB vCPU for concurrent live Container instances 100 1,500 Disk for concurrent live Container instances 2TB 30TB This 15x increase enables larger-scale workloads on Containers. You can now run 15,000 instances of the
liteinstance type, 6,000 instances ofbasic, over 1,500 instances ofstandard-1, or over 1,000 instances ofstandard-2concurrently.Refer to Limits for more details on the available instance types and limits.
Pywrangler ↗, the CLI tool for managing Python Workers and packages, now supports Windows, allowing you to develop and deploy Python Workers from Windows environments. Previously, Pywrangler was only available on macOS and Linux.
You can install and use Pywrangler on Windows the same way you would on other platforms. Specify your Worker's Python dependencies in your
pyproject.tomlfile, then use the following commands to develop and deploy:Terminal window uvx --from workers-py pywrangler devuvx --from workers-py pywrangler deployAll existing Pywrangler functionality, including package management, local development, and deployment, works on Windows without any additional configuration.
This feature requires the following minimum versions:
wrangler>= 4.64.0workers-py>= 1.72.0uv>= 0.29.8
To upgrade
workers-py(which includes Pywrangler) in your project, run:Terminal window uv tool upgrade workers-pyTo upgrade
wrangler, run:Terminal window npm install -g wrangler@latestTo upgrade
uv, run:Terminal window uv self updateTo get started with Python Workers on Windows, refer to the Python packages documentation for full details on Pywrangler.
Workers Observability now includes a query language that lets you write structured queries directly in the search bar to filter your logs and traces. The search bar doubles as a free text search box — type any term to search across all metadata and attributes, or write field-level queries for precise filtering.
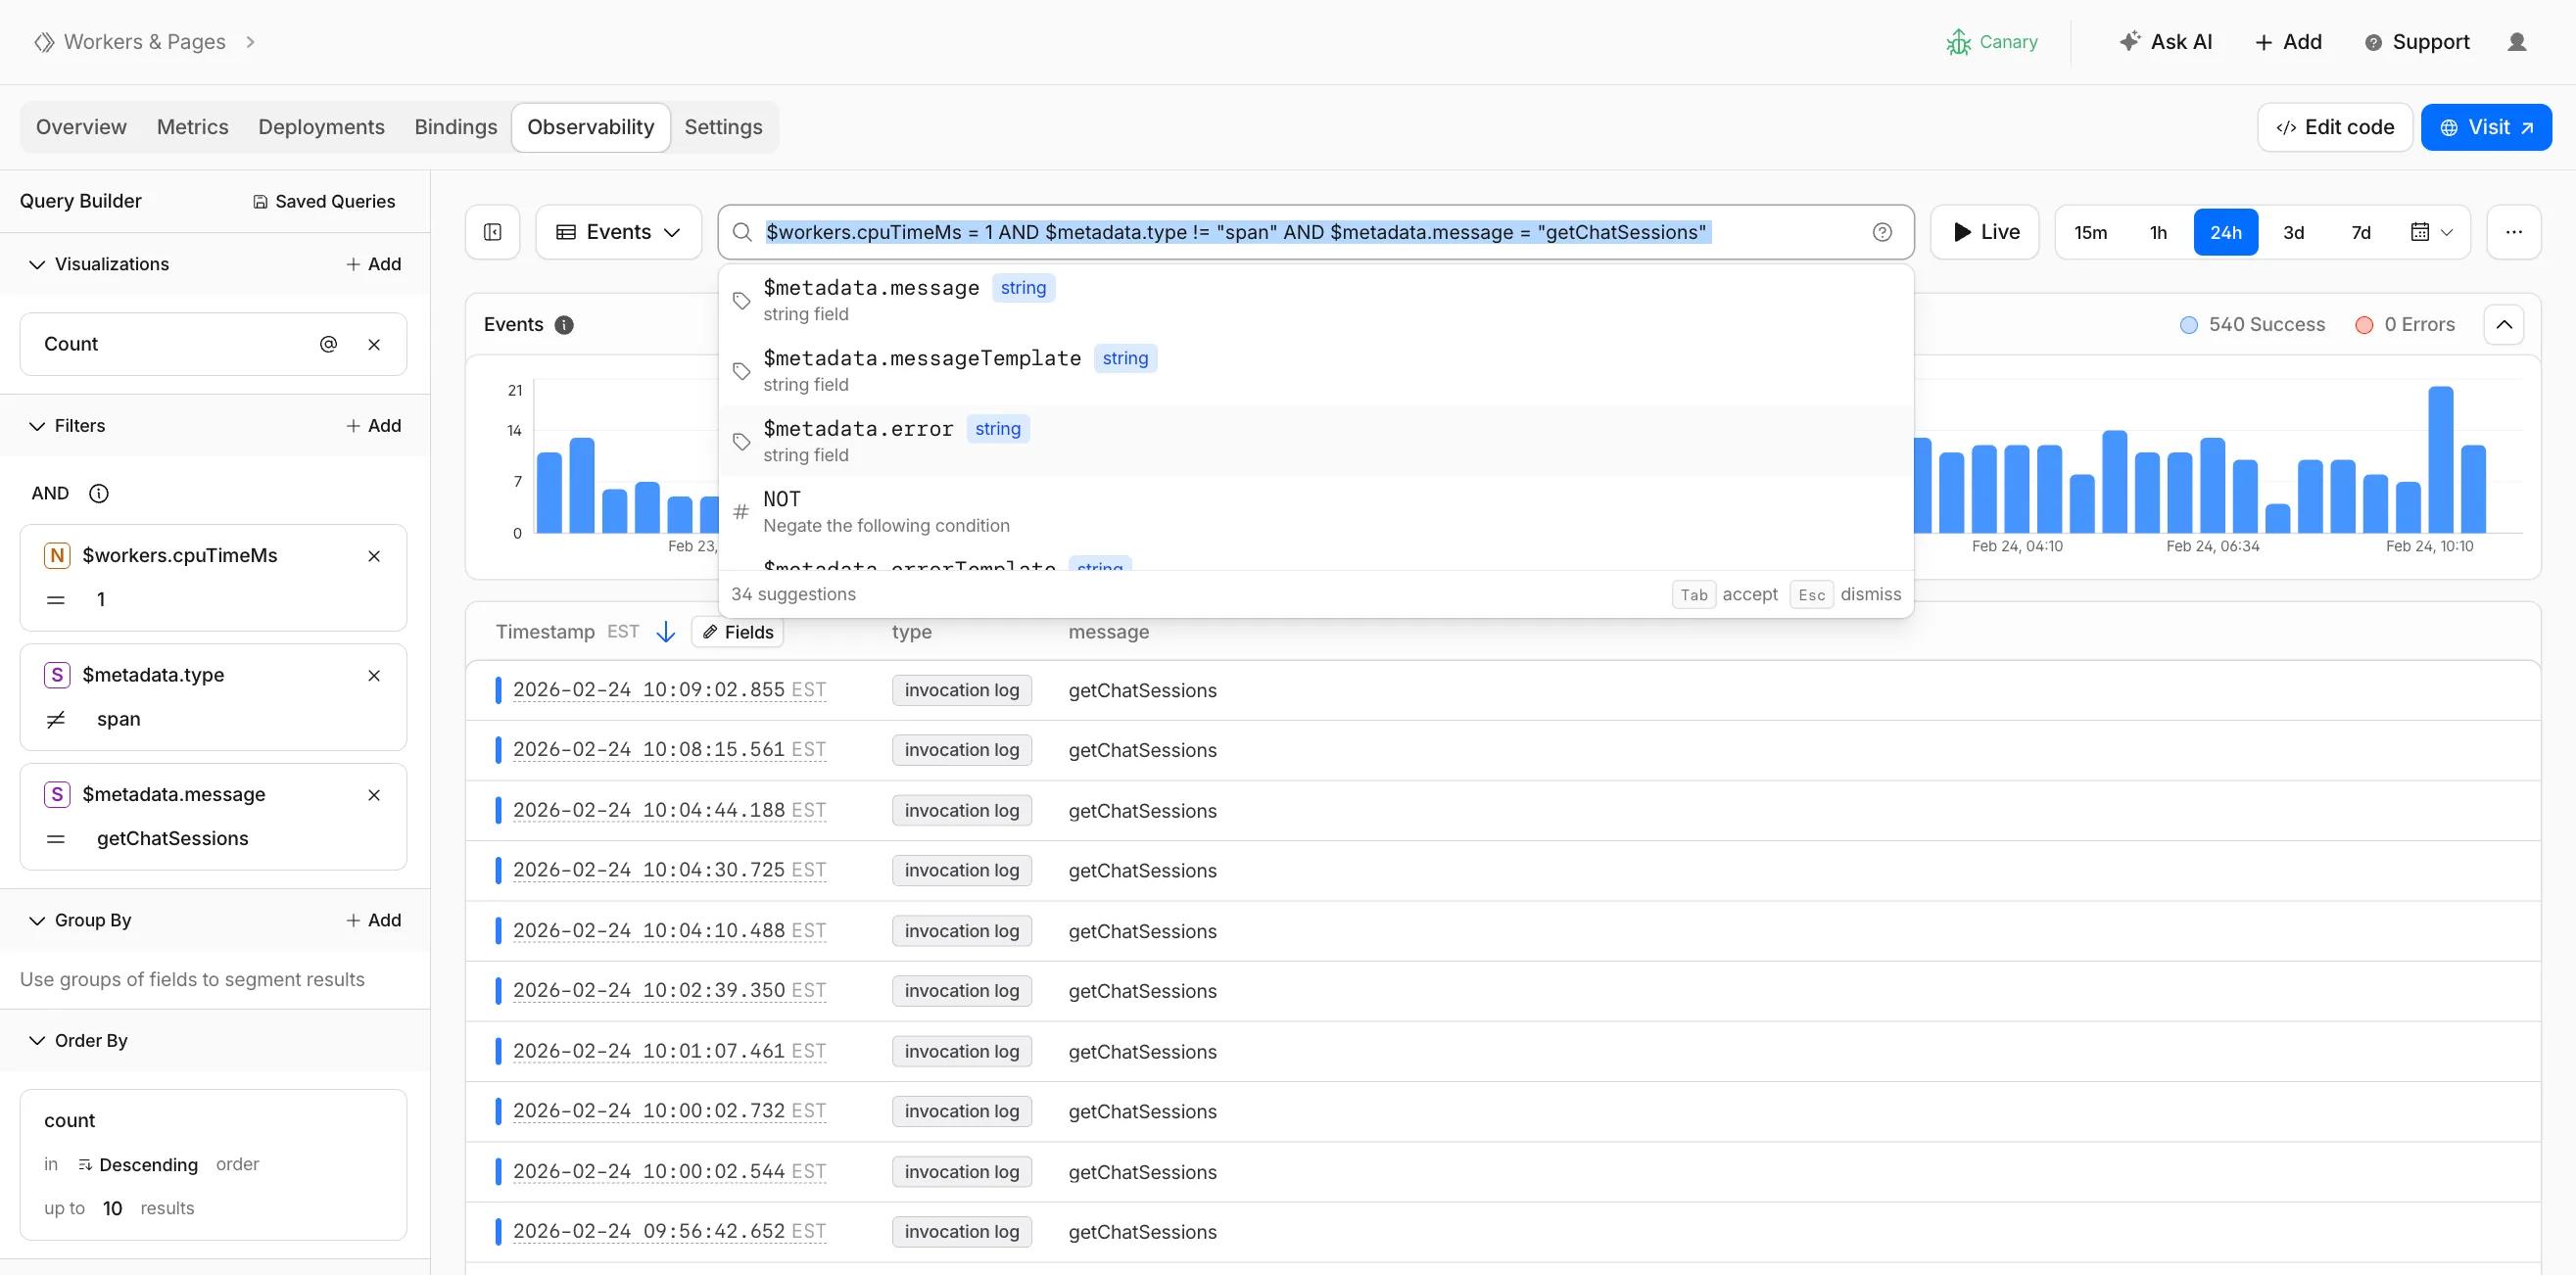
Queries written in the search bar sync with the Query Builder sidebar, so you can write a query by hand and then refine it visually, or build filters in the Query Builder and see the corresponding query syntax. The search bar provides autocomplete suggestions for metadata fields and operators as you type.
The query language supports:
- Free text search — search everywhere with a keyword like
error, or match an exact phrase with"exact phrase" - Field queries — filter by specific fields using comparison operators (for example,
status = 500or$workers.wallTimeMs > 100) - Operators —
=,!=,>,>=,<,<=, and:(contains) - Functions —
contains(field, value),startsWith(field, prefix),regex(field, pattern), andexists(field) - Boolean logic — add conditions with
AND,OR, andNOT
Select the help icon next to the search bar to view the full syntax reference, including all supported operators, functions, and keyboard shortcuts.
Go to the Workers Observability dashboard ↗ to try the query language.
- Free text search — search everywhere with a keyword like
You can now deploy any existing project to Cloudflare Workers — even without a Wrangler configuration file — and
wrangler deploywill just work.Starting with Wrangler 4.68.0, running
wrangler deployautomatically configures your project by detecting your framework, installing required adapters, and deploying it to Cloudflare Workers.Terminal window npx wrangler deployWhen you run
wrangler deployin a project without a configuration file, Wrangler:- Detects your framework from
package.json - Prompts you to confirm the detected settings
- Installs any required adapters
- Generates a
wrangler.jsoncconfiguration file - Deploys your project to Cloudflare Workers
You can also use
wrangler setupto configure without deploying, or pass--yesto skip prompts.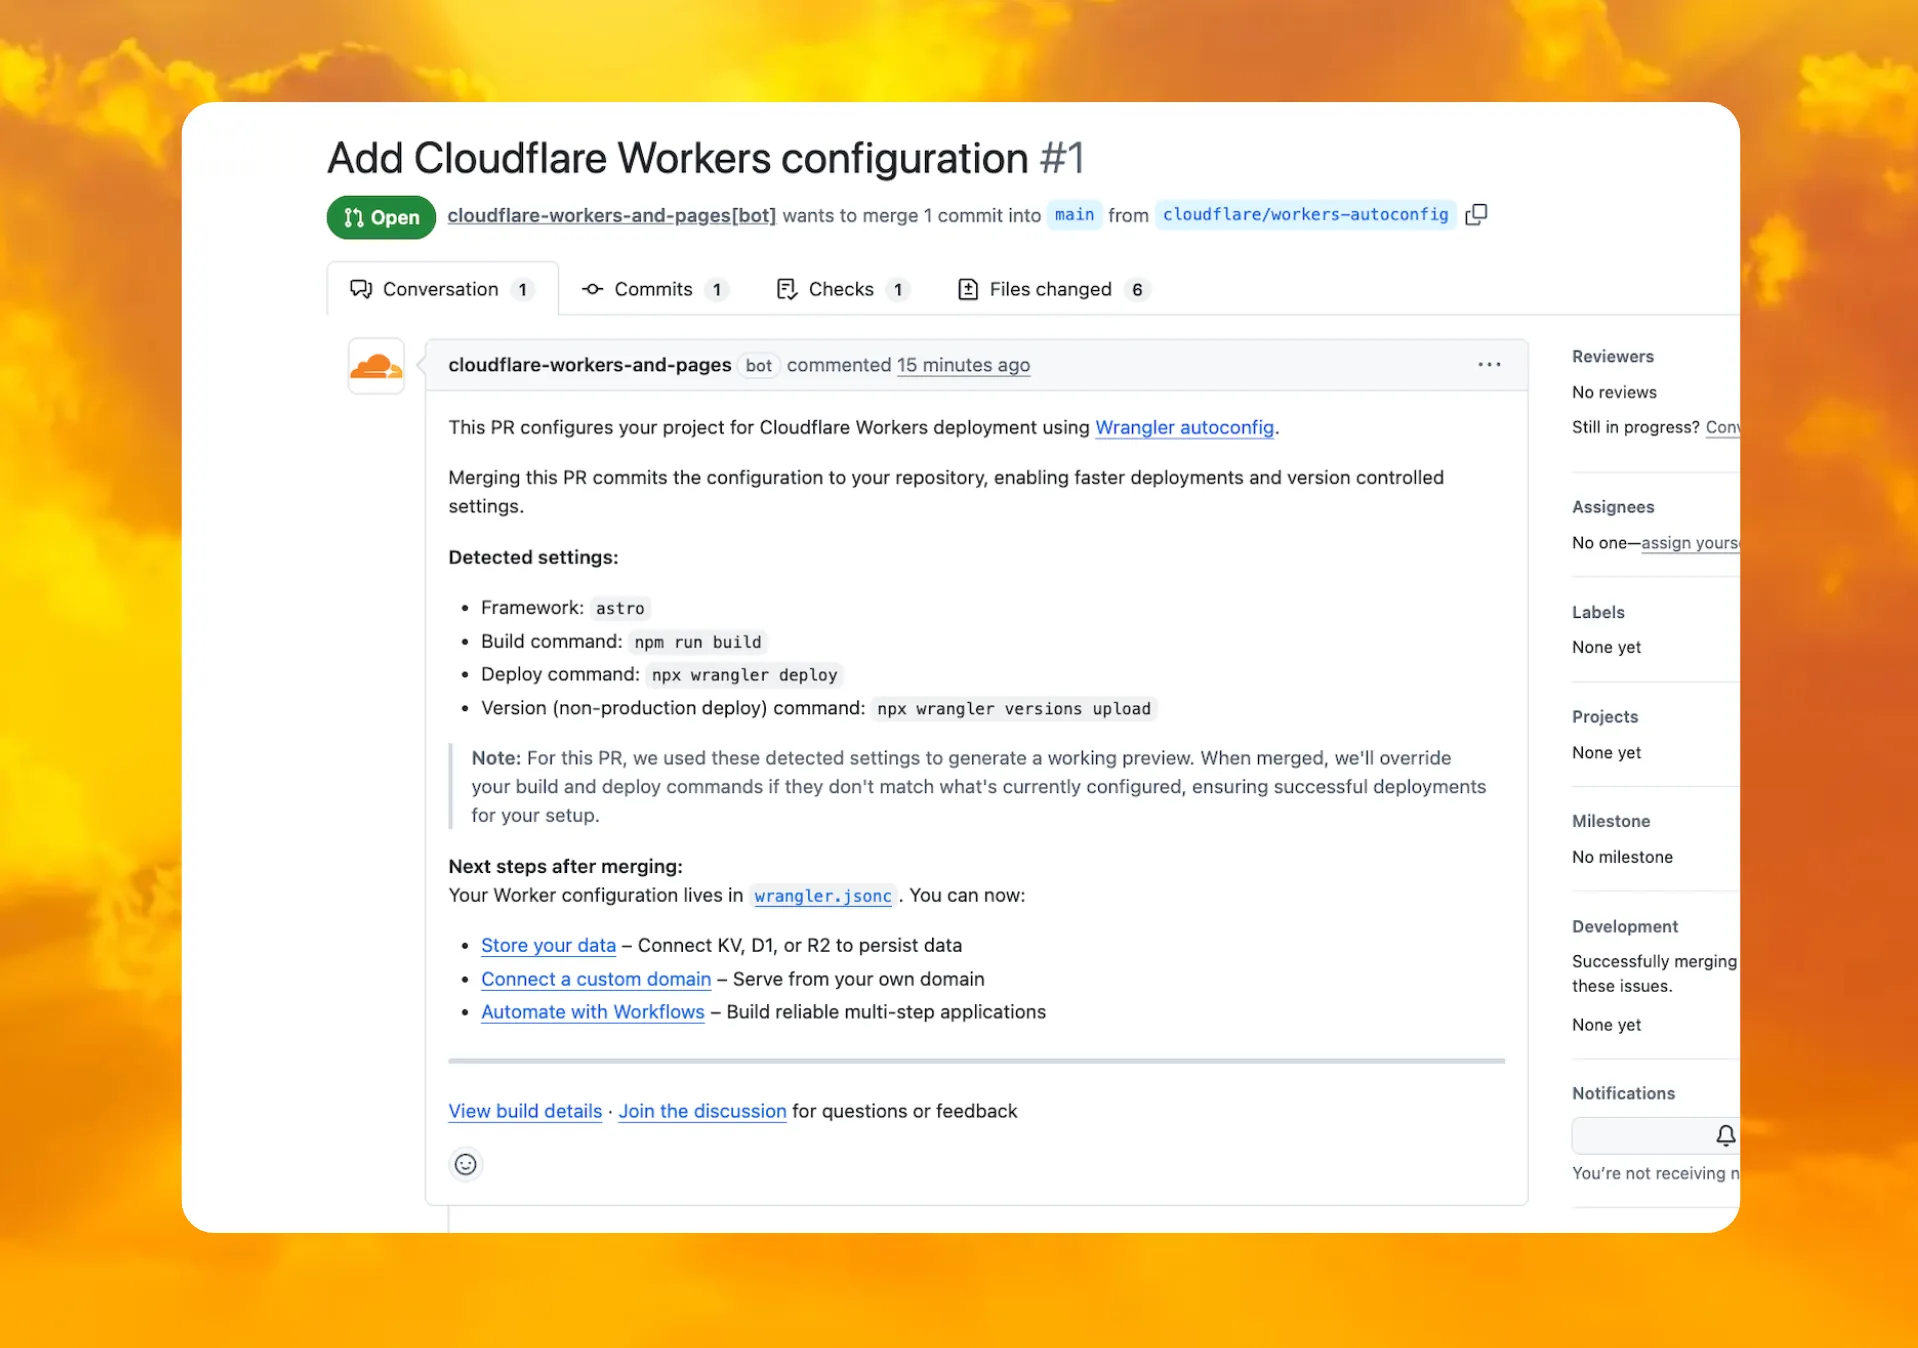
When you connect a repository through the Workers dashboard ↗, a pull request is generated for you with all necessary files, and a preview deployment to check before merging.
In December 2025, we introduced automatic configuration as an experimental feature. It is now generally available and the default behavior.
If you have questions or run into issues, join the GitHub discussion ↗.
- Detects your framework from
deleteAll()now deletes a Durable Object alarm in addition to stored data for Workers with a compatibility date of2026-02-24or later. This change simplifies clearing a Durable Object's storage with a single API call.Previously,
deleteAll()only deleted user-stored data for an object. Alarm usage stores metadata in an object's storage, which required a separatedeleteAlarm()call to fully clean up all storage for an object. ThedeleteAll()change applies to both KV-backed and SQLite-backed Durable Objects.JavaScript // Before: two API calls required to clear all storageawait this.ctx.storage.deleteAlarm();await this.ctx.storage.deleteAll();// Now: a single call clears both data and the alarmawait this.ctx.storage.deleteAll();For more information, refer to the Storage API documentation.
Cloudflare Pipelines ingests streaming data via Workers or HTTP endpoints, transforms it with SQL, and writes it to R2 as Apache Iceberg tables. Today we're shipping three improvements to help you understand why streaming events get dropped, catch data quality issues early, and set up Pipelines faster.
When stream events don't match the expected schema, Pipelines accepts them during ingestion but drops them when attempting to deliver them to the sink. To help you identify the root cause of these issues, we are introducing a new dashboard and metrics that surface dropped events with detailed error messages.
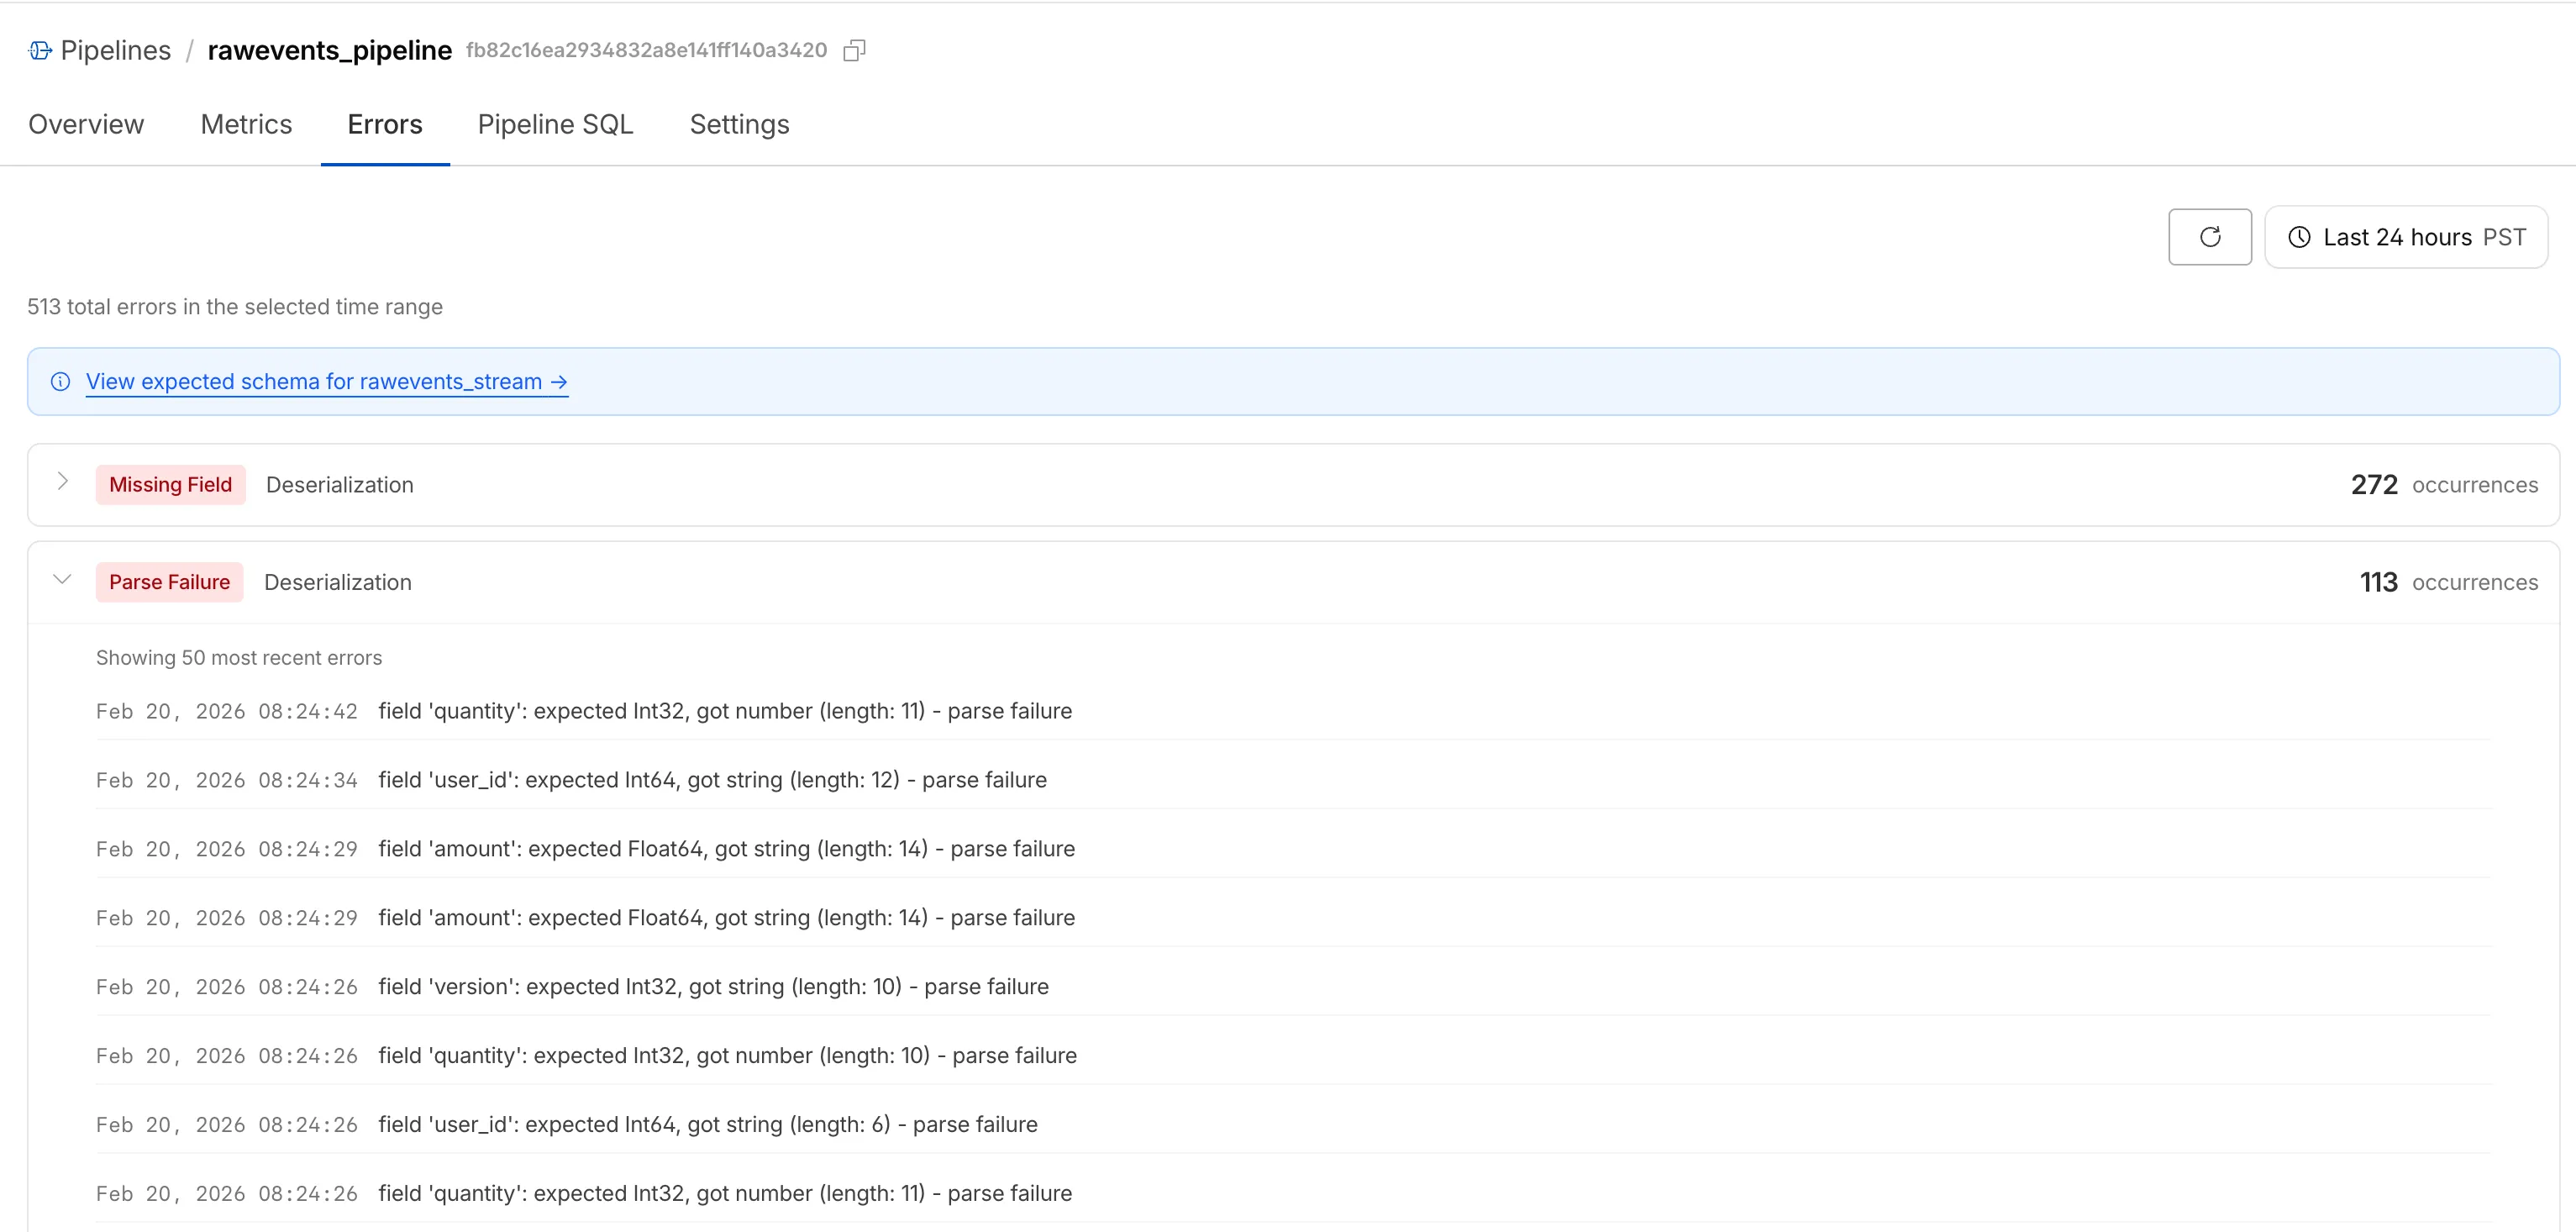
Dropped events can also be queried programmatically via the new
pipelinesUserErrorsAdaptiveGroupsGraphQL dataset. The dataset breaks down failures by specific error type (missing_field,type_mismatch,parse_failure, ornull_value) so you can trace issues back to the source.query GetPipelineUserErrors($accountTag: String!$pipelineId: String!$datetimeStart: Time!$datetimeEnd: Time!) {viewer {accounts(filter: { accountTag: $accountTag }) {pipelinesUserErrorsAdaptiveGroups(limit: 100filter: {pipelineId: $pipelineIddatetime_geq: $datetimeStartdatetime_leq: $datetimeEnd}orderBy: [count_DESC]) {countdimensions {errorFamilyerrorType}}}}}For the full list of dimensions, error types, and additional query examples, refer to User error metrics.
Sending data to a Pipeline from a Worker previously used a generic
Pipeline<PipelineRecord>type, which meant schema mismatches (wrong field names, incorrect types) were only caught at runtime as dropped events.Running
wrangler typesnow generates schema-specific TypeScript types for your Pipeline bindings. TypeScript catches missing required fields and incorrect field types at compile time, before your code is deployed.TypeScript declare namespace Cloudflare {type EcommerceStreamRecord = {user_id: string;event_type: string;product_id?: string;amount?: number;};interface Env {STREAM: import("cloudflare:pipelines").Pipeline<Cloudflare.EcommerceStreamRecord>;}}For more information, refer to Typed Pipeline bindings.
Setting up a new Pipeline previously required multiple manual steps: creating an R2 bucket, enabling R2 Data Catalog, generating an API token, and configuring format, compression, and rolling policies individually.
The
wrangler pipelines setupcommand now offers a Simple setup mode that applies recommended defaults and automatically creates the R2 bucket and enables R2 Data Catalog if they do not already exist. Validation errors during setup prompt you to retry inline rather than restarting the entire process.For a full walkthrough, refer to the Getting started guide.
You can now disable a live input to reject incoming RTMPS and SRT connections. When a live input is disabled, any broadcast attempts will fail to connect.
This gives you more control over your live inputs:
- Temporarily pause an input without deleting it
- Programmatically end creator broadcasts
- Prevent new broadcasts from starting on a specific input
To disable a live input via the API, set the
enabledproperty tofalse:Terminal window curl --request PUT \https://api.cloudflare.com/client/v4/accounts/{account_id}/stream/live_inputs/{input_id} \--header "Authorization: Bearer <API_TOKEN>" \--data '{"enabled": false}'You can also disable or enable a live input from the Live inputs list page or the live input detail page in the Dashboard.
All existing live inputs remain enabled by default. For more information, refer to Start a live stream.
Sandboxes now support
createBackup()andrestoreBackup()methods for creating and restoring point-in-time snapshots of directories.This allows you to restore environments quickly. For instance, in order to develop in a sandbox, you may need to include a user's codebase and run a build step. Unfortunately
git cloneandnpm installcan take minutes, and you don't want to run these steps every time the user starts their sandbox.Now, after the initial setup, you can just call
createBackup(), thenrestoreBackup()the next time this environment is needed. This makes it practical to pick up exactly where a user left off, even after days of inactivity, without repeating expensive setup steps.TypeScript const sandbox = getSandbox(env.Sandbox, "my-sandbox");// Make non-trivial changes to the file systemawait sandbox.gitCheckout(endUserRepo, { targetDir: "/workspace" });await sandbox.exec("npm install", { cwd: "/workspace" });// Create a point-in-time backup of the directoryconst backup = await sandbox.createBackup({ dir: "/workspace" });// Store the handle for later useawait env.KV.put(`backup:${userId}`, JSON.stringify(backup));// ... in a future session...// Restore instead of re-cloning and reinstallingawait sandbox.restoreBackup(backup);Backups are stored in R2 and can take advantage of R2 object lifecycle rules to ensure they do not persist forever.
Key capabilities:
- Persist and reuse across sandbox sessions — Easily store backup handles in KV, D1, or Durable Object storage for use in subsequent sessions
- Usable across multiple instances — Fork a backup across many sandboxes for parallel work
- Named backups — Provide optional human-readable labels for easier management
- TTLs — Set time-to-live durations so backups are automatically removed from storage once they are no longer needed
To get started, refer to the backup and restore guide for setup instructions and usage patterns, or the Backups API reference for full method documentation.
Hyperdrive now treats queries containing PostgreSQL
STABLEfunctions as uncacheable, in addition toVOLATILEfunctions.Previously, only functions that PostgreSQL categorizes ↗ as
VOLATILE(for example,RANDOM(),LASTVAL()) were detected as uncacheable.STABLEfunctions (for example,NOW(),CURRENT_TIMESTAMP,CURRENT_DATE) were incorrectly allowed to be cached.Because
STABLEfunctions can return different results across different SQL statements within the same transaction, caching their results could serve stale or incorrect data. This change aligns Hyperdrive's caching behavior with PostgreSQL's function volatility semantics.If your queries use
STABLEfunctions, and you were relying on them being cached, move the function call to your application code and pass the result as a query parameter. For example, instead ofWHERE created_at > NOW(), compute the timestamp in your Worker and pass it asWHERE created_at > $1.Hyperdrive uses text-based pattern matching to detect uncacheable functions. References to function names like
NOW()in SQL comments also cause the query to be marked as uncacheable.For more information, refer to Query caching and Troubleshoot and debug.
The
@cloudflare/codemode↗ package has been rewritten into a modular, runtime-agnostic SDK.Code Mode ↗ enables LLMs to write and execute code that orchestrates your tools, instead of calling them one at a time. This can (and does) yield significant token savings, reduces context window pressure and improves overall model performance on a task.
The new
Executorinterface is runtime agnostic and comes with a prebuiltDynamicWorkerExecutorto run generated code in a Dynamic Worker Loader.- Removed
experimental_codemode()andCodeModeProxy— the package no longer owns an LLM call or model choice - New import path:
createCodeTool()is now exported from@cloudflare/codemode/ai
createCodeTool()— Returns a standard AI SDKToolto use in your AI agents.Executorinterface — Minimalexecute(code, fns)contract. Implement for any code sandboxing primitive or runtime.
Runs code in a Dynamic Worker. It comes with the following features:
- Network isolation —
fetch()andconnect()blocked by default (globalOutbound: null) when usingDynamicWorkerExecutor - Console capture —
console.log/warn/errorcaptured and returned inExecuteResult.logs - Execution timeout — Configurable via
timeoutoption (default 30s)
JavaScript import { createCodeTool } from "@cloudflare/codemode/ai";import { DynamicWorkerExecutor } from "@cloudflare/codemode";import { streamText } from "ai";const executor = new DynamicWorkerExecutor({ loader: env.LOADER });const codemode = createCodeTool({ tools: myTools, executor });const result = streamText({model,tools: { codemode },messages,});TypeScript import { createCodeTool } from "@cloudflare/codemode/ai";import { DynamicWorkerExecutor } from "@cloudflare/codemode";import { streamText } from "ai";const executor = new DynamicWorkerExecutor({ loader: env.LOADER });const codemode = createCodeTool({ tools: myTools, executor });const result = streamText({model,tools: { codemode },messages,});JSONC {"worker_loaders": [{ "binding": "LOADER" }],}TOML [[worker_loaders]]binding = "LOADER"See the Code Mode documentation for full API reference and examples.
Terminal window npm i @cloudflare/codemode@latest- Removed
Cloudflare Tunnel is now available in the main Cloudflare Dashboard at Networking > Tunnels ↗, bringing first-class Tunnel management to developers using Tunnel for securing origin servers.
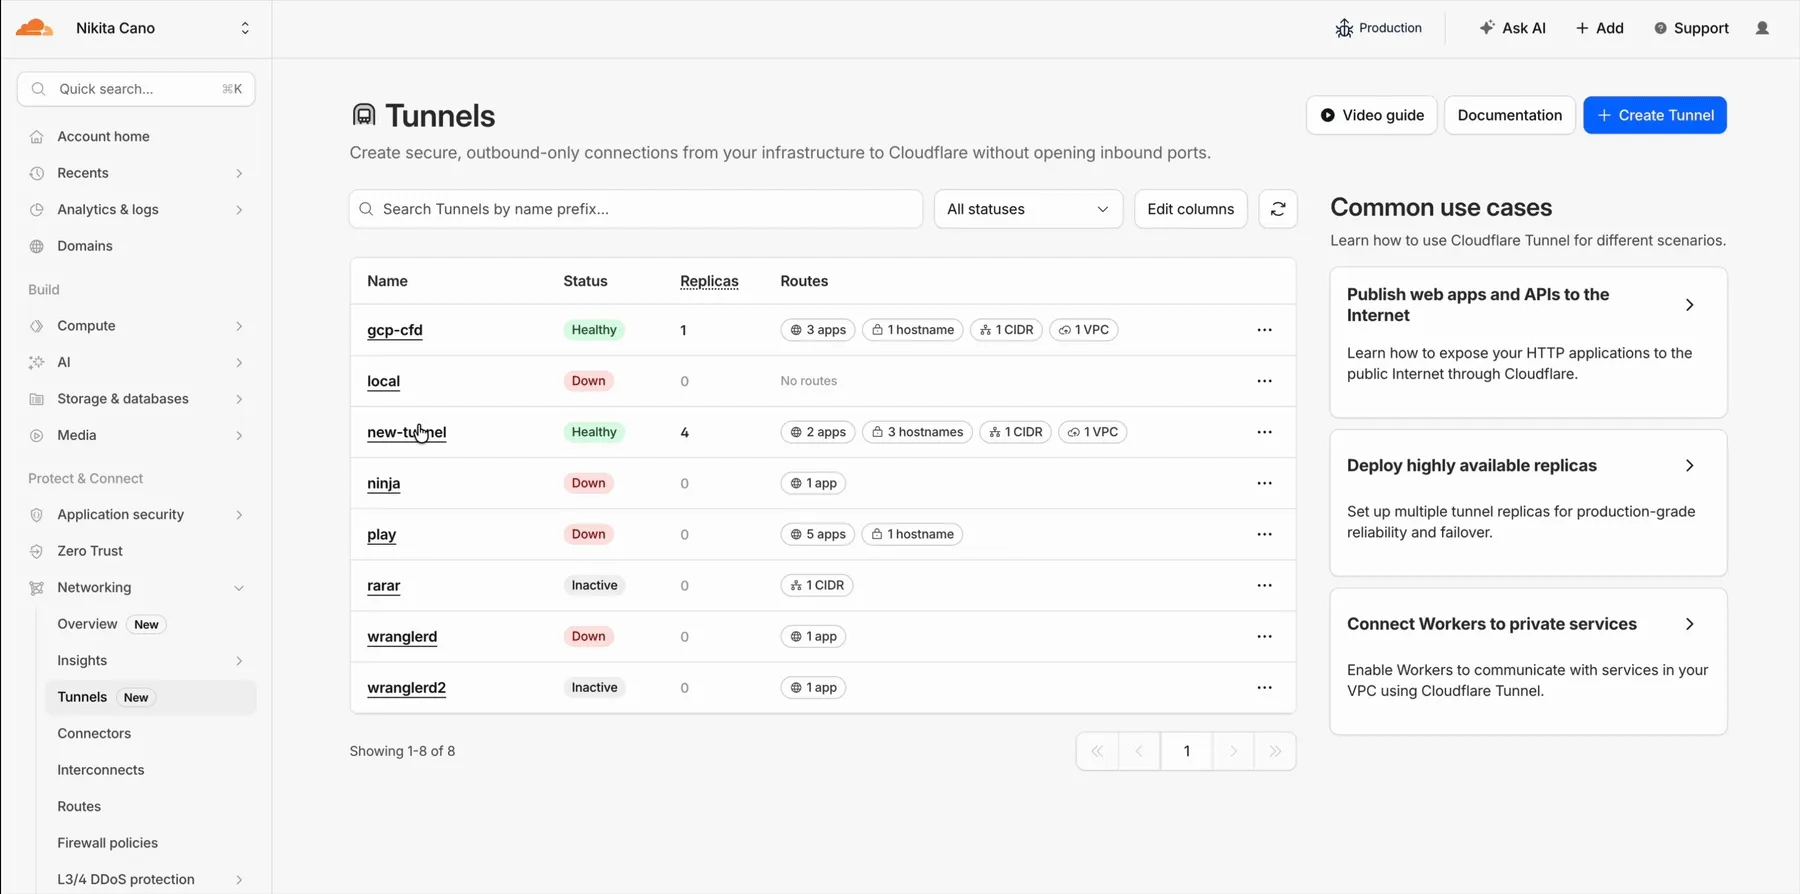
This new experience provides everything you need to manage Tunnels for public applications, including:
- Full Tunnel lifecycle management: Create, configure, delete, and monitor all your Tunnels in one place.
- Native integrations: View Tunnels by name when configuring DNS records and Workers VPC — no more copy-pasting UUIDs.
- Real-time visibility: Monitor replicas and Tunnel health status directly in the dashboard.
- Routing map: Manage all ingress routes for your Tunnel, including public applications, private hostnames, private CIDRs, and Workers VPC services, from a single interactive interface.
Core Dashboard: Navigate to Networking > Tunnels ↗ to manage Tunnels for:
- Securing origin servers and public applications with CDN, WAF, Load Balancing, and DDoS protection
- Connecting Workers to private services via Workers VPC
Cloudflare One Dashboard: Navigate to Zero Trust > Networks > Connectors ↗ to manage Tunnels for:
- Securing your public applications with Zero Trust access policies
- Connecting users to private applications
- Building a private mesh network
Both dashboards provide complete Tunnel management capabilities — choose based on your primary workflow.
New to Tunnel? Learn how to get started with Cloudflare Tunnel or explore advanced use cases like securing SSH servers or running Tunnels in Kubernetes.
Workers AI and AI Gateway have received a series of dashboard improvements to help you get started faster and manage your AI workloads more easily.
Navigation and discoverability
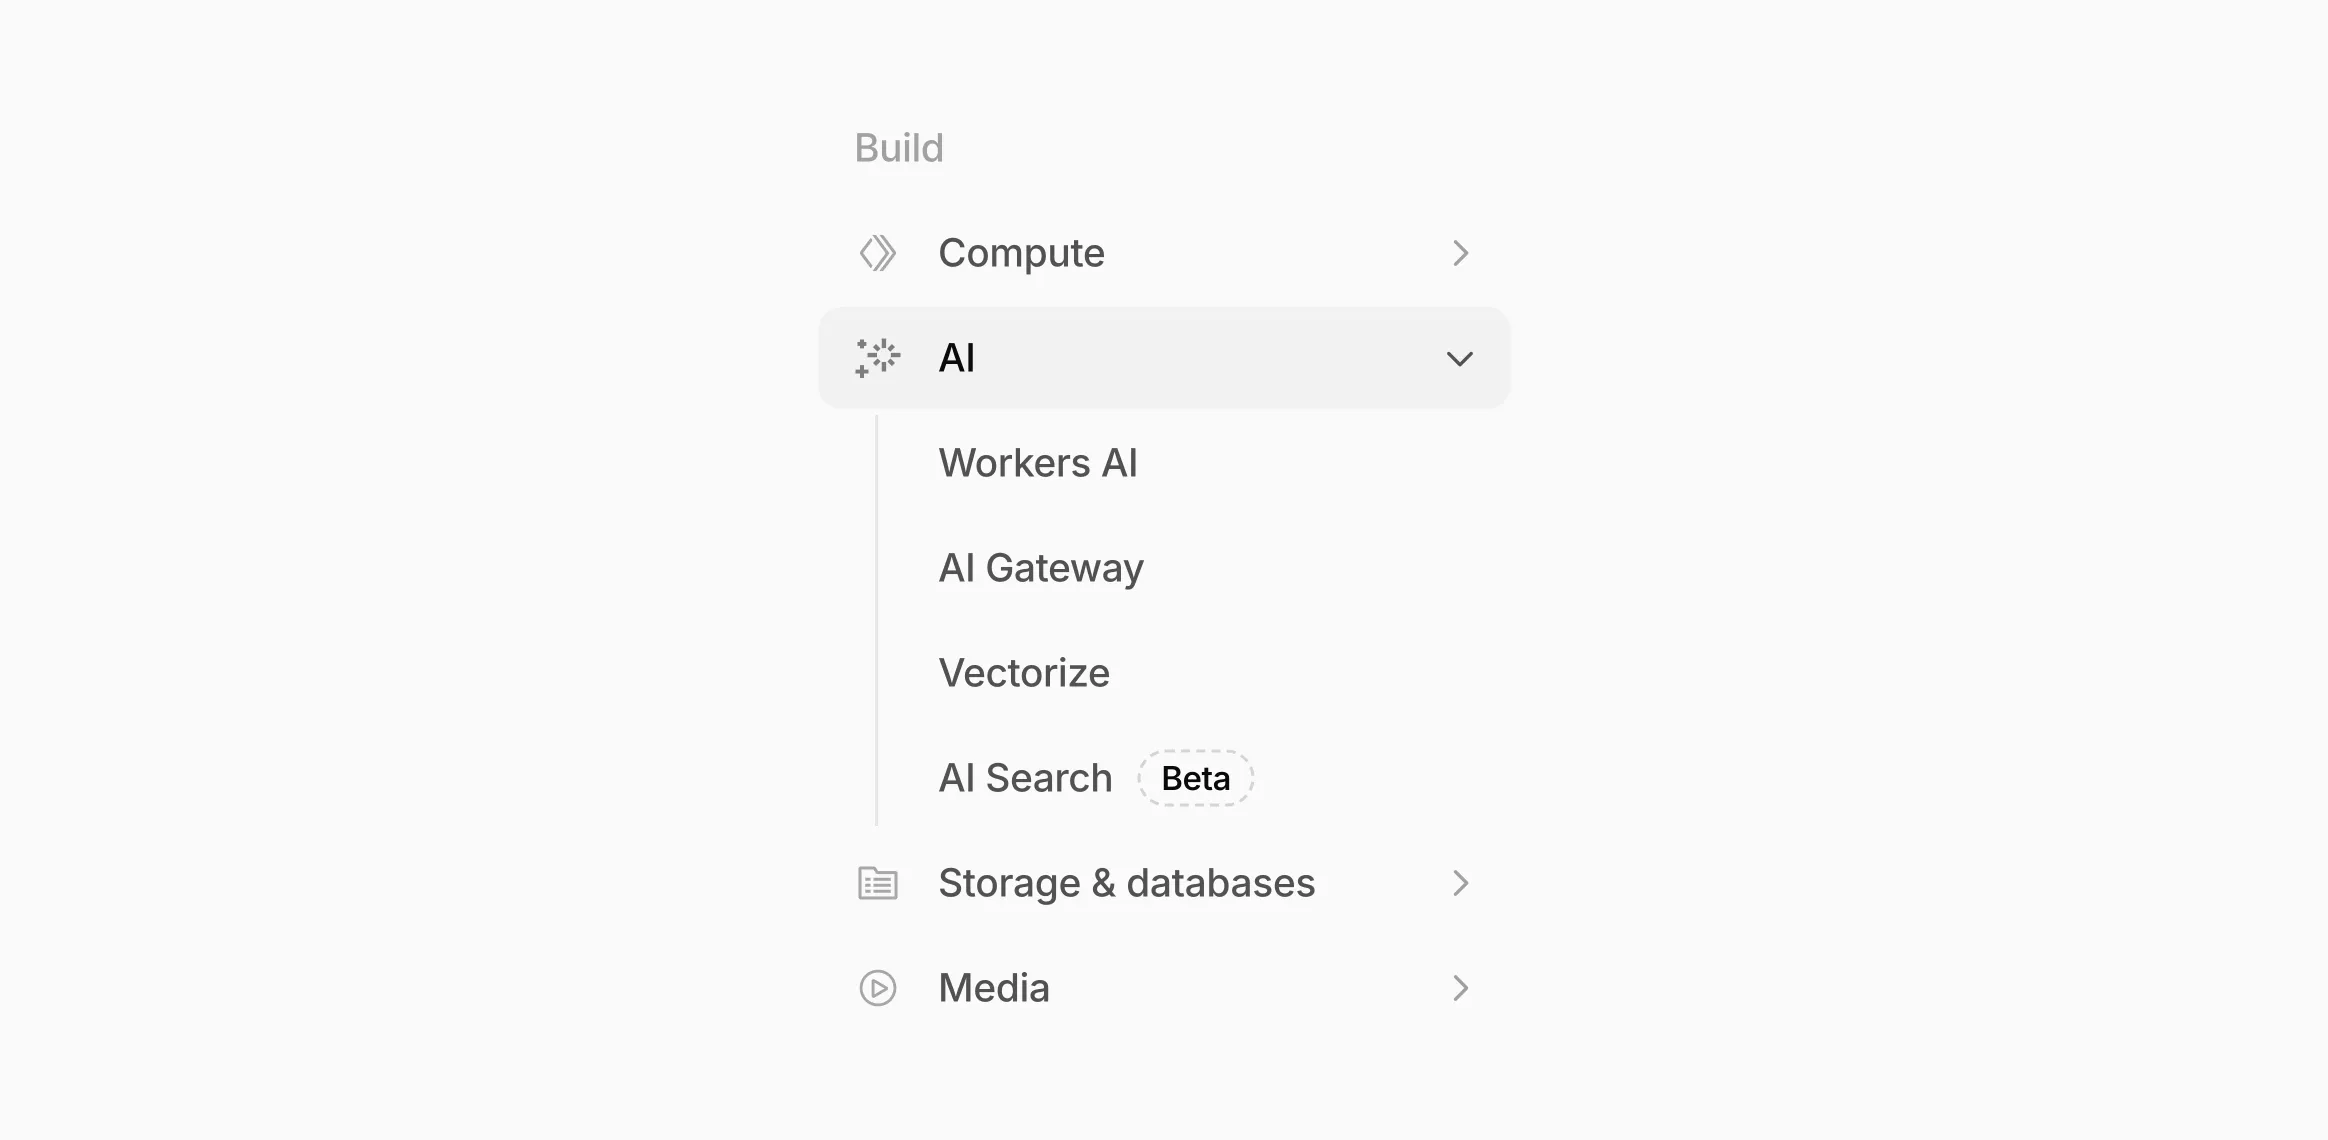
AI now has its own top-level section in the Cloudflare dashboard sidebar, so you can find AI features without digging through menus.
Onboarding and getting started
Getting started with AI Gateway is now simpler. When you create your first gateway, we now show your gateway's OpenAI-compatible endpoint and step-by-step guidance to help you configure it. The Playground also includes helpful prompts, and usage pages have clear next steps if you have not made any requests yet.
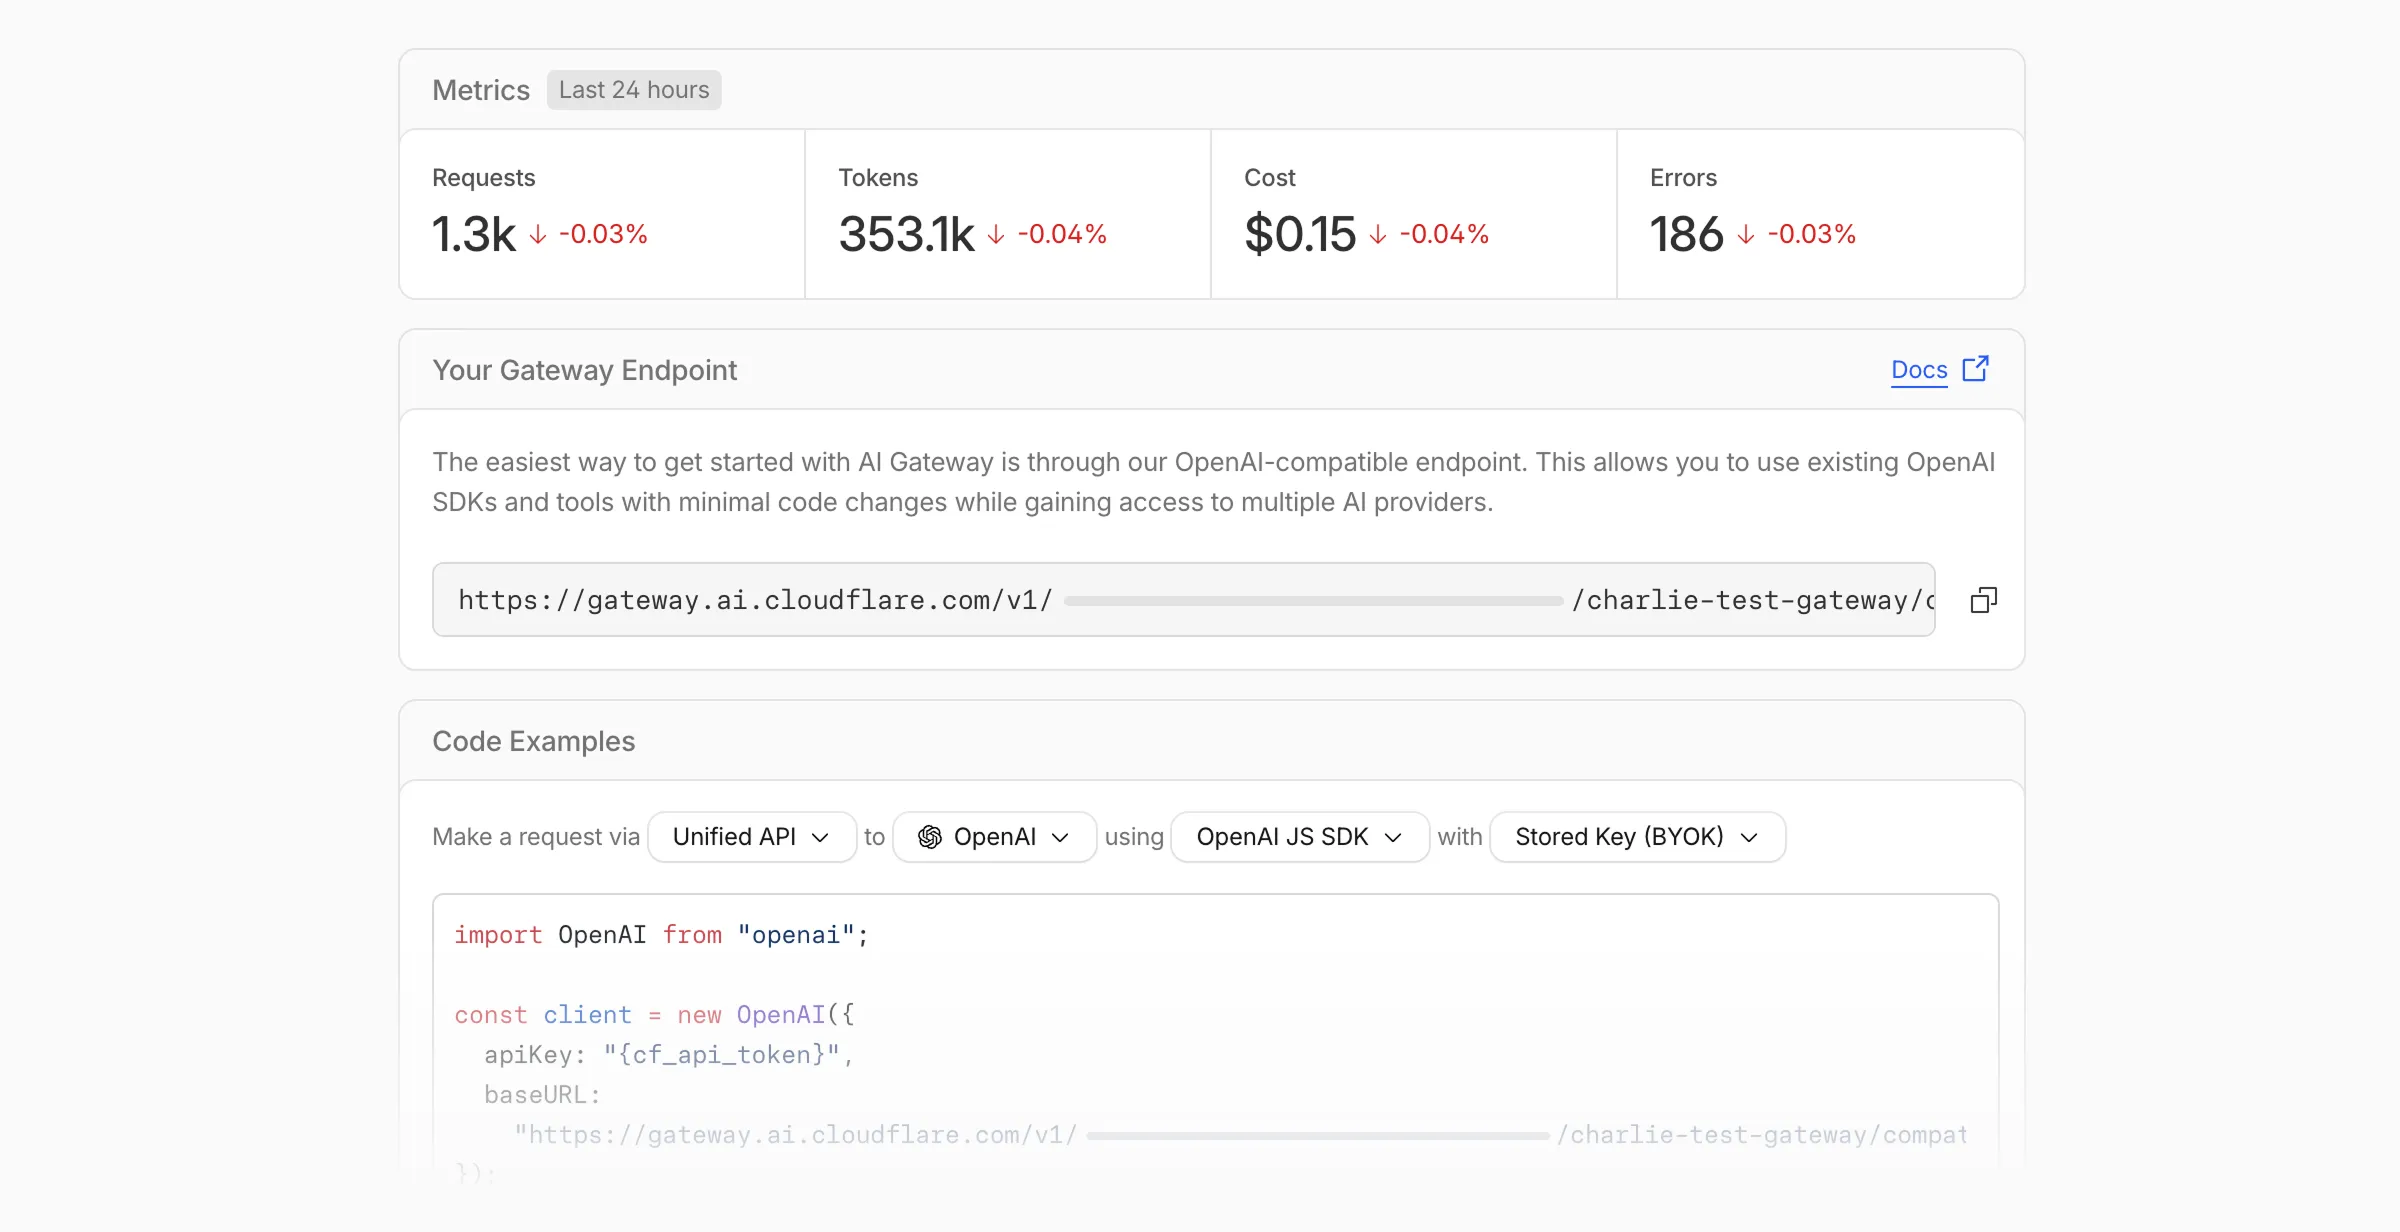
We've also combined the previously separate code example sections into one view with dropdown selectors for API type, provider, SDK, and authentication method so you can now customize the exact code snippet you need from one place.
Dynamic Routing
- The route builder is now more performant and responsive.
- You can now copy route names to your clipboard with a single click.
- Code examples use the Universal Endpoint format, making it easier to integrate routes into your application.
Observability and analytics
- Small monetary values now display correctly in cost analytics charts, so you can accurately track spending at any scale.
Accessibility
- Improvements to keyboard navigation within the AI Gateway, specifically when exploring usage by provider.
- Improvements to sorting and filtering components on the Workers AI models page.
For more information, refer to the AI Gateway documentation.
The latest release of the Agents SDK ↗ adds built-in retry utilities, per-connection protocol message control, and a fully rewritten
@cloudflare/ai-chatwith data parts, tool approval persistence, and zero breaking changes.A new
this.retry()method lets you retry any async operation with exponential backoff and jitter. You can pass an optionalshouldRetrypredicate to bail early on non-retryable errors.JavaScript class MyAgent extends Agent {async onRequest(request) {const data = await this.retry(() => callUnreliableService(), {maxAttempts: 4,shouldRetry: (err) => !(err instanceof PermanentError),});return Response.json(data);}}TypeScript class MyAgent extends Agent {async onRequest(request: Request) {const data = await this.retry(() => callUnreliableService(), {maxAttempts: 4,shouldRetry: (err) => !(err instanceof PermanentError),});return Response.json(data);}}Retry options are also available per-task on
queue(),schedule(),scheduleEvery(), andaddMcpServer():JavaScript // Per-task retry configuration, persisted in SQLite alongside the taskawait this.schedule(Date.now() + 60_000,"sendReport",{ userId: "abc" },{retry: { maxAttempts: 5 },},);// Class-level retry defaultsclass MyAgent extends Agent {static options = {retry: { maxAttempts: 3 },};}TypeScript // Per-task retry configuration, persisted in SQLite alongside the taskawait this.schedule(Date.now() + 60_000, "sendReport", { userId: "abc" }, {retry: { maxAttempts: 5 },});// Class-level retry defaultsclass MyAgent extends Agent {static options = {retry: { maxAttempts: 3 },};}Retry options are validated eagerly at enqueue/schedule time, and invalid values throw immediately. Internal retries have also been added for workflow operations (
terminateWorkflow,pauseWorkflow, and others) with Durable Object-aware error detection.Agents automatically send JSON text frames (identity, state, MCP server lists) to every WebSocket connection. You can now suppress these per-connection for clients that cannot handle them — binary-only devices, MQTT clients, or lightweight embedded systems.
JavaScript class MyAgent extends Agent {shouldSendProtocolMessages(connection, ctx) {// Suppress protocol messages for MQTT clientsconst subprotocol = ctx.request.headers.get("Sec-WebSocket-Protocol");return subprotocol !== "mqtt";}}TypeScript class MyAgent extends Agent {shouldSendProtocolMessages(connection: Connection, ctx: ConnectionContext) {// Suppress protocol messages for MQTT clientsconst subprotocol = ctx.request.headers.get("Sec-WebSocket-Protocol");return subprotocol !== "mqtt";}}Connections with protocol messages disabled still fully participate in RPC and regular messaging. Use
isConnectionProtocolEnabled(connection)to check a connection's status at any time. The flag persists across Durable Object hibernation.See Protocol messages for full documentation.
The first stable release of
@cloudflare/ai-chatships alongside this release with a major refactor ofAIChatAgentinternals — newResumableStreamclass, WebSocketChatTransport, and simplified SSE parsing — with zero breaking changes. Existing code usingAIChatAgentanduseAgentChatworks as-is.Key new features:
- Data parts — Attach typed JSON blobs (
data-*) to messages alongside text. Supports reconciliation (type+id updates in-place), append, and transient parts (ephemeral viaonDatacallback). See Data parts. - Tool approval persistence — The
needsApprovalapproval UI now survives page refresh and DO hibernation. The streaming message is persisted to SQLite when a tool entersapproval-requestedstate. maxPersistedMessages— Cap SQLite message storage with automatic oldest-message deletion.bodyoption onuseAgentChat— Send custom data with every request (static or dynamic).- Incremental persistence — Hash-based cache to skip redundant SQL writes.
- Row size guard — Automatic two-pass compaction when messages approach the SQLite 2 MB limit.
autoContinueAfterToolResultdefaults totrue— Client-side tool results and tool approvals now automatically trigger a server continuation, matching server-executed tool behavior. SetautoContinueAfterToolResult: falseinuseAgentChatto restore the previous behavior.
Notable bug fixes:
- Resolved stream resumption race conditions
- Resolved an issue where
setMessagesfunctional updater sent empty arrays - Resolved an issue where client tool schemas were lost after DO hibernation
- Resolved
InvalidPromptErrorafter tool approval (approval.idwas dropped) - Resolved an issue where message metadata was not propagated on broadcast/resume paths
- Resolved an issue where
clearAll()did not clear in-memory chunk buffers - Resolved an issue where
reasoning-deltasilently dropped data whenreasoning-startwas missed during stream resumption
getQueue(),getQueues(),getSchedule(),dequeue(),dequeueAll(), anddequeueAllByCallback()were unnecessarilyasyncdespite only performing synchronous SQL operations. They now return values directly instead of wrapping them in Promises. This is backward compatible — existing code usingawaiton these methods will continue to work.- Fix TypeScript "excessively deep" error — A depth counter on
CanSerializeandIsSerializableParamtypes bails out totrueafter 10 levels of recursion, preventing the "Type instantiation is excessively deep" error with deeply nested types like AI SDKCoreMessage[]. - POST SSE keepalive — The POST SSE handler now sends
event: pingevery 30 seconds to keep the connection alive, matching the existing GET SSE handler behavior. This prevents POST response streams from being silently dropped by proxies during long-running tool calls. - Widened peer dependency ranges — Peer dependency ranges across packages have been widened to prevent cascading major bumps during 0.x minor releases.
@cloudflare/ai-chatand@cloudflare/codemodeare now marked as optional peer dependencies.
To update to the latest version:
Terminal window npm i agents@latest @cloudflare/ai-chat@latest- Data parts — Attach typed JSON blobs (
Sandboxes and Containers now support running Docker for "Docker-in-Docker" setups. This is particularly useful when your end users or agents want to run a full sandboxed development environment.
This allows you to:
- Develop containerized applications with your Sandbox
- Run isolated test environments for images
- Build container images as part of CI/CD workflows
- Deploy arbitrary images supplied at runtime within a container
For Sandbox SDK users, see the Docker-in-Docker guide for instructions on combining Docker with the SandboxSDK. For general Containers usage, see the Containers FAQ.
Cloudflare has deprecated the Workers Quick Editor dev tools inspector and replaced it with a lightweight log viewer.
This aligns our logging with
wrangler tailand gives us the opportunity to focus our efforts on bringing benefits from the work we have invested in observability, which would not be possible otherwise.We have made improvements to this logging viewer based on your feedback such that you can log object and array types, and easily clear the list of logs. This does not include class instances. Limitations are documented in the Workers Playground docs.
If you do need to develop your Worker with a remote inspector, you can still do this using Wrangler locally. Cloning a project from your quick editor to your computer for local development can be done with the
wrangler init --from-dashcommand. For more information, refer to Wrangler commands.
A new Workers Best Practices guide provides opinionated recommendations for building fast, reliable, observable, and secure Workers. The guide draws on production patterns, Cloudflare internal usage, and best practices observed from developers building on Workers.
Key guidance includes:
- Keep your compatibility date current and enable
nodejs_compat— Ensure you have access to the latest runtime features and Node.js built-in modules.
JSONC {"name": "my-worker","main": "src/index.ts",// Set this to today's date"compatibility_date": "2026-07-02","compatibility_flags": ["nodejs_compat"],}TOML name = "my-worker"main = "src/index.ts"# Set this to today's datecompatibility_date = "2026-07-02"compatibility_flags = [ "nodejs_compat" ]- Generate binding types with
wrangler types— Never hand-write yourEnvinterface. Let Wrangler generate it from your actual configuration to catch mismatches at compile time. - Stream request and response bodies — Avoid buffering large payloads in memory. Use
TransformStreamandpipeToto stay within the 128 MB memory limit and improve time-to-first-byte. - Use bindings, not REST APIs — Bindings to KV, R2, D1, Queues, and other Cloudflare services are direct, in-process references with no network hop and no authentication overhead.
- Use Queues and Workflows for background work — Move long-running or retriable tasks out of the critical request path. Use Queues for simple fan-out and buffering, and Workflows for multi-step durable processes.
- Enable Workers Logs and Traces — Configure observability before deploying to production so you have data when you need to debug.
- Avoid global mutable state — Workers reuse isolates across requests. Storing request-scoped data in module-level variables causes cross-request data leaks.
- Always
awaitorwaitUntilyour Promises — Floating promises cause silent bugs and dropped work. - Use Web Crypto for secure token generation — Never use
Math.random()for security-sensitive operations.
To learn more, refer to Workers Best Practices.
- Keep your compatibility date current and enable
Disclaimer: Please note that v5.0.0-beta.1 is in Beta and we are still testing it for stability.
Full Changelog: v4.3.1...v5.0.0-beta.1 ↗
In this release, you'll see a large number of breaking changes. This is primarily due to a change in OpenAPI definitions, which our libraries are based off of, and codegen updates that we rely on to read those OpenAPI definitions and produce our SDK libraries. As the codegen is always evolving and improving, so are our code bases.
There may be changes that are not captured in this changelog. Feel free to open an issue to report any inaccuracies, and we will make sure it gets into the changelog before the v5.0.0 release.
Most of the breaking changes below are caused by improvements to the accuracy of the base OpenAPI schemas, which sometimes translates to breaking changes in downstream clients that depend on those schemas.
Please ensure you read through the list of changes below and the migration guide before moving to this version - this will help you understand any down or upstream issues it may cause to your environments.
The following resources have breaking changes. See the v5 Migration Guide ↗ for detailed migration instructions.
abusereportsacm.totaltlsapigateway.configurationscloudforceone.threateventsd1.databaseintel.indicatorfeedslogpush.edgeorigintlsclientauth.hostnamesqueues.consumersradar.bgprulesets.rulesschemavalidation.schemassnippetszerotrust.dlpzerotrust.networks
abusereports- Abuse report managementabusereports.mitigations- Abuse report mitigation actionsai.tomarkdown- AI-powered markdown conversionaigateway.dynamicrouting- AI Gateway dynamic routing configurationaigateway.providerconfigs- AI Gateway provider configurationsaisearch- AI-powered search functionalityaisearch.instances- AI Search instance managementaisearch.tokens- AI Search authentication tokensalerting.silences- Alert silence managementbrandprotection.logomatches- Brand protection logo match detectionbrandprotection.logos- Brand protection logo managementbrandprotection.matches- Brand protection match resultsbrandprotection.queries- Brand protection query managementcloudforceone.binarystorage- CloudForce One binary storageconnectivity.directory- Connectivity directory servicesd1.database- D1 database managementdiagnostics.endpointhealthchecks- Endpoint health check diagnosticsfraud- Fraud detection and preventioniam.sso- IAM Single Sign-On configurationloadbalancers.monitorgroups- Load balancer monitor groupsorganizations- Organization managementorganizations.organizationprofile- Organization profile settingsorigintlsclientauth.hostnamecertificates- Origin TLS client auth hostname certificatesorigintlsclientauth.hostnames- Origin TLS client auth hostnamesorigintlsclientauth.zonecertificates- Origin TLS client auth zone certificatespipelines- Data pipeline managementpipelines.sinks- Pipeline sink configurationspipelines.streams- Pipeline stream configurationsqueues.subscriptions- Queue subscription managementr2datacatalog- R2 Data Catalog integrationr2datacatalog.credentials- R2 Data Catalog credentialsr2datacatalog.maintenanceconfigs- R2 Data Catalog maintenance configurationsr2datacatalog.namespaces- R2 Data Catalog namespacesradar.bots- Radar bot analyticsradar.ct- Radar certificate transparency dataradar.geolocations- Radar geolocation datarealtimekit.activesession- Real-time Kit active session managementrealtimekit.analytics- Real-time Kit analyticsrealtimekit.apps- Real-time Kit application managementrealtimekit.livestreams- Real-time Kit live streamingrealtimekit.meetings- Real-time Kit meeting managementrealtimekit.presets- Real-time Kit preset configurationsrealtimekit.recordings- Real-time Kit recording managementrealtimekit.sessions- Real-time Kit session managementrealtimekit.webhooks- Real-time Kit webhook configurationstokenvalidation.configuration- Token validation configurationtokenvalidation.rules- Token validation rulesworkers.beta- Workers beta features
edit()update()
list()
create()get()update()
scan_list()scan_review()scan_trigger()
create()delete()list()
get()
list()
summary()timeseries()timeseries_groups()
changes()snapshot()
delete()
create()delete()edit()get()list()
- Type inference improvements: Allow Pyright to properly infer TypedDict types within SequenceNotStr
- Type completeness: Add missing types to method arguments and response models
- Pydantic compatibility: Ensure compatibility with Pydantic versions prior to 2.8.0 when using additional fields
- Multipart form data: Correctly handle sending multipart/form-data requests with JSON data
- Header handling: Do not send headers with default values set to omit
- GET request headers: Don't send Content-Type header on GET requests
- Response body model accuracy: Broad improvements to the correctness of models
- Discriminated unions: Correctly handle nested discriminated unions in response parsing
- Extra field types: Parse extra field types correctly
- Empty metadata: Ignore empty metadata fields during parsing
- Singularization rules: Update resource name singularization rules for better consistency