Changelog
New updates and improvements at Cloudflare.

Artifacts is now in private beta. Artifacts is Git-compatible storage built for scale: create tens of millions of repos, fork from any remote, and hand off a URL to any Git client. It provides a versioned filesystem for storing and exchanging file trees across Workers, the REST API, and any Git client, running locally or within an agent.
You can read the announcement blog ↗ to learn more about what Artifacts does, how it works, and how to create repositories for your agents to use.
Artifacts has three API surfaces:
- Workers bindings (for creating and managing repositories)
- REST API (for creating and managing repos from any other compute platform)
- Git protocol (for interacting with repos)
As an example: you can use the Workers binding to create a repo and read back its remote URL:
TypeScript # Create a thousand, a million or ten million repos: one for every agent, for every upstream branch, or every user.const created = await env.PROD_ARTIFACTS.create("agent-007");const remote = (await created.repo.info())?.remote;Or, use the REST API to create a repo inside a namespace from your agent(s) running on any platform:
Terminal window curl --request POST "https://artifacts.cloudflare.net/v1/api/namespaces/some-namespace/repos" --header "Authorization: Bearer $CLOUDFLARE_API_TOKEN" --header "Content-Type: application/json" --data '{"name":"agent-007"}'Any Git client that speaks smart HTTP can use the returned remote URL:
Terminal window # Agents know git.# Every repository can act as a git repo, allowing agents to interact with Artifacts the way they know best: using the git CLI.git clone https://x:${REPO_TOKEN}@artifacts.cloudflare.net/some-namespace/agent-007.gitTo learn more, refer to Get started, Workers binding, and Git protocol.
Email Sending is now in public beta. Send transactional emails directly from Workers (
env.EMAIL.send()) or the REST API, with support for HTML, plain text, attachments, inline images, and custom headers. Email Sending joins Email Routing ↗ under the new Cloudflare Email Service — a single service for sending and receiving email on the Cloudflare developer platform.Send an email from a Worker in a few lines of code:
src/index.js export default {async fetch(request, env) {const response = await env.EMAIL.send({from: "notifications@yourdomain.com",to: "user@example.com",subject: "Order confirmed",html: "<h1>Your order has been confirmed</h1>",text: "Your order has been confirmed.",});return Response.json({ messageId: response.messageId });},};src/index.ts export default {async fetch(request, env): Promise<Response> {const response = await env.EMAIL.send({from: "notifications@yourdomain.com",to: "user@example.com",subject: "Order confirmed",html: "<h1>Your order has been confirmed</h1>",text: "Your order has been confirmed.",});return Response.json({ messageId: response.messageId });},} satisfies ExportedHandler<Env>;Email Service also integrates with the Agents SDK, giving your agents a native
onEmailhook to receive, process, and reply to emails. Combined with the new Email MCP server ↗ and Wrangler CLI email commands, any agent can send email regardless of where it runs.Start sending and receiving emails from Workers and agents today. Email Sending is available on the Workers paid plan. Refer to the Email Service documentation to get started.
Workflows limits have been raised to the following:
Limit Previous New Concurrent instances (running in parallel) 10,000 50,000 Instance creation rate (per account) 100/second per account 300/second per account, 100/second per workflow Queued instances per Workflow 1 1 million 2 million These increases apply to all users on the Workers Paid plan. Refer to the Workflows limits documentation for more details.
-
Queued instances are instances that have been created or awoken and are waiting for a concurrency slot. ↩
-
We are renaming Browser Rendering to Browser Run. The name Browser Rendering never fully captured what the product does. Browser Run lets you run full browser sessions on Cloudflare's global network, drive them with code or AI, record and replay sessions, crawl pages for content, debug in real time, and let humans intervene when your agent needs help.
Along with the rename, we have increased limits for Workers Paid plans and redesigned the Browser Run dashboard.
We have 4x-ed concurrency limits for Workers Paid plan users:
- Concurrent browsers per account: 30 → 120 per account
- New browser instances: 30 per minute → 1 per second
- REST API rate limits: recently increased from 3 to 10 requests per second
Rate limits across the limits page are now expressed in per-second terms, matching how they are enforced. No action is needed to benefit from the higher limits.
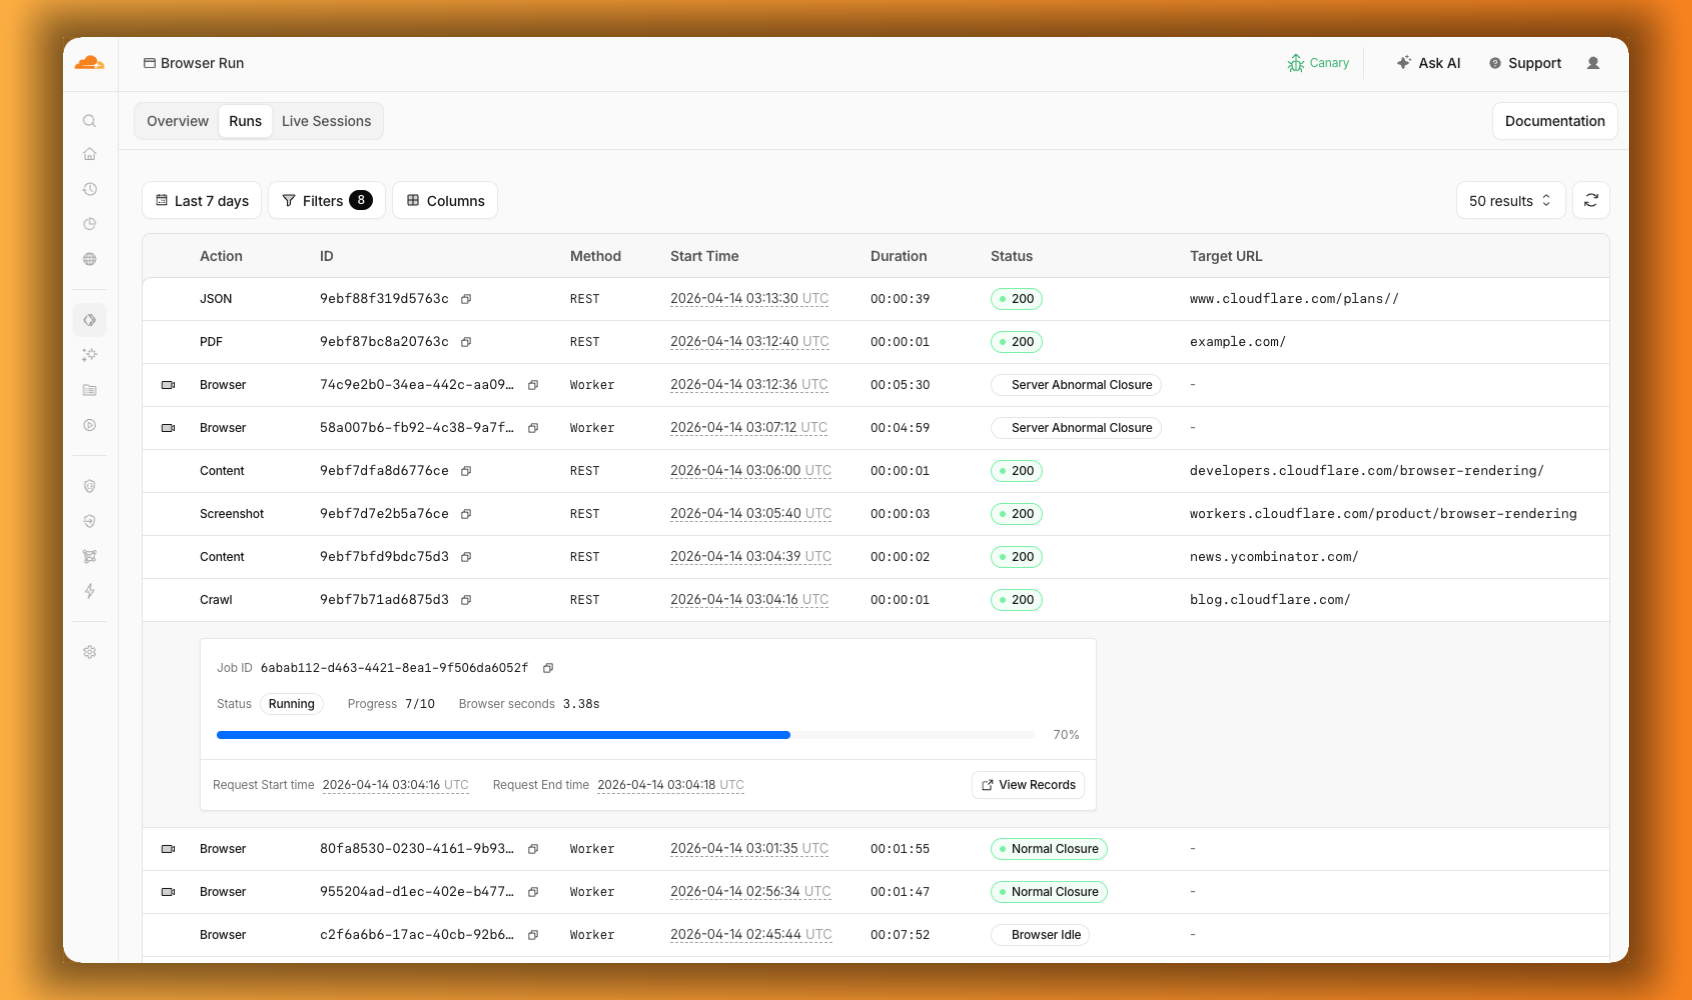
The redesigned dashboard ↗ now shows every request in a single Runs tab, not just browser sessions but also quick actions like screenshots, PDFs, markdown, and crawls. Filter by endpoint, view target URLs, status, and duration, and expand any row for more detail.
We are also shipping several new features:
- Live View, Human in the Loop, and Session Recordings - See what your agent is doing in real time, let humans step in when automation hits a wall, and replay any session after it ends.
- WebMCP - Websites can expose structured tools for AI agents to discover and call directly, replacing slow screenshot-analyze-click loops.
For the full story, read our Agents Week blog Browser Run: Give your agents a browser ↗.
When browser automation fails or behaves unexpectedly, it can be hard to understand what happened. We are shipping three new features in Browser Run (formerly Browser Rendering) to help:
- Live View for real-time visibility
- Human in the Loop for human intervention
- Session Recordings for replaying sessions after they end
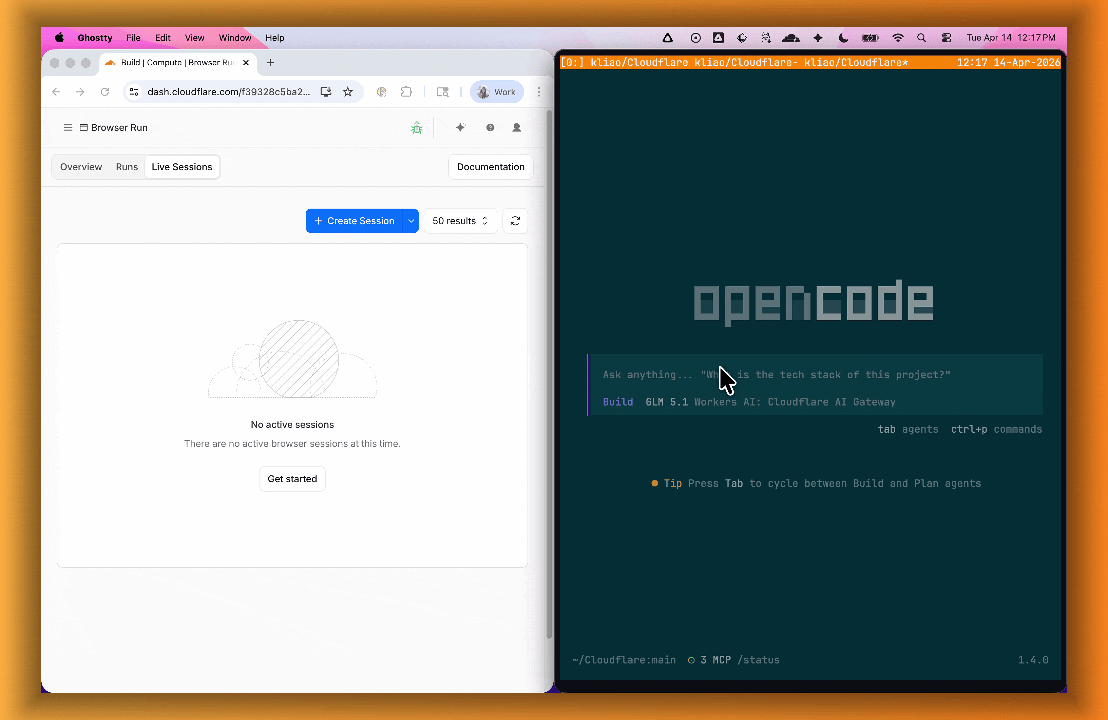
Live View lets you see what your agent is doing in real time. The page, DOM, console, and network requests are all visible for any active browser session. Access Live View from the Cloudflare dashboard, via the hosted UI at
live.browser.run, or using native Chrome DevTools.When your agent hits a snag like a login page or unexpected edge case, it can hand off to a human instead of failing. With Human in the Loop, a human steps into the live browser session through Live View, resolves the issue, and hands control back to the script.
Today, you can step in by opening the Live View URL for any active session. Next, we are adding a handoff flow where the agent can signal that it needs help, notify a human to step in, then hand control back to the agent once the issue is resolved.
Session Recordings records DOM state so you can replay any session after it ends. Enable recordings by passing
recording: truewhen launching a browser. After the session closes, view the recording in the Cloudflare dashboard under Browser Run > Runs, or retrieve via API using the session ID. Next, we are adding the ability to inspect DOM state and console output at any point during the recording.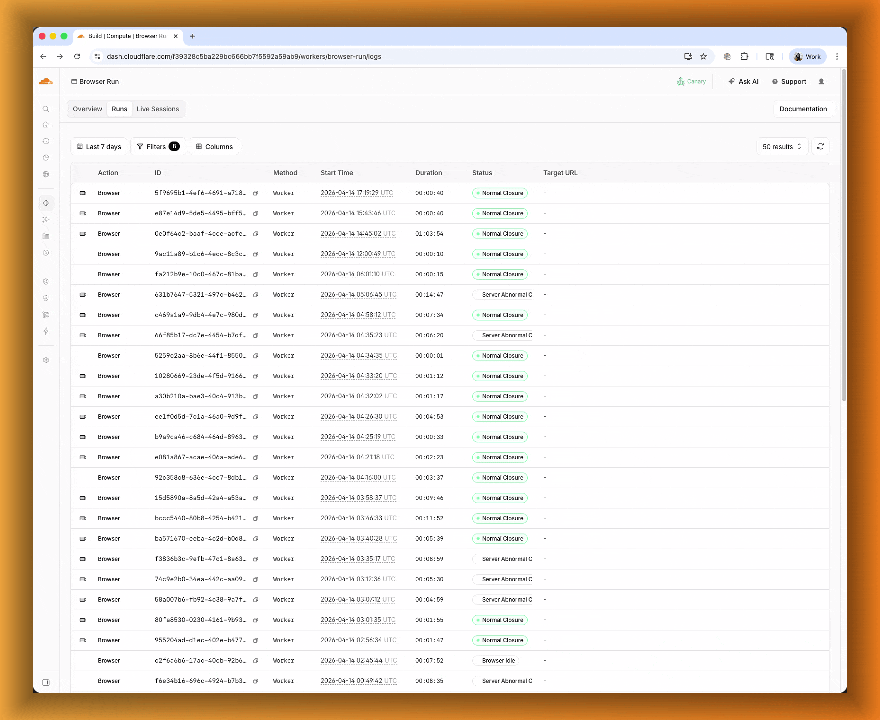
To get started, refer to the documentation for Live View, Human in the Loop, and Session Recording.
Browser Run (formerly Browser Rendering) now supports WebMCP ↗ (Web Model Context Protocol), a new browser API from the Google Chrome team.
The Internet was built for humans, so navigating as an AI agent today is unreliable. WebMCP lets websites expose structured tools for AI agents to discover and call directly. Instead of slow screenshot-analyze-click loops, agents can call website functions like
searchFlights()orbookTicket()with typed parameters, making browser automation faster, more reliable, and less fragile.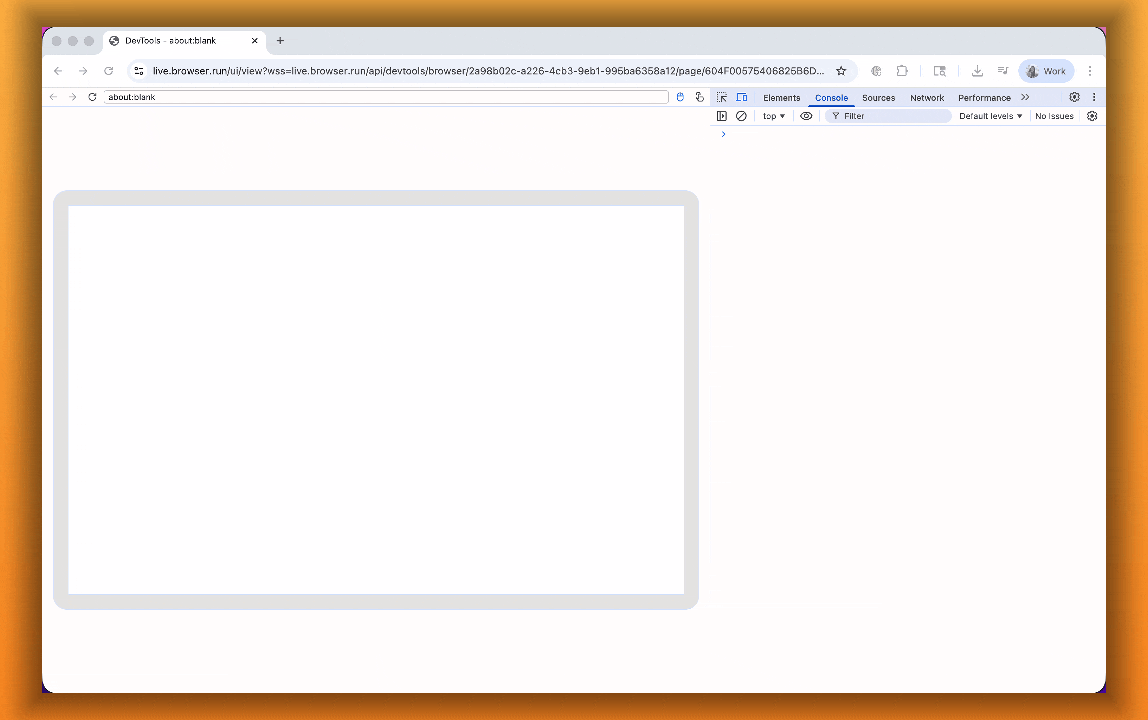
With WebMCP, you can:
- Discover website tools - Use
navigator.modelContextTesting.listTools()to see available actions on any WebMCP-enabled site - Execute tools directly - Call
navigator.modelContextTesting.executeTool()with typed parameters - Handle human-in-the-loop interactions - Some tools pause for user confirmation before completing sensitive actions
WebMCP requires Chrome beta features. We have an experimental pool with browser instances running Chrome beta so you can test emerging browser features before they reach stable Chrome. To start a WebMCP session, add
lab=trueto your/devtools/browserrequest:Terminal window curl -X POST "https://api.cloudflare.com/client/v4/accounts/{account_id}/browser-rendering/devtools/browser?lab=true&keep_alive=300000" \-H "Authorization: Bearer {api_token}"Combined with the recently launched CDP endpoint, AI agents can also use WebMCP. Connect an MCP client to Browser Run via CDP, and your agent can discover and call website tools directly. Here's the same hotel booking demo, this time driven by an AI agent through OpenCode:

For a step-by-step guide, refer to the WebMCP documentation.
- Discover website tools - Use
-
We are excited to announce two major capability upgrades for Agent Lee, the AI co-pilot built directly into the Cloudflare dashboard. Agent Lee is designed to understand your specific account configuration, and with this release, it moves from a passive advisor to an active assistant that can help you manage your infrastructure and visualize your data through natural language.
Agent Lee can now perform changes on your behalf across your Cloudflare account. Whether you need to update DNS records, modify SSL/TLS settings, or configure Workers routes, you can simply ask.
To ensure security and accuracy, every write operation requires explicit user approval. Before any change is committed, Agent Lee will present a summary of the proposed action in plain language. No action is taken until you select Confirm, and this approval requirement is enforced at the infrastructure level to prevent unauthorized changes.
Example requests:
- "Add an A record for blog.example.com pointing to 192.0.2.10."
- "Enable Always Use HTTPS on my zone."
- "Set the SSL mode for example.com to Full (strict)."
Understanding your traffic and security trends is now as easy as asking a question. Agent Lee now features Generative UI, allowing it to render inline charts and structured data visualizations directly within the chat interface using your actual account telemetry.
Example requests:
- "Show me a chart of my traffic over the last 7 days."
- "What does my error rate look like for the past 24 hours?"
- "Graph my cache hit rate for example.com this week."
These features are currently available in Beta for all users on the Free plan. To get started, log in to the Cloudflare dashboard ↗ and select Ask AI in the upper right corner.
To learn more about how to interact with your account using AI, refer to the Agent Lee documentation.
Privacy Proxy metrics are now queryable through Cloudflare's GraphQL Analytics API, the new default method for accessing Privacy Proxy observability data. All metrics are available through a single endpoint:
Terminal window curl https://api.cloudflare.com/client/v4/graphql \--header "Authorization: Bearer <API_TOKEN>" \--header "Content-Type: application/json" \--data '{"query": "{ viewer { accounts(filter: { accountTag: $accountTag }) { privacyProxyRequestMetricsAdaptiveGroups(filter: { date_geq: $startDate, date_leq: $endDate }, limit: 10000, orderBy: [date_ASC]) { count dimensions { date } } } } }","variables": {"accountTag": "<YOUR_ACCOUNT_TAG>","startDate": "2026-04-04","endDate": "2026-04-06"}}'Four GraphQL nodes are now live, providing aggregate metrics across all key dimensions of your Privacy Proxy deployment:
privacyProxyRequestMetricsAdaptiveGroups— Request volume, error rates, status codes, and proxy status breakdowns.privacyProxyIngressConnMetricsAdaptiveGroups— Client-to-proxy connection counts, bytes transferred, and latency percentiles.privacyProxyEgressConnMetricsAdaptiveGroups— Proxy-to-origin connection counts, bytes transferred, and latency percentiles.privacyProxyAuthMetricsAdaptiveGroups— Authentication attempt counts by method and result.
All nodes support filtering by time, data center (
coloCode), and endpoint, with additional node-specific dimensions such as transport protocol and authentication method.OpenTelemetry-based metrics export remains available. The GraphQL Analytics API is now the recommended default method — a plug-and-play method that requires no collector infrastructure, saving engineering overhead.
Browser Rendering now supports
wrangler browsercommands, letting you create, manage, and view browser sessions directly from your terminal, streamlining your workflow. Since Wrangler handles authentication, you do not need to pass API tokens in your commands.The following commands are available:
Command Description wrangler browser createCreate a new browser session wrangler browser closeClose a session wrangler browser listList active sessions wrangler browser viewView a live browser session The
createcommand spins up a browser instance on Cloudflare's network and returns a session URL. Once created, you can connect to the session using any CDP-compatible client like Puppeteer, Playwright, or MCP clients to automate browsing, scrape content, or debug remotely.Terminal window wrangler browser createUse
--keepAliveto set the session keep-alive duration (60-600 seconds):Terminal window wrangler browser create --keepAlive 300The
viewcommand auto-selects when only one session exists, or prompts for selection when multiple sessions are available.All commands support
--jsonfor structured output, and because these are CLI commands, you can incorporate them into scripts to automate session management.For full usage details, refer to the Wrangler commands documentation.
VPC Network bindings now give your Workers access to any service in your private network without pre-registering individual hosts or ports. This complements existing VPC Service bindings, which scope each binding to a specific host and port.
You can bind to a Cloudflare Tunnel by
tunnel_idto reach any service on the network where that tunnel is running, or bind to your Cloudflare Mesh network usingcf1:networkto reach any Mesh node, client device, or subnet route in your account:JSONC {"vpc_networks": [{"binding": "MESH","network_id": "cf1:network","remote": true}]}TOML [[vpc_networks]]binding = "MESH"network_id = "cf1:network"remote = trueAt runtime,
fetch()routes through the network to reach the service at the IP and port you specify:JavaScript const response = await env.MESH.fetch("http://10.0.1.50:8080/api/data");For configuration options and examples, refer to VPC Networks and Connect Workers to Cloudflare Mesh.
Cloudflare Containers and Sandboxes are now generally available.
Containers let you run more workloads on the Workers platform, including resource-intensive applications, different languages, and CLI tools that need full Linux environments.
Since the initial launch of Containers, there have been significant improvements to Containers' performance, stability, and feature set. Some highlights include:
- Higher limits allow you to run thousands of containers concurrently.
- Active-CPU pricing means that you only pay for used CPU cycles.
- Easy connections to Workers and other bindings via hostnames help you extend your Containers with additional functionality.
- Docker Hub support makes it easy to use your existing images and registries.
- SSH support helps you access and debug issues in live containers.
The Sandbox SDK provides isolated environments for running untrusted code securely, with a simple TypeScript API for executing commands, managing files, and exposing services. This makes it easier to secure and manage your agents at scale. Some additions since launch include:
- Live preview URLs so agents can run long-lived services and verify in-flight changes.
- Persistent code interpreters for Python, JavaScript, and TypeScript, with rich structured outputs.
- Interactive PTY terminals for real browser-based terminal access with multiple isolated shells per sandbox.
- Backup and restore APIs to snapshot a workspace and quickly restore an agent's coding session without repeating expensive setup steps.
- Real-time filesystem watching so apps and agents can react immediately to file changes inside a sandbox.
For more information, refer to Containers and Sandbox SDK documentation.
Outbound Workers for Sandboxes and Containers now support zero-trust credential injection, TLS interception, allow/deny lists, and dynamic per-instance egress policies. These features give platforms running agentic workloads full control over what leaves the sandbox, without exposing secrets to untrusted workloads, like user-generated code or coding agents.
Because outbound handlers run in the Workers runtime, outside the sandbox, they can hold secrets the sandbox never sees. A sandboxed workload can make a plain request, and credentials are transparently attached before a request is forwarded upstream.
For instance, you could run an agent in a sandbox and ensure that any requests it makes to Github are authenticated. But it will never be able to access the credentials:
TypeScript export class MySandbox extends Sandbox {}MySandbox.outboundByHost = {"github.com": (request: Request, env: Env, ctx: OutboundHandlerContext) => {const requestWithAuth = new Request(request);requestWithAuth.headers.set("x-auth-token", env.SECRET);return fetch(requestWithAuth);},};You can easily inject unique credentials for different instances by using
ctx.containerId:TypeScript MySandbox.outboundByHost = {"my-internal-vcs.dev": async (request: Request,env: Env,ctx: OutboundHandlerContext,) => {const authKey = await env.KEYS.get(ctx.containerId);const requestWithAuth = new Request(request);requestWithAuth.headers.set("x-auth-token", authKey);return fetch(requestWithAuth);},};No token is ever passed into the sandbox. You can rotate secrets in the Worker environment and every request will pick them up immediately.
Outbound Workers now intercept HTTPS traffic. A unique ephemeral certificate authority (CA) and private key are created for each sandbox instance. The CA is placed into the sandbox and trusted by default. The ephemeral private key never leaves the container runtime sidecar process and is never shared across instances.
With TLS interception active, outbound Workers can act as a transparent proxy for both HTTP and HTTPS traffic.
Easily filter outbound traffic with
allowedHostsanddeniedHosts. WhenallowedHostsis set, it becomes a deny-by-default allowlist. Both properties support glob patterns.TypeScript export class MySandbox extends Sandbox {allowedHosts = ["github.com", "npmjs.org"];}Define named outbound handlers then apply or remove them at runtime using
setOutboundHandler()orsetOutboundByHost(). This lets you change egress policy for a running sandbox without restarting it.TypeScript export class MySandbox extends Sandbox {}MySandbox.outboundHandlers = {allowHosts: async (req: Request, env: Env, ctx: OutboundHandlerContext ) => {const url = new URL(req.url);if (ctx.params.allowedHostnames.includes(url.hostname)) {return fetch(req);}return new Response(null, { status: 403 });},noHttp: async () => {return new Response(null, { status: 403 });},};Apply handlers programmatically from your Worker:
TypeScript const sandbox = getSandbox(env.Sandbox, userId);// Open network for setupawait sandbox.setOutboundHandler("allowHosts", {allowedHostnames: ["github.com", "npmjs.org"],});await sandbox.exec("npm install");// Lock down after setupawait sandbox.setOutboundHandler("noHttp");Handlers accept
params, so you can customize behavior per instance without defining separate handler functions.Upgrade to
@cloudflare/containers@0.3.0or@cloudflare/sandbox@0.8.9to use these features.For more details, refer to Sandbox outbound traffic and Container outbound traffic.
Local Explorer is a browser-based interface and REST API for viewing and editing local resource data during development. It removes the need to write throwaway scripts or dig through
.wrangler/stateto understand what data your Worker has stored locally.Local Explorer is available in Wrangler 4.82.1+ and the Cloudflare Vite plugin 1.32.0+. Start a local development session and press
ein your terminal, or navigate to/cdn-cgi/exploreron your local dev server.Local Explorer supports five resource types and works across multiple workers running locally:
- KV — Browse keys, view values and metadata, create, update, and delete key-value pairs.
- R2 — List objects, view metadata, upload files, and delete objects. Supports directory views and multi-select.
- D1 — Browse tables and rows, run arbitrary SQL queries, and edit schemas in a full data studio.
- Durable Objects (SQLite storage) — Browse individual object SQLite tables, run SQL queries, and edit schemas.
- Workflows — List instances, view status and step history, trigger new runs, and pause, resume, restart, or terminate instances.
Local Explorer exposes a REST API at
/cdn-cgi/explorer/apithat provides programmatic access to the same operations available in the browser. The root endpoint returns an OpenAPI specification ↗ describing all available endpoints, parameters, and response formats.Terminal window curl http://localhost:8787/cdn-cgi/explorer/apiPoint an AI coding agent at
/cdn-cgi/explorer/apiand it can discover and interact with your local resources without manual setup. This enables iterative development loops where an agent can populate test data in KV or D1, inspect Durable Object state, trigger Workflow runs, or upload files to R2.For more details, refer to the Local Explorer documentation.
Browser Rendering now exposes the Chrome DevTools Protocol (CDP), the low-level protocol that powers browser automation. The growing ecosystem of CDP-based agent tools, along with existing CDP automation scripts, can now use Browser Rendering directly.
Any CDP-compatible client, including Puppeteer and Playwright, can connect from any environment, whether that is Cloudflare Workers, your local machine, or a cloud environment. All you need is your Cloudflare API key.
For any existing CDP script, switching to Browser Rendering is a one-line change:
JavaScript const puppeteer = require("puppeteer-core");const browser = await puppeteer.connect({browserWSEndpoint: `wss://api.cloudflare.com/client/v4/accounts/${ACCOUNT_ID}/browser-rendering/devtools/browser?keep_alive=600000`,headers: { Authorization: `Bearer ${API_TOKEN}` },});const page = await browser.newPage();await page.goto("https://example.com");console.log(await page.title());await browser.close();Additionally, MCP clients like Claude Desktop, Claude Code, Cursor, and OpenCode can now use Browser Rendering as their remote browser via the chrome-devtools-mcp ↗ package.
Here is an example of how to configure Browser Rendering for Claude Desktop:
{"mcpServers": {"browser-rendering": {"command": "npx","args": ["-y","chrome-devtools-mcp@latest","--wsEndpoint=wss://api.cloudflare.com/client/v4/accounts/<ACCOUNT_ID>/browser-rendering/devtools/browser?keep_alive=600000","--wsHeaders={\"Authorization\":\"Bearer <API_TOKEN>\"}"]}}}To get started, refer to the CDP documentation.
The simultaneous open connections limit has been relaxed. Previously, each Worker invocation was limited to six open connections at a time for the entire lifetime of each connection, including while reading the response body. Now, a connection is freed as soon as response headers arrive, so the six-connection limit only constrains how many connections can be in the initial "waiting for headers" phase simultaneously.


This means Workers can now have many more connections open at the same time without queueing, as long as no more than six are waiting for their initial response. This eliminates the
Response closed due to connection limitexception that could previously occur when the runtime canceled stalled connections to prevent deadlocks.Previously, the runtime used a deadlock avoidance algorithm that watched each open connection for I/O activity. If all six connections appeared idle — even momentarily — the runtime would cancel the least-recently-used connection to make room for new requests. In practice, this heuristic was fragile. For example, when a response used
Content-Encoding: gzip, the runtime's internal decompression created brief gaps between read and write operations. During these gaps, the connection appeared stalled despite being actively read by the Worker. If multiple connections hit these gaps at the same time, the runtime could spuriously cancel a connection that was working correctly. By only counting connections during the waiting-for-headers phase — where the runtime is fully in control and there is no ambiguity about whether the connection is active — this class of bug is eliminated entirely.

AI Search now supports CSS content selectors for website data sources. You can now define which parts of a crawled page are extracted and indexed by specifying CSS selectors paired with URL glob patterns.
Content selectors solve the problem of indexing only relevant content while ignoring navigation, sidebars, footers, and other boilerplate. When a page URL matches a glob pattern, only elements matching the corresponding CSS selector are extracted and converted to Markdown for indexing.
Configure content selectors via the dashboard or API:
Terminal window curl "https://api.cloudflare.com/client/v4/accounts/{account_id}/ai-search/instances" \-H "Authorization: Bearer {api_token}" \-H "Content-Type: application/json" \-d '{"id": "my-ai-search","source": "https://example.com","type": "web-crawler","source_params": {"web_crawler": {"parse_options": {"content_selector": [{"path": "**/blog/**","selector": "article .post-body"}]}}}}'Selectors are evaluated in order, and the first matching pattern wins. You can define up to 10 content selector entries per instance.
For configuration details and examples, refer to the content selectors documentation.
AI Search now supports four additional Workers AI models across text generation and embedding.
Model Context window (tokens) @cf/zai-org/glm-4.7-flash131,072 @cf/qwen/qwen3-30b-a3b-fp832,000 GLM-4.7-Flash is a lightweight model from Zhipu AI with a 131,072 token context window, suitable for long-document summarization and retrieval tasks. Qwen3-30B-A3B is a mixture-of-experts model from Alibaba that activates only 3 billion parameters per forward pass, keeping inference fast while maintaining strong response quality.
Model Vector dims Input tokens Metric @cf/qwen/qwen3-embedding-0.6b1,024 4,096 cosine @cf/google/embeddinggemma-300m768 512 cosine Qwen3-Embedding-0.6B supports up to 4,096 input tokens, making it a good fit for indexing longer text chunks. EmbeddingGemma-300M from Google produces 768-dimension vectors and is optimized for low-latency embedding workloads.
All four models are available without additional provider keys since they run on Workers AI. Select them when creating or updating an AI Search instance in the dashboard or through the API.
For the full list of supported models, refer to Supported models.
The Workers runtime now automatically sends a reciprocal Close frame when it receives a Close frame from the peer. The
readyStatetransitions toCLOSEDbefore thecloseevent fires. This matches the WebSocket specification ↗ and standard browser behavior.This change is enabled by default for Workers using compatibility dates on or after
2026-04-07(via theweb_socket_auto_reply_to_closecompatibility flag). Existing code that manually callsclose()inside thecloseevent handler will continue to work — the call is silently ignored when the WebSocket is already closed.JavaScript const [client, server] = Object.values(new WebSocketPair());server.accept();server.addEventListener("close", (event) => {// readyState is already CLOSED — no need to call server.close().console.log(server.readyState); // WebSocket.CLOSEDconsole.log(event.code); // 1000console.log(event.wasClean); // true});The automatic close behavior can interfere with WebSocket proxying, where a Worker sits between a client and a backend and needs to coordinate the close on both sides independently. To support this use case, pass
{ allowHalfOpen: true }toaccept():JavaScript const [client, server] = Object.values(new WebSocketPair());server.accept({ allowHalfOpen: true });server.addEventListener("close", (event) => {// readyState is still CLOSING here, giving you time// to coordinate the close on the other side.console.log(server.readyState); // WebSocket.CLOSING// Manually close when ready.server.close(event.code, "done");});For more information, refer to WebSockets Close behavior.
You can now specify placement constraints to control where your Containers run.
Constraint Values Use case regionsENAM,WNAM,EEUR,WEURGeographic placement jurisdictioneu,fedrampCompliance boundaries Use
regionsto limit placement to specific geographic areas. Usejurisdictionto restrict containers to compliance boundaries —eumaps to European regions (EEUR, WEUR) andfedrampmaps to North American regions (ENAM, WNAM).Refer to Containers placement for more details.
We are partnering with Google to bring
@cf/google/gemma-4-26b-a4b-itto Workers AI. Gemma 4 26B A4B is a Mixture-of-Experts (MoE) model built from Gemini 3 research, with 26B total parameters and only 4B active per forward pass. By activating a small subset of parameters during inference, the model runs almost as fast as a 4B-parameter model while delivering the quality of a much larger one.Gemma 4 is Google's most capable family of open models, designed to maximize intelligence-per-parameter.
- Mixture-of-Experts architecture with 8 active experts out of 128 total (plus 1 shared expert), delivering frontier-level performance at a fraction of the compute cost of dense models
- 256,000 token context window for retaining full conversation history, tool definitions, and long documents across extended sessions
- Built-in thinking mode that lets the model reason step-by-step before answering, improving accuracy on complex tasks
- Vision understanding for object detection, document and PDF parsing, screen and UI understanding, chart comprehension, OCR (including multilingual), and handwriting recognition, with support for variable aspect ratios and resolutions
- Function calling with native support for structured tool use, enabling agentic workflows and multi-step planning
- Multilingual with out-of-the-box support for 35+ languages, pre-trained on 140+ languages
- Coding for code generation, completion, and correction
Use Gemma 4 26B A4B through the Workers AI binding (
env.AI.run()), the REST API at/runor/v1/chat/completions, or the OpenAI-compatible endpoint.For more information, refer to the Gemma 4 26B A4B model page.
AI Gateway now supports automatic retries at the gateway level. When an upstream provider returns an error, your gateway retries the request based on the retry policy you configure, without requiring any client-side changes.
You can configure the retry count (up to 5 attempts), the delay between retries (from 100ms to 5 seconds), and the backoff strategy (Constant, Linear, or Exponential). These defaults apply to all requests through the gateway, and per-request headers can override them.
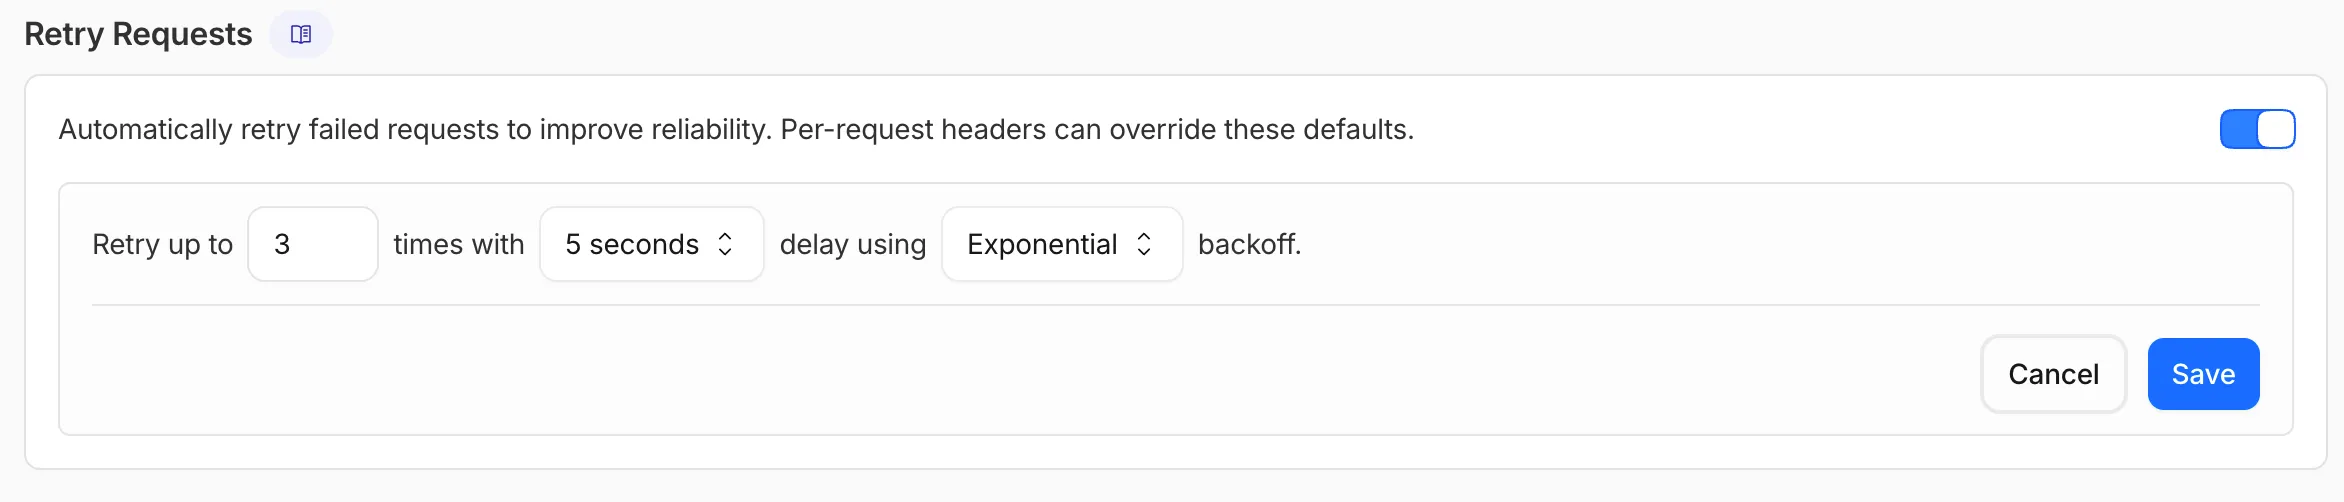
This is particularly useful when you do not control the client making the request and cannot implement retry logic on the caller side. For more complex failover scenarios — such as failing across different providers — use Dynamic Routing.
For more information, refer to Manage gateways.
All
wrangler workflowscommands now accept a--localflag to target a Workflow running in a localwrangler devsession instead of the production API.You can now manage the full Workflow lifecycle locally, including triggering Workflows, listing instances, pausing, resuming, restarting, terminating, and sending events:
Terminal window npx wrangler workflows list --localnpx wrangler workflows trigger my-workflow --localnpx wrangler workflows instances list my-workflow --localnpx wrangler workflows instances pause my-workflow <INSTANCE_ID> --localnpx wrangler workflows instances send-event my-workflow <INSTANCE_ID> --type my-event --localAll commands also accept
--portto target a specificwrangler devsession (defaults to8787).For more information, refer to Workflows local development.
AI Search supports a
wrangler ai-searchcommand namespace. Use it to manage instances from the command line.The following commands are available:
Command Description wrangler ai-search createCreate a new instance with an interactive wizard wrangler ai-search listList all instances in your account wrangler ai-search getGet details of a specific instance wrangler ai-search updateUpdate the configuration of an instance wrangler ai-search deleteDelete an instance wrangler ai-search searchRun a search query against an instance wrangler ai-search statsGet usage statistics for an instance The
createcommand guides you through setup, choosing a name, source type (r2orweb), and data source. You can also pass all options as flags for non-interactive use:Terminal window wrangler ai-search create my-instance --type r2 --source my-bucketUse
wrangler ai-search searchto query an instance directly from the CLI:Terminal window wrangler ai-search search my-instance --query "how do I configure caching?"All commands support
--jsonfor structured output that scripts and AI agents can parse directly.For full usage details, refer to the Wrangler commands documentation.
Workers Builds now supports Deploy Hooks — trigger builds from your headless CMS, a Cron Trigger, a Slack bot, or any system that can send an HTTP request.
Each Deploy Hook is a unique URL tied to a specific branch. Send it a
POSTand your Worker builds and deploys.Terminal window curl -X POST "https://api.cloudflare.com/client/v4/workers/builds/deploy_hooks/<DEPLOY_HOOK_ID>"To create one, go to Workers & Pages > your Worker > Settings > Builds > Deploy Hooks.
Since a Deploy Hook is a URL, you can also call it from another Worker. For example, a Worker with a Cron Trigger can rebuild your project on a schedule:
JavaScript export default {async scheduled(event, env, ctx) {ctx.waitUntil(fetch(env.DEPLOY_HOOK_URL, { method: "POST" }));},};TypeScript export default {async scheduled(event: ScheduledEvent, env: Env, ctx: ExecutionContext): Promise<void> {ctx.waitUntil(fetch(env.DEPLOY_HOOK_URL, { method: "POST" }));},} satisfies ExportedHandler<Env>;You can also use Deploy Hooks to rebuild when your CMS publishes new content or deploy from a Slack slash command.
- Automatic deduplication: If a Deploy Hook fires multiple times before the first build starts running, redundant builds are automatically skipped. This keeps your build queue clean when webhooks retry or CMS events arrive in bursts.
- Last triggered: The dashboard shows when each hook was last triggered.
- Build source: Your Worker's build history shows which Deploy Hook started each build by name.
Deploy Hooks are rate limited to 10 builds per minute per Worker and 100 builds per minute per account. For all limits, see Limits & pricing.
To get started, read the Deploy Hooks documentation.
Three new properties are now available on
request.cfin Workers that expose Layer 4 transport telemetry from the client connection. These properties let your Worker make decisions based on real-time connection quality signals — such as round-trip time and data delivery rate — without requiring any client-side changes.Previously, this telemetry was only available via the
Server-Timing: cfL4response header. These new properties surface the same data directly in the Workers runtime, so you can use it for routing, logging, or response customization.Property Type Description clientTcpRttnumber | undefined The smoothed TCP round-trip time (RTT) between Cloudflare and the client in milliseconds. Only present for TCP connections (HTTP/1, HTTP/2). For example, 22.clientQuicRttnumber | undefined The smoothed QUIC round-trip time (RTT) between Cloudflare and the client in milliseconds. Only present for QUIC connections (HTTP/3). For example, 42.edgeL4Object | undefined Layer 4 transport statistics. Contains deliveryRate(number) — the most recent data delivery rate estimate for the connection, in bytes per second. For example,123456.JavaScript export default {async fetch(request) {const cf = request.cf;const rtt = cf.clientTcpRtt ?? cf.clientQuicRtt ?? 0;const deliveryRate = cf.edgeL4?.deliveryRate ?? 0;const transport = cf.clientTcpRtt ? "TCP" : "QUIC";console.log(`Transport: ${transport}, RTT: ${rtt}ms, Delivery rate: ${deliveryRate} B/s`);const headers = new Headers(request.headers);headers.set("X-Client-RTT", String(rtt));headers.set("X-Delivery-Rate", String(deliveryRate));return fetch(new Request(request, { headers }));},};For more information, refer to Workers Runtime APIs: Request.