Changelog
New updates and improvements at Cloudflare.

R2 SQL is a serverless, distributed query engine that runs SQL against Apache Iceberg ↗ tables stored in R2 Data Catalog. R2 SQL now has published pricing based on a single dimension: the volume of compressed data scanned to execute your queries. At $2.50 / TB ($0.0025 / GB), R2 SQL is priced at half the cost of AWS Athena and less than half of Google BigQuery on-demand.
Billing is not yet enabled. We will provide at least 30 days notice before we start charging for R2 SQL usage.
Data scanned is measured on compressed bytes read from R2 object storage. This matches what you see in your R2 bucket — if a Parquet file is 100 MB on disk, scanning that file bills for 100 MB. Each query has a minimum billing increment of 10 MB.
Free plans include 1 GB / month and Paid plans include 10 GB / month. Standard R2 storage and operations and R2 Data Catalog charges apply separately.
For full pricing details and billing examples, refer to R2 SQL pricing.
R2 Data Catalog is a managed Apache Iceberg ↗ data catalog built directly into R2 buckets, queryable by any Iceberg-compatible engine such as Spark, Snowflake, and DuckDB. R2 Data Catalog now has published pricing for catalog operations and table compaction, in addition to standard R2 storage and operations.
Billing is not yet enabled. We will provide at least 30 days notice before we start charging for R2 Data Catalog usage.
Pricing is based on two dimensions:
- Catalog operations: $9.00 / million operations for metadata requests such as creating tables, reading table metadata, and updating table properties.
- Compaction: $0.005 / GB processed and $2.00 / million objects processed. These charges only apply when automatic compaction is turned on for a table.
Both dimensions include a monthly free tier: 1 million catalog operations, 10 GB of compaction data processed, and 1 million compaction objects processed.
For full pricing details and billing examples, refer to R2 Data Catalog pricing.
R2 Data Catalog is a managed Apache Iceberg ↗ data catalog built directly into your R2 bucket. It exposes a standard Iceberg REST catalog interface so you can connect query engines like Spark, Snowflake, DuckDB, and R2 SQL to your data in R2.
R2 Data Catalog now has a dedicated section in the Cloudflare dashboard, replacing the previous settings panel embedded in R2 bucket configuration. The new experience includes:
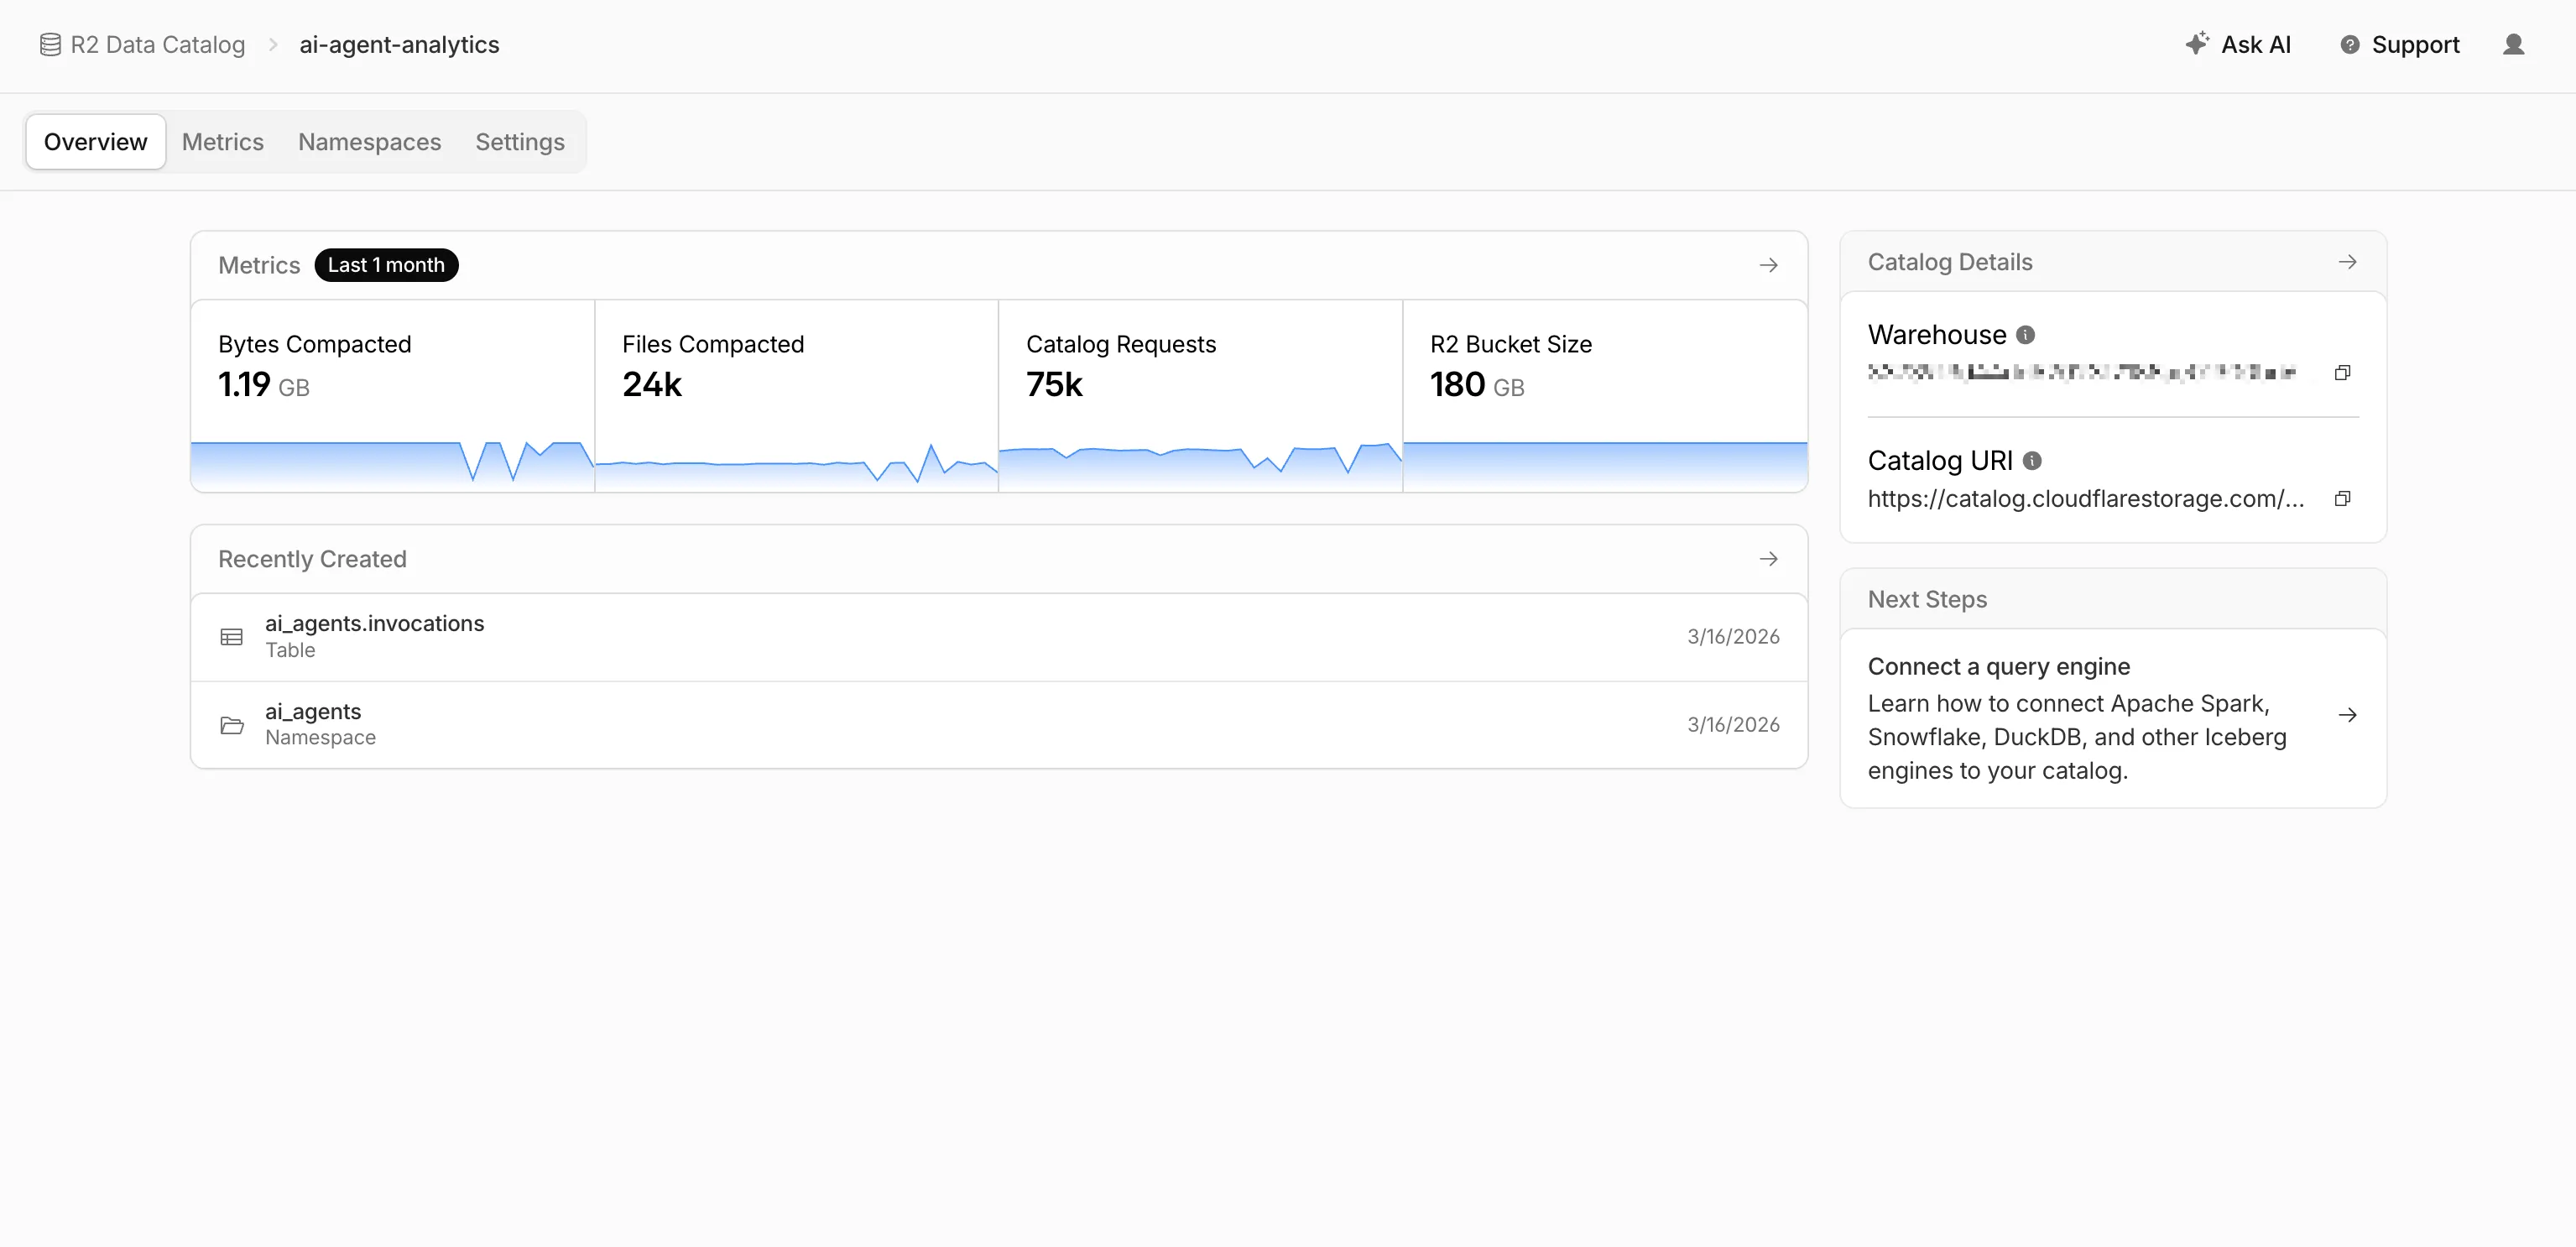
- Catalog overview — View all your catalogs in one place with catalog request counts, bucket sizes, and table maintenance status at a glance.
- Guided setup wizard — Create a catalog in three steps: choose or create an R2 bucket, configure table maintenance (compaction and snapshot expiration), and review. The wizard creates the bucket and generates a service credential automatically.
- Settings management — A dedicated settings page for each catalog with sections for general configuration, table maintenance, service credentials, and disabling the catalog. You can now enable and configure snapshot expiration directly from the dashboard.
- Built-in metrics — Five charts on each catalog's metrics tab: bytes compacted, files compacted, catalog requests, storage size, and snapshots expired.
To get started, go to R2 Data Catalog in the Cloudflare dashboard or refer to the getting started guide and manage catalogs documentation.
You can now record specific participant audio tracks in RealtimeKit with track recording. Track recording creates separate WebM files for each participant instead of a single composite recording, which is useful for post-processing, transcription, and regulated or content-sensitive workflows.
To record specific participants, pass
user_idswhen starting a track recording:Terminal window curl --request POST \--url https://api.cloudflare.com/client/v4/accounts/<account_id>/realtime/kit/<app_id>/recordings/track \--header 'Authorization: Bearer <api_token>' \--header 'Content-Type: application/json' \--data '{"meeting_id": "97440c6a-140b-40a9-9499-b23fd7a3868a","user_ids": ["user-123", "user-456"]}'To pass
user_idsfor selective track recording, use the following minimum SDK versions:- Web Core:
@cloudflare/realtimekitversion1.4.0or later - Web UI Kit:
@cloudflare/realtimekit-ui,@cloudflare/realtimekit-react-ui, or@cloudflare/realtimekit-angular-uiversion1.1.2or later - Android Core or iOS Core: version
2.0.0or later - Android UI Kit or iOS UI Kit: version
1.1.0or later
RealtimeKit provides SDKs and UI components so that you can build your own meeting experience on Cloudflare's global WebRTC infrastructure. Teams today build products ranging from telehealth to education on RealtimeKit for global audiences. You can get started today with our Quickstart or take a look at our Cloudflare Meet repo ↗ as a reference.
- Web Core:
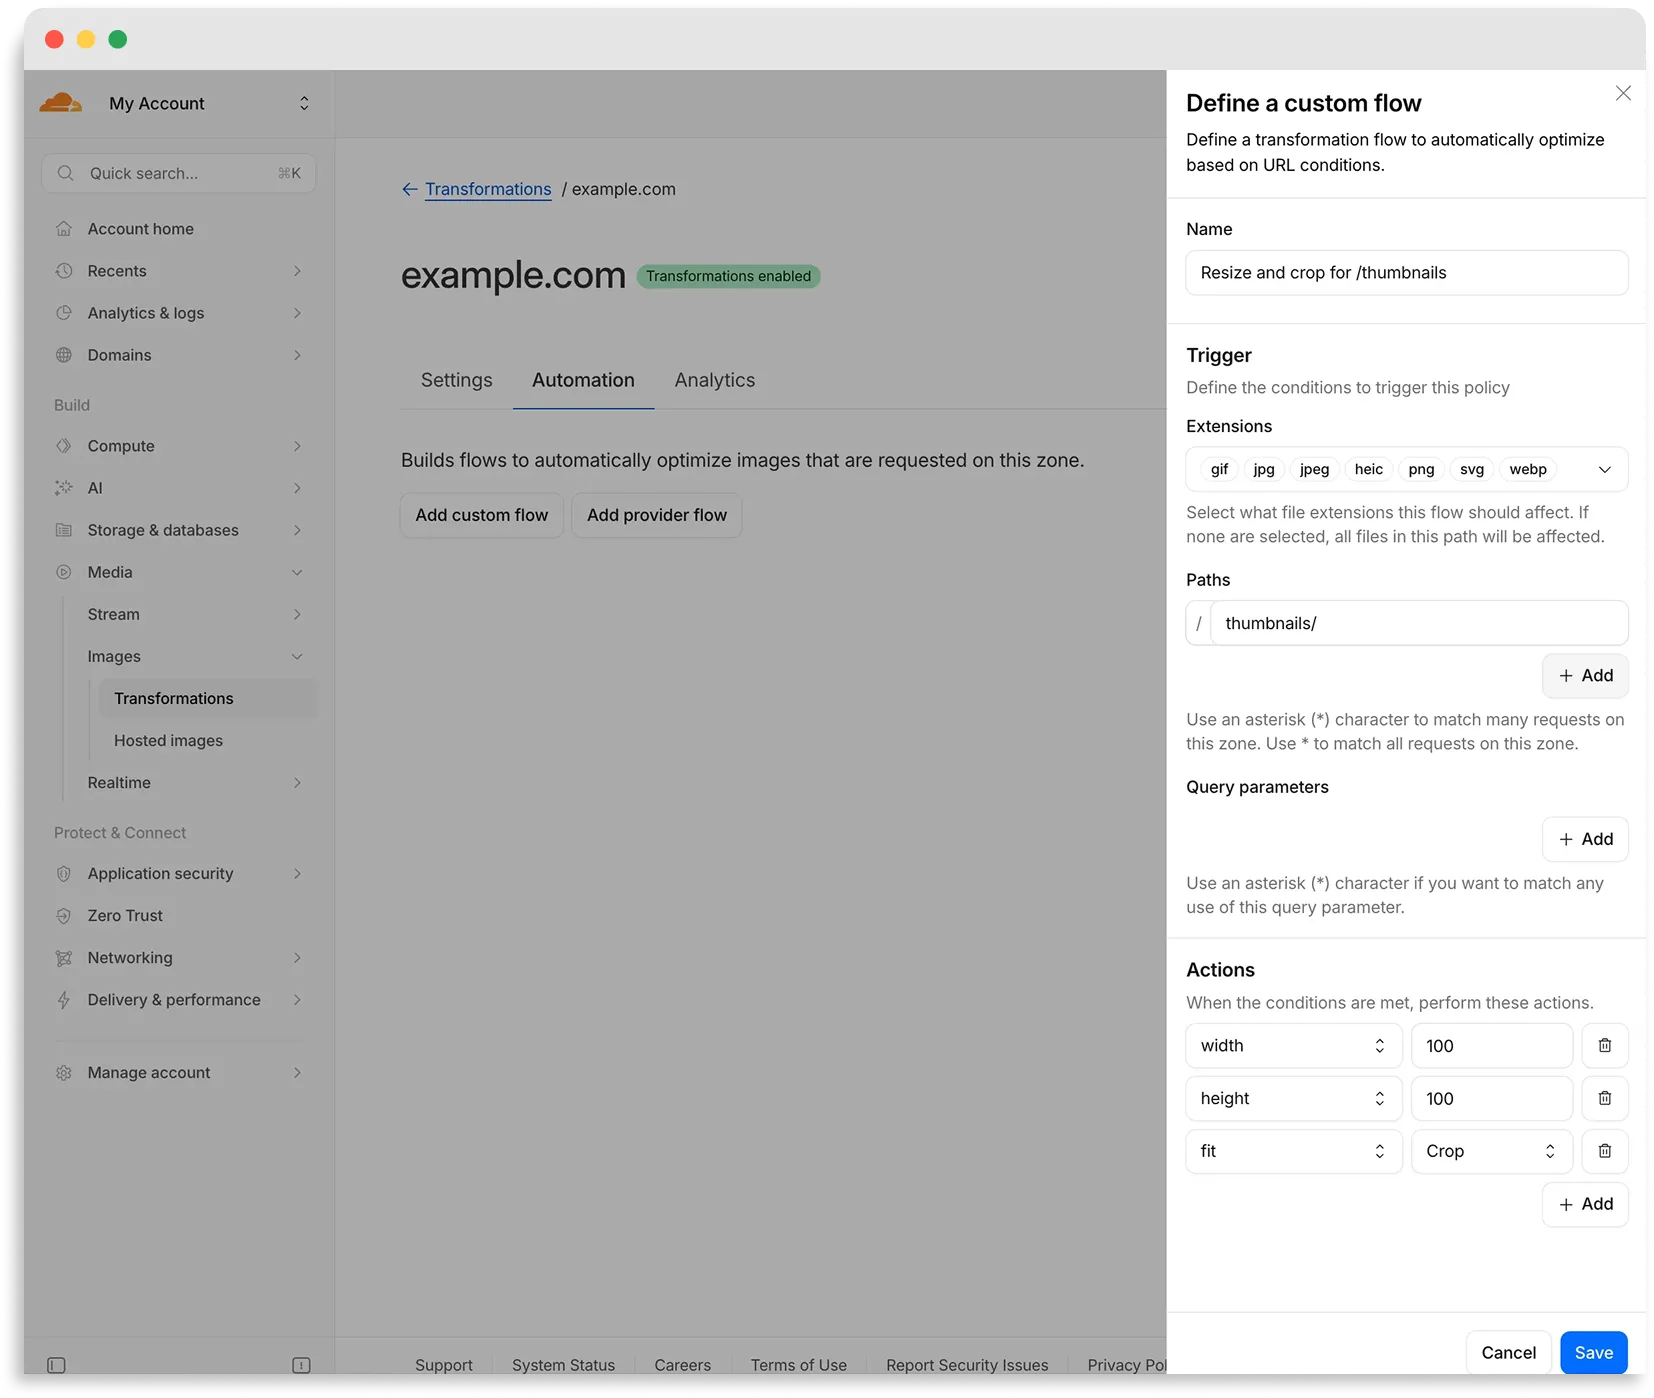
Flows are automated rules that pair conditions (such as file extension, URL path, or query parameter) with parameters. Set up a flow to automatically apply image optimization to matching requests on your zone without writing code or changing URLs.
There are two modes for transformation flows:
- Provider flows — Migrate from another image optimization service. Your existing URLs continue to work while Cloudflare rewrites provider-specific parameters to their Cloudflare equivalents. Currently, Cloudflare supports provider flows for Fastly Image Optimizer.
- Custom flows — Define your own conditions and actions for use cases like automatic format conversion, responsive sizing with
width=auto, or directory-based optimization.
To get started, go to Images > Transformations > Automation in the Cloudflare dashboard ↗.
Learn more about transformation flows.
Starting with
cloudflaredversion 2026.5.2 ↗, Cloudflare Tunnel automates the entire connectivity pre-checks workflow directly inside the binary. Previously, customers had to installdigandnetcatand run those commands by hand to verify their environment. Nowcloudflareddoes it natively at startup — and surfaces actionable remediation when something is blocked.
On every
cloudflared tunnel run(andcloudflared tunnel diag), the binary now natively checks:- DNS resolution —
region1.v2.argotunnel.comandregion2.v2.argotunnel.comresolve to valid Cloudflare IPs. - Transport connectivity — outbound
UDP (QUIC)andTCP (HTTP/2)on port7844. - Management API — outbound
TCP/443toapi.cloudflare.comfor software updates.
Results are printed in a scannable CLI table with three states:
- ✅ Pass — the check succeeded.
- ⚠️ Warn — a non-blocking issue, for example the Management API is unreachable so automatic updates will not work, but the tunnel will still come up.
- ❌ Fail — a blocking issue, with a specific remediation hint (for example,
Allow outbound UDP on port 7844).
If DNS is unresolvable, or both UDP and TCP fail on port 7844,
cloudflaredexits early with the failure rather than looping on opaquefailed to dialerrors.Pre-checks now run automatically on every start, which also catches regressions like overnight firewall policy changes — no need to remember to rerun the troubleshooting guide.
To get the new behavior, upgrade
cloudflaredto version2026.5.2or later. For more details, refer to the Connectivity pre-checks documentation.- DNS resolution —
Flagship is now in public beta. Evaluate feature flags directly from Cloudflare Workers with no outbound HTTP calls, using globally distributed flag configuration backed by Workers KV and Durable Objects. Flagship supports typed flag values, targeting rules, percentage rollouts, audit history, and OpenFeature-compatible SDKs.
Evaluate a flag from a Worker in a few lines of code:
src/index.js export default {async fetch(request, env) {const showNewCheckout = await env.FLAGS.getBooleanValue("new-checkout",false,);return new Response(showNewCheckout ? "New checkout" : "Standard checkout");},};src/index.ts export default {async fetch(request: Request, env: Env): Promise<Response> {const showNewCheckout = await env.FLAGS.getBooleanValue("new-checkout", false);return new Response(showNewCheckout ? "New checkout" : "Standard checkout",);},} satisfies ExportedHandler<Env>;Start creating flags from the Cloudflare dashboard today. Refer to the Flagship documentation to get started.
AI Gateway now uses the AI REST API on
api.cloudflare.com. You can call any model — whether from OpenAI, Anthropic, Google, or hosted on Workers AI — through one unified API, using the same endpoints and authentication regardless of provider. Four endpoints are available:POST /ai/run— universal endpoint for all models and modalitiesPOST /ai/v1/chat/completions— OpenAI SDK compatiblePOST /ai/v1/responses— OpenAI Responses API compatiblePOST /ai/v1/messages— Anthropic SDK compatible
Terminal window curl -X POST "https://api.cloudflare.com/client/v4/accounts/$CLOUDFLARE_ACCOUNT_ID/ai/v1/chat/completions" \--header "Authorization: Bearer $CLOUDFLARE_API_TOKEN" \--header "Content-Type: application/json" \--data '{"model": "openai/gpt-5.5","messages": [{"role": "user", "content": "What is Cloudflare?"}]}'All AI Gateway features — logging, caching, rate limiting, and guardrails — are applied automatically. Third-party models are billed through Unified Billing, so you do not need to manage separate provider API keys.
Third-party model requests are routed through your account's default gateway, which is created automatically on first use. To route requests through a specific gateway, add the
cf-aig-gateway-idheader.If you are already calling Workers AI models through the existing REST API, that path (
/ai/run/@cf/{model}) continues to work. To call Workers AI models through AI Gateway, use the@cf/model prefix (for example,@cf/moonshotai/kimi-k2.6) and include thecf-aig-gateway-idheader to specify which gateway to route through.For more details and examples, refer to the REST API documentation.
You can now scope Cloudflare permissions to individual Cloudflare Tunnel instances and Cloudflare Mesh nodes. Administrators can delegate access to specific Tunnels or Mesh nodes without granting account-wide control over private networking.
When you add a member or create a permission policy, the resource picker now lists Cloudflare Tunnel instances and Cloudflare Mesh nodes as scopable resource types. You can:
- Grant a read-only role on a single Cloudflare Tunnel instance to a support operator for log streaming and diagnostics — without exposing other Tunnels or destructive actions.
- Grant a write role on a specific Cloudflare Mesh node to an application team — without giving them access to the rest of your private network.
- Scope a single policy to one or many Tunnels and Mesh nodes at once.
Granular permissions are a parallel layer to existing account-level roles — they do not replace them.
- Existing account-level roles continue to work. A member with
Cloudflare AccessorCloudflare Zero Trustretains write access to every Tunnel and Mesh node in the account. This ensures backward compatibility for existing automation and tokens. - Granular permissions are additive. For any API request on a specific Tunnel or Mesh node, access is granted if the principal has either the account-level role or a granular permission for that resource.
- Resource enumeration is authorization-aware. Listing endpoints (
GET /accounts/{id}/cfd_tunnel,GET /accounts/{id}/warp_connector) return only the resources the principal has at least read access to.
- Configure granular permissions for Cloudflare Tunnel.
- Configure granular permissions for Cloudflare Tunnel and Cloudflare Mesh in Cloudflare One.
- Review the resource-scoped roles on the Cloudflare role reference.
You can now use VPC Network bindings with
network_id: "cf1:network"to reach your full private network from Workers, including:- Cloudflare Mesh nodes and client devices
- Subnet routes and hostname routes announced through Cloudflare Tunnel or Cloudflare Mesh
- Destinations connected through Cloudflare WAN on-ramps — GRE, IPsec, and CNI
This means a single VPC Network binding can route Worker requests to private services regardless of how those services are connected to Cloudflare: through a Cloudflare Tunnel from a cloud VPC, a Mesh node on a private subnet, or a Cloudflare WAN on-ramp from your data center or branch site.
JSONC {"vpc_networks": [{"binding": "PRIVATE_NETWORK","network_id": "cf1:network","remote": true,},],}TOML [[vpc_networks]]binding = "PRIVATE_NETWORK"network_id = "cf1:network"remote = trueAt runtime, the URL you pass to
fetch()determines the destination:JavaScript // Reach a service behind a Cloudflare WAN IPsec on-rampconst response = await env.PRIVATE_NETWORK.fetch("http://10.50.0.100:8080/api");For configuration options, refer to VPC Networks.
You can now receive event notifications for Artifacts repository changes and consume them from a Worker to build commit-driven automation.
This allows you to:
- Run custom workflows when a repository is created or imported
- Kick off a build and deploy a change when an agent pushes to a repo
- Trigger a review agent on every push
Available events include:
- Account-level events (
artifactssource) —repo.created,repo.deleted,repo.forked,repo.imported - Repository-level events (
artifacts.reposource) —pushed,cloned,fetched
To learn more, refer to Artifacts documentation.
You can now manage Artifacts namespaces, repos, and repo-scoped tokens directly from Wrangler CLI.
Available commands:
wrangler artifacts namespaces list— List Artifacts namespaces in your account.wrangler artifacts namespaces get— Get metadata for a namespace.wrangler artifacts repos create— Create a repo in a namespace.wrangler artifacts repos list— List repos in a namespace.wrangler artifacts repos get— Get metadata for a repo.wrangler artifacts repos delete— Delete a repo.wrangler artifacts repos issue-token— Issue a repo-scoped token for Git access.
To get started, refer to the Wrangler Artifacts commands documentation.
You can now share local dev sessions through Cloudflare Tunnel and get a public URL when using either Wrangler or the Cloudflare Vite plugin. This is useful when you need to share a preview, test a webhook, or access your app from another device.

This lets you either:
- start a temporary Quick tunnel with a random
*.trycloudflare.comhostname, or - use an existing named tunnel for a stable hostname and to restrict access with Cloudflare Access.
To start a tunnel, press
tin Wrangler ort + Enterin Vite while your dev server is running. For details on setting up a named tunnel, refer to Share a local dev server.- start a temporary Quick tunnel with a random
You can now view the size of your Hyperdrive database connection pools, giving you the ability to self-diagnose connection issues. Using the Cloudflare dashboard or the
hyperdrivePoolSizesAdaptiveGroupsdataset in the GraphQL Analytics API, you can seewaitingClients,currentPoolSize,availablePoolSlots, andmaxPoolSizefor each of your configurations.A new Pool connections chart has been added to the Metrics tab of each Hyperdrive configuration in the Cloudflare dashboard ↗. You can use the location selector to drill down into specific locations hosting your connection pool by airport code.
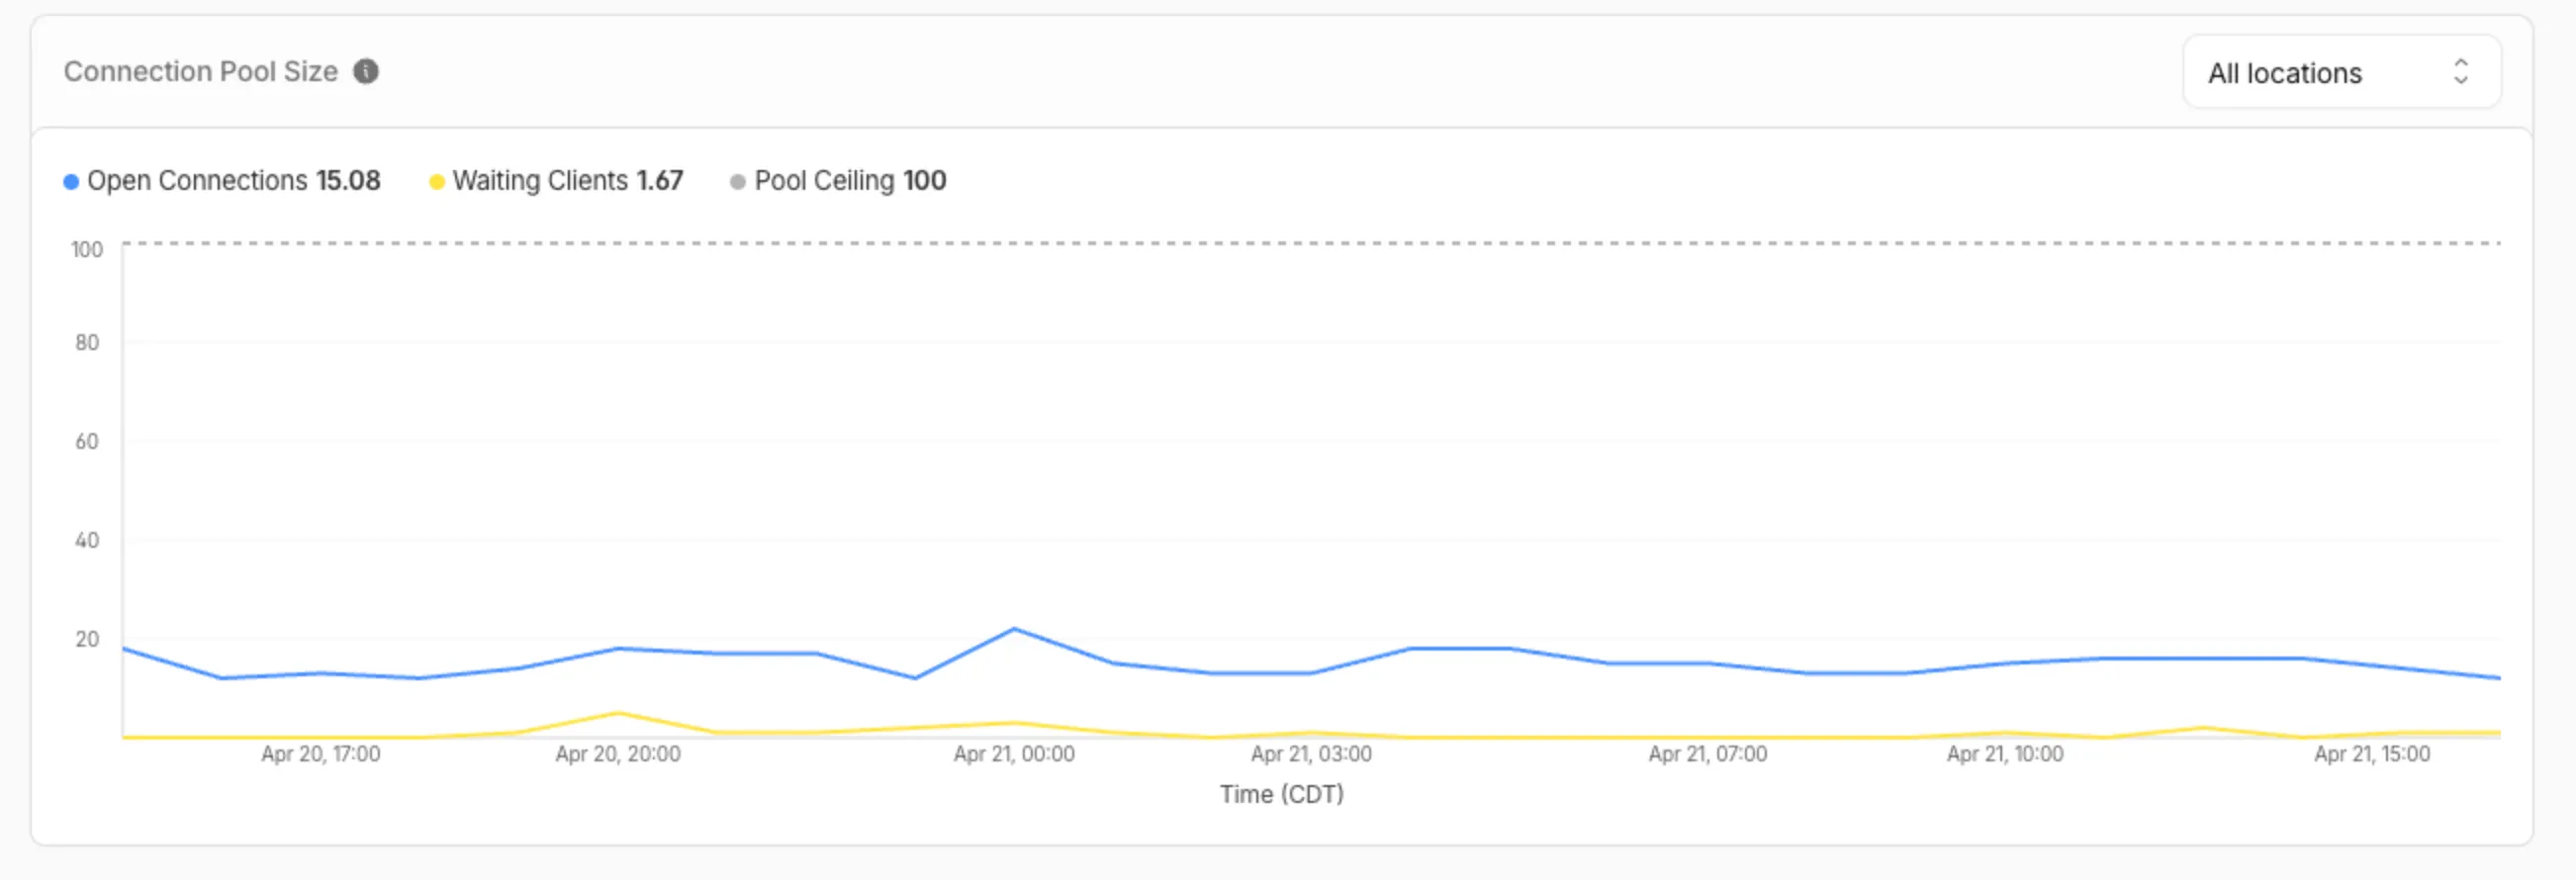
The chart shows:
- Waiting clients: Client requests waiting for an available connection.
- Open connections: Active connections to your database.
- Pool size maximum: Your configured origin connection limit.
Connection contention appears as a spike in waiting clients, or when open connections consistently approach the pool size maximum. If your open connections regularly approach this limit, consider contacting Cloudflare to increase your Hyperdrive connection limit.
The
hyperdrivePoolSizesAdaptiveGroupsdataset in the GraphQL Analytics API exposes the following key connection pool metrics for each Hyperdrive configuration:Under
avg:currentPoolSize— Average number of connections currently open in the pool.availablePoolSlots— Average number of pool connections available for checkout.waitingClients— Average number of clients waiting for a connection from the pool.
Under
max:maxPoolSize— Configured maximum size of the connection pool.currentPoolSize— Peak number of connections open in the pool.waitingClients— Peak number of clients waiting for a connection from the pool.
For more information, refer to Metrics and analytics and Connection pooling.
R2 SQL is Cloudflare's serverless, distributed SQL engine for querying Apache Iceberg ↗ tables stored in R2 Data Catalog. R2 SQL runs directly on Cloudflare's global network with no infrastructure to manage, so you can analyze data in R2 without exporting it to an external warehouse.
R2 SQL now supports joining multiple Iceberg tables in a single query. You can combine tables with JOINs, filter with subqueries, and define multi-table CTEs to build complex analytical queries.
- JOINs —
INNER JOIN,LEFT JOIN,RIGHT JOIN,FULL OUTER JOIN,CROSS JOIN, and implicit joins (comma-separatedFROMwith conditions inWHERE) - Subqueries —
IN/NOT IN,EXISTS/NOT EXISTS, scalar subqueries inSELECT/WHERE/HAVING, and derived tables (subqueries inFROM) - Multi-table CTEs —
WITHclauses can reference different tables and include JOINs - Self-joins — join a table with itself using different aliases
- Multi-way joins — join three or more tables in a single query
SELECT z.domain, z.plan, COUNT(*) AS request_countFROM my_namespace.zones zINNER JOIN my_namespace.http_requests h ON z.zone_id = h.zone_idWHERE z.plan = 'enterprise'GROUP BY z.domain, z.planORDER BY request_count DESCLIMIT 20SELECT z.domain, z.planFROM my_namespace.zones zWHERE EXISTS (SELECT 1 FROM my_namespace.firewall_events fWHERE f.zone_id = z.zone_id AND f.action = 'block')ORDER BY z.domainLIMIT 20WITH top_zones AS (SELECT zone_id, COUNT(*) AS req_countFROM my_namespace.http_requestsGROUP BY zone_idORDER BY req_count DESCLIMIT 50),zone_threats AS (SELECT zone_id, COUNT(*) AS threat_countFROM my_namespace.firewall_eventsWHERE risk_score > 0.5GROUP BY zone_id)SELECT tz.zone_id, tz.req_count, COALESCE(zt.threat_count, 0) AS threat_countFROM top_zones tzLEFT JOIN zone_threats zt ON tz.zone_id = zt.zone_idORDER BY tz.req_count DESCLIMIT 20For the full syntax reference, refer to the SQL reference. For performance guidance with joins, refer to Limitations and best practices.
- JOINs —
In your Worker's dashboard, there is now a dedicated Domains tab where you can purchase a new domain through Cloudflare Registrar and have it automatically connected, add an existing domain, and manage all of your Worker's routing in one place.
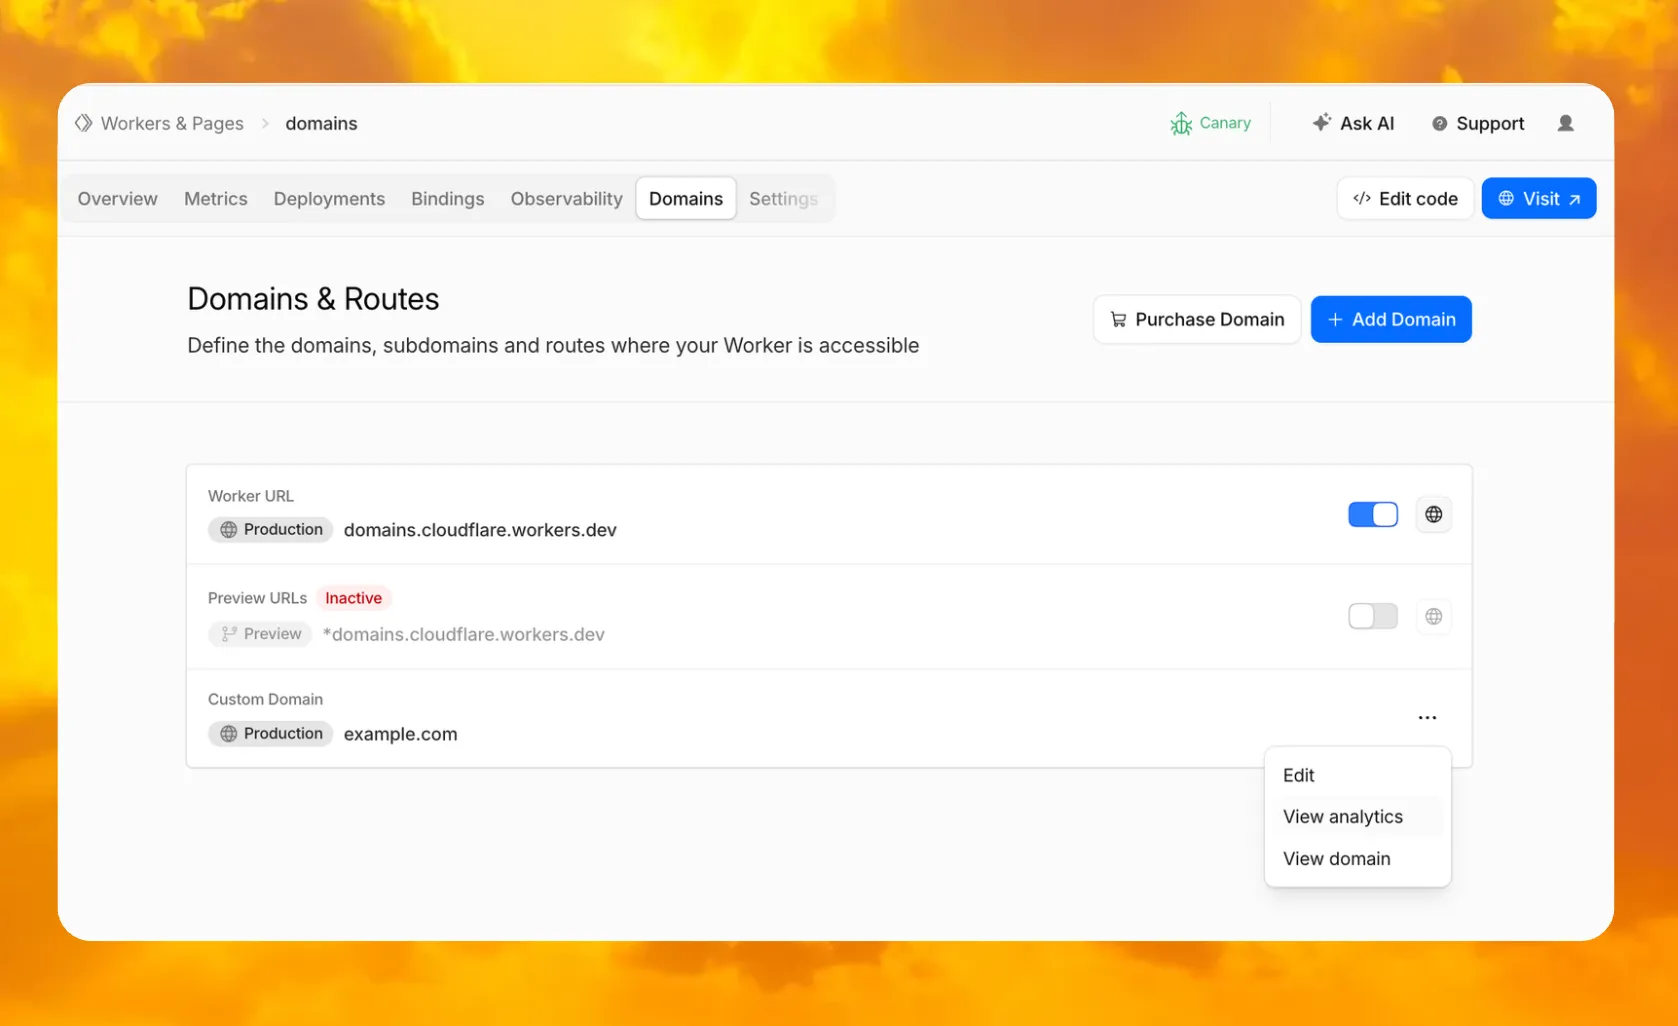
You can also enable or disable your
workers.devsubdomain and Preview URLs, put them behind Cloudflare Access to require sign-in, and jump directly to analytics or domain overview for any connected domain.To get started, go to Workers & Pages, select a Worker, and open the Domains tab.
Go to Workers & Pages
The latest release of the Agents SDK ↗ brings more reliable chat recovery, fixes Agent state synchronization during reconnects, adds durable submissions for Think, exposes routing retry configuration, and adds connection control for Voice agents.
@cloudflare/ai-chatnow keeps server turns running when a browser or client stream is interrupted. This is useful for long-running AI responses where users refresh the page, close a tab, or temporarily lose connection. Callingstop()still cancels the server turn.Set
cancelOnClientAbort: trueif browser or client aborts should also cancel the server turn:JavaScript const chat = useAgentChat({agent: "assistant",name: "user-123",cancelOnClientAbort: true,});TypeScript const chat = useAgentChat({agent: "assistant",name: "user-123",cancelOnClientAbort: true,});Notable bug fixes:
- Chat stream resume negotiation no longer throws when replay races with a closed WebSocket connection.
- Recovered chat continuations no longer leave
useAgentChatstuck in a streaming state when the original socket disconnects before a terminal response. - Approval auto-continuation preserves reasoning parts and persists continuation reasoning in the final message.
isServerStreamingnow resets correctly when a resumed stream moves from the fallback observer path to a transport-owned stream.
agents@0.12.4prevents duplicate initial state frames during WebSocket connection setup. This avoids stale initial state messages overwriting state updates already sent by the client.Agent recovery is also more reliable when tool calls span a Durable Object restart. Recovery now defers user finish hooks until after agent startup and isolates hook failures, so one failed hook does not block other recovered runs from finalizing.
getAgentByName()now supportsroutingRetryfor transient Durable Object routing failures:JavaScript import { getAgentByName } from "agents";const agent = await getAgentByName(env.AssistantAgent, "user-123", {routingRetry: {maxAttempts: 3,},});TypeScript import { getAgentByName } from "agents";const agent = await getAgentByName(env.AssistantAgent, "user-123", {routingRetry: {maxAttempts: 3,},});@cloudflare/thinknow supports durable programmatic submissions.submitMessages()provides durable acceptance, idempotent retries, status inspection, cancellation, and cleanup for server-driven turns that should continue after the caller returns.Think.chat()RPC turns now run inside chat recovery fibers and persist their stream chunks. Interrupted sub-agent turns can recover partial output instead of starting over.ChatOptions.toolshas been removed from the TypeScript API. Define durable tools on the child agent or use agent tools for orchestration. Runtimeoptions.toolsvalues passed by legacy callers are ignored with a warning.@cloudflare/thinkno longer appliespruneMessages({ toolCalls: "before-last-2-messages" })to model context by default. The previous default could strip client-side tool results from longer multi-turn flows.truncateOlderMessagesstill runs as before, so context cost remains bounded. Subclasses that relied on the old aggressive pruning can opt back in frombeforeTurn:JavaScript import { Think } from "@cloudflare/think";import { pruneMessages } from "ai";export class MyAgent extends Think {beforeTurn(ctx) {return {messages: pruneMessages({messages: ctx.messages,toolCalls: "before-last-2-messages",}),};}}TypeScript import { Think } from "@cloudflare/think";import { pruneMessages } from "ai";export class MyAgent extends Think<Env> {beforeTurn(ctx) {return {messages: pruneMessages({messages: ctx.messages,toolCalls: "before-last-2-messages",}),};}}@cloudflare/voiceadds anenabledoption touseVoiceAgent. React apps can now delay creating and connecting aVoiceClientuntil prerequisites such as capability tokens are ready.JavaScript const voice = useVoiceAgent({agent: "MyVoiceAgent",enabled: Boolean(token),});TypeScript const voice = useVoiceAgent({agent: "MyVoiceAgent",enabled: Boolean(token),});This release also fixes Workers AI speech-to-text session edge cases and
withVoicetext streaming from AI SDKtextStreamresponses.- Streamable HTTP routing — Server-to-client requests now route through the originating POST stream when no standalone SSE stream is available.
- Structured tool output — Tool output shapes are preserved when truncating older messages or oversized persisted rows.
- Non-chat Think tool steps — Think agent-tool children can complete without emitting assistant text and can return structured output through
getAgentToolOutput. - Sub-agent schedules — Stale sub-agent schedule rows are pruned when their owning facet registry entry no longer exists.
@cloudflare/codemode— Adds a browser-safe export with an iframe sandbox executor and resolves OpenAPI specs inside the sandbox to avoid Worker Loader RPC size limits.
To update to the latest version:
Terminal window npm i agents@latest @cloudflare/ai-chat@latest @cloudflare/think@latest @cloudflare/voice@latestRefer to the Agents API reference and Chat agents documentation for more information.
The
/cdn-cgi/rumbeacon endpoint now returns405 Method Not Allowedfor non-POST requests instead of404 Not Found. The response includes anAllow: POST, OPTIONSheader per RFC 9110 §15.5.6 ↗.Previously, sending a
GETor other non-POST request to this endpoint returned a404, which was misleading because it suggested the endpoint did not exist. The new405response clearly indicates that the endpoint exists but only acceptsPOSTrequests.The Web Analytics beacon (
beacon.min.js) already usesPOSTfor all metric submissions, so this change does not affect normal beacon operation.OPTIONSrequests for CORS preflight continue to work as before.For more information, refer to the Web Analytics FAQ.
SSH through Wrangler is now enabled by default for Containers. Previously, you had to set
ssh.enabledtotruein your Container configuration before you could connect.This change does not expose any publicly accessible ports on your Container. The SSH service is reachable only through
wrangler containers ssh, which authenticates against your Cloudflare account. You also need to add anssh-ed25519public key toauthorized_keysbefore anyone can connect, so enabling SSH alone does not grant access.To connect, add a public key to your Container configuration and run
wrangler containers ssh <INSTANCE_ID>:JSONC {"containers": [{"authorized_keys": [{"name": "<NAME>","public_key": "<YOUR_PUBLIC_KEY_HERE>",},],},],}TOML [[containers]][[containers.authorized_keys]]name = "<NAME>"public_key = "<YOUR_PUBLIC_KEY_HERE>"To disable SSH, set
ssh.enabledtofalsein your Container configuration:JSONC {"containers": [{"ssh": {"enabled": false,},},],}TOML [[containers]][containers.ssh]enabled = falseFor more information, refer to the SSH documentation.
R2 Data Catalog is a managed Apache Iceberg data catalog built directly into your R2 bucket that allows you to connect query engines like R2 SQL, Spark, Snowflake, and DuckDB to your data in R2.
You can now query analytics for your R2 Data Catalog warehouses via Cloudflare's GraphQL Analytics API. Two new datasets are available:
r2CatalogDataOperationsAdaptiveGroupstracks Iceberg REST API requests made to your catalog, including operation type, request duration, HTTP status, and request body bytes. Use this to monitor request volume and latency across warehouses, namespaces, and tables.r2CatalogTableMaintenanceAdaptiveGroupstracks table maintenance jobs such as compaction and snapshot expiration. Use this to monitor job success rates, files processed, bytes read and written, and job duration.
Both datasets support filtering by warehouse name, namespace, table name, and time range. They also include percentile aggregations for duration metrics.
For detailed schema information and example queries, refer to the R2 Data Catalog metrics and analytics documentation.
We are refreshing the Workers AI model catalog to make room for newer releases. Please update your apps to remove references to the models listed below before the deprecation date.
@cf/zai-org/glm-4.7-flash— fast multilingual model with multi-turn tool calling and coding capabilities.@cf/google/gemma-4-26b-a4b-it— efficient open model with vision and tool calling.@cf/moonshotai/kimi-k2.6— capable tool-calling and vision model for agentic workloads and coding.
For pricing, refer to the Workers AI pricing page.
We originally stated Kimi K2.5 would be deprecated on May 10, 2026, however we have extended the deprecation date to May 30, 2026. Requests will be automatically aliased to Kimi K2.6 on May 30, 2026, which has a higher price. Please review the
@cf/moonshotai/kimi-k2.6pricing and model capabilities prior to May 30, 2026 to ensure that the model suits your needs.@cf/moonshotai/kimi-k2.5-->@cf/moonshotai/kimi-k2.6@hf/meta-llama/meta-llama-3-8b-instruct@cf/meta/llama-3-8b-instruct@cf/meta/llama-3-8b-instruct-awq@cf/meta/llama-3.1-8b-instruct@cf/meta/llama-3.1-8b-instruct-awq@cf/meta/llama-3.1-70b-instruct@cf/meta/llama-2-7b-chat-int8@cf/meta/llama-2-7b-chat-fp16@cf/mistral/mistral-7b-instruct-v0.1@hf/mistral/mistral-7b-instruct-v0.2@hf/google/gemma-7b-it@cf/google/gemma-3-12b-it@hf/nousresearch/hermes-2-pro-mistral-7b@cf/microsoft/phi-2@cf/defog/sqlcoder-7b-2@cf/unum/uform-gen2-qwen-500m@cf/facebook/bart-large-cnn
The
-fastand-loravariants of models will remain active, including:@cf/meta/llama-3.3-70b-instruct-fp8-fast@cf/meta/llama-3.1-8b-instruct-fast@cf/google/gemma-7b-it-lora@cf/google/gemma-2b-it-lora@cf/mistral/mistral-7b-instruct-v0.2-lora@cf/meta-llama/llama-2-7b-chat-hf-lora
LoRA models may be deprecated in the future. We will be adding more LoRA capabilities to the catalog, and will communicate when new LoRA models come online to give users time to train new LoRAs before we deprecate old ones.
For the full list of available models, refer to the Workers AI model catalog.
Multiple security vulnerabilities were disclosed by the React team and Vercel affecting React Server Components and Next.js. These include denial of service, middleware and proxy bypass, server-side request forgery, cross-site scripting, and cache poisoning issues across a range of severity levels.
We strongly recommend updating your application and its dependencies immediately. Patched versions are available for React (
react-server-dom-webpack,react-server-dom-parcel, andreact-server-dom-turbopack19.0.6,19.1.7, and19.2.6) and Next.js (15.5.16and16.2.5).Cloudflare WAF rules deployed in response to prior React Server Component CVEs (
CVE-2025-55184↗ andCVE-2026-23864↗) already provide coverage for the newly disclosed denial-of-service vulnerabilities. These rules are enabled by default with a Block action for all customers using the Cloudflare Managed Ruleset, including Free plan customers using the Free Managed Ruleset.Ruleset Rule description Rule ID Default action Cloudflare Managed Ruleset React - DoS - CVE-2025-55184↗2694f1610c0b471393b21aef102ec699Block Cloudflare Managed Ruleset React - DoS - CVE-2026-23864↗aaede80b4d414dc89c443cea61680354Block The existing rules detect the underlying attack patterns generically. As a result, they apply to the new
CVE-2026-23870↗ denial-of-service vulnerability in Server Components and the corresponding Next.js advisoryGHSA-8h8q-6873-q5fj↗.Cloudflare is investigating whether WAF rules can be safely and effectively deployed for three of the high-severity advisories:
CVE-2026-23870↗ /GHSA-8h8q-6873-q5fj↗,GHSA-267c-6grr-h53f↗, andGHSA-mg66-mrh9-m8jx↗. If it is possible to create a managed WAF rule that mitigates these CVEs and does not potentially break application behavior, Cloudflare will add additional managed WAF rules. These rules will be announced through the WAF changelog. Because these vulnerabilities were shared with Cloudflare with minimal advance notice, we are still investigating what WAF mitigations are possible.Several of the disclosed vulnerabilities are not possible to block in WAF. We strongly recommend updating your applications so they are not purely reliant on WAF mitigations.
Customers on Pro, Business, or Enterprise plans should ensure that Managed Rules are enabled.
Vinext: Vinext ↗ is a Vite plugin that reimplements the Next.js API surface. Vinext's latest release is not vulnerable to any of the disclosed CVEs. Vinext's architecture differs from stock Next.js in ways that sidestep the affected code paths. For example, it does not implement the PPR resume protocol, does not expose Pages Router data-route endpoints, and strips internal headers such as
x-nextjs-dataat request boundaries. As an extra layer of defense, we added a React19.2.6or later requirement when runningvinext init(PR #1118 ↗, PR #1112 ↗) to prevent accidentally running a vulnerable version of React with Vinext.OpenNext on Cloudflare: OpenNext is an adapter that lets you deploy Next.js apps to the Cloudflare Workers platform. OpenNext itself is not directly vulnerable to the React denial-of-service CVE, but users must update the Next.js version in their application. The OpenNext team has updated the adapter to further harden against these vectors and released a new version of the Cloudflare adapter. Test fixtures and examples have been updated to use patched versions (PR #1255 ↗).
Advisory Severity Issue WAF status CVE-2026-23870↗ /GHSA-8h8q-6873-q5fj↗High Denial of service in Server Components WAF rules in place: 2694f1610c0b471393b21aef102ec699,aaede80b4d414dc89c443cea61680354
Cloudflare is investigating additional managed WAF coverageGHSA-267c-6grr-h53f↗High Middleware bypass via segment-prefetch routes Cloudflare is investigating if this can be safely and effectively mitigated by a managed WAF rule GHSA-mg66-mrh9-m8jx↗High Denial of service via connection exhaustion in Cache Components Cloudflare is investigating if this can be safely and effectively mitigated by a managed WAF rule GHSA-492v-c6pp-mqqv↗High Middleware bypass via dynamic route parameter injection Not possible to safely enable a managed WAF rule without potentially breaking application behavior GHSA-c4j6-fc7j-m34r↗High SSRF via WebSocket upgrades Not possible to safely enable a managed WAF rule without potentially breaking application behavior GHSA-36qx-fr4f-26g5↗High Middleware bypass in Pages Router i18n Custom WAF rule possible; global managed rule could potentially break application behavior GHSA-ffhc-5mcf-pf4q↗Moderate XSS via CSP nonces Custom WAF rule possible; global managed rule could potentially break application behavior GHSA-gx5p-jg67-6x7h↗Moderate XSS in beforeInteractivescriptsNot possible to safely enable a managed WAF rule without potentially breaking application behavior GHSA-h64f-5h5j-jqjh↗Moderate Denial of service in Image Optimization API Custom WAF rule possible; global managed rule could potentially break application behavior GHSA-wfc6-r584-vfw7↗Moderate Cache poisoning in RSC responses Custom WAF rule possible; global managed rule could potentially break application behavior GHSA-vfv6-92ff-j949↗Low Cache poisoning via RSC cache-busting collisions Not possible to safely enable a managed WAF rule without potentially breaking application behavior GHSA-3g8h-86w9-wvmq↗Low Middleware redirect cache poisoning Custom WAF rule possible; global managed rule could potentially break application behavior
You can now interact with your Stream video library using new bindings for Workers! This allows customers to upload content to Stream, provision direct uploads, manage videos, and generate signed URLs from a Worker without making authenticated API calls. We're excited to bring Stream and Workers closer together to empower more programmatic pipelines, tighter integrations, and support generative AI and inference workloads.
Use the Stream binding when you want to:
- Upload videos from URLs or create basic direct upload links for end users
- Generate signed playback tokens without managing signing keys
- Manage video metadata, captions, downloads, and watermarks
- Build video pipelines entirely within Workers
To get started, add the Stream binding to your Wrangler configuration:
JSONC {"$schema": "./node_modules/wrangler/config-schema.json","stream": {"binding": "STREAM"}}TOML [stream]binding = "STREAM"Generate a video with AI and upload directly to Stream or send a URL of a file you already have:
JavaScript const aiResponse = await env.AI.run("google/veo-3.1",{prompt: "A dog walking next to a river",duration: "10s",aspect_ratio: "16:9",resolution: "1080p",generate_audio: true,},{gateway: { id: "experiments" },},);// Veo will return a URL of the generated asset.const videoUrl = aiResponse.result.video;// Alternative option: a video of the Austin Office mobile// const videoUrl = 'https://pub-d9fcbc1abcd244c1821f38b99017347f.r2.dev/aus-mobile.mp4';// Upload to Stream by providing a URLconst streamVideo = await env.STREAM.upload(videoUrl);// The streamVideo response will include the video ID, playback and manifest// URLs, and other information, just like the REST API.TypeScript const aiResponse = await env.AI.run('google/veo-3.1',{prompt: 'A dog walking next to a river',duration: '10s',aspect_ratio: '16:9',resolution: '1080p',generate_audio: true,},{gateway: { id: 'experiments' },},);// Veo will return a URL of the generated asset.const videoUrl = aiResponse.result.video;// Alternative option: a video of the Austin Office mobile// const videoUrl = 'https://pub-d9fcbc1abcd244c1821f38b99017347f.r2.dev/aus-mobile.mp4';// Upload to Stream by providing a URLconst streamVideo = await env.STREAM.upload(videoUrl);// The streamVideo response will include the video ID, playback and manifest// URLs, and other information, just like the REST API.Generate a signed URL without using a signing key or an API call:
JavaScript const video_id = "ce800be43a9772f4bb02f35b860fb516";const token = await env.STREAM.video(video_id).generateToken();// Use the "token" in an iframe embed code, manifest URL, or thumbnail:const embedUrl = `https://customer-igynxd2rwhmuoxw8.cloudflarestream.com/${token}/iframe`;TypeScript const video_id = 'ce800be43a9772f4bb02f35b860fb516';const token = await env.STREAM.video(video_id).generateToken();// Use the "token" in an iframe embed code, manifest URL, or thumbnail:const embedUrl = `https://customer-igynxd2rwhmuoxw8.cloudflarestream.com/${token}/iframe`;Get and set video properties easily:
JavaScript const video_id = "46c8b7f480d410840758c1cb14a72e47";const result = await env.STREAM.video(video_id).details();await env.STREAM.video(video_id).update({meta: { name: "sample video" },});TypeScript const video_id = '46c8b7f480d410840758c1cb14a72e47';const result = await env.STREAM.video(video_id).details();await env.STREAM.video(video_id).update({meta: { name: 'sample video' }});For setup instructions and the full API reference, refer to Bind to Workers API.
Add a binding for Cloudflare Stream (env.STREAM). On the watch page, use the Stream binding to get info based on the ID, and leverage video.meta.name as the page title.
You can now get a single unified trace across Worker-to-Worker subrequests, with trace context propagating automatically. Previously, automatic tracing produced disconnected traces when a Worker called another Worker through a service binding or Durable Object.
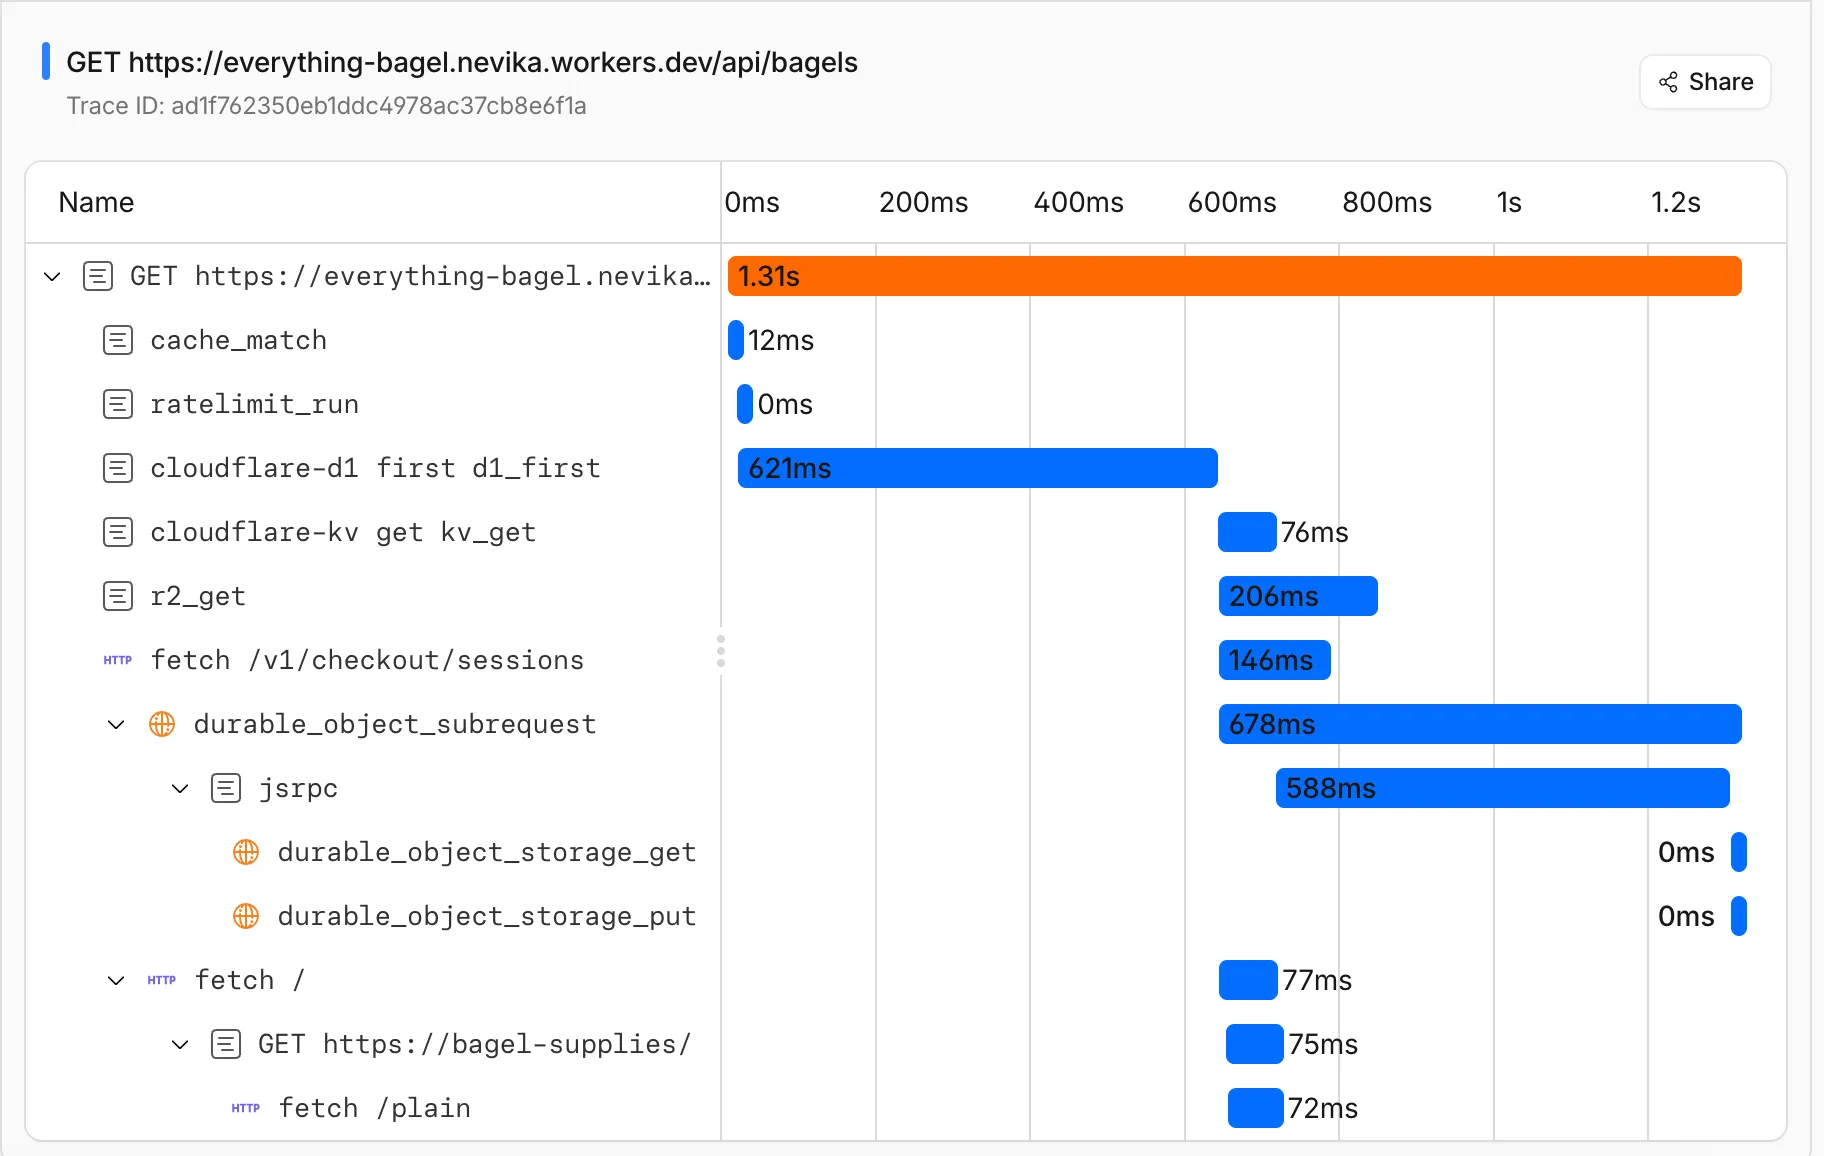
This means you can:
- Follow a request through your entire Worker architecture in one trace view
- See service binding and Durable Object calls as nested child spans instead of separate traces
- Debug cross-Worker request flows in the Cloudflare dashboard or in an external observability platform via OpenTelemetry
Tracing must be enabled in your Wrangler configuration for traces to be recorded. Checkout Workers tracing to get started.
Up next, we are working on external trace context propagation using W3C Trace Context standards ↗, which will allow traces from your Workers to link with traces from services outside of Cloudflare.
Cloudflare Pipelines ingests streaming data via Workers or HTTP endpoints, transforms it with SQL, and writes it to R2 as Apache Iceberg tables. R2 Data Catalog manages those Iceberg tables, compaction, and compatibility with query engines like R2 SQL, Spark, and DuckDB.
You can now create and manage both products using Terraform, supported in the Cloudflare Terraform provider v5.19.0 ↗.
This adds four new resources that let you define your entire data pipeline as infrastructure-as-code: a data catalog, a stream for ingestion, a sink that writes to R2 Data Catalog or R2, and a pipeline that connects them with SQL.
The new Terraform resources are:
cloudflare_r2_data_catalog↗ — enable the data catalog on an R2 bucketcloudflare_pipeline_stream↗ — create a stream that receives events via HTTP or Worker bindingscloudflare_pipeline_sink↗ — create a sink that writes to R2 Data Catalog or R2cloudflare_pipeline↗ — create a pipeline with SQL connecting a stream to a sink
Here is a minimal example that creates a stream, an R2 Data Catalog sink, and a pipeline:
resource "cloudflare_pipeline_stream" "my_stream" {account_id = var.cloudflare_account_idname = "my_stream"format = { type = "json" }schema = {fields = [{name = "value"type = "json"required = true}]}http = { enabled = true, authentication = false, cors = {} }worker_binding = { enabled = false }}resource "cloudflare_pipeline_sink" "my_sink" {account_id = var.cloudflare_account_idname = "my_sink"type = "r2_data_catalog"format = { type = "parquet" }schema = { fields = [] }config = {account_id = var.cloudflare_account_idbucket = "my-pipeline-bucket"table_name = "my_table"token = var.catalog_token}}resource "cloudflare_pipeline" "my_pipeline" {account_id = var.cloudflare_account_idname = "my_pipeline"sql = "INSERT INTO ${cloudflare_pipeline_sink.my_sink.name} SELECT * FROM ${cloudflare_pipeline_stream.my_stream.name}"}For a full end-to-end example that includes R2 bucket creation, data catalog setup, and scoped API token provisioning, refer to the Pipelines Terraform documentation.