Changelog
New updates and improvements at Cloudflare.

Users can now use an OpenAI Compatible endpoint in AI Gateway to easily switch between providers, while keeping the exact same request and response formats. We're launching now with the chat completions endpoint, with the embeddings endpoint coming up next.
To get started, use the OpenAI compatible chat completions endpoint URL with your own account id and gateway id and switch between providers by changing the
modelandapiKeyparameters.OpenAI SDK Example import OpenAI from "openai";const client = new OpenAI({apiKey: "YOUR_PROVIDER_API_KEY", // Provider API keybaseURL:"https://gateway.ai.cloudflare.com/v1/{account_id}/{gateway_id}/compat",});const response = await client.chat.completions.create({model: "google-ai-studio/gemini-2.0-flash",messages: [{ role: "user", content: "What is Cloudflare?" }],});console.log(response.choices[0].message.content);Additionally, the OpenAI Compatible endpoint can be combined with our Universal Endpoint to add fallbacks across multiple providers. That means AI Gateway will return every response in the same standardized format, no extra parsing logic required!
Learn more in the OpenAI Compatibility documentation.
You can now visualize, explore and modify your Worker’s architecture directly in the Cloudflare dashboard, making it easier to understand how your application connects to Cloudflare resources like D1 databases, Durable Objects, KV namespaces, and more.
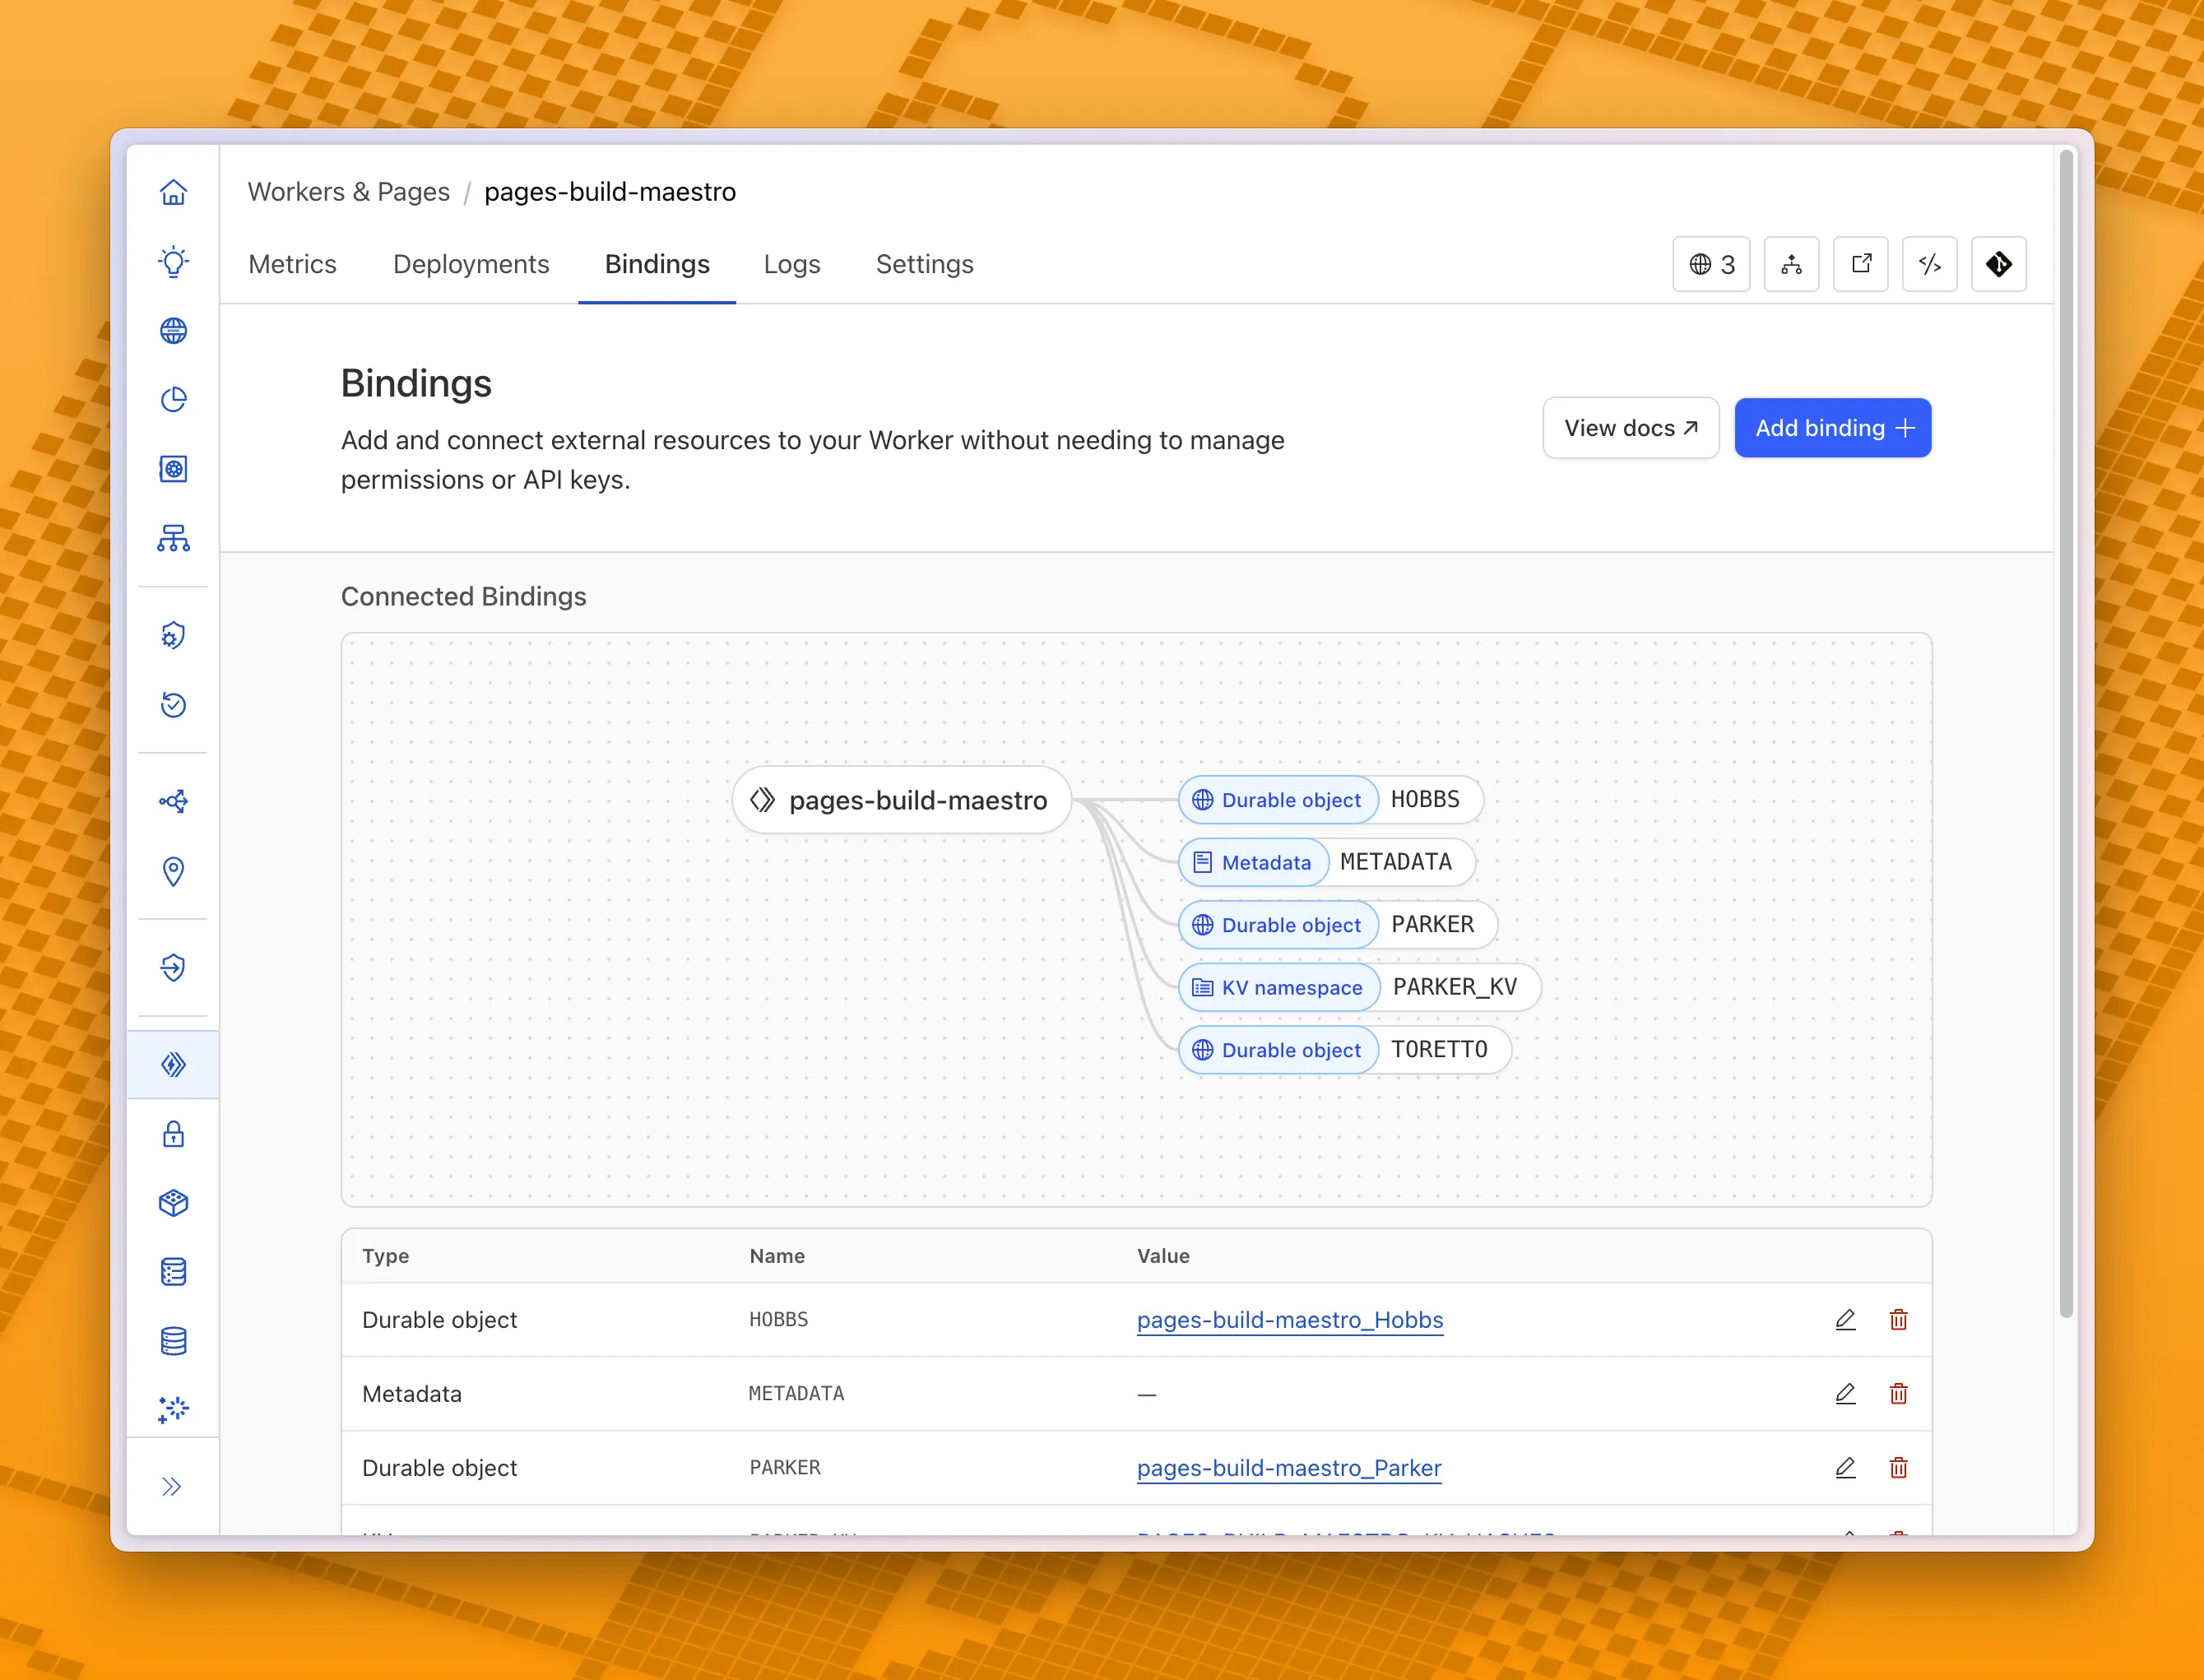
With this new view, you can easily:
- Explore existing bindings in a visual, architecture-style diagram
- Add and manage bindings directly from the same interface
- Discover the full range of compute, storage, AI, and media resources you can attach to your Workers application.
To get started, head to the Cloudflare dashboard ↗ and open the Bindings tab of any Workers application.
When you use the built-in build system that is part of Cloudflare Pages, the Build Image now includes Node.js v22. Previously, Node.js v18 was provided by default, and Node.js v18 is now end-of-life (EOL).
If you are creating a new Pages project, the new V3 build image that includes Node.js v22 will be used by default. If you have an existing Pages project, you can update to the latest build image by navigating to Settings > Build & deployments > Build system version in the Cloudflare dashboard for a specific Pages project.
Note that you can always specify a particular version of Node.js or other built-in dependencies by setting an environment variable.
For more, refer to the developer docs for Cloudflare Pages builds
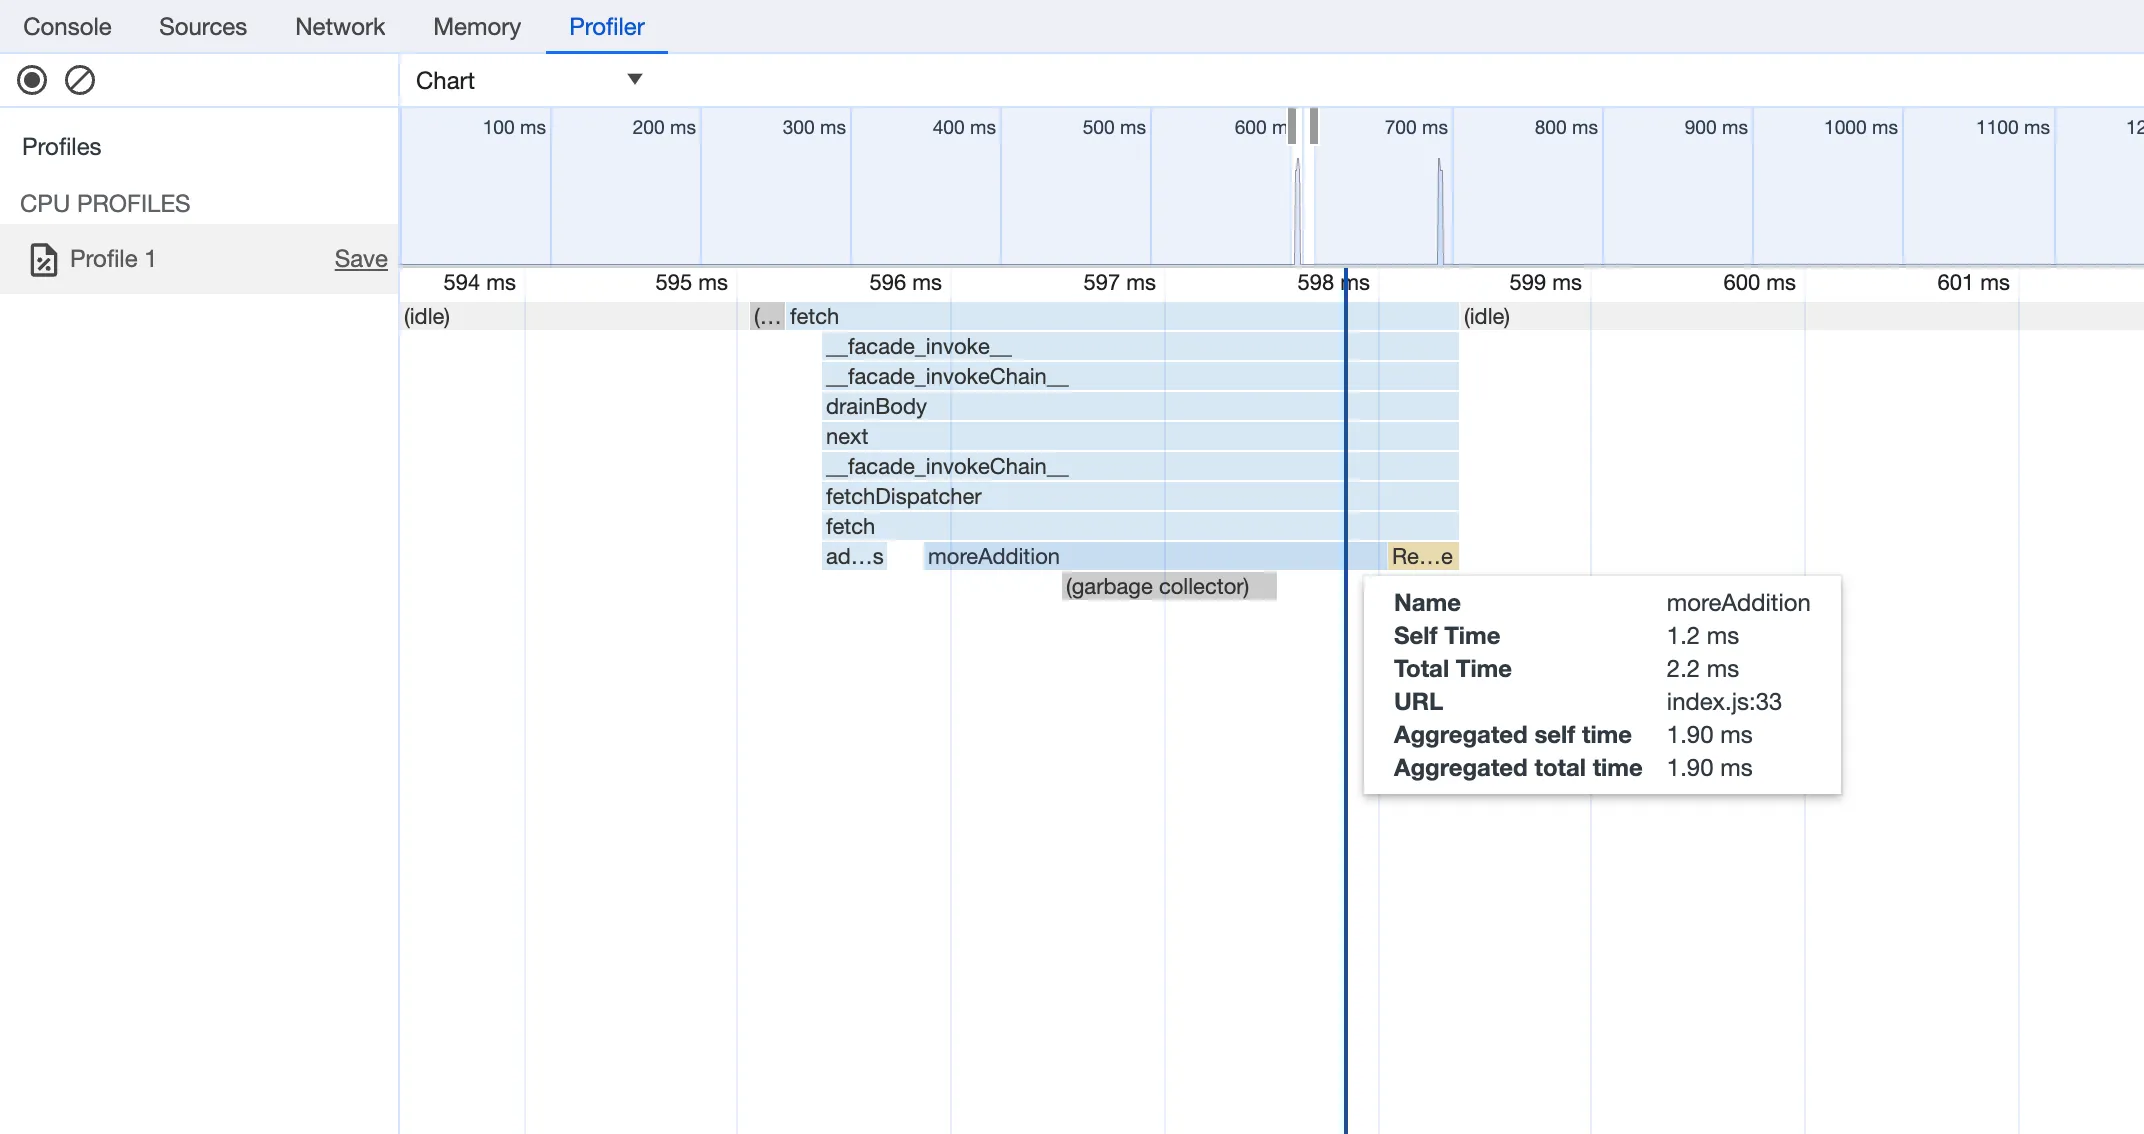
You can now debug, profile, view logs, and analyze memory usage for your Worker ↗ using Chrome Devtools ↗ when your Worker runs locally using the Cloudflare Vite plugin ↗.
Previously, this was only possible if your Worker ran locally using the Wrangler CLI ↗, and now you can do all the same things if your Worker uses Vite ↗.
When you run
vite, you'll now see a debug URL in your console:VITE v6.3.5 ready in 461 ms➜ Local: http://localhost:5173/➜ Network: use --host to expose➜ Debug: http://localhost:5173/__debug➜ press h + enter to show helpOpen the URL in Chrome, and an instance of Chrome Devtools will open and connect to your Worker running locally. You can then use Chrome Devtools to debug and introspect performance issues. For example, you can navigate to the Performance tab to understand where CPU time is spent in your Worker:
For more information on how to get the most out of Chrome Devtools, refer to the following docs:
Users using Cloudflare's REST API to query their D1 database can see lower end-to-end request latency now that D1 authentication is performed at the closest Cloudflare network data center that received the request. Previously, authentication required D1 REST API requests to proxy to Cloudflare's core, centralized data centers, which added network round trips and latency.
Latency improvements range from 50-500 ms depending on request location and database location and only apply to the REST API. REST API requests and databases outside the United States see a bigger benefit since Cloudflare's primary core data centers reside in the United States.
D1 query endpoints like
/queryand/rawhave the most noticeable improvements since they no longer access Cloudflare's core data centers. D1 control plane endpoints such as those to create and delete databases see smaller improvements, since they still require access to Cloudflare's core data centers for other control plane metadata.
We're excited to share that you can now use the Playwright MCP ↗ server with Browser Rendering.
Once you deploy the server, you can use any MCP client with it to interact with Browser Rendering. This allows you to run AI models that can automate browser tasks, such as taking screenshots, filling out forms, or scraping data.

Playwright MCP is available as an npm package at
@cloudflare/playwright-mcp↗. To install it, type:npm i -D @cloudflare/playwright-mcpyarn add -D @cloudflare/playwright-mcppnpm add -D @cloudflare/playwright-mcpbun add -d @cloudflare/playwright-mcpDeploying the server is then as easy as:
TypeScript import { env } from "cloudflare:workers";import { createMcpAgent } from "@cloudflare/playwright-mcp";export const PlaywrightMCP = createMcpAgent(env.BROWSER);export default PlaywrightMCP.mount("/sse");Check out the full code at GitHub ↗.
Learn more about Playwright MCP in our documentation.
With upgraded limits to all free and paid plans ↗, you can now scale more easily with Cloudflare for SaaS ↗ and Secrets Store ↗.
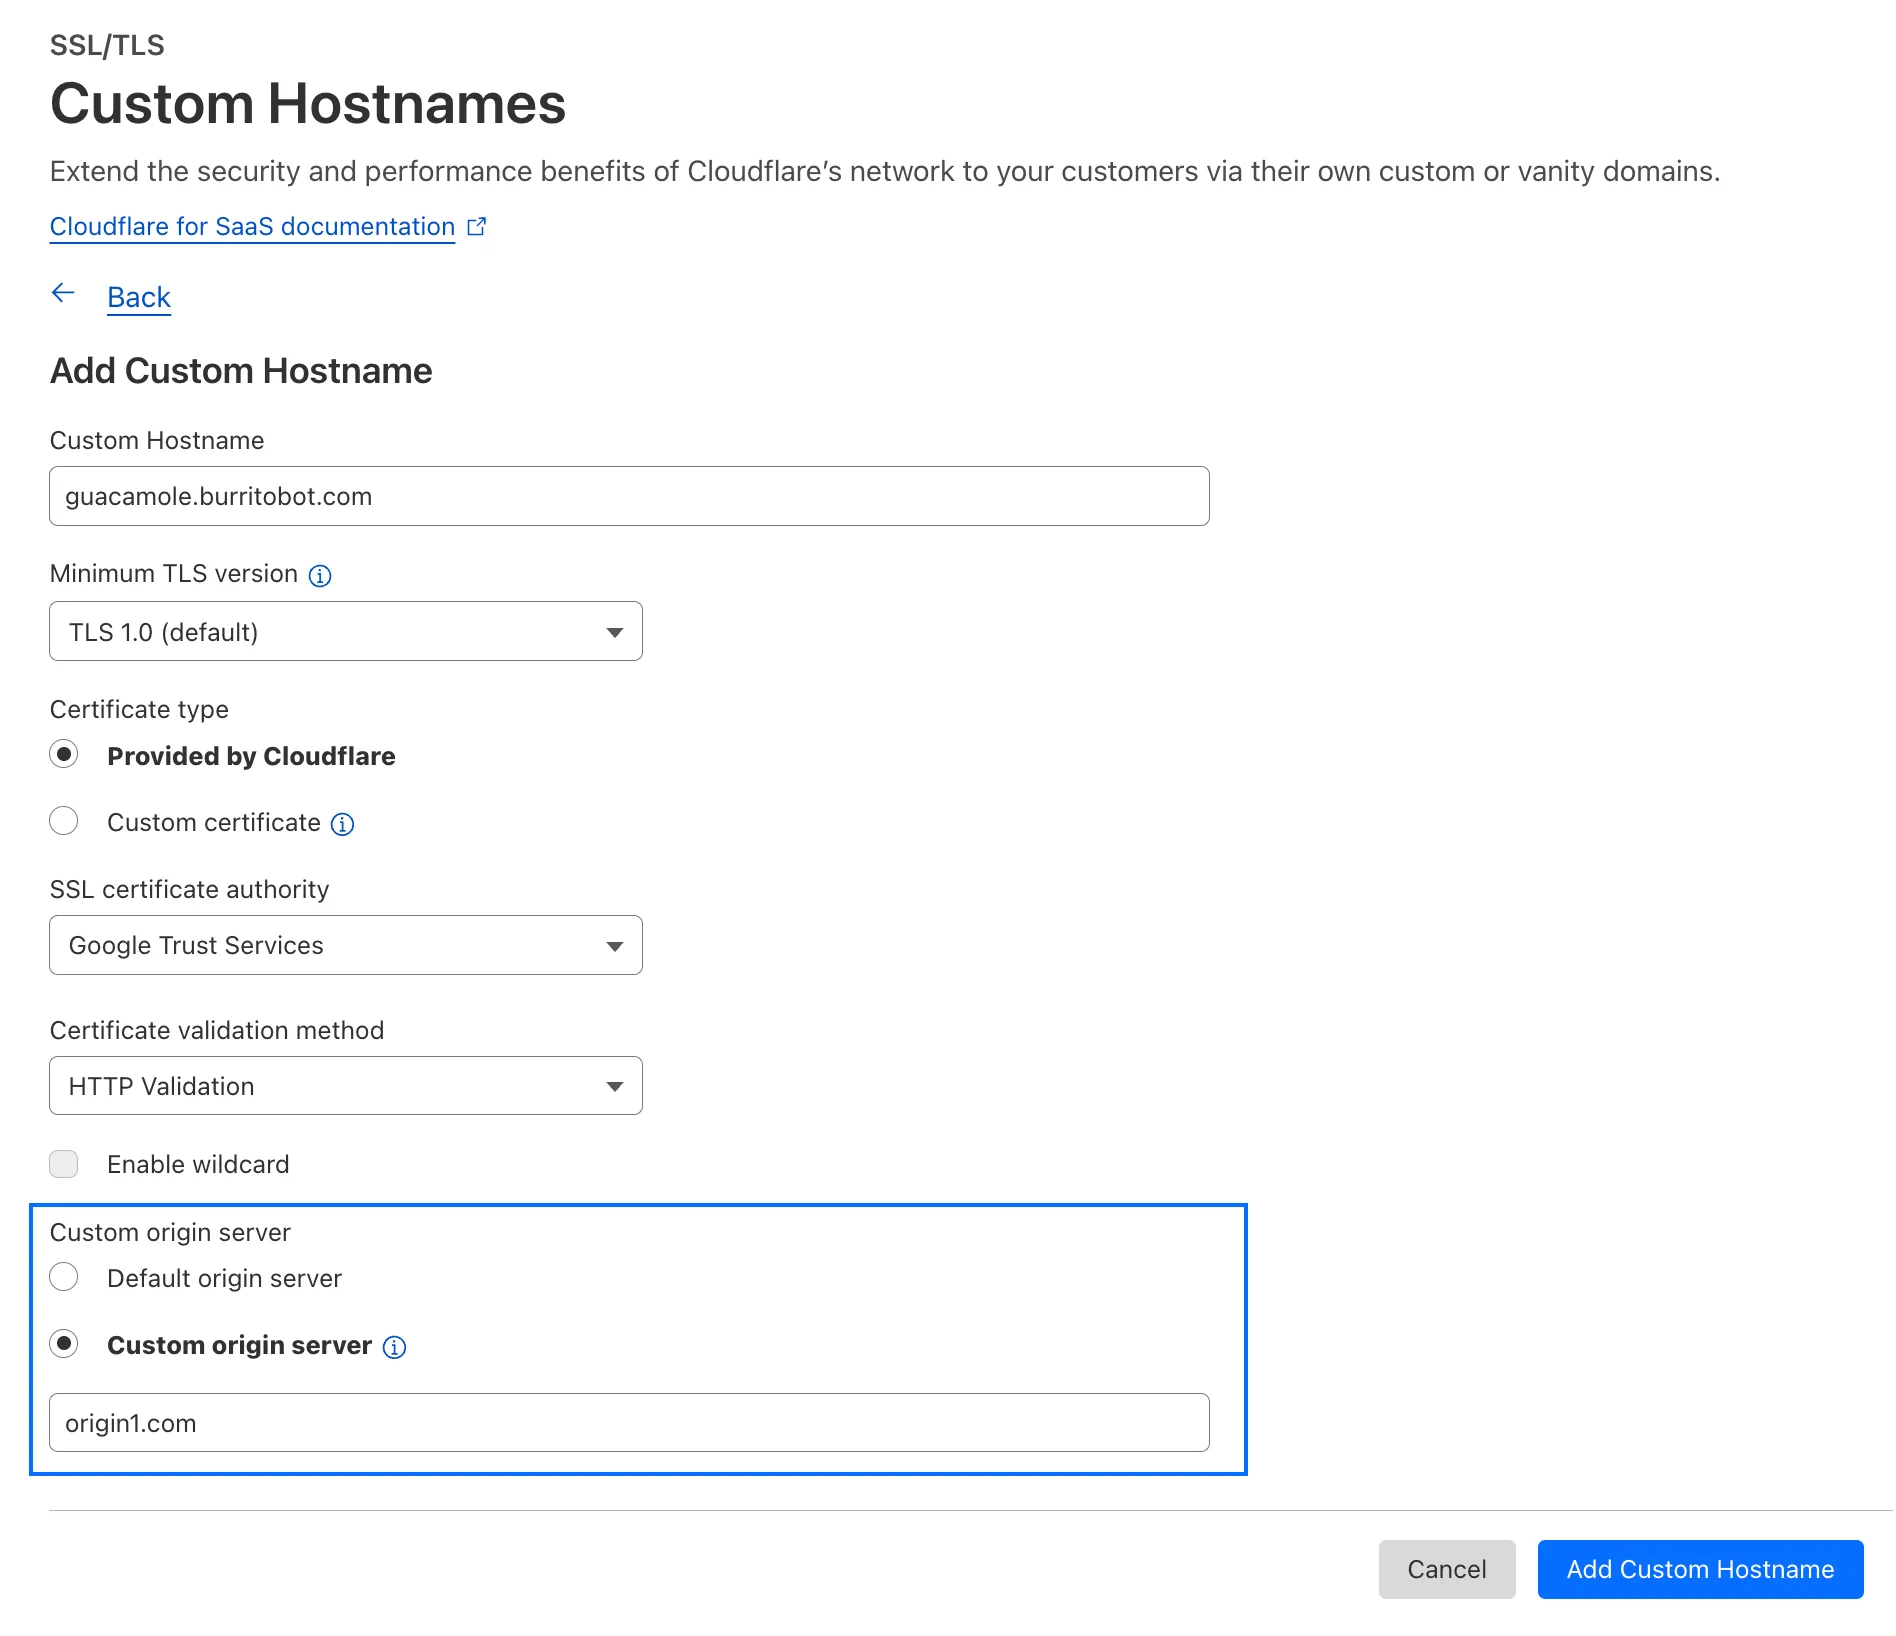
Cloudflare for SaaS ↗ allows you to extend the benefits of Cloudflare to your customers via their own custom or vanity domains. Now, the limit for custom hostnames ↗ on a Cloudflare for SaaS pay-as-you-go plan has been raised from 5,000 custom hostnames to 50,000 custom hostnames.
With custom origin server -- previously an enterprise-only feature -- you can route traffic from one or more custom hostnames somewhere other than your default proxy fallback. Custom origin server ↗ is now available to Cloudflare for SaaS customers on Free, Pro, and Business plans.
You can enable custom origin server on a per-custom hostname basis via the API ↗ or the UI:
Currently in beta with a Workers integration ↗, Cloudflare Secrets Store ↗ allows you to store, manage, and deploy account level secrets from a secure, centralized platform your Cloudflare Workers ↗. Now, you can create and deploy 100 secrets per account. Try it out in the dashboard ↗, with Wrangler ↗, or via the API ↗ today.
In Cloudflare Workers, you can now attach an event listener to
Requestobjects, using thesignalproperty ↗. This allows you to perform tasks when the request to your Worker is canceled by the client. To use this feature, you must set theenable_request_signalcompatibility flag.You can use a listener to perform cleanup tasks or write to logs before your Worker's invocation ends. For example, if you run the Worker below, and then abort the request from the client, a log will be written:
index.js export default {async fetch(request, env, ctx) {// This sets up an event listener that will be called if the client disconnects from your// worker.request.signal.addEventListener("abort", () => {console.log("The request was aborted!");});const { readable, writable } = new IdentityTransformStream();sendPing(writable);return new Response(readable, {headers: { "Content-Type": "text/plain" },});},};async function sendPing(writable) {const writer = writable.getWriter();const enc = new TextEncoder();for (;;) {// Send 'ping' every second to keep the connection aliveawait writer.write(enc.encode("ping\r\n"));await scheduler.wait(1000);}}index.ts export default {async fetch(request, env, ctx): Promise<Response> {// This sets up an event listener that will be called if the client disconnects from your// worker.request.signal.addEventListener('abort', () => {console.log('The request was aborted!');});const { readable, writable } = new IdentityTransformStream();sendPing(writable);return new Response(readable, { headers: { 'Content-Type': 'text/plain' } });},} satisfies ExportedHandler<Env>;async function sendPing(writable: WritableStream): Promise<void> {const writer = writable.getWriter();const enc = new TextEncoder();for (;;) {// Send 'ping' every second to keep the connection aliveawait writer.write(enc.encode('ping\r\n'));await scheduler.wait(1000);}}For more information see the
Requestdocumentation.
Earlier this year, we announced the launch of the new Terraform v5 Provider. Unlike the earlier Terraform providers, v5 is automatically generated based on the OpenAPI Schemas for our REST APIs. Since launch, we have seen an unexpectedly high number of issues ↗ reported by customers. These issues currently impact about 15% of resources. We have been working diligently to address these issues across the company, and have released the v5.5.0 release which includes a number of bug fixes. Please keep an eye on this changelog for more information about upcoming releases.
- Broad fixes across resources with recurring diffs, including, but not limited to:
cloudflare_zero_trust_gateway_policycloudflare_zero_trust_access_applicationcloudflare_zero_trust_tunnel_cloudflared_routecloudflare_zone_settingcloudflare_rulesetcloudflare_page_rule
- Zone settings can be re-applied without client errors
- Page rules conversion errors are fixed
- Failure to apply changes to
cloudflare_zero_trust_tunnel_cloudflared_route - Other bug fixes
For a more detailed look at all of the changes, see the changelog ↗ in GitHub.
- #5304: Importing cloudflare_zero_trust_gateway_policy invalid attribute filter value ↗
- #5303: cloudflare_page_rule import does not set values for all of the fields in terraform state ↗
- #5178: cloudflare_page_rule Page rule creation with redirect fails ↗
- #5336: cloudflare_turnstile_wwidget not able to udpate ↗
- #5418: cloudflare_cloud_connector_rules: Provider returned invalid result object after apply ↗
- #5423: cloudflare_zone_setting: "Invalid value for zone setting always_use_https" ↗
If you have an unaddressed issue with the provider, we encourage you to check the open issues ↗ and open a new one if one does not already exist for what you are experiencing.
If you are evaluating a move from v4 to v5, please make use of the migration guide ↗. We have provided automated migration scripts using Grit which simplify the transition, although these do not support implementations which use Terraform modules, so customers making use of modules need to migrate manually. Please make use of
terraform planto test your changes before applying, and let us know if you encounter any additional issues by reporting to our GitHub repository ↗.- Broad fixes across resources with recurring diffs, including, but not limited to:
You can now create Durable Objects using Python Workers. A Durable Object is a special kind of Cloudflare Worker which uniquely combines compute with storage, enabling stateful long-running applications which run close to your users. For more info see here.
You can define a Durable Object in Python in a similar way to JavaScript:
Python from workers import DurableObject, Response, WorkerEntrypointfrom urllib.parse import urlparseclass MyDurableObject(DurableObject):def __init__(self, ctx, env):self.ctx = ctxself.env = envdef fetch(self, request):result = self.ctx.storage.sql.exec("SELECT 'Hello, World!' as greeting").one()return Response(result.greeting)class Default(WorkerEntrypoint):async def fetch(self, request):url = urlparse(request.url)id = env.MY_DURABLE_OBJECT.idFromName(url.path)stub = env.MY_DURABLE_OBJECT.get(id)greeting = await stub.fetch(request.url)return greetingDefine the Durable Object in your Wrangler configuration file:
JSONC {"durable_objects": {"bindings": [{"name": "MY_DURABLE_OBJECT","class_name": "MyDurableObject"}]}}TOML [[durable_objects.bindings]]name = "MY_DURABLE_OBJECT"class_name = "MyDurableObject"Then define the storage backend for your Durable Object:
JSONC {"migrations": [{"tag": "v1", // Should be unique for each entry"new_sqlite_classes": [ // Array of new classes"MyDurableObject"]}]}TOML [[migrations]]tag = "v1"new_sqlite_classes = [ "MyDurableObject" ]Then test your new Durable Object locally by running
wrangler dev:npx wrangler devConsult the Durable Objects documentation for more details.
Hyperdrive has been approved for FedRAMP Authorization and is now available in the FedRAMP Marketplace ↗.
FedRAMP is a U.S. government program that provides standardized assessment and authorization for cloud products and services. As a result of this product update, Hyperdrive has been approved as an authorized service to be used by U.S. federal agencies at the Moderate Impact level.
For detailed information regarding FedRAMP and its implications, please refer to the official FedRAMP documentation for Cloudflare ↗.
We are adding source origin restrictions to the Media Transformations beta. This allows customers to restrict what sources can be used to fetch images and video for transformations. This feature is the same as --- and uses the same settings as --- Image Transformations sources.
When transformations is first enabled, the default setting only allows transformations on images and media from the same website or domain being used to make the transformation request. In other words, by default, requests to
example.com/cdn-cgi/mediacan only reference originals onexample.com.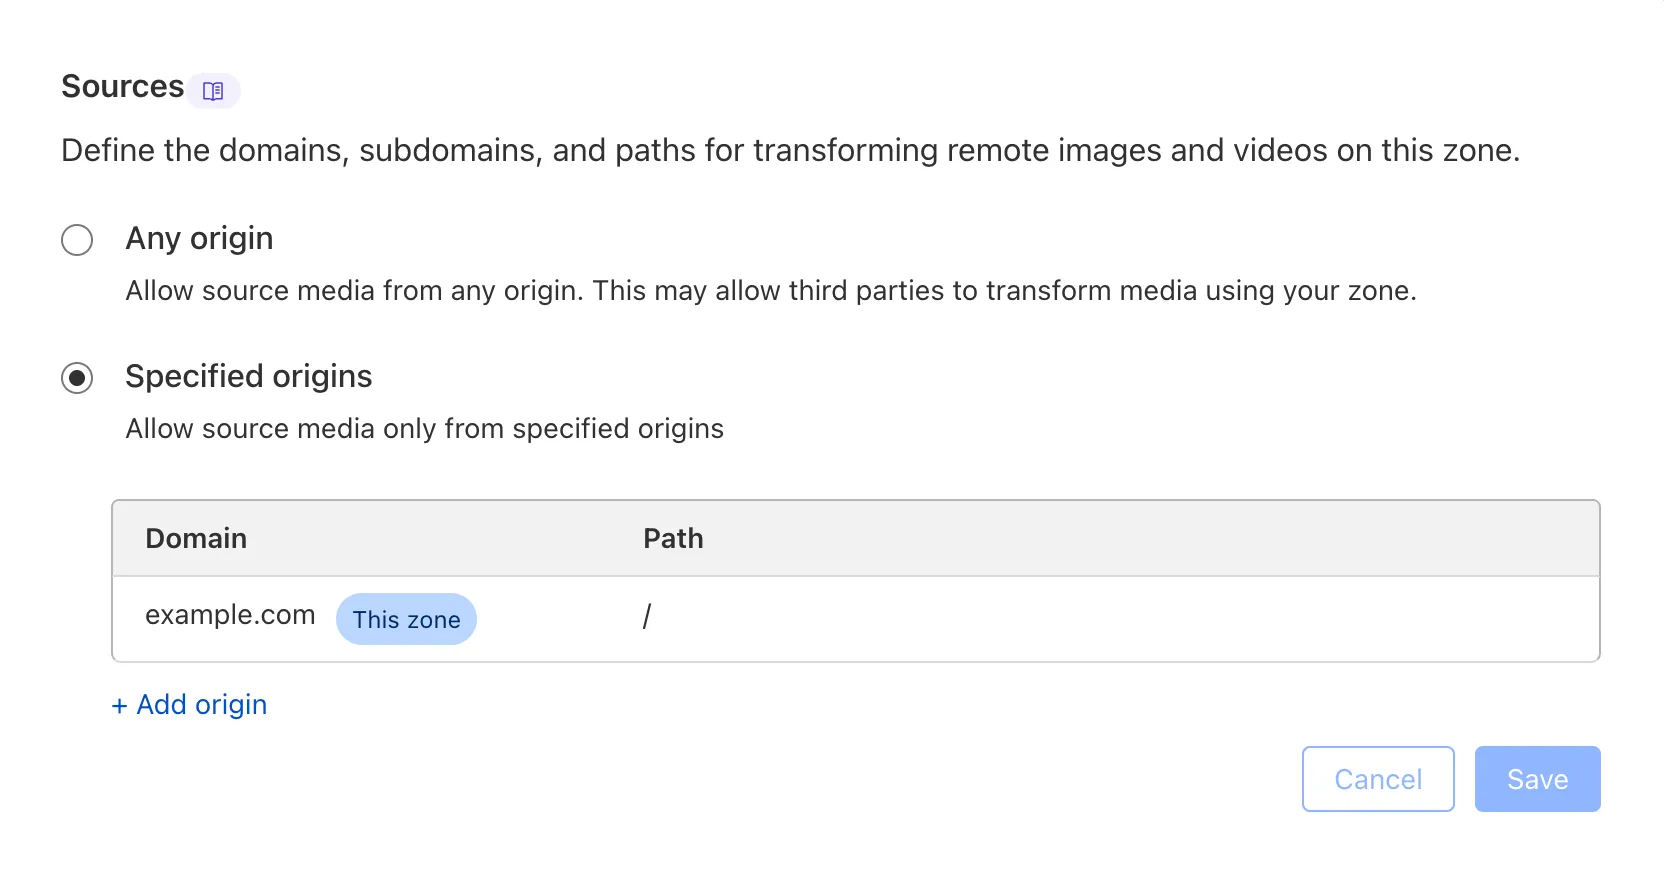
Adding access to other sources, or allowing any source, is easy to do in the Transformations tab under Stream. Click each domain enabled for Transformations and set its sources list to match the needs of your content. The user making this change will need permission to edit zone settings.
For more information, learn about Transforming Videos.
You can now publish messages to Cloudflare Queues directly via HTTP from any service or programming language that supports sending HTTP requests. Previously, publishing to queues was only possible from within Cloudflare Workers. You can already consume from queues via Workers or HTTP pull consumers, and now publishing is just as flexible.
Publishing via HTTP requires a Cloudflare API token with
Queues Editpermissions for authentication. Here's a simple example:Terminal window curl "https://api.cloudflare.com/client/v4/accounts/<account_id>/queues/<queue_id>/messages" \-X POST \-H 'Authorization: Bearer <api_token>' \--data '{ "body": { "greeting": "hello", "timestamp": "2025-07-24T12:00:00Z"} }'You can also use our SDKs for TypeScript, Python, and Go.
To get started with HTTP publishing, check out our step-by-step example and the full API documentation in our API reference.
FinalizationRegistry ↗ is now available in Workers. You can opt-in using the
enable_weak_refcompatibility flag.This can reduce memory leaks when using WebAssembly-based Workers, which includes Python Workers and Rust Workers. The FinalizationRegistry works by enabling toolchains such as Emscripten ↗ and wasm-bindgen ↗ to automatically free WebAssembly heap allocations. If you are using WASM and seeing Exceeded Memory errors and cannot determine a cause using memory profiling, you may want to enable the FinalizationRegistry.
For more information refer to the
enable_weak_refcompatibility flag documentation.
Earlier this year, we announced the launch of the new Terraform v5 Provider. Unlike the earlier Terraform providers, v5 is automatically generated based on the OpenAPI Schemas for our REST APIs. Since launch, we have seen an unexpectedly high number of issues ↗ reported by customers. These issues currently impact about 15% of resources. We have been working diligently to address these issues across the company, and have released the v5.4.0 release which includes a number of bug fixes. Please keep an eye on this changelog for more information about upcoming releases.
- Removes the
worker_platforms_script_secretresource from the provider (see migration guide ↗ for alternatives—applicable to both Workers and Workers for Platforms) - Removes duplicated fields in
cloudflare_cloud_connector_rulesresource - Fixes
cloudflare_workers_routeid issues #5134 ↗ #5501 ↗ - Fixes issue around refreshing resources that have unsupported response types
Affected resources
cloudflare_certificate_packcloudflare_registrar_domaincloudflare_stream_downloadcloudflare_stream_webhookcloudflare_usercloudflare_workers_kvcloudflare_workers_script
- Fixes
cloudflare_workers_kvstate refresh issues - Fixes issues around configurability of nested properties without computed values for the following resources
Affected resources
cloudflare_accountcloudflare_account_dns_settingscloudflare_account_tokencloudflare_api_tokencloudflare_cloud_connector_rulescloudflare_custom_sslcloudflare_d1_databasecloudflare_dns_recordemail_security_trusted_domainscloudflare_hyperdrive_configcloudflare_keyless_certificatecloudflare_list_itemcloudflare_load_balancercloudflare_logpush_dataset_jobcloudflare_magic_network_monitoring_configurationcloudflare_magic_transit_sitecloudflare_magic_transit_site_lancloudflare_magic_transit_site_wancloudflare_magic_wan_static_routecloudflare_notification_policycloudflare_pages_projectcloudflare_queuecloudflare_queue_consumercloudflare_r2_bucket_corscloudflare_r2_bucket_event_notificationcloudflare_r2_bucket_lifecyclecloudflare_r2_bucket_lockcloudflare_r2_bucket_sippycloudflare_rulesetcloudflare_snippet_rulescloudflare_snippetscloudflare_spectrum_applicationcloudflare_workers_deploymentcloudflare_zero_trust_access_applicationcloudflare_zero_trust_access_group
- Fixed defaults that made
cloudflare_workers_scriptfail when using Assets - Fixed Workers Logpush setting in
cloudflare_workers_scriptmistakenly being readonly - Fixed
cloudflare_pages_projectbroken when using "source"
The detailed changelog ↗ is available on GitHub.
If you are evaluating a move from v4 to v5, please make use of the migration guide ↗. We have provided automated migration scripts using Grit which simplify the transition, although these do not support implementations which use Terraform modules, so customers making use of modules need to migrate manually. Please make use of
terraform planto test your changes before applying, and let us know if you encounter any additional issues either by reporting to our GitHub repository ↗, or by opening a support ticket ↗.- Removes the
We're excited to announce several improvements to the Cloudflare R2 dashboard experience that make managing your object storage easier and more intuitive:

We've redesigned the bucket settings page, giving you a centralized location to manage all your bucket configurations in one place.
- Deeplink support for prefix directories: Navigate through your bucket hierarchy without losing your state. Your browser's back button now works as expected, and you can share direct links to specific prefix directories with teammates.
- Objects as clickable links: Objects are now proper links that you can copy or
CMD + Clickto open in a new tab.
- Renamed "r2.dev domain" to "Public Development URL" for better clarity when exposing bucket contents for non-production workloads.
- Public Access status now clearly displays "Enabled" when your bucket is exposed to the internet (via Public Development URL or Custom Domains).
We've also made numerous other usability improvements across the board to make your R2 experience smoother and more productive.
You can now create Python Workers which are executed via a cron trigger.
This is similar to how it's done in JavaScript Workers, simply define a scheduled event listener in your Worker:
Python from workers import handler@handlerasync def on_scheduled(event, env, ctx):print("cron processed")Define a cron trigger configuration in your Wrangler configuration file:
JSONC {"triggers": {// Schedule cron triggers:// - At every 3rd minute// - At 15:00 (UTC) on first day of the month// - At 23:59 (UTC) on the last weekday of the month"crons": ["*/3 * * * *","0 15 1 * *","59 23 LW * *"]}}TOML [triggers]crons = [ "*/3 * * * *", "0 15 1 * *", "59 23 LW * *" ]Then test your new handler by using Wrangler with the
--test-scheduledflag and making a request to/cdn-cgi/handler/scheduled?cron=*+*+*+*+*:Terminal window npx wrangler dev --test-scheduledcurl "http://localhost:8787/cdn-cgi/handler/scheduled?cron=*+*+*+*+*"Consult the Workers Cron Triggers page for full details on cron triggers in Workers.
You can now filter AutoRAG search results by
folderandtimestampusing metadata filtering to narrow down the scope of your query.This makes it easy to build multitenant experiences where each user can only access their own data. By organizing your content into per-tenant folders and applying a
folderfilter at query time, you ensure that each tenant retrieves only their own documents.Example folder structure:
Terminal window customer-a/logs/customer-a/contracts/customer-b/contracts/Example query:
JavaScript const response = await env.AI.autorag("my-autorag").search({query: "When did I sign my agreement contract?",filters: {type: "eq",key: "folder",value: "customer-a/contracts/",},});You can use metadata filtering by creating a new AutoRAG or reindexing existing data. To reindex all content in an existing AutoRAG, update any chunking setting and select Sync index. Metadata filtering is available for all data indexed on or after April 21, 2025.
If you are new to AutoRAG, get started with the Get started AutoRAG guide.
Queues pull consumers can now pull and acknowledge up to 5,000 messages / second per queue. Previously, pull consumers were rate limited to 1,200 requests / 5 minutes, aggregated across all queues.
Pull consumers allow you to consume messages over HTTP from any environment—including outside of Cloudflare Workers. They’re also useful when you need fine-grained control over how quickly messages are consumed.
To setup a new queue with a pull based consumer using Wrangler, run:
Create a queue with a pull based consumer npx wrangler queues create my-queuenpx wrangler queues consumer http add my-queueYou can also configure a pull consumer using the REST API or the Queues dashboard.
Once configured, you can pull messages from the queue using any HTTP client. You'll need a Cloudflare API Token with
queues_readandqueues_writepermissions. For example:Pull messages from a queue curl "https://api.cloudflare.com/client/v4/accounts/${CF_ACCOUNT_ID}/queues/${QUEUE_ID}/messages/pull" \--header "Authorization: Bearer ${API_TOKEN}" \--header "Content-Type: application/json" \--data '{ "visibility_timeout": 10000, "batch_size": 2 }'To learn more about how to acknowledge messages, pull batches at once, and setup multiple consumers, refer to the pull consumer documentation.
As always, Queues doesn't charge for data egress. Pull operations continue to be billed at the existing rate, of $0.40 / million operations. The increased limits are available now, on all new and existing queues. If you're new to Queues, get started with the Cloudflare Queues guide.
You can now retrieve up to 100 keys in a single bulk read request made to Workers KV using the binding.
This makes it easier to request multiple KV pairs within a single Worker invocation. Retrieving many key-value pairs using the bulk read operation is more performant than making individual requests since bulk read operations are not affected by Workers simultaneous connection limits.
JavaScript // Read single keyconst key = "key-a";const value = await env.NAMESPACE.get(key);// Read multiple keysconst keys = ["key-a", "key-b", "key-c", ...] // up to 100 keysconst values : Map<string, string?> = await env.NAMESPACE.get(keys);// Print the value of "key-a" to the console.console.log(`The first key is ${values.get("key-a")}.`)Consult the Workers KV Read key-value pairs API for full details on Workers KV's new bulk reads support.
-
Previously, a request to the Workers Create Route API always returned
nullfor "script" and an empty string for "pattern" even if the request was successful.Example request curl https://api.cloudflare.com/client/v4/zones/$CF_ACCOUNT_ID/workers/routes \-X PUT \-H "Authorization: Bearer $CF_API_TOKEN" \-H 'Content-Type: application/json' \--data '{ "pattern": "example.com/*", "script": "hello-world-script" }'Example bad response {"result": {"id": "bf153a27ba2b464bb9f04dcf75de1ef9","pattern": "","script": null,"request_limit_fail_open": false},"success": true,"errors": [],"messages": []}Now, it properly returns all values!
Example good response {"result": {"id": "bf153a27ba2b464bb9f04dcf75de1ef9","pattern": "example.com/*","script": "hello-world-script","request_limit_fail_open": false},"success": true,"errors": [],"messages": []}The Workers and Workers for Platforms secrets APIs are now properly documented in the Cloudflare OpenAPI docs. Previously, these endpoints were not publicly documented, leaving users confused on how to directly manage their secrets via the API. Now, you can find the proper endpoints in our public documentation, as well as in our API Library SDKs such as cloudflare-typescript ↗ (>4.2.0) and cloudflare-python ↗ (>4.1.0).
Note the
cloudflare_workers_secretandcloudflare_workers_for_platforms_script_secretTerraform resources ↗ are being removed in a future release. This resource is not recommended for managing secrets. Users should instead use the:- Secrets Store with the "Secrets Store Secret" binding on Workers and Workers for Platforms Script Upload
- "Secret Text" Binding on Workers Script Upload and Workers for Platforms Script Upload
- Workers (and WFP) Secrets API
Cloudflare Stream has completed an infrastructure upgrade for our Live WebRTC beta support which brings increased scalability and improved playback performance to all customers. WebRTC allows broadcasting directly from a browser (or supported WHIP client) with ultra-low latency to tens of thousands of concurrent viewers across the globe.
Additionally, as part of this upgrade, the WebRTC beta now supports Signed URLs to protect playback, just like our standard live stream options (HLS/DASH).
For more information, learn about the Stream Live WebRTC beta.
Workers AI for Developer Week - faster inference, new models, async batch API, expanded LoRA support
Happy Developer Week 2025! Workers AI is excited to announce a couple of new features and improvements available today. Check out our blog ↗ for all the announcement details.
We’re rolling out some in-place improvements to our models that can help speed up inference by 2-4x! Users of the models below will enjoy an automatic speed boost starting today:
@cf/meta/llama-3.3-70b-instruct-fp8-fastgets a speed boost of 2-4x, leveraging techniques like speculative decoding, prefix caching, and an updated inference backend.@cf/baai/bge-small-en-v1.5,@cf/baai/bge-base-en-v1.5,@cf/baai/bge-large-en-v1.5get an updated back end, which should improve inference times by 2x.- With the
bgemodels, we’re also announcing a new parameter calledpoolingwhich can takeclsormeanas options. We highly recommend usingpooling: clswhich will help generate more accurate embeddings. However, embeddings generated with cls pooling are not backwards compatible with mean pooling. For this to not be a breaking change, the default remains as mean pooling. Please specifypooling: clsto enjoy more accurate embeddings going forward.
- With the
We’re also excited to launch a few new models in our catalog to help round out your experience with Workers AI. We’ll be deprecating some older models in the future, so stay tuned for a deprecation announcement. Today’s new models include:
@cf/mistralai/mistral-small-3.1-24b-instruct: a 24B parameter model achieving state-of-the-art capabilities comparable to larger models, with support for vision and tool calling.@cf/google/gemma-3-12b-it: well-suited for a variety of text generation and image understanding tasks, including question answering, summarization and reasoning, with a 128K context window, and multilingual support in over 140 languages.@cf/qwen/qwq-32b: a medium-sized reasoning model, which is capable of achieving competitive performance against state-of-the-art reasoning models, e.g., DeepSeek-R1, o1-mini.@cf/qwen/qwen2.5-coder-32b-instruct: the current state-of-the-art open-source code LLM, with its coding abilities matching those of GPT-4o.
Introducing a new batch inference feature that allows you to send us an array of requests, which we will fulfill as fast as possible and send them back as an array. This is really helpful for large workloads such as summarization, embeddings, etc. where you don’t have a human-in-the-loop. Using the batch API will guarantee that your requests are fulfilled eventually, rather than erroring out if we don’t have enough capacity at a given time.
Check out the tutorial to get started! Models that support batch inference today include:
@cf/meta/llama-3.3-70b-instruct-fp8-fast@cf/baai/bge-small-en-v1.5@cf/baai/bge-base-en-v1.5@cf/baai/bge-large-en-v1.5@cf/baai/bge-m3@cf/meta/m2m100-1.2b
We’ve upgraded our LoRA experience to include 8 newer models, and can support ranks of up to 32 with a 300MB safetensors file limit (previously limited to rank of 8 and 100MB safetensors) Check out our LoRAs page to get started. Models that support LoRAs now include:
@cf/meta/llama-3.2-11b-vision-instruct@cf/meta/llama-3.3-70b-instruct-fp8-fast@cf/meta/llama-guard-3-8b@cf/meta/llama-3.1-8b-instruct-fast(coming soon)@cf/deepseek-ai/deepseek-r1-distill-qwen-32b(coming soon)@cf/qwen/qwen2.5-coder-32b-instruct@cf/qwen/qwq-32b@cf/mistralai/mistral-small-3.1-24b-instruct@cf/google/gemma-3-12b-it
D1 read replication is available in public beta to help lower average latency and increase overall throughput for read-heavy applications like e-commerce websites or content management tools.
Workers can leverage read-only database copies, called read replicas, by using D1 Sessions API. A session encapsulates all the queries from one logical session for your application. For example, a session may correspond to all queries coming from a particular web browser session. With Sessions API, D1 queries in a session are guaranteed to be sequentially consistent to avoid data consistency pitfalls. D1 bookmarks can be used from a previous session to ensure logical consistency between sessions.
TypeScript // retrieve bookmark from previous session stored in HTTP headerconst bookmark = request.headers.get("x-d1-bookmark") ?? "first-unconstrained";const session = env.DB.withSession(bookmark);const result = await session.prepare(`SELECT * FROM Customers WHERE CompanyName = 'Bs Beverages'`).run();// store bookmark for a future sessionresponse.headers.set("x-d1-bookmark", session.getBookmark() ?? "");Read replicas are automatically created by Cloudflare (currently one in each supported D1 region), are active/inactive based on query traffic, and are transparently routed to by Cloudflare at no additional cost.
To checkout D1 read replication, deploy the following Worker code using Sessions API, which will prompt you to create a D1 database and enable read replication on said database.
To learn more about how read replication was implemented, go to our blog post ↗.
Cloudflare Pipelines is now available in beta, to all users with a Workers Paid plan.
Pipelines let you ingest high volumes of real time data, without managing the underlying infrastructure. A single pipeline can ingest up to 100 MB of data per second, via HTTP or from a Worker. Ingested data is automatically batched, written to output files, and delivered to an R2 bucket in your account. You can use Pipelines to build a data lake of clickstream data, or to store events from a Worker.
Create your first pipeline with a single command:
Create a pipeline $ npx wrangler@latest pipelines create my-clickstream-pipeline --r2-bucket my-bucket🌀 Authorizing R2 bucket "my-bucket"🌀 Creating pipeline named "my-clickstream-pipeline"✅ Successfully created pipeline my-clickstream-pipelineId: 0e00c5ff09b34d018152af98d06f5a1xvcName: my-clickstream-pipelineSources:HTTP:Endpoint: https://0e00c5ff09b34d018152af98d06f5a1xvc.pipelines.cloudflare.com/Authentication: offFormat: JSONWorker:Format: JSONDestination:Type: R2Bucket: my-bucketFormat: newline-delimited JSONCompression: GZIPBatch hints:Max bytes: 100 MBMax duration: 300 secondsMax records: 100,000🎉 You can now send data to your pipeline!Send data to your pipeline's HTTP endpoint:curl "https://0e00c5ff09b34d018152af98d06f5a1xvc.pipelines.cloudflare.com/" -d '[{ ...JSON_DATA... }]'To send data to your pipeline from a Worker, add the following configuration to your config file:{"pipelines": [{"pipeline": "my-clickstream-pipeline","binding": "PIPELINE"}]}Head over to our getting started guide for an in-depth tutorial to building with Pipelines.