Changelog
New updates and improvements at Cloudflare.

Previously, if you wanted to develop or deploy a worker with attached resources, you'd have to first manually create the desired resources. Now, if your Wrangler configuration file includes a KV namespace, D1 database, or R2 bucket that does not yet exist on your account, you can develop locally and deploy your application seamlessly, without having to run additional commands.
Automatic provisioning is launching as an open beta, and we'd love to hear your feedback to help us make improvements! It currently works for KV, R2, and D1 bindings. You can disable the feature using the
--no-x-provisionflag.To use this feature, update to wrangler@4.45.0 and add bindings to your config file without resource IDs e.g.:
{"kv_namespaces": [{ "binding": "MY_KV" }],"d1_databases": [{ "binding": "MY_DB" }],"r2_buckets": [{ "binding": "MY_R2" }],}wrangler devwill then automatically create these resources for you locally, and on your next run ofwrangler deploy, Wrangler will call the Cloudflare API to create the requested resources and link them to your Worker.Though resource IDs will be automatically written back to your Wrangler config file after resource creation, resources will stay linked across future deploys even without adding the resource IDs to the config file. This is especially useful for shared templates, which now no longer need to include account-specific resource IDs when adding a binding.
The Cloudflare Vite plugin now supports TanStack Start ↗ apps. Get started with new or existing projects.
Create a new TanStack Start project that uses the Cloudflare Vite plugin via the
create-cloudflareCLI:Terminal window npm create cloudflare@latest -- my-tanstack-start-app --framework=tanstack-startTerminal window yarn create cloudflare my-tanstack-start-app --framework=tanstack-startTerminal window pnpm create cloudflare@latest my-tanstack-start-app --framework=tanstack-startMigrate an existing TanStack Start project to use the Cloudflare Vite plugin:
- Install
@cloudflare/vite-pluginandwrangler
Terminal window npm i -D @cloudflare/vite-plugin wranglerTerminal window yarn add -D @cloudflare/vite-plugin wranglerTerminal window pnpm add -D @cloudflare/vite-plugin wrangler- Add the Cloudflare plugin to your Vite config
vite.config.ts import { defineConfig } from "vite";import { tanstackStart } from "@tanstack/react-start/plugin/vite";import viteReact from "@vitejs/plugin-react";import { cloudflare } from "@cloudflare/vite-plugin";export default defineConfig({plugins: [cloudflare({ viteEnvironment: { name: "ssr" } }),tanstackStart(),viteReact(),],});- Add your Worker config file
{"$schema": "./node_modules/wrangler/config-schema.json","name": "my-tanstack-start-app",// Set this to today's date"compatibility_date": "2026-03-12","compatibility_flags": ["nodejs_compat"],"main": "@tanstack/react-start/server-entry"}"$schema" = "./node_modules/wrangler/config-schema.json"name = "my-tanstack-start-app"# Set this to today's datecompatibility_date = "2026-03-12"compatibility_flags = [ "nodejs_compat" ]main = "@tanstack/react-start/server-entry"- Modify the scripts in your
package.json
package.json {"scripts": {"dev": "vite dev","build": "vite build && tsc --noEmit","start": "node .output/server/index.mjs","preview": "vite preview","deploy": "npm run build && wrangler deploy","cf-typegen": "wrangler types"}}See the TanStack Start framework guide for more info.
- Install
Developers can now programmatically retrieve a list of all file formats supported by the Markdown Conversion utility in Workers AI.
You can use the
env.AIbinding:TypeScript await env.AI.toMarkdown().supported()Or call the REST API:
Terminal window curl https://api.cloudflare.com/client/v4/accounts/{ACCOUNT_ID}/ai/tomarkdown/supported \-H 'Authorization: Bearer {API_TOKEN}'Both return a list of file formats that users can convert into Markdown:
[{"extension": ".pdf","mimeType": "application/pdf",},{"extension": ".jpeg","mimeType": "image/jpeg",},...]Learn more about our Markdown Conversion utility.
We have updated the default behavior for Cloudflare Workers Preview URLs. Going forward, if a preview URL setting is not explicitly configured during deployment, its default behavior will automatically match the setting of your
workers.devsubdomain.This change is intended to provide a more intuitive and secure experience by aligning your preview URL's default state with your
workers.devconfiguration to prevent cases where a preview URL might remain public even after you disabled yourworkers.devroute.What this means for you:
- If neither setting is configured: both the workers.dev route and the preview URL will default to enabled
- If your workers.dev route is enabled and you do not explicitly set Preview URLs to enabled or disabled: Preview URLs will default to enabled
- If your workers.dev route is disabled and you do not explicitly set Preview URLs to enabled or disabled: Preview URLs will default to disabled
You can override the default setting by explicitly enabling or disabling the preview URL in your Worker's configuration through the API, Dashboard, or Wrangler.
Wrangler Version Behavior
The default behavior depends on the version of Wrangler you are using. This new logic applies to the latest version. Here is a summary of the behavior across different versions:
- Before v4.34.0: Preview URLs defaulted to enabled, regardless of the workers.dev setting.
- v4.34.0 up to (but not including) v4.44.0: Preview URLs defaulted to disabled, regardless of the workers.dev setting.
- v4.44.0 or later: Preview URLs now default to matching your workers.dev setting.
Why we’re making this change
In July, we introduced preview URLs to Workers, which let you preview code changes before deploying to production. This made disabling your Worker’s workers.dev URL an ambiguous action — the preview URL, served as a subdomain of
workers.dev(ex:preview-id-worker-name.account-name.workers.dev) would still be live even if you had disabled your Worker’sworkers.devroute. If you misinterpreted what it meant to disable yourworkers.devroute, you might unintentionally leave preview URLs enabled when you didn’t mean to, and expose them to the public Internet.To address this, we made a one-time update to disable preview URLs on existing Workers that had their workers.dev route disabled and changed the default behavior to be disabled for all new deployments where a preview URL setting was not explicitly configured.
While this change helped secure many customers, it was disruptive for customers who keep their
workers.devroute enabled and actively use the preview functionality, as it now required them to explicitly enable preview URLs on every redeployment.This new, more intuitive behavior ensures that your preview URL settings align with yourworkers.devconfiguration by default, providing a more secure and predictable experience.Securing access to
workers.devand preview URL endpointsTo further secure your
workers.devsubdomain and preview URL, you can enable Cloudflare Access with a single click in your Worker's settings to limit access to specific users or groups.
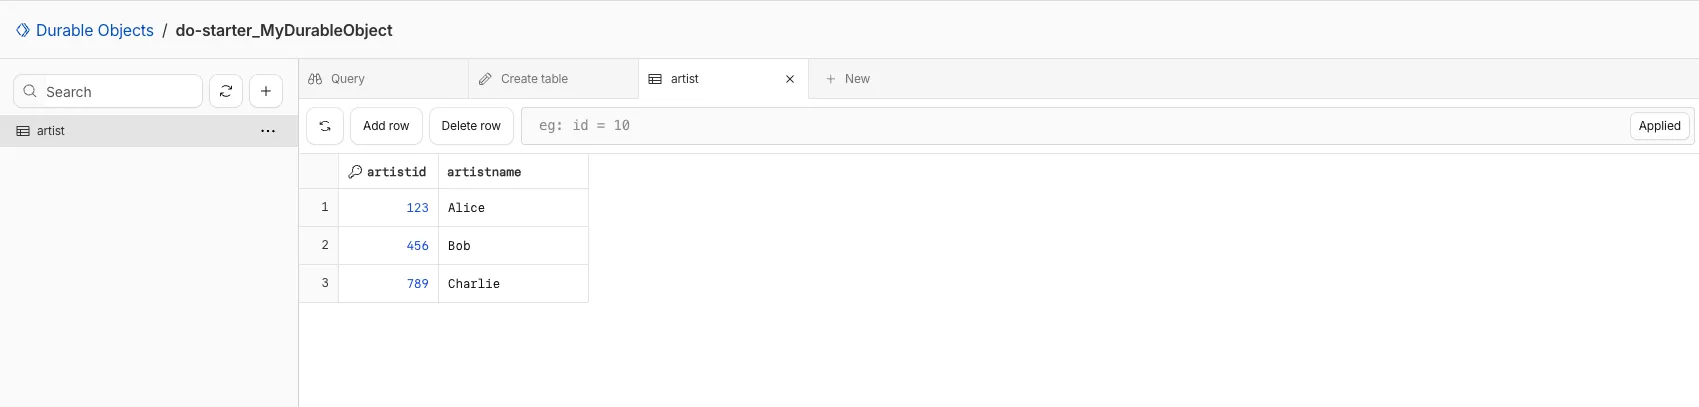
You can now view and write to each Durable Object's storage using a UI editor on the Cloudflare dashboard. Only Durable Objects using SQLite storage can use Data Studio.
Go to Durable ObjectsData Studio unlocks easier data access with Durable Objects for prototyping application data models to debugging production storage usage. Before, querying your Durable Objects data required deploying a Worker.
To access a Durable Object, you can provide an object's unique name or ID generated by Cloudflare. Data Studio requires you to have at least the
Workers Platform Adminrole, and all queries are captured with audit logging for your security and compliance needs. Queries executed by Data Studio send requests to your remote, deployed objects and incur normal usage billing.To learn more, visit the Data Studio documentation. If you have feedback or suggestions for the new Data Studio, please share your experience on Discord ↗
You can now upload a Worker that takes up 1 second to parse and execute its global scope. Previously, startup time was limited to 400 ms.
This allows you to run Workers that import more complex packages and execute more code prior to requests being handled.
For more information, see the documentation on Workers startup limits.
You can now upload Workers with static assets (like HTML, CSS, JavaScript, images) with the Cloudflare Terraform provider v5.11.0 ↗, making it even easier to deploy and manage full-stack apps with IaC.
Previously, you couldn't use Terraform to upload static assets without writing custom scripts to handle generating an asset manifest, calling the Cloudflare API to upload assets in chunks, and handling change detection.
Now, you simply define the directory where your assets are built, and we handle the rest. Check out the examples for what this looks like in Terraform configuration.
You can get started today with the Cloudflare Terraform provider (v5.11.0) ↗, using either the existing
cloudflare_workers_scriptresource ↗, or the betacloudflare_worker_versionresource ↗.Here's how you can use the existing
cloudflare_workers_script↗ resource to upload your Worker code and assets in one shot.resource "cloudflare_workers_script" "my_app" {account_id = var.account_idscript_name = "my-app"content_file = "./dist/worker/index.js"content_sha256 = filesha256("./dist/worker/index.js")main_module = "index.js"# Just point to your assets directory - that's it!assets = {directory = "./dist/static"}}And here's an example using the beta
cloudflare_worker_version↗ resource, alongside thecloudflare_worker↗ andcloudflare_workers_deployment↗ resources:# This tracks the existence of your Worker, so that you# can upload code and assets separately from tracking Worker state.resource "cloudflare_worker" "my_app" {account_id = var.account_idname = "my-app"}resource "cloudflare_worker_version" "my_app_version" {account_id = var.account_idworker_id = cloudflare_worker.my_app.id# Just point to your assets directory - that's it!assets = {directory = "./dist/static"}modules = [{name = "index.js"content_file = "./dist/worker/index.js"content_type = "application/javascript+module"}]}resource "cloudflare_workers_deployment" "my_app_deployment" {account_id = var.account_idscript_name = cloudflare_worker.my_app.namestrategy = "percentage"versions = [{version_id = cloudflare_worker_version.my_app_version.idpercentage = 100}]}Under the hood, the Cloudflare Terraform provider now handles the same logic that Wrangler uses for static asset uploads. This includes scanning your assets directory, computing hashes for each file, generating a manifest with file metadata, and calling the Cloudflare API to upload any missing files in chunks. We support large directories with parallel uploads and chunking, and when the asset manifest hash changes, we detect what's changed and trigger an upload for only those changed files.
- Get started with the Cloudflare Terraform provider (v5.11.0) ↗
- You can use either the existing
cloudflare_workers_scriptresource ↗ to upload your Worker code and assets in one resource. - Or you can use the new beta
cloudflare_worker_versionresource ↗ (along with thecloudflare_worker↗ andcloudflare_workers_deployment↗) resources to more granularly control the lifecycle of each Worker resource.
You can now create and manage Workflows using Terraform, now supported in the Cloudflare Terraform provider v5.11.0 ↗. Workflows allow you to build durable, multi-step applications -- without needing to worry about retrying failed tasks or managing infrastructure.
Now, you can deploy and manage Workflows through Terraform using the new
cloudflare_workflowresource ↗:resource "cloudflare_workflow" "my_workflow" {account_id = var.account_idworkflow_name = "my-workflow"class_name = "MyWorkflow"script_name = "my-worker"}Here are full examples of how to configure
cloudflare_workflowin Terraform, using the existingcloudflare_workers_scriptresource ↗, and the betacloudflare_worker_versionresource ↗.resource "cloudflare_workers_script" "workflow_worker" {account_id = var.cloudflare_account_idscript_name = "my-workflow-worker"content_file = "${path.module}/../dist/worker/index.js"content_sha256 = filesha256("${path.module}/../dist/worker/index.js")main_module = "index.js"}resource "cloudflare_workflow" "workflow" {account_id = var.cloudflare_account_idworkflow_name = "my-workflow"class_name = "MyWorkflow"script_name = cloudflare_workers_script.workflow_worker.script_name}You can more granularly control the lifecycle of each Worker resource using the beta
cloudflare_worker_version↗ resource, alongside thecloudflare_worker↗ andcloudflare_workers_deployment↗ resources.resource "cloudflare_worker" "workflow_worker" {account_id = var.cloudflare_account_idname = "my-workflow-worker"}resource "cloudflare_worker_version" "workflow_worker_version" {account_id = var.cloudflare_account_idworker_id = cloudflare_worker.workflow_worker.idmain_module = "index.js"modules = [{name = "index.js"content_file = "${path.module}/../dist/worker/index.js"content_type = "application/javascript+module"}]}resource "cloudflare_workers_deployment" "workflow_deployment" {account_id = var.cloudflare_account_idscript_name = cloudflare_worker.workflow_worker.namestrategy = "percentage"versions = [{version_id = cloudflare_worker_version.workflow_worker_version.idpercentage = 100}]}resource "cloudflare_workflow" "my_workflow" {account_id = var.cloudflare_account_idworkflow_name = "my-workflow"class_name = "MyWorkflow"script_name = cloudflare_worker.workflow_worker.name}- Get started with the Cloudflare Terraform provider (v5.11.0) ↗ and the new
cloudflare_workflowresource ↗.
- Get started with the Cloudflare Terraform provider (v5.11.0) ↗ and the new

Each of your Workers now has a new overview page in the Cloudflare dashboard.
The goal is to make it easier to understand your Worker without digging through multiple tabs. Think of it as a new home base, a place to get a high-level overview on what's going on.
It's the first place you land when you open a Worker in the dashboard, and it gives you an immediate view of what’s going on. You can see requests, errors, and CPU time at a glance. You can view and add bindings, and see recent versions of your app, including who published them.
Navigation is also simpler, with visually distinct tabs at the top of the page. At the bottom right you'll find guided steps for what to do next that are based on the state of your Worker, such as adding a binding or connecting a custom domain.
We plan to add more here over time. Better insights, more controls, and ways to manage your Worker from one page.
If you have feedback or suggestions for the new Overview page or your Cloudflare Workers experience in general, we'd love to hear from you. Join the Cloudflare developer community on Discord ↗.
You can now enable compaction for individual Apache Iceberg ↗ tables in R2 Data Catalog, giving you fine-grained control over different workloads.
Terminal window # Enable compaction for a specific table (no token required)npx wrangler r2 bucket catalog compaction enable <BUCKET> <NAMESPACE> <TABLE> --target-size 256This allows you to:
- Apply different target file sizes per table
- Disable compaction for specific tables
- Optimize based on table-specific access patterns
Learn more at Manage catalogs.
You can now enable Cloudflare Access for your
workers.devand Preview URLs in a single click.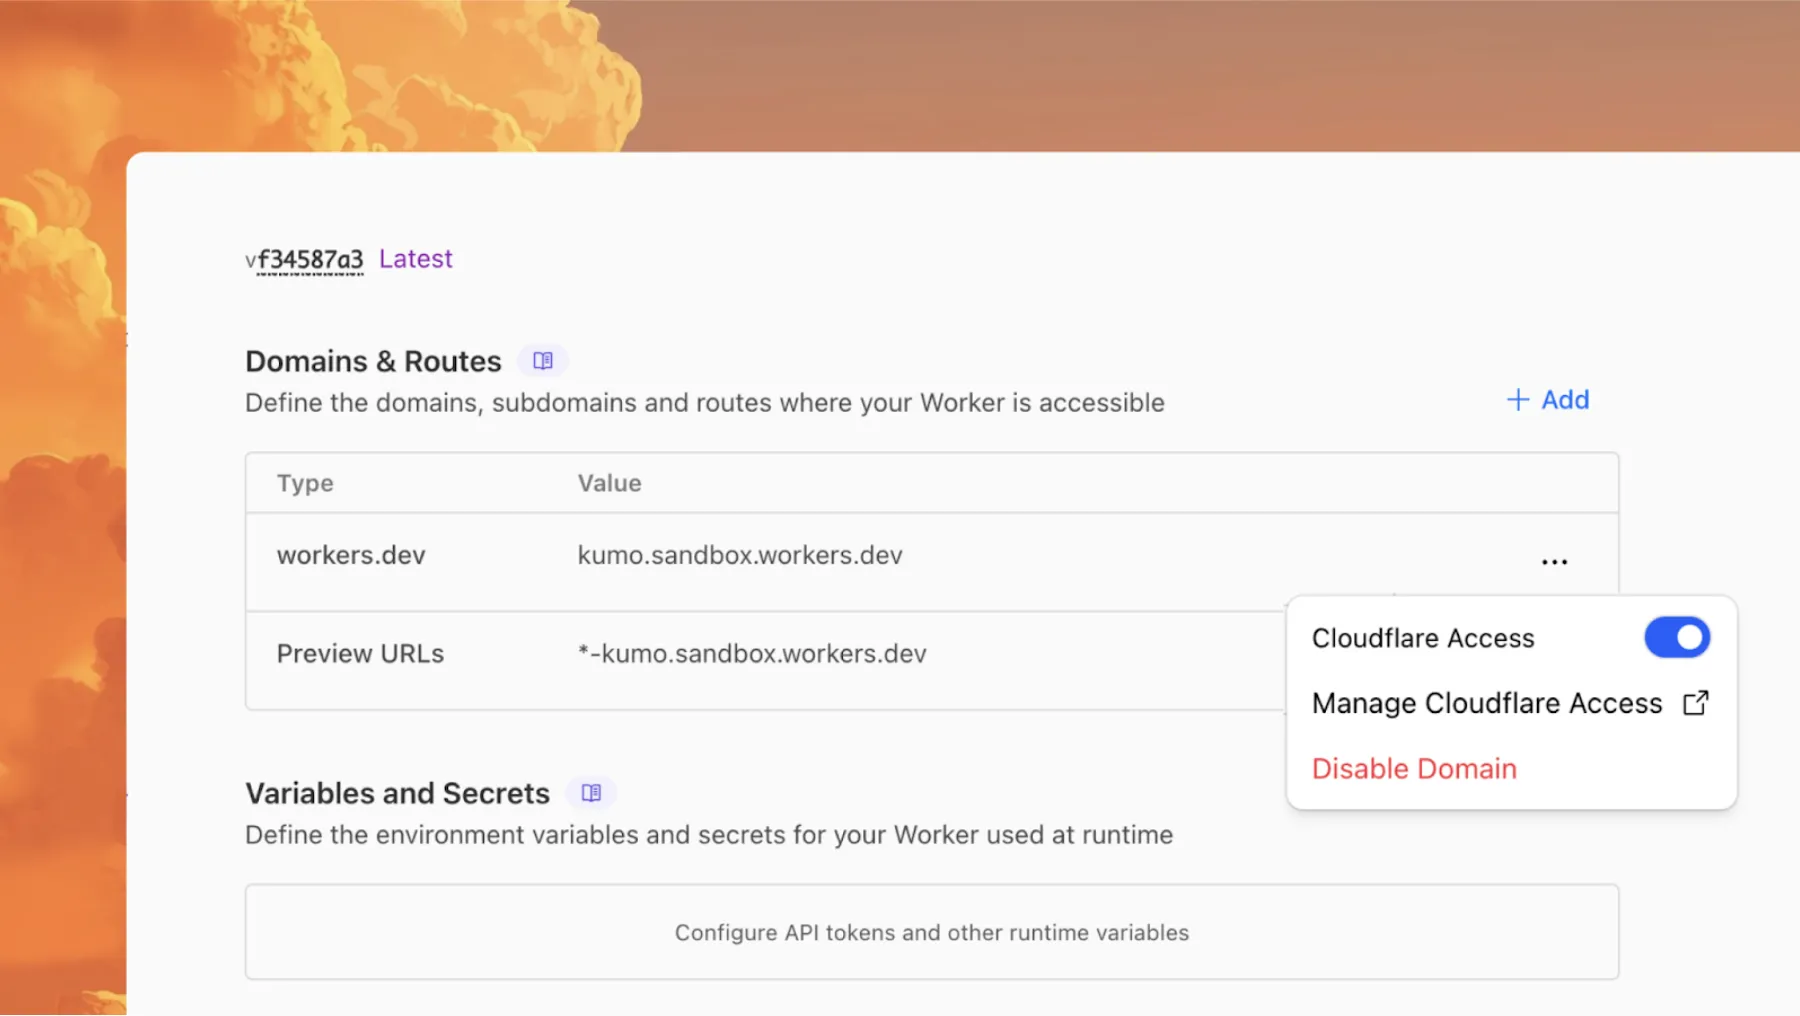
Access allows you to limit access to your Workers to specific users or groups. You can limit access to yourself, your teammates, your organization, or anyone else you specify in your Access policy.
To enable Cloudflare Access:
-
In the Cloudflare dashboard, go to the Workers & Pages page.
Go to Workers & Pages -
In Overview, select your Worker.
-
Go to Settings > Domains & Routes.
-
For
workers.devor Preview URLs, click Enable Cloudflare Access. -
Optionally, to configure the Access application, click Manage Cloudflare Access. There, you can change the email addresses you want to authorize. View Access policies to learn about configuring alternate rules.
To fully secure your application, it is important that you validate the JWT that Cloudflare Access adds to the
Cf-Access-Jwt-Assertionheader on the incoming request.The following code will validate the JWT using the jose NPM package ↗:
JavaScript import { jwtVerify, createRemoteJWKSet } from "jose";export default {async fetch(request, env, ctx) {// Verify the POLICY_AUD environment variable is setif (!env.POLICY_AUD) {return new Response("Missing required audience", {status: 403,headers: { "Content-Type": "text/plain" },});}// Get the JWT from the request headersconst token = request.headers.get("cf-access-jwt-assertion");// Check if token existsif (!token) {return new Response("Missing required CF Access JWT", {status: 403,headers: { "Content-Type": "text/plain" },});}try {// Create JWKS from your team domainconst JWKS = createRemoteJWKSet(new URL(`${env.TEAM_DOMAIN}/cdn-cgi/access/certs`),);// Verify the JWTconst { payload } = await jwtVerify(token, JWKS, {issuer: env.TEAM_DOMAIN,audience: env.POLICY_AUD,});// Token is valid, proceed with your application logicreturn new Response(`Hello ${payload.email || "authenticated user"}!`, {headers: { "Content-Type": "text/plain" },});} catch (error) {// Token verification failedreturn new Response(`Invalid token: ${error.message}`, {status: 403,headers: { "Content-Type": "text/plain" },});}},};Add these environment variables to your Worker:
POLICY_AUD: Your application's AUD tagTEAM_DOMAIN:https://<your-team-name>.cloudflareaccess.com
Both of these appear in the modal that appears when you enable Cloudflare Access.
You can set these variables by adding them to your Worker's Wrangler configuration file, or via the Cloudflare dashboard under Workers & Pages > your-worker > Settings > Environment Variables.
-
Deepgram's newest Flux model
@cf/deepgram/fluxis now available on Workers AI, hosted directly on Cloudflare's infrastructure. We're excited to be a launch partner with Deepgram and offer their new Speech Recognition model built specifically for enabling voice agents. Check out Deepgram's blog ↗ for more details on the release.The Flux model can be used in conjunction with Deepgram's speech-to-text model
@cf/deepgram/nova-3and text-to-speech model@cf/deepgram/aura-1to build end-to-end voice agents. Having Deepgram on Workers AI takes advantage of our edge GPU infrastructure, for ultra low latency voice AI applications.For the month of October 2025, Deepgram's Flux model will be free to use on Workers AI. Official pricing will be announced soon and charged after the promotional pricing period ends on October 31, 2025. Check out the model page for pricing details in the future.
The new Flux model is WebSocket only as it requires live bi-directional streaming in order to recognize speech activity.
- Create a worker that establishes a websocket connection with
@cf/deepgram/flux
JavaScript export default {async fetch(request, env, ctx): Promise<Response> {const resp = await env.AI.run("@cf/deepgram/flux", {encoding: "linear16",sample_rate: "16000"}, {websocket: true});return resp;},} satisfies ExportedHandler<Env>;- Deploy your worker
Terminal window npx wrangler deploy- Write a client script to connect to your worker and start sending random audio bytes to it
JavaScript const ws = new WebSocket('wss://<your-worker-url.com>');ws.onopen = () => {console.log('Connected to WebSocket');// Generate and send random audio bytes// You can replace this part with a function// that reads from your mic or other audio sourceconst audioData = generateRandomAudio();ws.send(audioData);console.log('Audio data sent');};ws.onmessage = (event) => {// Transcription will be received here// Add your custom logic to parse the dataconsole.log('Received:', event.data);};ws.onerror = (error) => {console.error('WebSocket error:', error);};ws.onclose = () => {console.log('WebSocket closed');};// Generate random audio data (1 second of noise at 44.1kHz, mono)function generateRandomAudio() {const sampleRate = 44100;const duration = 1;const numSamples = sampleRate * duration;const buffer = new ArrayBuffer(numSamples * 2);const view = new Int16Array(buffer);for (let i = 0; i < numSamples; i++) {view[i] = Math.floor(Math.random() * 65536 - 32768);}return buffer;}- Create a worker that establishes a websocket connection with
You can now perform more powerful queries directly in Workers Analytics Engine ↗ with a major expansion of our SQL function library.
Workers Analytics Engine allows you to ingest and store high-cardinality data at scale (such as custom analytics) and query your data through a simple SQL API.
Today, we've expanded Workers Analytics Engine's SQL capabilities with several new functions:
argMin()- Returns the value associated with the minimum in a groupargMax()- Returns the value associated with the maximum in a grouptopK()- Returns an array of the most frequent values in a grouptopKWeighted()- Returns an array of the most frequent values in a group using weightsfirst_value()- Returns the first value in an ordered set of values within a partitionlast_value()- Returns the last value in an ordered set of values within a partition
bitAnd()- Returns the bitwise AND of two expressionsbitCount()- Returns the number of bits set to one in the binary representation of a numberbitHammingDistance()- Returns the number of bits that differ between two numbersbitNot()- Returns a number with all bits flippedbitOr()- Returns the inclusive bitwise OR of two expressionsbitRotateLeft()- Rotates all bits in a number left by specified positionsbitRotateRight()- Rotates all bits in a number right by specified positionsbitShiftLeft()- Shifts all bits in a number left by specified positionsbitShiftRight()- Shifts all bits in a number right by specified positionsbitTest()- Returns the value of a specific bit in a numberbitXor()- Returns the bitwise exclusive-or of two expressions
abs()- Returns the absolute value of a numberlog()- Computes the natural logarithm of a numberround()- Rounds a number to a specified number of decimal placesceil()- Rounds a number up to the nearest integerfloor()- Rounds a number down to the nearest integerpow()- Returns a number raised to the power of another number
lowerUTF8()- Converts a string to lowercase using UTF-8 encodingupperUTF8()- Converts a string to uppercase using UTF-8 encoding
hex()- Converts a number to its hexadecimal representationbin()- Converts a string to its binary representation
New type conversion functions: ↗
toUInt8()- Converts any numeric expression, or expression resulting in a string representation of a decimal, into an unsigned 8 bit integer
Whether you're building usage-based billing systems, customer analytics dashboards, or other custom analytics, these functions let you get the most out of your data. Get started with Workers Analytics Engine and explore all available functions in our SQL reference documentation.
New instance types provide up to 4 vCPU, 12 GiB of memory, and 20 GB of disk per container instance.
Instance Type vCPU Memory Disk lite 1/16 256 MiB 2 GB basic 1/4 1 GiB 4 GB standard-1 1/2 4 GiB 8 GB standard-2 1 6 GiB 12 GB standard-3 2 8 GiB 16 GB standard-4 4 12 GiB 20 GB The
devandstandardinstance types are preserved for backward compatibility and are aliases forliteandstandard-1, respectively. Thestandard-1instance type now provides up to 8 GB of disk instead of only 4 GB.See the getting started guide to deploy your first Container, and the limits documentation for more details on the available instance types and limits.
The
ctx.exportsAPI contains automatically-configured bindings corresponding to your Worker's top-level exports. For each top-level export extendingWorkerEntrypoint,ctx.exportswill contain a Service Binding by the same name, and for each export extendingDurableObject(and for which storage has been configured via a migration),ctx.exportswill contain a Durable Object namespace binding. This means you no longer have to configure these bindings explicitly inwrangler.jsonc/wrangler.toml.Example:
JavaScript import { WorkerEntrypoint } from "cloudflare:workers";export class Greeter extends WorkerEntrypoint {greet(name) {return `Hello, ${name}!`;}}export default {async fetch(request, env, ctx) {let greeting = await ctx.exports.Greeter.greet("World")return new Response(greeting);}}At present, you must use the
enable_ctx_exportscompatibility flag to enable this API, though it will be on by default in the future.
Today, we're launching the new Cloudflare Pipelines: a streaming data platform that ingests events, transforms them with SQL, and writes to R2 as Apache Iceberg ↗ tables or Parquet files.
Pipelines can receive events via HTTP endpoints or Worker bindings, transform them with SQL, and deliver to R2 with exactly-once guarantees. This makes it easy to build analytics-ready warehouses for server logs, mobile application events, IoT telemetry, or clickstream data without managing streaming infrastructure.
For example, here's a pipeline that ingests clickstream events and filters out bot traffic while extracting domain information:
INSERT into events_tableSELECTuser_id,lower(event) AS event_type,to_timestamp_micros(ts_us) AS event_time,regexp_match(url, '^https?://([^/]+)')[1] AS domain,url,referrer,user_agentFROM events_jsonWHERE event = 'page_view'AND NOT regexp_like(user_agent, '(?i)bot|spider');Get started by creating a pipeline in the dashboard or running a single command in Wrangler:
Terminal window npx wrangler pipelines setupCheck out our getting started guide to learn how to create a pipeline that delivers events to an Iceberg table you can query with R2 SQL. Read more about today's announcement in our blog post ↗.
Today, we're launching the open beta for R2 SQL: A serverless, distributed query engine that can efficiently analyze petabytes of data in Apache Iceberg ↗ tables managed by R2 Data Catalog.
R2 SQL is ideal for exploring analytical and time-series data stored in R2, such as logs, events from Pipelines, or clickstream and user behavior data.
If you already have a table in R2 Data Catalog, running queries is as simple as:
Terminal window npx wrangler r2 sql query YOUR_WAREHOUSE "SELECTuser_id,event_type,valueFROM events.user_eventsWHERE event_type = 'CHANGELOG' or event_type = 'BLOG'AND __ingest_ts > '2025-09-24T00:00:00Z'ORDER BY __ingest_ts DESCLIMIT 100"To get started with R2 SQL, check out our getting started guide or learn more about supported features in the SQL reference. For a technical deep dive into how we built R2 SQL, read our blog post ↗.
We’re shipping three updates to Browser Rendering:
- Playwright support is now Generally Available and synced with Playwright v1.55 ↗, giving you a stable foundation for critical automation and AI-agent workflows.
- We’re also adding Stagehand support (Beta) so you can combine code with natural language instructions to build more resilient automations.
- Finally, we’ve tripled limits for paid plans across both the REST API and Workers Bindings to help you scale.
To get started with Stagehand, refer to the Stagehand example that uses Stagehand and Workers AI to search for a movie on this example movie directory ↗, extract its details using natural language (title, year, rating, duration, and genre), and return the information along with a screenshot of the webpage.
Stagehand example const stagehand = new Stagehand({env: "LOCAL",localBrowserLaunchOptions: { cdpUrl: endpointURLString(env.BROWSER) },llmClient: new WorkersAIClient(env.AI),verbose: 1,});await stagehand.init();const page = stagehand.page;await page.goto('https://demo.playwright.dev/movies');// if search is a multi-step action, stagehand will return an array of actions it needs to act onconst actions = await page.observe('Search for "Furiosa"');for (const action of actions)await page.act(action);await page.act('Click the search result');// normal playwright functions work as expectedawait page.waitForSelector('.info-wrapper .cast');let movieInfo = await page.extract({instruction: 'Extract movie information',schema: z.object({title: z.string(),year: z.number(),rating: z.number(),genres: z.array(z.string()),duration: z.number().describe("Duration in minutes"),}),});await stagehand.close();
AutoRAG is now AI Search! The new name marks a new and bigger mission: to make world-class search infrastructure available to every developer and business.
With AI Search you can now use models from different providers like OpenAI and Anthropic. By attaching your provider keys to the AI Gateway linked to your AI Search instance, you can use many more models for both embedding and inference.
To use AI Search with other model providers:
- Add provider keys to AI Gateway
- Go to AI > AI Gateway in the dashboard.
- Select or create an AI gateway.
- In Provider Keys, choose your provider, click Add, and enter the key.
- Connect a gateway to AI Search: When creating a new AI Search, select the AI Gateway with your provider keys. For an existing AI Search, go to Settings and switch to a gateway that has your keys under Resources.
- Select models: Embedding models are only available to be changed when creating a new AI Search. Generation model can be selected when creating a new AI Search and can be changed at any time in Settings.
Once configured, your AI Search instance will be able to reference models available through your AI Gateway when making a
/ai-searchrequest:JavaScript export default {async fetch(request, env) {// Query your AI Search instance with a natural language question to an OpenAI modelconst result = await env.AI.autorag("my-ai-search").aiSearch({query: "What's new for Cloudflare Birthday Week?",model: "openai/gpt-5"});// Return only the generated answer as plain textreturn new Response(result.response, {headers: { "Content-Type": "text/plain" },});},};In the coming weeks we will also roll out updates to align the APIs with the new name. The existing APIs will continue to be supported for the time being. Stay tuned to the AI Search Changelog and Discord ↗ for more updates!
- Add provider keys to AI Gateway
You can now run more Containers concurrently with higher limits on CPU, memory, and disk.
Limit New Limit Previous Limit Memory for concurrent live Container instances 400GiB 40GiB vCPU for concurrent live Container instances 100 20 Disk for concurrent live Container instances 2TB 100GB You can now run 1000 instances of the
devinstance type, 400 instances ofbasic, or 100 instances ofstandardconcurrently.This opens up new possibilities for running larger-scale workloads on Containers.
See the getting started guide to deploy your first Container, and the limits documentation for more details on the available instance types and limits.
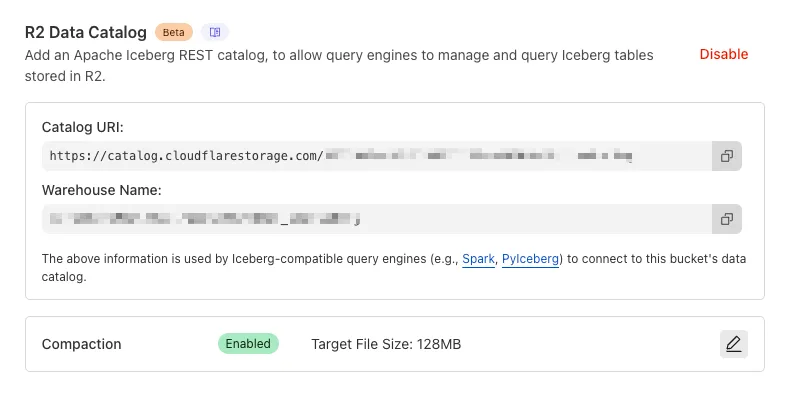
You can now enable automatic compaction for Apache Iceberg ↗ tables in R2 Data Catalog to improve query performance.
Compaction is the process of taking a group of small files and combining them into fewer larger files. This is an important maintenance operation as it helps ensure that query performance remains consistent by reducing the number of files that needs to be scanned.
To enable automatic compaction in R2 Data Catalog, find it under R2 Data Catalog in your R2 bucket settings in the dashboard.
Or with Wrangler, run:
Terminal window npx wrangler r2 bucket catalog compaction enable <BUCKET_NAME> --target-size 128 --token <API_TOKEN>To get started with compaction, check out manage catalogs. For best practices and limitations, refer to about compaction.
You can run multiple Workers in a single dev command by passing multiple config files to
wrangler dev:Terminal window wrangler dev --config ./web/wrangler.jsonc --config ./api/wrangler.jsoncPreviously, if you ran the command above and then also ran wrangler dev for a different Worker, the Workers running in separate wrangler dev sessions could not communicate with each other. This prevented you from being able to use Service Bindings ↗ and Tail Workers ↗ in local development, when running separate wrangler dev sessions.
Now, the following works as expected:
Terminal window # Terminal 1: Run your application that includes both Web and API workerswrangler dev --config ./web/wrangler.jsonc --config ./api/wrangler.jsonc# Terminal 2: Run your auth worker separatelywrangler dev --config ./auth/wrangler.jsoncThese Workers can now communicate with each other across separate dev commands, regardless of your development setup.
./api/src/index.ts export default {async fetch(request, env) {// This service binding call now works across dev commandsconst authorized = await env.AUTH.isAuthorized(request);if (!authorized) {return new Response('Unauthorized', { status: 401 });}return new Response('Hello from API Worker!', { status: 200 });},};Check out the Developing with multiple Workers guide to learn more about the different approaches and when to use each one.
AutoRAG now includes a Metrics tab that shows how your data is indexed and searched. Get a clear view of the health of your indexing pipeline, compare usage between
ai-searchandsearch, and see which files are retrieved most often.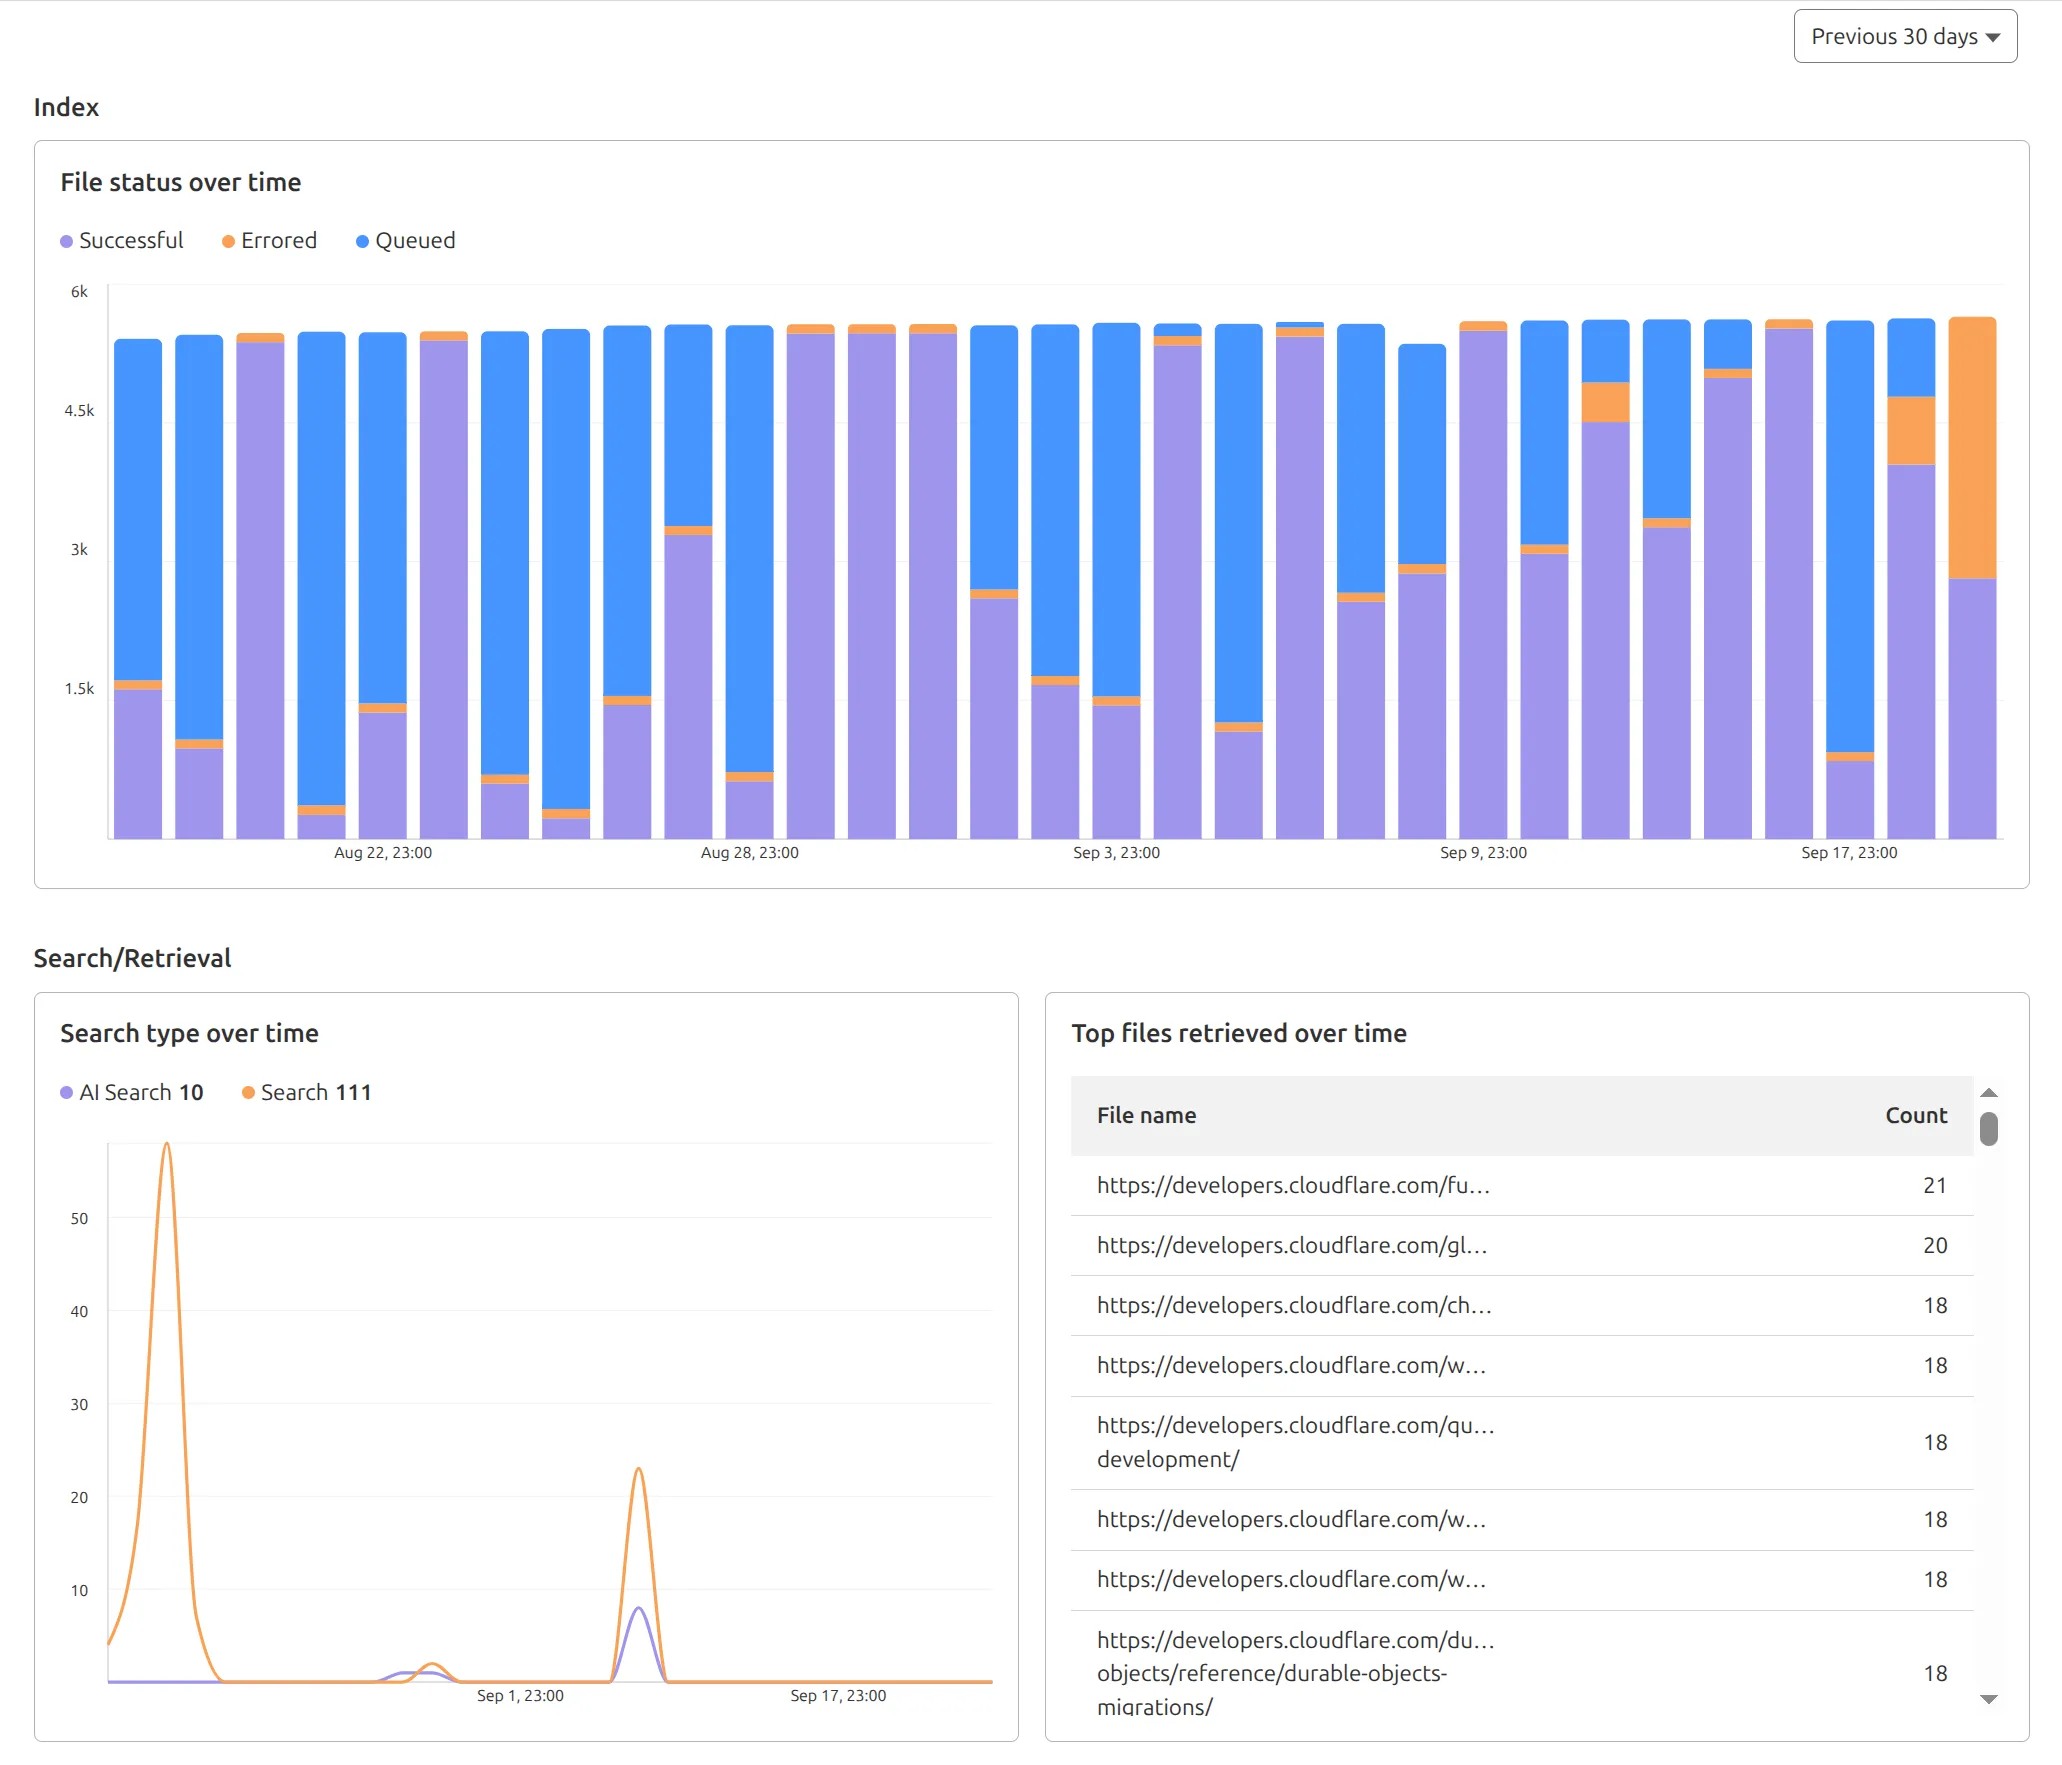
You can find these metrics within each AutoRAG instance:
- Indexing: Track how files are ingested and see status changes over time.
- Search breakdown: Compare usage between
ai-searchandsearchendpoints. - Top file retrievals: Identify which files are most frequently retrieved in a given period.
Try it today in AutoRAG.
Rate Limiting within Cloudflare Workers is now Generally Available (GA).
The
ratelimitbinding is now stable and recommended for all production workloads. Existing deployments using the unsafe binding will continue to function to allow for a smooth transition.For more details, refer to Workers Rate Limiting documentation.
In workers-rs ↗, Rust panics were previously non-recoverable. A panic would put the Worker into an invalid state, and further function calls could result in memory overflows or exceptions.
Now, when a panic occurs, in-flight requests will throw 500 errors, but the Worker will automatically and instantly recover for future requests.
This ensures more reliable deployments. Automatic panic recovery is enabled for all new workers-rs deployments as of version 0.6.5, with no configuration required.
Rust Workers are built with Wasm Bindgen, which treats panics as non-recoverable. After a panic, the entire Wasm application is considered to be in an invalid state.
We now attach a default panic handler in Rust:
std::panic::set_hook(Box::new(move |panic_info| {hook_impl(panic_info);}));Which is registered by default in the JS initialization:
JavaScript import { setPanicHook } from "./index.js";setPanicHook(function (err) {console.error("Panic handler!", err);});When a panic occurs, we reset the Wasm state to revert the Wasm application to how it was when the application started.
We worked upstream on the Wasm Bindgen project to implement a new
--experimental-reset-state-functioncompilation option ↗ which outputs a new__wbg_reset_statefunction.This function clears all internal state related to the Wasm VM, and updates all function bindings in place to reference the new WebAssembly instance.
One other necessary change here was associating Wasm-created JS objects with an instance identity. If a JS object created by an earlier instance is then passed into a new instance later on, a new "stale object" error is specially thrown when using this feature.
Building on this new Wasm Bindgen feature, layered with our new default panic handler, we also added a proxy wrapper to ensure all top-level exported class instantiations (such as for Rust Durable Objects) are tracked and fully reinitialized when resetting the Wasm instance. This was necessary because the workerd runtime will instantiate exported classes, which would then be associated with the Wasm instance.
This approach now provides full panic recovery for Rust Workers on subsequent requests.
Of course, we never want panics, but when they do happen they are isolated and can be investigated further from the error logs - avoiding broader service disruption.
In the future, full support for recoverable panics could be implemented without needing reinitialization at all, utilizing the WebAssembly Exception Handling ↗ proposal, part of the newly announced WebAssembly 3.0 ↗ specification. This would allow unwinding panics as normal JS errors, and concurrent requests would no longer fail.
We're making significant improvements to the reliability of Rust Workers ↗. Join us in
#rust-on-workerson the Cloudflare Developers Discord ↗ to stay updated.