Localize a website with HTMLRewriter
In this tutorial, you will build an example internationalization and localization engine (commonly referred to as i18n and l10n) for your application, serve the content of your site, and automatically translate the content based on your visitors’ location in the world.
This tutorial uses the HTMLRewriter class built into the Cloudflare Workers runtime, which allows for parsing and rewriting of HTML on the Cloudflare global network. This gives developers the ability to efficiently and transparently customize their Workers applications.
All of the framework guides assume you already have a fundamental understanding of Git ↗. If you are new to Git, refer to this summarized Git handbook ↗ on how to set up Git on your local machine.
If you clone with SSH, you must generate SSH keys ↗ on each computer you use to push or pull from GitHub.
Refer to the GitHub documentation ↗ and Git documentation ↗ for more information.
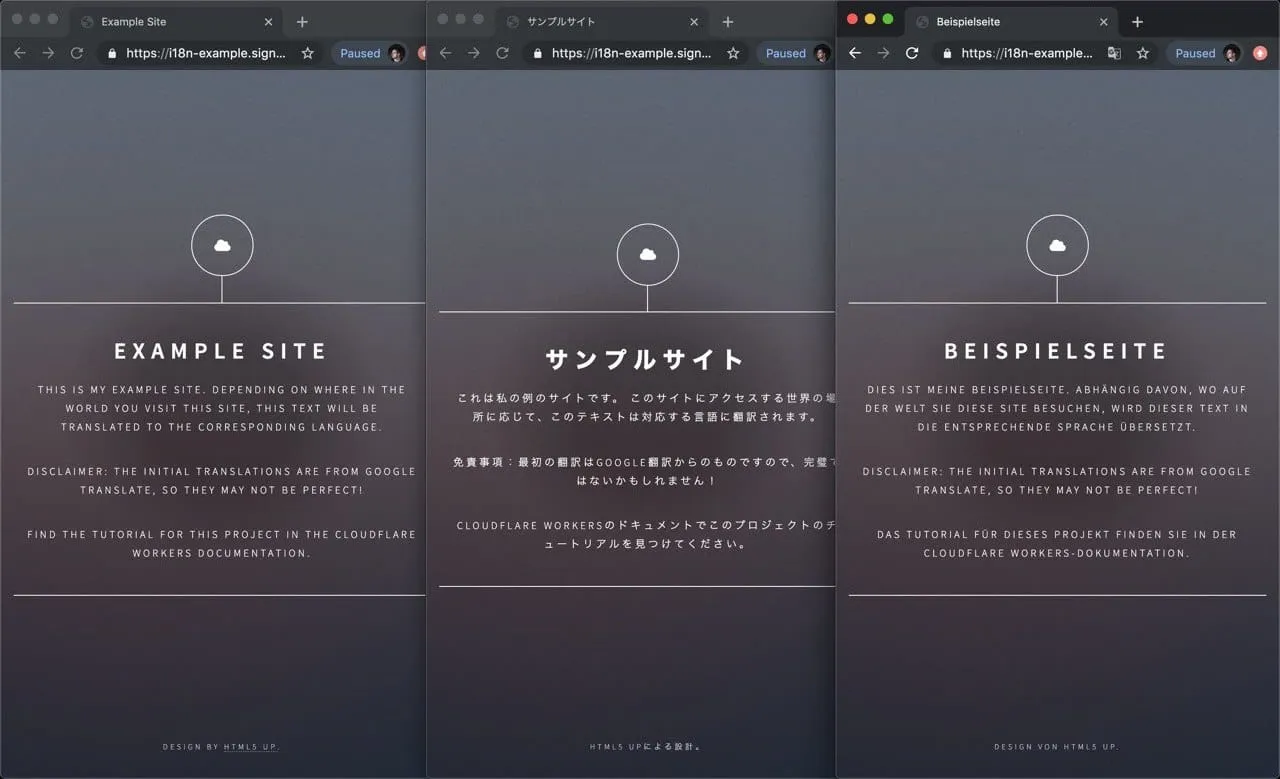
This tutorial is designed to use an existing website. To simplify this process, you will use a free HTML5 template from HTML5 UP ↗. With this website as the base, you will use the HTMLRewriter functionality in the Workers platform to overlay an i18n layer, automatically translating the site based on the user’s language.
If you would like to deploy your own version of the site, you can find the source on GitHub ↗. Instructions on how to deploy this application can be found in the project’s README.
Create a new application using the create-cloudflare, a CLI for creating and deploying new applications to Cloudflare.
npm create cloudflare@latest -- i18n-exampleyarn create cloudflare i18n-examplepnpm create cloudflare@latest i18n-exampleFor setup, select the following options:
- For What would you like to start with?, select
Framework Starter. - For Which development framework do you want to use?, select
React. - For, Do you want to deploy your application?, select
No.
The newly generated i18n-example project will contain two folders: public and src these contain files for a React application:
cd i18n-examplelspublic src package.jsonWe have to make a few adjustments to the generated project, first we want to the replace the content inside of the public directory, with the default generated HTML code for the HTML5 UP template seen in the demo screenshot: download a release ↗ (ZIP file) of the code for this project and copy the public folder to your own project to get started.
Next, let's create a functions directory with an index.js file, this will be where the logic of the application will be written.
mkdir functionscd functionstouch index.jsAdditionally, we'll remove the src/ directory since its content isn't necessary for this project. With the static HTML for this project updated, you can focus on the script inside of the functions folder, at index.js.
The HTMLRewriter class provided in the Workers runtime allows developers to parse HTML and write JavaScript to query and transform every element of the page.
The example website in this tutorial is a basic single-page HTML project that lives in the public directory. It includes an h1 element with the text Example Site and a number of p elements with different text:
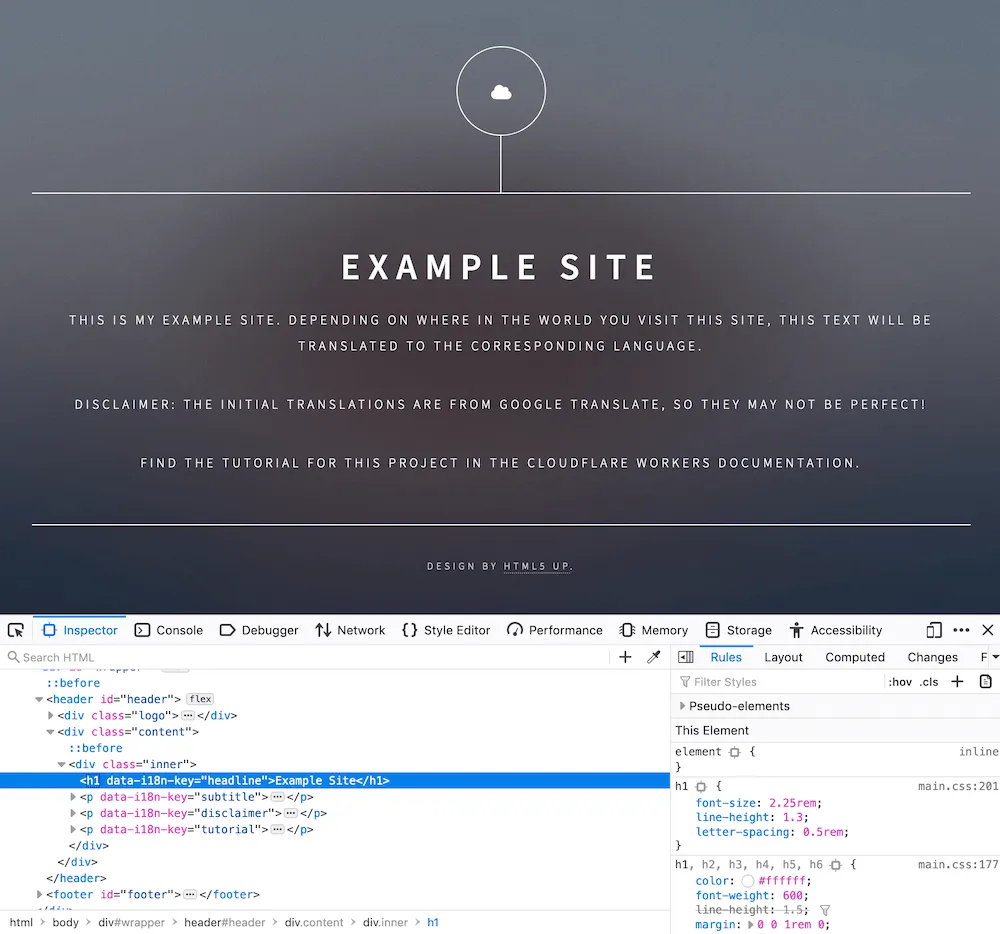
What is unique about this page is the addition of data attributes ↗ in the HTML – custom attributes defined on a number of elements on this page. The data-i18n-key on the h1 tag on this page, as well as many of the p tags, indicates that there is a corresponding internationalization key, which should be used to look up a translation for this text:
<!-- source clipped from i18n-example site -->
<div class="inner">  <h1 data-i18n-key="headline">Example Site</h1>  <p data-i18n-key="subtitle">This is my example site. Depending o...</p>  <p data-i18n-key="disclaimer">Disclaimer: the initial translations...</p></div>
Using HTMLRewriter, you will parse the HTML within the ./public/index.html page. When a data-i18n-key attribute is found, you should use the attribute's value to retrieve a matching translation from the strings object. With HTMLRewriter, you can query elements to accomplish tasks like finding a data attribute. However, as the name suggests, you can also rewrite elements by taking a translated string and directly inserting it into the HTML.
Another feature of this project is based on the Accept-Language header, which exists on incoming requests. You can set the translation language per request, allowing users from around the world to see a locally relevant and translated page.
Begin with the functions/index.js file. Your application in this tutorial will live entirely in this file.
Inside of this file, start by adding the default code for running a Pages Function.
export function onRequest(context) { return new Response("Hello, world!");}The important part of the code lives in the onRequest function. To implement translations on the site, take the HTML response retrieved from env.ASSETS.fetch(request) this allows you to fetch a static asset from your Pages project and pass it into a new instance of HTMLRewriter. When instantiating HTMLRewriter, you can attach handlers using the on function. For this tutorial, you will use the [data-i18n-key] selector (refer to the HTMLRewriter documentation for more advanced usage) to locate all elements with the data-i18n-key attribute, which means that they must be translated. Any matching element will be passed to an instance of your ElementHandler class, which will contain the translation logic. With the created instance of HTMLRewriter, the transform function takes a response and can be returned to the client:
export async function onRequest(context) { const { request, env } = context; const response = await env.ASSETS.fetch(request); return new HTMLRewriter() .on("[data-i18n-key]", new ElementHandler(countryStrings)) .transform(response);}Your ElementHandler will receive every element parsed by the HTMLRewriter instance, and due to the expressive API, you can query each incoming element for information.
In How it works, the documentation describes data-i18n-key, a custom data attribute that could be used to find a corresponding translated string for the website’s user interface. In ElementHandler, you can define an element function, which will be called as each element is parsed. Inside of the element function, you can query for the custom data attribute using getAttribute:
class ElementHandler { element(element) { const i18nKey = element.getAttribute("data-i18n-key"); }}With i18nKey defined, you can use it to search for a corresponding translated string. You will now set up a strings object with key-value pairs corresponding to the data-i18n-key value. For now, you will define a single example string, headline, with a German string, "Beispielseite" ("Example Site"), and retrieve it in the element function:
const strings = {  headline: "Beispielseite",};
class ElementHandler {  element(element) {    const i18nKey = element.getAttribute("data-i18n-key");    const string = strings[i18nKey];  }}
Take your translated string and insert it into the original element, using the setInnerContent function:
const strings = {  headline: "Beispielseite",};
class ElementHandler {  element(element) {    const i18nKey = element.getAttribute("data-i18n-key");    const string = strings[i18nKey];    if (string) {      element.setInnerContent(string);    }  }}
To review that everything looks as expected, use the preview functionality built into Wrangler. Call wrangler pages dev ./public to open up a live preview of your project. The command is refreshed after every code change that you make.
You can expand on this translation functionality to provide country-specific translations, based on the incoming request’s Accept-Language header. By taking this header, parsing it, and passing the parsed language into your ElementHandler, you can retrieve a translated string in your user’s home language, provided that it is defined in strings.
To implement this:
- Update the
stringsobject, adding a second layer of key-value pairs and allowing strings to be looked up in the formatstrings[country][key]. - Pass a
countryStringsobject into ourElementHandler, so that it can be used during the parsing process. - Grab the
Accept-Languageheader from an incoming request, parse it, and pass the parsed language toElementHandler.
To parse the Accept-Language header, install the accept-language-parser ↗ npm package:
npm i accept-language-parserOnce imported into your code, use the package to parse the most relevant language for a client based on Accept-Language header, and pass it to ElementHandler. Your final code for the project, with an included sample translation for Germany and Japan (using Google Translate) looks like this:
import parser from "accept-language-parser";
// do not set to true in production!const DEBUG = false;
const strings = {  de: {    title: "Beispielseite",    headline: "Beispielseite",    subtitle:      "Dies ist meine Beispielseite. Abhängig davon, wo auf der Welt Sie diese Site besuchen, wird dieser Text in die entsprechende Sprache übersetzt.",    disclaimer:      "Haftungsausschluss: Die anfänglichen Übersetzungen stammen von Google Translate, daher sind sie möglicherweise nicht perfekt!",    tutorial:      "Das Tutorial für dieses Projekt finden Sie in der Cloudflare Workers-Dokumentation.",    copyright: "Design von HTML5 UP.",  },  ja: {    title: "サンプルサイト",    headline: "サンプルサイト",    subtitle:      "これは私の例のサイトです。 このサイトにアクセスする世界の場所に応じて、このテキストは対応する言語に翻訳されます。",    disclaimer:      "免責事項:最初の翻訳はGoogle翻訳からのものですので、完璧ではないかもしれません!",    tutorial:      "Cloudflare Workersのドキュメントでこのプロジェクトのチュートリアルを見つけてください。",    copyright: "HTML5 UPによる設計。",  },};
class ElementHandler {  constructor(countryStrings) {    this.countryStrings = countryStrings;  }
  element(element) {    const i18nKey = element.getAttribute("data-i18n-key");    if (i18nKey) {      const translation = this.countryStrings[i18nKey];      if (translation) {        element.setInnerContent(translation);      }    }  }}
export async function onRequest(context) {  const { request, env } = context;  try {    let options = {};    if (DEBUG) {      options = {        cacheControl: {          bypassCache: true,        },      };    }    const languageHeader = request.headers.get("Accept-Language");    const language = parser.pick(["de", "ja"], languageHeader);    const countryStrings = strings[language] || {};
const response = await env.ASSETS.fetch(request); return new HTMLRewriter() .on("[data-i18n-key]", new ElementHandler(countryStrings)) .transform(response); } catch (e) { if (DEBUG) { return new Response(e.message || e.toString(), { status: 404, }); } else { return env.ASSETS.fetch(request); } }}Your i18n tool built on Cloudflare Pages is complete and it is time to deploy it to your domain.
To deploy your application to a *.pages.dev subdomain, you need to specify a directory of static assets to serve, configure the pages_build_output_dir in your project’s Wrangler file and set the value to ./public:
{ "$schema": "./node_modules/wrangler/config-schema.json", "name": "i18n-example", "pages_build_output_dir": "./public", // Set this to today's date "compatibility_date": "2026-04-03"}"$schema" = "./node_modules/wrangler/config-schema.json"name = "i18n-example"pages_build_output_dir = "./public"# Set this to today's datecompatibility_date = "2026-04-03"Next, you need to configure a deploy script in package.json file in your project. Add a deploy script with the value wrangler pages deploy:
"scripts": { "dev": "wrangler pages dev", "deploy": "wrangler pages deploy"}Using wrangler, deploy to Cloudflare’s network, using the deploy command:
npm run deployIn this tutorial, you built and deployed an i18n tool using HTMLRewriter. To review the full source code for this application, refer to the repository on GitHub ↗.
If you want to get started building your own projects, review the existing list of Quickstart templates.