Changelog
New updates and improvements at Cloudflare.

In workers-rs ↗, Rust panics were previously non-recoverable. A panic would put the Worker into an invalid state, and further function calls could result in memory overflows or exceptions.
Now, when a panic occurs, in-flight requests will throw 500 errors, but the Worker will automatically and instantly recover for future requests.
This ensures more reliable deployments. Automatic panic recovery is enabled for all new workers-rs deployments as of version 0.6.5, with no configuration required.
Rust Workers are built with Wasm Bindgen, which treats panics as non-recoverable. After a panic, the entire Wasm application is considered to be in an invalid state.
We now attach a default panic handler in Rust:
std::panic::set_hook(Box::new(move |panic_info| {hook_impl(panic_info);}));Which is registered by default in the JS initialization:
JavaScript import { setPanicHook } from "./index.js";setPanicHook(function (err) {console.error("Panic handler!", err);});When a panic occurs, we reset the Wasm state to revert the Wasm application to how it was when the application started.
We worked upstream on the Wasm Bindgen project to implement a new
--experimental-reset-state-functioncompilation option ↗ which outputs a new__wbg_reset_statefunction.This function clears all internal state related to the Wasm VM, and updates all function bindings in place to reference the new WebAssembly instance.
One other necessary change here was associating Wasm-created JS objects with an instance identity. If a JS object created by an earlier instance is then passed into a new instance later on, a new "stale object" error is specially thrown when using this feature.
Building on this new Wasm Bindgen feature, layered with our new default panic handler, we also added a proxy wrapper to ensure all top-level exported class instantiations (such as for Rust Durable Objects) are tracked and fully reinitialized when resetting the Wasm instance. This was necessary because the workerd runtime will instantiate exported classes, which would then be associated with the Wasm instance.
This approach now provides full panic recovery for Rust Workers on subsequent requests.
Of course, we never want panics, but when they do happen they are isolated and can be investigated further from the error logs - avoiding broader service disruption.
In the future, full support for recoverable panics could be implemented without needing reinitialization at all, utilizing the WebAssembly Exception Handling ↗ proposal, part of the newly announced WebAssembly 3.0 ↗ specification. This would allow unwinding panics as normal JS errors, and concurrent requests would no longer fail.
We're making significant improvements to the reliability of Rust Workers ↗. Join us in
#rust-on-workerson the Cloudflare Developers Discord ↗ to stay updated.
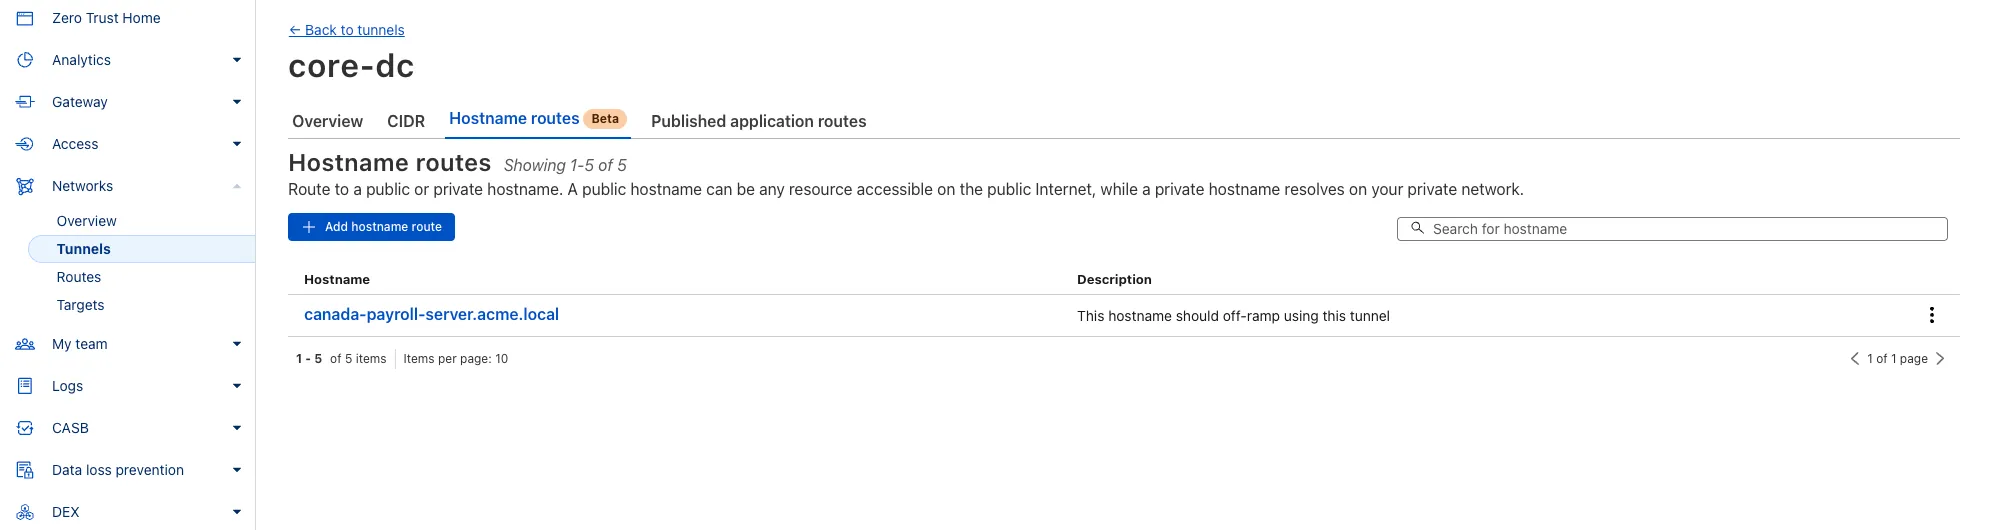
You can now route private traffic to Cloudflare Tunnel based on a hostname or domain, moving beyond the limitations of IP-based routing. This new capability is free for all Cloudflare One customers.
Previously, Tunnel routes could only be defined by IP address or CIDR range. This created a challenge for modern applications with dynamic or ephemeral IP addresses, often forcing administrators to maintain complex and brittle IP lists.
What’s new:
- Hostname & Domain Routing: Create routes for individual hostnames (e.g.,
payroll.acme.local) or entire domains (e.g.,*.acme.local) and direct their traffic to a specific Tunnel. - Simplified Zero Trust Policies: Build resilient policies in Cloudflare Access and Gateway using stable hostnames, making it dramatically easier to apply per-resource authorization for your private applications.
- Precise Egress Control: Route traffic for public hostnames (e.g.,
bank.example.com) through a specific Tunnel to enforce a dedicated source IP, solving the IP allowlist problem for third-party services. - No More IP Lists: This feature makes the workaround of maintaining dynamic IP Lists for Tunnel connections obsolete.
Get started in the Tunnels section of the Zero Trust dashboard with your first private hostname or public hostname route.
Learn more in our blog post ↗.
- Hostname & Domain Routing: Create routes for individual hostnames (e.g.,
We recently increased the available disk space from 8 GB to 20 GB for all plans. Building on that improvement, we’re now doubling the CPU power available for paid plans — from 2 vCPU to 4 vCPU.
These changes continue our focus on making Workers Builds faster and more reliable.
Metric Free Plan Paid Plans CPU 2 vCPU 4 vCPU - Fast build times: Even single-threaded workloads benefit from having more vCPUs
- 2x faster multi-threaded builds: Tools like esbuild ↗ and webpack ↗ can now utilize additional cores, delivering near-linear performance scaling
All other build limits — including memory, build minutes, and timeout remain unchanged.
To prevent the accidental exposure of applications, we've updated how Worker preview URLs (
<PREVIEW>-<WORKER_NAME>.<SUBDOMAIN>.workers.dev) are handled. We made this change to ensure preview URLs are only active when intentionally configured, improving the default security posture of your Workers.We performed a one-time update to disable preview URLs for existing Workers where the workers.dev subdomain was also disabled.
Because preview URLs were historically enabled by default, users who had intentionally disabled their workers.dev route may not have realized their Worker was still accessible at a separate preview URL. This update was performed to ensure that using a preview URL is always an intentional, opt-in choice.
If your Worker was affected, its preview URL (
<PREVIEW>-<WORKER_NAME>.<SUBDOMAIN>.workers.dev) will now direct to an informational page explaining this change.How to Re-enable Your Preview URL
If your preview URL was disabled, you can re-enable it via the Cloudflare dashboard by navigating to your Worker's Settings page and toggling on the Preview URL.
Alternatively, you can use Wrangler by adding the
preview_urls = truesetting to your Wrangler file and redeploying the Worker.JSONC {"preview_urls": true}TOML preview_urls = trueNote: You can set
preview_urls = truewith any Wrangler version that supports the preview URL flag (v3.91.0+). However, we recommend updating to v4.34.0 or newer, as this version defaultspreview_urlsto false, ensuring preview URLs are always enabled by explicit choice.
Three months ago we announced the public beta of remote bindings for local development. Now, we're excited to say that it's available for everyone in Wrangler, Vite, and Vitest without using an experimental flag!
With remote bindings, you can now connect to deployed resources like R2 buckets and D1 databases while running Worker code on your local machine. This means you can test your local code changes against real data and services, without the overhead of deploying for each iteration.
To enable remote bindings, add
"remote" : trueto each binding that you want to rely on a remote resource running on Cloudflare:JSONC {"name": "my-worker",// Set this to today's date"compatibility_date": "2026-07-03","r2_buckets": [{"bucket_name": "screenshots-bucket","binding": "screenshots_bucket","remote": true,},],}TOML name = "my-worker"# Set this to today's datecompatibility_date = "2026-07-03"[[r2_buckets]]bucket_name = "screenshots-bucket"binding = "screenshots_bucket"remote = trueWhen remote bindings are configured, your Worker still executes locally, but all binding calls are proxied to the deployed resource that runs on Cloudflare's network.
You can try out remote bindings for local development today with:
D1 now detects read-only queries and automatically attempts up to two retries to execute those queries in the event of failures with retryable errors. You can access the number of execution attempts in the returned response metadata property
total_attempts.At the moment, only read-only queries are retried, that is, queries containing only the following SQLite keywords:
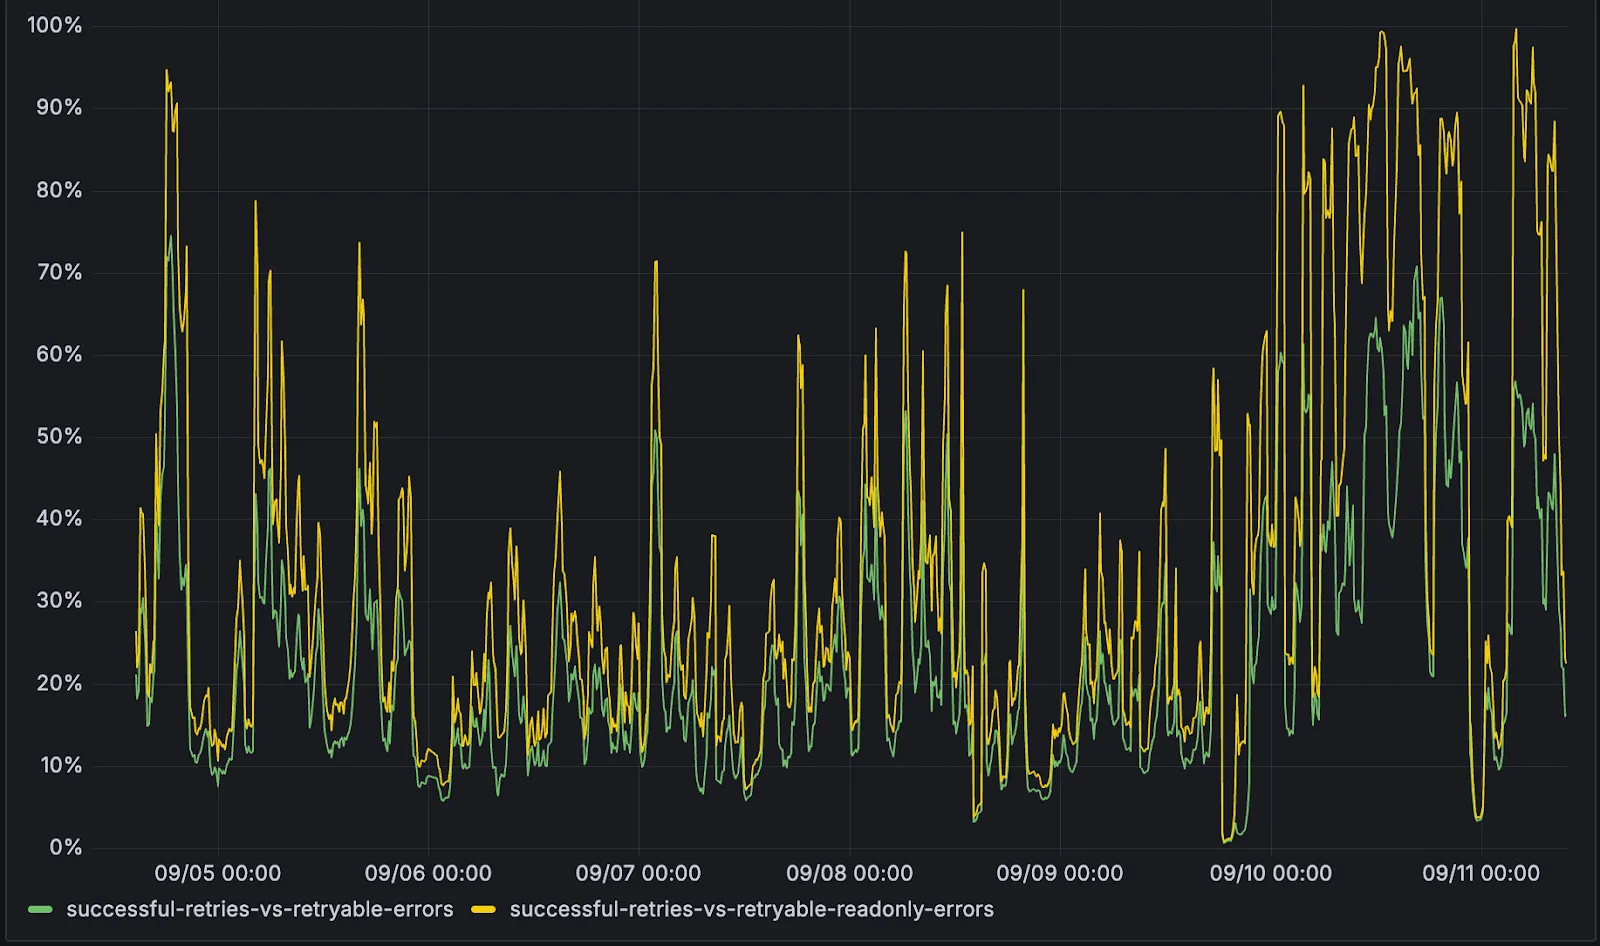
SELECT,EXPLAIN,WITH. Queries containing any SQLite keyword ↗ that leads to database writes are not retried.The retry success ratio among read-only retryable errors varies from 5% all the way up to 95%, depending on the underlying error and its duration (like network errors or other internal errors).
The retry success ratio among all retryable errors is lower, indicating that there are write-queries that could be retried. Therefore, we recommend D1 users to continue applying retries in their own code for queries that are not read-only but are idempotent according to the business logic of the application.
D1 ensures that any retry attempt does not cause database writes, making the automatic retries safe from side-effects, even if a query causing changes slips through the read-only detection. D1 achieves this by checking for modifications after every query execution, and if any write occurred due to a retry attempt, the query is rolled back.
The read-only query detection heuristics are simple for now, and there is room for improvement to capture more cases of queries that can be retried, so this is just the beginning.
The number of recent versions available for a Worker rollback has been increased from 10 to 100.
This allows you to:
-
Promote any of the 100 most recent versions to be the active deployment.
-
Split traffic using gradual deployments between your latest code and any of the 100 most recent versions.
You can do this through the Cloudflare dashboard or with Wrangler's rollback command
Learn more about versioned deployments and rollbacks.
-
We've shipped a new release for the Agents SDK ↗ bringing full compatibility with AI SDK v5 ↗ and introducing automatic message migration that handles all legacy formats transparently.
This release includes improved streaming and tool support, tool confirmation detection (for "human in the loop" systems), enhanced React hooks with automatic tool resolution, improved error handling for streaming responses, and seamless migration utilities that work behind the scenes.
This makes it ideal for building production AI chat interfaces with Cloudflare Workers AI models, agent workflows, human-in-the-loop systems, or any application requiring reliable message handling across SDK versions — all while maintaining backward compatibility.
Additionally, we've updated workers-ai-provider v2.0.0, the official provider for Cloudflare Workers AI models, to be compatible with AI SDK v5.
Creates a new chat interface with enhanced v5 capabilities.
TypeScript // Basic chat setupconst { messages, sendMessage, addToolResult } = useAgentChat({agent,experimental_automaticToolResolution: true,tools,});// With custom tool confirmationconst chat = useAgentChat({agent,experimental_automaticToolResolution: true,toolsRequiringConfirmation: ["dangerousOperation"],});Tools are automatically categorized based on their configuration:
TypeScript const tools = {// Auto-executes (has execute function)getLocalTime: {description: "Get current local time",inputSchema: z.object({}),execute: async () => new Date().toLocaleString(),},// Requires confirmation (no execute function)deleteFile: {description: "Delete a file from the system",inputSchema: z.object({filename: z.string(),}),},// Server-executed (no client confirmation)analyzeData: {description: "Analyze dataset on server",inputSchema: z.object({ data: z.array(z.number()) }),serverExecuted: true,},} satisfies Record<string, AITool>;Send messages using the new v5 format with parts array:
TypeScript // Text messagesendMessage({role: "user",parts: [{ type: "text", text: "Hello, assistant!" }],});// Multi-part message with filesendMessage({role: "user",parts: [{ type: "text", text: "Analyze this image:" },{ type: "image", image: imageData },],});Simplified logic for detecting pending tool confirmations:
TypeScript const pendingToolCallConfirmation = messages.some((m) =>m.parts?.some((part) => isToolUIPart(part) && part.state === "input-available",),);// Handle tool confirmationif (pendingToolCallConfirmation) {await addToolResult({toolCallId: part.toolCallId,tool: getToolName(part),output: "User approved the action",});}Seamlessly handle legacy message formats without code changes.
TypeScript // All these formats are automatically converted:// Legacy v4 string contentconst legacyMessage = {role: "user",content: "Hello world",};// Legacy v4 with tool callsconst legacyWithTools = {role: "assistant",content: "",toolInvocations: [{toolCallId: "123",toolName: "weather",args: { city: "SF" },state: "result",result: "Sunny, 72°F",},],};// Automatically becomes v5 format:// {// role: "assistant",// parts: [{// type: "tool-call",// toolCallId: "123",// toolName: "weather",// args: { city: "SF" },// state: "result",// result: "Sunny, 72°F"// }]// }Migrate tool definitions to use the new
inputSchemaproperty.TypeScript // Before (AI SDK v4)const tools = {weather: {description: "Get weather information",parameters: z.object({city: z.string(),}),execute: async (args) => {return await getWeather(args.city);},},};// After (AI SDK v5)const tools = {weather: {description: "Get weather information",inputSchema: z.object({city: z.string(),}),execute: async (args) => {return await getWeather(args.city);},},};Seamless integration with Cloudflare Workers AI models through the updated workers-ai-provider v2.0.0.
Use Cloudflare Workers AI models directly in your agent workflows:
TypeScript import { createWorkersAI } from "workers-ai-provider";import { useAgentChat } from "agents/ai-react";// Create Workers AI model (v2.0.0 - same API, enhanced v5 internals)const model = createWorkersAI({binding: env.AI,})("@cf/meta/llama-3.2-3b-instruct");Workers AI models now support v5 file handling with automatic conversion:
TypeScript // Send images and files to Workers AI modelssendMessage({role: "user",parts: [{ type: "text", text: "Analyze this image:" },{type: "file",data: imageBuffer,mediaType: "image/jpeg",},],});// Workers AI provider automatically converts to proper formatEnhanced streaming support with automatic warning detection:
TypeScript // Streaming with Workers AI modelsconst result = await streamText({model: createWorkersAI({ binding: env.AI })("@cf/meta/llama-3.2-3b-instruct"),messages,onChunk: (chunk) => {// Enhanced streaming with warning handlingconsole.log(chunk);},});Update your imports to use the new v5 types:
TypeScript // Before (AI SDK v4)import type { Message } from "ai";import { useChat } from "ai/react";// After (AI SDK v5)import type { UIMessage } from "ai";// or alias for compatibilityimport type { UIMessage as Message } from "ai";import { useChat } from "@ai-sdk/react";- Migration Guide ↗ - Comprehensive migration documentation
- AI SDK v5 Documentation ↗ - Official AI SDK migration guide
- An Example PR showing the migration from AI SDK v4 to v5 ↗
- GitHub Issues ↗ - Report bugs or request features
We'd love your feedback! We're particularly interested in feedback on:
- Migration experience - How smooth was the upgrade process?
- Tool confirmation workflow - Does the new automatic detection work as expected?
- Message format handling - Any edge cases with legacy message conversion?
We've updated our "Built with Cloudflare" button to make it easier to share that you're building on Cloudflare with the world. Embed it in your project's README, blog post, or wherever you want to let people know.

Check out the documentation for usage information.
Deploying static site to Workers is now easier. When you run
wrangler deploy [directory]orwrangler deploy --assets [directory]without an existing configuration file, Wrangler CLI now guides you through the deployment process with interactive prompts.Before: Required remembering multiple flags and parameters
Terminal window wrangler deploy --assets ./dist --compatibility-date 2025-09-09 --name my-projectAfter: Simple directory deployment with guided setup
Terminal window wrangler deploy dist# Interactive prompts handle the rest as shown in the example flow belowInteractive prompts for missing configuration:
- Wrangler detects when you're trying to deploy a directory of static assets
- Prompts you to confirm the deployment type
- Asks for a project name (with smart defaults)
- Automatically sets the compatibility date to today
Automatic configuration generation:
- Creates a
wrangler.jsoncfile with your deployment settings - Stores your choices for future deployments
- Eliminates the need to remember complex command-line flags
Terminal window # Deploy your built static sitewrangler deploy dist# Wrangler will prompt:✔ It looks like you are trying to deploy a directory of static assets only. Is this correct? … yes✔ What do you want to name your project? … my-astro-site# Automatically generates a wrangler.jsonc file and adds it to your project:{"name": "my-astro-site","compatibility_date": "2025-09-09","assets": {"directory": "dist"}}# Next time you run wrangler deploy, this will use the configuration in your newly generated wrangler.jsonc filewrangler deploy- You must use Wrangler version 4.24.4 or later in order to use this feature
We're excited to be a launch partner alongside Google ↗ to bring their newest embedding model, EmbeddingGemma, to Workers AI that delivers best-in-class performance for its size, enabling RAG and semantic search use cases.
@cf/google/embeddinggemma-300mis a 300M parameter embedding model from Google, built from Gemma 3 and the same research used to create Gemini models. This multilingual model supports 100+ languages, making it ideal for RAG systems, semantic search, content classification, and clustering tasks.Using EmbeddingGemma in AI Search: Now you can leverage EmbeddingGemma directly through AI Search for your RAG pipelines. EmbeddingGemma's multilingual capabilities make it perfect for global applications that need to understand and retrieve content across different languages with exceptional accuracy.
To use EmbeddingGemma for your AI Search projects:
- Go to Create in the AI Search dashboard ↗
- Follow the setup flow for your new RAG instance
- In the Generate Index step, open up More embedding models and select
@cf/google/embeddinggemma-300mas your embedding model - Complete the setup to create an AI Search
Try it out and let us know what you think!
You can now upload up to 100,000 static assets per Worker version
- Paid and Workers for Platforms users can now upload up to 100,000 static assets per Worker version, a 5x increase from the previous limit of 20,000.
- Customers on the free plan still have the same limit as before — 20,000 static assets per version of your Worker
- The individual file size limit of 25 MiB remains unchanged for all customers.
This increase allows you to build larger applications with more static assets without hitting limits.
To take advantage of the increased limits, you must use Wrangler version 4.34.0 or higher. Earlier versions of Wrangler will continue to enforce the previous 20,000 file limit.
For more information about Workers static assets, see the Static Assets documentation and Platform Limits.
You can now manage Workers, Versions, and Deployments as separate resources with a new, resource-oriented API (Beta).
This new API is supported in the Cloudflare Terraform provider ↗ and the Cloudflare Typescript SDK ↗, allowing platform teams to manage a Worker's infrastructure in Terraform, while development teams handle code deployments from a separate repository or workflow. We also designed this API with AI agents in mind, as a clear, predictable structure is essential for them to reliably build, test, and deploy applications.
- New beta API endpoints
- Cloudflare TypeScript SDK v5.0.0 ↗
- Cloudflare Go SDK v6.0.0 ↗
- Terraform provider v5.9.0 ↗:
cloudflare_worker↗ ,cloudflare_worker_version↗, andcloudflare_workers_deployments↗ resources. - See full examples in our Infrastructure as Code (IaC) guide
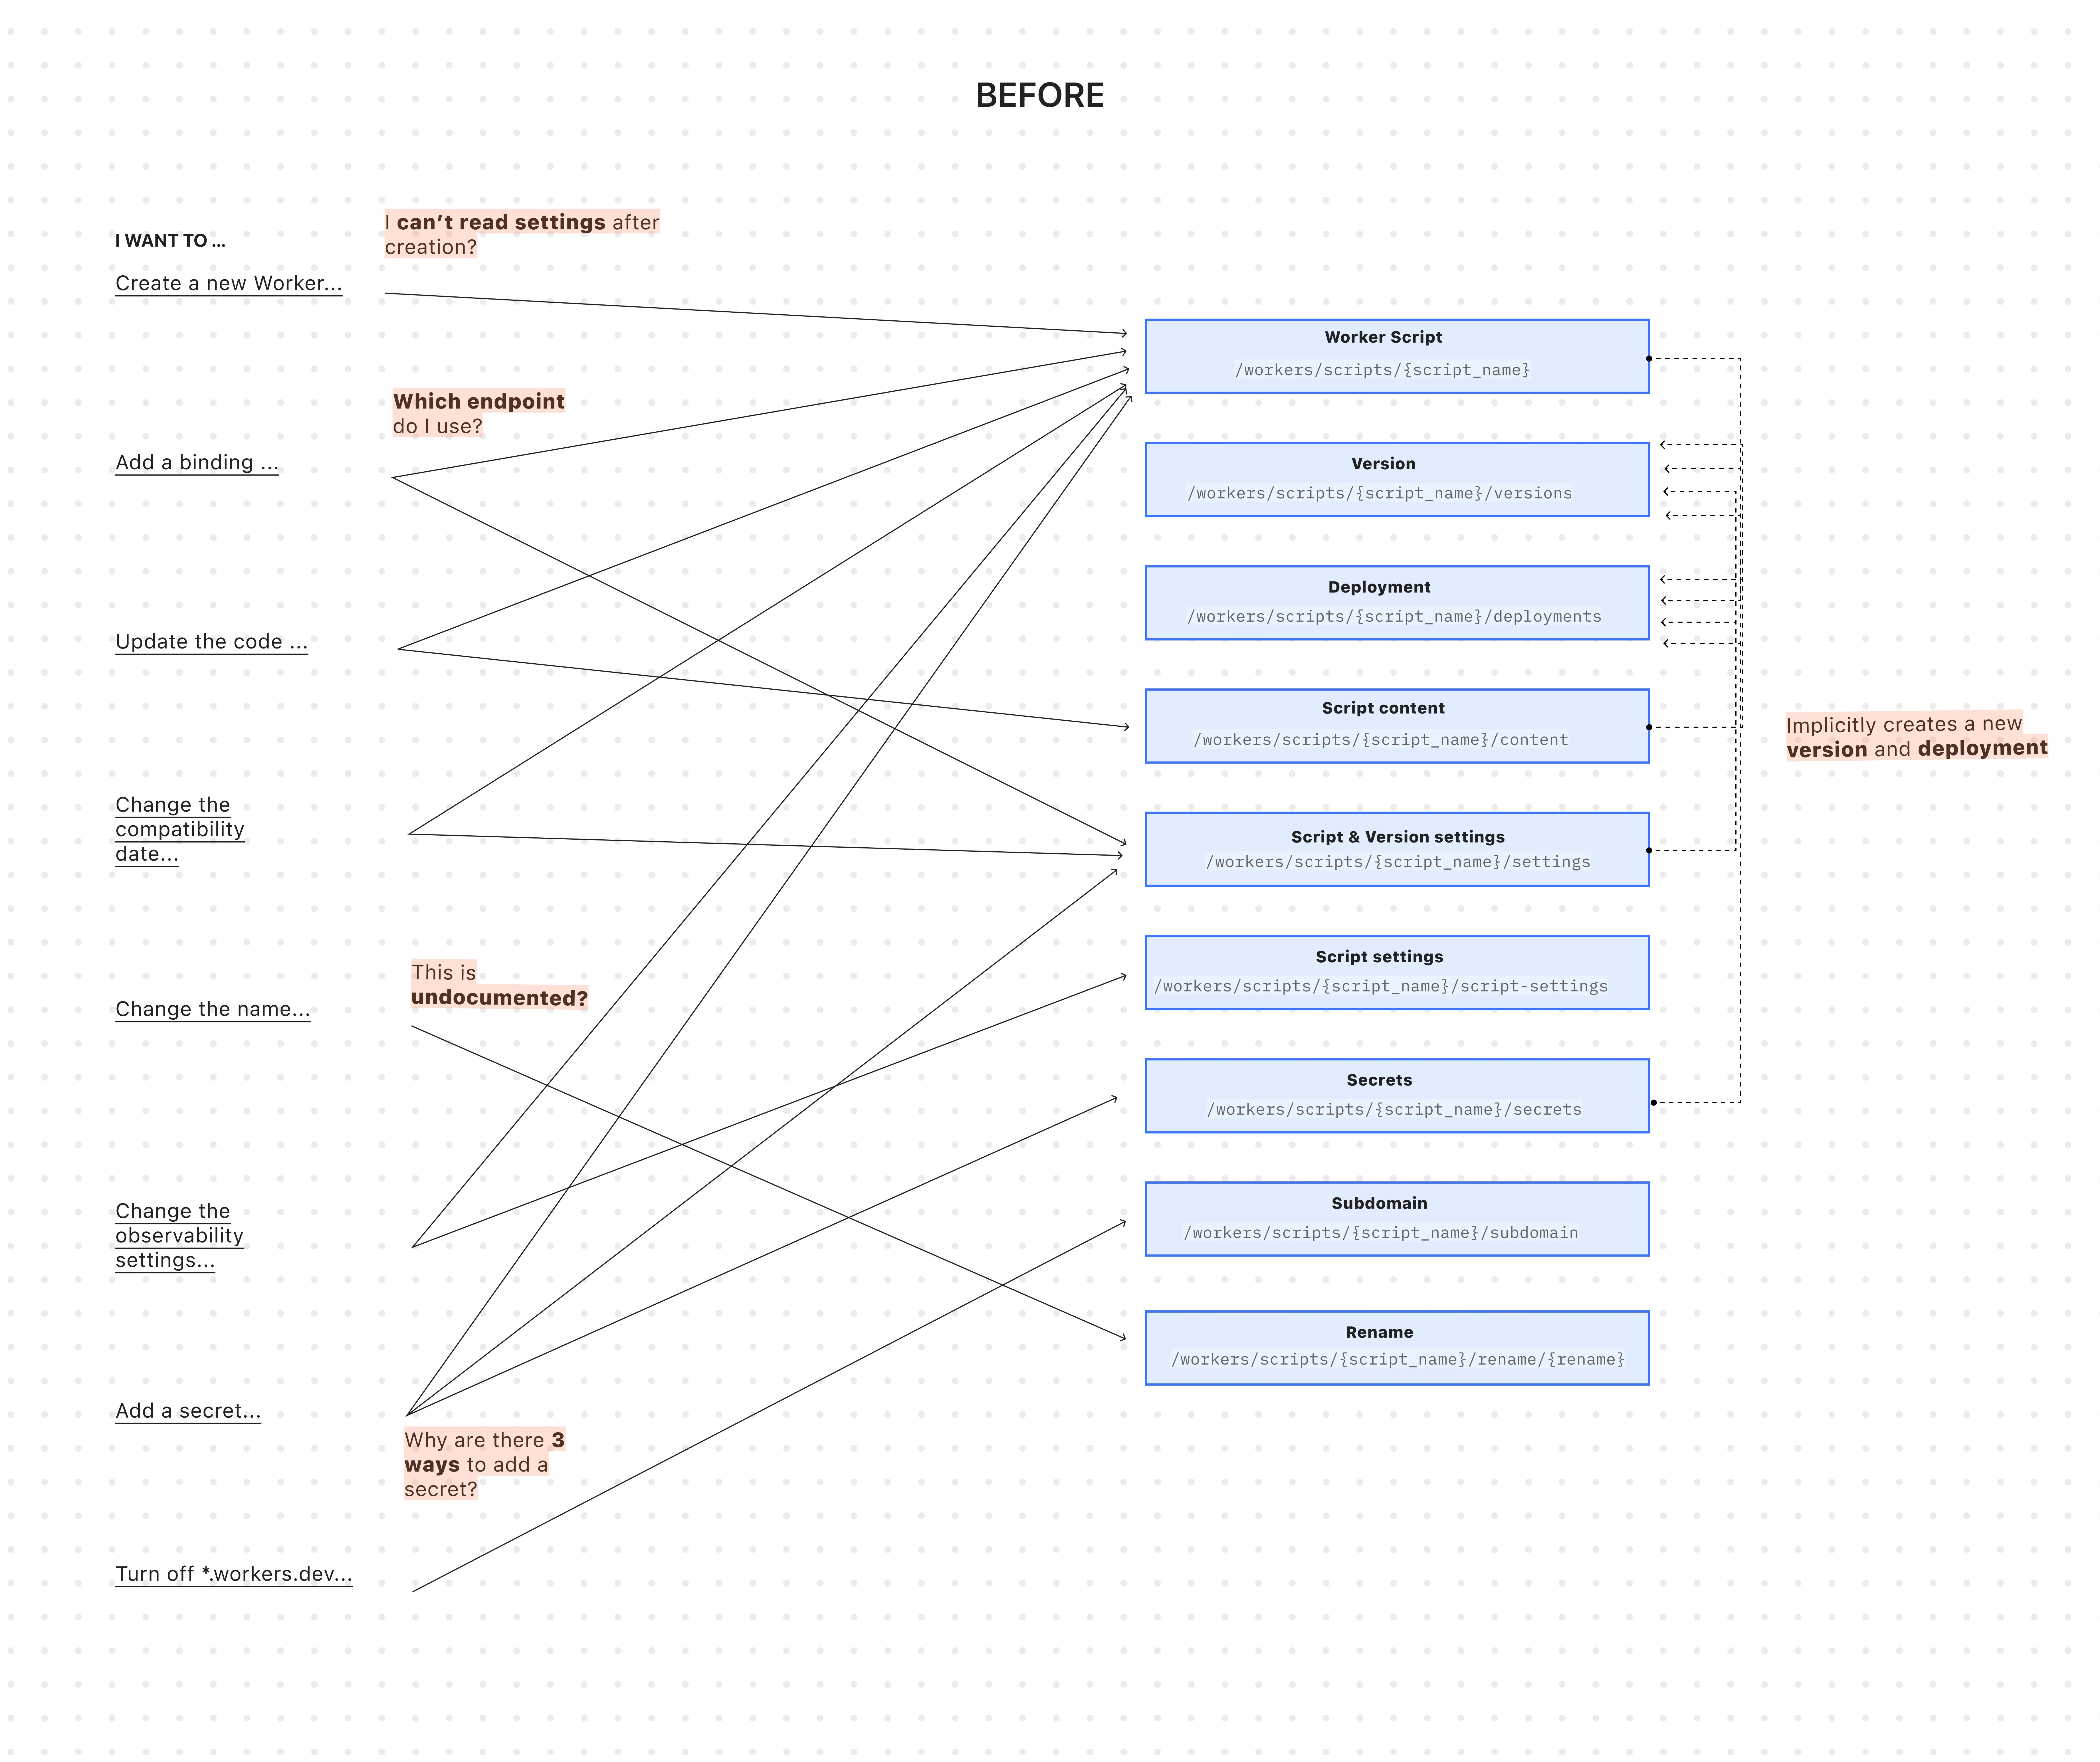
The existing API was originally designed for simple, one-shot script uploads:
Terminal window curl -X PUT "https://api.cloudflare.com/client/v4/accounts/$ACCOUNT_ID/workers/scripts/$SCRIPT_NAME" \-H "X-Auth-Email: $CLOUDFLARE_EMAIL" \-H "X-Auth-Key: $CLOUDFLARE_API_KEY" \-H "Content-Type: multipart/form-data" \-F 'metadata={"main_module": "worker.js","compatibility_date": "$today$"}' \-F "worker.js=@worker.js;type=application/javascript+module"This API worked for creating a basic Worker, uploading all of its code, and deploying it immediately — but came with challenges:
-
A Worker couldn't exist without code: To create a Worker, you had to upload its code in the same API request. This meant platform teams couldn't provision Workers with the proper settings, and then hand them off to development teams to deploy the actual code.
-
Several endpoints implicitly created deployments: Simple updates like adding a secret or changing a script's content would implicitly create a new version and immediately deploy it.
-
Updating a setting was confusing: Configuration was scattered across eight endpoints with overlapping responsibilities. This ambiguity made it difficult for human developers (and even more so for AI agents) to reliably update a Worker via API.
-
Scripts used names as primary identifiers: This meant simple renames could turn into a risky migration, requiring you to create a brand new Worker and update every reference. If you were using Terraform, this could inadvertently destroy your Worker altogether.

All endpoints now use simple JSON payloads, with script content embedded as
base64-encoded strings -- a more consistent and reliable approach than the previousmultipart/form-dataformat.-
Worker: The parent resource representing your application. It has a stable UUID and holds persistent settings like
name,tags, andlogpush. You can now create a Worker to establish its identity and settings before any code is uploaded. -
Version: An immutable snapshot of your code and its specific configuration, like bindings and
compatibility_date. Creating a new version is a safe action that doesn't affect live traffic. -
Deployment: An explicit action that directs traffic to a specific version.
Workers are now standalone resources that can be created and configured without any code. Platform teams can provision Workers with the right settings, then hand them off to development teams for implementation.
TypeScript // Step 1: Platform team creates the Worker resource (no code needed)const worker = await client.workers.beta.workers.create({name: "payment-service",account_id: "...",observability: {enabled: true,},});// Step 2: Development team adds code and creates a version laterconst version = await client.workers.beta.workers.versions.create(worker.id, {account_id: "...",main_module: "worker.js",compatibility_date: "$today",bindings: [ /*...*/ ],modules: [{name: "worker.js",content_type: "application/javascript+module",content_base64: Buffer.from(scriptContent).toString("base64"),},],});// Step 3: Deploy explicitly when readyconst deployment = await client.workers.scripts.deployments.create(worker.name, {account_id: "...",strategy: "percentage",versions: [{percentage: 100,version_id: version.id,},],});If you use Terraform, you can now declare the Worker in your Terraform configuration and manage configuration outside of Terraform in your Worker's
wrangler.jsoncfile and deploy code changes using Wrangler.resource "cloudflare_worker" "my_worker" {account_id = "..."name = "my-important-service"}# Manage Versions and Deployments here or outside of Terraform# resource "cloudflare_worker_version" "my_worker_version" {}# resource "cloudflare_workers_deployment" "my_worker_deployment" {}Creating a version and deploying it are now always explicit, separate actions - never implicit side effects. To update version-specific settings (like bindings), you create a new version with those changes. The existing deployed version remains unchanged until you explicitly deploy the new one.
Terminal window # Step 1: Create a new version with updated settings (doesn't affect live traffic)POST /workers/workers/{id}/versions{"compatibility_date": "$today","bindings": [{"name": "MY_NEW_ENV_VAR","text": "new_value","type": "plain_text"}],"modules": [...]}# Step 2: Explicitly deploy when ready (now affects live traffic)POST /workers/scripts/{script_name}/deployments{"strategy": "percentage","versions": [{"percentage": 100,"version_id": "new_version_id"}]}Configuration is now logically divided: Worker settings (like
nameandtags) persist across all versions, while Version settings (likebindingsandcompatibility_date) are specific to each code snapshot.Terminal window # Worker settings (the parent resource)PUT /workers/workers/{id}{"name": "payment-service","tags": ["production"],"logpush": true,}Terminal window # Version settings (the "code")POST /workers/workers/{id}/versions{"compatibility_date": "$today","bindings": [...],"modules": [...]}The
/workers/workers/path now supports addressing a Worker by both its immutable UUID and its mutable name.Terminal window # Both work for the same WorkerGET /workers/workers/29494978e03748669e8effb243cf2515 # UUID (stable for automation)GET /workers/workers/payment-service # Name (convenient for humans)This dual approach means:
- Developers can use readable names for debugging.
- Automation can rely on stable UUIDs to prevent errors when Workers are renamed.
- Terraform can rename Workers without destroying and recreating them.
- The pre-existing Workers REST API remains fully supported. Once the new API exits beta, we'll provide a migration timeline with ample notice and comprehensive migration guides.
- Existing Terraform resources and SDK methods will continue to be fully supported through the current major version.
- While the Deployments API currently remains on the
/scripts/endpoint, we plan to introduce a new Deployments endpoint under/workers/to match the new API structure.
Starting December 1, 2025, list endpoints for the Cloudflare Tunnel API and Zero Trust Networks API will no longer return deleted tunnels, routes, subnets and virtual networks by default. This change makes the API behavior more intuitive by only returning active resources unless otherwise specified.
No action is required if you already explicitly set
is_deleted=falseor if you only need to list active resources.This change affects the following API endpoints:
- List all tunnels:
GET /accounts/{account_id}/tunnels - List Cloudflare Tunnels:
GET /accounts/{account_id}/cfd_tunnel - List WARP Connector tunnels:
GET /accounts/{account_id}/warp_connector - List tunnel routes:
GET /accounts/{account_id}/teamnet/routes - List subnets:
GET /accounts/{account_id}/zerotrust/subnets - List virtual networks:
GET /accounts/{account_id}/teamnet/virtual_networks
The default behavior of the
is_deletedquery parameter will be updated.Scenario Previous behavior (before December 1, 2025) New behavior (from December 1, 2025) is_deletedparameter is omittedReturns active & deleted tunnels, routes, subnets and virtual networks Returns only active tunnels, routes, subnets and virtual networks If you need to retrieve deleted (or all) resources, please update your API calls to explicitly include the
is_deletedparameter before December 1, 2025.To get a list of only deleted resources, you must now explicitly add the
is_deleted=truequery parameter to your request:Terminal window # Example: Get ONLY deleted Tunnelscurl "https://api.cloudflare.com/client/v4/accounts/$ACCOUNT_ID/tunnels?is_deleted=true" \-H "Authorization: Bearer $API_TOKEN"# Example: Get ONLY deleted Virtual Networkscurl "https://api.cloudflare.com/client/v4/accounts/$ACCOUNT_ID/teamnet/virtual_networks?is_deleted=true" \-H "Authorization: Bearer $API_TOKEN"Following this change, retrieving a complete list of both active and deleted resources will require two separate API calls: one to get active items (by omitting the parameter or using
is_deleted=false) and one to get deleted items (is_deleted=true).This update is based on user feedback and aims to:
- Create a more intuitive default: Aligning with common API design principles where list operations return only active resources by default.
- Reduce unexpected results: Prevents users from accidentally operating on deleted resources that were returned unexpectedly.
- Improve performance: For most users, the default query result will now be smaller and more relevant.
To learn more, please visit the Cloudflare Tunnel API and Zero Trust Networks API documentation.
- List all tunnels:
Earlier this year, we announced the launch of the new Terraform v5 Provider. We are aware of the high number of issues ↗ reported by the Cloudflare community related to the v5 release. We have committed to releasing improvements on a 2 week cadence to ensure its stability and reliability, including the v5.9 release. We have also pivoted from an issue-to-issue approach to a resource-per-resource approach - we will be focusing on specific resources for every release, stabilizing the release, and closing all associated bugs with that resource before moving onto resolving migration issues.
Thank you for continuing to raise issues. We triage them weekly and they help make our products stronger.
This release includes a new resource,
cloudflare_snippet, which replacescloudflare_snippets.cloudflare_snippetis now considered deprecated but can still be used. Please utilizecloudflare_snippetas soon as possible.- Resources stabilized:
cloudflare_zone_settingcloudflare_worker_scriptcloudflare_worker_routetiered_cache
- NEW resource
cloudflare_snippetwhich should be used in place ofcloudflare_snippets.cloudflare_snippetsis now deprecated. This enables the management of Cloudflare's snippet functionality through Terraform. - DNS Record Improvements: Enhanced handling of DNS record drift detection
- Load Balancer Fixes: Resolved
created_onfield inconsistencies and improved pool configuration handling - Bot Management: Enhanced auto-update model state consistency and fight mode configurations
- Other bug fixes
For a more detailed look at all of the changes, refer to the changelog ↗ in GitHub.
- #5921: In cloudflare_ruleset removing an existing rule causes recreation of later rules ↗
- #5904: cloudflare_zero_trust_access_application is not idempotent ↗
- #5898: (cloudflare_workers_script) Durable Object migrations not applied ↗
- #5892: cloudflare_workers_script secret_text environment variable gets replaced on every deploy ↗
- #5891: cloudflare_zone suddenly started showing drift ↗
- #5882: cloudflare_zero_trust_list always marked for change due to read only attributes ↗
- #5879: cloudflare_zero_trust_gateway_certificate unable to manage resource (cant mark as active/inactive) ↗
- #5858: cloudflare_dns_records is always updated in-place ↗
- #5839: Recurring change on cloudflare_zero_trust_gateway_policy after upgrade to V5 provider & also setting expiration fails ↗
- #5811: Reusable policies are imported as inline type for cloudflare_zero_trust_access_application ↗
- #5795: cloudflare_zone_setting inconsistent value of "editable" upon apply ↗
- #5789: Pagination issue fetching all policies in "cloudflare_zero_trust_access_policies" data source ↗
- #5770: cloudflare_zero_trust_access_application type warp diff on every apply ↗
- #5765: V5 / cloudflare_zone_dnssec fails with HTTP/400 "Malformed request body" ↗
- #5755: Unable to manage Cloudflare managed WAF rules via Terraform ↗
- #5738: v4 to v5 upgrade failing Error: no schema available AND Unable to Read Previously Saved State for UpgradeResourceState ↗
- #5727: cloudflare_ruleset http_request_cache_settings bypass mismatch between dashboard and terraform ↗
- #5700: cloudflare_account_member invalid type 'string' for field 'roles' ↗
If you have an unaddressed issue with the provider, we encourage you to check the open issues ↗ and open a new issue if one does not already exist for what you are experiencing.
We suggest holding off on migration to v5 while we work on stabilization. This help will you avoid any blocking issues while the Terraform resources are actively being stabilized.
If you'd like more information on migrating from v4 to v5, please make use of the migration guide ↗. We have provided automated migration scripts using Grit which simplify the transition. These do not support implementations which use Terraform modules, so customers making use of modules need to migrate manually. Please make use of
terraform planto test your changes before applying, and let us know if you encounter any additional issues by reporting to our GitHub repository ↗.- Resources stabilized:
New state-of-the-art models have landed on Workers AI! This time, we're introducing new partner models trained by our friends at Deepgram ↗ and Leonardo ↗, hosted on Workers AI infrastructure.
As well, we're introuding a new turn detection model that enables you to detect when someone is done speaking — useful for building voice agents!
Read the blog ↗ for more details and check out some of the new models on our platform:
@cf/deepgram/aura-1is a text-to-speech model that allows you to input text and have it come to life in a customizable voice@cf/deepgram/nova-3is speech-to-text model that transcribes multilingual audio at a blazingly fast speed@cf/pipecat-ai/smart-turn-v2helps you detect when someone is done speaking@cf/leonardo/lucid-originis a text-to-image model that generates images with sharp graphic design, stunning full-HD renders, or highly specific creative direction@cf/leonardo/phoenix-1.0is a text-to-image model with exceptional prompt adherence and coherent text
You can filter out new partner models with the
Partnercapability on our Models page.As well, we're introducing WebSocket support for some of our audio models, which you can filter though the
Realtimecapability on our Models page. WebSockets allows you to create a bi-directional connection to our inference server with low latency — perfect for those that are building voice agents.An example python snippet on how to use WebSockets with our new Aura model:
import jsonimport osimport asyncioimport websocketsuri = f"wss://api.cloudflare.com/client/v4/accounts/{ACCOUNT_ID}/ai/run/@cf/deepgram/aura-1"input = ["Line one, out of three lines that will be provided to the aura model.","Line two, out of three lines that will be provided to the aura model.","Line three, out of three lines that will be provided to the aura model. This is a last line.",]async def text_to_speech():async with websockets.connect(uri, additional_headers={"Authorization": os.getenv("CF_TOKEN")}) as websocket:print("connection established")for line in input:print(f"sending `{line}`")await websocket.send(json.dumps({"type": "Speak", "text": line}))print("line was sent, flushing")await websocket.send(json.dumps({"type": "Flush"}))print("flushed, recving")resp = await websocket.recv()print(f"response received {resp}")if __name__ == "__main__":asyncio.run(text_to_speech())
You can now list all vector identifiers in a Vectorize index using the new
list-vectorsoperation. This enables bulk operations, auditing, and data migration workflows through paginated requests that maintain snapshot consistency.The operation is available via Wrangler CLI and REST API. Refer to the list-vectors best practices guide for detailed usage guidance.
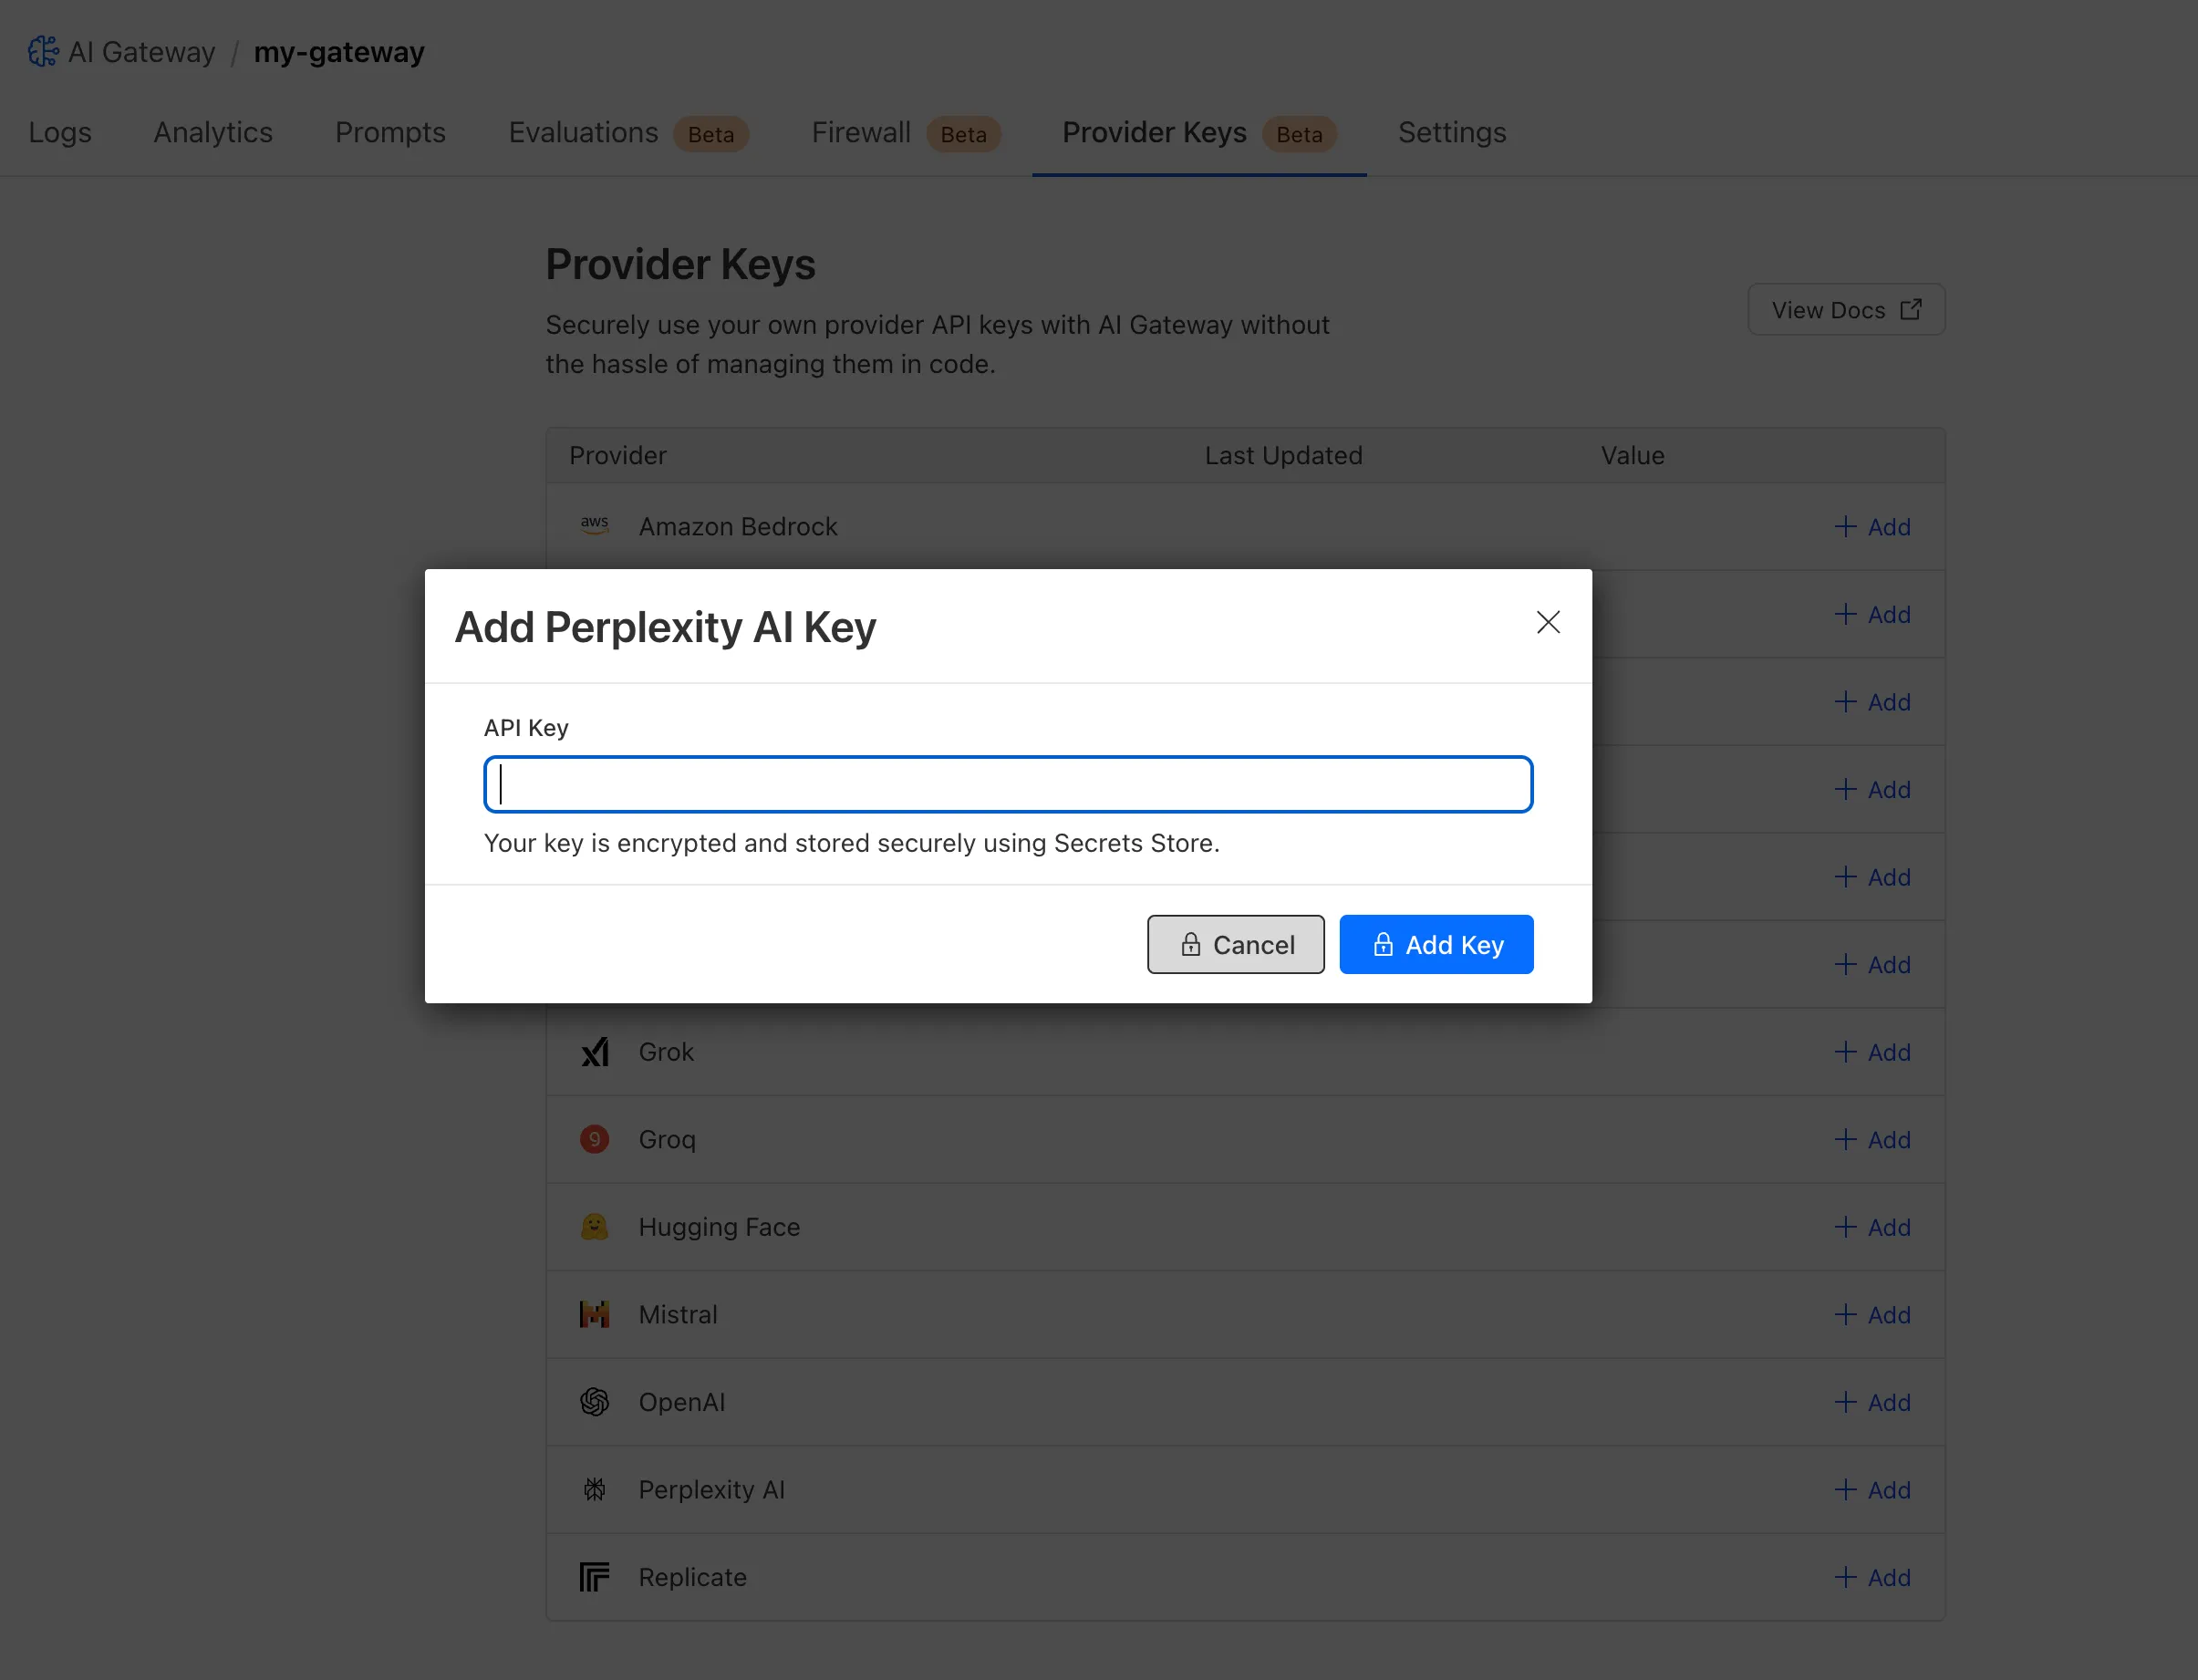
Cloudflare Secrets Store is now integrated with AI Gateway, allowing you to store, manage, and deploy your AI provider keys in a secure and seamless configuration through Bring Your Own Key ↗. Instead of passing your AI provider keys directly in every request header, you can centrally manage each key with Secrets Store and deploy in your gateway configuration using only a reference, rather than passing the value in plain text.
You can now create a secret directly from your AI Gateway in the dashboard ↗ by navigating into your gateway -> Provider Keys -> Add.
You can also create your secret with the newly available ai_gateway scope via wrangler ↗, the Secrets Store dashboard ↗, or the API ↗.
Then, pass the key in the request header using its Secrets Store reference:
Terminal window curl -X POST https://gateway.ai.cloudflare.com/v1/<ACCOUNT_ID>/my-gateway/anthropic/v1/messages \--header 'cf-aig-authorization: ANTHROPIC_KEY_1 \--header 'anthropic-version: 2023-06-01' \--header 'Content-Type: application/json' \--data '{"model": "claude-3-opus-20240229", "messages": [{"role": "user", "content": "What is Cloudflare?"}]}'Or, using Javascript:
import Anthropic from '@anthropic-ai/sdk';const anthropic = new Anthropic({apiKey: "ANTHROPIC_KEY_1",baseURL: "https://gateway.ai.cloudflare.com/v1/<ACCOUNT_ID>/my-gateway/anthropic",});const message = await anthropic.messages.create({model: 'claude-3-opus-20240229',messages: [{role: "user", content: "What is Cloudflare?"}],max_tokens: 1024});For more information, check out the blog ↗!
JavaScript asset responses have been updated to use the
text/javascriptContent-Type header instead ofapplication/javascript. While both MIME types are widely supported by browsers, the HTML Living Standard explicitly recommendstext/javascriptas the preferred type going forward.This change improves:
- Standards alignment: Ensures consistency with the HTML spec and modern web platform guidance.
- Interoperability: Some developer tools, validators, and proxies expect text/javascript and may warn or behave inconsistently with application/javascript.
- Future-proofing: By following the spec-preferred MIME type, we reduce the risk of deprecation warnings or unexpected behavior in evolving browser environments.
- Consistency: Most frameworks, CDNs, and hosting providers now default to text/javascript, so this change matches common ecosystem practice.
Because all major browsers accept both MIME types, this update is backwards compatible and should not cause breakage.
Users will see this change on the next deployment of their assets.
Workers KV has completed rolling out performance improvements across all KV namespaces, providing a significant latency reduction on read operations for all KV users. This is due to architectural changes to KV's underlying storage infrastructure, which introduces a new metadata later and substantially improves redundancy.
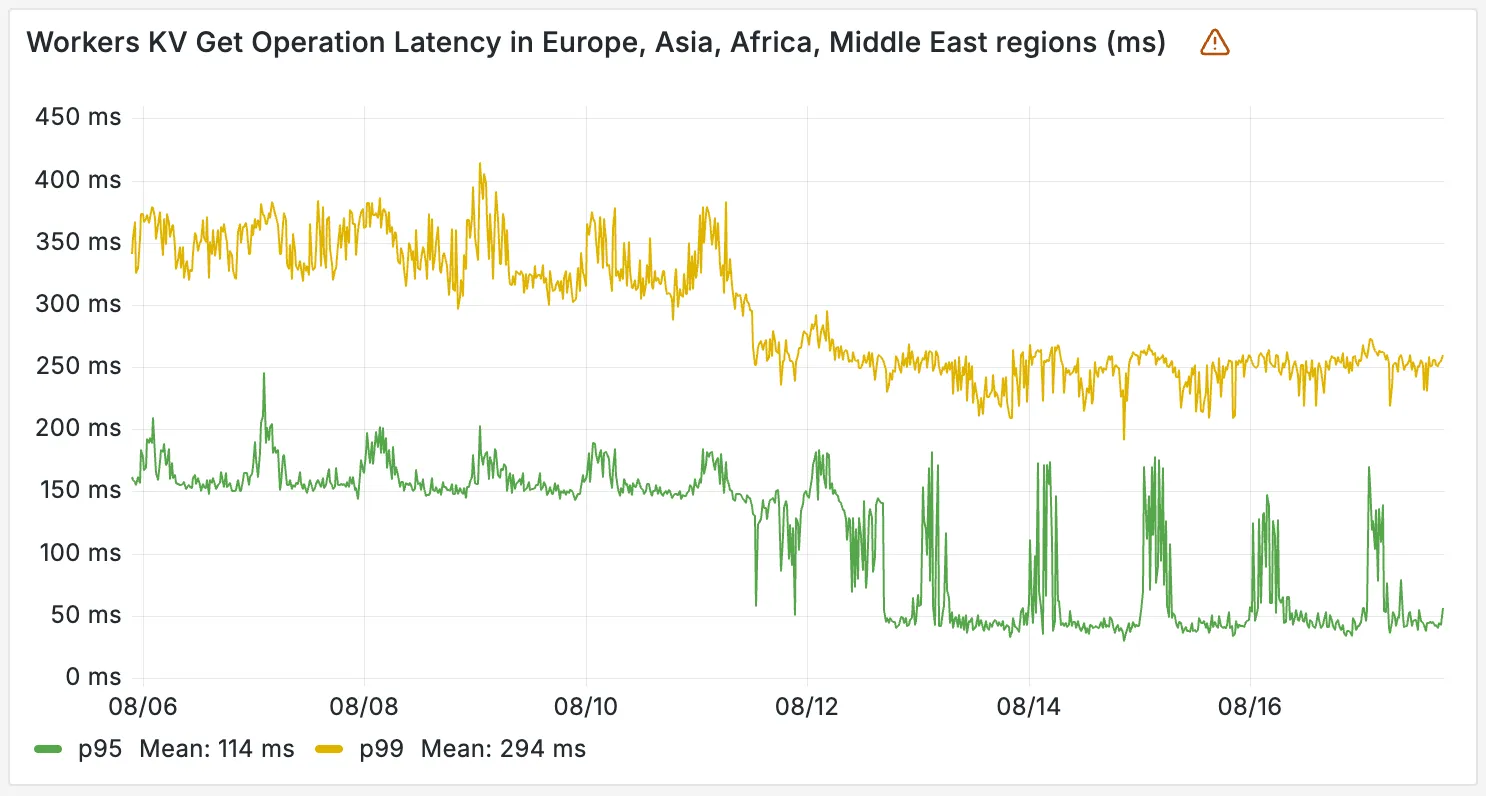
The new hybrid architecture delivers substantial latency reductions throughout Europe, Asia, Middle East, Africa regions. Over the past 2 weeks, we have observed the following:
- p95 latency: Reduced from ~150ms to ~50ms (67% decrease)
- p99 latency: Reduced from ~350ms to ~250ms (29% decrease)
You can now build Workflows using Python. With Python Workflows, you get automatic retries, state persistence, and the ability to run multi-step operations that can span minutes, hours, or weeks using Python’s familiar syntax and the Python Workers runtime.
Python Workflows use the same step-based execution model as JavaScript Workflows, but with Python syntax and access to Python’s ecosystem. Python Workflows also enable DAG (Directed Acyclic Graph) workflows, where you can define complex dependencies between steps using the depends parameter.
Here’s a simple example:
Python from workers import Response, WorkflowEntrypointclass PythonWorkflowStarter(WorkflowEntrypoint):async def run(self, event, step):@step.do("my first step")async def my_first_step():# do some workreturn "Hello Python!"await my_first_step()await step.sleep("my-sleep-step", "10 seconds")@step.do("my second step")async def my_second_step():# do some more workreturn "Hello again!"await my_second_step()class Default(WorkerEntrypoint):async def fetch(self, request):await self.env.MY_WORKFLOW.create()return Response("Hello Workflow creation!")Python Workflows support the same core capabilities as JavaScript Workflows, including sleep scheduling, event-driven workflows, and built-in error handling with configurable retry policies.
To learn more and get started, refer to Python Workflows documentation.
You can now create a client (a Durable Object stub) to a Durable Object with the new
getByNamemethod, removing the need to convert Durable Object names to IDs and then create a stub.JavaScript // Before: (1) translate name to ID then (2) get a clientconst objectId = env.MY_DURABLE_OBJECT.idFromName("foo"); // or .newUniqueId()const stub = env.MY_DURABLE_OBJECT.get(objectId);// Now: retrieve client to Durable Object directly via its nameconst stub = env.MY_DURABLE_OBJECT.getByName("foo");// Use client to send request to the remote Durable Objectconst rpcResponse = await stub.sayHello();Each Durable Object has a globally-unique name, which allows you to send requests to a specific object from anywhere in the world. Thus, a Durable Object can be used to coordinate between multiple clients who need to work together. You can have billions of Durable Objects, providing isolation between application tenants.
To learn more, visit the Durable Objects API Documentation or the getting started guide.
You can now subscribe to events from other Cloudflare services (for example, Workers KV, Workers AI, Workers) and consume those events via Queues, allowing you to build custom workflows, integrations, and logic in response to account activity.
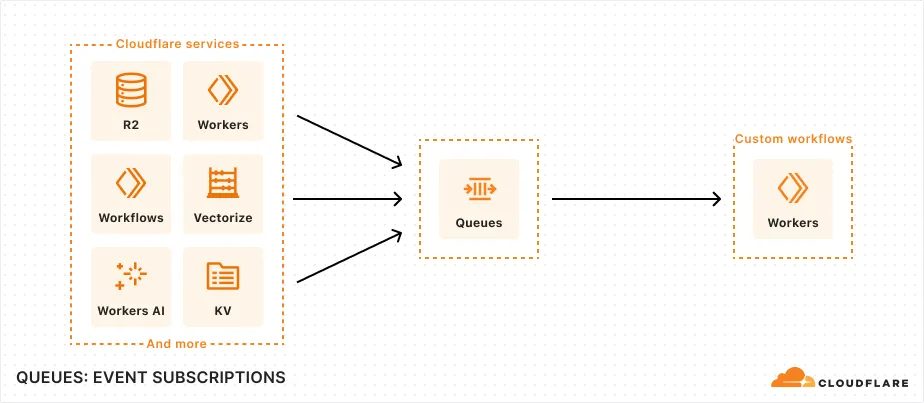
Event subscriptions allow you to receive messages when events occur across your Cloudflare account. Cloudflare products can publish structured events to a queue, which you can then consume with Workers or pull via HTTP from anywhere.
To create a subscription, use the dashboard or Wrangler:
Terminal window npx wrangler queues subscription create my-queue --source r2 --events bucket.createdAn event is a structured record of something happening in your Cloudflare account – like a Workers AI batch request being queued, a Worker build completing, or an R2 bucket being created. Events follow a consistent structure:
Example R2 bucket created event {"type": "cf.r2.bucket.created","source": {"type": "r2"},"payload": {"name": "my-bucket","location": "WNAM"},"metadata": {"accountId": "f9f79265f388666de8122cfb508d7776","eventTimestamp": "2025-07-28T10:30:00Z"}}Current event sources include R2, Workers KV, Workers AI, Workers Builds, Vectorize, Super Slurper, and Workflows. More sources and events are on the way.
For more information on event subscriptions, available events, and how to get started, refer to our documentation.
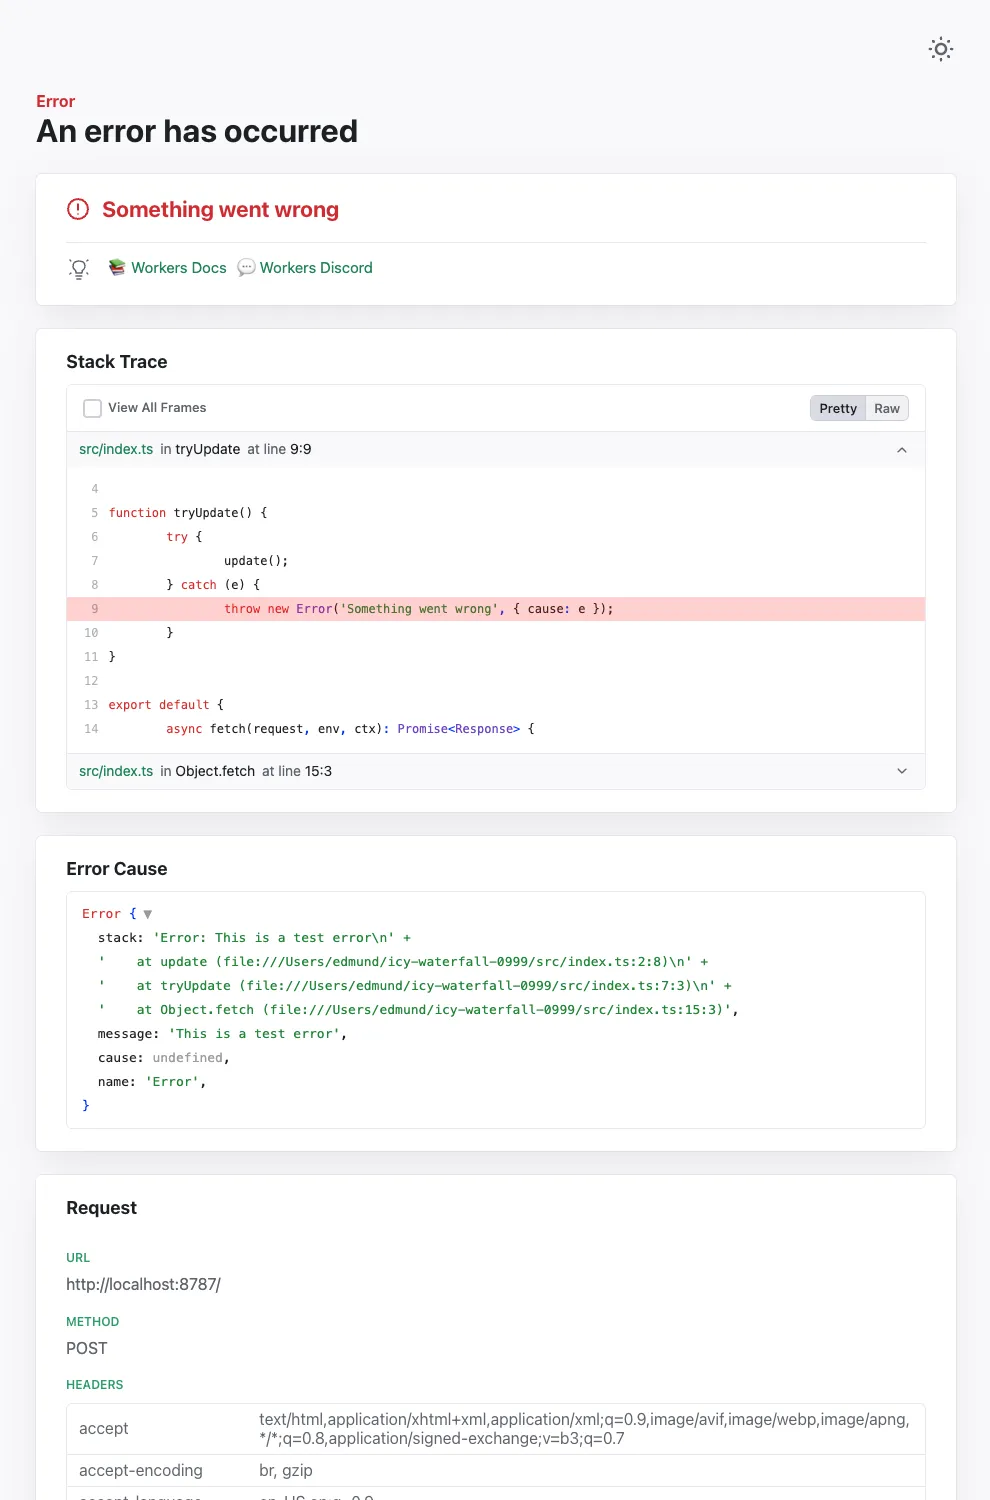
Wrangler's error screen has received several improvements to enhance your debugging experience!
The error screen now features a refreshed design thanks to youch ↗, with support for both light and dark themes, improved source map resolution logic that handles missing source files more reliably, and better error cause display.
Before After (Light) After (Dark) 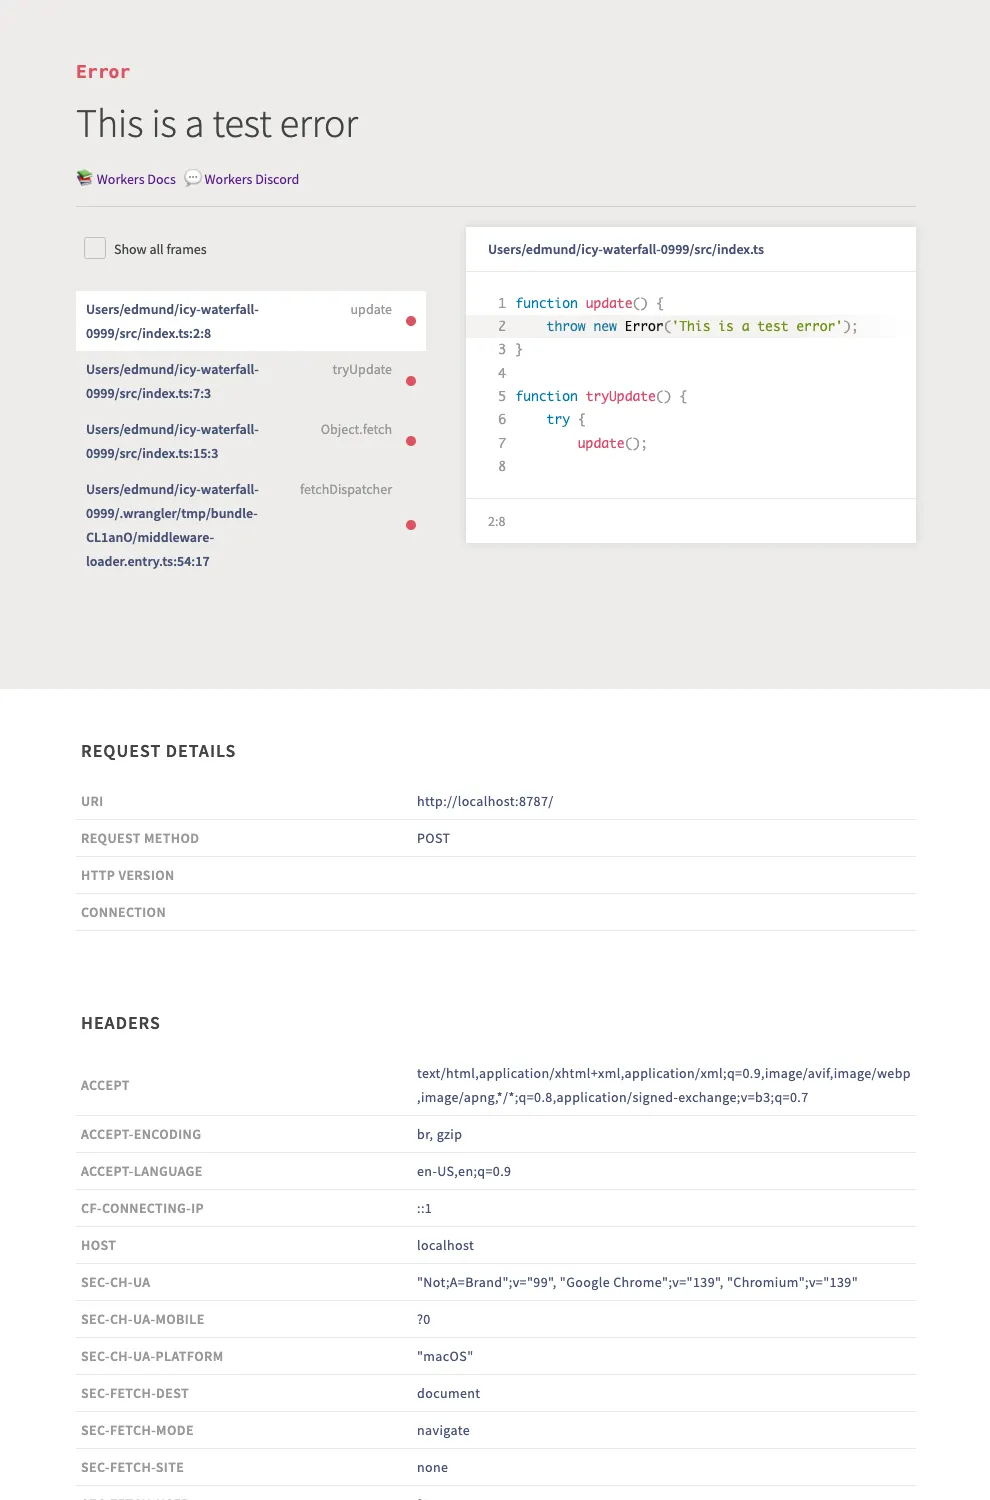
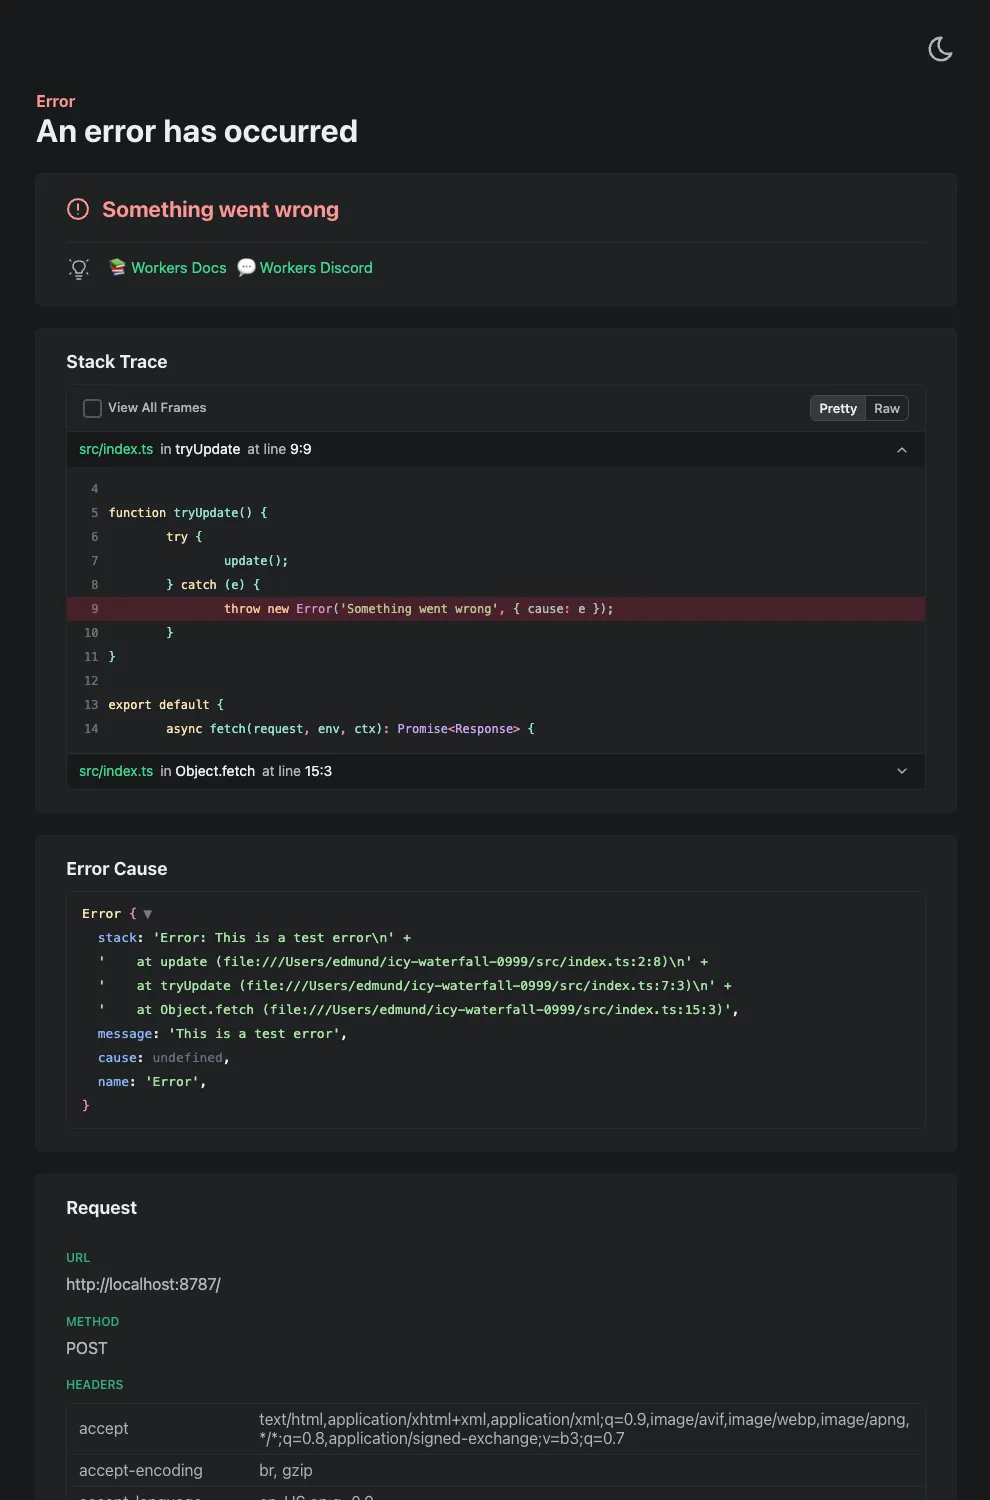
Try it out now with
npx wrangler@latest devin your Workers project.
Earlier this year, we announced the launch of the new Terraform v5 Provider. We are aware of the high number of issues ↗ reported by the Cloudflare Community related to the v5 release. We have committed to releasing improvements on a two week cadence to ensure stability and reliability.
One key change we adopted in recent weeks is a pivot to more comprehensive, test-driven development. We are still evaluating individual issues, but are also investing in much deeper testing to drive our stabilization efforts. We will subsequently be investing in comprehensive migration scripts. As a result, you will see several of the highest traffic APIs have been stabilized in the most recent release, and are supported by comprehensive acceptance tests.
Thank you for continuing to raise issues. We triage them weekly and they help make our products stronger.
- Resources stabilized:
cloudflare_argo_smart_routingcloudflare_bot_managementcloudflare_listcloudflare_list_itemcloudflare_load_balancercloudflare_load_balancer_monitorcloudflare_load_balancer_poolcloudflare_spectrum_applicationcloudflare_managed_transformscloudflare_url_normalization_settingscloudflare_snippetcloudflare_snippet_rulescloudflare_zero_trust_access_applicationcloudflare_zero_trust_access_groupcloudflare_zero_trust_access_identity_providercloudflare_zero_trust_access_mtls_certificatecloudflare_zero_trust_access_mtls_hostname_settingscloudflare_zero_trust_access_policycloudflare_zone
- Multipart handling restored for
cloudflare_snippet cloudflare_bot_managementdiff issues resolves when runningterraform planandterraform apply- Other bug fixes
For a more detailed look at all of the changes, refer to the changelog ↗ in GitHub.
- #5017: 'Uncaught Error: No such module' using cloudflare_snippets ↗
- #5701: cloudflare_workers_script migrations for Durable Objects not recorded in tfstate; cannot be upgraded between versions ↗
- #5640: cloudflare_argo_smart_routing importing doesn't read the actual value ↗
If you have an unaddressed issue with the provider, we encourage you to check the open issues ↗ and open a new one if one does not already exist for what you are experiencing.
We suggest holding off on migration to v5 while we work on stabilization. This will help you avoid any blocking issues while the Terraform resources are actively being stabilized.
If you'd like more information on migrating to v5, please make use of the migration guide ↗. We have provided automated migration scripts using Grit which simplify the transition. These migration scripts do not support implementations which use Terraform modules, so customers making use of modules need to migrate manually. Please make use of
terraform planto test your changes before applying, and let us know if you encounter any additional issues by reporting to our GitHub repository ↗.- Resources stabilized: