
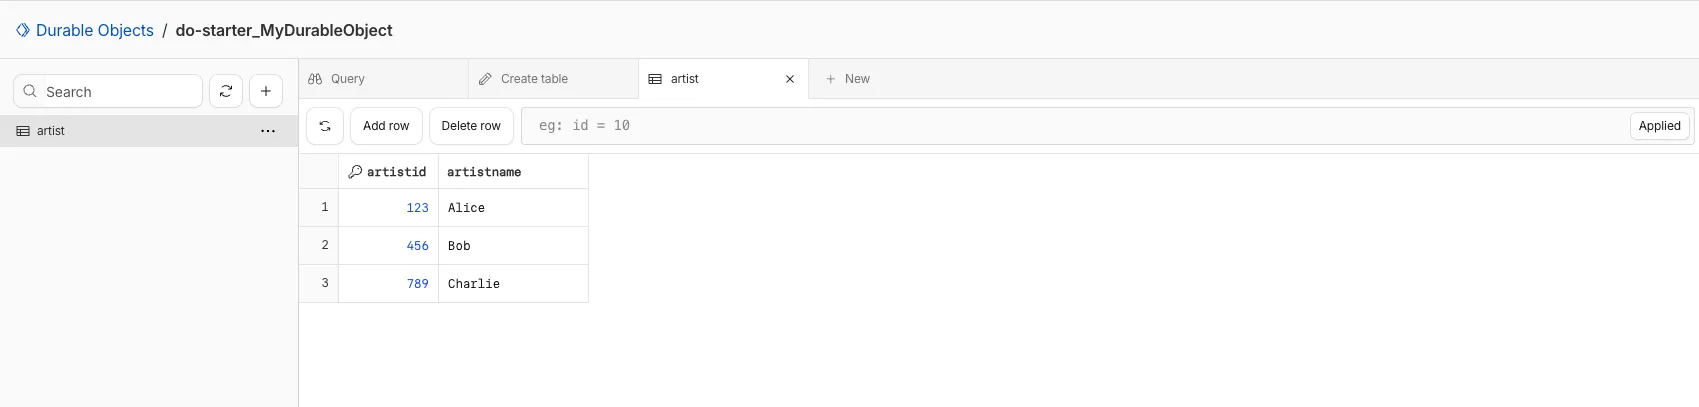
You can now view and write to each Durable Object's storage using a UI editor on the Cloudflare dashboard. Only Durable Objects using SQLite storage can use Data Studio.
Go to Durable ObjectsData Studio unlocks easier data access with Durable Objects for prototyping application data models to debugging production storage usage. Before, querying your Durable Objects data required deploying a Worker.
To access a Durable Object, you can provide an object's unique name or ID generated by Cloudflare. Data Studio requires you to have at least the
Workers Platform Adminrole, and all queries are captured with audit logging for your security and compliance needs. Queries executed by Data Studio send requests to your remote, deployed objects and incur normal usage billing.To learn more, visit the Data Studio documentation. If you have feedback or suggestions for the new Data Studio, please share your experience on Discord ↗
You can now enable compaction for individual Apache Iceberg ↗ tables in R2 Data Catalog, giving you fine-grained control over different workloads.
Terminal window # Enable compaction for a specific table (no token required)npx wrangler r2 bucket catalog compaction enable <BUCKET> <NAMESPACE> <TABLE> --target-size 256This allows you to:
- Apply different target file sizes per table
- Disable compaction for specific tables
- Optimize based on table-specific access patterns
Learn more at Manage catalogs.
You can now enable automatic compaction for Apache Iceberg ↗ tables in R2 Data Catalog to improve query performance.
Compaction is the process of taking a group of small files and combining them into fewer larger files. This is an important maintenance operation as it helps ensure that query performance remains consistent by reducing the number of files that needs to be scanned.
To enable automatic compaction in R2 Data Catalog, find it under R2 Data Catalog in your R2 bucket settings in the dashboard.
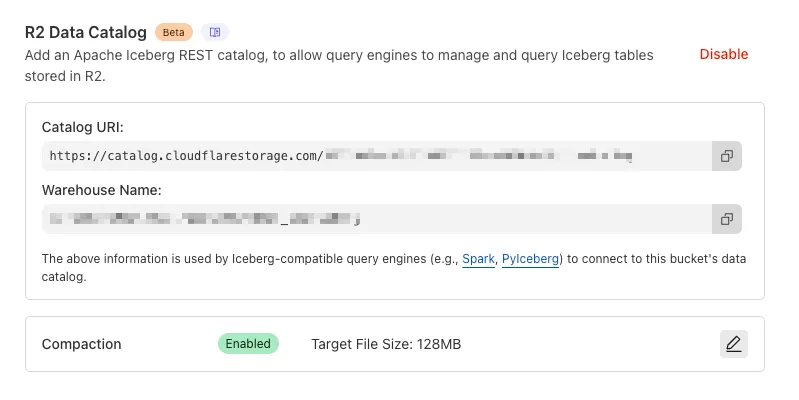
Or with Wrangler, run:
Terminal window npx wrangler r2 bucket catalog compaction enable <BUCKET_NAME> --target-size 128 --token <API_TOKEN>To get started with compaction, check out manage catalogs. For best practices and limitations, refer to about compaction.
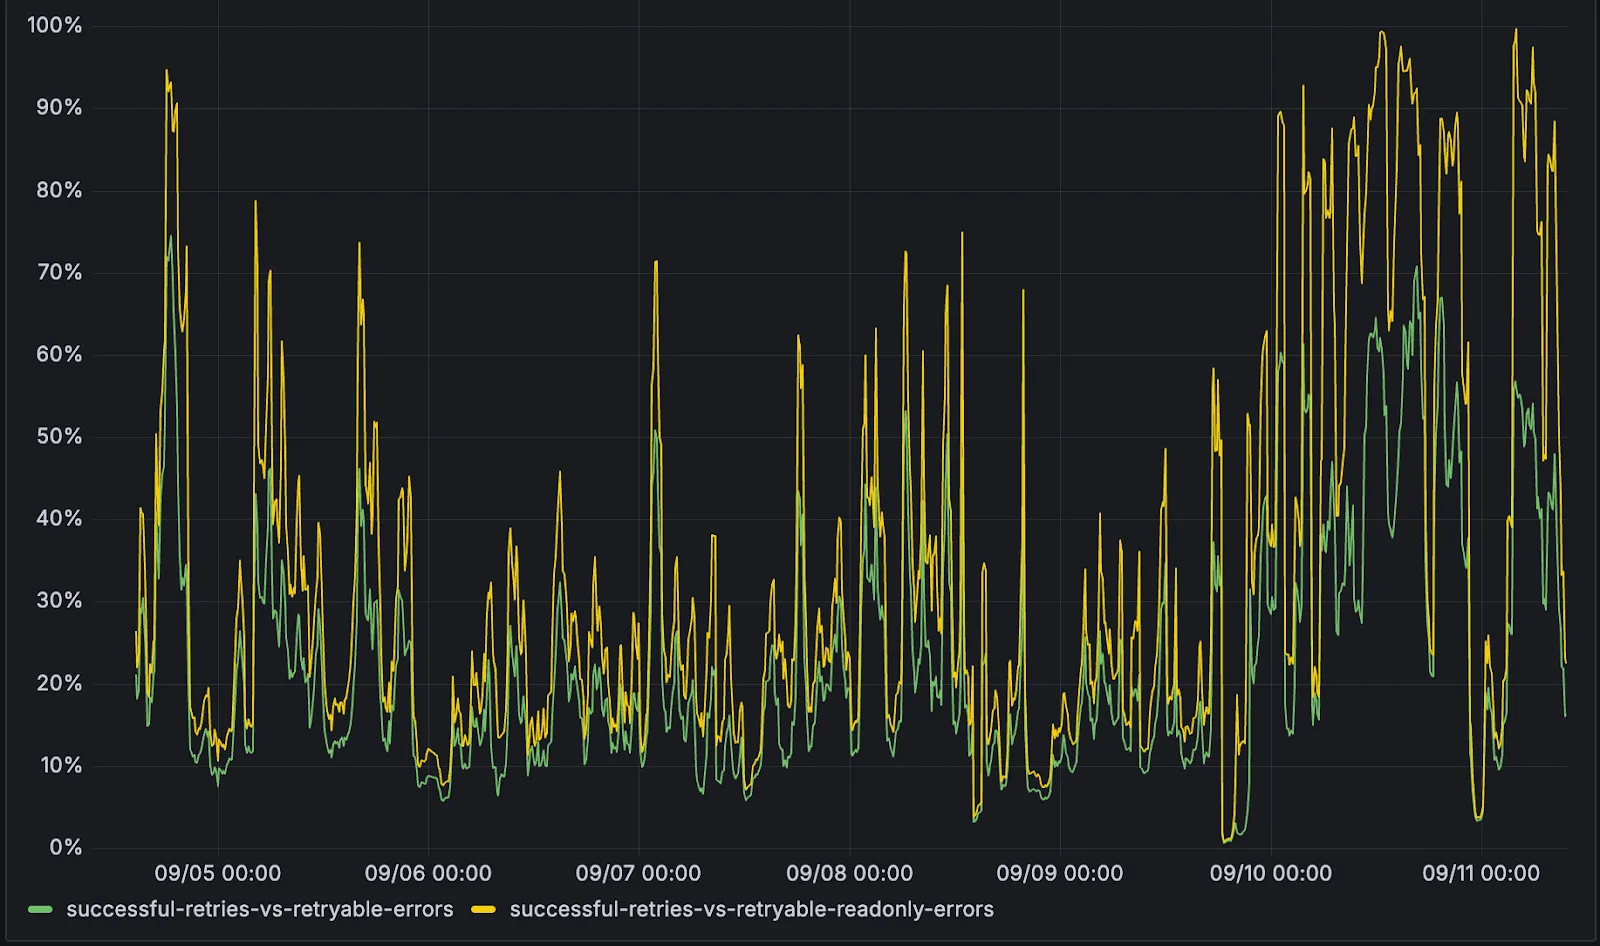
D1 now detects read-only queries and automatically attempts up to two retries to execute those queries in the event of failures with retryable errors. You can access the number of execution attempts in the returned response metadata property
total_attempts.At the moment, only read-only queries are retried, that is, queries containing only the following SQLite keywords:
SELECT,EXPLAIN,WITH. Queries containing any SQLite keyword ↗ that leads to database writes are not retried.The retry success ratio among read-only retryable errors varies from 5% all the way up to 95%, depending on the underlying error and its duration (like network errors or other internal errors).
The retry success ratio among all retryable errors is lower, indicating that there are write-queries that could be retried. Therefore, we recommend D1 users to continue applying retries in their own code for queries that are not read-only but are idempotent according to the business logic of the application.
D1 ensures that any retry attempt does not cause database writes, making the automatic retries safe from side-effects, even if a query causing changes slips through the read-only detection. D1 achieves this by checking for modifications after every query execution, and if any write occurred due to a retry attempt, the query is rolled back.
The read-only query detection heuristics are simple for now, and there is room for improvement to capture more cases of queries that can be retried, so this is just the beginning.
You can now list all vector identifiers in a Vectorize index using the new
list-vectorsoperation. This enables bulk operations, auditing, and data migration workflows through paginated requests that maintain snapshot consistency.The operation is available via Wrangler CLI and REST API. Refer to the list-vectors best practices guide for detailed usage guidance.
Workers KV has completed rolling out performance improvements across all KV namespaces, providing a significant latency reduction on read operations for all KV users. This is due to architectural changes to KV's underlying storage infrastructure, which introduces a new metadata later and substantially improves redundancy.
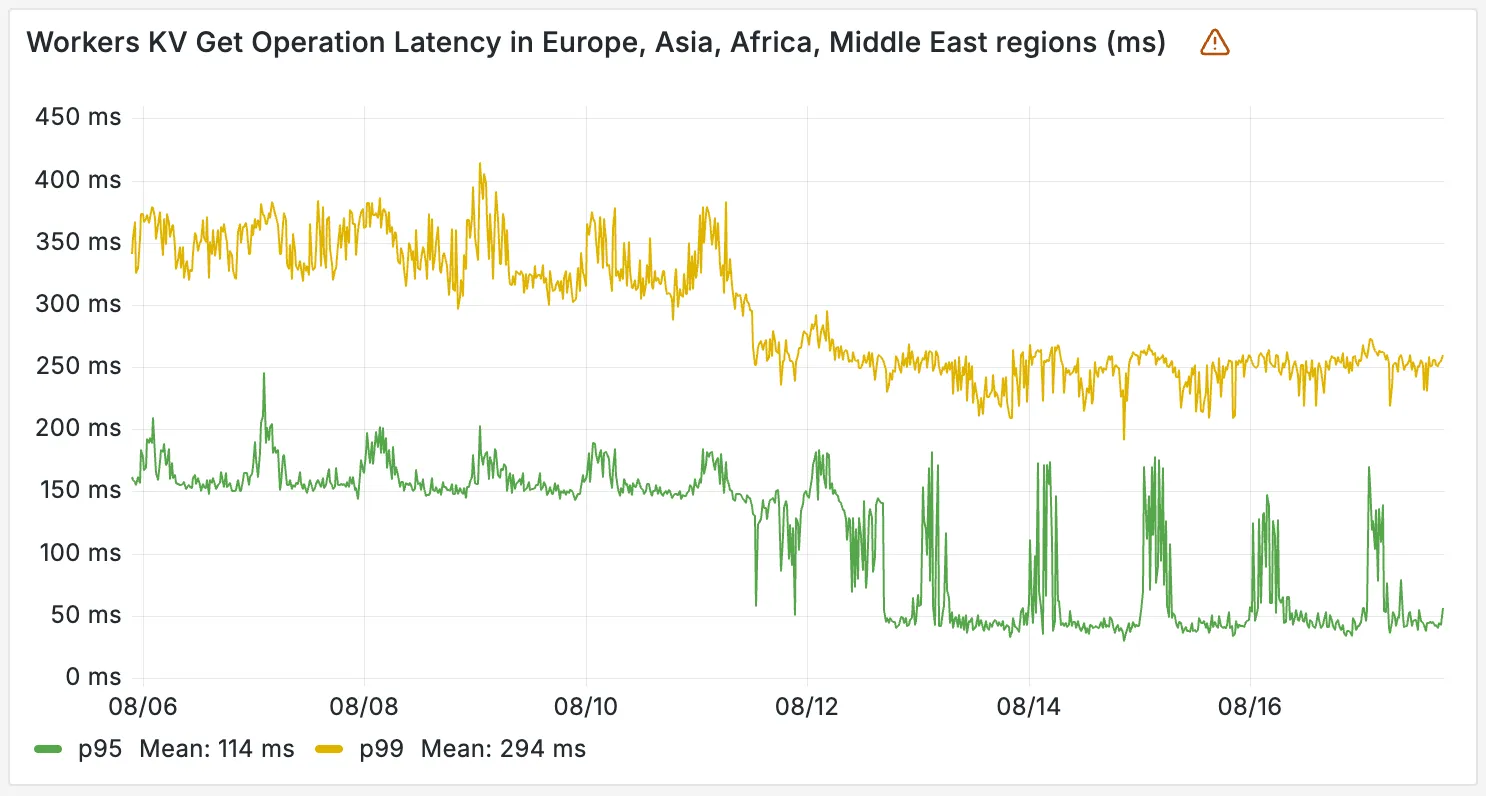
The new hybrid architecture delivers substantial latency reductions throughout Europe, Asia, Middle East, Africa regions. Over the past 2 weeks, we have observed the following:
- p95 latency: Reduced from ~150ms to ~50ms (67% decrease)
- p99 latency: Reduced from ~350ms to ~250ms (29% decrease)
You can now create a client (a Durable Object stub) to a Durable Object with the new
getByNamemethod, removing the need to convert Durable Object names to IDs and then create a stub.JavaScript // Before: (1) translate name to ID then (2) get a clientconst objectId = env.MY_DURABLE_OBJECT.idFromName("foo"); // or .newUniqueId()const stub = env.MY_DURABLE_OBJECT.get(objectId);// Now: retrieve client to Durable Object directly via its nameconst stub = env.MY_DURABLE_OBJECT.getByName("foo");// Use client to send request to the remote Durable Objectconst rpcResponse = await stub.sayHello();Each Durable Object has a globally-unique name, which allows you to send requests to a specific object from anywhere in the world. Thus, a Durable Object can be used to coordinate between multiple clients who need to work together. You can have billions of Durable Objects, providing isolation between application tenants.
To learn more, visit the Durable Objects API Documentation or the getting started guide.
You can now subscribe to events from other Cloudflare services (for example, Workers KV, Workers AI, Workers) and consume those events via Queues, allowing you to build custom workflows, integrations, and logic in response to account activity.
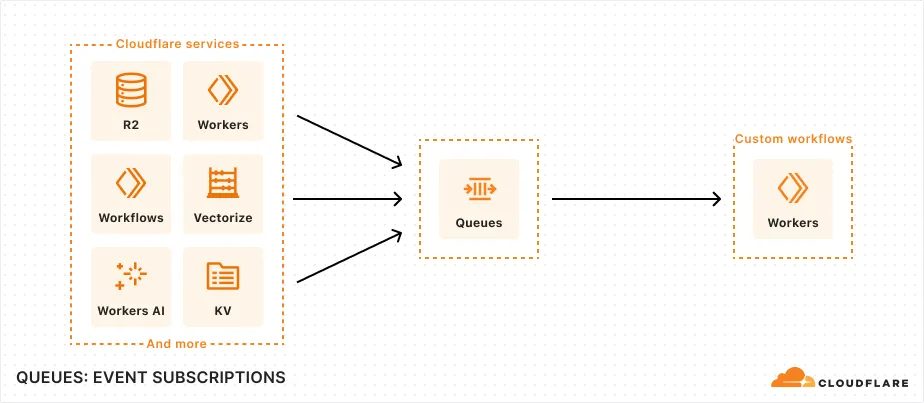
Event subscriptions allow you to receive messages when events occur across your Cloudflare account. Cloudflare products can publish structured events to a queue, which you can then consume with Workers or pull via HTTP from anywhere.
To create a subscription, use the dashboard or Wrangler:
Terminal window npx wrangler queues subscription create my-queue --source r2 --events bucket.createdAn event is a structured record of something happening in your Cloudflare account – like a Workers AI batch request being queued, a Worker build completing, or an R2 bucket being created. Events follow a consistent structure:
Example R2 bucket created event {"type": "cf.r2.bucket.created","source": {"type": "r2"},"payload": {"name": "my-bucket","location": "WNAM"},"metadata": {"accountId": "f9f79265f388666de8122cfb508d7776","eventTimestamp": "2025-07-28T10:30:00Z"}}Current event sources include R2, Workers KV, Workers AI, Workers Builds, Vectorize, Super Slurper, and Workflows. More sources and events are on the way.
For more information on event subscriptions, available events, and how to get started, refer to our documentation.
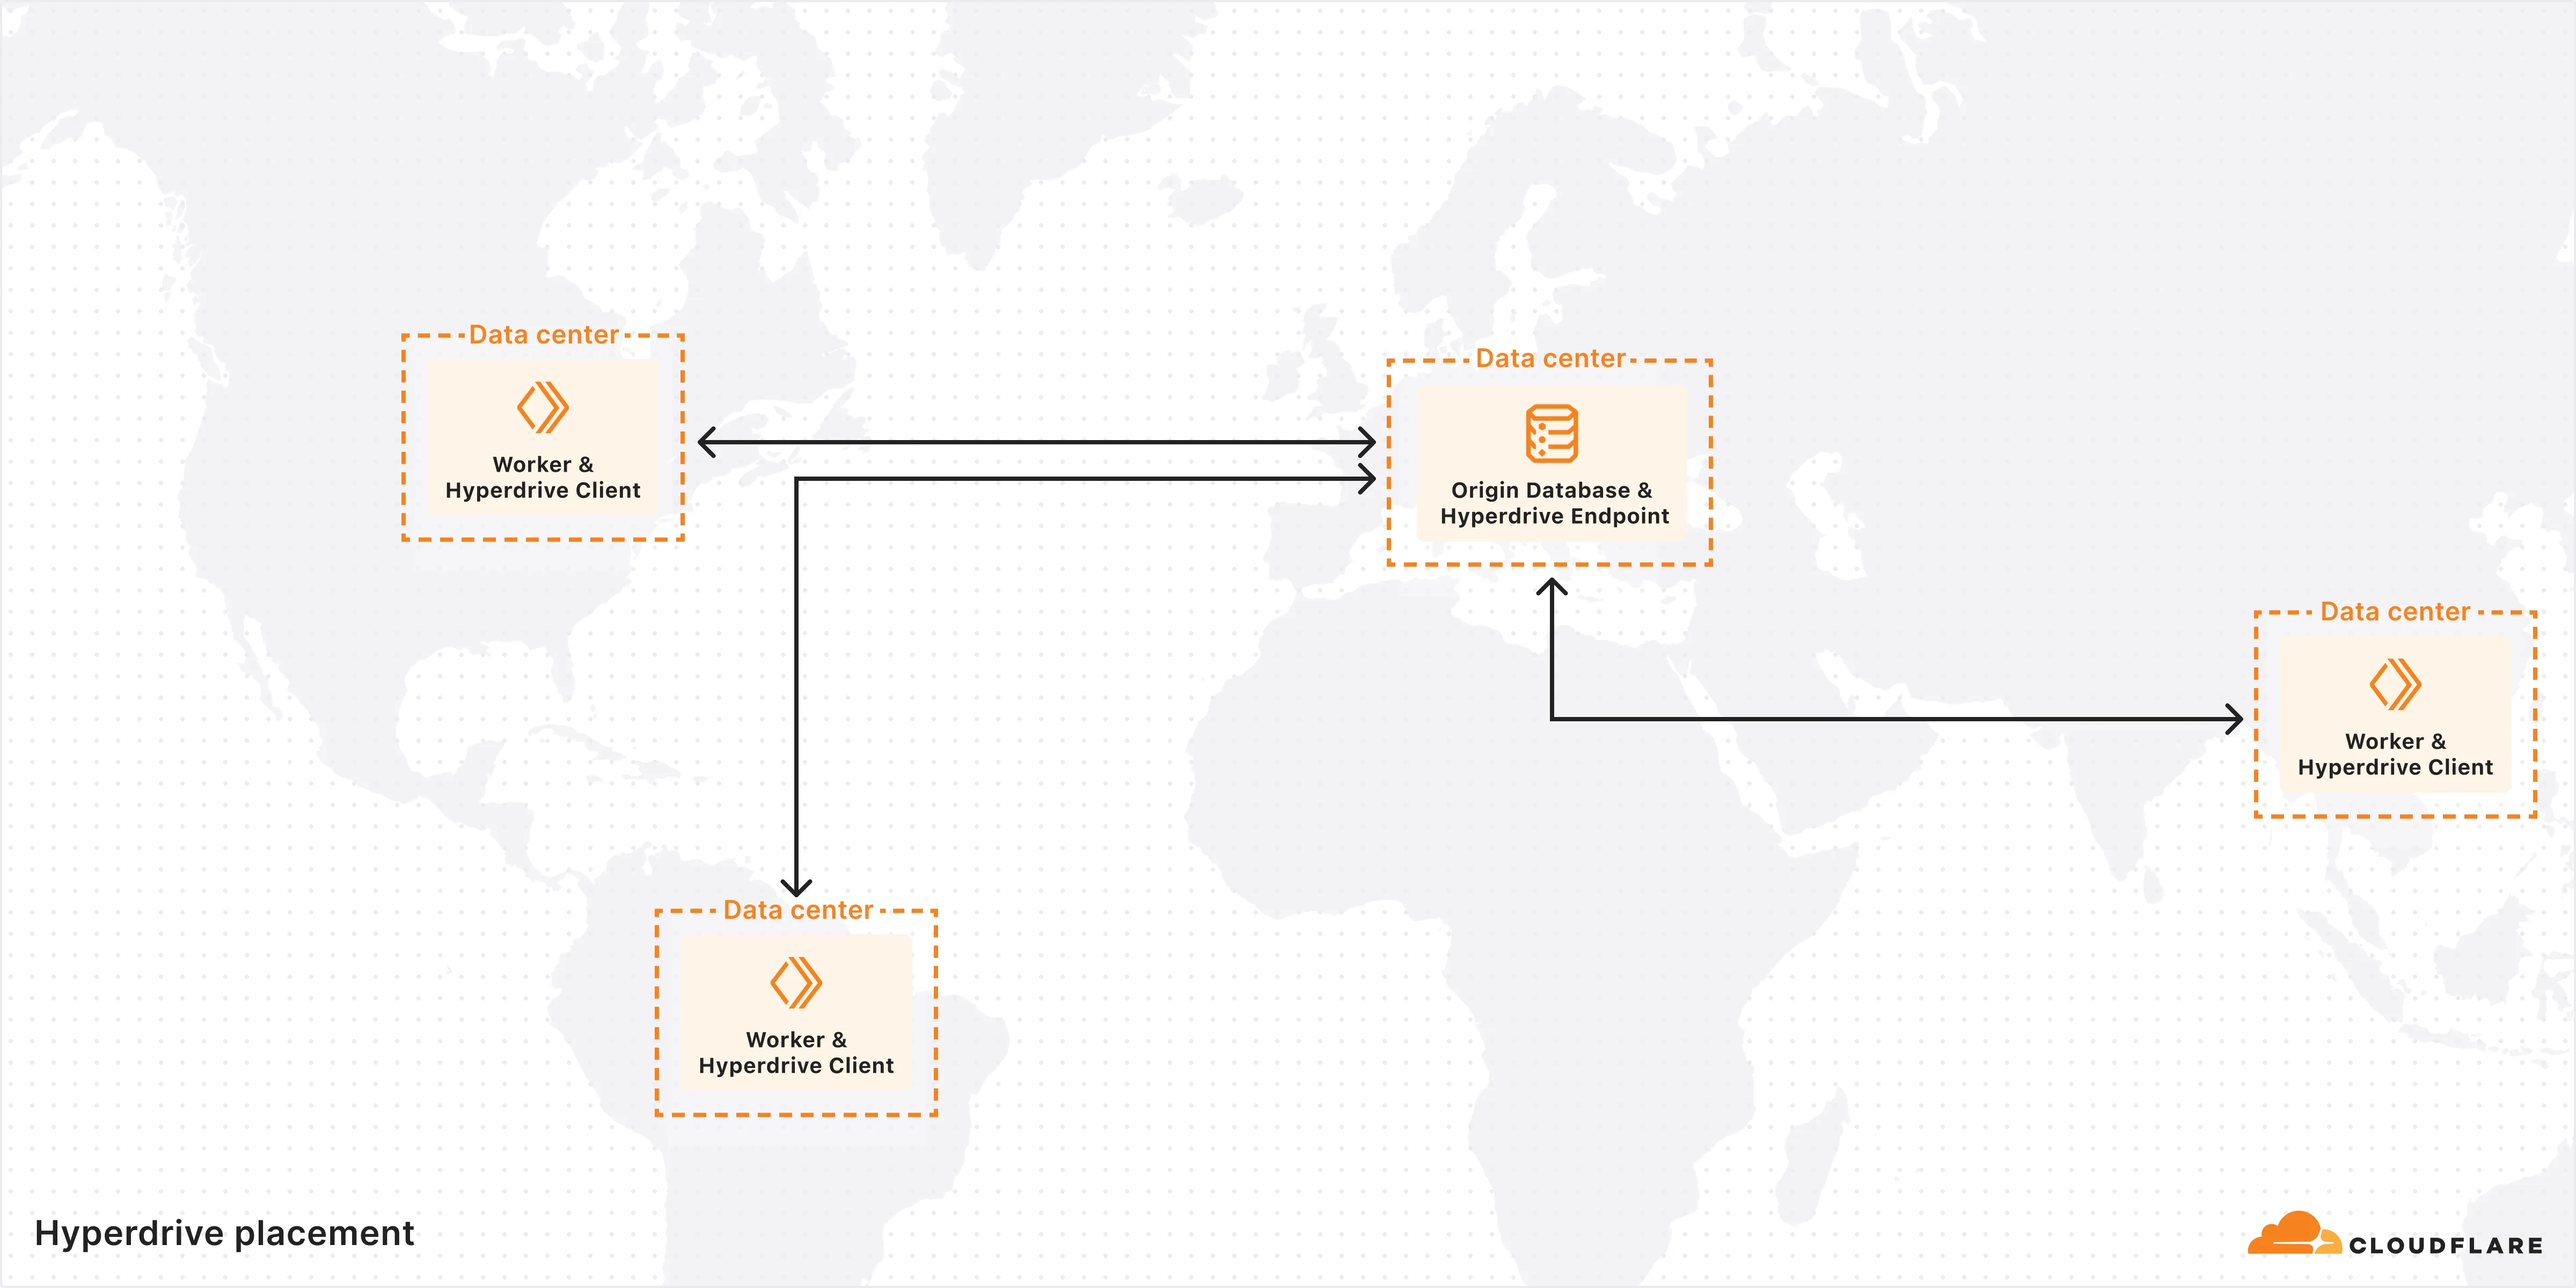
You can now specify the number of connections your Hyperdrive configuration uses to connect to your origin database.
All configurations have a minimum of 5 connections. The maximum connection count for a Hyperdrive configuration depends on the Hyperdrive limits of your Workers plan.
This feature allows you to right-size your connection pool based on your database capacity and application requirements. You can configure connection counts through the Cloudflare dashboard or API.
Refer to the Hyperdrive configuration documentation for more information.
The new @cloudflare/actors ↗ library is now in beta!
The
@cloudflare/actorslibrary is a new SDK for Durable Objects and provides a powerful set of abstractions for building real-time, interactive, and multiplayer applications on top of Durable Objects. With beta usage and feedback,@cloudflare/actorswill become the recommended way to build on Durable Objects and draws upon Cloudflare's experience building products/features on Durable Objects.The name "actors" originates from the actor programming model, which closely ties to how Durable Objects are modelled.
The
@cloudflare/actorslibrary includes:- Storage helpers for querying embeddeded, per-object SQLite storage
- Storage helpers for managing SQL schema migrations
- Alarm helpers for scheduling multiple alarms provided a date, delay in seconds, or cron expression
Actorclass for using Durable Objects with a defined pattern- Durable Objects Workers API ↗ is always available for your application as needed
Storage and alarm helper methods can be combined with any Javascript class ↗ that defines your Durable Object, i.e, ones that extend
DurableObjectincluding theActorclass.JavaScript import { Storage } from "@cloudflare/actors/storage";export class ChatRoom extends DurableObject<Env> {storage: Storage;constructor(ctx: DurableObjectState, env: Env) {super(ctx, env)this.storage = new Storage(ctx.storage);this.storage.migrations = [{idMonotonicInc: 1,description: "Create users table",sql: "CREATE TABLE IF NOT EXISTS users (id INTEGER PRIMARY KEY)"}]}async fetch(request: Request): Promise<Response> {// Run migrations before executing SQL queryawait this.storage.runMigrations();// Query with SQL templatelet userId = new URL(request.url).searchParams.get("userId");const query = this.storage.sql`SELECT * FROM users WHERE id = ${userId};`return new Response(`${JSON.stringify(query)}`);}}@cloudflare/actorslibrary introduces theActorclass pattern.Actorlets you access Durable Objects without writing the Worker that communicates with your Durable Object (the Worker is created for you). By default, requests are routed to a Durable Object named "default".JavaScript export class MyActor extends Actor<Env> {async fetch(request: Request): Promise<Response> {return new Response('Hello, World!')}}export default handler(MyActor);You can route to different Durable Objects by name within your
Actorclass usingnameFromRequest↗.JavaScript export class MyActor extends Actor<Env> {static nameFromRequest(request: Request): string {let url = new URL(request.url);return url.searchParams.get("userId") ?? "foo";}async fetch(request: Request): Promise<Response> {return new Response(`Actor identifier (Durable Object name): ${this.identifier}`);}}export default handler(MyActor);For more examples, check out the library README ↗.
@cloudflare/actorslibrary is a place for more helpers and built-in patterns, like retry handling and Websocket-based applications, to reduce development overhead for common Durable Objects functionality. Please share feedback and what more you would like to see on our Discord channel ↗.
-
We've simplified the programmatic deployment of Workers via our Cloudflare SDKs. This update abstracts away the low-level complexities of the
multipart/form-dataupload process, allowing you to focus on your code while we handle the deployment mechanics.This new interface is available in:
- cloudflare-typescript ↗ (4.4.1)
- cloudflare-python ↗ (4.3.1)
For complete examples, see our guide on programmatic Worker deployments.
Previously, deploying a Worker programmatically required manually constructing a
multipart/form-dataHTTP request, packaging your code and a separatemetadata.jsonfile. This was more complicated and verbose, and prone to formatting errors.For example, here's how you would upload a Worker script previously with cURL:
Terminal window curl https://api.cloudflare.com/client/v4/accounts/<account_id>/workers/scripts/my-hello-world-script \-X PUT \-H 'Authorization: Bearer <api_token>' \-F 'metadata={"main_module": "my-hello-world-script.mjs","bindings": [{"type": "plain_text","name": "MESSAGE","text": "Hello World!"}],"compatibility_date": "$today"};type=application/json' \-F 'my-hello-world-script.mjs=@-;filename=my-hello-world-script.mjs;type=application/javascript+module' <<EOFexport default {async fetch(request, env, ctx) {return new Response(env.MESSAGE, { status: 200 });}};EOFWith the new SDK interface, you can now define your entire Worker configuration using a single, structured object.
This approach allows you to specify metadata like
main_module,bindings, andcompatibility_dateas clearer properties directly alongside your script content. Our SDK takes this logical object and automatically constructs the complex multipart/form-data API request behind the scenes.Here's how you can now programmatically deploy a Worker via the
cloudflare-typescriptSDK ↗JavaScript import Cloudflare from "cloudflare";import { toFile } from "cloudflare/index";// ... client setup, script content, etc.const script = await client.workers.scripts.update(scriptName, {account_id: accountID,metadata: {main_module: scriptFileName,bindings: [],},files: {[scriptFileName]: await toFile(Buffer.from(scriptContent), scriptFileName, {type: "application/javascript+module",}),},});TypeScript import Cloudflare from 'cloudflare';import { toFile } from 'cloudflare/index';// ... client setup, script content, etc.const script = await client.workers.scripts.update(scriptName, {account_id: accountID,metadata: {main_module: scriptFileName,bindings: [],},files: {[scriptFileName]: await toFile(Buffer.from(scriptContent), scriptFileName, {type: 'application/javascript+module',}),},});View the complete example here: https://github.com/cloudflare/cloudflare-typescript/blob/main/examples/workers/script-upload.ts ↗
We've also made several fixes and enhancements to the Cloudflare Terraform provider ↗:
- Fixed the
cloudflare_workers_script↗ resource in Terraform, which previously was producing a diff even when there were no changes. Now, yourterraform planoutputs will be cleaner and more reliable. - Fixed the
cloudflare_workers_for_platforms_dispatch_namespace↗, where the provider would attempt to recreate the namespace on aterraform apply. The resource now correctly reads its remote state, ensuring stability for production environments and CI/CD workflows. - The
cloudflare_workers_route↗ resource now allows for thescriptproperty to be empty, null, or omitted to indicate that pattern should be negated for all scripts (see routes docs). You can now reserve a pattern or temporarily disable a Worker on a route without deleting the route definition itself. - Using
primary_location_hintin thecloudflare_d1_database↗ resource will no longer always try to recreate. You can now safely change the location hint for a D1 database without causing a destructive operation.
We've also properly documented the Workers Script And Version Settings in our public OpenAPI spec and SDKs.
Users using Cloudflare's REST API to query their D1 database can see lower end-to-end request latency now that D1 authentication is performed at the closest Cloudflare network data center that received the request. Previously, authentication required D1 REST API requests to proxy to Cloudflare's core, centralized data centers, which added network round trips and latency.
Latency improvements range from 50-500 ms depending on request location and database location and only apply to the REST API. REST API requests and databases outside the United States see a bigger benefit since Cloudflare's primary core data centers reside in the United States.
D1 query endpoints like
/queryand/rawhave the most noticeable improvements since they no longer access Cloudflare's core data centers. D1 control plane endpoints such as those to create and delete databases see smaller improvements, since they still require access to Cloudflare's core data centers for other control plane metadata.
You can now create Durable Objects using Python Workers. A Durable Object is a special kind of Cloudflare Worker which uniquely combines compute with storage, enabling stateful long-running applications which run close to your users. For more info see here.
You can define a Durable Object in Python in a similar way to JavaScript:
Python from workers import DurableObject, Response, WorkerEntrypointfrom urllib.parse import urlparseclass MyDurableObject(DurableObject):def __init__(self, ctx, env):self.ctx = ctxself.env = envdef fetch(self, request):result = self.ctx.storage.sql.exec("SELECT 'Hello, World!' as greeting").one()return Response(result.greeting)class Default(WorkerEntrypoint):async def fetch(self, request):url = urlparse(request.url)id = env.MY_DURABLE_OBJECT.idFromName(url.path)stub = env.MY_DURABLE_OBJECT.get(id)greeting = await stub.fetch(request.url)return greetingDefine the Durable Object in your Wrangler configuration file:
JSONC {"durable_objects": {"bindings": [{"name": "MY_DURABLE_OBJECT","class_name": "MyDurableObject"}]}}TOML [[durable_objects.bindings]]name = "MY_DURABLE_OBJECT"class_name = "MyDurableObject"Then define the storage backend for your Durable Object:
JSONC {"migrations": [{"tag": "v1", // Should be unique for each entry"new_sqlite_classes": [ // Array of new classes"MyDurableObject"]}]}TOML [[migrations]]tag = "v1"new_sqlite_classes = [ "MyDurableObject" ]Then test your new Durable Object locally by running
wrangler dev:npx wrangler devConsult the Durable Objects documentation for more details.
Hyperdrive has been approved for FedRAMP Authorization and is now available in the FedRAMP Marketplace ↗.
FedRAMP is a U.S. government program that provides standardized assessment and authorization for cloud products and services. As a result of this product update, Hyperdrive has been approved as an authorized service to be used by U.S. federal agencies at the Moderate Impact level.
For detailed information regarding FedRAMP and its implications, please refer to the official FedRAMP documentation for Cloudflare ↗.
You can now publish messages to Cloudflare Queues directly via HTTP from any service or programming language that supports sending HTTP requests. Previously, publishing to queues was only possible from within Cloudflare Workers. You can already consume from queues via Workers or HTTP pull consumers, and now publishing is just as flexible.
Publishing via HTTP requires a Cloudflare API token with
Queues Editpermissions for authentication. Here's a simple example:Terminal window curl "https://api.cloudflare.com/client/v4/accounts/<account_id>/queues/<queue_id>/messages" \-X POST \-H 'Authorization: Bearer <api_token>' \--data '{ "body": { "greeting": "hello", "timestamp": "2025-07-24T12:00:00Z"} }'You can also use our SDKs for TypeScript, Python, and Go.
To get started with HTTP publishing, check out our step-by-step example and the full API documentation in our API reference.
We're excited to announce several improvements to the Cloudflare R2 dashboard experience that make managing your object storage easier and more intuitive:

We've redesigned the bucket settings page, giving you a centralized location to manage all your bucket configurations in one place.
- Deeplink support for prefix directories: Navigate through your bucket hierarchy without losing your state. Your browser's back button now works as expected, and you can share direct links to specific prefix directories with teammates.
- Objects as clickable links: Objects are now proper links that you can copy or
CMD + Clickto open in a new tab.
- Renamed "r2.dev domain" to "Public Development URL" for better clarity when exposing bucket contents for non-production workloads.
- Public Access status now clearly displays "Enabled" when your bucket is exposed to the internet (via Public Development URL or Custom Domains).
We've also made numerous other usability improvements across the board to make your R2 experience smoother and more productive.
Queues pull consumers can now pull and acknowledge up to 5,000 messages / second per queue. Previously, pull consumers were rate limited to 1,200 requests / 5 minutes, aggregated across all queues.
Pull consumers allow you to consume messages over HTTP from any environment—including outside of Cloudflare Workers. They’re also useful when you need fine-grained control over how quickly messages are consumed.
To setup a new queue with a pull based consumer using Wrangler, run:
Create a queue with a pull based consumer npx wrangler queues create my-queuenpx wrangler queues consumer http add my-queueYou can also configure a pull consumer using the REST API or the Queues dashboard.
Once configured, you can pull messages from the queue using any HTTP client. You'll need a Cloudflare API Token with
queues_readandqueues_writepermissions. For example:Pull messages from a queue curl "https://api.cloudflare.com/client/v4/accounts/${CF_ACCOUNT_ID}/queues/${QUEUE_ID}/messages/pull" \--header "Authorization: Bearer ${API_TOKEN}" \--header "Content-Type: application/json" \--data '{ "visibility_timeout": 10000, "batch_size": 2 }'To learn more about how to acknowledge messages, pull batches at once, and setup multiple consumers, refer to the pull consumer documentation.
As always, Queues doesn't charge for data egress. Pull operations continue to be billed at the existing rate, of $0.40 / million operations. The increased limits are available now, on all new and existing queues. If you're new to Queues, get started with the Cloudflare Queues guide.
You can now retrieve up to 100 keys in a single bulk read request made to Workers KV using the binding.
This makes it easier to request multiple KV pairs within a single Worker invocation. Retrieving many key-value pairs using the bulk read operation is more performant than making individual requests since bulk read operations are not affected by Workers simultaneous connection limits.
JavaScript // Read single keyconst key = "key-a";const value = await env.NAMESPACE.get(key);// Read multiple keysconst keys = ["key-a", "key-b", "key-c", ...] // up to 100 keysconst values : Map<string, string?> = await env.NAMESPACE.get(keys);// Print the value of "key-a" to the console.console.log(`The first key is ${values.get("key-a")}.`)Consult the Workers KV Read key-value pairs API for full details on Workers KV's new bulk reads support.
D1 read replication is available in public beta to help lower average latency and increase overall throughput for read-heavy applications like e-commerce websites or content management tools.
Workers can leverage read-only database copies, called read replicas, by using D1 Sessions API. A session encapsulates all the queries from one logical session for your application. For example, a session may correspond to all queries coming from a particular web browser session. With Sessions API, D1 queries in a session are guaranteed to be sequentially consistent to avoid data consistency pitfalls. D1 bookmarks can be used from a previous session to ensure logical consistency between sessions.
TypeScript // retrieve bookmark from previous session stored in HTTP headerconst bookmark = request.headers.get("x-d1-bookmark") ?? "first-unconstrained";const session = env.DB.withSession(bookmark);const result = await session.prepare(`SELECT * FROM Customers WHERE CompanyName = 'Bs Beverages'`).run();// store bookmark for a future sessionresponse.headers.set("x-d1-bookmark", session.getBookmark() ?? "");Read replicas are automatically created by Cloudflare (currently one in each supported D1 region), are active/inactive based on query traffic, and are transparently routed to by Cloudflare at no additional cost.
To checkout D1 read replication, deploy the following Worker code using Sessions API, which will prompt you to create a D1 database and enable read replication on said database.
To learn more about how read replication was implemented, go to our blog post ↗.
Cloudflare Pipelines is now available in beta, to all users with a Workers Paid plan.
Pipelines let you ingest high volumes of real time data, without managing the underlying infrastructure. A single pipeline can ingest up to 100 MB of data per second, via HTTP or from a Worker. Ingested data is automatically batched, written to output files, and delivered to an R2 bucket in your account. You can use Pipelines to build a data lake of clickstream data, or to store events from a Worker.
Create your first pipeline with a single command:
Create a pipeline $ npx wrangler@latest pipelines create my-clickstream-pipeline --r2-bucket my-bucket🌀 Authorizing R2 bucket "my-bucket"🌀 Creating pipeline named "my-clickstream-pipeline"✅ Successfully created pipeline my-clickstream-pipelineId: 0e00c5ff09b34d018152af98d06f5a1xvcName: my-clickstream-pipelineSources:HTTP:Endpoint: https://0e00c5ff09b34d018152af98d06f5a1xvc.pipelines.cloudflare.com/Authentication: offFormat: JSONWorker:Format: JSONDestination:Type: R2Bucket: my-bucketFormat: newline-delimited JSONCompression: GZIPBatch hints:Max bytes: 100 MBMax duration: 300 secondsMax records: 100,000🎉 You can now send data to your pipeline!Send data to your pipeline's HTTP endpoint:curl "https://0e00c5ff09b34d018152af98d06f5a1xvc.pipelines.cloudflare.com/" -d '[{ ...JSON_DATA... }]'To send data to your pipeline from a Worker, add the following configuration to your config file:{"pipelines": [{"pipeline": "my-clickstream-pipeline","binding": "PIPELINE"}]}Head over to our getting started guide for an in-depth tutorial to building with Pipelines.
Today, we're launching R2 Data Catalog in open beta, a managed Apache Iceberg catalog built directly into your Cloudflare R2 bucket.
If you're not already familiar with it, Apache Iceberg ↗ is an open table format designed to handle large-scale analytics datasets stored in object storage, offering ACID transactions and schema evolution. R2 Data Catalog exposes a standard Iceberg REST catalog interface, so you can connect engines like Spark, Snowflake, and PyIceberg to start querying your tables using the tools you already know.
To enable a data catalog on your R2 bucket, find R2 Data Catalog in your buckets settings in the dashboard, or run:
Terminal window npx wrangler r2 bucket catalog enable my-bucketAnd that's it. You'll get a catalog URI and warehouse you can plug into your favorite Iceberg engines.
Visit our getting started guide for step-by-step instructions on enabling R2 Data Catalog, creating tables, and running your first queries.
Hyperdrive now supports more SSL/TLS security options for your database connections:
- Configure Hyperdrive to verify server certificates with
verify-caorverify-fullSSL modes and protect against man-in-the-middle attacks - Configure Hyperdrive to provide client certificates to the database server to authenticate itself (mTLS) for stronger security beyond username and password
Use the new
wrangler certcommands to create certificate authority (CA) certificate bundles or client certificate pairs:Terminal window # Create CA certificate bundlenpx wrangler cert upload certificate-authority --ca-cert your-ca-cert.pem --name your-custom-ca-name# Create client certificate pairnpx wrangler cert upload mtls-certificate --cert client-cert.pem --key client-key.pem --name your-client-cert-nameThen create a Hyperdrive configuration with the certificates and desired SSL mode:
Terminal window npx wrangler hyperdrive create your-hyperdrive-config \--connection-string="postgres://user:password@hostname:port/database" \--ca-certificate-id <CA_CERT_ID> \--mtls-certificate-id <CLIENT_CERT_ID>--sslmode verify-fullLearn more about configuring SSL/TLS certificates for Hyperdrive to enhance your database security posture.
- Configure Hyperdrive to verify server certificates with
Hyperdrive is now available on the Free plan of Cloudflare Workers, enabling you to build Workers that connect to PostgreSQL or MySQL databases without compromise.
Low-latency access to SQL databases is critical to building full-stack Workers applications. We want you to be able to build on fast, global apps on Workers, regardless of the tools you use. So we made Hyperdrive available for all, to make it easier to build Workers that connect to PostgreSQL and MySQL.
If you want to learn more about how Hyperdrive works, read the deep dive ↗ on how Hyperdrive can make your database queries up to 4x faster.
Visit the docs to get started with Hyperdrive for PostgreSQL or MySQL.
Hyperdrive now supports connecting to MySQL and MySQL-compatible databases, including Amazon RDS and Aurora MySQL, Google Cloud SQL for MySQL, Azure Database for MySQL, PlanetScale and MariaDB.
Hyperdrive makes your regional, MySQL databases fast when connecting from Cloudflare Workers. It eliminates unnecessary network roundtrips during connection setup, pools database connections globally, and can cache query results to provide the fastest possible response times.
Best of all, you can connect using your existing drivers, ORMs, and query builders with Hyperdrive's secure credentials, no code changes required.
TypeScript import { createConnection } from "mysql2/promise";export interface Env {HYPERDRIVE: Hyperdrive;}export default {async fetch(request, env, ctx): Promise<Response> {const connection = await createConnection({host: env.HYPERDRIVE.host,user: env.HYPERDRIVE.user,password: env.HYPERDRIVE.password,database: env.HYPERDRIVE.database,port: env.HYPERDRIVE.port,disableEval: true, // Required for Workers compatibility});const [results, fields] = await connection.query("SHOW tables;");ctx.waitUntil(connection.end());return new Response(JSON.stringify({ results, fields }), {headers: {"Content-Type": "application/json","Access-Control-Allow-Origin": "*",},});},} satisfies ExportedHandler<Env>;Learn more about how Hyperdrive works and get started building Workers that connect to MySQL with Hyperdrive.
AutoRAG is now in open beta, making it easy for you to build fully-managed retrieval-augmented generation (RAG) pipelines without managing infrastructure. Just upload your docs to R2, and AutoRAG handles the rest: embeddings, indexing, retrieval, and response generation via API.
With AutoRAG, you can:
- Customize your pipeline: Choose from Workers AI models, configure chunking strategies, edit system prompts, and more.
- Instant setup: AutoRAG provisions everything you need from Vectorize, AI gateway, to pipeline logic for you, so you can go from zero to a working RAG pipeline in seconds.
- Keep your index fresh: AutoRAG continuously syncs your index with your data source to ensure responses stay accurate and up to date.
- Ask questions: Query your data and receive grounded responses via a Workers binding or API.
Whether you're building internal tools, AI-powered search, or a support assistant, AutoRAG gets you from idea to deployment in minutes.
Get started in the Cloudflare dashboard ↗ or check out the guide for instructions on how to build your RAG pipeline today.