
You can now receive event notifications for Artifacts repository changes and consume them from a Worker to build commit-driven automation.
This allows you to:
- Run custom workflows when a repository is created or imported
- Kick off a build and deploy a change when an agent pushes to a repo
- Trigger a review agent on every push
Available events include:
- Account-level events (
artifactssource) —repo.created,repo.deleted,repo.forked,repo.imported - Repository-level events (
artifacts.reposource) —pushed,cloned,fetched
To learn more, refer to Artifacts documentation.
R2 Data Catalog is a managed Apache Iceberg data catalog built directly into your R2 bucket that allows you to connect query engines like R2 SQL, Spark, Snowflake, and DuckDB to your data in R2.
You can now query analytics for your R2 Data Catalog warehouses via Cloudflare's GraphQL Analytics API. Two new datasets are available:
r2CatalogDataOperationsAdaptiveGroupstracks Iceberg REST API requests made to your catalog, including operation type, request duration, HTTP status, and request body bytes. Use this to monitor request volume and latency across warehouses, namespaces, and tables.r2CatalogTableMaintenanceAdaptiveGroupstracks table maintenance jobs such as compaction and snapshot expiration. Use this to monitor job success rates, files processed, bytes read and written, and job duration.
Both datasets support filtering by warehouse name, namespace, table name, and time range. They also include percentile aggregations for duration metrics.
For detailed schema information and example queries, refer to the R2 Data Catalog metrics and analytics documentation.
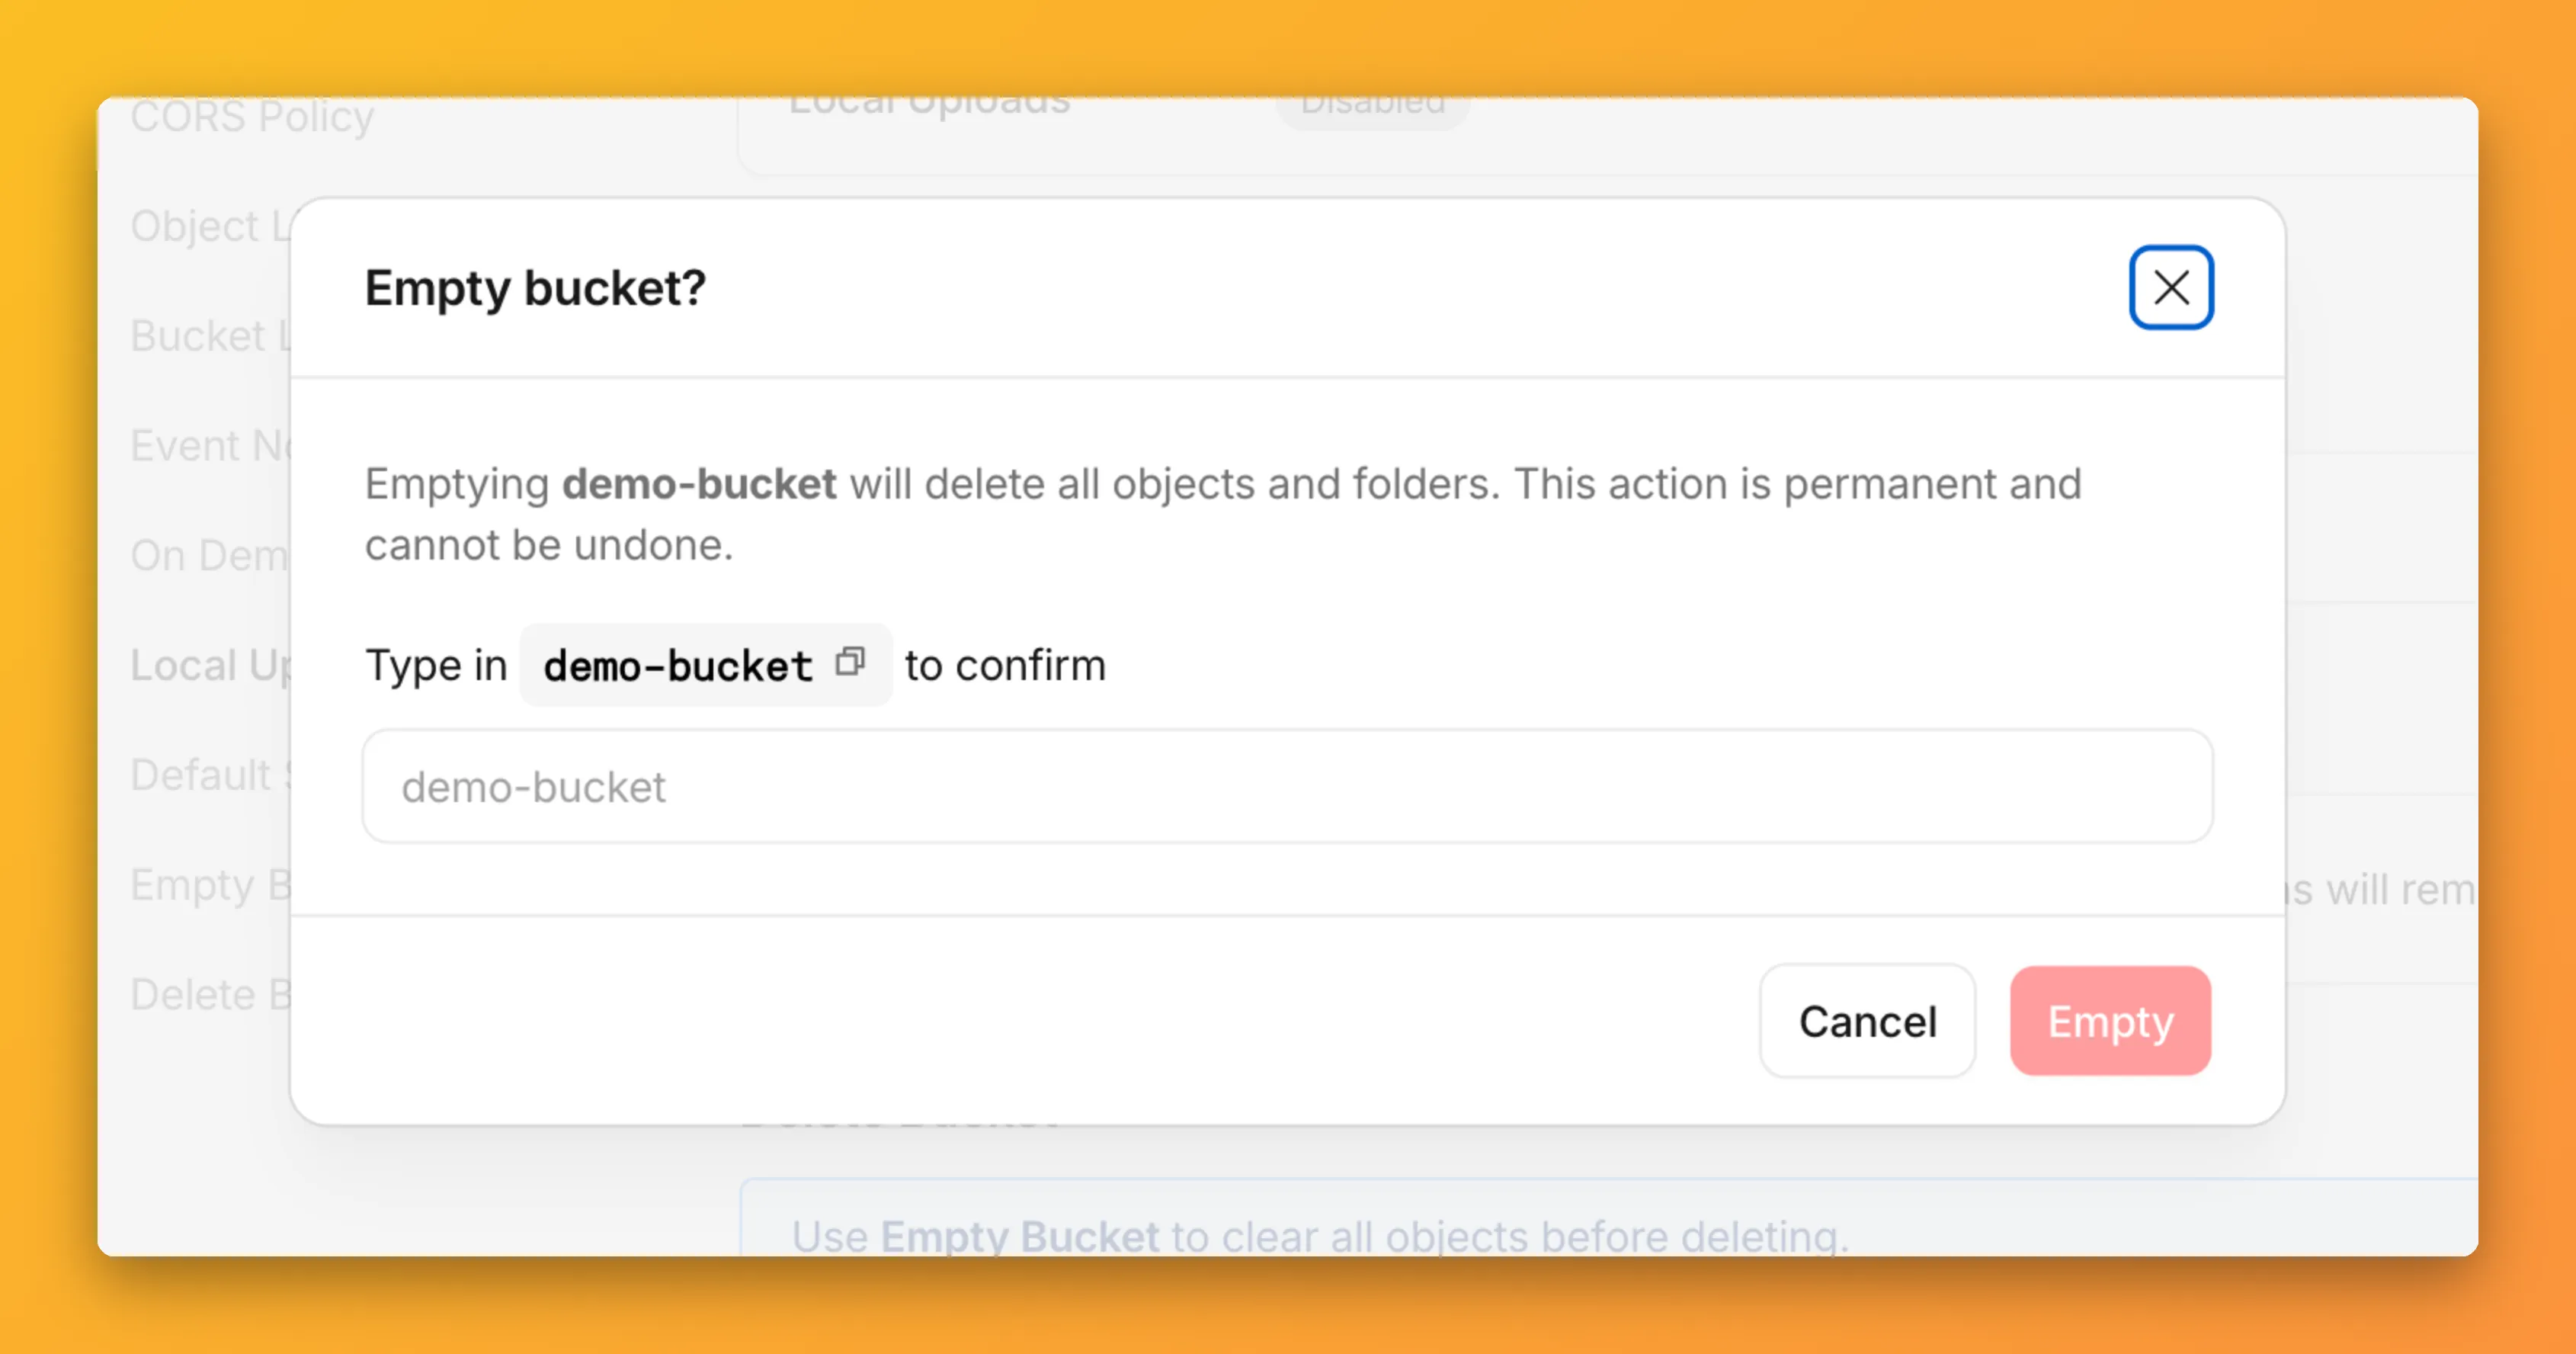
You can now empty an entire R2 bucket or delete folders directly from the dashboard. Emptying a bucket is required before you can delete it. Previously, this required scripting or configuring lifecycle rules. Now, the dashboard can handle it in a single action.
Go to your bucket's Settings tab and select Empty under the Empty Bucket section. This deletes all objects in the bucket while preserving the bucket and its configuration. For large buckets, the operation runs in the background and the dashboard displays progress.
Emptying a bucket is also a prerequisite for deleting it. The dashboard now guides you through both steps in one place.
R2 uses a flat object structure. The dashboard groups objects that share a common prefix into folders when the View prefixes as directories checkbox is selected. Deleting a folder removes every object under that prefix.
From the Objects tab, you can select one or more folders and delete them alongside individual objects.
For step-by-step instructions, refer to Delete buckets and Delete objects.
You can now connect Hyperdrive to a private database through a Workers VPC service. This is the recommended way to connect Hyperdrive to a private database that is not exposed to the public Internet.
When creating a Hyperdrive configuration in the Cloudflare dashboard, choose Connect to private database and then Workers VPC. From there, you can select an existing VPC service or create a new one inline by picking a Cloudflare Tunnel and entering your origin host and TCP port.
You can also create a Hyperdrive configuration backed by a Workers VPC service from the command line:
Terminal window npx wrangler hyperdrive create my-vpc-database \--service-id <YOUR_VPC_SERVICE_ID> \--database <DATABASE_NAME> \--user <DATABASE_USER> \--password <DATABASE_PASSWORD> \--scheme postgresqlWorkers VPC services are reusable across Hyperdrive configurations and can also be bound directly to Workers, so you can share the same private connection across multiple products.
To get started, refer to Connect Hyperdrive to a private database using Workers VPC.
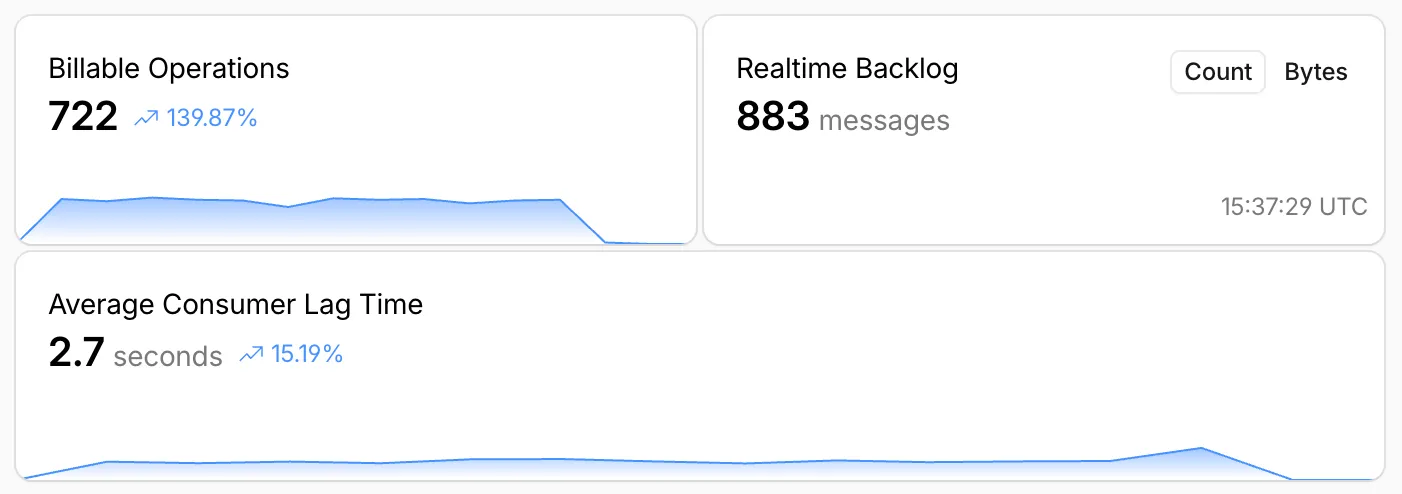
Queues, Cloudflare's managed message queue, now exposes realtime backlog metrics via the dashboard, REST API, and JavaScript API. Three new fields are available:
backlog_count— the number of unacknowledged messages in the queuebacklog_bytes— the total size of those messages in bytesoldest_message_timestamp_ms— the timestamp of the oldest unacknowledged message
The following endpoints also now include a
metadata.metricsobject on the result field after successful message consumption:/accounts/{account_id}/queues/{queue_id}/messages/pull/accounts/{account_id}/queues/{queue_id}/messages/accounts/{account_id}/queues/{queue_id}/messages/batch
Call
env.QUEUE.metrics()to get realtime backlog metrics:TypeScript const {backlogCount, // numberbacklogBytes, // numberoldestMessageTimestamp, // Date | undefined} = await env.QUEUE.metrics();env.QUEUE.send()andenv.QUEUE.sendBatch()also now return a metrics object on the response.You can also query these fields via the GraphQL Analytics API or view realtime backlog on the dashboard ↗.
For more information, refer to Queues metrics.
R2 Data Catalog, a managed Apache Iceberg ↗ catalog built into R2, now removes unreferenced data files during automatic snapshot expiration. This improvement reduces storage costs and eliminates the need to run manual maintenance jobs to reclaim space from deleted data.
Previously, snapshot expiration only cleaned up Iceberg metadata files such as manifests and manifest lists. Data files that were no longer referenced by active snapshots remained in R2 storage until you manually ran
remove_orphan_filesorexpire_snapshotsthrough an engine like Spark. This required extra operational overhead and left stale data files consuming storage.Snapshot expiration now handles both metadata and data file cleanup automatically. When a snapshot is expired, any data files that are no longer referenced by retained snapshots are removed from R2 storage.
Terminal window # Enable catalog-level snapshot expirationnpx wrangler r2 bucket catalog snapshot-expiration enable my-bucket \--older-than-days 7 \--retain-last 10To learn more about snapshot expiration and other automatic maintenance operations, refer to the table maintenance documentation.
Hyperdrive now supports custom TLS/SSL certificates for MySQL databases, bringing the same certificate options previously available for PostgreSQL to MySQL connections.
You can now configure:
- Server certificate verification with
VERIFY_CAorVERIFY_IDENTITYSSL modes to verify that your MySQL database server's certificate is signed by the expected certificate authority (CA). - Client certificates (mTLS) for Hyperdrive to authenticate itself to your MySQL database with credentials beyond username and password.
Create a Hyperdrive configuration with custom certificates for MySQL:
Terminal window # Upload a CA certificatenpx wrangler cert upload certificate-authority --ca-cert your-ca-cert.pem --name your-custom-ca-name# Create a Hyperdrive with VERIFY_IDENTITY modenpx wrangler hyperdrive create your-hyperdrive-config \--connection-string="mysql://user:password@hostname:port/database" \--ca-certificate-id <CA_CERT_ID> \--sslmode VERIFY_IDENTITYFor more information, refer to SSL/TLS certificates for Hyperdrive and MySQL TLS/SSL modes.
- Server certificate verification with
You can now set
topKup to50when a Vectorize query returns values or full metadata. This raises the previous limit of20for queries that usereturnValues: trueorreturnMetadata: "all".Use the higher limit when you need more matches in a single query response without dropping values or metadata. Refer to the Vectorize API reference for query options and current
topKlimits.
When your Worker accesses a Durable Object via
idFromName()orgetByName(), the same name is now available onctx.id.nameinside the object — no need to pass it through method arguments or persist it in storage. This brings the runtime behavior in line with the Workers runtime types.This is especially useful for alarms, where there is no calling client to pass the name as an argument. When an alarm handler runs,
ctx.id.namewill hold the same name the object was originally accessed with.JavaScript import { DurableObject } from "cloudflare:workers";export class ChatRoom extends DurableObject {async getRoomName() {// ctx.id.name returns the name passed to getByName() or idFromName()return this.ctx.id.name;}}// Workerexport default {async fetch(request, env) {const stub = env.CHAT_ROOM.getByName("general");const roomName = await stub.getRoomName();return new Response(`Welcome to ${roomName}!`);},};ctx.id.nameisundefinedin the following cases:- For Durable Objects created with
newUniqueId(). - When accessed via
idFromString(), even if the ID was originally created from a name. - For names longer than 1,024 bytes.
This works the same way in local development with
wrangler devas it does in production. Runnpm update wranglerto ensure you are on a version with this support.For more information, refer to the Durable Object ID documentation.
- For Durable Objects created with
deleteAll()now deletes a Durable Object alarm in addition to stored data for Workers with a compatibility date of2026-02-24or later. This change simplifies clearing a Durable Object's storage with a single API call.Previously,
deleteAll()only deleted user-stored data for an object. Alarm usage stores metadata in an object's storage, which required a separatedeleteAlarm()call to fully clean up all storage for an object. ThedeleteAll()change applies to both KV-backed and SQLite-backed Durable Objects.JavaScript // Before: two API calls required to clear all storageawait this.ctx.storage.deleteAlarm();await this.ctx.storage.deleteAll();// Now: a single call clears both data and the alarmawait this.ctx.storage.deleteAll();For more information, refer to the Storage API documentation.
Sandboxes now support
createBackup()andrestoreBackup()methods for creating and restoring point-in-time snapshots of directories.This allows you to restore environments quickly. For instance, in order to develop in a sandbox, you may need to include a user's codebase and run a build step. Unfortunately
git cloneandnpm installcan take minutes, and you don't want to run these steps every time the user starts their sandbox.Now, after the initial setup, you can just call
createBackup(), thenrestoreBackup()the next time this environment is needed. This makes it practical to pick up exactly where a user left off, even after days of inactivity, without repeating expensive setup steps.TypeScript const sandbox = getSandbox(env.Sandbox, "my-sandbox");// Make non-trivial changes to the file systemawait sandbox.gitCheckout(endUserRepo, { targetDir: "/workspace" });await sandbox.exec("npm install", { cwd: "/workspace" });// Create a point-in-time backup of the directoryconst backup = await sandbox.createBackup({ dir: "/workspace" });// Store the handle for later useawait env.KV.put(`backup:${userId}`, JSON.stringify(backup));// ... in a future session...// Restore instead of re-cloning and reinstallingawait sandbox.restoreBackup(backup);Backups are stored in R2 and can take advantage of R2 object lifecycle rules to ensure they do not persist forever.
Key capabilities:
- Persist and reuse across sandbox sessions — Easily store backup handles in KV, D1, or Durable Object storage for use in subsequent sessions
- Usable across multiple instances — Fork a backup across many sandboxes for parallel work
- Named backups — Provide optional human-readable labels for easier management
- TTLs — Set time-to-live durations so backups are automatically removed from storage once they are no longer needed
To get started, refer to the backup and restore guide for setup instructions and usage patterns, or the Backups API reference for full method documentation.
Hyperdrive now treats queries containing PostgreSQL
STABLEfunctions as uncacheable, in addition toVOLATILEfunctions.Previously, only functions that PostgreSQL categorizes ↗ as
VOLATILE(for example,RANDOM(),LASTVAL()) were detected as uncacheable.STABLEfunctions (for example,NOW(),CURRENT_TIMESTAMP,CURRENT_DATE) were incorrectly allowed to be cached.Because
STABLEfunctions can return different results across different SQL statements within the same transaction, caching their results could serve stale or incorrect data. This change aligns Hyperdrive's caching behavior with PostgreSQL's function volatility semantics.If your queries use
STABLEfunctions, and you were relying on them being cached, move the function call to your application code and pass the result as a query parameter. For example, instead ofWHERE created_at > NOW(), compute the timestamp in your Worker and pass it asWHERE created_at > $1.Hyperdrive uses text-based pattern matching to detect uncacheable functions. References to function names like
NOW()in SQL comments also cause the query to be marked as uncacheable.For more information, refer to Query caching and Troubleshoot and debug.
Cloudflare Queues is now part of the Workers free plan, offering guaranteed message delivery across up to 10,000 queues to either Cloudflare Workers or HTTP pull consumers. Every Cloudflare account now includes 10,000 operations per day across reads, writes, and deletes. For more details on how each operation is defined, refer to Queues pricing ↗.
All features of the existing Queues functionality are available on the free plan, including unlimited event subscriptions. Note that the maximum retention period on the free tier, however, is 24 hours rather than 14 days.
If you are new to Cloudflare Queues, follow this guide ↗ or try one of our tutorials to get started.
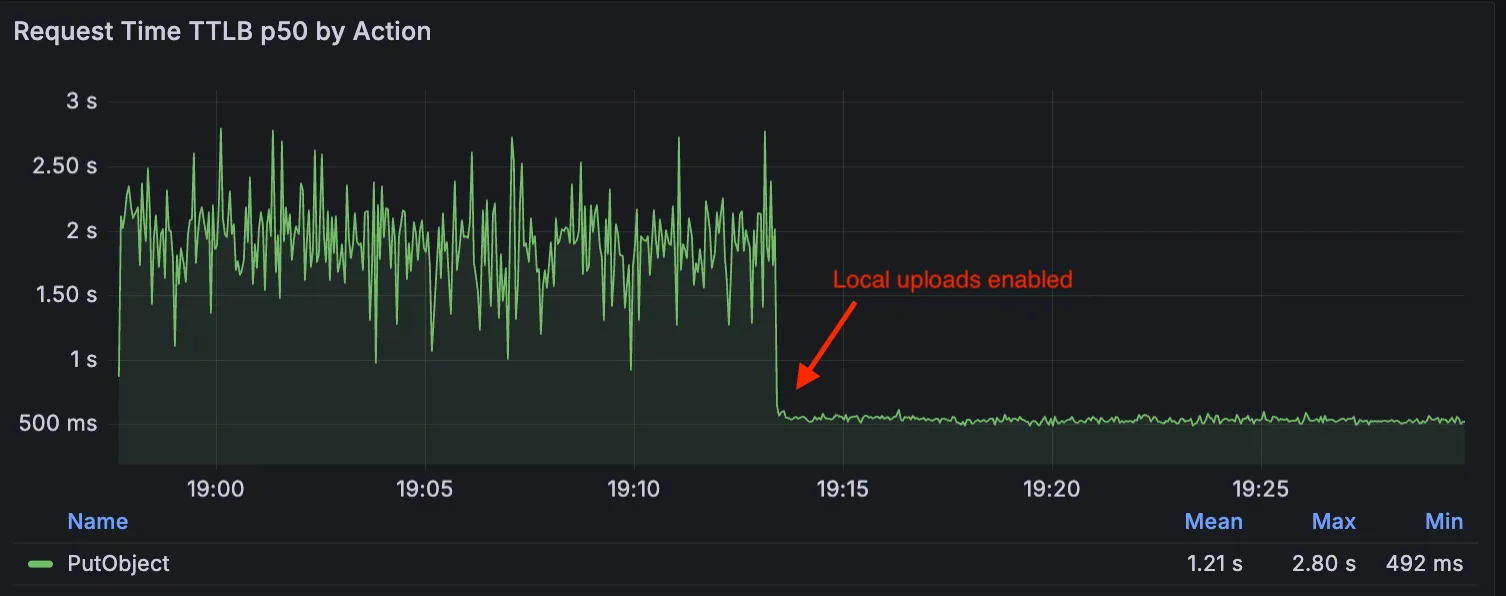
Local Uploads is now available in open beta. Enable it on your R2 bucket to improve upload performance when clients upload data from a different region than your bucket. With Local Uploads enabled, object data is written to storage infrastructure near the client, then asynchronously replicated to your bucket. The object is immediately accessible and remains strongly consistent throughout. Refer to How R2 works for details on how data is written to your bucket.
In our tests, we observed up to 75% reduction in Time to Last Byte (TTLB) for upload requests when Local Uploads is enabled.
This feature is ideal when:
- Your users are globally distributed
- Upload performance and reliability is critical to your application
- You want to optimize write performance without changing your bucket's primary location
To enable Local Uploads on your bucket, find Local Uploads in your bucket settings in the Cloudflare Dashboard ↗, or run:
Terminal window npx wrangler r2 bucket local-uploads enable <BUCKET_NAME>Enabling Local Uploads on a bucket is seamless: existing uploads will complete as expected and there’s no interruption to traffic. There is no additional cost to enable Local Uploads. Upload requests incur the standard Class A operation costs same as upload requests made without Local Uploads.
For more information, refer to Local Uploads.
The minimum
cacheTtlparameter for Workers KV has been reduced from 60 seconds to 30 seconds. This change applies to bothget()andgetWithMetadata()methods.This reduction allows you to maintain more up-to-date cached data and have finer-grained control over cache behavior. Applications requiring faster data refresh rates can now configure cache durations as low as 30 seconds instead of the previous 60-second minimum.
The
cacheTtlparameter defines how long a KV result is cached at the global network location it is accessed from:JavaScript // Read with custom cache TTLconst value = await env.NAMESPACE.get("my-key", {cacheTtl: 30, // Cache for minimum 30 seconds (previously 60)});// getWithMetadata also supports the reduced cache TTLconst valueWithMetadata = await env.NAMESPACE.getWithMetadata("my-key", {cacheTtl: 30, // Cache for minimum 30 seconds});The default cache TTL remains unchanged at 60 seconds. Upgrade to the latest version of Wrangler to be able to use 30 seconds
cacheTtl.This change affects all KV read operations using the binding API. For more information, consult the Workers KV cache TTL documentation.
You can now store up to 10 million vectors in a single Vectorize index, doubling the previous limit of 5 million vectors. This enables larger-scale semantic search, recommendation systems, and retrieval-augmented generation (RAG) applications without splitting data across multiple indexes.
Vectorize continues to support indexes with up to 1,536 dimensions per vector at 32-bit precision. Refer to the Vectorize limits documentation for complete details.
Workers KV has an updated dashboard UI with new dashboard styling that makes it easier to navigate and see analytics and settings for a KV namespace.
The new dashboard features a streamlined homepage for easy access to your namespaces and key operations, with consistent design with the rest of the dashboard UI updates. It also provides an improved analytics view.
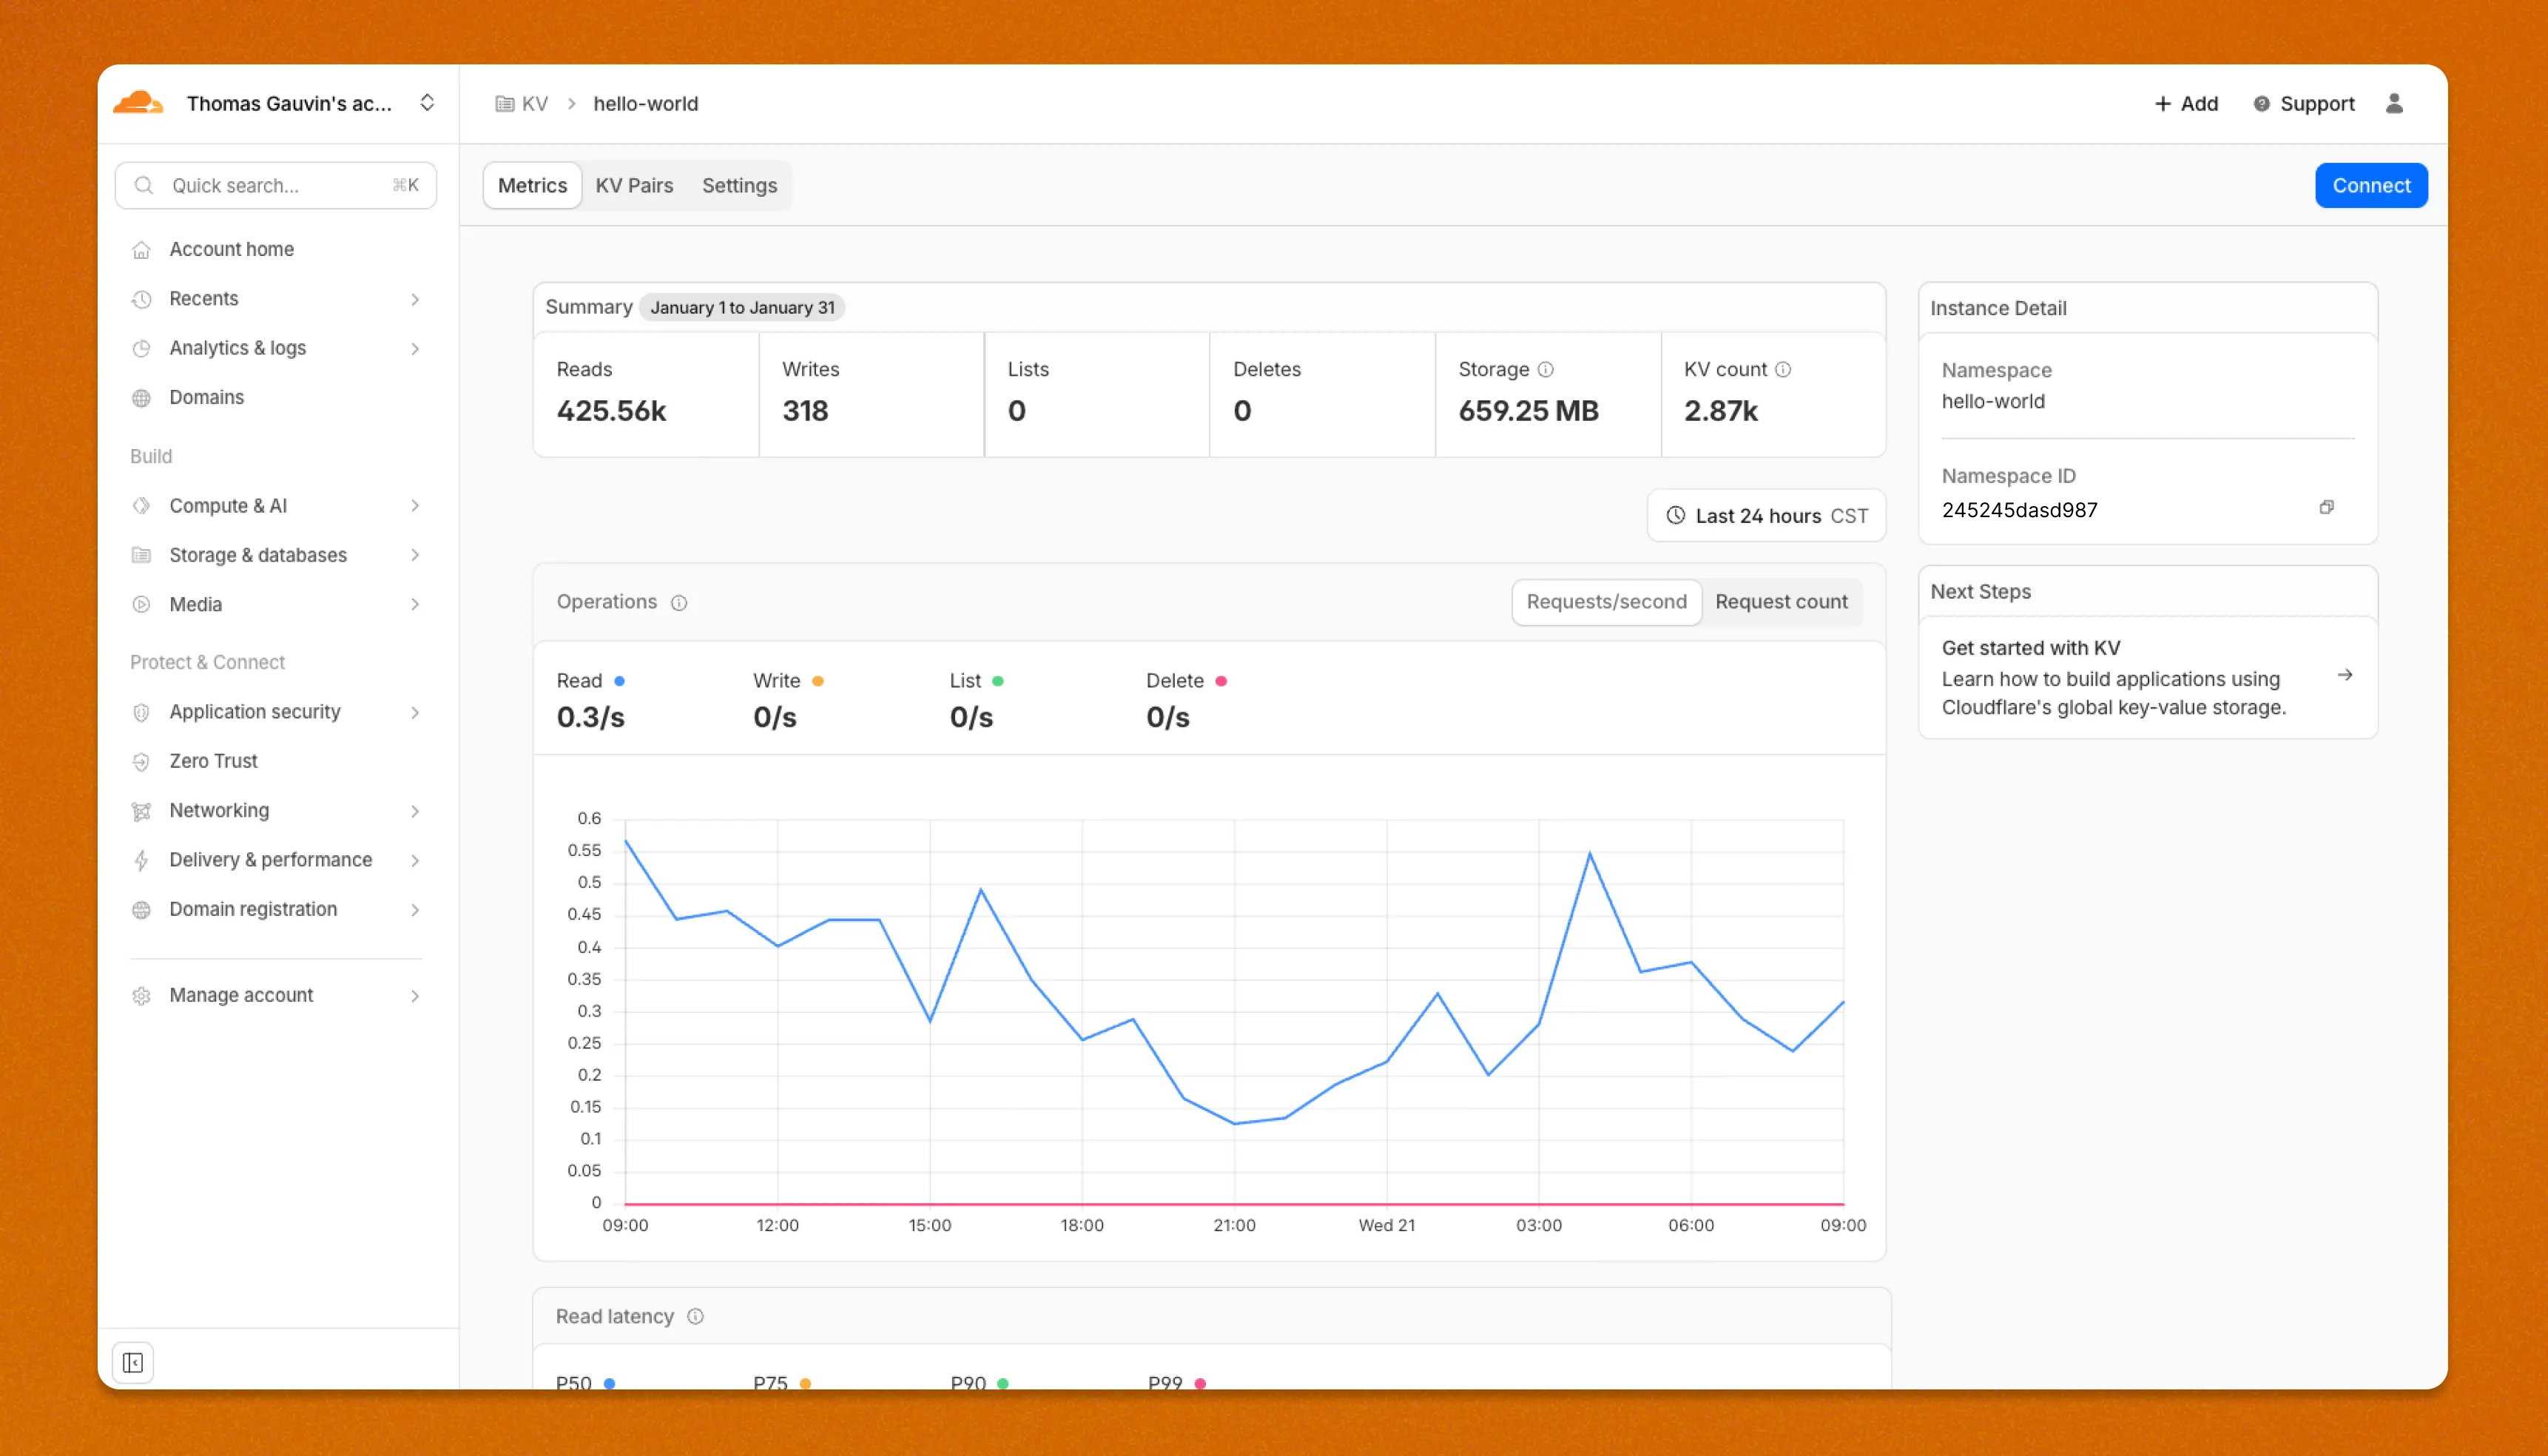
The updated dashboard is now available for all Workers KV users. Log in to the Cloudflare Dashboard ↗ to start exploring the new interface.
You can now receive notifications when your Workers' builds start, succeed, fail, or get cancelled using Event Subscriptions.
Workers Builds publishes events to a Queue that your Worker can read messages from, and then send notifications wherever you need — Slack, Discord, email, or any webhook endpoint.
You can deploy this Worker ↗ to your own Cloudflare account to send build notifications to Slack:
The template includes:
- Build status with Preview/Live URLs for successful deployments
- Inline error messages for failed builds
- Branch, commit hash, and author name
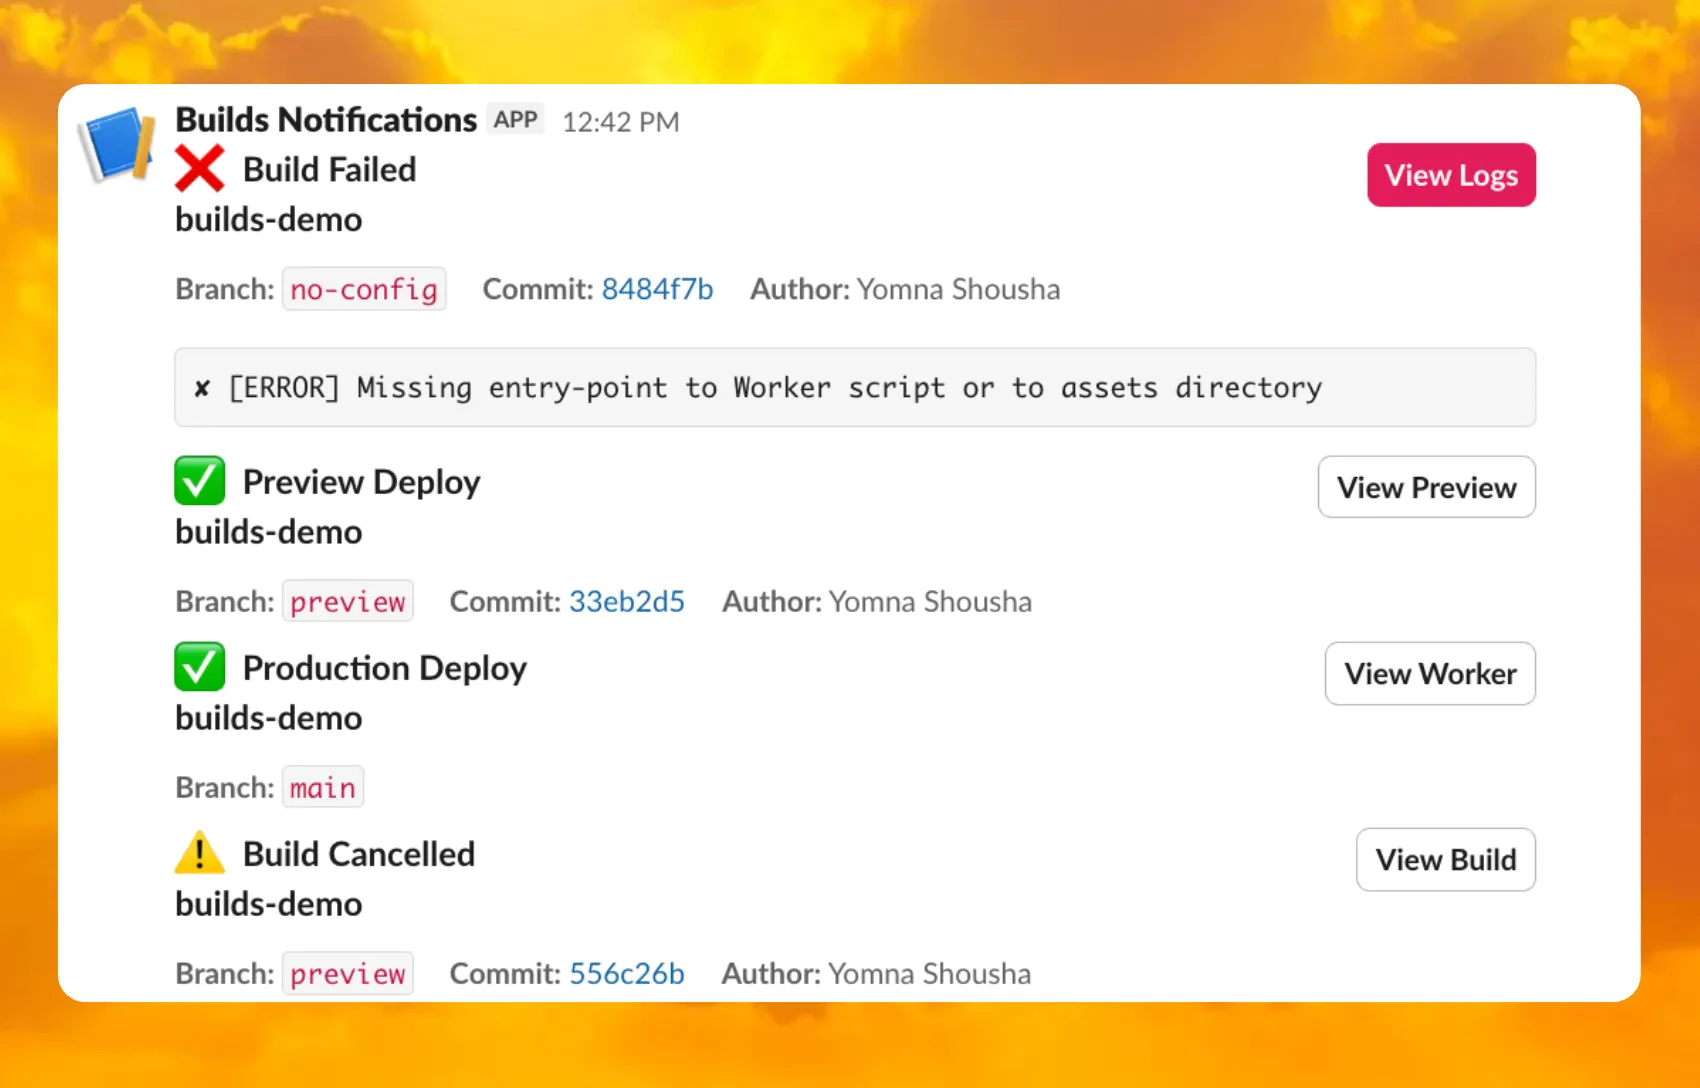
For setup instructions, refer to the template README ↗ or the Event Subscriptions documentation.
R2 Data Catalog now supports automatic snapshot expiration for Apache Iceberg tables.
In Apache Iceberg, a snapshot is metadata that represents the state of a table at a given point in time. Every mutation creates a new snapshot which enable powerful features like time travel queries and rollback capabilities but will accumulate over time.
Without regular cleanup, these accumulated snapshots can lead to:
- Metadata overhead
- Slower table operations
- Increased storage costs.
Snapshot expiration in R2 Data Catalog automatically removes old table snapshots based on your configured retention policy, improving performance and storage costs.
Terminal window # Enable catalog-level snapshot expiration# Expire snapshots older than 7 days, always retain at least 10 recent snapshotsnpx wrangler r2 bucket catalog snapshot-expiration enable my-bucket \--older-than-days 7 \--retain-last 10Snapshot expiration uses two parameters to determine which snapshots to remove:
--older-than-days: age threshold in days--retain-last: minimum snapshot count to retain
Both conditions must be met before a snapshot is expired, ensuring you always retain recent snapshots even if they exceed the age threshold.
This feature complements automatic compaction, which optimizes query performance by combining small data files into larger ones. Together, these automatic maintenance operations keep your Iceberg tables performant and cost-efficient without manual intervention.
To learn more about snapshot expiration and how to configure it, visit our table maintenance documentation or see how to manage catalogs.
A new Rules of Durable Objects guide is now available, providing opinionated best practices for building effective Durable Objects applications. This guide covers design patterns, storage strategies, concurrency, and common anti-patterns to avoid.
Key guidance includes:
- Design around your "atom" of coordination — Create one Durable Object per logical unit (chat room, game session, user) instead of a global singleton that becomes a bottleneck.
- Use SQLite storage with RPC methods — SQLite-backed Durable Objects with typed RPC methods provide the best developer experience and performance.
- Understand input and output gates — Learn how Cloudflare's runtime prevents data races by default, how write coalescing works, and when to use
blockConcurrencyWhile(). - Leverage Hibernatable WebSockets — Reduce costs for real-time applications by allowing Durable Objects to sleep while maintaining WebSocket connections.
The testing documentation has also been updated with modern patterns using
@cloudflare/vitest-pool-workers, including examples for testing SQLite storage, alarms, and direct instance access:test/counter.test.js import { env, runDurableObjectAlarm } from "cloudflare:test";import { it, expect } from "vitest";it("can test Durable Objects with isolated storage", async () => {const stub = env.COUNTER.getByName("test");// Call RPC methods directly on the stubawait stub.increment();expect(await stub.getCount()).toBe(1);// Trigger alarms immediately without waitingawait runDurableObjectAlarm(stub);});test/counter.test.ts import { env, runDurableObjectAlarm } from "cloudflare:test";import { it, expect } from "vitest";it("can test Durable Objects with isolated storage", async () => {const stub = env.COUNTER.getByName("test");// Call RPC methods directly on the stubawait stub.increment();expect(await stub.getCount()).toBe(1);// Trigger alarms immediately without waitingawait runDurableObjectAlarm(stub);});
Storage billing for SQLite-backed Durable Objects will be enabled in January 2026, with a target date of January 7, 2026 (no earlier).
To view your SQLite storage usage, go to the Durable Objects page
Go to Durable ObjectsIf you do not want to incur costs, please take action such as optimizing queries or deleting unnecessary stored data in order to reduce your SQLite storage usage ahead of the January 7th target. Only usage on and after the billing target date will incur charges.
Developers on the Workers Paid plan with Durable Object's SQLite storage usage beyond included limits will incur charges according to SQLite storage pricing announced in September 2024 with the public beta ↗. Developers on the Workers Free plan will not be charged.
Compute billing for SQLite-backed Durable Objects has been enabled since the initial public beta. SQLite-backed Durable Objects currently incur charges for requests and duration, and no changes are being made to compute billing.
For more information about SQLite storage pricing and limits, refer to the Durable Objects pricing documentation.
You can now connect directly to remote databases and databases requiring TLS with
wrangler dev. This lets you run your Worker code locally while connecting to remote databases, without needing to usewrangler dev --remote.The
localConnectionStringfield andCLOUDFLARE_HYPERDRIVE_LOCAL_CONNECTION_STRING_<BINDING_NAME>environment variable can be used to configure the connection string used bywrangler dev.JSONC {"hyperdrive": [{"binding": "HYPERDRIVE","id": "your-hyperdrive-id","localConnectionString": "postgres://user:password@remote-host.example.com:5432/database?sslmode=require"}]}Learn more about local development with Hyperdrive.
Containers now support mounting R2 buckets as FUSE (Filesystem in Userspace) volumes, allowing applications to interact with R2 using standard filesystem operations.
Common use cases include:
- Bootstrapping containers with datasets, models, or dependencies for sandboxes and agent environments
- Persisting user configuration or application state without managing downloads
- Accessing large static files without bloating container images or downloading at startup
FUSE adapters like tigrisfs ↗, s3fs ↗, and gcsfuse ↗ can be installed in your container image and configured to mount buckets at startup.
FROM alpine:3.20# Install FUSE and dependenciesRUN apk update && \apk add --no-cache ca-certificates fuse curl bash# Install tigrisfsRUN ARCH=$(uname -m) && \if [ "$ARCH" = "x86_64" ]; then ARCH="amd64"; fi && \if [ "$ARCH" = "aarch64" ]; then ARCH="arm64"; fi && \VERSION=$(curl -s https://api.github.com/repos/tigrisdata/tigrisfs/releases/latest | grep -o '"tag_name": "[^"]*' | cut -d'"' -f4) && \curl -L "https://github.com/tigrisdata/tigrisfs/releases/download/${VERSION}/tigrisfs_${VERSION#v}_linux_${ARCH}.tar.gz" -o /tmp/tigrisfs.tar.gz && \tar -xzf /tmp/tigrisfs.tar.gz -C /usr/local/bin/ && \rm /tmp/tigrisfs.tar.gz && \chmod +x /usr/local/bin/tigrisfs# Create startup script that mounts bucketRUN printf '#!/bin/sh\n\set -e\n\mkdir -p /mnt/r2\n\R2_ENDPOINT="https://${R2_ACCOUNT_ID}.r2.cloudflarestorage.com"\n\/usr/local/bin/tigrisfs --endpoint "${R2_ENDPOINT}" -f "${BUCKET_NAME}" /mnt/r2 &\n\sleep 3\n\ls -lah /mnt/r2\n\' > /startup.sh && chmod +x /startup.shCMD ["/startup.sh"]See the Mount R2 buckets with FUSE example for a complete guide on mounting R2 buckets and/or other S3-compatible storage buckets within your containers.
You can now set a jurisdiction when creating a D1 database to guarantee where your database runs and stores data. Jurisdictions can help you comply with data localization regulations such as GDPR. Supported jurisdictions include
euandfedramp.A jurisdiction can only be set at database creation time via wrangler, REST API or the UI and cannot be added/updated after the database already exists.
Terminal window npx wrangler@latest d1 create db-with-jurisdiction --jurisdiction eucurl -X POST "https://api.cloudflare.com/client/v4/accounts/<account_id>/d1/database" \-H "Authorization: Bearer $TOKEN" \-H "Content-Type: application/json" \--data '{"name": "db-with-jurisdiction", "jurisdiction": "eu" }'To learn more, visit D1's data location documentation.
Workers, including those using Durable Objects and Browser Rendering, may now process WebSocket messages up to 32 MiB in size. Previously, this limit was 1 MiB.
This change allows Workers to handle use cases requiring large message sizes, such as processing Chrome Devtools Protocol messages.
For more information, please see the Durable Objects startup limits.