
Multiple security vulnerabilities were disclosed by the React team and Vercel affecting React Server Components and Next.js. These include denial of service, middleware and proxy bypass, server-side request forgery, cross-site scripting, and cache poisoning issues across a range of severity levels.
We strongly recommend updating your application and its dependencies immediately. Patched versions are available for React (
react-server-dom-webpack,react-server-dom-parcel, andreact-server-dom-turbopack19.0.6,19.1.7, and19.2.6) and Next.js (15.5.16and16.2.5).Cloudflare WAF rules deployed in response to prior React Server Component CVEs (
CVE-2025-55184↗ andCVE-2026-23864↗) already provide coverage for the newly disclosed denial-of-service vulnerabilities. These rules are enabled by default with a Block action for all customers using the Cloudflare Managed Ruleset, including Free plan customers using the Free Managed Ruleset.Ruleset Rule description Rule ID Default action Cloudflare Managed Ruleset React - DoS - CVE-2025-55184↗2694f1610c0b471393b21aef102ec699Block Cloudflare Managed Ruleset React - DoS - CVE-2026-23864↗aaede80b4d414dc89c443cea61680354Block The existing rules detect the underlying attack patterns generically. As a result, they apply to the new
CVE-2026-23870↗ denial-of-service vulnerability in Server Components and the corresponding Next.js advisoryGHSA-8h8q-6873-q5fj↗.Cloudflare is investigating whether WAF rules can be safely and effectively deployed for three of the high-severity advisories:
CVE-2026-23870↗ /GHSA-8h8q-6873-q5fj↗,GHSA-267c-6grr-h53f↗, andGHSA-mg66-mrh9-m8jx↗. If it is possible to create a managed WAF rule that mitigates these CVEs and does not potentially break application behavior, Cloudflare will add additional managed WAF rules. These rules will be announced through the WAF changelog. Because these vulnerabilities were shared with Cloudflare with minimal advance notice, we are still investigating what WAF mitigations are possible.Several of the disclosed vulnerabilities are not possible to block in WAF. We strongly recommend updating your applications so they are not purely reliant on WAF mitigations.
Customers on Pro, Business, or Enterprise plans should ensure that Managed Rules are enabled.
Vinext: Vinext ↗ is a Vite plugin that reimplements the Next.js API surface. Vinext's latest release is not vulnerable to any of the disclosed CVEs. Vinext's architecture differs from stock Next.js in ways that sidestep the affected code paths. For example, it does not implement the PPR resume protocol, does not expose Pages Router data-route endpoints, and strips internal headers such as
x-nextjs-dataat request boundaries. As an extra layer of defense, we added a React19.2.6or later requirement when runningvinext init(PR #1118 ↗, PR #1112 ↗) to prevent accidentally running a vulnerable version of React with Vinext.OpenNext on Cloudflare: OpenNext is an adapter that lets you deploy Next.js apps to the Cloudflare Workers platform. OpenNext itself is not directly vulnerable to the React denial-of-service CVE, but users must update the Next.js version in their application. The OpenNext team has updated the adapter to further harden against these vectors and released a new version of the Cloudflare adapter. Test fixtures and examples have been updated to use patched versions (PR #1255 ↗).
Advisory Severity Issue WAF status CVE-2026-23870↗ /GHSA-8h8q-6873-q5fj↗High Denial of service in Server Components WAF rules in place: 2694f1610c0b471393b21aef102ec699,aaede80b4d414dc89c443cea61680354
Cloudflare is investigating additional managed WAF coverageGHSA-267c-6grr-h53f↗High Middleware bypass via segment-prefetch routes Cloudflare is investigating if this can be safely and effectively mitigated by a managed WAF rule GHSA-mg66-mrh9-m8jx↗High Denial of service via connection exhaustion in Cache Components Cloudflare is investigating if this can be safely and effectively mitigated by a managed WAF rule GHSA-492v-c6pp-mqqv↗High Middleware bypass via dynamic route parameter injection Not possible to safely enable a managed WAF rule without potentially breaking application behavior GHSA-c4j6-fc7j-m34r↗High SSRF via WebSocket upgrades Not possible to safely enable a managed WAF rule without potentially breaking application behavior GHSA-36qx-fr4f-26g5↗High Middleware bypass in Pages Router i18n Custom WAF rule possible; global managed rule could potentially break application behavior GHSA-ffhc-5mcf-pf4q↗Moderate XSS via CSP nonces Custom WAF rule possible; global managed rule could potentially break application behavior GHSA-gx5p-jg67-6x7h↗Moderate XSS in beforeInteractivescriptsNot possible to safely enable a managed WAF rule without potentially breaking application behavior GHSA-h64f-5h5j-jqjh↗Moderate Denial of service in Image Optimization API Custom WAF rule possible; global managed rule could potentially break application behavior GHSA-wfc6-r584-vfw7↗Moderate Cache poisoning in RSC responses Custom WAF rule possible; global managed rule could potentially break application behavior GHSA-vfv6-92ff-j949↗Low Cache poisoning via RSC cache-busting collisions Not possible to safely enable a managed WAF rule without potentially breaking application behavior GHSA-3g8h-86w9-wvmq↗Low Middleware redirect cache poisoning Custom WAF rule possible; global managed rule could potentially break application behavior
You can now get a single unified trace across Worker-to-Worker subrequests, with trace context propagating automatically. Previously, automatic tracing produced disconnected traces when a Worker called another Worker through a service binding or Durable Object.
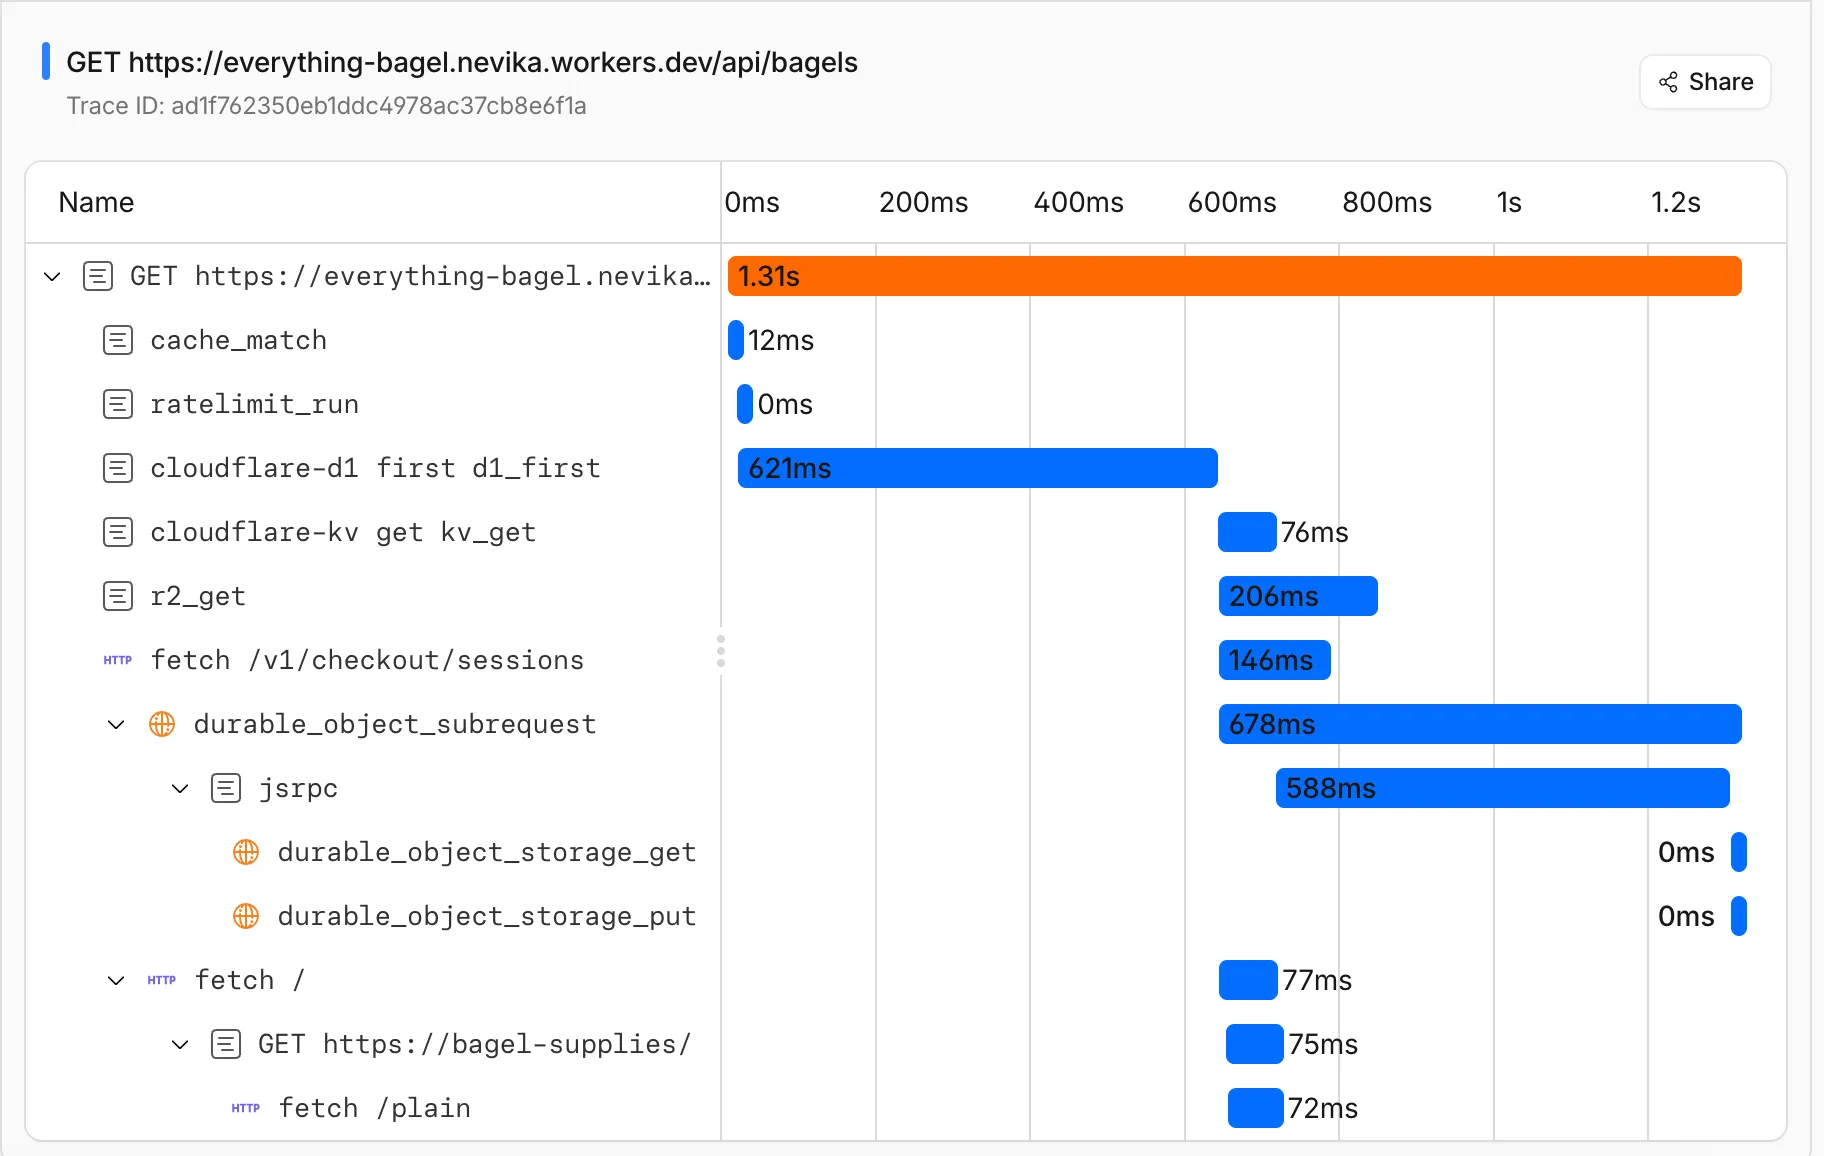
This means you can:
- Follow a request through your entire Worker architecture in one trace view
- See service binding and Durable Object calls as nested child spans instead of separate traces
- Debug cross-Worker request flows in the Cloudflare dashboard or in an external observability platform via OpenTelemetry
Tracing must be enabled in your Wrangler configuration for traces to be recorded. Checkout Workers tracing to get started.
Up next, we are working on external trace context propagation using W3C Trace Context standards ↗, which will allow traces from your Workers to link with traces from services outside of Cloudflare.
You can now use
@cloudflare/dynamic-workflows↗ to run a Workflow inside a Dynamic Worker, ensuring durable execution for code that is loaded at runtime.The Worker Loader loads Dynamic Workers on demand, which previously made durability challenging. Even within a Dynamic Worker, a Workflow might sleep for hours or days between steps, and by the time it resumes, the original Dynamic Worker code would no longer be in memory.
The library solves this by tagging each Workflow instance with metadata that identifies which Dynamic Worker to load — for example, a tenant ID — then reloading the matching Dynamic Worker through the Worker Loader whenever a Workflow awakens.
Because Dynamic Workers are created on-demand, you do not have to register each Workflow up front or manage them individually. Load the Workflow code in the Dynamic Worker when it is needed, and the Workflows engine handles persistence and retries behind the scenes. Your Workflow code itself is unaffected by the routing and behaves as normal.
This unlocks patterns where the Workflow code itself is dynamic. For example, this is useful with:
- SaaS platforms where each tenant defines their own automation, such as onboarding sequences, approval chains, or billing retry logic.
- AI agent frameworks where agents generate and execute multi-step plans at runtime, surviving restarts and waiting for human approval between tool calls.
- Multi-tenant job systems where each customer submits their own processing logic and every step persists progress and retries on failure.
TypeScript import {createDynamicWorkflowEntrypoint,DynamicWorkflowBinding,wrapWorkflowBinding,type WorkflowRunner,} from "@cloudflare/dynamic-workflows";export { DynamicWorkflowBinding };interface Env {WORKFLOWS: Workflow;LOADER: WorkerLoader;}function loadTenant(env: Env, tenantId: string) {return env.LOADER.get(tenantId, async () => ({compatibilityDate: "2026-01-01",mainModule: "index.js",modules: { "index.js": await fetchTenantCode(tenantId) },// The Dynamic Worker uses this exactly like a real Workflow binding;// every create() is tagged with { tenantId } automatically.env: { WORKFLOWS: wrapWorkflowBinding({ tenantId }) },}));}// The entrypoint name must match `class_name` in the workflows binding of your Wrangler config file.export const DynamicWorkflow = createDynamicWorkflowEntrypoint<Env>(async ({ env, metadata }) => {const stub = loadTenant(env, metadata.tenantId as string);return stub.getEntrypoint("TenantWorkflow") as unknown as WorkflowRunner;},);export default {fetch(request: Request, env: Env) {const tenantId = request.headers.get("x-tenant-id")!;return loadTenant(env, tenantId).getEntrypoint().fetch(request);},};For a full walkthrough, refer to the Dynamic Workflows guide.
Pay-as-you-go customers can now monitor usage-based costs and configure spend alerts through two new features: the Billable Usage dashboard and Budget alerts.
The Billable Usage dashboard provides daily visibility into usage-based costs across your Cloudflare account. The data comes from the same system that generates your monthly invoice, so the figures match your bill.
The dashboard displays:
- A bar chart showing daily usage charges for your billing period
- A sortable table breaking down usage by product, including total usage, billable usage, and cumulative costs
- Ability to view previous billing periods
Usage data aligns to your billing cycle, not the calendar month. The total usage cost shown at the end of a completed billing period matches the usage overage charges on your corresponding invoice.
To access the dashboard, go to Manage Account > Billing > Billable Usage.

Budget alerts allow you to set dollar-based thresholds for your account-level usage spend. You receive an email notification when your projected monthly spend reaches your configured threshold, giving you proactive visibility into your bill before month-end.
To configure a budget alert:
- Go to Manage Account > Billing > Billable Usage.
- Select Set Budget Alert.
- Enter a budget threshold amount greater than $0.
- Select Create.
Alternatively, configure alerts via Notifications > Add > Budget Alert.
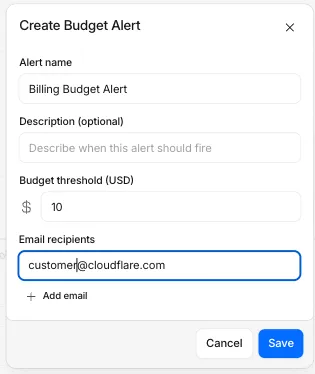
You can create multiple budget alerts at different dollar amounts. The notifications system automatically deduplicates alerts if multiple thresholds trigger at the same time. Budget alerts are calculated daily based on your usage trends and fire once per billing cycle when your projected spend first crosses your threshold.
Both features are available to Pay-as-you-go accounts with usage-based products (Workers, R2, Images, etc.). Enterprise contract accounts are not supported.
For more information, refer to the Usage based billing documentation.
Binary frames received on a
WebSocketare now delivered to themessageevent asBlob↗ objects by default. This matches the WebSocket specification ↗ and standard browser behavior. Previously, binary frames were always delivered asArrayBuffer↗. ThebinaryTypeproperty onWebSocketcontrols the delivery type on a per-WebSocket basis.This change has been active for Workers with compatibility dates on or after
2026-03-17, via thewebsocket_standard_binary_typecompatibility flag. We should have documented this change when it shipped but didn't. We're sorry for the trouble that caused. If your Worker handles binary WebSocket messages and assumesevent.datais anArrayBuffer, the frames will arrive asBlobinstead, and a naiveinstanceof ArrayBuffercheck will silently drop every frame.To opt back into
ArrayBufferdelivery, assignbinaryTypebefore callingaccept(). This works regardless of the compatibility flag:JavaScript const resp = await fetch("https://example.com", {headers: { Upgrade: "websocket" },});const ws = resp.webSocket;// Opt back into ArrayBuffer delivery for this WebSocket.ws.binaryType = "arraybuffer";ws.accept();ws.addEventListener("message", (event) => {if (typeof event.data === "string") {// Text frame.} else {// event.data is an ArrayBuffer because we set binaryType above.}});If you are not ready to migrate and want to keep
ArrayBufferas the default for all WebSockets in your Worker, add theno_websocket_standard_binary_typeflag to your Wrangler configuration file.This change has no effect on the Durable Object hibernatable WebSocket
webSocketMessagehandler, which continues to receive binary data asArrayBuffer.For more information, refer to WebSockets binary messages.
Workflows limits have been raised to the following:
Limit Previous New Concurrent instances (running in parallel) 10,000 50,000 Instance creation rate (per account) 100/second per account 300/second per account, 100/second per workflow Queued instances per Workflow 1 1 million 2 million These increases apply to all users on the Workers Paid plan. Refer to the Workflows limits documentation for more details.
-
Queued instances are instances that have been created or awoken and are waiting for a concurrency slot. ↩
-
Local Explorer is a browser-based interface and REST API for viewing and editing local resource data during development. It removes the need to write throwaway scripts or dig through
.wrangler/stateto understand what data your Worker has stored locally.Local Explorer is available in Wrangler 4.82.1+ and the Cloudflare Vite plugin 1.32.0+. Start a local development session and press
ein your terminal, or navigate to/cdn-cgi/exploreron your local dev server.Local Explorer supports five resource types and works across multiple workers running locally:
- KV — Browse keys, view values and metadata, create, update, and delete key-value pairs.
- R2 — List objects, view metadata, upload files, and delete objects. Supports directory views and multi-select.
- D1 — Browse tables and rows, run arbitrary SQL queries, and edit schemas in a full data studio.
- Durable Objects (SQLite storage) — Browse individual object SQLite tables, run SQL queries, and edit schemas.
- Workflows — List instances, view status and step history, trigger new runs, and pause, resume, restart, or terminate instances.
Local Explorer exposes a REST API at
/cdn-cgi/explorer/apithat provides programmatic access to the same operations available in the browser. The root endpoint returns an OpenAPI specification ↗ describing all available endpoints, parameters, and response formats.Terminal window curl http://localhost:8787/cdn-cgi/explorer/apiPoint an AI coding agent at
/cdn-cgi/explorer/apiand it can discover and interact with your local resources without manual setup. This enables iterative development loops where an agent can populate test data in KV or D1, inspect Durable Object state, trigger Workflow runs, or upload files to R2.For more details, refer to the Local Explorer documentation.
The simultaneous open connections limit has been relaxed. Previously, each Worker invocation was limited to six open connections at a time for the entire lifetime of each connection, including while reading the response body. Now, a connection is freed as soon as response headers arrive, so the six-connection limit only constrains how many connections can be in the initial "waiting for headers" phase simultaneously.


This means Workers can now have many more connections open at the same time without queueing, as long as no more than six are waiting for their initial response. This eliminates the
Response closed due to connection limitexception that could previously occur when the runtime canceled stalled connections to prevent deadlocks.Previously, the runtime used a deadlock avoidance algorithm that watched each open connection for I/O activity. If all six connections appeared idle — even momentarily — the runtime would cancel the least-recently-used connection to make room for new requests. In practice, this heuristic was fragile. For example, when a response used
Content-Encoding: gzip, the runtime's internal decompression created brief gaps between read and write operations. During these gaps, the connection appeared stalled despite being actively read by the Worker. If multiple connections hit these gaps at the same time, the runtime could spuriously cancel a connection that was working correctly. By only counting connections during the waiting-for-headers phase — where the runtime is fully in control and there is no ambiguity about whether the connection is active — this class of bug is eliminated entirely.

The Workers runtime now automatically sends a reciprocal Close frame when it receives a Close frame from the peer. The
readyStatetransitions toCLOSEDbefore thecloseevent fires. This matches the WebSocket specification ↗ and standard browser behavior.This change is enabled by default for Workers using compatibility dates on or after
2026-04-07(via theweb_socket_auto_reply_to_closecompatibility flag). Existing code that manually callsclose()inside thecloseevent handler will continue to work — the call is silently ignored when the WebSocket is already closed.JavaScript const [client, server] = Object.values(new WebSocketPair());server.accept();server.addEventListener("close", (event) => {// readyState is already CLOSED — no need to call server.close().console.log(server.readyState); // WebSocket.CLOSEDconsole.log(event.code); // 1000console.log(event.wasClean); // true});The automatic close behavior can interfere with WebSocket proxying, where a Worker sits between a client and a backend and needs to coordinate the close on both sides independently. To support this use case, pass
{ allowHalfOpen: true }toaccept():JavaScript const [client, server] = Object.values(new WebSocketPair());server.accept({ allowHalfOpen: true });server.addEventListener("close", (event) => {// readyState is still CLOSING here, giving you time// to coordinate the close on the other side.console.log(server.readyState); // WebSocket.CLOSING// Manually close when ready.server.close(event.code, "done");});For more information, refer to WebSockets Close behavior.
All
wrangler workflowscommands now accept a--localflag to target a Workflow running in a localwrangler devsession instead of the production API.You can now manage the full Workflow lifecycle locally, including triggering Workflows, listing instances, pausing, resuming, restarting, terminating, and sending events:
Terminal window npx wrangler workflows list --localnpx wrangler workflows trigger my-workflow --localnpx wrangler workflows instances list my-workflow --localnpx wrangler workflows instances pause my-workflow <INSTANCE_ID> --localnpx wrangler workflows instances send-event my-workflow <INSTANCE_ID> --type my-event --localAll commands also accept
--portto target a specificwrangler devsession (defaults to8787).For more information, refer to Workflows local development.
Workers Builds now supports Deploy Hooks — trigger builds from your headless CMS, a Cron Trigger, a Slack bot, or any system that can send an HTTP request.
Each Deploy Hook is a unique URL tied to a specific branch. Send it a
POSTand your Worker builds and deploys.Terminal window curl -X POST "https://api.cloudflare.com/client/v4/workers/builds/deploy_hooks/<DEPLOY_HOOK_ID>"To create one, go to Workers & Pages > your Worker > Settings > Builds > Deploy Hooks.
Since a Deploy Hook is a URL, you can also call it from another Worker. For example, a Worker with a Cron Trigger can rebuild your project on a schedule:
JavaScript export default {async scheduled(event, env, ctx) {ctx.waitUntil(fetch(env.DEPLOY_HOOK_URL, { method: "POST" }));},};TypeScript export default {async scheduled(event: ScheduledEvent, env: Env, ctx: ExecutionContext): Promise<void> {ctx.waitUntil(fetch(env.DEPLOY_HOOK_URL, { method: "POST" }));},} satisfies ExportedHandler<Env>;You can also use Deploy Hooks to rebuild when your CMS publishes new content or deploy from a Slack slash command.
- Automatic deduplication: If a Deploy Hook fires multiple times before the first build starts running, redundant builds are automatically skipped. This keeps your build queue clean when webhooks retry or CMS events arrive in bursts.
- Last triggered: The dashboard shows when each hook was last triggered.
- Build source: Your Worker's build history shows which Deploy Hook started each build by name.
Deploy Hooks are rate limited to 10 builds per minute per Worker and 100 builds per minute per account. For all limits, see Limits & pricing.
To get started, read the Deploy Hooks documentation.
Three new properties are now available on
request.cfin Workers that expose Layer 4 transport telemetry from the client connection. These properties let your Worker make decisions based on real-time connection quality signals — such as round-trip time and data delivery rate — without requiring any client-side changes.Previously, this telemetry was only available via the
Server-Timing: cfL4response header. These new properties surface the same data directly in the Workers runtime, so you can use it for routing, logging, or response customization.Property Type Description clientTcpRttnumber | undefined The smoothed TCP round-trip time (RTT) between Cloudflare and the client in milliseconds. Only present for TCP connections (HTTP/1, HTTP/2). For example, 22.clientQuicRttnumber | undefined The smoothed QUIC round-trip time (RTT) between Cloudflare and the client in milliseconds. Only present for QUIC connections (HTTP/3). For example, 42.edgeL4Object | undefined Layer 4 transport statistics. Contains deliveryRate(number) — the most recent data delivery rate estimate for the connection, in bytes per second. For example,123456.JavaScript export default {async fetch(request) {const cf = request.cf;const rtt = cf.clientTcpRtt ?? cf.clientQuicRtt ?? 0;const deliveryRate = cf.edgeL4?.deliveryRate ?? 0;const transport = cf.clientTcpRtt ? "TCP" : "QUIC";console.log(`Transport: ${transport}, RTT: ${rtt}ms, Delivery rate: ${deliveryRate} B/s`);const headers = new Headers(request.headers);headers.set("X-Client-RTT", String(rtt));headers.set("X-Delivery-Rate", String(deliveryRate));return fetch(new Request(request, { headers }));},};For more information, refer to Workers Runtime APIs: Request.
Four new fields are now available on
request.cf.tlsClientAuthin Workers for requests that include a mutual TLS (mTLS) client certificate. These fields encode the client certificate and its intermediate chain in RFC 9440 ↗ format — the same standard format used by theClient-CertandClient-Cert-ChainHTTP headers — so your Worker can forward them directly to your origin without any custom parsing or encoding logic.Field Type Description certRFC9440String The client leaf certificate in RFC 9440 format ( :base64-DER:). Empty if no client certificate was presented.certRFC9440TooLargeBoolean trueif the leaf certificate exceeded 10 KB and was omitted fromcertRFC9440.certChainRFC9440String The intermediate certificate chain in RFC 9440 format as a comma-separated list. Empty if no intermediates were sent or if the chain exceeded 16 KB. certChainRFC9440TooLargeBoolean trueif the intermediate chain exceeded 16 KB and was omitted fromcertChainRFC9440.JavaScript export default {async fetch(request) {const tls = request.cf.tlsClientAuth;// Only forward if cert was verified and chain is completeif (!tls || !tls.certVerified || tls.certRevoked || tls.certChainRFC9440TooLarge) {return new Response("Unauthorized", { status: 401 });}const headers = new Headers(request.headers);headers.set("Client-Cert", tls.certRFC9440);headers.set("Client-Cert-Chain", tls.certChainRFC9440);return fetch(new Request(request, { headers }));},};For more information, refer to Client certificate variables and Mutual TLS authentication.
ctx.id.jurisdictioninside a Durable Object now reports the jurisdiction the object was created in — for example"eu"when accessed throughenv.MY_DURABLE_OBJECT.jurisdiction("eu")— so you can make region-aware decisions without passing the jurisdiction through method arguments or persisting it in storage. For the full list of ID-construction paths that preservejurisdiction, refer to the Durable Object ID documentation.JavaScript export class RegionalRoom extends DurableObject {async fetch(request) {// "eu" when accessed through env.MY_DURABLE_OBJECT.jurisdiction("eu")const region = this.ctx.id.jurisdiction;return new Response(`Hello from ${region ?? "the default region"}!`);}}// Workerexport default {async fetch(request, env) {const stub = env.MY_DURABLE_OBJECT.jurisdiction("eu").getByName("general");return stub.fetch(request);},};ctx.id.jurisdictionisundefinedfor Durable Objects that were not created in a jurisdiction-restricted namespace. Alarms scheduled before 2026-03-15 also do not havejurisdictionstored; to backfill the value, reschedule the alarm from afetch()or RPC handler.
The new
secretsconfiguration property lets you declare the secret names your Worker requires in your Wrangler configuration file. Required secrets are validated during local development and deploy, and used as the source of truth for type generation.JSONC {"secrets": {"required": ["API_KEY", "DB_PASSWORD"],},}TOML [secrets]required = [ "API_KEY", "DB_PASSWORD" ]When
secretsis defined,wrangler devandvite devload only the keys listed insecrets.requiredfrom.dev.varsor.env/process.env. Additional keys in those files are excluded. If any required secrets are missing, a warning is logged listing the missing names.wrangler typesgenerates typed bindings fromsecrets.requiredinstead of inferring names from.dev.varsor.env. This lets you run type generation in CI or other environments where those files are not present. Per-environment secrets are supported — the aggregatedEnvtype marks secrets that only appear in some environments as optional.wrangler deployandwrangler versions uploadvalidate that all secrets insecrets.requiredare configured on the Worker before the operation succeeds. If any required secrets are missing, the command fails with an error listing which secrets need to be set.For more information, refer to the
secretsconfiguration property reference.
Dynamic Workers are now in open beta ↗ for all paid Workers users. You can now have a Worker spin up other Workers, called Dynamic Workers, at runtime to execute code on-demand in a secure, sandboxed environment. Dynamic Workers start in milliseconds, making them well suited for fast, secure code execution at scale.
- Code Mode: LLMs are trained to write code. Run tool-calling logic written in code instead of stepping through many tool calls, which can save up to 80% in inference tokens and cost.
- AI agents executing code: Run code for tasks like data analysis, file transformation, API calls, and chained actions.
- Running AI-generated code: Run generated code for prototypes, projects, and automations in a secure, isolated sandboxed environment.
- Fast development and previews: Load prototypes, previews, and playgrounds in milliseconds.
- Custom automations: Create custom tools on the fly that execute a task, call an integration, or automate a workflow.
Dynamic Workers support two loading modes:
load(code)— for one-time code execution (equivalent to callingget()with a null ID).get(id, callback)— caches a Dynamic Worker by ID so it can stay warm across requests. Use this when the same code will receive subsequent requests.
JavaScript export default {async fetch(request, env) {const worker = env.LOADER.load({compatibilityDate: "2026-01-01",mainModule: "src/index.js",modules: {"src/index.js": `export default {fetch() {return new Response("Hello from a dynamic Worker");},};`,},// Block all outbound network access from the Dynamic Worker.globalOutbound: null,});return worker.getEntrypoint().fetch(request);},};TypeScript export default {async fetch(request: Request, env: Env): Promise<Response> {const worker = env.LOADER.load({compatibilityDate: "2026-01-01",mainModule: "src/index.js",modules: {"src/index.js": `export default {fetch() {return new Response("Hello from a dynamic Worker");},};`,},// Block all outbound network access from the Dynamic Worker.globalOutbound: null,});return worker.getEntrypoint().fetch(request);},};Here are 3 new libraries to help you build with Dynamic Workers:
-
@cloudflare/codemode↗: Replace individual tool calls with a singlecode()tool, so LLMs write and execute TypeScript that orchestrates multiple API calls in one pass. -
@cloudflare/worker-bundler↗: Resolve npm dependencies and bundle source files into ready-to-load modules for Dynamic Workers, all at runtime. -
@cloudflare/shell↗: Give your agent a virtual filesystem inside a Dynamic Worker with persistent storage backed by SQLite and R2.
Dynamic Workers Starter
Use this starter ↗ to deploy a Worker that can load and execute Dynamic Workers.
Dynamic Workers Playground
Deploy the Dynamic Workers Playground ↗ to write or import code, bundle it at runtime with
@cloudflare/worker-bundler, execute it through a Dynamic Worker, and see real-time responses and execution logs.For the full API reference and configuration options, refer to the Dynamic Workers documentation.
Dynamic Workers pricing is based on three dimensions: Dynamic Workers created daily, requests, and CPU time.
Included Additional usage Dynamic Workers created daily 1,000 unique Dynamic Workers per month +$0.002 per Dynamic Worker per day Requests ¹ 10 million per month +$0.30 per million requests CPU time ¹ 30 million CPU milliseconds per month +$0.02 per million CPU milliseconds ¹ Uses Workers Standard rates and will appear as part of your existing Workers bill, not as separate Dynamic Workers charges.
Note: Dynamic Workers requests and CPU time are already billed as part of your Workers plan and will count toward your Workers requests and CPU usage. The Dynamic Workers created daily charge is not yet active — you will not be billed for the number of Dynamic Workers created at this time. Pricing information is shared in advance so you can estimate future costs.
Workflow instance methods
pause(),resume(),restart(), andterminate()are now available in local development when usingwrangler dev.You can now test the full Workflow instance lifecycle locally:
TypeScript const instance = await env.MY_WORKFLOW.create({id: "my-instance-id",});await instance.pause(); // pauses a running workflow instanceawait instance.resume(); // resumes a paused instanceawait instance.restart(); // restarts the instance from the beginningawait instance.terminate(); // terminates the instance immediately
The latest release of the Agents SDK ↗ exposes agent state as a readable property, prevents duplicate schedule rows across Durable Object restarts, brings full TypeScript inference to
AgentClient, and migrates to Zod 4.Both
useAgent(React) andAgentClient(vanilla JS) now expose astateproperty that reflects the current agent state. Previously, reading state required manually tracking it through theonStateUpdatecallback.React (
useAgent)JavaScript const agent = useAgent({agent: "game-agent",name: "room-123",});// Read state directly — no separate useState + onStateUpdate neededreturn <div>Score: {agent.state?.score}</div>;// Spread for partial updatesagent.setState({ ...agent.state, score: (agent.state?.score ?? 0) + 10 });TypeScript const agent = useAgent<GameAgent, GameState>({agent: "game-agent",name: "room-123",});// Read state directly — no separate useState + onStateUpdate neededreturn <div>Score: {agent.state?.score}</div>;// Spread for partial updatesagent.setState({ ...agent.state, score: (agent.state?.score ?? 0) + 10 });agent.stateis reactive — the component re-renders when state changes from either the server or a client-sidesetState()call.Vanilla JS (
AgentClient)JavaScript const client = new AgentClient({agent: "game-agent",name: "room-123",host: "your-worker.workers.dev",});client.setState({ score: 100 });console.log(client.state); // { score: 100 }TypeScript const client = new AgentClient<GameAgent>({agent: "game-agent",name: "room-123",host: "your-worker.workers.dev",});client.setState({ score: 100 });console.log(client.state); // { score: 100 }State starts as
undefinedand is populated when the server sends the initial state on connect (frominitialState) or whensetState()is called. Use optional chaining (agent.state?.field) for safe access. TheonStateUpdatecallback continues to work as before — the newstateproperty is additive.schedule()now supports anidempotentoption that deduplicates by(type, callback, payload), preventing duplicate rows from accumulating when called in places that run on every Durable Object restart such asonStart().Cron schedules are idempotent by default. Calling
schedule("0 * * * *", "tick")multiple times with the same callback, expression, and payload returns the existing schedule row instead of creating a new one. Pass{ idempotent: false }to override.Delayed and date-scheduled types support opt-in idempotency:
JavaScript import { Agent } from "agents";class MyAgent extends Agent {async onStart() {// Safe across restarts — only one row is createdawait this.schedule(60, "maintenance", undefined, { idempotent: true });}}TypeScript import { Agent } from "agents";class MyAgent extends Agent {async onStart() {// Safe across restarts — only one row is createdawait this.schedule(60, "maintenance", undefined, { idempotent: true });}}Two new warnings help catch common foot-guns:
- Calling
schedule()insideonStart()without{ idempotent: true }emits aconsole.warnwith actionable guidance (once per callback; skipped for cron and whenidempotentis set explicitly). - If an alarm cycle processes 10 or more stale one-shot rows for the same callback, the SDK emits a
console.warnand aschedule:duplicate_warningdiagnostics channel event.
AgentClientnow accepts an optional agent type parameter for full type inference on RPC calls, matching the typed experience already available withuseAgent.JavaScript const client = new AgentClient({agent: "my-agent",host: window.location.host,});// Typed call — method name autocompletes, args and return type inferredconst value = await client.call("getValue");// Typed stub — direct RPC-style proxyawait client.stub.getValue();await client.stub.add(1, 2);TypeScript const client = new AgentClient<MyAgent>({agent: "my-agent",host: window.location.host,});// Typed call — method name autocompletes, args and return type inferredconst value = await client.call("getValue");// Typed stub — direct RPC-style proxyawait client.stub.getValue();await client.stub.add(1, 2);State is automatically inferred from the agent type, so
onStateUpdateis also typed:JavaScript const client = new AgentClient({agent: "my-agent",host: window.location.host,onStateUpdate: (state) => {// state is typed as MyAgent's state type},});TypeScript const client = new AgentClient<MyAgent>({agent: "my-agent",host: window.location.host,onStateUpdate: (state) => {// state is typed as MyAgent's state type},});Existing untyped usage continues to work without changes. The RPC type utilities (
AgentMethods,AgentStub,RPCMethods) are now exported fromagents/clientfor advanced typing scenarios.agents,@cloudflare/ai-chat, and@cloudflare/codemodenow requirezod ^4.0.0. Zod v3 is no longer supported.- Turn serialization —
onChatMessage()and_reply()work is now queued so user requests, tool continuations, andsaveMessages()never stream concurrently. - Duplicate messages on stop — Clicking stop during an active stream no longer splits the assistant message into two entries.
- Duplicate messages after tool calls — Orphaned client IDs no longer leak into persistent storage.
keepAlive()now uses a lightweight in-memory ref count instead of schedule rows. Multiple concurrent callers share a single alarm cycle. The@experimentaltag has been removed from bothkeepAlive()andkeepAliveWhile().A new entry point
@cloudflare/codemode/tanstack-aiadds support for TanStack AI's ↗chat()as an alternative to the Vercel AI SDK'sstreamText():JavaScript import {createCodeTool,tanstackTools,} from "@cloudflare/codemode/tanstack-ai";import { chat } from "@tanstack/ai";const codeTool = createCodeTool({tools: [tanstackTools(myServerTools)],executor,});const stream = chat({ adapter, tools: [codeTool], messages });TypeScript import { createCodeTool, tanstackTools } from "@cloudflare/codemode/tanstack-ai";import { chat } from "@tanstack/ai";const codeTool = createCodeTool({tools: [tanstackTools(myServerTools)],executor,});const stream = chat({ adapter, tools: [codeTool], messages });To update to the latest version:
Terminal window npm i agents@latest @cloudflare/ai-chat@latest- Calling
You can now manage Cloudflare Tunnels directly from Wrangler, the CLI for the Cloudflare Developer Platform. The new
wrangler tunnelcommands let you create, run, and manage tunnels without leaving your terminal.
Available commands:
wrangler tunnel create— Create a new remotely managed tunnel.wrangler tunnel list— List all tunnels in your account.wrangler tunnel info— Display details about a specific tunnel.wrangler tunnel delete— Delete a tunnel.wrangler tunnel run— Run a tunnel using the cloudflared daemon.wrangler tunnel quick-start— Start a free, temporary tunnel without an account using Quick Tunnels.
Wrangler handles downloading and managing the cloudflared binary automatically. On first use, you will be prompted to download
cloudflaredto a local cache directory.These commands are currently experimental and may change without notice.
To get started, refer to the Wrangler tunnel commands documentation.
The latest releases of
@cloudflare/codemode↗ add a new MCP barrel export, removeaiandzodas required peer dependencies from the main entry point, and give you more control over the sandbox.A new
@cloudflare/codemode/mcpentry point provides two functions that wrap MCP servers with Code Mode:codeMcpServer({ server, executor })— wraps an existing MCP server with a singlecodetool where each upstream tool becomes a typedcodemode.*method.openApiMcpServer({ spec, executor, request })— createssearchandexecuteMCP tools from an OpenAPI spec with host-side request proxying and automatic$refresolution.
JavaScript import { codeMcpServer } from "@cloudflare/codemode/mcp";import { DynamicWorkerExecutor } from "@cloudflare/codemode";const executor = new DynamicWorkerExecutor({ loader: env.LOADER });// Wrap an existing MCP server — all its tools become// typed methods the LLM can call from generated codeconst server = await codeMcpServer({ server: upstreamMcp, executor });TypeScript import { codeMcpServer } from "@cloudflare/codemode/mcp";import { DynamicWorkerExecutor } from "@cloudflare/codemode";const executor = new DynamicWorkerExecutor({ loader: env.LOADER });// Wrap an existing MCP server — all its tools become// typed methods the LLM can call from generated codeconst server = await codeMcpServer({ server: upstreamMcp, executor });Breaking change in v0.2.0:
generateTypesand theToolDescriptor/ToolDescriptorstypes have moved to@cloudflare/codemode/ai:JavaScript // Beforeimport { generateTypes } from "@cloudflare/codemode";// Afterimport { generateTypes } from "@cloudflare/codemode/ai";TypeScript // Beforeimport { generateTypes } from "@cloudflare/codemode";// Afterimport { generateTypes } from "@cloudflare/codemode/ai";The main entry point (
@cloudflare/codemode) no longer requires theaiorzodpeer dependencies. It now exports:Export Description sanitizeToolNameSanitize tool names into valid JS identifiers normalizeCodeNormalize LLM-generated code into async arrow functions generateTypesFromJsonSchemaGenerate TypeScript type definitions from plain JSON Schema jsonSchemaToTypeConvert a single JSON Schema to a TypeScript type string DynamicWorkerExecutorSandboxed code execution via Dynamic Worker Loader ToolDispatcherRPC target for dispatching tool calls from sandbox to host The
aiandzodpeer dependencies are now optional — only required when importing from@cloudflare/codemode/ai.DynamicWorkerExecutornow accepts an optionalmodulesoption to inject custom ES modules into the sandbox:JavaScript const executor = new DynamicWorkerExecutor({loader: env.LOADER,modules: {"utils.js": `export function add(a, b) { return a + b; }`,},});// Sandbox code can then: import { add } from "utils.js"TypeScript const executor = new DynamicWorkerExecutor({loader: env.LOADER,modules: {"utils.js": `export function add(a, b) { return a + b; }`,},});// Sandbox code can then: import { add } from "utils.js"DynamicWorkerExecutornow normalizes code and sanitizes tool names internally. You no longer need to callnormalizeCode()orsanitizeToolName()before passing code and functions toexecute().Terminal window npm i @cloudflare/codemode@latestSee the Code Mode documentation for the full API reference.
When your Worker accesses a Durable Object via
idFromName()orgetByName(), the same name is now available onctx.id.nameinside the object — no need to pass it through method arguments or persist it in storage. This brings the runtime behavior in line with the Workers runtime types.This is especially useful for alarms, where there is no calling client to pass the name as an argument. When an alarm handler runs,
ctx.id.namewill hold the same name the object was originally accessed with.JavaScript import { DurableObject } from "cloudflare:workers";export class ChatRoom extends DurableObject {async getRoomName() {// ctx.id.name returns the name passed to getByName() or idFromName()return this.ctx.id.name;}}// Workerexport default {async fetch(request, env) {const stub = env.CHAT_ROOM.getByName("general");const roomName = await stub.getRoomName();return new Response(`Welcome to ${roomName}!`);},};ctx.id.nameisundefinedin the following cases:- For Durable Objects created with
newUniqueId(). - When accessed via
idFromString(), even if the ID was originally created from a name. - For names longer than 1,024 bytes.
This works the same way in local development with
wrangler devas it does in production. Runnpm update wranglerto ensure you are on a version with this support.For more information, refer to the Durable Object ID documentation.
- For Durable Objects created with
Cloudflare Workflows allows you to configure specific retry logic for each step in your workflow execution. Now, you can access which retry attempt is currently executing for calls to
step.do():TypeScript await step.do("my-step", async (ctx) => {// ctx.attempt is 1 on first try, 2 on first retry, etc.console.log(`Attempt ${ctx.attempt}`);});You can use the step context for improved logging & observability, progressive backoff, or conditional logic in your workflow definition.
Note that the current attempt number is 1-indexed. For more information on retry behavior, refer to Sleeping and Retrying.
Each Workflow on Workers Paid now supports 10,000 steps by default, configurable up to 25,000 steps in your
wrangler.jsoncfile:{"workflows": [{"name": "my-workflow","binding": "MY_WORKFLOW","class_name": "MyWorkflow","limits": {"steps": 25000}}]}Previously, each instance was limited to 1,024 steps. Now, Workflows can support more complex, long-running executions without the additional complexity of recursive or child workflow calls.
Note that the maximum persisted state limit per Workflow instance remains 100 MB for Workers Free and 1 GB for Workers Paid. Refer to Workflows limits for more information.
The latest release of the Agents SDK ↗ rewrites observability from scratch with
diagnostics_channel, addskeepAlive()to prevent Durable Object eviction during long-running work, and introduceswaitForMcpConnectionsso MCP tools are always available whenonChatMessageruns.The previous observability system used
console.log()with a customObservability.emit()interface. v0.7.0 replaces it with structured events published to diagnostics channels — silent by default, zero overhead when nobody is listening.Every event has a
type,payload, andtimestamp. Events are routed to seven named channels:Channel Event types agents:statestate:updateagents:rpcrpc,rpc:erroragents:messagemessage:request,message:response,message:clear,message:cancel,message:error,tool:result,tool:approvalagents:scheduleschedule:create,schedule:execute,schedule:cancel,schedule:retry,schedule:error,queue:retry,queue:erroragents:lifecycleconnect,destroyagents:workflowworkflow:start,workflow:event,workflow:approved,workflow:rejected,workflow:terminated,workflow:paused,workflow:resumed,workflow:restartedagents:mcpmcp:client:preconnect,mcp:client:connect,mcp:client:authorize,mcp:client:discoverUse the typed
subscribe()helper fromagents/observabilityfor type-safe access:JavaScript import { subscribe } from "agents/observability";const unsub = subscribe("rpc", (event) => {if (event.type === "rpc") {console.log(`RPC call: ${event.payload.method}`);}if (event.type === "rpc:error") {console.error(`RPC failed: ${event.payload.method} — ${event.payload.error}`,);}});// Clean up when doneunsub();TypeScript import { subscribe } from "agents/observability";const unsub = subscribe("rpc", (event) => {if (event.type === "rpc") {console.log(`RPC call: ${event.payload.method}`);}if (event.type === "rpc:error") {console.error(`RPC failed: ${event.payload.method} — ${event.payload.error}`,);}});// Clean up when doneunsub();In production, all diagnostics channel messages are automatically forwarded to Tail Workers — no subscription code needed in the agent itself:
JavaScript export default {async tail(events) {for (const event of events) {for (const msg of event.diagnosticsChannelEvents) {// msg.channel is "agents:rpc", "agents:workflow", etc.console.log(msg.timestamp, msg.channel, msg.message);}}},};TypeScript export default {async tail(events) {for (const event of events) {for (const msg of event.diagnosticsChannelEvents) {// msg.channel is "agents:rpc", "agents:workflow", etc.console.log(msg.timestamp, msg.channel, msg.message);}}},};The custom
Observabilityoverride interface is still supported for users who need to filter or forward events to external services.For the full event reference, refer to the Observability documentation.
Durable Objects are evicted after a period of inactivity (typically 70-140 seconds with no incoming requests, WebSocket messages, or alarms). During long-running operations — streaming LLM responses, waiting on external APIs, running multi-step computations — the agent can be evicted mid-flight.
keepAlive()prevents this by creating a 30-second heartbeat schedule. The alarm firing resets the inactivity timer. Returns a disposer function that cancels the heartbeat when called.JavaScript const dispose = await this.keepAlive();try {const result = await longRunningComputation();await sendResults(result);} finally {dispose();}TypeScript const dispose = await this.keepAlive();try {const result = await longRunningComputation();await sendResults(result);} finally {dispose();}keepAliveWhile()wraps an async function with automatic cleanup — the heartbeat starts before the function runs and stops when it completes:JavaScript const result = await this.keepAliveWhile(async () => {const data = await longRunningComputation();return data;});TypeScript const result = await this.keepAliveWhile(async () => {const data = await longRunningComputation();return data;});Key details:
- Multiple concurrent callers — Each
keepAlive()call returns an independent disposer. Disposing one does not affect others. - AIChatAgent built-in —
AIChatAgentautomatically callskeepAlive()during streaming responses. You do not need to add it yourself. - Uses the scheduling system — The heartbeat does not conflict with your own schedules. It shows up in
getSchedules()if you need to inspect it.
For the full API reference and when-to-use guidance, refer to Schedule tasks — Keeping the agent alive.
AIChatAgentnow waits for MCP server connections to settle before callingonChatMessage. This ensuresthis.mcp.getAITools()returns the full set of tools, especially after Durable Object hibernation when connections are being restored in the background.JavaScript export class ChatAgent extends AIChatAgent {// Default — waits up to 10 seconds// waitForMcpConnections = { timeout: 10_000 };// Wait foreverwaitForMcpConnections = true;// Disable waitingwaitForMcpConnections = false;}TypeScript export class ChatAgent extends AIChatAgent {// Default — waits up to 10 seconds// waitForMcpConnections = { timeout: 10_000 };// Wait foreverwaitForMcpConnections = true;// Disable waitingwaitForMcpConnections = false;}Value Behavior { timeout: 10_000 }Wait up to 10 seconds (default) { timeout: N }Wait up to NmillisecondstrueWait indefinitely until all connections ready falseDo not wait (old behavior before 0.2.0) For lower-level control, call
this.mcp.waitForConnections()directly insideonChatMessageinstead.- MCP deduplication by name and URL —
addMcpServerwith HTTP transport now deduplicates on both server name and URL. Calling it with the same name but a different URL creates a new connection. URLs are normalized before comparison (trailing slashes, default ports, hostname case). callbackHostoptional for non-OAuth servers —addMcpServerno longer requirescallbackHostwhen connecting to MCP servers that do not use OAuth.- MCP URL security — Server URLs are validated before connection to prevent SSRF. Private IP ranges, loopback addresses, link-local addresses, and cloud metadata endpoints are blocked.
- Custom denial messages —
addToolOutputnow supportsstate: "output-error"witherrorTextfor custom denial messages in human-in-the-loop tool approval flows. requestIdin chat options —onChatMessageoptions now include arequestIdfor logging and correlating events.
To update to the latest version:
Terminal window npm i agents@latest @cloudflare/ai-chat@latest- Multiple concurrent callers — Each
The latest release of the Agents SDK ↗ lets you define an Agent and an McpAgent in the same Worker and connect them over RPC — no HTTP, no network overhead. It also makes OAuth opt-in for simple MCP connections, hardens the schema converter for production workloads, and ships a batch of
@cloudflare/ai-chatreliability fixes.You can now connect an Agent to an McpAgent in the same Worker using a Durable Object binding instead of an HTTP URL. The connection stays entirely within the Cloudflare runtime — no network round-trips, no serialization overhead.
Pass the Durable Object namespace directly to
addMcpServer:JavaScript import { Agent } from "agents";export class MyAgent extends Agent {async onStart() {// Connect via DO binding — no HTTP, no network overheadawait this.addMcpServer("counter", env.MY_MCP);// With props for per-user contextawait this.addMcpServer("counter", env.MY_MCP, {props: { userId: "user-123", role: "admin" },});}}TypeScript import { Agent } from "agents";export class MyAgent extends Agent {async onStart() {// Connect via DO binding — no HTTP, no network overheadawait this.addMcpServer("counter", env.MY_MCP);// With props for per-user contextawait this.addMcpServer("counter", env.MY_MCP, {props: { userId: "user-123", role: "admin" },});}}The
addMcpServermethod now acceptsstring | DurableObjectNamespaceas the second parameter with full TypeScript overloads, so HTTP and RPC paths are type-safe and cannot be mixed.Key capabilities:
- Hibernation support — RPC connections survive Durable Object hibernation automatically. The binding name and props are persisted to storage and restored on wake-up, matching the behavior of HTTP MCP connections.
- Deduplication — Calling
addMcpServerwith the same server name returns the existing connection instead of creating duplicates. Connection IDs are stable across hibernation restore. - Smaller surface area — The RPC transport internals have been rewritten and reduced from 609 lines to 245 lines.
RPCServerTransportnow usesJSONRPCMessageSchemafrom the MCP SDK for validation instead of hand-written checks.
addMcpServer()no longer eagerly creates an OAuth provider for every connection. For servers that do not require authentication, a simple call is all you need:JavaScript // No callbackHost, no OAuth config — just worksawait this.addMcpServer("my-server", "https://mcp.example.com");TypeScript // No callbackHost, no OAuth config — just worksawait this.addMcpServer("my-server", "https://mcp.example.com");If the server responds with a 401, the SDK throws a clear error:
"This MCP server requires OAuth authentication. Provide callbackHost in addMcpServer options to enable the OAuth flow."The restore-from-storage flow also handles missing callback URLs gracefully, skipping auth provider creation for non-OAuth servers.The schema converter used by
generateTypes()andgetAITools()now handles edge cases that previously caused crashes in production:- Depth and circular reference guards — Prevents stack overflows on recursive or deeply nested schemas
$refresolution — Supports internal JSON Pointers (#/definitions/...,#/$defs/...,#)- Tuple support —
prefixItems(JSON Schema 2020-12) and arrayitems(draft-07) - OpenAPI 3.0
nullable: true— Supported across all schema branches - Per-tool error isolation — One malformed schema cannot crash the full pipeline in
generateTypes()orgetAITools() - Missing
inputSchemafallback —getAITools()falls back to{ type: "object" }instead of throwing
- Tool denial flow — Denied tool approvals (
approved: false) now transition tooutput-deniedwith atool_result, fixing Anthropic provider compatibility. Custom denial messages are supported viastate: "output-error"anderrorText. - Abort/cancel support — Streaming responses now properly cancel the reader loop when the abort signal fires and send a done signal to the client.
- Duplicate message persistence —
persistMessages()now reconciles assistant messages by content and order, preventing duplicate rows when clients resend full history. requestIdinOnChatMessageOptions— Handlers can now send properly-tagged error responses for pre-stream failures.redacted_thinkingpreservation — The message sanitizer no longer strips Anthropicredacted_thinkingblocks./get-messagesreliability — Endpoint handling moved from a prototypeonRequest()override to a constructor wrapper, so it works even when users overrideonRequestwithout callingsuper.onRequest().- Client tool APIs undeprecated —
createToolsFromClientSchemas,clientTools,AITool,extractClientToolSchemas, and thetoolsoption onuseAgentChatare restored for SDK use cases where tools are defined dynamically at runtime. jsonSchemainitialization — FixedjsonSchema not initializederror when callinggetAITools()inonChatMessage.
To update to the latest version:
Terminal window npm i agents@latest @cloudflare/ai-chat@latest