The new secrets configuration property lets you declare the secret names your Worker requires in your Wrangler configuration file. Required secrets are validated during local development and deploy, and used as the source of truth for type generation.
When secrets is defined, wrangler dev and vite dev load only the keys listed in secrets.required from .dev.vars or .env/process.env. Additional keys in those files are excluded. If any required secrets are missing, a warning is logged listing the missing names.
Type generation
wrangler types generates typed bindings from secrets.required instead of inferring names from .dev.vars or .env. This lets you run type generation in CI or other environments where those files are not present. Per-environment secrets are supported — the aggregated Env type marks secrets that only appear in some environments as optional.
Deploy
wrangler deploy and wrangler versions upload validate that all secrets in secrets.required are configured on the Worker before the operation succeeds. If any required secrets are missing, the command fails with an error listing which secrets need to be set.
Dynamic Workers are now in open beta ↗ for all paid Workers users. You can now have a Worker spin up other Workers, called Dynamic Workers, at runtime to execute code on-demand in a secure, sandboxed environment. Dynamic Workers start in milliseconds, making them well suited for fast, secure code execution at scale.
Use Dynamic Workers for
Code Mode: LLMs are trained to write code. Run tool-calling logic written in code instead of stepping through many tool calls, which can save up to 80% in inference tokens and cost.
AI agents executing code: Run code for tasks like data analysis, file transformation, API calls, and chained actions.
Running AI-generated code: Run generated code for prototypes, projects, and automations in a secure, isolated sandboxed environment.
Fast development and previews: Load prototypes, previews, and playgrounds in milliseconds.
Custom automations: Create custom tools on the fly that execute a task, call an integration, or automate a workflow.
Executing Dynamic Workers
Dynamic Workers support two loading modes:
load(code) — for one-time code execution (equivalent to calling get() with a null ID).
get(id, callback) — caches a Dynamic Worker by ID so it can stay warm across requests. Use this when the same code will receive subsequent requests.
export default { async fetch(request, env) { const worker = env.LOADER.load({ compatibilityDate: "2026-01-01", mainModule: "src/index.js", modules: { "src/index.js": ` export default { fetch() { return new Response("Hello from a dynamic Worker"); }, }; `, }, // Block all outbound network access from the Dynamic Worker. globalOutbound: null, }); return worker.getEntrypoint().fetch(request); },};
export default { async fetch(request: Request, env: Env): Promise<Response> { const worker = env.LOADER.load({ compatibilityDate: "2026-01-01", mainModule: "src/index.js", modules: { "src/index.js": ` export default { fetch() { return new Response("Hello from a dynamic Worker"); }, }; `, }, // Block all outbound network access from the Dynamic Worker. globalOutbound: null, }); return worker.getEntrypoint().fetch(request); },};
Helper libraries for Dynamic Workers
Here are 3 new libraries to help you build with Dynamic Workers:
@cloudflare/codemode ↗: Replace individual tool calls with a single code() tool, so LLMs write and execute TypeScript that orchestrates multiple API calls in one pass.
@cloudflare/worker-bundler ↗: Resolve npm dependencies and bundle source files into ready-to-load modules for Dynamic Workers, all at runtime.
@cloudflare/shell ↗: Give your agent a virtual filesystem inside a Dynamic Worker with persistent storage backed by SQLite and R2.
Try it out
Dynamic Workers Starter
Use this starter ↗ to deploy a Worker that can load and execute Dynamic Workers.
Dynamic Workers Playground
Deploy the Dynamic Workers Playground ↗ to write or import code, bundle it at runtime with @cloudflare/worker-bundler, execute it through a Dynamic Worker, and see real-time responses and execution logs.
Dynamic Workers pricing is based on three dimensions: Dynamic Workers created daily, requests, and CPU time.
Included
Additional usage
Dynamic Workers created daily
1,000 unique Dynamic Workers per month
+$0.002 per Dynamic Worker per day
Requests ¹
10 million per month
+$0.30 per million requests
CPU time ¹
30 million CPU milliseconds per month
+$0.02 per million CPU milliseconds
¹ Uses Workers Standard rates and will appear as part of your existing Workers bill, not as separate Dynamic Workers charges.
Note: Dynamic Workers requests and CPU time are already billed as part of your Workers plan and will count toward your Workers requests and CPU usage. The Dynamic Workers created daily charge is not yet active — you will not be billed for the number of Dynamic Workers created at this time. Pricing information is shared in advance so you can estimate future costs.
The latest release of the Agents SDK ↗ exposes agent state as a readable property, prevents duplicate schedule rows across Durable Object restarts, brings full TypeScript inference to AgentClient, and migrates to Zod 4.
Readable state on useAgent and AgentClient
Both useAgent (React) and AgentClient (vanilla JS) now expose a state property that reflects the current agent state. Previously, reading state required manually tracking it through the onStateUpdate callback.
React (useAgent)
const agent = useAgent({ agent: "game-agent", name: "room-123",});// Read state directly — no separate useState + onStateUpdate neededreturn <div>Score: {agent.state?.score}</div>;// Spread for partial updatesagent.setState({ ...agent.state, score: (agent.state?.score ?? 0) + 10 });
const agent = useAgent<GameAgent, GameState>({ agent: "game-agent", name: "room-123",});// Read state directly — no separate useState + onStateUpdate neededreturn <div>Score: {agent.state?.score}</div>;// Spread for partial updatesagent.setState({ ...agent.state, score: (agent.state?.score ?? 0) + 10 });
agent.state is reactive — the component re-renders when state changes from either the server or a client-side setState() call.
State starts as undefined and is populated when the server sends the initial state on connect (from initialState) or when setState() is called. Use optional chaining (agent.state?.field) for safe access. The onStateUpdate callback continues to work as before — the new state property is additive.
Idempotent schedule()
schedule() now supports an idempotent option that deduplicates by (type, callback, payload), preventing duplicate rows from accumulating when called in places that run on every Durable Object restart such as onStart().
Cron schedules are idempotent by default. Calling schedule("0 * * * *", "tick") multiple times with the same callback, expression, and payload returns the existing schedule row instead of creating a new one. Pass { idempotent: false } to override.
Delayed and date-scheduled types support opt-in idempotency:
import { Agent } from "agents";class MyAgent extends Agent { async onStart() { // Safe across restarts — only one row is created await this.schedule(60, "maintenance", undefined, { idempotent: true }); }}
import { Agent } from "agents";class MyAgent extends Agent { async onStart() { // Safe across restarts — only one row is created await this.schedule(60, "maintenance", undefined, { idempotent: true }); }}
Two new warnings help catch common foot-guns:
Calling schedule() inside onStart() without { idempotent: true } emits a console.warn with actionable guidance (once per callback; skipped for cron and when idempotent is set explicitly).
If an alarm cycle processes 10 or more stale one-shot rows for the same callback, the SDK emits a console.warn and a schedule:duplicate_warning diagnostics channel event.
Typed AgentClient with call inference and stub proxy
AgentClient now accepts an optional agent type parameter for full type inference on RPC calls, matching the typed experience already available with useAgent.
const client = new AgentClient({ agent: "my-agent", host: window.location.host,});// Typed call — method name autocompletes, args and return type inferredconst value = await client.call("getValue");// Typed stub — direct RPC-style proxyawait client.stub.getValue();await client.stub.add(1, 2);
const client = new AgentClient<MyAgent>({ agent: "my-agent", host: window.location.host,});// Typed call — method name autocompletes, args and return type inferredconst value = await client.call("getValue");// Typed stub — direct RPC-style proxyawait client.stub.getValue();await client.stub.add(1, 2);
State is automatically inferred from the agent type, so onStateUpdate is also typed:
const client = new AgentClient({ agent: "my-agent", host: window.location.host, onStateUpdate: (state) => { // state is typed as MyAgent's state type },});
const client = new AgentClient<MyAgent>({ agent: "my-agent", host: window.location.host, onStateUpdate: (state) => { // state is typed as MyAgent's state type },});
Existing untyped usage continues to work without changes. The RPC type utilities (AgentMethods, AgentStub, RPCMethods) are now exported from agents/client for advanced typing scenarios.
agents, @cloudflare/ai-chat, and @cloudflare/codemode now require zod ^4.0.0. Zod v3 is no longer supported.
@cloudflare/ai-chat fixes
Turn serialization — onChatMessage() and _reply() work is now queued so user requests, tool continuations, and saveMessages() never stream concurrently.
Duplicate messages on stop — Clicking stop during an active stream no longer splits the assistant message into two entries.
Duplicate messages after tool calls — Orphaned client IDs no longer leak into persistent storage.
keepAlive() and keepAliveWhile() are no longer experimental
keepAlive() now uses a lightweight in-memory ref count instead of schedule rows. Multiple concurrent callers share a single alarm cycle. The @experimental tag has been removed from both keepAlive() and keepAliveWhile().
@cloudflare/codemode: TanStack AI integration
A new entry point @cloudflare/codemode/tanstack-ai adds support for TanStack AI's ↗chat() as an alternative to the Vercel AI SDK's streamText():
You can now manage Cloudflare Tunnels directly from Wrangler, the CLI for the Cloudflare Developer Platform. The new wrangler tunnel commands let you create, run, and manage tunnels without leaving your terminal.
Available commands:
wrangler tunnel create — Create a new remotely managed tunnel.
wrangler tunnel list — List all tunnels in your account.
wrangler tunnel info — Display details about a specific tunnel.
wrangler tunnel delete — Delete a tunnel.
wrangler tunnel run — Run a tunnel using the cloudflared daemon.
wrangler tunnel quick-start — Start a free, temporary tunnel without an account using Quick Tunnels.
Wrangler handles downloading and managing the cloudflared binary automatically. On first use, you will be prompted to download cloudflared to a local cache directory.
These commands are currently experimental and may change without notice.
The latest releases of @cloudflare/codemode ↗ add a new MCP barrel export, remove ai and zod as required peer dependencies from the main entry point, and give you more control over the sandbox.
New @cloudflare/codemode/mcp export
A new @cloudflare/codemode/mcp entry point provides two functions that wrap MCP servers with Code Mode:
codeMcpServer({ server, executor }) — wraps an existing MCP server with a single code tool where each upstream tool becomes a typed codemode.* method.
openApiMcpServer({ spec, executor, request }) — creates search and execute MCP tools from an OpenAPI spec with host-side request proxying and automatic $ref resolution.
import { codeMcpServer } from "@cloudflare/codemode/mcp";import { DynamicWorkerExecutor } from "@cloudflare/codemode";const executor = new DynamicWorkerExecutor({ loader: env.LOADER });// Wrap an existing MCP server — all its tools become// typed methods the LLM can call from generated codeconst server = await codeMcpServer({ server: upstreamMcp, executor });
import { codeMcpServer } from "@cloudflare/codemode/mcp";import { DynamicWorkerExecutor } from "@cloudflare/codemode";const executor = new DynamicWorkerExecutor({ loader: env.LOADER });// Wrap an existing MCP server — all its tools become// typed methods the LLM can call from generated codeconst server = await codeMcpServer({ server: upstreamMcp, executor });
Zero-dependency main entry point
Breaking change in v0.2.0:generateTypes and the ToolDescriptor / ToolDescriptors types have moved to @cloudflare/codemode/ai:
// Beforeimport { generateTypes } from "@cloudflare/codemode";// Afterimport { generateTypes } from "@cloudflare/codemode/ai";
// Beforeimport { generateTypes } from "@cloudflare/codemode";// Afterimport { generateTypes } from "@cloudflare/codemode/ai";
The main entry point (@cloudflare/codemode) no longer requires the ai or zod peer dependencies. It now exports:
Export
Description
sanitizeToolName
Sanitize tool names into valid JS identifiers
normalizeCode
Normalize LLM-generated code into async arrow functions
generateTypesFromJsonSchema
Generate TypeScript type definitions from plain JSON Schema
jsonSchemaToType
Convert a single JSON Schema to a TypeScript type string
DynamicWorkerExecutor
Sandboxed code execution via Dynamic Worker Loader
ToolDispatcher
RPC target for dispatching tool calls from sandbox to host
The ai and zod peer dependencies are now optional — only required when importing from @cloudflare/codemode/ai.
Custom sandbox modules
DynamicWorkerExecutor now accepts an optional modules option to inject custom ES modules into the sandbox:
const executor = new DynamicWorkerExecutor({ loader: env.LOADER, modules: { "utils.js": `export function add(a, b) { return a + b; }`, },});// Sandbox code can then: import { add } from "utils.js"
const executor = new DynamicWorkerExecutor({ loader: env.LOADER, modules: { "utils.js": `export function add(a, b) { return a + b; }`, },});// Sandbox code can then: import { add } from "utils.js"
Internal normalization and sanitization
DynamicWorkerExecutor now normalizes code and sanitizes tool names internally. You no longer need to call normalizeCode() or sanitizeToolName() before passing code and functions to execute().
When your Worker accesses a Durable Object via idFromName() or getByName(), the same name is now available on ctx.id.name inside the object — no need to pass it through method arguments or persist it in storage. This brings the runtime behavior in line with the Workers runtime types.
This is especially useful for alarms, where there is no calling client to pass the name as an argument. When an alarm handler runs, ctx.id.name will hold the same name the object was originally accessed with.
import { DurableObject } from "cloudflare:workers";export class ChatRoom extends DurableObject { async getRoomName() { // ctx.id.name returns the name passed to getByName() or idFromName() return this.ctx.id.name; }}// Workerexport default { async fetch(request, env) { const stub = env.CHAT_ROOM.getByName("general"); const roomName = await stub.getRoomName(); return new Response(`Welcome to ${roomName}!`); },};
ctx.id.name is undefined in the following cases:
For Durable Objects created with newUniqueId().
When accessed via idFromString(), even if the ID was originally created from a name.
This works the same way in local development with wrangler dev as it does in production. Run npm update wrangler to ensure you are on a version with this support.
Cloudflare Workflows allows you to configure specific retry logic for each step in your workflow execution. Now, you can access which retry attempt is currently executing for calls to step.do():
await step.do("my-step", async (ctx) => { // ctx.attempt is 1 on first try, 2 on first retry, etc. console.log(`Attempt ${ctx.attempt}`);});
You can use the step context for improved logging & observability, progressive backoff, or conditional logic in your workflow definition.
Note that the current attempt number is 1-indexed. For more information on retry behavior, refer to Sleeping and Retrying.
Previously, each instance was limited to 1,024 steps. Now, Workflows can support more complex, long-running executions without the additional complexity of recursive or child workflow calls.
Note that the maximum persisted state limit per Workflow instance remains 100 MB for Workers Free and 1 GB for Workers Paid. Refer to Workflows limits for more information.
The latest release of the Agents SDK ↗ rewrites observability from scratch with diagnostics_channel, adds keepAlive() to prevent Durable Object eviction during long-running work, and introduces waitForMcpConnections so MCP tools are always available when onChatMessage runs.
Observability rewrite
The previous observability system used console.log() with a custom Observability.emit() interface. v0.7.0 replaces it with structured events published to diagnostics channels — silent by default, zero overhead when nobody is listening.
Every event has a type, payload, and timestamp. Events are routed to seven named channels:
Use the typed subscribe() helper from agents/observability for type-safe access:
import { subscribe } from "agents/observability";const unsub = subscribe("rpc", (event) => { if (event.type === "rpc") { console.log(`RPC call: ${event.payload.method}`); } if (event.type === "rpc:error") { console.error( `RPC failed: ${event.payload.method} — ${event.payload.error}`, ); }});// Clean up when doneunsub();
import { subscribe } from "agents/observability";const unsub = subscribe("rpc", (event) => { if (event.type === "rpc") { console.log(`RPC call: ${event.payload.method}`); } if (event.type === "rpc:error") { console.error( `RPC failed: ${event.payload.method} — ${event.payload.error}`, ); }});// Clean up when doneunsub();
In production, all diagnostics channel messages are automatically forwarded to Tail Workers — no subscription code needed in the agent itself:
export default { async tail(events) { for (const event of events) { for (const msg of event.diagnosticsChannelEvents) { // msg.channel is "agents:rpc", "agents:workflow", etc. console.log(msg.timestamp, msg.channel, msg.message); } } },};
export default { async tail(events) { for (const event of events) { for (const msg of event.diagnosticsChannelEvents) { // msg.channel is "agents:rpc", "agents:workflow", etc. console.log(msg.timestamp, msg.channel, msg.message); } } },};
The custom Observability override interface is still supported for users who need to filter or forward events to external services.
Durable Objects are evicted after a period of inactivity (typically 70-140 seconds with no incoming requests, WebSocket messages, or alarms). During long-running operations — streaming LLM responses, waiting on external APIs, running multi-step computations — the agent can be evicted mid-flight.
keepAlive() prevents this by creating a 30-second heartbeat schedule. The alarm firing resets the inactivity timer. Returns a disposer function that cancels the heartbeat when called.
AIChatAgent now waits for MCP server connections to settle before calling onChatMessage. This ensures this.mcp.getAITools() returns the full set of tools, especially after Durable Object hibernation when connections are being restored in the background.
For lower-level control, call this.mcp.waitForConnections() directly inside onChatMessage instead.
Other improvements
MCP deduplication by name and URL — addMcpServer with HTTP transport now deduplicates on both server name and URL. Calling it with the same name but a different URL creates a new connection. URLs are normalized before comparison (trailing slashes, default ports, hostname case).
callbackHost optional for non-OAuth servers — addMcpServer no longer requires callbackHost when connecting to MCP servers that do not use OAuth.
MCP URL security — Server URLs are validated before connection to prevent SSRF. Private IP ranges, loopback addresses, link-local addresses, and cloud metadata endpoints are blocked.
Custom denial messages — addToolOutput now supports state: "output-error" with errorText for custom denial messages in human-in-the-loop tool approval flows.
requestId in chat options — onChatMessage options now include a requestId for logging and correlating events.
The latest release of the Agents SDK ↗ lets you define an Agent and an McpAgent in the same Worker and connect them over RPC — no HTTP, no network overhead. It also makes OAuth opt-in for simple MCP connections, hardens the schema converter for production workloads, and ships a batch of @cloudflare/ai-chat reliability fixes.
RPC transport for MCP
You can now connect an Agent to an McpAgent in the same Worker using a Durable Object binding instead of an HTTP URL. The connection stays entirely within the Cloudflare runtime — no network round-trips, no serialization overhead.
Pass the Durable Object namespace directly to addMcpServer:
import { Agent } from "agents";export class MyAgent extends Agent { async onStart() { // Connect via DO binding — no HTTP, no network overhead await this.addMcpServer("counter", env.MY_MCP); // With props for per-user context await this.addMcpServer("counter", env.MY_MCP, { props: { userId: "user-123", role: "admin" }, }); }}
import { Agent } from "agents";export class MyAgent extends Agent { async onStart() { // Connect via DO binding — no HTTP, no network overhead await this.addMcpServer("counter", env.MY_MCP); // With props for per-user context await this.addMcpServer("counter", env.MY_MCP, { props: { userId: "user-123", role: "admin" }, }); }}
The addMcpServer method now accepts string | DurableObjectNamespace as the second parameter with full TypeScript overloads, so HTTP and RPC paths are type-safe and cannot be mixed.
Key capabilities:
Hibernation support — RPC connections survive Durable Object hibernation automatically. The binding name and props are persisted to storage and restored on wake-up, matching the behavior of HTTP MCP connections.
Deduplication — Calling addMcpServer with the same server name returns the existing connection instead of creating duplicates. Connection IDs are stable across hibernation restore.
Smaller surface area — The RPC transport internals have been rewritten and reduced from 609 lines to 245 lines. RPCServerTransport now uses JSONRPCMessageSchema from the MCP SDK for validation instead of hand-written checks.
Optional OAuth for MCP connections
addMcpServer() no longer eagerly creates an OAuth provider for every connection. For servers that do not require authentication, a simple call is all you need:
// No callbackHost, no OAuth config — just worksawait this.addMcpServer("my-server", "https://mcp.example.com");
// No callbackHost, no OAuth config — just worksawait this.addMcpServer("my-server", "https://mcp.example.com");
If the server responds with a 401, the SDK throws a clear error: "This MCP server requires OAuth authentication. Provide callbackHost in addMcpServer options to enable the OAuth flow." The restore-from-storage flow also handles missing callback URLs gracefully, skipping auth provider creation for non-OAuth servers.
Hardened JSON Schema to TypeScript converter
The schema converter used by generateTypes() and getAITools() now handles edge cases that previously caused crashes in production:
Depth and circular reference guards — Prevents stack overflows on recursive or deeply nested schemas
Tuple support — prefixItems (JSON Schema 2020-12) and array items (draft-07)
OpenAPI 3.0 nullable: true — Supported across all schema branches
Per-tool error isolation — One malformed schema cannot crash the full pipeline in generateTypes() or getAITools()
Missing inputSchema fallback — getAITools() falls back to { type: "object" } instead of throwing
@cloudflare/ai-chat fixes
Tool denial flow — Denied tool approvals (approved: false) now transition to output-denied with a tool_result, fixing Anthropic provider compatibility. Custom denial messages are supported via state: "output-error" and errorText.
Abort/cancel support — Streaming responses now properly cancel the reader loop when the abort signal fires and send a done signal to the client.
Duplicate message persistence — persistMessages() now reconciles assistant messages by content and order, preventing duplicate rows when clients resend full history.
requestId in OnChatMessageOptions — Handlers can now send properly-tagged error responses for pre-stream failures.
redacted_thinking preservation — The message sanitizer no longer strips Anthropic redacted_thinking blocks.
/get-messages reliability — Endpoint handling moved from a prototype onRequest() override to a constructor wrapper, so it works even when users override onRequest without calling super.onRequest().
Client tool APIs undeprecated — createToolsFromClientSchemas, clientTools, AITool, extractClientToolSchemas, and the tools option on useAgentChat are restored for SDK use cases where tools are defined dynamically at runtime.
jsonSchema initialization — Fixed jsonSchema not initialized error when calling getAITools() in onChatMessage.
Pywrangler ↗, the CLI tool for managing Python Workers and packages,
now supports Windows, allowing you to develop and deploy Python Workers from Windows environments.
Previously, Pywrangler was only available on macOS and Linux.
You can install and use Pywrangler on Windows the same way you would on other platforms.
Specify your Worker's Python dependencies in your pyproject.toml file,
then use the following commands to develop and deploy:
All existing Pywrangler functionality, including package management, local development, and deployment, works on Windows without any additional configuration.
Requirements
This feature requires the following minimum versions:
wrangler >= 4.64.0
workers-py >= 1.72.0
uv >= 0.29.8
To upgrade workers-py (which includes Pywrangler) in your project, run:
uv tool upgrade workers-py
To upgrade wrangler, run:
npm install -g wrangler@latest
To upgrade uv, run:
uv self update
To get started with Python Workers on Windows, refer to the Python packages documentation for full details on Pywrangler.
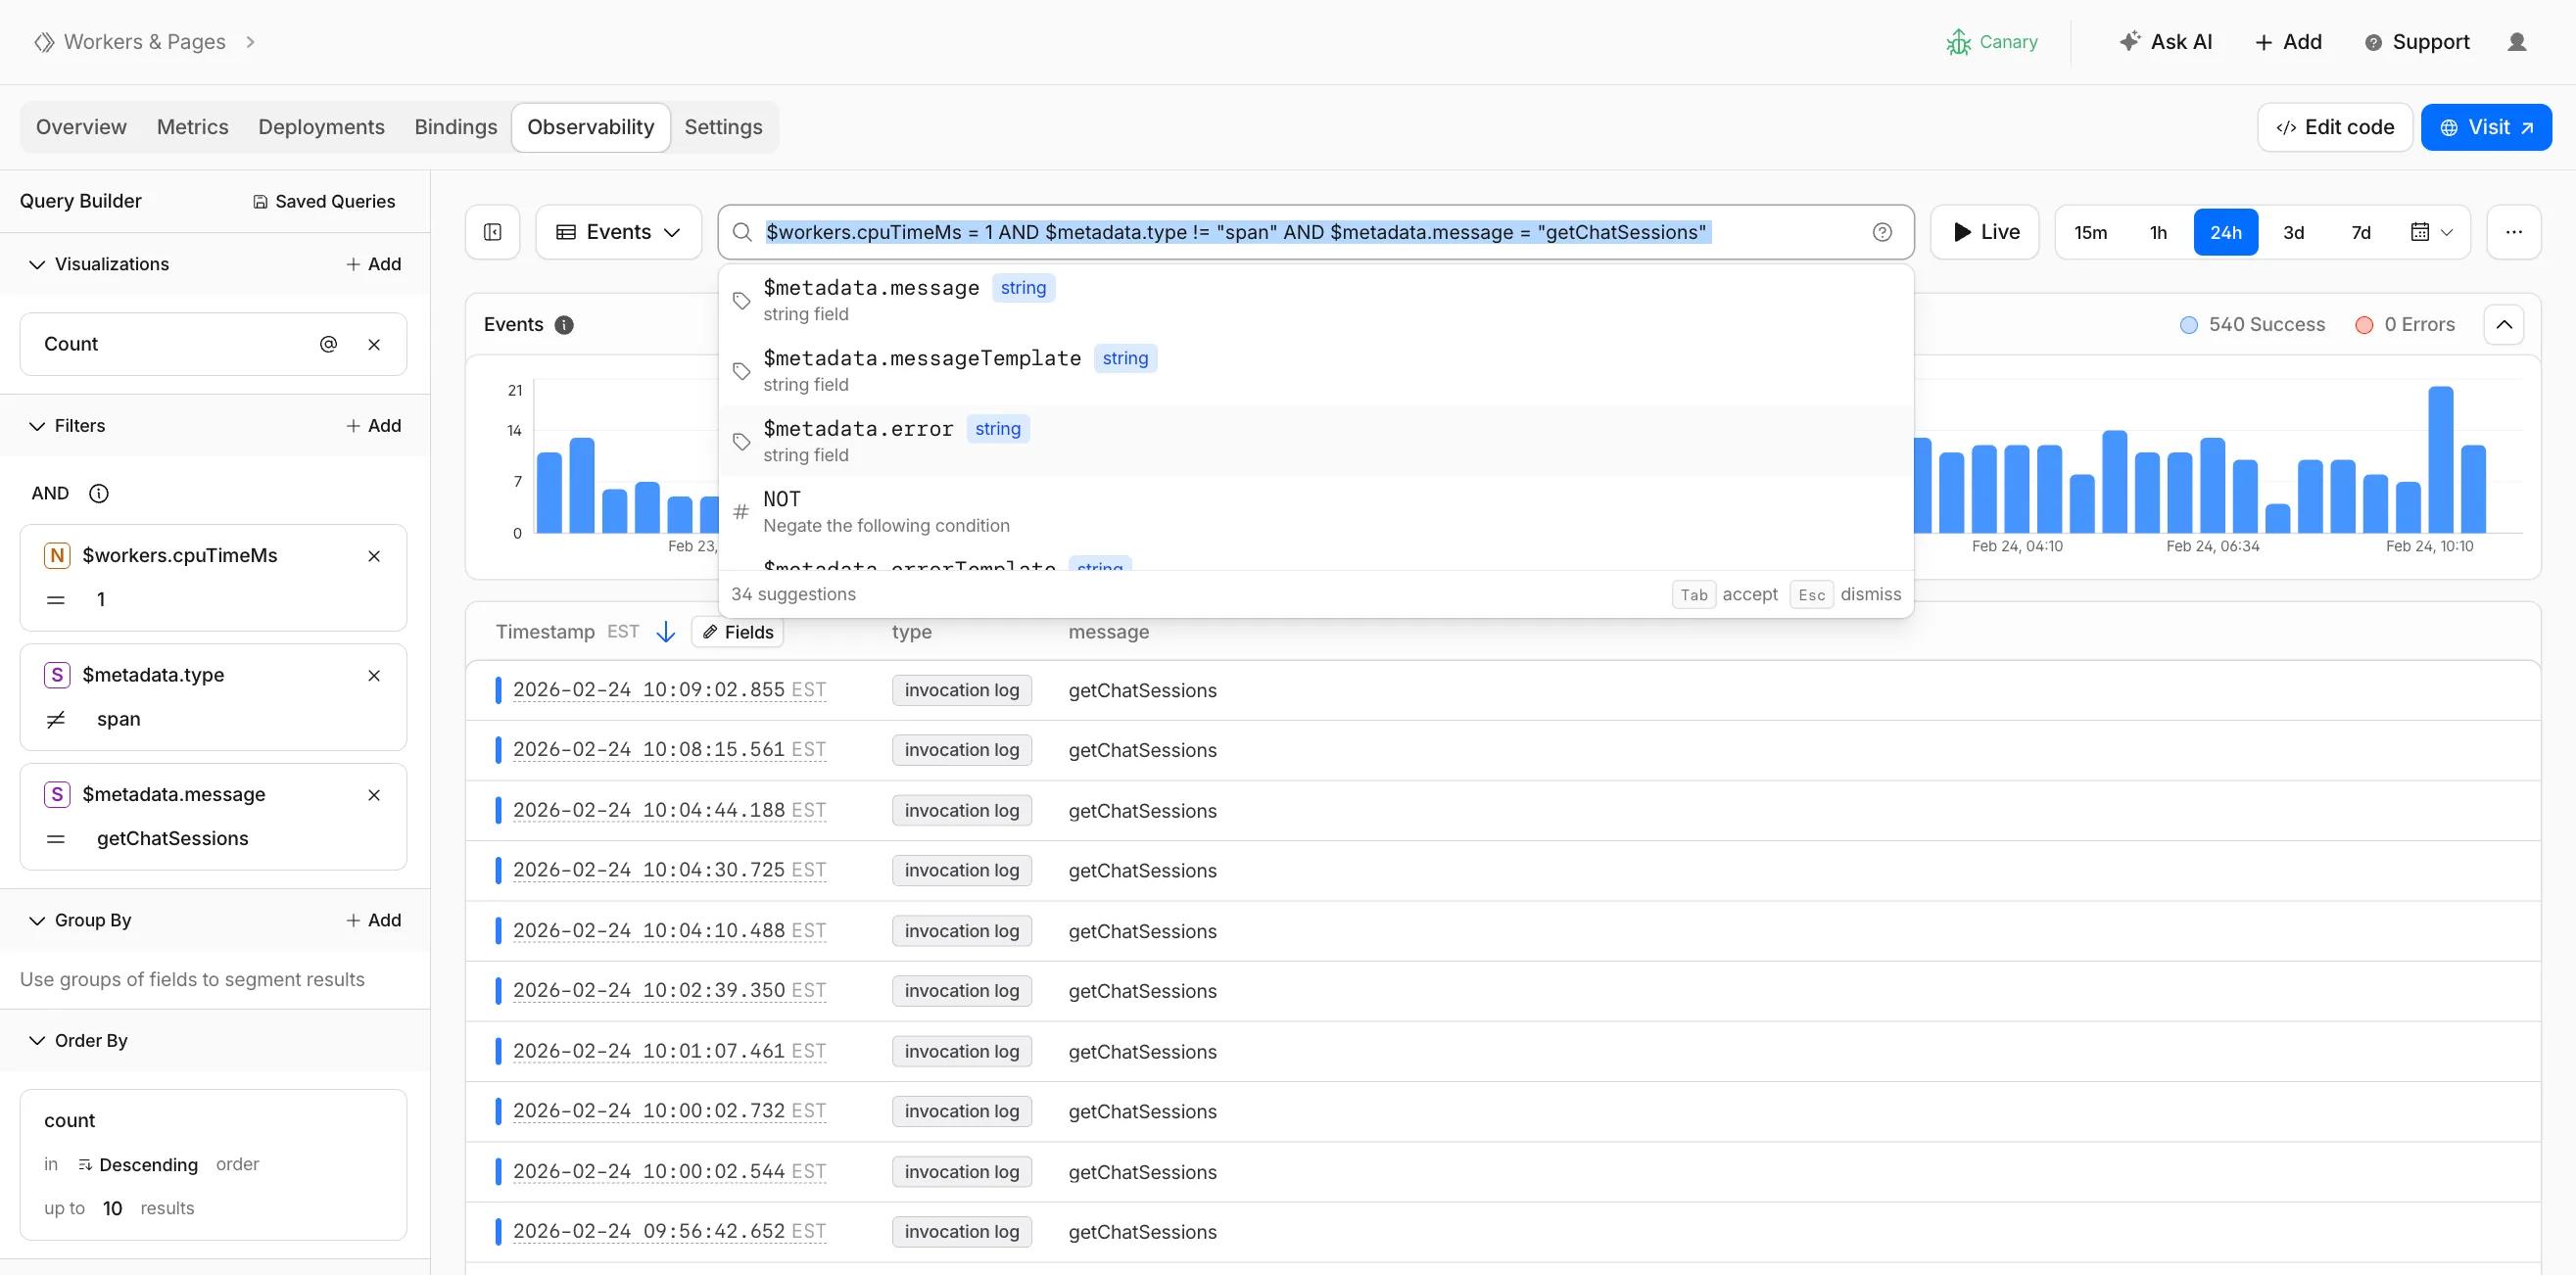
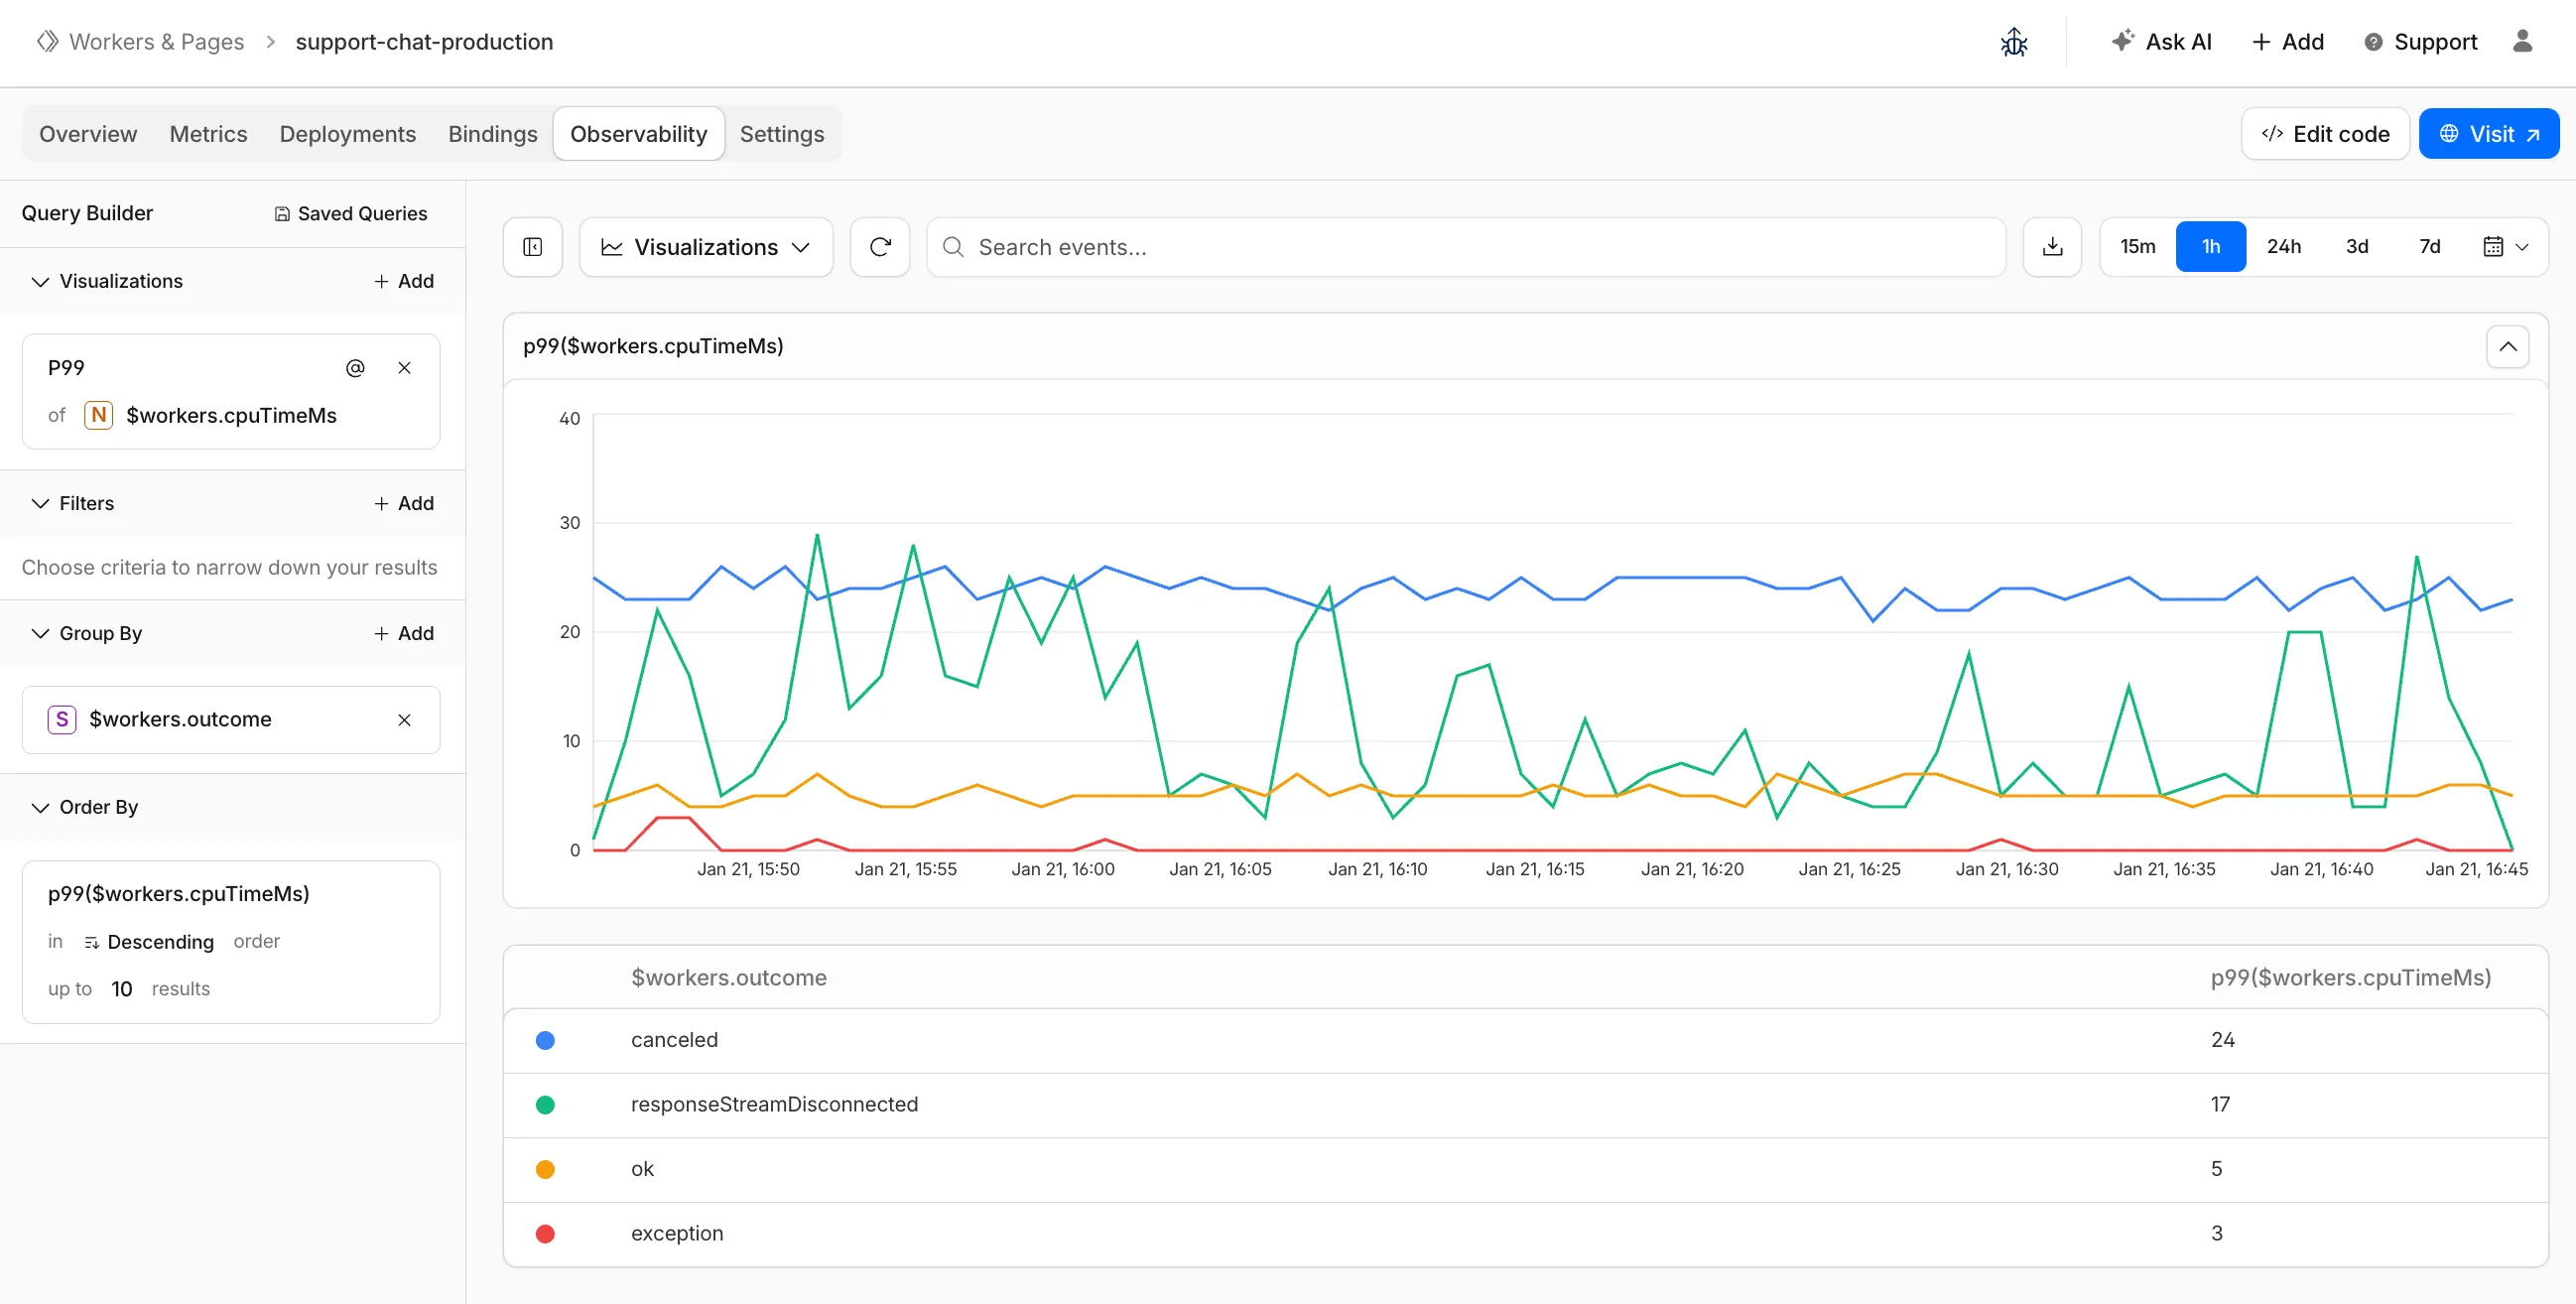
Workers Observability now includes a query language that lets you write structured queries directly in the search bar to filter your logs and traces. The search bar doubles as a free text search box — type any term to search across all metadata and attributes, or write field-level queries for precise filtering.
Queries written in the search bar sync with the Query Builder sidebar, so you can write a query by hand and then refine it visually, or build filters in the Query Builder and see the corresponding query syntax. The search bar provides autocomplete suggestions for metadata fields and operators as you type.
The query language supports:
Free text search — search everywhere with a keyword like error, or match an exact phrase with "exact phrase"
Field queries — filter by specific fields using comparison operators (for example, status = 500 or $workers.wallTimeMs > 100)
Operators — =, !=, >, >=, <, <=, and : (contains)
Functions — contains(field, value), startsWith(field, prefix), regex(field, pattern), and exists(field)
Boolean logic — add conditions with AND, OR, and NOT
Select the help icon next to the search bar to view the full syntax reference, including all supported operators, functions, and keyboard shortcuts.
deleteAll() now deletes a Durable Object alarm in addition to stored data for Workers with a compatibility date of 2026-02-24 or later. This change simplifies clearing a Durable Object's storage with a single API call.
Previously, deleteAll() only deleted user-stored data for an object. Alarm usage stores metadata in an object's storage, which required a separate deleteAlarm() call to fully clean up all storage for an object. The deleteAll() change applies to both KV-backed and SQLite-backed Durable Objects.
// Before: two API calls required to clear all storageawait this.ctx.storage.deleteAlarm();await this.ctx.storage.deleteAll();// Now: a single call clears both data and the alarmawait this.ctx.storage.deleteAll();
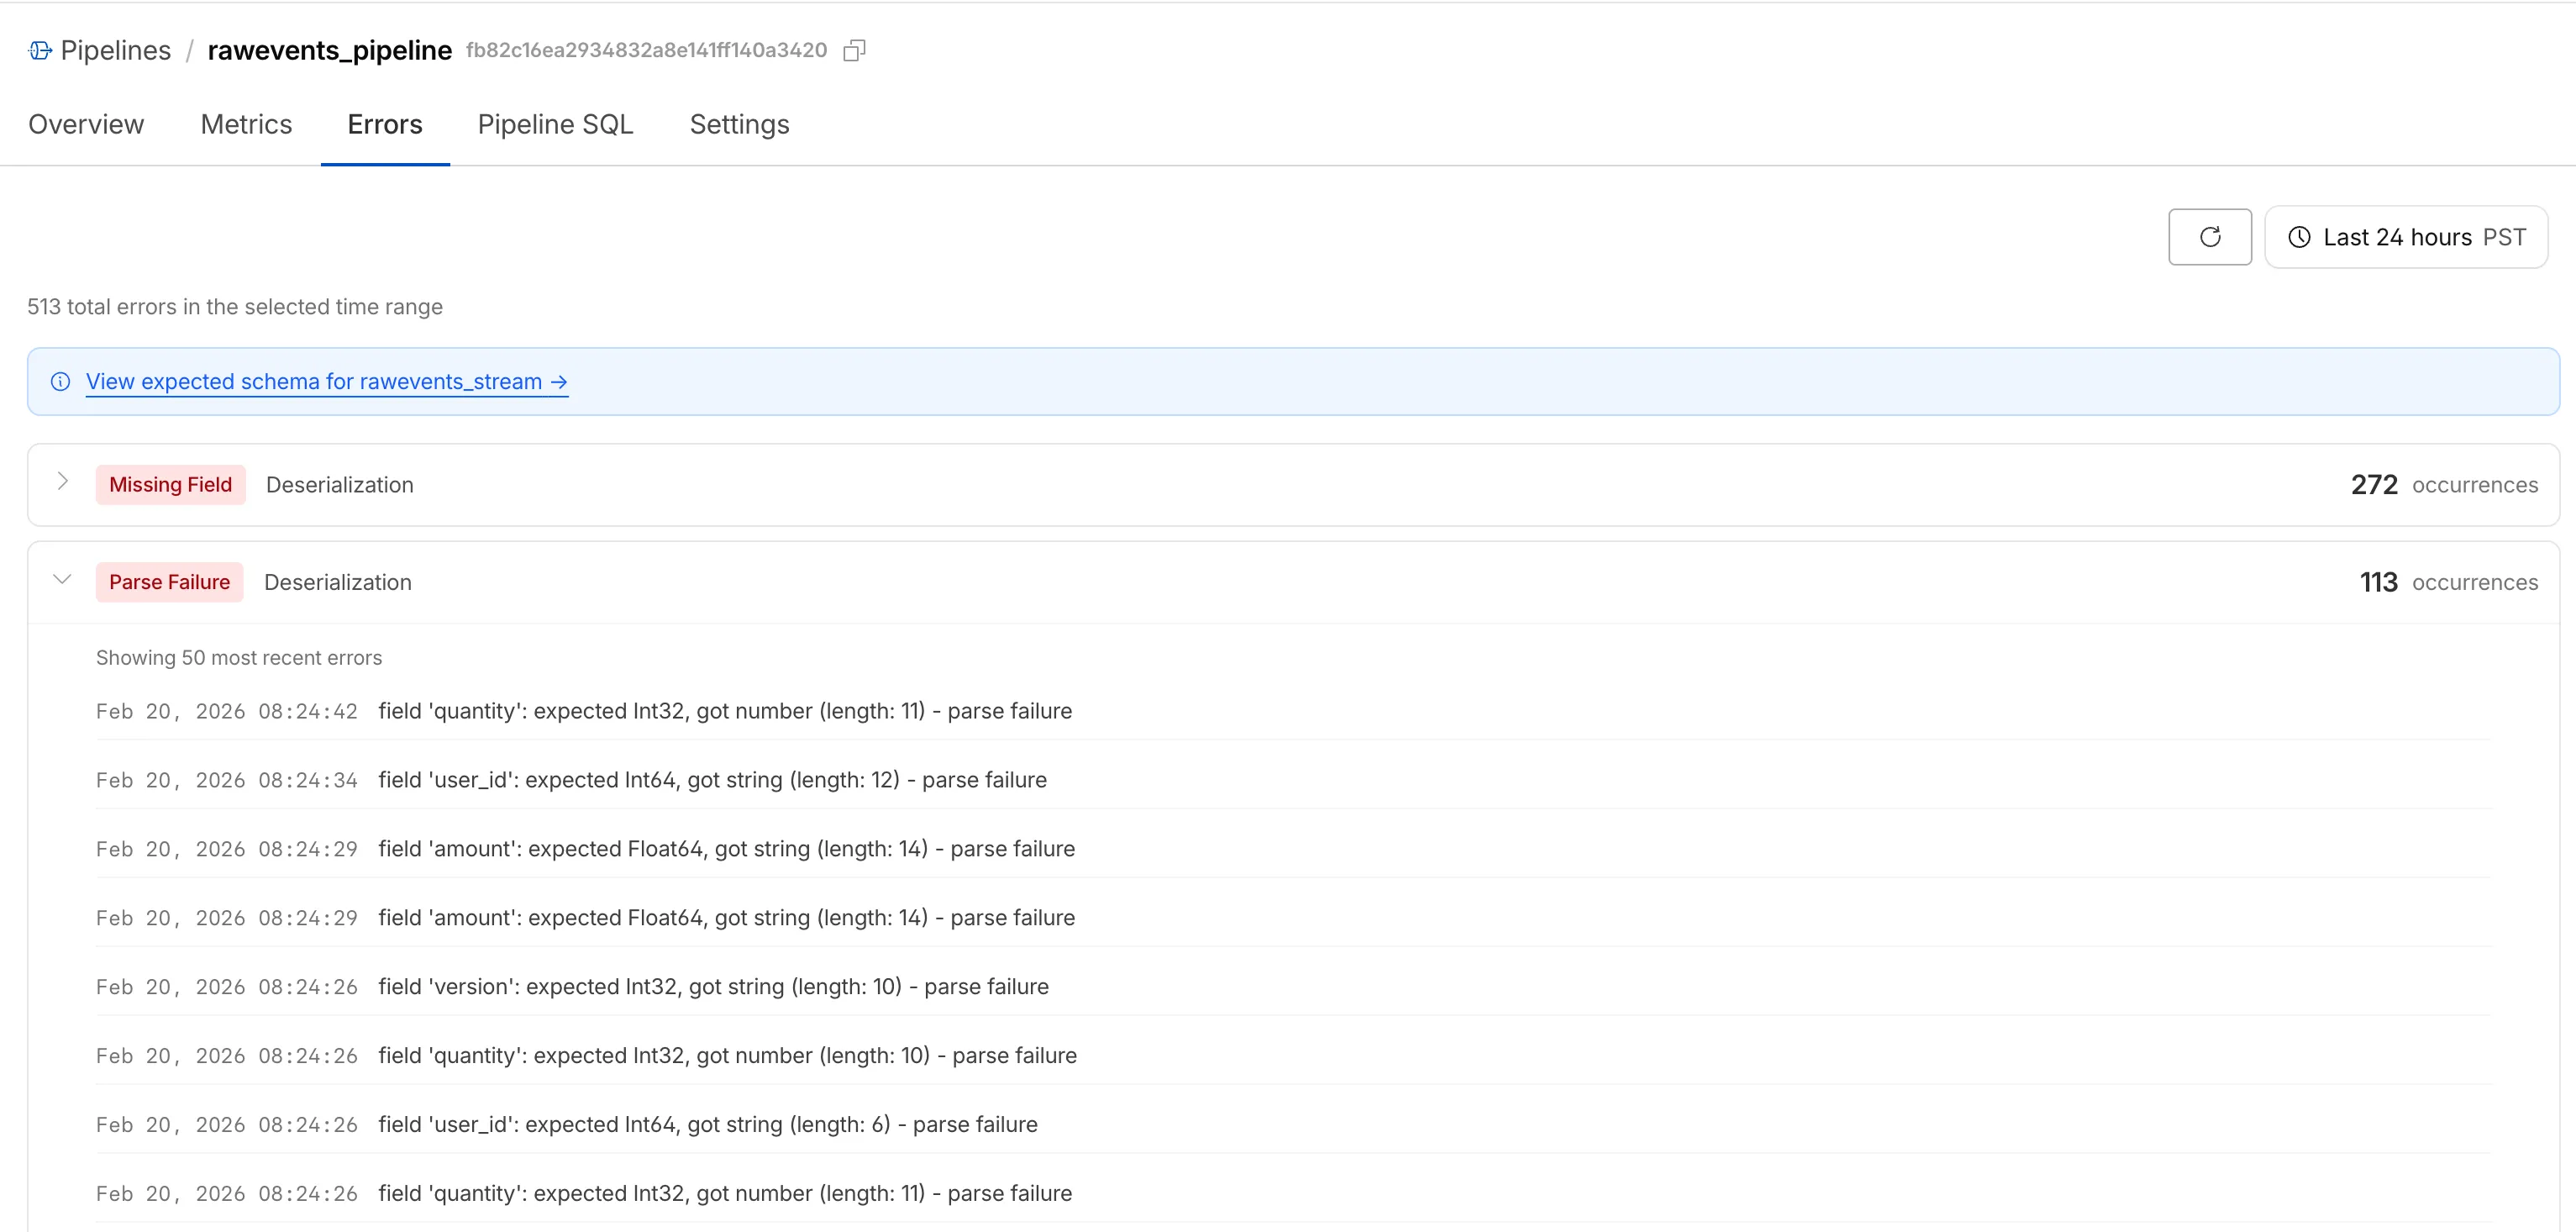
Cloudflare Pipelines ingests streaming data via Workers or HTTP endpoints, transforms it with SQL, and writes it to R2 as Apache Iceberg tables. Today we're shipping three improvements to help you understand why streaming events get dropped, catch data quality issues early, and set up Pipelines faster.
Dropped event metrics
When stream events don't match the expected schema, Pipelines accepts them during ingestion but drops them when attempting to deliver them to the sink. To help you identify the root cause of these issues, we are introducing a new dashboard and metrics that surface dropped events with detailed error messages.
Dropped events can also be queried programmatically via the new pipelinesUserErrorsAdaptiveGroups GraphQL dataset. The dataset breaks down failures by specific error type (missing_field, type_mismatch, parse_failure, or null_value) so you can trace issues back to the source.
For the full list of dimensions, error types, and additional query examples, refer to User error metrics.
Typed Pipelines bindings
Sending data to a Pipeline from a Worker previously used a generic Pipeline<PipelineRecord> type, which meant schema mismatches (wrong field names, incorrect types) were only caught at runtime as dropped events.
Running wrangler types now generates schema-specific TypeScript types for your Pipeline bindings. TypeScript catches missing required fields and incorrect field types at compile time, before your code is deployed.
Setting up a new Pipeline previously required multiple manual steps: creating an R2 bucket, enabling R2 Data Catalog, generating an API token, and configuring format, compression, and rolling policies individually.
The wrangler pipelines setup command now offers a Simple setup mode that applies recommended defaults and automatically creates the R2 bucket and enables R2 Data Catalog if they do not already exist. Validation errors during setup prompt you to retry inline rather than restarting the entire process.
The @cloudflare/codemode ↗ package has been rewritten into a modular, runtime-agnostic SDK.
Code Mode ↗ enables LLMs to write and execute code that orchestrates your tools, instead of calling them one at a time. This can (and does) yield significant token savings, reduces context window pressure and improves overall model performance on a task.
The new Executor interface is runtime agnostic and comes with a prebuilt DynamicWorkerExecutor to run generated code in a Dynamic Worker Loader.
Breaking changes
Removed experimental_codemode() and CodeModeProxy — the package no longer owns an LLM call or model choice
New import path: createCodeTool() is now exported from @cloudflare/codemode/ai
New features
createCodeTool() — Returns a standard AI SDK Tool to use in your AI agents.
Executor interface — Minimal execute(code, fns) contract. Implement for any code sandboxing primitive or runtime.
DynamicWorkerExecutor
Runs code in a Dynamic Worker. It comes with the following features:
Network isolation — fetch() and connect() blocked by default (globalOutbound: null) when using DynamicWorkerExecutor
Console capture — console.log/warn/error captured and returned in ExecuteResult.logs
Execution timeout — Configurable via timeout option (default 30s)
Usage
import { createCodeTool } from "@cloudflare/codemode/ai";import { DynamicWorkerExecutor } from "@cloudflare/codemode";import { streamText } from "ai";const executor = new DynamicWorkerExecutor({ loader: env.LOADER });const codemode = createCodeTool({ tools: myTools, executor });const result = streamText({ model, tools: { codemode }, messages,});
import { createCodeTool } from "@cloudflare/codemode/ai";import { DynamicWorkerExecutor } from "@cloudflare/codemode";import { streamText } from "ai";const executor = new DynamicWorkerExecutor({ loader: env.LOADER });const codemode = createCodeTool({ tools: myTools, executor });const result = streamText({ model, tools: { codemode }, messages,});
The latest release of the Agents SDK ↗ adds built-in retry utilities, per-connection protocol message control, and a fully rewritten @cloudflare/ai-chat with data parts, tool approval persistence, and zero breaking changes.
Retry utilities
A new this.retry() method lets you retry any async operation with exponential backoff and jitter. You can pass an optional shouldRetry predicate to bail early on non-retryable errors.
Retry options are validated eagerly at enqueue/schedule time, and invalid values throw immediately. Internal retries have also been added for workflow operations (terminateWorkflow, pauseWorkflow, and others) with Durable Object-aware error detection.
Per-connection protocol message control
Agents automatically send JSON text frames (identity, state, MCP server lists) to every WebSocket connection. You can now suppress these per-connection for clients that cannot handle them — binary-only devices, MQTT clients, or lightweight embedded systems.
Connections with protocol messages disabled still fully participate in RPC and regular messaging. Use isConnectionProtocolEnabled(connection) to check a connection's status at any time. The flag persists across Durable Object hibernation.
The first stable release of @cloudflare/ai-chat ships alongside this release with a major refactor of AIChatAgent internals — new ResumableStream class, WebSocket ChatTransport, and simplified SSE parsing — with zero breaking changes. Existing code using AIChatAgent and useAgentChat works as-is.
Key new features:
Data parts — Attach typed JSON blobs (data-*) to messages alongside text. Supports reconciliation (type+id updates in-place), append, and transient parts (ephemeral via onData callback). See Data parts.
Tool approval persistence — The needsApproval approval UI now survives page refresh and DO hibernation. The streaming message is persisted to SQLite when a tool enters approval-requested state.
maxPersistedMessages — Cap SQLite message storage with automatic oldest-message deletion.
body option on useAgentChat — Send custom data with every request (static or dynamic).
Incremental persistence — Hash-based cache to skip redundant SQL writes.
Row size guard — Automatic two-pass compaction when messages approach the SQLite 2 MB limit.
autoContinueAfterToolResult defaults to true — Client-side tool results and tool approvals now automatically trigger a server continuation, matching server-executed tool behavior. Set autoContinueAfterToolResult: false in useAgentChat to restore the previous behavior.
Notable bug fixes:
Resolved stream resumption race conditions
Resolved an issue where setMessages functional updater sent empty arrays
Resolved an issue where client tool schemas were lost after DO hibernation
Resolved InvalidPromptError after tool approval (approval.id was dropped)
Resolved an issue where message metadata was not propagated on broadcast/resume paths
Resolved an issue where clearAll() did not clear in-memory chunk buffers
Resolved an issue where reasoning-delta silently dropped data when reasoning-start was missed during stream resumption
Synchronous queue and schedule getters
getQueue(), getQueues(), getSchedule(), dequeue(), dequeueAll(), and dequeueAllByCallback() were unnecessarily async despite only performing synchronous SQL operations. They now return values directly instead of wrapping them in Promises. This is backward compatible — existing code using await on these methods will continue to work.
Other improvements
Fix TypeScript "excessively deep" error — A depth counter on CanSerialize and IsSerializableParam types bails out to true after 10 levels of recursion, preventing the "Type instantiation is excessively deep" error with deeply nested types like AI SDK CoreMessage[].
POST SSE keepalive — The POST SSE handler now sends event: ping every 30 seconds to keep the connection alive, matching the existing GET SSE handler behavior. This prevents POST response streams from being silently dropped by proxies during long-running tool calls.
Widened peer dependency ranges — Peer dependency ranges across packages have been widened to prevent cascading major bumps during 0.x minor releases. @cloudflare/ai-chat and @cloudflare/codemode are now marked as optional peer dependencies.
Cloudflare has deprecated the Workers Quick Editor dev tools inspector and replaced it with a lightweight log viewer.
This aligns our logging with wrangler tail and gives us the opportunity to focus our efforts on bringing benefits from the work we have invested in observability, which would not be possible otherwise.
We have made improvements to this logging viewer based on your feedback such that you can log object and array types, and easily clear the list of logs. This does not include class instances. Limitations are documented in the Workers Playground docs.
If you do need to develop your Worker with a remote inspector, you can still do this using Wrangler locally. Cloning a project from your quick editor to your computer for local development can be done with the wrangler init --from-dash command. For more information, refer to Wrangler commands.
A new Workers Best Practices guide provides opinionated recommendations for building fast, reliable, observable, and secure Workers. The guide draws on production patterns, Cloudflare internal usage, and best practices observed from developers building on Workers.
Key guidance includes:
Keep your compatibility date current and enable nodejs_compat — Ensure you have access to the latest runtime features and Node.js built-in modules.
{ "name": "my-worker", "main": "src/index.ts", // Set this to today's date "compatibility_date": "2026-07-27", "compatibility_flags": ["nodejs_compat"],}
name = "my-worker"main = "src/index.ts"# Set this to today's datecompatibility_date = "2026-07-27"compatibility_flags = [ "nodejs_compat" ]
Generate binding types with wrangler types — Never hand-write your Env interface. Let Wrangler generate it from your actual configuration to catch mismatches at compile time.
Stream request and response bodies — Avoid buffering large payloads in memory. Use TransformStream and pipeTo to stay within the 128 MB memory limit and improve time-to-first-byte.
Use bindings, not REST APIs — Bindings to KV, R2, D1, Queues, and other Cloudflare services are direct, in-process references with no network hop and no authentication overhead.
Use Queues and Workflows for background work — Move long-running or retriable tasks out of the critical request path. Use Queues for simple fan-out and buffering, and Workflows for multi-step durable processes.
Enable Workers Logs and Traces — Configure observability before deploying to production so you have data when you need to debug.
Avoid global mutable state — Workers reuse isolates across requests. Storing request-scoped data in module-level variables causes cross-request data leaks.
Always await or waitUntil your Promises — Floating promises cause silent bugs and dropped work.
Use Web Crypto for secure token generation — Never use Math.random() for security-sensitive operations.
We're excited to announce GLM-4.7-Flash on Workers AI, a fast and efficient text generation model optimized for multilingual dialogue and instruction-following tasks, along with the brand-new @cloudflare/tanstack-ai ↗ package and workers-ai-provider v3.1.1 ↗.
You can now run AI agents entirely on Cloudflare. With GLM-4.7-Flash's multi-turn tool calling support, plus full compatibility with TanStack AI and the Vercel AI SDK, you have everything you need to build agentic applications that run completely at the edge.
GLM-4.7-Flash — Multilingual Text Generation Model
@cf/zai-org/glm-4.7-flash is a multilingual model with a 131,072 token context window, making it ideal for long-form content generation, complex reasoning tasks, and multilingual applications.
Key Features and Use Cases:
Multi-turn Tool Calling for Agents: Build AI agents that can call functions and tools across multiple conversation turns
Multilingual Support: Built to handle content generation in multiple languages effectively
Large Context Window: 131,072 tokens for long-form writing, complex reasoning, and processing long documents
Fast Inference: Optimized for low-latency responses in chatbots and virtual assistants
Instruction Following: Excellent at following complex instructions for code generation and structured tasks
@cloudflare/tanstack-ai v0.1.1 — TanStack AI adapters for Workers AI and AI Gateway
We've released @cloudflare/tanstack-ai, a new package that brings Workers AI and AI Gateway support to TanStack AI ↗. This provides a framework-agnostic alternative for developers who prefer TanStack's approach to building AI applications.
Workers AI adapters support four configuration modes — plain binding (env.AI), plain REST, AI Gateway binding (env.AI.gateway(id)), and AI Gateway REST — across all capabilities:
Chat (createWorkersAiChat) — Streaming chat completions with tool calling, structured output, and reasoning text streaming.
Summarization (createWorkersAiSummarize) — Text summarization.
AI Gateway adapters route requests from third-party providers — OpenAI, Anthropic, Gemini, Grok, and OpenRouter — through Cloudflare AI Gateway for caching, rate limiting, and unified billing.
To get started:
npm install @cloudflare/tanstack-ai @tanstack/ai
workers-ai-provider v3.1.1 — transcription, speech, reranking, and reliability
The Workers AI provider for the Vercel AI SDK ↗ now supports three new capabilities beyond chat and image generation:
Transcription (provider.transcription(model)) — Speech-to-text with automatic handling of model-specific input formats across binding and REST paths.
Text-to-speech (provider.speech(model)) — Audio generation with support for voice and speed options.
Reranking (provider.reranking(model)) — Document reranking for RAG pipelines and search result ordering.
import { createWorkersAI } from "workers-ai-provider";import { experimental_transcribe, experimental_generateSpeech, rerank,} from "ai";const workersai = createWorkersAI({ binding: env.AI });const transcript = await experimental_transcribe({ model: workersai.transcription("@cf/openai/whisper-large-v3-turbo"), audio: audioData, mediaType: "audio/wav",});const speech = await experimental_generateSpeech({ model: workersai.speech("@cf/deepgram/aura-1"), text: "Hello world", voice: "asteria",});const ranked = await rerank({ model: workersai.reranking("@cf/baai/bge-reranker-base"), query: "What is machine learning?", documents: ["ML is a branch of AI.", "The weather is sunny."],});
This release also includes a comprehensive reliability overhaul (v3.0.5):
Fixed streaming — Responses now stream token-by-token instead of buffering all chunks, using a proper TransformStream pipeline with backpressure.
Fixed tool calling — Resolved issues with tool call ID sanitization, conversation history preservation, and a heuristic that silently fell back to non-streaming mode when tools were defined.
Premature stream termination detection — Streams that end unexpectedly now report finishReason: "error" instead of silently reporting "stop".
AI Search support — Added createAISearch as the canonical export (renamed from AutoRAG). createAutoRAG still works with a deprecation warning.
Workers no longer have a limit of 1000 subrequests per invocation, allowing you to make more fetch() calls or requests
to Cloudflare services on every incoming request. This is especially important for long-running Workers requests, such as
open websockets on Durable Objects or long-running Workflows, as these could often exceed this limit and error.
By default, Workers on paid plans are now limited to 10,000 subrequests per invocation, but this
limit can be increased up to 10 million by setting the new subrequests limit in your Wrangler configuration file.
{ "limits": { "subrequests": 50000, },}
[limits]subrequests = 50_000
Workers on the free plan remain limited to 50 external subrequests and 1000 subrequests to Cloudflare services per invocation.
To protect against runaway code or unexpected costs, you can also set a lower limit for both subrequests and CPU usage.
A childEnvironments option has been added to the plugin config to enable using multiple environments within a single Worker.
The parent environment can then import modules from a child environment in order to access a separate module graph.
For a typical RSC use case, the plugin might be configured as in the following example:
@vitejs/plugin-rsc provides the lower level functionality that frameworks, such as React Router ↗, build upon.
The GitHub repository includes a basic Cloudflare example ↗.
The latest release of the Agents SDK ↗ brings readonly connections, MCP protocol and security improvements, x402 payment protocol v2 migration, and the ability to customize OAuth for MCP server connections.
Readonly connections
Agents can now restrict WebSocket clients to read-only access, preventing them from modifying agent state. This is useful for dashboards, spectator views, or any scenario where clients should observe but not mutate.
New hooks: shouldConnectionBeReadonly, setConnectionReadonly, isConnectionReadonly. Readonly connections block both client-side setState() and mutating @callable() methods, and the readonly flag survives hibernation.
class MyAgent extends Agent { shouldConnectionBeReadonly(connection) { // Make spectators readonly return connection.url.includes("spectator"); }}
class MyAgent extends Agent { shouldConnectionBeReadonly(connection) { // Make spectators readonly return connection.url.includes("spectator"); }}
Custom MCP OAuth providers
The new createMcpOAuthProvider method on the Agent class allows subclasses to override the default OAuth provider used when connecting to MCP servers. This enables custom authentication strategies such as pre-registered client credentials or mTLS, beyond the built-in dynamic client registration.
class MyAgent extends Agent { createMcpOAuthProvider(callbackUrl) { return new MyCustomOAuthProvider(this.ctx.storage, this.name, callbackUrl); }}
class MyAgent extends Agent { createMcpOAuthProvider(callbackUrl: string): AgentMcpOAuthProvider { return new MyCustomOAuthProvider(this.ctx.storage, this.name, callbackUrl); }}
MCP SDK upgrade to 1.26.0
Upgraded the MCP SDK to 1.26.0 to prevent cross-client response leakage. Stateless MCP Servers should now create a new McpServer instance per request instead of sharing a single instance. A guard is added in this version of the MCP SDK which will prevent connection to a Server instance that has already been connected to a transport. Developers will need to modify their code if they declare their McpServer instance as a global variable.
MCP OAuth callback URL security fix
Added callbackPath option to addMcpServer to prevent instance name leakage in MCP OAuth callback URLs. When sendIdentityOnConnect is false, callbackPath is now required — the default callback URL would expose the instance name, undermining the security intent. Also fixes callback request detection to match via the state parameter instead of a loose /callback URL substring check, enabling custom callback paths.
Deprecate onStateUpdate in favor of onStateChanged
onStateChanged is a drop-in rename of onStateUpdate (same signature, same behavior). onStateUpdate still works but emits a one-time console warning per class. validateStateChange rejections now propagate a CF_AGENT_STATE_ERROR message back to the client.
x402 v2 migration
Migrated the x402 MCP payment integration from the legacy x402 package to @x402/core and @x402/evm v2.
Breaking changes for x402 users:
Peer dependencies changed: replace x402 with @x402/core and @x402/evm
PaymentRequirements type now uses v2 fields (e.g. amount instead of maxAmountRequired)
X402ClientConfig.account type changed from viem.Account to ClientEvmSigner (structurally compatible with privateKeyToAccount())
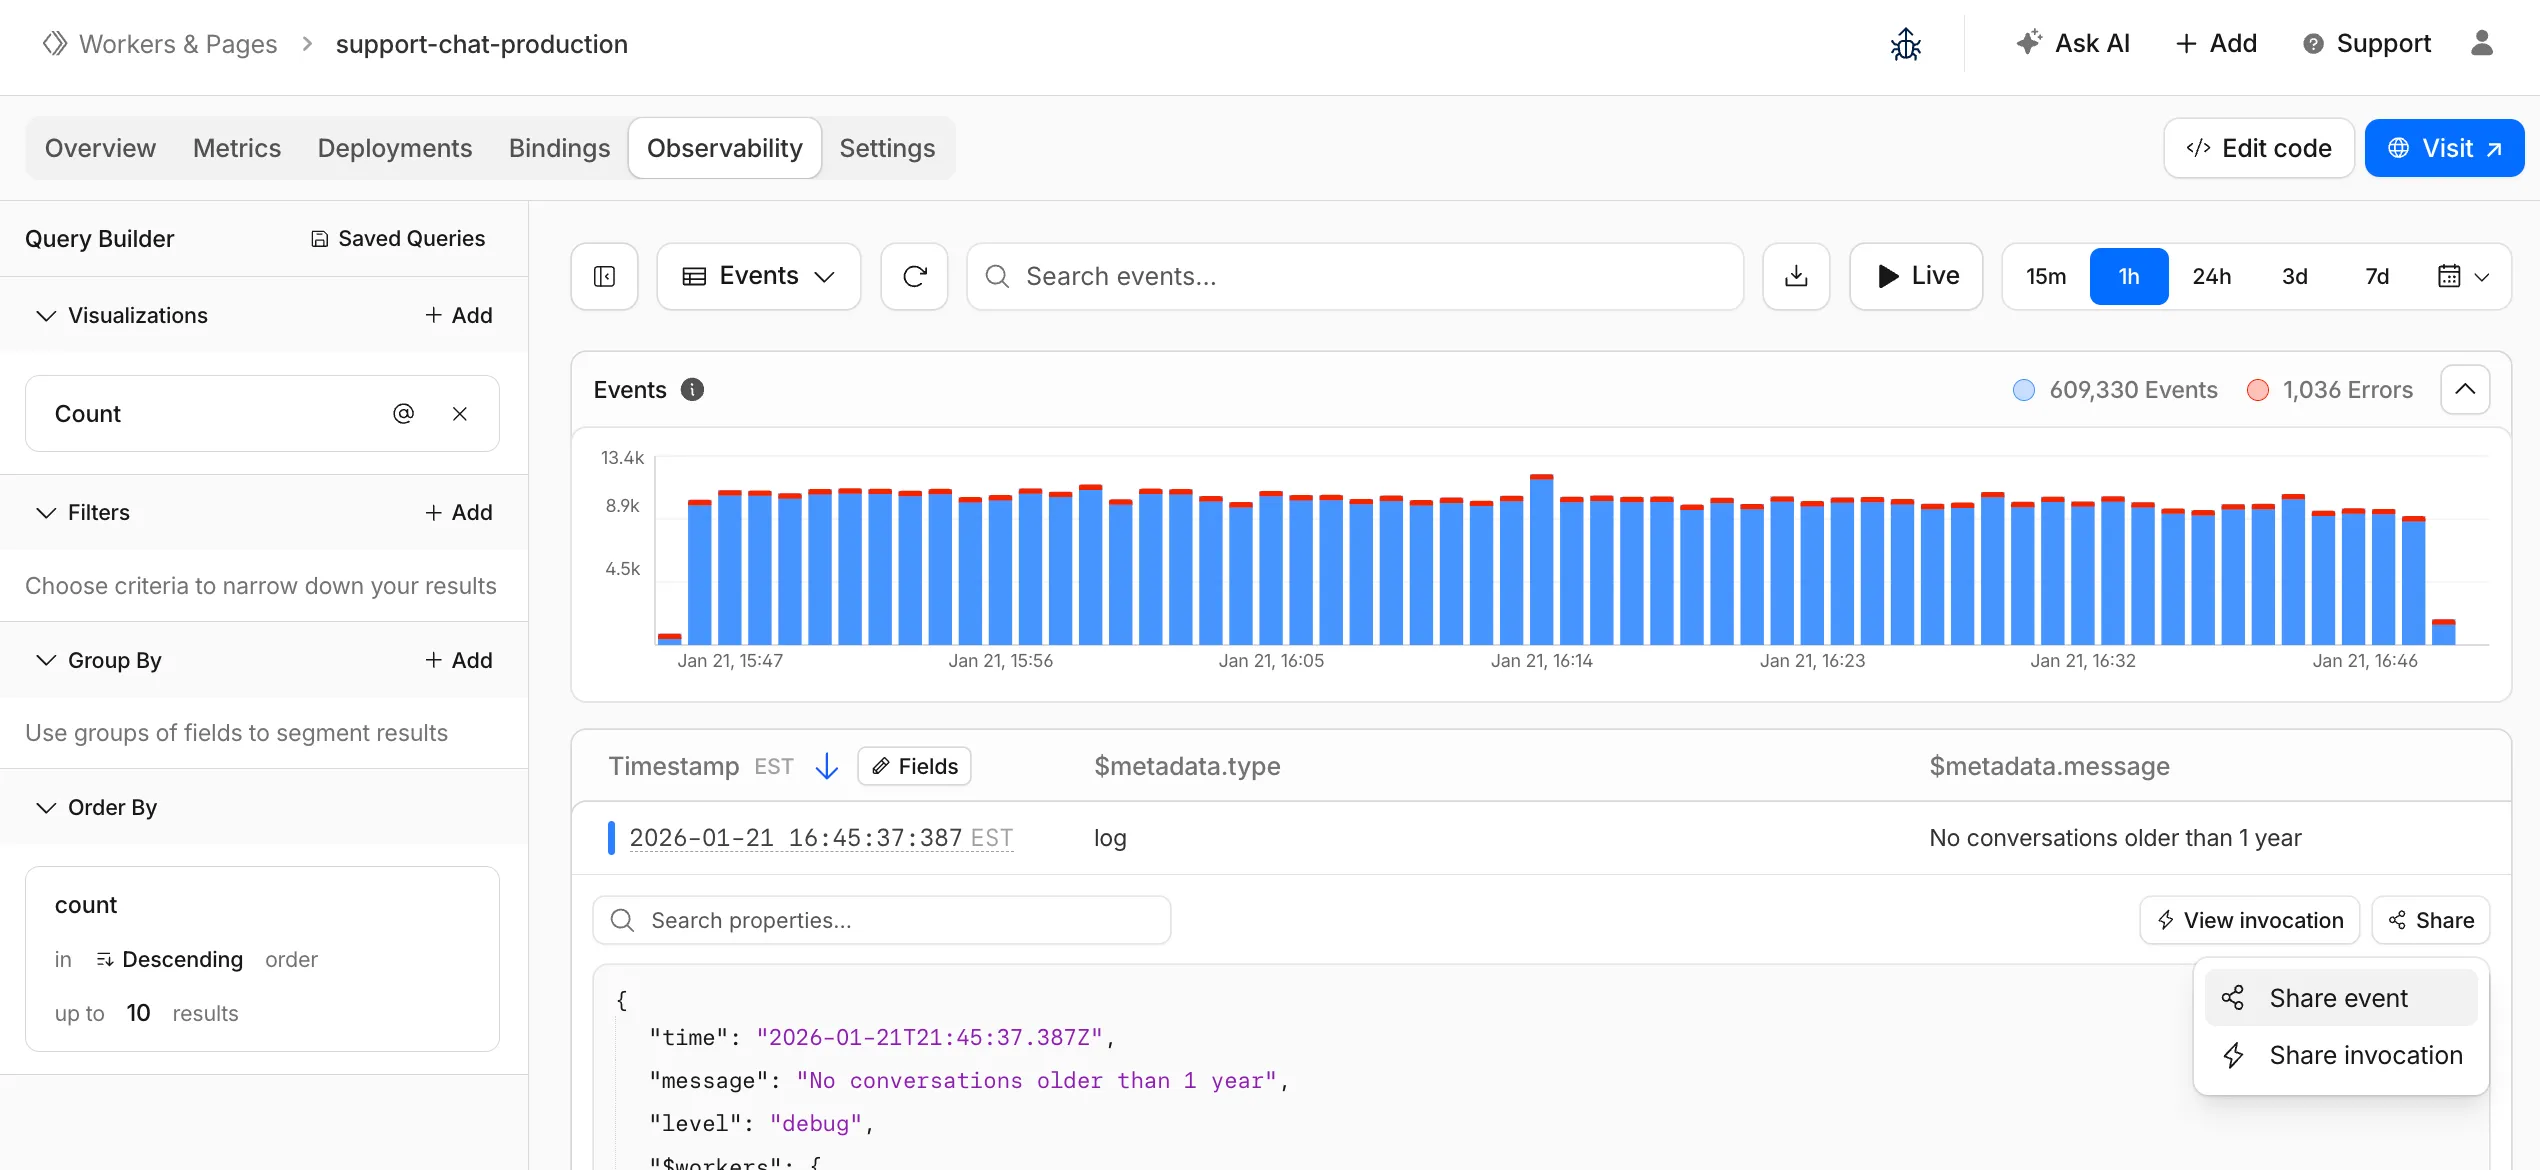
The Workers Observability dashboard ↗ has some major updates to make it easier to debug your application's issues and share findings with your team.
You can now:
Create visualizations — Build charts from your Worker data directly in a Worker's Observability tab
Export data as JSON or CSV — Download logs and traces for offline analysis or to share with teammates
Share events and traces — Generate direct URLs to specific events, invocations, and traces that open standalone pages with full context
Customize table columns — Improved field picker to add, remove, and reorder columns in the events table
Expandable event details — Expand events inline to view full details without leaving the table
Keyboard shortcuts — Navigate the dashboard with hotkey support
These updates are now live in the Cloudflare dashboard, both in a Worker's Observability tab and in the account-level Observability dashboard for a unified experience. To get started, go to Workers & Pages > select your Worker > Observability.