Changelog
New updates and improvements at Cloudflare.

AI Search now includes path filtering for both website and R2 data sources. You can now control which content gets indexed by defining include and exclude rules for paths.
By controlling what gets indexed, you can improve the relevance and quality of your search results. You can also use path filtering to split a single data source across multiple AI Search instances for specialized search experiences.
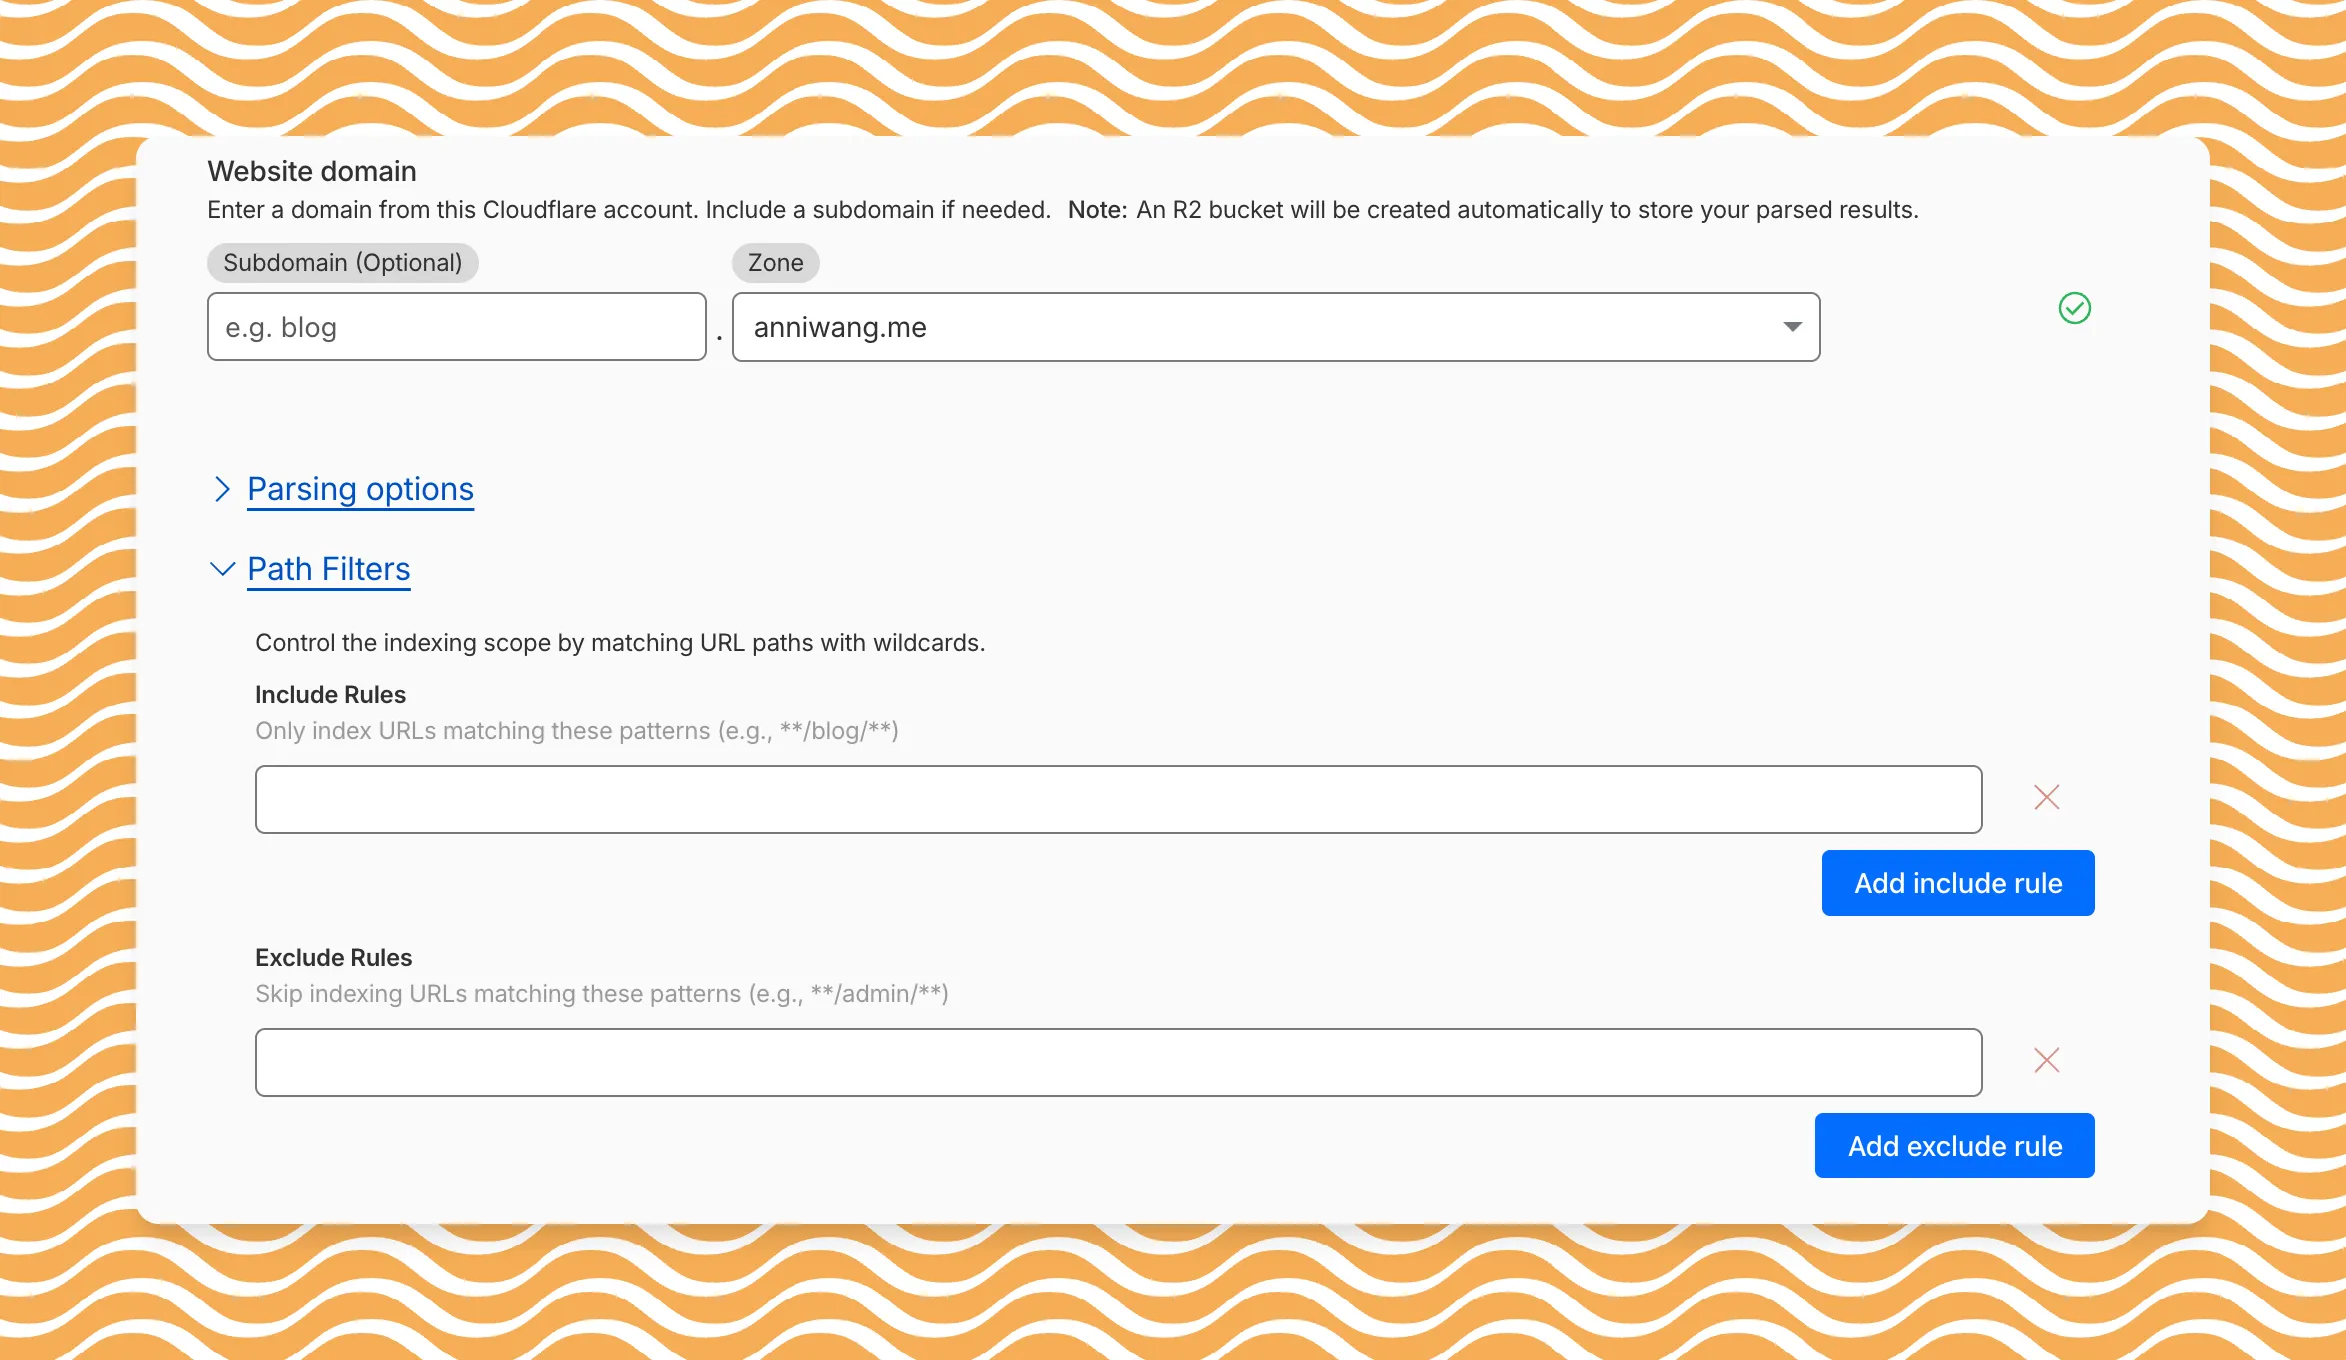
Path filtering uses micromatch ↗ patterns, so you can use
*to match within a directory and**to match across directories.Use case Include Exclude Index docs but skip drafts **/docs/****/docs/drafts/**Keep admin pages out of results — **/admin/**Index only English content **/en/**— Configure path filters when creating a new instance or update them anytime from Settings. Check out path filtering to learn more.
You can now create AI Search instances programmatically using the API. For example, use the API to create instances for each customer in a multi-tenant application or manage AI Search alongside your other infrastructure.
If you have created an AI Search instance via the dashboard before, you already have a service API token registered and can start creating instances programmatically right away. If not, follow the API guide to set up your first instance.
For example, you can now create separate search instances for each language on your website:
Terminal window for lang in en fr es de; docurl -X POST "https://api.cloudflare.com/client/v4/accounts/$ACCOUNT_ID/ai-search/instances" \-H "Authorization: Bearer $API_TOKEN" \-H "Content-Type: application/json" \--data '{"id": "docs-'"$lang"'","type": "web-crawler","source": "example.com","source_params": {"path_include": ["**/'"$lang"'/**"]}}'doneRefer to the REST API reference for additional configuration options.
Workers KV has an updated dashboard UI with new dashboard styling that makes it easier to navigate and see analytics and settings for a KV namespace.
The new dashboard features a streamlined homepage for easy access to your namespaces and key operations, with consistent design with the rest of the dashboard UI updates. It also provides an improved analytics view.
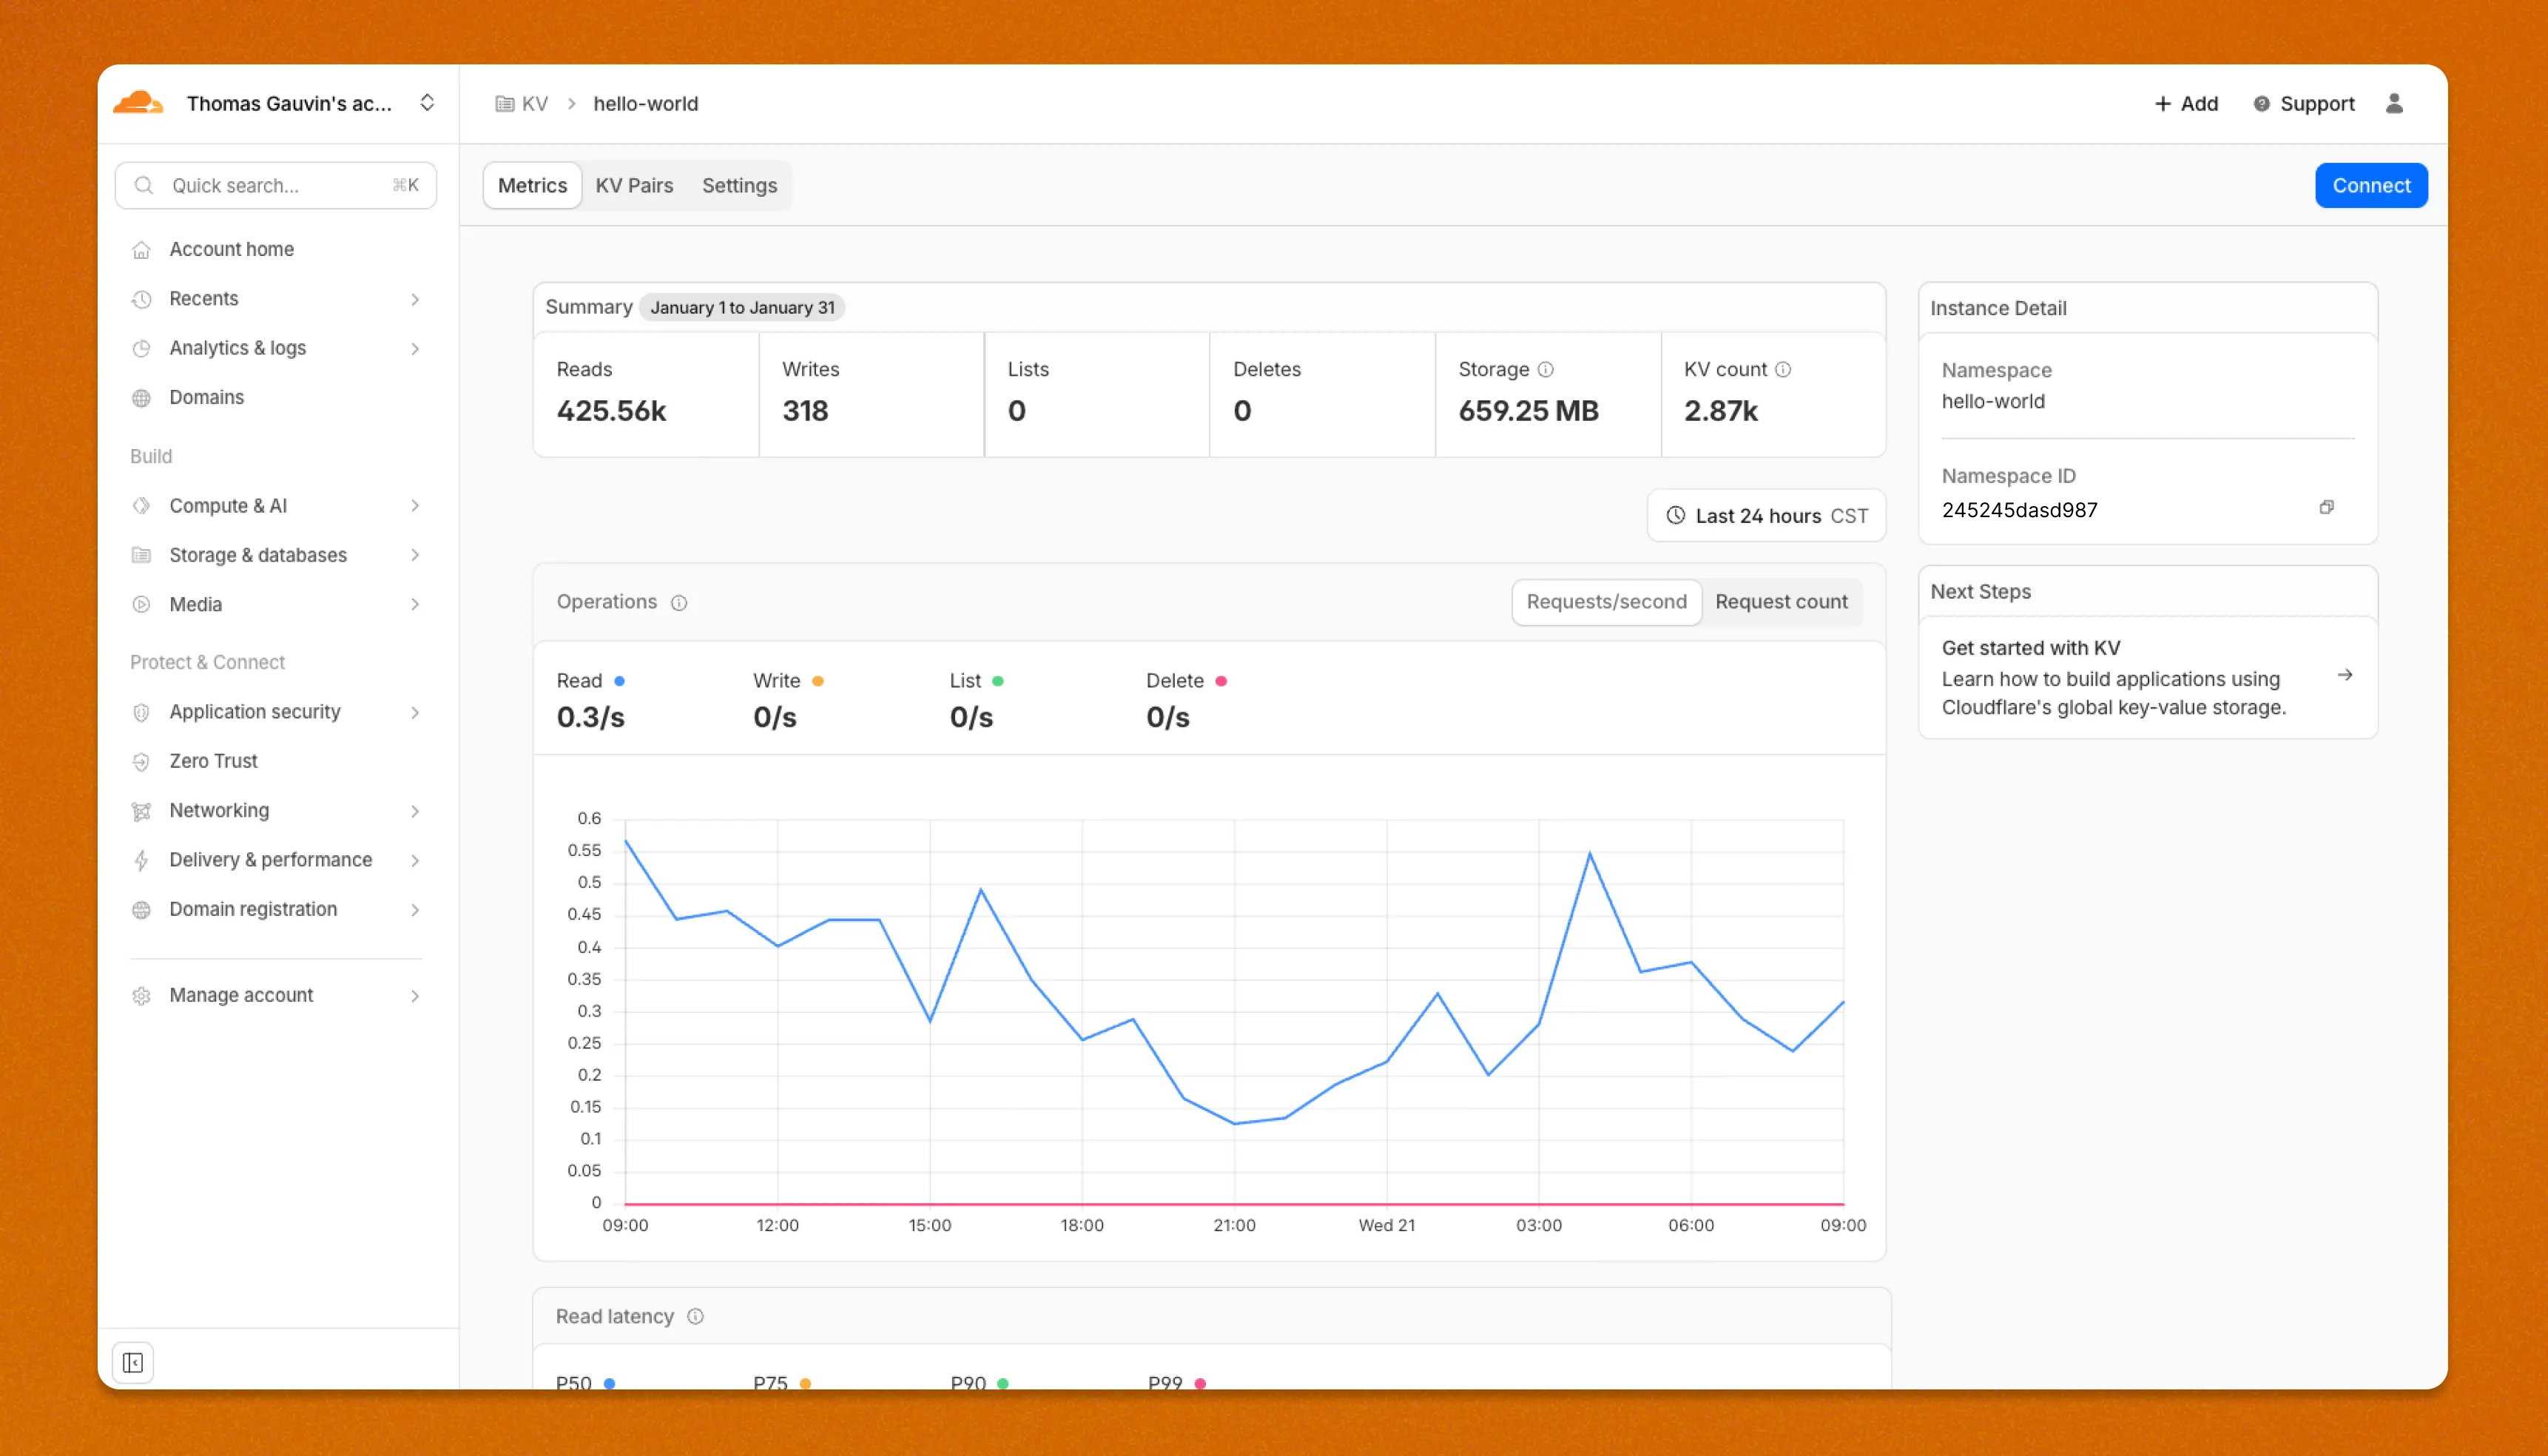
The updated dashboard is now available for all Workers KV users. Log in to the Cloudflare Dashboard ↗ to start exploring the new interface.
Disclaimer: Please note that v6.0.0-beta.1 is in Beta and we are still testing it for stability.
Full Changelog: v5.2.0...v6.0.0-beta.1 ↗
In this release, you'll see a large number of breaking changes. This is primarily due to a change in OpenAPI definitions, which our libraries are based off of, and codegen updates that we rely on to read those OpenAPI definitions and produce our SDK libraries. As the codegen is always evolving and improving, so are our code bases.
Some breaking changes were introduced due to bug fixes, also listed below.
Please ensure you read through the list of changes below before moving to this version - this will help you understand any down or upstream issues it may cause to your environments.
BGPPrefixCreateParams.cidr: optional → requiredPrefixCreateParams.asn:number | null→numberPrefixCreateParams.loa_document_id: required → optionalServiceBindingCreateParams.cidr: optional → requiredServiceBindingCreateParams.service_id: optional → required
ConfigurationUpdateResponseremovedPublicSchema→OldPublicSchemaSchemaUpload→UserSchemaCreateResponseConfigurationUpdateParams.propertiesremoved; usenormalize
ThreatEventBulkCreateResponse:number→ complex object with counts and errors
DatabaseQueryParams: simple interface → union type (D1SingleQuery | MultipleQueries)DatabaseRawParams: same change- Supports batch queries via
batcharray
All record type interfaces renamed from
*Recordto short names:RecordResponse.ARecord→RecordResponse.ARecordResponse.AAAARecord→RecordResponse.AAAARecordResponse.CNAMERecord→RecordResponse.CNAMERecordResponse.MXRecord→RecordResponse.MXRecordResponse.NSRecord→RecordResponse.NSRecordResponse.PTRRecord→RecordResponse.PTRRecordResponse.TXTRecord→RecordResponse.TXTRecordResponse.CAARecord→RecordResponse.CAARecordResponse.CERTRecord→RecordResponse.CERTRecordResponse.DNSKEYRecord→RecordResponse.DNSKEYRecordResponse.DSRecord→RecordResponse.DSRecordResponse.HTTPSRecord→RecordResponse.HTTPSRecordResponse.LOCRecord→RecordResponse.LOCRecordResponse.NAPTRRecord→RecordResponse.NAPTRRecordResponse.SMIMEARecord→RecordResponse.SMIMEARecordResponse.SRVRecord→RecordResponse.SRVRecordResponse.SSHFPRecord→RecordResponse.SSHFPRecordResponse.SVCBRecord→RecordResponse.SVCBRecordResponse.TLSARecord→RecordResponse.TLSARecordResponse.URIRecord→RecordResponse.URIRecordResponse.OpenpgpkeyRecord→RecordResponse.Openpgpkey
ResourceGroupCreateResponse.scope: optional single → required arrayResourceGroupCreateResponse.id: optional → required
OriginCACertificateCreateParams.csr: optional → requiredOriginCACertificateCreateParams.hostnames: optional → requiredOriginCACertificateCreateParams.request_type: optional → required
- Renamed:
DeploymentsSinglePage→DeploymentListResponsesV4PagePaginationArray - Domain response fields: many optional → required
- Entire v0 API deprecated; use v1 methods (
createV1,listV1, etc.) - New sub-resources:
Sinks,Streams
EventNotificationUpdateParams.rules: optional → required- Super Slurper:
bucket,secretnow required in source params
dataSource:string→ typed enum (23 values)eventType:string→ typed enum (6 values)- V2 methods require
dimensionparameter (breaking signature change)
- Removed:
status_messagefield from all recipient response types
- Consolidated
SchemaCreateResponse,SchemaListResponse,SchemaEditResponse,SchemaGetResponse→PublicSchema - Renamed:
SchemaListResponsesV4PagePaginationArray→PublicSchemasV4PagePaginationArray
- Renamed union members:
AppListResponse.UnionMember0→SpectrumConfigAppConfig - Renamed union members:
AppListResponse.UnionMember1→SpectrumConfigPaygoAppConfig
- Removed:
WorkersBindingKindTailConsumertype (all occurrences) - Renamed:
ScriptsSinglePage→ScriptListResponsesSinglePage - Removed:
DeploymentsSinglePage
datasets.create(),update(),get()return types changedPredefinedGetResponseunion members renamed toUnionMember0-5
- Removed:
CloudflaredCreateResponse,CloudflaredListResponse,CloudflaredDeleteResponse,CloudflaredEditResponse,CloudflaredGetResponse - Removed:
CloudflaredListResponsesV4PagePaginationArray
- Reports:
create,list,get - Mitigations: sub-resource for abuse mitigations
- Instances:
create,update,list,delete,read,stats - Items:
list,get - Jobs:
create,list,get,logs - Tokens:
create,update,list,delete,read
- Directory Services:
create,update,list,delete,get - Supports IPv4, IPv6, dual-stack, and hostname configurations
- Organizations:
create,update,list,delete,get - OrganizationProfile:
update,get - Hierarchical organization support with parent/child relationships
- Catalog:
list,enable,disable,get - Credentials:
create - MaintenanceConfigs:
update,get - Namespaces:
list - Tables:
list, maintenance config management - Apache Iceberg integration
- Apps:
get,post - Meetings:
create,get, participant management - Livestreams: 10+ methods for streaming
- Recordings: start, pause, stop, get
- Sessions: transcripts, summaries, chat
- Webhooks: full CRUD
- ActiveSession: polls, kick participants
- Analytics: organization analytics
- Configuration:
create,list,delete,edit,get - Credentials:
update - Rules:
create,list,delete,bulkCreate,bulkEdit,edit,get - JWT validation with RS256/384/512, PS256/384/512, ES256, ES384
create,update,list,delete,get
create,update,list,delete,get,beginVerification
- Sinks:
create,list,delete,get - Streams:
create,update,list,delete,get
- Portals:
create,update,list,delete,read - Servers:
create,update,list,delete,read,sync
managed_byfield withparent_org_id,parent_org_name
auto_generatedfield onLOADocumentCreateResponse
delegate_loa_creation,irr_validation_state,ownership_validation_state,ownership_validation_token,rpki_validation_state
- Added
toMarkdown.supported()method to get all supported conversion formats
zdrfield added to all responses and params
- New alert type:
abuse_report_alert typefield added to PolicyFilter
ContentCreateParams: refined to discriminated union (Variant0 | Variant1)- Split into URL-based and HTML-based parameter variants for better type safety
reactivateparameter in edit
ThreatEventCreateParams.indicatorType: required → optionalhasChildrenfield added to all threat event response typesdatasetIdsquery parameter onAttackerListParams,CategoryListParams,TargetIndustryListParamscategoryUuidfield onTagCreateResponseindicatorsarray for multi-indicator support per eventuuidandpreserveUuidfields for UUID preservation in bulk createformatquery parameter ('json' | 'stix2') onThreatEventListParamscreatedAt,datasetIdfields onThreatEventEditParams
- Added
create(),update(),get()methods
- New page types:
basic_challenge,under_attack,waf_challenge
served_by_colo- colo that handled queryjurisdiction-'eu' | 'fedramp'- Time Travel (
client.d1.database.timeTravel):getBookmark(),restore()- point-in-time recovery
- New fields on
InvestigateListResponse/InvestigateGetResponse:envelope_from,envelope_to,postfix_id_outbound,replyto - New detection classification:
'outbound_ndr' - Enhanced
Findinginterface withattachment,detection,field,portion,reason,score - Added
cursorquery parameter toInvestigateListParams
- New list types:
CATEGORY,LOCATION,DEVICE
- New issue type:
'configuration_suggestion' payloadfield:unknown→ typedPayloadinterface withdetection_method,zone_tag
- Added
detections.get()method
- New datasets:
dex_application_tests,dex_device_state_events,ipsec_logs,warp_config_changes,warp_toggle_changes
Monitor.port:number→number | nullPool.load_shedding:LoadShedding→LoadShedding | nullPool.origin_steering:OriginSteering→OriginSteering | null
license_keyfield on connectorsprovision_licenseparameter for auto-provisioning- IPSec:
custom_remote_identitieswith FQDN support - Snapshots: Bond interface,
probed_mtufield
- New response types:
ProjectCreateResponse,ProjectListResponse,ProjectEditResponse,ProjectGetResponse - Deployment methods return specific response types instead of generic
Deployment
- Added
subscriptions.get()method - Enhanced
SubscriptionGetResponsewith typed event source interfaces - New event source types: Images, KV, R2, Vectorize, Workers AI, Workers Builds, Workflows
- Sippy: new provider
s3(S3-compatible endpoints) - Sippy:
bucketUrlfield for S3-compatible sources - Super Slurper:
keysfield on source response schemas (specify specific keys to migrate) - Super Slurper:
pathPrefixfield on source schemas - Super Slurper:
regionfield on S3 source params
- Added
geolocations.list(),geolocations.get()methods - Added V2 dimension-based methods (
summaryV2,timeseriesGroupsV2) to radar sub-resources
- Added
terminalboolean field to Resource Error interfaces
- Added
idfield toItemDeleteParams.Item
- New buffering fields on
SetConfigRule:request_body_buffering,response_body_buffering
- New scopes:
'dex','access'(in addition to'workers','ai_gateway')
- Response types now proper interfaces (was
unknown) - Fields now required:
id,certificates,hosts,status,type
payloadfield:unknown→ typedPayloadinterface withdetection_method,zone_tag
- Added:
CloudflareTunnelsV4PagePaginationArraypagination class
- Added
subdomains.delete()method Worker.references- track external dependencies (domains, Durable Objects, queues)Worker.startup_time_ms- startup timingScript.observability- observability settings with loggingScript.tag,Script.tags- immutable ID and tags- Placement: support for region, hostname, host-based placement
tags,tail_consumersnow accept| null- Telemetry:
tracesfield,$containersevent info,durableObjectId,transactionName,abr_levelfields
ScriptUpdateResponse: new fieldsentry_point,observability,tag,tagsplacementfield now union of 4 variants (smart mode, region, hostname, host)tags,tail_consumersnow nullableTagUpdateParams.bodynow acceptsnull
instance_retention:unknown→ typedInstanceRetentioninterface witherror_retention,success_retention- New status option:
'restart'added toStatusEditParams.status
- External emergency disconnect settings (4 new fields)
antivirusdevice posture check typeos_version_extradocumentation improvements
- New response types:
SubscriptionCreateResponse,SubscriptionUpdateResponse,SubscriptionGetResponse
- New
ApplicationTypevalues:'mcp','mcp_portal','proxy_endpoint' - New destination type:
ViaMcpServerPortalDestinationfor MCP server access
- Added
rules.listTenant()method
ProxyEndpoint: interface → discriminated union (ZeroTrustGatewayProxyEndpointIP | ZeroTrustGatewayProxyEndpointIdentity)ProxyEndpointCreateParams: interface → union type- Added
kindfield:'ip' | 'identity'
WARPConnector*Response: union type → interface
- API Gateway:
UserSchemas,Settings,SchemaValidationresources - Audit Logs:
auditLogId.not(useid.not) - CloudforceOne:
ThreatEvents.get(),IndicatorTypes.list() - Devices:
public_ipfield (use DEX API) - Email Security:
item_countfield in Move responses - Pipelines: v0 methods (use v1)
- Radar: old
summary()andtimeseriesGroups()methods (use V2) - Rulesets:
disable_apps,miragefields - WARP Connector:
connectionsfield - Workers:
environmentparameter in Domains - Zones:
ResponseBufferingpage rule
- mcp: correct code tool API endpoint (599703c ↗)
- mcp: return correct lines on typescript errors (5d6f999 ↗)
- organization_profile: fix bad reference (d84ea77 ↗)
- schema_validation: correctly reflect model to openapi mapping (bb86151 ↗)
- workers: fix tests (2ee37f7 ↗)
In January 2025, we announced the launch of the new Terraform v5 Provider. We greatly appreciate the proactive engagement and valuable feedback from the Cloudflare community following the v5 release. In response, we've established a consistent and rapid 2-3 week cadence ↗ for releasing targeted improvements, demonstrating our commitment to stability and reliability.
With the help of the community, we have a growing number of resources that we have marked as stable ↗, with that list continuing to grow with every release. The most used resources ↗ are on track to be stable by the end of March 2026, when we will also be releasing a new migration tool to you migrate from v4 to v5 with ease.
Thank you for continuing to raise issues. They make our provider stronger and help us build products that reflect your needs.
This release includes bug fixes, the stabilization of even more popular resources, and more.
- custom_pages: add "waf_challenge" as new supported error page type identifier in both resource and data source schemas
- list: enhance CIDR validator to check for normalized CIDR notation requiring network address for IPv4 and IPv6
- magic_wan_gre_tunnel: add automatic_return_routing attribute for automatic routing control
- magic_wan_gre_tunnel: add BGP configuration support with new BGP model attribute
- magic_wan_gre_tunnel: add bgp_status computed attribute for BGP connection status information
- magic_wan_gre_tunnel: enhance schema with BGP-related attributes and validators
- magic_wan_ipsec_tunnel: add automatic_return_routing attribute for automatic routing control
- magic_wan_ipsec_tunnel: add BGP configuration support with new BGP model attribute
- magic_wan_ipsec_tunnel: add bgp_status computed attribute for BGP connection status information
- magic_wan_ipsec_tunnel: add custom_remote_identities attribute for custom identity configuration
- magic_wan_ipsec_tunnel: enhance schema with BGP and identity-related attributes
- ruleset: add request body buffering support
- ruleset: enhance ruleset data source with additional configuration options
- workers_script: add observability logs attributes to list data source model
- workers_script: enhance list data source schema with additional configuration options
- account_member: fix resource importability issues
- dns_record: remove unnecessary fmt.Sprintf wrapper around LoadTestCase call in test configuration helper function
- load_balancer: fix session_affinity_ttl type expectations to match Float64 in initial creation and Int64 after migration
- workers_kv: handle special characters correctly in URL encoding
- account_subscription: update schema description for rate_plan.sets attribute to clarify it returns an array of strings
- api_shield: add resource-level description for API Shield management of auth ID characteristics
- api_shield: enhance auth_id_characteristics.name attribute description to include JWT token configuration format requirements
- api_shield: specify JSONPath expression format for JWT claim locations
- hyperdrive_config: add description attribute to name attribute explaining its purpose in dashboard and API identification
- hyperdrive_config: apply description improvements across resource, data source, and list data source schemas
- hyperdrive_config: improve schema descriptions for cache settings to clarify default values
- hyperdrive_config: update port description to clarify defaults for different database types
Auxiliary Workers are now fully supported when using full-stack frameworks, such as React Router and TanStack Start, that integrate with the Cloudflare Vite plugin. They are included alongside the framework's build output in the build output directory. Note that this feature requires Vite 7 or above.
Auxiliary Workers are additional Workers that can be called via service bindings from your main (entry) Worker. They are defined in the plugin config, as in the example below:
vite.config.ts import { defineConfig } from "vite";import { tanstackStart } from "@tanstack/react-start/plugin/vite";import { cloudflare } from "@cloudflare/vite-plugin";export default defineConfig({plugins: [tanstackStart(),cloudflare({viteEnvironment: { name: "ssr" },auxiliaryWorkers: [{ configPath: "./wrangler.aux.jsonc" }],}),],});See the Vite plugin API docs for more info.
The
.sqlfile extension is now automatically configured to be importable in your Worker code when using Wrangler or the Cloudflare Vite plugin. This is particular useful for importing migrations in Durable Objects and means you no longer need to configure custom rules when using Drizzle ↗.SQL files are imported as JavaScript strings:
TypeScript // `example` will be a JavaScript stringimport example from "./example.sql";
We have made it easier to validate connectivity when deploying WARP Connector as part of your software-defined private network.
You can now
pingthe WARP Connector host directly on its LAN IP address immediately after installation. This provides a fast, familiar way to confirm that the Connector is online and reachable within your network before testing access to downstream services.Starting with version 2025.10.186.0, WARP Connector responds to traffic addressed to its own LAN IP, giving you immediate visibility into Connector reachability.
Learn more about deploying WARP Connector and building private network connectivity with Cloudflare One.
We've partnered with Black Forest Labs (BFL) again to bring their optimized FLUX.2 [klein] 4B model to Workers AI! This distilled model offers faster generation and cost-effective pricing, while maintaining great output quality. With a fixed 4-step inference process, Klein 4B is ideal for rapid prototyping and real-time applications where speed matters.
Read the BFL blog ↗ to learn more about the model itself, or try it out yourself on our multi modal playground ↗.
Pricing documentation is available on the model page or pricing page.
The model hosted on Workers AI is optimized for speed with a fixed 4-step inference process and supports up to 4 image inputs. Since this is a distilled model, the
stepsparameter is fixed at 4 and cannot be adjusted. Like FLUX.2 [dev], this image model uses multipart form data inputs, even if you just have a prompt.With the REST API, the multipart form data input looks like this:
Terminal window curl --request POST \--url 'https://api.cloudflare.com/client/v4/accounts/{ACCOUNT}/ai/run/@cf/black-forest-labs/flux-2-klein-4b' \--header 'Authorization: Bearer {TOKEN}' \--header 'Content-Type: multipart/form-data' \--form 'prompt=a sunset at the alps' \--form width=1024 \--form height=1024With the Workers AI binding, you can use it as such:
JavaScript const form = new FormData();form.append("prompt", "a sunset with a dog");form.append("width", "1024");form.append("height", "1024");// FormData doesn't expose its serialized body or boundary. Passing it to a// Request (or Response) constructor serializes it and generates the Content-Type// header with the boundary, which is required for the server to parse the multipart fields.const formResponse = new Response(form);const formStream = formResponse.body;const formContentType = formResponse.headers.get('content-type');const resp = await env.AI.run("@cf/black-forest-labs/flux-2-klein-4b", {multipart: {body: formStream,contentType: formContentType,},});The parameters you can send to the model are detailed here:
JSON Schema for Model
Required Parametersprompt(string) - Text description of the image to generate
Optional Parameters
input_image_0(string) - Binary imageinput_image_1(string) - Binary imageinput_image_2(string) - Binary imageinput_image_3(string) - Binary imageguidance(float) - Guidance scale for generation. Higher values follow the prompt more closelywidth(integer) - Width of the image, default1024Range: 256-1920height(integer) - Height of the image, default768Range: 256-1920seed(integer) - Seed for reproducibility
Note: Since this is a distilled model, the
stepsparameter is fixed at 4 and cannot be adjusted.## Multi-Reference ImagesThe FLUX.2 klein-4b model supports generating images based on reference images, just like FLUX.2 [dev]. You can use this feature to apply the style of one image to another, add a new character to an image, or iterate on past generated images. You would use it with the same multipart form data structure, with the input images in binary. The model supports up to 4 input images.For the prompt, you can reference the images based on the index, like `take the subject of image 1 and style it like image 0` or even use natural language like `place the dog beside the woman`.Note: you have to name the input parameter as `input_image_0`, `input_image_1`, `input_image_2`, `input_image_3` for it to work correctly. All input images must be smaller than 512x512.```bashcurl --request POST \--url 'https://api.cloudflare.com/client/v4/accounts/{ACCOUNT}/ai/run/@cf/black-forest-labs/flux-2-klein-4b' \--header 'Authorization: Bearer {TOKEN}' \--header 'Content-Type: multipart/form-data' \--form 'prompt=take the subject of image 1 and style it like image 0' \--form input_image_0=@/Users/johndoe/Desktop/icedoutkeanu.png \--form input_image_1=@/Users/johndoe/Desktop/me.png \--form width=1024 \--form height=1024Through Workers AI Binding:
JavaScript //helper function to convert ReadableStream to Blobasync function streamToBlob(stream: ReadableStream, contentType: string): Promise<Blob> {const reader = stream.getReader();const chunks = [];while (true) {const { done, value } = await reader.read();if (done) break;chunks.push(value);}return new Blob(chunks, { type: contentType });}const image0 = await fetch("http://image-url");const image1 = await fetch("http://image-url");const form = new FormData();const image_blob0 = await streamToBlob(image0.body, "image/png");const image_blob1 = await streamToBlob(image1.body, "image/png");form.append('input_image_0', image_blob0)form.append('input_image_1', image_blob1)form.append('prompt', 'take the subject of image 1 and style it like image 0')// FormData doesn't expose its serialized body or boundary. Passing it to a// Request (or Response) constructor serializes it and generates the Content-Type// header with the boundary, which is required for the server to parse the multipart fields.const formResponse = new Response(form);const formStream = formResponse.body;const formContentType = formResponse.headers.get('content-type');const resp = await env.AI.run("@cf/black-forest-labs/flux-2-klein-4b", {multipart: {body: formStream,contentType: formContentType}})
The
wrangler typescommand now generates TypeScript types for bindings from all environments defined in your Wrangler configuration file by default.Previously,
wrangler typesonly generated types for bindings in the top-level configuration (or a single environment when using the--envflag). This meant that if you had environment-specific bindings — for example, a KV namespace only in production or an R2 bucket only in staging — those bindings would be missing from your generated types, causing TypeScript errors when accessing them.Now, running
wrangler typescollects bindings from all environments and includes them in the generatedEnvtype. This ensures your types are complete regardless of which environment you deploy to.If you want the previous behavior of generating types for only a specific environment, you can use the
--envflag:Terminal window wrangler types --env productionLearn more about generating types for your Worker in the Wrangler documentation.
Wrangler now supports a
--checkflag for thewrangler typescommand. This flag validates that your generated types are up to date without writing any changes to disk.This is useful in CI/CD pipelines where you want to ensure that developers have regenerated their types after making changes to their Wrangler configuration. If the types are out of date, the command will exit with a non-zero status code.
Terminal window npx wrangler types --checkIf your types are up to date, the command will succeed silently. If they are out of date, you'll see an error message indicating which files need to be regenerated.
For more information, see the Wrangler types documentation.
You can now receive notifications when your Workers' builds start, succeed, fail, or get cancelled using Event Subscriptions.
Workers Builds publishes events to a Queue that your Worker can read messages from, and then send notifications wherever you need — Slack, Discord, email, or any webhook endpoint.
You can deploy this Worker ↗ to your own Cloudflare account to send build notifications to Slack:
The template includes:
- Build status with Preview/Live URLs for successful deployments
- Inline error messages for failed builds
- Branch, commit hash, and author name
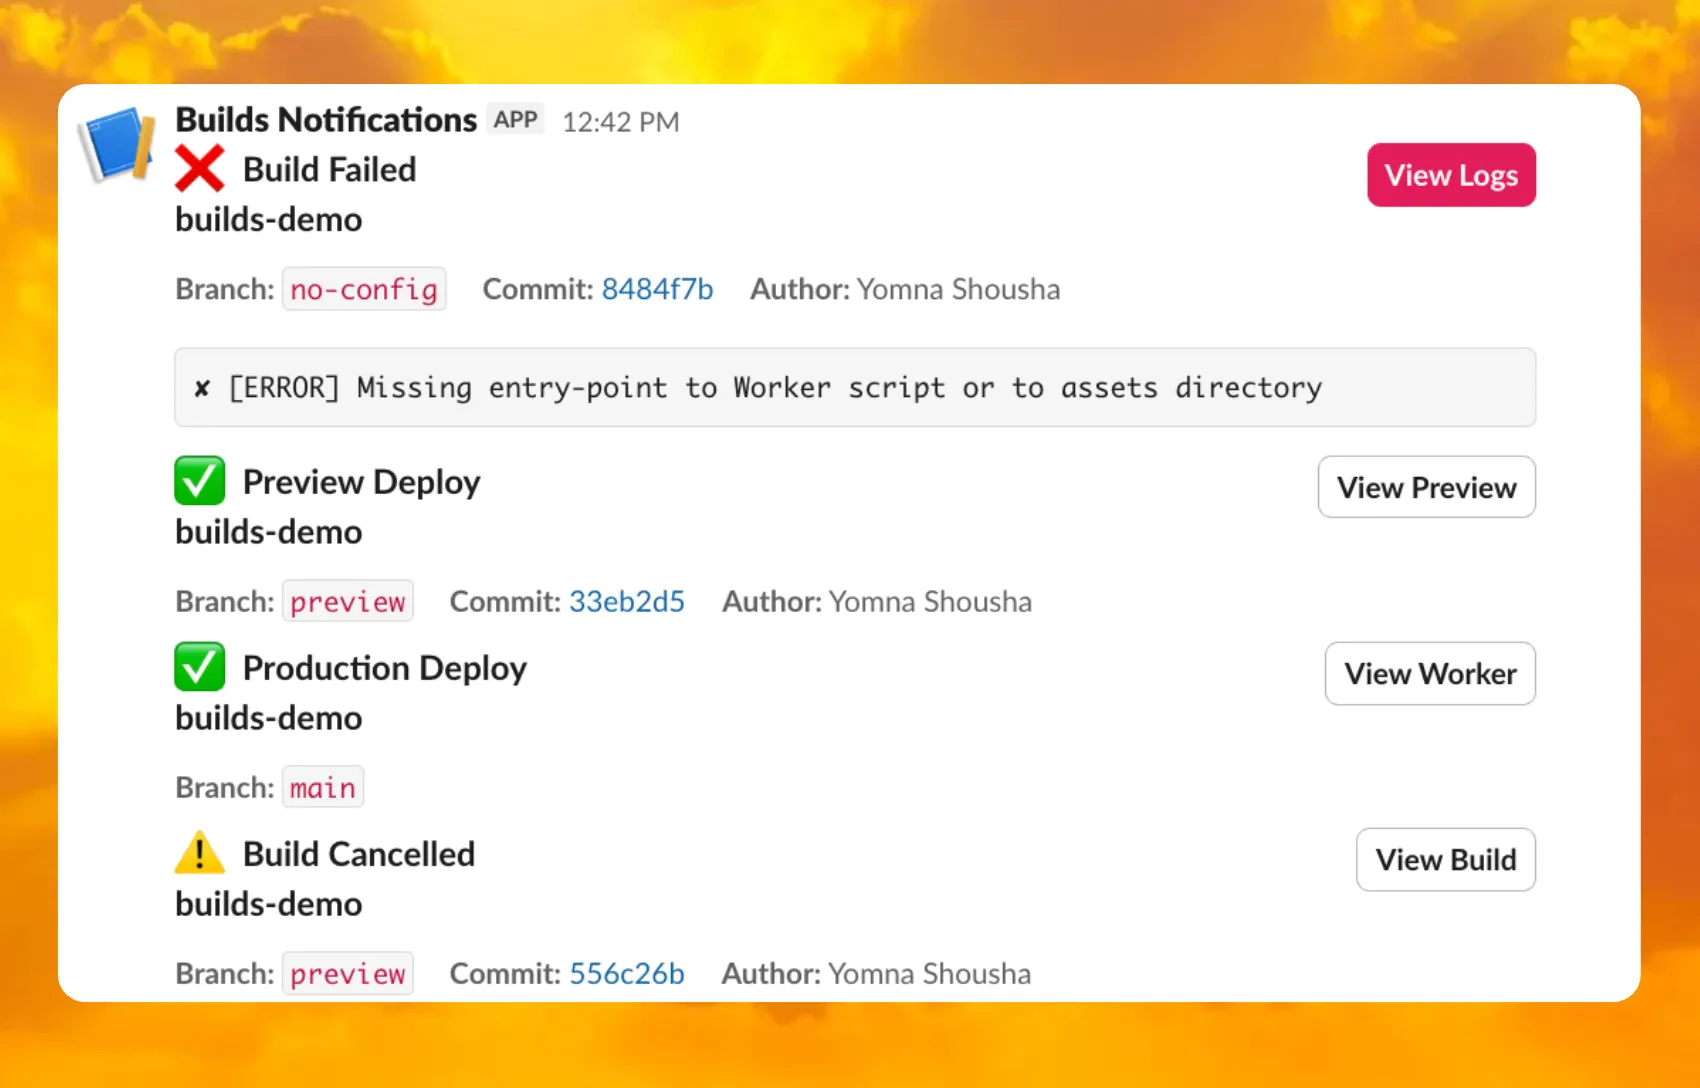
For setup instructions, refer to the template README ↗ or the Event Subscriptions documentation.
Wrangler now includes built-in shell tab completion support, making it faster and easier to navigate commands without memorizing every option. Press Tab as you type to autocomplete commands, subcommands, flags, and even option values like log levels.
Tab completions are supported for Bash, Zsh, Fish, and PowerShell.
Generate the completion script for your shell and add it to your configuration file:
Terminal window # Bashwrangler complete bash >> ~/.bashrc# Zshwrangler complete zsh >> ~/.zshrc# Fishwrangler complete fish >> ~/.config/fish/config.fish# PowerShellwrangler complete powershell >> $PROFILEAfter adding the script, restart your terminal or source your configuration file for the changes to take effect. Then you can simply press Tab to see available completions:
Terminal window wrangler d<TAB> # completes to 'deploy', 'dev', 'd1', etc.wrangler kv <TAB> # shows subcommands: namespace, key, bulkTab completions are dynamically generated from Wrangler's command registry, so they stay up-to-date as new commands and options are added. This feature is powered by
@bomb.sh/tab↗.See the
wrangler completedocumentation for more details.
You can now use the
HAVINGclause andLIKEpattern matching operators in Workers Analytics Engine ↗.Workers Analytics Engine allows you to ingest and store high-cardinality data at scale and query your data through a simple SQL API.
The
HAVINGclause complements theWHEREclause by enabling you to filter groups based on aggregate values. WhileWHEREfilters rows before aggregation,HAVINGfilters groups after aggregation is complete.You can use
HAVINGto filter groups where the average exceeds a threshold:SELECTblob1 AS probe_name,avg(double1) AS average_tempFROM temperature_readingsGROUP BY probe_nameHAVING average_temp > 10You can also filter groups based on aggregates such as the number of items in the group:
SELECTblob1 AS probe_name,count() AS num_readingsFROM temperature_readingsGROUP BY probe_nameHAVING num_readings > 100The new pattern matching operators enable you to search for strings that match specific patterns using wildcard characters:
LIKE- case-sensitive pattern matchingNOT LIKE- case-sensitive pattern exclusionILIKE- case-insensitive pattern matchingNOT ILIKE- case-insensitive pattern exclusion
Pattern matching supports two wildcard characters:
%(matches zero or more characters) and_(matches exactly one character).You can match strings starting with a prefix:
SELECT *FROM logsWHERE blob1 LIKE 'error%'You can also match file extensions (case-insensitive):
SELECT *FROM requestsWHERE blob2 ILIKE '%.jpg'Another example is excluding strings containing specific text:
SELECT *FROM eventsWHERE blob3 NOT ILIKE '%debug%'Learn more about the
HAVINGclause or pattern matching operators in the Workers Analytics Engine SQL reference documentation.
Custom instance types are now enabled for all Cloudflare Containers users. You can now specify specific vCPU, memory, and disk amounts, rather than being limited to pre-defined instance types. Previously, only select Enterprise customers were able to customize their instance type.
To use a custom instance type, specify the
instance_typeproperty as an object withvcpu,memory_mib, anddisk_mbfields in your Wrangler configuration:TOML [[containers]]image = "./Dockerfile"instance_type = { vcpu = 2, memory_mib = 6144, disk_mb = 12000 }Individual limits for custom instance types are based on the
standard-4instance type (4 vCPU, 12 GiB memory, 20 GB disk). You must allocate at least 1 vCPU for custom instance types. For workloads requiring less than 1 vCPU, use the predefined instance types likeliteorbasic.See the limits documentation for the full list of constraints on custom instance types. See the getting started guide to deploy your first Container,
You can now deploy microfrontends to Cloudflare, splitting a single application into smaller, independently deployable units that render as one cohesive application. This lets different teams using different frameworks develop, test, and deploy each microfrontend without coordinating releases.
Microfrontends solve several challenges for large-scale applications:
- Independent deployments: Teams deploy updates on their own schedule without redeploying the entire application
- Framework flexibility: Build multi-framework applications (for example, Astro, Remix, and Next.js in one app)
- Gradual migration: Migrate from a monolith to a distributed architecture incrementally
Create a microfrontend project:
This template automatically creates a router worker with pre-configured routing logic, and lets you configure Service bindings to Workers you have already deployed to your Cloudflare account. The router Worker analyzes incoming requests, matches them against configured routes, and forwards requests to the appropriate microfrontend via service bindings. The router automatically rewrites HTML, CSS, and headers to ensure assets load correctly from each microfrontend's mount path. The router includes advanced features like preloading for faster navigation between microfrontends, smooth page transitions using the View Transitions API, and automatic path rewriting for assets, redirects, and cookies.
Each microfrontend can be a full-framework application, a static site with Workers Static Assets, or any other Worker-based application.
Get started with the microfrontends template ↗, or read the microfrontends documentation for implementation details.
Agents SDK v0.3.0, workers-ai-provider v3.0.0, and ai-gateway-provider v3.0.0 with AI SDK v6 support
We've shipped a new release for the Agents SDK ↗ v0.3.0 bringing full compatibility with AI SDK v6 ↗ and introducing the unified tool pattern, dynamic tool approval, and enhanced React hooks with improved tool handling.
This release includes improved streaming and tool support, dynamic tool approval (for "human in the loop" systems), enhanced React hooks with
onToolCallcallback, improved error handling for streaming responses, and seamless migration from v5 patterns.This makes it ideal for building production AI chat interfaces with Cloudflare Workers AI models, agent workflows, human-in-the-loop systems, or any application requiring reliable tool execution and approval workflows.
Additionally, we've updated workers-ai-provider v3.0.0, the official provider for Cloudflare Workers AI models, and ai-gateway-provider v3.0.0, the provider for Cloudflare AI Gateway, to be compatible with AI SDK v6.
AI SDK v6 introduces a unified tool pattern where all tools are defined on the server using the
tool()function. This replaces the previous client-sideAIToolpattern.TypeScript import { tool } from "ai";import { z } from "zod";// Server: Define ALL tools on the serverconst tools = {// Server-executed toolgetWeather: tool({description: "Get weather for a city",inputSchema: z.object({ city: z.string() }),execute: async ({ city }) => fetchWeather(city)}),// Client-executed tool (no execute = client handles via onToolCall)getLocation: tool({description: "Get user location from browser",inputSchema: z.object({})// No execute function}),// Tool requiring approval (dynamic based on input)processPayment: tool({description: "Process a payment",inputSchema: z.object({ amount: z.number() }),needsApproval: async ({ amount }) => amount > 100,execute: async ({ amount }) => charge(amount)})};TypeScript // Client: Handle client-side tools via onToolCall callbackimport { useAgentChat } from "agents/ai-react";const { messages, sendMessage, addToolOutput } = useAgentChat({agent,onToolCall: async ({ toolCall, addToolOutput }) => {if (toolCall.toolName === "getLocation") {const position = await new Promise((resolve, reject) => {navigator.geolocation.getCurrentPosition(resolve, reject);});addToolOutput({toolCallId: toolCall.toolCallId,output: {lat: position.coords.latitude,lng: position.coords.longitude}});}}});Key benefits of the unified tool pattern:
- Server-defined tools: All tools are defined in one place on the server
- Dynamic approval: Use
needsApprovalto conditionally require user confirmation - Cleaner client code: Use
onToolCallcallback instead of managing tool configs - Type safety: Full TypeScript support with proper tool typing
Creates a new chat interface with enhanced v6 capabilities.
TypeScript // Basic chat setup with onToolCallconst { messages, sendMessage, addToolOutput } = useAgentChat({agent,onToolCall: async ({ toolCall, addToolOutput }) => {// Handle client-side tool executionawait addToolOutput({toolCallId: toolCall.toolCallId,output: { result: "success" }});}});Use
needsApprovalon server tools to conditionally require user confirmation:TypeScript const paymentTool = tool({description: "Process a payment",inputSchema: z.object({amount: z.number(),recipient: z.string()}),needsApproval: async ({ amount }) => amount > 1000,execute: async ({ amount, recipient }) => {return await processPayment(amount, recipient);}});The
isToolUIPartandgetToolNamefunctions now check both static and dynamic tool parts:TypeScript import { isToolUIPart, getToolName } from "ai";const pendingToolCallConfirmation = messages.some((m) =>m.parts?.some((part) => isToolUIPart(part) && part.state === "input-available",),);// Handle tool confirmationif (pendingToolCallConfirmation) {await addToolOutput({toolCallId: part.toolCallId,output: "User approved the action"});}If you need the v5 behavior (static-only checks), use the new functions:
TypeScript import { isStaticToolUIPart, getStaticToolName } from "ai";The
convertToModelMessages()function is now asynchronous. Update all calls to await the result:TypeScript import { convertToModelMessages } from "ai";const result = streamText({messages: await convertToModelMessages(this.messages),model: openai("gpt-4o")});The
CoreMessagetype has been removed. UseModelMessageinstead:TypeScript import { convertToModelMessages, type ModelMessage } from "ai";const modelMessages: ModelMessage[] = await convertToModelMessages(messages);The
modeoption forgenerateObjecthas been removed:TypeScript // Before (v5)const result = await generateObject({mode: "json",model,schema,prompt});// After (v6)const result = await generateObject({model,schema,prompt});While
generateObjectandstreamObjectare still functional, the recommended approach is to usegenerateText/streamTextwith theOutput.object()helper:TypeScript import { generateText, Output, stepCountIs } from "ai";const { output } = await generateText({model: openai("gpt-4"),output: Output.object({schema: z.object({ name: z.string() })}),stopWhen: stepCountIs(2),prompt: "Generate a name"});Note: When using structured output with
generateText, you must configure multiple steps withstopWhenbecause generating the structured output is itself a step.Seamless integration with Cloudflare Workers AI models through the updated workers-ai-provider v3.0.0 with AI SDK v6 support.
Use Cloudflare Workers AI models directly in your agent workflows:
TypeScript import { createWorkersAI } from "workers-ai-provider";import { useAgentChat } from "agents/ai-react";// Create Workers AI model (v3.0.0 - enhanced v6 internals)const model = createWorkersAI({binding: env.AI,})("@cf/meta/llama-3.2-3b-instruct");Workers AI models now support v6 file handling with automatic conversion:
TypeScript // Send images and files to Workers AI modelssendMessage({role: "user",parts: [{ type: "text", text: "Analyze this image:" },{type: "file",data: imageBuffer,mediaType: "image/jpeg",},],});// Workers AI provider automatically converts to proper formatEnhanced streaming support with automatic warning detection:
TypeScript // Streaming with Workers AI modelsconst result = await streamText({model: createWorkersAI({ binding: env.AI })("@cf/meta/llama-3.2-3b-instruct"),messages: await convertToModelMessages(messages),onChunk: (chunk) => {// Enhanced streaming with warning handlingconsole.log(chunk);},});The ai-gateway-provider v3.0.0 now supports AI SDK v6, enabling you to use Cloudflare AI Gateway with multiple AI providers including Anthropic, Azure, AWS Bedrock, Google Vertex, and Perplexity.
Use Cloudflare AI Gateway to add analytics, caching, and rate limiting to your AI applications:
TypeScript import { createAIGateway } from "ai-gateway-provider";// Create AI Gateway provider (v3.0.0 - enhanced v6 internals)const model = createAIGateway({gatewayUrl: "https://gateway.ai.cloudflare.com/v1/your-account-id/gateway",headers: {"Authorization": `Bearer ${env.AI_GATEWAY_TOKEN}`}})({provider: "openai",model: "gpt-4o"});The following APIs are deprecated in favor of the unified tool pattern:
Deprecated Replacement AITooltypeUse AI SDK's tool()function on serverextractClientToolSchemas()Define tools on server, no client schemas needed createToolsFromClientSchemas()Define tools on server with tool()toolsRequiringConfirmationoptionUse needsApprovalon server toolsexperimental_automaticToolResolutionUse onToolCallcallbacktoolsoption inuseAgentChatUse onToolCallfor client-side executionaddToolResult()Use addToolOutput()- Unified Tool Pattern: All tools must be defined on the server using
tool() convertToModelMessages()is async: Addawaitto all callsCoreMessageremoved: UseModelMessageinsteadgenerateObjectmode removed: RemovemodeoptionisToolUIPartbehavior changed: Now checks both static and dynamic tool parts
Update your dependencies to use the latest versions:
Terminal window npm install agents@^0.3.0 workers-ai-provider@^3.0.0 ai-gateway-provider@^3.0.0 ai@^6.0.0 @ai-sdk/react@^3.0.0 @ai-sdk/openai@^3.0.0- Migration Guide ↗ - Comprehensive migration documentation from v5 to v6
- AI SDK v6 Documentation ↗ - Official AI SDK migration guide
- AI SDK v6 Announcement ↗ - Learn about new features in v6
- AI SDK Documentation ↗ - Complete AI SDK reference
- GitHub Issues ↗ - Report bugs or request features
We'd love your feedback! We're particularly interested in feedback on:
- Migration experience - How smooth was the upgrade from v5 to v6?
- Unified tool pattern - How does the new server-defined tool pattern work for you?
- Dynamic tool approval - Does the
needsApprovalfeature meet your needs? - AI Gateway integration - How well does the new provider work with your setup?
Earlier this year, we announced the launch of the new Terraform v5 Provider. We are aware of the high number of issues reported by the Cloudflare community related to the v5 release. We have committed to releasing improvements on a 2-3 week cadence ↗ to ensure its stability and reliability, including the v5.15 release. We have also pivoted from an issue-to-issue approach to a resource-per-resource approach ↗ - we will be focusing on specific resources to not only stabilize the resource but also ensure it is migration-friendly for those migrating from v4 to v5.
Thank you for continuing to raise issues. They make our provider stronger and help us build products that reflect your needs.
This release includes bug fixes, the stabilization of even more popular resources, and more.
- ai_search: Add AI Search endpoints (6f02adb ↗)
- certificate_pack: Ensure proper Terraform resource ID handling for path parameters in API calls (081f32a ↗)
- worker_version: Support
startup_time_ms(286ab55 ↗) - zero_trust_dlp_custom_entry: Support
upload_status(7dc0fe3 ↗) - zero_trust_dlp_entry: Support
upload_status(7dc0fe3 ↗) - zero_trust_dlp_integration_entry: Support
upload_status(7dc0fe3 ↗) - zero_trust_dlp_predefined_entry: Support
upload_status(7dc0fe3 ↗) - zero_trust_gateway_policy: Support
forensic_copy(5741fd0 ↗) - zero_trust_list: Support additional types (category, location, device) (5741fd0 ↗)
- access_rules: Add validation to prevent state drift. Ideally, we'd use Semantic Equality but since that isn't an option, this will remove a foot-gun. (4457791 ↗)
- cloudflare_pages_project: Addressing drift issues (6edffcf ↗) (3db318e ↗)
- cloudflare_worker: Can be cleanly imported (4859b52 ↗)
- cloudflare_worker: Ensure clean imports (5b525bc ↗)
- list_items: Add validation for IP List items to avoid inconsistent state (b6733dc ↗)
- zero_trust_access_application: Remove all conditions from sweeper (3197f1a ↗)
- spectrum_application: Map missing fields during spectrum resource import (#6495 ↗) (ddb4e72 ↗)
We suggest waiting to migrate to v5 while we work on stabilization. This helps with avoiding any blocking issues while the Terraform resources are actively being stabilized ↗. We will be releasing a new migration tool in March 2026 to help support v4 to v5 transitions for our most popular resources.
TanStack Start ↗ apps can now prerender routes to static HTML at build time with access to build time environment variables and bindings, and serve them as static assets. To enable prerendering, configure the
prerenderoption of the TanStack Start plugin in your Vite config:vite.config.ts import { defineConfig } from "vite";import { cloudflare } from "@cloudflare/vite-plugin";import { tanstackStart } from "@tanstack/react-start/plugin/vite";export default defineConfig({plugins: [cloudflare({ viteEnvironment: { name: "ssr" } }),tanstackStart({prerender: {enabled: true,},}),],});This feature requires
@tanstack/react-startv1.138.0 or later. See the TanStack Start framework guide for more details.
R2 Data Catalog now supports automatic snapshot expiration for Apache Iceberg tables.
In Apache Iceberg, a snapshot is metadata that represents the state of a table at a given point in time. Every mutation creates a new snapshot which enable powerful features like time travel queries and rollback capabilities but will accumulate over time.
Without regular cleanup, these accumulated snapshots can lead to:
- Metadata overhead
- Slower table operations
- Increased storage costs.
Snapshot expiration in R2 Data Catalog automatically removes old table snapshots based on your configured retention policy, improving performance and storage costs.
Terminal window # Enable catalog-level snapshot expiration# Expire snapshots older than 7 days, always retain at least 10 recent snapshotsnpx wrangler r2 bucket catalog snapshot-expiration enable my-bucket \--older-than-days 7 \--retain-last 10Snapshot expiration uses two parameters to determine which snapshots to remove:
--older-than-days: age threshold in days--retain-last: minimum snapshot count to retain
Both conditions must be met before a snapshot is expired, ensuring you always retain recent snapshots even if they exceed the age threshold.
This feature complements automatic compaction, which optimizes query performance by combining small data files into larger ones. Together, these automatic maintenance operations keep your Iceberg tables performant and cost-efficient without manual intervention.
To learn more about snapshot expiration and how to configure it, visit our table maintenance documentation or see how to manage catalogs.
Workers for Platforms lets you build multi-tenant platforms on Cloudflare Workers, allowing your end users to deploy and run their own code on your platform. It's designed for anyone building an AI vibe coding platform, e-commerce platform, website builder, or any product that needs to securely execute user-generated code at scale.
Previously, setting up Workers for Platforms required using the API. Now, the Workers for Platforms UI supports namespace creation, dispatch worker templates, and tag management, making it easier for Workers for Platforms customers to build and manage multi-tenant platforms directly from the Cloudflare dashboard.
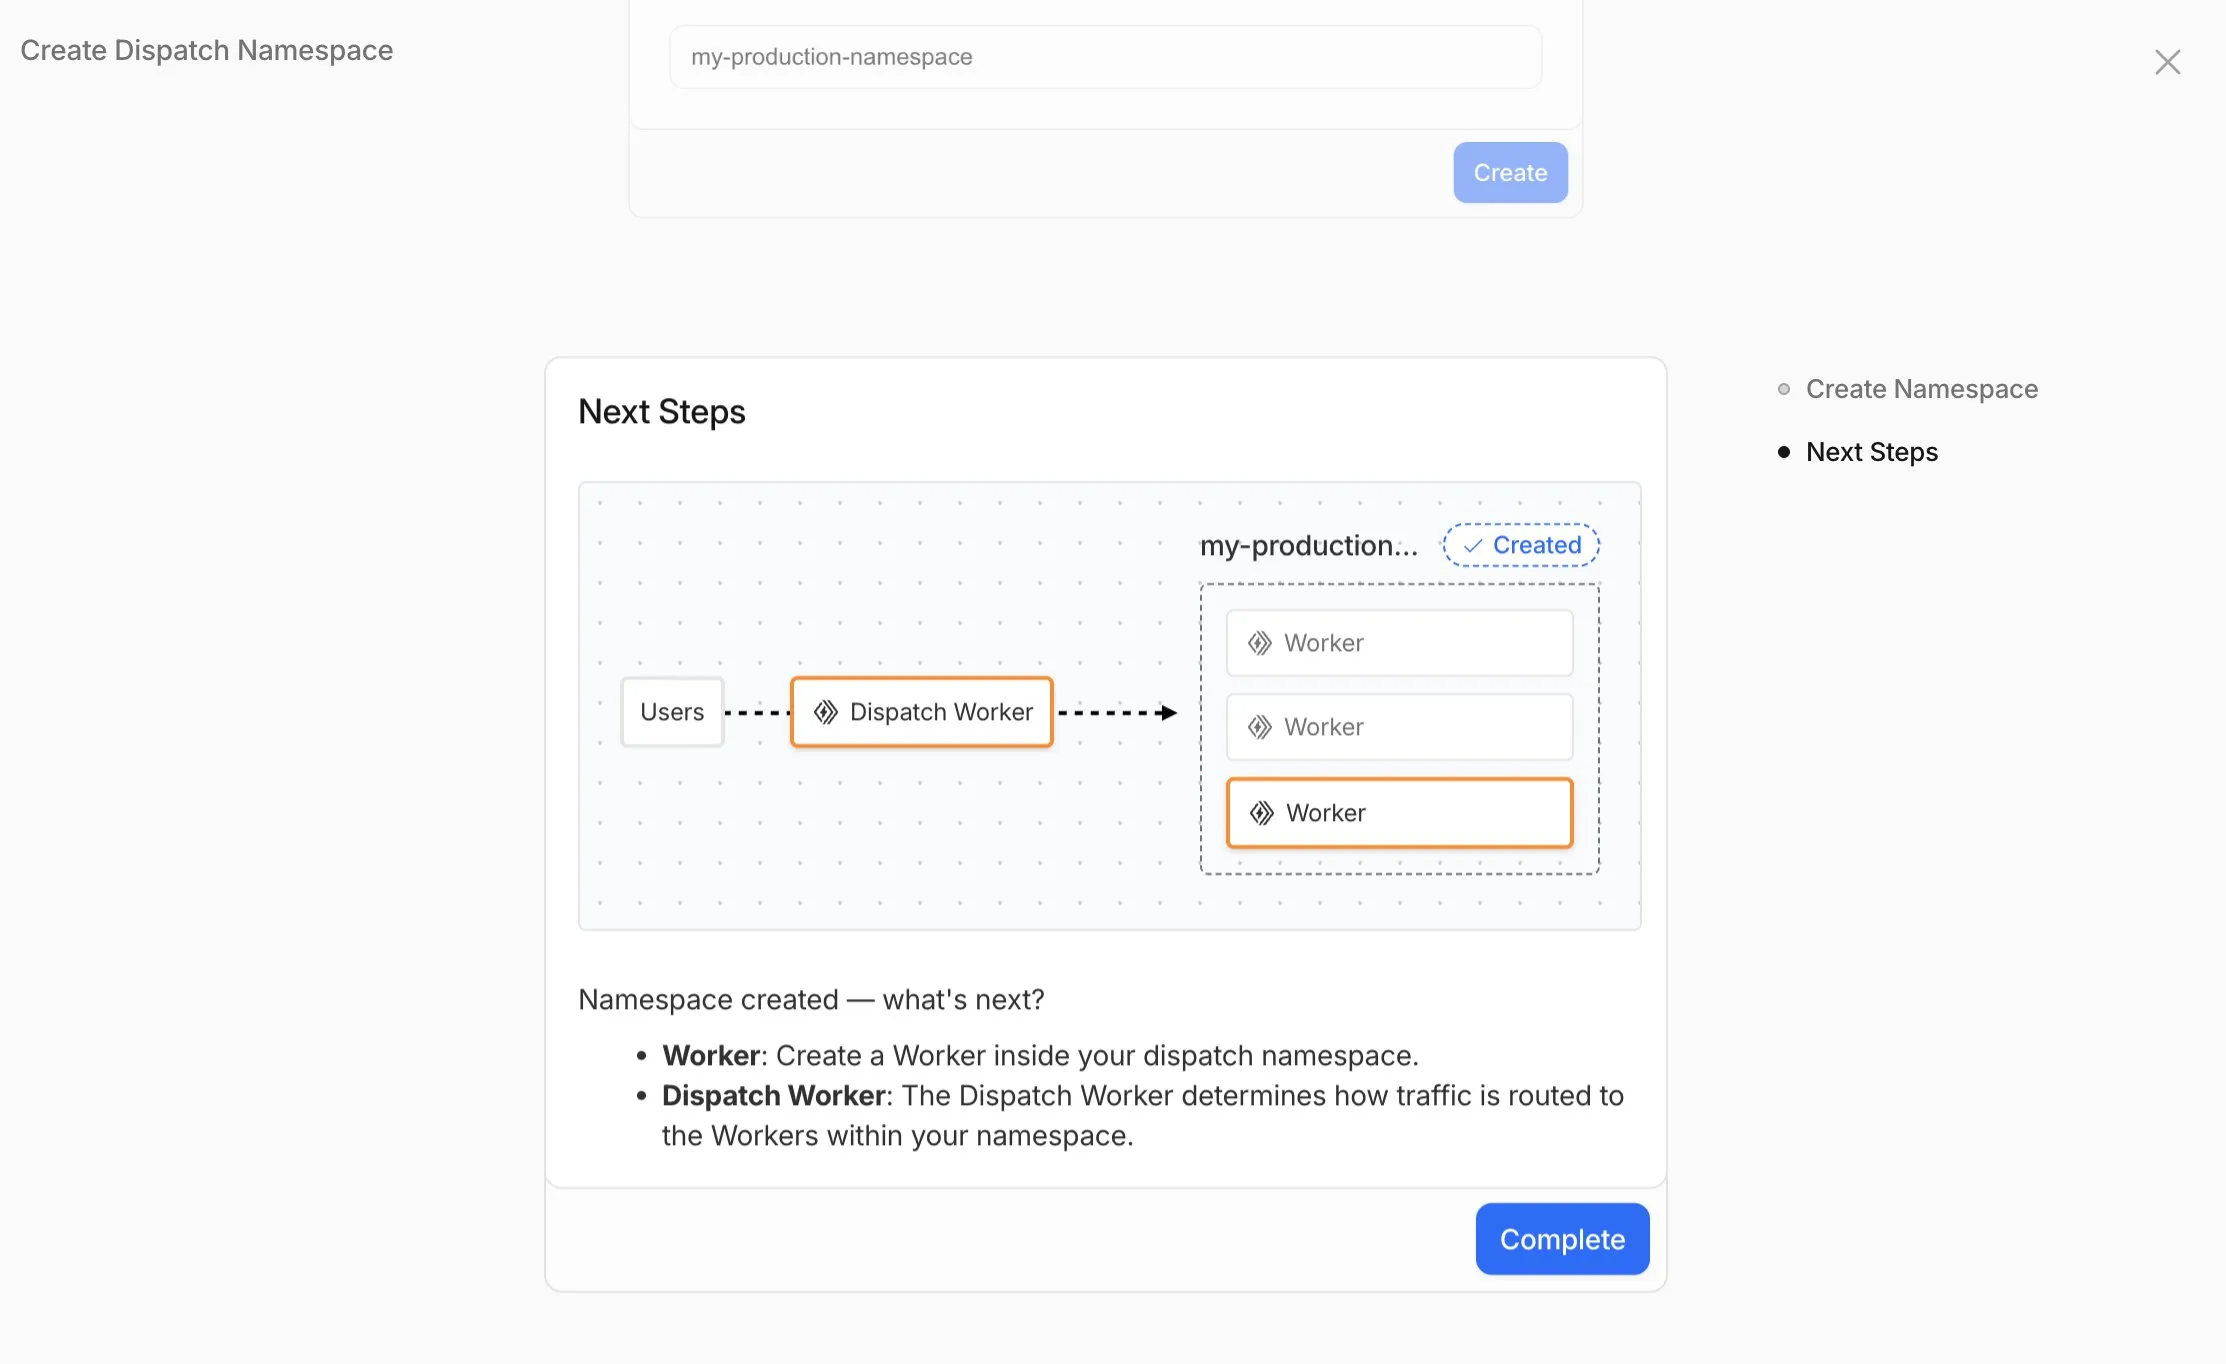
- Namespace Management: You can now create and configure dispatch namespaces directly within the dashboard to start a new platform setup.
- Dispatch Worker Templates: New Dispatch Worker templates allow you to quickly define how traffic is routed to individual Workers within your namespace. Refer to the Dynamic Dispatch documentation for more examples.
- Tag Management: You can now set and update tags on User Workers, making it easier to group and manage your Workers.
- Binding Visibility: Bindings attached to User Workers are now visible directly within the User Worker view.
- Deploy Vibe Coding Platform in one-click: Deploy a reference implementation of an AI vibe coding platform directly from the dashboard. Powered by the Cloudflare's VibeSDK ↗, this starter kit integrates with Workers for Platforms to handle the deployment of AI-generated projects at scale.
To get started, go to Workers for Platforms under Compute & AI in the Cloudflare dashboard ↗.
We've published build image policies for Workers Builds and Cloudflare Pages, which establish:
- Minor version updates: We typically update preinstalled software to the latest available minor version without notice. For tools that don't follow semantic versioning (e.g., Bun or Hugo), we provide 3 months’ notice.
- Major version updates: Before preinstalled software reaches end-of-life, we update to the next stable LTS version with 3 months’ notice.
- Build image version deprecation (Pages only): We provide 6 months’ notice before deprecation. Projects on v1 or v2 will be automatically moved to v3 on their specified deprecation dates.
To prepare for updates, monitor the Cloudflare Changelog ↗, dashboard notifications, and email. You can also override default versions to maintain specific versions.
Wrangler now includes a new
wrangler auth tokencommand that retrieves your current authentication token or credentials for use with other tools and scripts.Terminal window wrangler auth tokenThe command returns whichever authentication method is currently configured, in priority order: API token from
CLOUDFLARE_API_TOKEN, or OAuth token fromwrangler login(automatically refreshed if expired).Use the
--jsonflag to get structured output including the token type:Terminal window wrangler auth token --jsonThe JSON output includes the authentication type:
JSONC // API token{ "type": "api_token", "token": "..." }// OAuth token{ "type": "oauth", "token": "..." }// API key/email (only available with --json){ "type": "api_key", "key": "...", "email": "..." }API key/email credentials from
CLOUDFLARE_API_KEYandCLOUDFLARE_EMAILrequire the--jsonflag since this method uses two values instead of a single token.
The
@cloudflare/vitest-pool-workerspackage now supports thectx.exportsAPI, allowing you to access your Worker's top-level exports during tests.You can access
ctx.exportsin unit tests by callingcreateExecutionContext():TypeScript import { createExecutionContext } from "cloudflare:test";import { it, expect } from "vitest";it("can access ctx.exports", async () => {const ctx = createExecutionContext();const result = await ctx.exports.MyEntryPoint.myMethod();expect(result).toBe("expected value");});Alternatively, you can import
exportsdirectly fromcloudflare:workers:TypeScript import { exports } from "cloudflare:workers";import { it, expect } from "vitest";it("can access imported exports", async () => {const result = await exports.MyEntryPoint.myMethod();expect(result).toBe("expected value");});See the context-exports fixture ↗ for a complete example.
Wrangler now supports automatic configuration for popular web frameworks in experimental mode, making it even easier to deploy to Cloudflare Workers.
Previously, if you wanted to deploy an application using a popular web framework like Next.js or Astro, you had to follow tutorials to set up your application for deployment to Cloudflare Workers. This usually involved creating a Wrangler file, installing adapters, or changing configuration options.
Now
wrangler deploydoes this for you. Starting with Wrangler 4.55, you can usenpx wrangler deploy --x-autoconfigin the directory of any web application using one of the supported frameworks. Wrangler will then proceed to configure and deploy it to your Cloudflare account.You can also configure your application without deploying it by using the new
npx wrangler setupcommand. This enables you to easily review what changes we are making so your application is ready for Cloudflare Workers.The following application frameworks are supported starting today:
- Next.js
- Astro
- Nuxt
- TanStack Start
- SolidStart
- React Router
- SvelteKit
- Docusaurus
- Qwik
- Analog
Automatic configuration also supports static sites by detecting the assets directory and build command. From a single index.html file to the output of a generator like Jekyll or Hugo, you can just run
npx wrangler deploy --x-autoconfigto upload to Cloudflare.We're really excited to bring you automatic configuration so you can do more with Workers. Please let us know if you run into challenges using this experimentally. We’ve opened a GitHub discussion ↗ and would love to hear your feedback.