
We've updated the Workers AI pricing to include the latest models and how model usage maps to Neurons.
- Each model's core input format(s) (tokens, audio seconds, images, etc) now include mappings to Neurons, making it easier to understand how your included Neuron volume is consumed and how you are charged at scale
- Per-model pricing, instead of the previous bucket approach, allows us to be more flexible on how models are charged based on their size, performance and capabilities. As we optimize each model, we can then pass on savings for that model.
- You will still only pay for what you consume: Workers AI inference is serverless, and not billed by the hour.
Going forward, models will be launched with their associated Neuron costs, and we'll be updating the Workers AI dashboard and API to reflect consumption in both raw units and Neurons. Visit the Workers AI pricing page to learn more about Workers AI pricing.
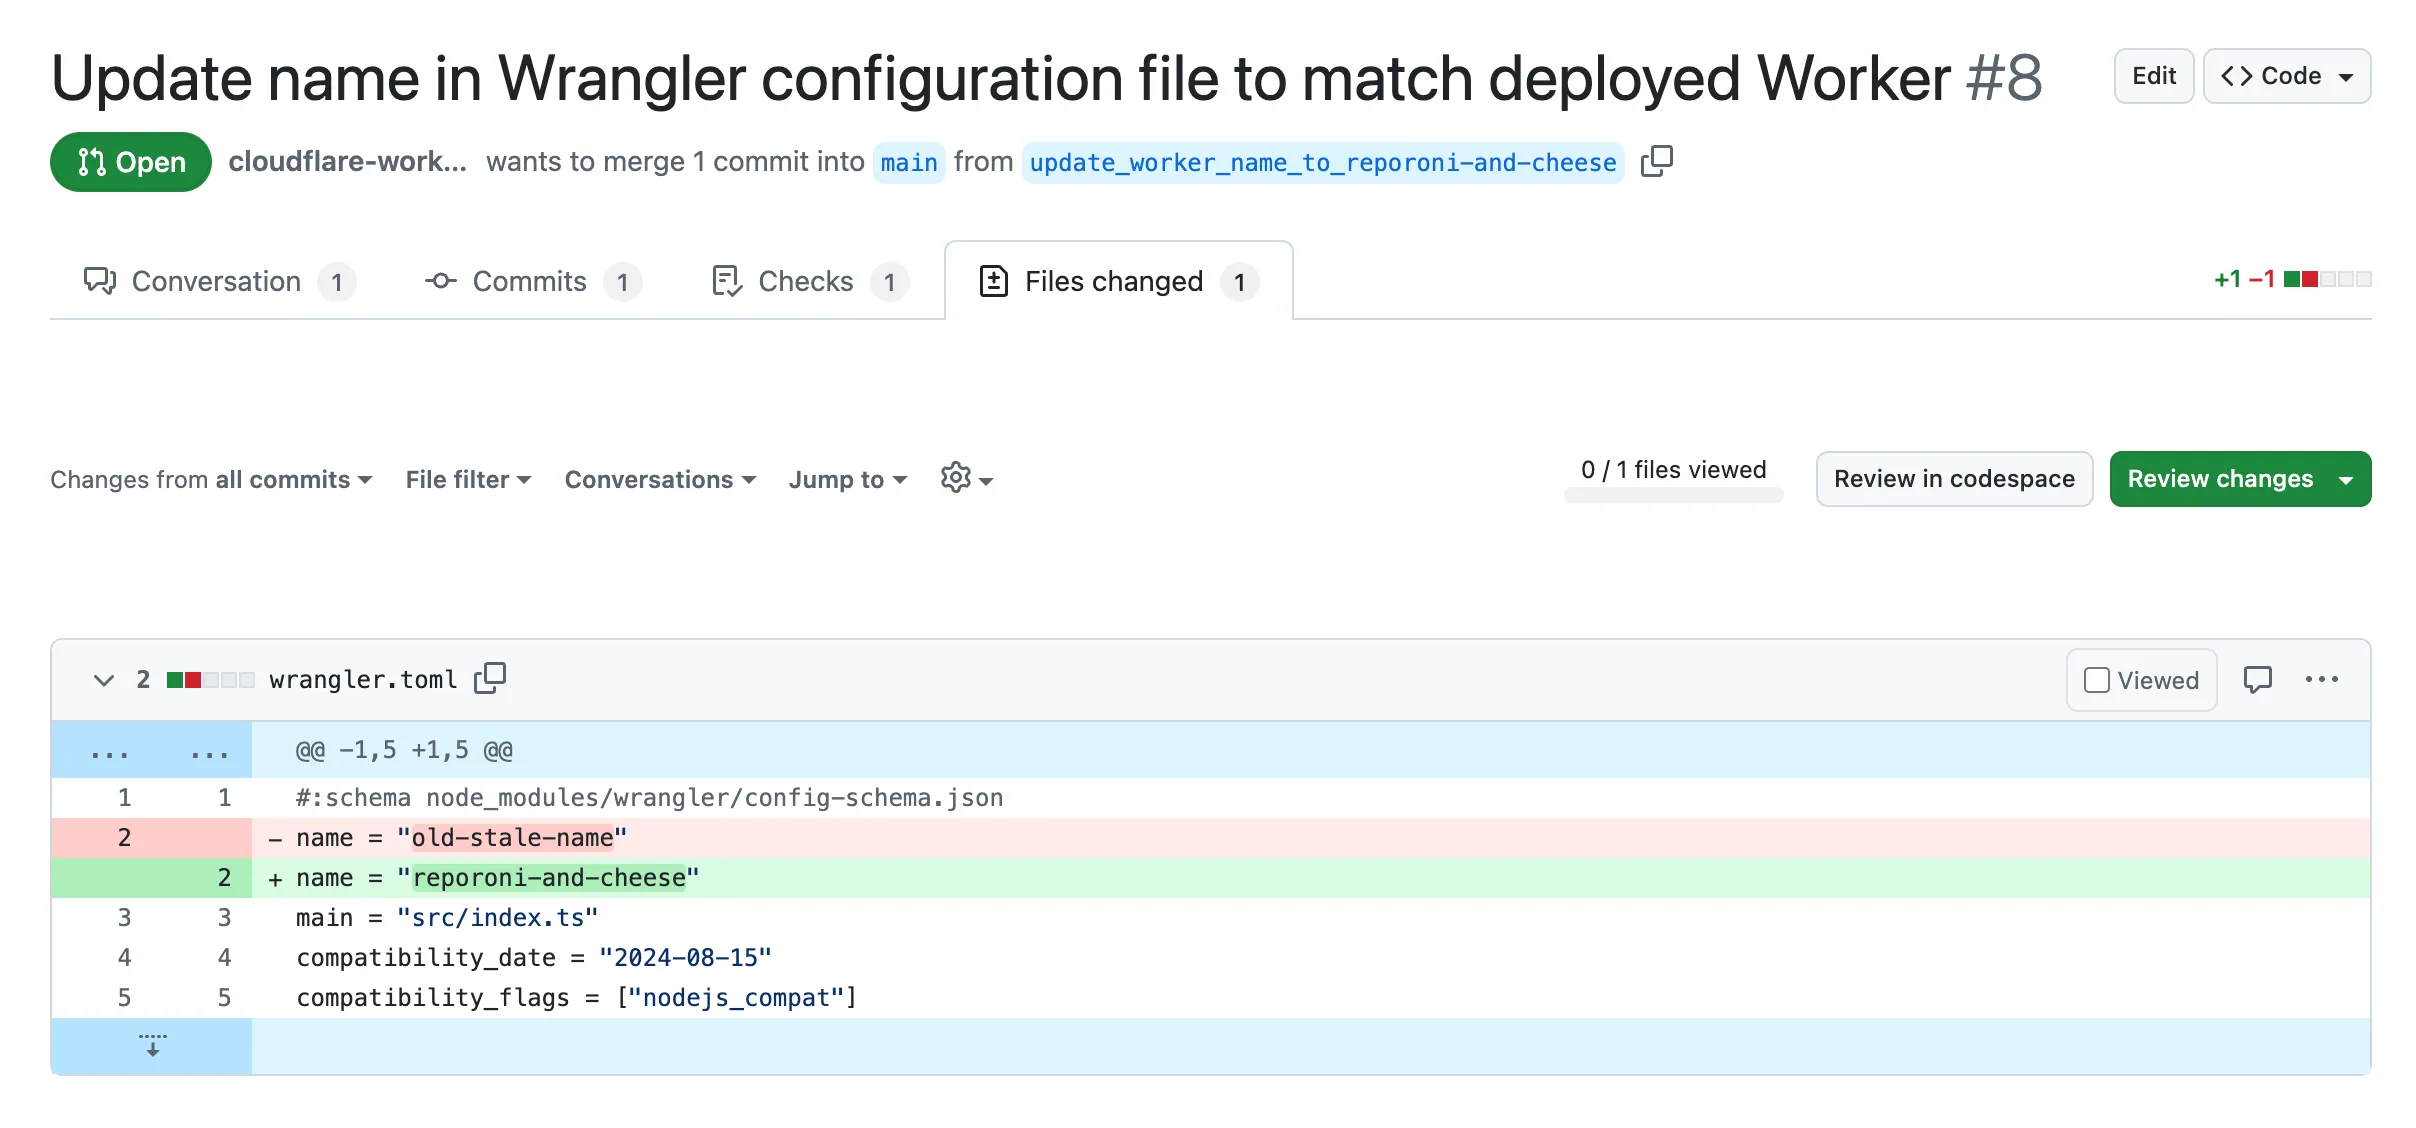
Small misconfigurations shouldn’t break your deployments. Cloudflare is introducing automatic error detection and fixes in Workers Builds, identifying common issues in your wrangler.toml or wrangler.jsonc and proactively offering fixes, so you spend less time debugging and more time shipping.
Here's how it works:
- Before running your build, Cloudflare checks your Worker's Wrangler configuration file (wrangler.toml or wrangler.jsonc) for common errors.
- Once you submit a build, if Cloudflare finds an error it can fix, it will submit a pull request to your repository that fixes it.
- Once you merge this pull request, Cloudflare will run another build.
We're starting with fixing name mismatches between your Wrangler file and the Cloudflare dashboard, a top cause of build failures.
This is just the beginning, we want your feedback on what other errors we should catch and fix next. Let us know in the Cloudflare Developers Discord, #workers-and-pages-feature-suggestions ↗.
Ruleset Rule ID Legacy Rule ID Description Previous Action New Action Comments Cloudflare Managed Ruleset 100715 FortiOS - Auth Bypass - CVE:CVE-2024-55591 Log Block This is a New Detection Cloudflare Managed Ruleset 100716 Ivanti - Auth Bypass - CVE:CVE-2021-44529 Log Block This is a New Detection Cloudflare Managed Ruleset 100717 SimpleHelp - Auth Bypass - CVE:CVE-2024-57727 Log Block This is a New Detection Cloudflare Managed Ruleset 100718 SonicWall SSLVPN - Auth Bypass - CVE:CVE-2024-53704 Log Block This is a New Detection Cloudflare Managed Ruleset 100719 Yeti Platform - Auth Bypass - CVE:CVE-2024-46507 Log Block This is a New Detection
You can now customize a queue's message retention period, from a minimum of 60 seconds to a maximum of 14 days. Previously, it was fixed to the default of 4 days.

You can customize the retention period on the settings page for your queue, or using Wrangler:
Update message retention period $ wrangler queues update my-queue --message-retention-period-secs 600This feature is available on all new and existing queues. If you haven't used Cloudflare Queues before, get started with the Cloudflare Queues guide.
We've added an example prompt to help you get started with building AI agents and applications on Cloudflare Workers, including Workflows, Durable Objects, and Workers KV.
You can use this prompt with your favorite AI model, including Claude 3.5 Sonnet, OpenAI's o3-mini, Gemini 2.0 Flash, or Llama 3.3 on Workers AI. Models with large context windows will allow you to paste the prompt directly: provide your own prompt within the
<user_prompt></user_prompt>tags.Terminal window {paste_prompt_here}<user_prompt>user: Build an AI agent using Cloudflare Workflows. The Workflow should run when a new GitHub issue is opened on a specific project with the label 'help' or 'bug', and attempt to help the user troubleshoot the issue by calling the OpenAI API with the issue title and description, and a clear, structured prompt that asks the model to suggest 1-3 possible solutions to the issue. Any code snippets should be formatted in Markdown code blocks. Documentation and sources should be referenced at the bottom of the response. The agent should then post the response to the GitHub issue. The agent should run as the provided GitHub bot account.</user_prompt>This prompt is still experimental, but we encourage you to try it out and provide feedback ↗.
You can now locally configure your Magic WAN Connector to work in a static IP configuration.
This local method does not require having access to a DHCP Internet connection. However, it does require being comfortable with using tools to access the serial port on Magic WAN Connector as well as using a serial terminal client to access the Connector's environment.
For more details, refer to WAN with a static IP address.
Super Slurper now transfers data from cloud object storage providers like AWS S3 and Google Cloud Storage to Cloudflare R2 up to 5x faster than it did before.
We moved from a centralized service to a distributed system built on the Cloudflare Developer Platform — using Cloudflare Workers, Durable Objects, and Queues — to both improve performance and increase system concurrency capabilities (and we'll share more details about how we did it soon!)
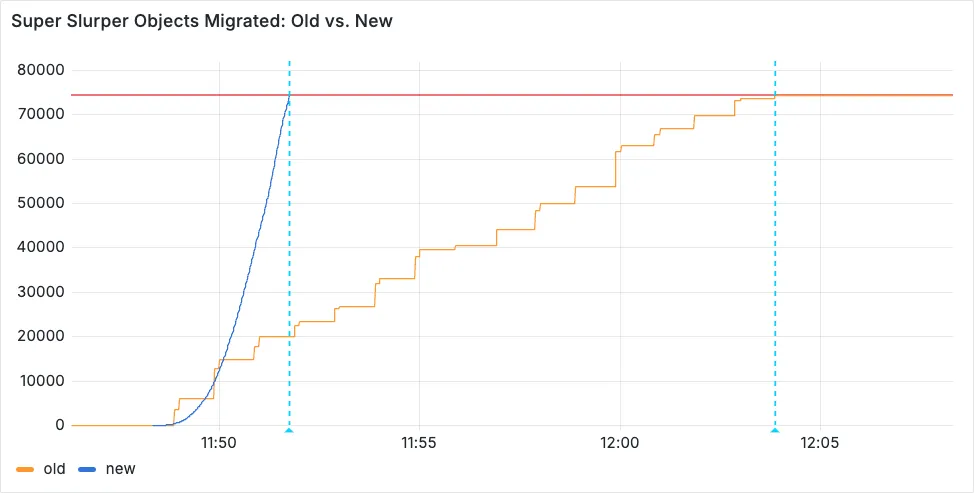
Time to copy 75,000 objects from AWS S3 to R2 decreased from 15 minutes 30 seconds (old) to 3 minutes 25 seconds (after performance improvements)
For more information on Super Slurper and how to migrate data from existing object storage to R2, refer to our documentation.
Cloudflare has supported both RSA and ECDSA certificates across our platform for a number of years. Both certificates offer the same security, but ECDSA is more performant due to a smaller key size. However, RSA is more widely adopted and ensures compatibility with legacy clients. Instead of choosing between them, you may want both – that way, ECDSA is used when clients support it, but RSA is available if not.
Now, you can upload both an RSA and ECDSA certificate on a custom hostname via the API.
curl -X POST https://api.cloudflare.com/client/v4/zones/$ZONE_ID/custom_hostnames \-H 'Content-Type: application/json' \-H "X-Auth-Email: $CLOUDFLARE_EMAIL" \-H "X-Auth-Key: $CLOUDFLARE_API_KEY" \-d '{"hostname": "hostname","ssl": {"custom_cert_bundle": [{"custom_certificate": "RSA Cert","custom_key": "RSA Key"},{"custom_certificate": "ECDSA Cert","custom_key": "ECDSA Key"}],"bundle_method": "force","wildcard": false,"settings": {"min_tls_version": "1.0"}}}’You can also:
-
Upload an RSA or ECDSA certificate to a custom hostname with an existing ECDSA or RSA certificate, respectively.
-
Replace the RSA or ECDSA certificate with a certificate of its same type.
-
Delete the RSA or ECDSA certificate (if the custom hostname has both an RSA and ECDSA uploaded).
This feature is available for Business and Enterprise customers who have purchased custom certificates.
-
Previously, all viewers watched "the live edge," or the latest content of the broadcast, synchronously. If a viewer paused for more than a few seconds, the player would automatically "catch up" when playback started again. Seeking through the broadcast was only available once the recording was available after it concluded.
Starting today, customers can make a small adjustment to the player embed or manifest URL to enable the DVR experience for their viewers. By offering this feature as an opt-in adjustment, our customers are empowered to pick the best experiences for their applications.
When building a player embed code or manifest URL, just add
dvrEnabled=trueas a query parameter. There are some things to be aware of when using this option. For more information, refer to DVR for Live.
You can now configure HTTP/2 multiplexing settings for origin connections on Enterprise plans. This feature allows you to optimize how Cloudflare manages concurrent requests over HTTP/2 connections to your origin servers, improving cache efficiency and reducing connection overhead.
HTTP/2 multiplexing allows multiple requests to be sent over a single TCP connection. With this configuration option, you can:
- Control concurrent streams: Adjust the maximum number of concurrent streams per connection.
- Optimize connection reuse: Fine-tune connection pooling behavior for your origin infrastructure.
- Reduce connection overhead: Minimize the number of TCP connections required between Cloudflare and your origin.
- Improve cache performance: Better connection management can enhance cache fetch efficiency.
- Customizable performance: Tailor multiplexing settings to your origin's capabilities.
- Reduced latency: Fewer connection handshakes improve response times.
- Lower origin load: More efficient connection usage reduces server resource consumption.
- Enhanced scalability: Better connection management supports higher traffic volumes.
Enterprise customers can configure HTTP/2 multiplexing settings in the Cloudflare Dashboard ↗ or through our API.
We have upgraded and streamlined Cloudflare Rules limits across all plans, simplifying rule management and improving scalability for everyone.
New limits by product:
- Bulk Redirects
- Free: 20 → 10,000 URL redirects across lists
- Pro: 500 → 25,000 URL redirects across lists
- Business: 500 → 50,000 URL redirects across lists
- Enterprise: 10,000 → 1,000,000 URL redirects across lists
- Cloud Connector
- Free: 5 → 10 connectors
- Enterprise: 125 → 300 connectors
- Custom Errors
- Pro: 5 → 25 error assets and rules
- Business: 20 → 50 error assets and rules
- Enterprise: 50 → 300 error assets and rules
- Snippets
- Pro: 10 → 25 code snippets and rules
- Business: 25 → 50 code snippets and rules
- Enterprise: 50 → 300 code snippets and rules
- Cache Rules, Configuration Rules, Compression Rules, Origin Rules, Single Redirects, and Transform Rules
- Enterprise: 125 → 300 rules
- Bulk Redirects
We're introducing Custom Errors (beta), which builds on our existing Custom Error Responses feature with new asset storage capabilities.
This update allows you to store externally hosted error pages on Cloudflare and reference them in custom error rules, eliminating the need to supply inline content.
This brings the following new capabilities:
- Custom error assets – Fetch and store external error pages at the edge for use in error responses.
- Account-Level custom errors – Define error handling rules and assets at the account level for consistency across multiple zones. Zone-level rules take precedence over account-level ones, and assets are not shared between levels.
You can use Cloudflare API to upload your existing assets for use with Custom Errors:
Terminal window curl "https://api.cloudflare.com/client/v4/zones/{zone_id}/custom_pages/assets" \--header "Authorization: Bearer <API_TOKEN>" \--header 'Content-Type: application/json' \--data '{"name": "maintenance","description": "Maintenance template page","url": "https://example.com/"}'You can then reference the stored asset in a Custom Error rule:
Terminal window curl --request PUT \"https://api.cloudflare.com/client/v4/zones/{zone_id}/rulesets/phases/http_custom_errors/entrypoint" \--header "Authorization: Bearer <API_TOKEN>" \--header 'Content-Type: application/json' \--data '{"rules": [{"action": "serve_error","action_parameters": {"asset_name": "maintenance","content_type": "text/html","status_code": 503},"enabled": true,"expression": "http.request.uri.path contains \"error\""}]}'
Ruleset Rule ID Legacy Rule ID Description Previous Action New Action Comments Cloudflare Managed Ruleset 100708 Aviatrix Network - Remote Code Execution - CVE:CVE-2024-50603 Log Block This is a New Detection Cloudflare Managed Ruleset 100709 Next.js - Remote Code Execution - CVE:CVE-2024-46982 Log Disabled This is a New Detection Cloudflare Managed Ruleset 100710 Progress Software WhatsUp Gold - Directory Traversal - CVE:CVE-2024-12105
Log Block This is a New Detection Cloudflare Managed Ruleset 100711 WordPress - Remote Code Execution - CVE:CVE-2024-56064 Log Block This is a New Detection Cloudflare Managed Ruleset 100712 WordPress - Remote Code Execution - CVE:CVE-2024-9047 Log Block This is a New Detection Cloudflare Managed Ruleset 100713 FortiOS - Auth Bypass - CVE:CVE-2022-40684 Log Block This is a New Detection
You can now investigate links in emails with Cloudflare Security Center to generate a report containing a myriad of technical details: a phishing scan, SSL certificate data, HTTP request and response data, page performance data, DNS records, what technologies and libraries the page uses, and more.
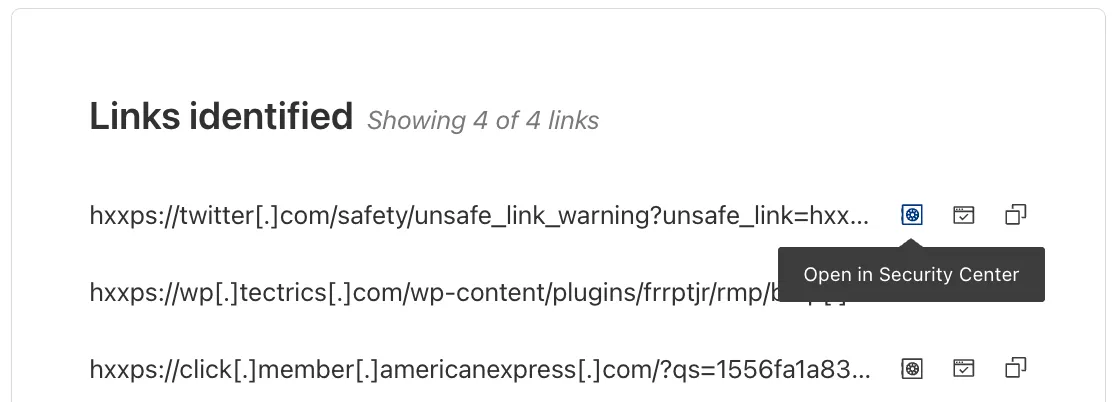
From Investigation, go to View details, and look for the Links identified section. Select Open in Security Center next to each link. Open in Security Center allows your team to quickly generate a detailed report about the link with no risk to the analyst or your environment.
For more details, refer to Open links.
This feature is available across these Email security packages:
- Advantage
- Enterprise
- Enterprise + PhishGuard
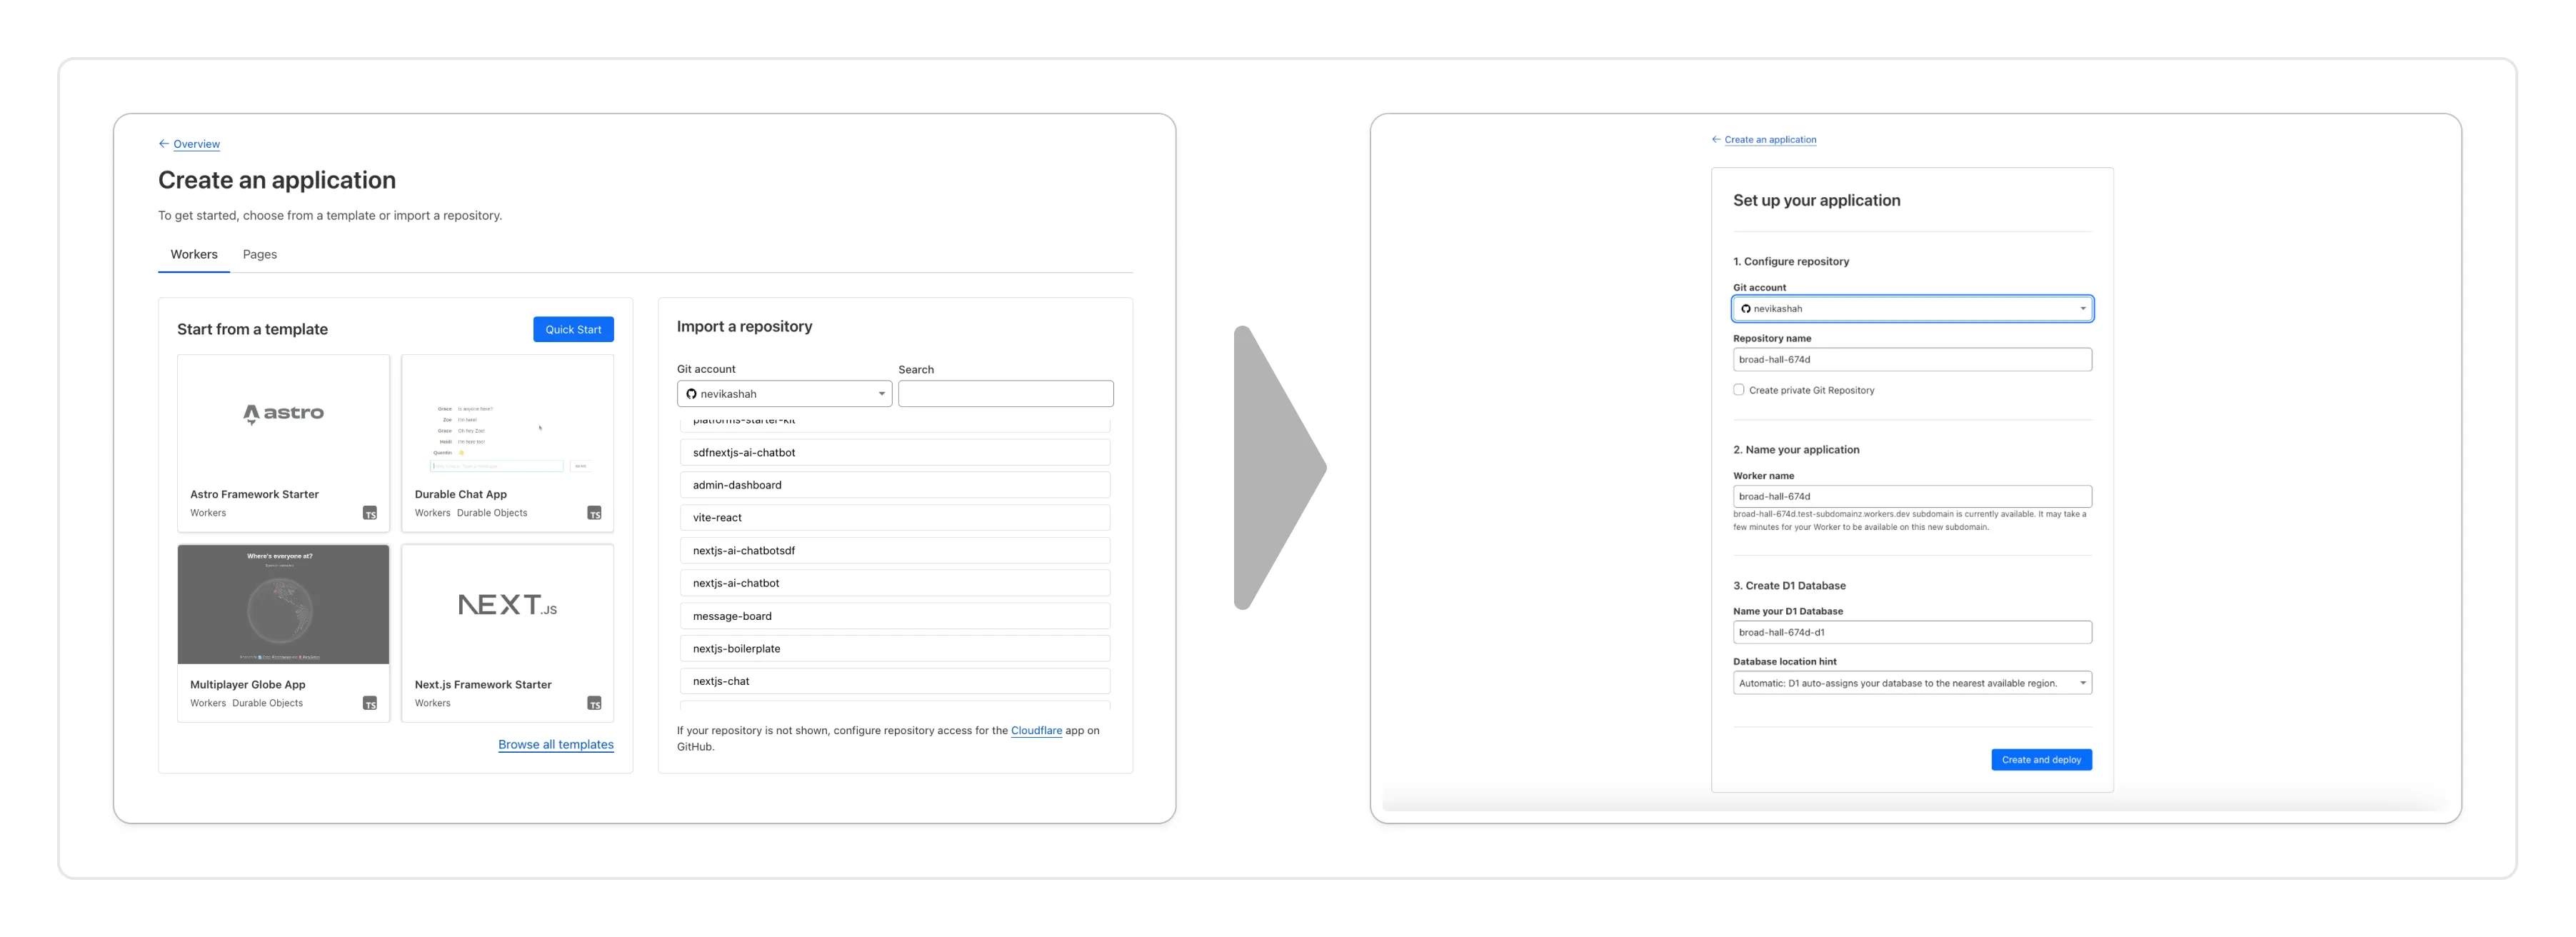
You can now create a Worker by:
- Importing a Git repository: Choose an existing Git repo on your GitHub/GitLab account and set up Workers Builds to deploy your Worker.
- Deploying a template with Git: Choose from a brand new selection of production ready examples ↗ to help you get started with popular frameworks like Astro ↗, Remix ↗ and Next ↗ or build stateful applications with Cloudflare resources like D1 databases, Workers AI or Durable Objects! When you're ready to deploy, Cloudflare will set up your project by cloning the template to your GitHub/GitLab account, provisioning any required resources and deploying your Worker.
With every push to your chosen branch, Cloudflare will automatically build and deploy your Worker.
To get started, go to the Workers dashboard ↗.
These new features are available today in the Cloudflare dashboard to a subset of Cloudflare customers, and will be coming to all customers in the next few weeks. Don't see it in your dashboard, but want early access? Add your Cloudflare Account ID to this form ↗.
AI Gateway adds additional ways to handle requests - Request Timeouts and Request Retries, making it easier to keep your applications responsive and reliable.
Timeouts and retries can be used on both the Universal Endpoint or directly to a supported provider.
Request timeouts A request timeout allows you to trigger fallbacks or a retry if a provider takes too long to respond.
To set a request timeout directly to a provider, add a
cf-aig-request-timeoutheader.Provider-specific endpoint example curl https://gateway.ai.cloudflare.com/v1/{account_id}/{gateway_id}/workers-ai/@cf/meta/llama-3.1-8b-instruct \--header 'Authorization: Bearer {cf_api_token}' \--header 'Content-Type: application/json' \--header 'cf-aig-request-timeout: 5000'--data '{"prompt": "What is Cloudflare?"}'Request retries A request retry automatically retries failed requests, so you can recover from temporary issues without intervening.
To set up request retries directly to a provider, add the following headers:
- cf-aig-max-attempts (number)
- cf-aig-retry-delay (number)
- cf-aig-backoff ("constant" | "linear" | "exponential)
AI Gateway has added three new providers: Cartesia, Cerebras, and ElevenLabs, giving you more even more options for providers you can use through AI Gateway. Here's a brief overview of each:
- Cartesia provides text-to-speech models that produce natural-sounding speech with low latency.
- Cerebras delivers low-latency AI inference to Meta's Llama 3.1 8B and Llama 3.3 70B models.
- ElevenLabs offers text-to-speech models with human-like voices in 32 languages.
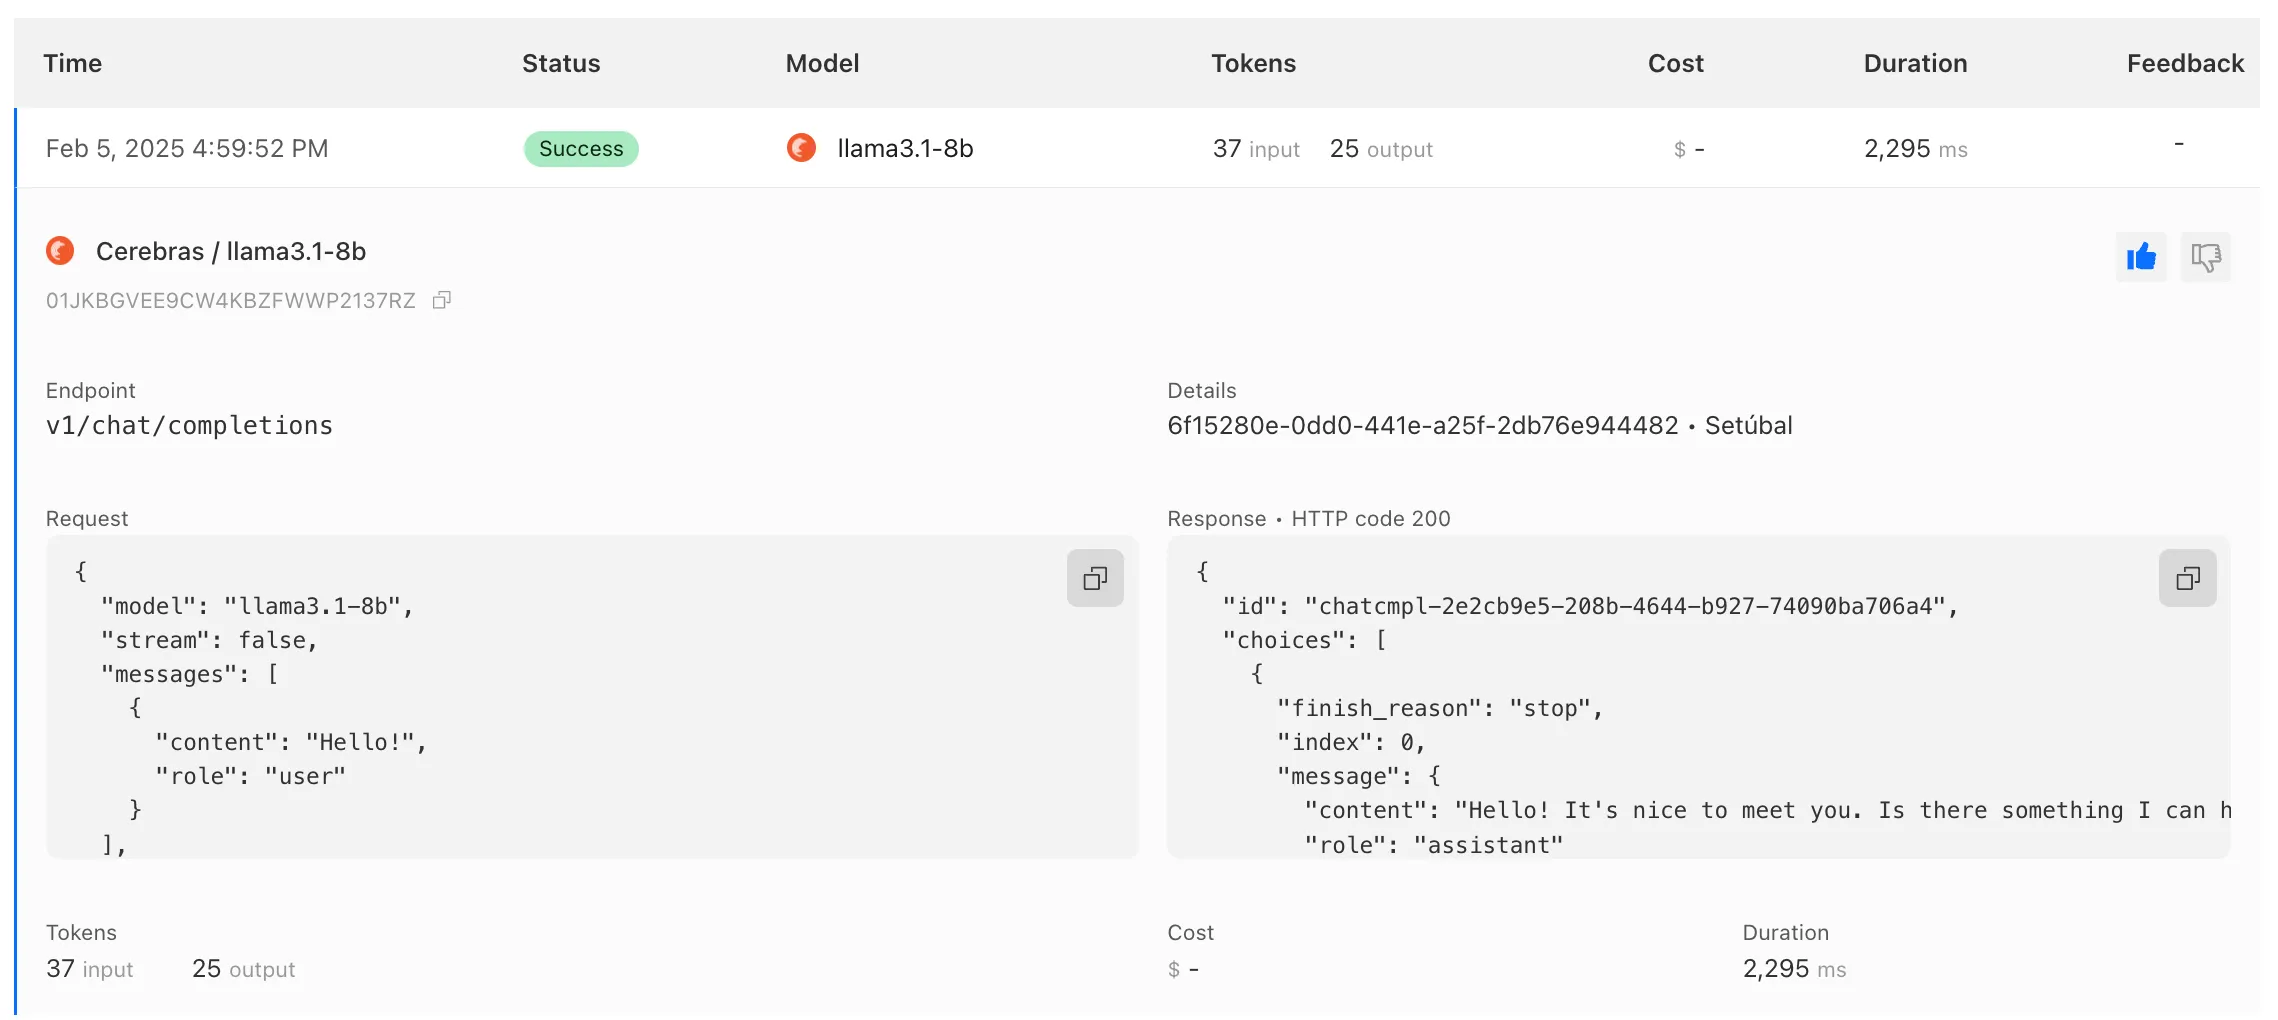
To get started with AI Gateway, just update the base URL. Here's how you can send a request to Cerebras using cURL:
Example fetch request curl -X POST https://gateway.ai.cloudflare.com/v1/ACCOUNT_TAG/GATEWAY/cerebras/chat/completions \--header 'content-type: application/json' \--header 'Authorization: Bearer CEREBRAS_TOKEN' \--data '{"model": "llama-3.3-70b","messages": [{"role": "user","content": "What is Cloudflare?"}]}'
You can now implement our child safety tooling, the CSAM Scanning Tool, more easily. Instead of requiring external reporting credentials, you only need a verified email address for notifications to onboard. This change makes the tool more accessible to a wider range of customers.
How It Works
When enabled, the tool automatically hashes images for enabled websites as they enter the Cloudflare cache ↗. These hashes are then checked against a database of known abusive images.
- Potential match detected?
- The content URL is blocked, and
- Cloudflare will notify you about the found matches via the provided email address.
Updated Service-Specific Terms
We have also made updates to our Service-Specific Terms ↗ to reflect these changes.
- Potential match detected?
Radar has expanded its AI insights with new API endpoints for Internet services rankings, robots.txt analysis, and AI inference data.
Radar now provides rankings for Internet services, including Generative AI platforms, based on anonymized 1.1.1.1 resolver data. Previously limited to the annual Year in Review, these insights are now available daily via the API, through the following endpoints:
/ranking/internet_services/topshow service popularity at a specific date./ranking/internet_services/timeseries_groupstrack ranking trends over time.
Radar now analyzes robots.txt files from the top 10,000 domains, identifying AI bot access rules. AI-focused user agents from ai.robots.txt ↗ are categorized as:
- Fully allowed/disallowed if directives apply to all paths (
*). - Partially allowed/disallowed if restrictions apply to specific paths.
These insights are now available weekly via the API, through the following endpoints:
/robots_txt/top/user_agents/directiveto get the top AI user agents by directive./robots_txt/top/domain_categoriesto get the top domain categories by robots.txt files.
Radar now provides insights into public AI inference models from Workers AI, tracking usage trends across models and tasks. These insights are now available via the API, through the following endpoints:
/ai/inference/summary/{dimension}to view aggregatedmodelandtaskpopularity./ai/inference/timeseries_groups/{dimension}to track changes over time formodelortask.
Learn more about the new Radar AI insights in our blog post ↗.
Added new records to the leaked credentials database from a third-party database.
Gateway HTTP policies can now block files that are password-protected, compressed, or otherwise unscannable.
These unscannable files are now matched with the Download and Upload File Types traffic selectors for HTTP policies:
- Password-protected Microsoft Office document
- Password-protected PDF
- Password-protected ZIP archive
- Unscannable ZIP archive
To get started inspecting and modifying behavior based on these and other rules, refer to HTTP filtering.
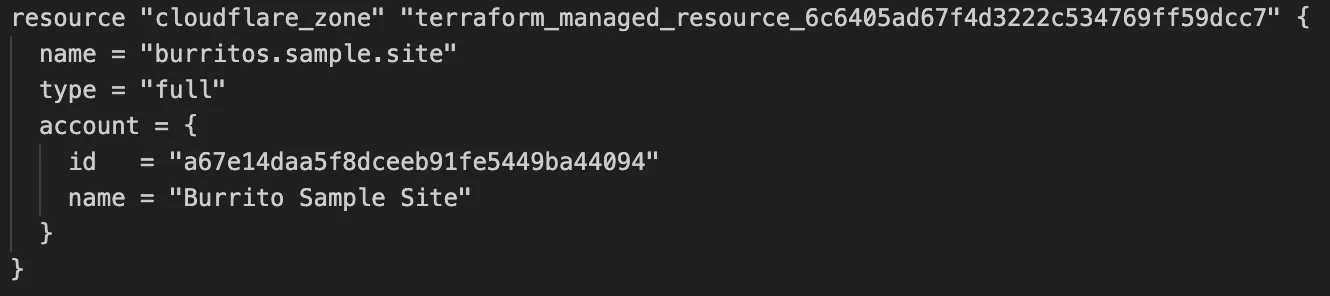
Cloudflare's v5 Terraform Provider is now generally available. With this release, Terraform resources are now automatically generated based on OpenAPI Schemas. This change brings alignment across our SDKs, API documentation, and now Terraform Provider. The new provider boosts coverage by increasing support for API properties to 100%, adding 25% more resources, and more than 200 additional data sources. Going forward, this will also reduce the barriers to bringing more resources into Terraform across the broader Cloudflare API. This is a small, but important step to making more of our platform manageable through GitOps, making it easier for you to manage Cloudflare just like you do your other infrastructure.
The Cloudflare Terraform Provider v5 is a ground-up rewrite of the provider and introduces breaking changes for some resource types. Please refer to the upgrade guide ↗ for best practices, or the blog post on automatically generating Cloudflare's Terraform Provider ↗ for more information about the approach.
For more info
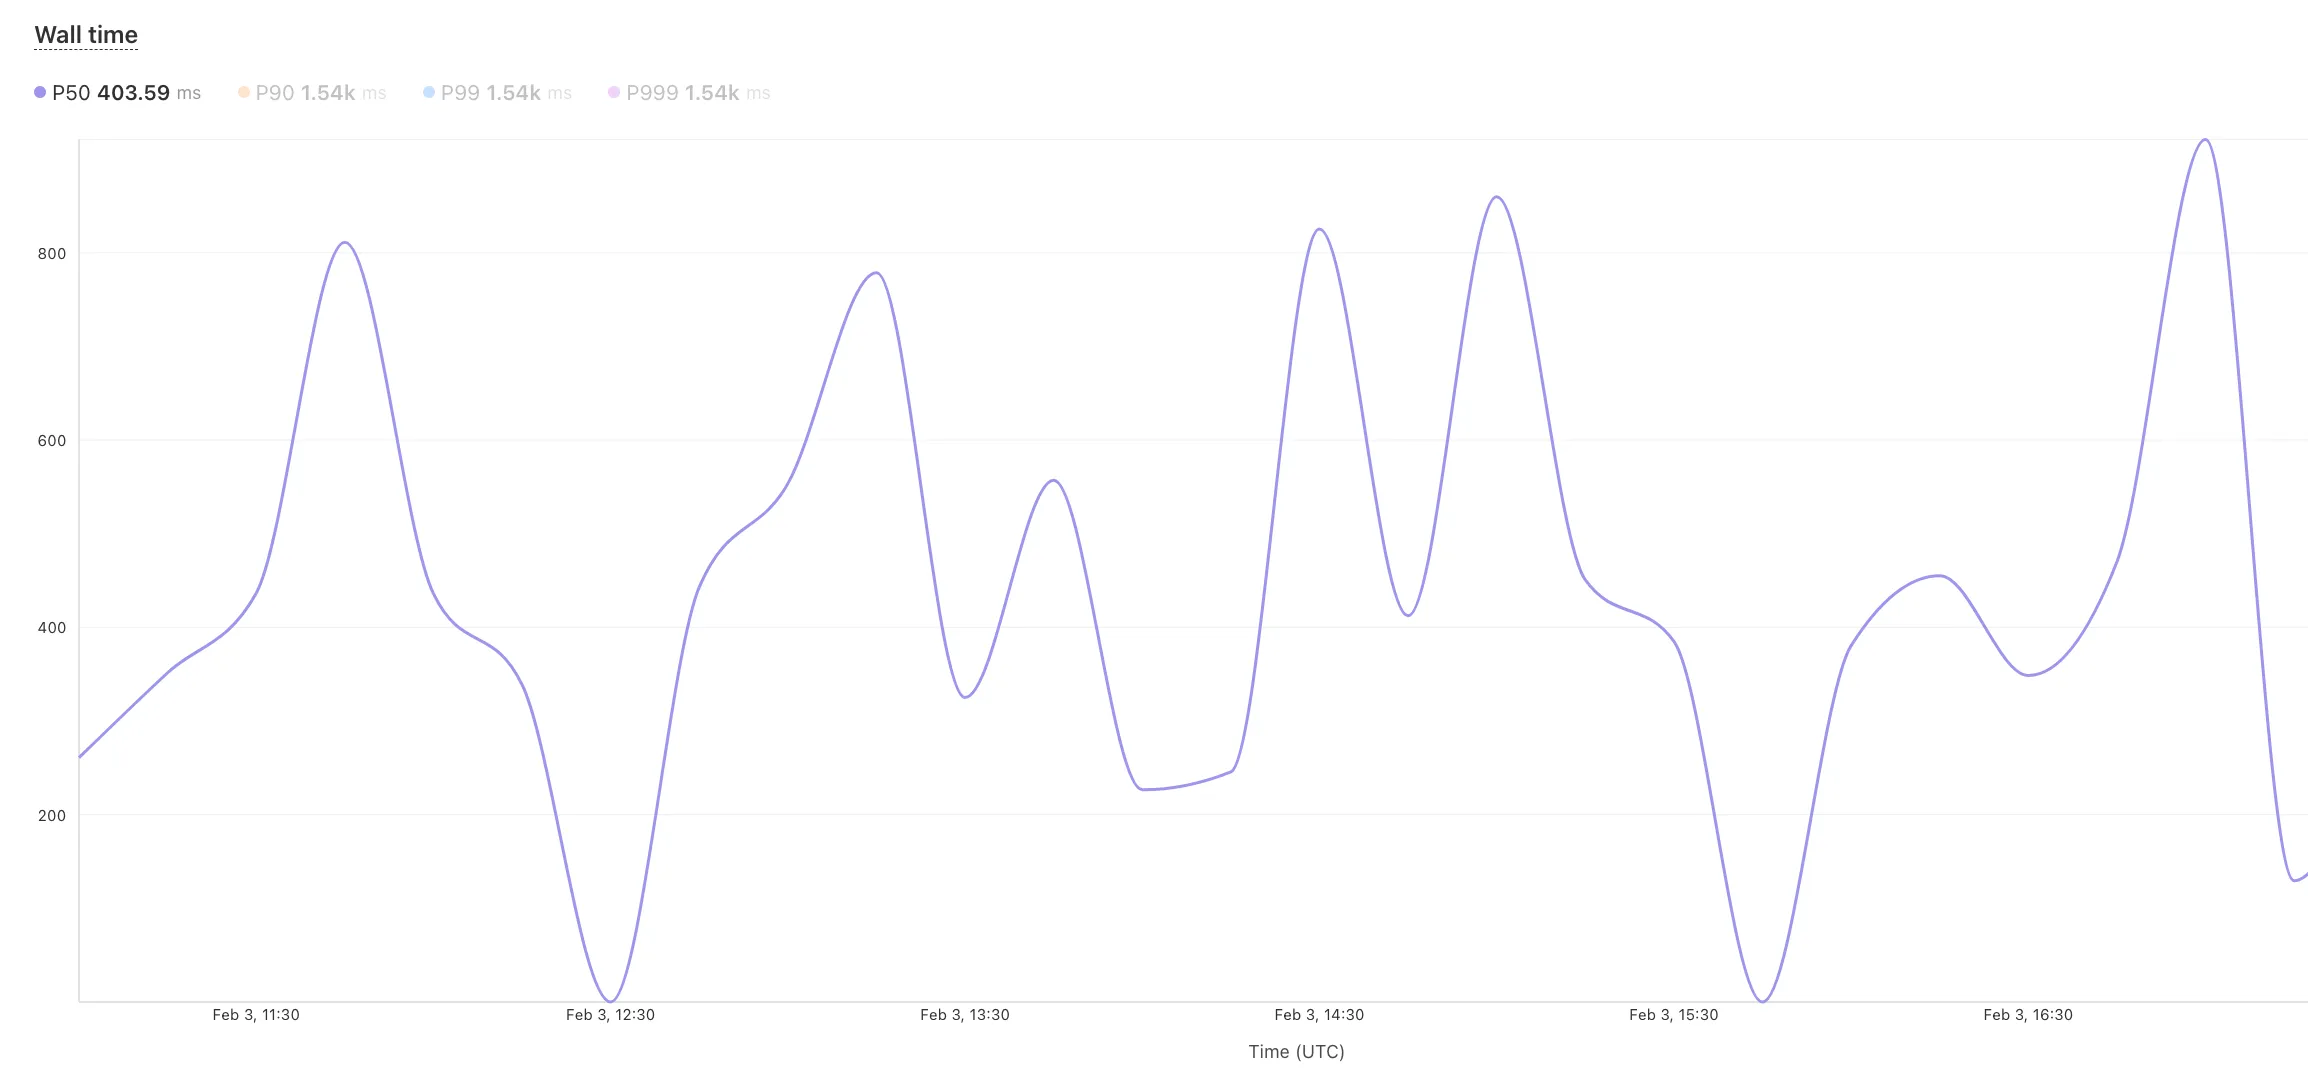
We've revamped the Workers Metrics dashboard ↗.
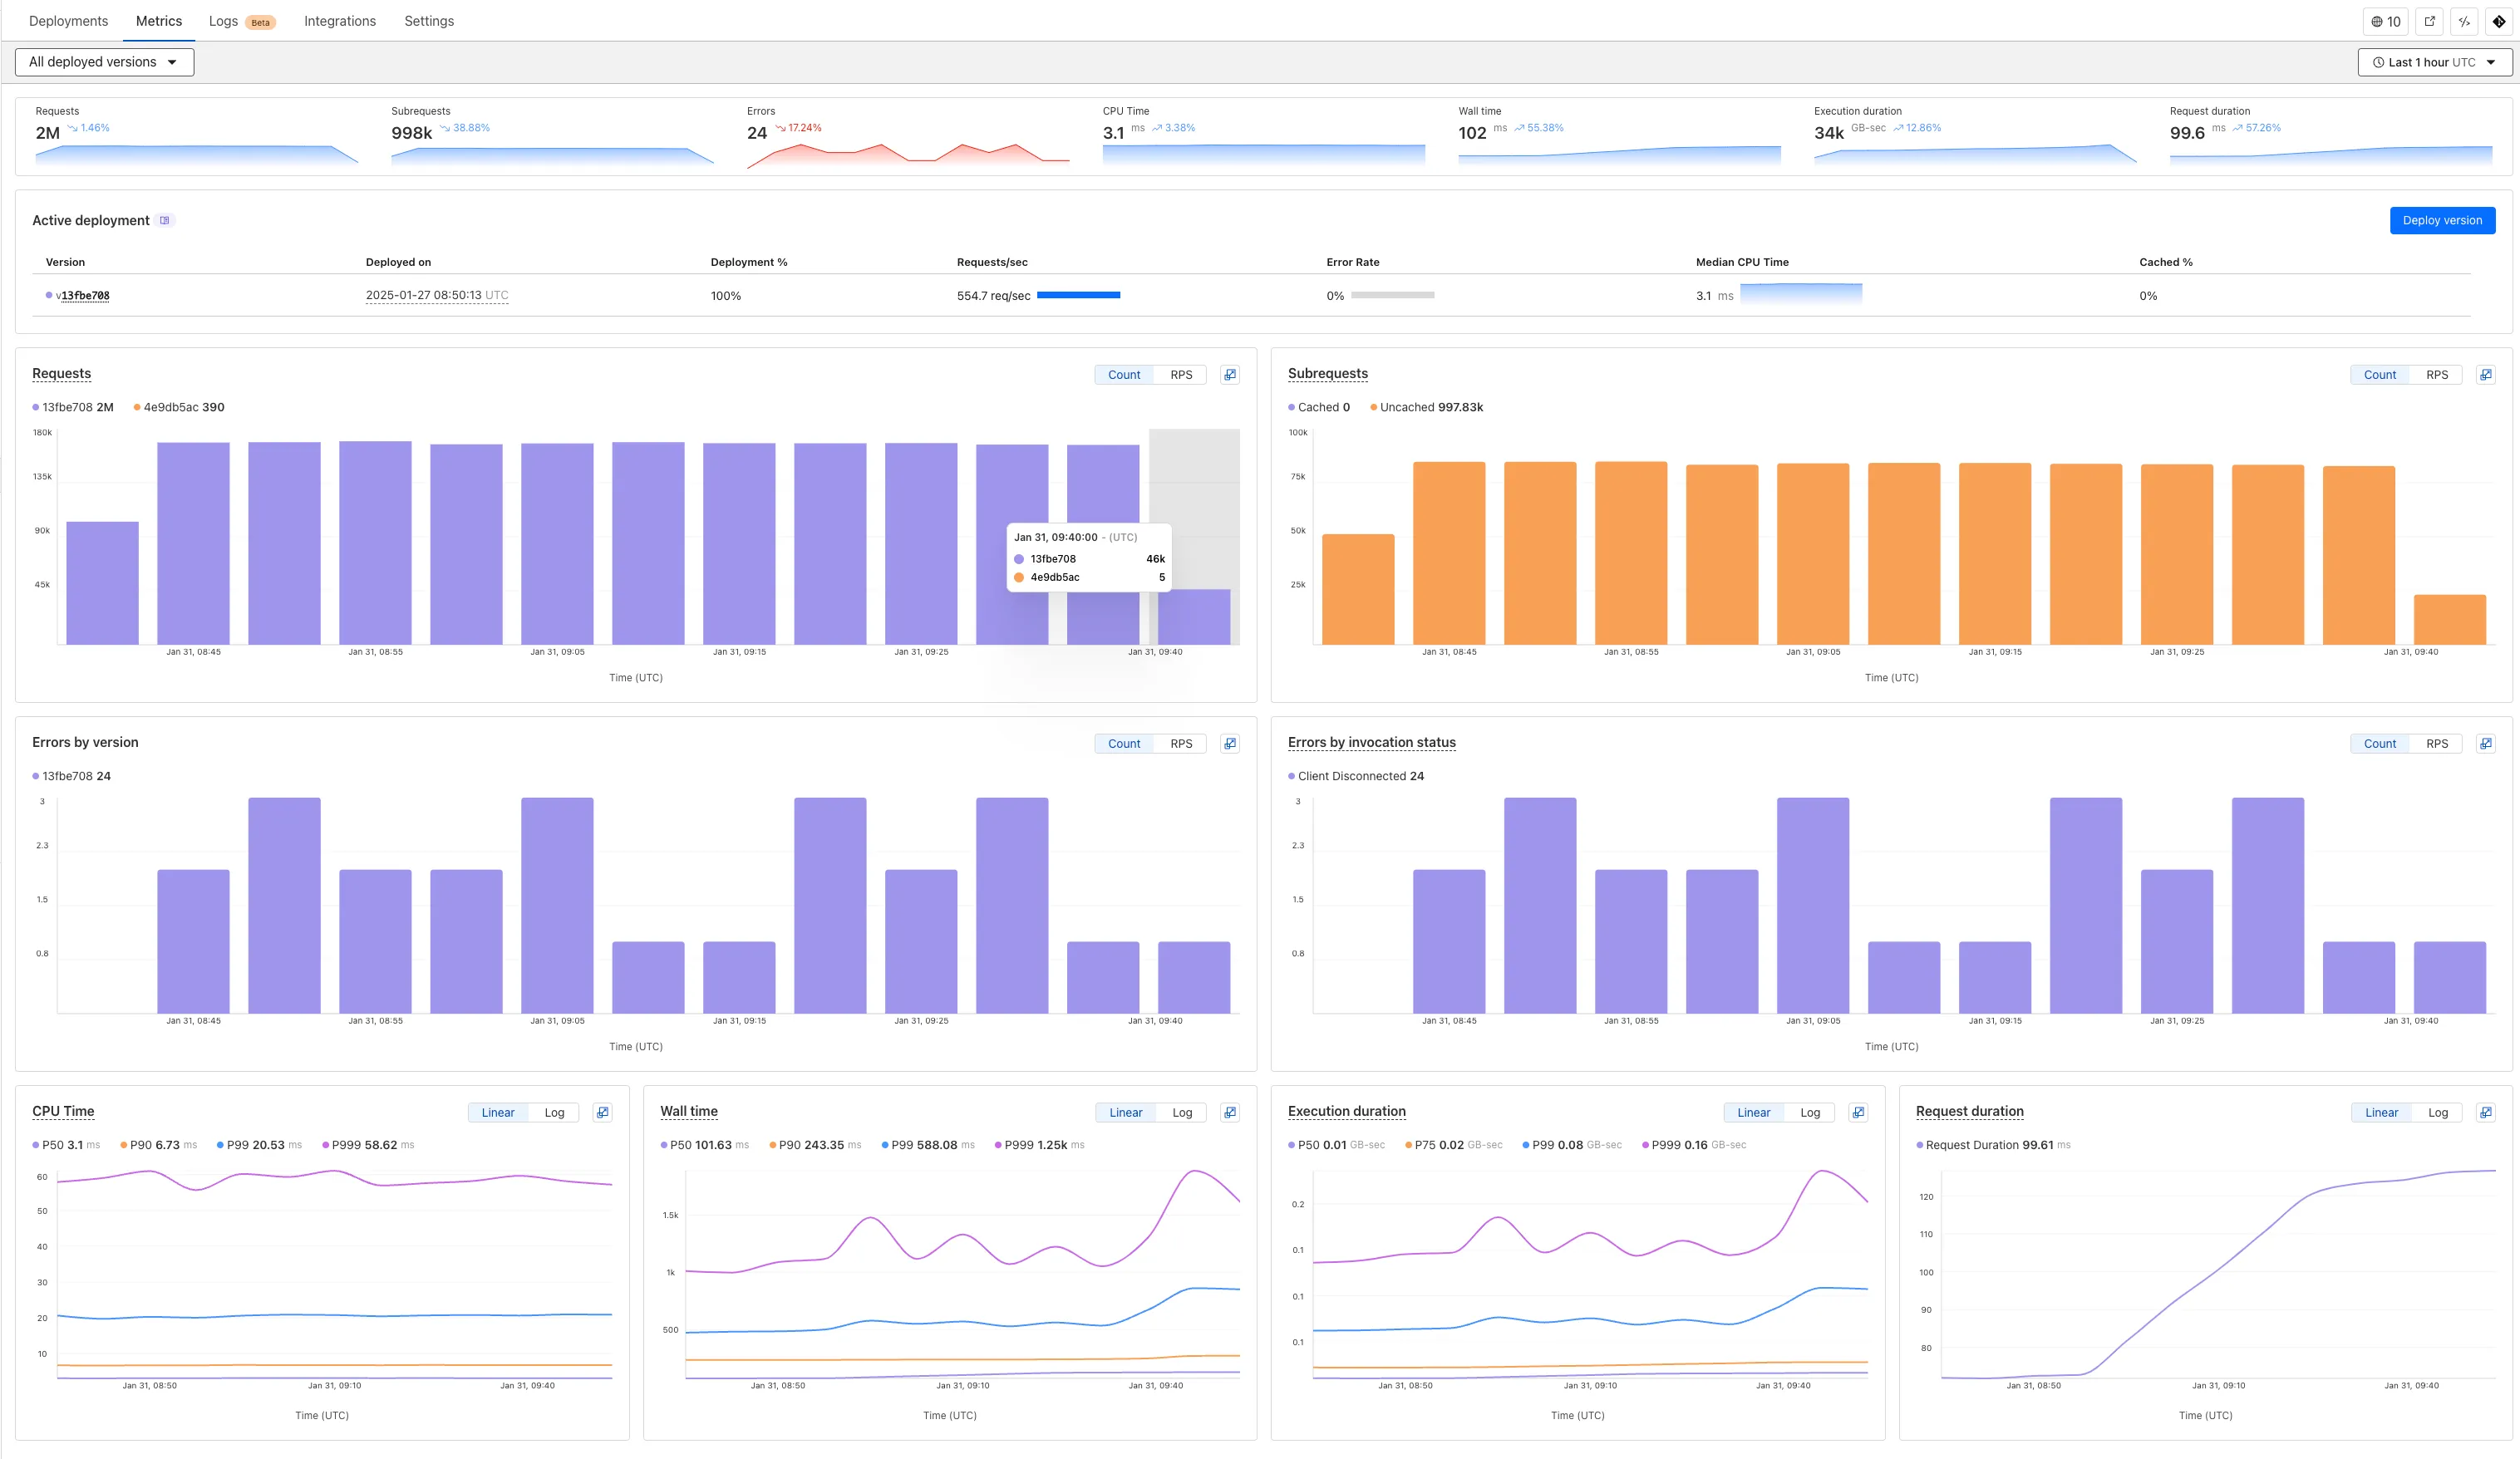
Now you can easily compare metrics across Worker versions, understand the current state of a gradual deployment, and review key Workers metrics in a single view. This new interface enables you to:
- Drag-and-select using a graphical timepicker for precise metric selection.
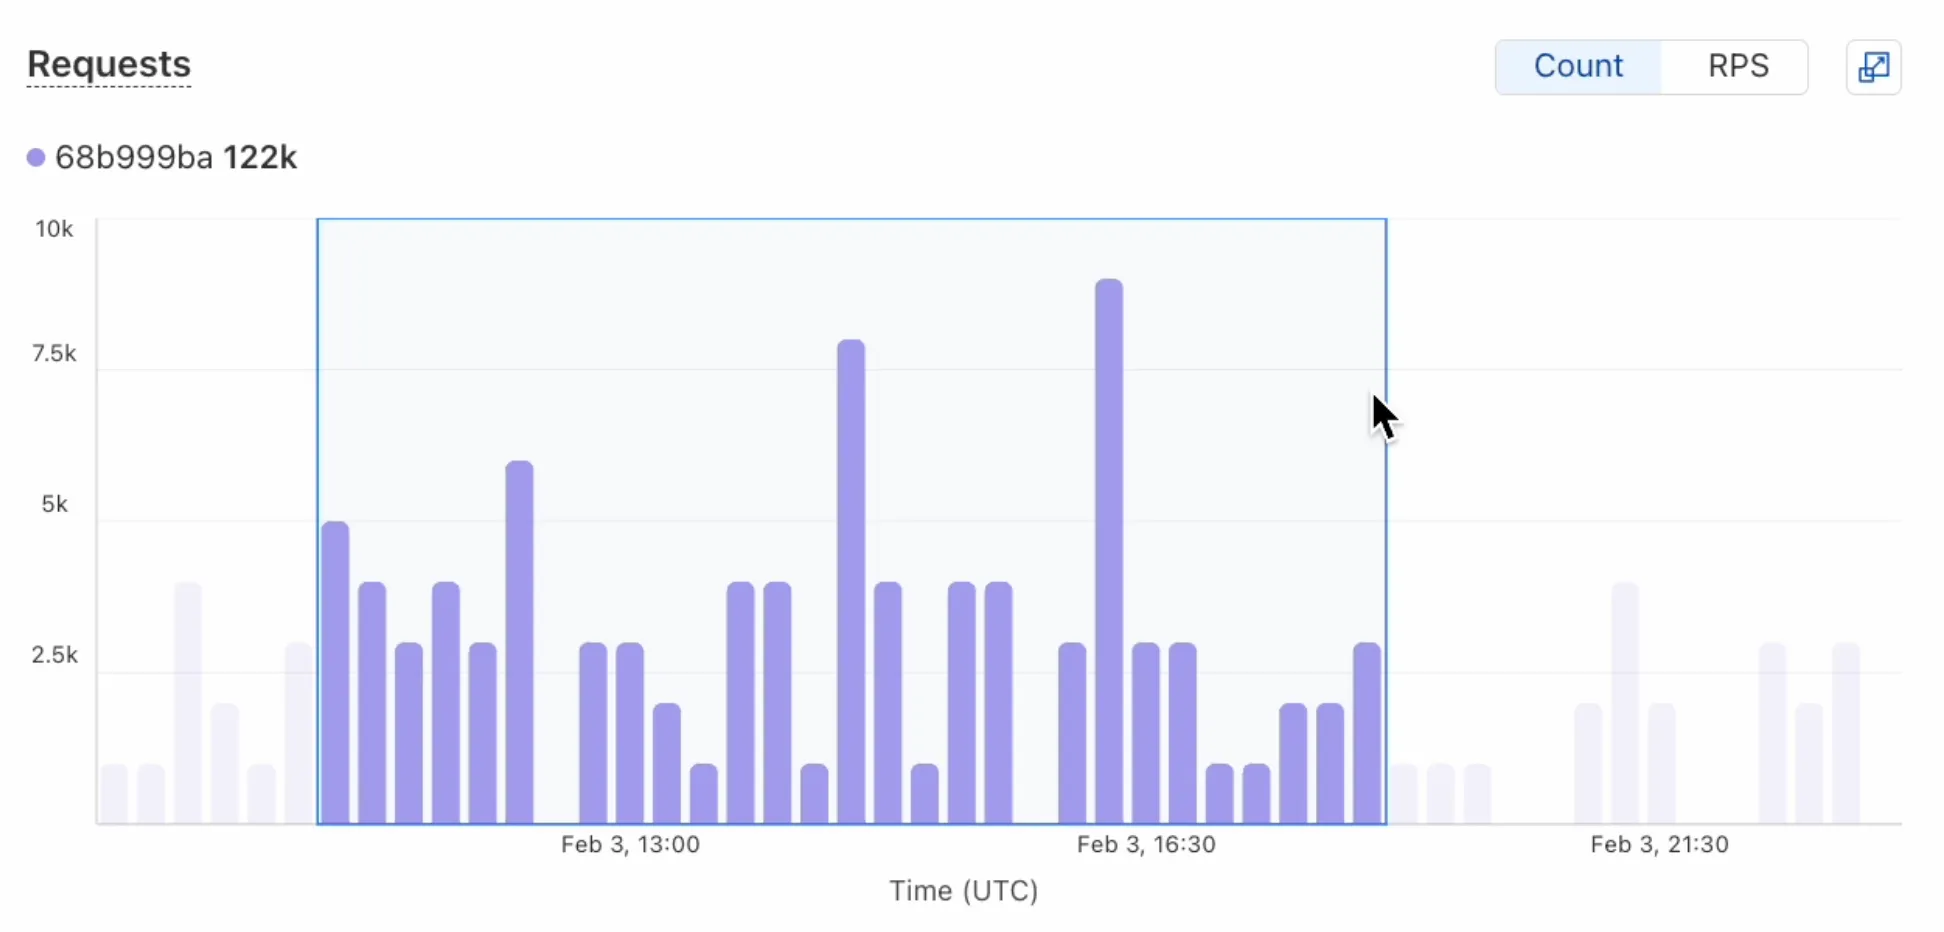
- Use histograms to visualize cumulative metrics, allowing you to bucket and compare rates over time.
- Focus on Worker versions by directly interacting with the version numbers in the legend.
- Monitor and compare active gradual deployments.
- Track error rates across versions with grouping both by version and by invocation status.
- Measure how Smart Placement improves request duration.
Learn more about metrics.
Cloudflare is removing five fields from the
metaobject of DNS records. These fields have been unused for more than a year and are no longer set on new records. This change may take up to four weeks to fully roll out.The affected fields are:
- the
auto_addedboolean - the
managed_by_appsboolean and correspondingapps_install_id - the
managed_by_argo_tunnelboolean and correspondingargo_tunnel_id
An example record returned from the API would now look like the following:
Updated API Response {"result": {"id": "<ID>","zone_id": "<ZONE_ID>","zone_name": "example.com","name": "www.example.com","type": "A","content": "192.0.2.1","proxiable": true,"proxied": false,"ttl": 1,"locked": false,"meta": {"auto_added": false,"managed_by_apps": false,"managed_by_argo_tunnel": false,"source": "primary"},"comment": null,"tags": [],"created_on": "2025-03-17T20:37:05.368097Z","modified_on": "2025-03-17T20:37:05.368097Z"},"success": true,"errors": [],"messages": []}For more guidance, refer to Manage DNS records.
- the
Workers for Platforms customers can now attach static assets (HTML, CSS, JavaScript, images) directly to User Workers, removing the need to host separate infrastructure to serve the assets.
This allows your platform to serve entire front-end applications from Cloudflare's global edge, utilizing caching for fast load times, while supporting dynamic logic within the same Worker. Cloudflare automatically scales its infrastructure to handle high traffic volumes, enabling you to focus on building features without managing servers.
Static Sites: Host and serve HTML, CSS, JavaScript, and media files directly from Cloudflare's network, ensuring fast loading times worldwide. This is ideal for blogs, landing pages, and documentation sites because static assets can be efficiently cached and delivered closer to the user, reducing latency and enhancing the overall user experience.
Full-Stack Applications: Combine asset hosting with Cloudflare Workers to power dynamic, interactive applications. If you're an e-commerce platform, you can serve your customers' product pages and run inventory checks from within the same Worker.
index.js export default {async fetch(request, env) {const url = new URL(request.url);// Check real-time inventoryif (url.pathname === "/api/inventory/check") {const product = url.searchParams.get("product");const inventory = await env.INVENTORY_KV.get(product);return new Response(inventory);}// Serve static assets (HTML, CSS, images)return env.ASSETS.fetch(request);},};index.ts export default {async fetch(request, env) {const url = new URL(request.url);// Check real-time inventoryif (url.pathname === '/api/inventory/check') {const product = url.searchParams.get('product');const inventory = await env.INVENTORY_KV.get(product);return new Response(inventory);}// Serve static assets (HTML, CSS, images)return env.ASSETS.fetch(request);}};Get Started: Upload static assets using the Workers for Platforms API or Wrangler. For more information, visit our Workers for Platforms documentation. ↗