Deliver emails to the junk email folder and user managed quarantine
In this tutorial, you will learn how to deliver SUSPICIOUS and BULK messages to the user’s junk folder, and SPAM and SPOOF messages to the user managed quarantine.
Configure domains
You first need to configure the domains you are onboarding on the Cloud Email Security (formerly Area 1) dashboard. To configure your domains:
- Log in to the Cloud Email Securitydashboard.
- Go to Settings (the gear icon).
- Go to Email configuration > Domains & Routing > Domains.
- Make sure each domain you are onboarding has been added.
- For each domain you are configuring, select … > Edit, and set the following options:
- Domain -
<YOUR_DOMAIN>. - Configured as -
MX Records. - Forwarding to - This should match the expected MX record for each domain in your Office 365 account.
- IP Restrictions - Leave this field empty.
- Outbound TLS -
Forward all messages over TLS. - Quarantine Policy - Only
MALICIOUSshould be checked.
- Domain -
Create quarantine policies
To create quarantine policies:
Open the Microsoft 365 Defender console.
Go to Email & collaboration > Policies & rules.
Select Threat policies.
Under Rules, select Quarantine policies.
Select Add custom policy.
Set the Policy name to
UserNotifyUserRelease.Select Next.
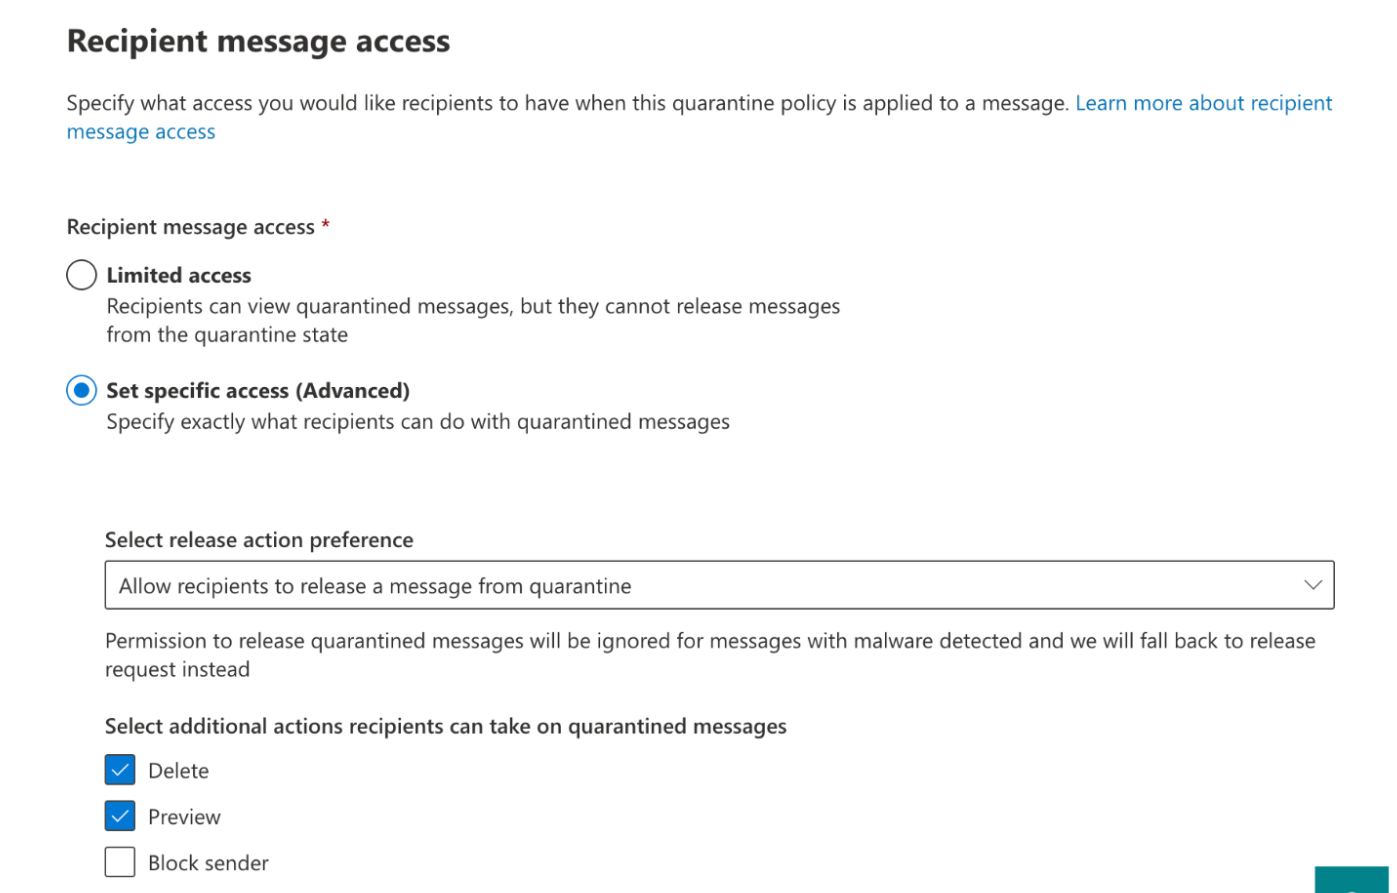
In Recipient message access, select Set specific access (Advanced), and then:
- In Select release action preference, choose Allow recipients to release a message from quarantine.
- In Select additional actions recipients can take on quarantined messages, select the Delete and Preview checkboxes.
Select Next.
In Quarantine notification, select Enable.
Select Next.
Review your settings and select Submit.
Select Done.
Select Add custom policy.
Set the Policy name to
UserNotifyAdminRelease.Select Next.
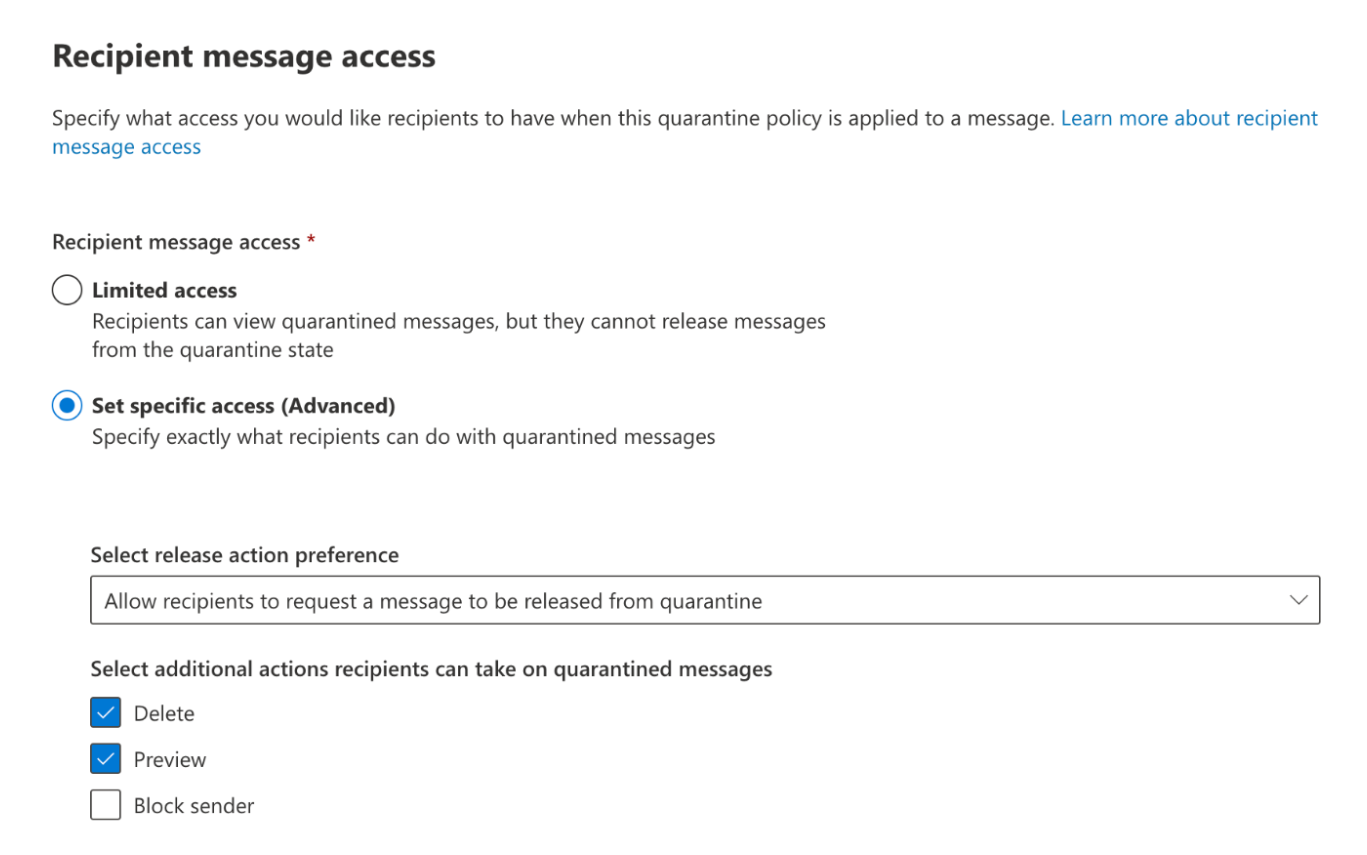
In Recipient message access, select Set specific access (Advanced), and then:
- In Select release action preference, from the drop-down menu, choose Allow recipients to request a message to be released from quarantine.
- In Select additional actions recipients can take on quarantined messages, select the Delete and Preview checkboxes.
Select Next.
In Quarantine notification, select Enable.
Select Next.
Review your settings and select Submit.
Select Done.
Configure quarantine notifications
To configure quarantine notifications:
Open the Microsoft 365 Defender console.
Go to Email & collaboration > Policies & rules.
Select Threat policies.
Under Rules, select Quarantine policies.
Select Global settings.
Scroll to the bottom and set the desired frequency in Send end-user spam notifications every (days). This value can only be incremented in days.
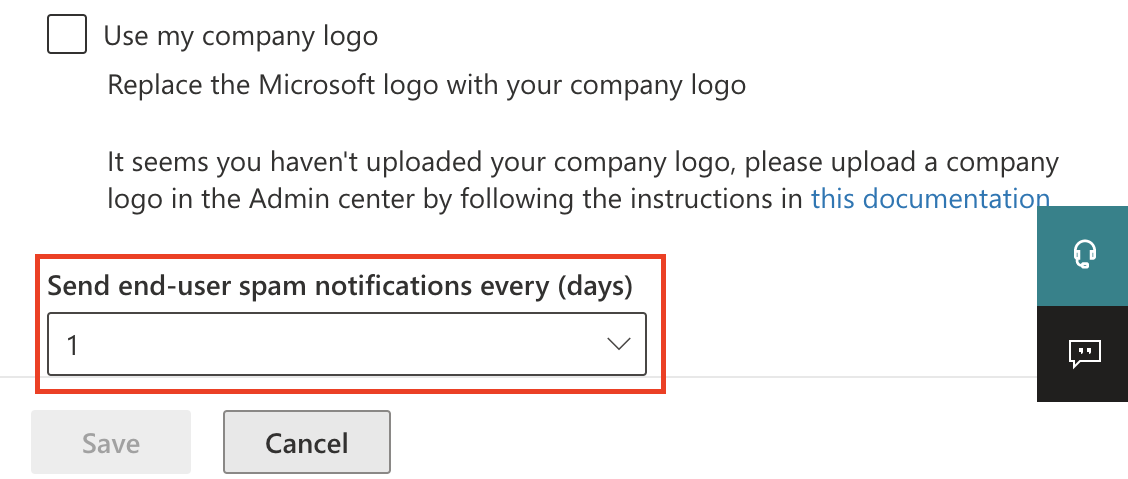
Select Save.
Configure anti-spam policies
To configure anti-spam policies:
Open the Microsoft 365 Defender console.
Go to Email & collaboration > Policies & rules.
Select Threat policies.
Under Policies, select Anti-spam.
Select the Anti-spam inbound policy (Default) text (not the checkbox).
In Actions, scroll down and select Edit actions.
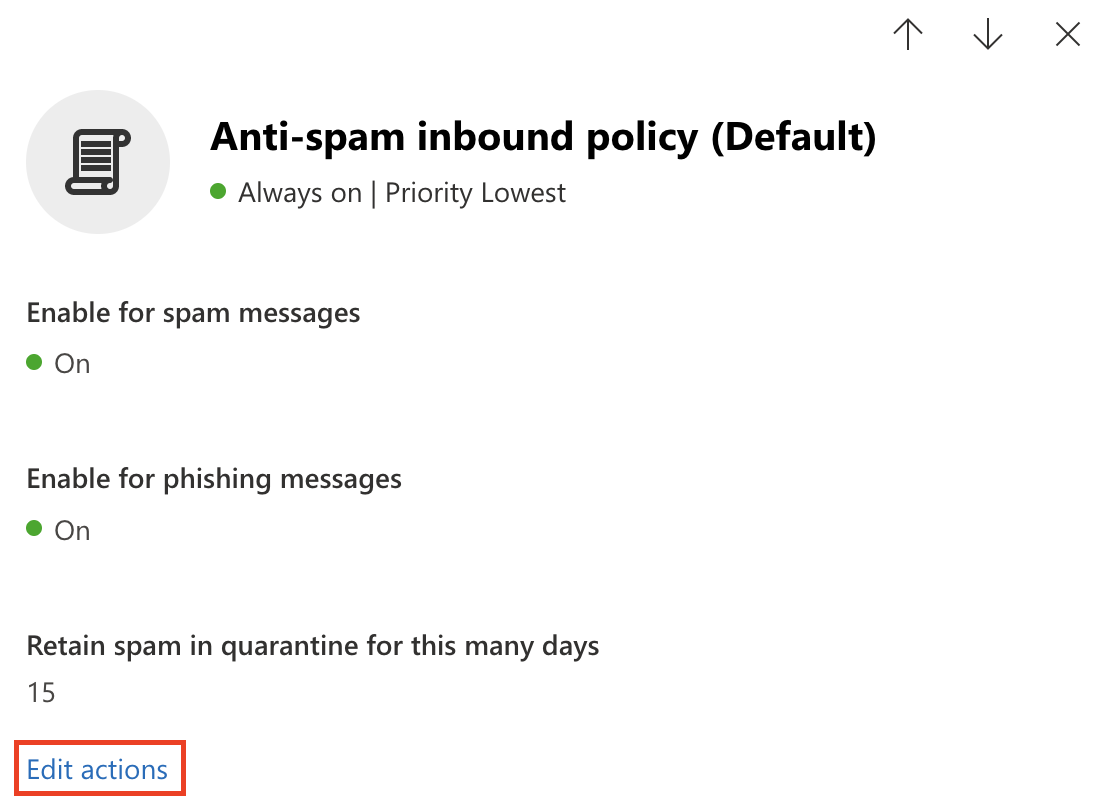
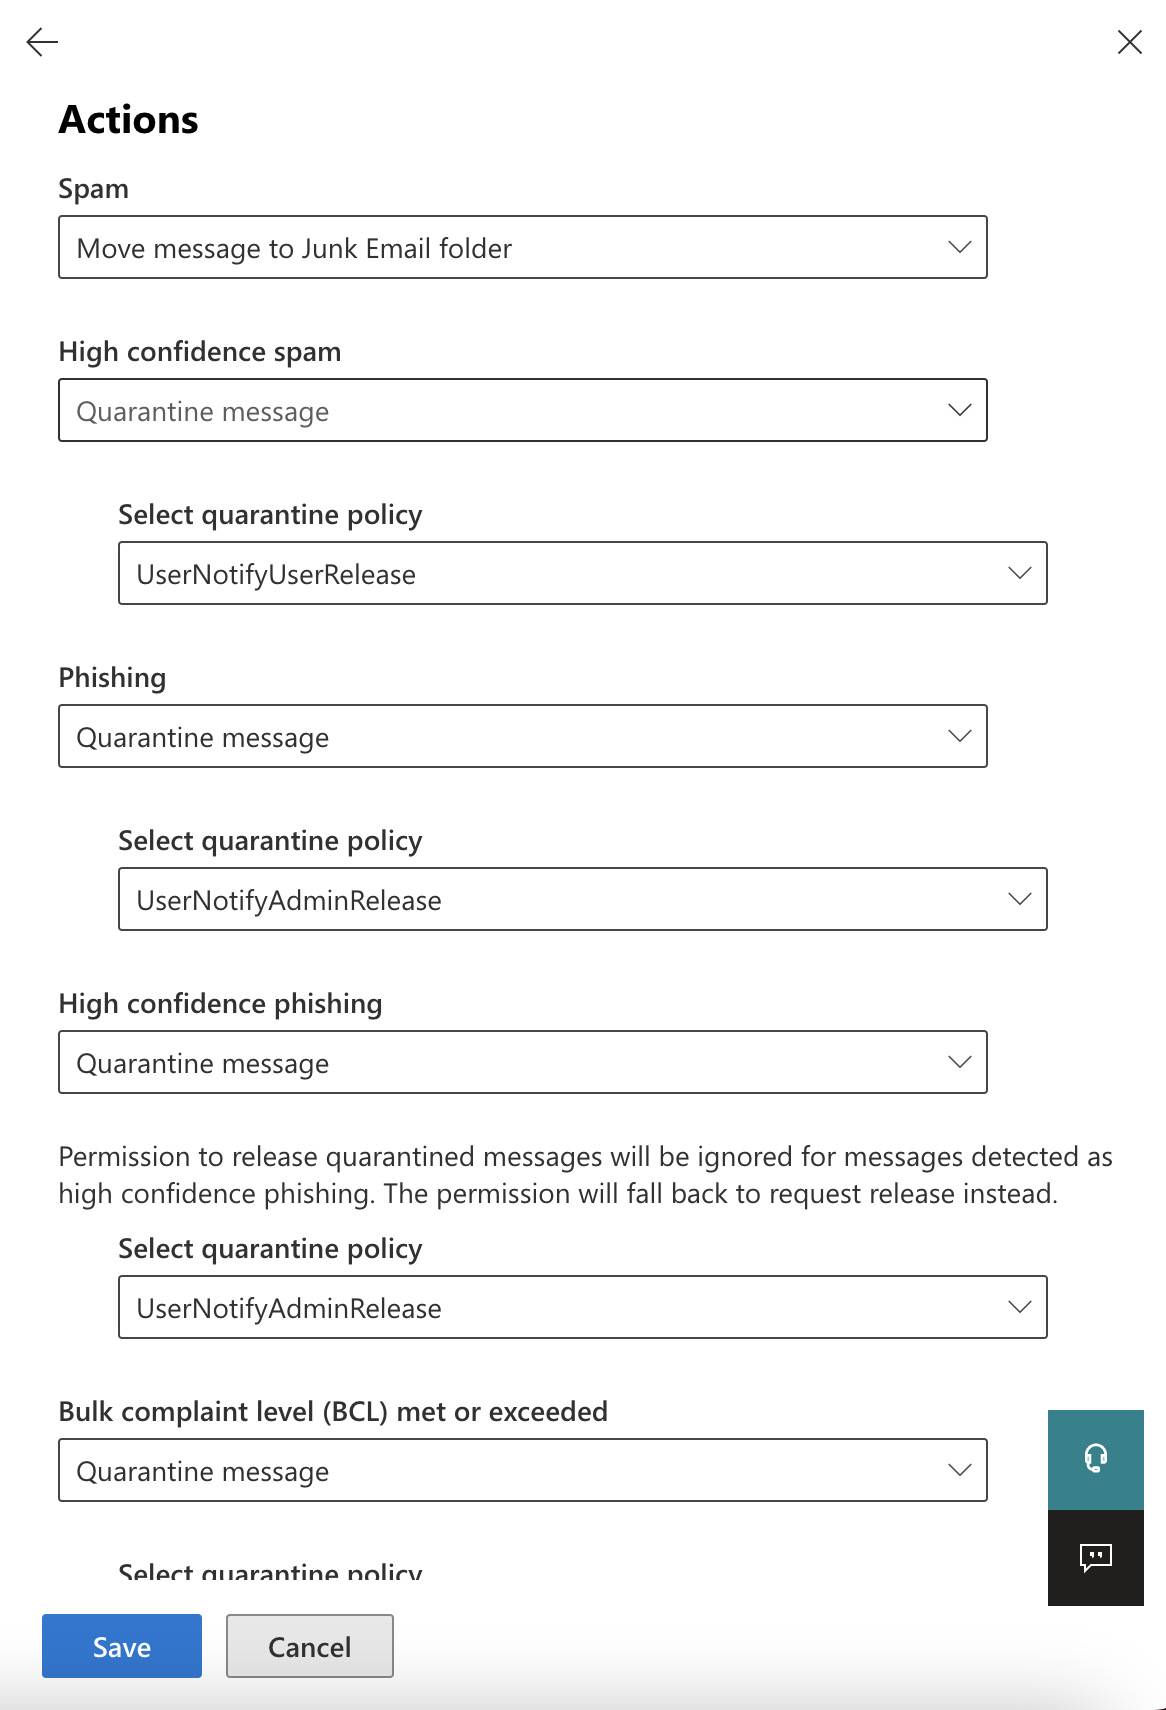
Set the following conditions and actions (you might need to scroll up or down to find them):
- Spam: Move messages to Junk Email folder.
- High confidence spam: Quarantine message.
- Select quarantine policy: UserNotifyUserRelease.
- Phishing: Quarantine message.
- Select quarantine policy: UserNotifyAdminRelease.
- High confidence phishing: Quarantine message.
- Select quarantine policy: UserNotifyAdminRelease.
- Retain spam in quarantine for this many days: Default is 15 days. Cloudflare Cloud Email Security (formerly Area 1) recommends 15-30 days.
Select Save.
Create transport rules
To create the transport rules that will send emails with certain dispositions to Cloud Email Security:
Open the new Exchange admin center.
Go to Mail flow > Rules.
Select Add a Rule > Create a new rule.
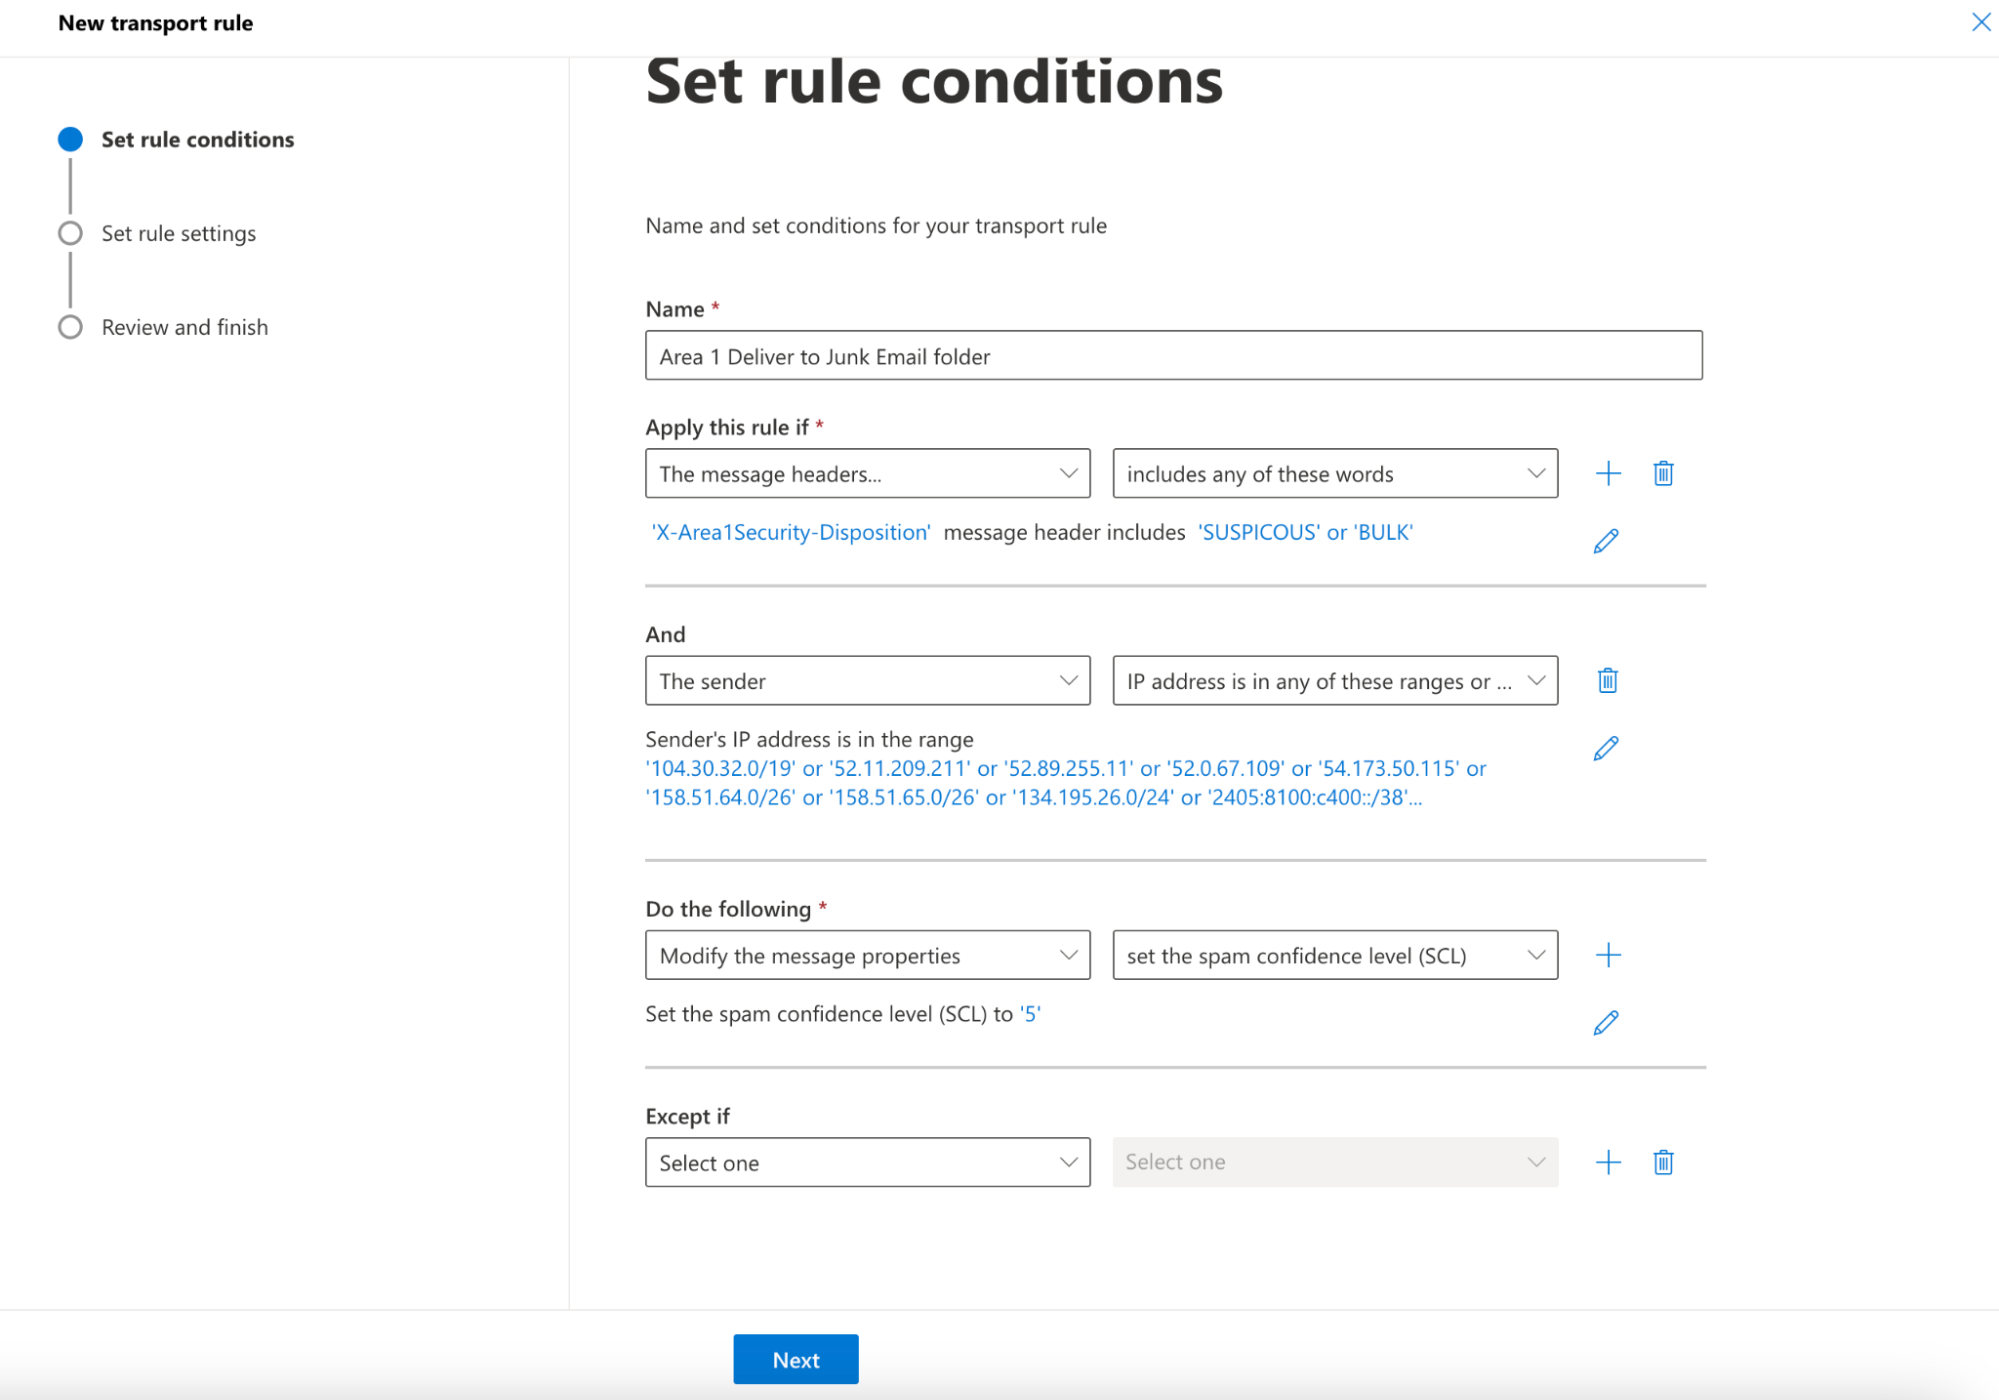
Set the following rule conditions:
- Name:
Area 1 Deliver to Junk Email folder. - Apply this rule if: The message headers > includes any of these words.
- Enter text:
X-Area1Security-Disposition> Save. - Enter words:
SUSPICIOUS,BULK> Add > Save.
- Enter text:
- Apply this rule if: Select + to add a second condition.
- And: The sender > IP address is in any of these ranges or exactly matches > enter the egress IPs in the Egress IPs page.
- Do the following - Modify the message properties > Set the Spam Confidence Level (SCL) > 5.
- Name:
Select Next.
You can use the default values on this screen. Select Next.
Review your settings and select Finish > Done.
Select the rule
Area 1 Deliver to Junk Email folderyou have just created, and Enable.Select Add a Rule > Create a new rule.
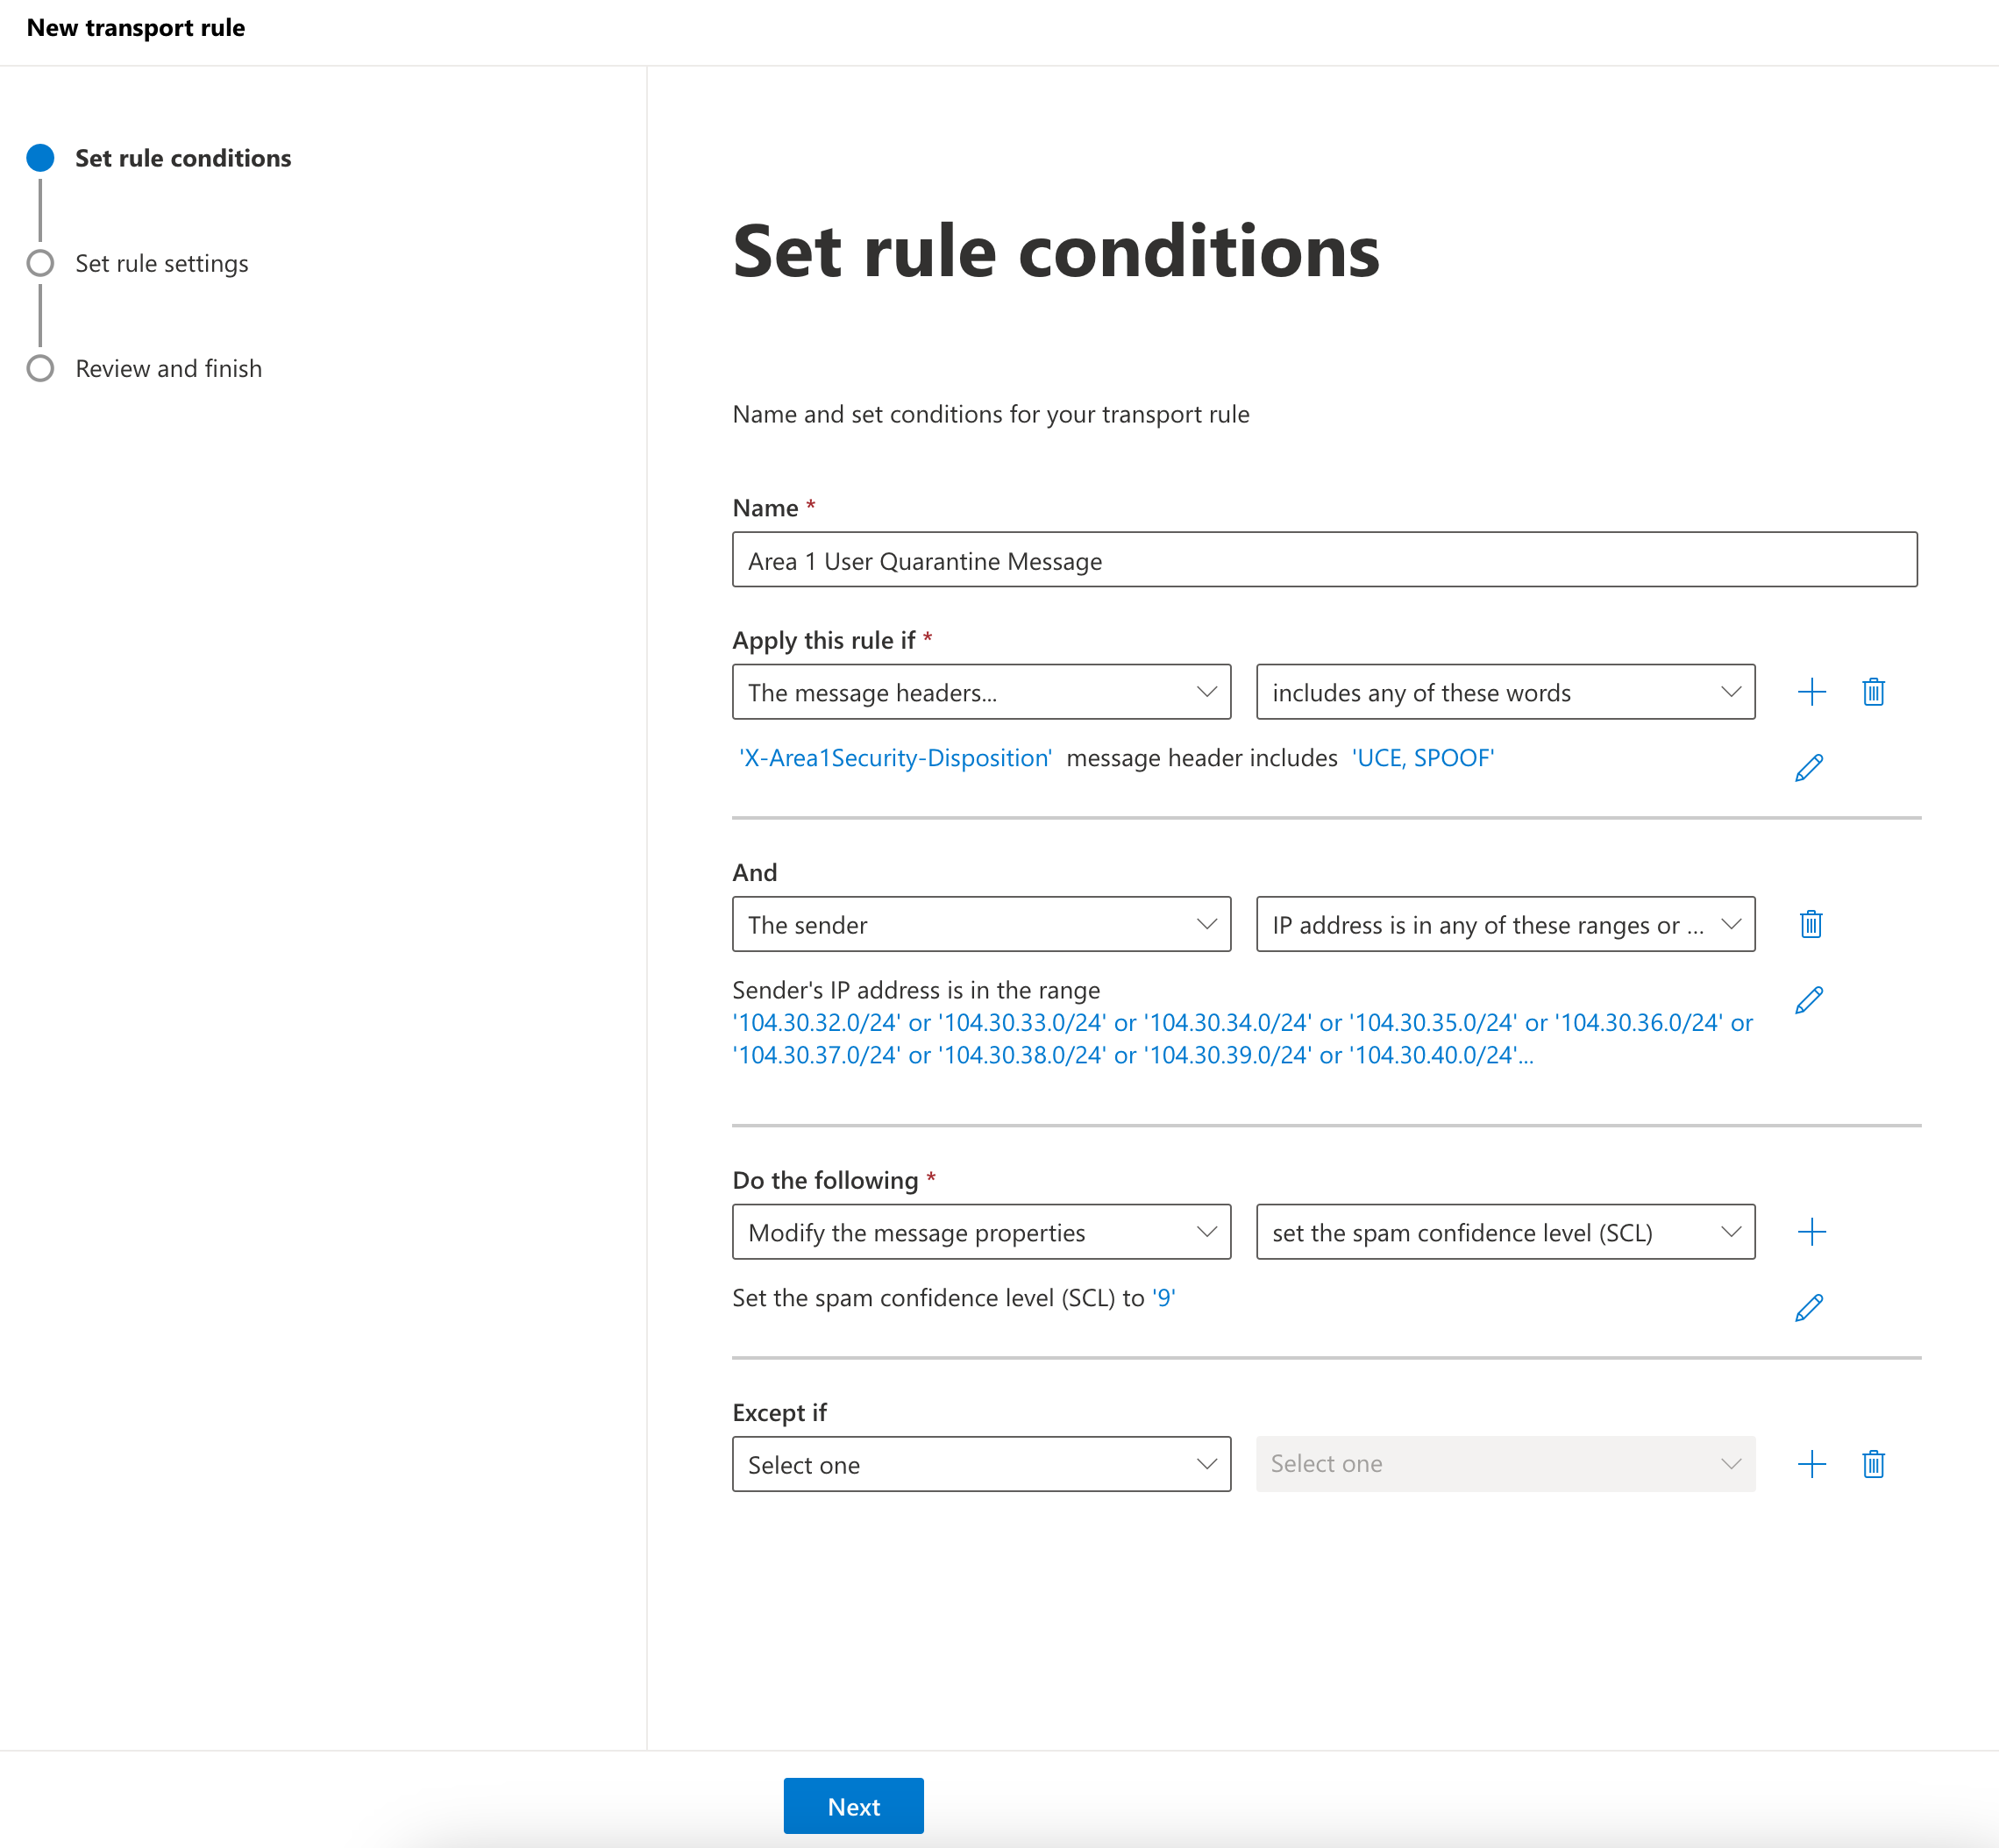
Set the following rule conditions:
- Name:
Area 1 User Quarantine Message. - Apply this rule if: The message headers > includes any of these words.
- Enter text:
X-Area1Security-Disposition> Save. - Enter words:
UCE,SPOOF> Add > Save.
- Enter text:
- Apply this rule if: Select + to add a second condition.
- And: The sender > IP address is in any of these ranges or exactly matches > enter the egress IPs in the Egress IPs page.
- Do the following: Modify the message properties > Set the Spam Confidence Level (SCL) > 9.
- Name:
Select Next.
You can use the default values on this screen. Select Next.
Review your settings and select Finish > Done.
Select the rule
Area 1 User Quarantine Messageyou have just created, and select Enable.