Before
New updates and improvements at Cloudflare.

When using the Cloudflare Vite plugin to build and deploy Workers, a Wrangler configuration file is now optional for assets-only (static) sites. If no wrangler.toml, wrangler.json, or wrangler.jsonc file is found, the plugin generates sensible defaults for an assets-only site. The name is based on the package.json or the project directory name, and the compatibility_date uses the latest date supported by your installed Miniflare version.
This allows easier setup for static sites using Vite. Note that SPAs will still need to set assets.not_found_handling to single-page-application ↗ in order to function correctly.
The Cloudflare Vite plugin now supports programmatic configuration of Workers without a Wrangler configuration file. You can use the config option to define Worker settings directly in your Vite configuration, or to modify existing configuration loaded from a Wrangler config file. This is particularly useful when integrating with other build tools or frameworks, as it allows them to control Worker configuration without needing users to manage a separate config file.
The Vite plugin's new config option accepts either a partial configuration object or a function that receives the current configuration and returns overrides. This option is applied after any config file is loaded, allowing the plugin to override specific values or define Worker configuration entirely in code.
Setting config to an object to provide configuration values that merge with defaults and config file settings:
import { defineConfig } from "vite";import { cloudflare } from "@cloudflare/vite-plugin";
export default defineConfig({  plugins: [    cloudflare({      config: {        name: "my-worker",        compatibility_flags: ["nodejs_compat"],        send_email: [          {            name: "EMAIL",          },        ],      },    }),  ],});
Use a function to modify the existing configuration:
import { defineConfig } from "vite";import { cloudflare } from "@cloudflare/vite-plugin";export default defineConfig({ plugins: [ cloudflare({ config: (userConfig) => { delete userConfig.compatibility_flags; }, }), ],});Return an object with values to merge:
import { defineConfig } from "vite";import { cloudflare } from "@cloudflare/vite-plugin";
export default defineConfig({  plugins: [    cloudflare({      config: (userConfig) => {        if (!userConfig.compatibility_flags.includes("no_nodejs_compat")) {          return { compatibility_flags: ["nodejs_compat"] };        }      },    }),  ],});
Auxiliary Workers also support the config option, enabling multi-Worker architectures without config files.
Define auxiliary Workers without config files using config inside the auxiliaryWorkers array:
import { defineConfig } from "vite";import { cloudflare } from "@cloudflare/vite-plugin";
export default defineConfig({  plugins: [    cloudflare({      config: {        name: "entry-worker",        main: "./src/entry.ts",        services: [{ binding: "API", service: "api-worker" }],      },      auxiliaryWorkers: [        {          config: {            name: "api-worker",            main: "./src/api.ts",          },        },      ],    }),  ],});
For more details and examples, see Programmatic configuration.
Earlier this year, we announced the launch of the new Terraform v5 Provider. We are aware of the high number of issues reported by the Cloudflare community related to the v5 release. We have committed to releasing improvements on a 2-3 week cadence ↗ to ensure its stability and reliability, including the v5.14 release. We have also pivoted from an issue-to-issue approach to a resource-per-resource approach ↗ - we will be focusing on specific resources to not only stabilize the resource but also ensure it is migration-friendly for those migrating from v4 to v5.
Thank you for continuing to raise issues. They make our provider stronger and help us build products that reflect your needs.
This release includes bug fixes, the stabilization of even more popular resources, and more.
Resource affected: api_shield_discovery_operation
Cloudflare continuously discovers and updates API endpoints and web assets of your web applications. To improve the maintainability of these dynamic resources, we are working on reducing the need to actively engage with discovered operations.
The corresponding public API endpoint of discovered operations ↗ is not affected and will continue to be supported.
dlp_custom_profilepartners_ent as valid enum for rate_plan.id (#6505 ↗)We suggest waiting to migrate to v5 while we work on stabilization. This helps with avoiding any blocking issues while the Terraform resources are actively being stabilized ↗. We will be releasing a new migration tool in March 2026 to help support v4 to v5 transitions for our most popular resources.
You can now connect directly to remote databases and databases requiring TLS with wrangler dev.
This lets you run your Worker code locally while connecting to remote databases, without needing to use wrangler dev --remote.
The localConnectionString field and CLOUDFLARE_HYPERDRIVE_LOCAL_CONNECTION_STRING_<BINDING_NAME> environment variable can be used to configure the connection string used by wrangler dev.
{ "hyperdrive": [ { "binding": "HYPERDRIVE", "id": "your-hyperdrive-id", "localConnectionString": "postgres://user:password@remote-host.example.com:5432/database?sslmode=require" } ]}Learn more about local development with Hyperdrive.
Workers applications now use reusable Cloudflare Access policies to reduce duplication and simplify access management across multiple Workers.
Previously, enabling Cloudflare Access on a Worker created per-application policies, unique to each application. Now, we create reusable policies that can be shared across applications:
Preview URLs: All Workers preview URLs share a single "Cloudflare Workers Preview URLs" policy across your account. This policy is automatically created the first time you enable Access on any preview URL. By sharing a single policy across all preview URLs, you can configure access rules once and have them apply company-wide to all Workers which protect preview URLs. This makes it much easier to manage who can access preview environments without having to update individual policies for each Worker.
Production workers.dev URLs: When enabled, each Worker gets its own reusable policy (named <worker-name> - Production) by default. We recognize production services often have different access requirements and having individual policies here makes it easier to configure service-to-service authentication or protect internal dashboards or applications with specific user groups. Keeping these policies separate gives you the flexibility to configure exactly the right access rules for each production service. When you disable Access on a production Worker, the associated policy is automatically cleaned up if it's not being used by other applications.
This change reduces policy duplication, simplifies cross-company access management for preview environments, and provides the flexibility needed for production services. You can still customize access rules by editing the reusable policies in the Zero Trust dashboard.
To enable Cloudflare Access on your Worker:
workers.dev or Preview URLs, click Enable Cloudflare Access.For more information on configuring Cloudflare Access for Workers, refer to the Workers Access documentation.
The latest release of @cloudflare/agents ↗ brings resumable streaming, significant MCP client improvements, and critical fixes for schedules and Durable Object lifecycle management.
AIChatAgent now supports resumable streaming, allowing clients to reconnect and continue receiving streamed responses without losing data. This is useful for:
Streams are maintained across page refreshes, broken connections, and syncing across open tabs and devices.
The MCPClientManager API has been redesigned for better clarity and control:
registerServer() method: Register MCP servers without immediately connectingconnectToServer() method: Establish connections to registered serversrestoreConnectionsFromStorage() now properly handles failed connections// Register a server to Agentconst { id } = await this.mcp.registerServer({ name: "my-server", url: "https://my-mcp-server.example.com",});
// Connect when readyawait this.mcp.connectToServer(id);
// Discover tools, prompts and resourcesawait this.mcp.discoverIfConnected(id);The SDK now includes a formalized MCPConnectionState enum with states: idle, connecting, authenticating, connected, discovering, and ready.
MCP discovery fetches the available tools, prompts, and resources from an MCP server so your agent knows what capabilities are available. The MCPClientConnection class now includes a dedicated discover() method with improved reliability:
this.schedule(new Date(), ...) would not fireTo update to the latest version:
npm i agents@latestWe've partnered with Black Forest Labs (BFL) to bring their latest FLUX.2 [dev] model to Workers AI! This model excels in generating high-fidelity images with physical world grounding, multi-language support, and digital asset creation. You can also create specific super images with granular controls like JSON prompting.
Read the BFL blog ↗ to learn more about the model itself. Read our Cloudflare blog ↗ to see the model in action, or try it out yourself on our multi modal playground ↗.
Pricing documentation is available on the model page or pricing page. Note, we expect to drop pricing in the next few days after iterating on the model performance.
The model hosted on Workers AI is able to support up to 4 image inputs (512x512 per input image). Note, this image model is one of the most powerful in the catalog and is expected to be slower than the other image models we currently support. One catch to look out for is that this model takes multipart form data inputs, even if you just have a prompt.
With the REST API, the multipart form data input looks like this:
curl --request POST \ --url 'https://api.cloudflare.com/client/v4/accounts/{ACCOUNT}/ai/run/@cf/black-forest-labs/flux-2-dev' \ --header 'Authorization: Bearer {TOKEN}' \ --header 'Content-Type: multipart/form-data' \ --form 'prompt=a sunset at the alps' \ --form steps=25 --form width=1024 --form height=1024With the Workers AI binding, you can use it as such:
const form = new FormData();form.append('prompt', 'a sunset with a dog');form.append('width', '1024');form.append('height', '1024');
//this dummy request is temporary hack//we're pushing a change to address this soonconst formRequest = new Request('http://dummy', {  method: 'POST',  body: form});const formStream = formRequest.body;const formContentType = formRequest.headers.get('content-type') || 'multipart/form-data';
const resp = await env.AI.run("@cf/black-forest-labs/flux-2-dev", {  multipart: {    body: formStream,    contentType: formContentType  }});
The parameters you can send to the model are detailed here:
prompt (string) - Text description of the image to generateOptional Parameters
input_image_0 (string) - Binary imageinput_image_1 (string) - Binary imageinput_image_2 (string) - Binary imageinput_image_3 (string) - Binary imagesteps (integer) - Number of inference steps. Higher values may improve quality but increase generation timeguidance (float) - Guidance scale for generation. Higher values follow the prompt more closelywidth (integer) - Width of the image, default 1024 Range: 256-1920height (integer) - Height of the image, default 768 Range: 256-1920seed (integer) - Seed for reproducibility## Multi-Reference Images
The FLUX.2 model is great at generating images based on reference images. You can use this feature to apply the style of one image to another, add a new character to an image, or iterate on past generate images. You would use it with the same multipart form data structure, with the input images in binary.
For the prompt, you can reference the images based on the index, like `take the subject of image 1 and style it like image 0` or even use natural language like `place the dog beside the woman`.
Note: you have to name the input parameter as `input_image_0`, `input_image_1`, `input_image_2` for it to work correctly. All input images must be smaller than 512x512.
```bashcurl --request POST \ --url 'https://api.cloudflare.com/client/v4/accounts/{ACCOUNT}/ai/run/@cf/black-forest-labs/flux-2-dev' \ --header 'Authorization: Bearer {TOKEN}' \ --header 'Content-Type: multipart/form-data' \ --form 'prompt=take the subject of image 1 and style it like image 0' \ --form input_image_0=@/Users/johndoe/Desktop/icedoutkeanu.png \ --form input_image_1=@/Users/johndoe/Desktop/me.png \ --form steps=25 --form width=1024 --form height=1024Through Workers AI Binding:
//helper function to convert ReadableStream to Blobasync function streamToBlob(stream: ReadableStream, contentType: string): Promise<Blob> {  const reader = stream.getReader();  const chunks = [];
  while (true) {    const { done, value } = await reader.read();    if (done) break;    chunks.push(value);  }
  return new Blob(chunks, { type: contentType });}
const image0 = await fetch("http://image-url");const image1 = await fetch("http://image-url");const form = new FormData();
const image_blob0 = await streamToBlob(image0.body, "image/png");const image_blob1 = await streamToBlob(image1.body, "image/png");form.append('input_image_0', image_blob0)form.append('input_image_1', image_blob1)form.append('prompt', 'take the subject of image 1and style it like image 0')
//this dummy request is temporary hack//we're pushing a change to address this soonconst formRequest = new Request('http://dummy', {  method: 'POST',  body: form});const formStream = formRequest.body;const formContentType = formRequest.headers.get('content-type') || 'multipart/form-data';
const resp = await env.AI.run("@cf/black-forest-labs/flux-2-dev", { multipart: { body: form, contentType: "multipart/form-data" }})The model supports prompting in JSON to get more granular control over images. You would pass the JSON as the value of the 'prompt' field in the multipart form data. See the JSON schema below on the base parameters you can pass to the model.
{ "type": "object", "properties": { "scene": { "type": "string", "description": "Overall scene setting or location" }, "subjects": { "type": "array", "items": { "type": "object", "properties": { "type": { "type": "string", "description": "Type of subject (e.g., desert nomad, blacksmith, DJ, falcon)" }, "description": { "type": "string", "description": "Physical attributes, clothing, accessories" }, "pose": { "type": "string", "description": "Action or stance" }, "position": { "type": "string", "enum": ["foreground", "midground", "background"], "description": "Depth placement in scene" } }, "required": ["type", "description", "pose", "position"] } }, "style": { "type": "string", "description": "Artistic rendering style (e.g., digital painting, photorealistic, pixel art, noir sci-fi, lifestyle photo, wabi-sabi photo)" }, "color_palette": { "type": "array", "items": { "type": "string" }, "minItems": 3, "maxItems": 3, "description": "Exactly 3 main colors for the scene (e.g., ['navy', 'neon yellow', 'magenta'])" }, "lighting": { "type": "string", "description": "Lighting condition and direction (e.g., fog-filtered sun, moonlight with star glints, dappled sunlight)" }, "mood": { "type": "string", "description": "Emotional atmosphere (e.g., harsh and determined, playful and modern, peaceful and dreamy)" }, "background": { "type": "string", "description": "Background environment details" }, "composition": { "type": "string", "enum": [ "rule of thirds", "circular arrangement", "framed by foreground", "minimalist negative space", "S-curve", "vanishing point center", "dynamic off-center", "leading leads", "golden spiral", "diagonal energy", "strong verticals", "triangular arrangement" ], "description": "Compositional technique" }, "camera": { "type": "object", "properties": { "angle": { "type": "string", "enum": ["eye level", "low angle", "slightly low", "bird's-eye", "worm's-eye", "over-the-shoulder", "isometric"], "description": "Camera perspective" }, "distance": { "type": "string", "enum": ["close-up", "medium close-up", "medium shot", "medium wide", "wide shot", "extreme wide"], "description": "Framing distance" }, "focus": { "type": "string", "enum": ["deep focus", "macro focus", "selective focus", "sharp on subject", "soft background"], "description": "Focus type" }, "lens": { "type": "string", "enum": ["14mm", "24mm", "35mm", "50mm", "70mm", "85mm"], "description": "Focal length (wide to telephoto)" }, "f-number": { "type": "string", "description": "Aperture (e.g., f/2.8, the smaller the number the more blurry the background)" }, "ISO": { "type": "number", "description": "Light sensitivity value (comfortable range between 100 & 6400, lower = less sensitivity)" } } }, "effects": { "type": "array", "items": { "type": "string" }, "description": "Post-processing effects (e.g., 'lens flare small', 'subtle film grain', 'soft bloom', 'god rays', 'chromatic aberration mild')" } }, "required": ["scene", "subjects"]}#2ECC71Containers now support mounting R2 buckets as FUSE (Filesystem in Userspace) volumes, allowing applications to interact with R2 using standard filesystem operations.
Common use cases include:
FUSE adapters like tigrisfs ↗, s3fs ↗, and gcsfuse ↗ can be installed in your container image and configured to mount buckets at startup.
FROM alpine:3.20
# Install FUSE and dependenciesRUN apk update && \    apk add --no-cache ca-certificates fuse curl bash
# Install tigrisfsRUN ARCH=$(uname -m) && \    if [ "$ARCH" = "x86_64" ]; then ARCH="amd64"; fi && \    if [ "$ARCH" = "aarch64" ]; then ARCH="arm64"; fi && \    VERSION=$(curl -s https://api.github.com/repos/tigrisdata/tigrisfs/releases/latest | grep -o '"tag_name": "[^"]*' | cut -d'"' -f4) && \    curl -L "https://github.com/tigrisdata/tigrisfs/releases/download/${VERSION}/tigrisfs_${VERSION#v}_linux_${ARCH}.tar.gz" -o /tmp/tigrisfs.tar.gz && \    tar -xzf /tmp/tigrisfs.tar.gz -C /usr/local/bin/ && \    rm /tmp/tigrisfs.tar.gz && \    chmod +x /usr/local/bin/tigrisfs
# Create startup script that mounts bucketRUN printf '#!/bin/sh\n\    set -e\n\    mkdir -p /mnt/r2\n\    R2_ENDPOINT="https://${R2_ACCOUNT_ID}.r2.cloudflarestorage.com"\n\    /usr/local/bin/tigrisfs --endpoint "${R2_ENDPOINT}" -f "${BUCKET_NAME}" /mnt/r2 &\n\    sleep 3\n\    ls -lah /mnt/r2\n\    ' > /startup.sh && chmod +x /startup.sh
CMD ["/startup.sh"]
See the Mount R2 buckets with FUSE example for a complete guide on mounting R2 buckets and/or other S3-compatible storage buckets within your containers.
Containers and Sandboxes pricing for CPU time is now based on active usage only, instead of provisioned resources.
This means that you now pay less for Containers and Sandboxes.
Imagine running the standard-2 instance type for one hour, which can use up to 1 vCPU,
but on average you use only 20% of your CPU capacity.
CPU-time is priced at $0.00002 per vCPU-second.
Previously, you would be charged for the CPU allocated to the instance multiplied by the time it was active, in this case 1 hour.
CPU cost would have been: $0.072 — 1 vCPU * 3600 seconds * $0.00002
Now, since you are only using 20% of your CPU capacity, your CPU cost is cut to 20% of the previous amount.
CPU cost is now: $0.0144 — 1 vCPU * 3600 seconds * $0.00002 * 20% utilization
This can significantly reduce costs for Containers and Sandboxes.
See the documentation to learn more about Containers, Sandboxes, and associated pricing.
Workers Builds now supports up to 64 environment variables, and each environment variable can be up to 5 KB in size. The previous limit was 5 KB total across all environment variables.
This change enables better support for complex build configurations, larger application settings, and more flexible CI/CD workflows.
For more details, refer to the build limits documentation.
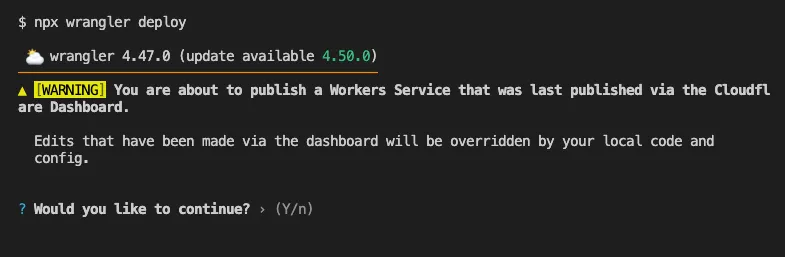
Until now, if a Worker had been previously deployed via the Cloudflare Dashboard ↗, a subsequent deployment done via the Cloudflare Workers CLI, Wrangler
(through the deploy command), would allow the user to override the Worker's dashboard settings without providing details on
what dashboard settings would be lost.
Now instead, wrangler deploy presents a helpful representation of the differences between the local configuration
and the remote dashboard settings, and offers to update your local configuration file for you.
See example below showing a before and after for wrangler deploy when a local configuration is expected to override a Worker's dashboard settings:
Before
After
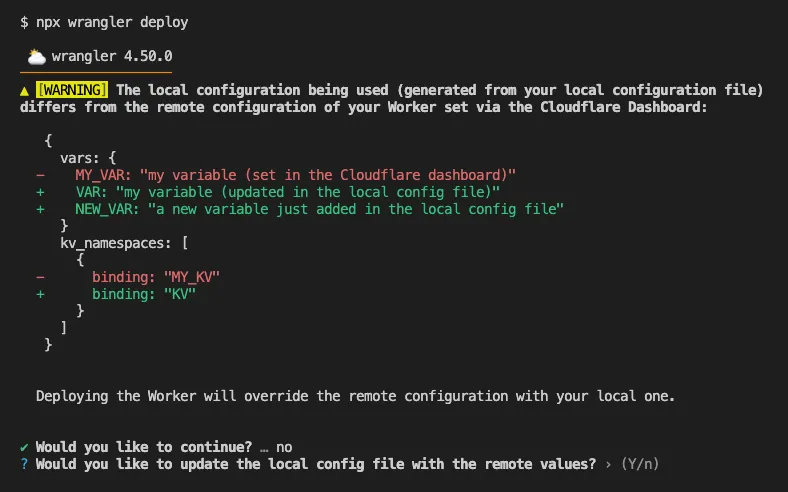
Also, if instead Wrangler detects that a deployment would override remote dashboard settings but in an additive way, without modifying or removing any of them, it will simply proceed with the deployment without requesting any user interaction.
Update to Wrangler v4.50.0 or greater to take advantage of this improved deploy flow.
Earlier this year, we announced the launch of the new Terraform v5 Provider. We are aware of the high number of issues reported by the Cloudflare community related to the v5 release. We have committed to releasing improvements on a 2-3 week cadence ↗ to ensure its stability and reliability, including the v5.13 release. We have also pivoted from an issue-to-issue approach to a resource-per-resource approach ↗ - we will be focusing on specific resources to not only stabilize the resource but also ensure it is migration-friendly for those migrating from v4 to v5.
Thank you for continuing to raise issues. They make our provider stronger and help us build products that reflect your needs.
This release includes new features, new resources and data sources, bug fixes, updates to our Developer Documentation, and more.
Please be aware that there are breaking changes for the cloudflare_api_token and cloudflare_account_token resources. These changes eliminate configuration drift caused by policy ordering differences in the Cloudflare API.
For more specific information about the changes or the actions required, please see the detailed Repository changelog ↗.
We suggest holding off on migration to v5 while we work on stabilization. This help will you avoid any blocking issues while the Terraform resources are actively being stabilized. We will be releasing a new migration tool in March 2026 to help support v4 to v5 transitions for our most popular resources.
AI Search now supports custom HTTP headers for website crawling, solving a common problem where valuable content behind authentication or access controls could not be indexed.
Previously, AI Search could only crawl publicly accessible pages, leaving knowledge bases, documentation, and other protected content out of your search results. With custom headers support, you can now include authentication credentials that allow the crawler to access this protected content.
This is particularly useful for indexing content like:
To add custom headers when creating an AI Search instance, select Parse options. In the Extra headers section, you can add up to five custom headers per Website data source.
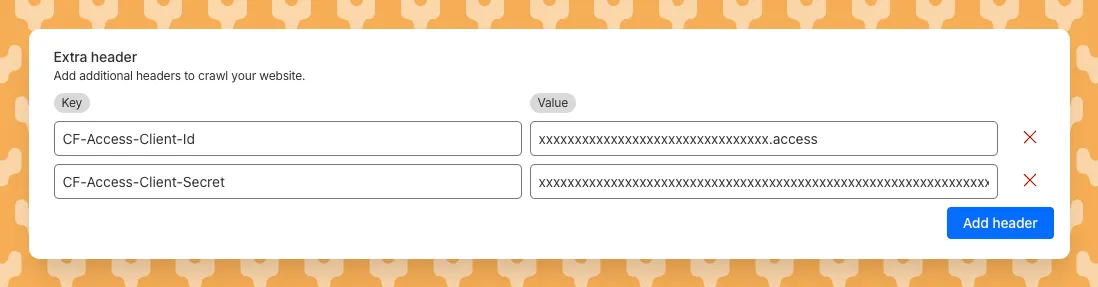
For example, to crawl a site protected by Cloudflare Access, you can add service token credentials as custom headers:
CF-Access-Client-Id: your-token-id.accessCF-Access-Client-Secret: your-token-secretThe crawler will automatically include these headers in all requests, allowing it to access protected pages that would otherwise be blocked.
Learn more about configuring custom headers for website crawling in AI Search.
You can now perform more powerful queries directly in Workers Analytics Engine ↗ with a major expansion of our SQL function library.
Workers Analytics Engine allows you to ingest and store high-cardinality data at scale (such as custom analytics) and query your data through a simple SQL API.
Today, we've expanded Workers Analytics Engine's SQL capabilities with several new functions:
countIf() - count the number of rows which satisfy a provided conditionsumIf() - calculate a sum from rows which satisfy a provided conditionavgIf() - calculate an average from rows which satisfy a provided conditionNew date and time functions: ↗
toYear()toMonth()toDayOfMonth()toDayOfWeek()toHour()toMinute()toSecond()toStartOfYear()toStartOfMonth()toStartOfWeek()toStartOfDay()toStartOfHour()toStartOfFifteenMinutes()toStartOfTenMinutes()toStartOfFiveMinutes()toStartOfMinute()today()toYYYYMM()Whether you're building usage-based billing systems, customer analytics dashboards, or other custom analytics, these functions let you get the most out of your data. Get started with Workers Analytics Engine and explore all available functions in our SQL reference documentation.
Starting February 2, 2026, the cloudflared proxy-dns command will be removed from all new cloudflared releases.
This change is being made to enhance security and address a potential vulnerability in an underlying DNS library. This vulnerability is specific to the proxy-dns command and does not affect any other cloudflared features, such as the core Cloudflare Tunnel service.
The proxy-dns command, which runs a client-side DNS-over-HTTPS (DoH) proxy, has been an officially undocumented feature for several years. This functionality is fully and securely supported by our actively developed products.
Versions of cloudflared released before this date will not be affected and will continue to operate. However, note that our official support policy for any cloudflared release is one year from its release date.
We strongly advise users of this undocumented feature to migrate to one of the following officially supported solutions before February 2, 2026, to continue benefiting from secure DNS-over-HTTPS.
The preferred method for enabling DNS-over-HTTPS on user devices is the Cloudflare WARP client. The WARP client automatically secures and proxies all DNS traffic from your device, integrating it with your organization's Zero Trust policies and posture checks.
For scenarios where installing a client on every device is not possible (such as servers, routers, or IoT devices), we recommend using the WARP Connector.
Instead of running cloudflared proxy-dns on a machine, you can install the WARP Connector on a single Linux host within your private network. This connector will act as a gateway, securely routing all DNS and network traffic from your entire subnet to Cloudflare for filtering and logging.
Wrangler now supports using the CLOUDFLARE_ENV environment variable to select the active environment for your Worker commands. This provides a more flexible way to manage environments, especially when working with build tools and CI/CD pipelines.
Environment selection via environment variable:
CLOUDFLARE_ENV to specify which environment to use for Wrangler commands--env flag--env command line argument takes precedence over the CLOUDFLARE_ENV environment variable# Deploy to the production environment using CLOUDFLARE_ENVCLOUDFLARE_ENV=production wrangler deploy
# Upload a version to the staging environmentCLOUDFLARE_ENV=staging wrangler versions upload
# The --env flag takes precedence over CLOUDFLARE_ENVCLOUDFLARE_ENV=dev wrangler deploy --env production# This will deploy to production, not devThe CLOUDFLARE_ENV environment variable is particularly useful when working with build tools like Vite. You can set the environment once during the build process, and it will be used for both building and deploying your Worker:
# Set the environment for both build and deployCLOUDFLARE_ENV=production npm run build & wrangler deployWhen using @cloudflare/vite-plugin, the build process generates a "redirected deploy config" that is flattened to only contain the active environment. Wrangler will validate that the environment specified matches the environment used during the build to prevent accidentally deploying a Worker built for one environment to a different environment.
Enable automatic tracing on your Workers, giving you detailed metadata and timing information for every operation your Worker performs.
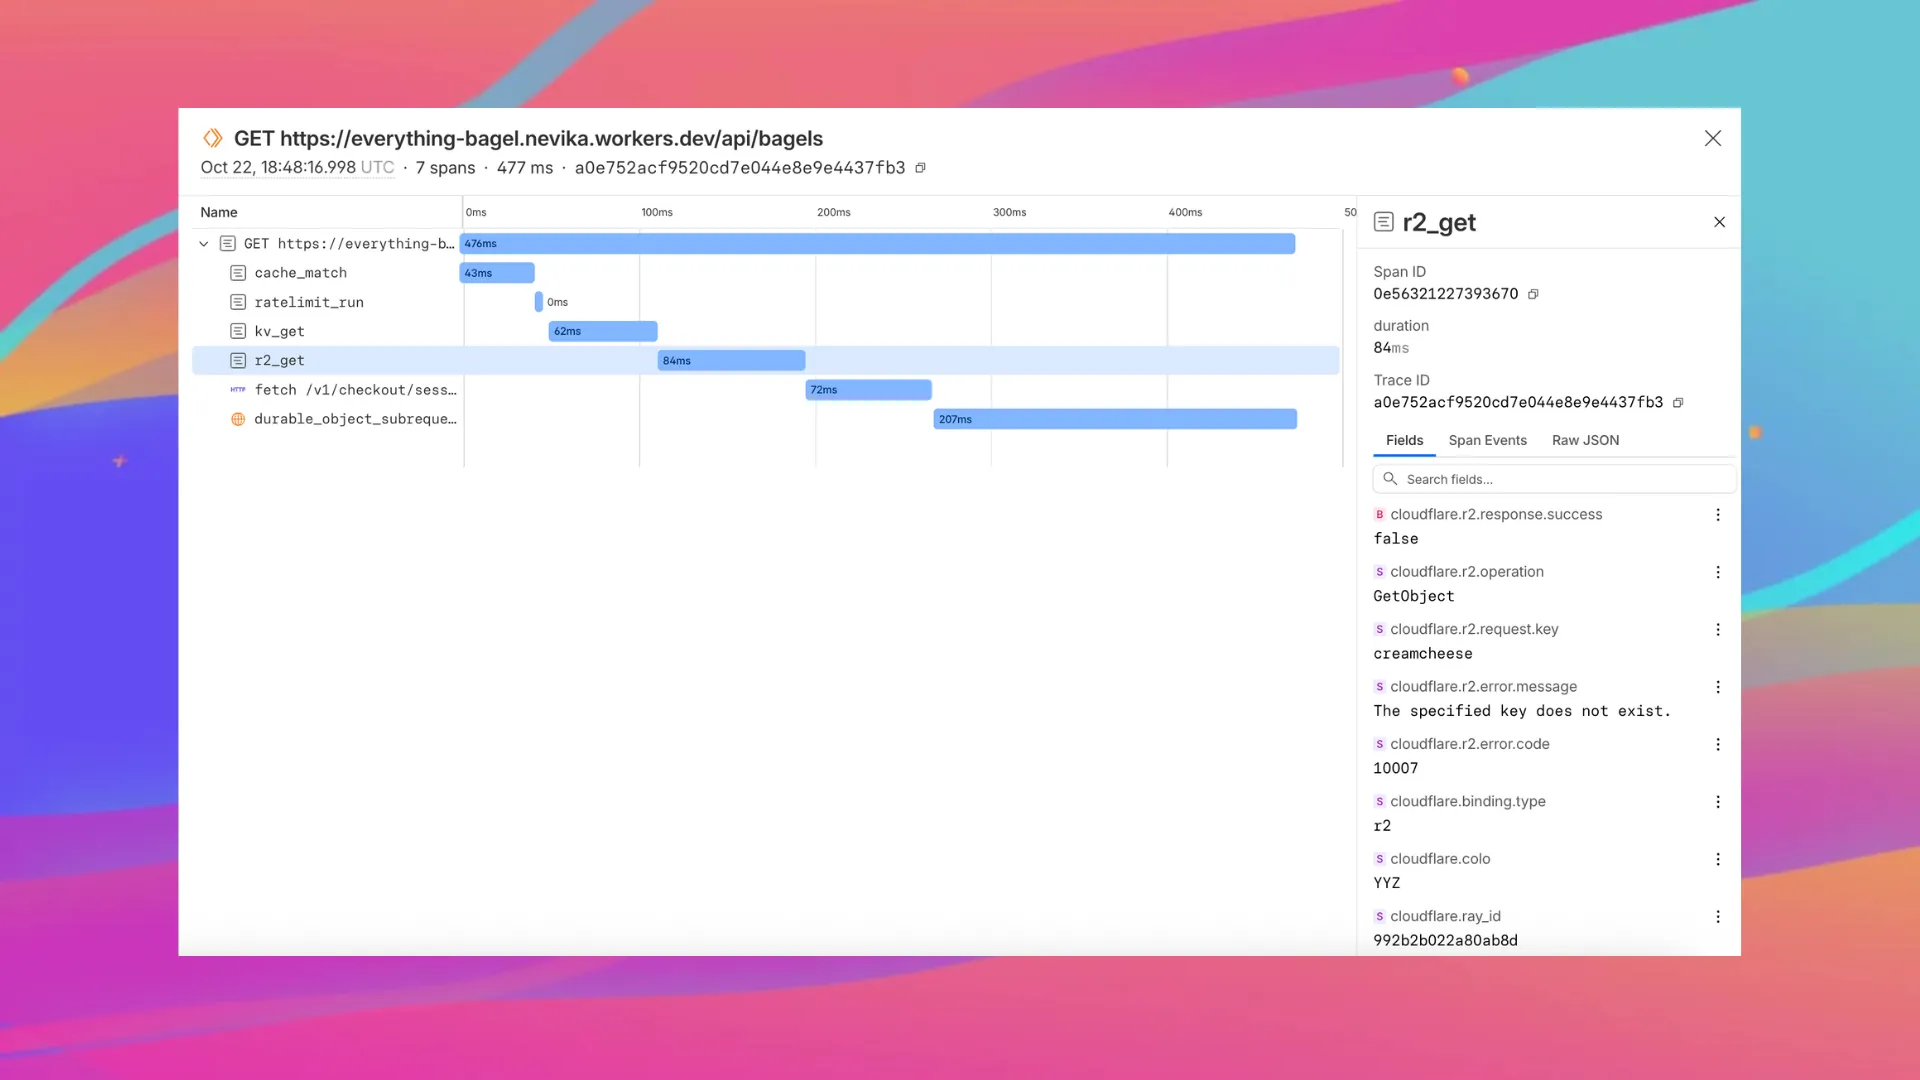
Tracing helps you identify performance bottlenecks, resolve errors, and understand how your Worker interacts with other services on the Workers platform. You can now answer questions like:
You can now:
{ "observability": { "traces": { "enabled": true, }, },}You can now set a jurisdiction when creating a D1 database to guarantee where your database runs and stores data. Jurisdictions can help you comply with data localization regulations such as GDPR. Supported jurisdictions include eu and fedramp.
A jurisdiction can only be set at database creation time via wrangler, REST API or the UI and cannot be added/updated after the database already exists.
npx wrangler@latest d1 create db-with-jurisdiction --jurisdiction eucurl -X POST "https://api.cloudflare.com/client/v4/accounts/<account_id>/d1/database" \ -H "Authorization: Bearer $TOKEN" \ -H "Content-Type: application/json" \ --data '{"name": "db-with-jurisdiction", "jurisdiction": "eu" }'To learn more, visit D1's data location documentation.
Workers VPC Services is now available, enabling your Workers to securely access resources in your private networks, without having to expose them on the public Internet.
export default {  async fetch(request, env, ctx) {    // Perform application logic in Workers here
    // Sample call to an internal API running on ECS in AWS using the binding    const response = await env.AWS_VPC_ECS_API.fetch("https://internal-host.example.com");
// Additional application logic in Workers return new Response(); },};Set up a Cloudflare Tunnel, create a VPC Service, add service bindings to your Worker, and access private resources securely. Refer to the documentation to get started.
You can now capture Wrangler command output in a structured ND-JSON ↗ format by setting the WRANGLER_OUTPUT_FILE_PATH or WRANGLER_OUTPUT_FILE_DIRECTORY environment variables. This feature is particularly useful for CI/CD pipelines and automation tools that need programmatic access to deployment information such as worker names, version IDs, deployment URLs, and error details. Commands that support this feature include wrangler deploy, wrangler versions upload, wrangler versions deploy, and wrangler pages deploy.
Workers, including those using Durable Objects and Browser Rendering, may now process WebSocket messages up to 32 MiB in size. Previously, this limit was 1 MiB.
This change allows Workers to handle use cases requiring large message sizes, such as processing Chrome Devtools Protocol messages.
For more information, please see the Durable Objects startup limits.
We've raised the Cloudflare Workflows account-level limits for all accounts on the Workers paid plan:
These increases mean you can create new instances up to 10x faster, and have more workflow instances concurrently executing. To learn more and get started with Workflows, refer to the getting started guide.
If your application requires a higher limit, fill out the Limit Increase Request Form or contact your account team. Please refer to Workflows pricing for more information.
You can now access preview URLs directly from the build details page, making it easier to test your changes when reviewing builds in the dashboard.
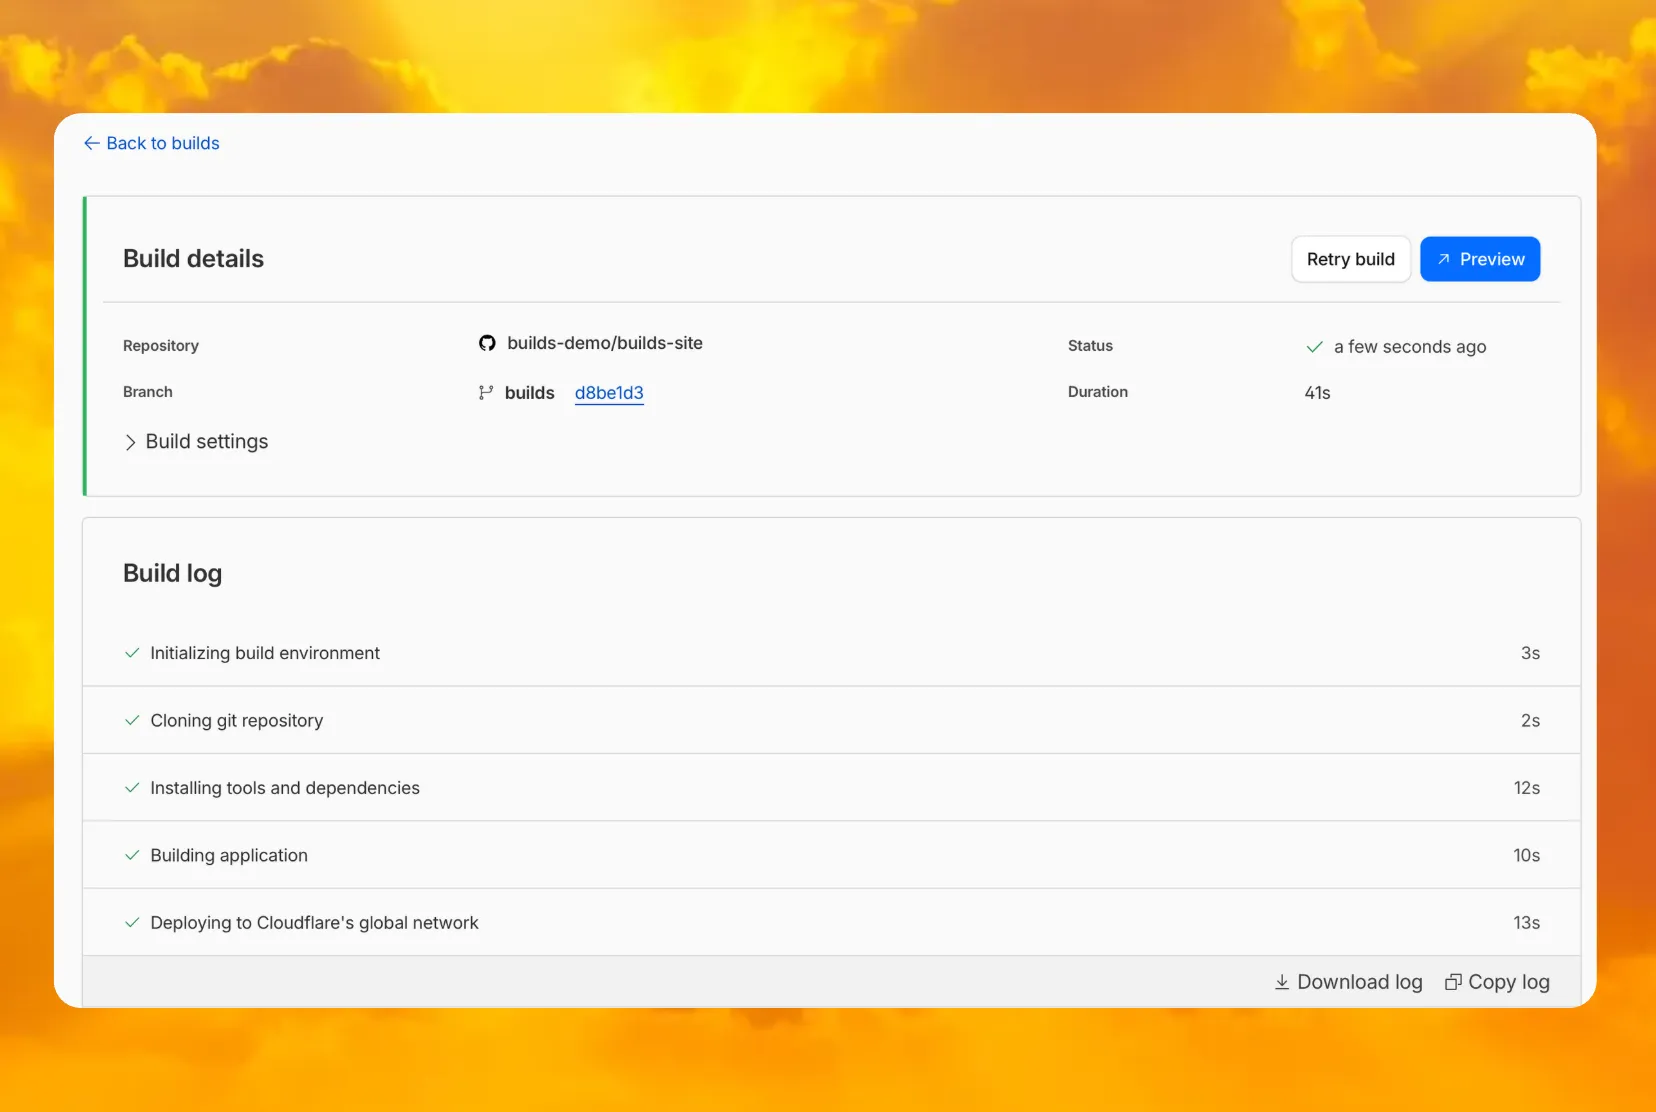
What's new
AI Search now supports reranking for improved retrieval quality and allows you to set the system prompt directly in your API requests.
You can now enable reranking to reorder retrieved documents based on their semantic relevance to the user’s query. Reranking helps improve accuracy, especially for large or noisy datasets where vector similarity alone may not produce the optimal ordering.
You can enable and configure reranking in the dashboard or directly in your API requests:
const answer = await env.AI.autorag("my-autorag").aiSearch({ query: "How do I train a llama to deliver coffee?", model: "@cf/meta/llama-3.3-70b-instruct-fp8-fast", reranking: { enabled: true, model: "@cf/baai/bge-reranker-base", },});Previously, system prompts could only be configured in the dashboard. You can now define them directly in your API requests, giving you per-query control over behavior. For example:
// Dynamically set query and system prompt in AI Searchasync function getAnswer(query, tone) {  const systemPrompt = `You are a ${tone} assistant.`;
  const response = await env.AI.autorag("my-autorag").aiSearch({    query: query,    system_prompt: systemPrompt,  });
  return response;}
// Example usageconst query = "What is Cloudflare?";const tone = "friendly";
const answer = await getAnswer(query, tone);console.log(answer);
Learn more about Reranking and System Prompt in AI Search.
Previously, if you wanted to develop or deploy a worker with attached resources, you'd have to first manually create the desired resources. Now, if your Wrangler configuration file includes a KV namespace, D1 database, or R2 bucket that does not yet exist on your account, you can develop locally and deploy your application seamlessly, without having to run additional commands.
Automatic provisioning is launching as an open beta, and we'd love to hear your feedback to help us make improvements! It currently works for KV, R2, and D1 bindings. You can disable the feature using the --no-x-provision flag.
To use this feature, update to wrangler@4.45.0 and add bindings to your config file without resource IDs e.g.:
{ "kv_namespaces": [{ "binding": "MY_KV" }], "d1_databases": [{ "binding": "MY_DB" }], "r2_buckets": [{ "binding": "MY_R2" }],}wrangler dev will then automatically create these resources for you locally, and on your next run of wrangler deploy, Wrangler will call the Cloudflare API to create the requested resources and link them to your Worker.
Though resource IDs will be automatically written back to your Wrangler config file after resource creation, resources will stay linked across future deploys even without adding the resource IDs to the config file. This is especially useful for shared templates, which now no longer need to include account-specific resource IDs when adding a binding.