Two-factor authentication
We recommend that all Cloudflare user account holders enable two-factor authentication (2FA) to keep your accounts secure.
2FA can only be enabled successfully on an account with a verified email address. If you do not verify your email address first, you may lock yourself out of your account.
To enable two-factor authentication for your Cloudflare login:
- Log in to the Cloudflare dashboard ↗.
- Under the My Profile dropdown, select My Profile.
- Select Authentication.
- Select Manage in the Two-Factor Authentication card.
- Configure either a TOTP mobile app or a security key to enable 2FA on your account.
A security key provides phishing-resistant multifactor authentication to your Cloudflare account using a built-in authenticator (Apple Touch ID, Android fingerprint, or Windows Hello) or an external hardware key (like YubiKey ↗) that connects to your computer through USB-A, USB-C, NFC, or Bluetooth.
Cloudflare recommends configuring multiple security keys. With multiple keys, you can still use 2FA if the primary key is unavailable or if you are working on a different device.
After enabling 2FA on your Cloudflare account, you can select Manage to configure 2FA security key authentication.
You can configure a built-in authenticator such as Apple Touch ID, Android fingerprint, or Windows Hello.
- In Security Key Authentication, select Add.
- On the Add a Security Key, enter your Cloudflare password and select Next.
- Interact with your built-in authenticator to add it to your Cloudflare account.
- Enter a name for the built-in authenticator. If this is the initial setup, you will be prompted to generate backup codes. If not, skip to Step 8.
- Enter your Cloudflare password.
- Select Next to review your backup codes. Backup codes can be used to access your user account without your mobile device.
- Select Download, Print, or Copy to save your backup codes in a secure location.
- Select Next to finish the configuration.
You can configure a security key, such as a Yubikey, to use with your account. Before you begin, ensure your hardware security key is configured and plugged in.
On a Windows device, you may need to set up Windows Hello or register your security key to your Microsoft account. Review the Windows documentation for more details.
- Once your security key is plugged in, go to Profile > Authentication.
- From **Two-Factor Authentication, select Set up.
- From Security Key Authentication, select Add.
- Enter your Cloudflare password on the Add a Security Key screen, then select Next.
- Interact with your security key to add it to your Cloudflare account. Ensure that the dialog is for the security key setup. If the Windows Hello dialog appears on a Windows device, select Cancel. The security key dialog box will then appear. Depending on your system, you may be required to register a PIN for the security key.
- Enter a name for the security key. If this is the initial setup, you will be prompted to generate backup codes. If not, skip to Step 8.
- Enter your Cloudflare password.
- Select Next to review your backup codes. Backup codes can be used to access your user account without your mobile device.
- Select Download, Print, or Copy to save your backup codes in a secure location.
- Select Next to finish the configuration.
Time-based one-time password (TOTP) authentication works by using an authenticatior app, such as Google Authenticator or Microsoft Authenticator, which generates a secret code shared between the app and a website. When you log in to the website, you enter your username, password, and the secret code generated from the authenticator app. The secret code is only valid for a short period of time, about 30 to 60 seconds, before a new code is generated.
- Once your security key is plugged in, go to Profile > Authentication.
- From Two-Factor Authentication, select Set up.
- Under Mobile App Authentication, select Add.
- Scan the QR code with your mobile device and enter the code from your authenticator application.
- Enter your Cloudflare password, then select Next. If you cannot scan the QR code, select Can't scan QR code, Follow alternative steps to configure your authenticator application manually.
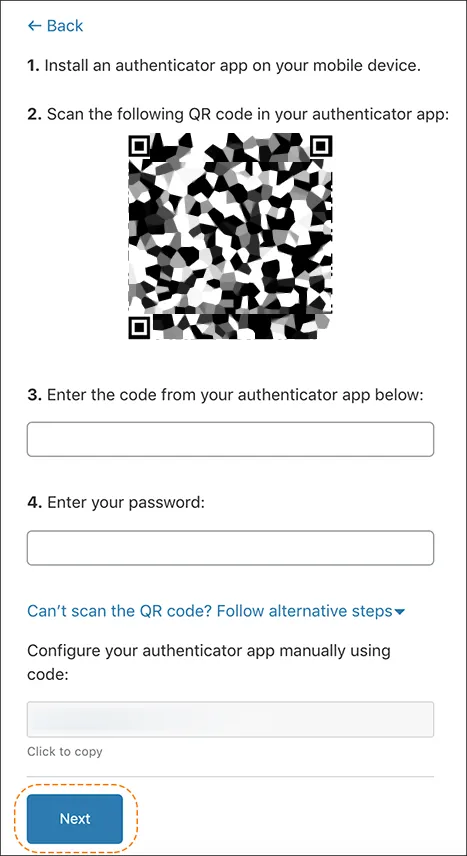
- Enter your Cloudflare password again.
- Select Next to review your backup codes. You can use backup codes to access your account without your mobile device.
- Select Download, Print, or Copy to save your backup codes in a secure location.
- Select Next on the backup code page to complete the recovery code setup.
You may need to reconfigure your mobile application authentication if you join a new organization or lose access to your mobile device. When you reconfigure your mobile application authentication, your previous TOTP codes are invalid.
To reconfigure, follow Steps 1-7 as detailed above.
Each backup code is one-time use only, but you can always request a new set of backup codes using the Cloudflare dashboard. This is useful if you have lost access to or used all of your previous backup codes.
- Log in to the Cloudflare dashboard.
- Select My Profile.
- Select Authentication.
- Select Regenerate to generate and save a new set of two-factor backup codes.
To disable 2FA for your Cloudflare account, you must delete all security keys and TOTP authenticators from your account.
- Log in to the Cloudflare dashboard.
- Select Profile.
- Select the Authentication.
- To remove your security key:
- Select Edit in the Security Key Authentication card. A drop-down menu shows more details about your security key.
- Select Delete.
- Enter your Cloudflare password, then select Remove.
- To remove your TOTP mobile application authentication:
- Select Delete method in the Mobile App Authentication card.
- Enter your Cloudflare password, authenticator application code, or a recovery code, then select Disable.
- To remove your security key:
If you lose access to a mobile device, security key, or authentication code, you can solve these issues by using a backup code or retrieving a backup code from your preferred authentication app.
Refer to Google's documentation to transfer Google Authenticator codes from one Android device to another ↗.
When setting up 2FA, you should have saved your backup codes in a secure location. To restore lost access using a Cloudflare backup code:
- Retrieve the backup code from where you stored it.
- Go to the Cloudflare login page ↗, enter your username and password and select Log in.
- You should see a page titled Two-Factor Authentication
- If it has a text box, enter one of your backup codes and select Log in.
- If instead you see "Insert your security key and touch it", cancel any prompts from your browser that appear and select try another authentication method or backup code. Proceed to enter one of your backup codes and select Log in.
If you do not have access to your 2FA account or backup codes and cannot currently generate a 2FA code, use a verified device that you have logged in from before to request a temporary access code.
-
Log into the Cloudflare dashboard ↗.
-
On the Two-Factor Authentication page, select Try recovery on Lost all 2FA devices and backup codes?.
-
Select Begin recovery.
-
A 6-digit access code will be sent to the email address associated with your Cloudflare account.
-
Enter the temporary access code into the Cloudflare Dashboard and select Verify email.
-
Select Verify device. This checks whether you are using a device that has previously logged into your account.
-
If you receive a "Device verification failed" message:
- If you clear your cookies often or are logging in from a different IP address, you have wiped Cloudflare's memory of your device and will need to use a different device to verify.
- For security reasons, you must wait three to five days after completing verification to receive your temporary access code.
- Your browser may be set to clear cookies on exit or after browser or OS upgrades. This interferes with the device verification process.
- You may be using anti-malware or other software that automatically clears your browser cookies and makes your device unregognizable by Cloudflare's Dashboard.
If you are still unable to verify your device, follow the instructions shown in the recovery workflow.
Was this helpful?
- Resources
- API
- New to Cloudflare?
- Products
- Sponsorships
- Open Source
- Support
- Help Center
- System Status
- Compliance
- GDPR
- Company
- cloudflare.com
- Our team
- Careers
- 2025 Cloudflare, Inc.
- Privacy Policy
- Terms of Use
- Report Security Issues
- Trademark
-
