
The
@cloudflare/codemode↗ package has been rewritten into a modular, runtime-agnostic SDK.Code Mode ↗ enables LLMs to write and execute code that orchestrates your tools, instead of calling them one at a time. This can (and does) yield significant token savings, reduces context window pressure and improves overall model performance on a task.
The new
Executorinterface is runtime agnostic and comes with a prebuiltDynamicWorkerExecutorto run generated code in a Dynamic Worker Loader.- Removed
experimental_codemode()andCodeModeProxy— the package no longer owns an LLM call or model choice - New import path:
createCodeTool()is now exported from@cloudflare/codemode/ai
createCodeTool()— Returns a standard AI SDKToolto use in your AI agents.Executorinterface — Minimalexecute(code, fns)contract. Implement for any code sandboxing primitive or runtime.
Runs code in a Dynamic Worker. It comes with the following features:
- Network isolation —
fetch()andconnect()blocked by default (globalOutbound: null) when usingDynamicWorkerExecutor - Console capture —
console.log/warn/errorcaptured and returned inExecuteResult.logs - Execution timeout — Configurable via
timeoutoption (default 30s)
JavaScript import { createCodeTool } from "@cloudflare/codemode/ai";import { DynamicWorkerExecutor } from "@cloudflare/codemode";import { streamText } from "ai";const executor = new DynamicWorkerExecutor({ loader: env.LOADER });const codemode = createCodeTool({ tools: myTools, executor });const result = streamText({model,tools: { codemode },messages,});TypeScript import { createCodeTool } from "@cloudflare/codemode/ai";import { DynamicWorkerExecutor } from "@cloudflare/codemode";import { streamText } from "ai";const executor = new DynamicWorkerExecutor({ loader: env.LOADER });const codemode = createCodeTool({ tools: myTools, executor });const result = streamText({model,tools: { codemode },messages,});JSONC {"worker_loaders": [{ "binding": "LOADER" }],}TOML [[worker_loaders]]binding = "LOADER"See the Code Mode documentation for full API reference and examples.
Terminal window npm i @cloudflare/codemode@latest- Removed
Workers AI and AI Gateway have received a series of dashboard improvements to help you get started faster and manage your AI workloads more easily.
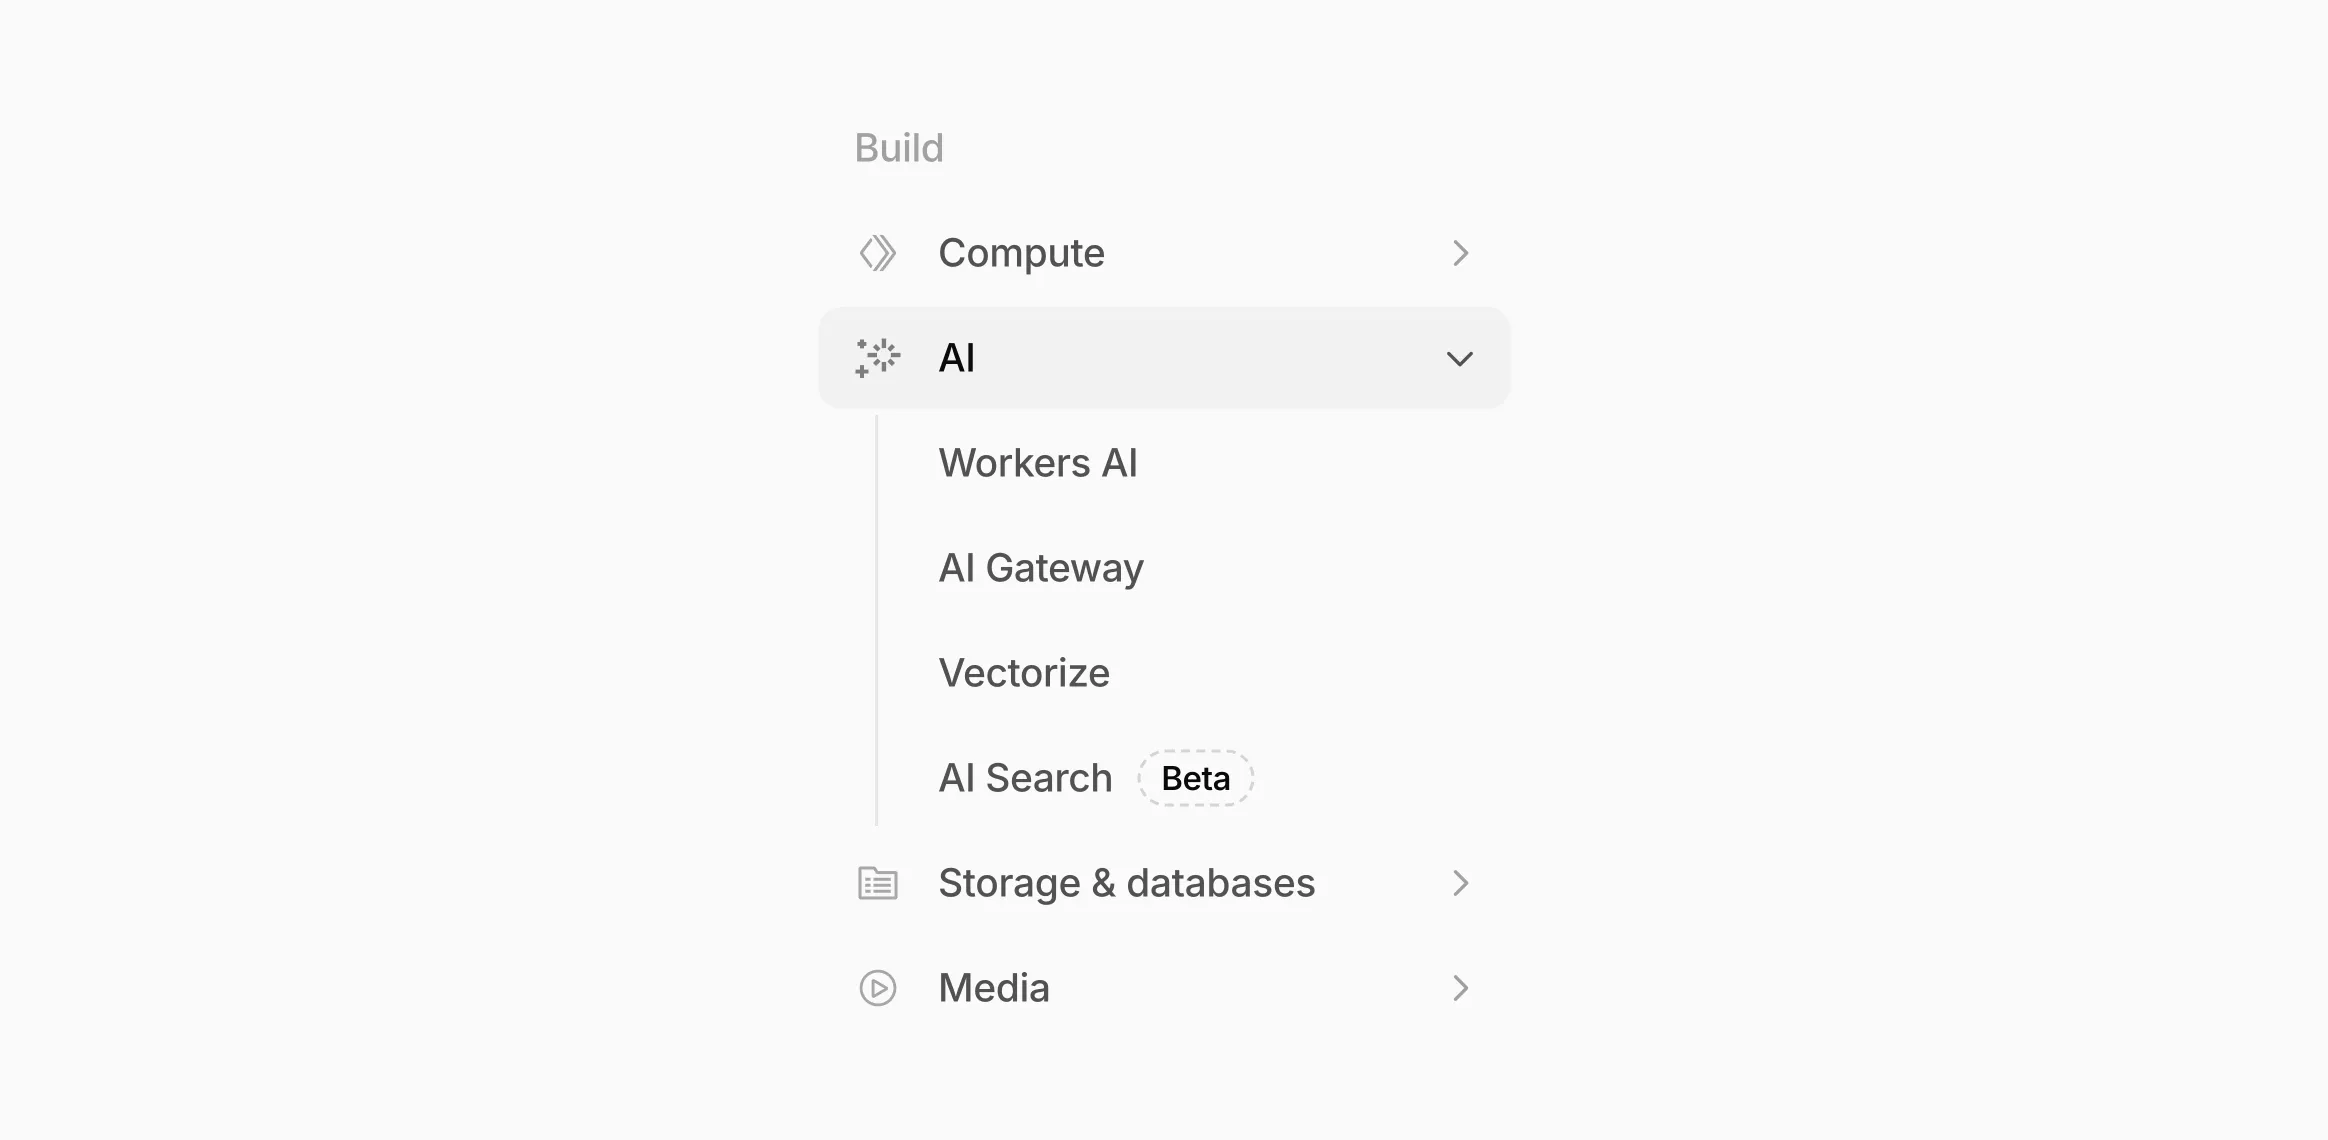
Navigation and discoverability
AI now has its own top-level section in the Cloudflare dashboard sidebar, so you can find AI features without digging through menus.
Onboarding and getting started
Getting started with AI Gateway is now simpler. When you create your first gateway, we now show your gateway's OpenAI-compatible endpoint and step-by-step guidance to help you configure it. The Playground also includes helpful prompts, and usage pages have clear next steps if you have not made any requests yet.
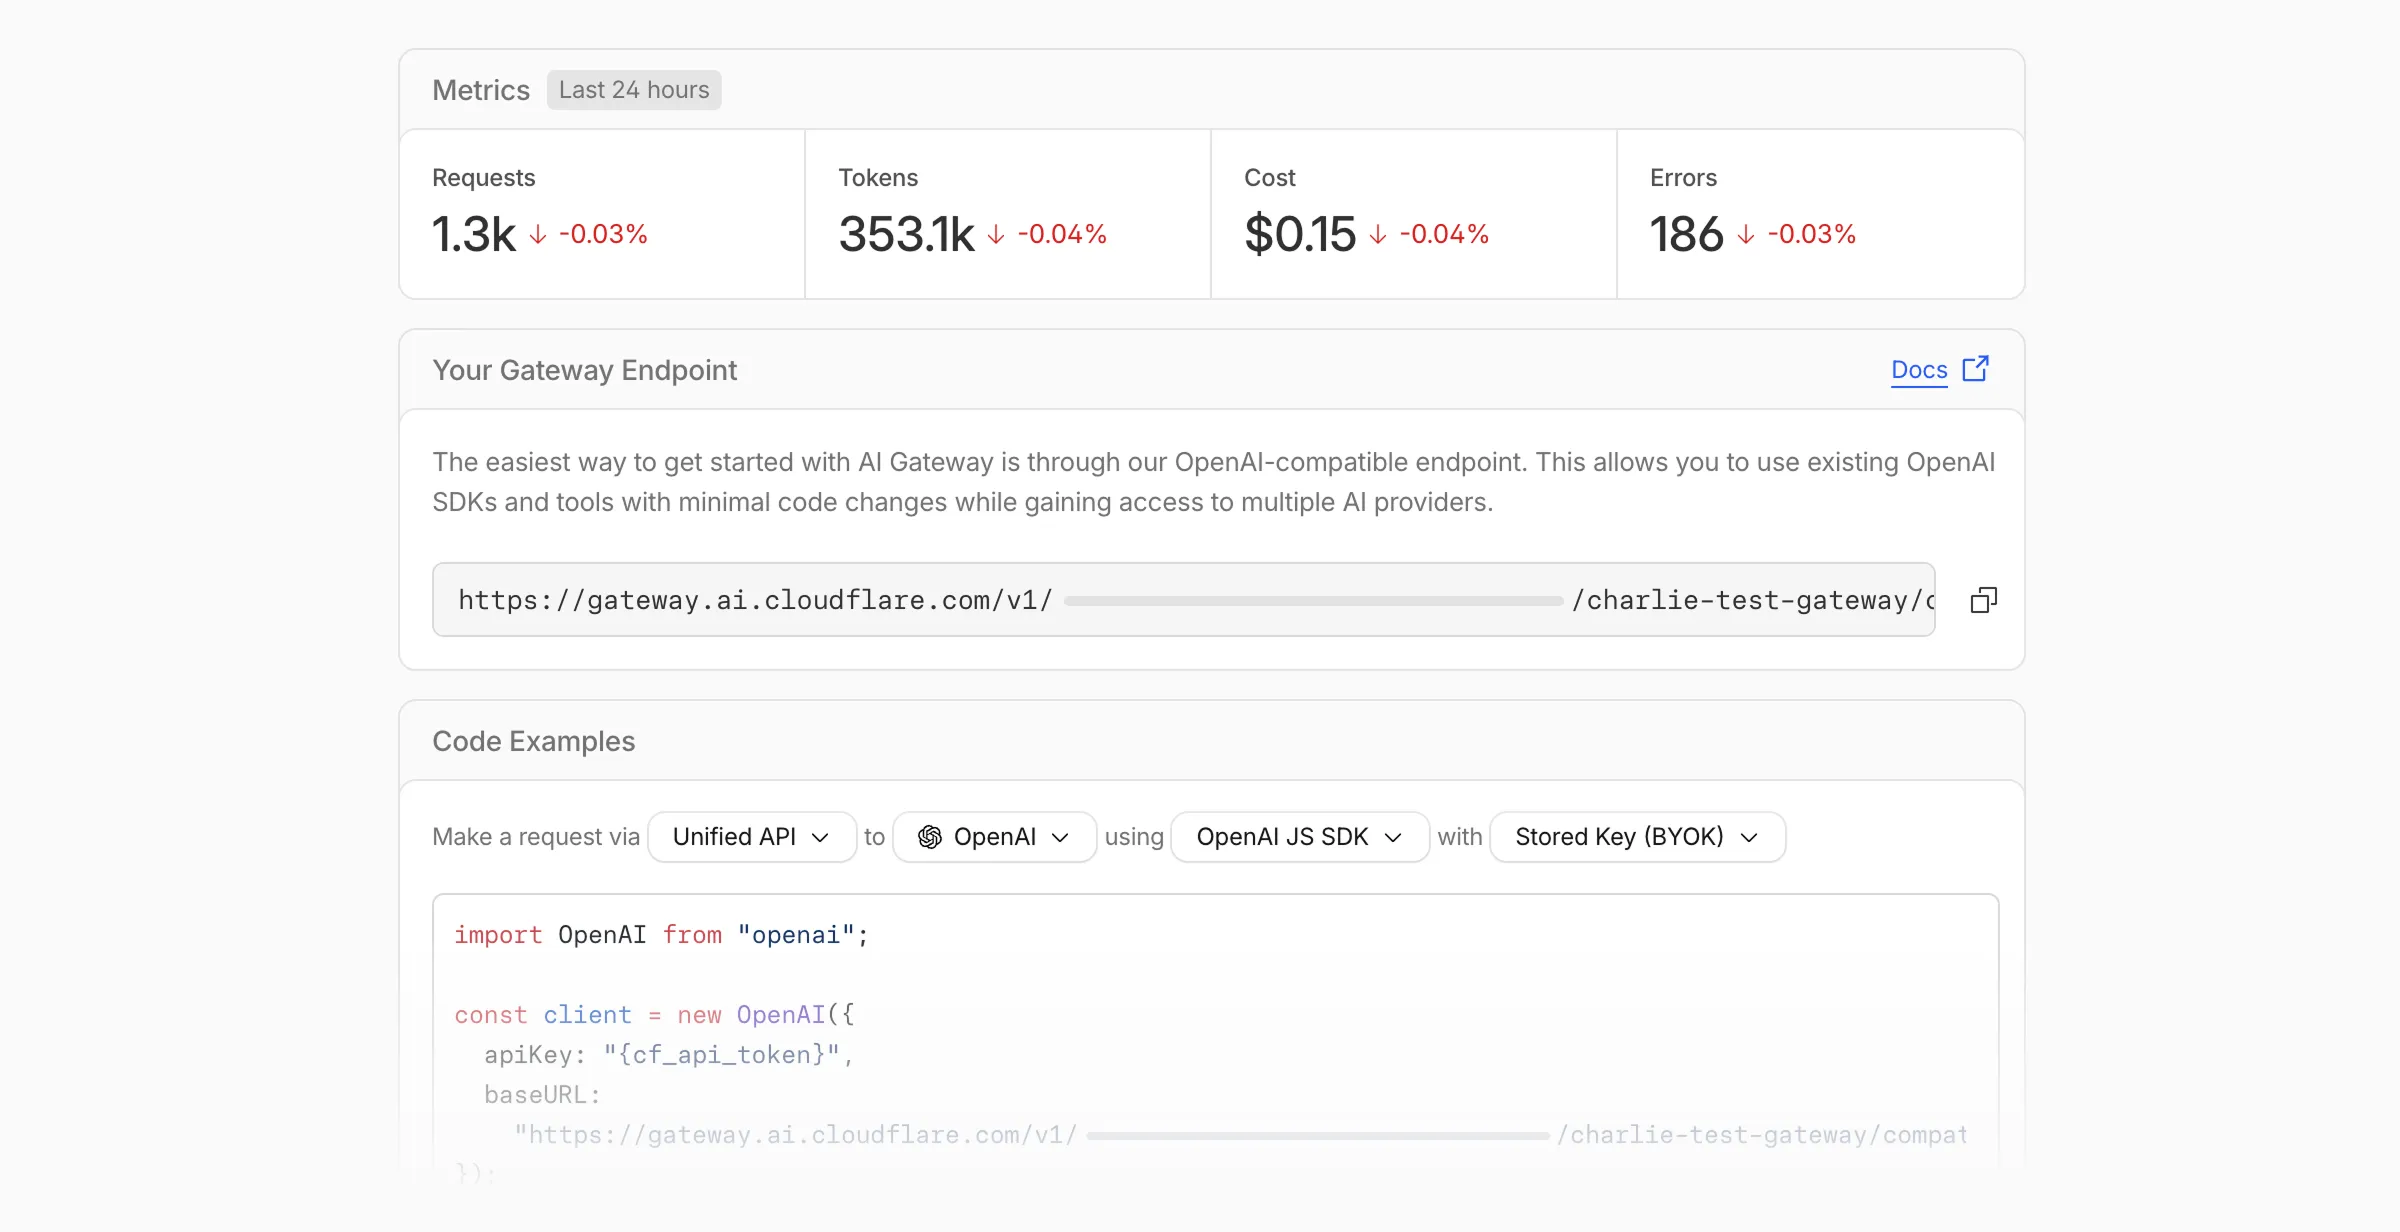
We've also combined the previously separate code example sections into one view with dropdown selectors for API type, provider, SDK, and authentication method so you can now customize the exact code snippet you need from one place.
Dynamic Routing
- The route builder is now more performant and responsive.
- You can now copy route names to your clipboard with a single click.
- Code examples use the Universal Endpoint format, making it easier to integrate routes into your application.
Observability and analytics
- Small monetary values now display correctly in cost analytics charts, so you can accurately track spending at any scale.
Accessibility
- Improvements to keyboard navigation within the AI Gateway, specifically when exploring usage by provider.
- Improvements to sorting and filtering components on the Workers AI models page.
For more information, refer to the AI Gateway documentation.
The latest release of the Agents SDK ↗ adds built-in retry utilities, per-connection protocol message control, and a fully rewritten
@cloudflare/ai-chatwith data parts, tool approval persistence, and zero breaking changes.A new
this.retry()method lets you retry any async operation with exponential backoff and jitter. You can pass an optionalshouldRetrypredicate to bail early on non-retryable errors.JavaScript class MyAgent extends Agent {async onRequest(request) {const data = await this.retry(() => callUnreliableService(), {maxAttempts: 4,shouldRetry: (err) => !(err instanceof PermanentError),});return Response.json(data);}}TypeScript class MyAgent extends Agent {async onRequest(request: Request) {const data = await this.retry(() => callUnreliableService(), {maxAttempts: 4,shouldRetry: (err) => !(err instanceof PermanentError),});return Response.json(data);}}Retry options are also available per-task on
queue(),schedule(),scheduleEvery(), andaddMcpServer():JavaScript // Per-task retry configuration, persisted in SQLite alongside the taskawait this.schedule(Date.now() + 60_000,"sendReport",{ userId: "abc" },{retry: { maxAttempts: 5 },},);// Class-level retry defaultsclass MyAgent extends Agent {static options = {retry: { maxAttempts: 3 },};}TypeScript // Per-task retry configuration, persisted in SQLite alongside the taskawait this.schedule(Date.now() + 60_000, "sendReport", { userId: "abc" }, {retry: { maxAttempts: 5 },});// Class-level retry defaultsclass MyAgent extends Agent {static options = {retry: { maxAttempts: 3 },};}Retry options are validated eagerly at enqueue/schedule time, and invalid values throw immediately. Internal retries have also been added for workflow operations (
terminateWorkflow,pauseWorkflow, and others) with Durable Object-aware error detection.Agents automatically send JSON text frames (identity, state, MCP server lists) to every WebSocket connection. You can now suppress these per-connection for clients that cannot handle them — binary-only devices, MQTT clients, or lightweight embedded systems.
JavaScript class MyAgent extends Agent {shouldSendProtocolMessages(connection, ctx) {// Suppress protocol messages for MQTT clientsconst subprotocol = ctx.request.headers.get("Sec-WebSocket-Protocol");return subprotocol !== "mqtt";}}TypeScript class MyAgent extends Agent {shouldSendProtocolMessages(connection: Connection, ctx: ConnectionContext) {// Suppress protocol messages for MQTT clientsconst subprotocol = ctx.request.headers.get("Sec-WebSocket-Protocol");return subprotocol !== "mqtt";}}Connections with protocol messages disabled still fully participate in RPC and regular messaging. Use
isConnectionProtocolEnabled(connection)to check a connection's status at any time. The flag persists across Durable Object hibernation.See Protocol messages for full documentation.
The first stable release of
@cloudflare/ai-chatships alongside this release with a major refactor ofAIChatAgentinternals — newResumableStreamclass, WebSocketChatTransport, and simplified SSE parsing — with zero breaking changes. Existing code usingAIChatAgentanduseAgentChatworks as-is.Key new features:
- Data parts — Attach typed JSON blobs (
data-*) to messages alongside text. Supports reconciliation (type+id updates in-place), append, and transient parts (ephemeral viaonDatacallback). See Data parts. - Tool approval persistence — The
needsApprovalapproval UI now survives page refresh and DO hibernation. The streaming message is persisted to SQLite when a tool entersapproval-requestedstate. maxPersistedMessages— Cap SQLite message storage with automatic oldest-message deletion.bodyoption onuseAgentChat— Send custom data with every request (static or dynamic).- Incremental persistence — Hash-based cache to skip redundant SQL writes.
- Row size guard — Automatic two-pass compaction when messages approach the SQLite 2 MB limit.
autoContinueAfterToolResultdefaults totrue— Client-side tool results and tool approvals now automatically trigger a server continuation, matching server-executed tool behavior. SetautoContinueAfterToolResult: falseinuseAgentChatto restore the previous behavior.
Notable bug fixes:
- Resolved stream resumption race conditions
- Resolved an issue where
setMessagesfunctional updater sent empty arrays - Resolved an issue where client tool schemas were lost after DO hibernation
- Resolved
InvalidPromptErrorafter tool approval (approval.idwas dropped) - Resolved an issue where message metadata was not propagated on broadcast/resume paths
- Resolved an issue where
clearAll()did not clear in-memory chunk buffers - Resolved an issue where
reasoning-deltasilently dropped data whenreasoning-startwas missed during stream resumption
getQueue(),getQueues(),getSchedule(),dequeue(),dequeueAll(), anddequeueAllByCallback()were unnecessarilyasyncdespite only performing synchronous SQL operations. They now return values directly instead of wrapping them in Promises. This is backward compatible — existing code usingawaiton these methods will continue to work.- Fix TypeScript "excessively deep" error — A depth counter on
CanSerializeandIsSerializableParamtypes bails out totrueafter 10 levels of recursion, preventing the "Type instantiation is excessively deep" error with deeply nested types like AI SDKCoreMessage[]. - POST SSE keepalive — The POST SSE handler now sends
event: pingevery 30 seconds to keep the connection alive, matching the existing GET SSE handler behavior. This prevents POST response streams from being silently dropped by proxies during long-running tool calls. - Widened peer dependency ranges — Peer dependency ranges across packages have been widened to prevent cascading major bumps during 0.x minor releases.
@cloudflare/ai-chatand@cloudflare/codemodeare now marked as optional peer dependencies.
To update to the latest version:
Terminal window npm i agents@latest @cloudflare/ai-chat@latest- Data parts — Attach typed JSON blobs (
We're excited to announce GLM-4.7-Flash on Workers AI, a fast and efficient text generation model optimized for multilingual dialogue and instruction-following tasks, along with the brand-new @cloudflare/tanstack-ai ↗ package and workers-ai-provider v3.1.1 ↗.
You can now run AI agents entirely on Cloudflare. With GLM-4.7-Flash's multi-turn tool calling support, plus full compatibility with TanStack AI and the Vercel AI SDK, you have everything you need to build agentic applications that run completely at the edge.
@cf/zai-org/glm-4.7-flashis a multilingual model with a 131,072 token context window, making it ideal for long-form content generation, complex reasoning tasks, and multilingual applications.Key Features and Use Cases:
- Multi-turn Tool Calling for Agents: Build AI agents that can call functions and tools across multiple conversation turns
- Multilingual Support: Built to handle content generation in multiple languages effectively
- Large Context Window: 131,072 tokens for long-form writing, complex reasoning, and processing long documents
- Fast Inference: Optimized for low-latency responses in chatbots and virtual assistants
- Instruction Following: Excellent at following complex instructions for code generation and structured tasks
Use GLM-4.7-Flash through the Workers AI binding (
env.AI.run()), the REST API at/runor/v1/chat/completions, AI Gateway, or via workers-ai-provider for the Vercel AI SDK.Pricing is available on the model page or pricing page.
We've released
@cloudflare/tanstack-ai, a new package that brings Workers AI and AI Gateway support to TanStack AI ↗. This provides a framework-agnostic alternative for developers who prefer TanStack's approach to building AI applications.Workers AI adapters support four configuration modes — plain binding (
env.AI), plain REST, AI Gateway binding (env.AI.gateway(id)), and AI Gateway REST — across all capabilities:- Chat (
createWorkersAiChat) — Streaming chat completions with tool calling, structured output, and reasoning text streaming. - Image generation (
createWorkersAiImage) — Text-to-image models. - Transcription (
createWorkersAiTranscription) — Speech-to-text. - Text-to-speech (
createWorkersAiTts) — Audio generation. - Summarization (
createWorkersAiSummarize) — Text summarization.
AI Gateway adapters route requests from third-party providers — OpenAI, Anthropic, Gemini, Grok, and OpenRouter — through Cloudflare AI Gateway for caching, rate limiting, and unified billing.
To get started:
Terminal window npm install @cloudflare/tanstack-ai @tanstack/aiThe Workers AI provider for the Vercel AI SDK ↗ now supports three new capabilities beyond chat and image generation:
- Transcription (
provider.transcription(model)) — Speech-to-text with automatic handling of model-specific input formats across binding and REST paths. - Text-to-speech (
provider.speech(model)) — Audio generation with support for voice and speed options. - Reranking (
provider.reranking(model)) — Document reranking for RAG pipelines and search result ordering.
TypeScript import { createWorkersAI } from "workers-ai-provider";import {experimental_transcribe,experimental_generateSpeech,rerank,} from "ai";const workersai = createWorkersAI({ binding: env.AI });const transcript = await experimental_transcribe({model: workersai.transcription("@cf/openai/whisper-large-v3-turbo"),audio: audioData,mediaType: "audio/wav",});const speech = await experimental_generateSpeech({model: workersai.speech("@cf/deepgram/aura-1"),text: "Hello world",voice: "asteria",});const ranked = await rerank({model: workersai.reranking("@cf/baai/bge-reranker-base"),query: "What is machine learning?",documents: ["ML is a branch of AI.", "The weather is sunny."],});This release also includes a comprehensive reliability overhaul (v3.0.5):
- Fixed streaming — Responses now stream token-by-token instead of buffering all chunks, using a proper
TransformStreampipeline with backpressure. - Fixed tool calling — Resolved issues with tool call ID sanitization, conversation history preservation, and a heuristic that silently fell back to non-streaming mode when tools were defined.
- Premature stream termination detection — Streams that end unexpectedly now report
finishReason: "error"instead of silently reporting"stop". - AI Search support — Added
createAISearchas the canonical export (renamed from AutoRAG).createAutoRAGstill works with a deprecation warning.
To upgrade:
Terminal window npm install workers-ai-provider@latest ai
The latest release of the Agents SDK ↗ brings readonly connections, MCP protocol and security improvements, x402 payment protocol v2 migration, and the ability to customize OAuth for MCP server connections.
Agents can now restrict WebSocket clients to read-only access, preventing them from modifying agent state. This is useful for dashboards, spectator views, or any scenario where clients should observe but not mutate.
New hooks:
shouldConnectionBeReadonly,setConnectionReadonly,isConnectionReadonly. Readonly connections block both client-sidesetState()and mutating@callable()methods, and the readonly flag survives hibernation.JavaScript class MyAgent extends Agent {shouldConnectionBeReadonly(connection) {// Make spectators readonlyreturn connection.url.includes("spectator");}}TypeScript class MyAgent extends Agent {shouldConnectionBeReadonly(connection) {// Make spectators readonlyreturn connection.url.includes("spectator");}}The new
createMcpOAuthProvidermethod on theAgentclass allows subclasses to override the default OAuth provider used when connecting to MCP servers. This enables custom authentication strategies such as pre-registered client credentials or mTLS, beyond the built-in dynamic client registration.JavaScript class MyAgent extends Agent {createMcpOAuthProvider(callbackUrl) {return new MyCustomOAuthProvider(this.ctx.storage, this.name, callbackUrl);}}TypeScript class MyAgent extends Agent {createMcpOAuthProvider(callbackUrl: string): AgentMcpOAuthProvider {return new MyCustomOAuthProvider(this.ctx.storage, this.name, callbackUrl);}}Upgraded the MCP SDK to 1.26.0 to prevent cross-client response leakage. Stateless MCP Servers should now create a new
McpServerinstance per request instead of sharing a single instance. A guard is added in this version of the MCP SDK which will prevent connection to a Server instance that has already been connected to a transport. Developers will need to modify their code if they declare theirMcpServerinstance as a global variable.Added
callbackPathoption toaddMcpServerto prevent instance name leakage in MCP OAuth callback URLs. WhensendIdentityOnConnectisfalse,callbackPathis now required — the default callback URL would expose the instance name, undermining the security intent. Also fixes callback request detection to match via thestateparameter instead of a loose/callbackURL substring check, enabling custom callback paths.onStateChangedis a drop-in rename ofonStateUpdate(same signature, same behavior).onStateUpdatestill works but emits a one-time console warning per class.validateStateChangerejections now propagate aCF_AGENT_STATE_ERRORmessage back to the client.Migrated the x402 MCP payment integration from the legacy
x402package to@x402/coreand@x402/evmv2.Breaking changes for x402 users:
- Peer dependencies changed: replace
x402with@x402/coreand@x402/evm PaymentRequirementstype now uses v2 fields (e.g.amountinstead ofmaxAmountRequired)X402ClientConfig.accounttype changed fromviem.AccounttoClientEvmSigner(structurally compatible withprivateKeyToAccount())
Terminal window npm uninstall x402npm install @x402/core @x402/evmNetwork identifiers now accept both legacy names and CAIP-2 format:
TypeScript // Legacy name (auto-converted){network: "base-sepolia",}// CAIP-2 format (preferred){network: "eip155:84532",}Other x402 changes:
X402ClientConfig.networkis now optional — the client auto-selects from available payment requirements- Server-side lazy initialization: facilitator connection is deferred until the first paid tool invocation
- Payment tokens support both v2 (
PAYMENT-SIGNATURE) and v1 (X-PAYMENT) HTTP headers - Added
normalizeNetworkexport for converting legacy network names to CAIP-2 format - Re-exports
PaymentRequirements,PaymentRequired,Network,FacilitatorConfig, andClientEvmSignerfromagents/x402
- Fix
useAgentandAgentClientcrashing when usingbasePathrouting - CORS handling delegated to partyserver's native support (simpler, more reliable)
- Client-side
onStateUpdateErrorcallback for handling rejected state updates
To update to the latest version:
Terminal window npm i agents@latest- Peer dependencies changed: replace
The Sandbox SDK ↗ now supports PTY (pseudo-terminal) passthrough, enabling browser-based terminal UIs to connect to sandbox shells via WebSocket.
The new
terminal()method proxies a WebSocket upgrade to the container's PTY endpoint, with output buffering for replay on reconnect.JavaScript // Worker: proxy WebSocket to container terminalreturn sandbox.terminal(request, { cols: 80, rows: 24 });TypeScript // Worker: proxy WebSocket to container terminalreturn sandbox.terminal(request, { cols: 80, rows: 24 });Each session can have its own terminal with an isolated working directory and environment, so users can run separate shells side-by-side in the same container.
JavaScript // Multiple isolated terminals in the same sandboxconst dev = await sandbox.getSession("dev");return dev.terminal(request);TypeScript // Multiple isolated terminals in the same sandboxconst dev = await sandbox.getSession("dev");return dev.terminal(request);The new
@cloudflare/sandbox/xtermexport provides aSandboxAddonfor xterm.js ↗ with automatic reconnection (exponential backoff + jitter), buffered output replay, and resize forwarding.JavaScript import { SandboxAddon } from "@cloudflare/sandbox/xterm";const addon = new SandboxAddon({getWebSocketUrl: ({ sandboxId, origin }) =>`${origin}/ws/terminal?id=${sandboxId}`,onStateChange: (state, error) => updateUI(state),});terminal.loadAddon(addon);addon.connect({ sandboxId: "my-sandbox" });TypeScript import { SandboxAddon } from "@cloudflare/sandbox/xterm";const addon = new SandboxAddon({getWebSocketUrl: ({ sandboxId, origin }) =>`${origin}/ws/terminal?id=${sandboxId}`,onStateChange: (state, error) => updateUI(state),});terminal.loadAddon(addon);addon.connect({ sandboxId: "my-sandbox" });To update to the latest version:
Terminal window npm i @cloudflare/sandbox@latest
AI Crawl Control metrics have been enhanced with new views, improved filtering, and better data visualization.
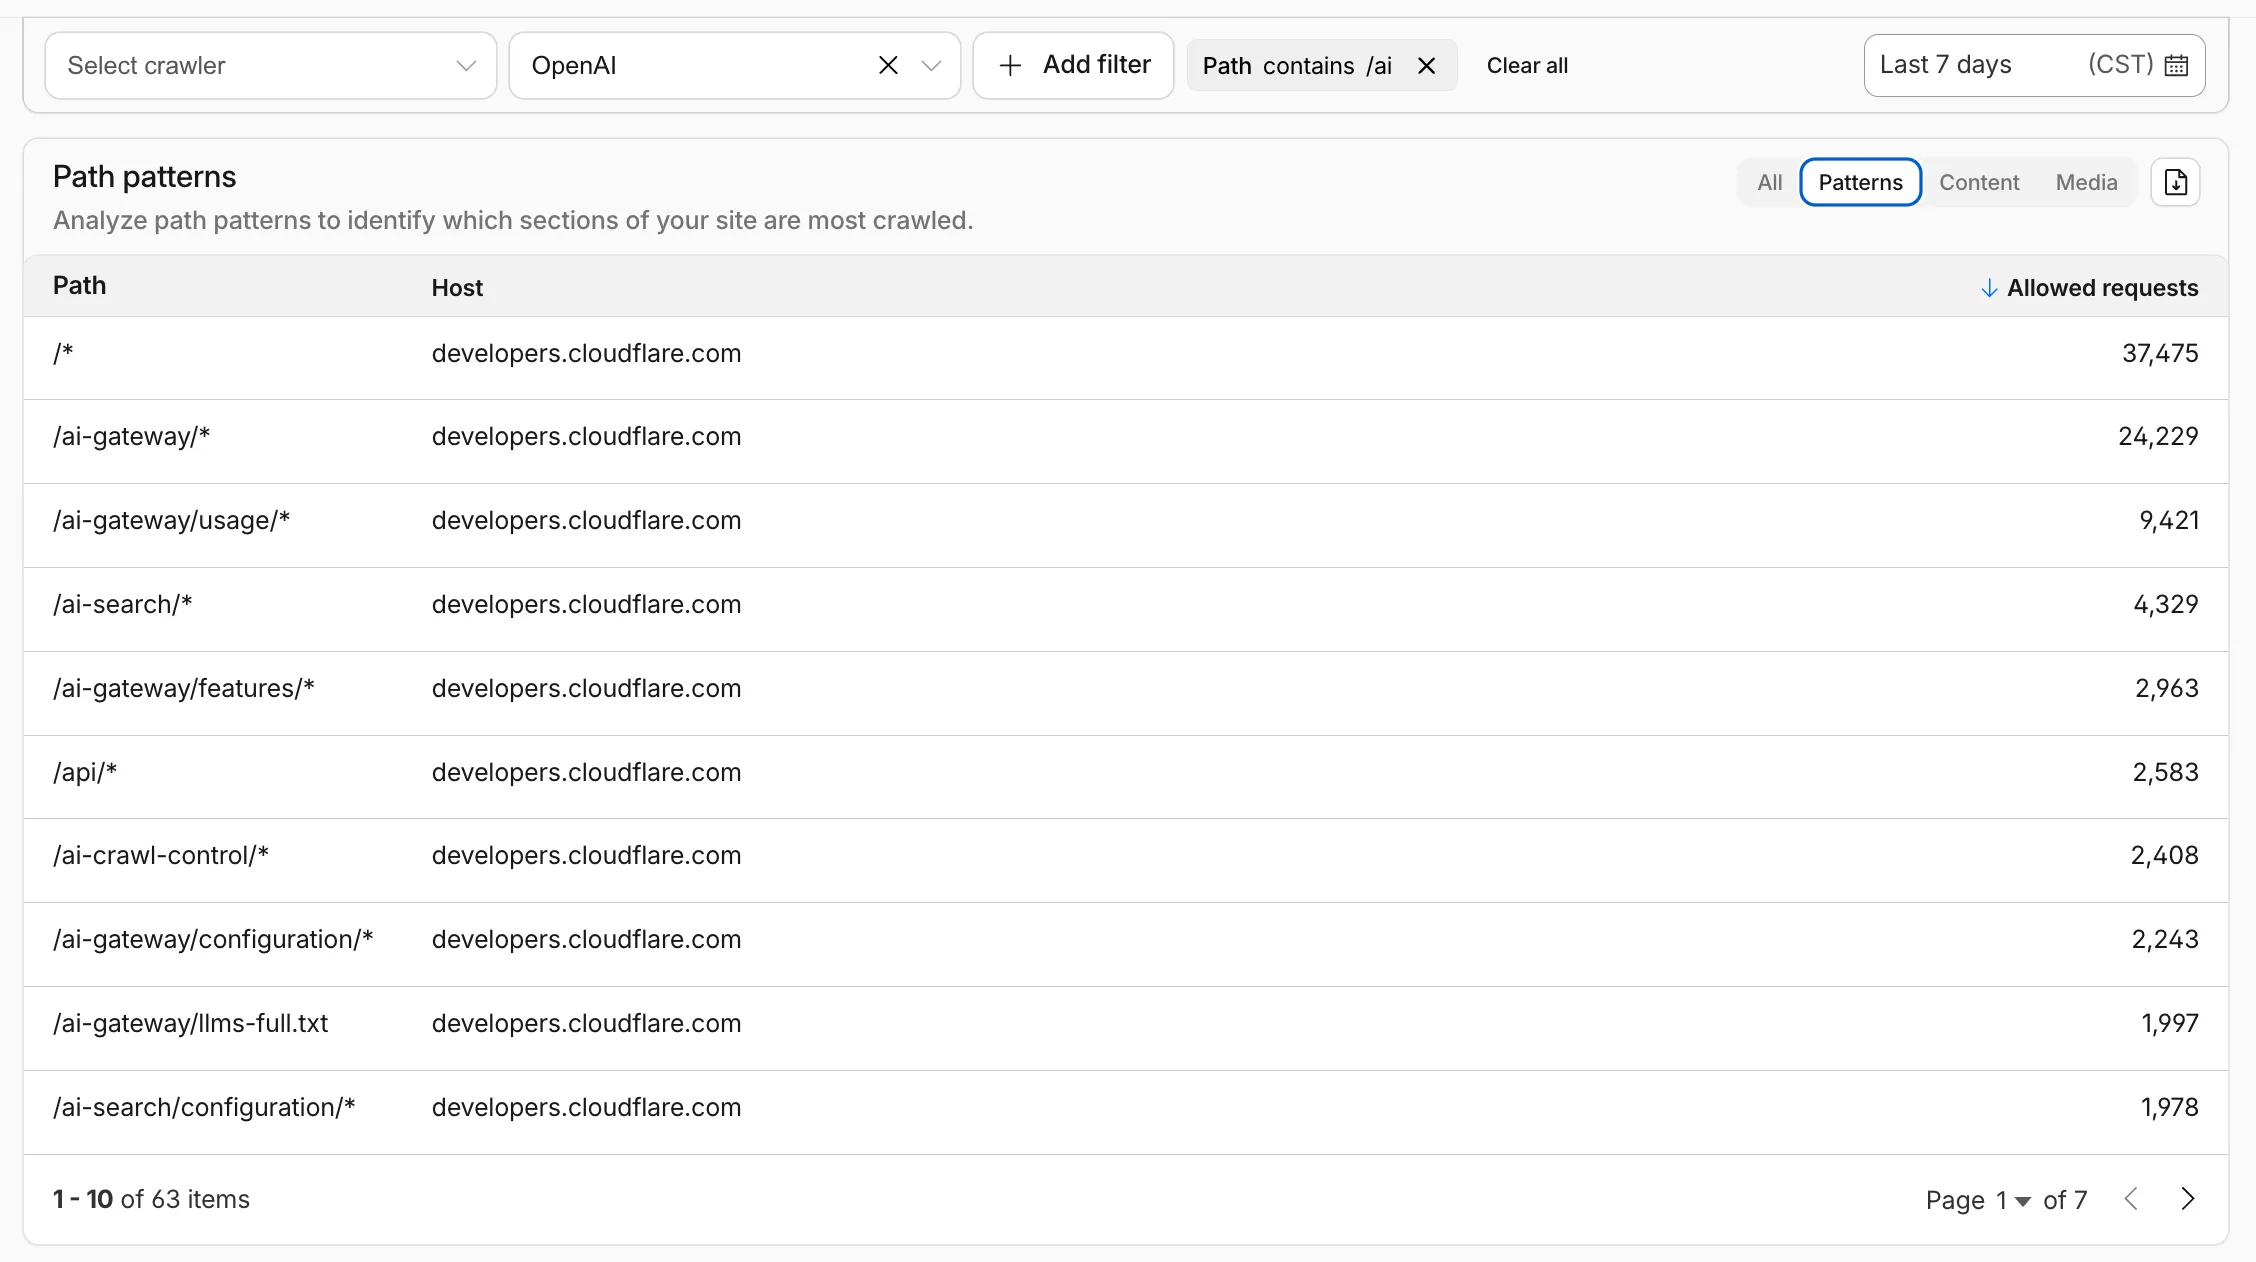
Path pattern grouping
- In the Metrics tab > Most popular paths table, use the new Patterns tab that groups requests by URI pattern (
/blog/*,/api/v1/*,/docs/*) to identify which site areas crawlers target most. Refer to the screenshot above.
Enhanced referral analytics
- Destination patterns show which site areas receive AI-driven referral traffic.
- In the Metrics tab, a new Referrals over time chart shows trends by operator or source.
Data transfer metrics
- In the Metrics tab > Allowed requests over time chart, toggle Bytes to show bandwidth consumption.
- In the Crawlers tab, a new Bytes Transferred column shows bandwidth per crawler.
Image exports
- Export charts and tables as images for reports and presentations.
Learn more about analyzing AI traffic.
- In the Metrics tab > Most popular paths table, use the new Patterns tab that groups requests by URI pattern (
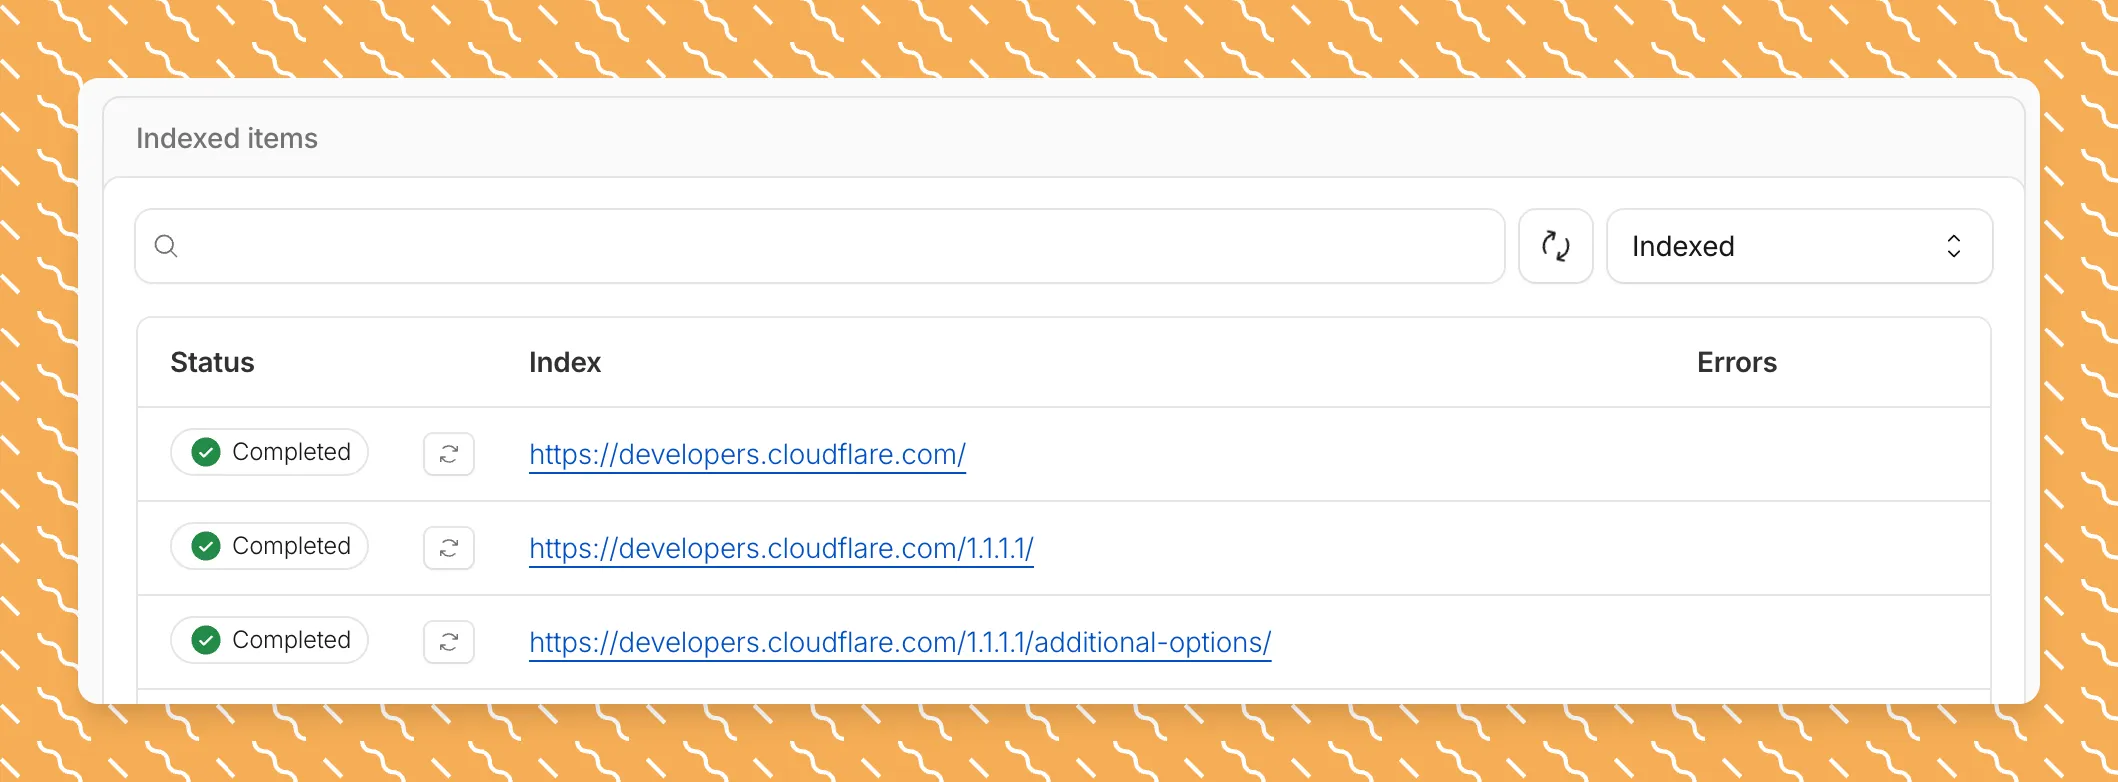
Get your content updates into AI Search faster and avoid a full rescan when you do not need it.
Updated a file or need to retry one that errored? When you know exactly which file changed, you can now reindex it directly instead of rescanning your entire data source.
Go to Overview > Indexed Items and select the sync icon next to any file to reindex it immediately.
By default, AI Search crawls all sitemaps listed in your
robots.txt, up to the maximum files per index limit. If your site has multiple sitemaps but you only want to index a specific set, you can now specify a single sitemap URL to limit what the crawler visits.For example, if your
robots.txtlists bothblog-sitemap.xmlanddocs-sitemap.xml, you can specify justhttps://example.com/docs-sitemap.xmlto index only your documentation.Configure your selection anytime in Settings > Parsing options > Specific sitemaps, then trigger a sync to apply the changes.

Learn more about indexing controls and website crawling configuration.
New reference documentation is now available for AI Crawl Control:
- GraphQL API reference — Query examples for crawler requests, top paths, referral traffic, and data transfer. Includes key filters for detection IDs, user agents, and referrer domains.
- Bot reference — Detection IDs and user agents for major AI crawlers from OpenAI, Anthropic, Google, Meta, and others.
- Worker templates — Deploy the x402 Payment-Gated Proxy to monetize crawler access or charge bots while letting humans through free.
The latest release of the Agents SDK ↗ brings first-class support for Cloudflare Workflows, synchronous state management, and new scheduling capabilities.
Agents excel at real-time communication and state management. Workflows excel at durable execution. Together, they enable powerful patterns where Agents handle WebSocket connections while Workflows handle long-running tasks, retries, and human-in-the-loop flows.
Use the new
AgentWorkflowclass to define workflows with typed access to your Agent:JavaScript import { AgentWorkflow } from "agents/workflows";export class ProcessingWorkflow extends AgentWorkflow {async run(event, step) {// Call Agent methods via RPCawait this.agent.updateStatus(event.payload.taskId, "processing");// Non-durable: progress reporting to clientsawait this.reportProgress({ step: "process", percent: 0.5 });this.broadcastToClients({ type: "update", taskId: event.payload.taskId });// Durable via step: idempotent, won't repeat on retryawait step.mergeAgentState({ taskProgress: 0.5 });const result = await step.do("process", async () => {return processData(event.payload.data);});await step.reportComplete(result);return result;}}TypeScript import { AgentWorkflow } from "agents/workflows";import type { AgentWorkflowEvent, AgentWorkflowStep } from "agents/workflows";export class ProcessingWorkflow extends AgentWorkflow<MyAgent, TaskParams> {async run(event: AgentWorkflowEvent<TaskParams>, step: AgentWorkflowStep) {// Call Agent methods via RPCawait this.agent.updateStatus(event.payload.taskId, "processing");// Non-durable: progress reporting to clientsawait this.reportProgress({ step: "process", percent: 0.5 });this.broadcastToClients({ type: "update", taskId: event.payload.taskId });// Durable via step: idempotent, won't repeat on retryawait step.mergeAgentState({ taskProgress: 0.5 });const result = await step.do("process", async () => {return processData(event.payload.data);});await step.reportComplete(result);return result;}}Start workflows from your Agent with
runWorkflow()and handle lifecycle events:JavaScript export class MyAgent extends Agent {async startTask(taskId, data) {const instanceId = await this.runWorkflow("PROCESSING_WORKFLOW", {taskId,data,});return { instanceId };}async onWorkflowProgress(workflowName, instanceId, progress) {this.broadcast(JSON.stringify({ type: "progress", progress }));}async onWorkflowComplete(workflowName, instanceId, result) {console.log(`Workflow ${instanceId} completed`);}async onWorkflowError(workflowName, instanceId, error) {console.error(`Workflow ${instanceId} failed:`, error);}}TypeScript export class MyAgent extends Agent {async startTask(taskId: string, data: string) {const instanceId = await this.runWorkflow("PROCESSING_WORKFLOW", {taskId,data,});return { instanceId };}async onWorkflowProgress(workflowName: string,instanceId: string,progress: unknown,) {this.broadcast(JSON.stringify({ type: "progress", progress }));}async onWorkflowComplete(workflowName: string,instanceId: string,result?: unknown,) {console.log(`Workflow ${instanceId} completed`);}async onWorkflowError(workflowName: string,instanceId: string,error: unknown,) {console.error(`Workflow ${instanceId} failed:`, error);}}Key workflow methods on your Agent:
runWorkflow(workflowName, params, options?)— Start a workflow with optional metadatagetWorkflow(workflowId)/getWorkflows(criteria?)— Query workflows with cursor-based paginationapproveWorkflow(workflowId)/rejectWorkflow(workflowId)— Human-in-the-loop approval flowspauseWorkflow(),resumeWorkflow(),terminateWorkflow()— Workflow control
State updates are now synchronous with a new
validateStateChange()validation hook:JavaScript export class MyAgent extends Agent {validateStateChange(oldState, newState) {// Return false to reject the changeif (newState.count < 0) return false;// Return modified state to transformreturn { ...newState, lastUpdated: Date.now() };}}TypeScript export class MyAgent extends Agent<Env, State> {validateStateChange(oldState: State, newState: State): State | false {// Return false to reject the changeif (newState.count < 0) return false;// Return modified state to transformreturn { ...newState, lastUpdated: Date.now() };}}The new
scheduleEvery()method enables fixed-interval recurring tasks with built-in overlap prevention:JavaScript // Run every 5 minutesawait this.scheduleEvery("syncData", 5 * 60 * 1000, { source: "api" });TypeScript // Run every 5 minutesawait this.scheduleEvery("syncData", 5 * 60 * 1000, { source: "api" });- Client-side RPC timeout — Set timeouts on callable method invocations
StreamingResponse.error(message)— Graceful stream error signalinggetCallableMethods()— Introspection API for discovering callable methods- Connection close handling — Pending calls are automatically rejected on disconnect
JavaScript await agent.call("method", [args], {timeout: 5000,stream: { onChunk, onDone, onError },});TypeScript await agent.call("method", [args], {timeout: 5000,stream: { onChunk, onDone, onError },});Secure email reply routing — Email replies are now secured with HMAC-SHA256 signed headers, preventing unauthorized routing of emails to agent instances.
Routing improvements:
basePathoption to bypass default URL construction for custom routing- Server-sent identity — Agents send
nameandagenttype on connect - New
onIdentityandonIdentityChangecallbacks on the client
JavaScript const agent = useAgent({basePath: "user",onIdentity: (name, agentType) => console.log(`Connected to ${name}`),});TypeScript const agent = useAgent({basePath: "user",onIdentity: (name, agentType) => console.log(`Connected to ${name}`),});To update to the latest version:
Terminal window npm i agents@latestFor the complete Workflows API reference and patterns, see Run Workflows.
We have partnered with Black Forest Labs (BFL) again to bring their optimized FLUX.2 [klein] 9B model to Workers AI. This distilled model offers enhanced quality compared to the 4B variant, while maintaining cost-effective pricing. With a fixed 4-step inference process, Klein 9B is ideal for rapid prototyping and real-time applications where both speed and quality matter.
Read the BFL blog ↗ to learn more about the model itself, or try it out yourself on our multi modal playground ↗.
Pricing documentation is available on the model page or pricing page.
The model hosted on Workers AI is optimized for speed with a fixed 4-step inference process and supports up to 4 image inputs. Since this is a distilled model, the
stepsparameter is fixed at 4 and cannot be adjusted. Like FLUX.2 [dev] and FLUX.2 [klein] 4B, this image model uses multipart form data inputs, even if you just have a prompt.With the REST API, the multipart form data input looks like this:
Terminal window curl --request POST \--url 'https://api.cloudflare.com/client/v4/accounts/{ACCOUNT}/ai/run/@cf/black-forest-labs/flux-2-klein-9b' \--header 'Authorization: Bearer {TOKEN}' \--header 'Content-Type: multipart/form-data' \--form 'prompt=a sunset at the alps' \--form width=1024 \--form height=1024With the Workers AI binding, you can use it as such:
JavaScript const form = new FormData();form.append("prompt", "a sunset with a dog");form.append("width", "1024");form.append("height", "1024");// FormData doesn't expose its serialized body or boundary. Passing it to a// Request (or Response) constructor serializes it and generates the Content-Type// header with the boundary, which is required for the server to parse the multipart fields.const formResponse = new Response(form);const formStream = formResponse.body;const formContentType = formResponse.headers.get('content-type');const resp = await env.AI.run("@cf/black-forest-labs/flux-2-klein-9b", {multipart: {body: formStream,contentType: formContentType,},});The parameters you can send to the model are detailed here:
JSON Schema for Model
Required Parametersprompt(string) - Text description of the image to generate
Optional Parameters
input_image_0(string) - Binary imageinput_image_1(string) - Binary imageinput_image_2(string) - Binary imageinput_image_3(string) - Binary imageguidance(float) - Guidance scale for generation. Higher values follow the prompt more closelywidth(integer) - Width of the image, default1024Range: 256-1920height(integer) - Height of the image, default768Range: 256-1920seed(integer) - Seed for reproducibility
Note: Since this is a distilled model, the
stepsparameter is fixed at 4 and cannot be adjusted.The FLUX.2 klein-9b model supports generating images based on reference images, just like FLUX.2 [dev] and FLUX.2 [klein] 4B. You can use this feature to apply the style of one image to another, add a new character to an image, or iterate on past generated images. You would use it with the same multipart form data structure, with the input images in binary. The model supports up to 4 input images.
For the prompt, you can reference the images based on the index, like
take the subject of image 1 and style it like image 0or even use natural language likeplace the dog beside the woman.You must name the input parameter as
input_image_0,input_image_1,input_image_2,input_image_3for it to work correctly. All input images must be smaller than 512x512.Terminal window curl --request POST \--url 'https://api.cloudflare.com/client/v4/accounts/{ACCOUNT}/ai/run/@cf/black-forest-labs/flux-2-klein-9b' \--header 'Authorization: Bearer {TOKEN}' \--header 'Content-Type: multipart/form-data' \--form 'prompt=take the subject of image 1 and style it like image 0' \--form input_image_0=@/Users/johndoe/Desktop/icedoutkeanu.png \--form input_image_1=@/Users/johndoe/Desktop/me.png \--form width=1024 \--form height=1024Through Workers AI Binding:
JavaScript //helper function to convert ReadableStream to Blobasync function streamToBlob(stream: ReadableStream, contentType: string): Promise<Blob> {const reader = stream.getReader();const chunks = [];while (true) {const { done, value } = await reader.read();if (done) break;chunks.push(value);}return new Blob(chunks, { type: contentType });}const image0 = await fetch("http://image-url");const image1 = await fetch("http://image-url");const form = new FormData();const image_blob0 = await streamToBlob(image0.body, "image/png");const image_blob1 = await streamToBlob(image1.body, "image/png");form.append('input_image_0', image_blob0)form.append('input_image_1', image_blob1)form.append('prompt', 'take the subject of image 1 and style it like image 0')// FormData doesn't expose its serialized body or boundary. Passing it to a// Request (or Response) constructor serializes it and generates the Content-Type// header with the boundary, which is required for the server to parse the multipart fields.const formResponse = new Response(form);const formStream = formResponse.body;const formContentType = formResponse.headers.get('content-type');const resp = await env.AI.run("@cf/black-forest-labs/flux-2-klein-9b", {multipart: {body: formStream,contentType: formContentType}})
You can now store up to 10 million vectors in a single Vectorize index, doubling the previous limit of 5 million vectors. This enables larger-scale semantic search, recommendation systems, and retrieval-augmented generation (RAG) applications without splitting data across multiple indexes.
Vectorize continues to support indexes with up to 1,536 dimensions per vector at 32-bit precision. Refer to the Vectorize limits documentation for complete details.
AI Search now includes path filtering for both website and R2 data sources. You can now control which content gets indexed by defining include and exclude rules for paths.
By controlling what gets indexed, you can improve the relevance and quality of your search results. You can also use path filtering to split a single data source across multiple AI Search instances for specialized search experiences.
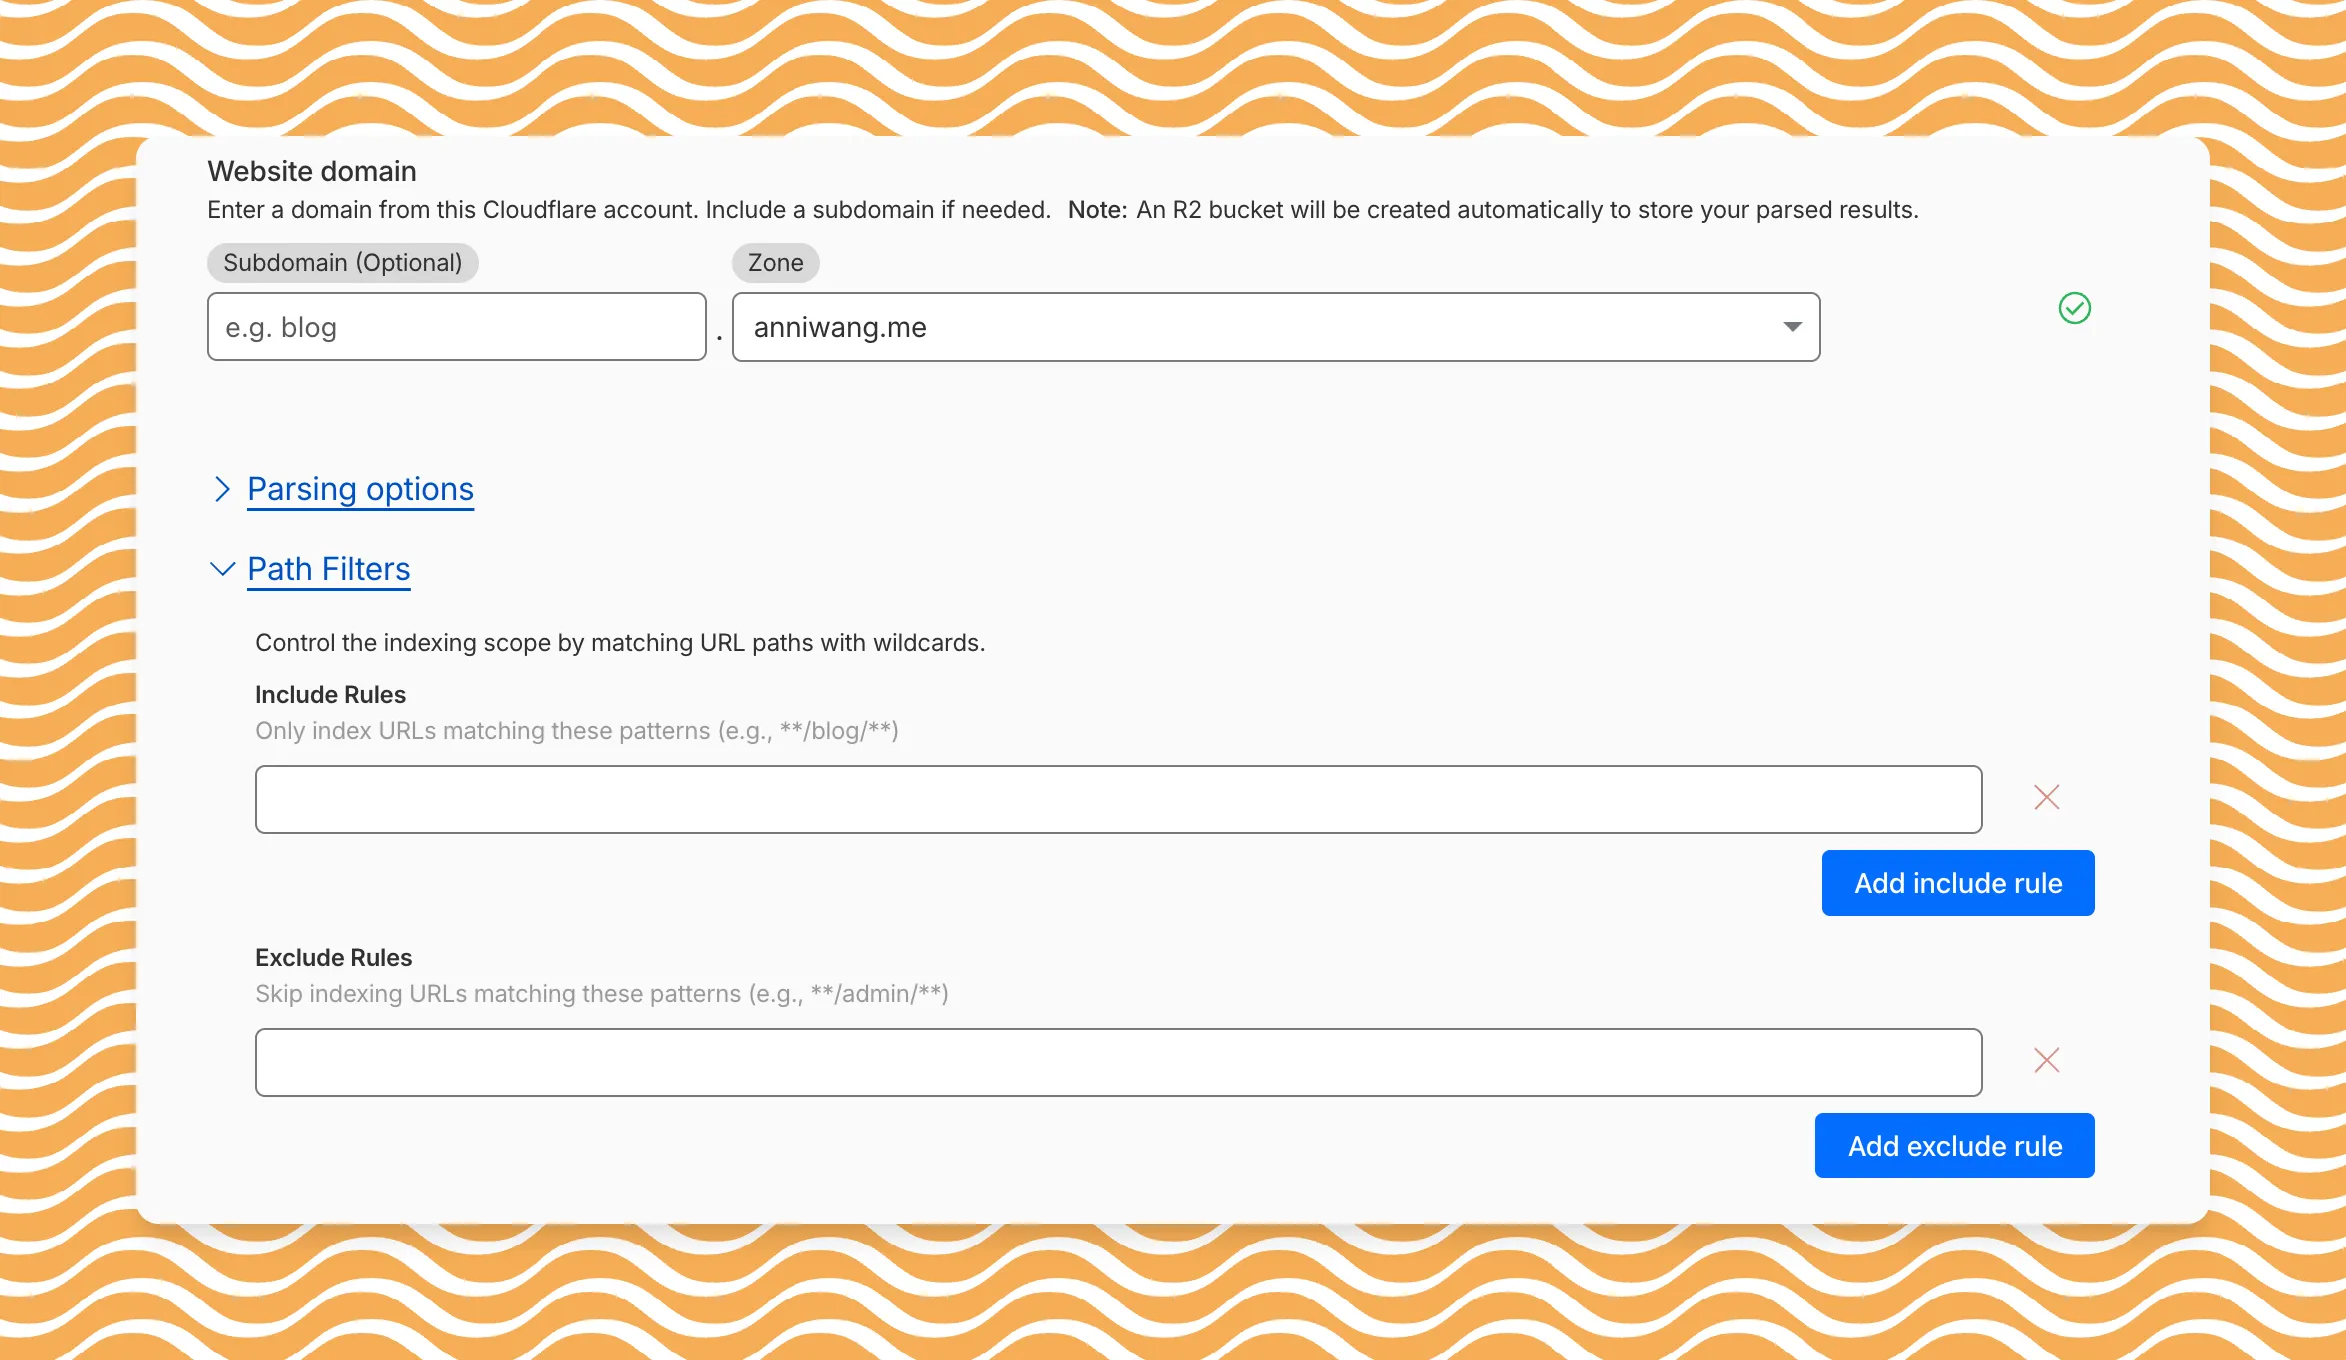
Path filtering uses micromatch ↗ patterns, so you can use
*to match within a directory and**to match across directories.Use case Include Exclude Index docs but skip drafts **/docs/****/docs/drafts/**Keep admin pages out of results — **/admin/**Index only English content **/en/**— Configure path filters when creating a new instance or update them anytime from Settings. Check out path filtering to learn more.
You can now create AI Search instances programmatically using the API. For example, use the API to create instances for each customer in a multi-tenant application or manage AI Search alongside your other infrastructure.
If you have created an AI Search instance via the dashboard before, you already have a service API token registered and can start creating instances programmatically right away. If not, follow the API guide to set up your first instance.
For example, you can now create separate search instances for each language on your website:
Terminal window for lang in en fr es de; docurl -X POST "https://api.cloudflare.com/client/v4/accounts/$ACCOUNT_ID/ai-search/instances" \-H "Authorization: Bearer $API_TOKEN" \-H "Content-Type: application/json" \--data '{"id": "docs-'"$lang"'","type": "web-crawler","source": "example.com","source_params": {"path_include": ["**/'"$lang"'/**"]}}'doneRefer to the REST API reference for additional configuration options.
We've partnered with Black Forest Labs (BFL) again to bring their optimized FLUX.2 [klein] 4B model to Workers AI! This distilled model offers faster generation and cost-effective pricing, while maintaining great output quality. With a fixed 4-step inference process, Klein 4B is ideal for rapid prototyping and real-time applications where speed matters.
Read the BFL blog ↗ to learn more about the model itself, or try it out yourself on our multi modal playground ↗.
Pricing documentation is available on the model page or pricing page.
The model hosted on Workers AI is optimized for speed with a fixed 4-step inference process and supports up to 4 image inputs. Since this is a distilled model, the
stepsparameter is fixed at 4 and cannot be adjusted. Like FLUX.2 [dev], this image model uses multipart form data inputs, even if you just have a prompt.With the REST API, the multipart form data input looks like this:
Terminal window curl --request POST \--url 'https://api.cloudflare.com/client/v4/accounts/{ACCOUNT}/ai/run/@cf/black-forest-labs/flux-2-klein-4b' \--header 'Authorization: Bearer {TOKEN}' \--header 'Content-Type: multipart/form-data' \--form 'prompt=a sunset at the alps' \--form width=1024 \--form height=1024With the Workers AI binding, you can use it as such:
JavaScript const form = new FormData();form.append("prompt", "a sunset with a dog");form.append("width", "1024");form.append("height", "1024");// FormData doesn't expose its serialized body or boundary. Passing it to a// Request (or Response) constructor serializes it and generates the Content-Type// header with the boundary, which is required for the server to parse the multipart fields.const formResponse = new Response(form);const formStream = formResponse.body;const formContentType = formResponse.headers.get('content-type');const resp = await env.AI.run("@cf/black-forest-labs/flux-2-klein-4b", {multipart: {body: formStream,contentType: formContentType,},});The parameters you can send to the model are detailed here:
JSON Schema for Model
Required Parametersprompt(string) - Text description of the image to generate
Optional Parameters
input_image_0(string) - Binary imageinput_image_1(string) - Binary imageinput_image_2(string) - Binary imageinput_image_3(string) - Binary imageguidance(float) - Guidance scale for generation. Higher values follow the prompt more closelywidth(integer) - Width of the image, default1024Range: 256-1920height(integer) - Height of the image, default768Range: 256-1920seed(integer) - Seed for reproducibility
Note: Since this is a distilled model, the
stepsparameter is fixed at 4 and cannot be adjusted.## Multi-Reference ImagesThe FLUX.2 klein-4b model supports generating images based on reference images, just like FLUX.2 [dev]. You can use this feature to apply the style of one image to another, add a new character to an image, or iterate on past generated images. You would use it with the same multipart form data structure, with the input images in binary. The model supports up to 4 input images.For the prompt, you can reference the images based on the index, like `take the subject of image 1 and style it like image 0` or even use natural language like `place the dog beside the woman`.Note: you have to name the input parameter as `input_image_0`, `input_image_1`, `input_image_2`, `input_image_3` for it to work correctly. All input images must be smaller than 512x512.```bashcurl --request POST \--url 'https://api.cloudflare.com/client/v4/accounts/{ACCOUNT}/ai/run/@cf/black-forest-labs/flux-2-klein-4b' \--header 'Authorization: Bearer {TOKEN}' \--header 'Content-Type: multipart/form-data' \--form 'prompt=take the subject of image 1 and style it like image 0' \--form input_image_0=@/Users/johndoe/Desktop/icedoutkeanu.png \--form input_image_1=@/Users/johndoe/Desktop/me.png \--form width=1024 \--form height=1024Through Workers AI Binding:
JavaScript //helper function to convert ReadableStream to Blobasync function streamToBlob(stream: ReadableStream, contentType: string): Promise<Blob> {const reader = stream.getReader();const chunks = [];while (true) {const { done, value } = await reader.read();if (done) break;chunks.push(value);}return new Blob(chunks, { type: contentType });}const image0 = await fetch("http://image-url");const image1 = await fetch("http://image-url");const form = new FormData();const image_blob0 = await streamToBlob(image0.body, "image/png");const image_blob1 = await streamToBlob(image1.body, "image/png");form.append('input_image_0', image_blob0)form.append('input_image_1', image_blob1)form.append('prompt', 'take the subject of image 1 and style it like image 0')// FormData doesn't expose its serialized body or boundary. Passing it to a// Request (or Response) constructor serializes it and generates the Content-Type// header with the boundary, which is required for the server to parse the multipart fields.const formResponse = new Response(form);const formStream = formResponse.body;const formContentType = formResponse.headers.get('content-type');const resp = await env.AI.run("@cf/black-forest-labs/flux-2-klein-4b", {multipart: {body: formStream,contentType: formContentType}})
Account administrators can now assign the AI Crawl Control Read Only role to provide read-only access to AI Crawl Control at the domain level.
Users with this role can view the Overview, Crawlers, Metrics, Robots.txt, and Settings tabs but cannot modify crawler actions or settings.
This role is specific for AI Crawl Control. You still require correct permissions to access other areas / features of the dashboard.
To assign, go to Manage Account > Members and add a policy with the AI Crawl Control Read Only role scoped to the desired domain.
Agents SDK v0.3.0, workers-ai-provider v3.0.0, and ai-gateway-provider v3.0.0 with AI SDK v6 support
We've shipped a new release for the Agents SDK ↗ v0.3.0 bringing full compatibility with AI SDK v6 ↗ and introducing the unified tool pattern, dynamic tool approval, and enhanced React hooks with improved tool handling.
This release includes improved streaming and tool support, dynamic tool approval (for "human in the loop" systems), enhanced React hooks with
onToolCallcallback, improved error handling for streaming responses, and seamless migration from v5 patterns.This makes it ideal for building production AI chat interfaces with Cloudflare Workers AI models, agent workflows, human-in-the-loop systems, or any application requiring reliable tool execution and approval workflows.
Additionally, we've updated workers-ai-provider v3.0.0, the official provider for Cloudflare Workers AI models, and ai-gateway-provider v3.0.0, the provider for Cloudflare AI Gateway, to be compatible with AI SDK v6.
AI SDK v6 introduces a unified tool pattern where all tools are defined on the server using the
tool()function. This replaces the previous client-sideAIToolpattern.TypeScript import { tool } from "ai";import { z } from "zod";// Server: Define ALL tools on the serverconst tools = {// Server-executed toolgetWeather: tool({description: "Get weather for a city",inputSchema: z.object({ city: z.string() }),execute: async ({ city }) => fetchWeather(city)}),// Client-executed tool (no execute = client handles via onToolCall)getLocation: tool({description: "Get user location from browser",inputSchema: z.object({})// No execute function}),// Tool requiring approval (dynamic based on input)processPayment: tool({description: "Process a payment",inputSchema: z.object({ amount: z.number() }),needsApproval: async ({ amount }) => amount > 100,execute: async ({ amount }) => charge(amount)})};TypeScript // Client: Handle client-side tools via onToolCall callbackimport { useAgentChat } from "agents/ai-react";const { messages, sendMessage, addToolOutput } = useAgentChat({agent,onToolCall: async ({ toolCall, addToolOutput }) => {if (toolCall.toolName === "getLocation") {const position = await new Promise((resolve, reject) => {navigator.geolocation.getCurrentPosition(resolve, reject);});addToolOutput({toolCallId: toolCall.toolCallId,output: {lat: position.coords.latitude,lng: position.coords.longitude}});}}});Key benefits of the unified tool pattern:
- Server-defined tools: All tools are defined in one place on the server
- Dynamic approval: Use
needsApprovalto conditionally require user confirmation - Cleaner client code: Use
onToolCallcallback instead of managing tool configs - Type safety: Full TypeScript support with proper tool typing
Creates a new chat interface with enhanced v6 capabilities.
TypeScript // Basic chat setup with onToolCallconst { messages, sendMessage, addToolOutput } = useAgentChat({agent,onToolCall: async ({ toolCall, addToolOutput }) => {// Handle client-side tool executionawait addToolOutput({toolCallId: toolCall.toolCallId,output: { result: "success" }});}});Use
needsApprovalon server tools to conditionally require user confirmation:TypeScript const paymentTool = tool({description: "Process a payment",inputSchema: z.object({amount: z.number(),recipient: z.string()}),needsApproval: async ({ amount }) => amount > 1000,execute: async ({ amount, recipient }) => {return await processPayment(amount, recipient);}});The
isToolUIPartandgetToolNamefunctions now check both static and dynamic tool parts:TypeScript import { isToolUIPart, getToolName } from "ai";const pendingToolCallConfirmation = messages.some((m) =>m.parts?.some((part) => isToolUIPart(part) && part.state === "input-available",),);// Handle tool confirmationif (pendingToolCallConfirmation) {await addToolOutput({toolCallId: part.toolCallId,output: "User approved the action"});}If you need the v5 behavior (static-only checks), use the new functions:
TypeScript import { isStaticToolUIPart, getStaticToolName } from "ai";The
convertToModelMessages()function is now asynchronous. Update all calls to await the result:TypeScript import { convertToModelMessages } from "ai";const result = streamText({messages: await convertToModelMessages(this.messages),model: openai("gpt-4o")});The
CoreMessagetype has been removed. UseModelMessageinstead:TypeScript import { convertToModelMessages, type ModelMessage } from "ai";const modelMessages: ModelMessage[] = await convertToModelMessages(messages);The
modeoption forgenerateObjecthas been removed:TypeScript // Before (v5)const result = await generateObject({mode: "json",model,schema,prompt});// After (v6)const result = await generateObject({model,schema,prompt});While
generateObjectandstreamObjectare still functional, the recommended approach is to usegenerateText/streamTextwith theOutput.object()helper:TypeScript import { generateText, Output, stepCountIs } from "ai";const { output } = await generateText({model: openai("gpt-4"),output: Output.object({schema: z.object({ name: z.string() })}),stopWhen: stepCountIs(2),prompt: "Generate a name"});Note: When using structured output with
generateText, you must configure multiple steps withstopWhenbecause generating the structured output is itself a step.Seamless integration with Cloudflare Workers AI models through the updated workers-ai-provider v3.0.0 with AI SDK v6 support.
Use Cloudflare Workers AI models directly in your agent workflows:
TypeScript import { createWorkersAI } from "workers-ai-provider";import { useAgentChat } from "agents/ai-react";// Create Workers AI model (v3.0.0 - enhanced v6 internals)const model = createWorkersAI({binding: env.AI,})("@cf/meta/llama-3.2-3b-instruct");Workers AI models now support v6 file handling with automatic conversion:
TypeScript // Send images and files to Workers AI modelssendMessage({role: "user",parts: [{ type: "text", text: "Analyze this image:" },{type: "file",data: imageBuffer,mediaType: "image/jpeg",},],});// Workers AI provider automatically converts to proper formatEnhanced streaming support with automatic warning detection:
TypeScript // Streaming with Workers AI modelsconst result = await streamText({model: createWorkersAI({ binding: env.AI })("@cf/meta/llama-3.2-3b-instruct"),messages: await convertToModelMessages(messages),onChunk: (chunk) => {// Enhanced streaming with warning handlingconsole.log(chunk);},});The ai-gateway-provider v3.0.0 now supports AI SDK v6, enabling you to use Cloudflare AI Gateway with multiple AI providers including Anthropic, Azure, AWS Bedrock, Google Vertex, and Perplexity.
Use Cloudflare AI Gateway to add analytics, caching, and rate limiting to your AI applications:
TypeScript import { createAIGateway } from "ai-gateway-provider";// Create AI Gateway provider (v3.0.0 - enhanced v6 internals)const model = createAIGateway({gatewayUrl: "https://gateway.ai.cloudflare.com/v1/your-account-id/gateway",headers: {"Authorization": `Bearer ${env.AI_GATEWAY_TOKEN}`}})({provider: "openai",model: "gpt-4o"});The following APIs are deprecated in favor of the unified tool pattern:
Deprecated Replacement AITooltypeUse AI SDK's tool()function on serverextractClientToolSchemas()Define tools on server, no client schemas needed createToolsFromClientSchemas()Define tools on server with tool()toolsRequiringConfirmationoptionUse needsApprovalon server toolsexperimental_automaticToolResolutionUse onToolCallcallbacktoolsoption inuseAgentChatUse onToolCallfor client-side executionaddToolResult()Use addToolOutput()- Unified Tool Pattern: All tools must be defined on the server using
tool() convertToModelMessages()is async: Addawaitto all callsCoreMessageremoved: UseModelMessageinsteadgenerateObjectmode removed: RemovemodeoptionisToolUIPartbehavior changed: Now checks both static and dynamic tool parts
Update your dependencies to use the latest versions:
Terminal window npm install agents@^0.3.0 workers-ai-provider@^3.0.0 ai-gateway-provider@^3.0.0 ai@^6.0.0 @ai-sdk/react@^3.0.0 @ai-sdk/openai@^3.0.0- Migration Guide ↗ - Comprehensive migration documentation from v5 to v6
- AI SDK v6 Documentation ↗ - Official AI SDK migration guide
- AI SDK v6 Announcement ↗ - Learn about new features in v6
- AI SDK Documentation ↗ - Complete AI SDK reference
- GitHub Issues ↗ - Report bugs or request features
We'd love your feedback! We're particularly interested in feedback on:
- Migration experience - How smooth was the upgrade from v5 to v6?
- Unified tool pattern - How does the new server-defined tool pattern work for you?
- Dynamic tool approval - Does the
needsApprovalfeature meet your needs? - AI Gateway integration - How well does the new provider work with your setup?
The Overview tab is now the default view in AI Crawl Control. The previous default view with controls for individual AI crawlers is available in the Crawlers tab.
- Executive summary — Monitor total requests, volume change, most common status code, most popular path, and high-volume activity
- Operator grouping — Track crawlers by their operating companies (OpenAI, Microsoft, Google, ByteDance, Anthropic, Meta)
- Customizable filters — Filter your snapshot by date range, crawler, operator, hostname, or path

- Log in to the Cloudflare dashboard and select your account and domain.
- Go to AI Crawl Control, where the Overview tab opens by default with your activity snapshot.
- Use filters to customize your view by date range, crawler, operator, hostname, or path.
- Navigate to the Crawlers tab to manage controls for individual crawlers.
Learn more about analyzing AI traffic and managing AI crawlers.
Pay Per Crawl is introducing enhancements for both AI crawler operators and site owners, focusing on programmatic discovery, flexible pricing models, and granular configuration control.
A new authenticated API endpoint allows verified crawlers to programmatically discover domains participating in Pay Per Crawl. Crawlers can use this to build optimized crawl queues, cache domain lists, and identify new participating sites. This eliminates the need to discover payable content through trial requests.
The API endpoint is
GET https://crawlers-api.ai-audit.cfdata.org/charged_zonesand requires Web Bot Auth authentication. Refer to Discover payable content for authentication steps, request parameters, and response schema.Payment headers (
crawler-exact-priceorcrawler-max-price) must now be included in the Web Bot Authsignature-inputheader components. This security enhancement prevents payment header tampering, ensures authenticated payment intent, validates crawler identity with payment commitment, and protects against replay attacks with modified pricing. Crawlers must add their payment header to the list of signed components when constructing the signature-input header.Pay Per Crawl error responses now include a new
crawler-errorheader with 11 specific error codes for programmatic handling. Error response bodies remain unchanged for compatibility. These codes enable robust error handling, automated retry logic, and accurate spending tracking.Site owners can now offer free access to specific pages like homepages, navigation, or discovery pages while charging for other content. Create a Configuration Rule in Rules > Configuration Rules, set your URI pattern using wildcard, exact, or prefix matching on the URI Full field, and enable the Disable Pay Per Crawl setting. When disabled for a URI pattern, crawler requests pass through without blocking or charging.
Some paths are always free to crawl. These paths are:
/robots.txt,/sitemap.xml,/security.txt,/.well-known/security.txt,/crawlers.json.AI crawler operators: Discover payable content | Crawl pages
Site owners: Advanced configuration
The latest release of @cloudflare/agents ↗ brings resumable streaming, significant MCP client improvements, and critical fixes for schedules and Durable Object lifecycle management.
AIChatAgentnow supports resumable streaming, allowing clients to reconnect and continue receiving streamed responses without losing data. This is useful for:- Long-running AI responses
- Users on unreliable networks
- Users switching between devices mid-conversation
- Background tasks where users navigate away and return
- Real-time collaboration where multiple clients need to stay in sync
Streams are maintained across page refreshes, broken connections, and syncing across open tabs and devices.
- Default JSON schema validator added to MCP client
- Schedules ↗ can now safely destroy the agent
The
MCPClientManagerAPI has been redesigned for better clarity and control:- New
registerServer()method: Register MCP servers without immediately connecting - New
connectToServer()method: Establish connections to registered servers - Improved reconnect logic:
restoreConnectionsFromStorage()now properly handles failed connections
TypeScript // Register a server to Agentconst { id } = await this.mcp.registerServer({name: "my-server",url: "https://my-mcp-server.example.com",});// Connect when readyawait this.mcp.connectToServer(id);// Discover tools, prompts and resourcesawait this.mcp.discoverIfConnected(id);The SDK now includes a formalized
MCPConnectionStateenum with states:idle,connecting,authenticating,connected,discovering, andready.MCP discovery fetches the available tools, prompts, and resources from an MCP server so your agent knows what capabilities are available. The
MCPClientConnectionclass now includes a dedicateddiscover()method with improved reliability:- Supports cancellation via AbortController
- Configurable timeout (default 15s)
- Discovery failures now throw errors immediately instead of silently continuing
- Fixed a bug where schedules ↗ meant to fire immediately with this.schedule(0, ...) or
this.schedule(new Date(), ...)would not fire - Fixed an issue where schedules that took longer than 30 seconds would occasionally time out
- Fixed SSE transport now properly forwards session IDs and request headers
- Fixed AI SDK stream events convertion to UIMessageStreamPart
To update to the latest version:
Terminal window npm i agents@latest
We've partnered with Black Forest Labs (BFL) to bring their latest FLUX.2 [dev] model to Workers AI! This model excels in generating high-fidelity images with physical world grounding, multi-language support, and digital asset creation. You can also create specific super images with granular controls like JSON prompting.
Read the BFL blog ↗ to learn more about the model itself. Read our Cloudflare blog ↗ to see the model in action, or try it out yourself on our multi modal playground ↗.
Pricing documentation is available on the model page or pricing page. Note, we expect to drop pricing in the next few days after iterating on the model performance.
The model hosted on Workers AI is able to support up to 4 image inputs (512x512 per input image). Note, this image model is one of the most powerful in the catalog and is expected to be slower than the other image models we currently support. One catch to look out for is that this model takes multipart form data inputs, even if you just have a prompt.
With the REST API, the multipart form data input looks like this:
Terminal window curl --request POST \--url 'https://api.cloudflare.com/client/v4/accounts/{ACCOUNT}/ai/run/@cf/black-forest-labs/flux-2-dev' \--header 'Authorization: Bearer {TOKEN}' \--header 'Content-Type: multipart/form-data' \--form 'prompt=a sunset at the alps' \--form steps=25--form width=1024--form height=1024With the Workers AI binding, you can use it as such:
JavaScript const form = new FormData();form.append('prompt', 'a sunset with a dog');form.append('width', '1024');form.append('height', '1024');//this dummy request is temporary hack//we're pushing a change to address this soonconst formRequest = new Request('http://dummy', {method: 'POST',body: form});const formStream = formRequest.body;const formContentType = formRequest.headers.get('content-type') || 'multipart/form-data';const resp = await env.AI.run("@cf/black-forest-labs/flux-2-dev", {multipart: {body: formStream,contentType: formContentType}});The parameters you can send to the model are detailed here:
JSON Schema for Model
Required Parametersprompt(string) - Text description of the image to generate
Optional Parameters
input_image_0(string) - Binary imageinput_image_1(string) - Binary imageinput_image_2(string) - Binary imageinput_image_3(string) - Binary imagesteps(integer) - Number of inference steps. Higher values may improve quality but increase generation timeguidance(float) - Guidance scale for generation. Higher values follow the prompt more closelywidth(integer) - Width of the image, default1024Range: 256-1920height(integer) - Height of the image, default768Range: 256-1920seed(integer) - Seed for reproducibility
## Multi-Reference ImagesThe FLUX.2 model is great at generating images based on reference images. You can use this feature to apply the style of one image to another, add a new character to an image, or iterate on past generate images. You would use it with the same multipart form data structure, with the input images in binary.For the prompt, you can reference the images based on the index, like `take the subject of image 1 and style it like image 0` or even use natural language like `place the dog beside the woman`.Note: you have to name the input parameter as `input_image_0`, `input_image_1`, `input_image_2` for it to work correctly. All input images must be smaller than 512x512.```bashcurl --request POST \--url 'https://api.cloudflare.com/client/v4/accounts/{ACCOUNT}/ai/run/@cf/black-forest-labs/flux-2-dev' \--header 'Authorization: Bearer {TOKEN}' \--header 'Content-Type: multipart/form-data' \--form 'prompt=take the subject of image 1 and style it like image 0' \--form input_image_0=@/Users/johndoe/Desktop/icedoutkeanu.png \--form input_image_1=@/Users/johndoe/Desktop/me.png \--form steps=25--form width=1024--form height=1024Through Workers AI Binding:
JavaScript //helper function to convert ReadableStream to Blobasync function streamToBlob(stream: ReadableStream, contentType: string): Promise<Blob> {const reader = stream.getReader();const chunks = [];while (true) {const { done, value } = await reader.read();if (done) break;chunks.push(value);}return new Blob(chunks, { type: contentType });}const image0 = await fetch("http://image-url");const image1 = await fetch("http://image-url");const form = new FormData();const image_blob0 = await streamToBlob(image0.body, "image/png");const image_blob1 = await streamToBlob(image1.body, "image/png");form.append('input_image_0', image_blob0)form.append('input_image_1', image_blob1)form.append('prompt', 'take the subject of image 1and style it like image 0')//this dummy request is temporary hack//we're pushing a change to address this soonconst formRequest = new Request('http://dummy', {method: 'POST',body: form});const formStream = formRequest.body;const formContentType = formRequest.headers.get('content-type') || 'multipart/form-data';const resp = await env.AI.run("@cf/black-forest-labs/flux-2-dev", {multipart: {body: form,contentType: "multipart/form-data"}})The model supports prompting in JSON to get more granular control over images. You would pass the JSON as the value of the 'prompt' field in the multipart form data. See the JSON schema below on the base parameters you can pass to the model.
JSON Prompting Schema
{"type": "object","properties": {"scene": {"type": "string","description": "Overall scene setting or location"},"subjects": {"type": "array","items": {"type": "object","properties": {"type": {"type": "string","description": "Type of subject (e.g., desert nomad, blacksmith, DJ, falcon)"},"description": {"type": "string","description": "Physical attributes, clothing, accessories"},"pose": {"type": "string","description": "Action or stance"},"position": {"type": "string","enum": ["foreground", "midground", "background"],"description": "Depth placement in scene"}},"required": ["type", "description", "pose", "position"]}},"style": {"type": "string","description": "Artistic rendering style (e.g., digital painting, photorealistic, pixel art, noir sci-fi, lifestyle photo, wabi-sabi photo)"},"color_palette": {"type": "array","items": { "type": "string" },"minItems": 3,"maxItems": 3,"description": "Exactly 3 main colors for the scene (e.g., ['navy', 'neon yellow', 'magenta'])"},"lighting": {"type": "string","description": "Lighting condition and direction (e.g., fog-filtered sun, moonlight with star glints, dappled sunlight)"},"mood": {"type": "string","description": "Emotional atmosphere (e.g., harsh and determined, playful and modern, peaceful and dreamy)"},"background": {"type": "string","description": "Background environment details"},"composition": {"type": "string","enum": ["rule of thirds","circular arrangement","framed by foreground","minimalist negative space","S-curve","vanishing point center","dynamic off-center","leading leads","golden spiral","diagonal energy","strong verticals","triangular arrangement"],"description": "Compositional technique"},"camera": {"type": "object","properties": {"angle": {"type": "string","enum": ["eye level", "low angle", "slightly low", "bird's-eye", "worm's-eye", "over-the-shoulder", "isometric"],"description": "Camera perspective"},"distance": {"type": "string","enum": ["close-up", "medium close-up", "medium shot", "medium wide", "wide shot", "extreme wide"],"description": "Framing distance"},"focus": {"type": "string","enum": ["deep focus", "macro focus", "selective focus", "sharp on subject", "soft background"],"description": "Focus type"},"lens": {"type": "string","enum": ["14mm", "24mm", "35mm", "50mm", "70mm", "85mm"],"description": "Focal length (wide to telephoto)"},"f-number": {"type": "string","description": "Aperture (e.g., f/2.8, the smaller the number the more blurry the background)"},"ISO": {"type": "number","description": "Light sensitivity value (comfortable range between 100 & 6400, lower = less sensitivity)"}}},"effects": {"type": "array","items": { "type": "string" },"description": "Post-processing effects (e.g., 'lens flare small', 'subtle film grain', 'soft bloom', 'god rays', 'chromatic aberration mild')"}},"required": ["scene", "subjects"]}- The model also supports the most common latin and non-latin character languages
- You can prompt the model with specific hex codes like
#2ECC71 - Try creating digital assets like landing pages, comic strips, infographics too!
AI Search now supports custom HTTP headers for website crawling, solving a common problem where valuable content behind authentication or access controls could not be indexed.
Previously, AI Search could only crawl publicly accessible pages, leaving knowledge bases, documentation, and other protected content out of your search results. With custom headers support, you can now include authentication credentials that allow the crawler to access this protected content.
This is particularly useful for indexing content like:
- Internal documentation behind corporate login systems
- Premium content that requires users to provide access to unlock
- Sites protected by Cloudflare Access using service tokens
To add custom headers when creating an AI Search instance, select Parse options. In the Extra headers section, you can add up to five custom headers per Website data source.
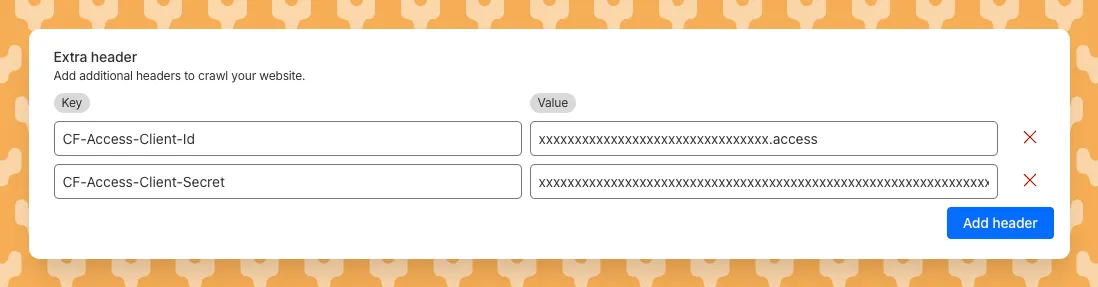
For example, to crawl a site protected by Cloudflare Access, you can add service token credentials as custom headers:
CF-Access-Client-Id: your-token-id.accessCF-Access-Client-Secret: your-token-secretThe crawler will automatically include these headers in all requests, allowing it to access protected pages that would otherwise be blocked.
Learn more about configuring custom headers for website crawling in AI Search.
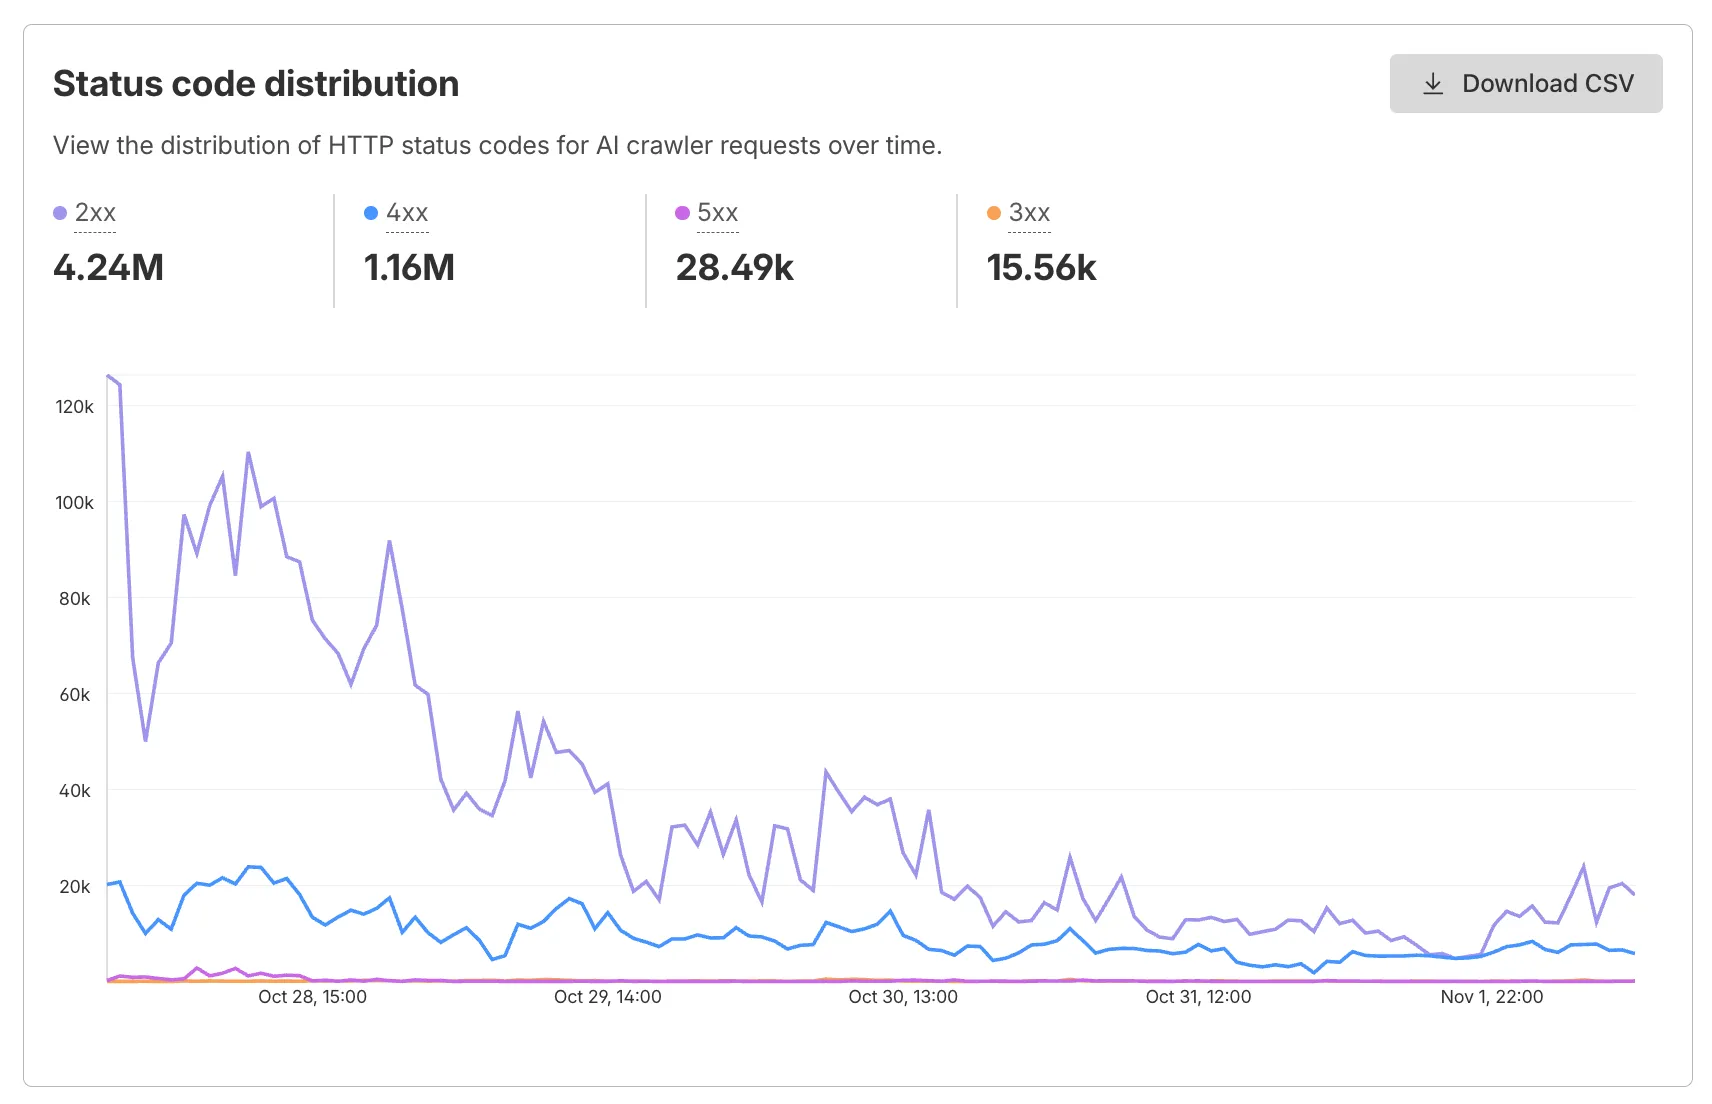
AI Crawl Control now supports per-crawler drilldowns with an extended actions menu and status code analytics. Drill down into Metrics, Cloudflare Radar, and Security Analytics, or export crawler data for use in WAF custom rules, Redirect Rules, and robots.txt files.
The Metrics tab includes a status code distribution chart showing HTTP response codes (2xx, 3xx, 4xx, 5xx) over time. Filter by individual crawler, category, operator, or time range to analyze how specific crawlers interact with your site.
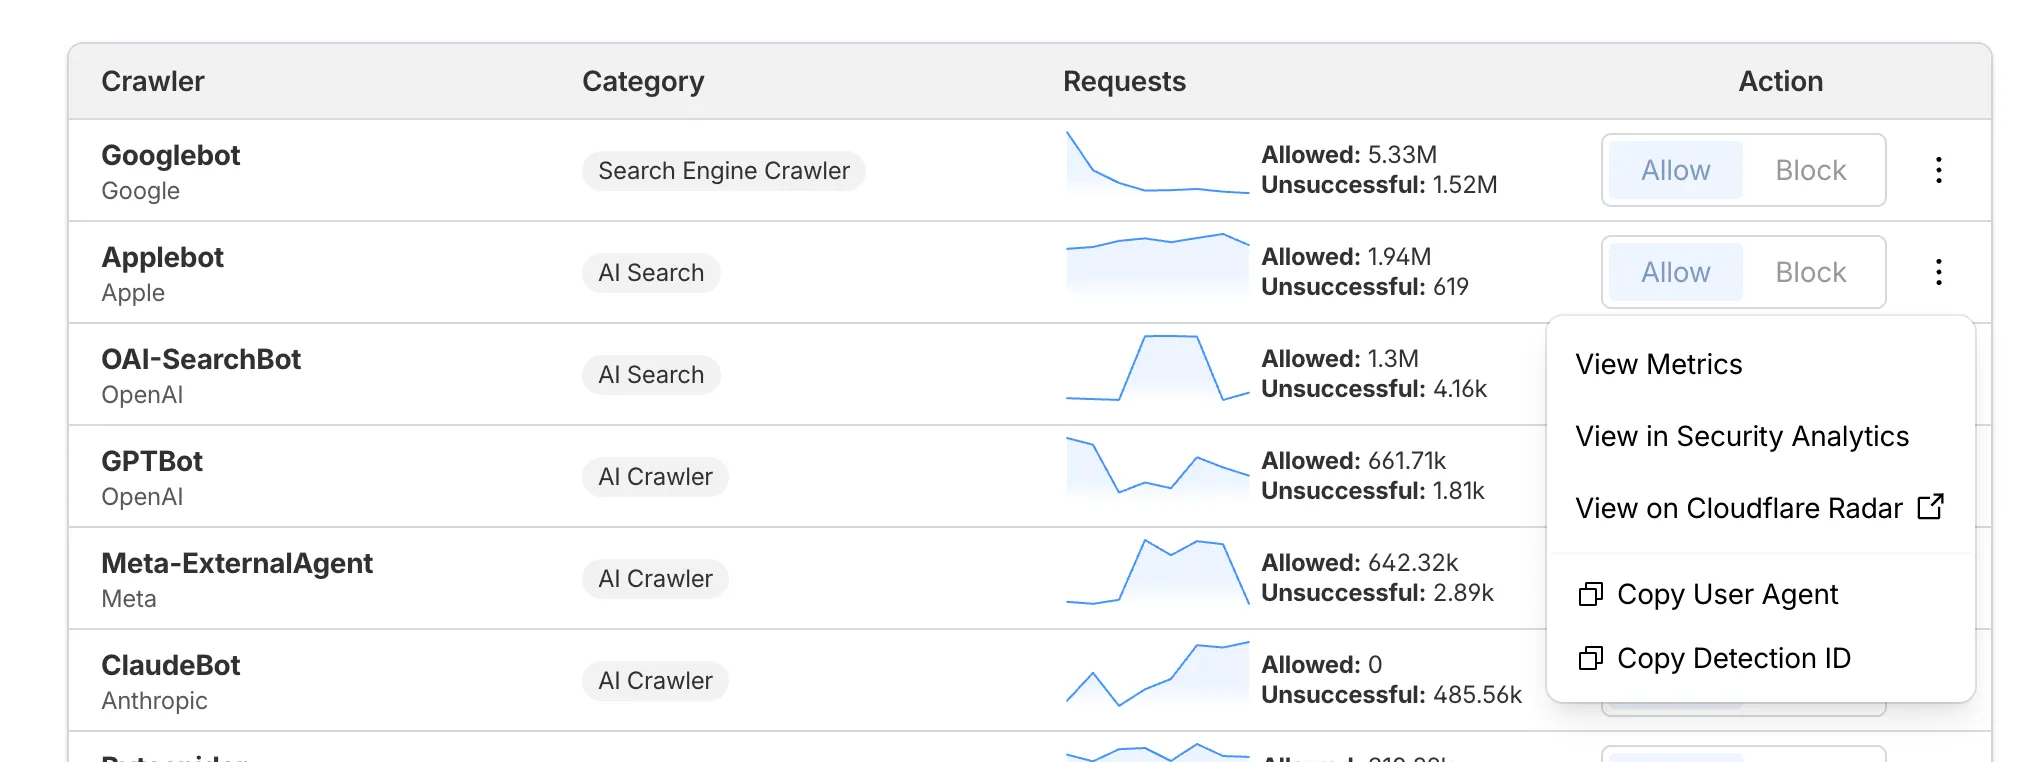
Each crawler row includes a three-dot menu with per-crawler actions:
- View Metrics — Filter the AI Crawl Control Metrics page to the selected crawler.
- View on Cloudflare Radar — Access verified crawler details on Cloudflare Radar.
- Copy User Agent — Copy user agent strings for use in WAF custom rules, Redirect Rules, or robots.txt files.
- View in Security Analytics — Filter Security Analytics by detection IDs (Bot Management customers).
- Copy Detection ID — Copy detection IDs for use in WAF custom rules (Bot Management customers).
- Log in to the Cloudflare dashboard, and select your account and domain.
- Go to AI Crawl Control > Metrics to access the status code distribution chart.
- Go to AI Crawl Control > Crawlers and select the three-dot menu for any crawler to access per-crawler actions.
- Select multiple crawlers to use bulk copy buttons for user agents or detection IDs.
Learn more about AI Crawl Control.
Workers, including those using Durable Objects and Browser Rendering, may now process WebSocket messages up to 32 MiB in size. Previously, this limit was 1 MiB.
This change allows Workers to handle use cases requiring large message sizes, such as processing Chrome Devtools Protocol messages.
For more information, please see the Durable Objects startup limits.
AI Search now supports reranking for improved retrieval quality and allows you to set the system prompt directly in your API requests.
You can now enable reranking to reorder retrieved documents based on their semantic relevance to the user’s query. Reranking helps improve accuracy, especially for large or noisy datasets where vector similarity alone may not produce the optimal ordering.
You can enable and configure reranking in the dashboard or directly in your API requests:
JavaScript const answer = await env.AI.autorag("my-autorag").aiSearch({query: "How do I train a llama to deliver coffee?",model: "@cf/meta/llama-3.3-70b-instruct-fp8-fast",reranking: {enabled: true,model: "@cf/baai/bge-reranker-base"}});Previously, system prompts could only be configured in the dashboard. You can now define them directly in your API requests, giving you per-query control over behavior. For example:
JavaScript // Dynamically set query and system prompt in AI Searchasync function getAnswer(query, tone) {const systemPrompt = `You are a ${tone} assistant.`;const response = await env.AI.autorag("my-autorag").aiSearch({query: query,system_prompt: systemPrompt});return response;}// Example usageconst query = "What is Cloudflare?";const tone = "friendly";const answer = await getAnswer(query, tone);console.log(answer);Learn more about Reranking and System Prompt in AI Search.