Containers now support Google Artifact Registry ↗ images. After you configure credentials, you can use a fully qualified Google Artifact Registry image reference in your Wrangler configuration instead of first pushing the image to Cloudflare Registry.
Provide the service account email with --gar-email and pipe the service account JSON key through stdin:
exec() is now available for Containers. Use this.ctx.container.exec() to start processes inside a running Container, stream standard input and output, inspect exit codes, and signal each process.
Call exec() from a class extending Container, or from another Durable Object through this.ctx.container. The associated Container must already be running.
This example starts the Container when needed, then reads its Node.js version:
src/index.jsjs
import { Container } from "@cloudflare/containers";export class MyContainer extends Container { async readVersion() { if (!this.ctx.container.running) { await this.start(); } const process = await this.ctx.container.exec(["node", "--version"]); const output = await process.output(); const decoder = new TextDecoder(); return { exitCode: output.exitCode, stdout: decoder.decode(output.stdout), stderr: decoder.decode(output.stderr), }; }}
src/index.tsts
import { Container } from "@cloudflare/containers";export class MyContainer extends Container { async readVersion() { if (!this.ctx.container.running) { await this.start(); } const process = await this.ctx.container.exec(["node", "--version"]); const output = await process.output(); const decoder = new TextDecoder(); return { exitCode: output.exitCode, stdout: decoder.decode(output.stdout), stderr: decoder.decode(output.stderr), }; }}
The command array starts an executable directly, without an implicit shell. Invoke a shell explicitly for pipes, redirects, or variable expansion.
One RPC method can coordinate multiple exec() calls in one caller-to-Durable Object round trip. It can also pass byte-oriented ReadableStream input or return streamed output with flow control.
Pay-as-you-go customers can now view billable usage and create budget alerts directly from the product overview pages for Workers & Pages, D1, R2, Workers KV, Queues, Vectorize, Durable Objects, and Containers. A new sidebar widget shows current-period spend and the billing cycle date range, alongside a button to create a budget alert.
The widget pulls from the same data as the Billable Usage dashboard and aligns to your billing cycle (or the current day on Free plans), so the numbers match your invoice. Enterprise contract accounts are not yet supported.
Selecting Create budget alert opens the budget alert flow inline so you can set a dollar threshold in the same place you are reviewing usage. Budget alerts apply to your total account-level spend across all products, not just the product page you create them from.
Wrangler supports using wrangler containers ssh as an OpenSSH ProxyCommand for Containers. This lets your local SSH client connect to a running Container through Wrangler.
SSH through Wrangler is now enabled by default for Containers. Previously, you had to set ssh.enabled to true in your Container configuration before you could connect.
This change does not expose any publicly accessible ports on your Container. The SSH service is reachable only through wrangler containers ssh, which authenticates against your Cloudflare account. You also need to add an ssh-ed25519 public key to authorized_keys before anyone can connect, so enabling SSH alone does not grant access.
To connect, add a public key to your Container configuration and run wrangler containers ssh <INSTANCE_ID>:
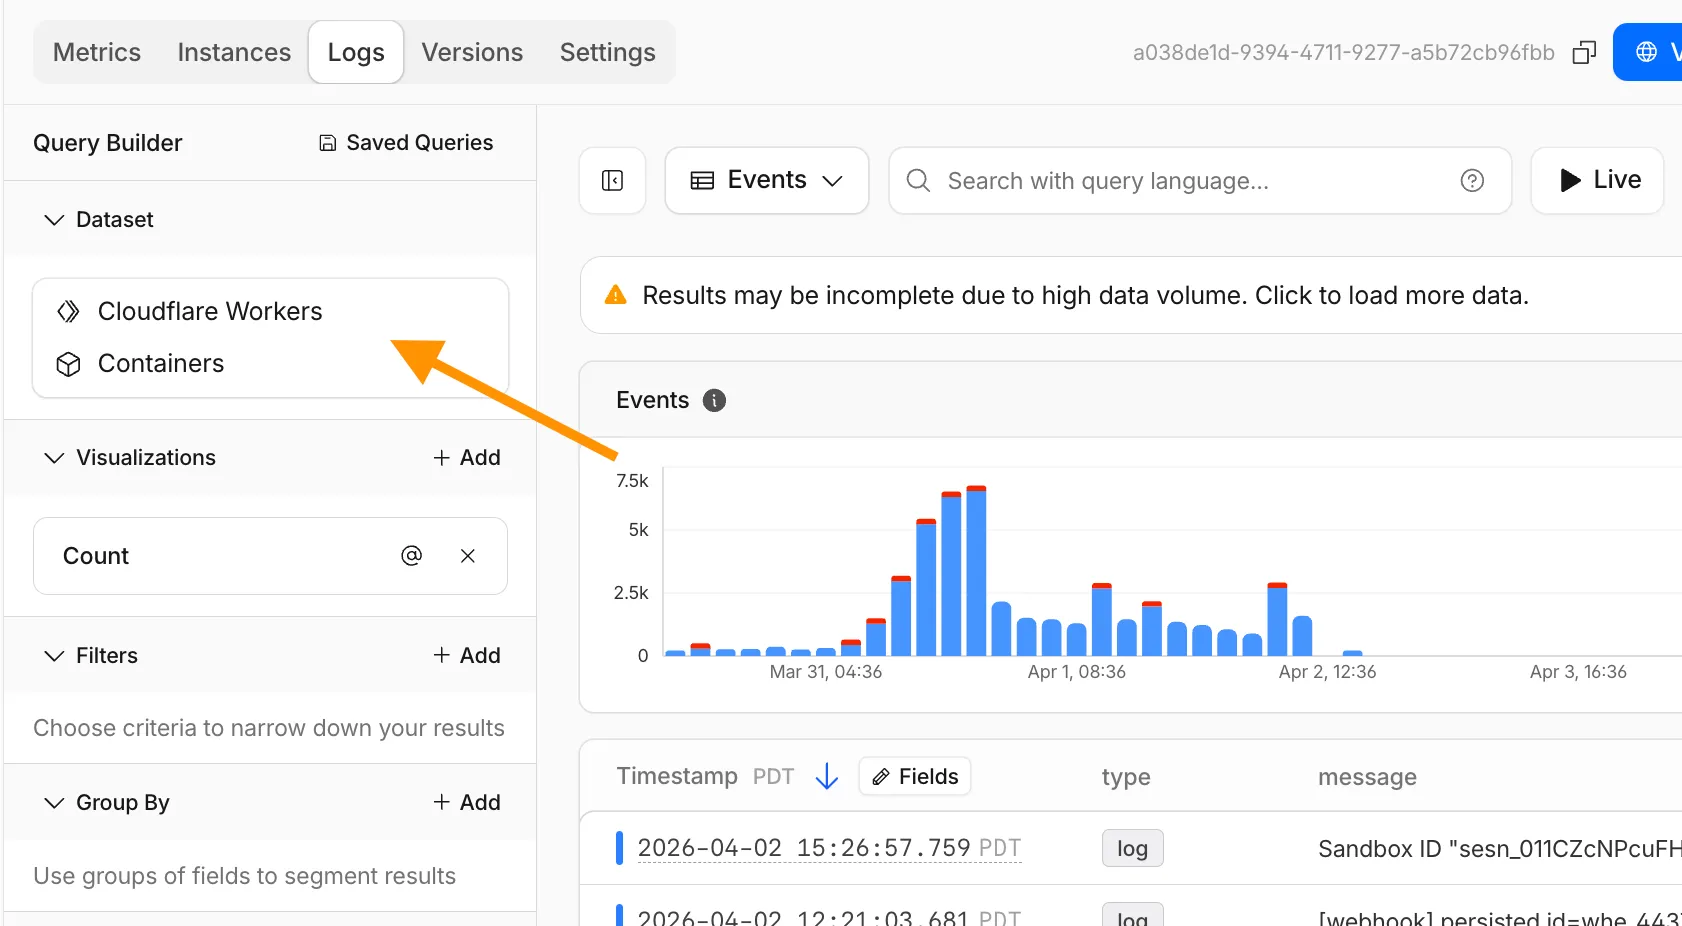
The Container logs page now displays related Worker and Durable Object logs alongside container logs. This co-locates all relevant log events for a container application in one place, making it easier to trace requests and debug issues.
You can filter to a single source when you need to isolate Container, Worker, or Durable Object output.
Containers let you run more workloads on the Workers platform, including resource-intensive applications, different languages, and CLI tools that need full Linux environments.
Since the initial launch of Containers, there have been significant improvements to Containers' performance, stability, and feature set. Some highlights include:
Higher limits allow you to run thousands of containers concurrently.
Docker Hub support makes it easy to use your existing images and registries.
SSH support helps you access and debug issues in live containers.
The Sandbox SDK provides isolated environments for running untrusted code securely, with a simple TypeScript API for executing commands, managing files, and exposing services. This makes it easier to secure and manage your agents at scale. Some additions since launch include:
Live preview URLs so agents can run long-lived services and verify in-flight changes.
Outbound Workers for Sandboxes and Containers now support zero-trust credential injection, TLS interception, allow/deny lists, and dynamic per-instance egress policies. These features give platforms running agentic workloads full control over what leaves the sandbox, without exposing secrets to untrusted workloads, like user-generated code or coding agents.
Credential injection
Because outbound handlers run in the Workers runtime, outside the sandbox, they can hold secrets the sandbox never sees. A sandboxed workload can make a plain request, and credentials are transparently attached before a request is forwarded upstream.
For instance, you could run an agent in a sandbox and ensure that any requests it makes to Github are authenticated.
But it will never be able to access the credentials:
No token is ever passed into the sandbox. You can rotate secrets in the Worker environment
and every request will pick them up immediately.
TLS interception
Outbound Workers now intercept HTTPS traffic. A unique ephemeral certificate authority (CA) and private key are created for each sandbox instance. The CA is placed into the sandbox and trusted by default. The ephemeral private key never leaves the container runtime sidecar process and is never shared across instances.
With TLS interception active, outbound Workers can act as a transparent proxy for both HTTP and HTTPS traffic.
Allow and deny hosts
Easily filter outbound traffic with allowedHosts and deniedHosts. When allowedHosts is set, it becomes a deny-by-default allowlist. Both properties support glob patterns.
export class MySandbox extends Sandbox { allowedHosts = ["github.com", "npmjs.org"];}
Dynamic outbound handlers
Define named outbound handlers then apply or remove them at runtime using setOutboundHandler() or setOutboundByHost(). This lets you change egress policy for a running sandbox without restarting it.
You can now specify placement constraints to control where your Containers run.
Constraint
Values
Use case
regions
ENAM, WNAM, EEUR, WEUR
Geographic placement
jurisdiction
eu, fedramp
Compliance boundaries
Use regions to limit placement to specific geographic areas. Use jurisdiction to restrict containers to compliance boundaries — eu maps to European regions (EEUR, WEUR) and fedramp maps to North American regions (ENAM, WNAM).
Containers and Sandboxes now support connecting directly to Workers over HTTP. This allows you to call Workers
functions and bindings, like KV or R2, from within the container at specific hostnames.
Run Worker code
Define an outbound handler to capture any HTTP request or use outboundByHost to capture requests to individual hostnames and IPs.
export class MyApp extends Sandbox {}MyApp.outbound = async (request, env, ctx) => { // you can run arbitrary functions defined in your Worker on any HTTP request return await someWorkersFunction(request.body);};MyApp.outboundByHost = { "my.worker": async (request, env, ctx) => { return await anotherFunction(request.body); },};
In this example, requests from the container to http://my.worker will run the function defined within outboundByHost,
and any other HTTP requests will run the outbound handler. These handlers run entirely inside the Workers runtime,
outside of the container sandbox.
Access Workers bindings
Each handler has access to env, so it can call any binding set in Wrangler config.
Code inside the container makes a standard HTTP request to that hostname and the outbound Worker translates it into a binding call.
export class MyApp extends Sandbox {}MyApp.outboundByHost = { "my.kv": async (request, env, ctx) => { const key = new URL(request.url).pathname.slice(1); const value = await env.KV.get(key); return new Response(value ?? "", { status: value ? 200 : 404 }); }, "my.r2": async (request, env, ctx) => { const key = new URL(request.url).pathname.slice(1); const object = await env.BUCKET.get(key); return new Response(object?.body ?? "", { status: object ? 200 : 404 }); },};
Now, from inside the container sandbox, curl http://my.kv/some-key will access Workers KV and curl http://my.r2/some-object will access R2.
Access Durable Object state
Use ctx.containerId to reference the container's automatically provisioned Durable Object.
Containers now support Docker Hub ↗ images. You can use a fully qualified Docker Hub image reference in your Wrangler configuration ↗ instead of first pushing the image to Cloudflare Registry.
You can now SSH into running Container instances using Wrangler. This is useful for debugging, inspecting running processes, or executing one-off commands inside a Container.
To connect, enable wrangler_ssh in your Container configuration and add your ssh-ed25519 public key to authorized_keys:
A new wrangler containers instances command lists all instances for a given Container application. This mirrors the instances view in the Cloudflare dashboard.
The command displays each instance's ID, name, state, location, version, and creation time:
wrangler containers instances <APPLICATION_ID>
Use the --json flag for machine-readable output, which is also the default format in non-interactive environments such as CI pipelines.
You can now run more Containers concurrently with significantly higher limits on memory, vCPU, and disk.
Limit
Previous Limit
New Limit
Memory for concurrent live Container instances
400GiB
6TiB
vCPU for concurrent live Container instances
100
1,500
Disk for concurrent live Container instances
2TB
30TB
This 15x increase enables larger-scale workloads on Containers. You can now run 15,000 instances of the lite instance type, 6,000 instances of basic, over 1,500 instances of standard-1, or over 1,000 instances of standard-2 concurrently.
Refer to Limits for more details on the available instance types and limits.
Sandboxes now support createBackup() and restoreBackup() methods for creating and restoring point-in-time snapshots of directories.
This allows you to restore environments quickly. For instance, in order to develop in a sandbox, you may need to include a user's codebase and run a build step.
Unfortunately git clone and npm install can take minutes, and you don't want to run these steps every time the user starts their sandbox.
Now, after the initial setup, you can just call createBackup(), then restoreBackup() the next time this environment is needed. This makes it practical to pick up exactly
where a user left off, even after days of inactivity, without repeating expensive setup steps.
const sandbox = getSandbox(env.Sandbox, "my-sandbox");// Make non-trivial changes to the file systemawait sandbox.gitCheckout(endUserRepo, { targetDir: "/workspace" });await sandbox.exec("npm install", { cwd: "/workspace" });// Create a point-in-time backup of the directoryconst backup = await sandbox.createBackup({ dir: "/workspace" });// Store the handle for later useawait env.KV.put(`backup:${userId}`, JSON.stringify(backup));// ... in a future session...// Restore instead of re-cloning and reinstallingawait sandbox.restoreBackup(backup);
Backups are stored in R2 and can take advantage of R2 object lifecycle rules to ensure they do not persist forever.
Key capabilities:
Persist and reuse across sandbox sessions — Easily store backup handles in KV, D1, or Durable Object storage for use in subsequent sessions
Usable across multiple instances — Fork a backup across many sandboxes for parallel work
Named backups — Provide optional human-readable labels for easier management
TTLs — Set time-to-live durations so backups are automatically removed from storage once they are no longer needed
Sandboxes and Containers now support running Docker for "Docker-in-Docker" setups. This is particularly useful when your end users or agents want to run a full sandboxed development environment.
This allows you to:
Develop containerized applications with your Sandbox
Run isolated test environments for images
Build container images as part of CI/CD workflows
Deploy arbitrary images supplied at runtime within a container
Custom instance types are now enabled for all Cloudflare Containers users. You can now specify specific vCPU, memory, and disk amounts, rather than being limited to pre-defined instance types. Previously, only select Enterprise customers were able to customize their instance type.
To use a custom instance type, specify the instance_type property as an object with vcpu, memory_mib, and disk_mb fields in your Wrangler configuration:
Individual limits for custom instance types are based on the standard-4 instance type (4 vCPU, 12 GiB memory, 20 GB disk). You must allocate at least 1 vCPU for custom instance types. For workloads requiring less than 1 vCPU, use the predefined instance types like lite or basic.
Containers now support mounting R2 buckets as FUSE (Filesystem in Userspace) volumes, allowing applications to interact with R2 using standard filesystem operations.
Common use cases include:
Bootstrapping containers with datasets, models, or dependencies for sandboxes and agent environments
Persisting user configuration or application state without managing downloads
Accessing large static files without bloating container images or downloading at startup
FUSE adapters like tigrisfs ↗, s3fs ↗, and gcsfuse ↗ can be installed in your container image and configured to mount buckets at startup.
FROM alpine:3.20# Install FUSE and dependenciesRUN apk update && \ apk add --no-cache ca-certificates fuse curl bash# Install tigrisfsRUN ARCH=$(uname -m) && \ if [ "$ARCH" = "x86_64" ]; then ARCH="amd64"; fi && \ if [ "$ARCH" = "aarch64" ]; then ARCH="arm64"; fi && \ VERSION=$(curl -s https://api.github.com/repos/tigrisdata/tigrisfs/releases/latest | grep -o '"tag_name": "[^"]*' | cut -d'"' -f4) && \ curl -L "https://github.com/tigrisdata/tigrisfs/releases/download/${VERSION}/tigrisfs_${VERSION#v}_linux_${ARCH}.tar.gz" -o /tmp/tigrisfs.tar.gz && \ tar -xzf /tmp/tigrisfs.tar.gz -C /usr/local/bin/ && \ rm /tmp/tigrisfs.tar.gz && \ chmod +x /usr/local/bin/tigrisfs# Create startup script that mounts bucketRUN printf '#!/bin/sh\n\ set -e\n\ mkdir -p /mnt/r2\n\ R2_ENDPOINT="https://${R2_ACCOUNT_ID}.r2.cloudflarestorage.com"\n\ /usr/local/bin/tigrisfs --endpoint "${R2_ENDPOINT}" -f "${BUCKET_NAME}" /mnt/r2 &\n\ sleep 3\n\ ls -lah /mnt/r2\n\ ' > /startup.sh && chmod +x /startup.shCMD ["/startup.sh"]
See the Mount R2 buckets with FUSE example for a complete guide on mounting R2 buckets and/or other S3-compatible storage buckets within your containers.
New instance types provide up to 4 vCPU, 12 GiB of memory, and 20 GB of disk per container instance.
Instance Type
vCPU
Memory
Disk
lite
1/16
256 MiB
2 GB
basic
1/4
1 GiB
4 GB
standard-1
1/2
4 GiB
8 GB
standard-2
1
6 GiB
12 GB
standard-3
2
8 GiB
16 GB
standard-4
4
12 GiB
20 GB
The dev and standard instance types are preserved for backward compatibility and are aliases for lite and standard-1, respectively. The standard-1 instance type now provides up to 8 GB of disk instead of only 4 GB.