
R2 Data Catalog now accepts read-only API tokens, so query engines and clients that only read data no longer need a read-write token. Previously, every catalog operation required an Admin Read & Write token, which meant read-only clients were granted more access than they needed.
You can now authenticate your Iceberg engine based on your workload:
- Read-only operations (such as listing namespaces, loading tables, and querying data) work with an Admin Read only token (R2 Data Catalog read and R2 storage read).
- Write operations (such as creating or dropping tables and committing transactions) continue to require an Admin Read & Write token.
This lets you follow the principle of least privilege — for example, using a read-write token for the pipeline that writes to your tables and read-only tokens for engines like R2 SQL, DuckDB, or PyIceberg that query them.
Note that credentials vended by the catalog inherit the R2 storage permissions of the token used to authenticate. To ensure read-only access to your underlying data, scope the R2 storage permission to read-only as well.
For details on choosing and creating the right token, refer to Authenticate your Iceberg engine.
R2 Data Catalog, a managed Apache Iceberg ↗ catalog built into R2, now automatically optimizes manifest files as part of compaction.
Manifest files track the data files that make up an Iceberg table. As a table accumulates many small or fragmented manifests, query engines must read more metadata during query planning, which slows down queries even before any data is scanned.
When compaction runs, R2 Data Catalog now rewrites and clusters manifest files by partition as a best-effort pre-step. This consolidates fragmented manifests, reduces the number of manifests a query engine must open, and lowers metadata I/O overhead. Tables that are already well-clustered are skipped, so the operation only runs when it provides a benefit.
This happens automatically for tables with compaction enabled — no configuration changes are required.
For more information, refer to Table maintenance.
R2 Data Catalog is a managed Apache Iceberg ↗ catalog built directly into your R2 bucket. Iceberg tracks your data through a tree of metadata files, so every insert, update, and delete must go through a catalog transaction. Manually adding, modifying, or deleting objects outside the catalog can leave pointers referencing files that no longer exist, corrupting the table into an inconsistent state that is difficult to recover from.
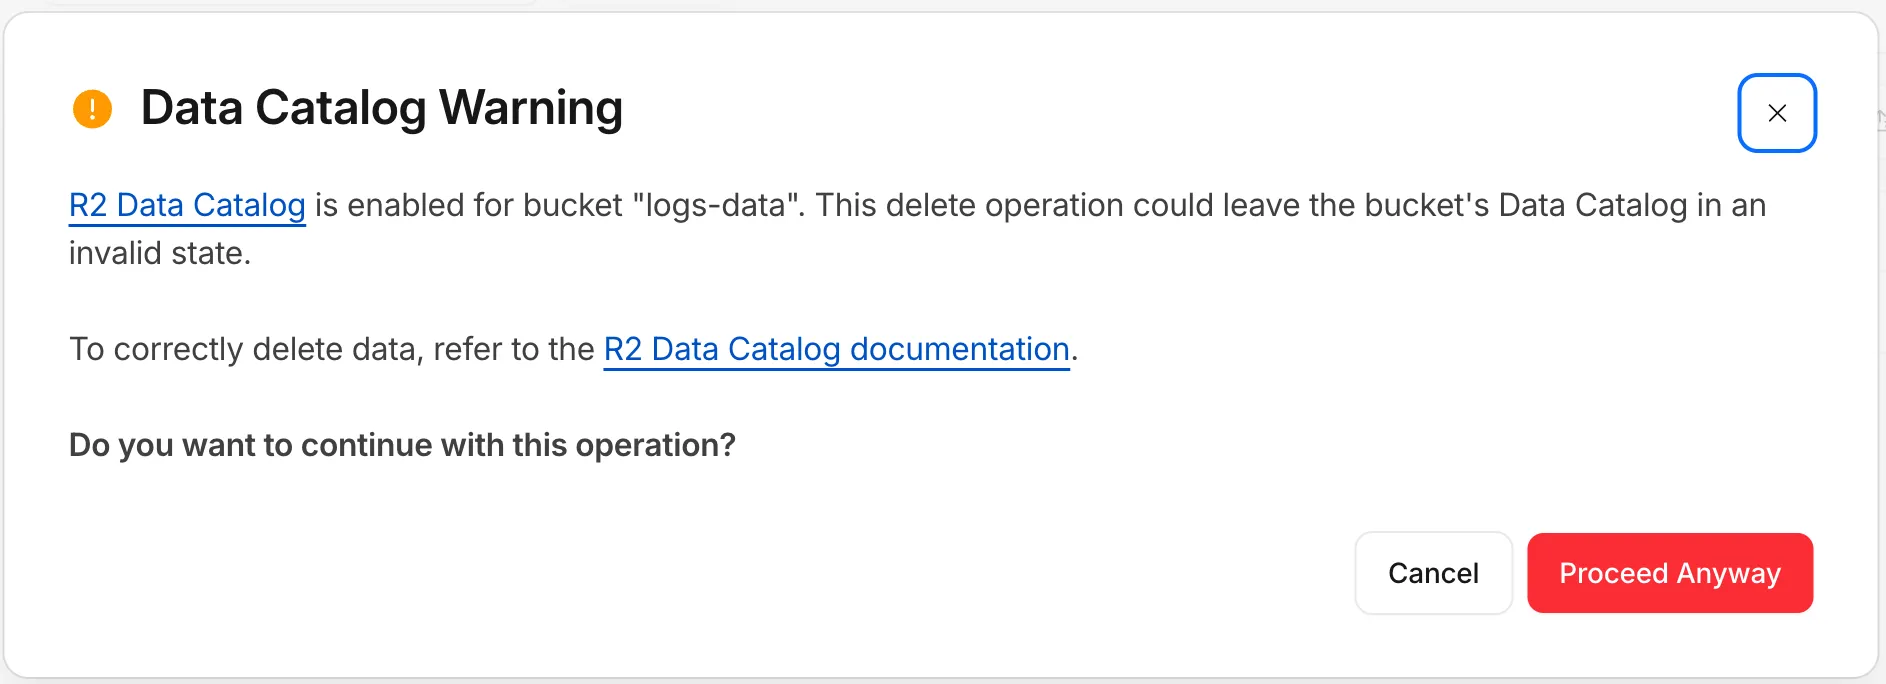
To help prevent this, the R2 dashboard and Wrangler now warn you when you attempt a manual delete operation on a Data Catalog-enabled bucket.
When you try to delete objects from a bucket that has R2 Data Catalog enabled, the dashboard displays a warning explaining that the operation could leave the catalog in an invalid state, with a link to the documentation for deleting data correctly. You can cancel the operation or choose to proceed anyway.
Wrangler now checks whether a bucket is Data Catalog-enabled before running a delete and warns you before continuing:
Data Catalog is enabled for this bucket.Proceeding may leave the data catalog in an invalid state. Continue?To learn how to safely manage and delete data in your tables, refer to the R2 Data Catalog documentation.
Pay-as-you-go customers can now view billable usage and create budget alerts directly from the product overview pages for Workers & Pages, D1, R2, Workers KV, Queues, Vectorize, Durable Objects, and Containers. A new sidebar widget shows current-period spend and the billing cycle date range, alongside a button to create a budget alert.
The widget pulls from the same data as the Billable Usage dashboard and aligns to your billing cycle (or the current day on Free plans), so the numbers match your invoice. Enterprise contract accounts are not yet supported.

Selecting Create budget alert opens the budget alert flow inline so you can set a dollar threshold in the same place you are reviewing usage. Budget alerts apply to your total account-level spend across all products, not just the product page you create them from.
For more information, refer to the Usage-based billing documentation.
R2 Data Catalog is a managed Apache Iceberg ↗ data catalog built directly into R2 buckets, queryable by any Iceberg-compatible engine such as Spark, Snowflake, and DuckDB. R2 Data Catalog now has published pricing for catalog operations and table compaction, in addition to standard R2 storage and operations.
Billing is not yet enabled. We will provide at least 30 days notice before we start charging for R2 Data Catalog usage.
Pricing is based on two dimensions:
- Catalog operations: $9.00 / million operations for metadata requests such as creating tables, reading table metadata, and updating table properties.
- Compaction: $0.005 / GB processed and $2.00 / million objects processed. These charges only apply when automatic compaction is turned on for a table.
Both dimensions include a monthly free tier: 1 million catalog operations, 10 GB of compaction data processed, and 1 million compaction objects processed.
For full pricing details and billing examples, refer to R2 Data Catalog pricing.
R2 Data Catalog is a managed Apache Iceberg ↗ data catalog built directly into your R2 bucket. It exposes a standard Iceberg REST catalog interface so you can connect query engines like Spark, Snowflake, DuckDB, and R2 SQL to your data in R2.
R2 Data Catalog now has a dedicated section in the Cloudflare dashboard, replacing the previous settings panel embedded in R2 bucket configuration. The new experience includes:
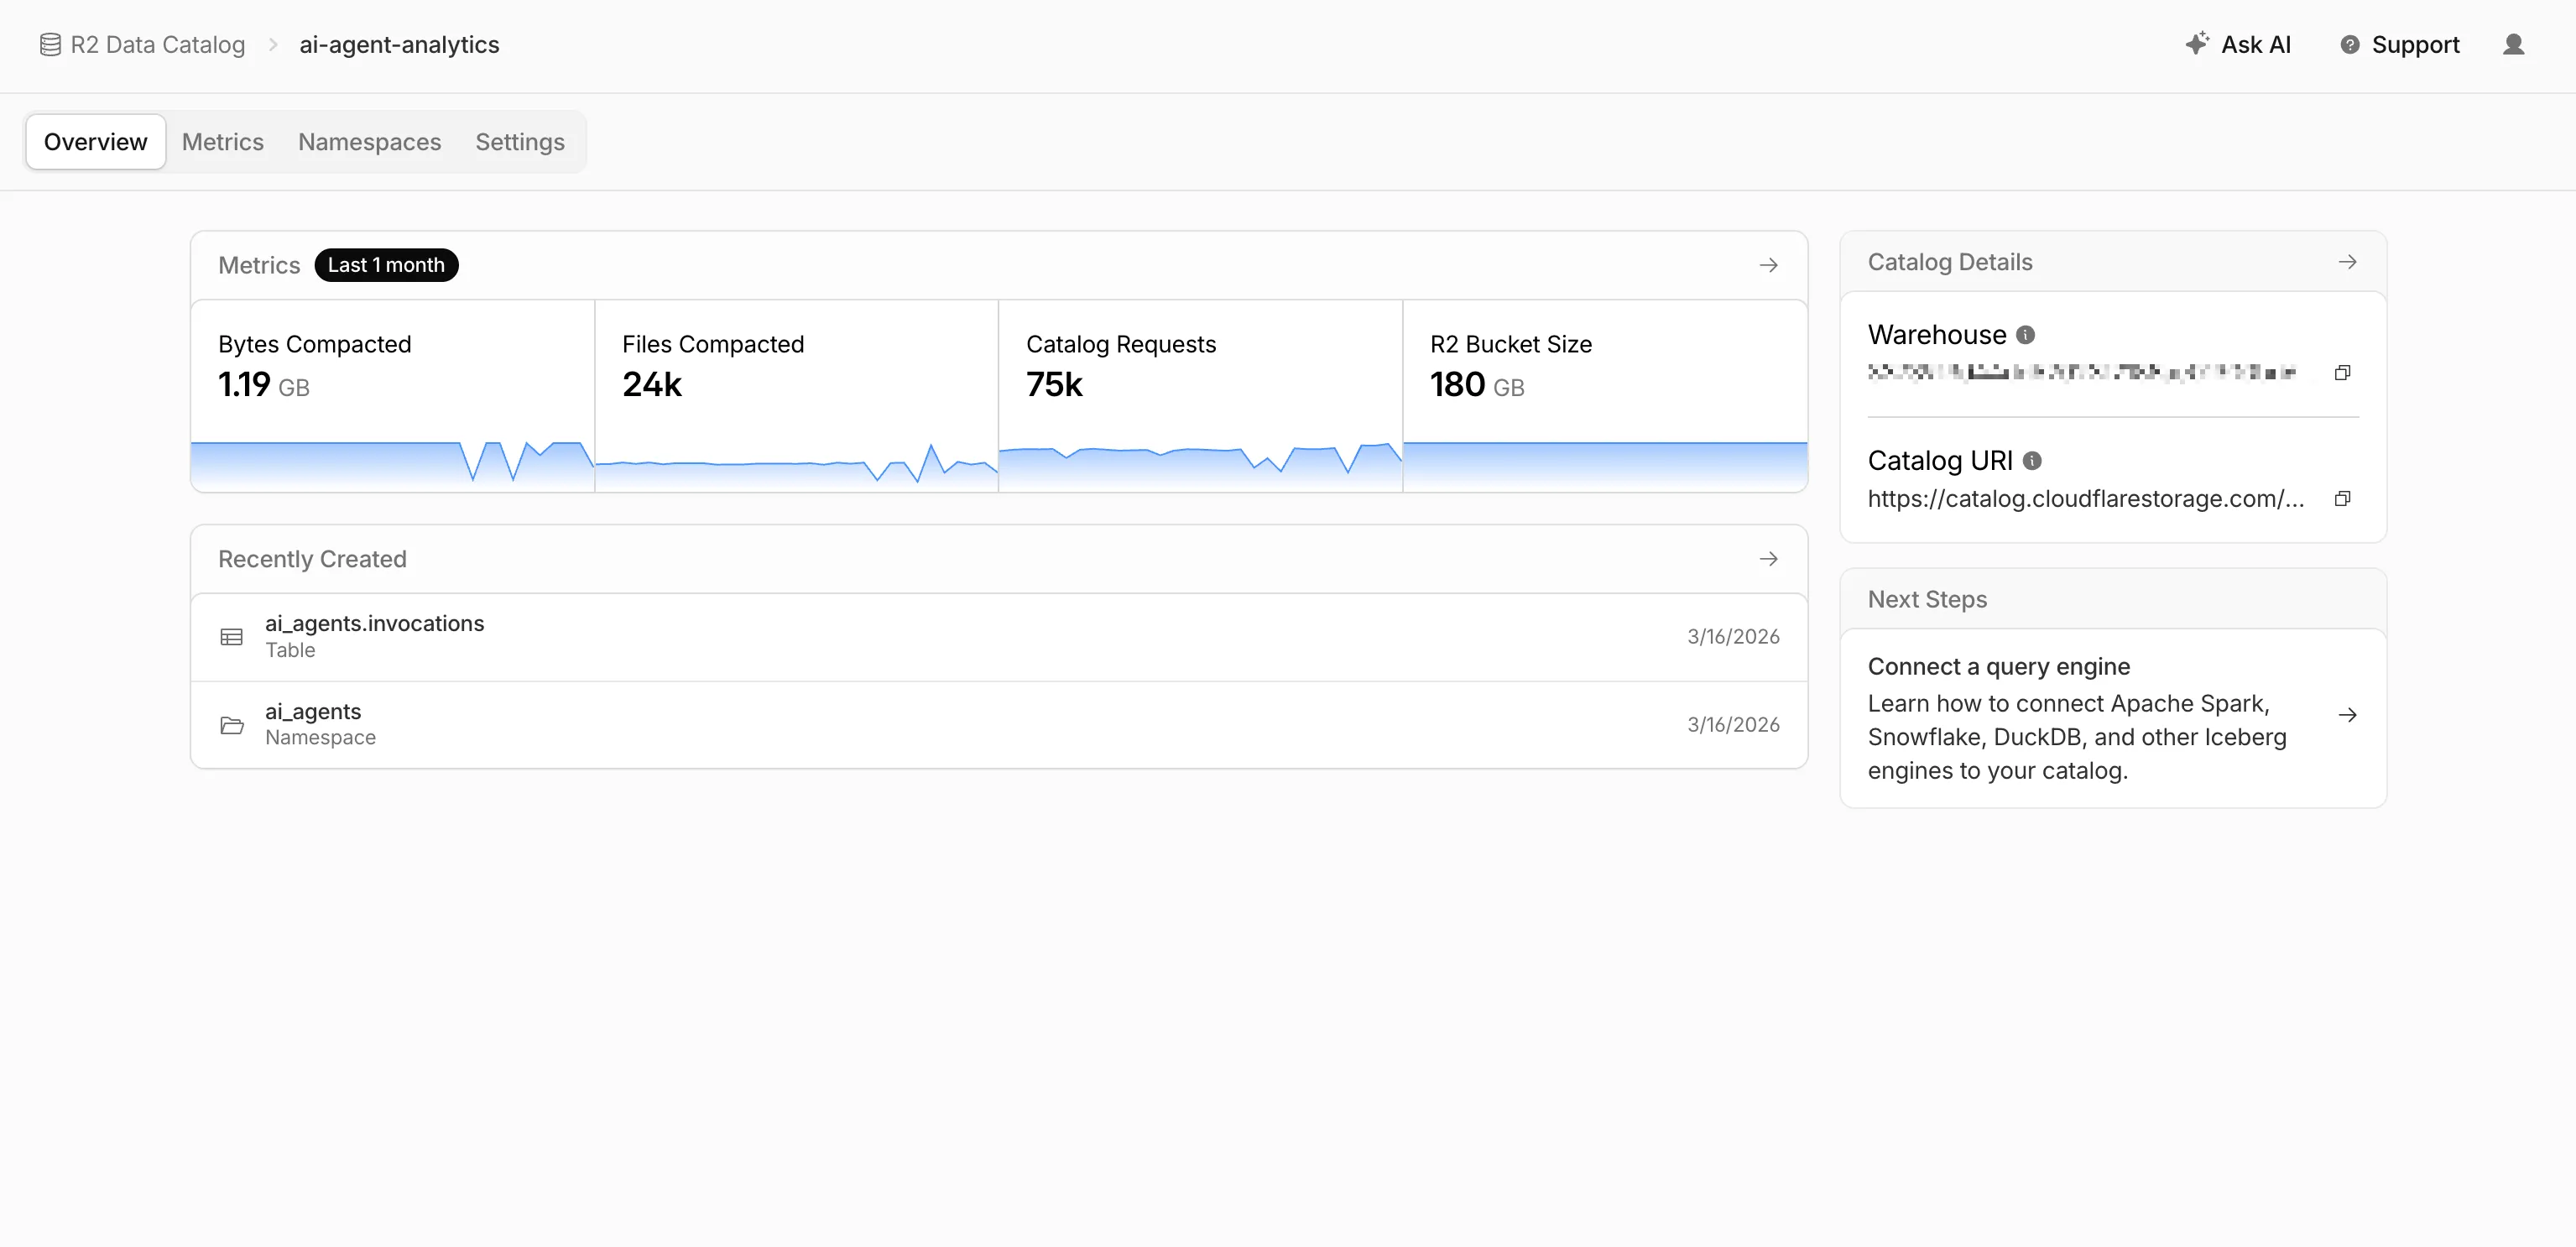
- Catalog overview — View all your catalogs in one place with catalog request counts, bucket sizes, and table maintenance status at a glance.
- Guided setup wizard — Create a catalog in three steps: choose or create an R2 bucket, configure table maintenance (compaction and snapshot expiration), and review. The wizard creates the bucket and generates a service credential automatically.
- Settings management — A dedicated settings page for each catalog with sections for general configuration, table maintenance, service credentials, and disabling the catalog. You can now enable and configure snapshot expiration directly from the dashboard.
- Built-in metrics — Five charts on each catalog's metrics tab: bytes compacted, files compacted, catalog requests, storage size, and snapshots expired.
To get started, go to R2 Data Catalog in the Cloudflare dashboard or refer to the getting started guide and manage catalogs documentation.
R2 Data Catalog is a managed Apache Iceberg data catalog built directly into your R2 bucket that allows you to connect query engines like R2 SQL, Spark, Snowflake, and DuckDB to your data in R2.
You can now query analytics for your R2 Data Catalog warehouses via Cloudflare's GraphQL Analytics API. Two new datasets are available:
r2CatalogDataOperationsAdaptiveGroupstracks Iceberg REST API requests made to your catalog, including operation type, request duration, HTTP status, and request body bytes. Use this to monitor request volume and latency across warehouses, namespaces, and tables.r2CatalogTableMaintenanceAdaptiveGroupstracks table maintenance jobs such as compaction and snapshot expiration. Use this to monitor job success rates, files processed, bytes read and written, and job duration.
Both datasets support filtering by warehouse name, namespace, table name, and time range. They also include percentile aggregations for duration metrics.
For detailed schema information and example queries, refer to the R2 Data Catalog metrics and analytics documentation.
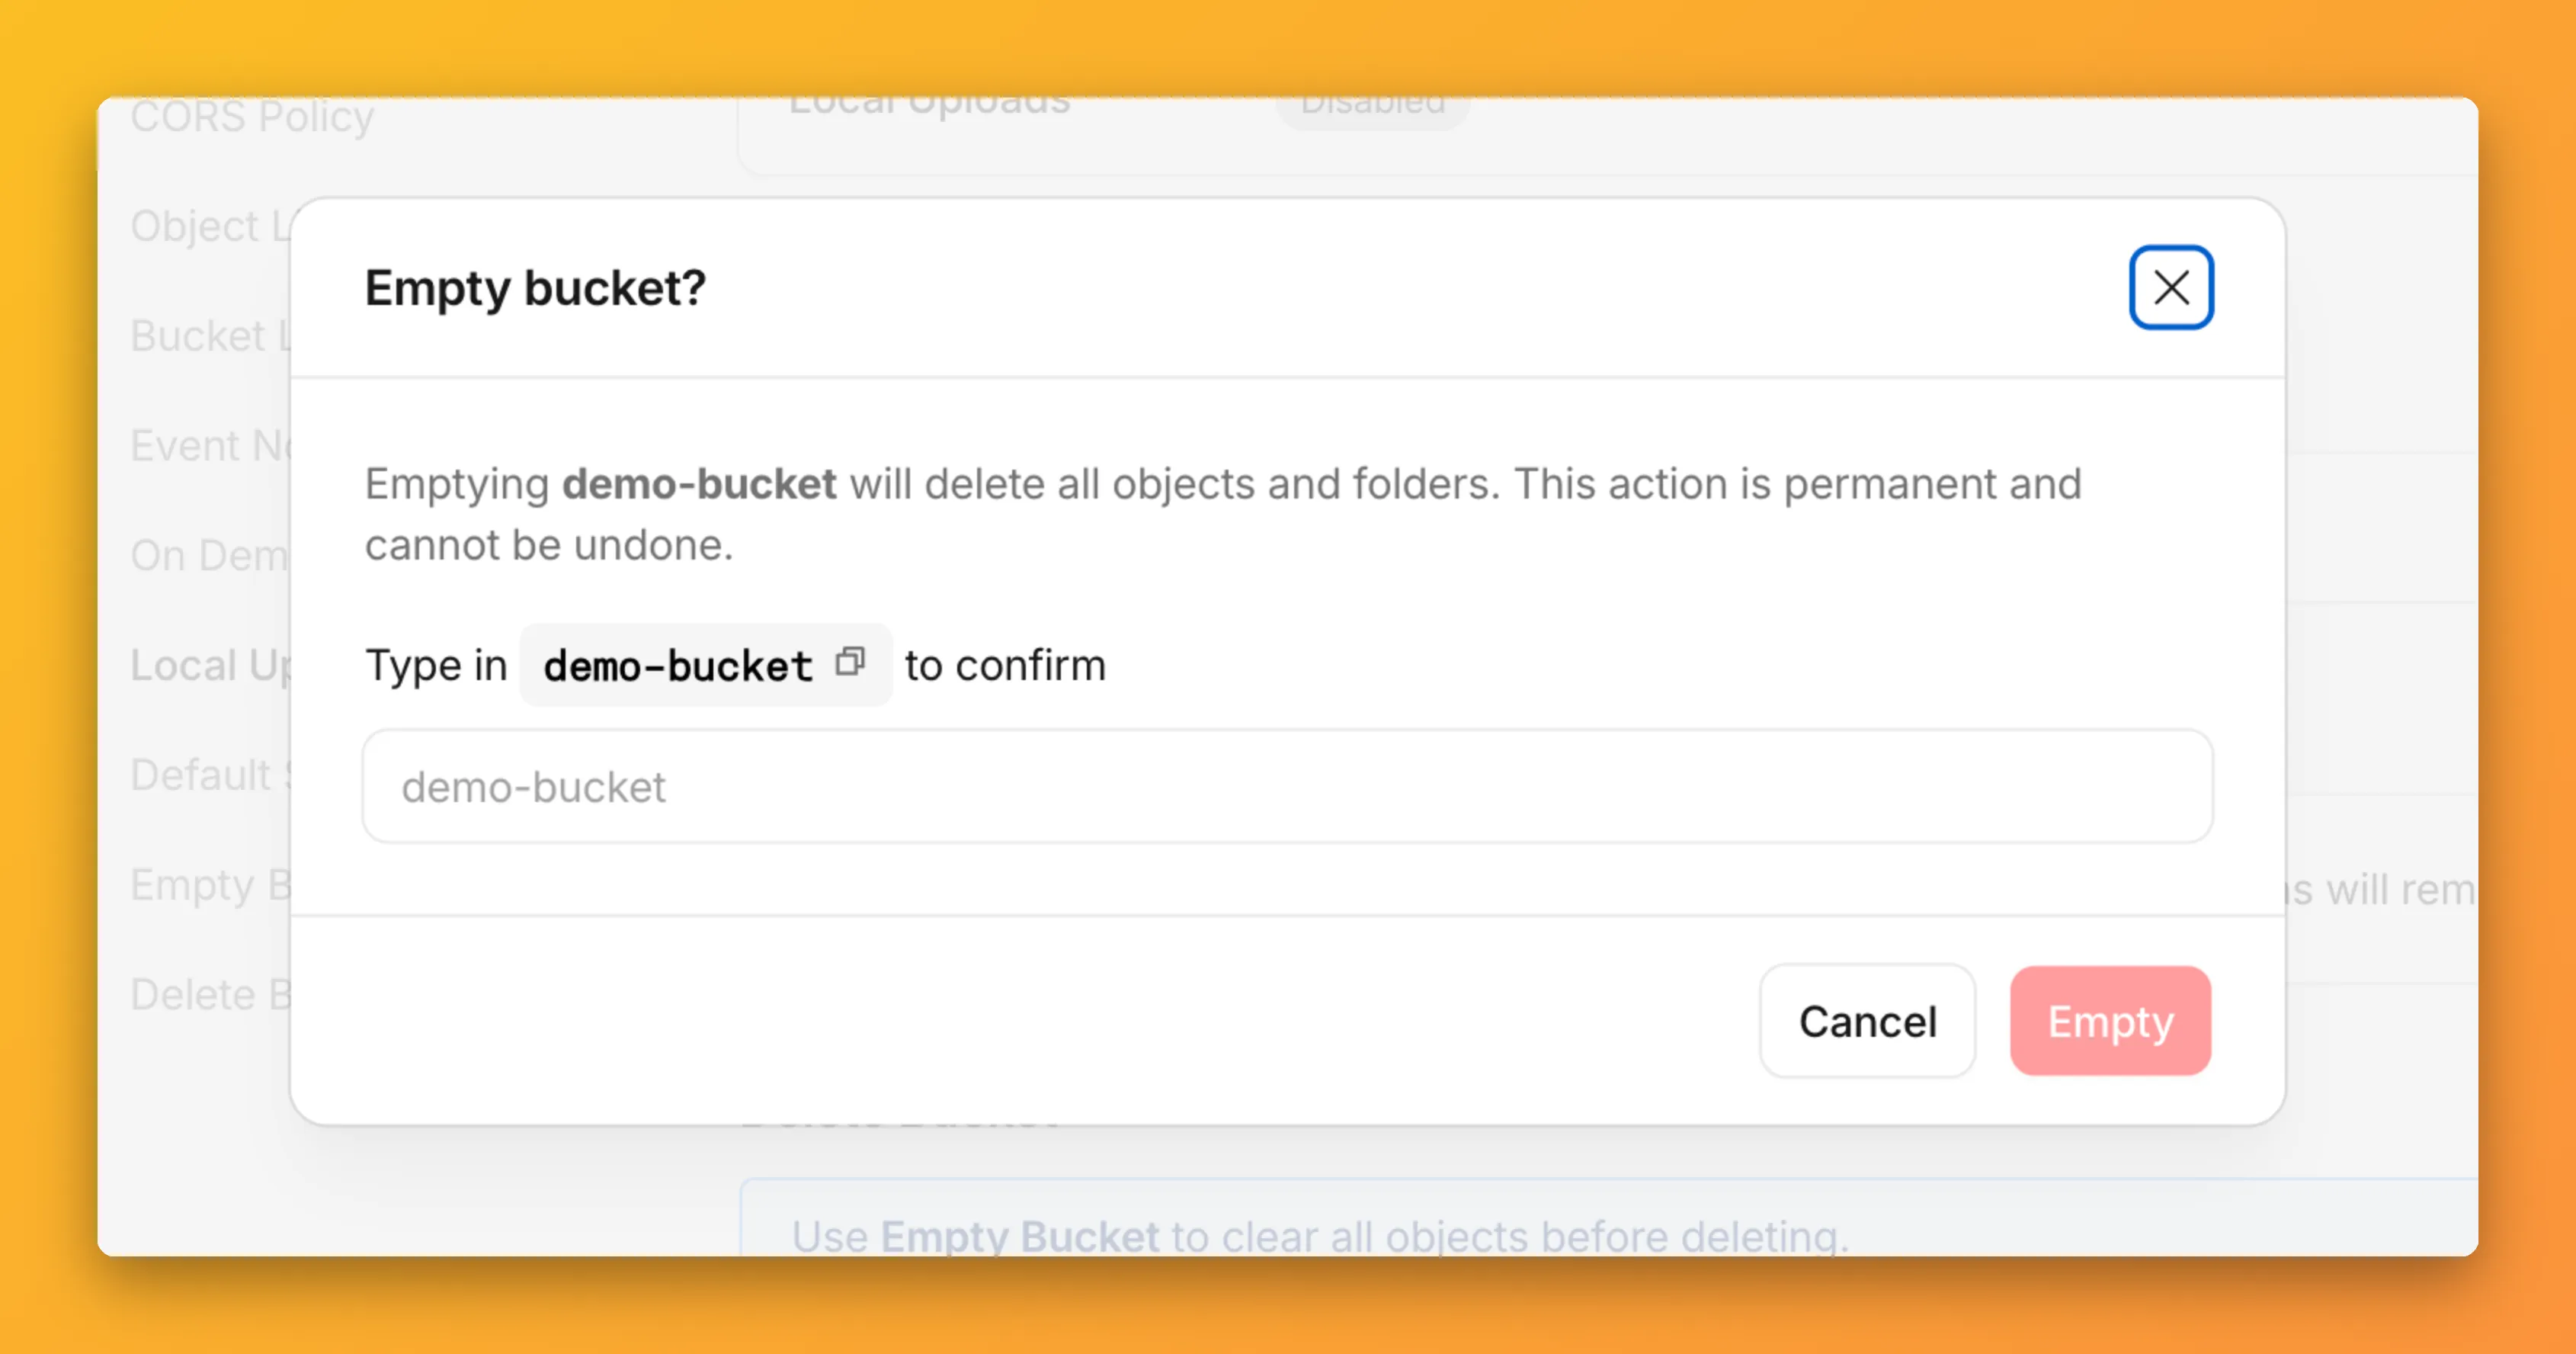
You can now empty an entire R2 bucket or delete folders directly from the dashboard. Emptying a bucket is required before you can delete it. Previously, this required scripting or configuring lifecycle rules. Now, the dashboard can handle it in a single action.
Go to your bucket's Settings tab and select Empty under the Empty Bucket section. This deletes all objects in the bucket while preserving the bucket and its configuration. For large buckets, the operation runs in the background and the dashboard displays progress.
Emptying a bucket is also a prerequisite for deleting it. The dashboard now guides you through both steps in one place.
R2 uses a flat object structure. The dashboard groups objects that share a common prefix into folders when the View prefixes as directories checkbox is selected. Deleting a folder removes every object under that prefix.
From the Objects tab, you can select one or more folders and delete them alongside individual objects.
For step-by-step instructions, refer to Delete buckets and Delete objects.
R2 Data Catalog, a managed Apache Iceberg ↗ catalog built into R2, now removes unreferenced data files during automatic snapshot expiration. This improvement reduces storage costs and eliminates the need to run manual maintenance jobs to reclaim space from deleted data.
Previously, snapshot expiration only cleaned up Iceberg metadata files such as manifests and manifest lists. Data files that were no longer referenced by active snapshots remained in R2 storage until you manually ran
remove_orphan_filesorexpire_snapshotsthrough an engine like Spark. This required extra operational overhead and left stale data files consuming storage.Snapshot expiration now handles both metadata and data file cleanup automatically. When a snapshot is expired, any data files that are no longer referenced by retained snapshots are removed from R2 storage.
Terminal window # Enable catalog-level snapshot expirationnpx wrangler r2 bucket catalog snapshot-expiration enable my-bucket \--older-than-days 7 \--retain-last 10To learn more about snapshot expiration and other automatic maintenance operations, refer to the table maintenance documentation.
Sandboxes now support
createBackup()andrestoreBackup()methods for creating and restoring point-in-time snapshots of directories.This allows you to restore environments quickly. For instance, in order to develop in a sandbox, you may need to include a user's codebase and run a build step. Unfortunately
git cloneandnpm installcan take minutes, and you don't want to run these steps every time the user starts their sandbox.Now, after the initial setup, you can just call
createBackup(), thenrestoreBackup()the next time this environment is needed. This makes it practical to pick up exactly where a user left off, even after days of inactivity, without repeating expensive setup steps.TypeScript const sandbox = getSandbox(env.Sandbox, "my-sandbox");// Make non-trivial changes to the file systemawait sandbox.gitCheckout(endUserRepo, { targetDir: "/workspace" });await sandbox.exec("npm install", { cwd: "/workspace" });// Create a point-in-time backup of the directoryconst backup = await sandbox.createBackup({ dir: "/workspace" });// Store the handle for later useawait env.KV.put(`backup:${userId}`, JSON.stringify(backup));// ... in a future session...// Restore instead of re-cloning and reinstallingawait sandbox.restoreBackup(backup);Backups are stored in R2 and can take advantage of R2 object lifecycle rules to ensure they do not persist forever.
Key capabilities:
- Persist and reuse across sandbox sessions — Easily store backup handles in KV, D1, or Durable Object storage for use in subsequent sessions
- Usable across multiple instances — Fork a backup across many sandboxes for parallel work
- Named backups — Provide optional human-readable labels for easier management
- TTLs — Set time-to-live durations so backups are automatically removed from storage once they are no longer needed
To get started, refer to the backup and restore guide for setup instructions and usage patterns, or the Backups API reference for full method documentation.
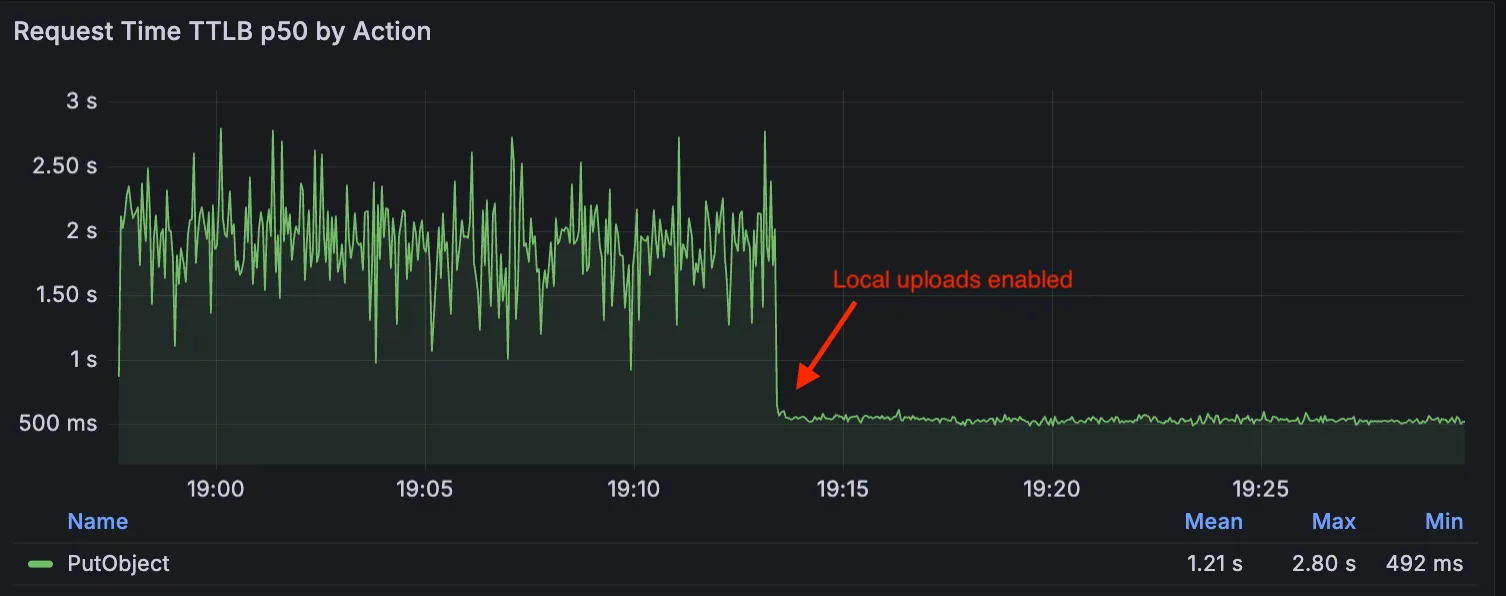
Local Uploads is now available in open beta. Enable it on your R2 bucket to improve upload performance when clients upload data from a different region than your bucket. With Local Uploads enabled, object data is written to storage infrastructure near the client, then asynchronously replicated to your bucket. The object is immediately accessible and remains strongly consistent throughout. Refer to How R2 works for details on how data is written to your bucket.
In our tests, we observed up to 75% reduction in Time to Last Byte (TTLB) for upload requests when Local Uploads is enabled.
This feature is ideal when:
- Your users are globally distributed
- Upload performance and reliability is critical to your application
- You want to optimize write performance without changing your bucket's primary location
To enable Local Uploads on your bucket, find Local Uploads in your bucket settings in the Cloudflare Dashboard ↗, or run:
Terminal window npx wrangler r2 bucket local-uploads enable <BUCKET_NAME>Enabling Local Uploads on a bucket is seamless: existing uploads will complete as expected and there’s no interruption to traffic. There is no additional cost to enable Local Uploads. Upload requests incur the standard Class A operation costs same as upload requests made without Local Uploads.
For more information, refer to Local Uploads.
R2 Data Catalog now supports automatic snapshot expiration for Apache Iceberg tables.
In Apache Iceberg, a snapshot is metadata that represents the state of a table at a given point in time. Every mutation creates a new snapshot which enable powerful features like time travel queries and rollback capabilities but will accumulate over time.
Without regular cleanup, these accumulated snapshots can lead to:
- Metadata overhead
- Slower table operations
- Increased storage costs.
Snapshot expiration in R2 Data Catalog automatically removes old table snapshots based on your configured retention policy, improving performance and storage costs.
Terminal window # Enable catalog-level snapshot expiration# Expire snapshots older than 7 days, always retain at least 10 recent snapshotsnpx wrangler r2 bucket catalog snapshot-expiration enable my-bucket \--older-than-days 7 \--retain-last 10Snapshot expiration uses two parameters to determine which snapshots to remove:
--older-than-days: age threshold in days--retain-last: minimum snapshot count to retain
Both conditions must be met before a snapshot is expired, ensuring you always retain recent snapshots even if they exceed the age threshold.
This feature complements automatic compaction, which optimizes query performance by combining small data files into larger ones. Together, these automatic maintenance operations keep your Iceberg tables performant and cost-efficient without manual intervention.
To learn more about snapshot expiration and how to configure it, visit our table maintenance documentation or see how to manage catalogs.
Containers now support mounting R2 buckets as FUSE (Filesystem in Userspace) volumes, allowing applications to interact with R2 using standard filesystem operations.
Common use cases include:
- Bootstrapping containers with datasets, models, or dependencies for sandboxes and agent environments
- Persisting user configuration or application state without managing downloads
- Accessing large static files without bloating container images or downloading at startup
FUSE adapters like tigrisfs ↗, s3fs ↗, and gcsfuse ↗ can be installed in your container image and configured to mount buckets at startup.
FROM alpine:3.20# Install FUSE and dependenciesRUN apk update && \apk add --no-cache ca-certificates fuse curl bash# Install tigrisfsRUN ARCH=$(uname -m) && \if [ "$ARCH" = "x86_64" ]; then ARCH="amd64"; fi && \if [ "$ARCH" = "aarch64" ]; then ARCH="arm64"; fi && \VERSION=$(curl -s https://api.github.com/repos/tigrisdata/tigrisfs/releases/latest | grep -o '"tag_name": "[^"]*' | cut -d'"' -f4) && \curl -L "https://github.com/tigrisdata/tigrisfs/releases/download/${VERSION}/tigrisfs_${VERSION#v}_linux_${ARCH}.tar.gz" -o /tmp/tigrisfs.tar.gz && \tar -xzf /tmp/tigrisfs.tar.gz -C /usr/local/bin/ && \rm /tmp/tigrisfs.tar.gz && \chmod +x /usr/local/bin/tigrisfs# Create startup script that mounts bucketRUN printf '#!/bin/sh\n\set -e\n\mkdir -p /mnt/r2\n\R2_ENDPOINT="https://${R2_ACCOUNT_ID}.r2.cloudflarestorage.com"\n\/usr/local/bin/tigrisfs --endpoint "${R2_ENDPOINT}" -f "${BUCKET_NAME}" /mnt/r2 &\n\sleep 3\n\ls -lah /mnt/r2\n\' > /startup.sh && chmod +x /startup.shCMD ["/startup.sh"]See the Mount R2 buckets with FUSE example for a complete guide on mounting R2 buckets and/or other S3-compatible storage buckets within your containers.
You can now enable compaction for individual Apache Iceberg ↗ tables in R2 Data Catalog, giving you fine-grained control over different workloads.
Terminal window # Enable compaction for a specific table (no token required)npx wrangler r2 bucket catalog compaction enable <BUCKET> <NAMESPACE> <TABLE> --target-size 256This allows you to:
- Apply different target file sizes per table
- Disable compaction for specific tables
- Optimize based on table-specific access patterns
Learn more at Manage catalogs.
You can now enable automatic compaction for Apache Iceberg ↗ tables in R2 Data Catalog to improve query performance.
Compaction is the process of taking a group of small files and combining them into fewer larger files. This is an important maintenance operation as it helps ensure that query performance remains consistent by reducing the number of files that needs to be scanned.
To enable automatic compaction in R2 Data Catalog, find it under R2 Data Catalog in your R2 bucket settings in the dashboard.
Or with Wrangler, run:
Terminal window npx wrangler r2 bucket catalog compaction enable <BUCKET_NAME> --target-size 128 --token <API_TOKEN>To get started with compaction, check out manage catalogs. For best practices and limitations, refer to about compaction.
We're excited to announce several improvements to the Cloudflare R2 dashboard experience that make managing your object storage easier and more intuitive:

We've redesigned the bucket settings page, giving you a centralized location to manage all your bucket configurations in one place.
- Deeplink support for prefix directories: Navigate through your bucket hierarchy without losing your state. Your browser's back button now works as expected, and you can share direct links to specific prefix directories with teammates.
- Objects as clickable links: Objects are now proper links that you can copy or
CMD + Clickto open in a new tab.
- Renamed "r2.dev domain" to "Public Development URL" for better clarity when exposing bucket contents for non-production workloads.
- Public Access status now clearly displays "Enabled" when your bucket is exposed to the internet (via Public Development URL or Custom Domains).
We've also made numerous other usability improvements across the board to make your R2 experience smoother and more productive.
Cloudflare Pipelines is now available in beta, to all users with a Workers Paid plan.
Pipelines let you ingest high volumes of real time data, without managing the underlying infrastructure. A single pipeline can ingest up to 100 MB of data per second, via HTTP or from a Worker. Ingested data is automatically batched, written to output files, and delivered to an R2 bucket in your account. You can use Pipelines to build a data lake of clickstream data, or to store events from a Worker.
Create your first pipeline with a single command:
Create a pipeline $ npx wrangler@latest pipelines create my-clickstream-pipeline --r2-bucket my-bucket🌀 Authorizing R2 bucket "my-bucket"🌀 Creating pipeline named "my-clickstream-pipeline"✅ Successfully created pipeline my-clickstream-pipelineId: 0e00c5ff09b34d018152af98d06f5a1xvcName: my-clickstream-pipelineSources:HTTP:Endpoint: https://0e00c5ff09b34d018152af98d06f5a1xvc.pipelines.cloudflare.com/Authentication: offFormat: JSONWorker:Format: JSONDestination:Type: R2Bucket: my-bucketFormat: newline-delimited JSONCompression: GZIPBatch hints:Max bytes: 100 MBMax duration: 300 secondsMax records: 100,000🎉 You can now send data to your pipeline!Send data to your pipeline's HTTP endpoint:curl "https://0e00c5ff09b34d018152af98d06f5a1xvc.pipelines.cloudflare.com/" -d '[{ ...JSON_DATA... }]'To send data to your pipeline from a Worker, add the following configuration to your config file:{"pipelines": [{"pipeline": "my-clickstream-pipeline","binding": "PIPELINE"}]}Head over to our getting started guide for an in-depth tutorial to building with Pipelines.
Today, we're launching R2 Data Catalog in open beta, a managed Apache Iceberg catalog built directly into your Cloudflare R2 bucket.
If you're not already familiar with it, Apache Iceberg ↗ is an open table format designed to handle large-scale analytics datasets stored in object storage, offering ACID transactions and schema evolution. R2 Data Catalog exposes a standard Iceberg REST catalog interface, so you can connect engines like Spark, Snowflake, and PyIceberg to start querying your tables using the tools you already know.
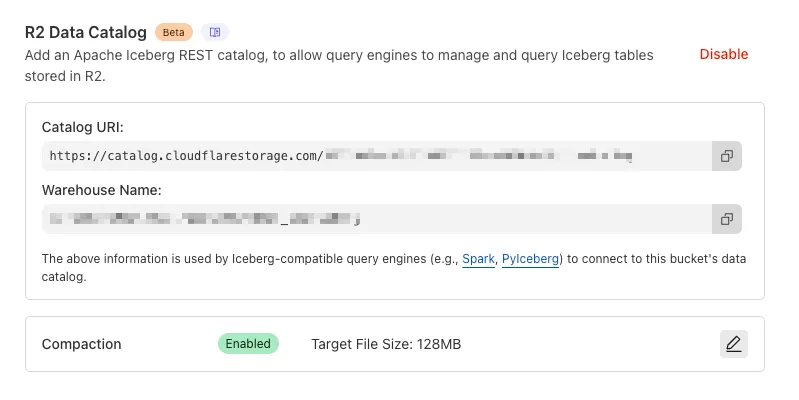
To enable a data catalog on your R2 bucket, find R2 Data Catalog in your buckets settings in the dashboard, or run:
Terminal window npx wrangler r2 bucket catalog enable my-bucketAnd that's it. You'll get a catalog URI and warehouse you can plug into your favorite Iceberg engines.
Visit our getting started guide for step-by-step instructions on enabling R2 Data Catalog, creating tables, and running your first queries.
You can now use bucket locks to set retention policies on your R2 buckets (or specific prefixes within your buckets) for a specified period — or indefinitely. This can help ensure compliance by protecting important data from accidental or malicious deletion.
Locks give you a few ways to ensure your objects are retained (not deleted or overwritten). You can:
- Lock objects for a specific duration, for example 90 days.
- Lock objects until a certain date, for example January 1, 2030.
- Lock objects indefinitely, until the lock is explicitly removed.
Buckets can have up to 1,000 bucket lock rules. Each rule specifies which objects it covers (via prefix) and how long those objects must remain retained.
Here are a couple of examples showing how you can configure bucket lock rules using Wrangler:
Terminal window npx wrangler r2 bucket lock add <bucket> --name 180-days-all --retention-days 180Terminal window npx wrangler r2 bucket lock add <bucket> --name indefinite-logs --prefix logs/ --retention-indefiniteFor more information on bucket locks and how to set retention policies for objects in your R2 buckets, refer to our documentation.
Super Slurper can now migrate data from any S3-compatible object storage provider to Cloudflare R2. This includes transfers from services like MinIO, Wasabi, Backblaze B2, and DigitalOcean Spaces.
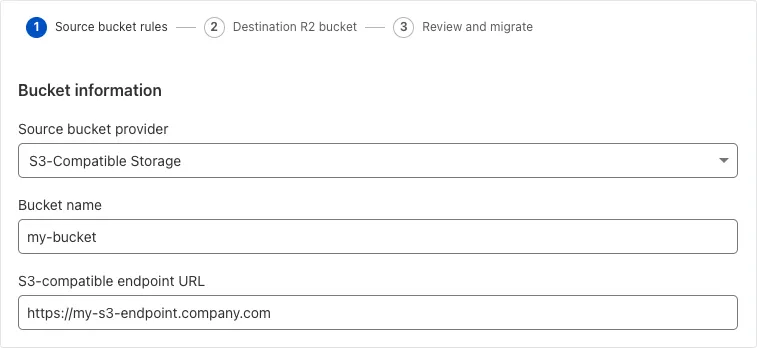
For more information on Super Slurper and how to migrate data from your existing S3-compatible storage buckets to R2, refer to our documentation.
Super Slurper now transfers data from cloud object storage providers like AWS S3 and Google Cloud Storage to Cloudflare R2 up to 5x faster than it did before.
We moved from a centralized service to a distributed system built on the Cloudflare Developer Platform — using Cloudflare Workers, Durable Objects, and Queues — to both improve performance and increase system concurrency capabilities (and we'll share more details about how we did it soon!)
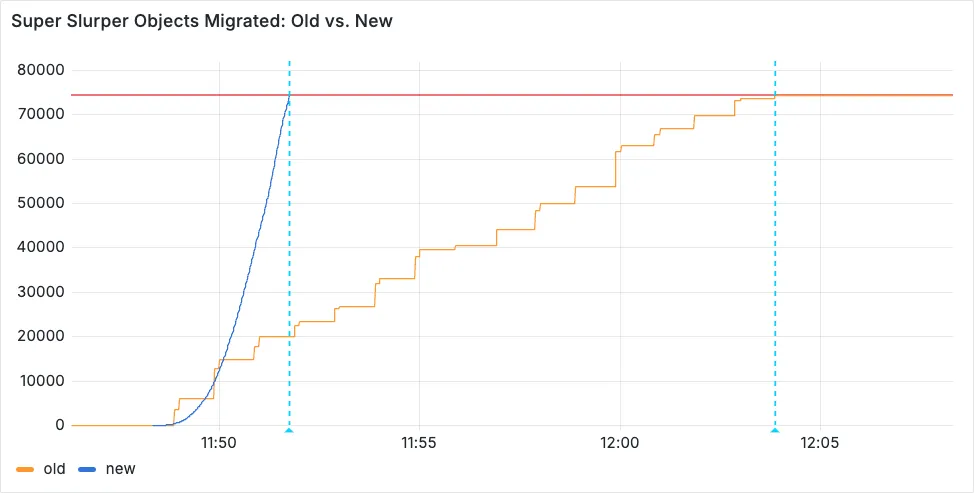
Time to copy 75,000 objects from AWS S3 to R2 decreased from 15 minutes 30 seconds (old) to 3 minutes 25 seconds (after performance improvements)
For more information on Super Slurper and how to migrate data from existing object storage to R2, refer to our documentation.