
Changelog
New updates and improvements at Cloudflare.
Cloudflare IPsec now supports the
IKE_SA_INIT_FULL_TRANSCRIPT_AUTH↗ IKEv2 extension to protect against downgrade attacks on IPsec tunnels.IKEv2's original authentication design has each endpoint sign only its own outbound messages, not the full handshake transcript. A quantum-capable on-path attacker ↗ can exploit this to bypass post-quantum key exchange by downgrading the connection to classical cryptography. The
IKE_SA_INIT_FULL_TRANSCRIPT_AUTHextension addresses this by having both peers sign the entire handshake transcript during the authentication exchange, preventing an attacker from manipulating the negotiation without detection.Key details:
- Available in beta for Cloudflare WAN and Magic Transit IPsec tunnels.
- Cloudflare sends the
IKE_SA_INIT_FULL_TRANSCRIPT_AUTHnotification unconditionally as a responder when the feature flag is enabled. - Both the initiator (your device) and responder (Cloudflare) must support the extension for downgrade protection to be effective.
- This feature is currently gated by a per-account feature flag. Contact your account team to turn it on.
Refer to Downgrade protection for more details.
You can now configure file transfer controls for browser-based RDP with Cloudflare Access, allowing you to restrict whether users can upload or download files between their local machine and the remote Windows server.

This feature is useful for organizations that support bring-your-own-device (BYOD) policies or third-party contractors using unmanaged devices. By restricting file transfers, you can prevent sensitive data from being moved out of the remote session to a user's personal device.
File transfer controls are configured per policy within your Access application, alongside existing text clipboard controls. For each policy, you can select one of the following options:
- Client to remote RDP session allowed — Users can upload files from their local machine into the browser-based RDP session.
- Remote RDP session to client allowed — Users can download files from the browser-based RDP session to their local machine.
- Both directions allowed — Users can upload and download files between their local machine and the browser-based RDP session.
- Disable copying/pasting — Users are not allowed to transfer files between their local machine and the browser-based RDP session.
By default, file transfer is denied for new policies. For existing Access applications created before this feature was available, file transfer remains denied.
To upload, drag files into the browser window or select the settings gear icon on the left side of the RDP session. To download, copy a file in the remote session and select the settings gear to download it, download multiple files as a zip, or print PDFs to a local printer.


This feature is in beta and available on all Zero Trust plans. For more information, refer to File transfer for browser-based RDP.
Browser Isolation now supports Gateway authorization proxy endpoints. You can apply HTTP Isolate policies to traffic routed through authorization proxy endpoints, the same way you can for traffic from the Cloudflare One Client.
Previously, only source IP proxy endpoints supported Browser Isolation, and only with non-identity policies. Because authorization proxy endpoints authenticate users through an identity provider, you can now apply identity-based Isolate policies to PAC file-proxied traffic without requiring the Cloudflare One Client.
To get started, create an authorization proxy endpoint and build an Isolate policy.
You can now register a Cloudflare One Virtual Appliance and generate its license key directly from the dashboard, without contacting your account team.

- On the Connectors page, select Add an appliance and choose Virtual appliance to register a virtual appliance and generate its authentication key.
- Use Regenerate authentication key from a virtual appliance connector's menu to rotate its key. The previous key is immediately and irrevocably revoked.
- The authentication key is shown only once — copy and store it securely.
This complements the existing API and Terraform self-serve workflow for provisioning virtual appliances. Hardware appliances continue to use the existing account-team fulfillment workflow.
For details, refer to Configure a Cloudflare One Virtual Appliance.
You can now add hostname routes to a Cloudflare Mesh node, in addition to CIDR routes.
-
Requests
wiki.internal.local - DNS query
-
Returns a token IP, then rewrites the destination to the real private IP.
100.80.0.0/16 - Hostname route
-
Forwards traffic to the host on the local network
- Private host
wiki.internal.local·10.0.0.50
Instead of managing IP ranges, you can attract traffic for a hostname to a Mesh node:
- Private hostname (for example,
wiki.internal.local) — reach an internal application by name, which is useful when it has an unknown or ephemeral IP. On Mesh you do not need to run a DNS server; a local hosts-file entry on the node is enough, or you can use a Gateway resolver policy for split DNS. - Public hostname (for example,
www.example.com) — route that hostname's traffic through the node and egress via the node's public IP.
For setup steps, prerequisites, and DNS options, refer to Hostname routes.
-
You can now assign granular, resource-scoped roles for Cloudflare Gateway firewall policies and Zero Trust lists. Administrators can delegate access to specific policy types or list management without granting account-wide or product-wide control.
When you add a member or create a permission policy, the following resource-scoped roles are now available:
Role Description Zero Trust Gateway Firewall Policies Admin Can view and edit all Gateway firewall policies, including DNS, HTTP, and Network policies. Zero Trust Gateway DNS Policies Admin Can view and edit Gateway DNS policies. Zero Trust Gateway HTTP Policies Admin Can view and edit Gateway HTTP policies. Zero Trust Gateway Network Policies Admin Can view and edit Gateway Network policies. Zero Trust Gateway Egress Policies Admin Can view and edit Gateway Egress policies. Zero Trust Gateway Resolver Policies Admin Can view and edit Gateway Resolver policies. Zero Trust Gateway Policies Admin Can view and edit all Gateway policies. Zero Trust Gateway Policies Read Can view all Gateway policies. Zero Trust Gateway Read Only Can view all Gateway resources. Zero Trust DNS Locations Admin Can view and edit DNS locations. Zero Trust Proxy Endpoints Admin Can view and edit Gateway Proxy Endpoints. Zero Trust Account Lists Admin Can view and edit all Gateway and Access lists. Zero Trust Account Lists Read Can view all Gateway and Access lists. These roles allow you to:
- Grant a network engineer write access to Network policies only, without exposing DNS or HTTP policy configuration.
- Allow a security analyst to view all Gateway policies in read-only mode for auditing purposes.
- Delegate list management to a team that maintains block and allow lists without giving them access to policy configuration.
You can also now assign Resource-scoped roles. These roles are complementary to existing account-level roles, and allow you to grant access to a specific resource, like an individual Gateway policy or Cloudflare One list. Existing account-level roles continue to work. A member with the
Cloudflare GatewayorCloudflare Zero Trustrole retains full access to all Gateway resources. This ensures backward compatibility for existing automation and API tokens.- Review the resource-scoped roles on the Cloudflare role reference.
- Learn how to create permission policies that use these roles.
You can now connect autonomous agents and bots to an MCP server portal using an Access service token. Service token sessions can reach upstream MCP servers through the portal without a browser-based OAuth flow.
To set this up:
- Add a Service Auth policy that matches your service token to the portal's Access application.
- Add a Service Auth policy that matches the same token to each linked MCP server's Access application.
- Turn Require user auth off (
on_behalf: false) for each linked server so the portal uses the admin credential instead of a per-user OAuth grant.
The bot connects with
CF-Access-Client-IdandCF-Access-Client-Secretheaders and sees the tools from every linked server it is authorized for. Servers that still require per-user OAuth are excluded from service token sessions because a service token cannot complete a per-user OAuth grant.For step-by-step setup, refer to Connect with a service token.
The Routes page in the Cloudflare dashboard now shows the routes across all of your connectors — Cloudflare Mesh and Cloudflare Tunnel routes alongside Cloudflare WAN and Magic Transit static routes — in a single table, instead of a separate routes view per product.

From the unified Routes page you can:
- Visualize your network with an interactive map that shows how your destinations flow through to your connectors — including equal-cost multi-path (ECMP) routes where the same prefix is served by several connectors. Select a node to filter the table down to the routes behind it.
- See every route in one table, with its destination, type, connector, priority, and source, and filter or sort to find what you need.
- Create, edit, and delete routes of any supported type without leaving the page. When adding a Cloudflare WAN or Magic Transit static route, you now pick the next hop by connector name instead of typing its IP.
- Manage virtual networks from a dedicated tab.
- Test a route to see which connector and next hop a destination resolves to before you commit a change.
To find it, go to Networking > Routes in the dashboard sidebar.
Go to RoutesYour existing routes, APIs, and configurations are unchanged — this is a dashboard experience that brings them together in one place. Learn how to add routes and manage virtual networks.
When you create a new Zero Trust organization, Cloudflare now adds the Cloudflare identity provider as your default login method. Previously, new organizations started with one-time PIN (OTP).
With the Cloudflare identity provider, your users authenticate using their existing Cloudflare account credentials, and authentication is restricted to members of your account. You can still add OTP or connect any third-party identity provider whenever you need to.
This change only applies to newly created accounts. Existing organizations keep the login methods they already have configured. If you would like to use the Cloudflare Identity Provider in an existing account, you must enable it.
The Cisco IOS XE third-party integration guide for Cloudflare WAN has been updated to include:
- Post Quantum Cryptography (PQC)
- Policy-Based Routing (PBR)
- IP Service Level Agreement (IP SLA)
This link will take you directly to the updated Cisco IOS XE guide.
The Cloudflare Mesh dashboard now shows per-replica details for high availability nodes. You can see which replica is active, view each replica's Mesh IP and connection details, and manually trigger failover — all from the node detail page.

- Replica tabs on the node detail page — switch between replicas to see each one's Mesh IP, edge data center, origin IP, platform, version, and uptime.
- Active/passive badges identify which replica is currently routing traffic.
- Manual failover — promote a passive replica to active with a single click. The previous active replica switches to standby.
- HA badge in the overview table identifies nodes running multiple replicas.
- Active replica IP shown in the overview table — the dashboard now resolves which replica is active and displays the correct Mesh IP.
To manually promote a passive replica:
- In the Cloudflare dashboard ↗, go to Networking > Mesh.
- Select an HA-enabled node.
- Select the passive replica tab.
- Select Promote to active and confirm.
Traffic reroutes to the promoted replica immediately. Refer to High availability for details on failover behavior.
Cloudflare Gateway policy selectors which support regular expressions can now be authored in the dashboard using natural language. When building a policy with a regex-based selector (like
matches regex), you can describe what you want to match in plain English and the Cloudflare Agent will generate and validate a corresponding regular expression.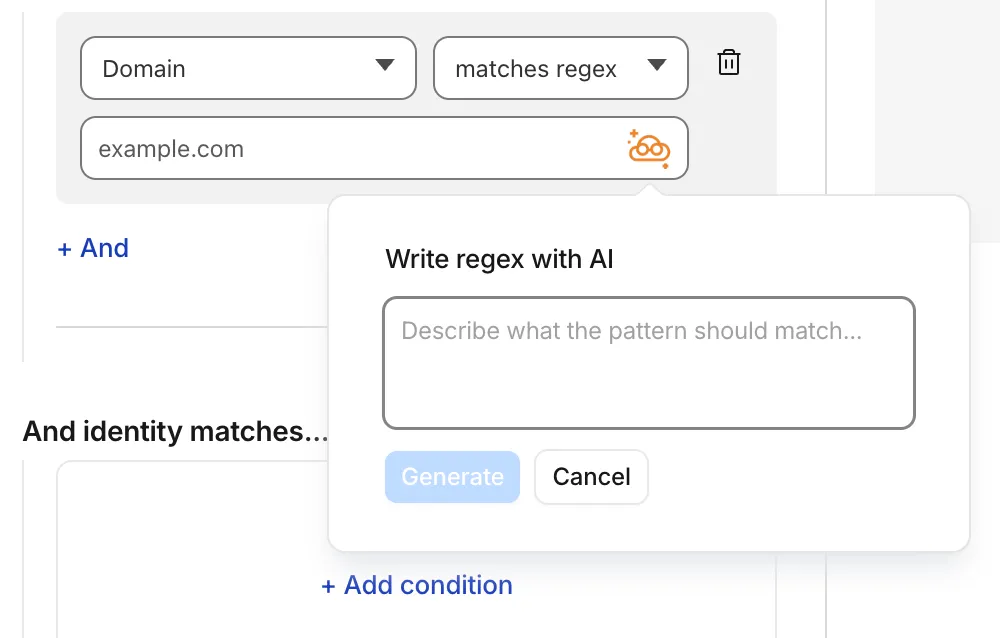
To get started, select a regex-compatible selector in the Gateway policy builder and select the icon. You'll see an input field for natural language, such as "any URL starting with /api/v1" or ".com, .net, and .app hosts which contain
goooglein the host."You can also use the tool to explain existing regular expressions. If a policy already contains a regex pattern, you can instantly generate a plain-language description.
A built-in feedback mechanism allows you to rate each interaction to help improve output quality over time.
For more information, refer to Cloudflare One firewall policies and expect to see the same functionality supported soon in Data loss prevention profiles.
You can now scope Cloudflare permissions to individual Cloudflare Tunnel instances and Cloudflare Mesh nodes. Administrators can delegate access to specific Tunnels or Mesh nodes without granting account-wide control over private networking.
When you add a member or create a permission policy, the resource picker now lists Cloudflare Tunnel instances and Cloudflare Mesh nodes as scopable resource types. You can:
- Grant a read-only role on a single Cloudflare Tunnel instance to a support operator for log streaming and diagnostics — without exposing other Tunnels or destructive actions.
- Grant a write role on a specific Cloudflare Mesh node to an application team — without giving them access to the rest of your private network.
- Scope a single policy to one or many Tunnels and Mesh nodes at once.
Granular permissions are a parallel layer to existing account-level roles — they do not replace them.
- Existing account-level roles continue to work. A member with
Cloudflare AccessorCloudflare Zero Trustretains write access to every Tunnel and Mesh node in the account. This ensures backward compatibility for existing automation and tokens. - Granular permissions are additive. For any API request on a specific Tunnel or Mesh node, access is granted if the principal has either the account-level role or a granular permission for that resource.
- Resource enumeration is authorization-aware. Listing endpoints (
GET /accounts/{id}/cfd_tunnel,GET /accounts/{id}/warp_connector) return only the resources the principal has at least read access to.
- Configure granular permissions for Cloudflare Tunnel.
- Configure granular permissions for Cloudflare Tunnel and Cloudflare Mesh in Cloudflare One.
- Review the resource-scoped roles on the Cloudflare role reference.
The Access login page and one-time password (OTP) page now feature a refreshed design that improves visual consistency, user trust, and mobile responsiveness.
Before:

After:

The updated login experience includes:
- Unified authentication card - All sign-in options (identity provider buttons, email input, OTP) now appear in a single card with consistent styling, replacing the previous multi-section layout.
- Consistent button styling - Identity provider buttons use a uniform size and layout for easier scanning and selection.
- Better mobile experience - Responsive layout improvements ensure the login page renders correctly on phones and tablets.
- Dark mode support - The login page now supports dark mode.
New Magic Transit and Cloudflare WAN accounts are now assigned a single IPv4 anycast address by default.
Cloudflare handles failures on its network automatically by advertising your endpoint IP from multiple nodes across many globally distributed data centers. To handle failures on your network, configure two tunnels from separate routers.
To request additional anycast IP addresses for your account, contact your account team.
For tunnel configuration guidance, refer to Configure tunnel endpoints for Cloudflare WAN or Configure tunnel endpoints for Magic Transit.
When the Cloudflare One Appliance is acting as the DHCP server for a LAN, you can now configure custom DHCP options on the leases it issues. This unlocks workflows such as PXE / iPXE boot, VoIP phone provisioning, and vendor-specific client configuration.
Each option is defined by
option_number,value, and one of four value types:text,integer,hex, orip. Configurations are validated on the appliance before being applied — invalid configurations are rejected and the underlying error is returned to the API caller, so a bad option will not disrupt the live DHCP service.For details, refer to DHCP server options.
Breakout and traffic prioritization rules on the Cloudflare One Appliance can now match by source in addition to destination application. You can pin breakout or priority behavior to:
- A source LAN interface — VLANs attached to that LAN are included automatically.
- A source IP address, range, or CIDR block.
This is the natural way to break out a guest VLAN to the local Internet, or to prioritize traffic from a specific subnet, without enumerating destination applications.
For details, refer to Breakout traffic.
You can now create, rotate, and delete Cloudflare One Virtual Appliance instances and their license keys directly via the API and Terraform.
- Create a virtual appliance and receive a license key:
POST /accounts/{account_id}/magic/connectorswithdevice.provision_license: true. - Rotate the license key for an existing virtual appliance:
PATCH /accounts/{account_id}/magic/connectors/{connector_id}withprovision_license: true. The previous key is immediately and irrevocably revoked. - Delete a virtual appliance to release the associated licensed device.
The license key is returned in the response only once, at create or rotate time. Copy and store it securely.
For details, refer to Configure a Cloudflare One Virtual Appliance.
- Create a virtual appliance and receive a license key:
Cloudflare Mesh nodes now support IPv6 CIDR routes. You can advertise both IPv4 and IPv6 subnets through your Mesh nodes, making IPv6-only or dual-stack private networks reachable from any enrolled device.
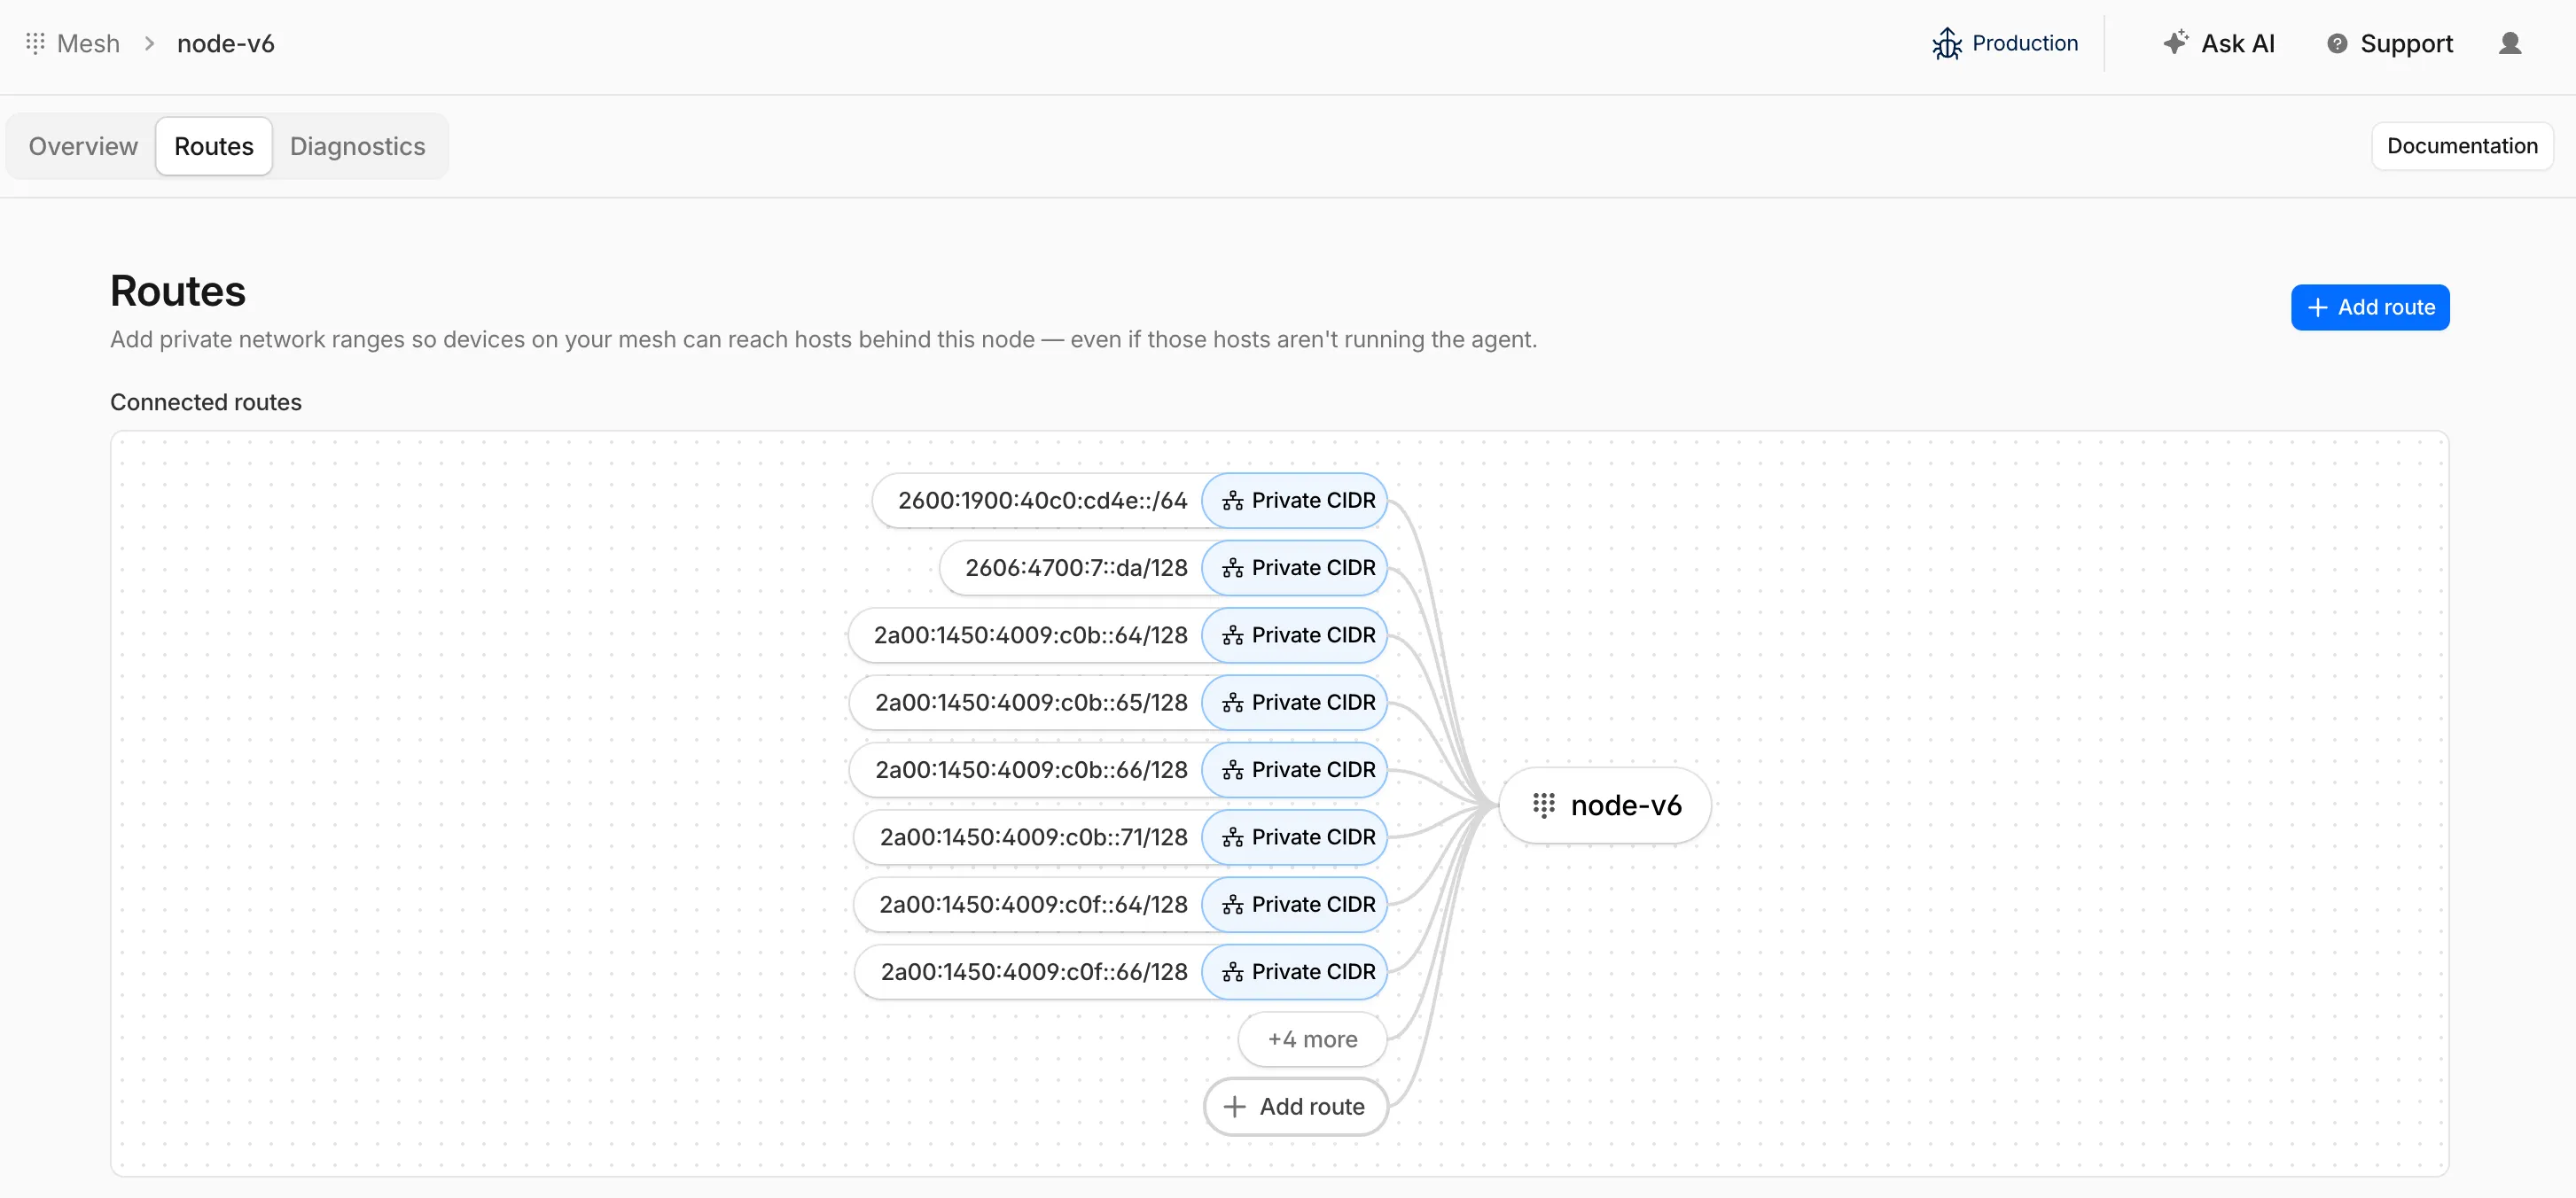
To add an IPv6 route, follow the same steps as adding an IPv4 route — enter the IPv6 CIDR (for example,
fd00::/64) when configuring the route in the dashboard ↗ or via the API.
Cloudflare IPsec now supports post-quantum key agreement with compatible third-party devices. Cisco ↗ and Fortinet ↗ are the first third-party vendors validated to interoperate with Cloudflare IPsec using ML-KEM (Module-Lattice-Based Key-Encapsulation Mechanism).
Post-quantum IPsec uses RFC 9370 ↗ and draft-ietf-ipsecme-ikev2-mlkem ↗ to negotiate hybrid key agreement during the IKEv2
IKE_INTERMEDIATEphase. This combines classical Diffie-Hellman (Group 20) with ML-KEM-768 or ML-KEM-1024 to protect against harvest-now, decrypt-later ↗ attacks.Key details:
- Compatible with Cisco 8000 Series Secure Routers with IOS XR Release 26.1.1 and Fortinet FortiOS 7.6.6 and later.
- Uses ML-KEM-768 or ML-KEM-1024 as an additional Key Exchange to DH Group 20.
- Follows RFC 9370 and draft-ietf-ipsecme-ikev2-mlkem standards.
- No additional licensing required.
Post-quantum IPsec with third-party devices is now generally available with confirmed interoperability for the platforms listed above. Cloudflare intends to support interoperability with more vendors as they build out support for draft-ietf-ipsecme-ikev2-mlkem. Contact your account team to discuss support for additional vendors.
For supported key exchange methods and the list of validated platforms, refer to GRE and IPsec tunnels.
Zero Trust Network Session Logs are now generated for all traffic proxied through Cloudflare Gateway, regardless of on-ramp type. This includes traffic from proxy endpoints (PAC files) and Browser Isolation egress — on-ramps that previously did not generate session logs.
Customers who already consume the
zero_trust_network_sessionsdataset via Logpush or Log Explorer may see increased log volume if they use these on-ramps.For field definitions, refer to Zero Trust Network Session Logs. For traffic analysis, refer to Network session analytics.
The new Network session analytics dashboard is now available in Cloudflare One. This dashboard provides visibility into your network traffic patterns, helping you understand how traffic flows through your Cloudflare One infrastructure.
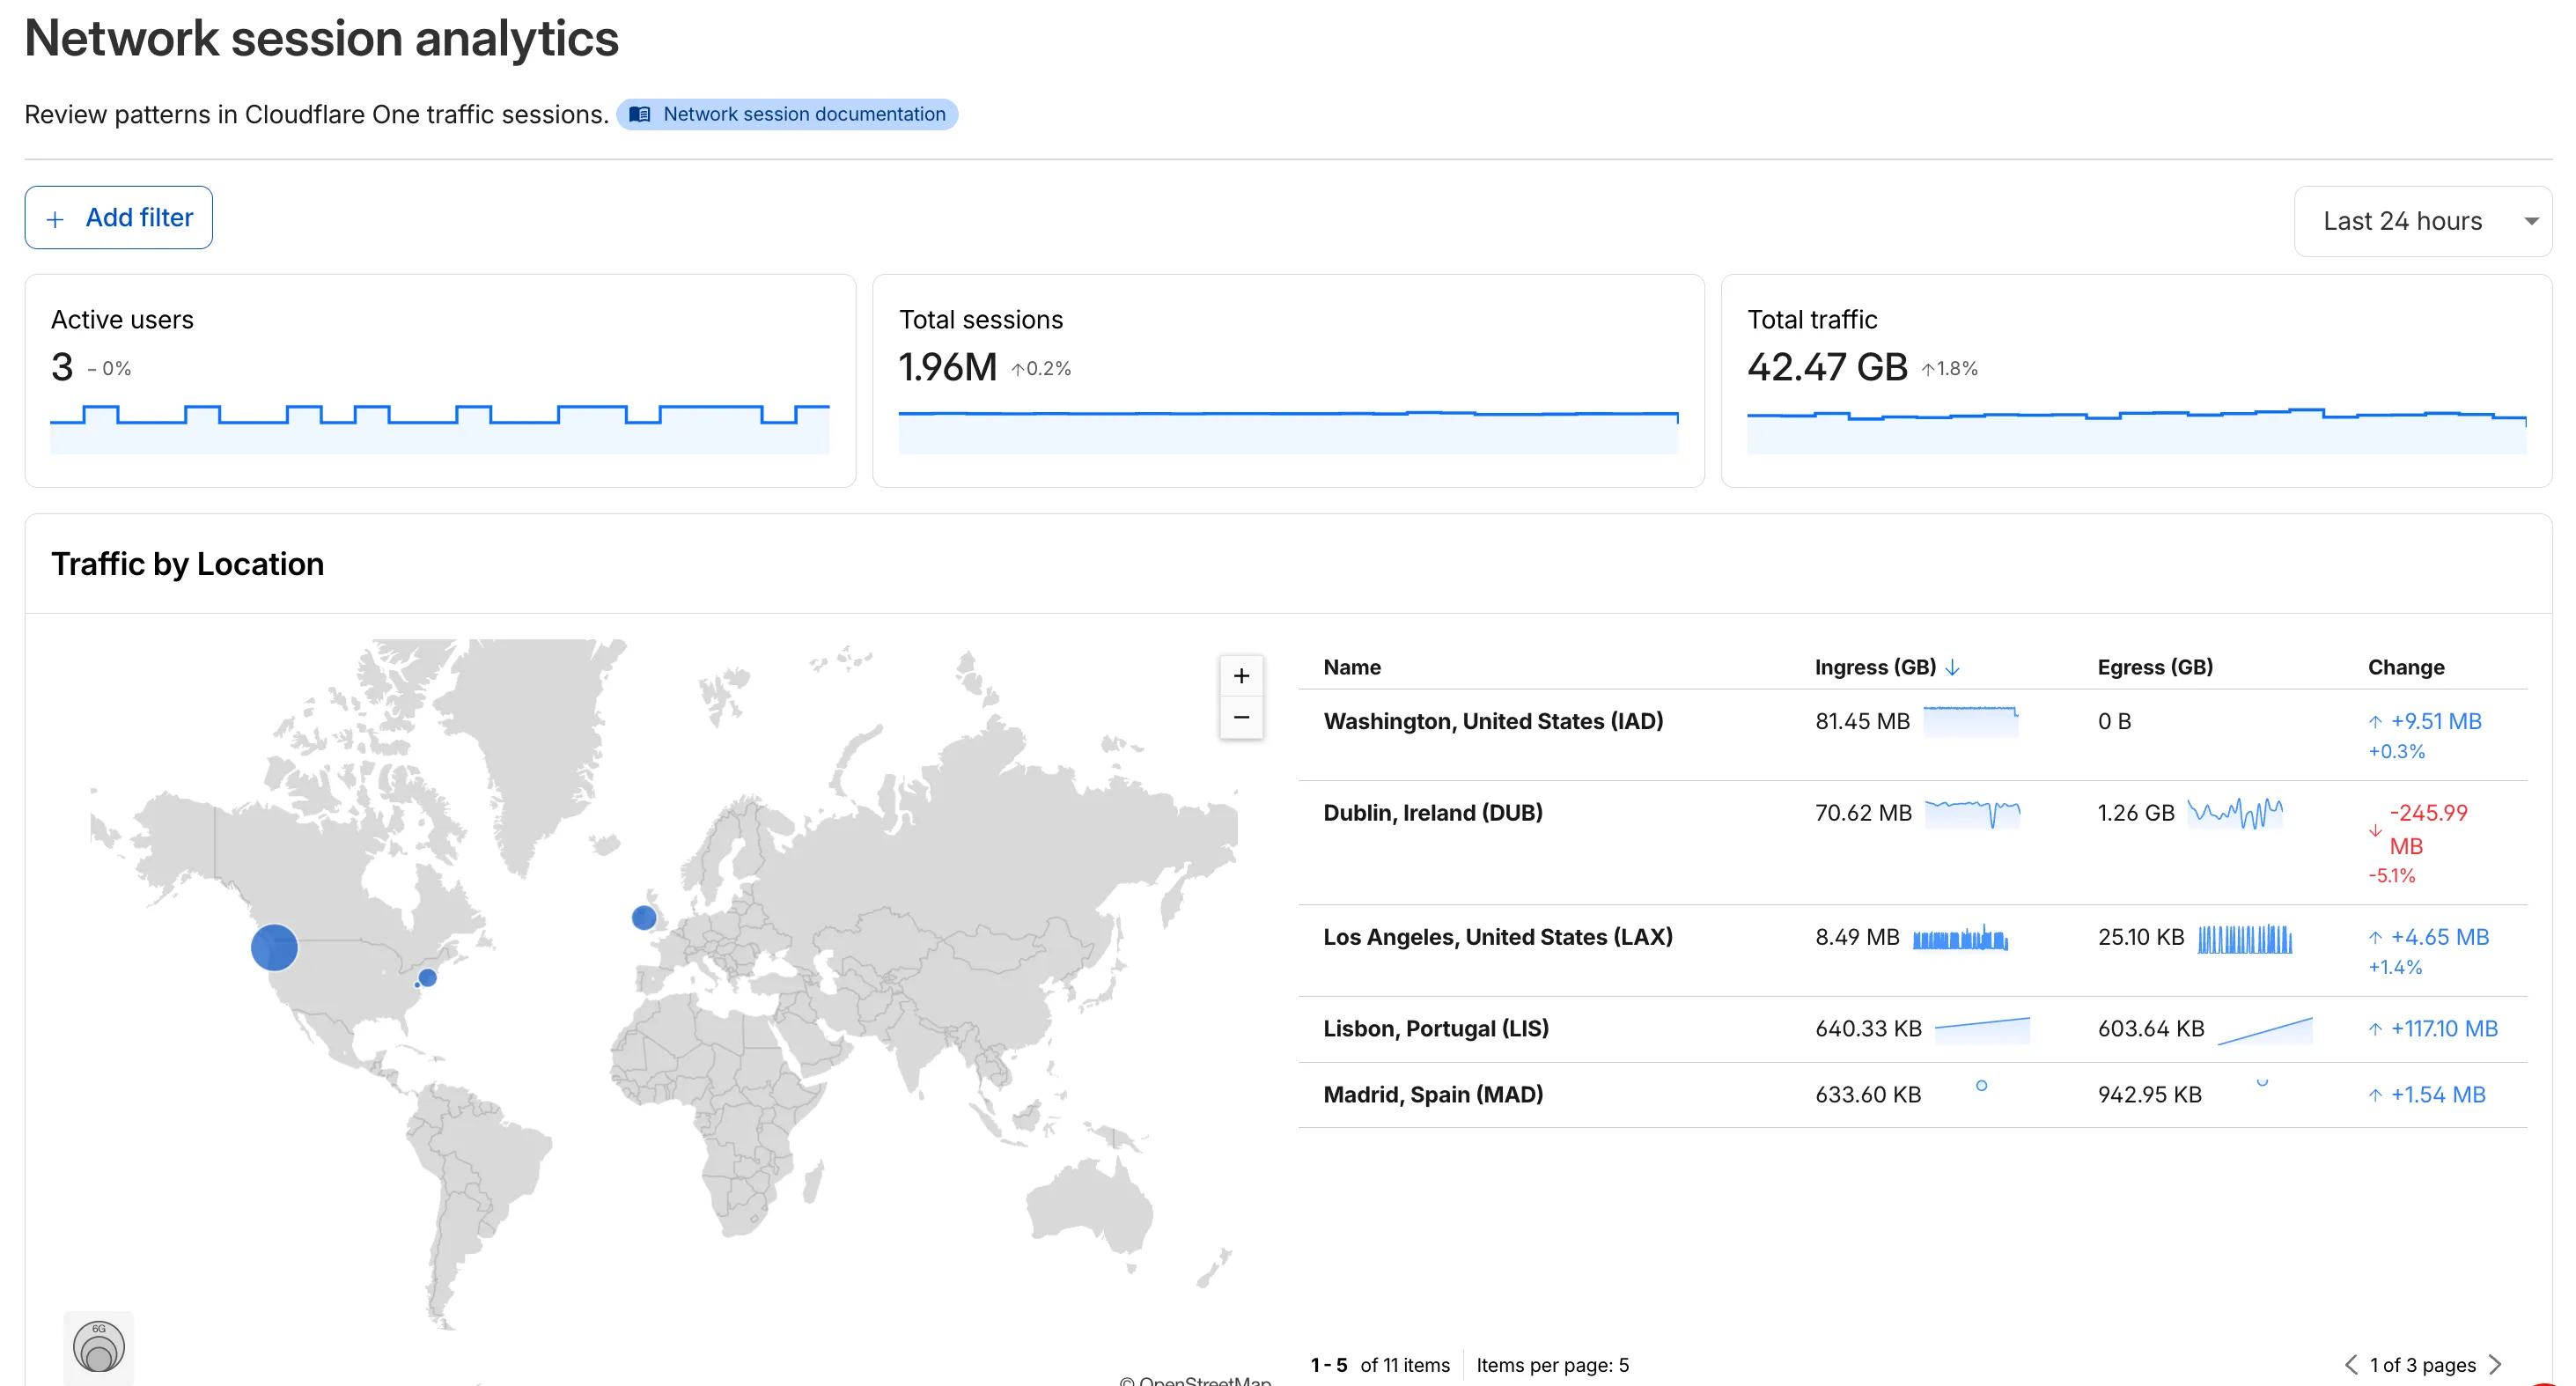
- Analyze geographic distribution: View a world map showing where your network traffic originates, with a list of top locations by session count.
- Monitor key metrics: Track session count, total bytes transferred, and unique users.
- Identify connection issues: Analyze connection close reasons to troubleshoot network problems.
- Review protocol usage: See which network protocols (TCP, UDP, ICMP) are most used.
- Summary metrics: Session count, bytes total, and unique users
- Traffic by location: World map visualization and location list with top traffic sources
- Top protocols: Breakdown of TCP, UDP, ICMP, and ICMPv6 traffic
- Connection close reasons: Insights into why sessions terminated (client closed, origin closed, timeouts, errors)
- Log in to Cloudflare One ↗.
- Go to Zero Trust > Insights > Dashboards.
- Select Network session analytics.
For more information, refer to the Network session analytics documentation.
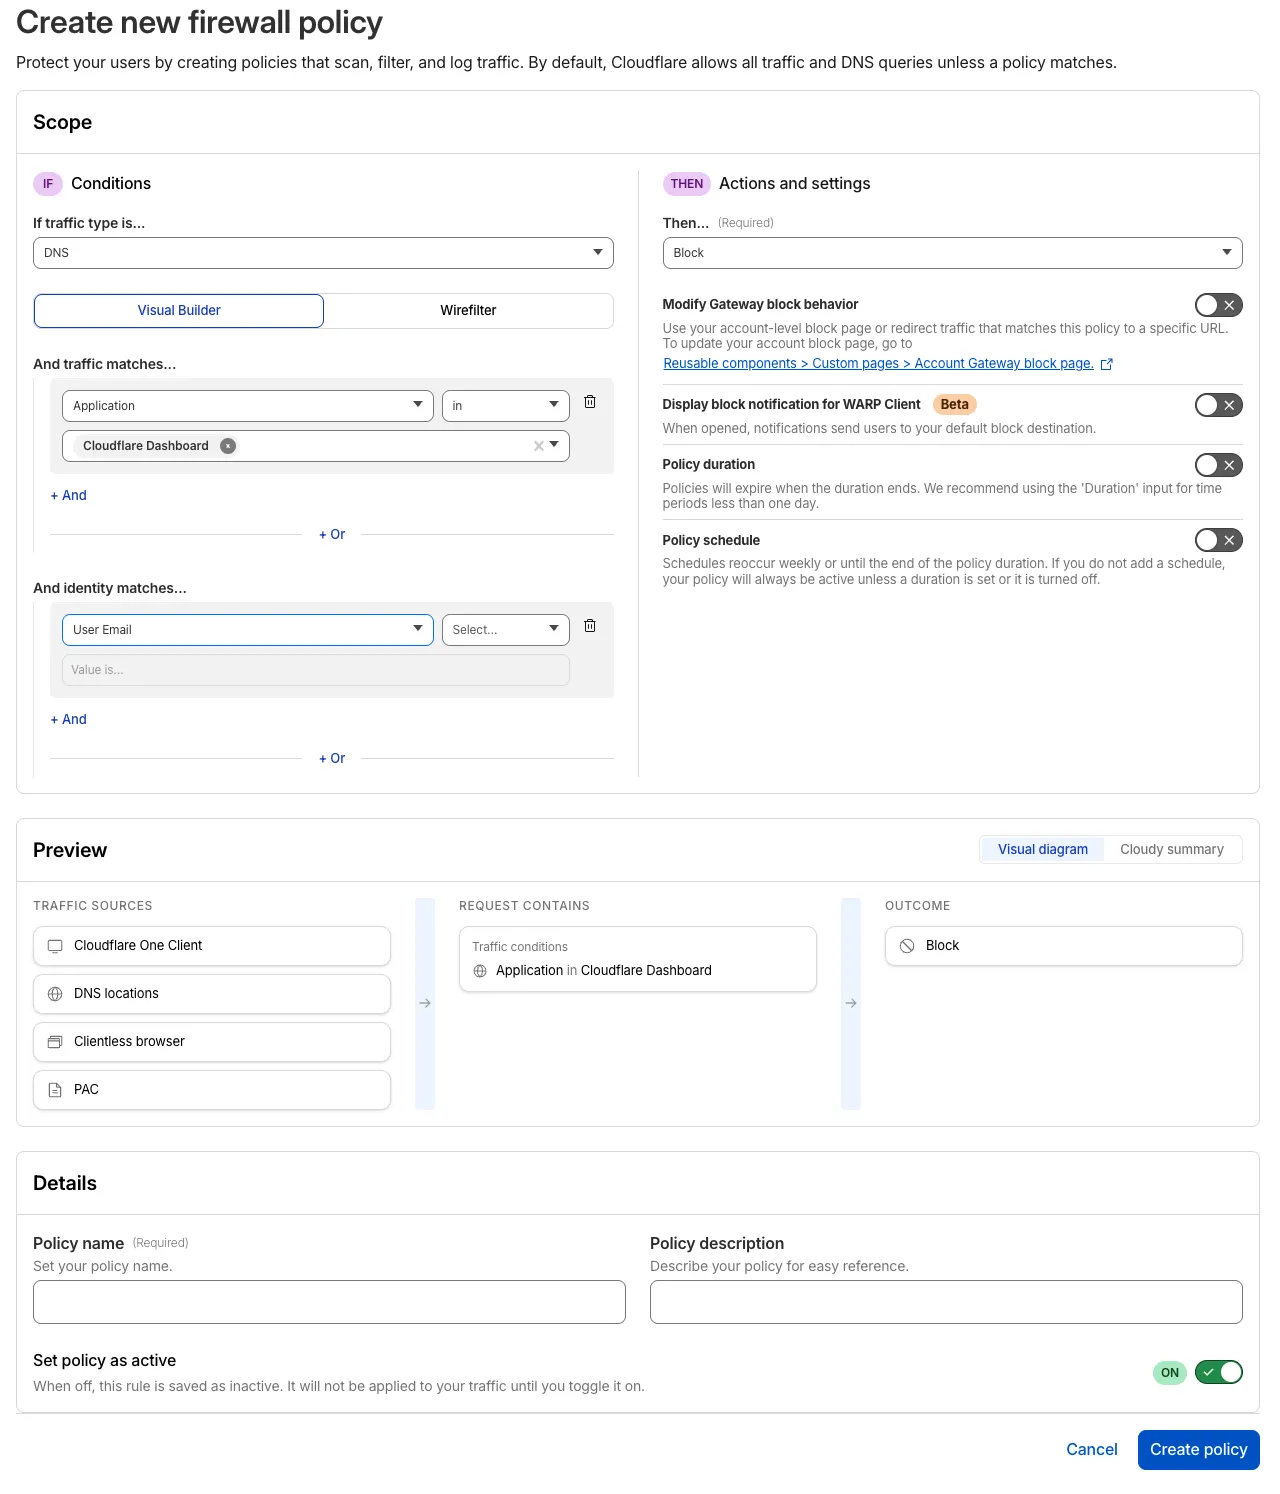
The Cloudflare One dashboard now features redesigned builders for two core workflows: creating Gateway policies and configuring self-hosted Access applications.
The Gateway rule builder now features a redesigned user experience, bringing it in line with the Access policy builder experience. Improvements include:
- Streamlined UX with clearer states and improved user interactions
- Wirefilter editing for viewing and editing Gateway rules directly from wirefilter expressions
- Preview state to review the impact of your policy in a simple graphic
For more information, refer to Traffic policies.
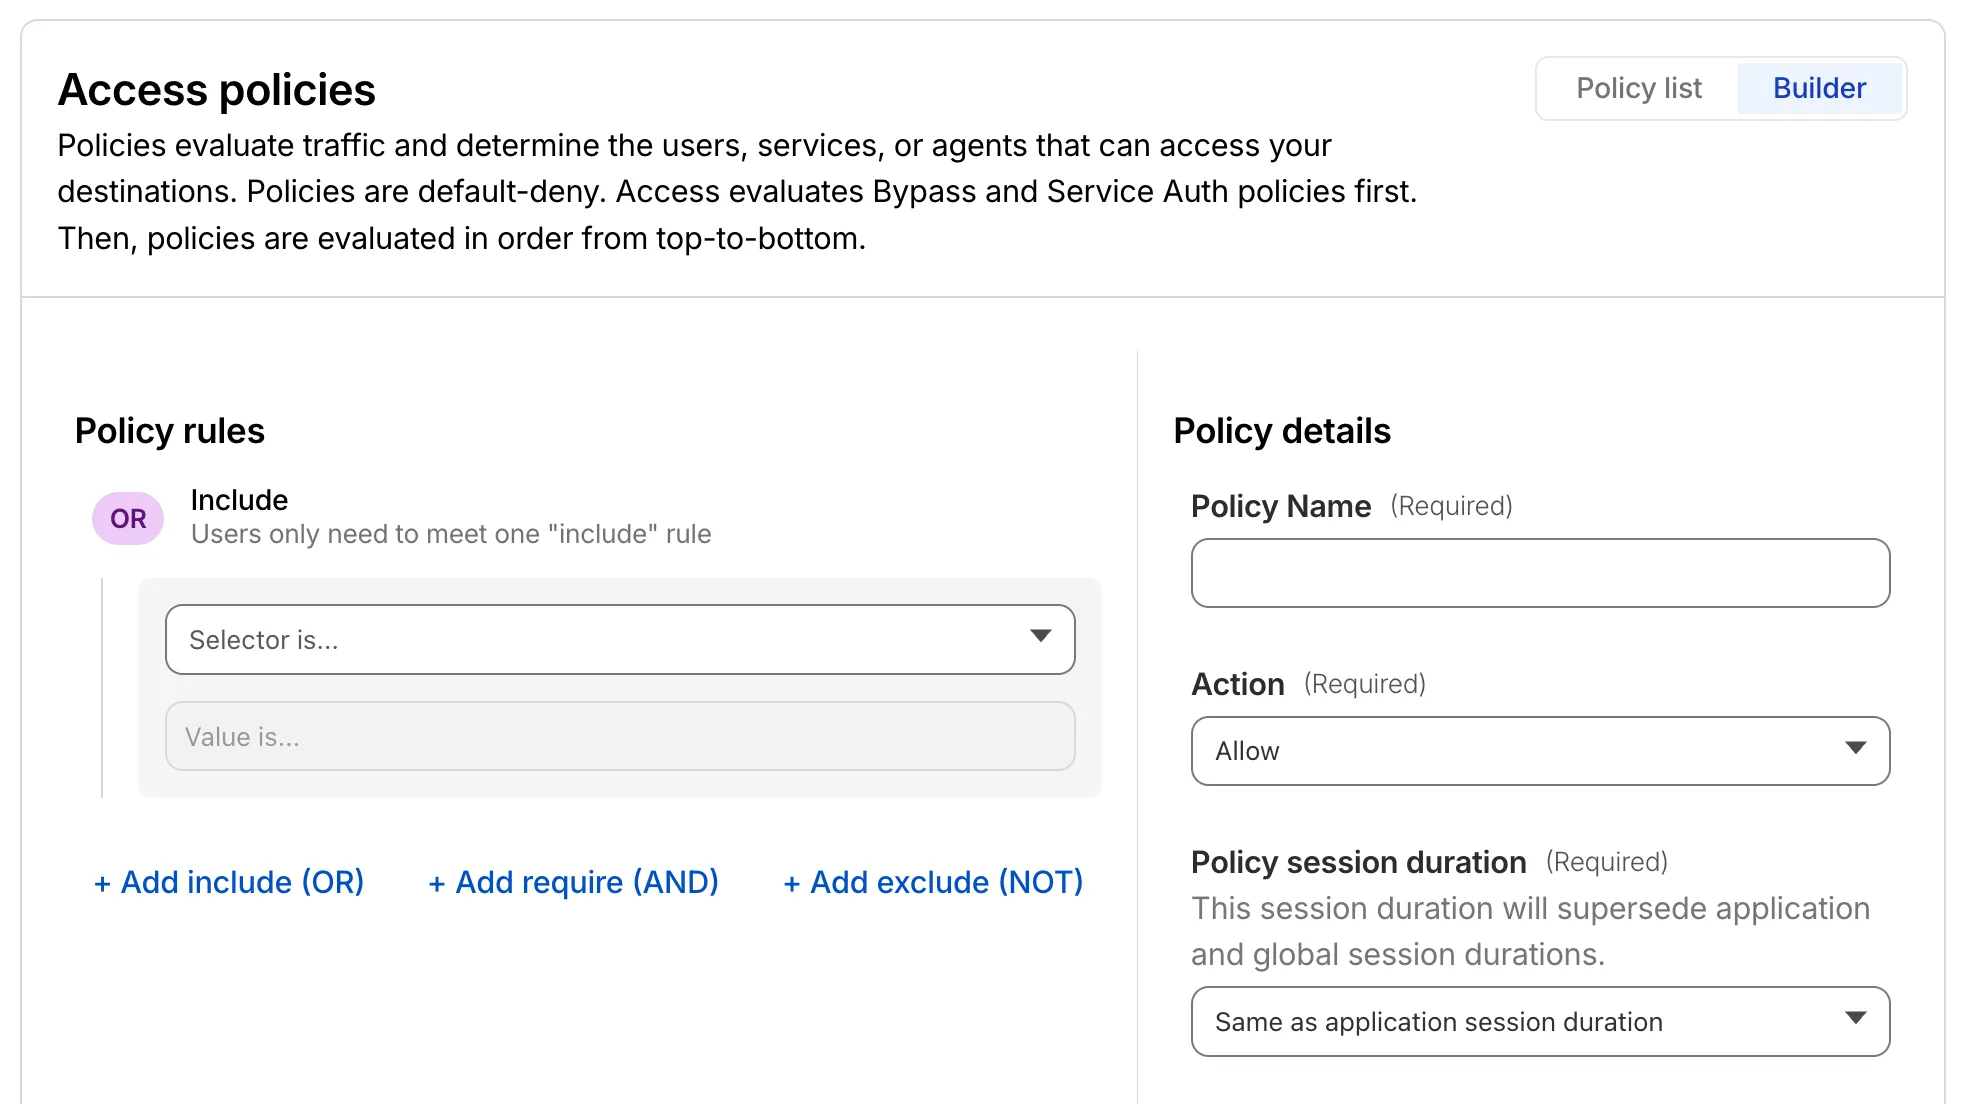
The self-hosted Access application builder now offers a simplified creation workflow with fewer steps from setup to save. Improvements include:
- New application selection experience that makes choosing the right application type before you begin easier.
- Streamlined creation flow with fewer clicks to build and save an application
- Inline policy creation for building Access policies directly within the application creation flow
- Preview state to understand how your policies enforce user access before saving
For more information, refer to self-hosted applications.
Cloudflare Mesh is now available (blog post ↗). Mesh connects your services and devices with post-quantum encrypted networking, allowing you to route traffic privately between servers, laptops, and phones over TCP, UDP, and ICMP.

- Assigns a private Mesh IP to every enrolled device and node.
- Enables any participant to reach any other participant by IP — including client-to-client, without deploying any infrastructure.
- Supports CIDR routes for subnet routing through Mesh nodes.
- Supports high availability with active-passive replicas for nodes with routes.
- All traffic flows through Cloudflare, so Gateway network policies, device posture checks, and access rules apply to every connection.
- WARP Connector is now Cloudflare Mesh. Existing WARP Connectors are now called mesh nodes. All existing deployments continue to work — no migration required.
- Peer-to-peer connectivity is now called Mesh connectivity and is part of the Cloudflare Mesh documentation.
- Mesh node limit increased from 10 to 50 per account.
- New dashboard experience ↗ at Networking > Mesh with an interactive network map, node management, route configuration, diagnostics, and a setup wizard.
Refer to the Cloudflare Mesh documentation to set up your first Mesh network.
Cloudflare One Appliance now supports Link Aggregation Control Protocol (LACP), allowing you to bundle up to six physical LAN ports into a single logical interface. Link aggregation increases available bandwidth and eliminates single points of failure on the LAN side of the appliance.
This feature is available in beta on physical appliance hardware with the latest OS. No entitlement is required.
To configure a Link Aggregation Group, refer to Configure link aggregation groups.