pfSense
This tutorial includes the steps required to configure IPsec tunnels to connect a pfSense firewall to Cloudflare WAN (formerly Magic WAN).
| Manufacturer | Firmware revision |
|---|---|
| pfSense | 24.03 |
This tutorial requires the following information:
- Anycast IP addresses (Cloudflare provides these)
- External IP addresses
- Internal IP address ranges
- Inside tunnel
/31ranges
This tutorial uses the following IP addresses. These examples replace legally routable IP addresses with IPv4 Address Blocks Reserved for Documentation (RFC 5737 ↗) addresses within the 203.0.113.0/24 subnet.
| Tunnel name | PF_TUNNEL_01 | PF_TUNNEL_02 |
|---|---|---|
| Interface address | 10.252.2.26/31 | 10.252.2.28/31 |
| Customer endpoint | 203.0.113.254 | 203.0.113.254 |
| Cloudflare endpoint | <YOUR_ANYCAST_IP_ADDRESS_1> | <YOUR_ANYCAST_IP_ADDRESS_2> |
| pfSense IPsec Phase 2 Local IP | 10.252.2.27 | 10.252.2.29 |
| pfSense IPsec Phase 2 Remote IP | 10.252.2.26 | 10.252.2.28 |
| Cloudflare WAN static routes - Prefix | 10.1.100.0/24 | 10.1.100.0/24 |
| Cloudflare WAN static routes - Next hop | PF_TUNNEL_01 | PF_TUNNEL_02 |
Use the Cloudflare dashboard or API to configure two IPsec tunnels. This guide uses the settings mentioned below for the IPsec tunnels throughout the remainder.
- Follow the Add tunnels instructions to create the required IPsec tunnels with the following options:
- Tunnel name:
PF_TUNNEL_01 - Interface address:
10.252.2.26/31 - Customer endpoint:
203.0.113.254 - Cloudflare endpoint: Enter one of the anycast IP addresses assigned to your account, available in Leased IPs ↗.
- Health check rate: Medium
- Health check type: Request
- Health check direction: Bidirectional
- Turn on replay protection: Enable
- Tunnel name:
- Select Add pre-shared key later > Add tunnels.
- Repeat the process to create a second IPsec tunnel with the following options:
- Tunnel name:
PF_TUNNEL_02 - Interface address:
10.252.2.28/31 - Customer endpoint:
203.0.113.254 - Cloudflare endpoint: Enter the second anycast IP address assigned to your account.
- Health check rate: Medium
- Health check type: Request
- Health check direction: Bidirectional
- Turn on replay protection: Enable
- Tunnel name:
- Select Add pre-shared key later > Add tunnels.
When creating IPsec tunnels with the option Add pre-shared key later, the Cloudflare dashboard will show a warning indicator.
- Select Edit to edit the properties of each IPsec tunnel.
- Select Generate a new pre-shared key > Update and generate pre-shared key.
- Copy the pre-shared key value for each IPsec tunnel, and save these values. Then, select Done.
After creating IPsec tunnels, the Cloudflare dashboard will list them under Tunnels. To retrieve the IPsec tunnel's user ID:
- Go to the Connectors page.
- In the IPsec/GRE tunnels tab, select the IPsec tunnel.
- Scroll to User ID and copy the string. For example,
ipsec@long_string_of_letters_and_numbers.
Configuring IKE Phase 1 on the pfSense firewall requires the User ID.
Create a static route for each of the two IPsec tunnels configured in the previous section, with the following settings (settings not mentioned here can be left with their default values):
- Description:
PF_TUNNEL_01 - Prefix:
10.1.100.0/24 - Tunnel/Next hop:
PF_TUNNEL_01
- Description:
PF_TUNNEL_02 - Prefix:
10.1.100.0/24 - Tunnel/Next hop:
PF_TUNNEL_02
Install pfSense and boot up. Then, assign and set LAN and WAN interfaces, as well as IP addresses. For example:
- LAN:
203.0.113.254 - WAN:
<YOUR_WAN_ADDRESS>
Add a new IPsec tunnel Phase 1 entry ↗, with the following settings:
- General Information
- Description:
CF1_IPsec_P1
- Description:
- IKE Endpoint Configuration
- Key exchange version: IKE_v2
- Internet Protocol: IPv4
- Interface: WAN
- Remote gateway: Enter the Cloudflare Anycast IP address.
- Phase 1 Proposal (Authentication)
- Authentication method: Mutual PSK
- My identifier: User Fully qualified domain name >
ipsec@long_string_of_letters_and_numbers
(Find this identifier in the Cloudflare IPsec tunnel configuration > User ID) - Peer identifier: Peer IP Address (Cloudflare Anycast IP)
- Pre-Shared Key (PSK): Enter the pre-shared key from the Cloudflare IPsec tunnel.
- Phase 1 proposal (Encryption algorithm)
- Encryption algorithm: AES 256 bits
- Key length: 256 bits
- Hash algorithm: SHA256
- DH key group: 20
- Lifetime:
86400
Add a new IPsec tunnel Phase 2 entry ↗, with the following settings. Create two separate Phase 2 entries (one for tunnel 1 and one for tunnel 2), adjusting the IP addresses for local and remote networks accordingly:
- General Information
- Description:
CF1_IPsec_P2 - Mode: Routed (VTI) (Virtual Tunnel Interface)
- Description:
- Networks
- Local Network: Address > Higher IP address in the
/31assigned in Cloudflare tunnel. For example,10.252.2.27for tunnel 1 and10.252.2.29for tunnel 2. - Remote Network: Address > Lower IP address in the
/31for Cloudflare side. For example,10.252.2.26for tunnel 1, and10.252.2.28for tunnel 2.
- Local Network: Address > Higher IP address in the
- Phase 2 Proposal (SA/Key Exchange)
- Protocol: ESP (Encapsulating Security Payload)
- Encryption algorithm: AES 256 bits
- Hash algorithm: SHA256
- DH key group: 20
- Lifetime:
28800
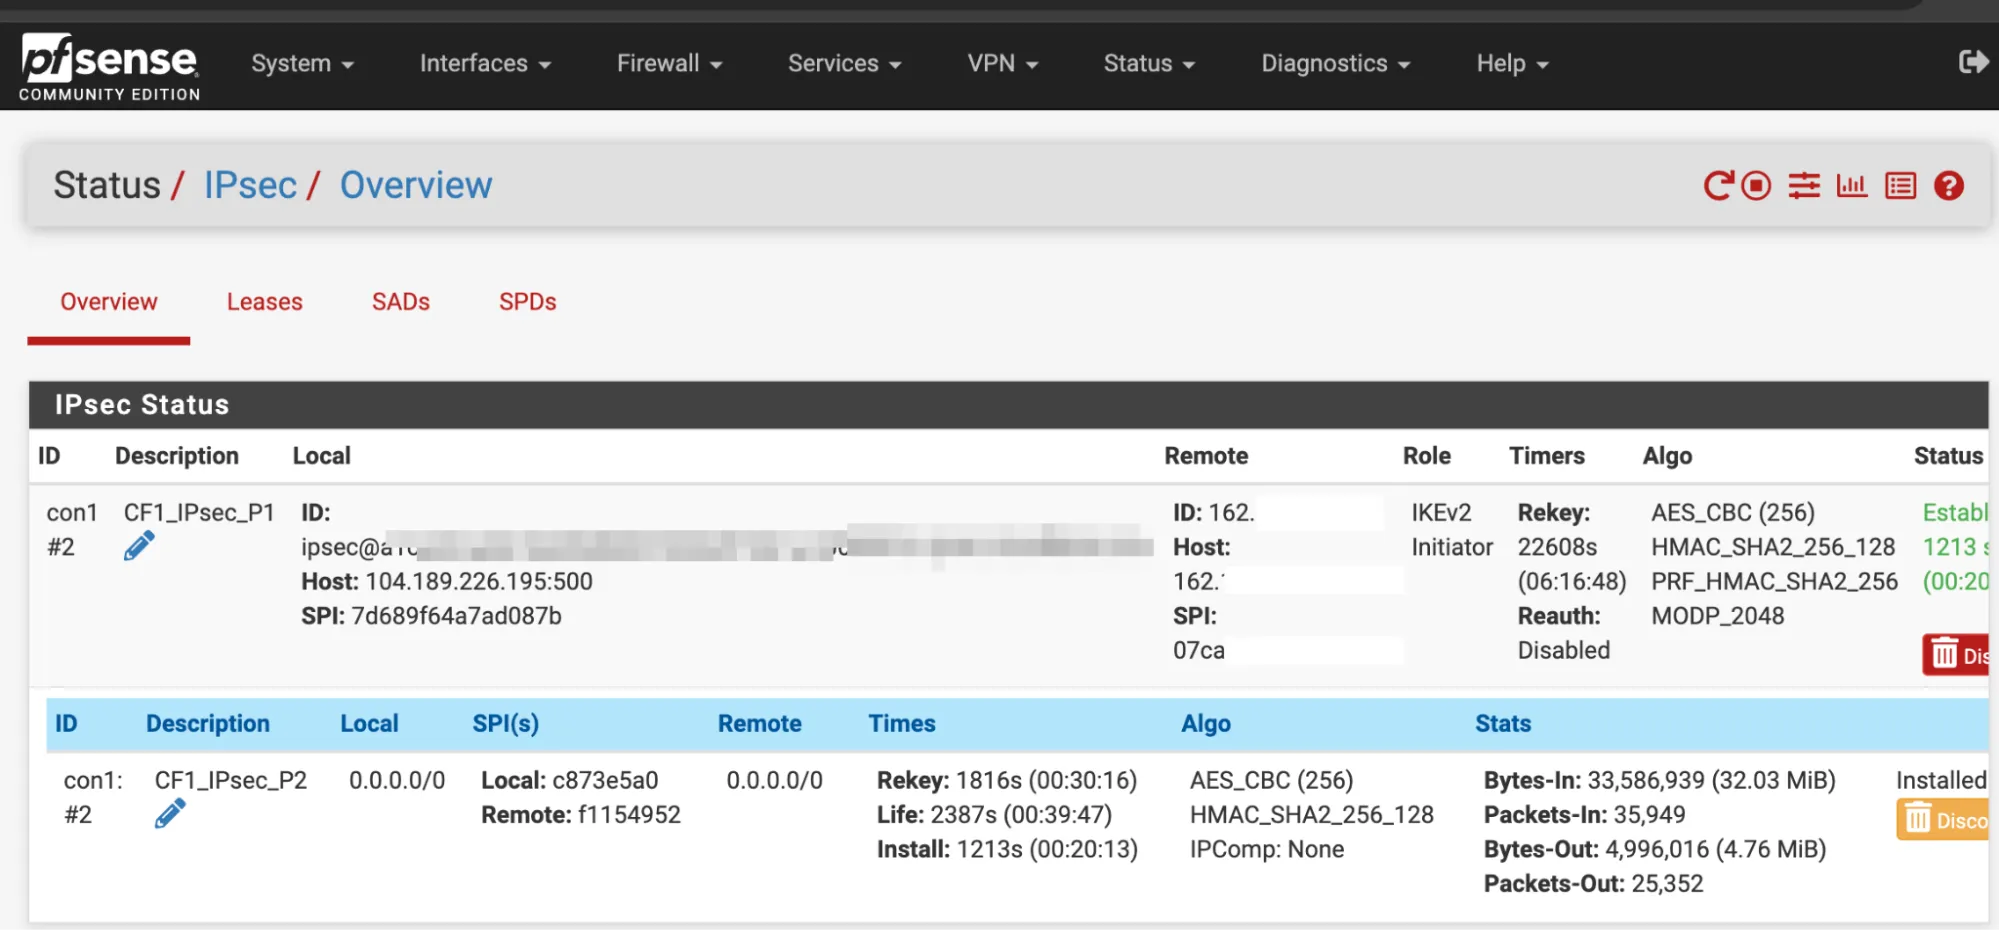
Apply the changes. Navigate to Status > IPsec to verify that both Phase 1 and Phase 2 are connected.
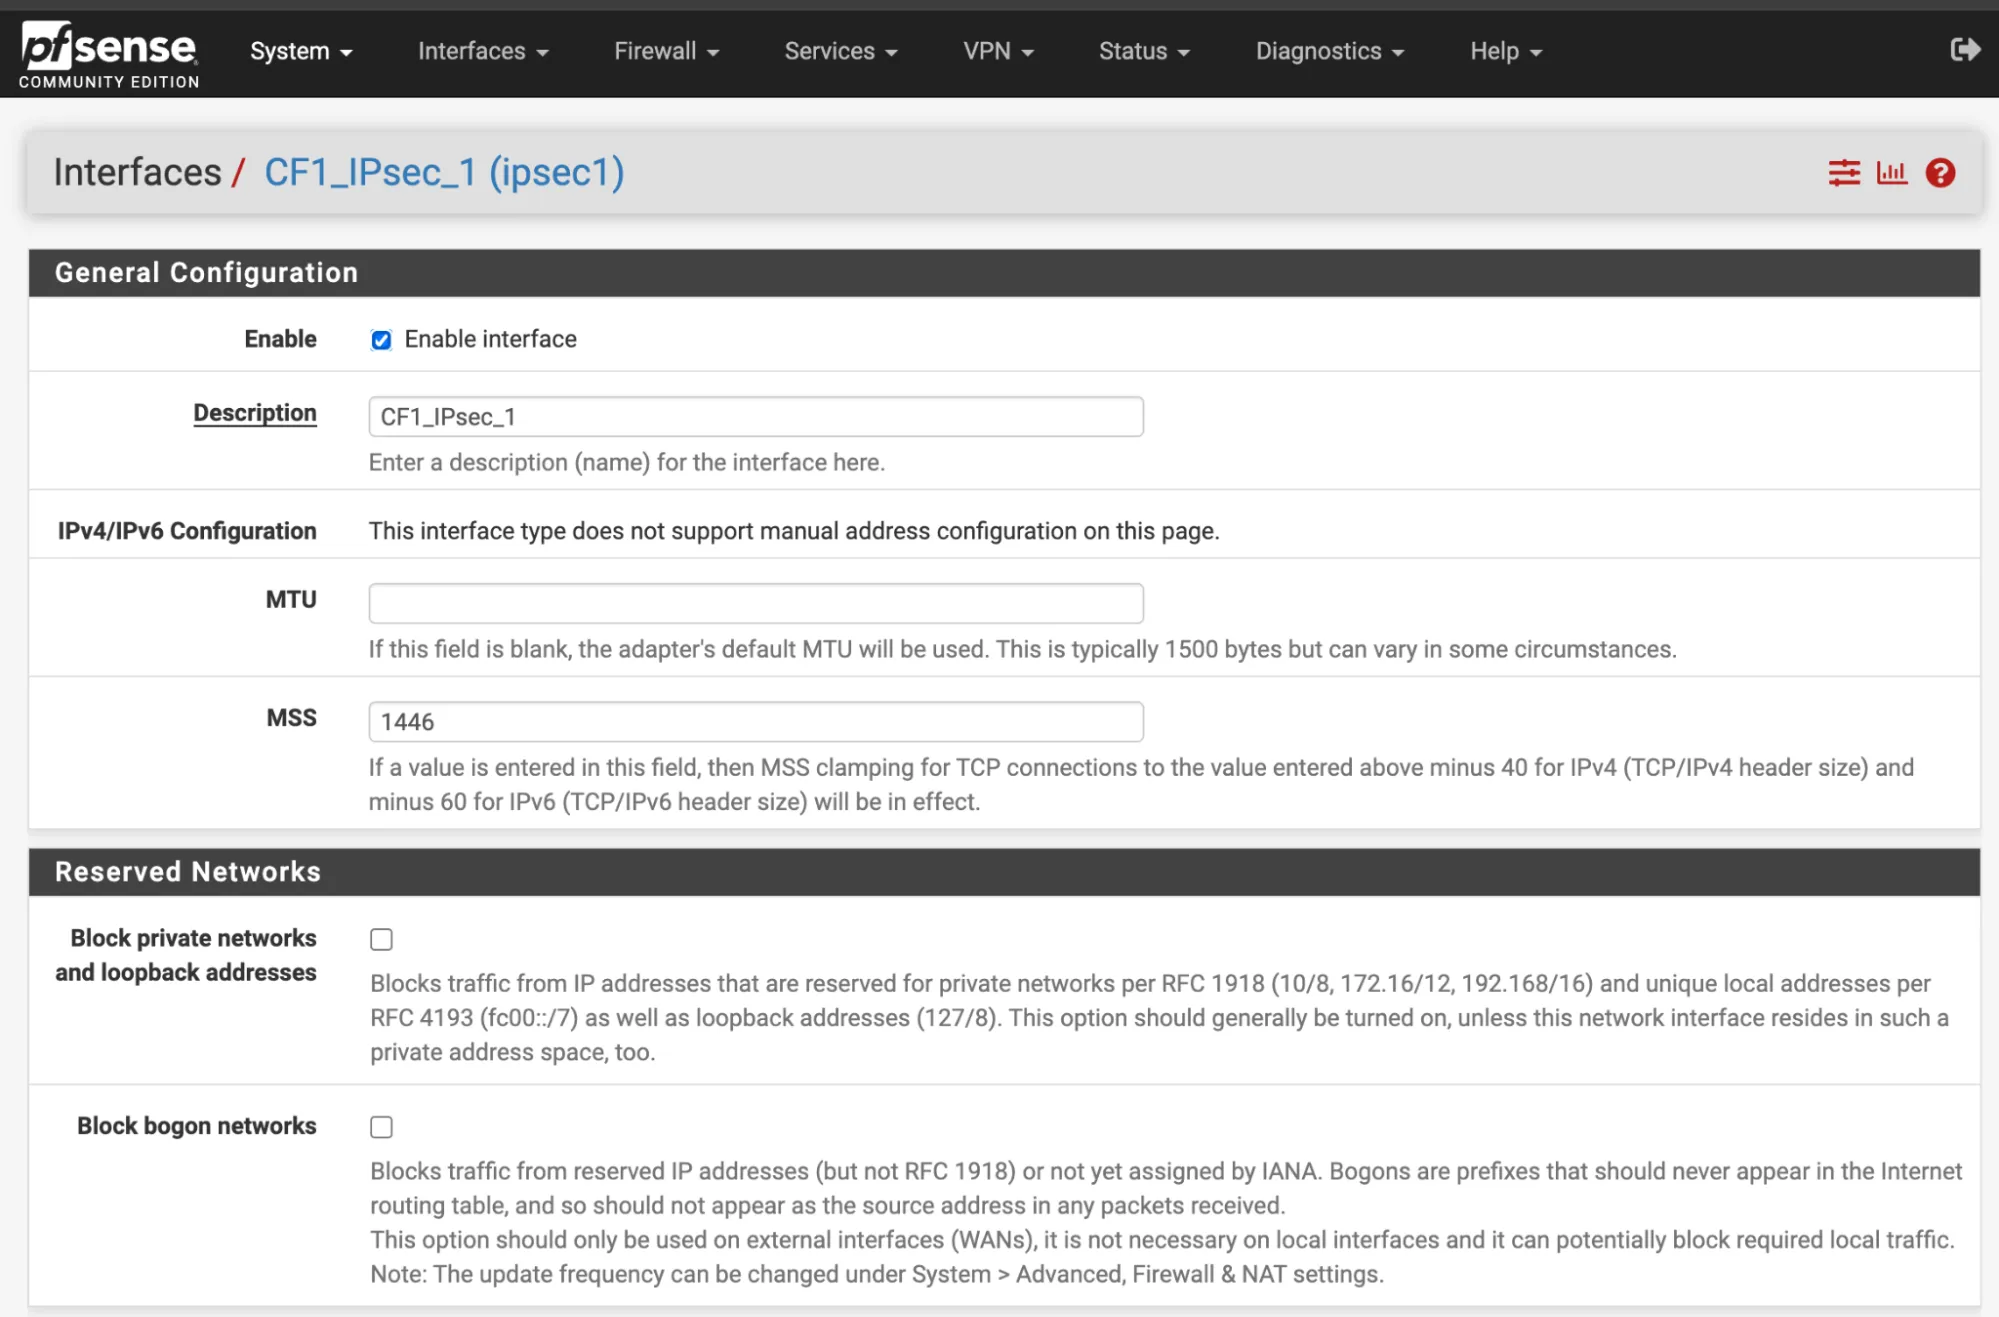
In Interfaces > Assignments > Add, create a new interface to assign to the first IPsec tunnel, with the following settings:
- General configuration
- Description:
CF1_IPsec_1 - MSS:
1446
- Description:
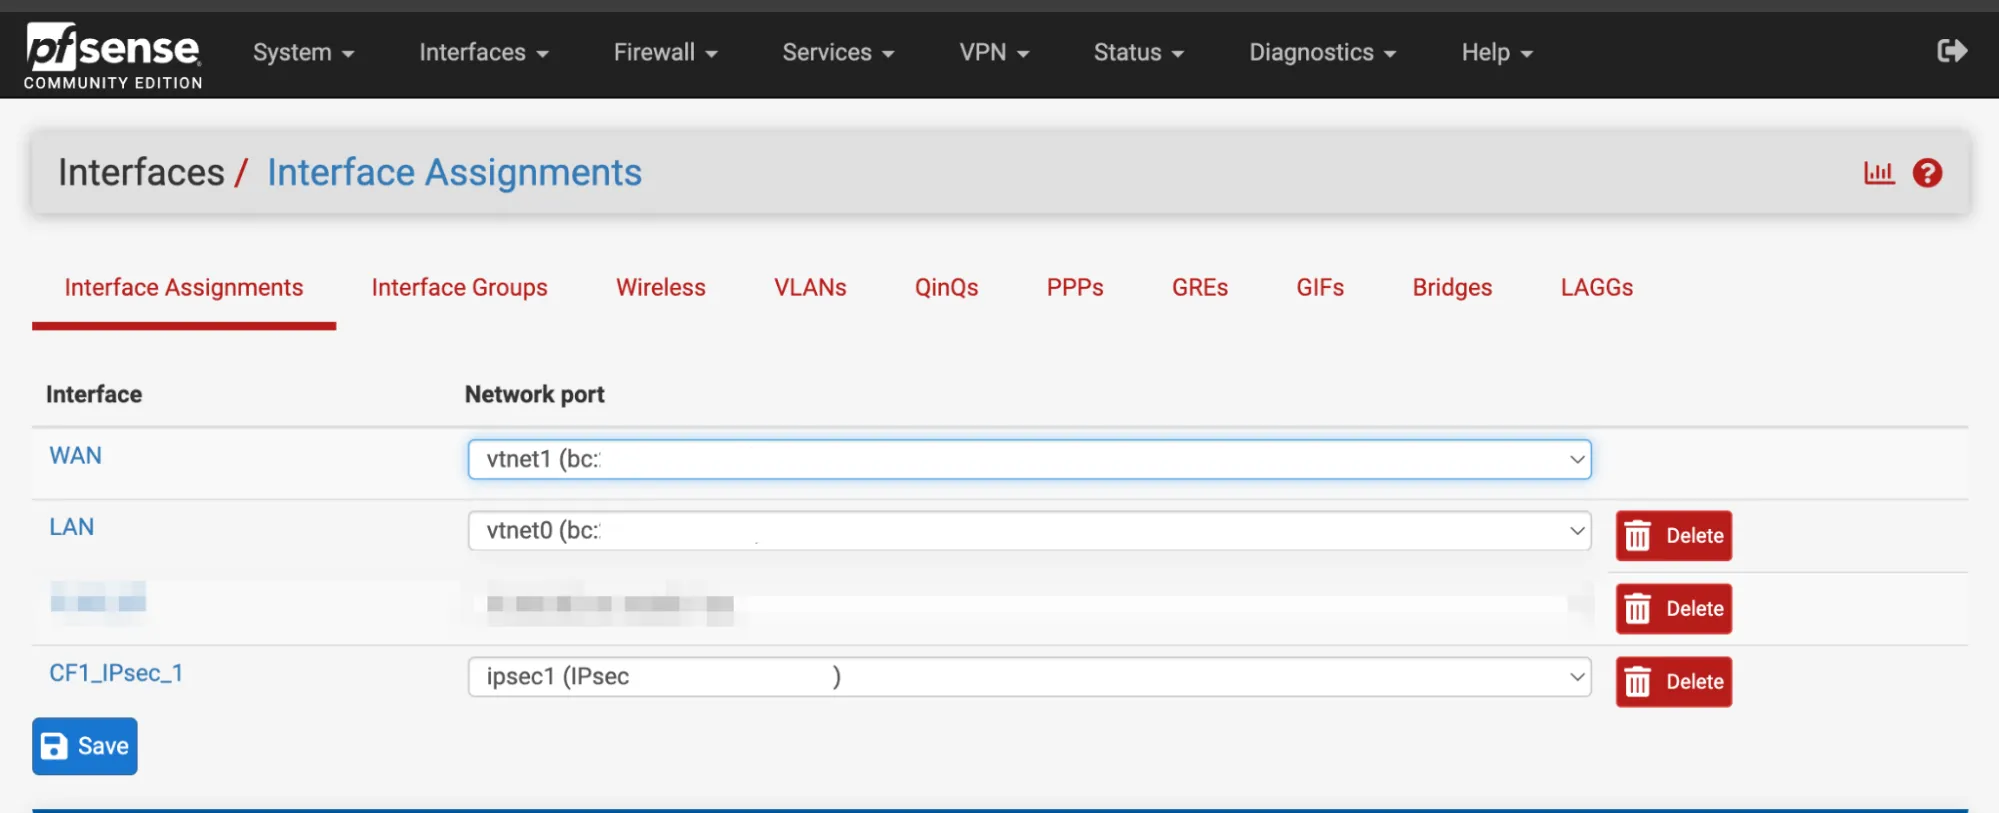
- Interface Assignments
- WAN: Add the WAN interface. For example,
vnet1. - LAN: Add the LAN interface. For example,
vnet0. - Add the CF_IPsec_1 interface from Phase 1 above.
- WAN: Add the WAN interface. For example,
Select Save to apply the changes.
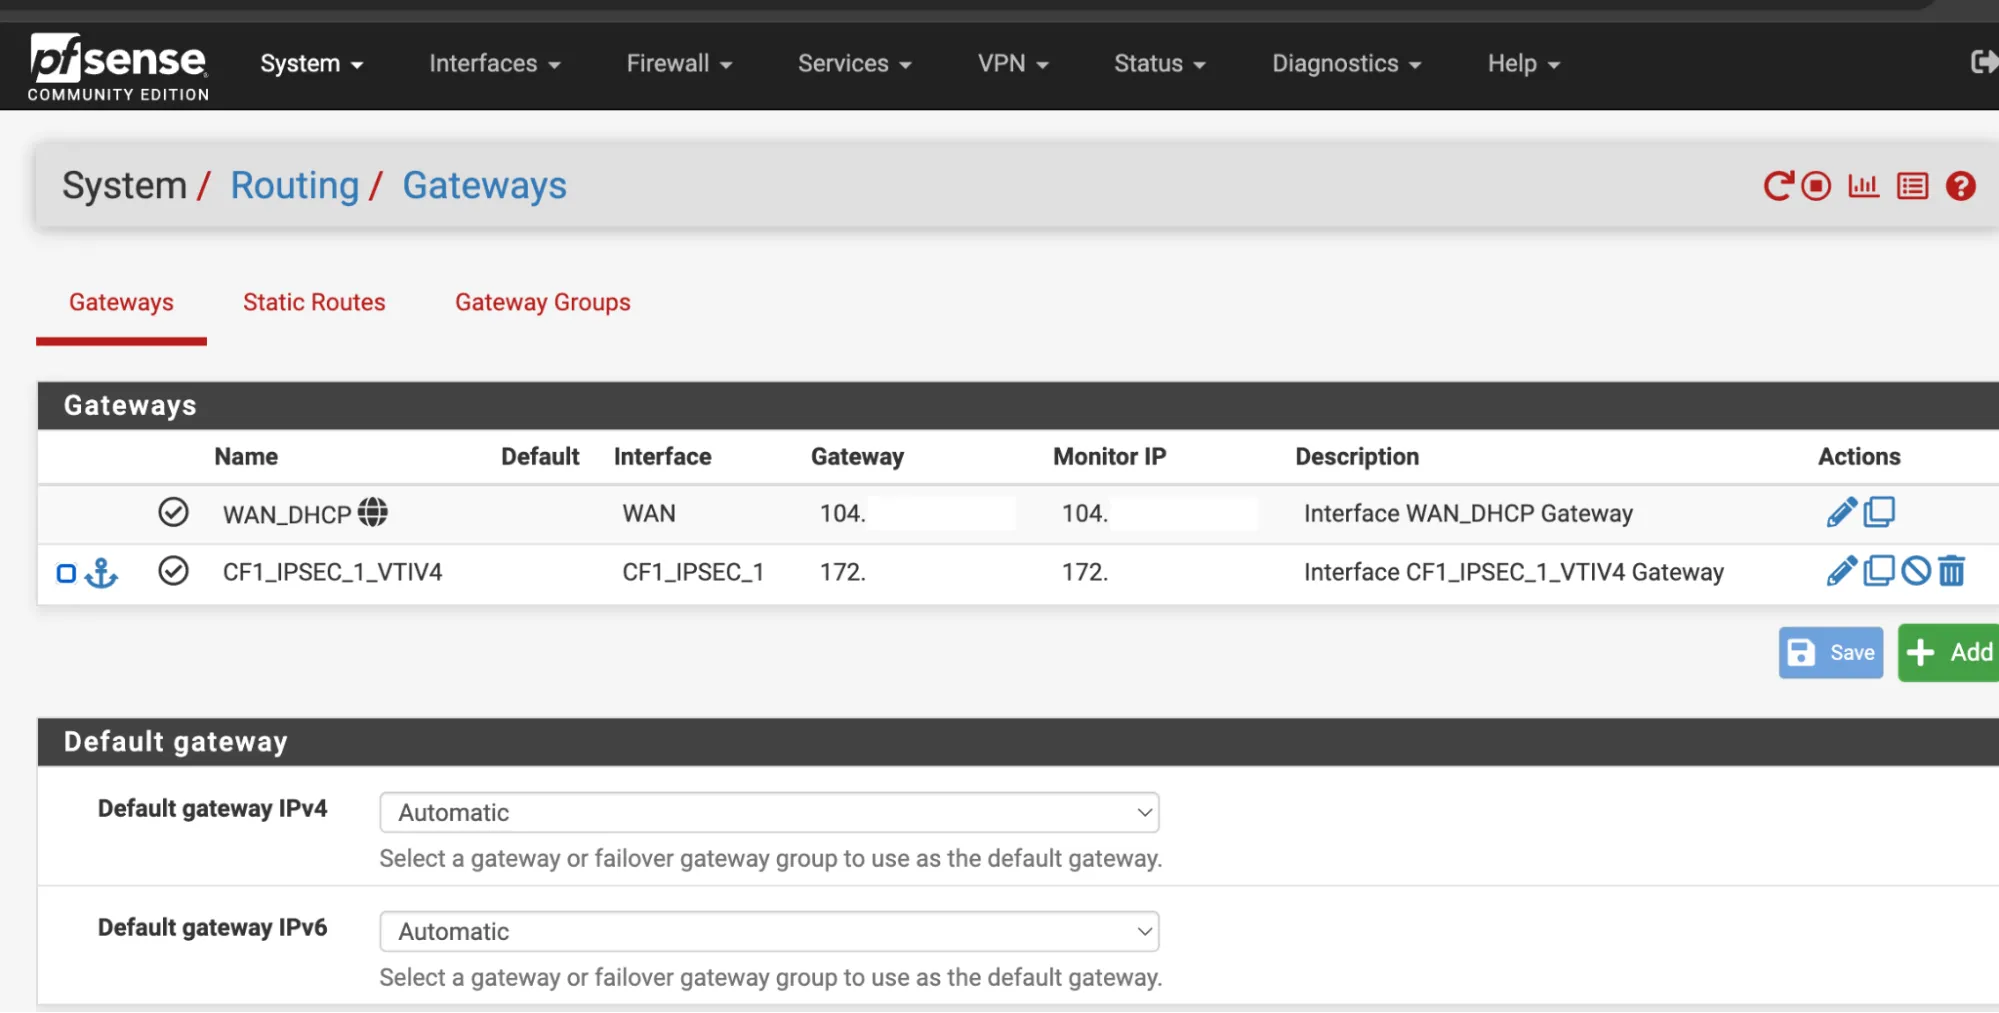
In System > Routing > Gateways there should already be a gateway. For this example, it is named CF1_IPSEC_1_VTIV4.
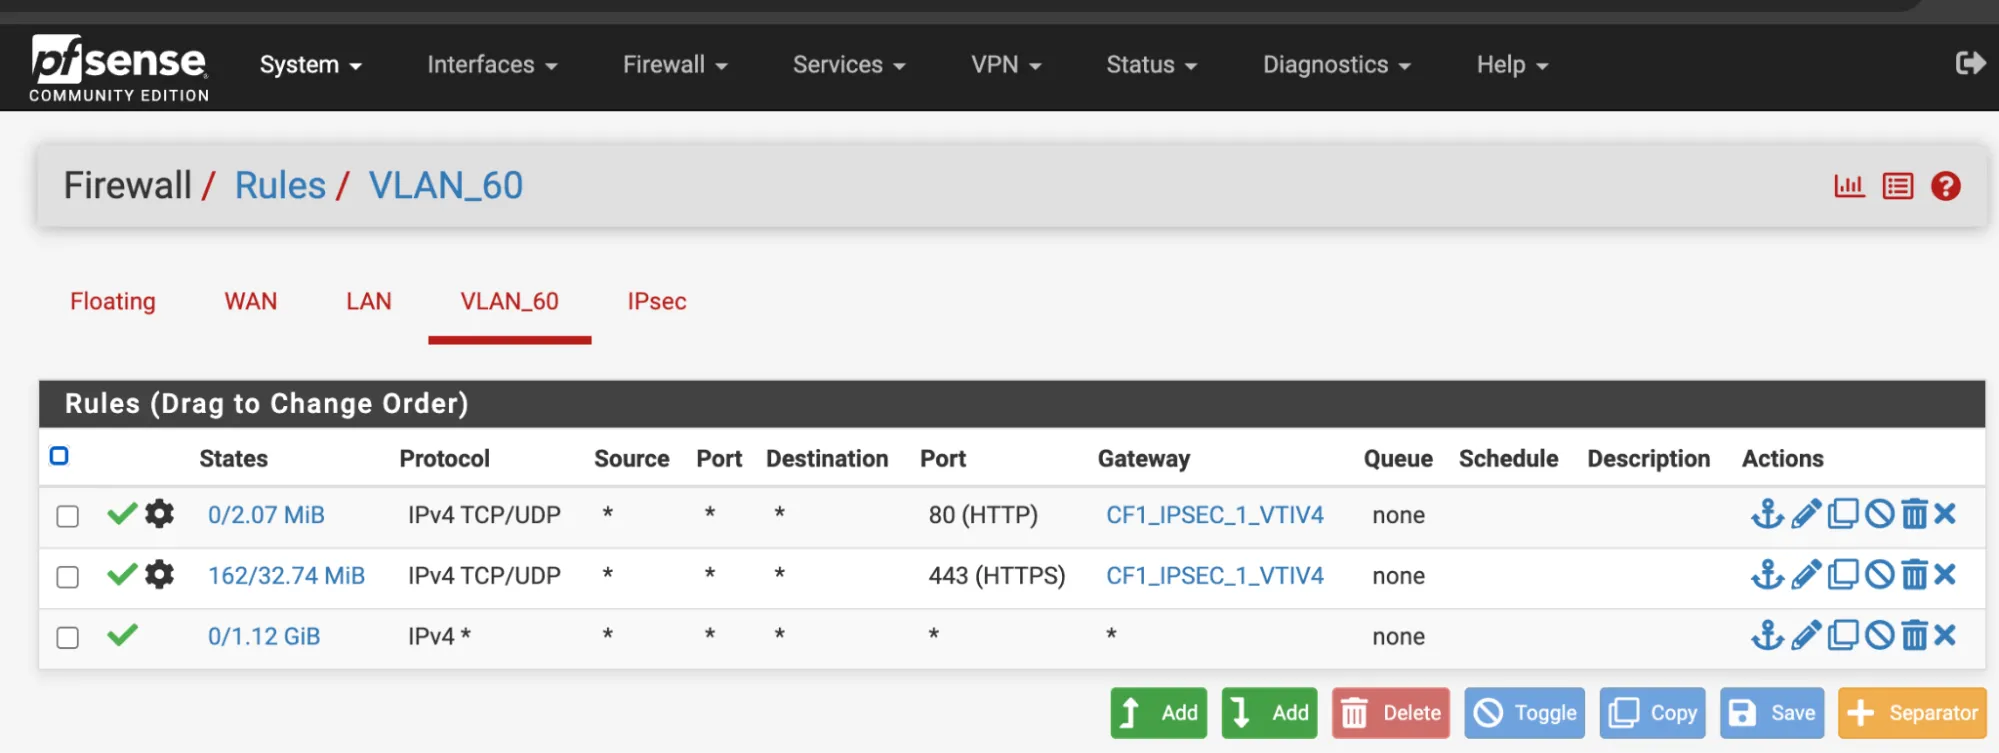
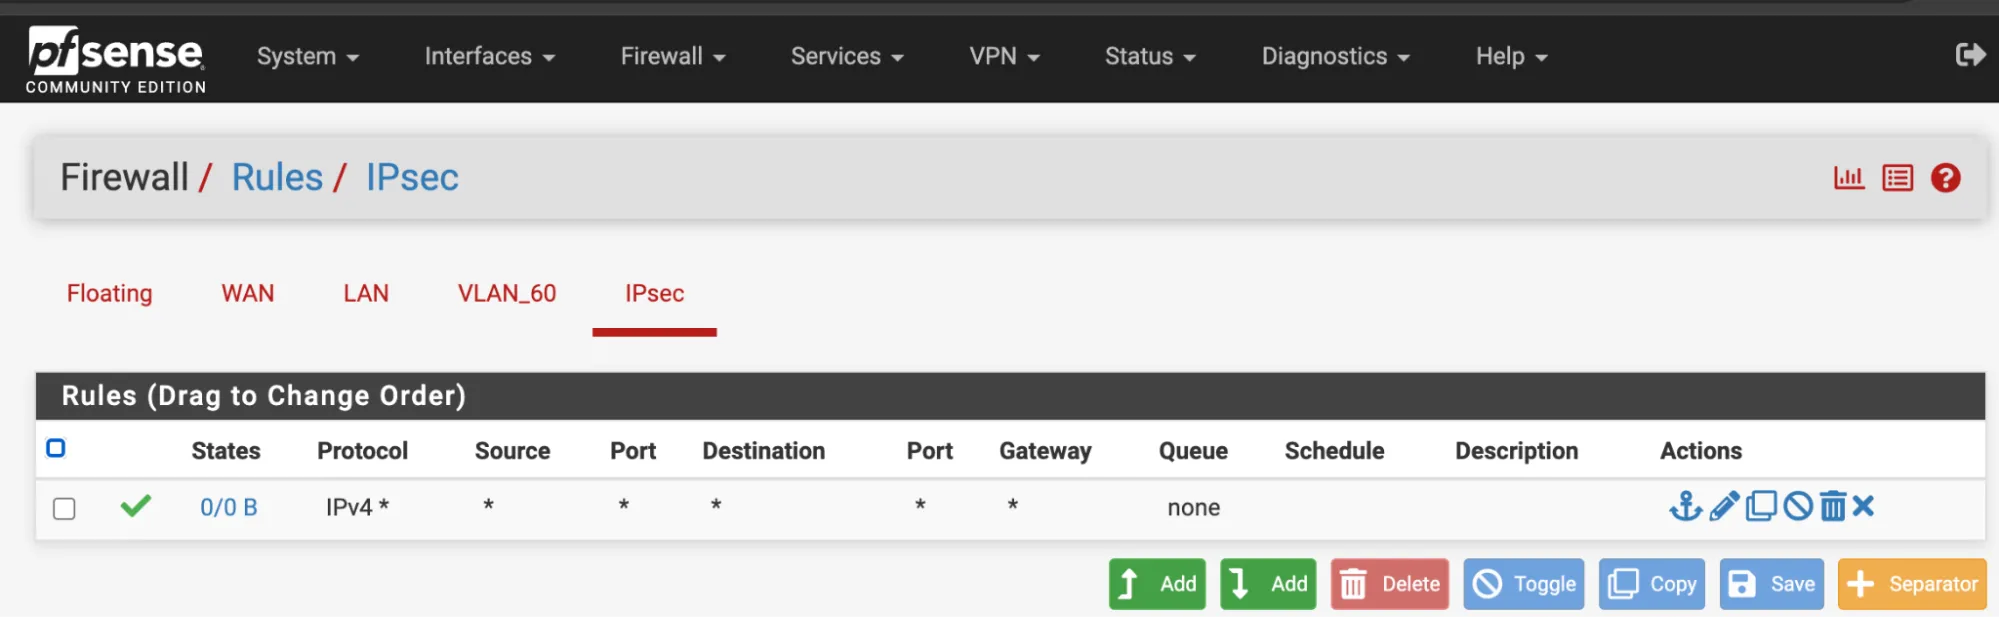
- In Firewall Rules > IPsec interface, allow any type of traffic.
- Navigate to Status > Gateways.
CF1_IPSEC_1_VTIV4should now be online.

- In Firewall > Rules > LAN, allow any type of traffic.
- Expand the Advanced section.
- Change the Gateway to
CF1_IPSEC_1_VTIV4.