Skip to content

Changelog

New updates and improvements at Cloudflare.

Connect multiple clients to one Browser Run session

Browser Run sessions now accept multiple concurrent connections. Before, a session accepted only one connection at a time, and other Workers had to wait until that connection closed. Now multiple Workers can connect to the same browser at the same time.

Each puppeteer.connect() call opens its own Chrome DevTools Protocol (CDP) connection. Create a separate browser context for each request to keep its pages, cookies, and storage apart from other clients.

const browser = await puppeteer.connect(env.MYBROWSER, sessionId);
const context = await browser.createBrowserContext();

try {
	const page = await context.newPage();
	await page.goto("https://example.com");
	// ...
} finally {
	await context.close();
	await browser.disconnect(); // keep the shared browser running
}
const browser = await puppeteer.connect(env.MYBROWSER, sessionId);
const context = await browser.createBrowserContext();

try {
	const page = await context.newPage();
	await page.goto("https://example.com");
	// ...
} finally {
	await context.close();
	await browser.disconnect(); // keep the shared browser running
}

Sharing sessions means fewer new browsers to launch, less cold-start time, and fewer concurrent browsers counted against your limits.

Concurrent connections require @cloudflare/puppeteer version 1.1.0 or later.

Refer to Reuse sessions for a full example.

Browser Run adds WebMCP to Kitesurf and moves to document.modelContext

WebMCP now works in Kitesurf sessions as well as Lab sessions. Both backends use the document.modelContext API from the WebMCP Community Group draft ↗︎. Lab sessions no longer expose navigator.modelContextTesting.

To list and run page tools:

  • Chrome DevTools: Use the Application > WebMCP panel in the live view of a Lab session or in the Kitesurf playground ↗︎.
  • AI agents: Start Chrome DevTools MCP with the --category-experimental-webmcp flag to add the list_webmcp_tools and execute_webmcp_tool tools.
  • CDP clients: Use the WebMCP CDP domain.

Subscribe to Browser Run crawl events

Browser Run crawl jobs can publish lifecycle events to Cloudflare Queues. Subscribe to started, updated, and finished events to track progress or trigger downstream processing without polling.

To create an account-level subscription, run the following command:

npx wrangler queues subscription create <QUEUE_NAME> --source browserRun --events crawl.started,crawl.updated,crawl.finished

For payload examples, refer to the Browser Run event schemas.

Browser Run adds session and DevTools methods to browser bindings

Browser Run browser bindings now provide typed methods for session management and DevTools operations. You can acquire a session, connect a browser client, create Live View URLs, manage targets, and close sessions without constructing HTTP requests.

The new acquire() and launch() methods also accept outboundByHost. This lets you route requests for selected hostnames through another Worker, including a Worker that adds authentication or reaches a private service.

const connection = await env.BROWSER.launch({
	outboundByHost: {
		"private.example.test": env.OUTBOUND,
	},
});
const connection = await env.BROWSER.launch({
	outboundByHost: {
		"private.example.test": env.OUTBOUND,
	},
});

Use connectSession(sessionId) when you need to acquire and connect in separate steps. The method returns a session-pinned webSocket Fetcher for a CDP client.

The binding also includes session methods for Live View, active sessions, session history, limits, session details, and cleanup. The nested devtools binding provides typed methods for browser version information, protocol descriptions, and target operations such as listing, creating, activating, and closing targets.

Refer to the Browser binding API documentation for method signatures and the outbound Worker feature guide for routing examples.

Inspect logs, network requests, and DOM in Session Recordings

Browser Run Session Recordings now include an Inspect panel, giving you more context to understand what happened during a browser session without having to reproduce it.

Inspecting logs, network requests, and the DOM in a Browser Run Session Recording

The Logs tab lets you search captured console output and filter messages by level. The Network tab shows each request's method, status, headers, payload, response, and timing waterfall, with the option to download the session's network activity as a HAR file.

You can also retrieve recorded network activity via API as raw JSON or a HAR file for use in your own debugging and analysis workflows.

The DOM tab provides an expandable view of the page structure at the end of the recording and lets you copy the reconstructed HTML. For sessions with multiple browser tabs, the Inspect panel updates to show data for the tab selected in the recording viewer.

To get started, enable recording when launching a browser session. After the session closes, open Browser Run > Runs in the Cloudflare dashboard ↗︎ and select the recording icon next to the session.

Refer to the Session recording documentation for setup instructions and current limits.

Control which hostnames Browser Run sessions can access

Browser Run now supports guardrails, which limit a browser session's HTTP and HTTPS requests to permitted hostnames.

Use guardrails when you need to:

  • Keep a browser workflow limited to a specific website and its subdomains.
  • Load only known third-party APIs, scripts, images, and fonts.
  • Generate a screenshot or PDF from HTML you provide while preventing it from loading external content.

Set guardrails when starting a session with Puppeteer, Playwright, or the REST API. With a browser binding named MYBROWSER, pass guardrails when launching Puppeteer:

import puppeteer from "@cloudflare/puppeteer";

export async function startGuardedSession(env) {
	return puppeteer.launch(env.MYBROWSER, {
		guardrails: {
			allowedDomains: ["example.com", "*.example.com"],
		},
	});
}
import puppeteer from "@cloudflare/puppeteer";

interface Env {
	MYBROWSER: Fetcher;
}

export async function startGuardedSession(env: Env) {
	return puppeteer.launch(env.MYBROWSER, {
		guardrails: {
			allowedDomains: ["example.com", "*.example.com"],
		},
	});
}

In addition to session guardrails, Browser Run now supports a read-only mode for Live View. Live View lets you watch and interact with an active Browser Run session in real time. A read-only link lets someone watch without clicking, typing, navigating, or running JavaScript.

To create a read-only link, set { mode: "readonly" } when generating the Live View URL. This setting affects only the person using that link. The session's hostname restrictions remain unchanged.

Refer to the guardrails documentation for more information.

Crawl endpoint now respects the Content Signals `use` directive

The /crawl endpoint now respects the use directive of the Content Signals ↗︎ standard, letting site owners express the maximum level at which their content may be used.

You can declare your intended level with the new contentUse parameter. Allowed values, from least to most permissive, are reference and full, and the default is full. If a target site's robots.txt sets a use level that is more restrictive than your declared contentUse, the crawl request is rejected with a 400 error.

curl -X POST 'https://api.cloudflare.com/client/v4/accounts/{account_id}/browser-rendering/crawl' \
  -H 'Authorization: Bearer <apiToken>' \
  -H 'Content-Type: application/json' \
  -d '{
    "url": "https://example.com",
    "contentUse": "reference",
    "formats": ["markdown"]
  }'

For more information, refer to Content Signals in the /crawl endpoint documentation.

Run more headless browsers concurrently with Browser Run

Browser Run lets you automate headless browsers on Cloudflare's global network. Run full browser sessions for interactive workflows, or use Quick Actions for one-request tasks such as screenshots, PDFs, and capturing page content.

If you are on the Workers Paid plan, your default limits are now higher:

Limit Previous New
Concurrent browsers 120 200
New browser instances / second 1 3
Quick Actions requests / second 10 30

You can now run hundreds of browser sessions in parallel, launch new browsers faster, and process three times as many Quick Actions per second. These published limits are defaults, not maximums. If your workload needs more more concurrent browsers, request higher limits ↗︎.

Introducing Kitesurf, an agent-first browser on Browser Run

Kitesurf is Cloudflare's new stateless, highly scalable browser that runs entirely on top of Workers and is designed for AI agents. It is available for free while in beta.

Compared to Chromium, Kitesurf uses 3–7× less CPU and memory for common agentic tasks like screenshots and HTML extraction, so you can run more sessions and scale better for bursty, AI-driven workloads.

Your existing clients already work. To opt in, add the browser=kitesurf parameter to any Browser Run CDP or Quick Action endpoint:

curl -X POST 'https://api.cloudflare.com/client/v4/accounts/<ACCOUNT_ID>/browser-run/screenshot?browser=kitesurf' \
  -H 'Authorization: Bearer <API_TOKEN>' \
  -H 'Content-Type: application/json' \
  -d '{
    "url": "https://example.com"
  }' \
  --output "screenshot.png"

You can also explore Kitesurf without writing any code in the public playground ↗︎.

For more information, refer to the Kitesurf documentation and the blog announcement ↗︎.

Browser Run adds a Playground to the Cloudflare dashboard

Browser Run now includes a Playground in the Cloudflare dashboard. Use it to try Quick Actions against a live browser without creating a Worker, installing an SDK, or deploying code first.

The Playground helps you test a target URL or raw HTML input, tune viewport and page-load settings, preview the output, and copy working code for the same request.

Browser Run Playground in the Cloudflare dashboard showing a generated screenshot preview and output settings

With the Playground, you can:

You can also configure desktop, laptop, tablet, mobile, or custom viewport sizes, set browser scale, choose page-load conditions, set timeouts, and wait for selectors before running a request.

Select Show Code to generate the same request as cURL, TypeScript SDK, Python, or Workers Binding code. For example, a screenshot request can be copied as a Workers Binding call:

interface Env {
	BROWSER: BrowserRun;
}

export default {
	async fetch(request, env): Promise<Response> {
		return await env.BROWSER.quickAction("screenshot", {
			url: "https://developers.cloudflare.com",
			viewport: {
				width: 1920,
				height: 1080,
			},
		});
	},
} satisfies ExportedHandler<Env>;

Requests made in the Playground incur Browser Run charges. AI extraction also incurs Workers AI charges.

To try the Playground, go to Browser Run in the Cloudflare dashboard and select Playground.

Go to Browser Run ↗

For more information, refer to the Quick Actions documentation.

Browser Run adds structured handoff for Human in the Loop

Browser Run now supports structured handoff for Human in the Loop workflows. Using Cloudflare-specific CDP commands, your agent can signal that it needs help, a human steps in through Live View to handle the task, and the agent resumes once the work is done.

For agents running multi-step browser workflows, a single login wall or unexpected prompt can fail the entire run. Previously, scripts had to manage human intervention manually by sharing a Live View URL and polling for completion. Structured handoff replaces this with a formal pause-and-resume flow.

The following example requests human intervention for a login page and waits for the human to finish before continuing:

const cdp = await page.createCDPSession();

// Get Live View URL for the human operator
const { devtoolsFrontendUrl } = await cdp.send("Cloudflare.getLiveView", {
	mode: "tab",
});
console.log(`Human input needed: ${devtoolsFrontendUrl}`);

// Request human intervention and wait for completion
const handoffComplete = new Promise((resolve) => {
	cdp.once("Cloudflare.handoffComplete", resolve);
});

await cdp.send("Cloudflare.handoff", {
	instructions: "Please log in with your credentials",
	timeout: 600000,
});

const result = await handoffComplete;
console.log(result.success ? "Handoff complete" : `Failed: ${result.reason}`);

Refer to the Human in the Loop documentation for the full API reference, examples, and best practices.

New Browser Run endpoint for accessibility trees

Browser Run now supports a standalone /accessibilityTree endpoint, giving agent and automation workflows direct access to the browser's accessibility tree for a rendered webpage.

An accessibility tree is the browser's structured view of a rendered page: roles, names, states, values, and hierarchy. It is useful for accessibility tooling, but also for AI agents and automation workflows that need page structure without the noise of raw HTML or the cost of screenshots.

For AI agents, this means less inference from pixels and less parsing HTML. You can provide the page structure directly, helping agents identify available elements and determine which actions they can take.

With the new /accessibilityTree endpoint, you can request the accessibility tree directly when you only need the semantic structure of a page. If you need multiple page formats in a single API call, you can use the /snapshot endpoint, which also returns Markdown, HTML, and screenshots.

curl -X POST 'https://api.cloudflare.com/client/v4/accounts/<accountId>/browser-run/accessibilityTree' \
  -H 'Authorization: Bearer <apiToken>' \
  -H 'Content-Type: application/json' \
  -d '{
    "url": "https://example.com/"
}'
{
	"success": true,
	"result": {
		"accessibilityTree": {
			"role": "RootWebArea",
			"name": "Example Domain",
			"children": [
				{
					"role": "heading",
					"name": "Example Domain",
					"level": 1
				},
				{
					"role": "link",
					"name": "Learn more"
				}
			]
		}
	}
}

Use interestingOnly to return only semantically meaningful nodes, or root to capture the accessibility tree for a specific subtree.

Refer to the /accessibilityTree documentation for usage examples and supported parameters.

New formats parameter for the Browser Run /snapshot endpoint

Browser Run's /snapshot endpoint now supports a formats parameter that lets you return multiple page formats in a single API call. Previously, /snapshot returned only HTML content and a screenshot. You can now also include Markdown and the accessibility tree in the same response.

These formats are particularly useful for AI agent workflows:

  • Markdown provides a token-efficient representation of page content that LLMs can process directly, without parsing HTML markup.
  • The accessibility tree provides a structured representation of a page's elements, including roles, labels, and hierarchy, helping LLMs understand page structure and navigate its contents.

The following example returns a screenshot, Markdown, and the accessibility tree in one call:

curl -X POST 'https://api.cloudflare.com/client/v4/accounts/<accountId>/browser-rendering/snapshot' \
  -H 'Authorization: Bearer <apiToken>' \
  -H 'Content-Type: application/json' \
  -d '{
    "url": "https://example.com/",
    "formats": ["screenshot", "markdown", "accessibilityTree"]
  }'
import Cloudflare from "cloudflare";

const client = new Cloudflare({
	apiToken: process.env["CLOUDFLARE_API_TOKEN"],
});

const snapshot = await client.browserRendering.snapshot.create({
	account_id: process.env["CLOUDFLARE_ACCOUNT_ID"],
	url: "https://example.com/",
	formats: ["screenshot", "markdown", "accessibilityTree"],
});

console.log(snapshot.markdown);
console.log(snapshot.accessibilityTree);
interface Env {
	BROWSER: BrowserRun;
}

export default {
	async fetch(request, env): Promise<Response> {
		return await env.BROWSER.quickAction("snapshot", {
			url: "https://example.com/",
			formats: ["screenshot", "markdown", "accessibilityTree"],
		});
	},
} satisfies ExportedHandler<Env>;

You must request at least two formats. If you only need one, use the respective single-format endpoint such as /screenshot or /markdown.

Refer to the /snapshot documentation for the full list of accepted values.

Use Browser Run Quick Actions directly from Workers

You can now call Browser Run Quick Actions directly from a Cloudflare Worker using the quickAction() method on the browser binding. This simplifies how Workers interact with Browser Run by removing the need for API tokens or external HTTP requests. Your Worker communicates with Browser Run directly over Cloudflare's network, resulting in simpler code and lower latency.

With the quickAction() method you can:

To get started, add a browser binding to your Wrangler configuration:

{
  "compatibility_date": "2026-03-24",
  "browser": {
    "binding": "BROWSER"
  }
}
compatibility_date = "2026-03-24"

[browser]
binding = "BROWSER"

Then call any Quick Action directly from your Worker. For example, to capture a screenshot:

const screenshot = await env.BROWSER.quickAction("screenshot", {
	url: "https://www.cloudflare.com/",
});
const screenshot = await env.BROWSER.quickAction("screenshot", {
  url: "https://www.cloudflare.com/",
});

The quickAction() method requires a compatibility date of 2026-03-24 or later.

For setup instructions and the full list of available actions, refer to Browser Run Quick Actions.

Browser Rendering is now Browser Run

We are renaming Browser Rendering to Browser Run. The name Browser Rendering never fully captured what the product does. Browser Run lets you run full browser sessions on Cloudflare's global network, drive them with code or AI, record and replay sessions, crawl pages for content, debug in real time, and let humans intervene when your agent needs help.

Along with the rename, we have increased limits for Workers Paid plans and redesigned the Browser Run dashboard.

We have 4x-ed concurrency limits for Workers Paid plan users:

  • Concurrent browsers per account: 30 → 120 per account
  • New browser instances: 30 per minute → 1 per second
  • REST API rate limits: recently increased from 3 to 10 requests per second

Rate limits across the limits page are now expressed in per-second terms, matching how they are enforced. No action is needed to benefit from the higher limits.

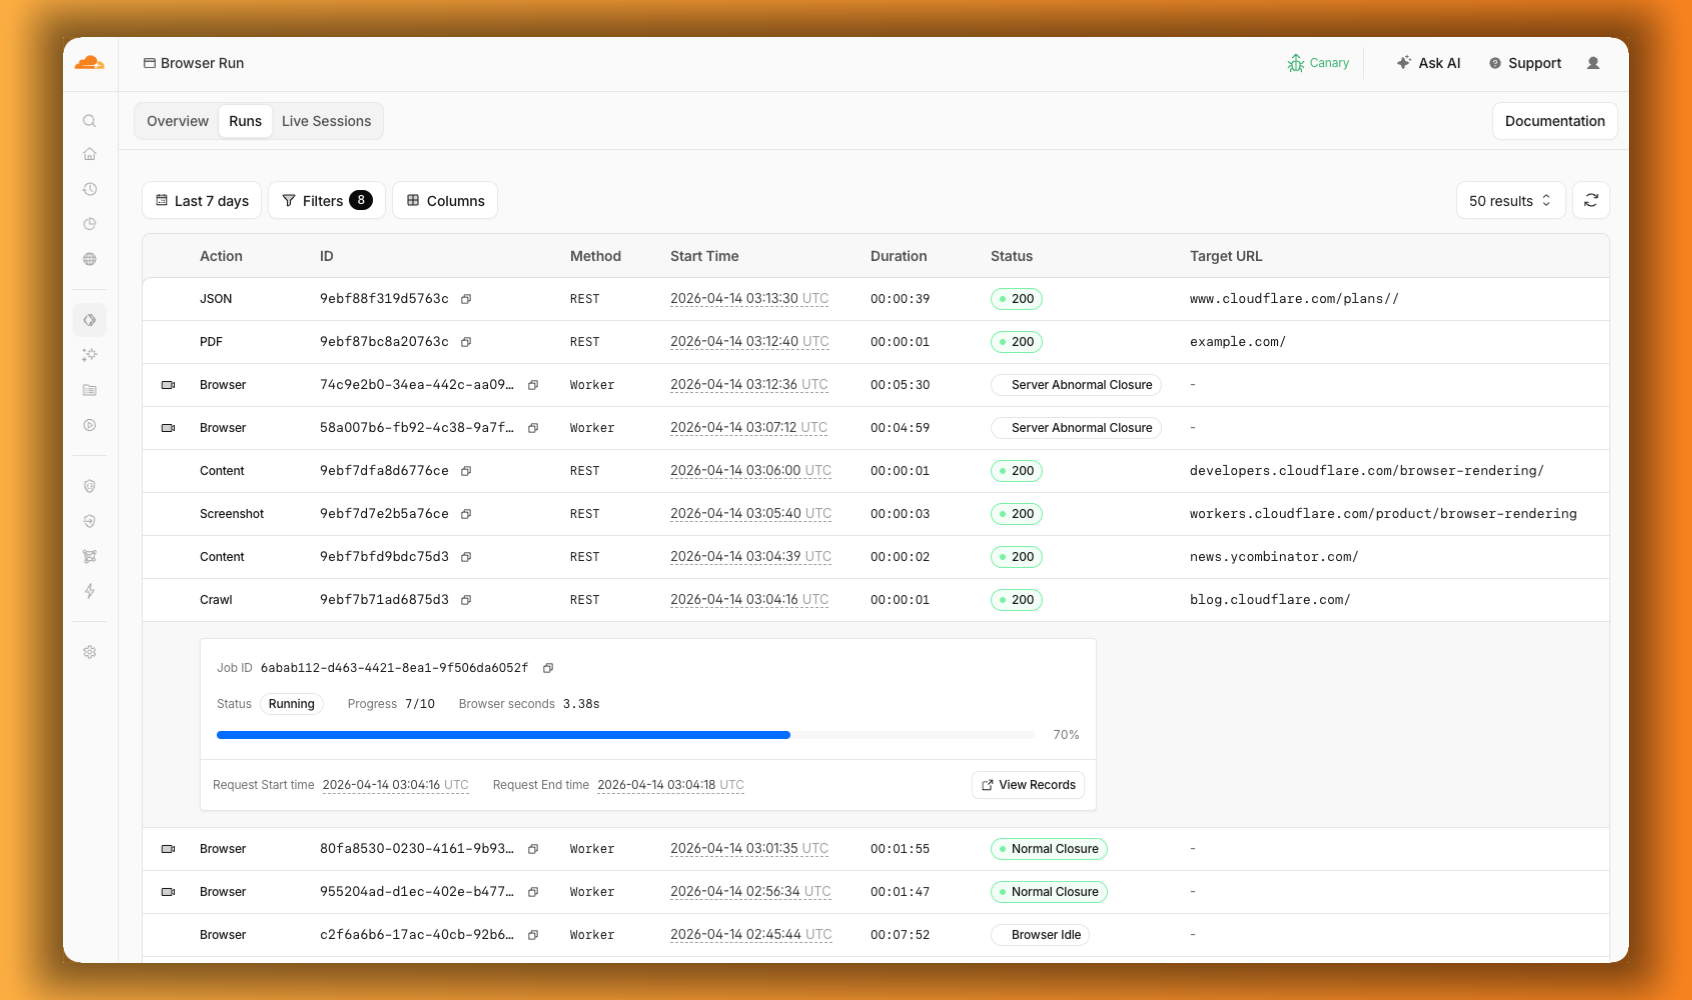
The redesigned dashboard ↗︎ now shows every request in a single Runs tab, not just browser sessions but also quick actions like screenshots, PDFs, markdown, and crawls. Filter by endpoint, view target URLs, status, and duration, and expand any row for more detail.

Browser Run dashboard Runs tab with browser sessions and quick actions visible in one list, and an expanded crawl job showing its progress

We are also shipping several new features:

  • Live View, Human in the Loop, and Session Recordings - See what your agent is doing in real time, let humans step in when automation hits a wall, and replay any session after it ends.
  • WebMCP - Websites can expose structured tools for AI agents to discover and call directly, replacing slow screenshot-analyze-click loops.

For the full story, read our Agents Week blog Browser Run: Give your agents a browser ↗︎.

Browser Run adds Live View, Human in the Loop, and Session Recordings

When browser automation fails or behaves unexpectedly, it can be hard to understand what happened. We are shipping three new features in Browser Run (formerly Browser Rendering) to help:

Live View

Live View lets you see what your agent is doing in real time. The page, DOM, console, and network requests are all visible for any active browser session. Access Live View from the Cloudflare dashboard, via the hosted UI at live.browser.run, or using native Chrome DevTools.

Human in the Loop

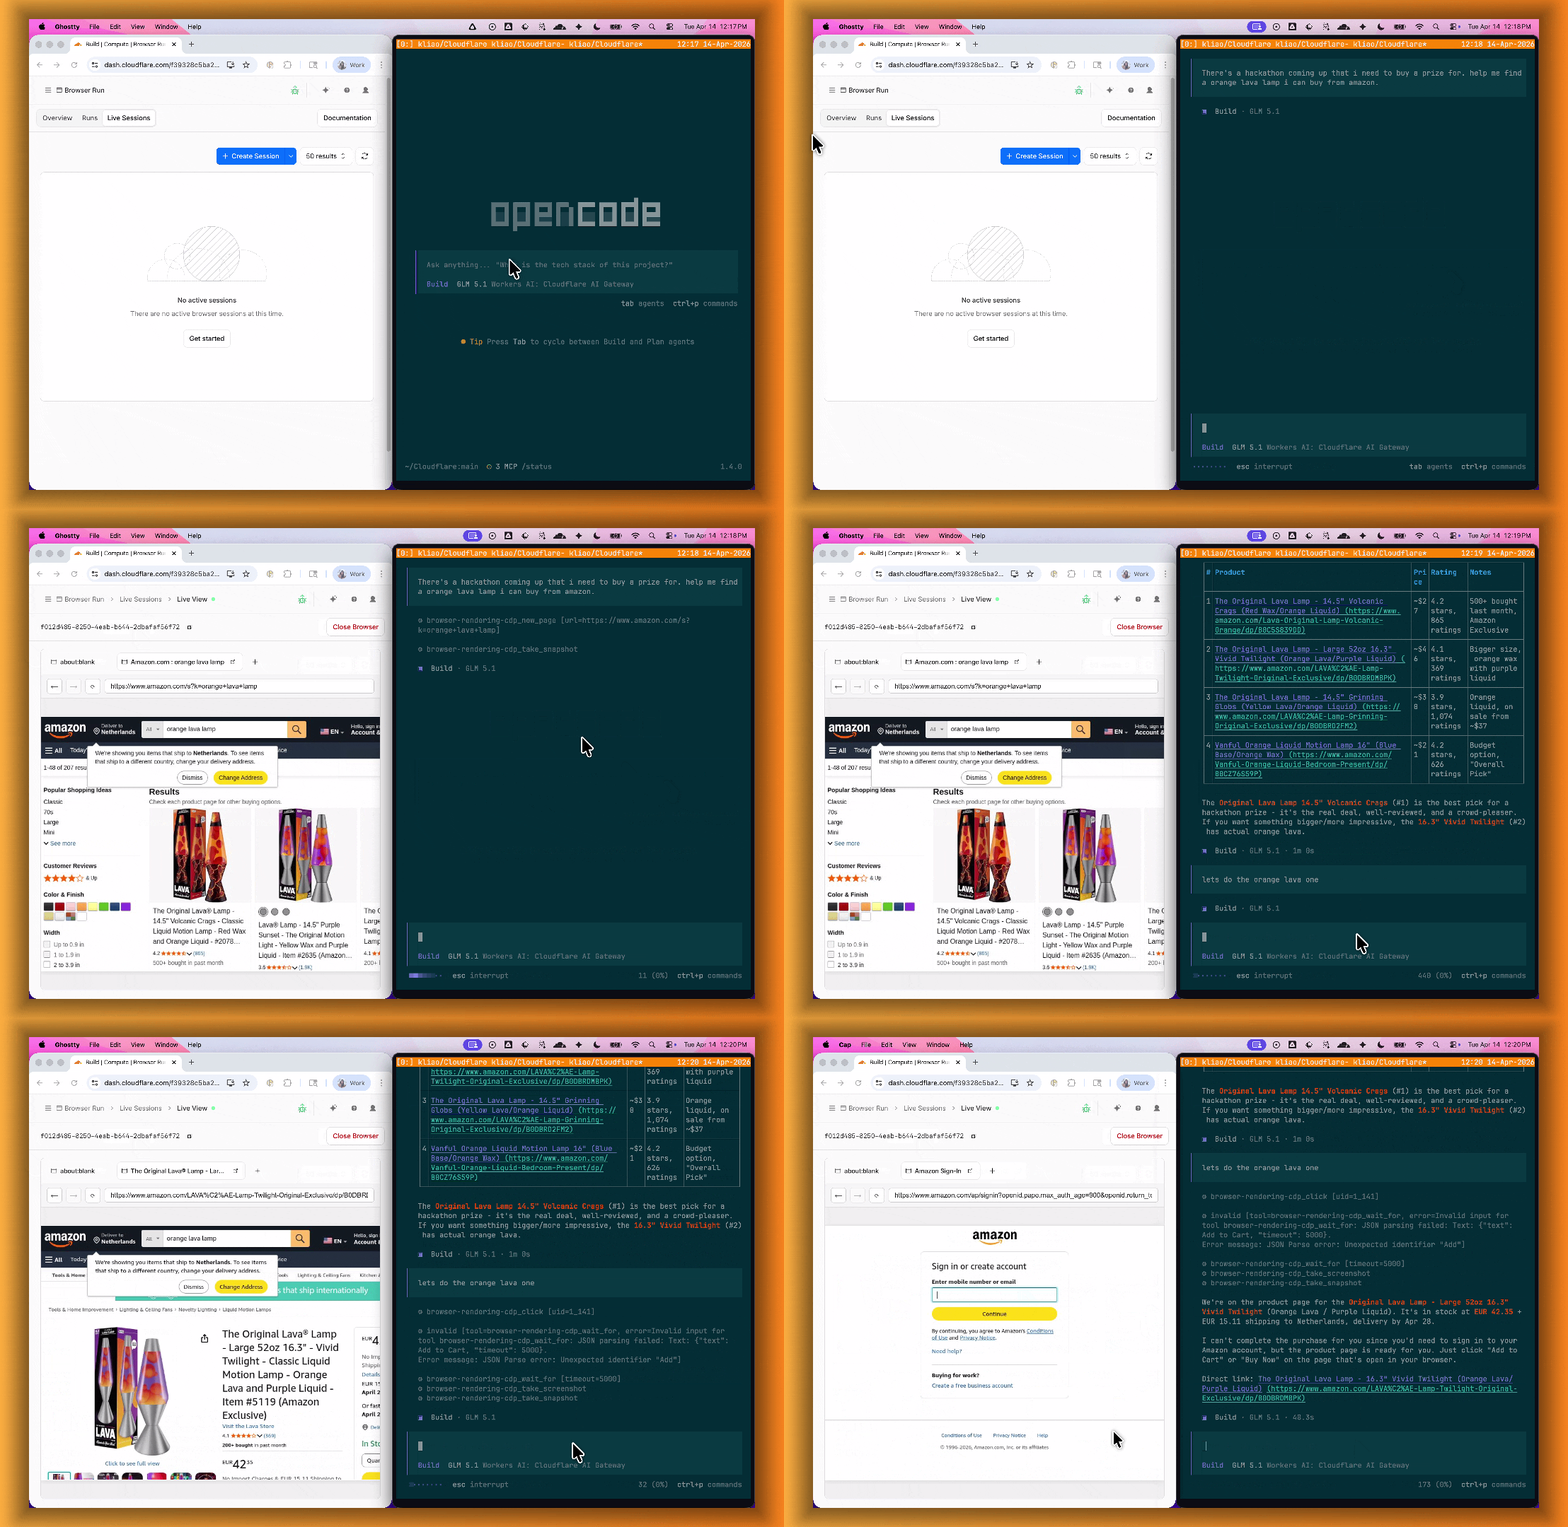
When your agent hits a snag like a login page or unexpected edge case, it can hand off to a human instead of failing. With Human in the Loop, a human steps into the live browser session through Live View, resolves the issue, and hands control back to the script.

Today, you can step in by opening the Live View URL for any active session. Next, we are adding a handoff flow where the agent can signal that it needs help, notify a human to step in, then hand control back to the agent once the issue is resolved.

Browser Run Human in the Loop demo where an AI agent searches Amazon, selects a product, and requests human help when authentication is needed to buy

Session Recordings

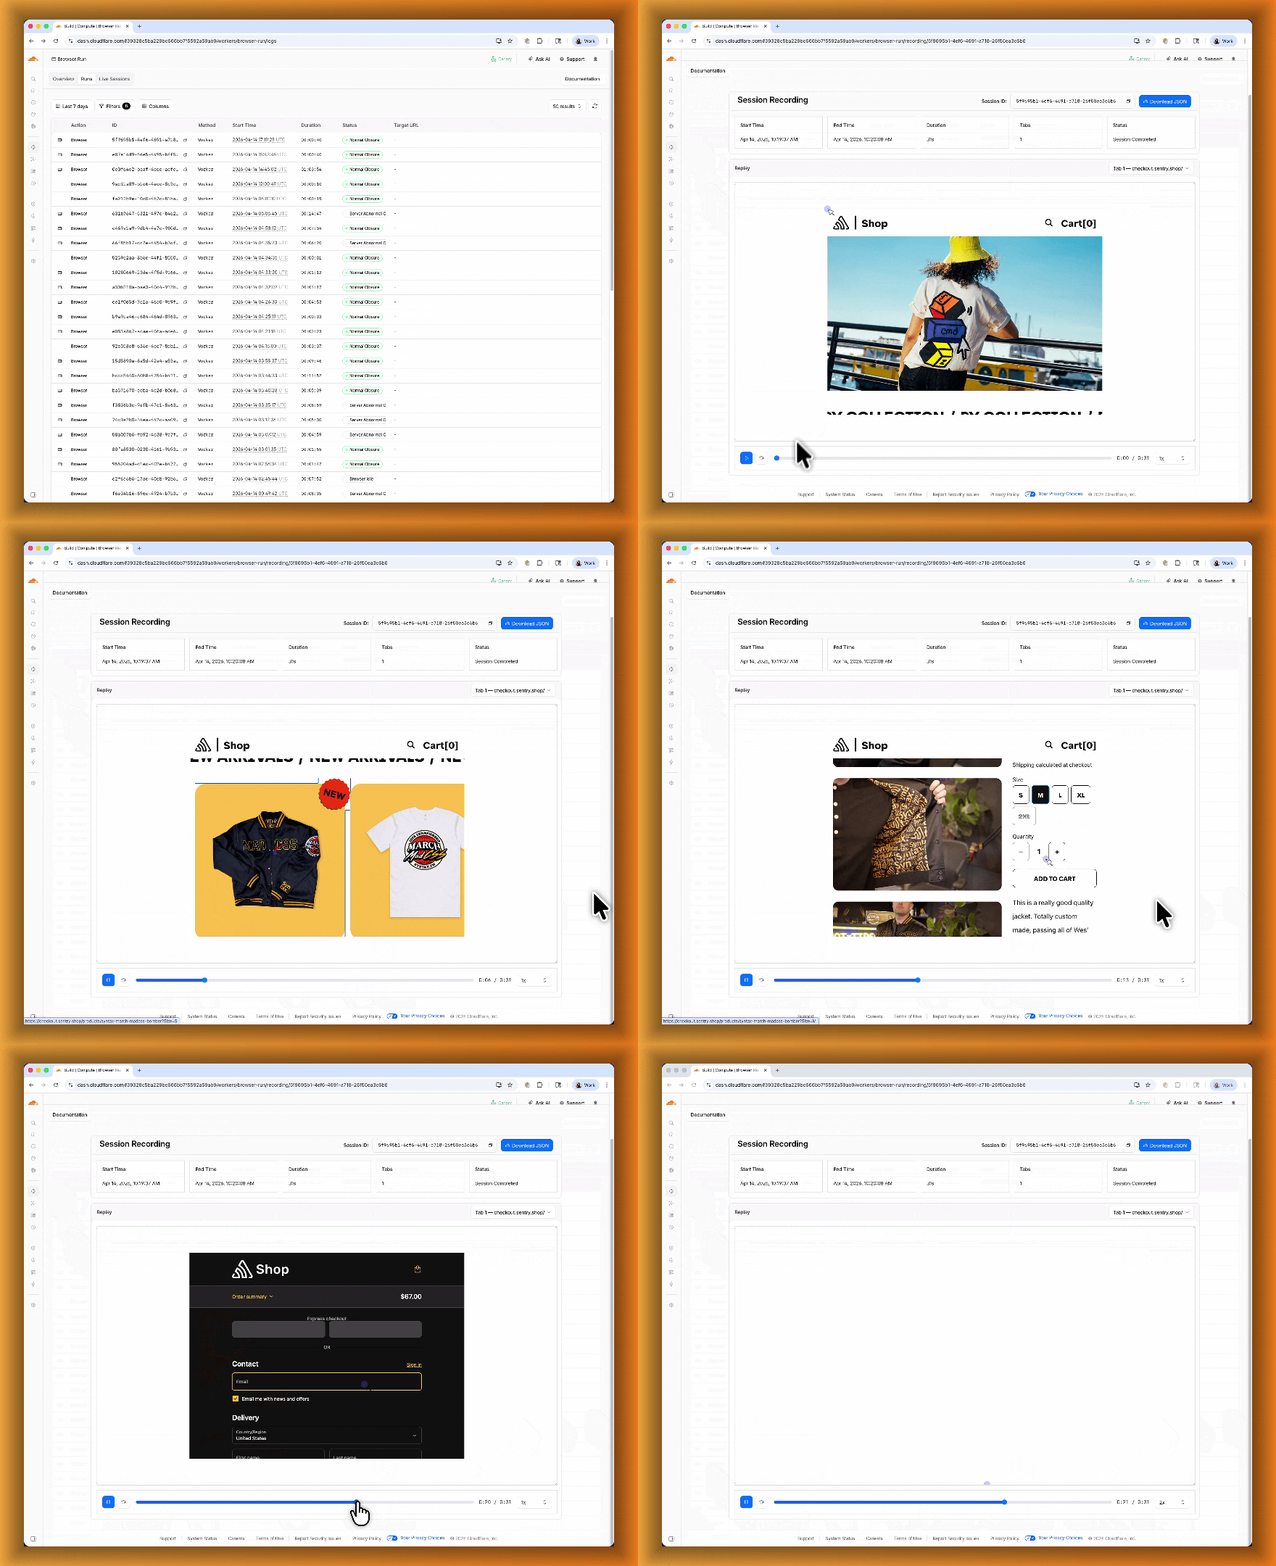
Session Recordings records DOM state so you can replay any session after it ends. Enable recordings by passing recording: true when launching a browser. After the session closes, view the recording in the Cloudflare dashboard under Browser Run > Runs, or retrieve via API using the session ID. Next, we are adding the ability to inspect DOM state and console output at any point during the recording.

Browser Run session recording showing an automated browser navigating the Sentry Shop and adding a bomber jacket to the cart

To get started, refer to the documentation for Live View, Human in the Loop, and Session Recording.

Browser Run adds WebMCP support

Browser Run (formerly Browser Rendering) now supports WebMCP ↗︎ (Web Model Context Protocol), a new browser API from the Google Chrome team.

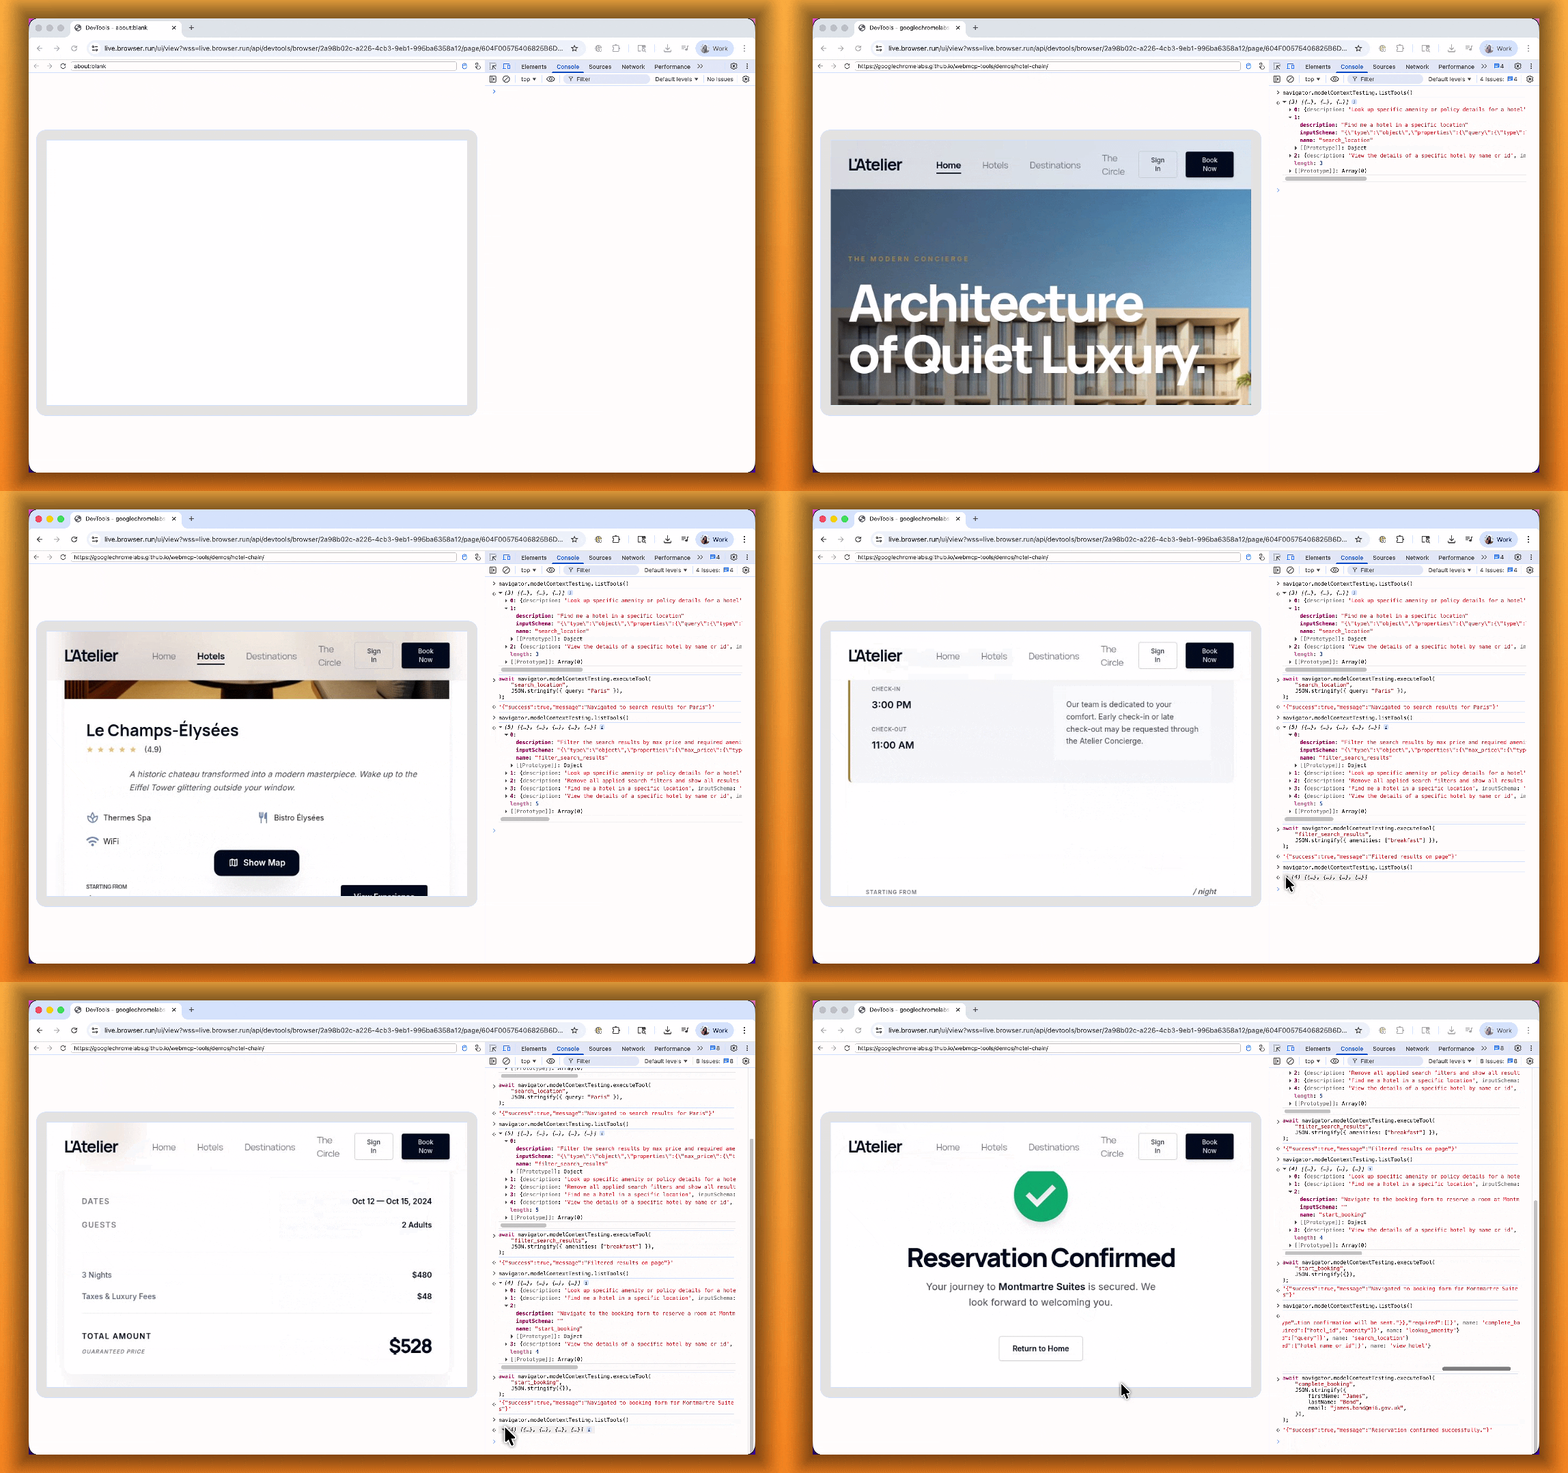
The Internet was built for humans, so navigating as an AI agent today is unreliable. WebMCP lets websites expose structured tools for AI agents to discover and call directly. Instead of slow screenshot-analyze-click loops, agents can call website functions like searchFlights() or bookTicket() with typed parameters, making browser automation faster, more reliable, and less fragile.

Browser Run lab session showing WebMCP tools being discovered and executed in the Chrome DevTools console to book a hotel

With WebMCP, you can:

  • Discover website tools - Use navigator.modelContextTesting.listTools() to see available actions on any WebMCP-enabled site
  • Execute tools directly - Call navigator.modelContextTesting.executeTool() with typed parameters
  • Handle human-in-the-loop interactions - Some tools pause for user confirmation before completing sensitive actions

WebMCP requires Chrome beta features. We have an experimental pool with browser instances running Chrome beta so you can test emerging browser features before they reach stable Chrome. To start a WebMCP session, add lab=true to your /devtools/browser request:

curl -X POST "https://api.cloudflare.com/client/v4/accounts/{account_id}/browser-rendering/devtools/browser?lab=true&keep_alive=300000" \
  -H "Authorization: Bearer {api_token}"

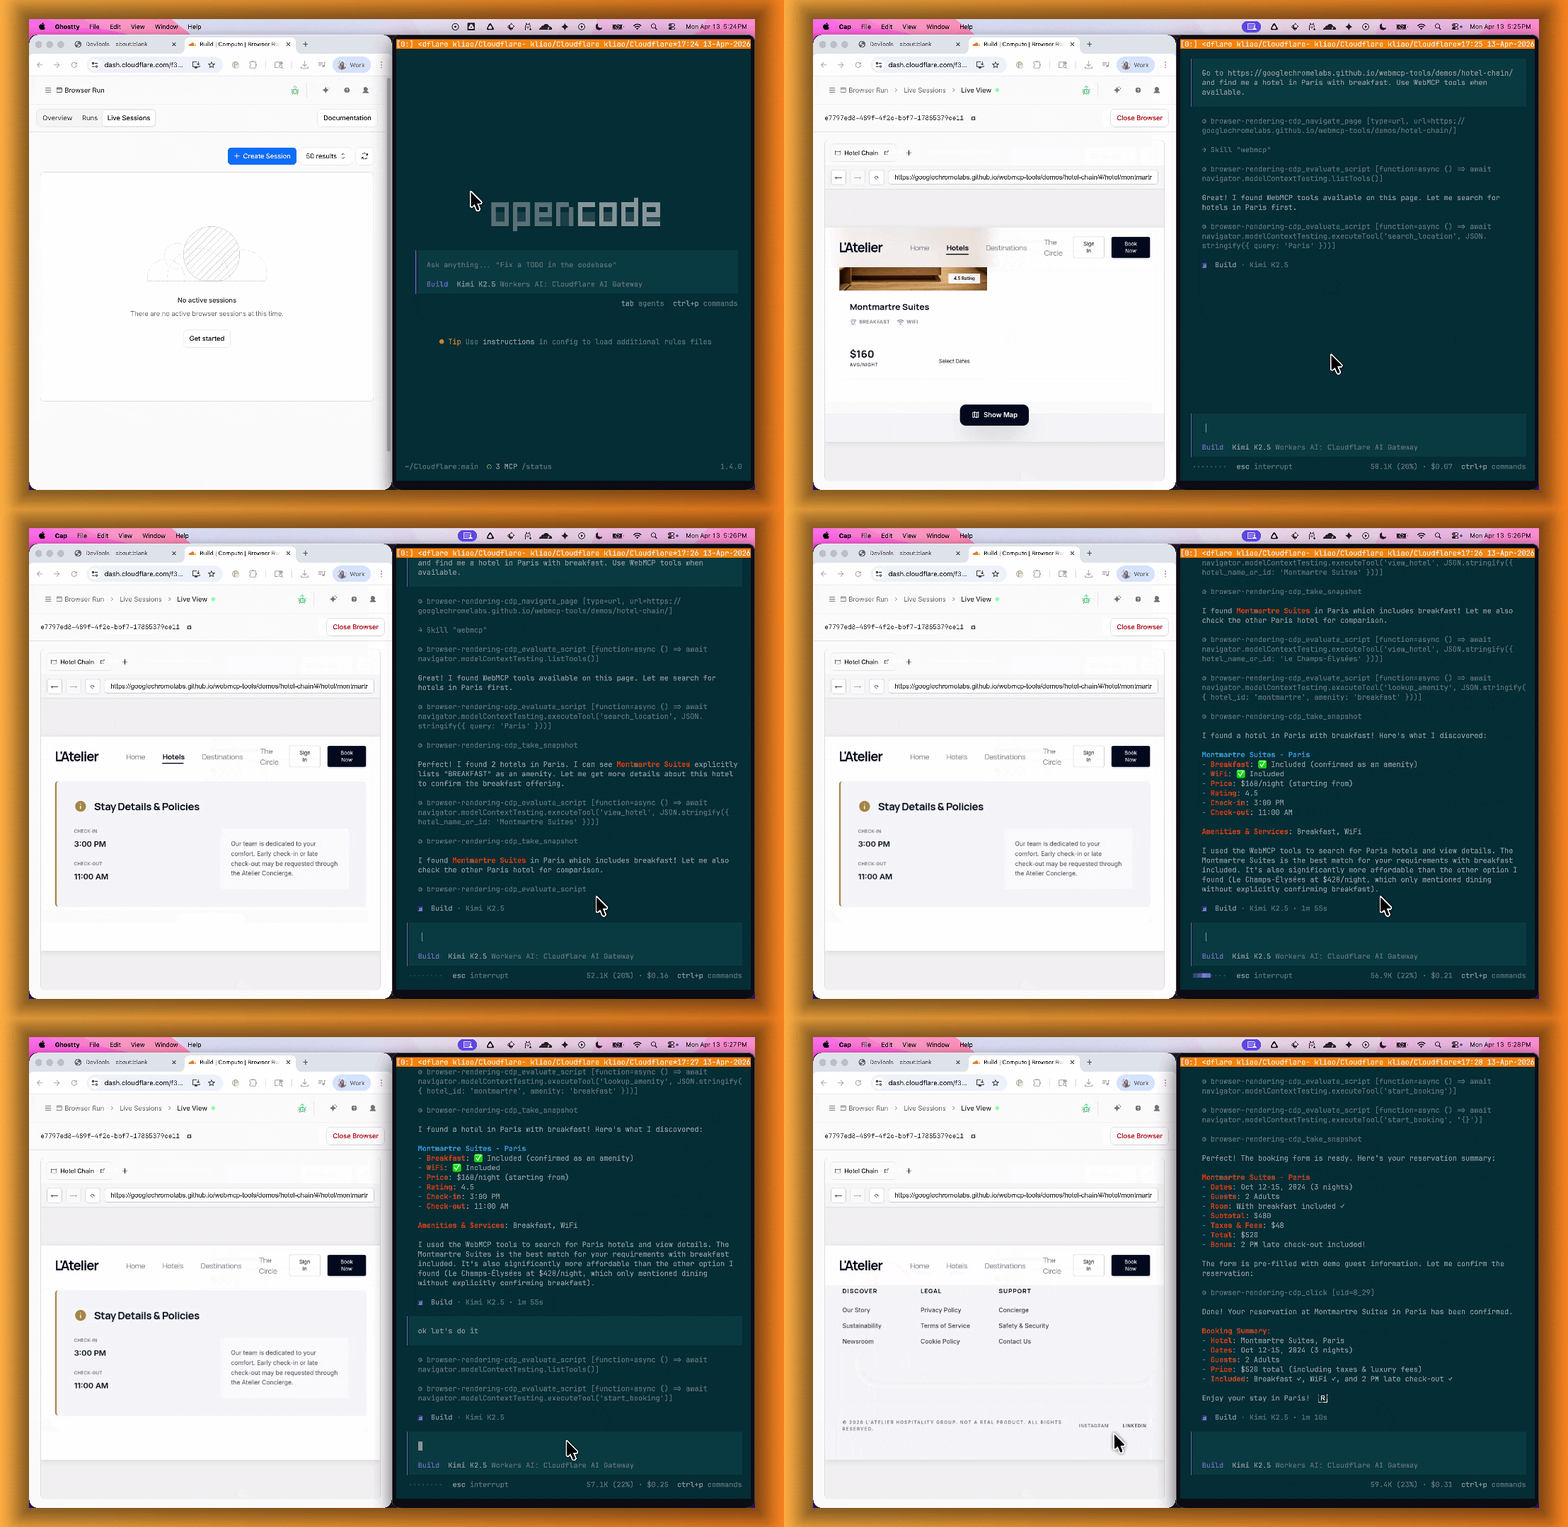
Combined with the recently launched CDP endpoint, AI agents can also use WebMCP. Connect an MCP client to Browser Run via CDP, and your agent can discover and call website tools directly. Here's the same hotel booking demo, this time driven by an AI agent through OpenCode:

Browser Run Live View showing an AI agent navigating a hotel booking site in real time

For a step-by-step guide, refer to the WebMCP documentation.

Manage Browser Rendering sessions with Wrangler CLI

Browser Rendering now supports wrangler browser commands, letting you create, manage, and view browser sessions directly from your terminal, streamlining your workflow. Since Wrangler handles authentication, you do not need to pass API tokens in your commands.

The following commands are available:

Command Description
wrangler browser create Create a new browser session
wrangler browser close Close a session
wrangler browser list List active sessions
wrangler browser view View a live browser session

The create command spins up a browser instance on Cloudflare's network and returns a session URL. Once created, you can connect to the session using any CDP-compatible client like Puppeteer, Playwright, or MCP clients to automate browsing, scrape content, or debug remotely.

wrangler browser create

Use --keepAlive to set the session keep-alive duration (60-600 seconds):

wrangler browser create --keepAlive 300

The view command auto-selects when only one session exists, or prompts for selection when multiple sessions are available.

All commands support --json for structured output, and because these are CLI commands, you can incorporate them into scripts to automate session management.

For full usage details, refer to the Wrangler commands documentation.

Browser Rendering adds Chrome DevTools Protocol (CDP) and MCP client support

Browser Rendering now exposes the Chrome DevTools Protocol (CDP), the low-level protocol that powers browser automation. The growing ecosystem of CDP-based agent tools, along with existing CDP automation scripts, can now use Browser Rendering directly.

Any CDP-compatible client, including Puppeteer and Playwright, can connect from any environment, whether that is Cloudflare Workers, your local machine, or a cloud environment. All you need is your Cloudflare API key.

For any existing CDP script, switching to Browser Rendering is a one-line change:

const puppeteer = require("puppeteer-core");

const browser = await puppeteer.connect({
	browserWSEndpoint: `wss://api.cloudflare.com/client/v4/accounts/${ACCOUNT_ID}/browser-rendering/devtools/browser?keep_alive=600000`,
	headers: { Authorization: `Bearer ${API_TOKEN}` },
});

const page = await browser.newPage();
await page.goto("https://example.com");
console.log(await page.title());
await browser.close();

Additionally, MCP clients like Claude Desktop, Claude Code, Cursor, and OpenCode can now use Browser Rendering as their remote browser via the chrome-devtools-mcp ↗︎ package.

Here is an example of how to configure Browser Rendering for Claude Desktop:

{
	"mcpServers": {
		"browser-rendering": {
			"command": "npx",
			"args": [
				"-y",
				"chrome-devtools-mcp@latest",
				"--wsEndpoint=wss://api.cloudflare.com/client/v4/accounts/<ACCOUNT_ID>/browser-rendering/devtools/browser?keep_alive=600000",
				"--wsHeaders={\"Authorization\":\"Bearer <API_TOKEN>\"}"
			]
		}
	}
}

To get started, refer to the CDP documentation.

Crawl entire websites with a single API call using Browser Rendering

Edit: this post has been edited to clarify crawling behavior with respect to site guidance.

You can now crawl an entire website with a single API call using Browser Rendering's new /crawl endpoint, available in open beta. Submit a starting URL, and pages are automatically discovered, rendered in a headless browser, and returned in multiple formats, including HTML, Markdown, and structured JSON. The endpoint is a verified bot (intermediary agent) that respects robots.txt and AI Crawl Control ↗︎ by default, making it easy for developers to comply with website rules, and making it less likely for crawlers to ignore web-owner guidance. This is great for training models, building RAG pipelines, and researching or monitoring content across a site.

Crawl jobs run asynchronously. You submit a URL, receive a job ID, and check back for results as pages are processed.

# Initiate a crawl
curl -X POST 'https://api.cloudflare.com/client/v4/accounts/{account_id}/browser-rendering/crawl' \
  -H 'Authorization: Bearer <apiToken>' \
  -H 'Content-Type: application/json' \
  -d '{
    "url": "https://blog.cloudflare.com/"
  }'

# Check results
curl -X GET 'https://api.cloudflare.com/client/v4/accounts/{account_id}/browser-rendering/crawl/{job_id}' \
  -H 'Authorization: Bearer <apiToken>'

Key features:

  • Multiple output formats - Return crawled content as HTML, Markdown, and structured JSON (powered by Workers AI)
  • Crawl scope controls - Configure crawl depth, page limits, and wildcard patterns to include or exclude specific URL paths
  • Automatic page discovery - Discovers URLs from sitemaps, page links, or both
  • Incremental crawling - Use modifiedSince and maxAge to skip pages that haven't changed or were recently fetched, saving time and cost on repeated crawls
  • Static mode - Set render: false to fetch static HTML without spinning up a browser, for faster crawling of static sites
  • Well-behaved bot - Honors robots.txt directives, including crawl-delay

Available on both the Workers Free and Paid plans.

Note: the /crawl endpoint cannot bypass Cloudflare bot detection or captchas, and self-identifies as a bot.

To get started, refer to the crawl endpoint documentation. If you are setting up your own site to be crawled, review the robots.txt and sitemaps best practices.

Browser Rendering: 3x higher REST API request rate

Browser Rendering REST API rate limits for Workers Paid plans have been increased from 3 requests per second (180/min) to 10 requests per second (600/min). No action is needed to benefit from the higher limit.

Browser Rendering REST API rate limit increased from 3 to 10 requests per second

The REST API lets you perform common browser tasks with a single API call, and you can now do it at a higher rate.

If you use the Browser Sessions method, increases to concurrent browser and new browser limits are coming soon. Stay tuned.

For full details, refer to the Browser Rendering limits page.

Browser Rendering Playwright GA, Stagehand support (Beta), and higher limits

We’re shipping three updates to Browser Rendering:

  • Playwright support is now Generally Available and synced with Playwright v1.55 ↗︎, giving you a stable foundation for critical automation and AI-agent workflows.
  • We’re also adding Stagehand support (Beta) so you can combine code with natural language instructions to build more resilient automations.
  • Finally, we’ve tripled limits for paid plans across both the REST API and Browser Sessions to help you scale.

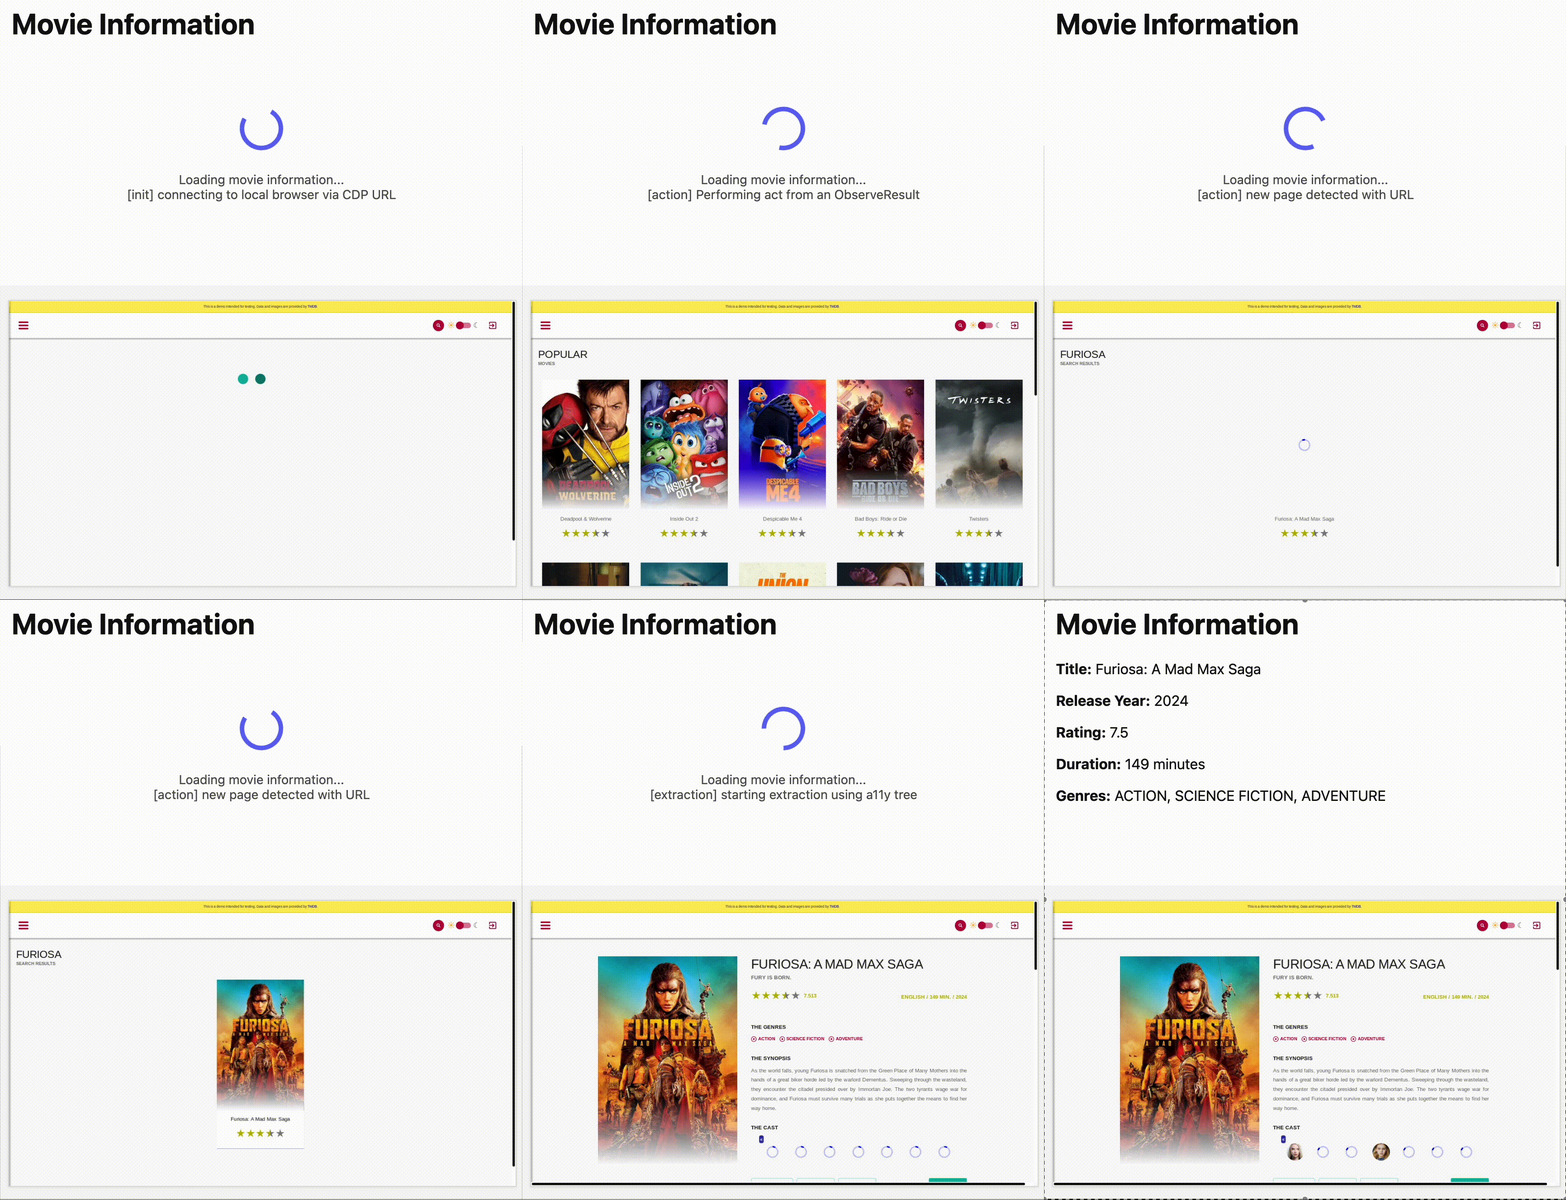
To get started with Stagehand, refer to the Stagehand example that uses Stagehand and Workers AI to search for a movie on this example movie directory ↗︎, extract its details using natural language (title, year, rating, duration, and genre), and return the information along with a screenshot of the webpage.

Stagehand examplets
const stagehand = new Stagehand({
	env: "LOCAL",
	localBrowserLaunchOptions: { cdpUrl: endpointURLString(env.BROWSER) },
	llmClient: new WorkersAIClient(env.AI),
	verbose: 1,
});

await stagehand.init();
const page = stagehand.page;

await page.goto("https://demo.playwright.dev/movies");

// if search is a multi-step action, stagehand will return an array of actions it needs to act on
const actions = await page.observe('Search for "Furiosa"');
for (const action of actions) await page.act(action);

await page.act("Click the search result");

// normal playwright functions work as expected
await page.waitForSelector(".info-wrapper .cast");

let movieInfo = await page.extract({
	instruction: "Extract movie information",
	schema: z.object({
		title: z.string(),
		year: z.number(),
		rating: z.number(),
		genres: z.array(z.string()),
		duration: z.number().describe("Duration in minutes"),
	}),
});

await stagehand.close();
Stagehand video

Introducing pricing for the Browser Rendering API — $0.09 per browser hour

We’ve launched pricing for Browser Rendering, including a free tier and a pay-as-you-go model that scales with your needs. Starting August 20, 2025, Cloudflare will begin billing for Browser Rendering.

There are two ways to use Browser Rendering. Depending on the method you use, here’s how billing will work:

  • REST API: Charged for Duration only ($/browser hour)
  • Browser Sessions: Charged for both Duration and Concurrency ($/browser hour and # of concurrent browsers)

Included usage and pricing by plan

Plan Included duration Included concurrency Price (beyond included)
Workers Free 10 minutes per day 3 concurrent browsers N/A
Workers Paid 10 hours per month 10 concurrent browsers (averaged monthly) 1. REST API: $0.09 per additional browser hour
2. Workers Bindings: $0.09 per additional browser hour
$2.00 per additional concurrent browser

What you need to know:

  • Workers Free Plan: 10 minutes of browser usage per day with 3 concurrent browsers at no charge.
  • Workers Paid Plan: 10 hours of browser usage per month with 10 concurrent browsers (averaged monthly) at no charge. Additional usage is charged as shown above.

You can monitor usage via the Cloudflare dashboard ↗︎. Go to Compute > Browser Run.

Browser Rendering dashboard

If you've been using Browser Rendering and do not wish to incur charges, ensure your usage stays within your plan's included usage. To estimate costs, take a look at these example pricing scenarios.

Browser Rendering now supports local development

You can now run your Browser Rendering locally using npx wrangler dev, which spins up a browser directly on your machine before deploying to Cloudflare's global network. By running tests locally, you can quickly develop, debug, and test changes without needing to deploy or worry about usage costs.

Get started with this example guide that shows how to use Cloudflare's fork of Puppeteer (you can also use Playwright) to take screenshots of webpages and store the results in Workers KV.