Changelog
New updates and improvements at Cloudflare.

You can now implement our child safety tooling, the CSAM Scanning Tool, more easily. Instead of requiring external reporting credentials, you only need a verified email address for notifications to onboard. This change makes the tool more accessible to a wider range of customers.
How It Works
When enabled, the tool automatically hashes images for enabled websites as they enter the Cloudflare cache ↗. These hashes are then checked against a database of known abusive images.
- Potential match detected?
- The content URL is blocked, and
- Cloudflare will notify you about the found matches via the provided email address.
Updated Service-Specific Terms
We have also made updates to our Service-Specific Terms ↗ to reflect these changes.
- Potential match detected?
Cloudflare is removing five fields from the
metaobject of DNS records. These fields have been unused for more than a year and are no longer set on new records. This change may take up to four weeks to fully roll out.The affected fields are:
- the
auto_addedboolean - the
managed_by_appsboolean and correspondingapps_install_id - the
managed_by_argo_tunnelboolean and correspondingargo_tunnel_id
An example record returned from the API would now look like the following:
Updated API Response {"result": {"id": "<ID>","zone_id": "<ZONE_ID>","zone_name": "example.com","name": "www.example.com","type": "A","content": "192.0.2.1","proxiable": true,"proxied": false,"ttl": 1,"locked": false,"meta": {"auto_added": false,"managed_by_apps": false,"managed_by_argo_tunnel": false,"source": "primary"},"comment": null,"tags": [],"created_on": "2025-03-17T20:37:05.368097Z","modified_on": "2025-03-17T20:37:05.368097Z"},"success": true,"errors": [],"messages": []}For more guidance, refer to Manage DNS records.
- the
The new Snippets code editor lets you edit Snippet code and rule in one place, making it easier to test and deploy changes without switching between pages.
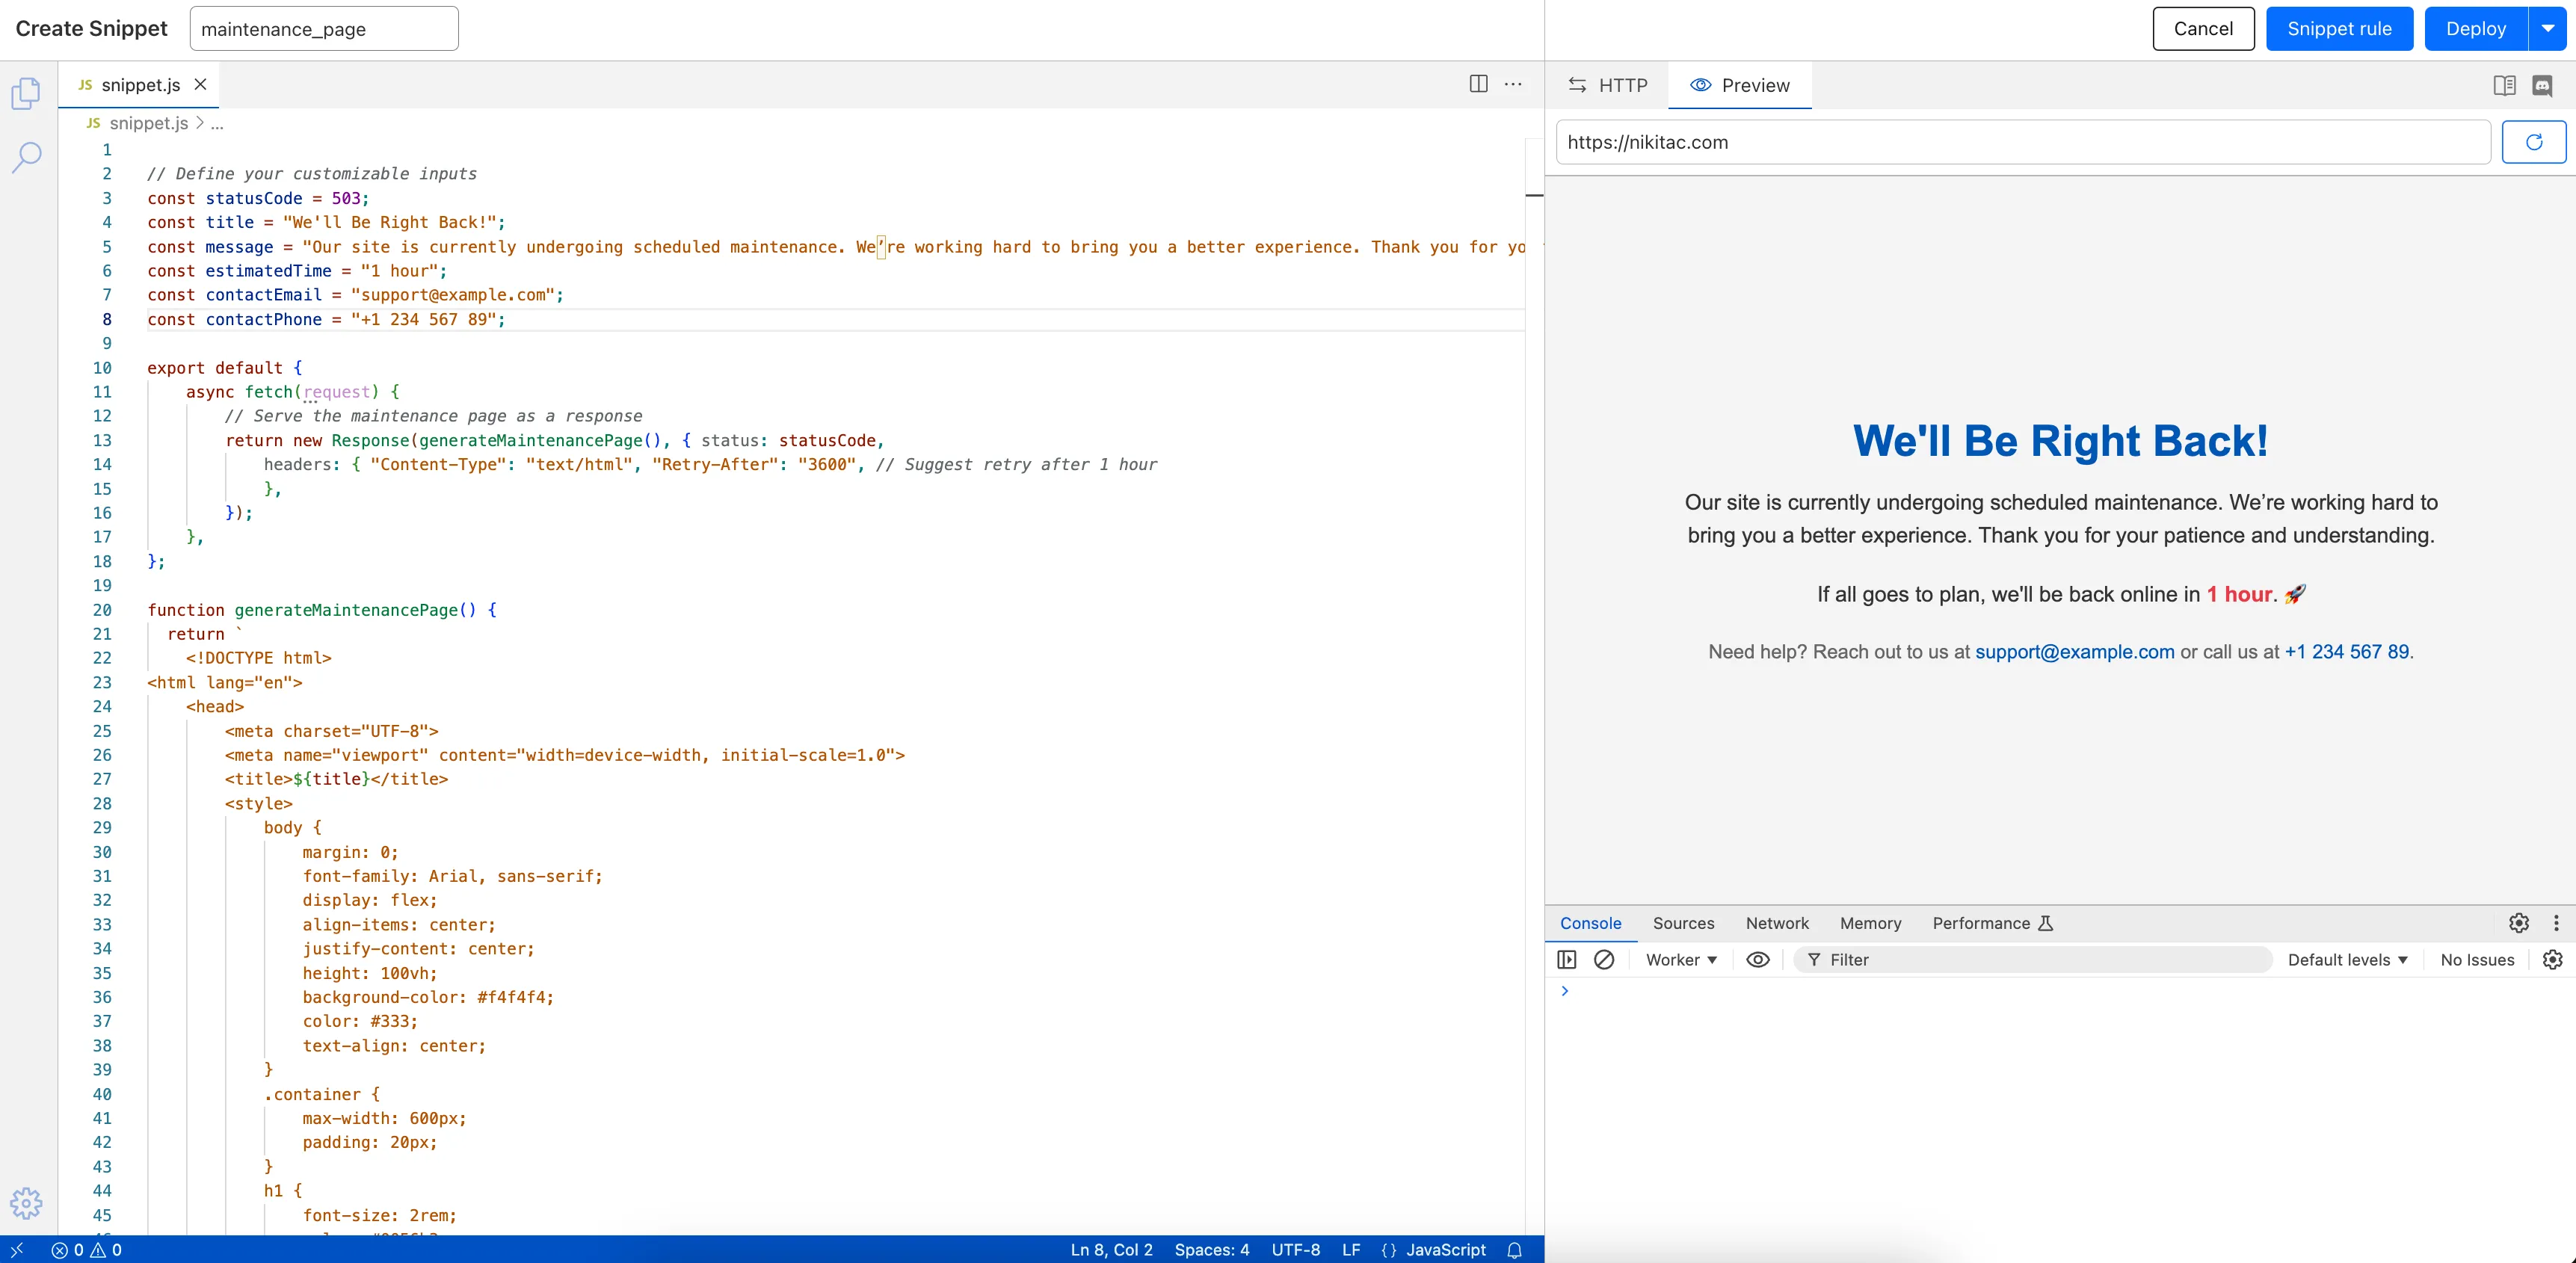
What’s new:
- Single-page editing for code and rule – No need to jump between screens.
- Auto-complete & syntax highlighting – Get suggestions and avoid mistakes.
- Code formatting & refactoring – Write cleaner, more readable code.
Try it now in Rules > Snippets ↗.
Rules Overview gives you a single page to manage all your Cloudflare Rules.
What you can do:
- See all your rules in one place – No more clicking around.
- Find rules faster – Search by name.
- Understand execution order – See how rules run in sequence.
- Debug easily – Use Trace without switching tabs.
Check it out in Rules > Overview ↗.
You can now achieve higher cache hit rates and reduce origin load when using Load Balancing with Smart Tiered Cache. Cloudflare automatically selects a single, optimal tiered data center for all origins in your Load Balancing Pool.
When you use Load Balancing with Smart Tiered Cache, Cloudflare analyzes performance metrics across your pool's origins and automatically selects the optimal Upper Tier data center for the entire pool. This means:
- Consistent cache location: All origins in the pool share the same Upper Tier cache.
- Higher HIT rates: Requests for the same content hit the cache more frequently.
- Reduced origin requests: Fewer requests reach your origin servers.
- Improved performance: Faster response times for cache HITs.
Load Balancing Pool: api-pool├── Origin 1: api-1.example.com├── Origin 2: api-2.example.com└── Origin 3: api-3.example.com↓Selected Upper Tier: [Optimal data center based on pool performance]To get started, enable Smart Tiered Cache on your zone and configure your Load Balancing Pool.
Now, you can manage Cloudflare Snippets with Terraform. Use infrastructure-as-code to deploy and update Snippet code and rules without manual changes in the dashboard.
Example Terraform configuration:
resource "cloudflare_snippet" "my_snippet" {zone_id = "<ZONE_ID>"name = "my_test_snippet_1"main_module = "file1.js"files {name = "file1.js"content = file("file1.js")}}resource "cloudflare_snippet_rules" "cookie_snippet_rule" {zone_id = "<ZONE_ID>"rules {enabled = trueexpression = "http.cookie eq \"a=b\""description = "Trigger snippet on specific cookie"snippet_name = "my_test_snippet_1"}depends_on = [cloudflare_snippet.my_snippet]}Learn more in the Configure Snippets using Terraform documentation.
Now, you can use Cloud Connector to route traffic to your R2 buckets based on URLs, headers, geolocation, and more.
Example setup:
Terminal window curl --request PUT \"https://api.cloudflare.com/client/v4/zones/{zone_id}/cloud_connector/rules" \--header "Authorization: Bearer <API_TOKEN>" \--header "Content-Type: application/json" \--data '[{"expression": "http.request.uri.path wildcard \"/images/*\"","provider": "cloudflare_r2","description": "Connect to R2 bucket containing images","parameters": {"host": "mybucketcustomdomain.example.com"}}]'Get started using Cloud Connector documentation.
You can now reduce latency and lower R2 egress costs automatically when using Smart Tiered Cache with R2. Cloudflare intelligently selects a tiered data center close to your R2 bucket location, creating an efficient caching topology without additional configuration.
When you enable Smart Tiered Cache for zones using R2 as an origin, Cloudflare automatically:
- Identifies your R2 bucket location: Determines the geographical region where your R2 bucket is stored.
- Selects an optimal Upper Tier: Chooses a data center close to your bucket as the common Upper Tier cache.
- Routes requests efficiently: All cache misses in edge locations route through this Upper Tier before reaching R2.
- Automatic optimization: No manual configuration required.
- Lower egress costs: Fewer requests to R2 reduce egress charges.
- Improved hit ratio: Common Upper Tier increases cache efficiency.
- Reduced latency: Upper Tier proximity to R2 minimizes fetch times.
To get started, enable Smart Tiered Cache on your zone using R2 as an origin.
You can now stage and test cache configurations before deploying them to production. Versioned environments let you safely validate cache rules, purge operations, and configuration changes without affecting live traffic.
With versioned environments, you can:
- Create staging versions of your cache configuration.
- Test cache rules in a non-production environment.
- Purge staged content independently from production.
- Validate changes before promoting to production.
This capability integrates with Cloudflare's broader versioning system, allowing you to manage cache configurations alongside other zone settings.
- Risk-free testing: Validate configuration changes without impacting production.
- Independent purging: Clear staging cache without affecting live content.
- Deployment confidence: Catch issues before they reach end users.
- Team collaboration: Multiple team members can work on different versions.
To get started, refer to the version management documentation.
Enterprise customers can now optimize cache hit ratios for content that varies by device, language, or referrer by sharding cache using up to ten values from previously restricted headers with custom cache keys.
When configuring custom cache keys, you can now include values from these headers to create distinct cache entries:
accept*headers (for example,accept,accept-encoding,accept-language): Serve different cached versions based on content negotiation.refererheader: Cache content differently based on the referring page or site.user-agentheader: Maintain separate caches for different browsers, devices, or bots.
- Content varies significantly by device type (mobile vs desktop).
- Different language or encoding preferences require distinct responses.
- Referrer-specific content optimization is needed.
{"cache_key": {"custom_key": {"header": {"include": ["accept-language", "user-agent"],"check_presence": ["referer"]}}}}This configuration creates separate cache entries based on the
accept-languageanduser-agentheaders, while also considering whether therefererheader is present.To get started, refer to the custom cache keys documentation.
It’s now easy to create wildcard-based URL Rewrites. No need for complex functions—just define your patterns and go.
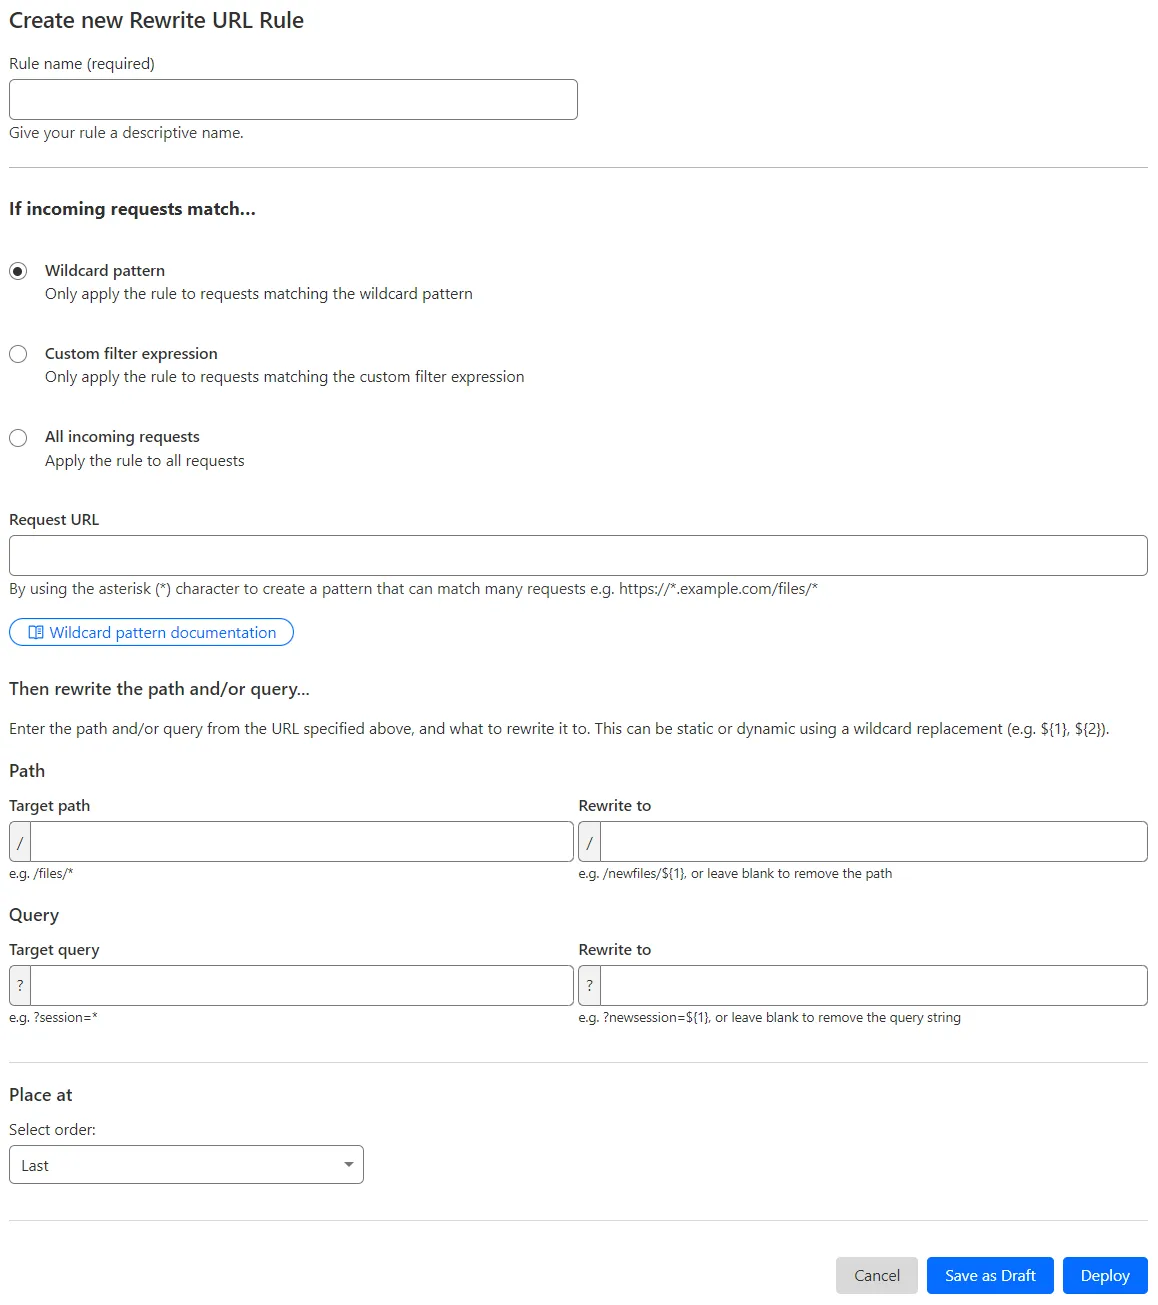
What’s improved:
- Full wildcard support – Create rewrite patterns using intuitive interface.
- Simplified rule creation – No need for complex functions.
Try it via creating a Rewrite URL rule in the dashboard.
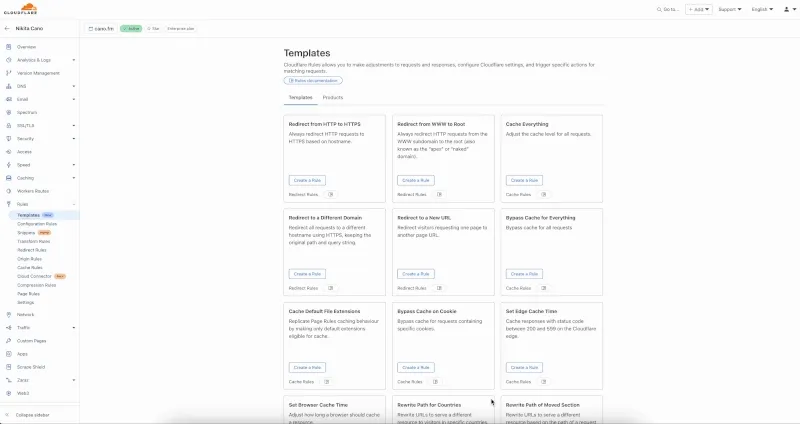
You can now create optimized cache rules instantly with one-click templates, eliminating the complexity of manual rule configuration.
- Navigate to Rules > Templates in your Cloudflare dashboard.
- Select a template for your use case.
- Click to apply the template with sensible defaults.
- Customize as needed for your specific requirements.
- Cache everything: Adjust the cache level for all requests.
- Bypass cache for everything: Bypass cache for all requests.
- Cache default file extensions: Replicate Page Rules caching behavior by making only default extensions eligible for cache.
- Bypass cache on cookie: Bypass cache for requests containing specific cookies.
- Set edge cache time: Cache responses with status code between 200 and 599 on the Cloudflare edge.
- Set browser cache time: Adjust how long a browser should cache a resource.
To get started, go to Rules > Templates ↗ in the dashboard. For more information, refer to the Cache Rules documentation.
Now, you can create common rule configurations in just one click using Rules Templates.
What you can do:
- Pick a pre-built rule – Choose from a library of templates.
- One-click setup – Deploy best practices instantly.
- Customize as needed – Adjust templates to fit your setup.
Template cards are now also available directly in the rule builder for each product.
Need more ideas? Check out the Examples gallery in our documentation.
You can now achieve higher cache hit ratios with Generic Global Tiered Cache. Regional content hashing routes content consistently to the same upper-tier data centers, eliminating redundant caching and reducing origin load.
Regional content hashing groups data centers by region and uses consistent hashing to route content to designated upper-tier caches:
- Same content always routes to the same upper-tier data center within a region.
- Eliminates redundant copies across multiple upper-tier caches.
- Increases the likelihood of cache HITs for the same content.
A popular image requested from multiple edge locations in a region:
- Before: Cached at 3-4 different upper-tier data centers
- After: Cached at 1 designated upper-tier data center
- Result: 3-4x fewer cache MISSes, reducing origin load and improving performance
To get started, enable Generic Global Tiered Cache on your zone.
You can now easily enable Real User Monitoring (RUM) monitoring for your hostnames, while safely dropping requests from visitors in the European Union to comply with GDPR and CCPA.
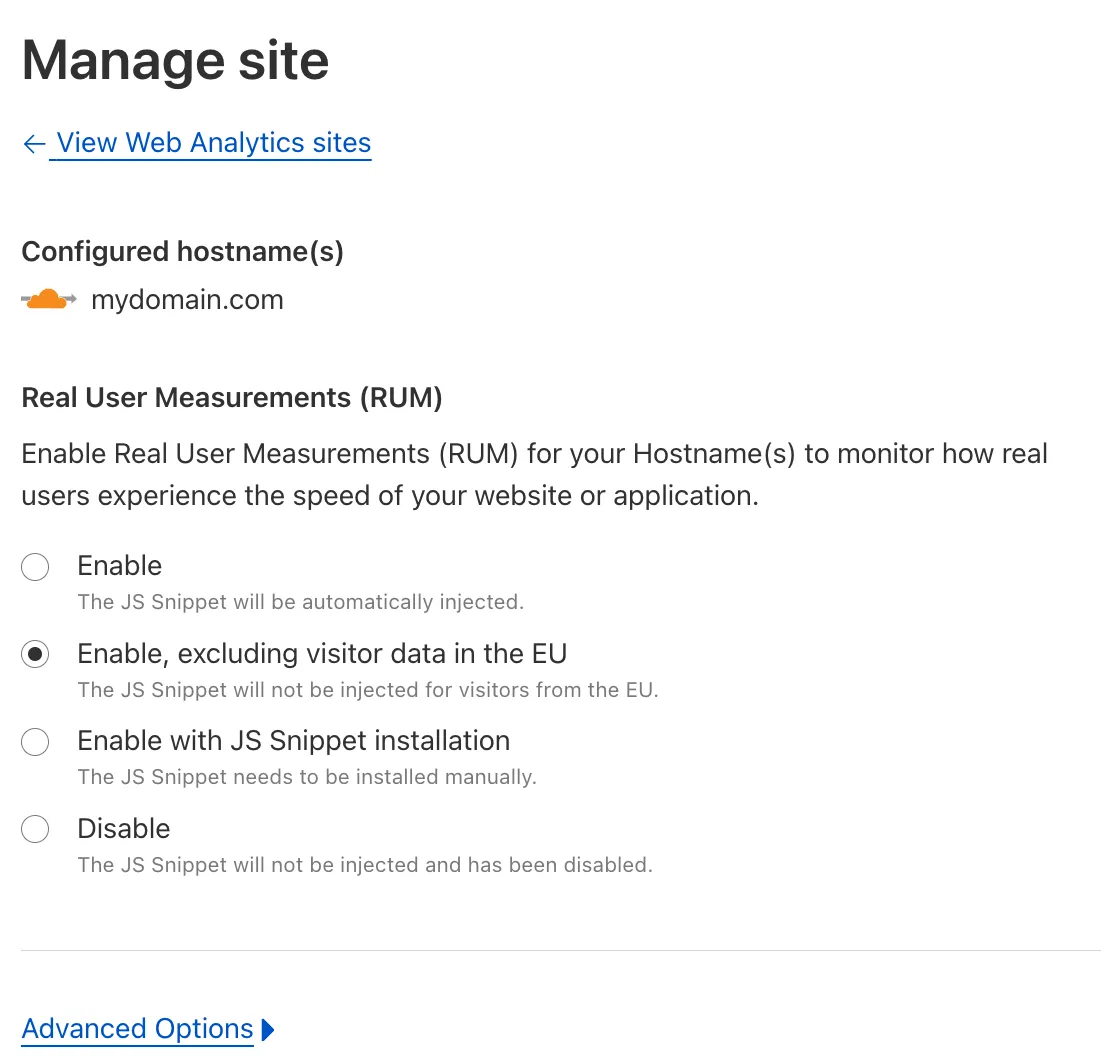
Our Web Analytics product has always been centered on giving you insights into your users' experience that you need to provide the best quality experience, without sacrificing user privacy in the process.
To help with that aim, you can now selectively enable RUM monitoring for your hostname and exclude EU visitor data in a single click. If you opt for this option, we will drop all metrics collected by our EU data centers automatically.
You can learn more about what metrics are reported by Web Analytics and how it is collected in the Web Analytics documentation. You can enable Web Analytics on any hostname by going to the Web Analytics ↗ section of the dashboard, selecting "Manage Site" for the hostname you want to monitor, and choosing the appropriate enablement option.