Aruba EdgeConnect Enterprise
Cloudflare partners with Aruba's EdgeConnect SD-WAN solution to provide users with an integrated solution. The EdgeConnect appliances manage subnets associated with branch offices or retail locations. Anycast tunnels are set up between the EdgeConnect appliances and Cloudflare to securely route traffic.
This tutorial describes how to configure the EdgeConnect device for both east-west (branch to branch) and north-south (Internet-bound) use cases.
Before setting up a connection between EdgeConnect and Cloudflare, you must have:
- A contract that includes Cloudflare WAN (formerly Magic WAN) and Secure Web Gateway.
- Received two Cloudflare endpoints (anycast IP addresses), available in Leased IPs ↗.
- Determined a private static /31 IP pair to use with each tunnel. The /31 pairs should be from a different private subnet, separate from the private subnets used behind each EdgeConnect appliance.
- The EdgeConnect devices used in this tutorial and on v9.0.
GRE tunnel configuration
For the purpose of this tutorial, the integration will refer to a scenario with two branch offices, each with distinct subnets.
There are 2 branch offices each with distinct subnets.
- The east branch office has a
10.3.0.0/16network with an EdgeConnect terminating the anycast GRE tunnel. - The west branch office has a
10.30.0.0/16network with an EdgeConnect terminating the anycast GRE tunnel.
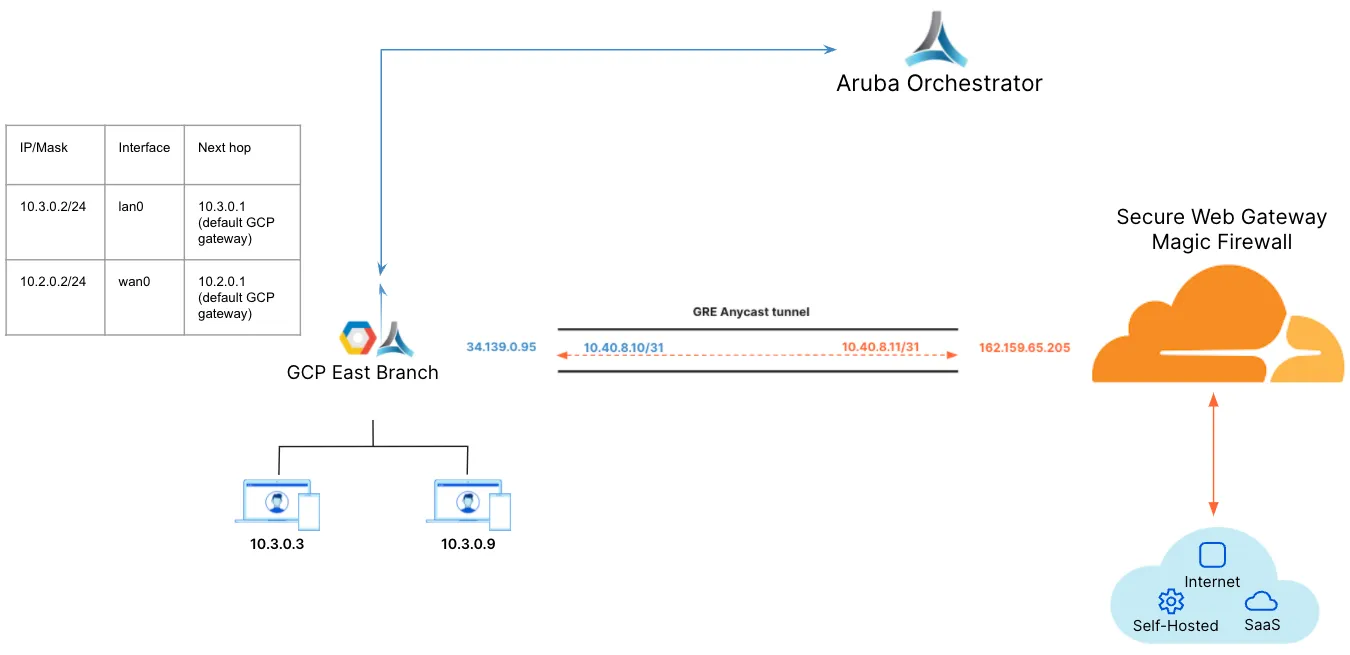
Note: Labels in this image may reflect a previous product name.
The following example shows the east_branch deployment on the Orchestrator.
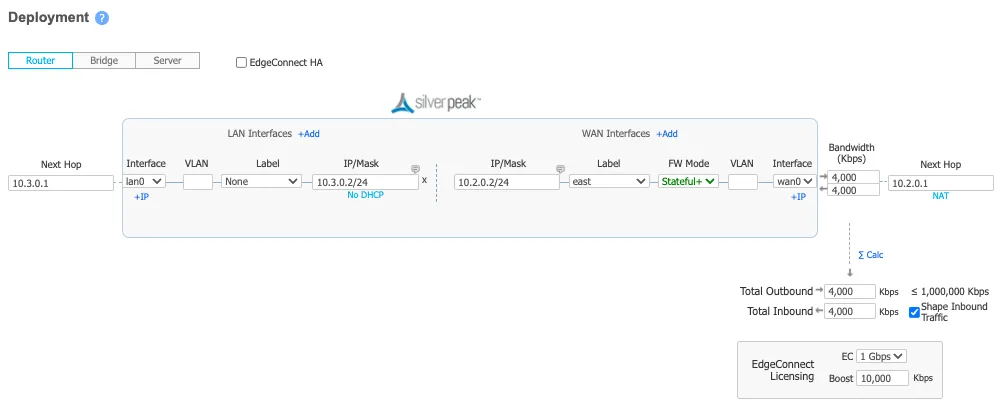
The Deployment screenshot displays several different IP addresses and interfaces. From left to right:
- Next Hop 10.3.0.1 - This example uses Google Cloud. This IP defines the default gateway IP for the subnet and is built into GCP.
- IP/Mask (LAN) 10.3.0.2/24 - This defines the LAN0 interface IP of the EdgeConnect appliance.
- IP/Mask (WAN) 10.2.0.2/24 - This defines the WAN0 interface IP of the EdgeConnect appliance.
- Next Hop 10.2.0.1 - This example uses Google Cloud. This IP defines the default gateway IP for the subnet and is built into GCP.
IPsec tunnel configuration
For the purpose of this tutorial, the integration will refer to a scenario with two branch offices, each with distinct subnets.
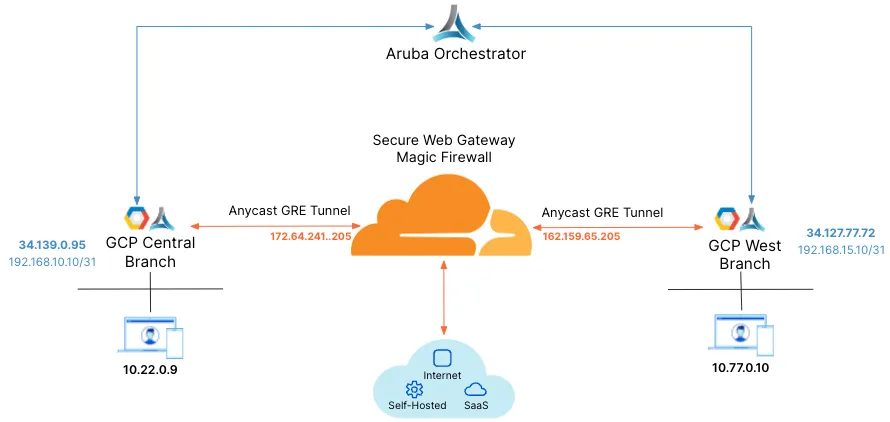
The central branch office has a 10.22.0.0/24 network with an EdgeConnect terminating the anycast IPsec tunnel.
The west branch office has a 10.77.0.0/24 network with an EdgeConnect terminating the anycast IPsec tunnel.

Note: Labels in this image may reflect a previous product name.
The following example shows the central_branch deployment on the Orchestrator.
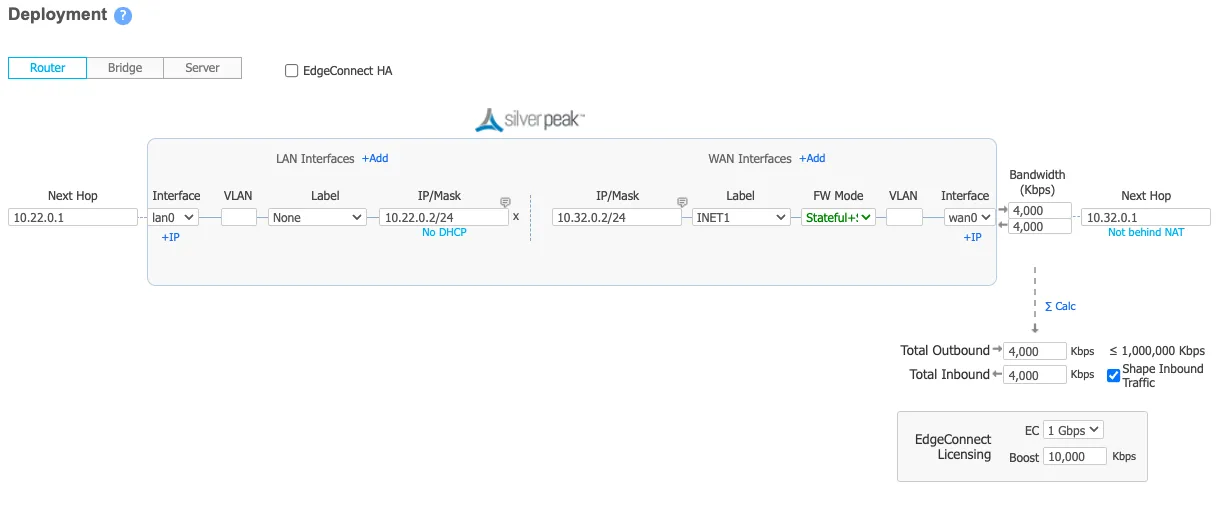
The Deployment screenshot displays several different IP addresses and interfaces. From left to right:
- Next Hop 10.22.0.1 - This example uses Google Cloud. This IP defines the default gateway IP for the subnet and is built into GCP.
- IP/Mask (LAN) 10.22.0.2/24 - This defines the LAN0 interface IP of the EdgeConnect appliance.
- IP/Mask (WAN) 10.32.0.2/24 - This defines the WAN0 interface IP of the EdgeConnect appliance.
- Next Hop 10.32.0.1 - This example uses Google Cloud. This IP defines the default gateway IP for the subnet and is built into GCP.
For all EdgeConnect devices using Cloudflare, modify the devices to put them on the same site. This disables automatic IPsec tunnel creation between the EdgeConnect devices using the same labels for the WAN interfaces in use.
This step is only required if Cloudflare is used for east-west traffic routing.
Aruba Orchestrator's Business Intent Overlays create intuitive policies which automatically identify and steer application traffic to Cloudflare. This example creates two Business Intent Overlay (BIO) policies.
GRE tunnel configuration
Cloudflare's tunnel health checks are ping reply packets encapsulated in GRE packets. The source IP is the EdgeConnect WAN interface used to establish a tunnel, and the destination IP is Cloudflare servers. These packets need to be sent directly from the WAN interface and not through the established tunnels.
To create the overlay policy:
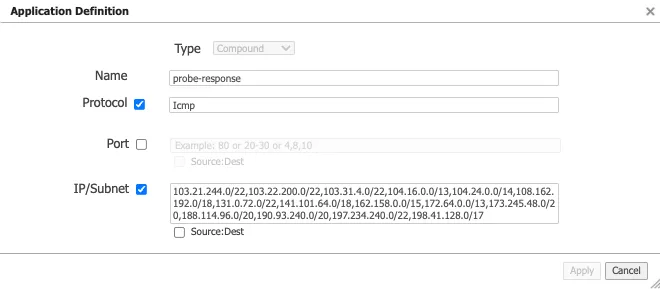
- Create a compound application, which is a combination of all Cloudflare public IPs ↗ and ICMP packets.
-
Create a breakout Business Intent Overlay (BIO) to bypass the GRE tunnel as the first policy and use this newly created application as the match criteria.
-
Define at least one additional overlay policy and the traffic you want to send to Cloudflare over the GRE tunnels.
The service name used to send traffic through the tunnel created in the next step is Cloudflare_GRE. The example uses Match Everything to send all other traffic through the established tunnel (both private east-west traffic & Internet bound north-south traffic through Cloudflare's Secure Web Gateway).
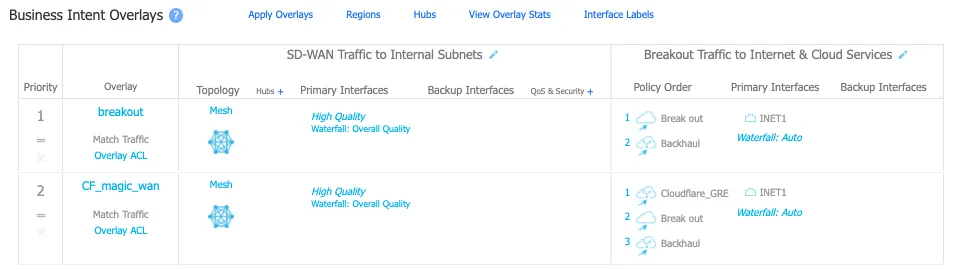
Note: Labels in this image may reflect a previous product name.
IPsec tunnel configuration
Cloudflare's tunnel health checks are ping reply packets encapsulated in IPsec packets. The source IP is the EdgeConnect WAN interface used to establish a tunnel, and the destination IP is Cloudflare servers. These packets need to be sent directly from the WAN interface and not through the established tunnels.
To create the overlay policy:
- Create a compound application, which is a combination of all Cloudflare public IPs ↗ and ICMP packets.
-
Create a breakout Business Intent Overlay (BIO) to bypass the IPsec tunnel as the first policy and use this newly created application as the match criteria.
-
Define at least one additional overlay policy and the traffic you want to send to Cloudflare over the IPsec tunnels.
The service name used to send traffic through the tunnel created in the next step is Cloudflare_IPsec. The example uses Match Everything to send all other traffic through the established tunnel (both private east-west traffic and Internet bound north-south traffic through Cloudflare's Secure Web Gateway).
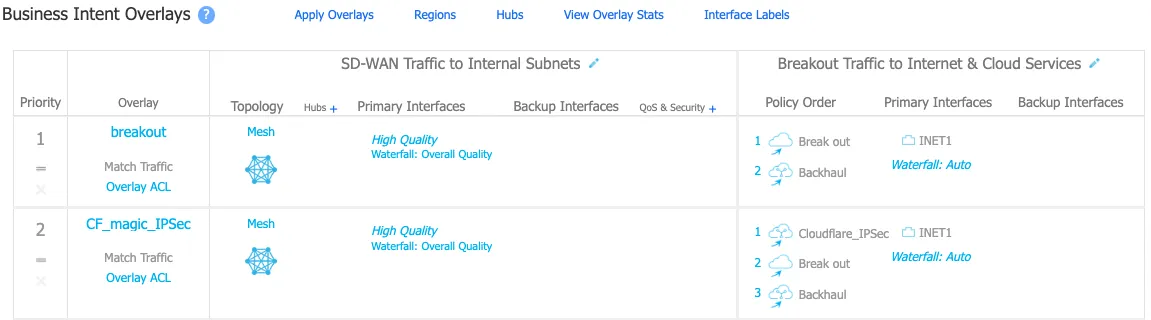
Note: Labels in this image may reflect a previous product name.
GRE tunnel configuration
Note: Labels in this image may reflect a previous product name.
- Create a tunnel on the EdgeConnect using Cloudflare's assigned public anycast IP and the service used in the overlay policy in the previous step.
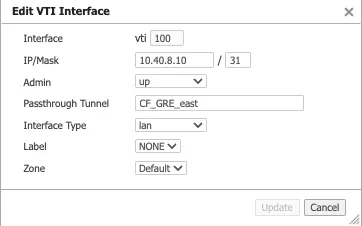
- Create a Virtual Tunnel Interface (VTI) using the private IP pair shared with CF GRE tunnel endpoint and the passthrough tunnel to match the newly created tunnel alias (CF_GRE_east in our example).
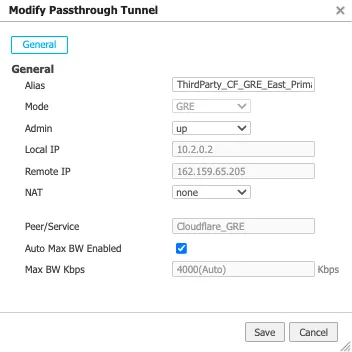
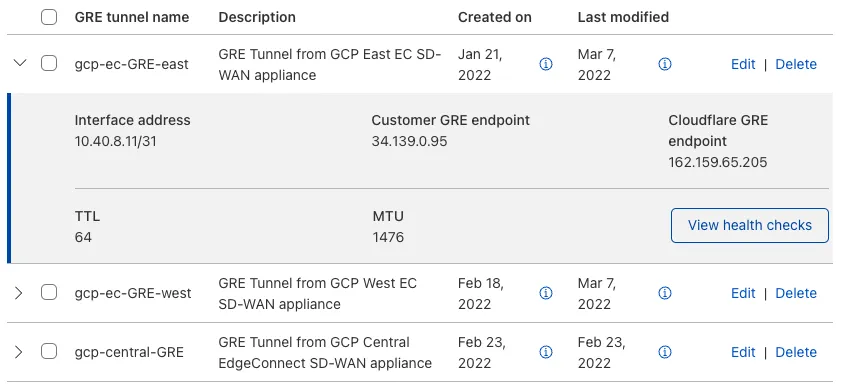
- Define a GRE tunnel on the Cloudflare dashboard using the EdgeConnect appliance's public IP and the private IP pair /31 shared with the appliance.
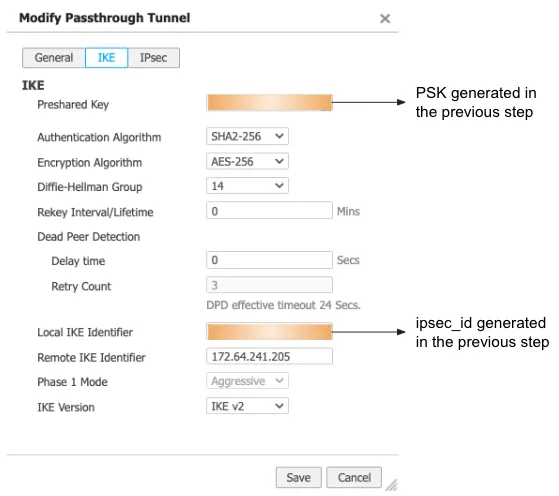
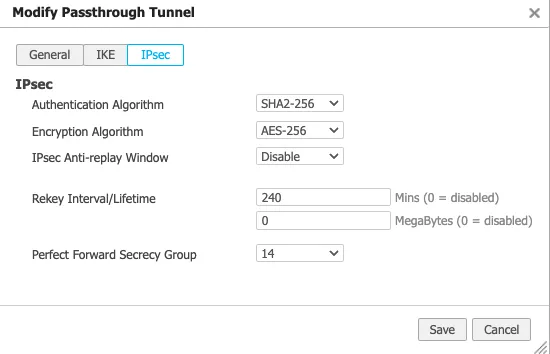
IPsec tunnel configuration
Note: Labels in this image may reflect a previous product name.
For additional information on creating IPsec tunnels, refer to API documentation for IPsec tunnels.
X-Auth-Email: Your Cloudflare email IDX-Auth-Key: Seen in the URL (dash.cloudflare.com/<X-Auth-Key>/....)Account key: Global API token in Cloudflare dashboard
- Test new IPsec tunnel creation
curl "https://api.cloudflare.com/client/v4/accounts/{account_id}/magic/ipsec_tunnels?validate_only=true" \--header "X-Auth-Email: <EMAIL>" \--header "X-Auth-Key: <API_KEY>" \--header "Content-Type: application/json" \--data '{ "ipsec_tunnels": [ { "name": "EdgeConnect_IPSEC_1", "customer_endpoint": "35.188.72.56", "cloudflare_endpoint": "172.64.241.205", "interface_address": "192.168.10.11/31", "description": "Tunnel for EdgeConnect - GCP Central" } ]}'- Create a new IPsec tunnel
curl https://api.cloudflare.com/client/v4/accounts/{account_id}/magic/ipsec_tunnels \--header "X-Auth-Email: <EMAIL>" \--header "X-Auth-Key: <API_KEY>" \--header "Content-Type: application/json" \--data '{ "ipsec_tunnels": [ { "name": "EdgeConnect_IPSEC_1", "customer_endpoint": "35.188.72.56", "cloudflare_endpoint": "172.64.241.205", "interface_address": "192.168.10.11/31", "description": "Tunnel for EdgeConnect - GCP Central" } ]}'{ "result": { "ipsec_tunnels": [ { "id": "tunnel_id", "interface_address": "192.168.10.11/31", "created_on": "2022-04-14T19:57:43.938376Z", "modified_on": "2022-04-14T19:57:43.938376Z", "name": "EdgeConnect_IPSEC_1", "cloudflare_endpoint": "172.64.241.205", "customer_endpoint": "35.188.72.56", "description": "Tunnel for EdgeConnect - GCP Central", "health_check": { "enabled": true, "target": "35.188.72.56", "type": "reply" } } ] }, "success": true, "errors": [], "messages": []}- Generate Pre Shared Key (PSK) for tunnel
Use the tunnel ID from the response in Step 2. Save the pre-shared key generated in this step as you will need it to set up tunnels on the Orchestrator.
curl --request POST \"https://api.cloudflare.com/client/v4/accounts/{account_id}/magic/ipsec_tunnels/{tunnel_id}/psk_generate?validate_only=true" \--header "X-Auth-Email: <EMAIL>" \--header "X-Auth-Key: <API_KEY>"{ "result": { "ipsec_id": "<ipsec_id>", "ipsec_tunnel_id": "<tunnel_id>", "psk": "XXXXXXXXXXXXXXXXX", "psk_metadata": { "last_generated_on": "2022-04-14T20:05:29.756514071Z" } }, "success": true, "errors": [], "messages": []}Create an IPsec tunnel on EdgeConnect
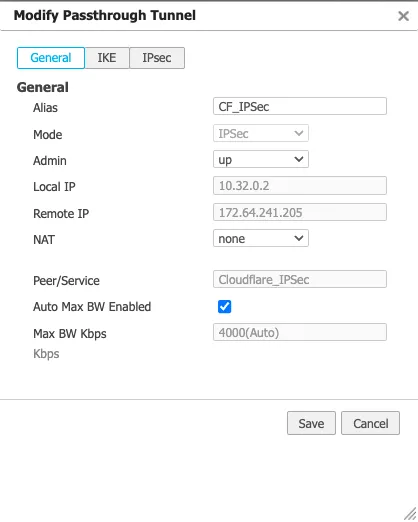
You can create a tunnel after the Business Intent Overlay policies have been defined. Use the correct policy or service created in configure overlay policy. The local IP is the local WAN interface of the EdgeConnect device, and the remote IP is the Cloudflare public IP assigned as the tunnel endpoint.
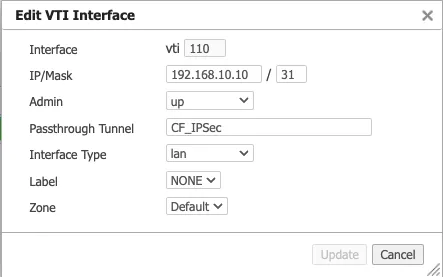
Create a Virtual Tunnel Interface (VTI) on the EdgeConnect appliance
GRE tunnel configuration
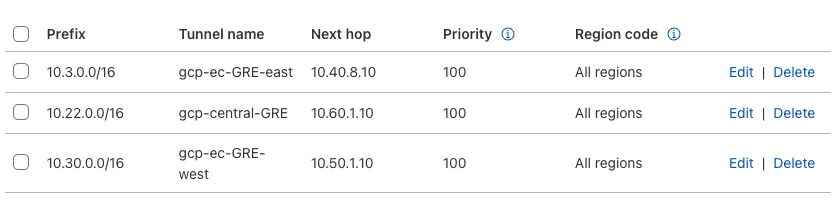
-
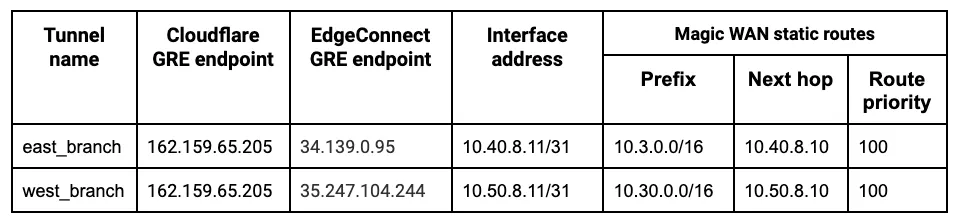
Define static routes on the Cloudflare dashboard for the LAN subnet(s) attached to the EdgeConnect appliance. Use the private IP pair for the EdgeConnect tunnel endpoint.
In this example, the traffic to subnet
10.3.0.0/16attached to the east_branch EdgeConnect appliance has a next hop of10.40.8.10.
-
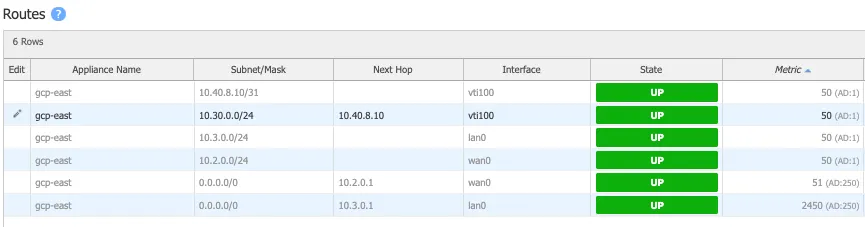
Define static routes on the Orchestrator so Cloudflare can route traffic between sites.
This example creates a route for the subnet
10.30.0.0/24on the west_branch to route via the established GRE tunnel between the EdgeConnect appliance and Cloudflare.
IPsec tunnel configuration

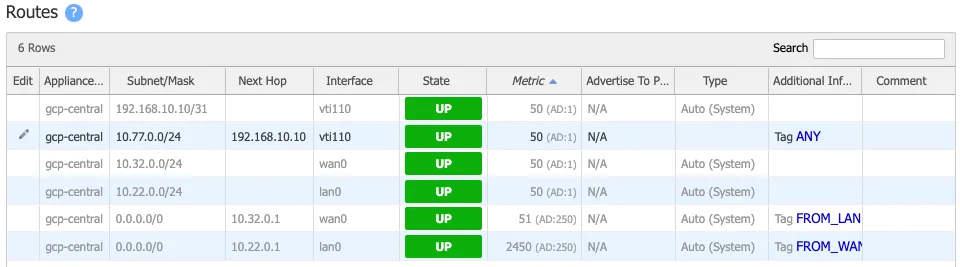
Static routes for central branch on EdgeConnect
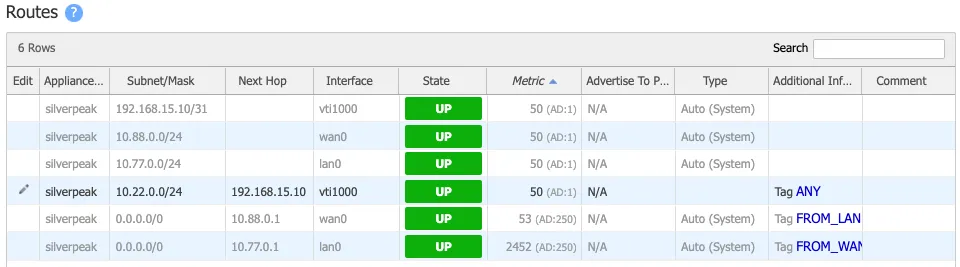
Static routes for west branch on EdgeConnect
GRE tunnel configuration
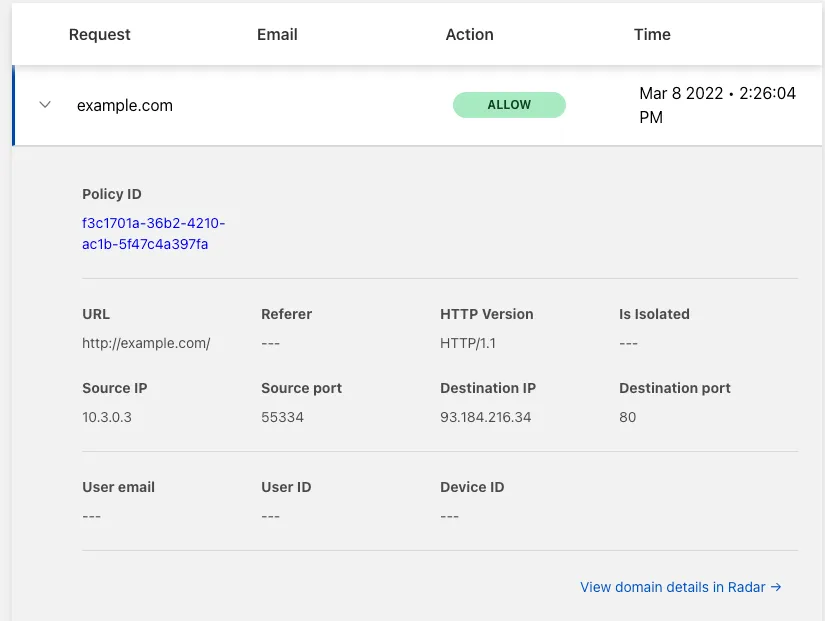
Validate Secure Web Gateway
To validate traffic flow from the local subnet through Cloudflare's Secure Web Gateway, perform a cURL as shown in this example.
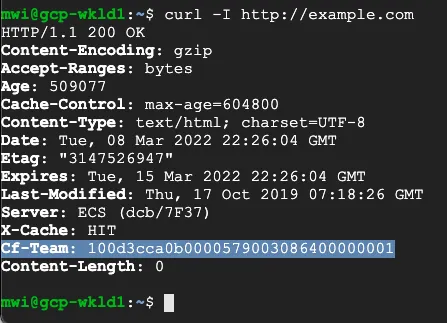
You can validate the request went through Gateway with the presence of the Cf-Team response header, or by looking at the logs in the dashboard under Logs > Gateway > HTTP.
Validate east-west traffic
To validate east-west traffic flow, perform a traceroute as shown in the example.
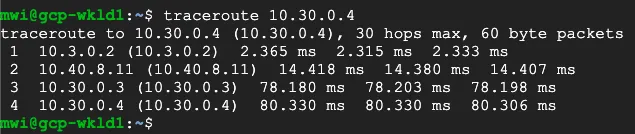
The example shows a client in GCP East (10.3.0.3), which can ping the private IP of a client in GCP West (10.30.0.4).
The traceroute shows the path going from the client (10.3.0.3) to:
- the GCP East lan0 IP on the EdgeConnect (
10.3.0.2) - the Cloudflare private GRE endpoint IP (
10.4.8.11) - the GCP West lan0 IP on the West EdgeConnect (
10.30.0.3) - the GCP West client (
10.30.0.4)
This validates the east-west traffic flow through Cloudflare WAN.
IPsec tunnel configuration
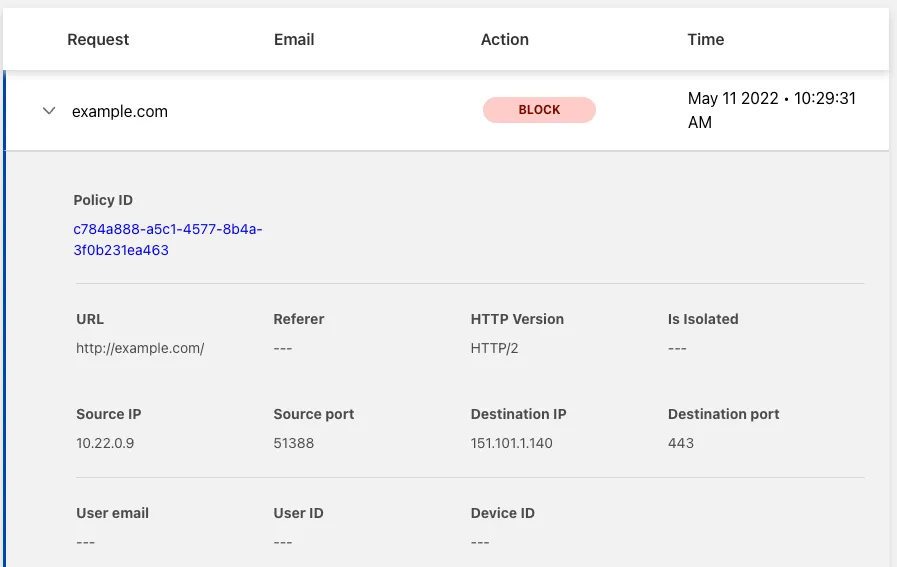
Validate Secure Web Gateway
To validate traffic flow from the local subnet through Cloudflare's Secure Web Gateway, perform a cURL as shown in this example.
You can validate the request went through Secure Web Gateway with the presence of the Cf-Team response header or by looking at the logs in the dashboard under Logs > Gateway > HTTP.
Validate east-west traffic
To validate east-west traffic flow, perform a traceroute as shown in the example.

The example shows a client in GCP Central (10.22.0.9), which can ping the private IP of a client in GCP West (10.77.0.10).
The traceroute shows the path going from the client (10.22.0.9) to:
- the GCP Central lan0 IP on the EdgeConnect (
10.22.0.2) - the Cloudflare private IPsec endpoint IP (
192.168.10.11) - the GCP West EdgeConnect private IPsec endpoint IP (
192.168.15.10) - the GCP West client (
10.77.0.10)
This validates the east-west traffic flow through Cloudflare WAN.
At this point, the GRE or IPsec tunnels should be connected from the EdgeConnect appliances to Cloudflare's global network, and traffic is scoped to route over the tunnels using the EdgeConnect Business Intent Overlays.
To begin filtering traffic and gathering analytics, refer to the Cloudflare Network Firewall documentation to learn how to create filters for east-west inter-branch traffic and the Secure Web Gateway documentation to learn how to configure Gateway policies if you decide to send traffic from your local private subnets to the Internet through Cloudflare Gateway.