Sophos Firewall
This tutorial shows you how to use Cloudflare WAN (formerly Magic WAN) with the following versions of the Sophos Firewall:
-
Sophos form factor tested:
- Sophos Firewall XGS and XG series hardware
- Sophos Firewall virtual appliance on VMware
-
Sophos software versions tested:
- SFOS Version 19.0 MR2-Build 472
- SFOS Version 19.5.1 MR1-Build 278
You can connect through Generic Routing Encapsulation (GRE) or IPsec tunnels to Cloudflare WAN.
The following instructions show how to setup an IPsec connection on your Sophos Firewall device. Settings not explicitly mentioned can be left with their default values.
- Go to System > Profiles.
- In IPsec profiles, select Add.
- In the General settings group, make sure you have the following settings:
- Name: Give your profile a descriptive name.
- Key exchange: IKEv2
- Authentication mode: Main mode
- In the Phase 1 group, make sure you have the following settings:
- DH group (key group): 20
- Encryption: AES256
- Authentication: SHA2 256
- In the Phase 2 group, select the following:
- PFS group (DH group): Same as phase-1
- Key life: 28800
- Encryption: AES256
- Authentication: SHA2 256
- Enable Dead Peer Detection.
- In When peer unreachable, select Re-initiate.
- Select Save.
The next step involves configuring a site-to-site IPsec VPN connection on your Sophos Firewall device.
- Go to Configure > Site-to-site VPN.
- In IPsec, select Add.
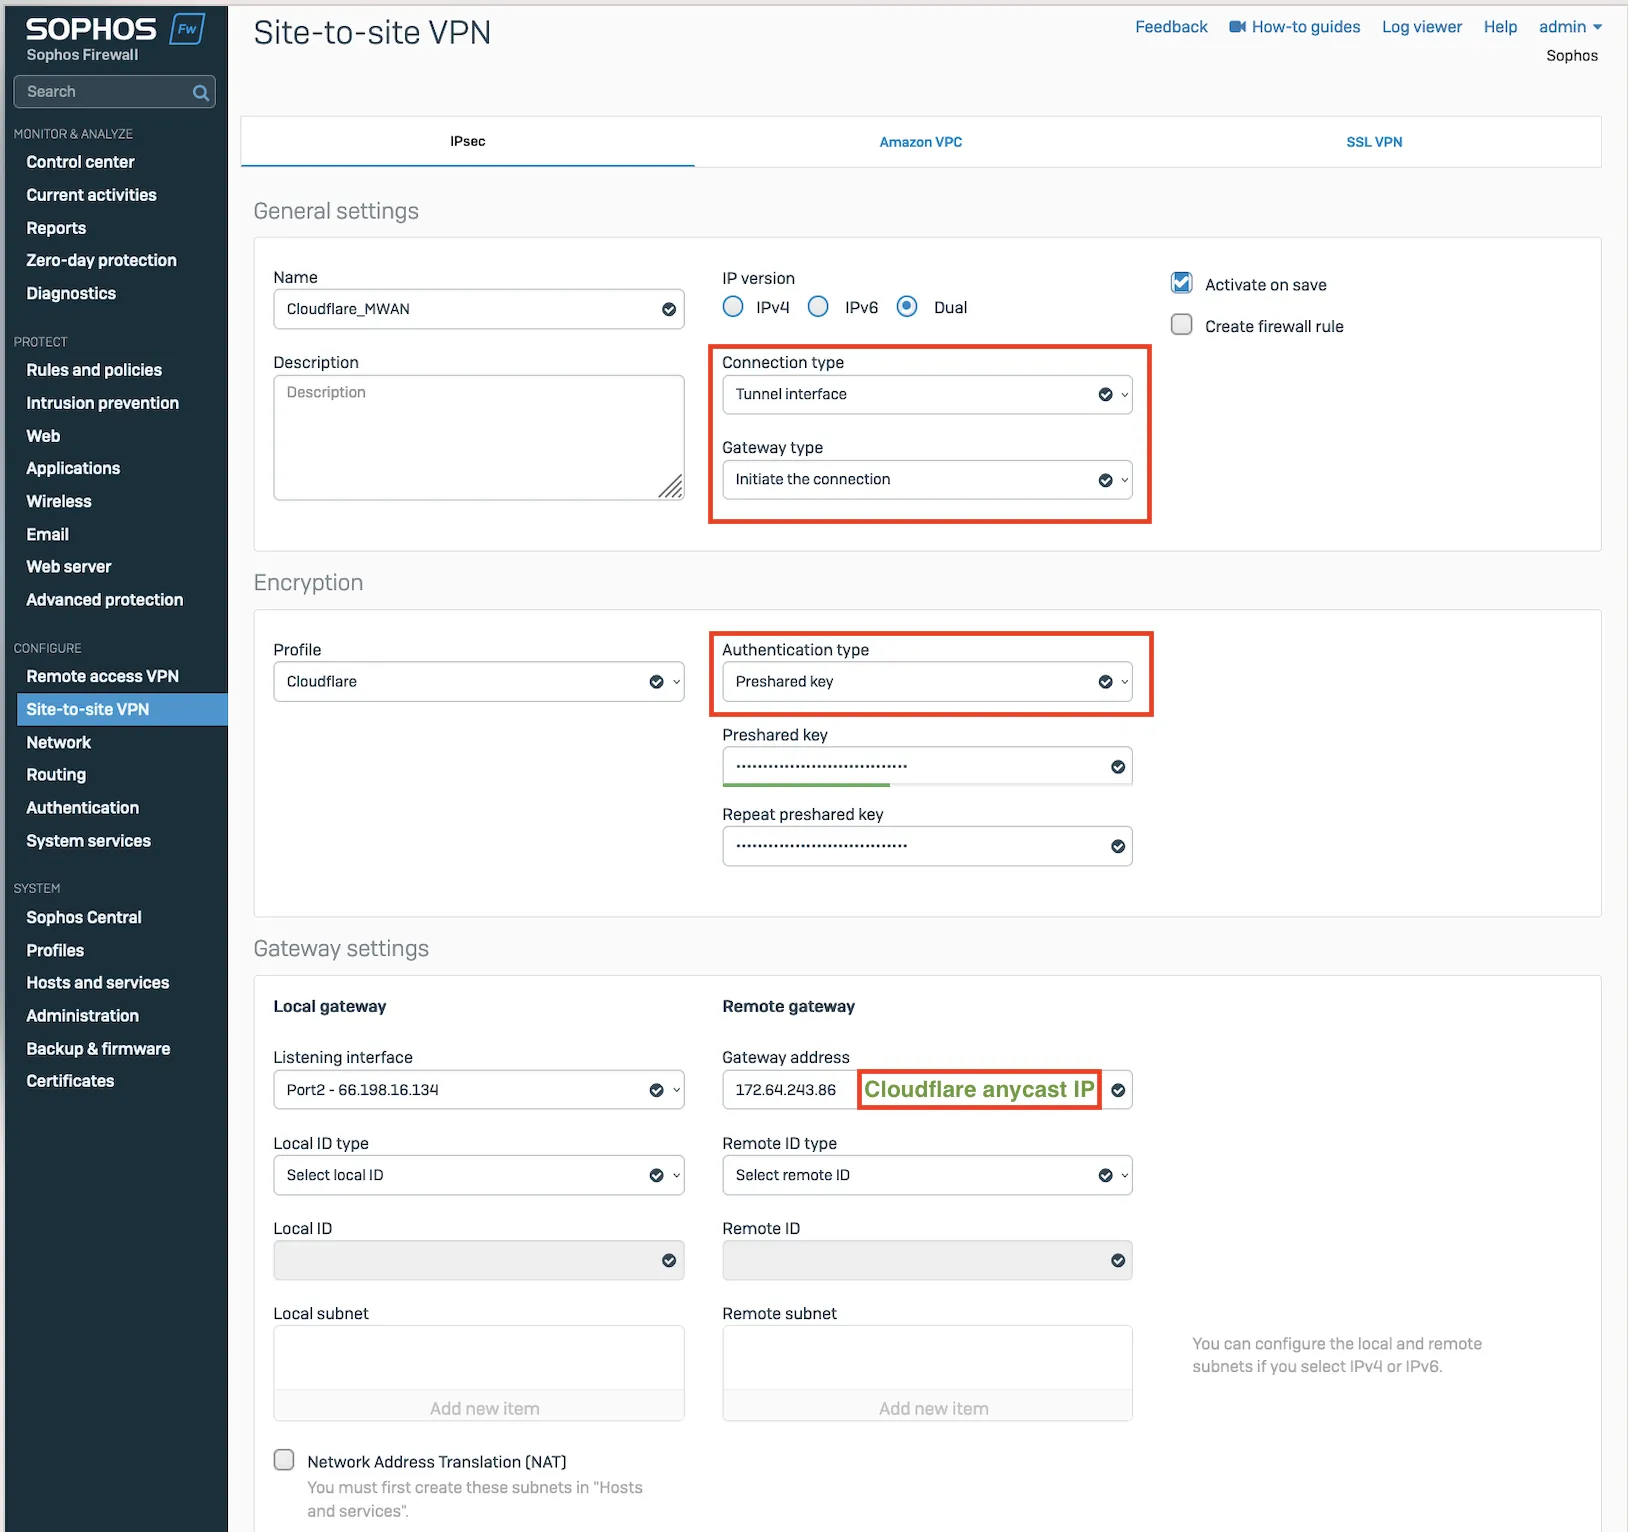
- In the General settings group, make sure you have the following settings:
- Name: Give your site-to-site VPN a descriptive name.
- Connection type: Tunnel interface
- Gateway type: Initiate the connection
- In the Encryption group, make sure you have the following settings:
- Authentication type: Preshared key
- In Gateway settings, make sure you have the following settings:
- Gateway address: Enter one of the Cloudflare anycast IP addresses assigned to your account, available in Leased IPs ↗.
- Local ID type: Add the IKE ID provided by Cloudflare.
Note: Labels in this image may reflect a previous product name.
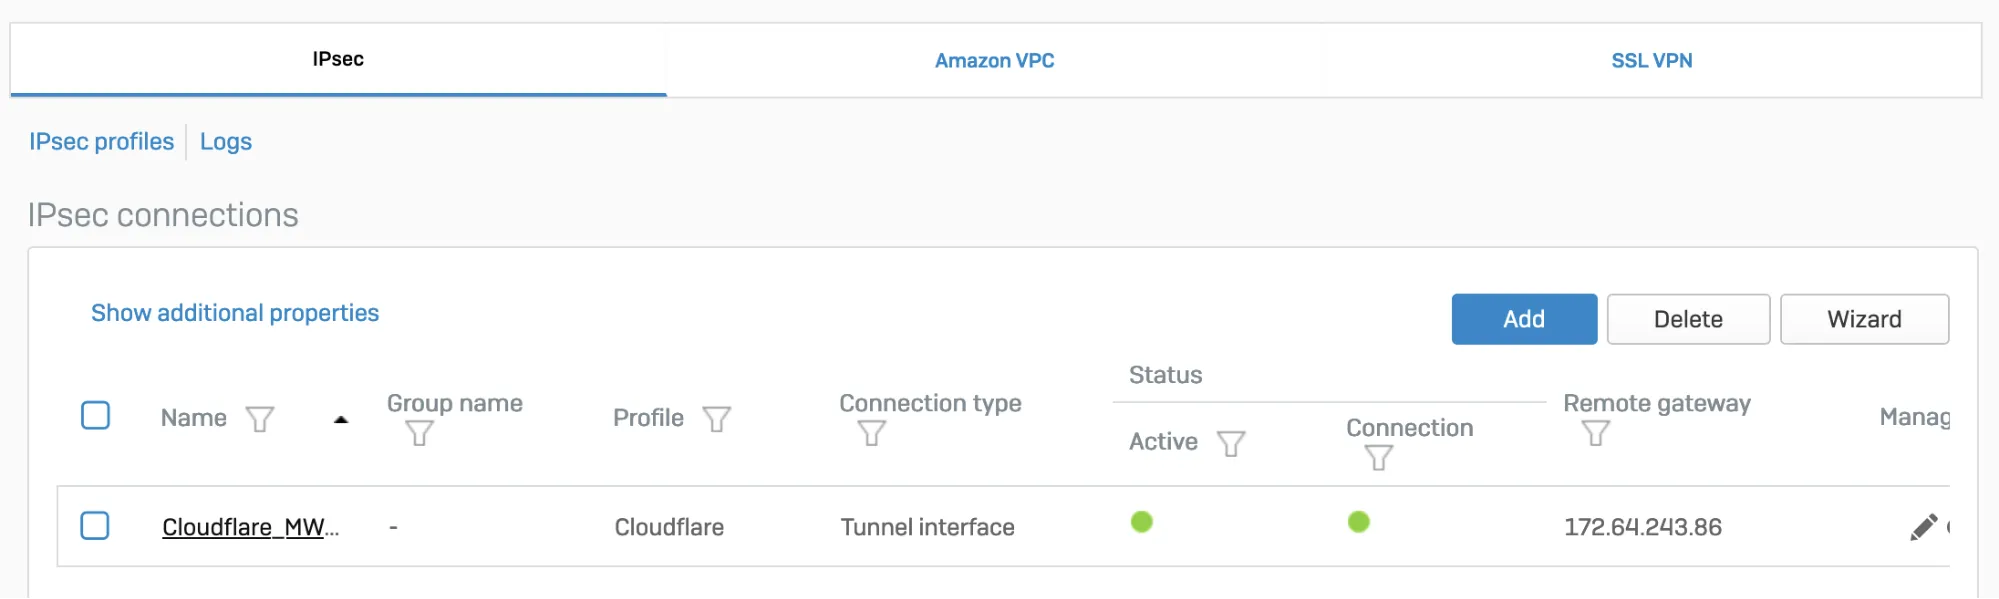
After setting up your IPsec tunnel, it will show up on the IPsec connections list with an Active status.
Note: Labels in this image may reflect a previous product name.
You must use an interface address from the /31 subnet required to configure tunnel endpoints on Cloudflare WAN.
- Go to Configure > Network.
- In Interfaces, select the corresponding interface to the IPsec tunnel you created in step 2.
- Edit the interface to assign an address from the
/31subnet required to configure tunnel endpoints. When you are finished, it should look similar to the following:

Note: Labels in this image may reflect a previous product name.
- Go to Protect > Rules and policies.
- In Firewall rules, create a firewall rule with the criteria and security policies from your company that allows traffic to flow between Sophos and Cloudflare WAN.

Disable IPsec Anti-Replay on your Sophos Firewall. Changing the anti-replay settings restarts the IPsec service, which causes tunnel-flap for all IPsec tunnels. This will also disable IPsec anti-replay protection for all VPN connections globally. Plan these changes accordingly.
Below are instructions on how to achieve this on SFOS version 19 and SFOS version 19.5:
-
Sign in to the CLI.
-
Enter 4 to choose Device console, and enter the following command:
Terminal window set vpn ipsec-performance anti-replay window-size 0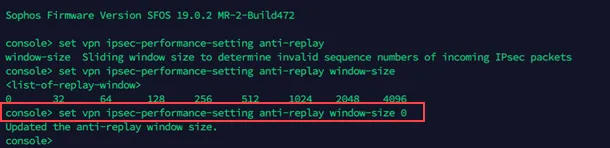
Contact Sophos support.
Start by configuring a GRE tunnel between SFOS and the Cloudflare anycast IP address.
-
Sign in to the CLI.
-
Enter 4 to choose Device console, and enter the following command:
Terminal window system gre tunnel add name <NAME_OF_YOUR_GRE_TUNNEL> local-gw <WAN_PORT> remote-gw <REMOTE_GATEWAY_IP_ADDRESS> local-ip <LOCAL_IP_ADDRESS> remote-ip <REMOTE_IP_ADDRESS>
For more details, refer to the Sophos Firewall knowledge base ↗.
Refer to Traffic redirection mechanism on Sophos Firewall for information on how to add a GRE or SD-WAN route to redirect traffic through the GRE tunnel.
Create a firewall rule with the criteria and security policies from your company that allows traffic to flow between Sophos and Cloudflare WAN. This firewall rule should include the required networks and services.
- Go to Protect > Rules and policies.
- In Firewall rules, select IPv4 > Add firewall rule.
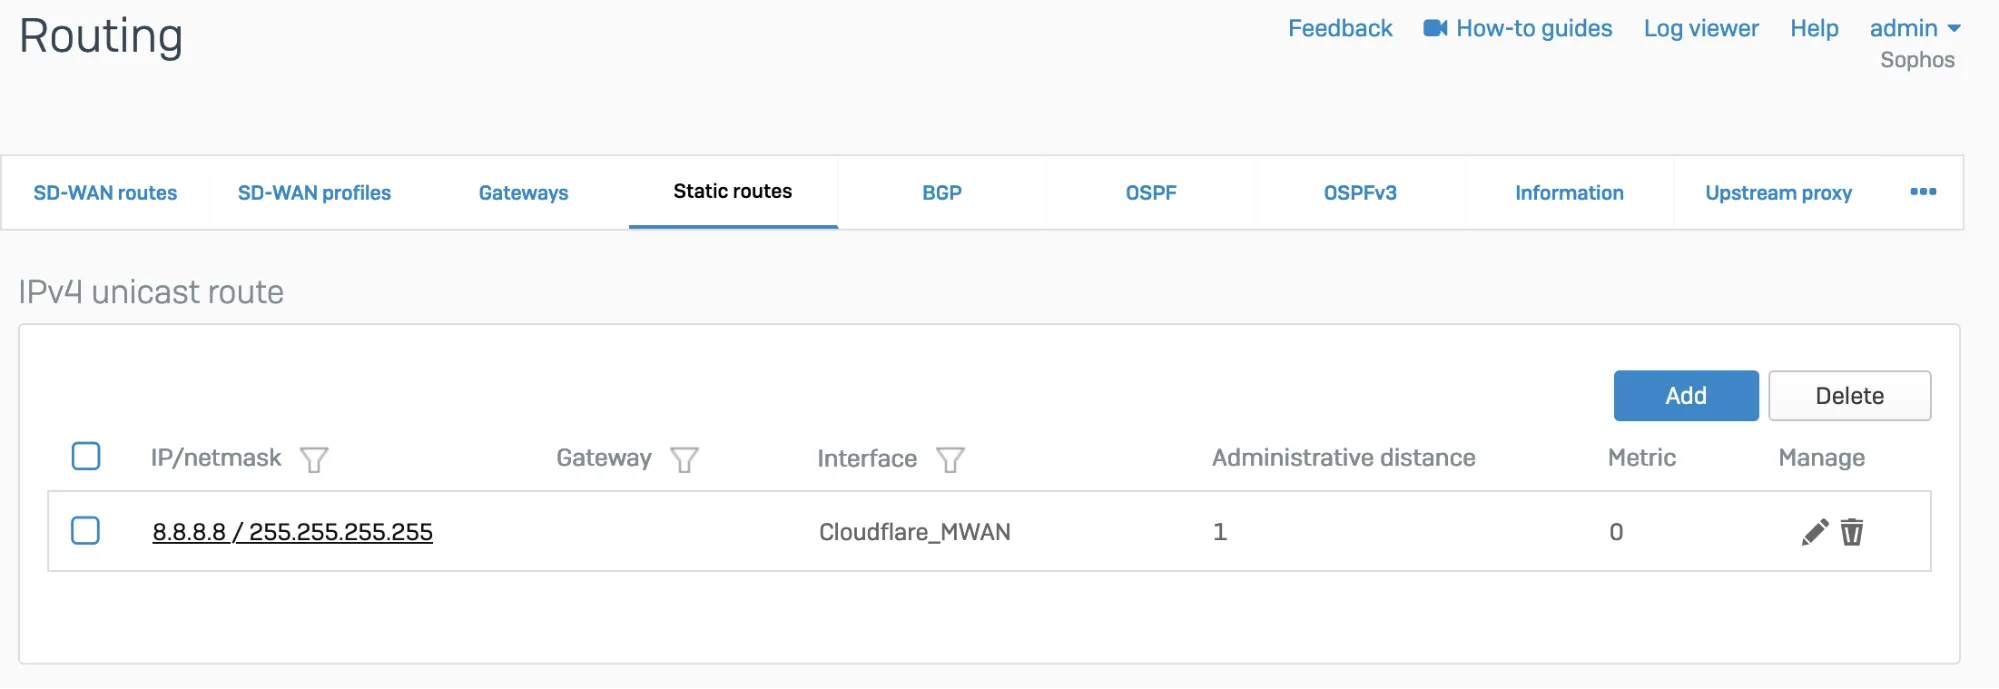
To redirect traffic, you can add a static or an SD-WAN route.
Go to Configure > Routing > Static routes to add an XFRM interface-based route. The interface will be automatically created when you set up a tunnel interface based on IPsec (such as the Cloudflare_MWAN example from above).
Note: Labels in this image may reflect a previous product name.
- Go to Configure > Routing > Gateways to create a custom gateway on the XFRM interface. The interface will be automatically created when you set up a tunnel interface based on IPsec (such as the Cloudflare_MWAN example from above).
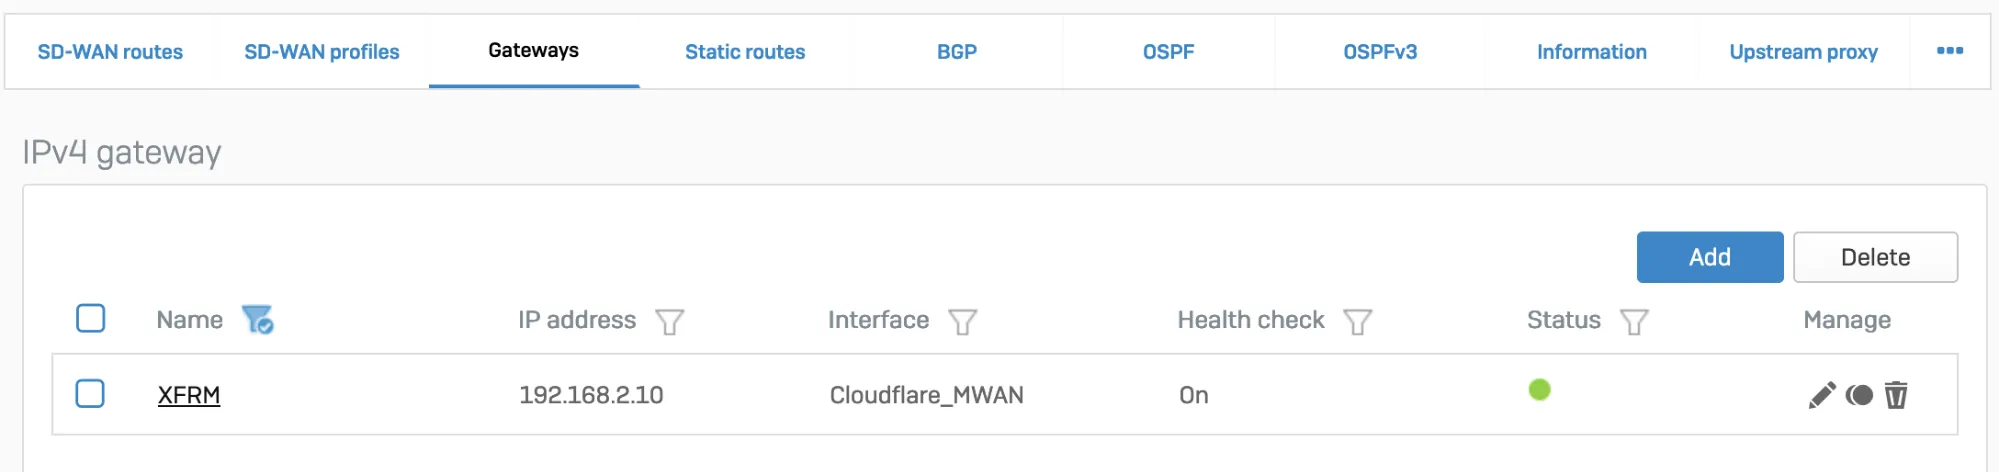
Note: Labels in this image may reflect a previous product name.
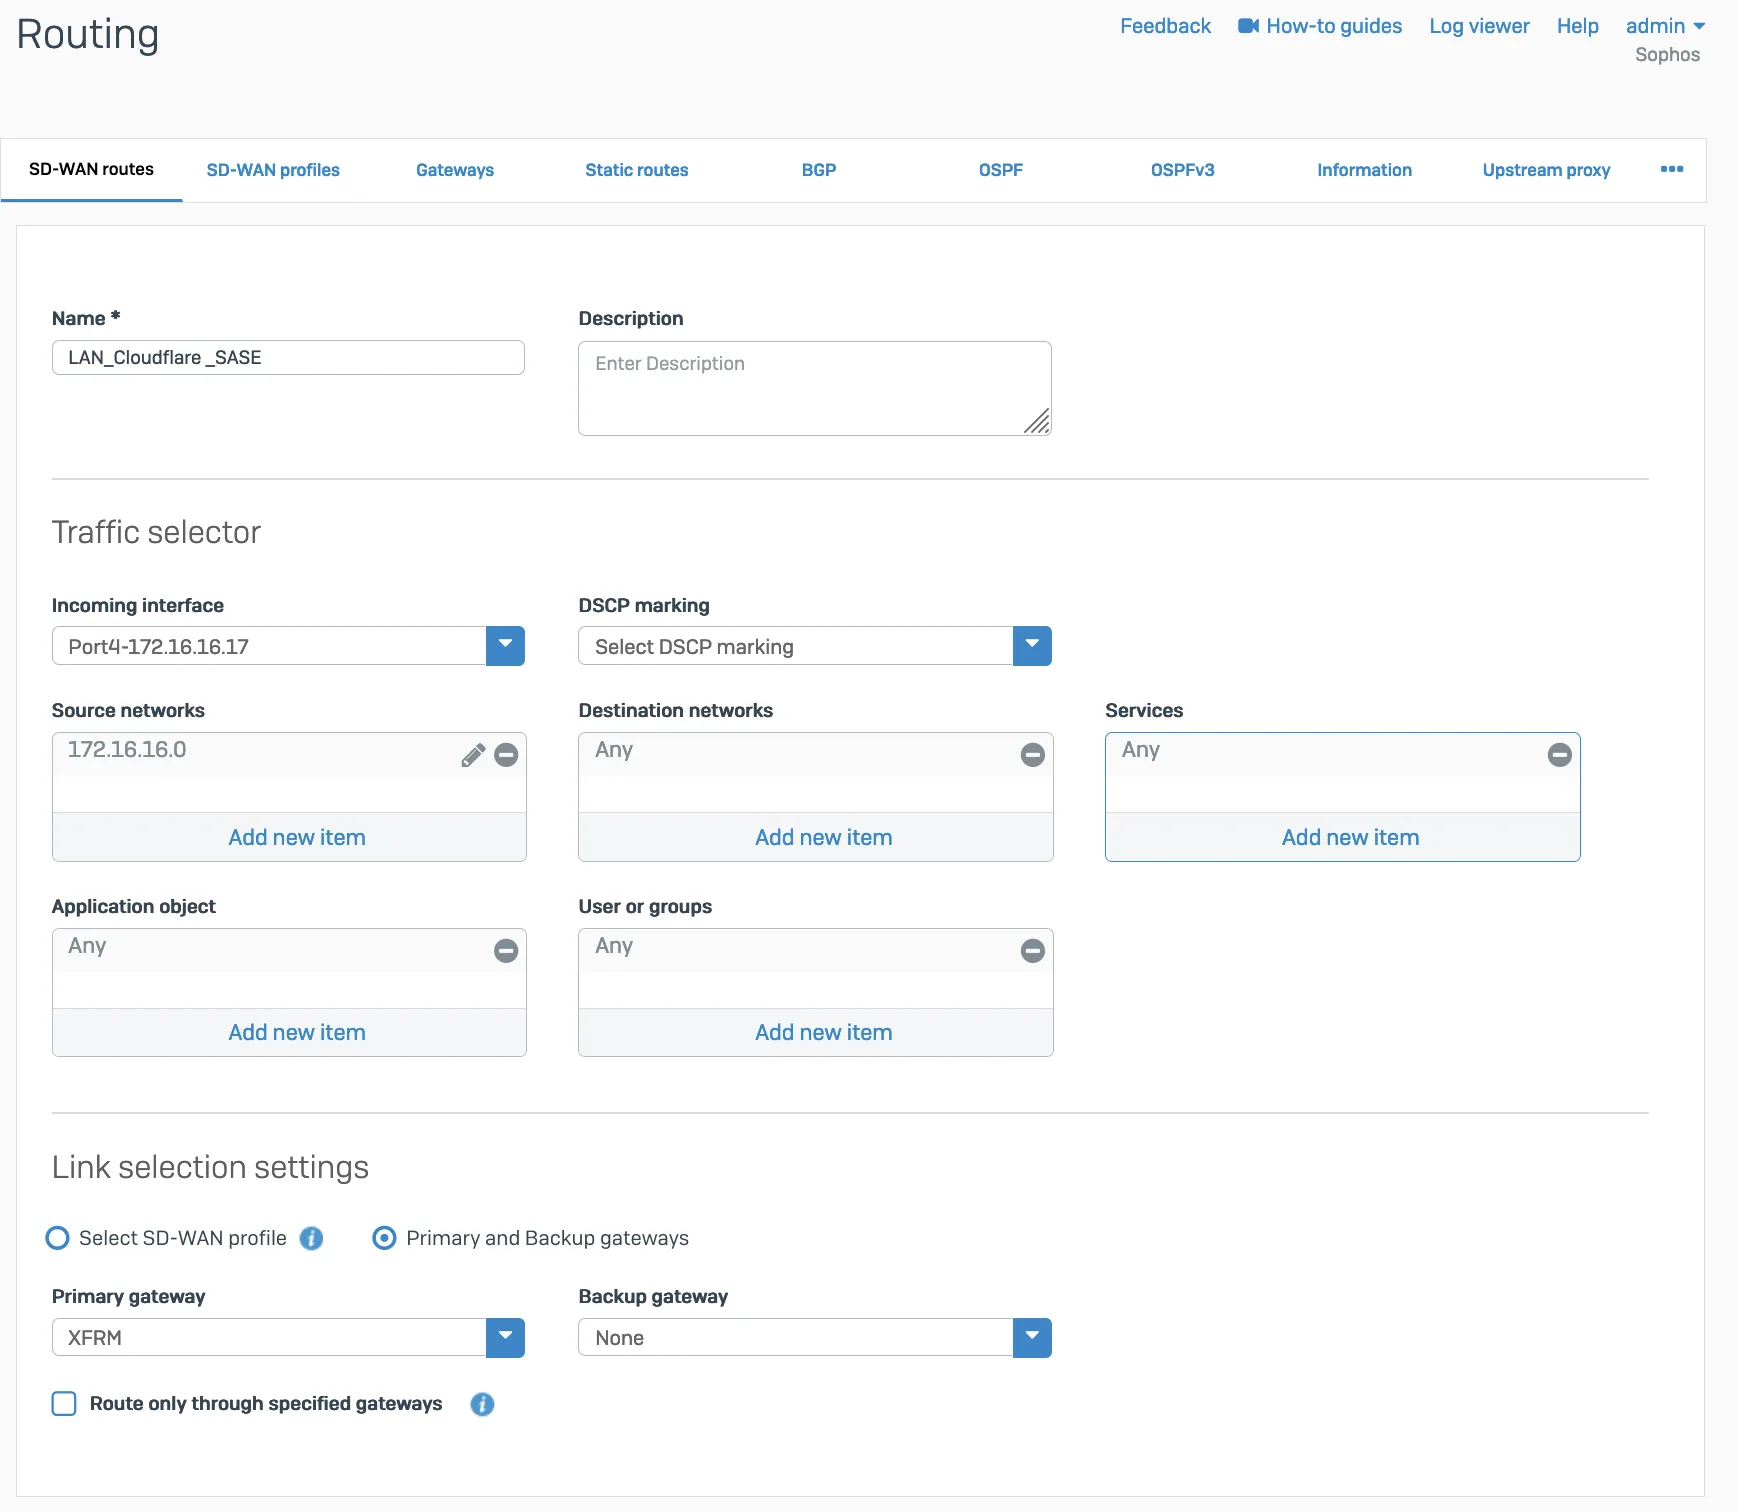
- In Configure > Routing > SD-WAN routes, select Add to add the desired networks and services in the route to redirect traffic to Cloudflare. Enter a descriptive name for your connection, and the IP addresses you set up for your IPsec tunnels in Incoming interface and Source networks. Do not forget to choose the correct Primary gateway option.
Add a GRE route, an SD-WAN route, or both depending on your routing requirements.
Add the route on the CLI.
- Sign in to the CLI.
- Enter 4 to choose Device console, and enter the following command to create the tunnel:
system gre route add net <IP_ADDRESS> tunnelname <TUNNEL_NAME>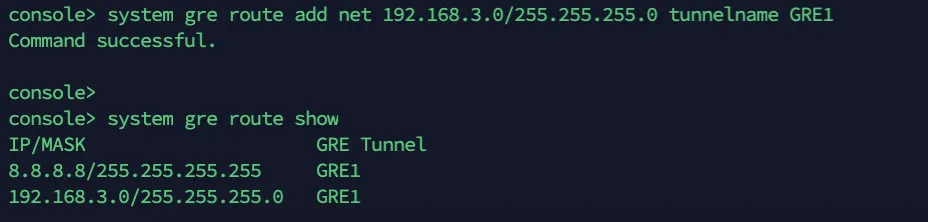
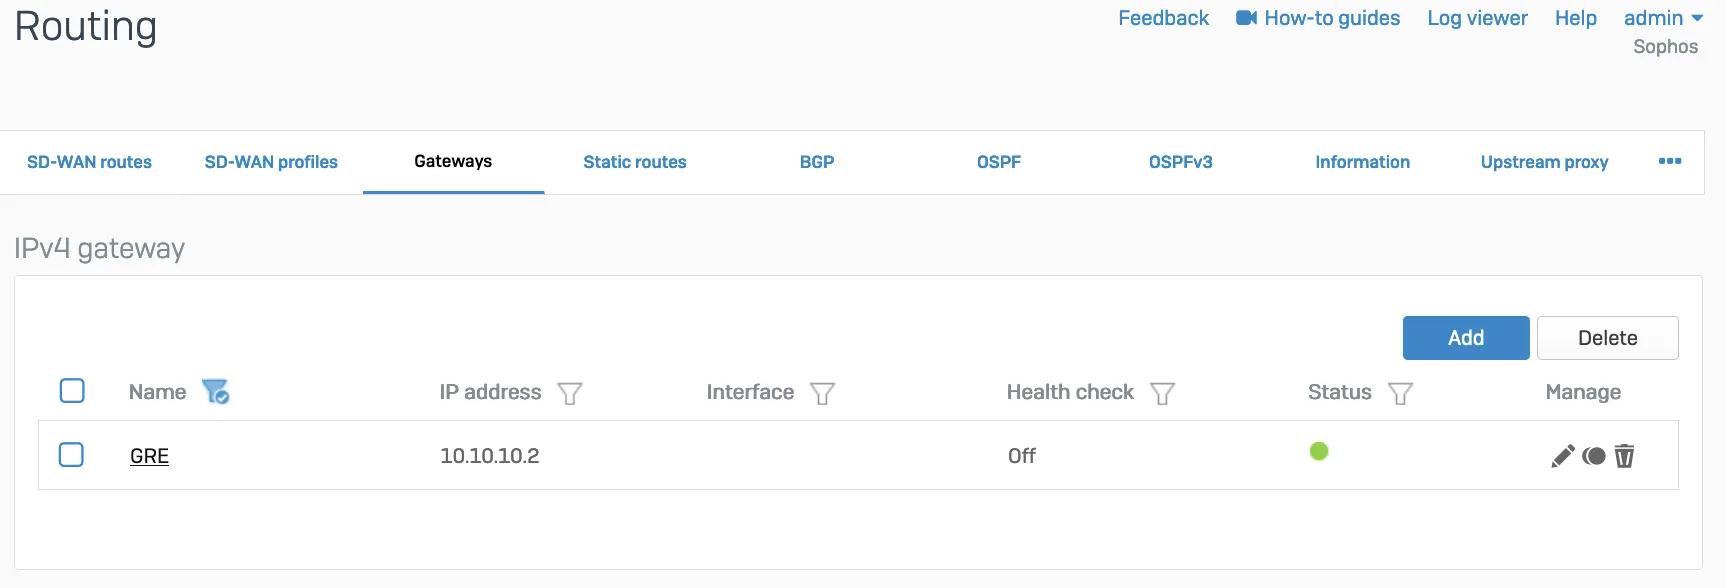
- Add a custom gateway on GRE with the peer IP address (from the
/31subnet you chose earlier) as the Gateway IP address, and disable Health check.
- Add an SD-WAN route with the desired networks and services in the route to redirect traffic to Cloudflare.
The Cloudflare dashboard monitors the health of all anycast tunnels on your account that route traffic from Cloudflare to your origin network. Refer to Check tunnel health in the dashboard for more information.
- The ICMP probe packet from Cloudflare must be the type ICMP request, with anycast source IP. In the following example, we have used
172.64.240.252as a target example:
curl --request PUT \https://api.cloudflare.com/client/v4/accounts/{account_id}/magic/ipsec_tunnels/{tunnel_id} \--header "X-Auth-Email: <EMAIL>" \--header "X-Auth-Key: <API_KEY>" \--header "Content-Type: application/json" \--data '{ "health_check": { "enabled": true, "target": "172.64.240.252", "type": "request", "rate": "mid" }}'- Go to Configure > Network > Interfaces > Add alias. Add the IP address provided by Cloudflare for the ICMP probe traffic. This is needed to prevent Sophos firewall from dropping them as spoof packets. This is not the same IP used to create VPN. This is the special IP address for probe traffic only.

- ICMP reply from SFOS should go back via the same tunnel on which the probe packets are received. You will need to create an additional SD-WAN policy route.

Packet flow will look like the following:
tcpdump -nn proto 1tcpdump: verbose output suppressed, use -v or -vv for full protocol decodelistening on any, link-type LINUX_SLL (Linux cooked v1), capture size 262144 bytes
13:09:55.500453 xfrm1, IN: IP 172.70.51.31 > 172.64.240.252: ICMP echo request, id 33504, seq 0, length 6413:09:55.500480 xfrm1, OUT: IP 172.64.240.252 > 172.70.51.31: ICMP echo reply, id 33504, seq 0, length 64
13:09:55.504669 xfrm1, IN: IP 172.71.29.66 > 172.64.240.252: ICMP echo request, id 60828, seq 0, length 6413:09:55.504695 xfrm1, OUT: IP 172.64.240.252 > 172.71.29.66: ICMP echo reply, id 60828, seq 0, length 64When the tunnel is working, its Status will be green.
Note: Labels in this image may reflect a previous product name.
The corresponding XFRM interface will also show a Connected status.
Note: Labels in this image may reflect a previous product name.
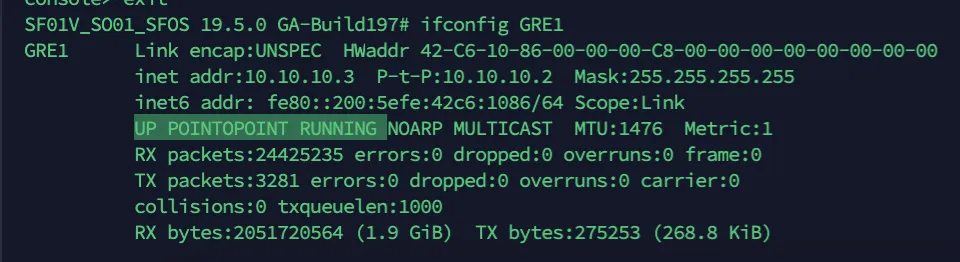
Access the CLI and type system gre tunnel show to check the status of a GRE tunnel. When the tunnel is working, its status will show up as Enabled.

If a tunnel shows a connected status at both ends, but is not established:
- Check if the IPsec profile configuration is correct.
- Make sure the corresponding tunnel interfaces are up.
- Make sure routing configuration and route precedence are correctly set on SFOS.
- Make sure a static back route is added on Cloudflare.
- Firewall rules for specific zones and host or service must be added in SFOS. GRE and IPsec belong to the VPN zone.
- Perform
tcpdumpto check if packets are going through the VPN or GRE tunnel as expected. - Perform a packet capture on Cloudflare to see if traffic is reaching the Cloudflare platform.