SonicWall
This tutorial shows you how to use Cloudflare WAN (formerly Magic WAN) with the following versions of the SonicWall appliances:
- Hardware tested:
- SonicWall NSv 470
- SonicWall 3700
- Software versions tested:
- SonicOS 7.0.1
You can connect your SonicWall appliance through IPsec tunnels to Cloudflare WAN. Generic Routing Encapsulation (GRE) is not supported on SonicWall.

Note: Labels in this image may reflect previous product names.
The following instructions show how to set up an IPsec connection on your SonicWall device. We will use the IP ranges from the above topology example to create the connections needed. Settings not explicitly mentioned can be left with their default values.
-
Start by creating your IPsec tunnels on Cloudflare. Name and describe the tunnels as needed, and add the following settings:
- Interface address: Enter the internal tunnel IP on the Cloudflare side of the IPsec tunnel. In this example, it is
10.200.1.0/31. - Customer endpoint: Enter the WAN IP address of your SonicWall device. In our example, this is
198.51.100.2. - Cloudflare endpoint: Enter one of the Cloudflare anycast IP addresses assigned to your account, available in Leased IPs ↗. In our example, this is
1.2.3.4. - Pre-shared key: Select Use my own pre-shared key and paste a secure key of your own.
- Interface address: Enter the internal tunnel IP on the Cloudflare side of the IPsec tunnel. In this example, it is
-
Select Add tunnels when you are finished.
-
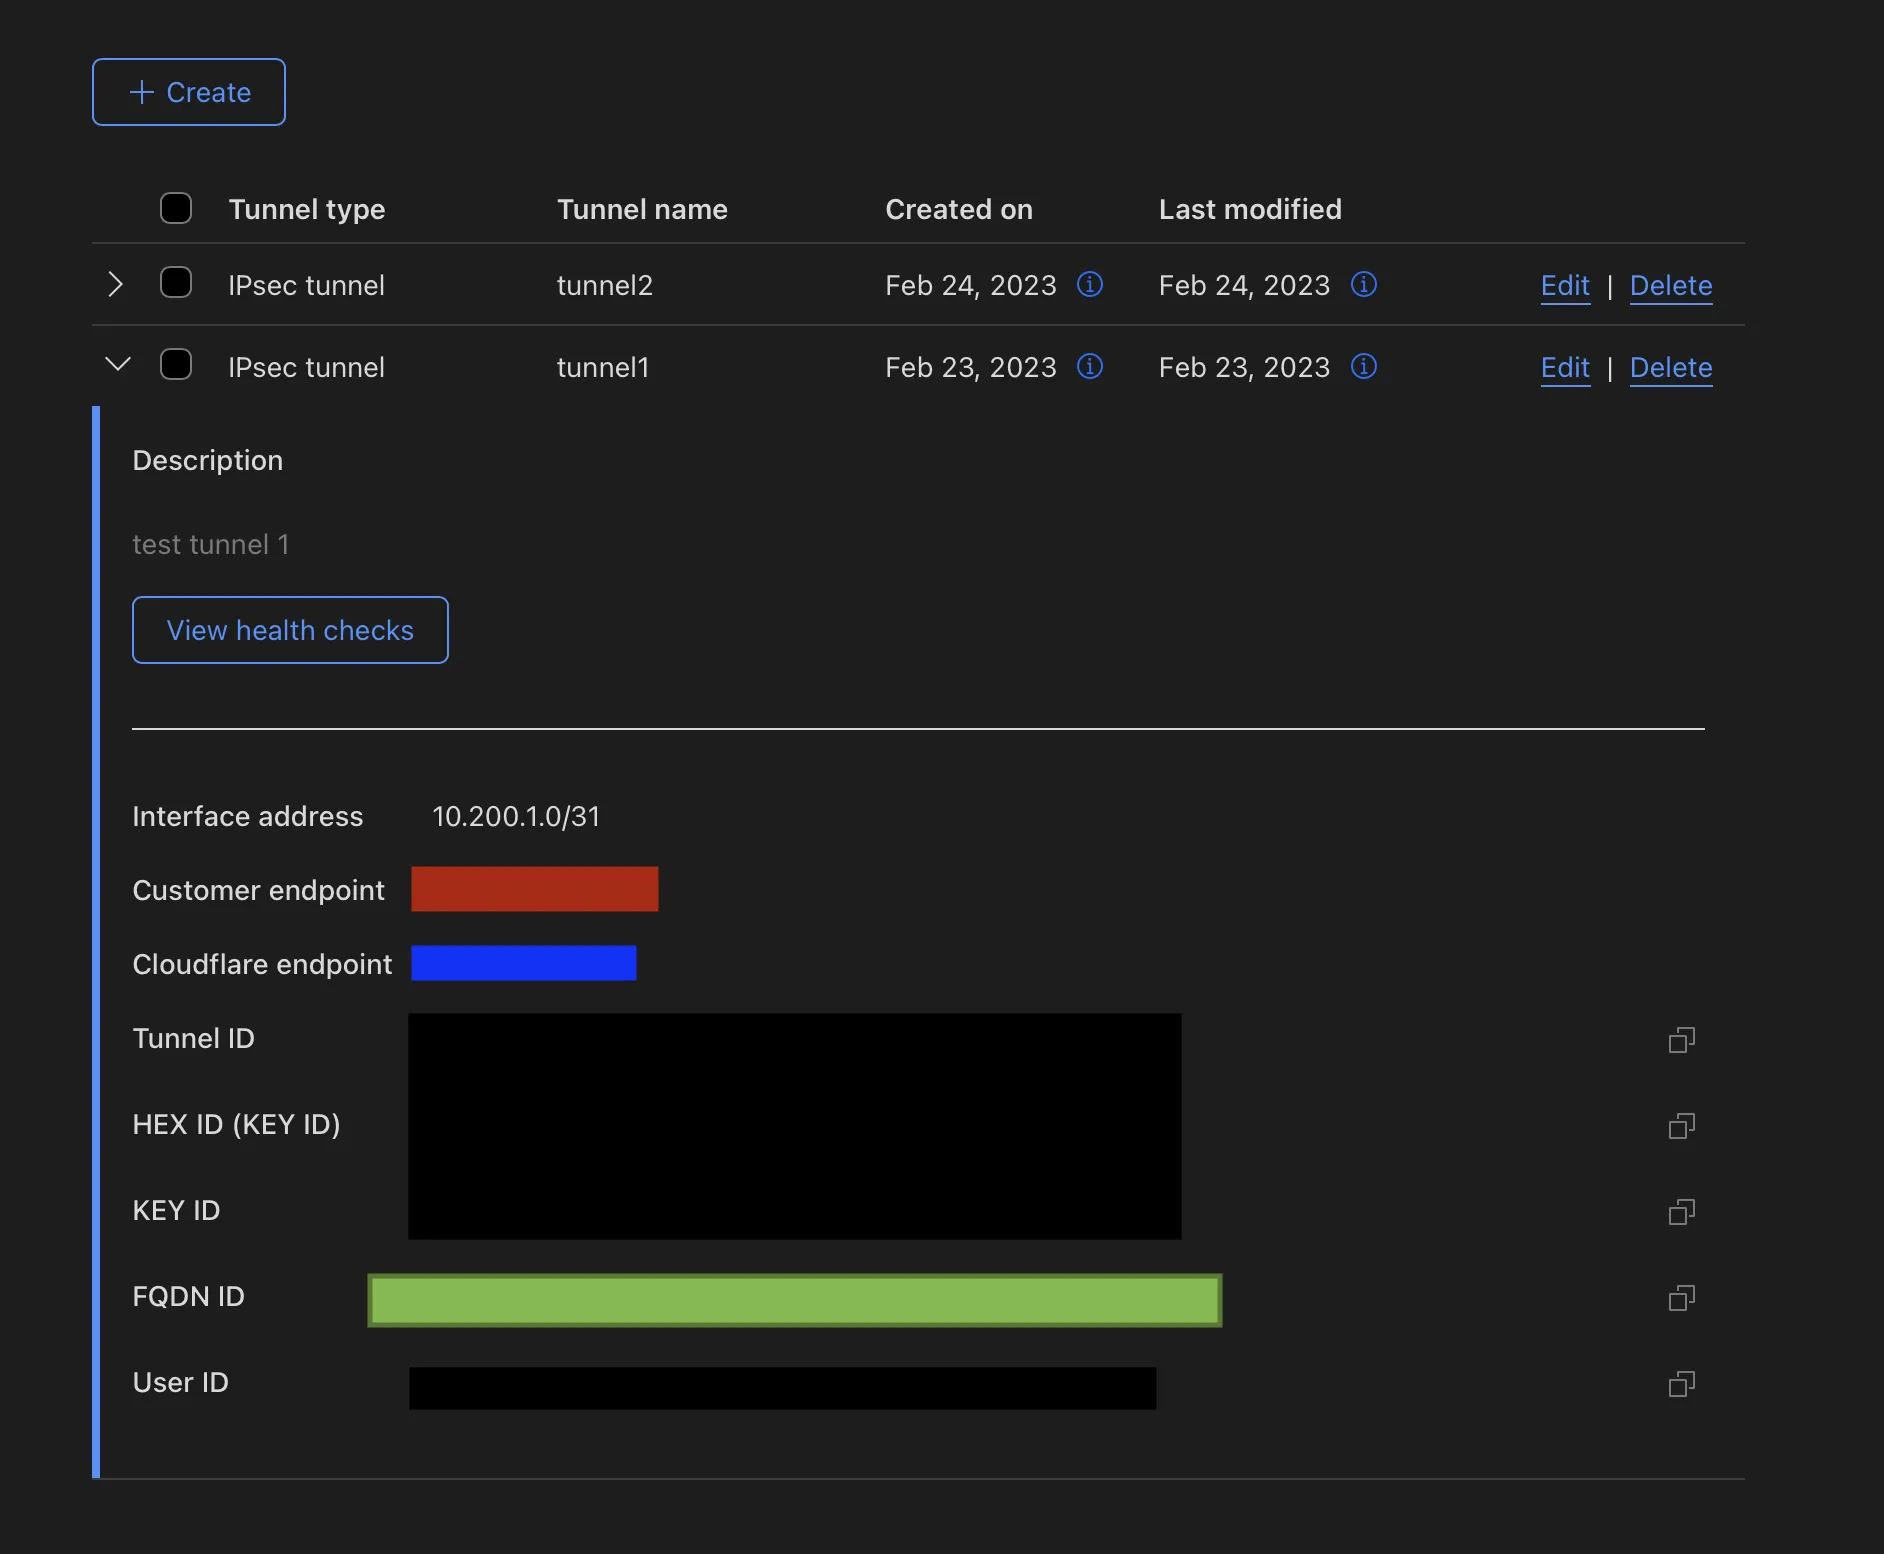
After you create your tunnel, Cloudflare dashboard will load a list of tunnels set up for your account. Select the arrow to expand the tunnels you have just created, and check the following settings:
- Customer endpoint: Refers to the SonicWall WAN IP that the VPN policy is bound to (in red).
- Cloudflare endpoint: Refers to the Cloudflare anycast IP address (in blue).
- FQDN ID: The ID used in the VPN policy for the SonicWall's Local IKE ID. Copy this ID and save it. You will need it when configuring the tunnel on your SonicWall (in green).
Static routes are required for any networks that will be reached via the IPsec tunnel. In our example, there are two networks: 172.31.3.0/24 and the tunnel network 10.200.1.0/31.
-
Create your static routes. Name and describe them as needed, and add the following settings:
- First tunnel: Following our example, add
10.200.1.0/31as the Prefix and10.200.1.1for the Tunnel/Next hop. - Second tunnel: Following our example, add
172.31.3.0/24as the Prefix and10.200.1.1for the Tunnel/Next hop.
- First tunnel: Following our example, add
-
Select Add routes when you are finished.
- Go to Network > IPsec VPN > Rules and Settings.
- Select Add.
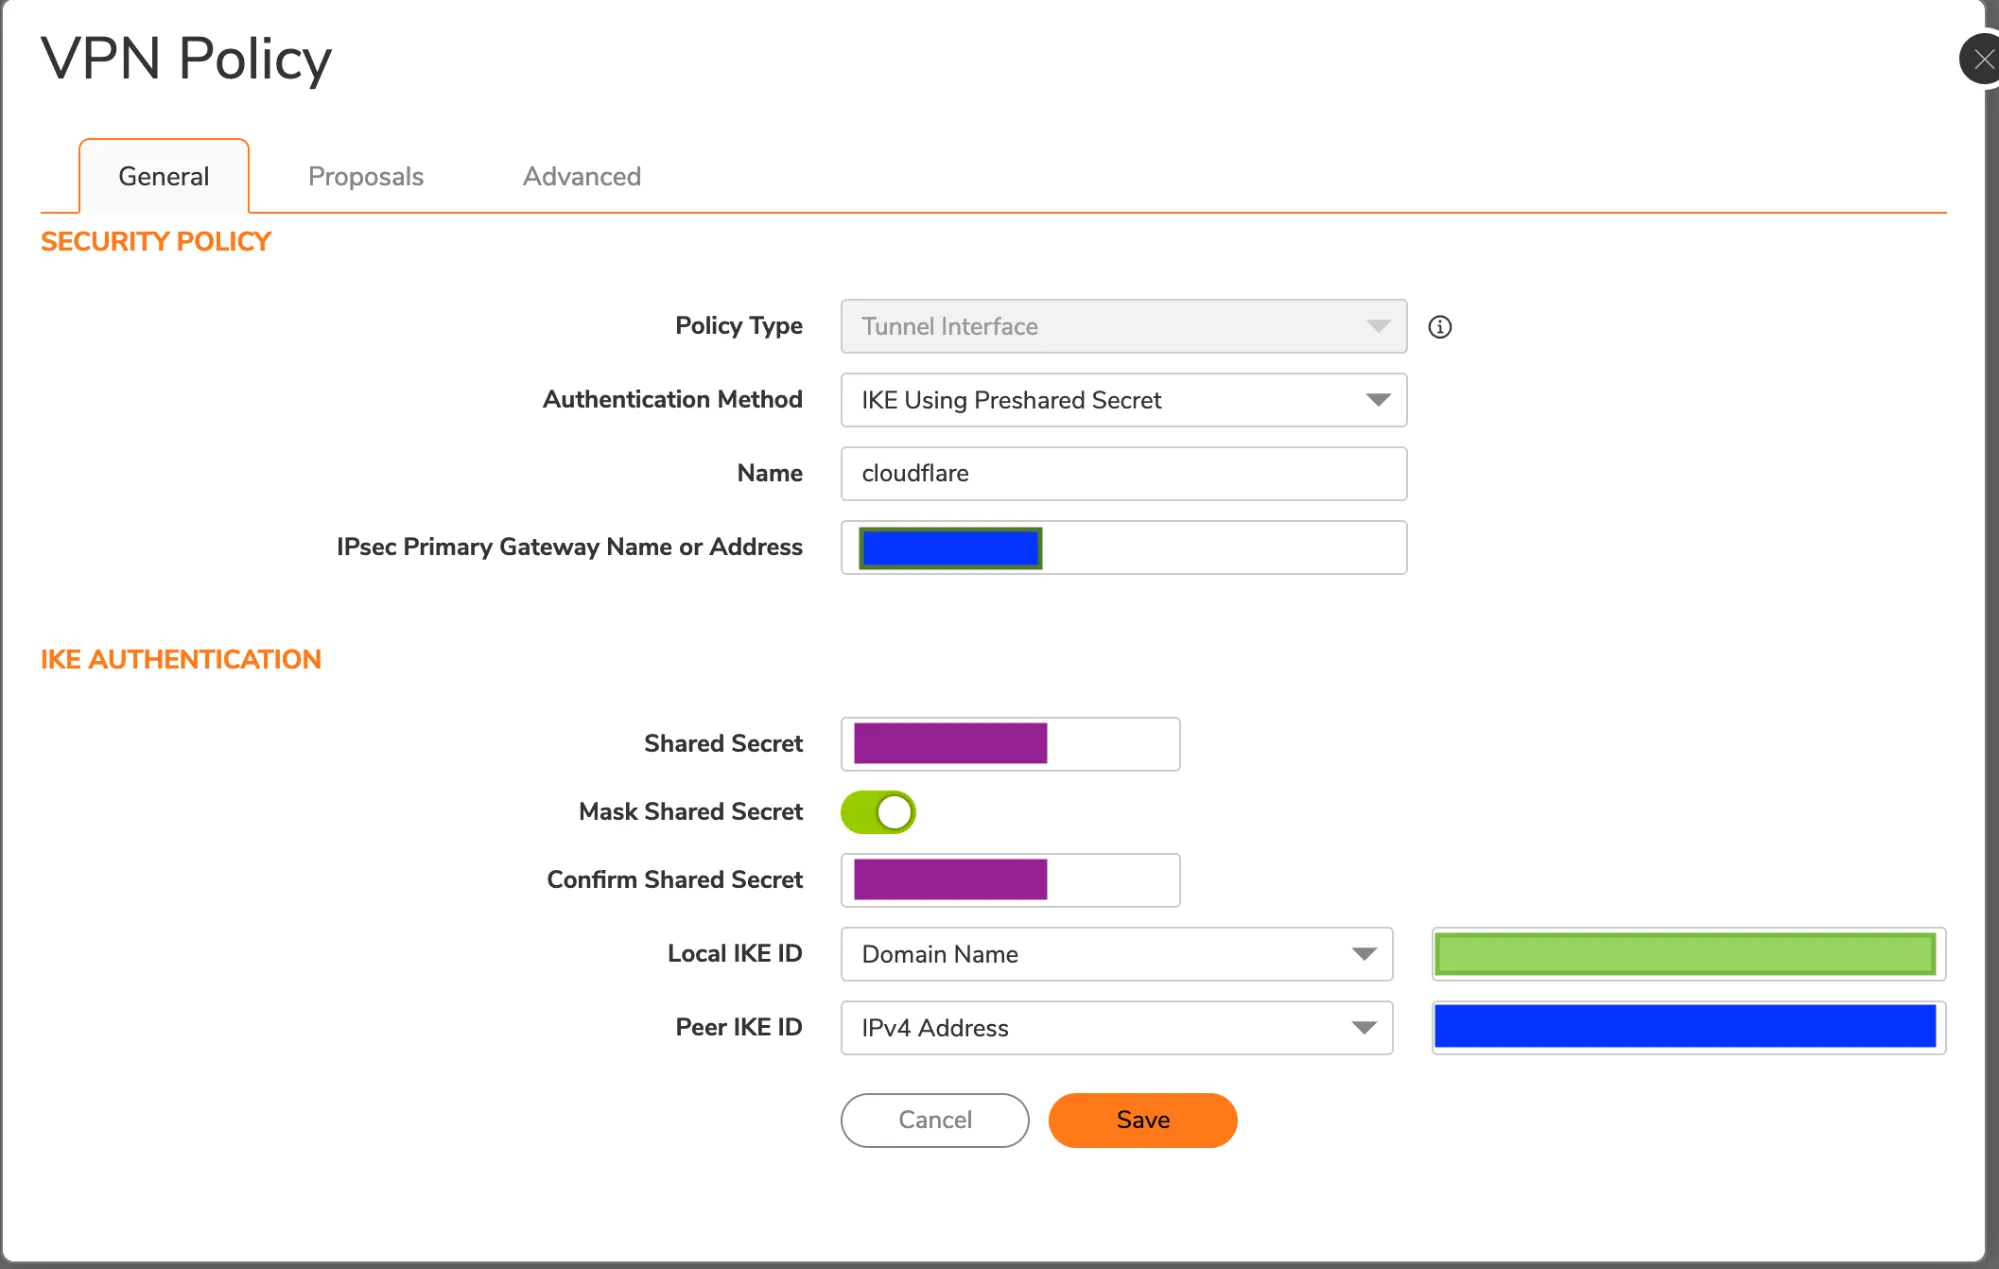
- In General > Security Policy group, add the following settings:
- Authentication Method: IKE Using Preshared Secret.
- IPsec Primary Gateway Name or Address: Enter Cloudflare's anycast IP address for the primary gateway (in blue).
- In the IKE Authentication group, add the following settings:
- Shared secret: Paste the pre-shared key you use to create the IPsec tunnel in step 1 (in purple).
- Local IKE ID: Select Domain name from the drop-down menu, and paste here the FQDN ID you saved from step 1, after creating the IPsec tunnel (in green).
- Peer IKE IDE: Select IPv4 Address from the drop-down menu, and enter the Cloudflare anycast IP address (in blue).
- Select Proposals. VPN Policy is somewhat flexible. Adjust these settings to match your organization's preferred security policy. As an example, you can use the settings in the examples below.
- In the IKE (Phase 1) Proposal group, select the following settings:
- Exchange: IKEv2 Mode
- DH Group: Group 20
- Encryption: AES-256
- Authentication: SHA256
- Life Time (seconds):
86400
- In the IPsec (Phase 2) Proposal group, add the following settings:
- Protocol: ESP
- Encryption: AESGCM16-256
- Authentication: None
- Enable Perfect Forward Secrecy: Enabled
- DH Group: Group 20
- Life Time (seconds):
28800
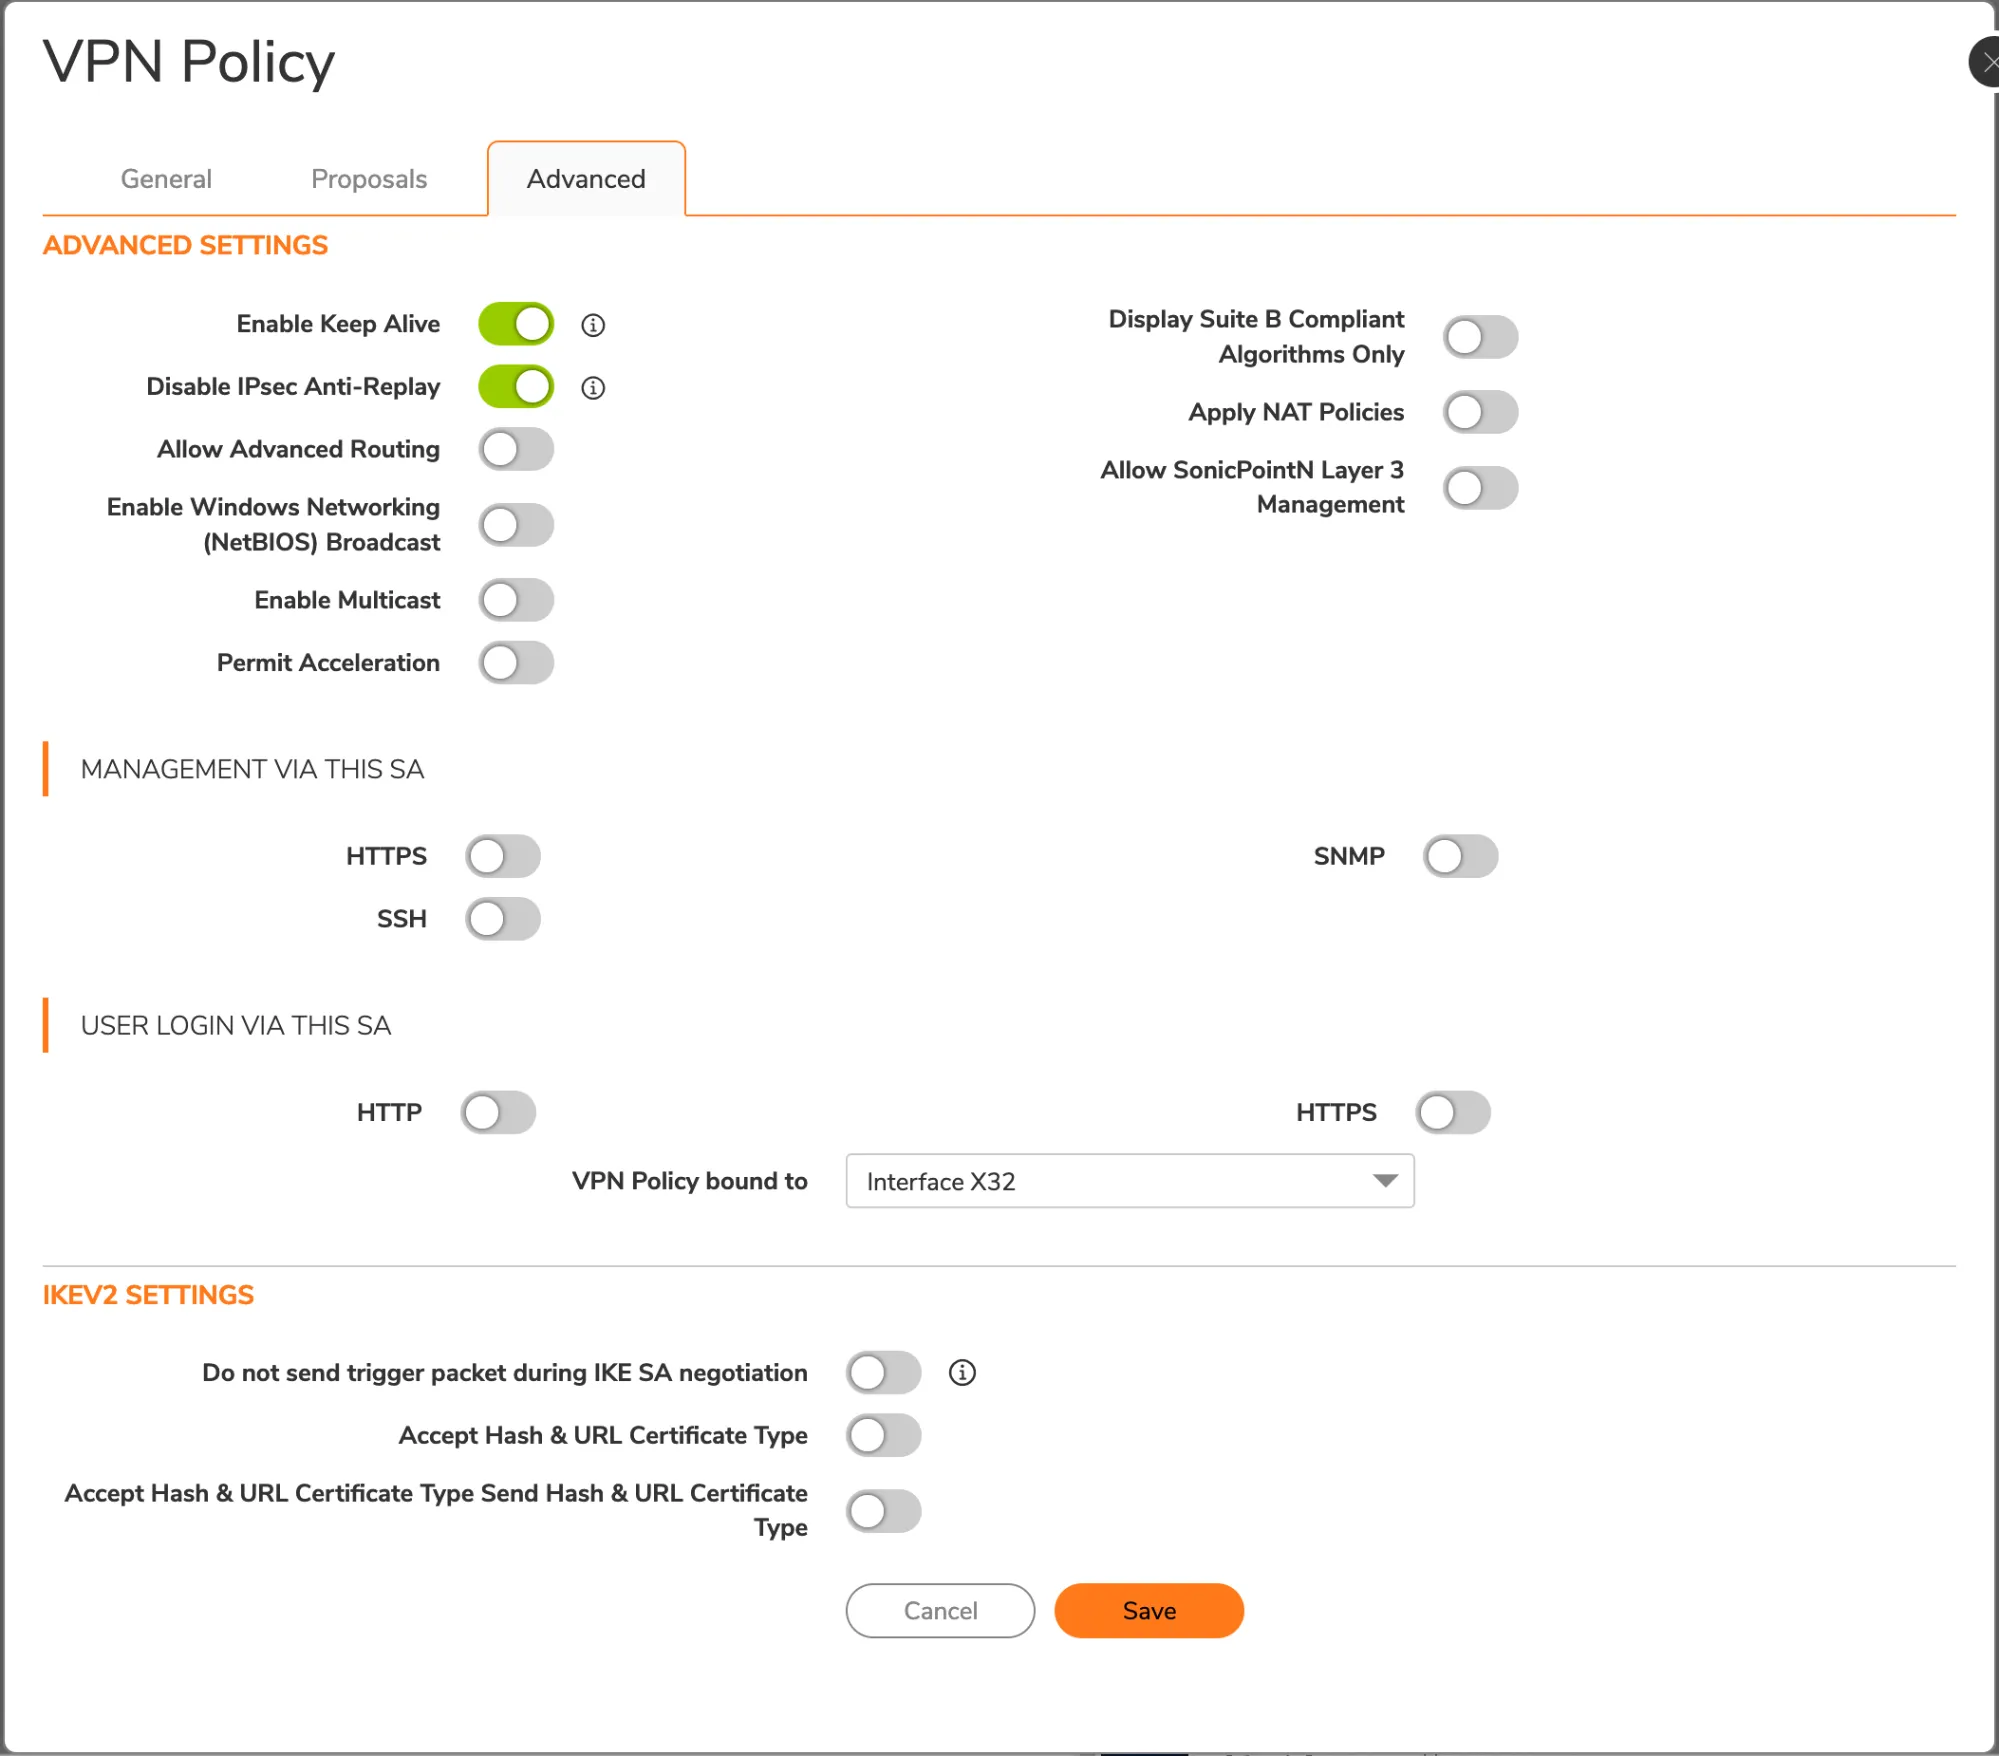
- Select Advanced.
- Enable Disable IPsec Anti-Replay.
- In VPN Policy bound to select your WAN interface from the drop-down menu, to bind it to your VPN.
- Select Save.
SonicOS requires a VPN tunnel interface to route traffic via Cloudflare WAN. When creating the interface, use the prefix 10.200.1.1/31. This matches with the Cloudflare side for this tunnel, which is 10.200.1.0.
- Go to Network > System > Interfaces.
- Select Add interface > VPN Tunnel Interface.
- For IP Address, use
10.200.1.1. - Enable Ping. This is required so the interface can be pinged for debugging and Cloudflare WAN health checks.

- Select Advanced.
- Enable the Enable Asymmetric Route Support option. This is required for the IPsec tunnel health check.
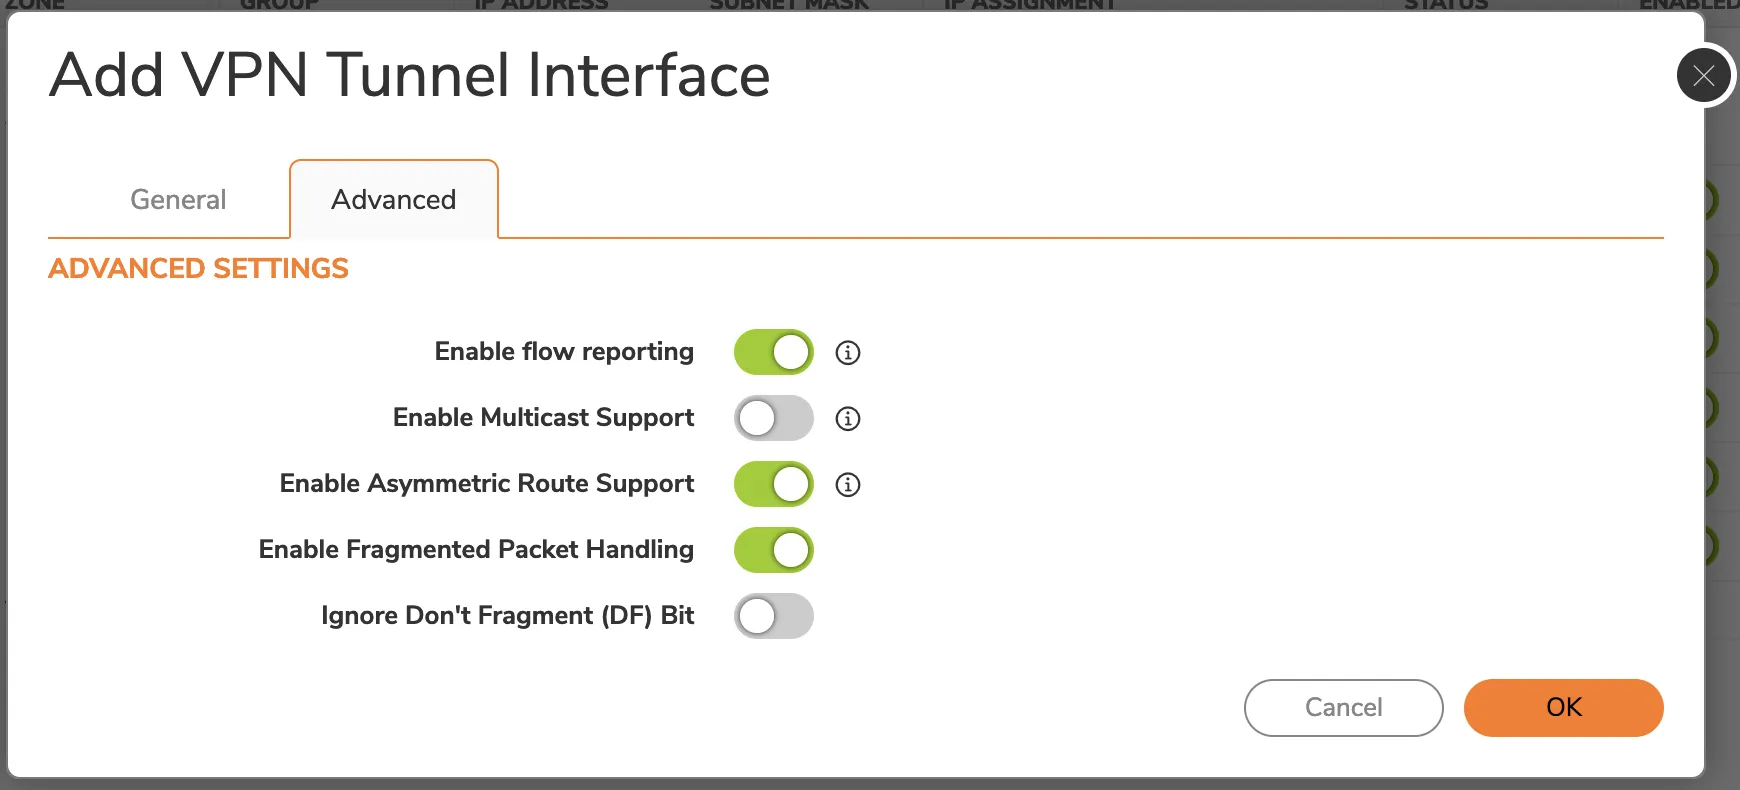
- Select OK.
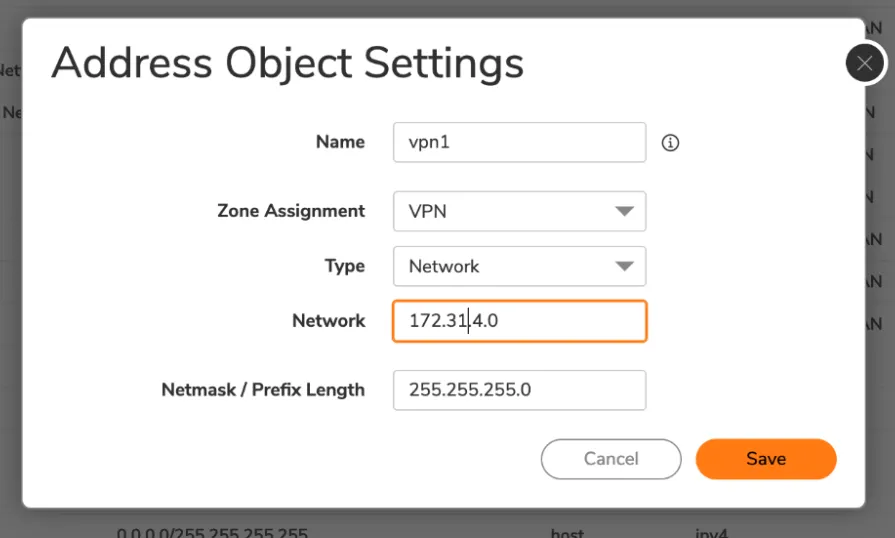
Address objects are necessary for route policies. In our example, we have one other site that will be reached via Cloudflare WAN. First, you need to create address objects for each network. Then, you need to create an address group that contains all the remote networks. This address group will be used in the next step to create the correct route policies.
To add an address object:
- Select Object > Match Objects > Addresses.
- Select Address Objects > Add.
- Enter the information for your address object - refer to the topology image for the examples this tutorial is using. Since the addresses are in the VPN zone, set the Zone Assignment for the object to VPN.
- Select Save. The window will stay on to facilitate multiple entries. Select X to close it.
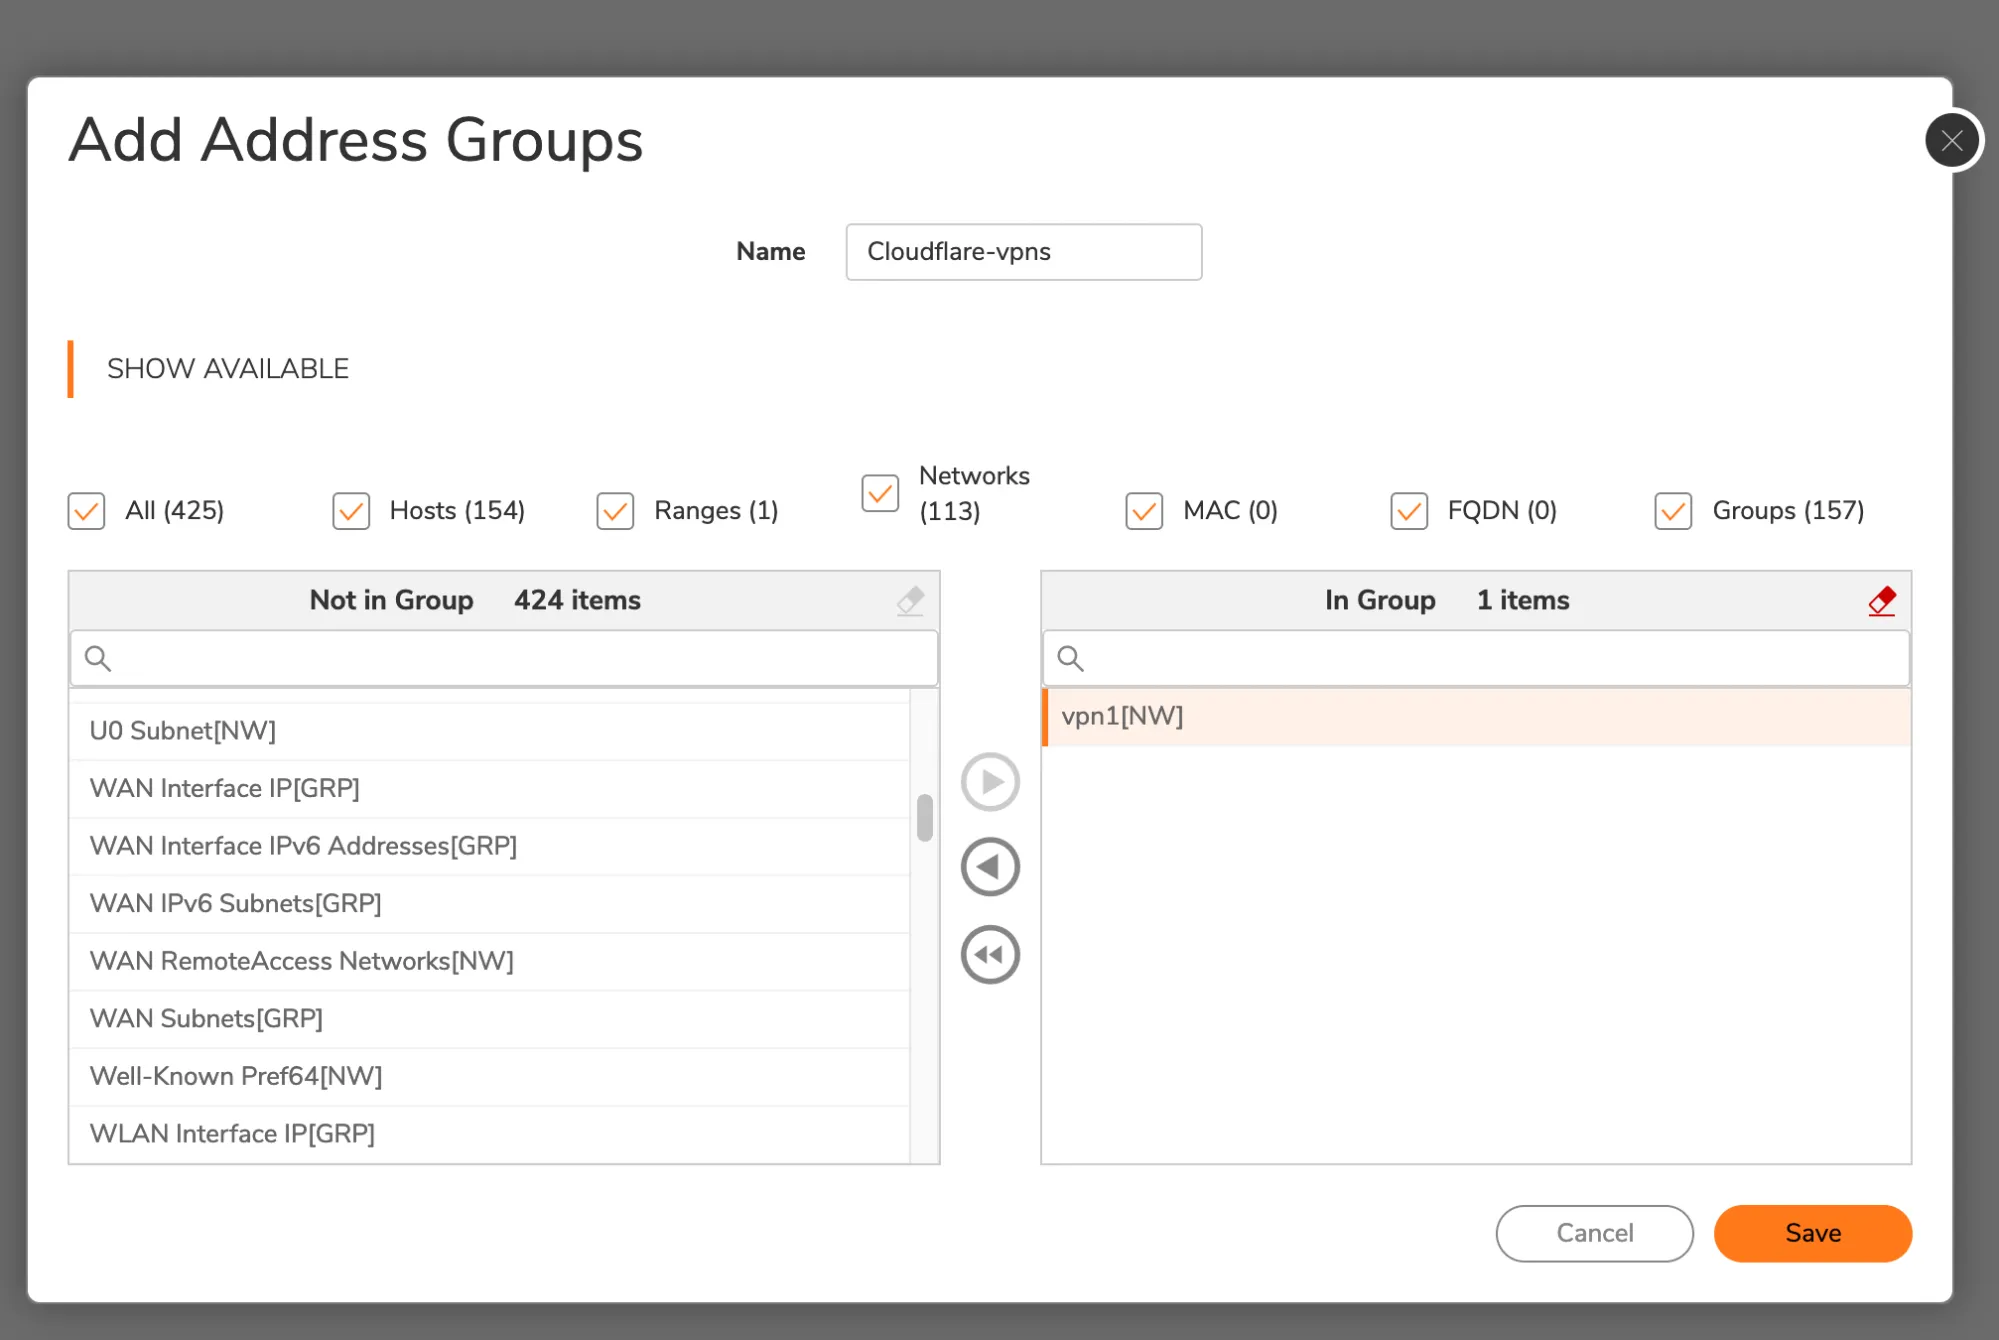
- Select Address Groups > Add to add a new address group.
- Enter a Name for your address group.
- Select the individual network objects you have created on the left menu, and add them to the group by selecting the right-facing arrow in the middle column.
- Select Save.
Add a route using the address object or group just created as the destination.
- Select Policy > Rules and Policies > Routing Rules.
- Select Add to add your route policy.
- The Next Hop should be the VPN tunnel interface that was previously created in the interface panel.
An additional access rule is required for Cloudflare WAN health checks to work properly. This will enable the WAN IP to receive ICMP pings via the tunnel, and return them over the WAN.
- Select Policy > Rules and Policies.
- Select Access Rules > Add.
- Enter a descriptive name for your policy.
- In Source / Destination > Destination > Port/Services, select ICMP from the drop-down menu.
- Select Optional Settings.
- In Others, enable Allow Management traffic.
You have to configure Cloudflare WAN health checks correctly. Here is an example of how to set up health checks:
curl --request PUT \https://api.cloudflare.com/client/v4/accounts/{account_id}/magic/ipsec_tunnels/{tunnel_id} \--header "X-Auth-Email: <EMAIL>" \--header "X-Auth-Key: <API_KEY>" \--header "Content-Type: application/json" \--data '{ "health_check": { "direction": "bidirectional", "enabled": true, "type": "request", "rate": "low" }}'Health checks might take some time to stabilize after the configuration is changed.
The Cloudflare dashboard monitors the health of all anycast tunnels on your account that route traffic from Cloudflare to your origin network. Refer to Check tunnel health in the dashboard for more information.