Transfer your domain to Cloudflare
Transferring a domain moves your registration from your current registrar to Cloudflare.
- Active work: About 30 minutes.
- Total time: Up to 10 days, depending on your registrar.
- Cost: Cloudflare domains are at-cost with no markup fees. Most transfers include a one-year extension from your current expiration date. Some country-code domains (such as
.uk) have no transfer fee.
Before you begin
Confirm the following before you start:
-
You have a Cloudflare account with a verified email address.
-
Your Cloudflare account has a valid payment method on file.
-
Your domain was registered at least 60 days ago and has not been transferred in the last 60 days (ICANN requirement).
-
You have not changed your registrant name, organization, or email address in the last 60 days. Under ICANN rules, changes to these fields trigger a 60-day transfer lock. Some registrars let you opt out of this lock during the change, but not all do.
-
Your account at your current registrar is active. If your domain has expired, renew it at your current registrar first.
-
Your domain uses only standard characters (letters, numbers, hyphens). Cloudflare does not support domains with non-Latin characters (for example,
例え.jp). -
If you are transferring a
.usdomain, refer to Additional requirements for .US domains. -
If you are transferring multiple domains, notify your bank to prevent fraud alerts on multiple charges.
-
Cloudflare Registrar requires your domain to use Cloudflare for authoritative DNS (full setup). You cannot use another DNS provider while registered with Cloudflare.
Before you can transfer your registration, your domain must be active on Cloudflare. This is what allows Cloudflare to protect your site with performance and security features during and after the transfer. You will not be able to enter an authorization code or proceed with the transfer until this step is complete.
If DNSSEC is enabled at your current registrar, disable it before you change nameservers. DNSSEC validates DNS responses using cryptographic signatures tied to your current provider. When you point nameservers to Cloudflare, those signatures will no longer match, which causes DNS resolution failures and can prevent your domain from becoming active.
At your current registrar:
- Check your domain settings for DNSSEC or DS records. If there are none, DNSSEC is not active and you can skip to Add your domain.
- Remove or disable DNSSEC (sometimes labeled "DS records").
- Wait at least 24 hours for the change to propagate before changing nameservers.
Provider-specific DNSSEC instructions
This is not an exhaustive list, but the following links may be helpful:
After your transfer completes, you can re-enable DNSSEC through Cloudflare with one click. Refer to Enable DNSSEC.
Follow the steps in Set up Cloudflare DNS to add your domain, review your DNS records, and get your assigned nameservers. Then update the nameservers at your current registrar to the ones Cloudflare assigned.
Nameserver instructions for popular registrars
Each registrar has a different interface for updating nameservers. These links explain the process at popular registrars:
In the Cloudflare dashboard:
Wait for your domain status to change from Pending to Active. This usually takes a few minutes but can take up to 24 hours.
If your zone has been pending for more than 24 hours, verify that you updated the nameservers correctly at your current registrar and that DNSSEC is disabled.
Once your domain is active on Cloudflare, you can transfer the registration. This moves your domain record from your current registrar to Cloudflare. You will go back and forth between your current registrar and Cloudflare during this process.
At your current registrar:
Remove the lock on your domain so Cloudflare can process the transfer. Most registrars apply a lock by default (sometimes called registrar lock, domain lock, or transfer lock) to prevent unauthorized transfers. In WHOIS, this appears as clientTransferProhibited.
At your current registrar:
Request an authorization code for your domain. This is also called an auth code, EPP code, authinfo code, or transfer code. Cloudflare uses this code to verify that the transfer is authorized by the domain owner.
Authorization codes are usually only valid for a limited period. Request the code when you are ready to enter it in the next step.
In the Cloudflare dashboard:
Go to Transfer domainsSelect your domain and enter the authorization code. For most generic TLDs (such as .com, .net, and .org), the transfer price includes a one-year registration extension from your current expiration date. This is an ICANN requirement for gTLD transfers. Country-code domains follow their own registry policies — for example, .uk transfers do not add an extra year or charge a transfer fee.
If you do not have a payment method on file, add one before proceeding.
For information about registration limits and the one-year extension, refer to Transfer rejected due to registration limits.
In the Cloudflare dashboard:
Enter the contact information for your registration. Cloudflare Registrar redacts this information from public WHOIS by default, but ICANN requires Cloudflare to collect accurate contact details. Providing inaccurate information may result in domain suspension.
You can modify your contact information later.
After entering the contact information, agree to the domain registration terms of service by selecting Confirm transfer.
After you submit the transfer, Cloudflare will begin processing it and send a Form of Authorization (FOA) email to the registrant if the information is available in the public WHOIS database.
Your current registrar will email you confirming the transfer or asking for your approval. Afterwards, most registrars process it within 5 business days (but some TLDs, such as .mx, can take up to 10 business days).
Some commerce and site-building platforms (such as Shopify, Block, and Wix) act as both your hosting provider and domain registrar. These platforms typically do not allow you to change nameservers while the domain is registered with them. Because Cloudflare requires your nameservers to point to Cloudflare before a transfer can begin, a direct transfer is not possible.
The workaround is to transfer your domain to another registrar first, wait 60 days, then transfer to Cloudflare:
- Get your authorization code from your current platform. Each platform has a different process. Refer to your platform documentation for instructions on transferring your domain away.
- Transfer to another registrar that allows nameserver changes. Enter the authorization code there and complete the transfer. This usually takes 3-5 days.
- Update nameservers to Cloudflare. Once the domain is at the new registrar, update the nameservers to Cloudflare. You can use all Cloudflare features (CDN, DNS, security) immediately after this step.
- Transfer to Cloudflare Registrar after 60 days. ICANN requires a 60-day wait between transfers. After that period, initiate the transfer to Cloudflare from the Transfer Domains page.
You can check the status of your transfer on the Transfer Domains page in the dashboard.
-
Transfer in progress: Cloudflare has submitted the request to your current registrar. If this status persists for more than 24 hours, verify that you have unlocked the domain at your current registrar.
-
Pending approval: Your current registrar has received the transfer request and can take up to five days to release the domain. To speed this up, approve the transfer through the email or dashboard of your current registrar.
-
Transfer rejected: The transfer was rejected by your current registrar. This can happen if you declined the transfer request, or if the registrar determined the domain is not eligible. Select Retry to start a new transfer request.
The process for transferring domains in bulk is the same as transferring a single domain. Each domain is charged individually.
Here are suggestions for how to handle common transfer issues:
- Domain is still locked
- Authorization code is invalid or expired
- Cannot find where to enter your authorization code
- Transfer rejected
- Transfer is taking too long
- Payment failed during transfer
For a full list of issues, refer to Troubleshoot failed domain transfers.
As mentioned in Review DNS records in Cloudflare, when moving your domain to Cloudflare Registrar, you might need to configure your DNS records to correctly point traffic to your web host. Cloudflare automatically scans for common records and adds them to your account's DNS page, but the scan is not guaranteed to find all existing DNS records.
Refer to your web host's documentation to learn what type of records you need to configure and where they should point, to avoid downtime.
Example
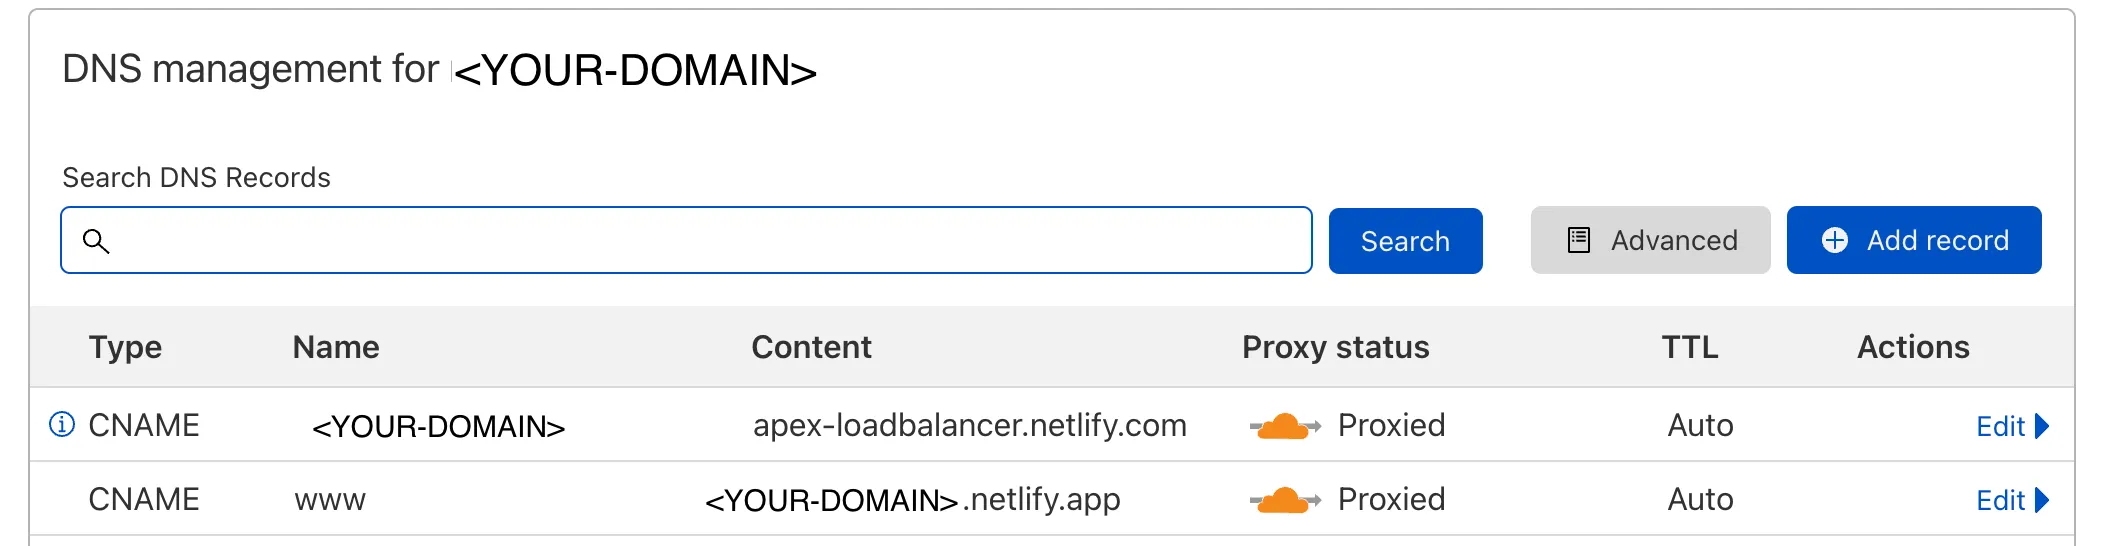
For example, Netlify asks customers that host websites with them to add a CNAME record pointing <YOUR-DOMAIN> to apex-loadbalancer.netlify.com, and another CNAME record pointing www to <YOUR-DOMAIN>.netlify.app, depending on which one is the primary domain.
You may also want to enable DNSSEC.