Use R2 with Mastodon
Mastodon is a popular fediverse software. This guide will explain how to configure R2 to be the object storage for a self hosted Mastodon instance, for either a new instance or an existing instance.
Set up a new instance
You can set up a self hosted Mastodon instance in multiple ways. Refer to the official documentation for more details. When you reach the Configuring your environment step in the Mastodon documentation after installation, refer to the procedures below for the next steps.
1. Determine the hostname to access files
Different from the default hostname of your Mastodon instance, object storage for files requires a unique hostname. As an example, if you set up your Mastodon’s hostname to be mastodon.example.com, you can use mastodon-files.example.com or files.example.com for accessing files. This means that when visiting your instance on mastodon.example.com, whenever there are media attached to a post such as an image or a video, the file will be served under the hostname determined at this step, such as mastodon-files.example.com.
2. Create and set up an R2 bucket
- Log in to the Cloudflare dashboard.
- From Account Home, select R2.
- From R2, select Create bucket.
- Enter your bucket name and then select Create bucket. This name is internal when setting up your Mastodon instance and is not publicly accessible.
- Once the bucket is created, navigate to the Settings tab of this bucket and copy the value of S3 API.
- From the Settings tab, select Connect Domain and enter the hostname from step 1.
- Navigate back to the R2’s overview page and select Manage R2 API Tokens.
- Select Create API token.
- Name your token
Mastodonby selecting the pencil icon next to the API name and grant it the Edit permission. Select Create API Token to finalize token creation. - Copy the values of Access Key ID and Secret Access Key.
3. Configure R2 for Mastodon
While configuring your Mastodon instance based on the official configuration file, replace the File storage section with the following details.
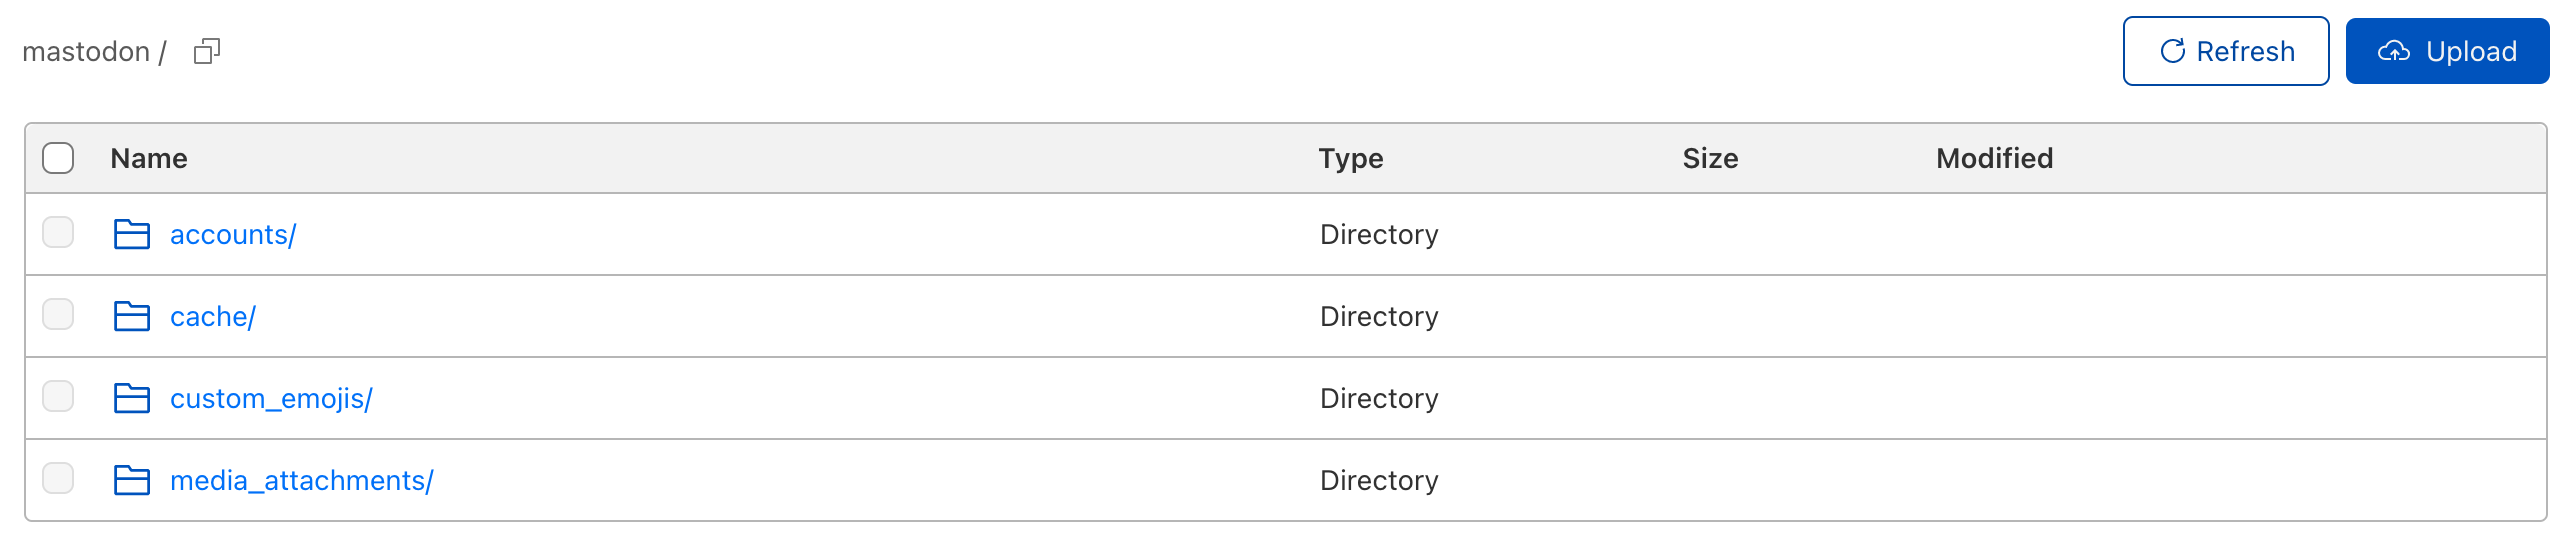
S3_ENABLED=trueS3_ALIAS_HOST={{mastodon-files.example.com}} # Change to the hostname determined in step 1S3_BUCKET={{your-bucket-name}} # Change to the bucket name set in step 2S3_ENDPOINT=https://{{unique-id}}.r2.cloudflarestorage.com/ # Change the {{unique-id}} to the part of S3 API retrieved in step 2AWS_ACCESS_KEY_ID={{your-access-key-id}} # Change to the Access Key ID retrieved in step 2AWS_SECRET_ACCESS_KEY={{your-secret-access-key}} # Change to the Secret Access Key retrieved in step 2S3_PROTOCOL=httpsS3_PERMISSION=privateAfter configuration, you can run your instance. After the instance is running, upload a media attachment and verify the attachment is retrieved from the hostname set above. When navigating back to the bucket’s page in R2, you should see the following structure.
Migrate to R2
If you already have an instance running, you can migrate the media files to R2 and benefit from no egress cost.
1. Set up an R2 bucket and start file migration
- (Optional) To minimize the number of migrated files, you can use the Mastodon admin CLI to clean up unused files.
- Set up an R2 bucket ready for file migration by following steps 1 and 2 from Setting up a new instance section above.
- Migrate all the media files to R2. Refer to the examples provided to connect various providers together. If you currently host these media files locally, you can use
rcloneto upload these local files to R2.
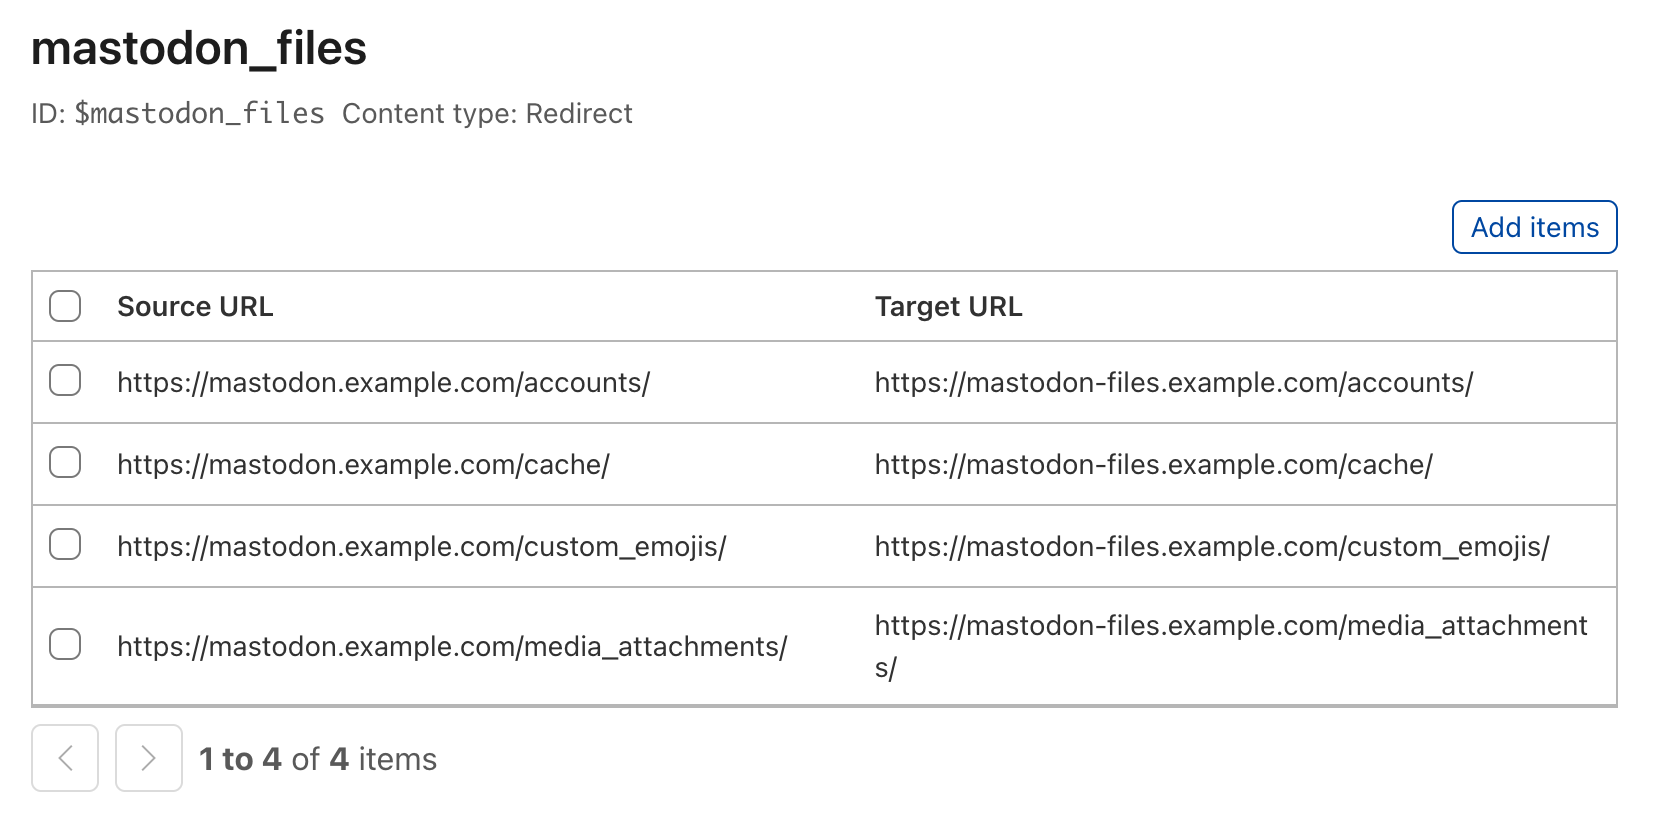
2. (Optional) Set up file path redirects
While the file migration is in progress, which may take a while, you can prepare file path redirect settings.
If you had the media files hosted locally, you will likely need to set up redirects. By default, media files hosted locally would have a path similar to https://mastodon.example.com/cache/..., which needs to be redirected to a path similar to https://mastodon-files.example.com/cache/... after the R2 bucket is up and running alongside your Mastodon instance. If you already use another S3 compatible object storage service and would like to keep the same hostname, you do not need to set up redirects.
Bulk Redirects are available for all plans. Refer to Create Bulk Redirects in the dashboard for more information.
3. Verify bucket and redirects
Depending on your migration plan, you can verify if the bucket is accessible publicly and the redirects work correctly. To verify, open an existing uploaded media file with a path like https://mastodon.example.com/cache/... and replace the hostname from mastodon.example.com to mastocon-files.example.com and visit the new path. If the file opened correctly, proceed to the final step.
4. Finalize migration
Your instance may be still running during migration, and during migration, you likely have new media files created either through direct uploads or fetched from other federated instances. To upload only the newly created files, you can use a program like rclone. Note that when re-running the sync program, all existing files will be checked using at least Class B operations.
Once all the files are synced, you can restart your Mastodon instance with the new object storage configuration as mentioned in step 3 of Set up a new instance.