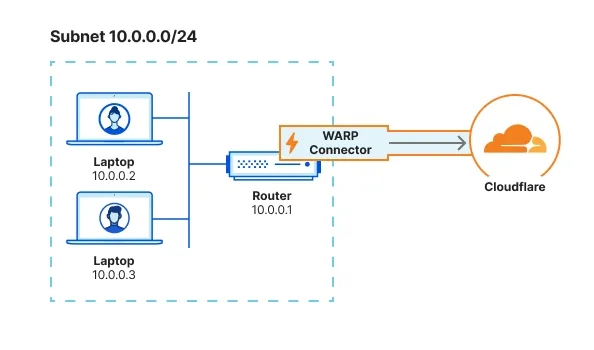
Connect private network to Internet
This guide covers how to connect a private network to the Internet using WARP Connector. In this example, we will create a WARP Connector for subnet 10.0.0.0/24 and install it on 10.0.0.1.
    flowchart LR
      subgraph subnet1[Subnet 10.0.0.0/24]
        device1["Device
        10.0.0.2"]-->router1["WARP Connector
        10.0.0.1"]
      end
      router1-->C((Cloudflare))-->I{Internet}
- A Linux host 1 on the subnet
- Verify that your firewall allows inbound/outbound traffic over the WARP IP addresses, ports, and domains.
To install WARP Connector on a host machine:
-
In Zero Trust ↗, go to Networks > Tunnels.
-
Select Create a tunnel.
-
For the tunnel type, select WARP Connector.
-
You will be prompted to turn on Warp to Warp and Override local interface IP if they are currently turned off. These settings allow Cloudflare to assign a unique CGNAT IP to each WARP device and route traffic between them.
-
Give the tunnel any name (for example,
Subnet-10.0.0.0/24) and select Create tunnel. -
Select the operating system of your host machine.
-
On your host machine, open a terminal window and run the commands shown in the Zero Trust dashboard. Those commands will install the WARP Connector, enable IP forwarding on the host, and connect WARP Connector to your Zero Trust organization.
-
(Optional) Configure IP forwarding:
Enable IP forwarding to persist after reboot
Terminal window echo 'net.ipv4.ip_forward = 1' | sudo tee -a /etc/sysctl.d/99-warp-svc.confsudo sysctl -p /etc/sysctl.d/99-warp-svc.confConfigure IP forwarding with iptables
If you are setting up WARP Connector on a host with iptables enabled, make sure that your iptables FORWARD chain includes rules to accept the desired traffic. For testing and troubleshooting purposes, you can set the default policy for the WARP interface to ACCEPT:
Terminal window iptables -A FORWARD -i CloudflareWARP -J ACCEPTiptables -A FORWARD -o CloudflareWARP -J ACCEPT -
To verify that the WARP Connector is connected to Cloudflare:
Terminal window $ warp-cli statusStatus update: ConnectedTroubleshoot connection
If WARP is disconnected, try the following troubleshooting strategies:
-
Run
warp-cli connect. -
If your private network uses a firewall to restrict Internet traffic, ensure that it allows the WARP ports and IPs.
-
Review your WARP daemon logs for information about why the connection is failing.
-
WARP Connector software is now installed but not yet routing traffic.
A dedicated device profile allows you to manage the WARP Connector host machine separately from WARP client user devices. WARP Connector hosts are registered to your Zero Trust organization with the email address warp_connector@<your-team-name>.cloudflareaccess.com. To set up a device profile for WARP Connector:
-
Create a new profile that matches on the following expression:
Selector Operator Value User email is warp_connector@<your-team-name>.cloudflareaccess.com -
In the profile settings, ensure that Service mode is set to Gateway with WARP.
Depending on where you installed the WARP Connector, you may need to configure other devices on the subnet to route outbound requests through WARP Connector.
If you installed WARP Connector on your router, no additional configuration is necessary. All traffic will use the router as the default gateway.
If you have access to the router but installed WARP Connector on another machine, you can configure the router to forward traffic to the WARP Connector. This typically involves adding a static route for the destination IPs that you want to connect to through Cloudflare. Refer to your router documentation for specific instructions on how to add an IP route.
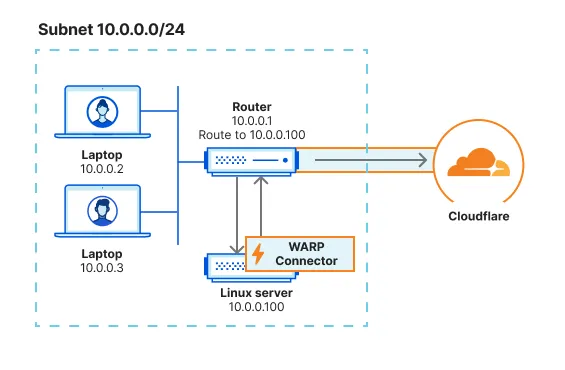
For example, for all traffic from the subnet to egress through WARP Connector, add a rule on the router that routes 0.0.0.0 to the WARP Connector host machine (10.0.0.100).
When a device on the subnet sends a request, the router will first redirect the traffic to the WARP Connector host. WARP Connector encrypts the traffic, changes its destination IP to the WARP ingress IP, and sends it back to the router. The router will now forward this encrypted traffic to Cloudflare.
If you do not have access to the router, you will need to configure each device on the subnet to egress through the WARP Connector machine instead of the default gateway.
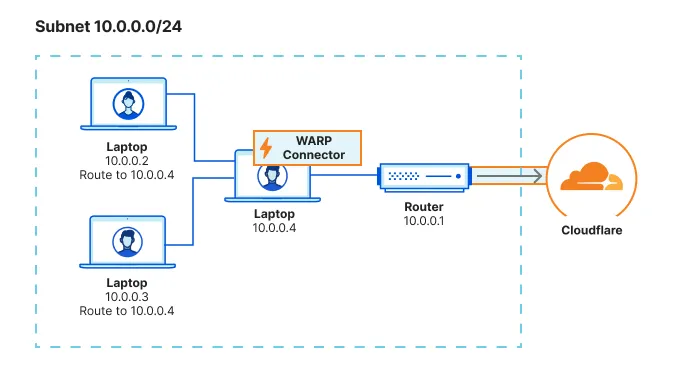
You can configure all traffic on a device to egress through WARP Connector with its local source IP. All traffic will be filtered by your Gateway network policies.
sudo ip route add default via <WARP-CONNECTOR-IP> dev eth0 metric 101Ensure that the metric value is lower than other default gateways.
sudo route -n change default <WARP-CONNECTOR-IP> -interface en0route /p add 0.0.0.0 mask 0.0.0.0 <WARP-CONNECTOR-IP> metric 101Ensure that the metric value is lower than other default gateways.
To validate subnet routing, check your routing table and ensure that traffic is routing through the CloudflareWARP virtual interface.
You can now test if traffic from your subnet routes through Cloudflare. For example,
- On the
10.0.0.2device, runcurl --ipv4 www.google.com. - Check your Gateway DNS logs for queries from
warp_connector@<your-team-name>.cloudflareaccess.com. Logs may take a few minutes to populate.
    flowchart LR
      subgraph subnet1[Subnet 10.0.0.0/24]
        device1["Device
        10.0.0.2"]--Request-->router1["WARP Connector
        10.0.0.1"]
      end
      router1-->C((Cloudflare))-->I{Internet}
Was this helpful?
- Resources
- API
- New to Cloudflare?
- Products
- Sponsorships
- Open Source
- Support
- Help Center
- System Status
- Compliance
- GDPR
- Company
- cloudflare.com
- Our team
- Careers
- 2025 Cloudflare, Inc.
- Privacy Policy
- Terms of Use
- Report Security Issues
- Trademark