
-
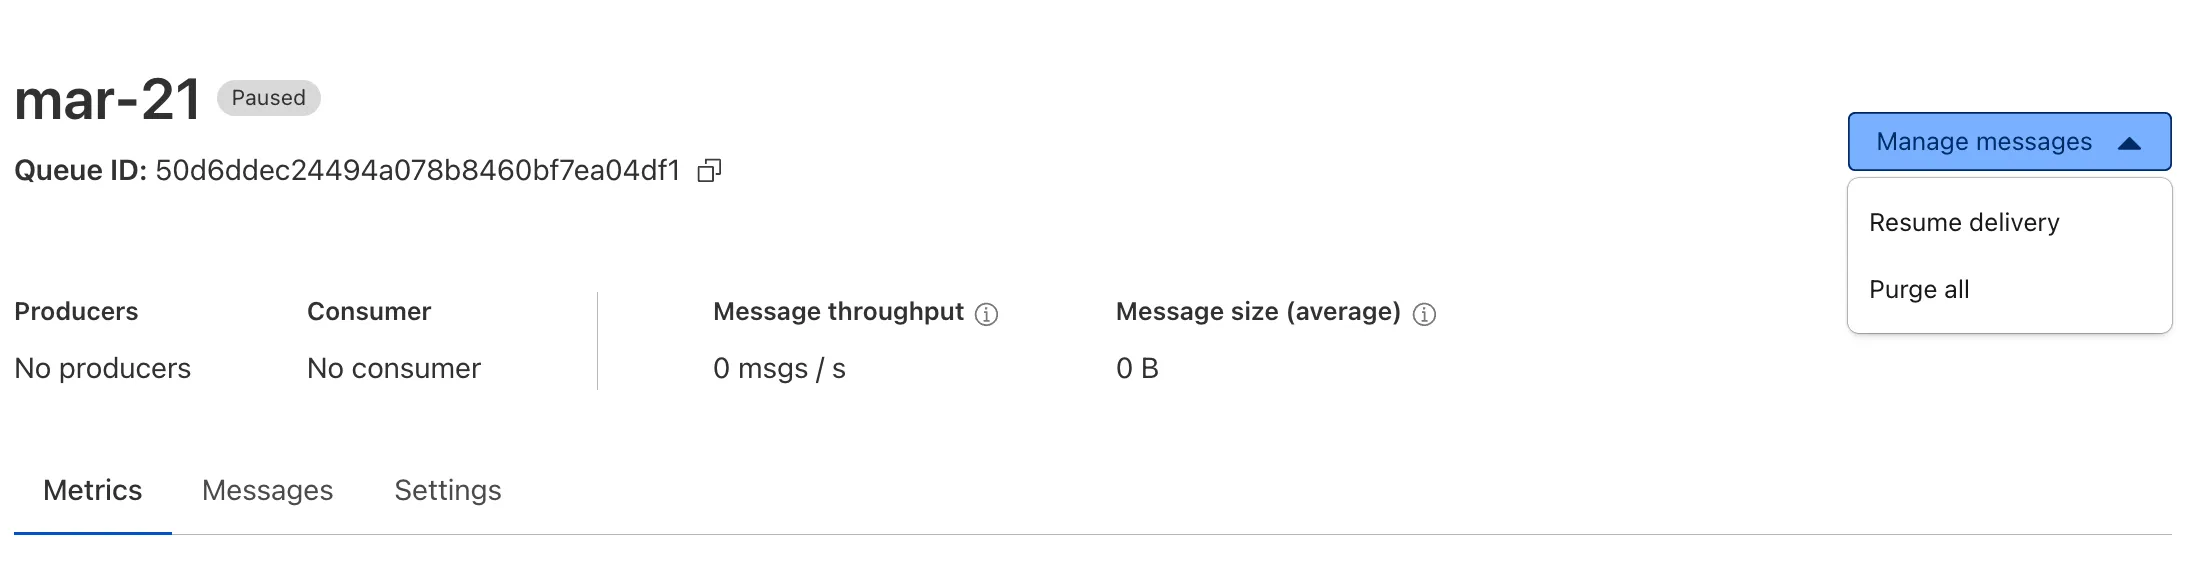
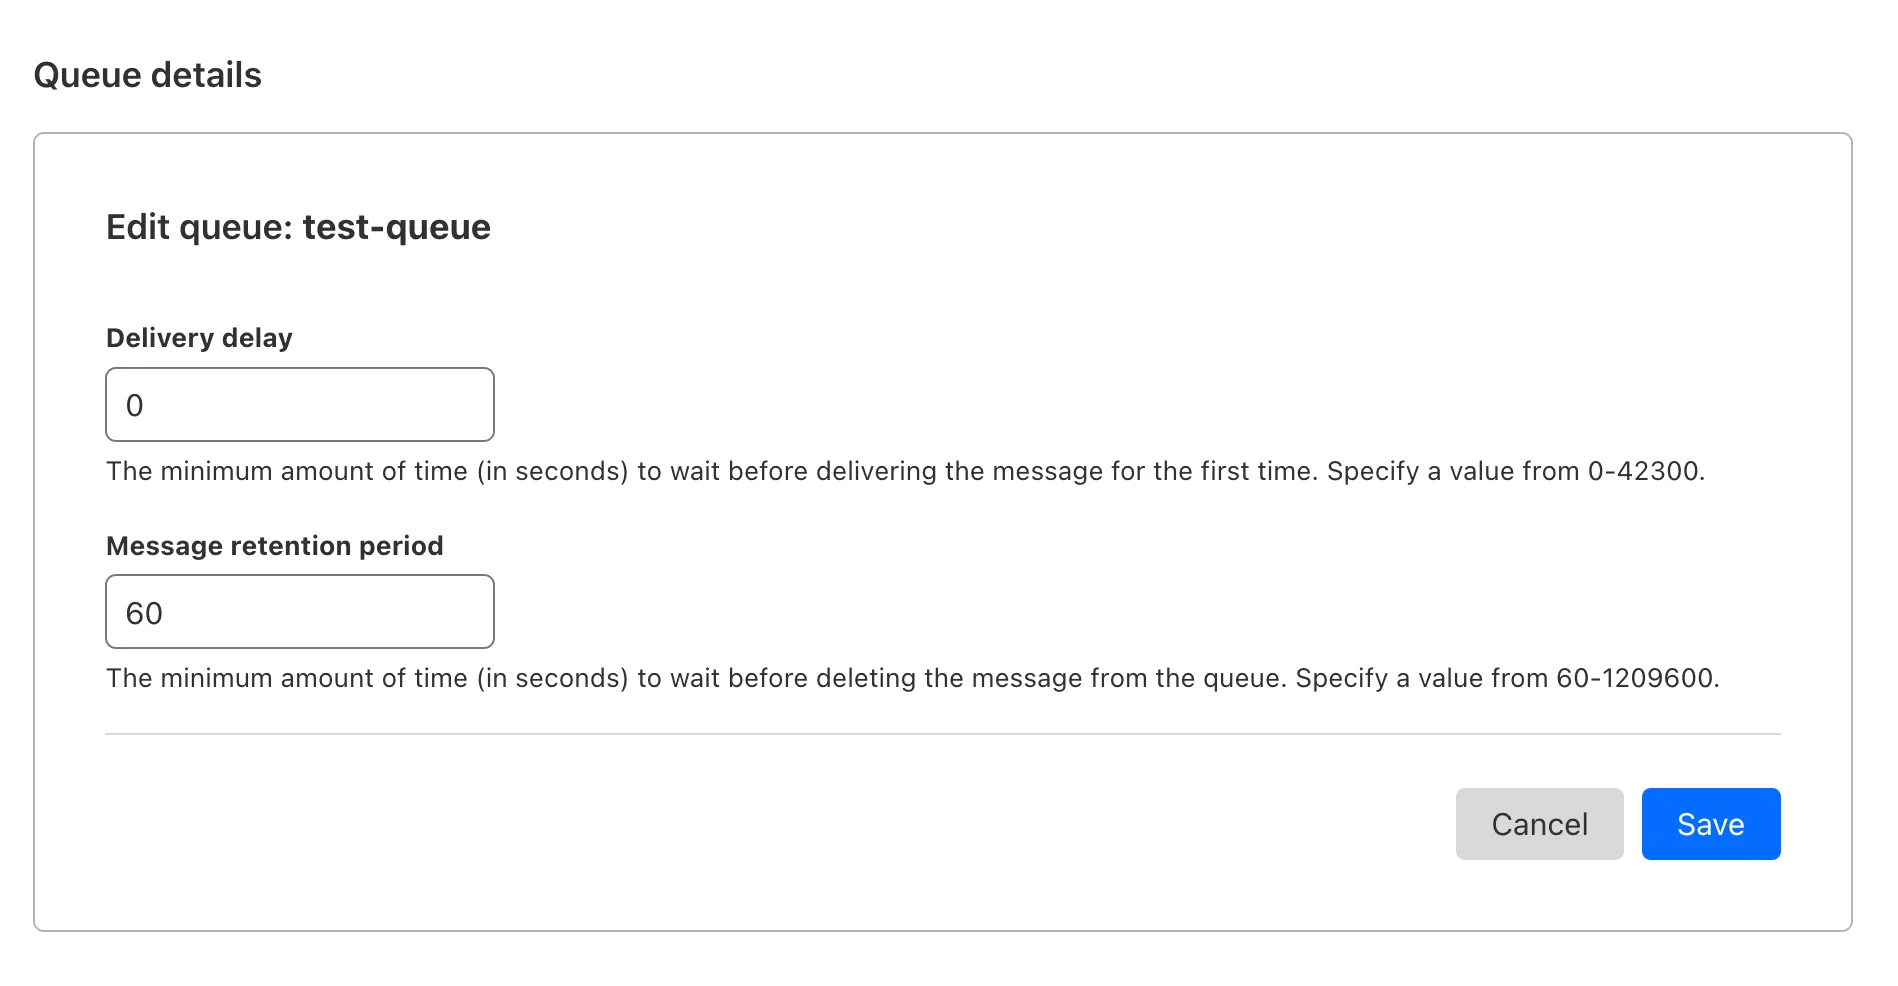
Queues now supports the ability to pause message delivery and/or purge (delete) messages on a queue. These operations can be useful when:
- Your consumer has a bug or downtime, and you want to temporarily stop messages from being processed while you fix the bug
- You have pushed invalid messages to a queue due to a code change during development, and you want to clean up the backlog
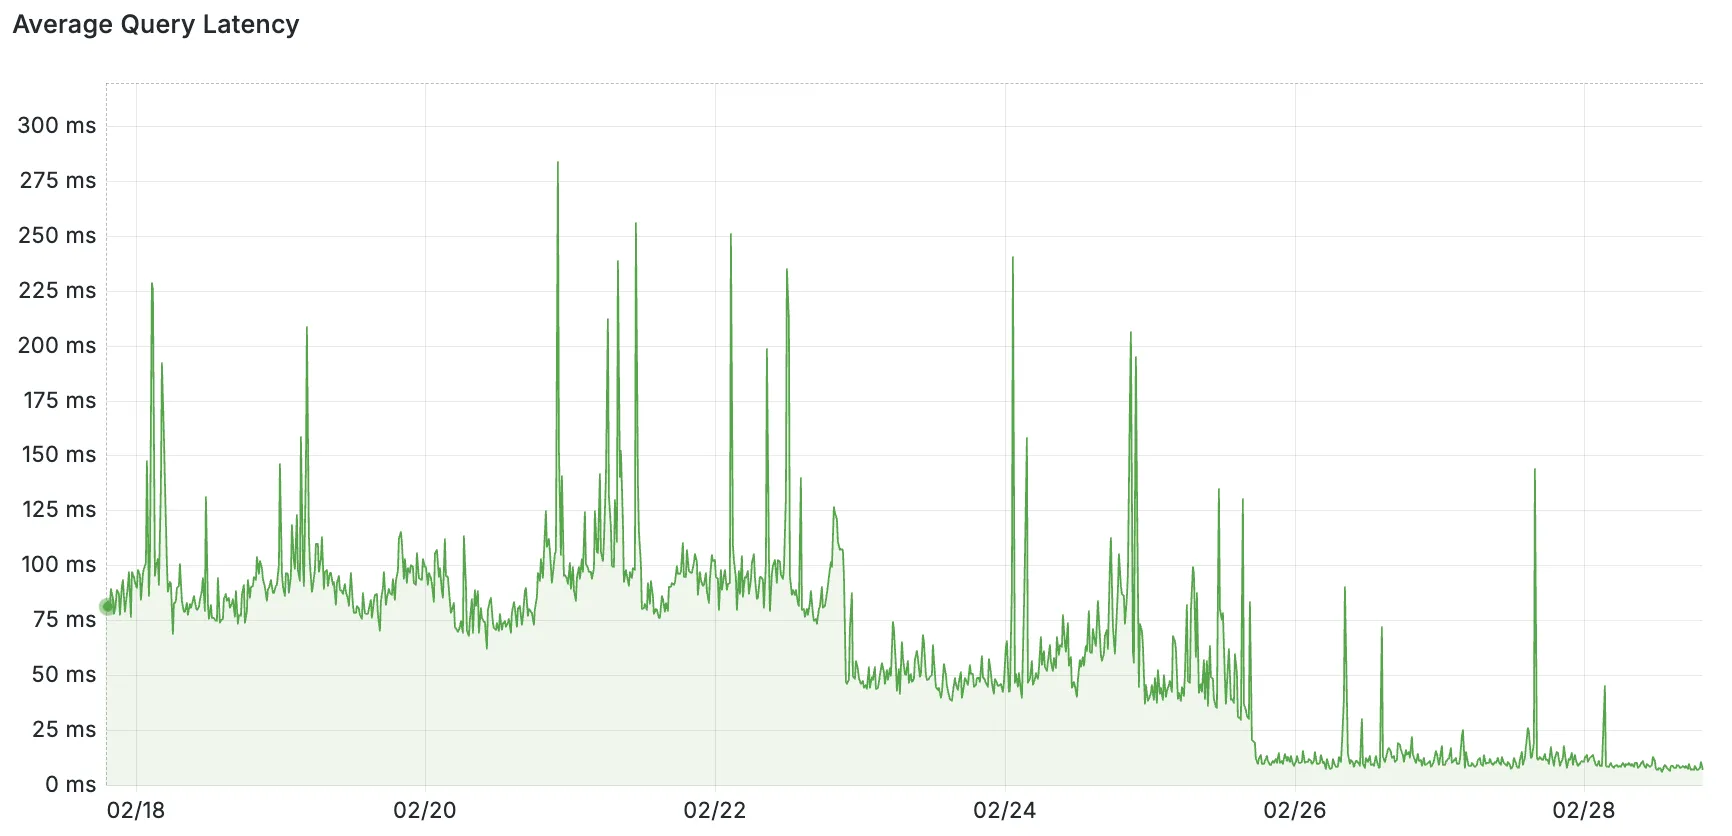
- Your queue has a backlog that is stale and you want to clean it up to allow new messages to be consumed
To pause a queue using Wrangler, run the
pause-deliverycommand. Paused queues continue to receive messages. And you can easily unpause a queue using theresume-deliverycommand.Pause and resume a queue $ wrangler queues pause-delivery my-queuePausing message delivery for queue my-queue.Paused message delivery for queue my-queue.$ wrangler queues resume-delivery my-queueResuming message delivery for queue my-queue.Resumed message delivery for queue my-queue.Purging a queue permanently deletes all messages in the queue. Unlike pausing, purging is an irreversible operation:
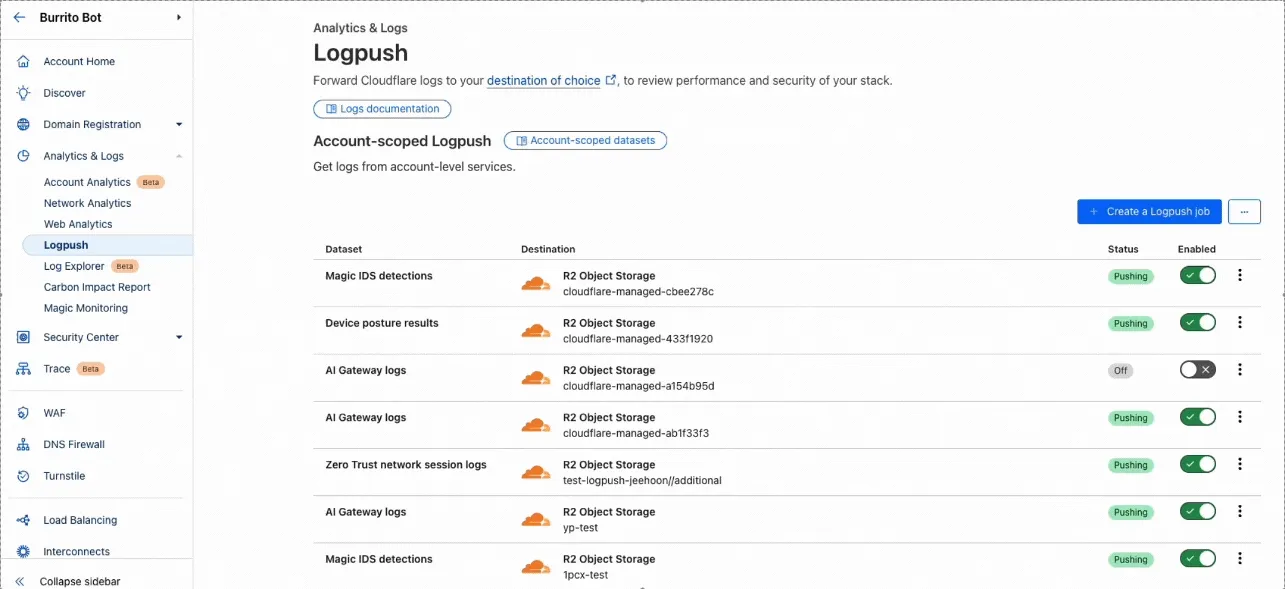
Purge a queue $ wrangler queues purge my-queue✔ This operation will permanently delete all the messages in queue my-queue. Type my-queue to proceed. … my-queuePurged queue 'my-queue'You can also do these operations using the Queues REST API, or the dashboard page for a queue.
This feature is available on all new and existing queues. Head over to the pause and purge documentation to learn more. And if you haven't used Cloudflare Queues before, get started with the Cloudflare Queues guide.
-

Cloudflare Registrar now supports
.aiand.shopdomains. These are two of our most highly-requested top-level domains (TLDs) and are great additions to the 300+ other TLDs we support ↗.Starting today, customers can:
- Register and renew these domains at cost without any markups or add-on fees
- Enjoy best-in-class security and performance with native integrations with Cloudflare DNS, CDN, and SSL services like one-click DNSSEC
- Combat domain hijacking with Custom Domain Protection ↗ (available on enterprise plans)
We can't wait to see what AI and e-commerce projects you deploy on Cloudflare. To get started, transfer your domains to Cloudflare or search for new ones to register ↗.
-
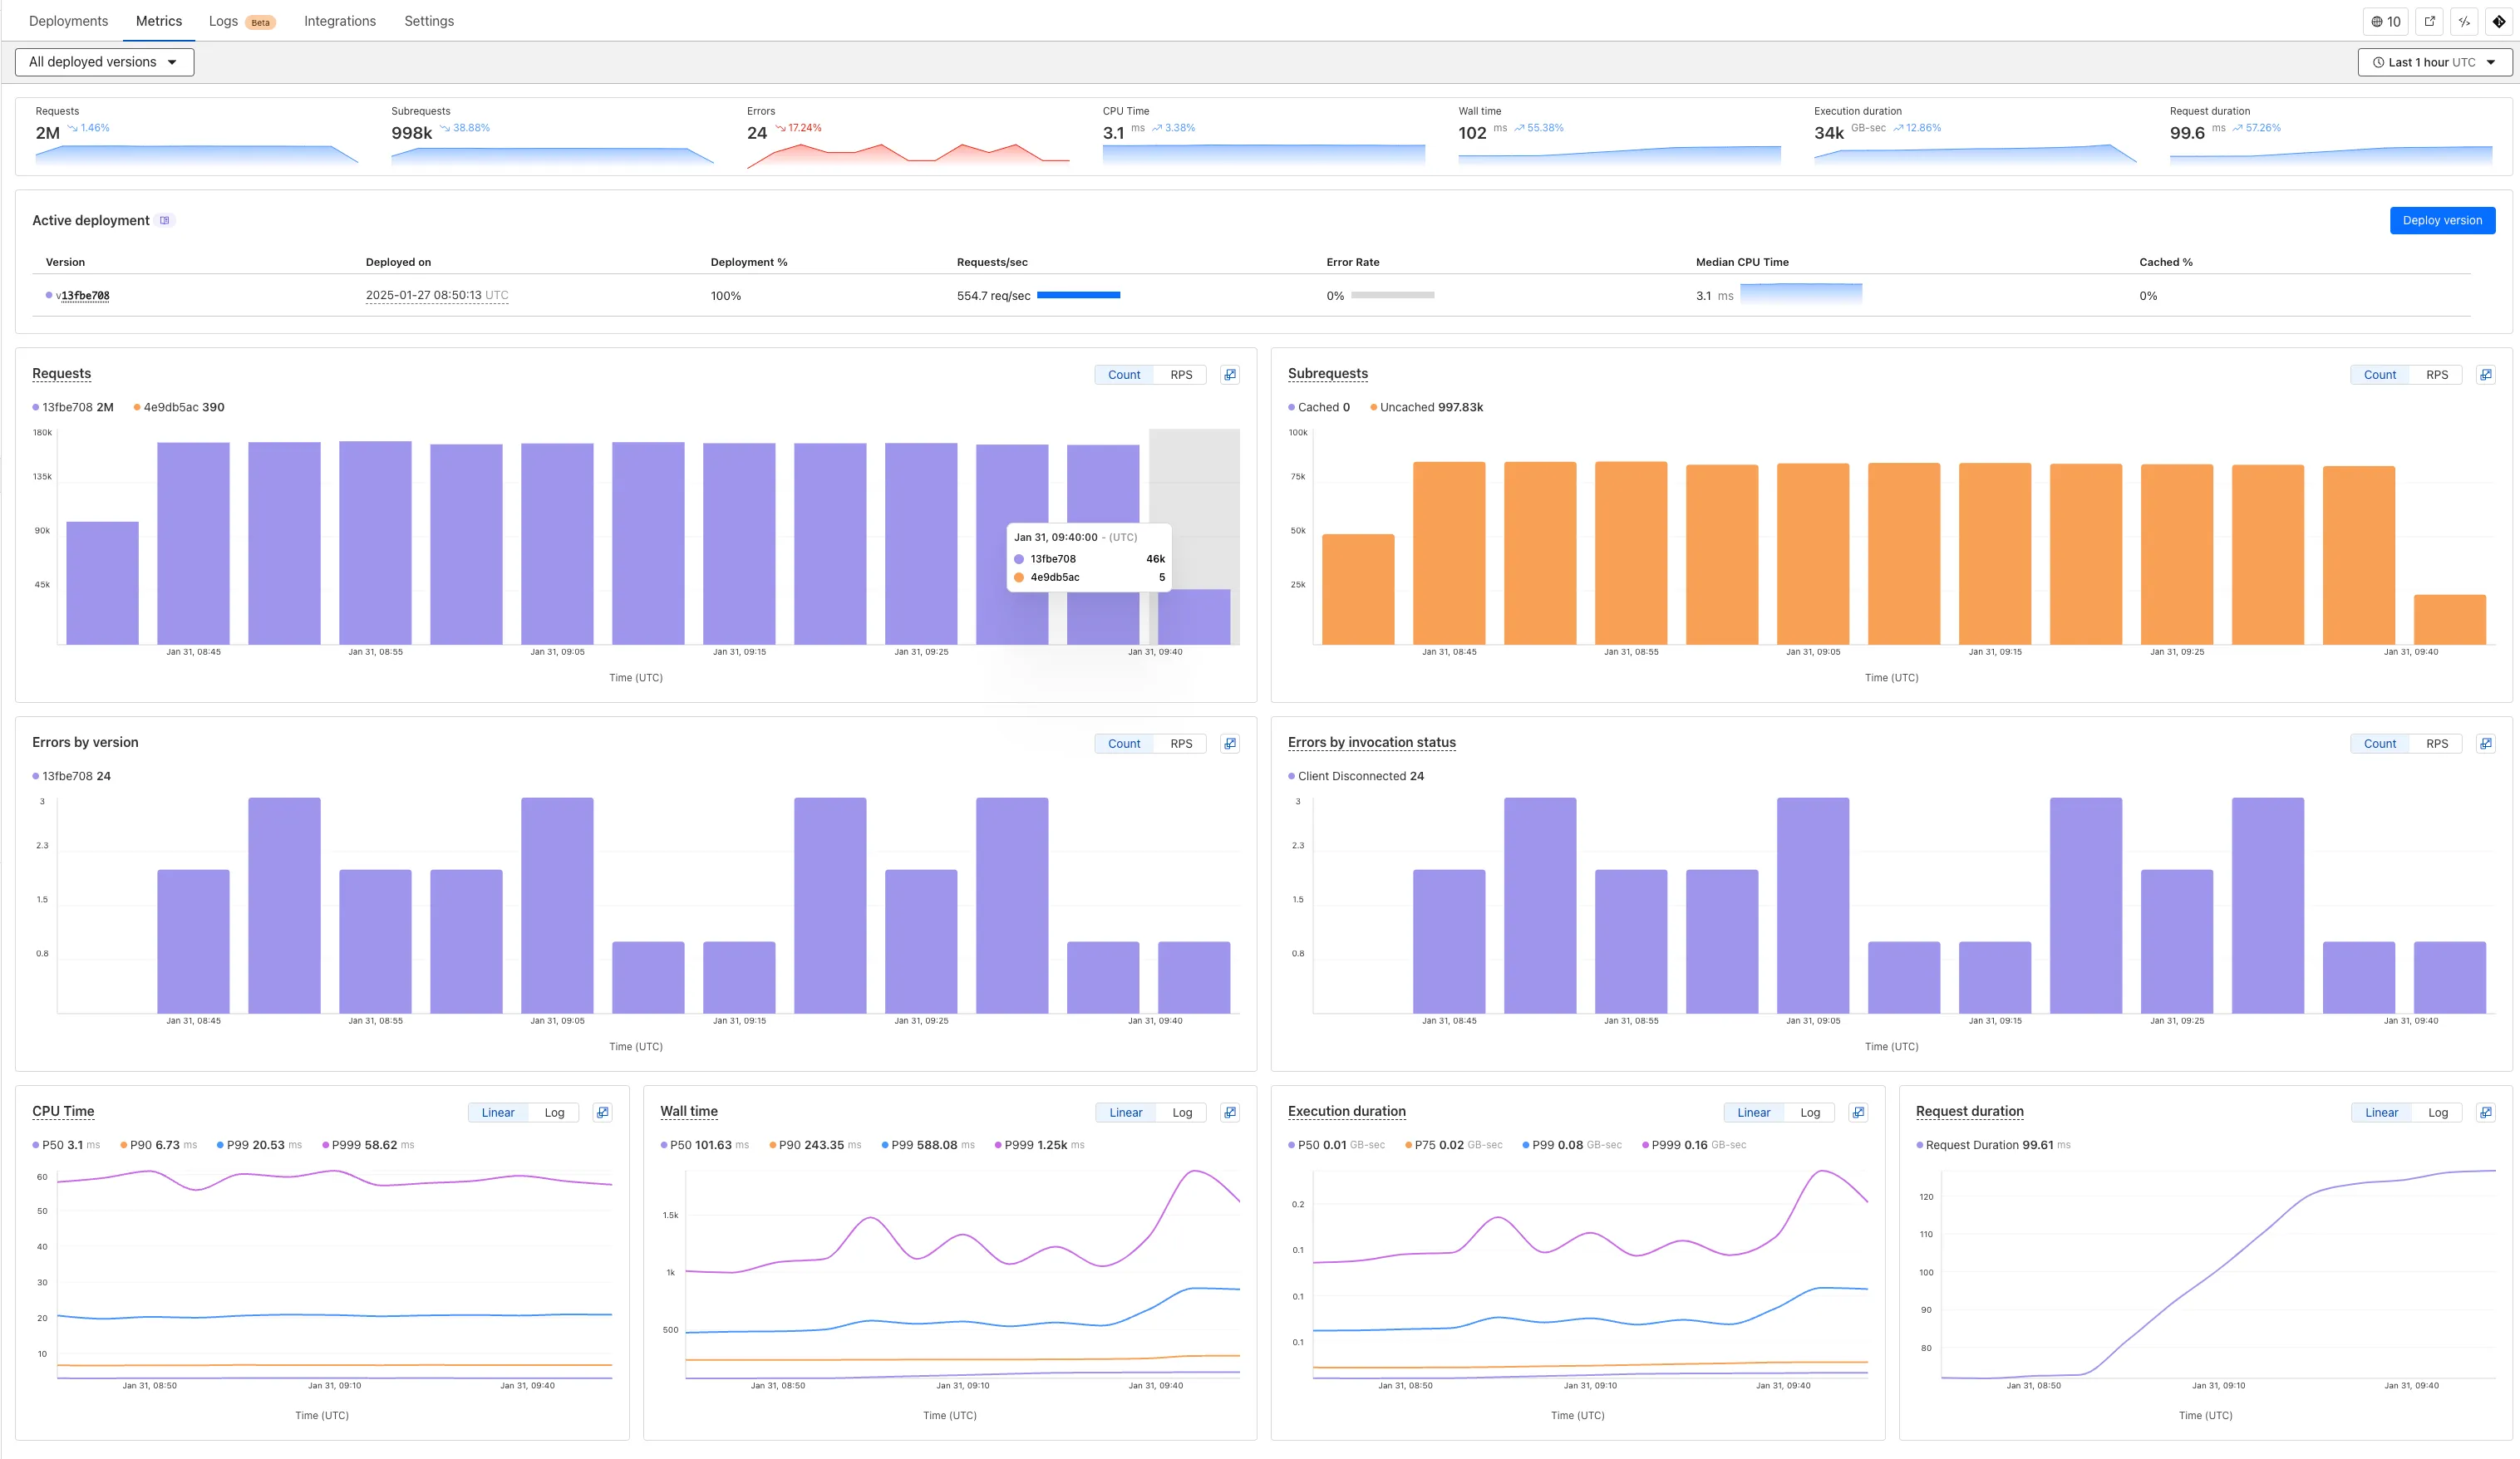
You can now run a Worker for up to 5 minutes of CPU time for each request.
Previously, each Workers request ran for a maximum of 30 seconds of CPU time — that is the time that a Worker is actually performing a task (we still allowed unlimited wall-clock time, in case you were waiting on slow resources). This meant that some compute-intensive tasks were impossible to do with a Worker. For instance, you might want to take the cryptographic hash of a large file from R2. If this computation ran for over 30 seconds, the Worker request would have timed out.
By default, Workers are still limited to 30 seconds of CPU time. This protects developers from incurring accidental cost due to buggy code.
By changing the
cpu_msvalue in your Wrangler configuration, you can opt in to any value up to 300,000 (5 minutes).{// ...rest of your configuration..."limits": {"cpu_ms": 300000,},// ...rest of your configuration...}[limits]cpu_ms = 300_000For more information on the updates limits, see the documentation on Wrangler configuration for
cpu_msand on Workers CPU time limits.For building long-running tasks on Cloudflare, we also recommend checking out Workflows and Queues.
-
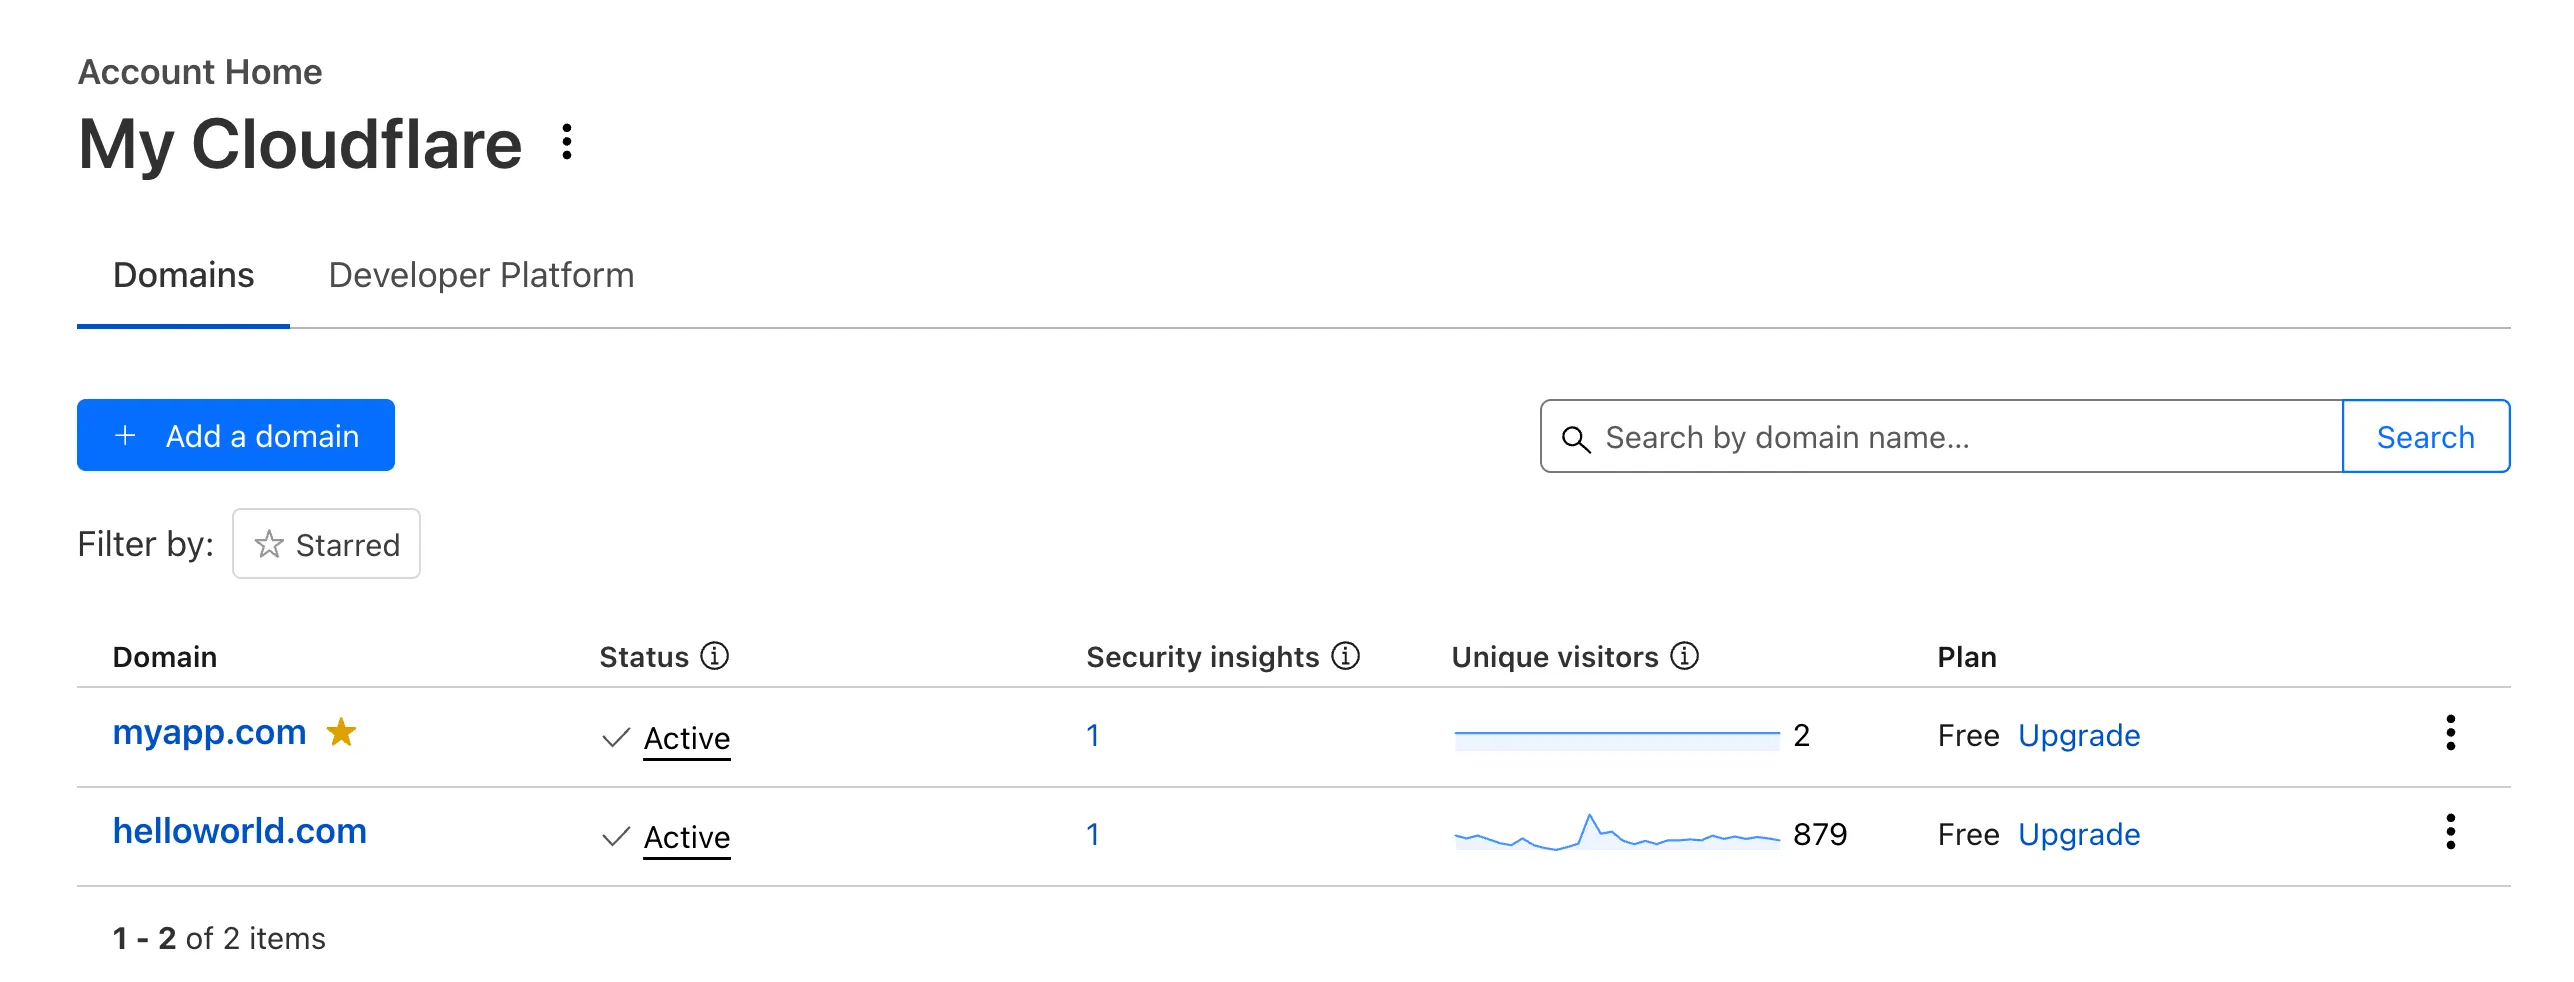
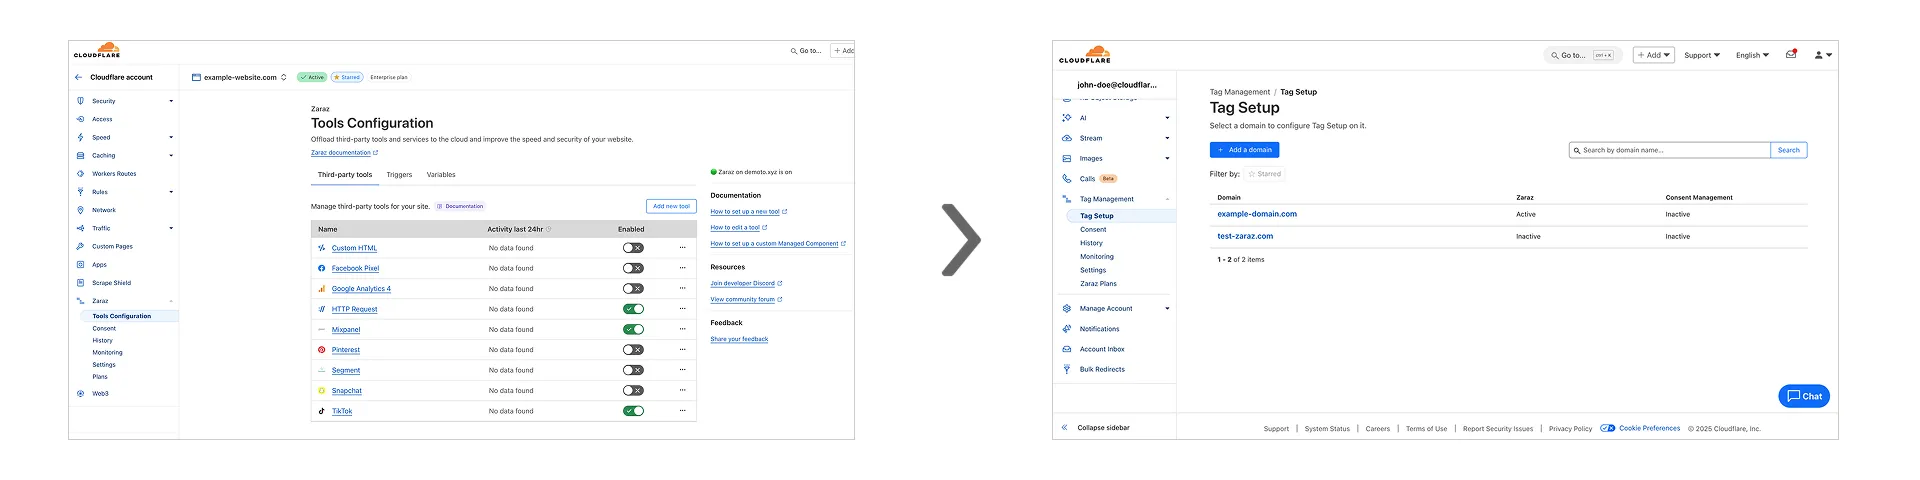
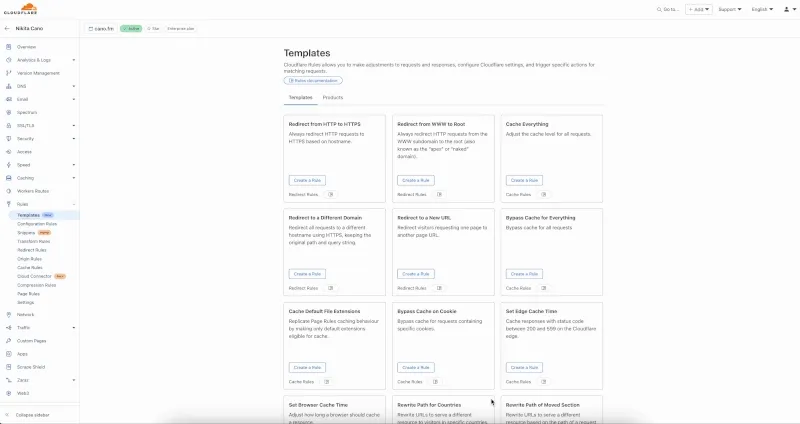
Recently, Account Home has been updated to streamline your workflows:
-
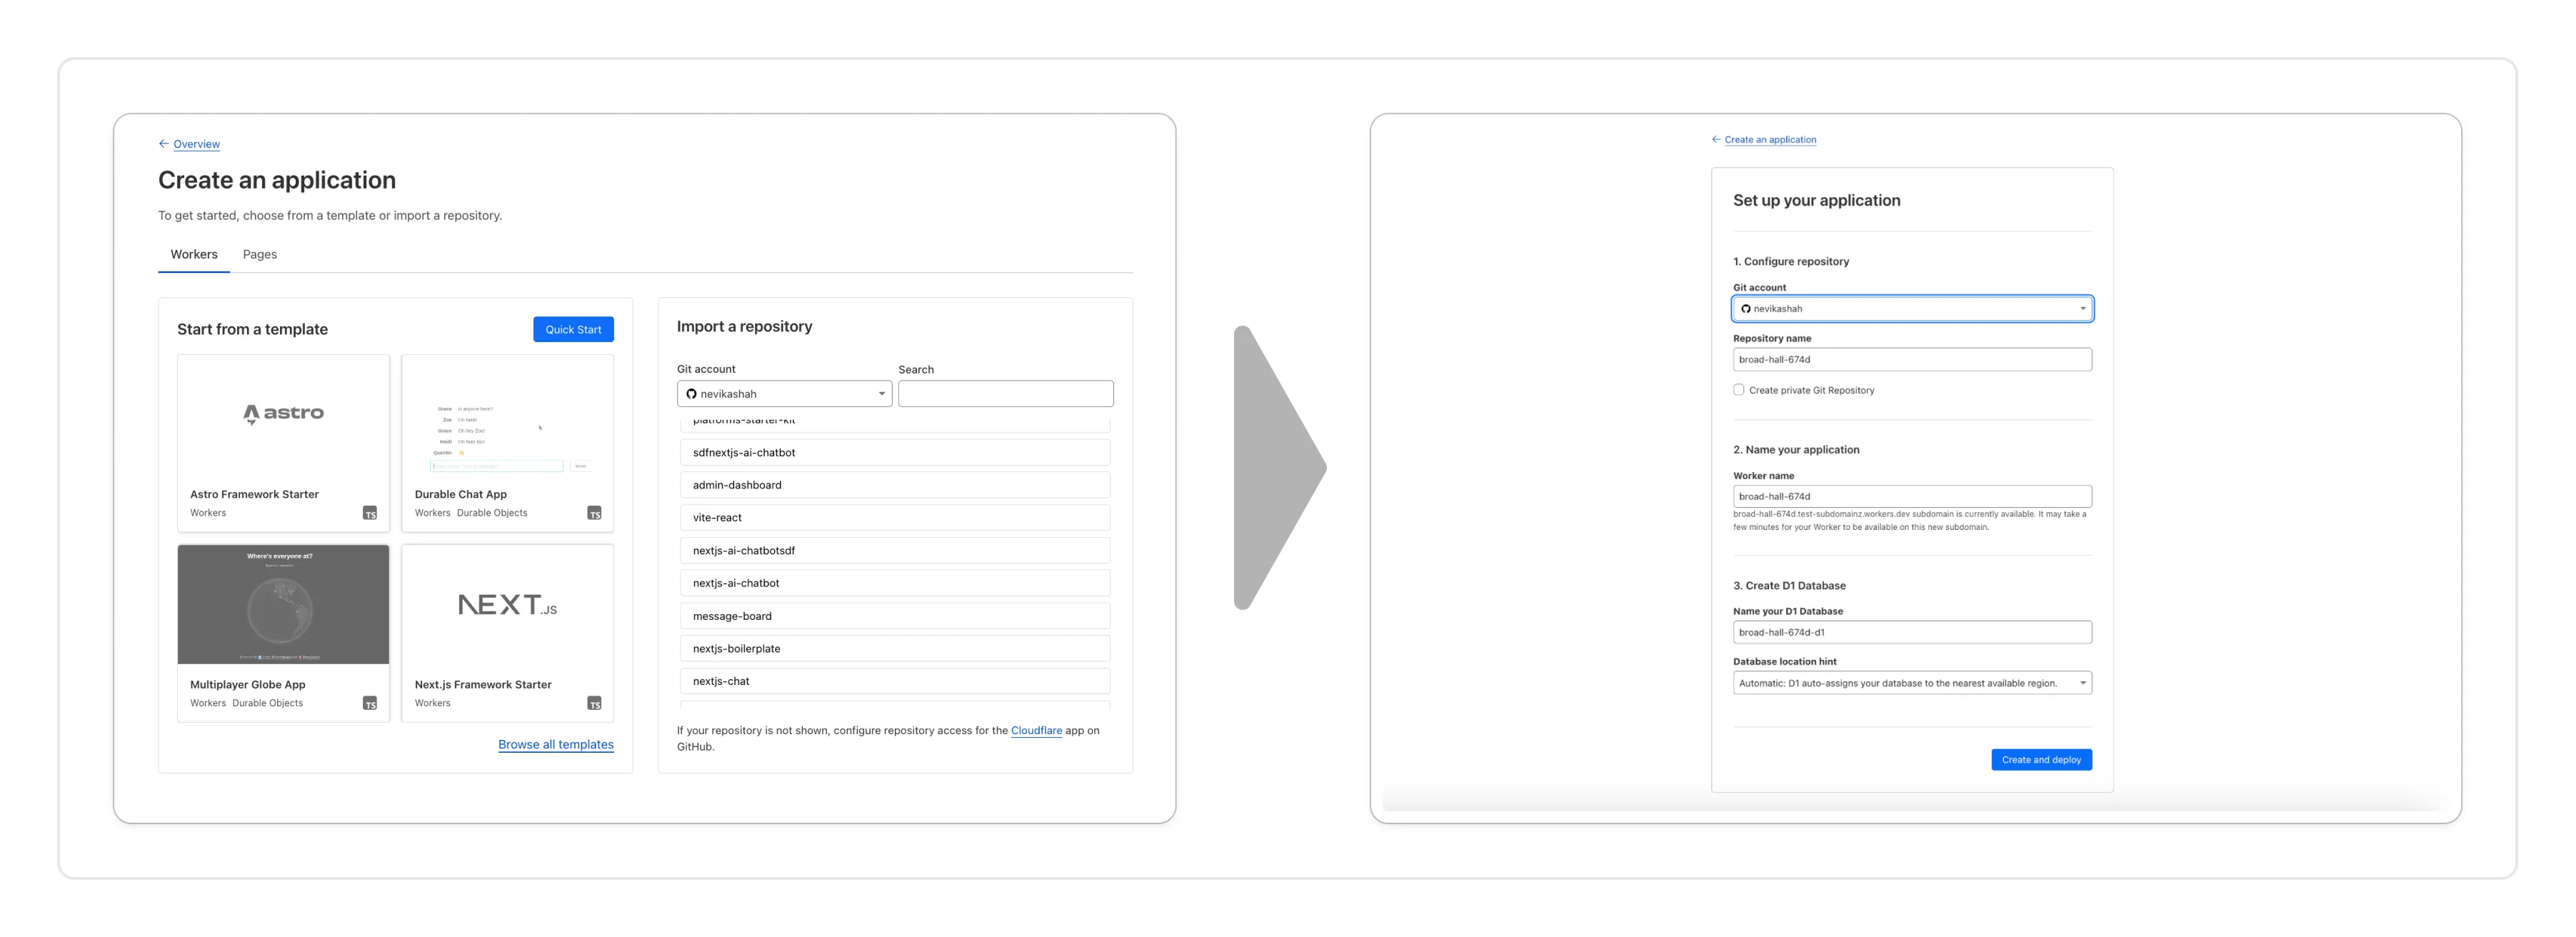
Recent Workers projects: You'll now find your projects readily accessible from a new
Developer Platformtab on Account Home. See recently-modified projects and explore what you can work our developer-focused products. -
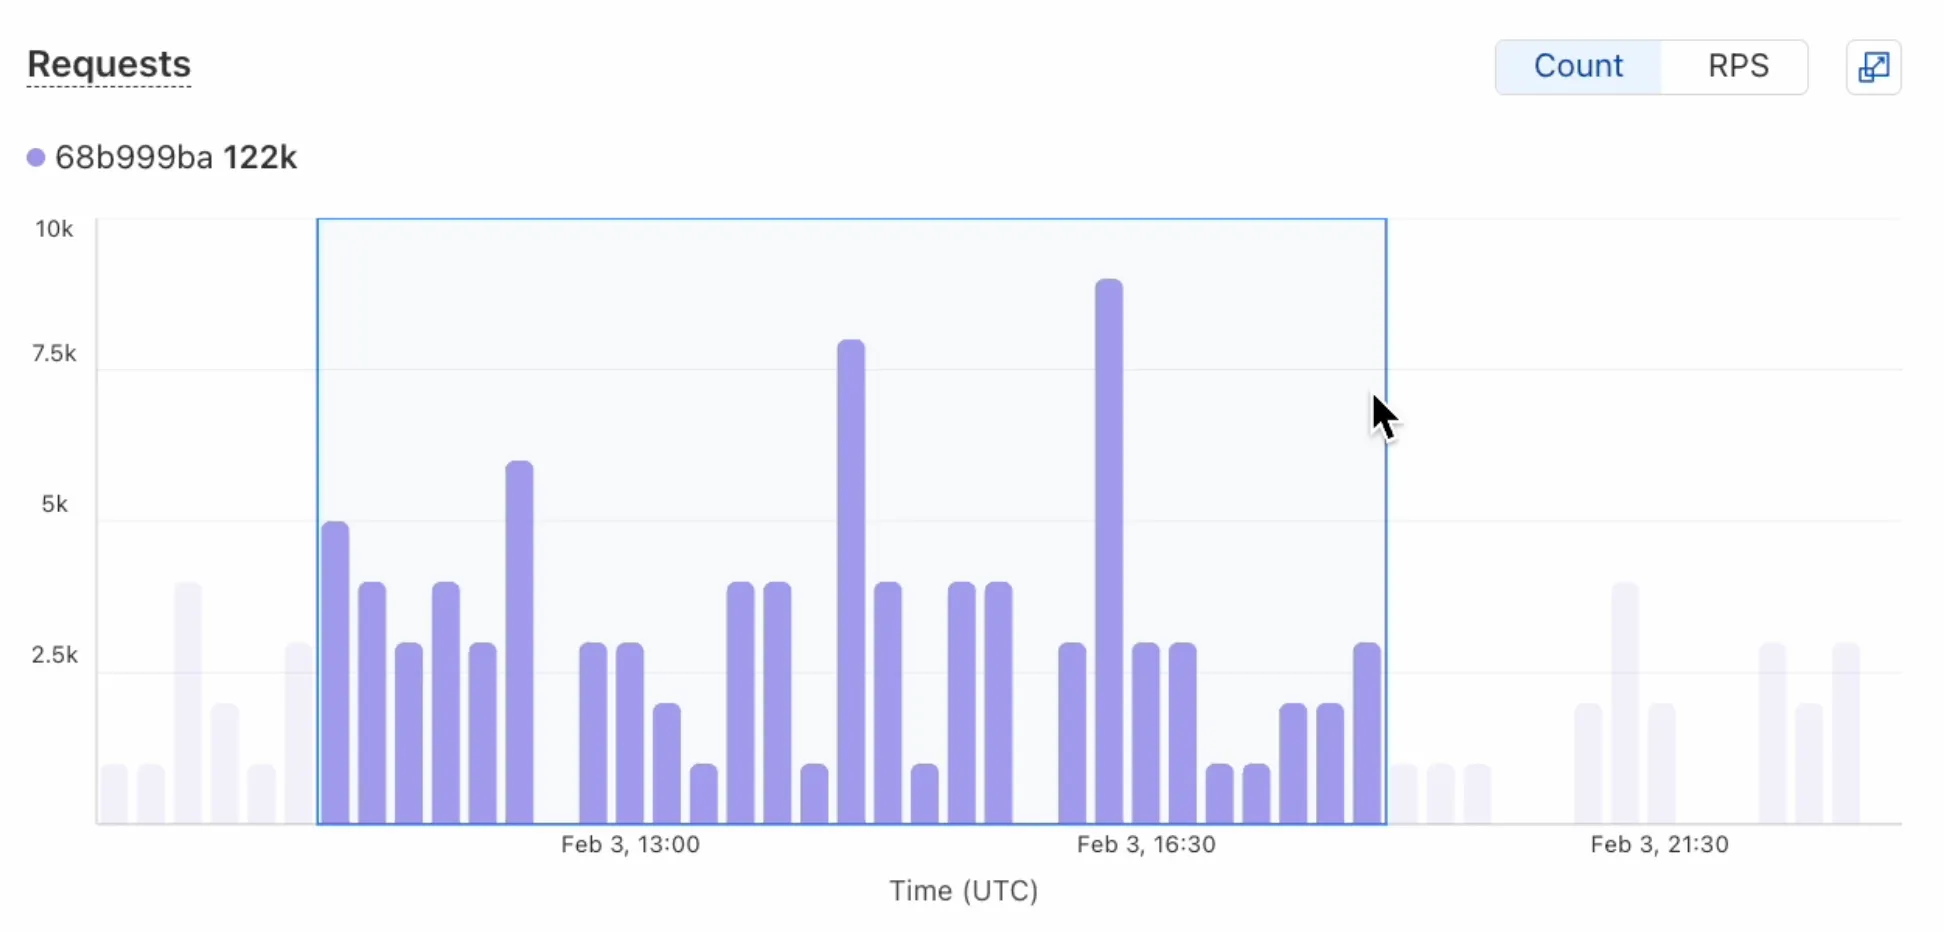
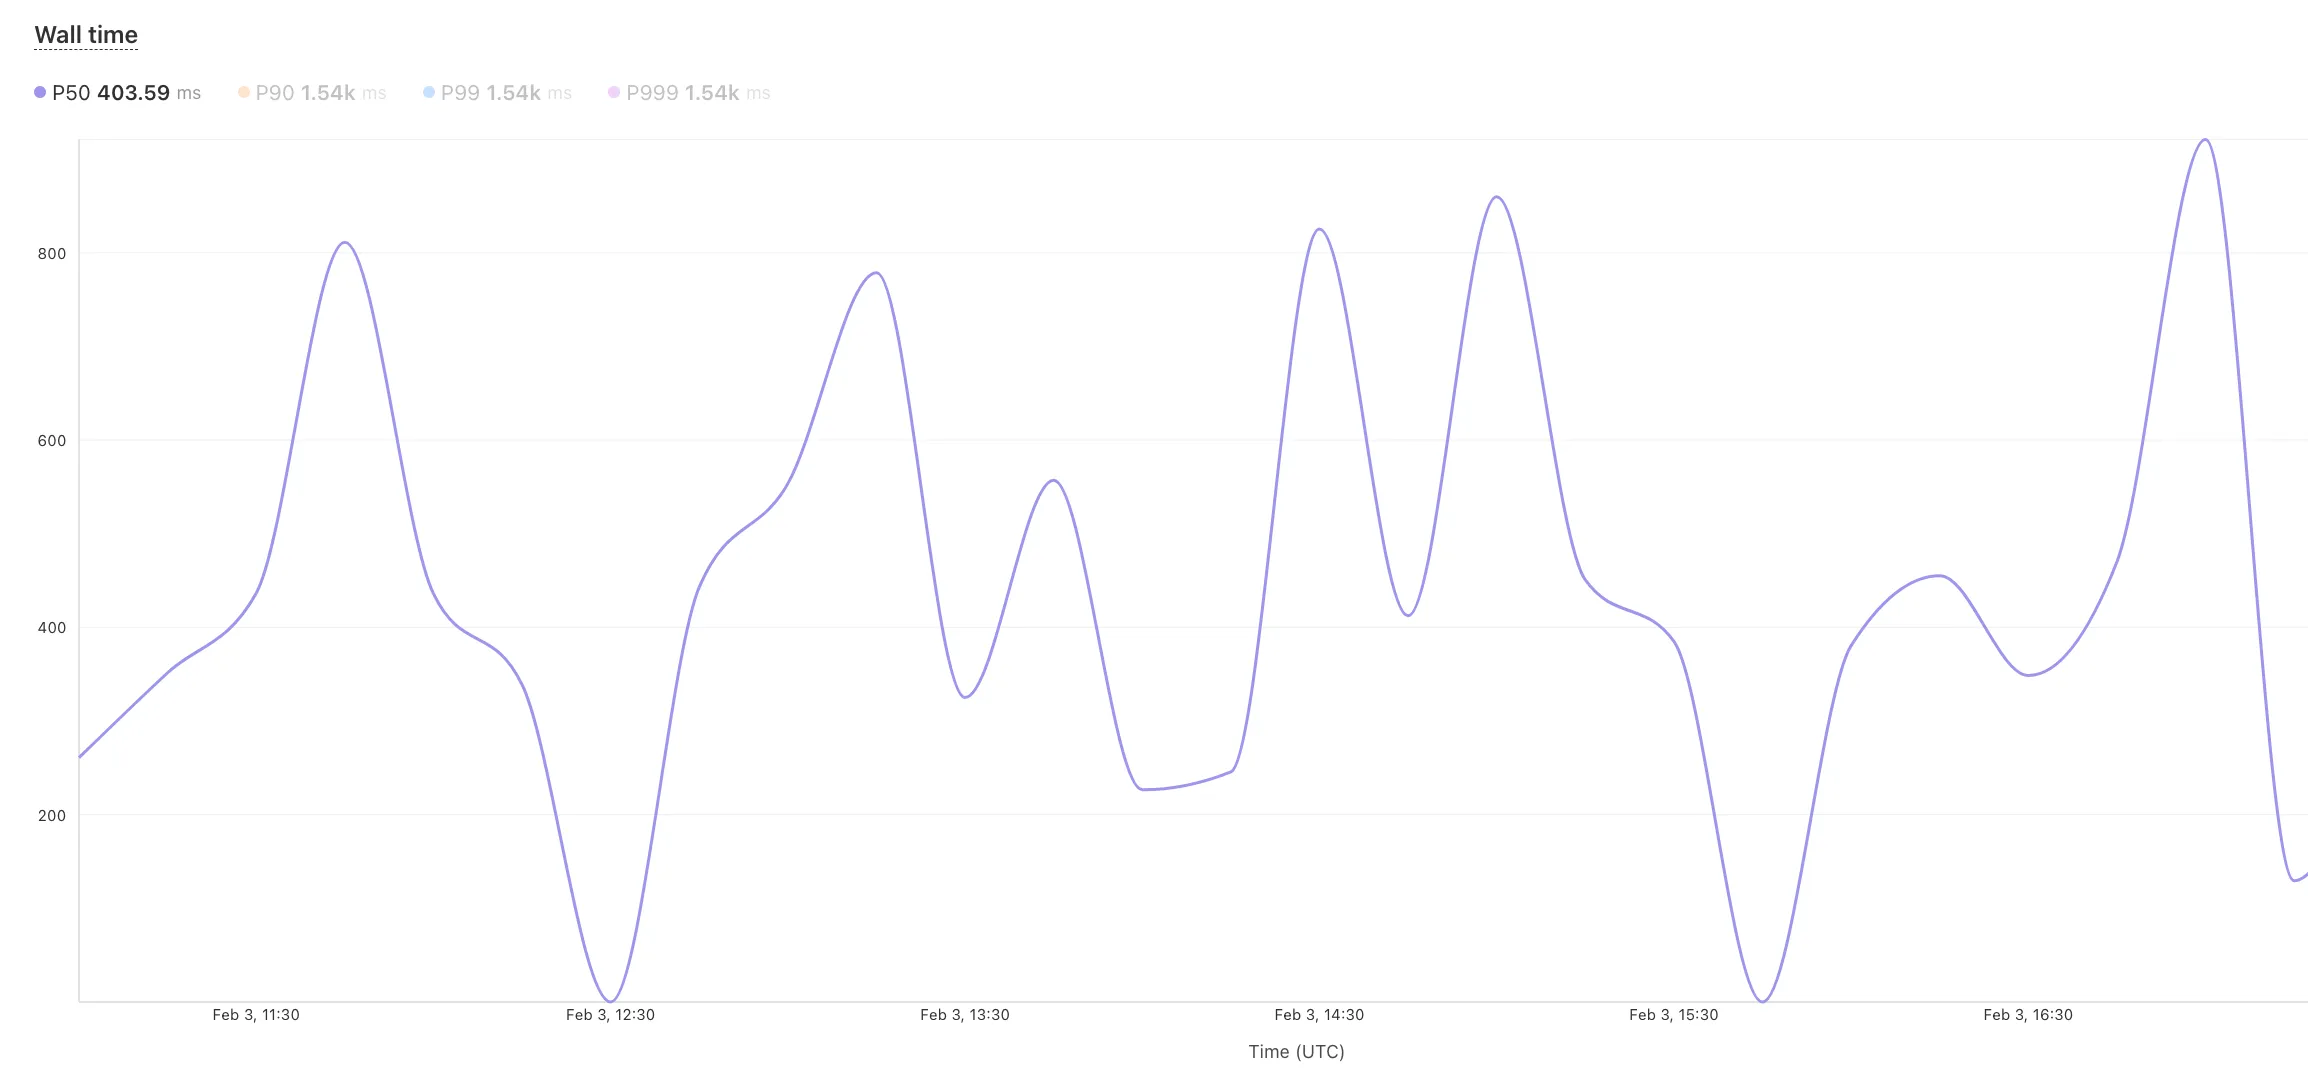
Traffic and security insights: Get a snapshot of domain performance at a glance with key metrics and trends.
-
Quick actions: You can now perform common actions for your account, domains, and even Workers in just 1-2 clicks from the 3-dot menu.
-
Keep starred domains front and center: Now, when you filter for starred domains on Account Home, we'll save your preference so you'll continue to only see starred domains by default.
We can't wait for you to take the new Account Home for a spin.
For more info:
-
-
Source maps are now Generally Available (GA). You can now be uploaded with a maximum gzipped size of 15 MB. Previously, the maximum size limit was 15 MB uncompressed.
Source maps help map between the original source code and the transformed/minified code that gets deployed to production. By uploading your source map, you allow Cloudflare to map the stack trace from exceptions onto the original source code making it easier to debug.

With no source maps uploaded: notice how all the Javascript has been minified to one file, so the stack trace is missing information on file name, shows incorrect line numbers, and incorrectly references
jsinstead ofts.
With source maps uploaded: all methods reference the correct files and line numbers.
Uploading source maps and stack trace remapping happens out of band from the Worker execution, so source maps do not affect upload speed, bundle size, or cold starts. The remapped stack traces are accessible through Tail Workers, Workers Logs, and Workers Logpush.
To enable source maps, add the following to your Pages Function's or Worker's wrangler configuration:
{"upload_source_maps": true}upload_source_maps = true
-
Update: Mon Mar 24th, 11PM UTC: Next.js has made further changes to address a smaller vulnerability introduced in the patches made to its middleware handling. Users should upgrade to Next.js versions
15.2.4,14.2.26,13.5.10or12.3.6. If you are unable to immediately upgrade or are running an older version of Next.js, you can enable the WAF rule described in this changelog as a mitigation.Update: Mon Mar 24th, 8PM UTC: Next.js has now backported the patch for this vulnerability ↗ to cover Next.js v12 and v13. Users on those versions will need to patch to
13.5.9and12.3.5(respectively) to mitigate the vulnerability.Update: Sat Mar 22nd, 4PM UTC: We have changed this WAF rule to opt-in only, as sites that use auth middleware with third-party auth vendors were observing failing requests.
We strongly recommend updating your version of Next.js (if eligible) to the patched versions, as your app will otherwise be vulnerable to an authentication bypass attack regardless of auth provider.
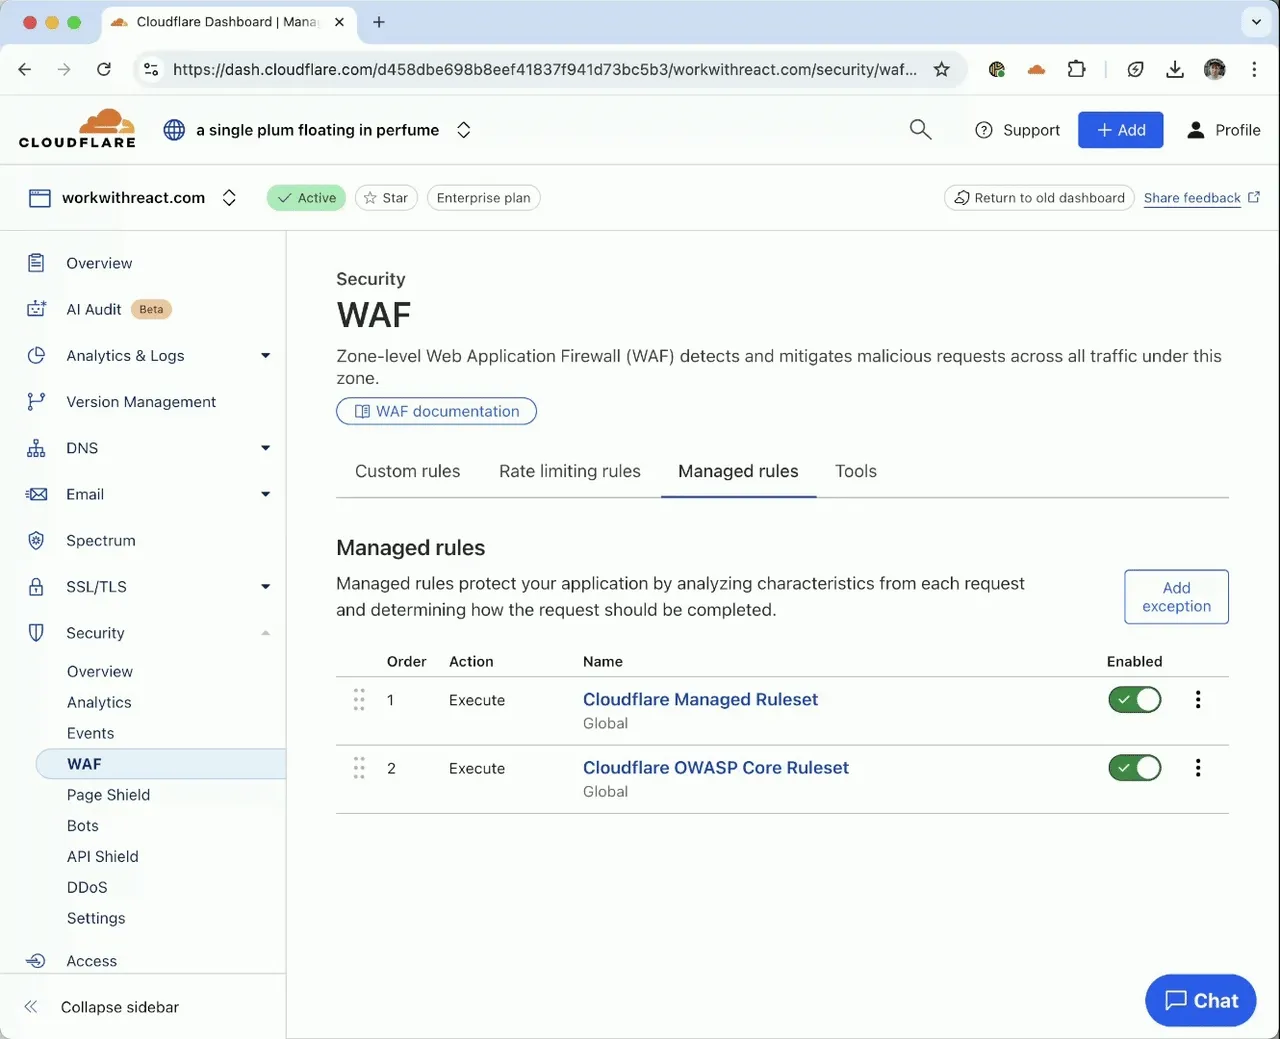
This rule is opt-in only for sites on the Pro plan or above in the WAF managed ruleset.
To enable the rule:
- Head to Security > WAF > Managed rules in the Cloudflare dashboard for the zone (website) you want to protect.
- Click the three dots next to Cloudflare Managed Ruleset and choose Edit
- Scroll down and choose Browse Rules
- Search for CVE-2025-29927 (ruleId:
34583778093748cc83ff7b38f472013e) - Change the Status to Enabled and the Action to Block. You can optionally set the rule to Log, to validate potential impact before enabling it. Log will not block requests.
- Click Next
- Scroll down and choose Save
This will enable the WAF rule and block requests with the
x-middleware-subrequestheader regardless of Next.js version.For users on the Free plan, or who want to define a more specific rule, you can create a Custom WAF rule to block requests with the
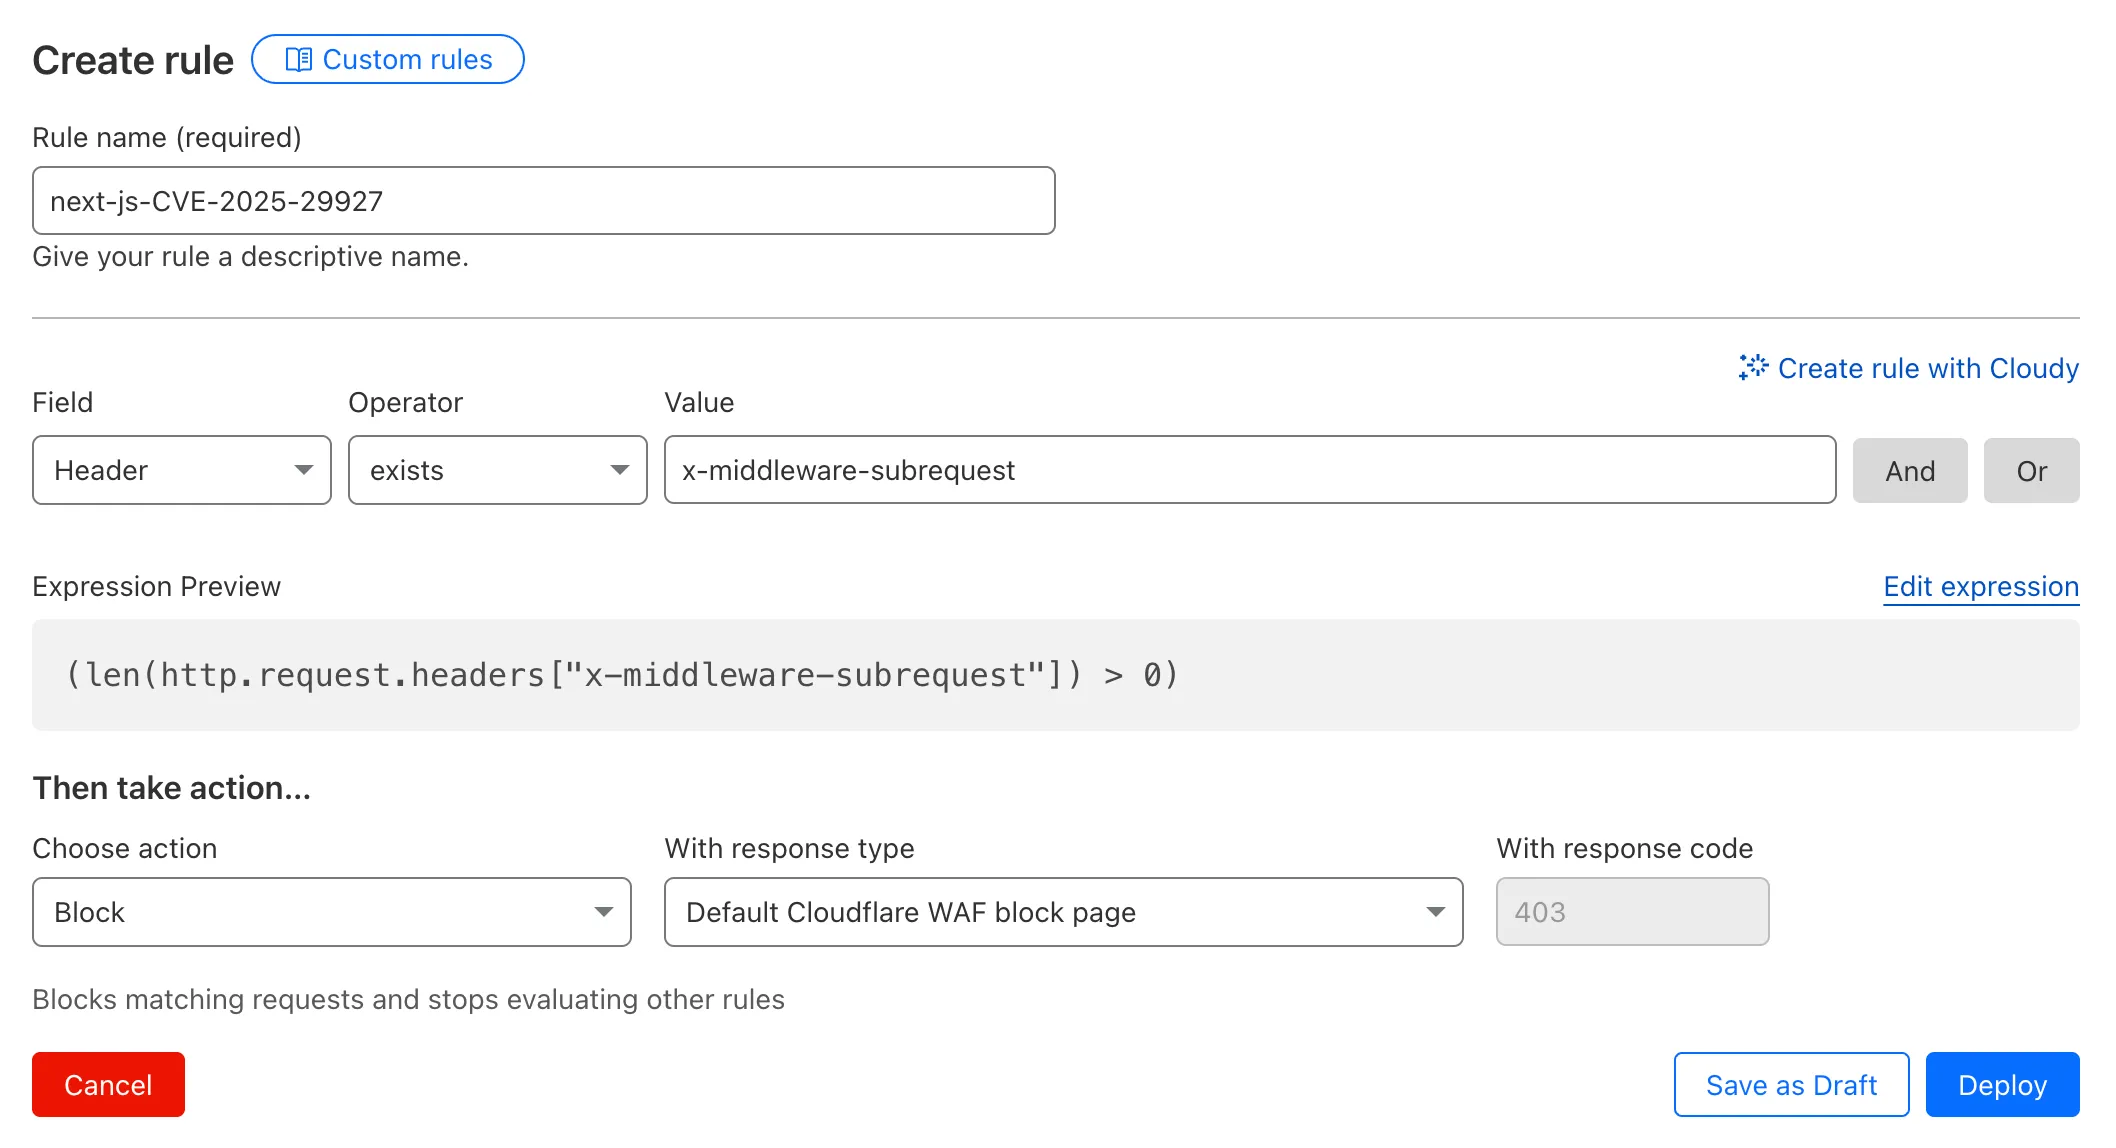
x-middleware-subrequestheader regardless of Next.js version.To create a custom rule:
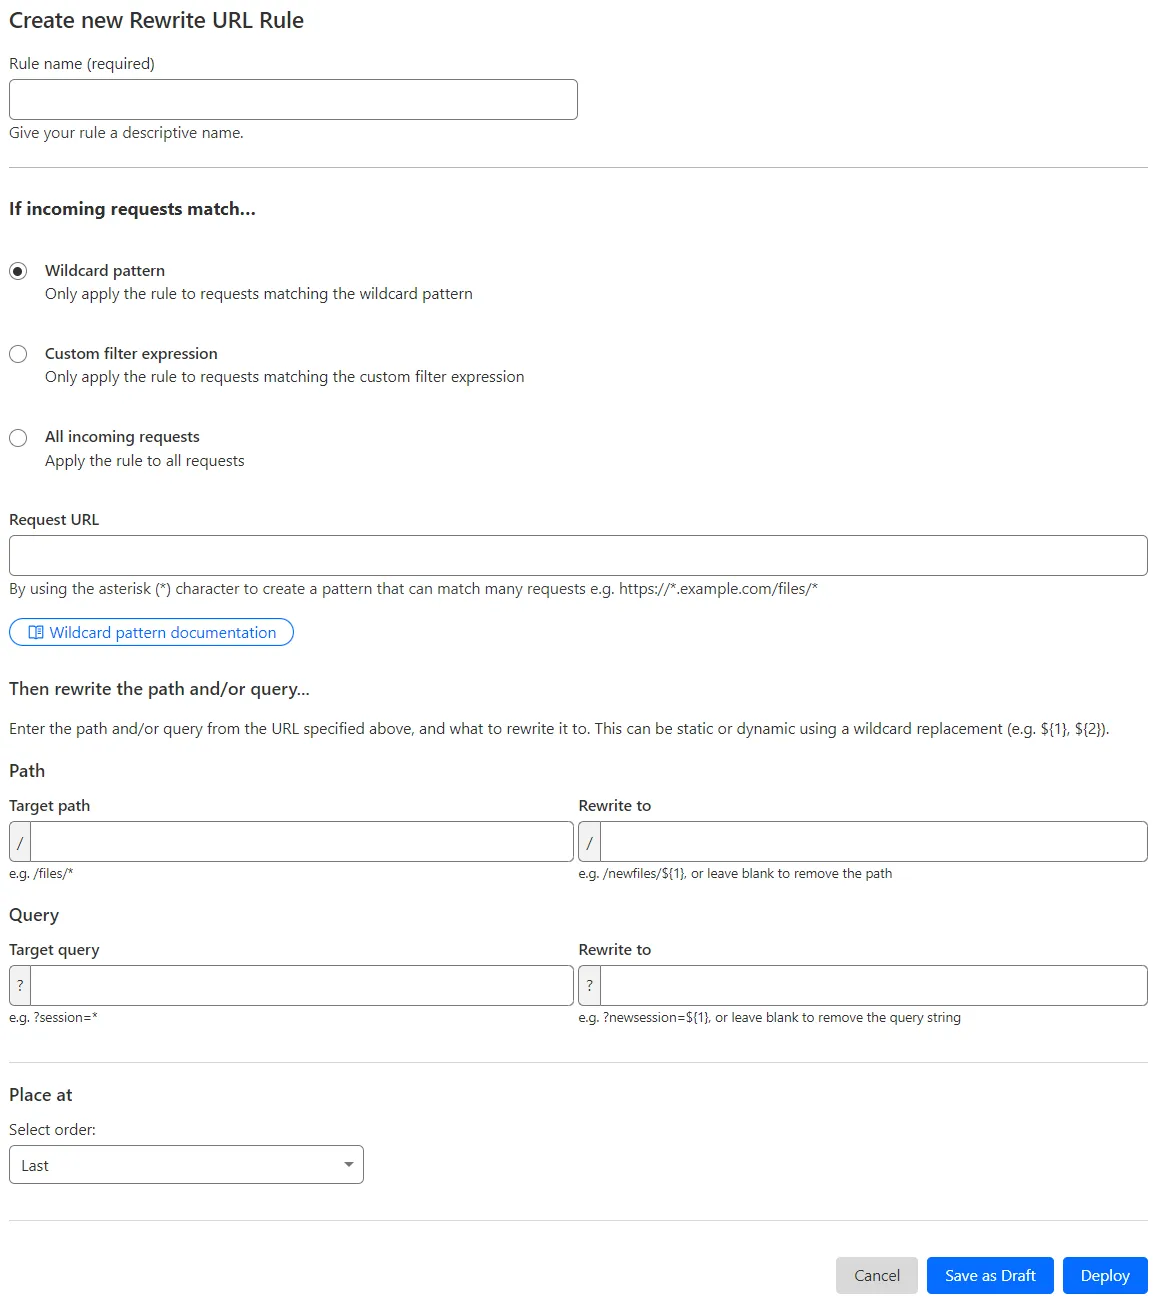
- Head to Security > WAF > Custom rules in the Cloudflare dashboard for the zone (website) you want to protect.
- Give the rule a name - e.g.
next-js-CVE-2025-29927 - Set the matching parameters for the rule match any request where the
x-middleware-subrequestheaderexistsper the rule expression below.
Terminal window (len(http.request.headers["x-middleware-subrequest"]) > 0)- Set the action to 'block'. If you want to observe the impact before blocking requests, set the action to 'log' (and edit the rule later).
- Deploy the rule.
We've made a WAF (Web Application Firewall) rule available to all sites on Cloudflare to protect against the Next.js authentication bypass vulnerability ↗ (
CVE-2025-29927) published on March 21st, 2025.Note: This rule is not enabled by default as it blocked requests across sites for specific authentication middleware.
- This managed rule protects sites using Next.js on Workers and Pages, as well as sites using Cloudflare to protect Next.js applications hosted elsewhere.
- This rule has been made available (but not enabled by default) to all sites as part of our WAF Managed Ruleset and blocks requests that attempt to bypass authentication in Next.js applications.
- The vulnerability affects almost all Next.js versions, and has been fully patched in Next.js
14.2.26and15.2.4. Earlier, interim releases did not fully patch this vulnerability. - Users on older versions of Next.js (
11.1.4to13.5.6) did not originally have a patch available, but this the patch for this vulnerability and a subsequent additional patch have been backported to Next.js versions12.3.6and13.5.10as of Monday, March 24th. Users on Next.js v11 will need to deploy the stated workaround or enable the WAF rule.
The managed WAF rule mitigates this by blocking external user requests with the
x-middleware-subrequestheader regardless of Next.js version, but we recommend users using Next.js 14 and 15 upgrade to the patched versions of Next.js as an additional mitigation.
-
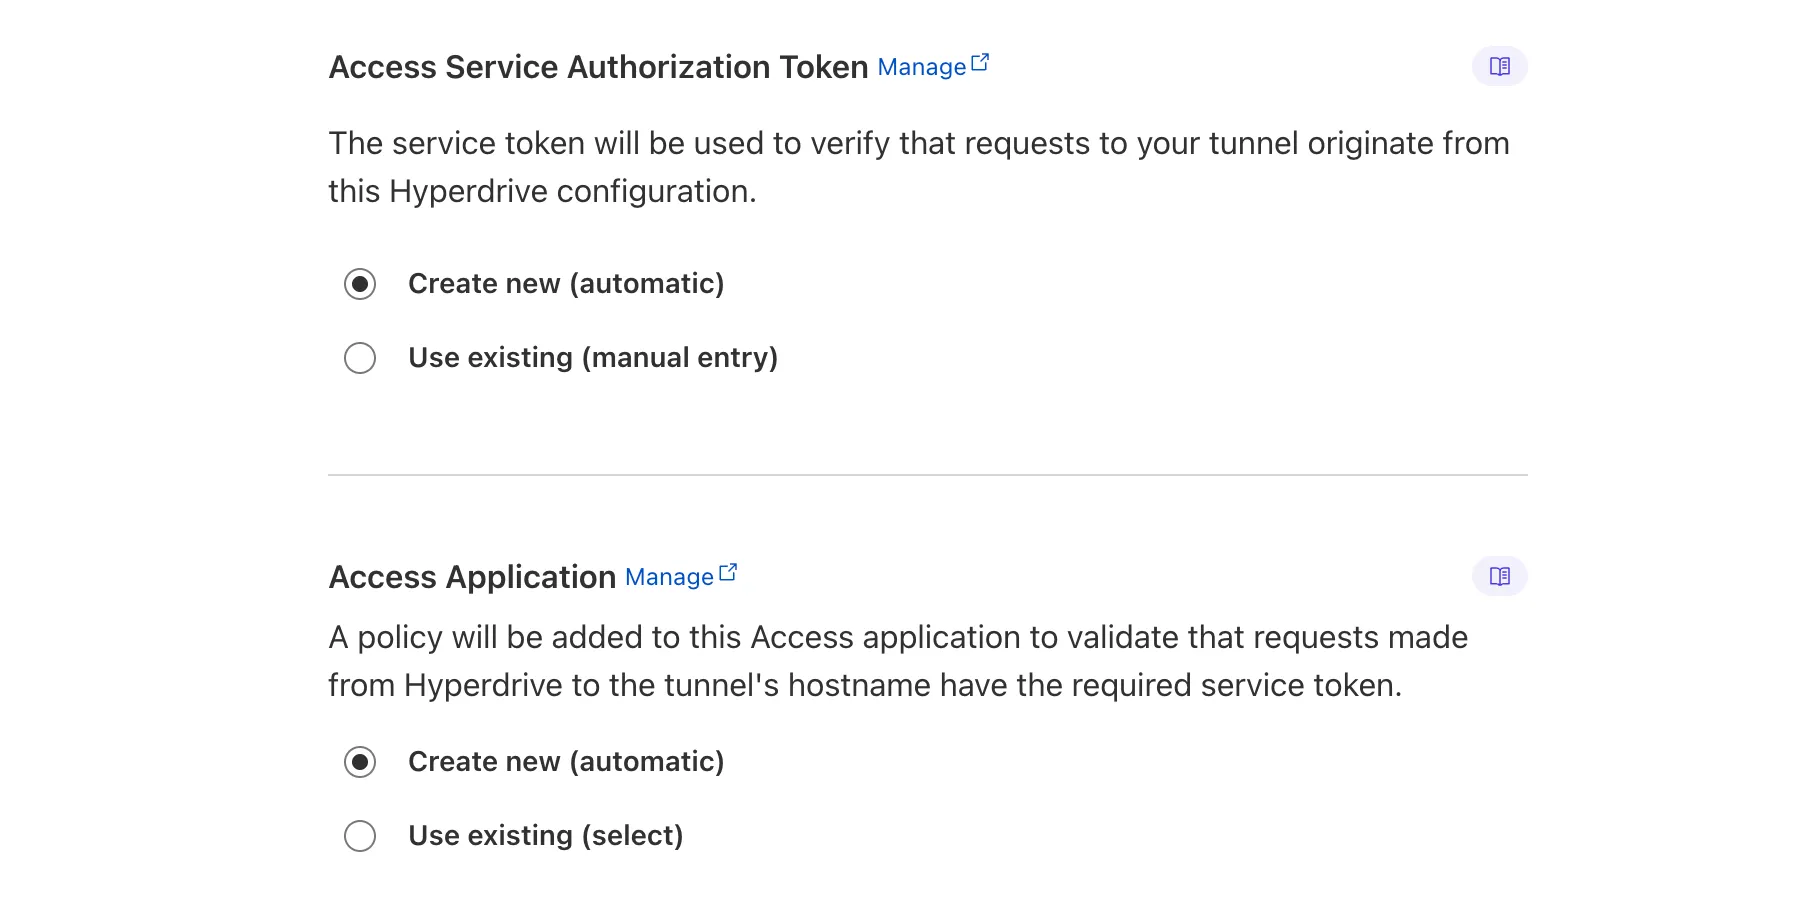
We’re excited to introduce the Cloudflare Zero Trust Secure DNS Locations Write role, designed to provide DNS filtering customers with granular control over third-party access when configuring their Protective DNS (PDNS) solutions.
Many DNS filtering customers rely on external service partners to manage their DNS location endpoints. This role allows you to grant access to external parties to administer DNS locations without overprovisioning their permissions.
Secure DNS Location Requirements:
-
Mandate usage of Bring your own DNS resolver IP addresses ↗ if available on the account.
-
Require source network filtering for IPv4/IPv6/DoT endpoints; token authentication or source network filtering for the DoH endpoint.
You can assign the new role via Cloudflare Dashboard (
Manage Accounts > Members) or via API. For more information, refer to the Secure DNS Locations documentation ↗. -
-
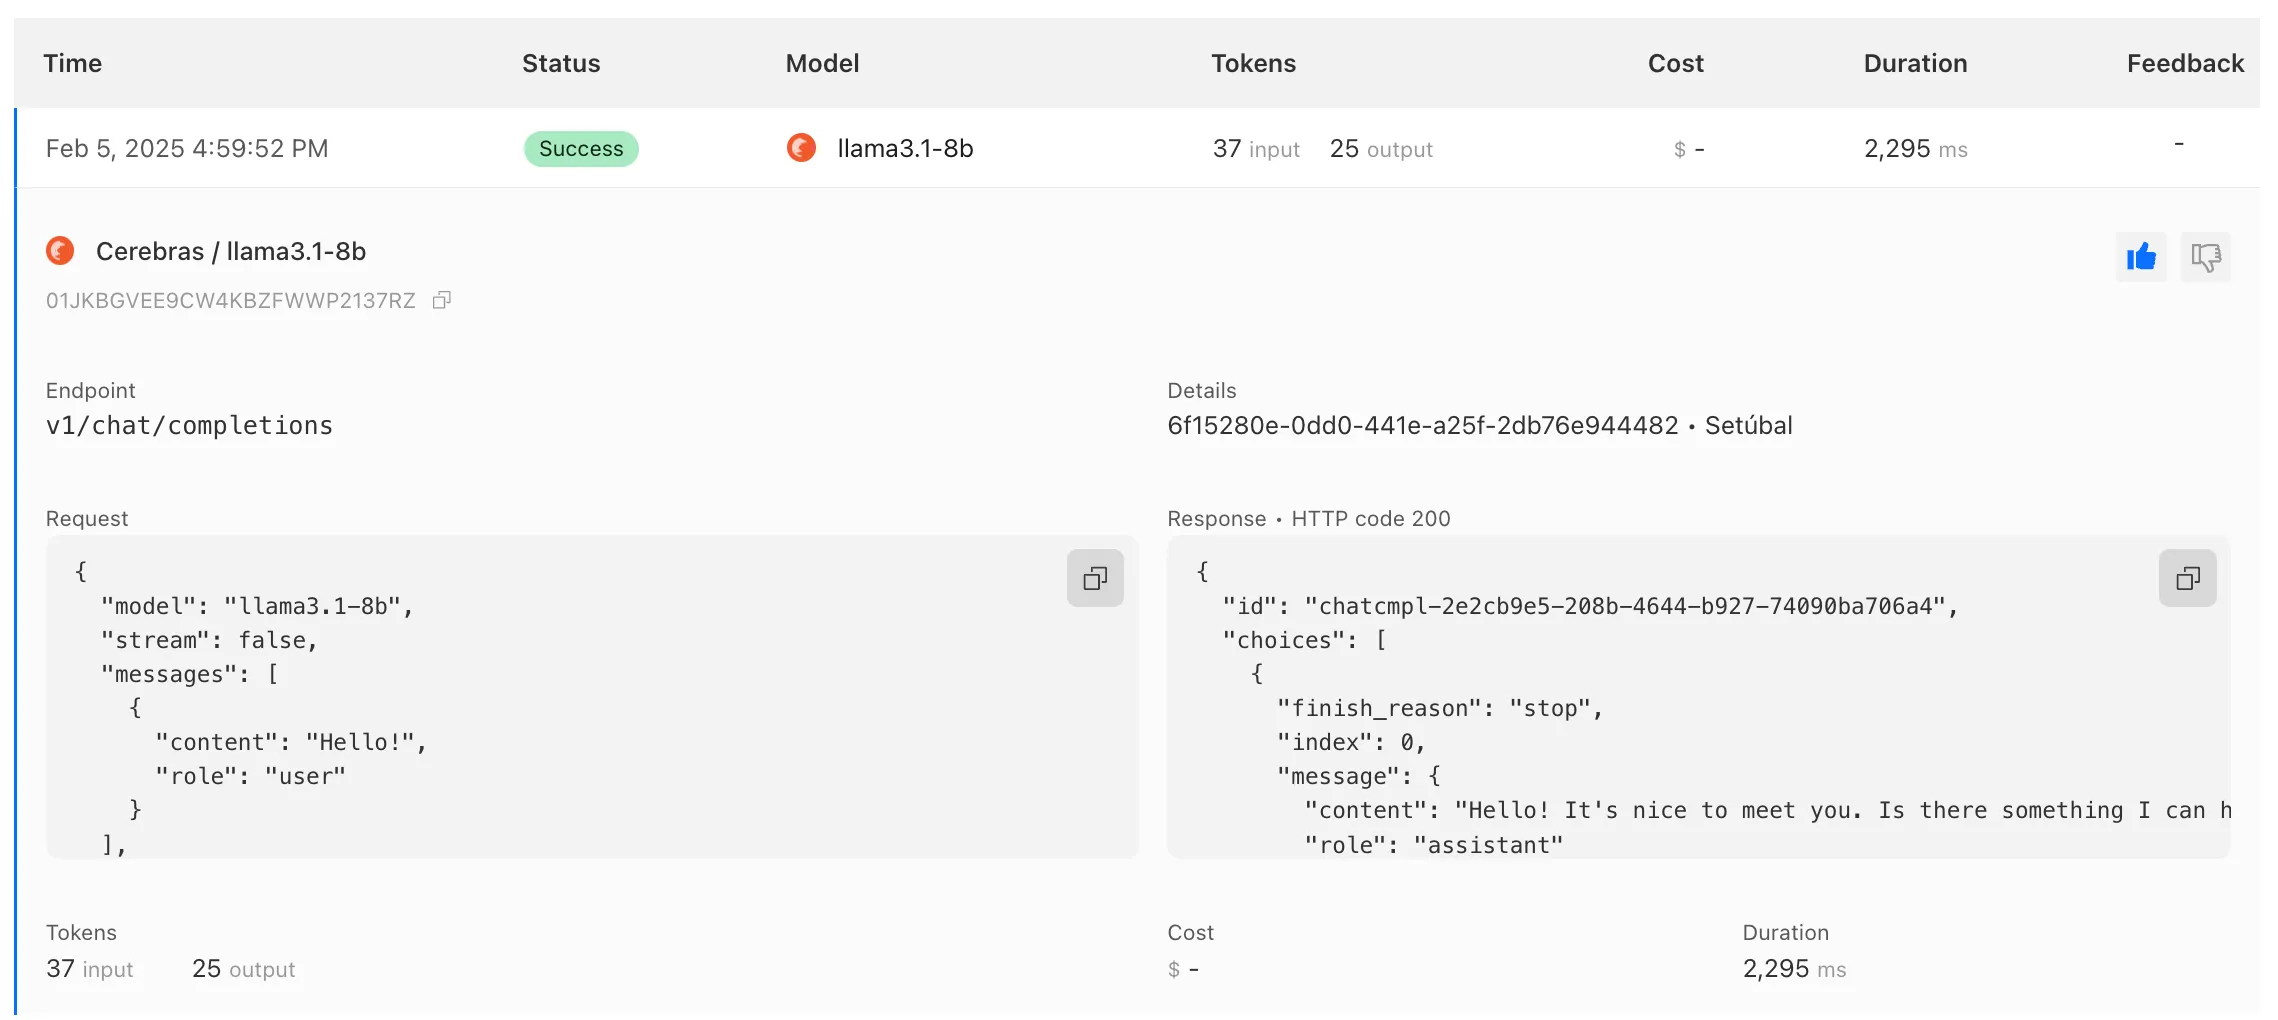
We are excited to announce that AI Gateway now supports real-time AI interactions with the new Realtime WebSockets API.
This new capability allows developers to establish persistent, low-latency connections between their applications and AI models, enabling natural, real-time conversational AI experiences, including speech-to-speech interactions.
The Realtime WebSockets API works with the OpenAI Realtime API ↗, Google Gemini Live API ↗, and supports real-time text and speech interactions with models from Cartesia ↗, and ElevenLabs ↗.
Here's how you can connect AI Gateway to OpenAI's Realtime API ↗ using WebSockets:
OpenAI Realtime API example import WebSocket from "ws";const url ="wss://gateway.ai.cloudflare.com/v1/<account_id>/<gateway>/openai?model=gpt-4o-realtime-preview-2024-12-17";const ws = new WebSocket(url, {headers: {"cf-aig-authorization": process.env.CLOUDFLARE_API_KEY,Authorization: "Bearer " + process.env.OPENAI_API_KEY,"OpenAI-Beta": "realtime=v1",},});ws.on("open", () => console.log("Connected to server."));ws.on("message", (message) => console.log(JSON.parse(message.toString())));ws.send(JSON.stringify({type: "response.create",response: { modalities: ["text"], instructions: "Tell me a joke" },}),);Get started by checking out the Realtime WebSockets API documentation.
-
Document conversion plays an important role when designing and developing AI applications and agents. Workers AI now provides the
toMarkdownutility method that developers can use to for quick, easy, and convenient conversion and summary of documents in multiple formats to Markdown language.You can call this new tool using a binding by calling
env.AI.toMarkdown()or the using the REST API endpoint.In this example, we fetch a PDF document and an image from R2 and feed them both to
env.AI.toMarkdown(). The result is a list of converted documents. Workers AI models are used automatically to detect and summarize the image.import { Env } from "./env";export default {async fetch(request: Request, env: Env, ctx: ExecutionContext) {// https://pub-979cb28270cc461d94bc8a169d8f389d.r2.dev/somatosensory.pdfconst pdf = await env.R2.get('somatosensory.pdf');// https://pub-979cb28270cc461d94bc8a169d8f389d.r2.dev/cat.jpegconst cat = await env.R2.get('cat.jpeg');return Response.json(await env.AI.toMarkdown([{name: "somatosensory.pdf",blob: new Blob([await pdf.arrayBuffer()], { type: "application/octet-stream" }),},{name: "cat.jpeg",blob: new Blob([await cat.arrayBuffer()], { type: "application/octet-stream" }),},]),);},};This is the result:
[{"name": "somatosensory.pdf","mimeType": "application/pdf","format": "markdown","tokens": 0,"data": "# somatosensory.pdf\n## Metadata\n- PDFFormatVersion=1.4\n- IsLinearized=false\n- IsAcroFormPresent=false\n- IsXFAPresent=false\n- IsCollectionPresent=false\n- IsSignaturesPresent=false\n- Producer=Prince 20150210 (www.princexml.com)\n- Title=Anatomy of the Somatosensory System\n\n## Contents\n### Page 1\nThis is a sample document to showcase..."},{"name": "cat.jpeg","mimeType": "image/jpeg","format": "markdown","tokens": 0,"data": "The image is a close-up photograph of Grumpy Cat, a cat with a distinctive grumpy expression and piercing blue eyes. The cat has a brown face with a white stripe down its nose, and its ears are pointed upright. Its fur is light brown and darker around the face, with a pink nose and mouth. The cat's eyes are blue and slanted downward, giving it a perpetually grumpy appearance. The background is blurred, but it appears to be a dark brown color. Overall, the image is a humorous and iconic representation of the popular internet meme character, Grumpy Cat. The cat's facial expression and posture convey a sense of displeasure or annoyance, making it a relatable and entertaining image for many people."}]See Markdown Conversion for more information on supported formats, REST API and pricing.
-
📝 We've renamed the Agents package to
agents!If you've already been building with the Agents SDK, you can update your dependencies to use the new package name, and replace references to
agents-sdkwithagents:Terminal window # Install the new packagenpm i agentsTerminal window # Remove the old (deprecated) packagenpm uninstall agents-sdk# Find instances of the old package name in your codebasegrep -r 'agents-sdk' .# Replace instances of the old package name with the new one# (or use find-replace in your editor)sed -i 's/agents-sdk/agents/g' $(grep -rl 'agents-sdk' .)All future updates will be pushed to the new
agentspackage, and the older package has been marked as deprecated.We've added a number of big new features to the Agents SDK over the past few weeks, including:
- You can now set
cors: truewhen usingrouteAgentRequestto return permissive default CORS headers to Agent responses. - The regular client now syncs state on the agent (just like the React version).
useAgentChatbug fixes for passing headers/credentials, includng properly clearing cache on unmount.- Experimental
/schedulemodule with a prompt/schema for adding scheduling to your app (with evals!). - Changed the internal
zodschema to be compatible with the limitations of Google's Gemini models by removing the discriminated union, allowing you to use Gemini models with the scheduling API.
We've also fixed a number of bugs with state synchronization and the React hooks.
// via https://github.com/cloudflare/agents/tree/main/examples/cross-domainexport default {async fetch(request, env) {return (// Set { cors: true } to enable CORS headers.(await routeAgentRequest(request, env, { cors: true })) ||new Response("Not found", { status: 404 }));},};// via https://github.com/cloudflare/agents/tree/main/examples/cross-domainexport default {async fetch(request: Request, env: Env) {return (// Set { cors: true } to enable CORS headers.(await routeAgentRequest(request, env, { cors: true })) ||new Response("Not found", { status: 404 }));},} satisfies ExportedHandler<Env>;We've added a new
@unstable_callable()decorator for defining methods that can be called directly from clients. This allows you call methods from within your client code: you can call methods (with arguments) and get native JavaScript objects back.// server.tsimport { unstable_callable, Agent } from "agents";export class Rpc extends Agent {// Use the decorator to define a callable method@unstable_callable({description: "rpc test",})async getHistory() {return this.sql`SELECT * FROM history ORDER BY created_at DESC LIMIT 10`;}}// server.tsimport { unstable_callable, Agent, type StreamingResponse } from "agents";import type { Env } from "../server";export class Rpc extends Agent<Env> {// Use the decorator to define a callable method@unstable_callable({description: "rpc test",})async getHistory() {return this.sql`SELECT * FROM history ORDER BY created_at DESC LIMIT 10`;}}We've fixed a number of small bugs in the
agents-starter↗ project — a real-time, chat-based example application with tool-calling & human-in-the-loop built using the Agents SDK. The starter has also been upgraded to use the latest wrangler v4 release.If you're new to Agents, you can install and run the
agents-starterproject in two commands:Terminal window # Install it$ npm create cloudflare@latest agents-starter -- --template="cloudflare/agents-starter"# Run it$ npm run startYou can use the starter as a template for your own Agents projects: open up
src/server.tsandsrc/client.tsxto see how the Agents SDK is used.We've heard your feedback on the Agents SDK documentation, and we're shipping more API reference material and usage examples, including:
- Expanded API reference documentation, covering the methods and properties exposed by the Agents SDK, as well as more usage examples.
- More Client API documentation that documents
useAgent,useAgentChatand the new@unstable_callableRPC decorator exposed by the SDK. - New documentation on how to call agents and (optionally) authenticate clients before they connect to your Agents.
Note that the Agents SDK is continually growing: the type definitions included in the SDK will always include the latest APIs exposed by the
agentspackage.If you're still wondering what Agents are, read our blog on building AI Agents on Cloudflare ↗ and/or visit the Agents documentation to learn more.
- You can now set


Was this helpful?
- Resources
- API
- New to Cloudflare?
- Products
- Sponsorships
- Open Source
- Support
- Help Center
- System Status
- Compliance
- GDPR
- Company
- cloudflare.com
- Our team
- Careers
- 2025 Cloudflare, Inc.
- Privacy Policy
- Terms of Use
- Report Security Issues
- Trademark