---
title: Cloudflare AI Search · Cloudflare AI Search docs
description: Build scalable, fully-managed RAG applications with Cloudflare AI
Search. Create retrieval-augmented generation pipelines to deliver accurate,
context-aware AI without managing infrastructure.
lastUpdated: 2025-09-24T17:03:07.000Z
chatbotDeprioritize: false
tags: AI
source_url:
html: https://developers.cloudflare.com/ai-search/
md: https://developers.cloudflare.com/ai-search/index.md
---
Create AI-powered search for your data
Available on all plans
AI Search (formerly AutoRAG) is Cloudflare’s managed search service. You can connect your data such as websites or unstructured content, and it automatically creates a continuously updating index that you can query with natural language in your applications or AI agents. It natively integrates with Cloudflare’s developer platform tools like Vectorize, AI Gateway, R2, and Workers AI, while also supporting third-party providers and open standards.
It supports retrieval-augmented generation (RAG) patterns, enabling you to build enterprise search, natural language search, and AI-powered chat without managing infrastructure.
[Get started](https://developers.cloudflare.com/ai-search/get-started)
[Watch AI Search demo](https://www.youtube.com/watch?v=JUFdbkiDN2U)
***
## Features
### Automated indexing
Automatically and continuously index your data source, keeping your content fresh without manual reprocessing.
[View indexing](https://developers.cloudflare.com/ai-search/configuration/indexing/)
### Multitenancy support
Create multitenancy by scoping search to each tenant’s data using folder-based metadata filters.
[Add filters](https://developers.cloudflare.com/ai-search/how-to/multitenancy/)
### Workers Binding
Call your AI Search instance for search or AI Search directly from a Cloudflare Worker using the native binding integration.
[Add to Worker](https://developers.cloudflare.com/ai-search/usage/workers-binding/)
### Similarity caching
Cache repeated queries and results to improve latency and reduce compute on repeated requests.
[Use caching](https://developers.cloudflare.com/ai-search/configuration/cache/)
***
## Related products
**[Workers AI](https://developers.cloudflare.com/workers-ai/)**
Run machine learning models, powered by serverless GPUs, on Cloudflare’s global network.
**[AI Gateway](https://developers.cloudflare.com/ai-gateway/)**
Observe and control your AI applications with caching, rate limiting, request retries, model fallback, and more.
**[Vectorize](https://developers.cloudflare.com/vectorize/)**
Build full-stack AI applications with Vectorize, Cloudflare’s vector database.
**[Workers](https://developers.cloudflare.com/workers/)**
Build serverless applications and deploy instantly across the globe for exceptional performance, reliability, and scale.
**[R2](https://developers.cloudflare.com/r2/)**
Store large amounts of unstructured data without the costly egress bandwidth fees associated with typical cloud storage services.
***
## More resources
[Get started](https://developers.cloudflare.com/workers-ai/get-started/workers-wrangler/)
Build and deploy your first Workers AI application.
[Developer Discord](https://discord.cloudflare.com)
Connect with the Workers community on Discord to ask questions, share what you are building, and discuss the platform with other developers.
[@CloudflareDev](https://x.com/cloudflaredev)
Follow @CloudflareDev on Twitter to learn about product announcements, and what is new in Cloudflare Workers.
---
title: 404 - Page Not Found · Cloudflare AI Search docs
chatbotDeprioritize: false
source_url:
html: https://developers.cloudflare.com/ai-search/404/
md: https://developers.cloudflare.com/ai-search/404/index.md
---
# 404
Check the URL, try using our [search](https://developers.cloudflare.com/search/) or try our LLM-friendly [llms.txt directory](https://developers.cloudflare.com/llms.txt).
---
title: REST API · Cloudflare AI Search docs
lastUpdated: 2025-09-29T16:11:04.000Z
chatbotDeprioritize: false
source_url:
html: https://developers.cloudflare.com/ai-search/autorag-api/
md: https://developers.cloudflare.com/ai-search/autorag-api/index.md
---
---
title: Concepts · Cloudflare AI Search docs
lastUpdated: 2025-09-24T17:03:07.000Z
chatbotDeprioritize: true
source_url:
html: https://developers.cloudflare.com/ai-search/concepts/
md: https://developers.cloudflare.com/ai-search/concepts/index.md
---
* [What is RAG](https://developers.cloudflare.com/ai-search/concepts/what-is-rag/)
* [How AI Search works](https://developers.cloudflare.com/ai-search/concepts/how-ai-search-works/)
---
title: Configuration · Cloudflare AI Search docs
description: You can customize how your AI Search instance indexes your data,
and retrieves and generates responses for queries. Some settings can be
updated after the instance is created, while others are fixed at creation
time.
lastUpdated: 2025-10-28T15:46:27.000Z
chatbotDeprioritize: false
source_url:
html: https://developers.cloudflare.com/ai-search/configuration/
md: https://developers.cloudflare.com/ai-search/configuration/index.md
---
You can customize how your AI Search instance indexes your data, and retrieves and generates responses for queries. Some settings can be updated after the instance is created, while others are fixed at creation time.
The table below lists all available configuration options:
| Configuration | Editable after creation | Description |
| - | - | - |
| [Data source](https://developers.cloudflare.com/ai-search/configuration/data-source/) | no | The source where your knowledge base is stored |
| [Chunk size](https://developers.cloudflare.com/ai-search/configuration/chunking/) | yes | Number of tokens per chunk |
| [Chunk overlap](https://developers.cloudflare.com/ai-search/configuration/chunking/) | yes | Number of overlapping tokens between chunks |
| [Embedding model](https://developers.cloudflare.com/ai-search/configuration/models/) | no | Model used to generate vector embeddings |
| [Query rewrite](https://developers.cloudflare.com/ai-search/configuration/query-rewriting/) | yes | Enable or disable query rewriting before retrieval |
| [Query rewrite model](https://developers.cloudflare.com/ai-search/configuration/models/) | yes | Model used for query rewriting |
| [Query rewrite system prompt](https://developers.cloudflare.com/ai-search/configuration/system-prompt/) | yes | Custom system prompt to guide query rewriting behavior |
| [Match threshold](https://developers.cloudflare.com/ai-search/configuration/retrieval-configuration/) | yes | Minimum similarity score required for a vector match |
| [Maximum number of results](https://developers.cloudflare.com/ai-search/configuration/retrieval-configuration/) | yes | Maximum number of vector matches returned (`top_k`) |
| [Reranking](https://developers.cloudflare.com/ai-search/configuration/reranking/) | yes | Rerank to reorder retrieved results by semantic relevance using a reranking model after initial retrieval |
| [Generation model](https://developers.cloudflare.com/ai-search/configuration/models/) | yes | Model used to generate the final response |
| [Generation system prompt](https://developers.cloudflare.com/ai-search/configuration/system-prompt/) | yes | Custom system prompt to guide response generation |
| [Similarity caching](https://developers.cloudflare.com/ai-search/configuration/cache/) | yes | Enable or disable caching of responses for similar (not just exact) prompts |
| [Similarity caching threshold](https://developers.cloudflare.com/ai-search/configuration/cache/) | yes | Controls how similar a new prompt must be to a previous one to reuse its cached response |
| [AI Gateway](https://developers.cloudflare.com/ai-gateway) | yes | AI Gateway for monitoring and controlling model usage |
| AI Search name | no | Name of your AI Search instance |
| Service API token | yes | API token granted to AI Search to give it permission to configure resources on your account. |
API token
The Service API token is different from the AI Search API token that you can make to interact with your AI Search. The Service API token is only used by AI Search to get permissions to configure resources on your account.
---
title: Get started with AI Search · Cloudflare AI Search docs
description: AI Search (formerly AutoRAG) is Cloudflare’s managed search
service. You can connect your data such as websites or unstructured content,
and it automatically creates a continuously updating index that you can query
with natural language in your applications or AI agents.
lastUpdated: 2025-09-25T15:07:56.000Z
chatbotDeprioritize: false
source_url:
html: https://developers.cloudflare.com/ai-search/get-started/
md: https://developers.cloudflare.com/ai-search/get-started/index.md
---
AI Search (formerly AutoRAG) is Cloudflare’s managed search service. You can connect your data such as websites or unstructured content, and it automatically creates a continuously updating index that you can query with natural language in your applications or AI agents.
## Prerequisite
AI Search integrates with R2 for storing your data. You must have an **active R2 subscription** before creating your first AI Search. You can purchase the subscription on the Cloudflare R2 dashboard.
[Go to **Overview**](https://dash.cloudflare.com/?to=/:account/r2/overview)
## 1. Create an AI Search
To create a new AI Search:
1. In the Cloudflare dashboard, go to the **AI Search** page.
[Go to **AI Search (AutoRAG)**](https://dash.cloudflare.com/?to=/:account/ai/ai-search)
1. Select **Create**
2. In Create a RAG, select **Get Started**
3. Then choose how you want to connect your data:
* **R2 bucket**: Index the content from one of your R2 buckets.
* **Website**: Provide a domain from your Cloudflare account and AI Search will automatically crawl your site, store the content in R2, and index it.
4. Configure the AI Search and complete the setup process.
5. Select **Create**.
## 2. Monitor indexing
After setup, AI Search creates a Vectorize index in your account and begins indexing the data.
To monitor progress:
1. From the **AI Search** page in the dashboard, locate and select your AI Search.
2. Navigate to the **Overview** page to view the current indexing status.
## 3. Try it out
Once indexing is complete, you can run your first query:
1. From the **AI Search** page in the dashboard, locate and select your AI Search.
2. Navigate to the **Playground** tab.
3. Select **Search with AI** or **Search**.
4. Enter a **query** to test out its response.
## 4. Add to your application
Once you are ready, go to **Connect** for instructions on how to connect AI Search to your application.
There are multiple ways you can connect:
* [Workers Binding](https://developers.cloudflare.com/ai-search/usage/workers-binding/)
* [REST API](https://developers.cloudflare.com/ai-search/usage/rest-api/)
---
title: How to · Cloudflare AI Search docs
lastUpdated: 2025-09-24T17:03:07.000Z
chatbotDeprioritize: true
source_url:
html: https://developers.cloudflare.com/ai-search/how-to/
md: https://developers.cloudflare.com/ai-search/how-to/index.md
---
* [NLWeb](https://developers.cloudflare.com/ai-search/how-to/nlweb/)
* [Bring your own generation model](https://developers.cloudflare.com/ai-search/how-to/bring-your-own-generation-model/)
* [Create a simple search engine](https://developers.cloudflare.com/ai-search/how-to/simple-search-engine/)
* [Create multitenancy](https://developers.cloudflare.com/ai-search/how-to/multitenancy/)
---
title: MCP server · Cloudflare AI Search docs
lastUpdated: 2025-10-09T17:32:08.000Z
chatbotDeprioritize: false
source_url:
html: https://developers.cloudflare.com/ai-search/mcp-server/
md: https://developers.cloudflare.com/ai-search/mcp-server/index.md
---
---
title: Platform · Cloudflare AI Search docs
lastUpdated: 2025-09-24T17:03:07.000Z
chatbotDeprioritize: true
source_url:
html: https://developers.cloudflare.com/ai-search/platform/
md: https://developers.cloudflare.com/ai-search/platform/index.md
---
* [Limits & pricing](https://developers.cloudflare.com/ai-search/platform/limits-pricing/)
* [Release note](https://developers.cloudflare.com/ai-search/platform/release-note/)
---
title: Tutorial · Cloudflare AI Search docs
lastUpdated: 2025-09-24T17:03:07.000Z
chatbotDeprioritize: true
source_url:
html: https://developers.cloudflare.com/ai-search/tutorial/
md: https://developers.cloudflare.com/ai-search/tutorial/index.md
---
* [Build a RAG from your website](https://developers.cloudflare.com/ai-search/tutorial/brower-rendering-autorag-tutorial/)
---
title: Usage · Cloudflare AI Search docs
lastUpdated: 2025-09-24T17:03:07.000Z
chatbotDeprioritize: true
source_url:
html: https://developers.cloudflare.com/ai-search/usage/
md: https://developers.cloudflare.com/ai-search/usage/index.md
---
* [Workers Binding](https://developers.cloudflare.com/ai-search/usage/workers-binding/)
* [REST API](https://developers.cloudflare.com/ai-search/usage/rest-api/)
---
title: How AI Search works · Cloudflare AI Search docs
description: AI Search (formerly AutoRAG) is Cloudflare’s managed search
service. You can connect your data such as websites or unstructured content,
and it automatically creates a continuously updating index that you can query
with natural language in your applications or AI agents.
lastUpdated: 2025-09-24T17:03:07.000Z
chatbotDeprioritize: false
source_url:
html: https://developers.cloudflare.com/ai-search/concepts/how-ai-search-works/
md: https://developers.cloudflare.com/ai-search/concepts/how-ai-search-works/index.md
---
AI Search (formerly AutoRAG) is Cloudflare’s managed search service. You can connect your data such as websites or unstructured content, and it automatically creates a continuously updating index that you can query with natural language in your applications or AI agents.
AI Search consists of two core processes:
* **Indexing:** An asynchronous background process that monitors your data source for changes and converts your data into vectors for search.
* **Querying:** A synchronous process triggered by user queries. It retrieves the most relevant content and generates context-aware responses.
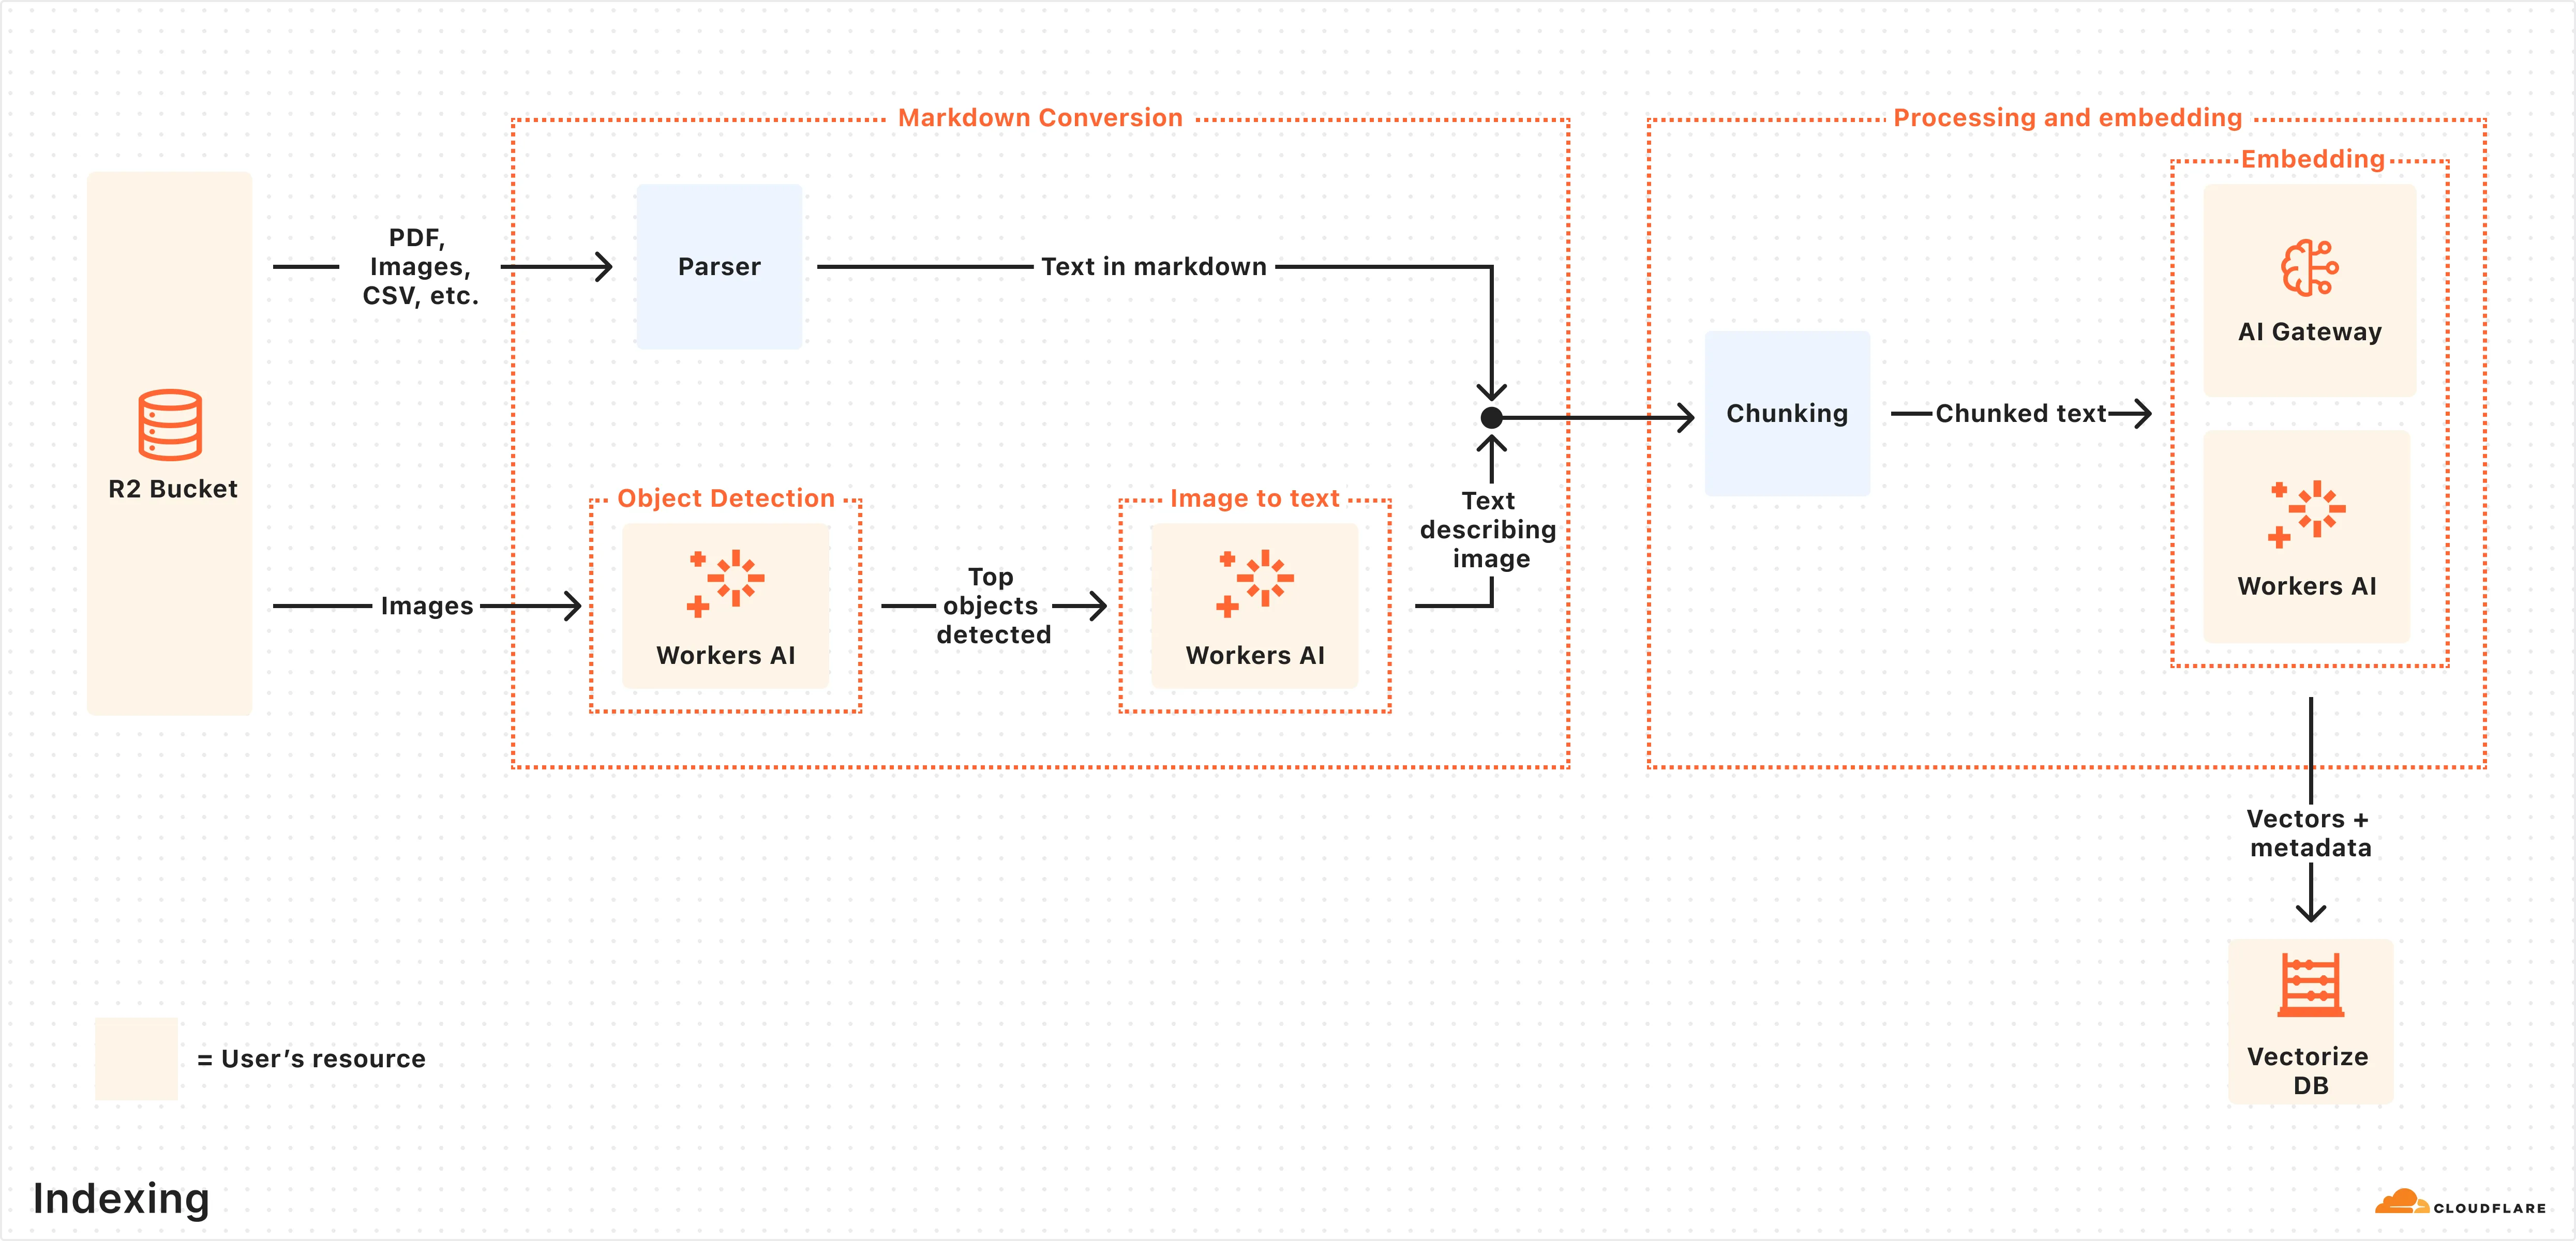
## How indexing works
Indexing begins automatically when you create an AI Search instance and connect a data source.
Here is what happens during indexing:
1. **Data ingestion:** AI Search reads from your connected data source.
2. **Markdown conversion:** AI Search uses [Workers AI’s Markdown Conversion](https://developers.cloudflare.com/workers-ai/features/markdown-conversion/) to convert [supported data types](https://developers.cloudflare.com/ai-search/configuration/data-source/) into structured Markdown. This ensures consistency across diverse file types. For images, Workers AI is used to perform object detection followed by vision-to-language transformation to convert images into Markdown text.
3. **Chunking:** The extracted text is [chunked](https://developers.cloudflare.com/ai-search/configuration/chunking/) into smaller pieces to improve retrieval granularity.
4. **Embedding:** Each chunk is embedded using Workers AI’s embedding model to transform the content into vectors.
5. **Vector storage:** The resulting vectors, along with metadata like file name, are stored in a the [Vectorize](https://developers.cloudflare.com/vectorize/) database created on your Cloudflare account.
After the initial data set is indexed, AI Search will regularly check for updates in your data source (e.g. additions, updates, or deletes) and index changes to ensure your vector database is up to date.
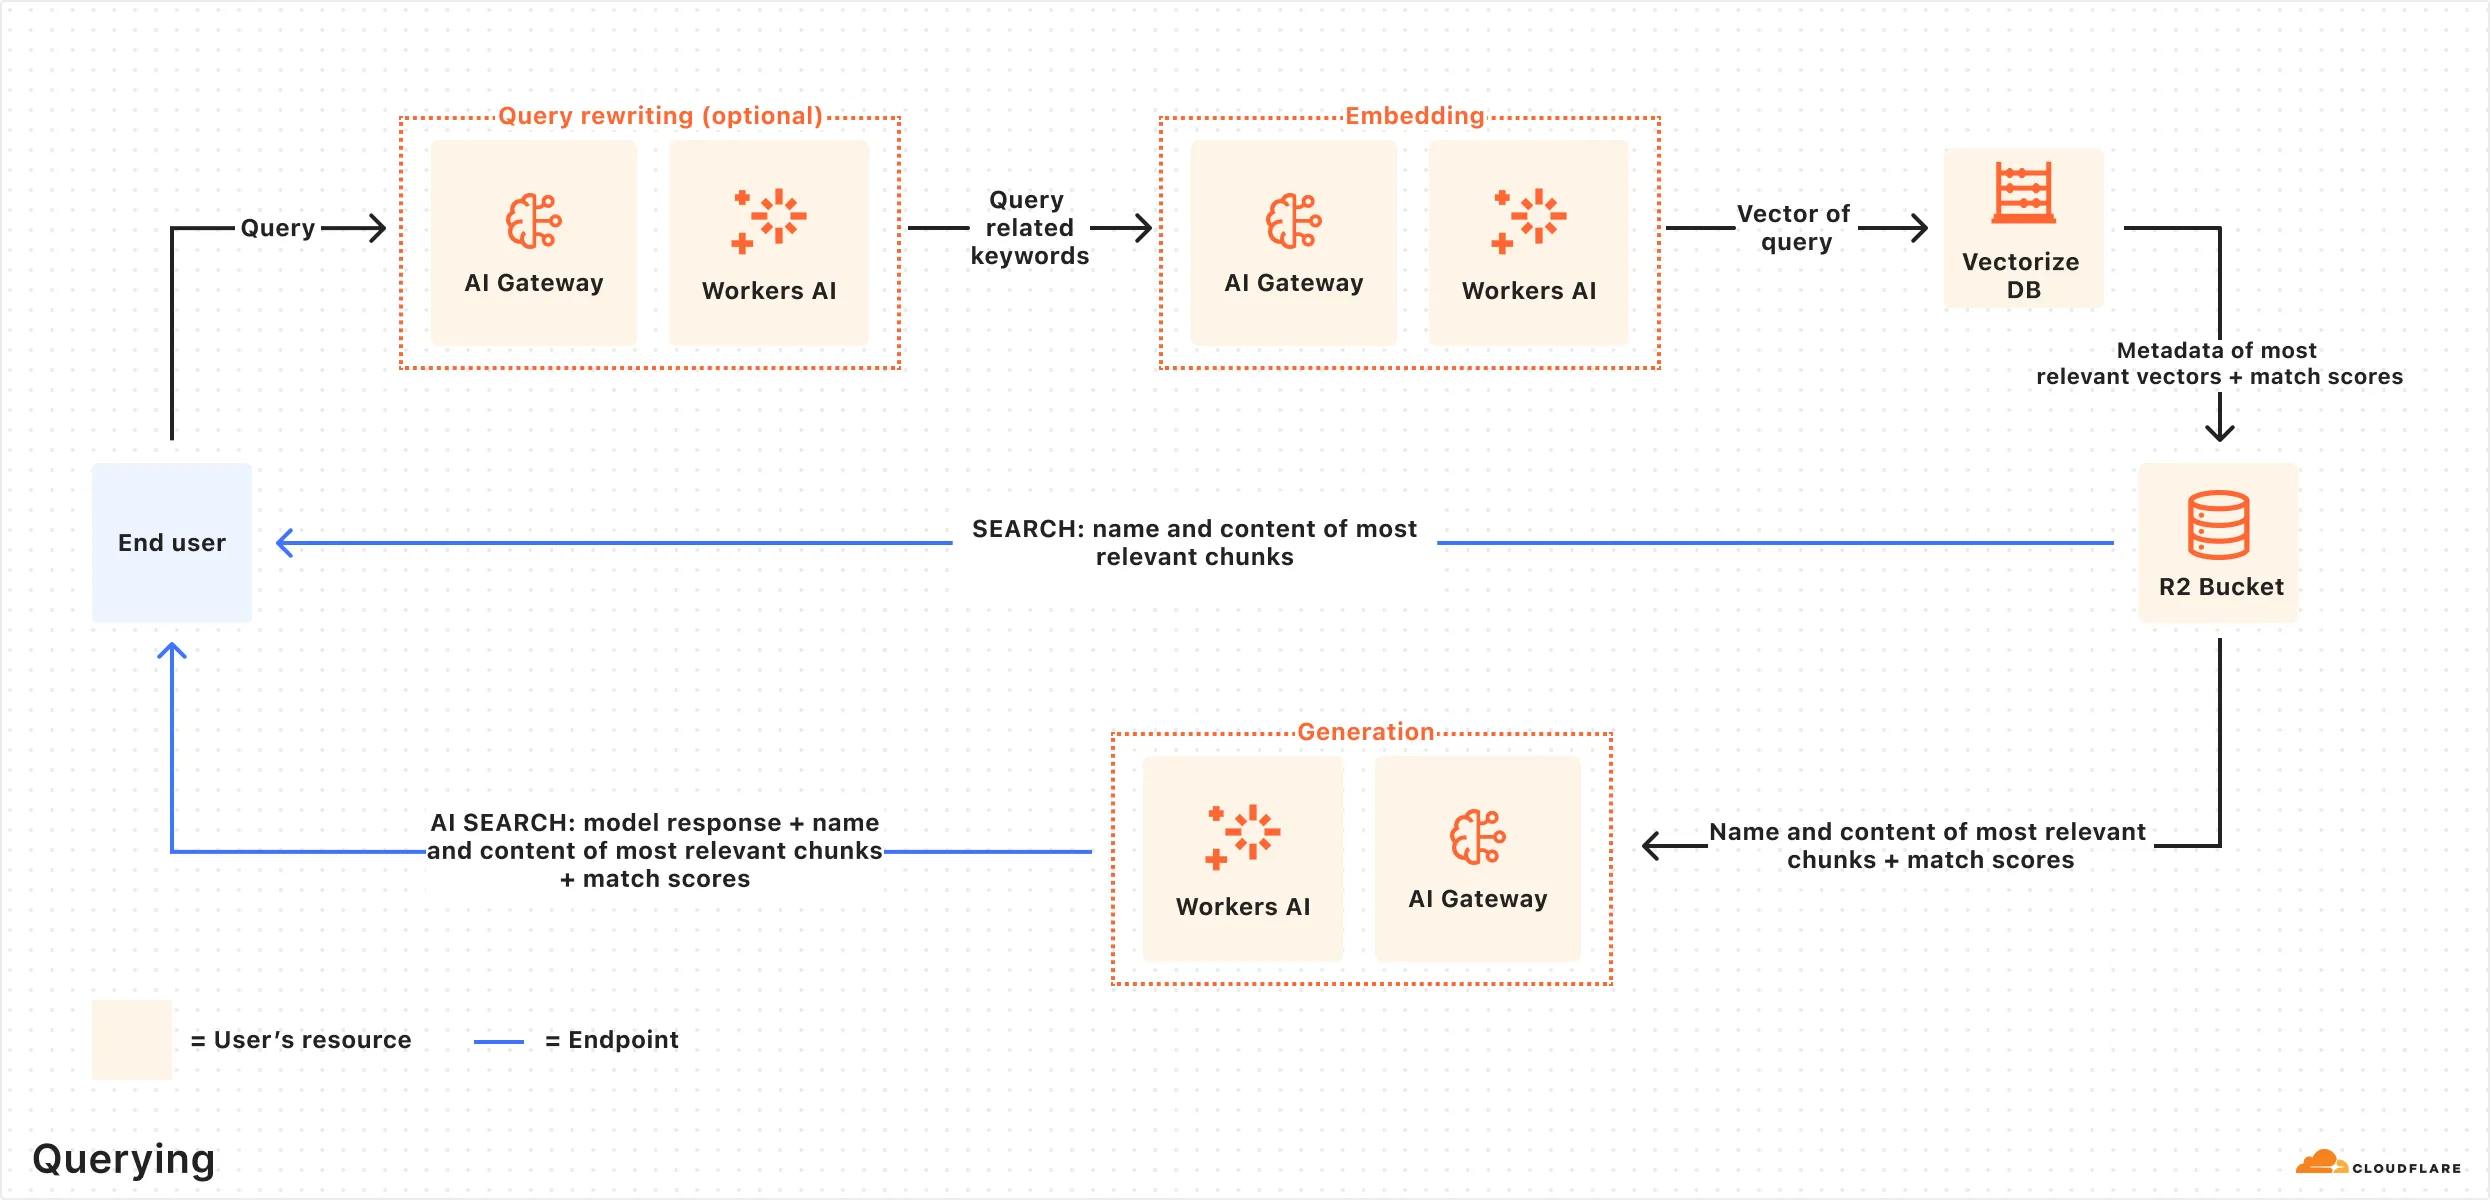
## How querying works
Once indexing is complete, AI Search is ready to respond to end-user queries in real time.
Here is how the querying pipeline works:
1. **Receive query from AI Search API:** The query workflow begins when you send a request to either the AI Search’s [AI Search](https://developers.cloudflare.com/ai-search/usage/rest-api/#ai-search) or [Search](https://developers.cloudflare.com/ai-search/usage/rest-api/#search) endpoints.
2. **Query rewriting (optional):** AI Search provides the option to [rewrite the input query](https://developers.cloudflare.com/ai-search/configuration/query-rewriting/) using one of Workers AI’s LLMs to improve retrieval quality by transforming the original query into a more effective search query.
3. **Embedding the query:** The rewritten (or original) query is transformed into a vector via the same embedding model used to embed your data so that it can be compared against your vectorized data to find the most relevant matches.
4. **Querying Vectorize index:** The query vector is [queried](https://developers.cloudflare.com/vectorize/best-practices/query-vectors/) against stored vectors in the associated Vectorize database for your AI Search.
5. **Content retrieval:** Vectorize returns the metadata of the most relevant chunks, and the original content is retrieved from the R2 bucket. If you are using the Search endpoint, the content is returned at this point.
6. **Response generation:** If you are using the AI Search endpoint, then a text-generation model from Workers AI is used to generate a response using the retrieved content and the original user’s query, combined via a [system prompt](https://developers.cloudflare.com/ai-search/configuration/system-prompt/). The context-aware response from the model is returned.
---
title: What is RAG · Cloudflare AI Search docs
description: Retrieval-Augmented Generation (RAG) is a way to use your own data
with a large language model (LLM). Instead of relying only on what the model
was trained on, RAG searches for relevant information from your data source
and uses it to help answer questions.
lastUpdated: 2025-09-24T17:03:07.000Z
chatbotDeprioritize: false
tags: LLM
source_url:
html: https://developers.cloudflare.com/ai-search/concepts/what-is-rag/
md: https://developers.cloudflare.com/ai-search/concepts/what-is-rag/index.md
---
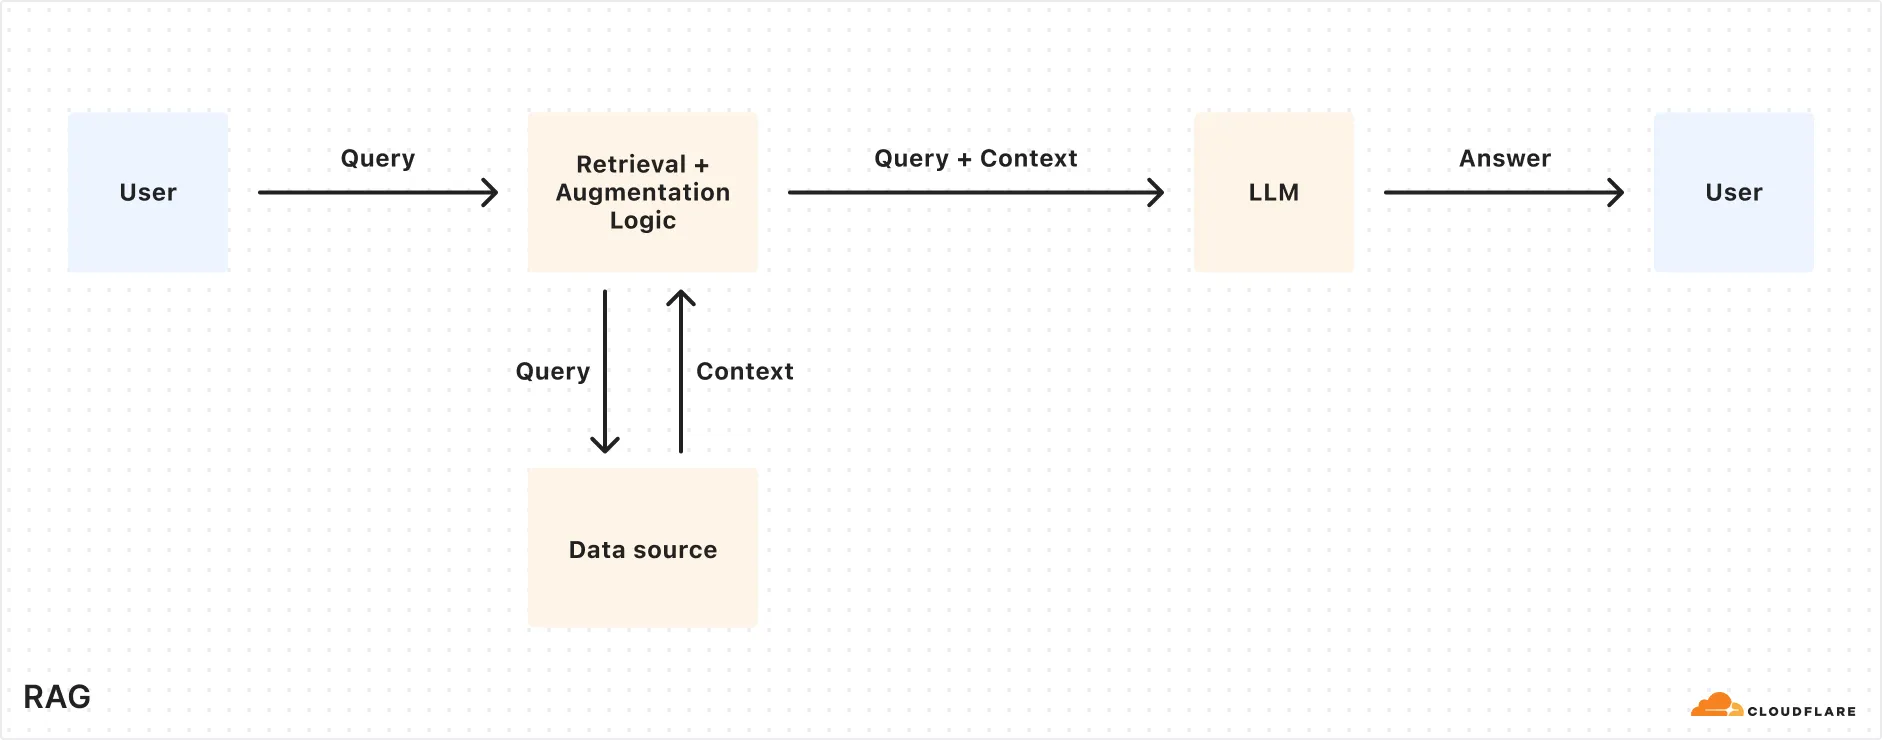
Retrieval-Augmented Generation (RAG) is a way to use your own data with a large language model (LLM). Instead of relying only on what the model was trained on, RAG searches for relevant information from your data source and uses it to help answer questions.
## How RAG works
Here’s a simplified overview of the RAG pipeline:
1. **Indexing:** Your content (e.g. docs, wikis, product information) is split into smaller chunks and converted into vectors using an embedding model. These vectors are stored in a vector database.
2. **Retrieval:** When a user asks a question, it’s also embedded into a vector and used to find the most relevant chunks from the vector database.
3. **Generation:** The retrieved content and the user’s original question are combined into a single prompt. An LLM uses that prompt to generate a response.
The resulting response should be accurate, relevant, and based on your own data.
How does AI Search work
To learn more details about how AI Search uses RAG under the hood, reference [How AI Search works](https://developers.cloudflare.com/ai-search/concepts/how-ai-search-works/).
## Why use RAG?
RAG lets you bring your own data into LLM generation without retraining or fine-tuning a model. It improves both accuracy and trust by retrieving relevant content at query time and using that as the basis for a response.
Benefits of using RAG:
* **Accurate and current answers:** Responses are based on your latest content, not outdated training data.
* **Control over information sources:** You define the knowledge base so answers come from content you trust.
* **Fewer hallucinations:** Responses are grounded in real, retrieved data, reducing made-up or misleading answers.
* **No model training required:** You can get high-quality results without building or fine-tuning your own LLM which can be time consuming and costly.
RAG is ideal for building AI-powered apps like:
* AI assistants for internal knowledge
* Support chatbots connected to your latest content
* Enterprise search across documentation and files
---
title: Similarity cache · Cloudflare AI Search docs
description: Similarity-based caching in AI Search lets you serve responses from
Cloudflare’s cache for queries that are similar to previous requests, rather
than creating new, unique responses for every request. This speeds up response
times and cuts costs by reusing answers for questions that are close in
meaning.
lastUpdated: 2025-09-24T17:03:07.000Z
chatbotDeprioritize: false
source_url:
html: https://developers.cloudflare.com/ai-search/configuration/cache/
md: https://developers.cloudflare.com/ai-search/configuration/cache/index.md
---
Similarity-based caching in AI Search lets you serve responses from Cloudflare’s cache for queries that are similar to previous requests, rather than creating new, unique responses for every request. This speeds up response times and cuts costs by reusing answers for questions that are close in meaning.
## How It Works
Unlike with basic caching, which creates a new response with every request, this is what happens when a request is received using similarity-based caching:
1. AI Search checks if a *similar* prompt (based on your chosen threshold) has been answered before.
2. If a match is found, it returns the cached response instantly.
3. If no match is found, it generates a new response and caches it.
To see if a response came from the cache, check the `cf-aig-cache-status` header: `HIT` for cached and `MISS` for new.
## What to consider when using similarity cache
Consider these behaviors when using similarity caching:
* **Volatile Cache**: If two similar requests hit at the same time, the first might not cache in time for the second to use it, resulting in a `MISS`.
* **30-Day Cache**: Cached responses last 30 days, then expire automatically. No custom durations for now.
* **Data Dependency**: Cached responses are tied to specific document chunks. If those chunks change or get deleted, the cache clears to keep answers fresh.
## How similarity matching works
AI Search’s similarity cache uses **MinHash and Locality-Sensitive Hashing (LSH)** to find and reuse responses for prompts that are worded similarly.
Here’s how it works when a new prompt comes in:
1. The prompt is split into small overlapping chunks of words (called shingles), like “what’s the” or “the weather.”
2. These shingles are turned into a “fingerprint” using MinHash. The more overlap two prompts have, the more similar their fingerprints will be.
3. Fingerprints are placed into LSH buckets, which help AI Search quickly find similar prompts without comparing every single one.
4. If a past prompt in the same bucket is similar enough (based on your configured threshold), AI Search reuses its cached response.
## Choosing a threshold
The similarity threshold decides how close two prompts need to be to reuse a cached response. Here are the available thresholds:
| Threshold | Description | Example Match |
| - | - | - |
| Exact | Near-identical matches only | "What’s the weather like today?" matches with "What is the weather like today?" |
| Strong (default) | High semantic similarity | "What’s the weather like today?" matches with "How’s the weather today?" |
| Broad | Moderate match, more hits | "What’s the weather like today?" matches with "Tell me today’s weather" |
| Loose | Low similarity, max reuse | "What’s the weather like today?" matches with "Give me the forecast" |
Test these values to see which works best with your [RAG application](https://developers.cloudflare.com/ai-search/).
---
title: Chunking · Cloudflare AI Search docs
description: Chunking is the process of splitting large data into smaller
segments before embedding them for search. AI Search uses recursive chunking,
which breaks your content at natural boundaries (like paragraphs or
sentences), and then further splits it if the chunks are too large.
lastUpdated: 2025-09-24T17:03:07.000Z
chatbotDeprioritize: false
source_url:
html: https://developers.cloudflare.com/ai-search/configuration/chunking/
md: https://developers.cloudflare.com/ai-search/configuration/chunking/index.md
---
Chunking is the process of splitting large data into smaller segments before embedding them for search. AI Search uses **recursive chunking**, which breaks your content at natural boundaries (like paragraphs or sentences), and then further splits it if the chunks are too large.
## What is recursive chunking
Recursive chunking tries to keep chunks meaningful by:
* **Splitting at natural boundaries:** like paragraphs, then sentences.
* **Checking the size:** if a chunk is too long (based on token count), it’s split again into smaller parts.
This way, chunks are easy to embed and retrieve, without cutting off thoughts mid-sentence.
## Chunking controls
AI Search exposes two parameters to help you control chunking behavior:
* **Chunk size**: The number of tokens per chunk.
* Minimum: `64`
* Maximum: `512`
* **Chunk overlap**: The percentage of overlapping tokens between adjacent chunks.
* Minimum: `0%`
* Maximum: `30%`
These settings apply during the indexing step, before your data is embedded and stored in Vectorize.
## Choosing chunk size and overlap
Chunking affects both how your content is retrieved and how much context is passed into the generation model. Try out this external [chunk visualizer tool](https://huggingface.co/spaces/m-ric/chunk_visualizer) to help understand how different chunk settings could look.
For chunk size, consider how:
* **Smaller chunks** create more precise vector matches, but may split relevant ideas across multiple chunks.
* **Larger chunks** retain more context, but may dilute relevance and reduce retrieval precision.
For chunk overlap, consider how:
* **More overlap** helps preserve continuity across boundaries, especially in flowing or narrative content.
* **Less overlap** reduces indexing time and cost, but can miss context if key terms are split between chunks.
### Additional considerations:
* **Vector index size:** Smaller chunk sizes produce more chunks and more total vectors. Refer to the [Vectorize limits](https://developers.cloudflare.com/vectorize/platform/limits/) to ensure your configuration stays within the maximum allowed vectors per index.
* **Generation model context window:** Generation models have a limited context window that must fit all retrieved chunks (`topK` × `chunk size`), the user query, and the model’s output. Be careful with large chunks or high topK values to avoid context overflows.
* **Cost and performance:** Larger chunks and higher topK settings result in more tokens passed to the model, which can increase latency and cost. You can monitor this usage in [AI Gateway](https://developers.cloudflare.com/ai-gateway/).
---
title: Data source · Cloudflare AI Search docs
description: "AI Search can directly ingest data from the following sources:"
lastUpdated: 2025-09-24T17:03:07.000Z
chatbotDeprioritize: false
source_url:
html: https://developers.cloudflare.com/ai-search/configuration/data-source/
md: https://developers.cloudflare.com/ai-search/configuration/data-source/index.md
---
AI Search can directly ingest data from the following sources:
| Data Source | Description |
| - | - |
| [Website](https://developers.cloudflare.com/ai-search/configuration/data-source/website/) | Connect a domain you own to index website pages. |
| [R2 Bucket](https://developers.cloudflare.com/ai-search/configuration/data-source/r2/) | Connect a Cloudflare R2 bucket to index stored documents. |
---
title: Indexing · Cloudflare AI Search docs
description: AI Search automatically indexes your data into vector embeddings
optimized for semantic search. Once a data source is connected, indexing runs
continuously in the background to keep your knowledge base fresh and
queryable.
lastUpdated: 2025-09-24T17:03:07.000Z
chatbotDeprioritize: false
source_url:
html: https://developers.cloudflare.com/ai-search/configuration/indexing/
md: https://developers.cloudflare.com/ai-search/configuration/indexing/index.md
---
AI Search automatically indexes your data into vector embeddings optimized for semantic search. Once a data source is connected, indexing runs continuously in the background to keep your knowledge base fresh and queryable.
## Jobs
AI Search automatically monitors your data source for updates and reindexes your content every **6 hours**. During each cycle, new or modified files are reprocessed to keep your Vectorize index up to date.
You can monitor the status and history of all indexing activity in the Jobs tab, including real-time logs for each job to help you troubleshoot and verify successful syncs.
## Controls
You can control indexing behavior through the following actions on the dashboard:
* **Sync Index**: Force AI Search to scan your data source for new or modified files and initiate an indexing job to update the associated Vectorize index. A new indexing job can be initiated every 30 seconds.
* **Pause Indexing**: Temporarily stop all scheduled indexing checks and reprocessing. Useful for debugging or freezing your knowledge base.
## Performance
The total time to index depends on the number and type of files in your data source. Factors that affect performance include:
* Total number of files and their sizes
* File formats (for example, images take longer than plain text)
* Latency of Workers AI models used for embedding and image processing
## Best practices
To ensure smooth and reliable indexing:
* Make sure your files are within the [**size limit**](https://developers.cloudflare.com/ai-search/platform/limits-pricing/#limits) and in a supported format to avoid being skipped.
* Keep your Service API token valid to prevent indexing failures.
* Regularly clean up outdated or unnecessary content in your knowledge base to avoid hitting [Vectorize index limits](https://developers.cloudflare.com/vectorize/platform/limits/).
---
title: Metadata · Cloudflare AI Search docs
description: Use metadata to filter documents before retrieval and provide
context to guide AI responses. This page covers how to apply filters and
attach optional context metadata to your files.
lastUpdated: 2025-09-24T17:03:07.000Z
chatbotDeprioritize: false
source_url:
html: https://developers.cloudflare.com/ai-search/configuration/metadata/
md: https://developers.cloudflare.com/ai-search/configuration/metadata/index.md
---
Use metadata to filter documents before retrieval and provide context to guide AI responses. This page covers how to apply filters and attach optional context metadata to your files.
## Metadata filtering
Metadata filtering narrows down search results based on metadata, so only relevant content is retrieved. The filter narrows down results prior to retrieval, so that you only query the scope of documents that matter.
Here is an example of metadata filtering using [Workers Binding](https://developers.cloudflare.com/ai-search/usage/workers-binding/) but it can be easily adapted to use the [REST API](https://developers.cloudflare.com/ai-search/usage/rest-api/) instead.
```js
const answer = await env.AI.autorag("my-autorag").search({
query: "How do I train a llama to deliver coffee?",
filters: {
type: "and",
filters: [
{
type: "eq",
key: "folder",
value: "llama/logistics/",
},
{
type: "gte",
key: "timestamp",
value: "1735689600000", // unix timestamp for 2025-01-01
},
],
},
});
```
### Metadata attributes
| Attribute | Description | Example |
| - | - | - |
| `filename` | The name of the file. | `dog.png` or `animals/mammals/cat.png` |
| `folder` | The folder or prefix to the object. | For the object `animals/mammals/cat.png`, the folder is `animals/mammals/` |
| `timestamp` | The timestamp for when the object was last modified. Comparisons are supported using a 13-digit Unix timestamp (milliseconds), but values will be rounded down to 10 digits (seconds). | The timestamp `2025-01-01 00:00:00.999 UTC` is `1735689600999` and it will be rounded down to `1735689600000`, corresponding to `2025-01-01 00:00:00 UTC` |
### Filter schema
You can create simple comparison filters or an array of comparison filters using a compound filter.
#### Comparison filter
You can compare a metadata attribute (for example, `folder` or `timestamp`) with a target value using a comparison filter.
```js
filters: {
type: "operator",
key: "metadata_attribute",
value: "target_value"
}
```
The available operators for the comparison are:
| Operator | Description |
| - | - |
| `eq` | Equals |
| `ne` | Not equals |
| `gt` | Greater than |
| `gte` | Greater than or equals to |
| `lt` | Less than |
| `lte` | Less than or equals to |
#### Compound filter
You can use a compound filter to combine multiple comparison filters with a logical operator.
```js
filters: {
type: "compound_operator",
filters: [...]
}
```
The available compound operators are: `and`, `or`.
Note the following limitations with the compound operators:
* No nesting combinations of `and`'s and `or`'s, meaning you can only pick 1 `and` or 1 `or`.
* When using `or`:
* Only the `eq` operator is allowed.
* All conditions must filter on the **same key** (for example, all on `folder`)
#### "Starts with" filter for folders
You can use "starts with" filtering on the `folder` metadata attribute to search for all files and subfolders within a specific path.
For example, consider this file structure:
If you were to filter using an `eq` (equals) operator with `value: "customer-a/"`, it would only match files directly within that folder, like `profile.md`. It would not include files in subfolders like `customer-a/contracts/`.
To recursively filter for all items starting with the path `customer-a/`, you can use the following compound filter:
```js
filters: {
type: "and",
filters: [
{
type: "gt",
key: "folder",
value: "customer-a//",
},
{
type: "lte",
key: "folder",
value: "customer-a/z",
},
],
},
```
This filter identifies paths starting with `customer-a/` by using:
* The `and` condition to combine the effects of the `gt` and `lte` conditions.
* The `gt` condition to include paths greater than the `/` ASCII character.
* The `lte` condition to include paths less than and including the lower case `z` ASCII character.
Together, these conditions effectively select paths that begin with the provided path value.
## Add `context` field to guide AI Search
You can optionally include a custom metadata field named `context` when uploading an object to your R2 bucket.
The `context` field is attached to each chunk and passed to the LLM during an `/ai-search` query. It does not affect retrieval but helps the LLM interpret and frame the answer.
The field can be used for providing document summaries, source links, or custom instructions without modifying the file content.
You can add [custom metadata](https://developers.cloudflare.com/r2/api/workers/workers-api-reference/#r2putoptions) to an object in the `/PUT` operation when uploading the object to your R2 bucket. For example if you are using the [Workers binding with R2](https://developers.cloudflare.com/r2/api/workers/workers-api-usage/):
```javascript
await env.MY_BUCKET.put("cat.png", file, {
customMetadata: {
context: "This is a picture of Joe's cat. His name is Max."
}
});
```
During `/ai-search`, this context appears in the response under `attributes.file.context`, and is included in the data passed to the LLM for generating a response.
## Response
You can see the metadata attributes of your retrieved data in the response under the property `attributes` for each retrieved chunk. For example:
```js
"data": [
{
"file_id": "llama001",
"filename": "llama/logistics/llama-logistics.md",
"score": 0.45,
"attributes": {
"timestamp": 1735689600000, // unix timestamp for 2025-01-01
"folder": "llama/logistics/",
"file": {
"url": "www.llamasarethebest.com/logistics"
"context": "This file contains information about how llamas can logistically deliver coffee."
}
},
"content": [
{
"id": "llama001",
"type": "text",
"text": "Llamas can carry 3 drinks max."
}
]
}
]
```
---
title: Models · Cloudflare AI Search docs
description: AI Search uses models at multiple stages. You can configure which
models are used, or let AI Search automatically select a smart default for
you.
lastUpdated: 2025-09-24T17:03:07.000Z
chatbotDeprioritize: false
source_url:
html: https://developers.cloudflare.com/ai-search/configuration/models/
md: https://developers.cloudflare.com/ai-search/configuration/models/index.md
---
AI Search uses models at multiple stages. You can configure which models are used, or let AI Search automatically select a smart default for you.
## Models usage
AI Search leverages Workers AI models in the following stages:
* Image to markdown conversion (if images are in data source): Converts image content to Markdown using object detection and captioning models.
* Embedding: Transforms your documents and queries into vector representations for semantic search.
* Query rewriting (optional): Reformulates the user’s query to improve retrieval accuracy.
* Generation: Produces the final response from retrieved context.
## Model providers
All AI Search instances support models from [Workers AI](https://developers.cloudflare.com/workers-ai). You can use other providers (such as OpenAI or Anthropic) in AI Search by adding their API keys to an [AI Gateway](https://developers.cloudflare.com/ai-gateway) and connecting that gateway to your AI Search.
To use AI Search with other model providers:
1. Add provider keys to AI Gateway
* Go to **AI > AI Gateway** in the dashboard.
* Select or create an AI gateway.
* In **Provider Keys**, choose your provider, click **Add**, and enter the key.
1. Connect the gateway to AI Search
* When creating a new AI Search, select the AI Gateway with your provider keys.
* For an existing AI Search, go to **Settings** and switch to a gateway that has your keys under **Resources**.
1. Select models
* Embedding model: Only available to be changed when creating a new AI Search.
* Generation model: Can be selected when creating a new AI Search and can be changed at any time in **Settings**.
AI Search supports a subset of models that have been selected to provide the best experience. See list of [supported models](https://developers.cloudflare.com/ai-search/configuration/models/supported-models/).
### Smart default
If you choose **Smart Default** in your model selection, then AI Search will select a Cloudflare recommended model and will update it automatically for you over time. You can switch to explicit model configuration at any time by visiting **Settings**.
### Per-request generation model override
While the generation model can be set globally at the AI Search instance level, you can also override it on a per-request basis in the [AI Search API](https://developers.cloudflare.com/ai-search/usage/rest-api/#ai-search). This is useful if your [RAG application](https://developers.cloudflare.com/ai-search/) requires dynamic selection of generation models based on context or user preferences.
## Model deprecation
AI Search may deprecate support for a given model in order to provide support for better-performing models with improved capabilities. When a model is being deprecated, we announce the change and provide an end-of-life date after which the model will no longer be accessible. Applications that depend on AI Search may therefore require occasional updates to continue working reliably.
### Model lifecycle
AI Search models follow a defined lifecycle to ensure stability and predictable deprecation:
1. **Production:** The model is actively supported and recommended for use. It is included in Smart Defaults and receives ongoing updates and maintenance.
2. **Announcement & Transition:** The model remains available but has been marked for deprecation. An end-of-life date is communicated through documentation, release notes, and other official channels. During this phase, users are encouraged to migrate to the recommended replacement model.
3. **Automatic Upgrade (if applicable):** If you have selected the Smart Default option, AI Search will automatically upgrade requests to a recommended replacement.
4. **End of life:** The model is no longer available. Any requests to the retired model return a clear error message, and the model is removed from documentation and Smart Defaults.
See models are their lifecycle status in [supported models](https://developers.cloudflare.com/ai-search/configuration/models/supported-models/).
### Best practices
* Regularly check the [release note](https://developers.cloudflare.com/ai-search/platform/release-note/) for updates.
* Plan migration efforts according to the communicated end-of-life date.
* Migrate and test the recommended replacement models before the end-of-life date.
---
title: Query rewriting · Cloudflare AI Search docs
description: Query rewriting is an optional step in the AI Search pipeline that
improves retrieval quality by transforming the original user query into a more
effective search query.
lastUpdated: 2025-09-24T17:03:07.000Z
chatbotDeprioritize: false
source_url:
html: https://developers.cloudflare.com/ai-search/configuration/query-rewriting/
md: https://developers.cloudflare.com/ai-search/configuration/query-rewriting/index.md
---
Query rewriting is an optional step in the AI Search pipeline that improves retrieval quality by transforming the original user query into a more effective search query.
Instead of embedding the raw user input directly, AI Search can use a large language model (LLM) to rewrite the query based on a system prompt. The rewritten query is then used to perform the vector search.
## Why use query rewriting?
The wording of a user’s question may not match how your documents are written. Query rewriting helps bridge this gap by:
* Rephrasing informal or vague queries into precise, information-dense terms
* Adding synonyms or related keywords
* Removing filler words or irrelevant details
* Incorporating domain-specific terminology
This leads to more relevant vector matches which improves the accuracy of the final generated response.
## Example
**Original query:** `how do i make this work when my api call keeps failing?`
**Rewritten query:** `API call failure troubleshooting authentication headers rate limiting network timeout 500 error`
In this example, the original query is conversational and vague. The rewritten version extracts the core problem (API call failure) and expands it with relevant technical terms and likely causes. These terms are much more likely to appear in documentation or logs, improving semantic matching during vector search.
## How it works
If query rewriting is enabled, AI Search performs the following:
1. Sends the **original user query** and the **query rewrite system prompt** to the configured LLM
2. Receives the **rewritten query** from the model
3. Embeds the rewritten query using the selected embedding model
4. Performs vector search in your AI Search’s Vectorize index
For details on how to guide model behavior during this step, see the [system prompt](https://developers.cloudflare.com/ai-search/configuration/system-prompt/) documentation.
---
title: Reranking · Cloudflare AI Search docs
description: Reranking can help improve the quality of AI Search results by
reordering retrieved documents based on semantic relevance to the user’s
query. It applies a secondary model after retrieval to "rerank" the top
results before they are outputted.
lastUpdated: 2025-10-28T15:46:27.000Z
chatbotDeprioritize: false
source_url:
html: https://developers.cloudflare.com/ai-search/configuration/reranking/
md: https://developers.cloudflare.com/ai-search/configuration/reranking/index.md
---
Reranking can help improve the quality of AI Search results by reordering retrieved documents based on semantic relevance to the user’s query. It applies a secondary model after retrieval to "rerank" the top results before they are outputted.
## How it works
By default, reranking is **disabled** for all AI Search instances. You can enable it during creation or later from the settings page.
When enabled, AI Search will:
1. Retrieve a set of relevant results from your index, constrained by your `max_num_of_results` and `score_threshold` parameters.
2. Pass those results through a [reranking model](https://developers.cloudflare.com/ai-search/configuration/models/supported-models/).
3. Return the reranked results, which the text generation model can use for answer generation.
Reranking helps improve accuracy, especially for large or noisy datasets where vector similarity alone may not produce the optimal ordering.
## Configuration
You can configure reranking in several ways:
### Configure via API
When you make a `/search` or `/ai-search` request using the [Workers Binding](https://developers.cloudflare.com/ai-search/usage/workers-binding/) or [REST API](https://developers.cloudflare.com/ai-search/usage/rest-api/), you can:
* Enable or disable reranking per request
* Specify the reranking model
For example:
```javascript
const answer = await env.AI.autorag("my-autorag").aiSearch({
query: "How do I train a llama to deliver coffee?",
model: "@cf/meta/llama-3.3-70b-instruct-fp8-fast",
reranking: {
enabled: true,
model: "@cf/baai/bge-reranker-base"
}
});
```
### Configure in dashboard for new AI Search
When creating a new RAG in the dashboard:
1. Go to **AI Search** in the Cloudflare dashboard.
[Go to **AI Search (AutoRAG)**](https://dash.cloudflare.com/?to=/:account/ai/ai-search)
2. Select **Create** > **Get started**.
3. In the **Retrieval configuration** step, open the **Reranking** dropdown.
4. Toggle **Reranking** on.
5. Select the reranking model.
6. Complete your setup.
### Configure in dashboard for existing AI Search
To update reranking for an existing instance:
1. Go to **AI Search** in the Cloudflare dashboard.
[Go to **AI Search (AutoRAG)**](https://dash.cloudflare.com/?to=/:account/ai/ai-search)
2. Select an existing AI Search instance.
3. Go to the **Settings** tab.
4. Under **Reranking**, toggle reranking on.
5. Select the reranking model.
---
title: Retrieval configuration · Cloudflare AI Search docs
description: "AI Search allows you to configure how content is retrieved from
your vector index and used to generate a final response. Two options control
this behavior:"
lastUpdated: 2025-09-24T17:03:07.000Z
chatbotDeprioritize: false
source_url:
html: https://developers.cloudflare.com/ai-search/configuration/retrieval-configuration/
md: https://developers.cloudflare.com/ai-search/configuration/retrieval-configuration/index.md
---
AI Search allows you to configure how content is retrieved from your vector index and used to generate a final response. Two options control this behavior:
* **Match threshold**: Minimum similarity score required for a vector match to be considered relevant.
* **Maximum number of results**: Maximum number of top-matching results to return (`top_k`).
AI Search uses the [`query()`](https://developers.cloudflare.com/vectorize/best-practices/query-vectors/) method from [Vectorize](https://developers.cloudflare.com/vectorize/) to perform semantic search. This function compares the embedded query vector against the stored vectors in your index and returns the most similar results.
## Match threshold
The `match_threshold` sets the minimum similarity score (for example, cosine similarity) that a document chunk must meet to be included in the results. Threshold values range from `0` to `1`.
* A higher threshold means stricter filtering, returning only highly similar matches.
* A lower threshold allows broader matches, increasing recall but possibly reducing precision.
## Maximum number of results
This setting controls the number of top-matching chunks returned by Vectorize after filtering by similarity score. It corresponds to the `topK` parameter in `query()`. The maximum allowed value is 50.
* Use a higher value if you want to synthesize across multiple documents. However, providing more input to the model can increase latency and cost.
* Use a lower value if you prefer concise answers with minimal context.
## How they work together
AI Search's retrieval step follows this sequence:
1. Your query is embedded using the configured Workers AI model.
2. `query()` is called to search the Vectorize index, with `topK` set to the `maximum_number_of_results`.
3. Results are filtered using the `match_threshold`.
4. The filtered results are passed into the generation step as context.
If no results meet the threshold, AI Search will not generate a response.
## Configuration
These values can be configured at the AI Search instance level or overridden on a per-request basis using the [REST API](https://developers.cloudflare.com/ai-search/usage/rest-api/) or the [Workers Binding](https://developers.cloudflare.com/ai-search/usage/workers-binding/).
Use the parameters `match_threshold` and `max_num_results` to customize retrieval behavior per request.
---
title: System prompt · Cloudflare AI Search docs
description: "System prompts allow you to guide the behavior of the
text-generation models used by AI Search at query time. AI Search supports
system prompt configuration in two steps:"
lastUpdated: 2025-10-28T15:46:27.000Z
chatbotDeprioritize: false
source_url:
html: https://developers.cloudflare.com/ai-search/configuration/system-prompt/
md: https://developers.cloudflare.com/ai-search/configuration/system-prompt/index.md
---
System prompts allow you to guide the behavior of the text-generation models used by AI Search at query time. AI Search supports system prompt configuration in two steps:
* **Query rewriting**: Reformulates the original user query to improve semantic retrieval. A system prompt can guide how the model interprets and rewrites the query.
* **Generation**: Generates the final response from retrieved context. A system prompt can help define how the model should format, filter, or prioritize information when constructing the answer.
## What is a system prompt?
A system prompt is a special instruction sent to a large language model (LLM) that guides how it behaves during inference. The system prompt defines the model's role, context, or rules it should follow.
System prompts are particularly useful for:
* Enforcing specific response formats
* Constraining behavior (for example, it only responds based on the provided content)
* Applying domain-specific tone or terminology
* Encouraging consistent, high-quality output
## System prompt configuration
### Default system prompt
When configuring your AI Search instance, you can provide your own system prompts. If you do not provide a system prompt, AI Search will use the **default system prompt** provided by Cloudflare.
You can view the effective system prompt used for any AI Search's model call through AI Gateway logs, where model inputs and outputs are recorded.
Note
The default system prompt can change and evolve over time to improve performance and quality.
### Configure via API
When you make a `/ai-search` request using the [Workers Binding](https://developers.cloudflare.com/ai-search/usage/workers-binding/) or [REST API](https://developers.cloudflare.com/ai-search/usage/rest-api/), you can set the system prompt programmatically.
For example:
```javascript
const answer = await env.AI.autorag("my-autorag").aiSearch({
query: "How do I train a llama to deliver coffee?",
model: "@cf/meta/llama-3.3-70b-instruct-fp8-fast",
system_prompt: "You are a helpful assistant."
});
```
### Configure via Dashboard
The system prompt for your AI Search can be set after it has been created:
1. Go to **AI Search** in the Cloudflare dashboard. [Go to **AI Search (AutoRAG)**](https://dash.cloudflare.com/?to=/:account/ai/ai-search)
2. Select an existing AI Search instance.
3. Go to the **Settings** tab.
4. Go to **Query rewrite** or **Generation**, and edit the **System prompt**.
## Query rewriting system prompt
If query rewriting is enabled, you can provide a custom system prompt to control how the model rewrites user queries. In this step, the model receives:
* The query rewrite system prompt
* The original user query
The model outputs a rewritten query optimized for semantic retrieval.
### Example
```text
You are a search query optimizer for vector database searches. Your task is to reformulate user queries into more effective search terms.
Given a user's search query, you must:
1. Identify the core concepts and intent
2. Add relevant synonyms and related terms
3. Remove irrelevant filler words
4. Structure the query to emphasize key terms
5. Include technical or domain-specific terminology if applicable
Provide only the optimized search query without any explanations, greetings, or additional commentary.
Example input: "how to fix a bike tire that's gone flat"
Example output: "bicycle tire repair puncture fix patch inflate maintenance flat tire inner tube replacement"
Constraints:
- Output only the enhanced search terms
- Keep focus on searchable concepts
- Include both specific and general related terms
- Maintain all important meaning from original query
```
## Generation system prompt
If you are using the AI Search API endpoint, you can use the system prompt to influence how the LLM responds to the final user query using the retrieved results. At this step, the model receives:
* The user's original query
* Retrieved document chunks (with metadata)
* The generation system prompt
The model uses these inputs to generate a context-aware response.
### Example
```plaintext
You are a helpful AI assistant specialized in answering questions using retrieved documents.
Your task is to provide accurate, relevant answers based on the matched content provided.
For each query, you will receive:
User's question/query
A set of matched documents, each containing:
- File name
- File content
You should:
1. Analyze the relevance of matched documents
2. Synthesize information from multiple sources when applicable
3. Acknowledge if the available documents don't fully answer the query
4. Format the response in a way that maximizes readability, in Markdown format
Answer only with direct reply to the user question, be concise, omit everything which is not directly relevant, focus on answering the question directly and do not redirect the user to read the content.
If the available documents don't contain enough information to fully answer the query, explicitly state this and provide an answer based on what is available.
Important:
- Cite which document(s) you're drawing information from
- Present information in order of relevance
- If documents contradict each other, note this and explain your reasoning for the chosen answer
- Do not repeat the instructions
```
---
title: Bring your own generation model · Cloudflare AI Search docs
description: When using AI Search, AI Search leverages a Workers AI model to
generate the response. If you want to use a model outside of Workers AI, you
can use AI Search for search while leveraging a model outside of Workers AI to
generate responses.
lastUpdated: 2025-09-24T17:03:07.000Z
chatbotDeprioritize: false
tags: AI
source_url:
html: https://developers.cloudflare.com/ai-search/how-to/bring-your-own-generation-model/
md: https://developers.cloudflare.com/ai-search/how-to/bring-your-own-generation-model/index.md
---
When using `AI Search`, AI Search leverages a Workers AI model to generate the response. If you want to use a model outside of Workers AI, you can use AI Search for `search` while leveraging a model outside of Workers AI to generate responses.
Here is an example of how you can use an OpenAI model to generate your responses. This example uses [Workers Binding](https://developers.cloudflare.com/ai-search/usage/workers-binding/), but can be easily adapted to use the [REST API](https://developers.cloudflare.com/ai-search/usage/rest-api/) instead.
Note
AI Search now supports [bringing your own models natively](https://developers.cloudflare.com/ai-search/configuration/models/). You can attach provider keys through AI Gateway and select third-party models directly in your AI Search settings. The example below still works, but the recommended way is to configure your external model through AI Gateway.
* JavaScript
```js
import { openai } from "@ai-sdk/openai";
import { generateText } from "ai";
export default {
async fetch(request, env) {
// Parse incoming url
const url = new URL(request.url);
// Get the user query or default to a predefined one
const userQuery =
url.searchParams.get("query") ??
"How do I train a llama to deliver coffee?";
// Search for documents in AI Search
const searchResult = await env.AI.autorag("my-rag").search({
query: userQuery,
});
if (searchResult.data.length === 0) {
// No matching documents
return Response.json({ text: `No data found for query "${userQuery}"` });
}
// Join all document chunks into a single string
const chunks = searchResult.data
.map((item) => {
const data = item.content
.map((content) => {
return content.text;
})
.join("\n\n");
return `${data}`;
})
.join("\n\n");
// Send the user query + matched documents to openai for answer
const generateResult = await generateText({
model: openai("gpt-4o-mini"),
messages: [
{
role: "system",
content:
"You are a helpful assistant and your task is to answer the user question using the provided files.",
},
{ role: "user", content: chunks },
{ role: "user", content: userQuery },
],
});
// Return the generated answer
return Response.json({ text: generateResult.text });
},
};
```
* TypeScript
```ts
import { openai } from "@ai-sdk/openai";
import { generateText } from "ai";
export interface Env {
AI: Ai;
OPENAI_API_KEY: string;
}
export default {
async fetch(request, env): Promise {
// Parse incoming url
const url = new URL(request.url);
// Get the user query or default to a predefined one
const userQuery =
url.searchParams.get("query") ??
"How do I train a llama to deliver coffee?";
// Search for documents in AI Search
const searchResult = await env.AI.autorag("my-rag").search({
query: userQuery,
});
if (searchResult.data.length === 0) {
// No matching documents
return Response.json({ text: `No data found for query "${userQuery}"` });
}
// Join all document chunks into a single string
const chunks = searchResult.data
.map((item) => {
const data = item.content
.map((content) => {
return content.text;
})
.join("\n\n");
return `${data}`;
})
.join("\n\n");
// Send the user query + matched documents to openai for answer
const generateResult = await generateText({
model: openai("gpt-4o-mini"),
messages: [
{
role: "system",
content:
"You are a helpful assistant and your task is to answer the user question using the provided files.",
},
{ role: "user", content: chunks },
{ role: "user", content: userQuery },
],
});
// Return the generated answer
return Response.json({ text: generateResult.text });
},
} satisfies ExportedHandler;
```
---
title: Create multitenancy · Cloudflare AI Search docs
description: AI Search supports multitenancy by letting you segment content by
tenant, so each user, customer, or workspace can only access their own data.
This is typically done by organizing documents into per-tenant folders and
applying metadata filters at query time.
lastUpdated: 2025-09-24T17:03:07.000Z
chatbotDeprioritize: false
source_url:
html: https://developers.cloudflare.com/ai-search/how-to/multitenancy/
md: https://developers.cloudflare.com/ai-search/how-to/multitenancy/index.md
---
AI Search supports multitenancy by letting you segment content by tenant, so each user, customer, or workspace can only access their own data. This is typically done by organizing documents into per-tenant folders and applying [metadata filters](https://developers.cloudflare.com/ai-search/configuration/metadata/) at query time.
## 1. Organize Content by Tenant
When uploading files to R2, structure your content by tenant using unique folder paths.
Example folder structure:
When indexing, AI Search will automatically store the folder path as metadata under the `folder` attribute. It is recommended to enforce folder separation during upload or indexing to prevent accidental data access across tenants.
## 2. Search Using Folder Filters
To ensure a tenant only retrieves their own documents, apply a `folder` filter when performing a search.
Example using [Workers Binding](https://developers.cloudflare.com/ai-search/usage/workers-binding/):
```js
const response = await env.AI.autorag("my-autorag").search({
query: "When did I sign my agreement contract?",
filters: {
type: "eq",
key: "folder",
value: `customer-a/contracts/`,
},
});
```
To filter across multiple folders, or to add date-based filtering, you can use a compound filter with an array of [comparison filters](https://developers.cloudflare.com/ai-search/configuration/metadata/#compound-filter).
## Tip: Use "Starts with" filter
While an `eq` filter targets files at the specific folder, you'll often want to retrieve all documents belonging to a tenant regardless if there are files in its subfolders. For example, all files in `customer-a/` with a structure like:
To achieve this [starts with](https://developers.cloudflare.com/ai-search/configuration/metadata/#starts-with-filter-for-folders) behavior, use a compound filter like:
```js
filters: {
type: "and",
filters: [
{
type: "gt",
key: "folder",
value: "customer-a//",
},
{
type: "lte",
key: "folder",
value: "customer-a/z",
},
],
},
```
This filter identifies paths starting with `customer-a/` by using:
* The `and` condition to combine the effects of the `gt` and `lte` conditions.
* The `gt` condition to include paths greater than the `/` ASCII character.
* The `lte` condition to include paths less than and including the lower case `z` ASCII character.
This filter captures both files `profile.md` and `contract-1.pdf`.
---
title: Create a simple search engine · Cloudflare AI Search docs
description: By using the search method, you can implement a simple but fast
search engine. This example uses Workers Binding, but can be easily adapted to
use the REST API instead.
lastUpdated: 2025-09-24T17:03:07.000Z
chatbotDeprioritize: false
source_url:
html: https://developers.cloudflare.com/ai-search/how-to/simple-search-engine/
md: https://developers.cloudflare.com/ai-search/how-to/simple-search-engine/index.md
---
By using the `search` method, you can implement a simple but fast search engine. This example uses [Workers Binding](https://developers.cloudflare.com/ai-search/usage/workers-binding/), but can be easily adapted to use the [REST API](https://developers.cloudflare.com/ai-search/usage/rest-api/) instead.
To replicate this example remember to:
* Disable `rewrite_query`, as you want to match the original user query
* Configure your AI Search to have small chunk sizes, usually 256 tokens is enough
- JavaScript
```js
export default {
async fetch(request, env) {
const url = new URL(request.url);
const userQuery =
url.searchParams.get("query") ??
"How do I train a llama to deliver coffee?";
const searchResult = await env.AI.autorag("my-rag").search({
query: userQuery,
rewrite_query: false,
});
return Response.json({
files: searchResult.data.map((obj) => obj.filename),
});
},
};
```
- TypeScript
```ts
export interface Env {
AI: Ai;
}
export default {
async fetch(request, env): Promise {
const url = new URL(request.url);
const userQuery =
url.searchParams.get("query") ??
"How do I train a llama to deliver coffee?";
const searchResult = await env.AI.autorag("my-rag").search({
query: userQuery,
rewrite_query: false,
});
return Response.json({
files: searchResult.data.map((obj) => obj.filename),
});
},
} satisfies ExportedHandler;
```
---
title: NLWeb · Cloudflare AI Search docs
description: Enable conversational search on your website with NLWeb and
Cloudflare AI Search. This template crawls your site, indexes the content, and
deploys NLWeb-standard endpoints to serve both people and AI agents.
lastUpdated: 2025-09-24T17:03:07.000Z
chatbotDeprioritize: false
source_url:
html: https://developers.cloudflare.com/ai-search/how-to/nlweb/
md: https://developers.cloudflare.com/ai-search/how-to/nlweb/index.md
---
Enable conversational search on your website with NLWeb and Cloudflare AI Search. This template crawls your site, indexes the content, and deploys NLWeb-standard endpoints to serve both people and AI agents.
Note
This is a public preview ideal for experimentation. If you're interested in running this in production workflows, please contact us at .
## What is NLWeb
[NLWeb](https://github.com/nlweb-ai/NLWeb) is an open project developed by Microsoft that defines a standard protocol for natural language queries on websites. Its goal is to make every website as accessible and interactive as a conversational AI app, so both people and AI agents can reliably query site content. It does this by exposing two key endpoints:
* `/ask`: Conversational endpoint for user queries
* `/mcp`: Structured Model Context Protocol (MCP) endpoint for AI agents
## How to use it
You can deploy NLWeb on your website directly through the AI Search dashboard:
1. Log in to your [Cloudflare dashboard](https://dash.cloudflare.com/).
2. Go to **Compute & AI** > **AI Search**.
3. Select **Create AI Search**, then choose the **NLWeb Website** option.
4. Select your domain from your Cloudflare account.
5. Click **Start indexing**.
Once complete, AI Search will crawl and index your site, then deploy an NLWeb Worker for you.
## What this template includes
Choosing the NLWeb Website option extends a normal AI Search by tailoring it for content‑heavy websites and giving you everything that is required to adopt NLWeb as the standard for conversational search on your site. Specifically, the template provides:
* **Website as a data source:** Uses [Website](https://developers.cloudflare.com/ai-search/configuration/data-source/website/) as data source option to crawl and ingest pages with the Rendered Sites option.
* **Defaults for content-heavy websites:** Applies tuned embedding and retrieval configurations ideal for publishing and content‑rich websites.
* **NLWeb Worker deployment:** Automatically spins up a Cloudflare Worker from the [NLWeb Worker template](https://github.com/cloudflare/templates).
## What the Worker includes
Your deployed Worker provides two endpoints:
* `/ask` — NLWeb’s standard conversational endpoint
* Powers the conversational UI at the root (`/`)
* Powers the embeddable preview widget (`/snippet.html`)
* `/mcp` — NLWeb’s MCP server endpoint for trusted AI agents
These endpoints give both people and agents structured access to your content.
## Using It on Your Website
To integrate NLWeb search directly into your site you can:
1. Find your deployed Worker in the [Cloudflare dashboard](https://dash.cloudflare.com/):
* Go to **Compute & AI** > **AI Search**.
* Select **Connect**, then go to the **NLWeb** tab.
* Select **Go to Worker**.
1. Add a [custom domain](https://developers.cloudflare.com/workers/configuration/routing/custom-domains/) to your Worker (for example, ask.example.com)
2. Use the `/ask` endpoint on your custom domain to power the search (for example, ask.example.com/ask)
You can also use the embeddable snippet to add a search UI directly into your website. For example:
```html
```
This lets you serve conversational AI search directly from your own domain, with control over how people and agents access your content.
## Modifying or updating the Worker
You may want to customize your Worker, for example, to adjust the UI for the embeddable snippet. In those cases, we recommend calling the `/ask` endpoint for queries and building your own UI on top of it, however, you may also choose to modify the Worker's code for the embeddable UI.
If the NLWeb standard is updated, you can update your Worker to stay compatible and recieve the latest updates.
The simplest way to apply changes or updates is to redeploy the Worker template:
[](https://deploy.workers.cloudflare.com/?url=https://github.com/cloudflare/templates/tree/main/nlweb-template)
To do so:
1. Select the **Deploy to Cloudflare** button from above to deploy the Worker template to your Cloudflare account.
2. Enter the name of your AI Search in the `RAG_ID` environment variable field.
3. Click **Deploy**.
4. Select the **GitHub/GitLab** icon on the Workers Dashboard.
5. Clone the repository that is created for your Worker.
6. Make your modifications, then commit and push changes to the repository to update your Worker.
Now you can use this Worker as the new NLWeb endpoint for your website.
---
title: Limits & pricing · Cloudflare AI Search docs
description: "During the open beta, AI Search is free to enable. When you create
an AI Search instance, it provisions and runs on top of Cloudflare services in
your account. These resources are billed as part of your Cloudflare usage, and
includes:"
lastUpdated: 2025-11-06T19:11:47.000Z
chatbotDeprioritize: false
source_url:
html: https://developers.cloudflare.com/ai-search/platform/limits-pricing/
md: https://developers.cloudflare.com/ai-search/platform/limits-pricing/index.md
---
## Pricing
During the open beta, AI Search is **free to enable**. When you create an AI Search instance, it provisions and runs on top of Cloudflare services in your account. These resources are **billed as part of your Cloudflare usage**, and includes:
| Service & Pricing | Description |
| - | - |
| [**R2**](https://developers.cloudflare.com/r2/pricing/) | Stores your source data |
| [**Vectorize**](https://developers.cloudflare.com/vectorize/platform/pricing/) | Stores vector embeddings and powers semantic search |
| [**Workers AI**](https://developers.cloudflare.com/workers-ai/platform/pricing/) | Handles image-to-Markdown conversion, embedding, query rewriting, and response generation |
| [**AI Gateway**](https://developers.cloudflare.com/ai-gateway/reference/pricing/) | Monitors and controls model usage |
| [**Browser Rendering**](https://developers.cloudflare.com/browser-rendering/pricing/) | Loads dynamic JavaScript content during [website](https://developers.cloudflare.com/ai-search/configuration/data-source/website/) crawling with the Render option |
For more information about how each resource is used within AI Search, reference [How AI Search works](https://developers.cloudflare.com/ai-search/concepts/how-ai-search-works/).
## Limits
The following limits currently apply to AI Search during the open beta:
Need a higher limit?
To request an adjustment to a limit, complete the [Limit Increase Request Form](https://forms.gle/wnizxrEUW33Y15CT8). If the limit can be increased, Cloudflare will contact you with next steps.
| Limit | Value |
| - | - |
| Max AI Search instances per account | 10 |
| Max files per AI Search | 100,000 |
| Max file size | 4 MB |
These limits are subject to change as AI Search evolves beyond open beta.
---
title: Release note · Cloudflare AI Search docs
description: Review recent changes to Cloudflare AI Search.
lastUpdated: 2025-09-24T17:03:07.000Z
chatbotDeprioritize: false
source_url:
html: https://developers.cloudflare.com/ai-search/platform/release-note/
md: https://developers.cloudflare.com/ai-search/platform/release-note/index.md
---
This release notes section covers regular updates and minor fixes. For major feature releases or significant updates, see the [changelog](https://developers.cloudflare.com/changelog).
## 2025-09-25
**AI Search (formerly AutoRAG) now supports more models**
Connect your provider keys through AI Gateway to use models like from OpenAI and Anthropic for both embeddings and inference. API updates to align with the new name are coming soon, with existing APIs still supported.
## 2025-09-23
**Support document file types in AutoRAG**
Our [conversion utility](https://developers.cloudflare.com/workers-ai/features/markdown-conversion/) can now convert `.docx` and `.odt` files to Markdown, making these files available to index inside your AutoRAG instance.
## 2025-08-20
**Increased maximum query results to 50**
The maximum number of results returned from a query has been increased from **20** to **50**. This allows you to surface more relevant matches in a single request.
## 2025-07-16
**Deleted files now removed from index on next sync**
When a file is deleted from your R2 bucket, its corresponding chunks are now automatically removed from the Vectorize index linked to your AI Search instance during the next sync.
## 2025-07-08
**Reduced cooldown between syncs**
The cooldown period between sync jobs has been reduced to **3 minutes**, allowing you to trigger syncs more frequently when updating your data. If a sync is requested during the cooldown window, the dashboard and API now return clear response indicating that the sync cannot proceed due to the cooldown.
## 2025-06-16
**Rich format file size limit increased to 4 MB**
You can now index rich format files (e.g., PDF) up to 4 MB in size, up from the previous 1 MB limit.
## 2025-06-12
**Index processing status displayed on dashboard**
The dashboard now includes a new “Processing” step for the indexing pipeline that displays the files currently being processed.
## 2025-06-12
**Sync AI Search REST API published**
You can now trigger a sync job for an AI Search using the [Sync REST API](https://developers.cloudflare.com/api/resources/ai-search/subresources/rags/methods/sync/). This scans your data source for changes and queues updated or previously errored files for indexing.
## 2025-06-10
**Files modified in the data source will now be updated**
Files modified in your source R2 bucket will now be updated in the AI Search index during the next sync. For example, if you upload a new version of an existing file, the changes will be reflected in the index after the subsequent sync job. Please note that deleted files are not yet removed from the index. We are actively working on this functionality.
## 2025-05-31
**Errored files will now be retried in next sync**
Files that failed to index will now be automatically retried in the next indexing job. For instance, if a file initially failed because it was oversized but was then corrected (e.g. replaced with a file of the same name/key within the size limit), it will be re-attempted during the next scheduled sync.
## 2025-05-31
**Fixed character cutoff in recursive chunking**
Resolved an issue where certain characters (e.g. '#') were being cut off during the recursive chunking and embedding process. This fix ensures complete character processing in the indexing process.
## 2025-05-25
**EU jurisdiction R2 buckets now supported**
AI Search now supports R2 buckets configured with European Union (EU) jurisdiction restrictions. Previously, files in EU-restricted R2 buckets would not index when linked. This issue has been resolved, and all EU-restricted R2 buckets should now function as expected.
## 2025-04-23
**Response streaming in AI Search binding added**
AI Search now supports response streaming in the `AI Search` method of the [Workers binding](https://developers.cloudflare.com/ai-search/usage/workers-binding/), allowing you to stream results as they’re retrieved by setting `stream: true`.
## 2025-04-07
**AI Search is now in open beta!**
AI Search allows developers to create fully-managed retrieval-augmented generation (RAG) pipelines powered by Cloudflare allowing developers to integrate context-aware AI into their applications without managing infrastructure. Get started today on the [Cloudflare Dashboard](https://dash.cloudflare.com/?to=/:account/ai/autorag).
---
title: Build a RAG from your website · Cloudflare AI Search docs
description: AI Search is designed to work out of the box with data in R2
buckets. But what if your content lives on a website or needs to be rendered
dynamically?
lastUpdated: 2025-09-25T12:33:53.000Z
chatbotDeprioritize: false
source_url:
html: https://developers.cloudflare.com/ai-search/tutorial/brower-rendering-autorag-tutorial/
md: https://developers.cloudflare.com/ai-search/tutorial/brower-rendering-autorag-tutorial/index.md
---
AI Search is designed to work out of the box with data in R2 buckets. But what if your content lives on a website or needs to be rendered dynamically?
In this tutorial, we’ll walk through how to:
1. Render your website using Cloudflare's Browser Rendering API
2. Store the rendered HTML in R2
3. Connect it to AI Search for querying
Note
AI Search now lets you use your [website](https://developers.cloudflare.com/ai-search/configuration/data-source/website/) as a data source. When enabled, AI Search will automatically crawl and parse your site content for you.
## Step 1. Create a Worker to fetch webpages and upload into R2
We’ll create a Cloudflare Worker that uses Puppeteer to visit your URL, render it, and store the full HTML in your R2 bucket. If you already have an R2 bucket with content you’d like to build a RAG for then you can skip this step.
1. Create a new Worker project named `browser-r2-worker` by running:
```bash
npm create cloudflare@latest -- browser-r2-worker
```
For setup, select the following options:
* For *What would you like to start with*?, choose `Hello World example`.
* For *Which template would you like to use*?, choose `Worker only`.
* For *Which language do you want to use*?, choose `TypeScript`.
* For *Do you want to use git for version control*?, choose `Yes`.
* For *Do you want to deploy your application*?, choose `No` (we will be making some changes before deploying).
1. Install `@cloudflare/puppeteer`, which allows you to control the Browser Rendering instance:
```bash
npm i @cloudflare/puppeteer
```
1. Create a new R2 bucket named `html-bucket` by running:
```bash
npx wrangler r2 bucket create html-bucket
```
1. Add the following configurations to your Wrangler configuration file so your Worker can use browser rendering and your new R2 bucket:
```jsonc
{
"compatibility_flags": ["nodejs_compat"],
"browser": {
"binding": "MY_BROWSER",
},
"r2_buckets": [
{
"binding": "HTML_BUCKET",
"bucket_name": "html-bucket",
},
],
}
```
1. Replace the contents of `src/index.ts` with the following skeleton script:
* JavaScript
```js
import puppeteer from "@cloudflare/puppeteer";
// Define our environment bindings
// Define request body structure
export default {
async fetch(request, env) {
// Only accept POST requests
if (request.method !== "POST") {
return new Response("Please send a POST request with a target URL", {
status: 405,
});
}
// Get URL from request body
const body = await request.json();
// Note: Only use this parser for websites you own
const targetUrl = new URL(body.url);
// Launch browser and create new page
const browser = await puppeteer.launch(env.MY_BROWSER);
const page = await browser.newPage();
// Navigate to the page and fetch its html
await page.goto(targetUrl.href);
const htmlPage = await page.content();
// Create filename and store in R2
const key = targetUrl.hostname + "_" + Date.now() + ".html";
await env.HTML_BUCKET.put(key, htmlPage);
// Close browser
await browser.close();
// Return success response
return new Response(
JSON.stringify({
success: true,
message: "Page rendered and stored successfully",
key: key,
}),
{
headers: { "Content-Type": "application/json" },
},
);
},
};
```
* TypeScript
```ts
import puppeteer from "@cloudflare/puppeteer";
// Define our environment bindings
interface Env {
MY_BROWSER: any;
HTML_BUCKET: R2Bucket;
}
// Define request body structure
interface RequestBody {
url: string;
}
export default {
async fetch(request: Request, env: Env): Promise {
// Only accept POST requests
if (request.method !== "POST") {
return new Response("Please send a POST request with a target URL", {
status: 405,
});
}
// Get URL from request body
const body = (await request.json()) as RequestBody;
// Note: Only use this parser for websites you own
const targetUrl = new URL(body.url);
// Launch browser and create new page
const browser = await puppeteer.launch(env.MY_BROWSER);
const page = await browser.newPage();
// Navigate to the page and fetch its html
await page.goto(targetUrl.href);
const htmlPage = await page.content();
// Create filename and store in R2
const key = targetUrl.hostname + "_" + Date.now() + ".html";
await env.HTML_BUCKET.put(key, htmlPage);
// Close browser
await browser.close();
// Return success response
return new Response(
JSON.stringify({
success: true,
message: "Page rendered and stored successfully",
key: key,
}),
{
headers: { "Content-Type": "application/json" },
},
);
},
} satisfies ExportedHandler;
```
1. Once the code is ready, you can deploy it to your Cloudflare account by running:
```bash
npx wrangler deploy
```
1. To test your Worker, you can use the following cURL request to fetch the HTML file of a page. In this example we are fetching this page to upload into the `html-bucket` bucket:
```bash
curl -X POST https://browser-r2-worker..workers.dev \
-H "Content-Type: application/json" \
-d '{"url": "https://developers.cloudflare.com/ai-search/tutorial/brower-rendering-autorag-tutorial/"}'
```
## Step 2. Create your AI Search and monitor the indexing
Now that you have created your R2 bucket and filled it with your content that you’d like to query from, you are ready to create an AI Search instance:
1. In your [Cloudflare Dashboard](https://dash.cloudflare.com/?to=/:account/ai/autorag), navigate to AI > AI Search
2. Select Create AI Search and complete the setup process:
1. Select the **R2 bucket** which contains your knowledge base, in this case, select the `html-bucket`.
2. Select an **embedding model** used to convert your data to vector representation. It is recommended to use the Default.
3. Select an **LLM** to use to generate your responses. It is recommended to use the Default.
4. Select or create an **AI Gateway** to monitor and control your model usage.
5. **Name** your AI Search as `my-rag`
6. Select or create a **Service API** token to grant AI Search access to create and access resources in your account.
3. Select Create to spin up your AI Search.
Once you’ve created your AI Search, it will automatically create a Vectorize database in your account and begin indexing the data.
## Step 3. Test and add to your application
Once AI Search finishes indexing your content, you’re ready to start asking it questions. You can open up your AI Search instance, navigate to the Playground tab, and ask a question based on your uploaded content, like “What is AI Search?”.
Once you’re happy with the results in the Playground, you can integrate AI Search directly into the application that you are building. If you are using a Worker to build your [RAG application](https://developers.cloudflare.com/ai-search/), then you can use the AI binding to directly call your AI Search:
```jsonc
{
"ai": {
"binding": "AI",
},
}
```
Then, query your AI Search instance from your Worker code by calling the `aiSearch()` method.
```javascript
const answer = await env.AI.autorag("my-rag").aiSearch({
query: "What is AI Search?",
});
```
For more information on how to add AI Search into your application, go to your AI Search then navigate to Use AI Search for more instructions.
---
title: REST API · Cloudflare AI Search docs
description: This guide will instruct you through how to use the AI Search REST
API to make a query to your AI Search.
lastUpdated: 2025-11-19T23:05:28.000Z
chatbotDeprioritize: false
source_url:
html: https://developers.cloudflare.com/ai-search/usage/rest-api/
md: https://developers.cloudflare.com/ai-search/usage/rest-api/index.md
---
This guide will instruct you through how to use the AI Search REST API to make a query to your AI Search.
AI Search is the new name for AutoRAG
API endpoints may still reference `autorag` for the time being. Functionality remains the same, and support for the new naming will be introduced gradually.
## Prerequisite: Get AI Search API token
You need an API token with the `AI Search - Read` and `AI Search Edit` permissions to use the REST API. To create a new token:
1. In the Cloudflare dashboard, go to the **AI Search** page.
[Go to **AI Search (AutoRAG)**](https://dash.cloudflare.com/?to=/:account/ai/ai-search)
1. Select your AI Search.
2. Select **Use AI Search** and then select **API**.
3. Select **Create an API Token**.
4. Review the prefilled information then select **Create API Token**.
5. Select **Copy API Token** and save that value for future use.
## AI Search
This REST API searches for relevant results from your data source and generates a response using the model and the retrieved relevant context:
```bash
curl https://api.cloudflare.com/client/v4/accounts/{ACCOUNT_ID}/autorag/rags/{AUTORAG_NAME}/ai-search \
-H 'Content-Type: application/json' \
-H "Authorization: Bearer {API_TOKEN}" \
-d '{
"query": "How do I train a llama to deliver coffee?",
"model": @cf/meta/llama-3.3-70b-instruct-fp8-fast,
"rewrite_query": false,
"max_num_results": 10,
"ranking_options": {
"score_threshold": 0.3,
},
"reranking": {
"enabled": true,
"model": "@cf/baai/bge-reranker-base"
},
"stream": true,
}'
```
Note
You can get your `ACCOUNT_ID` by navigating to [Workers & Pages on the dashboard](https://developers.cloudflare.com/fundamentals/account/find-account-and-zone-ids/#find-account-id-workers-and-pages).
### Parameters
`query` string required
The input query.
`model` string optional
The text-generation model that is used to generate the response for the query. For a list of valid options, check the AI Search Generation model Settings. Defaults to the generation model selected in the AI Search Settings.
`system_prompt` string optional
The system prompt for generating the answer.
`rewrite_query` boolean optional
Rewrites the original query into a search optimized query to improve retrieval accuracy. Defaults to `false`.
`max_num_results` number optional
The maximum number of results that can be returned from the Vectorize database. Defaults to `10`. Must be between `1` and `50`.
`ranking_options` object optional
Configurations for customizing result ranking. Defaults to `{}`.
* `score_threshold` number optional
* The minimum match score required for a result to be considered a match. Defaults to `0`. Must be between `0` and `1`.
`reranking` object optional
Configurations for customizing reranking. Defaults to `{}`.
* `enabled` boolean optional
* Enables or disables reranking, which reorders retrieved results based on semantic relevance using a reranking model. Defaults to `false`.
* `model` string optional
* The reranking model to use when reranking is enabled.
`stream` boolean optional
Returns a stream of results as they are available. Defaults to `false`.
`filters` object optional
Narrow down search results based on metadata, like folder and date, so only relevant content is retrieved. For more details, refer to [Metadata filtering](https://developers.cloudflare.com/ai-search/configuration/metadata/).
### Response
This is the response structure without `stream` enabled.
```sh
{
"success": true,
"result": {
"object": "vector_store.search_results.page",
"search_query": "How do I train a llama to deliver coffee?",
"response": "To train a llama to deliver coffee:\n\n1. **Build trust** — Llamas appreciate patience (and decaf).\n2. **Know limits** — Max 3 cups per llama, per `llama-logistics.md`.\n3. **Use voice commands** — Start with \"Espresso Express!\"\n4.",
"data": [
{
"file_id": "llama001",
"filename": "llama/logistics/llama-logistics.md",
"score": 0.45,
"attributes": {
"modified_date": 1735689600000, // unix timestamp for 2025-01-01
"folder": "llama/logistics/",
},
"content": [
{
"id": "llama001",
"type": "text",
"text": "Llamas can carry 3 drinks max."
}
]
},
{
"file_id": "llama042",
"filename": "llama/llama-commands.md",
"score": 0.4,
"attributes": {
"modified_date": 1735689600000, // unix timestamp for 2025-01-01
"folder": "llama/",
},
"content": [
{
"id": "llama042",
"type": "text",
"text": "Start with basic commands like 'Espresso Express!' Llamas love alliteration."
}
]
},
],
"has_more": false,
"next_page": null
}
}
```
## Search
This REST API searches for results from your data source and returns the relevant results:
```bash
curl https://api.cloudflare.com/client/v4/accounts/{ACCOUNT_ID}/autorag/rags/{AUTORAG_NAME}/search \
-H 'Content-Type: application/json' \
-H "Authorization: Bearer {API_TOKEN}" \
-d '{
"query": "How do I train a llama to deliver coffee?",
"rewrite_query": true,
"max_num_results": 10,
"ranking_options": {
"score_threshold": 0.3,
},
"reranking": {
"enabled": true,
"model": "@cf/baai/bge-reranker-base"
}'
```
Note
You can get your `ACCOUNT_ID` by navigating to Workers & Pages on the dashboard, and copying the Account ID under Account Details.
### Parameters
`query` string required
The input query.
`rewrite_query` boolean optional
Rewrites the original query into a search optimized query to improve retrieval accuracy. Defaults to `false`.
`max_num_results` number optional
The maximum number of results that can be returned from the Vectorize database. Defaults to `10`. Must be between `1` and `50`.
`ranking_options` object optional
Configurations for customizing result ranking. Defaults to `{}`.
* `score_threshold` number optional
* The minimum match score required for a result to be considered a match. Defaults to `0`. Must be between `0` and `1`.
`reranking` object optional
Configurations for customizing reranking. Defaults to `{}`.
* `enabled` boolean optional
* Enables or disables reranking, which reorders retrieved results based on semantic relevance using a reranking model. Defaults to `false`.
* `model` string optional
* The reranking model to use when reranking is enabled.
`filters` object optional
Narrow down search results based on metadata, like folder and date, so only relevant content is retrieved. For more details, refer to [Metadata filtering](https://developers.cloudflare.com/ai-search/configuration/metadata).
### Response
```sh
{
"success": true,
"result": {
"object": "vector_store.search_results.page",
"search_query": "How do I train a llama to deliver coffee?",
"data": [
{
"file_id": "llama001",
"filename": "llama/logistics/llama-logistics.md",
"score": 0.45,
"attributes": {
"modified_date": 1735689600000, // unix timestamp for 2025-01-01
"folder": "llama/logistics/",
},
"content": [
{
"id": "llama001",
"type": "text",
"text": "Llamas can carry 3 drinks max."
}
]
},
{
"file_id": "llama042",
"filename": "llama/llama-commands.md",
"score": 0.4,
"attributes": {
"modified_date": 1735689600000, // unix timestamp for 2025-01-01
"folder": "llama/",
},
"content": [
{
"id": "llama042",
"type": "text",
"text": "Start with basic commands like 'Espresso Express!' Llamas love alliteration."
}
]
},
],
"has_more": false,
"next_page": null
}
}
```
---
title: Workers Binding · Cloudflare AI Search docs
description: Cloudflare’s serverless platform allows you to run code at the edge
to build full-stack applications with Workers. A binding enables your Worker
or Pages Function to interact with resources on the Cloudflare Developer
Platform.
lastUpdated: 2025-10-28T15:46:27.000Z
chatbotDeprioritize: false
tags: Bindings
source_url:
html: https://developers.cloudflare.com/ai-search/usage/workers-binding/
md: https://developers.cloudflare.com/ai-search/usage/workers-binding/index.md
---
Cloudflare’s serverless platform allows you to run code at the edge to build full-stack applications with [Workers](https://developers.cloudflare.com/workers/). A [binding](https://developers.cloudflare.com/workers/runtime-apis/bindings/) enables your Worker or Pages Function to interact with resources on the Cloudflare Developer Platform.
To use your AI Search with Workers or Pages, create an AI binding either in the Cloudflare dashboard (refer to [AI bindings](https://developers.cloudflare.com/pages/functions/bindings/#workers-ai) for instructions), or you can update your [Wrangler file](https://developers.cloudflare.com/workers/wrangler/configuration/). To bind AI Search to your Worker, add the following to your Wrangler file:
* wrangler.jsonc
```jsonc
{
"$schema": "./node_modules/wrangler/config-schema.json",
"ai": {
"binding": "AI"
}
}
```
* wrangler.toml
```toml
[ai]
binding = "AI" # i.e. available in your Worker on env.AI
```
AI Search is the new name for AutoRAG
API endpoints may still reference `autorag` for the time being. Functionality remains the same, and support for the new naming will be introduced gradually.
## `aiSearch()`
This method searches for relevant results from your data source and generates a response using your default model and the retrieved context, for an AI Search named `my-autorag`:
```js
const answer = await env.AI.autorag("my-autorag").aiSearch({
query: "How do I train a llama to deliver coffee?",
model: "@cf/meta/llama-3.3-70b-instruct-fp8-fast",
rewrite_query: true,
max_num_results: 2,
ranking_options: {
score_threshold: 0.3
},
reranking: {
enabled: true,
model: "@cf/baai/bge-reranker-base"
},
stream: true,
});
```
### Parameters
`query` string required
The input query.
`model` string optional
The text-generation model that is used to generate the response for the query. For a list of valid options, check the AI Search Generation model Settings. Defaults to the generation model selected in the AI Search Settings.
`system_prompt` string optional
The system prompt for generating the answer.
`rewrite_query` boolean optional
Rewrites the original query into a search optimized query to improve retrieval accuracy. Defaults to `false`.
`max_num_results` number optional
The maximum number of results that can be returned from the Vectorize database. Defaults to `10`. Must be between `1` and `50`.
`ranking_options` object optional
Configurations for customizing result ranking. Defaults to `{}`.
* `score_threshold` number optional
* The minimum match score required for a result to be considered a match. Defaults to `0`. Must be between `0` and `1`.
`reranking` object optional
Configurations for customizing reranking. Defaults to `{}`.
* `enabled` boolean optional
* Enables or disables reranking, which reorders retrieved results based on semantic relevance using a reranking model. Defaults to `false`.
* `model` string optional
* The reranking model to use when reranking is enabled.
`stream` boolean optional
Returns a stream of results as they are available. Defaults to `false`.
`filters` object optional
Narrow down search results based on metadata, like folder and date, so only relevant content is retrieved. For more details, refer to [Metadata filtering](https://developers.cloudflare.com/ai-search/configuration/metadata/).
### Response
This is the response structure without `stream` enabled.
```sh
{
"object": "vector_store.search_results.page",
"search_query": "How do I train a llama to deliver coffee?",
"response": "To train a llama to deliver coffee:\n\n1. **Build trust** — Llamas appreciate patience (and decaf).\n2. **Know limits** — Max 3 cups per llama, per `llama-logistics.md`.\n3. **Use voice commands** — Start with \"Espresso Express!\"\n4.",
"data": [
{
"file_id": "llama001",
"filename": "llama/logistics/llama-logistics.md",
"score": 0.45,
"attributes": {
"modified_date": 1735689600000, // unix timestamp for 2025-01-01
"folder": "llama/logistics/",
},
"content": [
{
"id": "llama001",
"type": "text",
"text": "Llamas can carry 3 drinks max."
}
]
},
{
"file_id": "llama042",
"filename": "llama/llama-commands.md",
"score": 0.4,
"attributes": {
"modified_date": 1735689600000, // unix timestamp for 2025-01-01
"folder": "llama/",
},
"content": [
{
"id": "llama042",
"type": "text",
"text": "Start with basic commands like 'Espresso Express!' Llamas love alliteration."
}
]
},
],
"has_more": false,
"next_page": null
}
```
## `search()`
This method searches for results from your corpus and returns the relevant results, for the AI Search instance named `my-autorag`:
```js
const answer = await env.AI.autorag("my-autorag").search({
query: "How do I train a llama to deliver coffee?",
rewrite_query: true,
max_num_results: 2,
ranking_options: {
score_threshold: 0.3
},
reranking: {
enabled: true,
model: "@cf/baai/bge-reranker-base"
}
});
```
### Parameters
`query` string required
The input query.
`rewrite_query` boolean optional
Rewrites the original query into a search optimized query to improve retrieval accuracy. Defaults to `false`.
`max_num_results` number optional
The maximum number of results that can be returned from the Vectorize database. Defaults to `10`. Must be between `1` and `50`.
`ranking_options` object optional
Configurations for customizing result ranking. Defaults to `{}`.
* `score_threshold` number optional
* The minimum match score required for a result to be considered a match. Defaults to `0`. Must be between `0` and `1`.
`reranking` object optional
Configurations for customizing reranking. Defaults to `{}`.
* `enabled` boolean optional
* Enables or disables reranking, which reorders retrieved results based on semantic relevance using a reranking model. Defaults to `false`.
* `model` string optional
* The reranking model to use when reranking is enabled.
`filters` object optional
Narrow down search results based on metadata, like folder and date, so only relevant content is retrieved. For more details, refer to [Metadata filtering](https://developers.cloudflare.com/ai-search/configuration/metadata).
### Response
```sh
{
"object": "vector_store.search_results.page",
"search_query": "How do I train a llama to deliver coffee?",
"data": [
{
"file_id": "llama001",
"filename": "llama/logistics/llama-logistics.md",
"score": 0.45,
"attributes": {
"modified_date": 1735689600000, // unix timestamp for 2025-01-01
"folder": "llama/logistics/",
},
"content": [
{
"id": "llama001",
"type": "text",
"text": "Llamas can carry 3 drinks max."
}
]
},
{
"file_id": "llama042",
"filename": "llama/llama-commands.md",
"score": 0.4,
"attributes": {
"modified_date": 1735689600000, // unix timestamp for 2025-01-01
"folder": "llama/",
},
"content": [
{
"id": "llama042",
"type": "text",
"text": "Start with basic commands like 'Espresso Express!' Llamas love alliteration."
}
]
},
],
"has_more": false,
"next_page": null
}
```
## Local development
Local development is supported by proxying requests to your deployed AI Search instance. When running in local mode, your application forwards queries to the configured remote AI Search instance and returns the generated responses as if they were served locally.
---
title: R2 · Cloudflare AI Search docs
description: You can use Cloudflare R2 to store data for indexing. To get
started, configure an R2 bucket containing your data.
lastUpdated: 2025-09-24T17:03:07.000Z
chatbotDeprioritize: false
source_url:
html: https://developers.cloudflare.com/ai-search/configuration/data-source/r2/
md: https://developers.cloudflare.com/ai-search/configuration/data-source/r2/index.md
---
You can use Cloudflare R2 to store data for indexing. To get started, [configure an R2 bucket](https://developers.cloudflare.com/r2/get-started/) containing your data.
AI Search will automatically scan and process supported files stored in that bucket. Files that are unsupported or exceed the size limit will be skipped during indexing and logged as errors.
## File limits
AI Search has different file size limits depending on the file type:
* **Plain text files:** Up to **4 MB**
* **Rich format files:** Up to **4 MB**
Files that exceed these limits will not be indexed and will show up in the error logs.
## File types
AI Search can ingest a variety of different file types to power your RAG. The following plain text files and rich format files are supported.
### Plain text file types
AI Search supports the following plain text file types:
| Format | File extensions | Mime Type |
| - | - | - |
| Text | `.txt`, `.rst` | `text/plain` |
| Log | `.log` | `text/plain` |
| Config | `.ini`, `.conf`, `.env`, `.properties`, `.gitignore`, `.editorconfig`, `.toml` | `text/plain`, `text/toml` |
| Markdown | `.markdown`, `.md`, `.mdx` | `text/markdown` |
| LaTeX | `.tex`, `.latex` | `application/x-tex`, `application/x-latex` |
| Script | `.sh`, `.bat` , `.ps1` | `application/x-sh` , `application/x-msdos-batch`, `text/x-powershell` |
| SGML | `.sgml` | `text/sgml` |
| JSON | `.json` | `application/json` |
| YAML | `.yaml`, `.yml` | `application/x-yaml` |
| CSS | `.css` | `text/css` |
| JavaScript | `.js` | `application/javascript` |
| PHP | `.php` | `application/x-httpd-php` |
| Python | `.py` | `text/x-python` |
| Ruby | `.rb` | `text/x-ruby` |
| Java | `.java` | `text/x-java-source` |
| C | `.c` | `text/x-c` |
| C++ | `.cpp`, `.cxx` | `text/x-c++` |
| C Header | `.h`, `.hpp` | `text/x-c-header` |
| Go | `.go` | `text/x-go` |
| Rust | `.rs` | `text/rust` |
| Swift | `.swift` | `text/swift` |
| Dart | `.dart` | `text/dart` |
### Rich format file types
AI Search uses [Markdown Conversion](https://developers.cloudflare.com/workers-ai/features/markdown-conversion/) to convert rich format files to markdown. The following table lists the supported formats that will be converted to Markdown:
| Format | File extensions | Mime Types |
| - | - | - |
| PDF Documents | `.pdf` | `application/pdf` |
| Images 1 | `.jpeg`, `.jpg`, `.png`, `.webp`, `.svg` | `image/jpeg`, `image/png`, `image/webp`, `image/svg+xml` |
| HTML Documents | `.html` | `text/html` |
| XML Documents | `.xml` | `application/xml` |
| Microsoft Office Documents | `.xlsx`, `.xlsm`, `.xlsb`, `.xls`, `.et`, `.docx` | `application/vnd.openxmlformats-officedocument.spreadsheetml.sheet`, `application/vnd.ms-excel.sheet.macroenabled.12`, `application/vnd.ms-excel.sheet.binary.macroenabled.12`, `application/vnd.ms-excel`, `application/vnd.openxmlformats-officedocument.wordprocessingml.document` |
| Open Document Format | `.ods`, `.odt` | `application/vnd.oasis.opendocument.spreadsheet`, `application/vnd.oasis.opendocument.text` |
| CSV | `.csv` | `text/csv` |
| Apple Documents | `.numbers` | `application/vnd.apple.numbers` |
1 Image conversion uses two Workers AI models for object detection and summarization. See [Workers AI pricing](https://developers.cloudflare.com/workers-ai/features/markdown-conversion/#pricing) for more details.
---
title: Website · Cloudflare AI Search docs
description: The Website data source allows you to connect a domain you own so
its pages can be crawled, stored, and indexed.
lastUpdated: 2025-11-19T15:26:37.000Z
chatbotDeprioritize: false
source_url:
html: https://developers.cloudflare.com/ai-search/configuration/data-source/website/
md: https://developers.cloudflare.com/ai-search/configuration/data-source/website/index.md
---
The Website data source allows you to connect a domain you own so its pages can be crawled, stored, and indexed.
You can only crawl domains that you have onboarded onto the same Cloudflare account. Refer to [Onboard a domain](https://developers.cloudflare.com/fundamentals/manage-domains/add-site/) for more information on adding a domain to your Cloudflare account.
Bot protection may block crawling
If you use Cloudflare products that control or restrict bot traffic such as [Bot Management](https://developers.cloudflare.com/bots/), [Web Application Firewall (WAF)](https://developers.cloudflare.com/waf/), or [Turnstile](https://developers.cloudflare.com/turnstile/), the same rules will apply to the AI Search (AutoRAG) crawler. Make sure to configure an exception or an allow-list for the AutoRAG crawler in your settings.
## How website crawling works
When you connect a domain, the crawler looks for your website's sitemap to determine which pages to visit:
1. The crawler first checks the `robots.txt` for listed sitemaps. If it exists, it reads all sitemaps existing inside.
2. If no `robots.txt` is found, the crawler first checks for a sitemap at `/sitemap.xml`.
3. If no sitemap is available, the domain cannot be crawled.
Pages are visited, according to the `` attribute set on the sitemaps, if this field is defined.
## How to set WAF rules to allowlist the crawler
If you have Security rules configured to block bot activity, you can add a rule to allowlist the crawler bot.
1. In the Cloudflare dashboard, go to the **Security rules** page.
[Go to **Security rules**](https://dash.cloudflare.com/?to=/:account/:zone/security/security-rules)
2. To create a new empty rule, select **Create rule** > **Custom rules**.
3. Enter a descriptive name for the rule in **Rule name**, such as `Allow AI Search`.
4. Under **When incoming requests match**, use the **Field** drop-down list to choose *Bot Detection ID*. For **Operator**, select *equals*. For **Value**, enter `122933950`.
5. Under **Then take action**, in the **Choose action** dropdown, choose *Skip*.
6. Under **Place at**, select the order of the rule in the **Select order** dropdown to be *First*. Setting the order as *First* allows this rule to be applied before subsequent rules.
7. To save and deploy your rule, select **Deploy**.
## Parsing options
You can choose how pages are parsed during crawling:
* **Static sites**: Downloads the raw HTML for each page.
* **Rendered sites**: Loads pages with a headless browser and downloads the fully rendered version, including dynamic JavaScript content. Note that the [Browser Rendering](https://developers.cloudflare.com/browser-rendering/pricing/) limits and billing apply.
## Access protected content
If your website has pages behind authentication or are only visible to logged-in users, you can configure custom HTTP headers to allow the AI Search crawler to access this protected content. You can add up to five custom HTTP headers to the requests AI Search sends when crawling your site.
### Providing access to sites protected by Cloudflare Access
To allow AI Search to crawl a site protected by [Cloudflare Access](https://developers.cloudflare.com/cloudflare-one/access-controls/), you need to create service token credentials and configure them as custom headers.
Service tokens bypass user authentication, so ensure your Access policies are configured appropriately for the content you want to index. The service token will allow the AI Search crawler to access all content covered by the Service Auth policy.
1. In [Cloudflare One](https://one.dash.cloudflare.com/), [create a service token](https://developers.cloudflare.com/cloudflare-one/access-controls/service-credentials/service-tokens/#create-a-service-token). Once the Client ID and Client Secret are generated, save them for the next steps. For example they can look like:
```plaintext
CF-Access-Client-Id: xxxxxxxxxxxxxxxxxxxxxxxxxxxxxxxx.access
CF-Access-Client-Secret: xxxxxxxxxxxxxxxxxxxxxxxxxxxxxxxxxxxxxxxxxxxxxxxxxxxxxxxxxxxxxxxx
```
2. [Create a policy](https://developers.cloudflare.com/cloudflare-one/access-controls/policies/policy-management/#create-a-policy) with the following configuration:
* Add an **Include** rule with **Selector** set to **Service token**.
* In **Value**, select the Service Token you created in step 1.
3. [Add your self-hosted application to Access](https://developers.cloudflare.com/cloudflare-one/access-controls/applications/http-apps/self-hosted-public-app/) and with the following configuration:
* In Access policies, click **Select existing policies**.
* Select the policy that you have just created and select **Confirm**.
4. In the Cloudflare dashboard, go to the **AI Search** page.
[Go to **AI Search (AutoRAG)**](https://dash.cloudflare.com/?to=/:account/ai/ai-search)
5. Select **Create**.
6. Select **Website** as your data source.
7. Under **Parse options**, locate **Extra headers** and add the following two headers using your saved credentials:
* Header 1:
* **Key**: `CF-Access-Client-Id`
* **Value**: `xxxxxxxxxxxxxxxxxxxxxxxxxxxxxxxx.access`
* Header 2:
* **Key**: `CF-Access-Client-Secret`
* **Value**: `xxxxxxxxxxxxxxxxxxxxxxxxxxxxxxxxxxxxxxxxxxxxxxxxxxxxxxxxxxxxxxxx`
8. Complete the AI Search setup process to create your search instance.
## Storage
During setup, AI Search creates a dedicated R2 bucket in your account to store the pages that have been crawled and downloaded as HTML files. This bucket is automatically managed and is used only for content discovered by the crawler. Any files or objects that you add directly to this bucket will not be indexed.
Note
We recommend not modifying the bucket as it may disrupt the indexing flow and cause content to not be updated properly.
## Sync and updates
During scheduled or manual [sync jobs](https://developers.cloudflare.com/ai-search/configuration/indexing/), the crawler will check for changes to the `` attribute in your sitemap. If it has been changed to a date occurring after the last sync date, then the page will be crawled, the updated version is stored in the R2 bucket, and automatically reindexed so that your search results always reflect the latest content.
If the `` attribute is not defined, then AI Search will automatically crawl each link defined in the sitemap once a day.
## Limits
The regular AI Search [limits](https://developers.cloudflare.com/ai-search/platform/limits-pricing/) apply when using the Website data source.
The crawler will download and index pages only up to the maximum object limit supported for an AI Search instance, and it processes the first set of pages it visits until that limit is reached. In addition, any files that are downloaded but exceed the file size limit will not be indexed.
---
title: Supported models · Cloudflare AI Search docs
description: This page lists all models supported by AI Search and their lifecycle status.
lastUpdated: 2025-10-28T15:46:27.000Z
chatbotDeprioritize: false
source_url:
html: https://developers.cloudflare.com/ai-search/configuration/models/supported-models/
md: https://developers.cloudflare.com/ai-search/configuration/models/supported-models/index.md
---
This page lists all models supported by AI Search and their lifecycle status.
Request model support
If you would like to use a model that is not currently supported, reach out to us on [Discord](https://discord.gg/cloudflaredev) to request it.
## Production models
Production models are the actively supported and recommended models that are stable, fully available.
### Text generation
| Provider | Alias | Context window (tokens) |
| - | - | - |
| **Anthropic** | `anthropic/claude-3-7-sonnet` | 200,000 |
| | `anthropic/claude-sonnet-4` | 200,000 |
| | `anthropic/claude-opus-4` | 200,000 |
| | `anthropic/claude-3-5-haiku` | 200,000 |
| **Cerebras** | `cerebras/qwen-3-235b-a22b-instruct` | 64,000 |
| | `cerebras/qwen-3-235b-a22b-thinking` | 65,000 |
| | `cerebras/llama-3.3-70b` | 65,000 |
| | `cerebras/llama-4-maverick-17b-128e-instruct` | 8,000 |
| | `cerebras/llama-4-scout-17b-16e-instruct` | 8,000 |
| | `cerebras/gpt-oss-120b` | 64,000 |
| **Google AI Studio** | `google-ai-studio/gemini-2.5-flash` | 1,048,576 |
| | `google-ai-studio/gemini-2.5-pro` | 1,048,576 |
| **Grok (x.ai)** | `grok/grok-4` | 256,000 |
| **Groq** | `groq/llama-3.3-70b-versatile` | 131,072 |
| | `groq/llama-3.1-8b-instant` | 131,072 |
| **OpenAI** | `openai/gpt-5` | 400,000 |
| | `openai/gpt-5-mini` | 400,000 |
| | `openai/gpt-5-nano` | 400,000 |
| **Workers AI** | `@cf/meta/llama-3.3-70b-instruct-fp8-fast` | 24,000 |
| | `@cf/meta/llama-3.1-8b-instruct-fast` | 60,000 |
| | `@cf/meta/llama-3.1-8b-instruct-fp8` | 32,000 |
| | `@cf/meta/llama-4-scout-17b-16e-instruct` | 131,000 |
### Embedding
| Provider | Alias | Vector dims | Input tokens | Metric |
| - | - | - | - | - |
| **Google AI Studio** | `google-ai-studio/gemini-embedding-001` | 1,536 | 2048 | cosine |
| **OpenAI** | `openai/text-embedding-3-small` | 1,536 | 8192 | cosine |
| | `openai/text-embedding-3-large` | 1,536 | 8192 | cosine |
| **Workers AI** | `@cf/baai/bge-m3` | 1,024 | 512 | cosine |
| | `@cf/baai/bge-large-en-v1.5` | 1,024 | 512 | cosine |
### Reranking
| Provider | Alias | Input tokens |
| - | - | - |
| **Workers AI** | `@cf/baai/bge-reranker-base` | 512 |
## Transition models
There are currently no models marked for end-of-life.