Active Directory® (SAML)
Active Directory is a directory service developed by Microsoft for Windows domain networks. It is included in most Windows Server operating systems as a set of processes and services. Active Directory integrates with Cloudflare Access using Security Assertion Markup Language (SAML).
Before you start
To get started, you need:
- An Active Directory Domain Controller where all users have an email attribute
- Generic SAML enabled for your Access Identity Provider (IdP)
- A Microsoft server running with Active Directory Federation Services (ADFS) installed. All screenshots in these instructions are for Server 2012R2. Similar steps will work for newer versions.
- A browser safe certificate for Active Directory Federation Services (ADFS)
Once you fulfill the requirements above, you are ready to begin. Installation and basic configuration of Active Directory Federation Services (ADFS) is outside the scope of this guide. A detailed guide can be found in a Microsoft KB.
Then to begin the connection between Cloudflare Access and ADFS create a Relying Party Trust in ADFS.
Create a Relying Party Trust
Run the Add Relying Party Trust wizard to begin SAML AD integration with Cloudflare Access.
To create a Relying Party Trust:
In Windows Server, launch the ADFS Management tool.
Select the Relying Party Trusts folder.
On the Actions sidebar, select Add Relying Party Trust. The Add Relying Party Trust Wizard launches.
In the left menu, choose Select Data Source.
Select the Enter data about the relying party manually option.
Select Next.
Enter a Display name. We suggest you use a recognizable name. Include any information regarding this connection in the Notes field.
Select Next. The Choose Profile step displays.
Select the AD FS profile option.
Select Next. The Configure Certificate step displays.
Leave the Certificate options at their defaults.
Select Next. The Configure URL step displays.
Select the Enable support for the SAML 2.0 WebSSO protocol option.
In the Relying party SAML 2.0 SSO service URL field, enter the following URL:
https://<your-team-name>.cloudflareaccess.com/cdn-cgi/access/callbackYou can find your team name in Zero Trust under Settings > Custom Pages.
Select Next. The Configure Identifiers step displays.

Paste your callback URL in the Relying party trust identifier field.
Select Next. In the Configure Multi-factor Authentication Now? step, you can configure multi-factor authentication.
Select Next. The Choose Issuance Authorization Rules step displays.
Select the Permit all users to access this relying party option.
Select Next. The Ready to Add Trust step displays.
Review your settings.
Select Next. Cloudflare now relies on ADFS for user-identity authorization.
The Edit Claim Rules for CF Login screen automatically displays.
Create claim rules
Now create 2 Claim Rules so that ADFS can take information from Cloudflare and return it to create Access policies.
If you closed the Add Relying Trust wizard, use Explorer to find the Relying Party Trusts folder, select the newly created RPT file, and select Edit Claim Rules in the Action sidebar.
To create Claim Rules:
In the Edit Claim Rules for CF Login window, select Add Rule. The Choose Rule Type step displays.
In the Claim rule template field, select Send LDAP Attributes as Claims from the drop-down list.
Select Next. The Edit Rule — Send Email step displays.
Enter a descriptive Claim rule name.
Select Active Directory from the Attribute store drop-down list.
Select E-mail-Addresses from the LDAP Attribute and Outgoing Claim Type drop-down lists.
Select OK. You return to the Choose Rule Type step.
Select Transform an Incoming Claim from the Claim rule template drop-down list to create the second rule.
Select Next. The Edit - Create Transient Name Identifier window displays.
Enter a descriptive Claim rule name.
Select E-Mail Address from the Incoming claim type drop-down list.
Select Name ID from the Outgoing claim type drop-down list.
Select Transient Identifier from the Outgoing name ID format drop-down list.
Ensure that the Pass through all claim values option is selected.
Select OK.
Both Claim Rules are now available to export to your Cloudflare Access account.
Export the certificate
Now you’ll configure Cloudflare to recognize ADFS by extracting the token-signing certificate from ADFS.
To export the certificate:
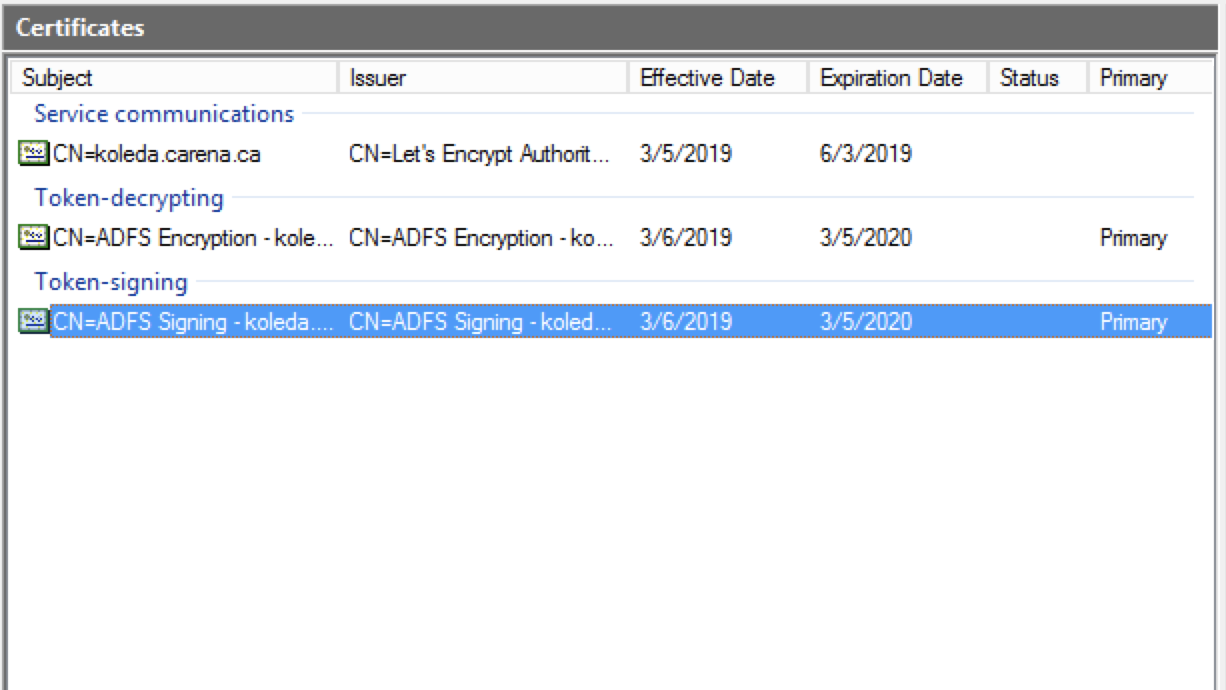
Within the ADFS management console, select the Service under AD FS and choose the Certificates folder which contains the certificate to export.
In the Certificates card, right-click on the entry under Token-signing, and select View certificate. The Certificates window displays.
Select the Details tab, and select the Copy to File option.
The Certificate Export Wizard displays.
Select Next. The Export File Format window displays.
Select the Base-64 encoded X.509 (.CER) option.
Select Next.
Enter a name for the file.
Select Next.
Select Finish.
Note the file path for later.
Configure ADFS to sign SAML responses
To ensure that ADFS signs the full response when communicating with Cloudflare, open your local PowerShell and enter the following command:
Set-ADFSRelyingPartyTrust -TargetName "Name of RPT Display Name" -SamlResponseSignature "MessageAndAssertion"
Configure Cloudflare Zero Trust
To enable Cloudflare Zero Trust to accept the claims and assertions sent from ADFS, follow these steps:
In Zero Trust, go to Settings > Authentication.
Under Login methods, select Add new.
The Add a SAML identity provider card displays.
Enter an IdP Name.
Under Single Sign On URL enter:
https://hostnameOfADFS/adfs/ls/This is the default location. You can find your federation service identifier in ADFS.
In the IdP Entity ID or Issuer URL field, enter your Zero Trust team domain and include this callback at the end of the path:
/cdn-cgi/access/callback. For example:https://<your-team-name>.cloudflareaccess.com/cdn-cgi/access/callbackUnder Signing certificate, paste the exported certificate.
There can be no spaces or return characters in the text field.
Select Save.
To test that your connection is working, go to Authentication > Login methods and select Test next to the login method you want to test.
Download SP metadata (optional)
Some IdPs allow administrators to upload metadata files from their SP (service provider).
To get your Cloudflare metadata file:
Download your unique SAML metadata file at the following URL:
https://<your-team-name>.cloudflareaccess.com/cdn-cgi/access/saml-metadataIn Cloudflare Access, you can find a link to this URL in the Edit a SAML identity provider dialog. The link returns a web page with your SAML SP data in XML format.
Save the file in XML format.
Upload the XML document to your Active Directory account.
Example API Configuration
{  "config": {    "issuer_url": "https://<your-team-name>.cloudflareaccess.com/",    "sso_target_url": "https://adfs.example.com/adfs/ls/",    "attributes": ["email"],    "email_attribute_name": "",    "sign_request": false,    "idp_public_cert": "MIIDpDCCAoygAwIBAgIGAV2ka+55MA0GCSqGSIb3DQEBCwUAMIGSMQswCQYDVQQGEwJVUzETMBEG\nA1UEC.....GF/Q2/MHadws97cZg\nuTnQyuOqPuHbnN83d/2l1NSYKCbHt24o"  },  "type": "saml",  "name": "adfs saml example"
}